

Page 1
!
!
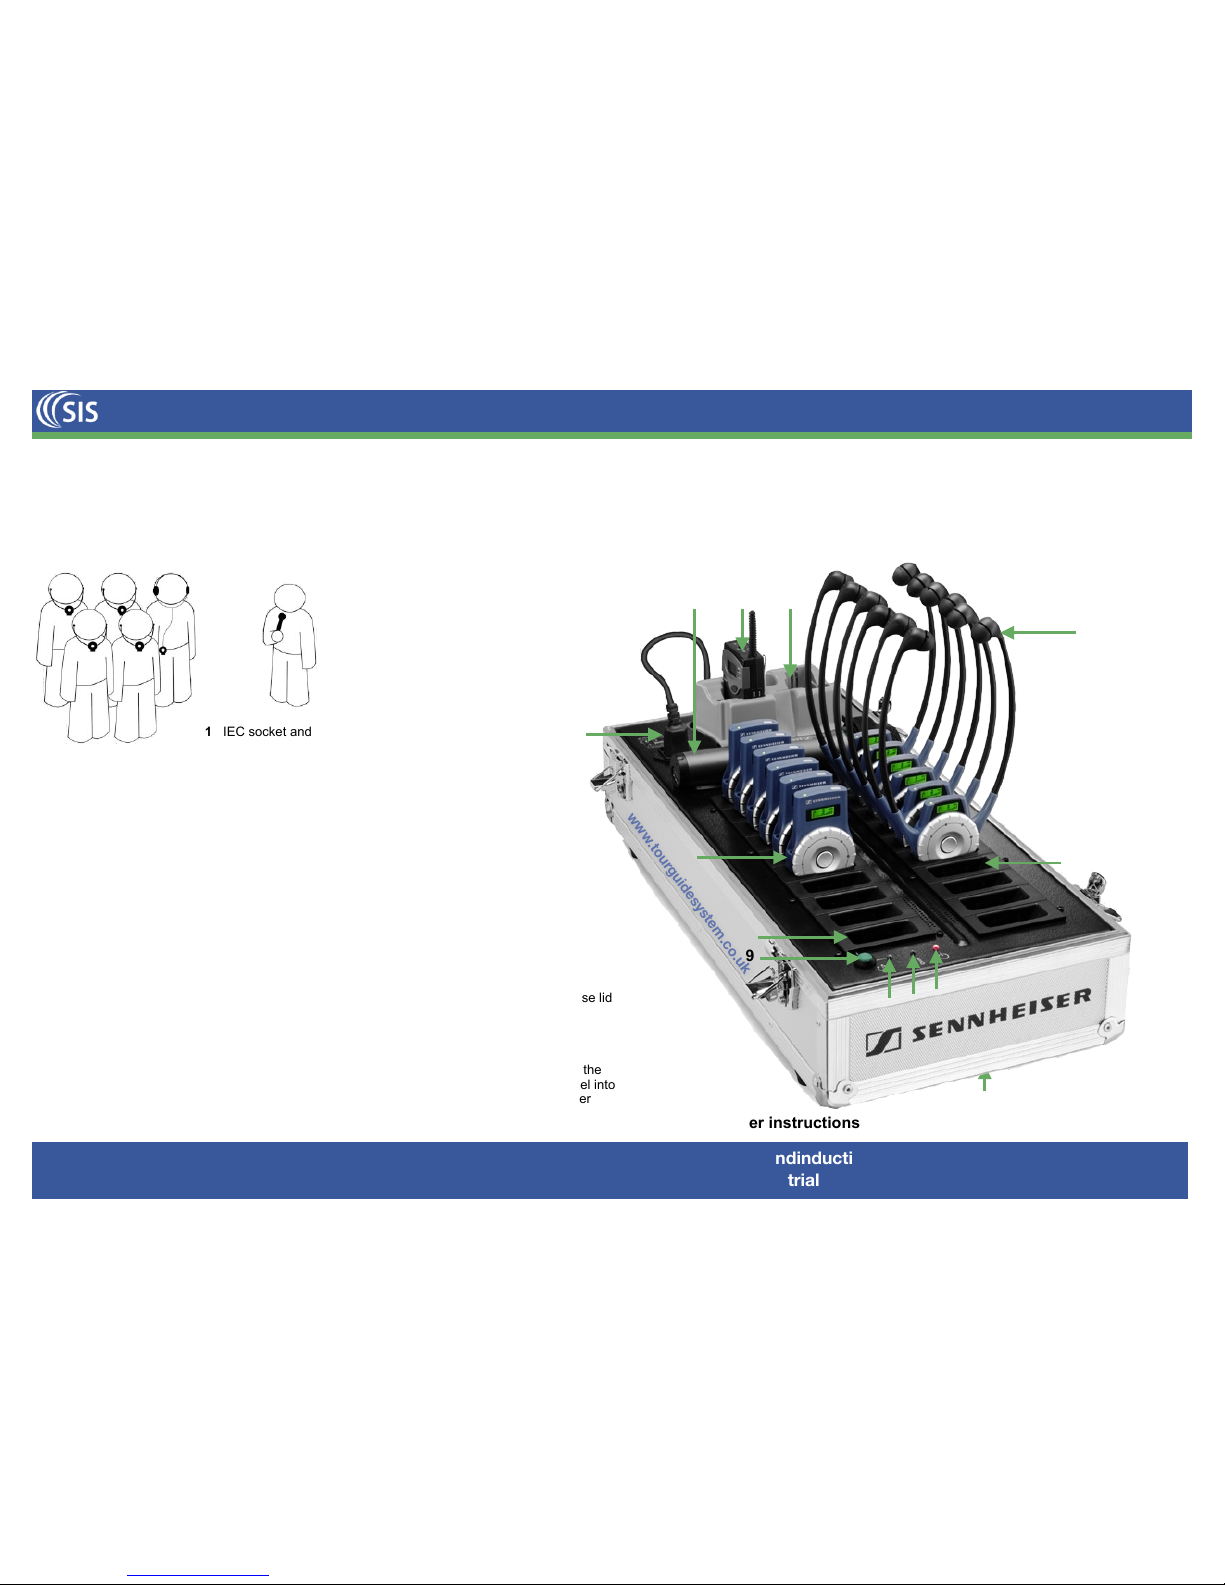
CHARGER
The charger can simultaneously recharge 20 receivers and 2 transmitter batteries.
The receivers are charged in the charging docks (as seen right).
The transmitter batteries are charged in the dual transmitter charging docks.
To charge the system remove the mains cable from the pocket on the inside of the storage case lid
and plug into the charger and a mains outlet.
Switch the charger ON.
A LED on each receiver and the transmitter charging dock will indicate the charging status:
Red=Charging in progress. Green=Fully charged.
A useful facility of the charger case is the COPY function. This allows the user to preselect all the
channels of the receivers with the push of one button. Place a receiver on the required channel into
the master charging dock and press the copy function button. This will instantly set all the other
receivers in the charger to the required channel.
1 IEC socket and mains switch
2 Handheld transmitter
3 Bodypack transmitter
4 Dual transmitter battery charging docks
5 Stethoset receiver
6 Receiver charging dock
7 Bodypack receiver
8 Master charging dock
9 Copy button
10 Copy available LED
11 Temp error LED
12 Power LED
13 Trolley frame mount (underneath)
Sennheiser 2020-D tour guide system - Quick guide
INTRODUCTION
Please read these instructions and familiarise yourself with the equipment before your event. The instructions are intended as a quick guide only. Should you require more information please refer to
the supplied manufacturers handbook (also available on the download section of our website) or contact us.
A tour guide system is a wireless radio system used to transmit a message from a presenter to listeners. The presenter simply speaks into a microphone and the listeners use receivers to hear the
message. A tour guide system can be used indoors and outdoors (with a maximum range of 100m). Up to 6 channels can be used simultaneously.
After each use, recharge all transmitters and receivers so they are ready for the next event.
Please turn over for transmitter and receiver instructions
ENSURE TRANSMITTER AND RECEIVERS ARE CHARGED PRIOR TO USE
Copyright © 2018 www.tourguidesystem.co.uk email: sales@soundinduction.co.uk Tel: (01686) 628012
Sennsis Tour Guide Systems, Sound Induction Systems Ltd, Unit 24 Mochdre Industrial Estate, Newtown, Powys SY16 4LE
V0518
5
1
2
10
9
8
13
6
1
3
4
7
11
12
www.tourguidesystem.co.uk
Page 2
Battery life > Hrs
Stethoset receiver 8
Bodypack receiver 16
Transmitters 8
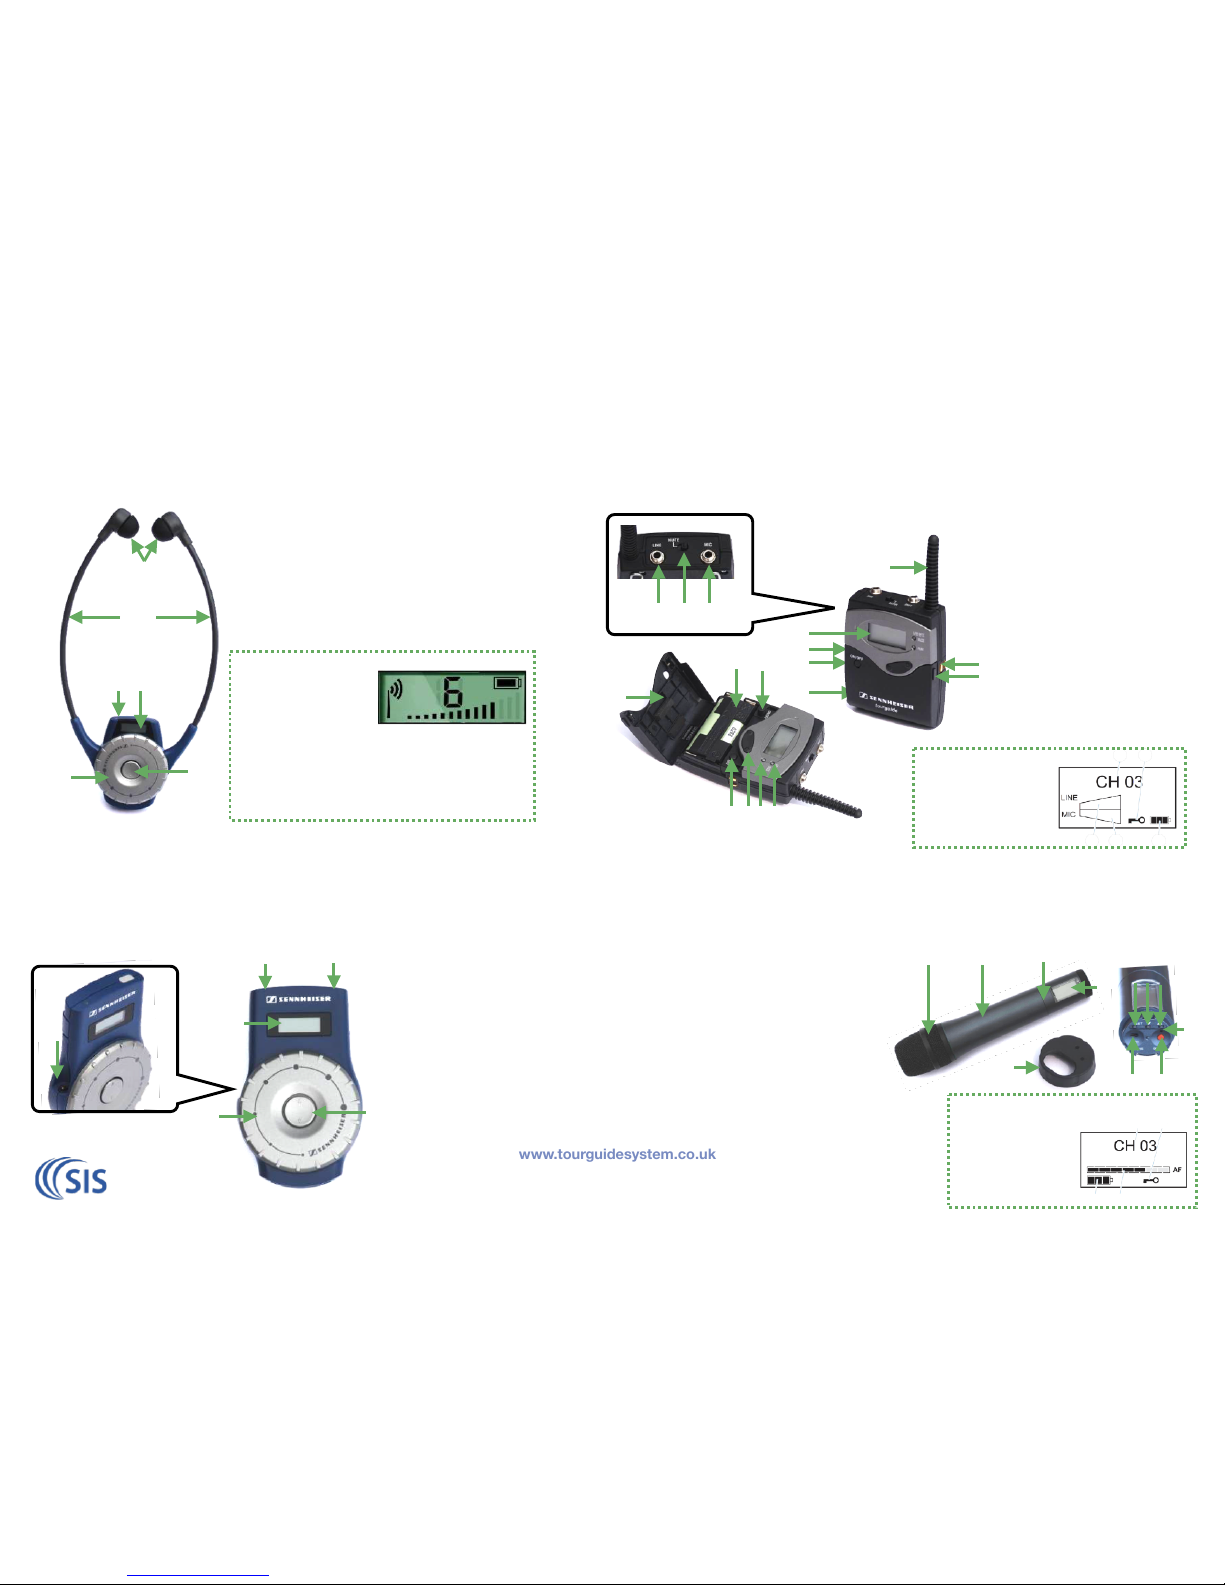
BODYPACK TRANSMITTER
The bodypack transmitter is used with a headband microphone plugged into the MIC socket on
the top. A LINE input for an external sound source and a microphone MUTE switch are also
incorporated. The transmitter is switched on and off by pressing the ON/OFF button on the front
for approx 3 seconds.
The transmitter can be recharged by inserting it into one of the two charging docks on the
charger case (the battery pack does not have to be removed).
1 Line Input (from smartphone)
2 Microphone MUTE Switch
3 Microphone input
4 Battery compartment cover
5 Rechargeable battery pack
6 ON/OFF Button
7 Red LED LOW BATT/MUTE
8 Yellow LED PEAK
9 ▲/▼Rocker button
10 SET Button
11 Antenna
12 Charging contacts
13 Battery compartment buttons
14 Display (see below)
15 Belt clip (on the back)
1 Channel display
2 Lock mode icon
3 Battery status
4 MIC level display
5 LINE level display
Display
HANDHELD TRANSMITTER
The handheld transmitter is switched on and off by pressing the ON/OFF button on the end for
approx 3 seconds. A mute switch is also incorporated.
The transmitters battery pack has to be removed to recharge. This is done by unscrewing the
display end of the transmitter and inserting the battery into one of the two charging docks on the
charger case.
The transmitter can be secured for transportation in the storage case by using the Velcro straps.
1 Mouthpiece
2 Handle of wireless microphone
3 Battery compartment
(hidden from view)
4 Display (see right)
5 Twist-cap to protect the operating controls
6 SET Button
7 ▼Button
8 ▲Button
9 Operation and battery status indicator, red
LED (ON/LOW BATT)
10 ON/OFF Button with ESC function (Cancel) in menu
11 MUTE Switch
Display
1 Channel display
2 Lock mode icon
3 Battery status
4 7-Step audio level
display “AF”
123
4
5
6
789
10
STETHOSET RECEIVER
This receiver is switched on by opening the arms and resting in the ears. The volume is controlled
by rotating the wheel on the front. If the channel needs to be changed this can be done by pushing
the rocker switch in the centre of the volume control.
The receiver automatically switches off when the receiver is removed from the ears to preserve
battery life.
Earpads can be cleaned using antibacterial wipes.
1 Volume control
2 ▲/▼ Rocker button for channel selection
3 Red/Green LED for charge status
4 Display (see below)
5 Earbows
6 Earpads
Receiver Display
1 Channel display
2 Battery status display
3 Volume display
4 RF Signal indication
BODYPACK RECEIVER
This receiver is switched on by pressing the button on the top. It is used by inserting either
headphones or an inductive neck loop (for hearing aid wearers) into the socket on the side. The
volume is controlled by rotating the wheel on the front. If the channel needs to be changed this
can be done by pushing the rocker switch in the centre of the volume control.
The receiver automatically switches off 5 mins after the headphones/ neck loop plug is removed,
or by pressing the button on the top for 3 seconds.
1 Headphone socket
2 Volume control
3 Display (see above)
4 Charging status LED
5 ON/OFF Button
6 ▲/▼ Rocker button for
channel selection
1
2
4
3
1
2
3
4
5
6
2
6
1
3
4
5
11
14
12
12
13
13
15
123
4
5
6
7
8
9
10
11
1
2
3
4
Please turn over for charger instructions
5
3
1
2
www.tourguidesystem.co.uk
 Loading...