

Page 1
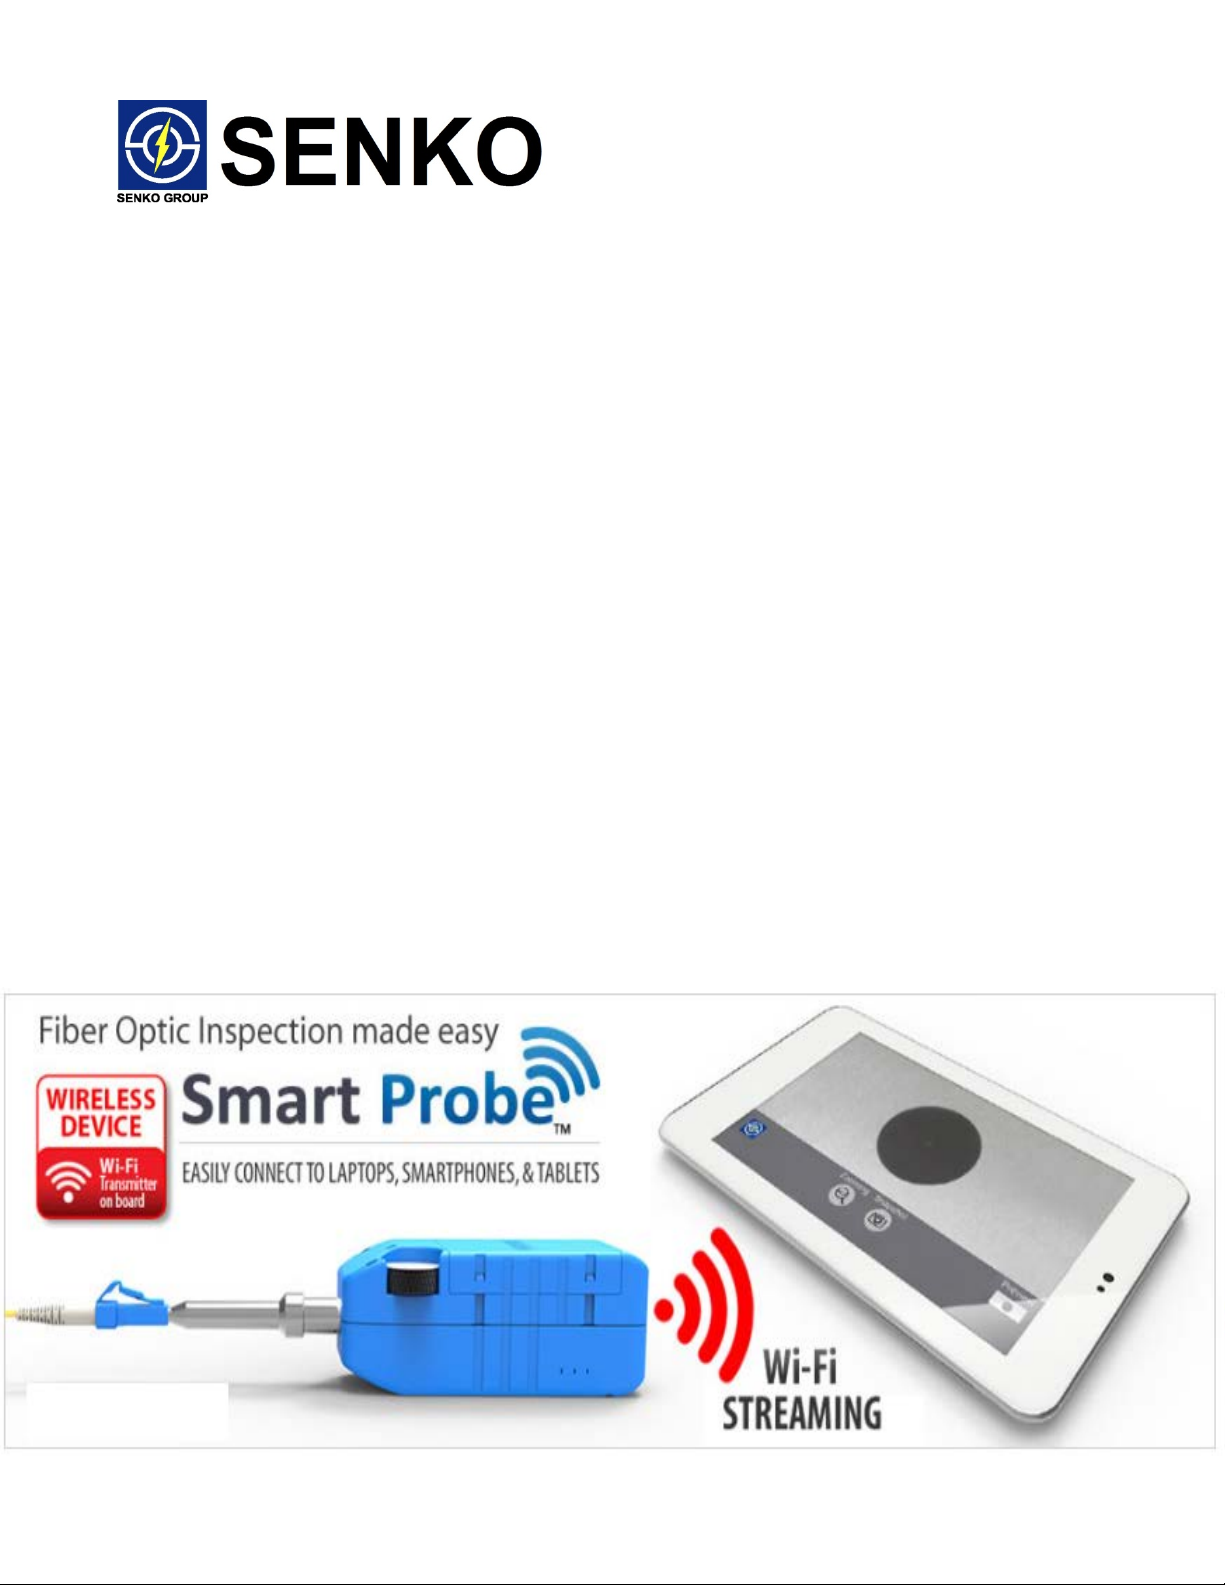
SENKO SMART Pro b e – Wi-Fi Model
USER MANUAL
Index
Page 2

Welcome Note
Package Content
Battery Caution and Warning
Regulatory Compliance
Product Specifications
Product Overview
Preparation
Start Inspection
App Functions
Page 3
Thank you for purchasing the SENKO Smart Probe, before you operate the Probe,
please read this manual carefully.
Package Contents,
1x Smart Probe
1x 2.5mm inspection tip (installed on Probe)
1x 1.25mm inspection tip
2x BL-5C Li-ion Battery Pack
1x External Battery Charger
1x USB charging cable
1x Hand Strap
1x Soft carrying case
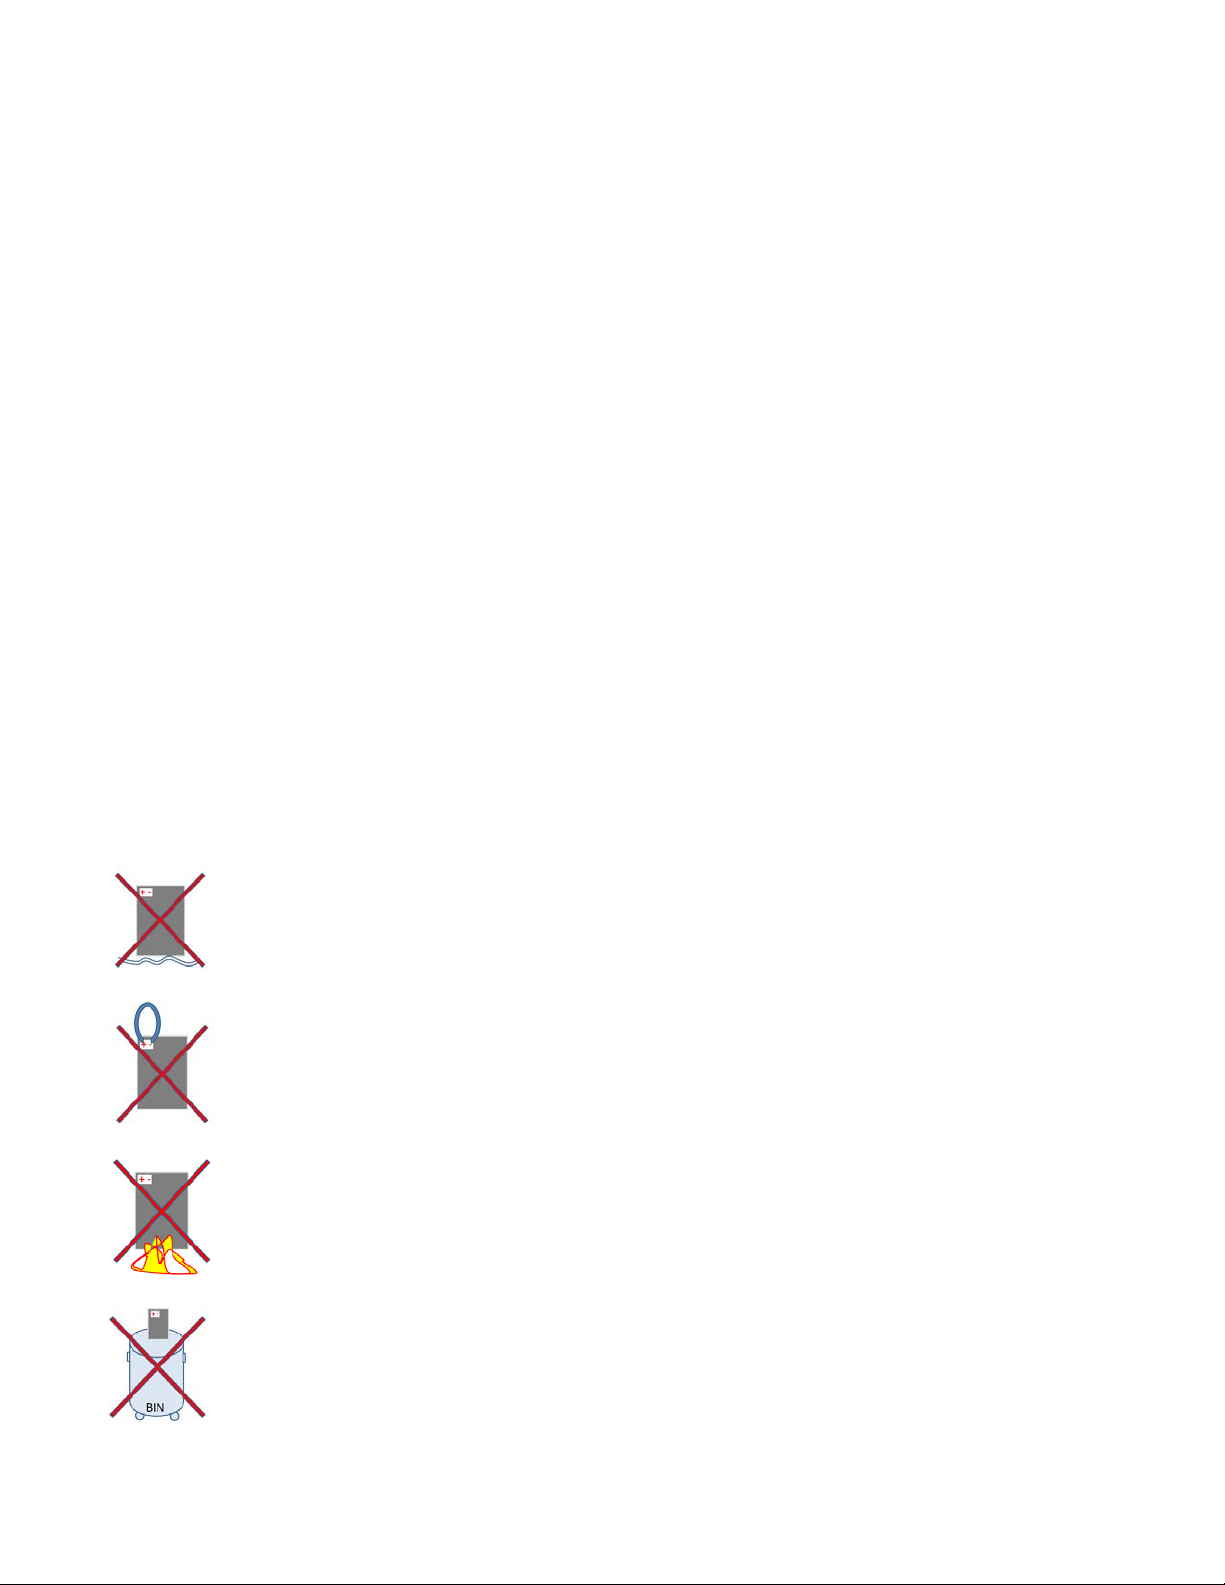
Battery WARNING:
Use on right polarity as indicated to connect to the Probe
Do not immerse battery in water
Do not short circuit
Do not put on fire
Dispose of or Recycle responsibly
Page 4

CAUTION:
RISK OF EXPLOSION IF BATTERY IS REPLACED BY AN INCORRECT TYPE.
DISPOSE OF USED BATTERIES ACCORDING TO THE INSTRUCTIONS.
Disposal:
All electrical and electronic products including batteries should be disposed of separately from the
municipal waste stream via designated collection facilities appointed by the government or the local
authorities.
Regulatory Compliance
FCC This device complies with part 15 of the FCC Rules. Operation is subject to the following
two conditions: (1) This device may not cause harmful interference, and (2) this device
must accept any interference received, including interference that may cause undesired
operation.
Changes or modifications not expressly approved by the party responsible for
compliance could void the user’s authority to operate the equipment.
NOTE: This equipment has been tested and found to comply with the limits for a Class B
digital device, pursuant to part 15 of the FCC Rules. These limits are designed to
provide reasonable protection against harmful interference in a residential installation.
This equipment generates, uses and can radiate radio frequency energy and, if not
installed and used in accordance with the instructions, may cause harmful interference
to radio communications. However, there is no guarantee that interference will not occur
in a particular installation. If this equipment does cause harmful interference to radio or
television reception, which can be determined by turning the equipment off and on, the
user is encouraged to try to correct the interference by one or more of the following
measures:
—Reorient or relocate the receiving antenna.
—Increase the separation between the equipment and receiver.
—Connect the equipment into an outlet on a circuit different from that to which
the receiver is connected.
—Consult the dealer or an experienced radio/TV technician for help.
Page 5

Industry Canada This device complies with Industry Canada licence-exempt RSS standard(s).
Operation is subject to the following two conditions: (1) this device may not cause
interference, and (2) this device must accept any interference, including
interference that may cause undesired operation of the device.
Le présent appareil est conforme aux CNR d'Industrie Canada applicables aux
appareils radio exempts de licence. L'exploitation est autorisée aux deux
conditions suivantes : (1) l'appareil ne doit pas produire de brouillage, et (2)
l'utilisateur de l'appareil doit accepter tout brouillage radioélectrique subi, même
si le brouillage est susceptible d'en compromettre le fonctionnement.
CAN ICES-3(B)/NMB-3(B)
Japan ARIB T66 certified. Registration number R203-JN3056
An exact Japanese translation if this user manual will be supplied.
CE R&TTE:
This device complies with the tests and standards as stipulated in the R&TTE Directive.
—RF: EN300328 V1.8.1
—EMC: EN301489-1 V1.9.2 & EN 301 489-17 V2.2.1
—LVD: EN60950-1
—Evaluation: EN62209
Page 6

Product Specifications
Item
Description
Part Number
SCK-VM2000-01
Image Sensor Type
2 Megapixel 1/2.7" CMOS
Image Resolution
960px x 544px
Optical Resolution
<1.0µm
Field Of View
457µm x 259µm.
Magnification
328 (based on 7" screen size)
Video Frame Rate
15fps
Focus
Adjustable Manual Focus
Zoom/magnification
x1.25, x1.5 and x2.0 (Digital)
Illumination Method
Coaxial
LED/ LED Wavelength
Blue / 470nm
Connectivity
Wifi 802.11g/n
Range
5m (unobstructed)
Battery/Type
2 x 1,150mAh rechargeable Li-ion / BL-5C
Power Consumption
600mA
USB Input (charging)
Micro USB. DC 5V, 1A max
Operation Temperature
-10 ℃ ~ +50℃
Storage temperature
-30⁰C ~ +100⁰C
Storage humidity
5% ~ 90%, Non-Condensing
Weight
147g incl batteries
Dimensions (without tip)
137.7mm (L) x 40.0mm (H) x 37.4mm (W)
Page 7

Product Overview
① - Power Button Press and hold to Switch On / Off the Probe
② - Micro USB Port Used for charging only, cannot be used for use with PC/Laptop
③ - LED Status Indication.
When Battery in recharging process:
Red – Battery is in charging progress
Blue – Battery charging finished
When Probe is in use,
Green – The Probe is in operation
Flashing Green – Error on connection between Probe and Tablet
Flashing Red – Battery Running Low
④ - Battery Cover Removable battery cover
⑤ - Tip Fastening Nut Turn counter clockwise to fasten tip, clockwise to release
⑥ - Inspection Tip Changeable Tip
⑦ - Hand Strap Slot Use hand strap to prevent accidental drops
⑧ - Heat Release Vent Avoid covering ventilation vents when whenever possible
⑨ - Focusing Wheel Rotate it to adjust focus
Page 8

Preparation
5. Close the Battery Cover with
3. Follow the Battery and
2. Check and locate the polarity pin
battery
1. Remove the Battery Cover
direction as shown
4. Follow the Battery and
Battery Installation
Open the battery cover and insert the batteries as shown below.
upward gently from
Connection Pin polarity sign and
place 2
nd
battery in compartment
“+” and “-“ before installation of
gentle press down from 2
sides evenly
Connection Pin polarity sign
and place 1st battery in
compartment
Page 9

Removal or Change of Batteries
NOTE,
1. The batteries are not installed in device on purchase, please fully recharge batteries and install
batteries before use of the device, use only the USB charging cable provided,
2. Two pieces of the BL-5C batteries are provided in the set, the Smart Probe can be operated
continuously for approx. 1 hour and 30mins with one single fully recharged battery, two batteries
working together in the Probe will increase the operating time to approx. 3 hours (based on both
2 batteries fully recharged, the battery capacity will vary and gradually decrease upon the
battery life shortening).
3. Please REMOVE the batteries from the Smart Probe if the device is intended for storge or to be
transported again.
Page 10

Install SENKO Vue App
Before using the Smart Probe, please download and installed the SENKO Vue App to your Andoid
smartphone or tablet PC. The App can be downloaded and installed directly from Google Play tore.
Simply enter the Play Store, search for SENKO Vue, download and install.
Connecting Android Device to Smart Probe
1. Switch the probe on by pressing and holding the power button until the green LED is lit.
2. Tap the “Smart Probe” icon to start the App.
3. Startup splash screen below will briefly appear.
4. At the Home Screen (below), tap “connect” to connect to the Smart Probe.
Page 11

5. The Wi-Fi connection settings screen below will appear. Select the SSID of the probe which will
start with “SP_”
6. Enter 12345678 when prompted for password.
7. Once connected, tap the “back/return” button the phone or tablet to return to the Home Screen.
Start Inspecting
Once the Android device is connected to the Probe, inspection can begin. The SENKO Vue App provides
zoom, snapshot, snapshot review and file rename functions.
1. At the Home Screen tap “Inspect” to view live image of the endface.
Page 12

2. The endface should appear full screen as below with a menu containing Zoom, Snapshot and
Preview buttons. The menu can be hidden from view or unhidden with a tap anywhere on the
screen.
App Functions
1. Consecutive taps on the Zooming button with cycle through x1.25, x1.5, x2 magnification of the live
image then back to the original non zoom image. Alternatively you can zoom in and out using the open
and pinch gestures with thumb and index finger.
2. To take a Snapshot, tap the snapshot button of the live image (without the menu).
3. To review the snapshot, tap the preview button. You can cycle through previous snapshots by swiping
the screen with a finger from right to left. To go back to live image just tap the “back/return” button.
4. To edit the snapshot name, tap on the snapshot’s current name on the right of the menu bar. See
below.
Page 13

5. To return to live image, tap the return button.
6. To exit the App, tap the “back/return” button whilst viewing a live image and tap “Ok” to quit.
Other Information.
There are a few things to note.
1. The probe will work with one or both batteries inserted as long as there is sufficient charge.
2. Devices will not be able to connect to the probe whilst it’s connected to a USB power source WITHOUT
any batteries inserted. Wi-Fi is not available when the probe is running solely from a USB power source
without a battery inserted.
 Loading...