

Page 1
Date: 08-05-2019
Doc Number: ENG-SP2M-0519-001
1
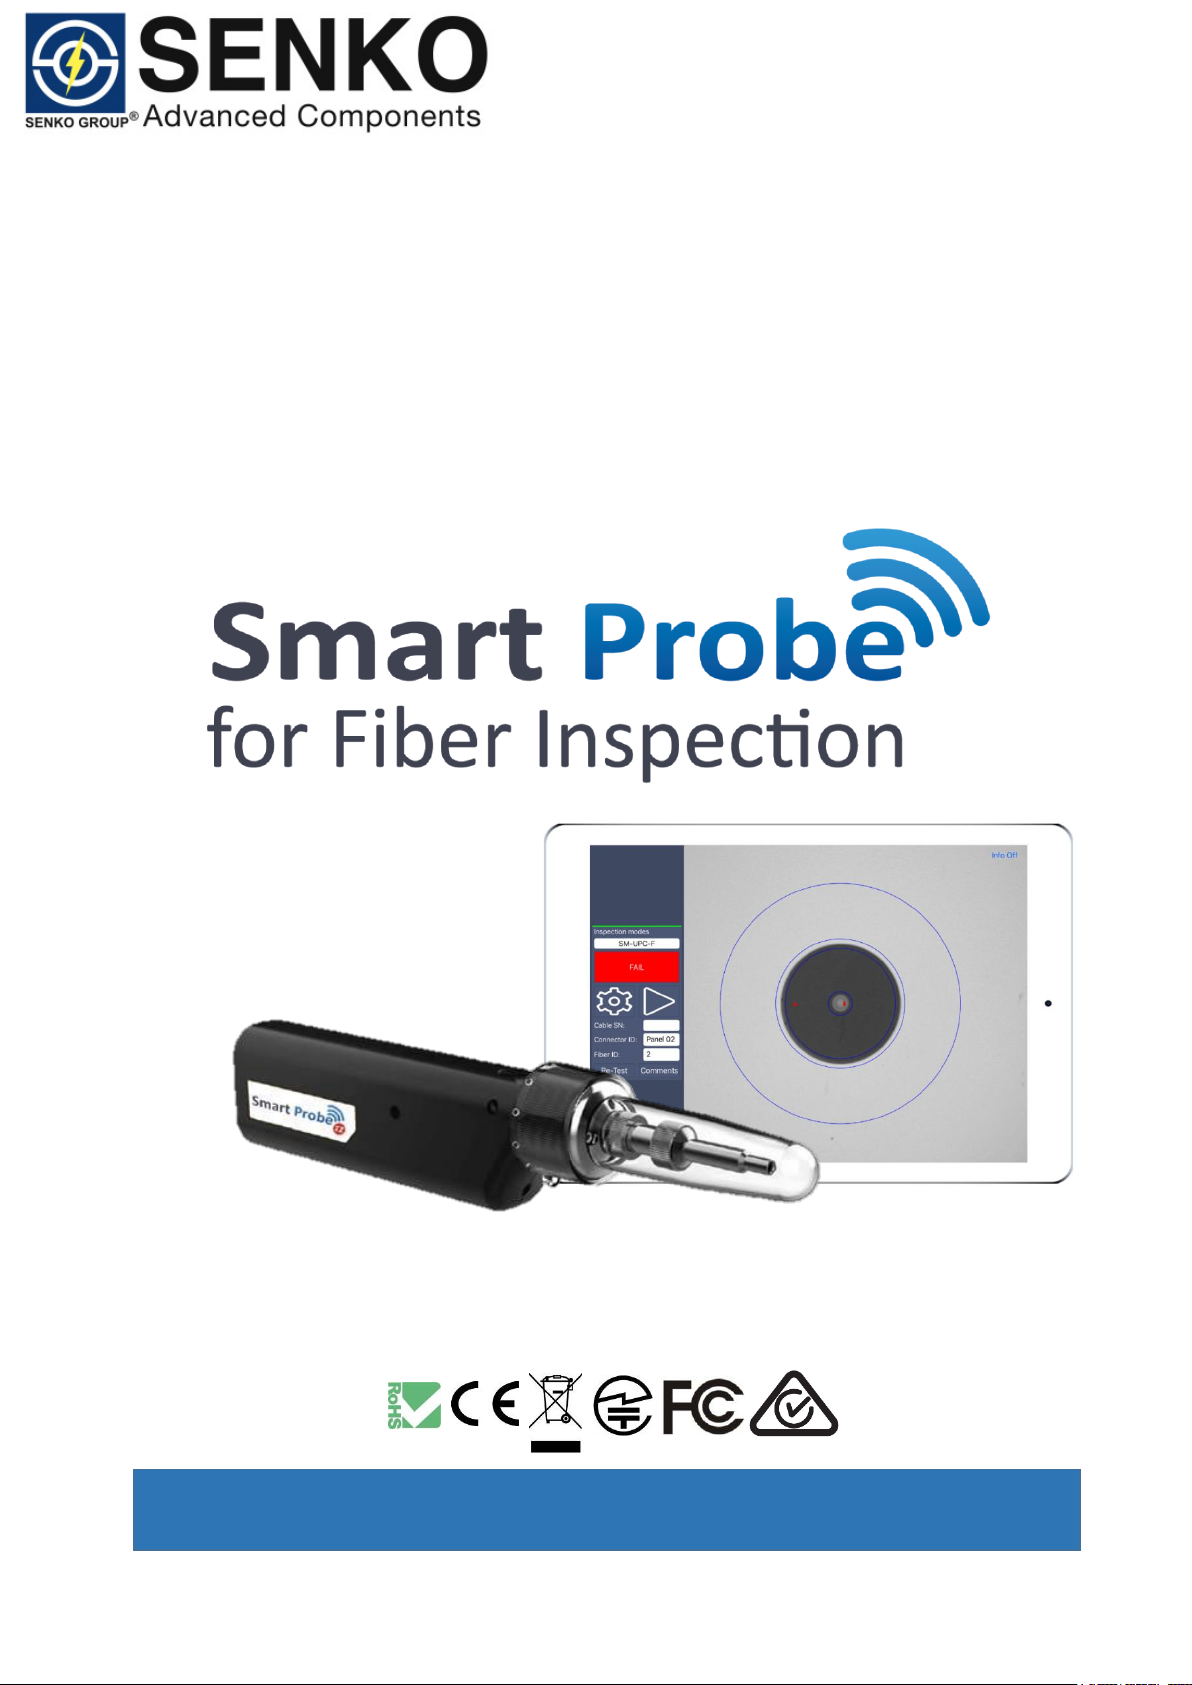
Vue3 User Manual
Your Source for Optical Interconnect Solutions
Design – Test - Manufacture
Page 2

Date: 08-05-2019
Doc Number: ENG-SP2M-0519-001
2
Contents
1. Read Me First ………………………………………………………………………….4
2. Safety Information ………………………………………………………………….4-5
3. Certification…………………………………………………………………………..5-7
4. Introduction ……………………………………………………………………………7
5. Hardware Overview…………………………………………………………………7-9
5.1. Features ……………………………………………………………………………7-8
5.2. Specification and Accessories …………………………………………………...8-9
6. Basic Operation ………………………………………………………………………9
6.1. Charging ……………………………………………………………………………...9
6.2. Replacing the Battery ……………………………………………………………….9
6.3. Installing Inspection Tips……………………………………………………….10-11
6.4. Optional Interchangeable Inspection Tips…………………………………….....11
6.5. LED Torch…………………………………………………………………………...12
7. Software Download and Initial Set-up …………………………………………..12
7.1. Required Operating System…………………………………………………..…...12
7.2. Getting Started……………………………………………………………………....12
7.3. WiFi Set-up…………………………………………………………………………..12
8. Software Overview …………………………………………………………………14
8.1. Functionality Diagram…………………………………………………………...14-17
9. Customizing the Software ………………………………………………………..18
9.1. Standard Report …………………………………………………………………18-19
9.2. Consolidated Report …………………………………………………………….20-22
9.3. Create a Report Manually………………………………………………………….22
9.4. Automated Report Creation………………………………………………………..22
9.5. Auto Increment ………………………………………………………………………22
9.6. Re-Test Function…………………………………………………………………….23
9.7. Comments………………………………………………………………………...23-24
Page 3

Date: 08-05-2019
Doc Number: ENG-SP2M-0519-001
3
10. Inspecting Fiber Ends and Analyzing Captures………………………………24
11. Extracting Files………………………………………………………………….25-26
12. Warranty ……………………………………………………………………………..27
13. Maintenance and Support……………………………………………………..27-28
Page 4
Date: 08-05-2019
Doc Number: ENG-SP2M-0519-001
4
1. Read Me First
Thank you for purchasing the SENKO Smart Probe. Please read this manual before
using the device to ensure safe and proper use.
2. Safety Information
The following general safety precautions must be observed during all phases of
operation, service and repair of the instrument. Failures to comply with these
precautions or with specific warnings elsewhere in this manual violate standards of
design, manufacture and intended use of the instrument. Always read the manual for
safety points before using the instrument. You must follow these to ensure correct and
safe operation of the instrument.
WARNING
Do not install or terminate fibers while a light source is active. Never look directly into
a live fiber and ensure that your ayes are protected at all times.
Battery CAUTION and WARNING:
There are no user serviceable parts inside; under no circumstances should you attempt
to access the internal parts. For servicing please contact Senko Advanced
Components or Senko Distribution partner.
Only use battery and accessories specified by the manufacturer.
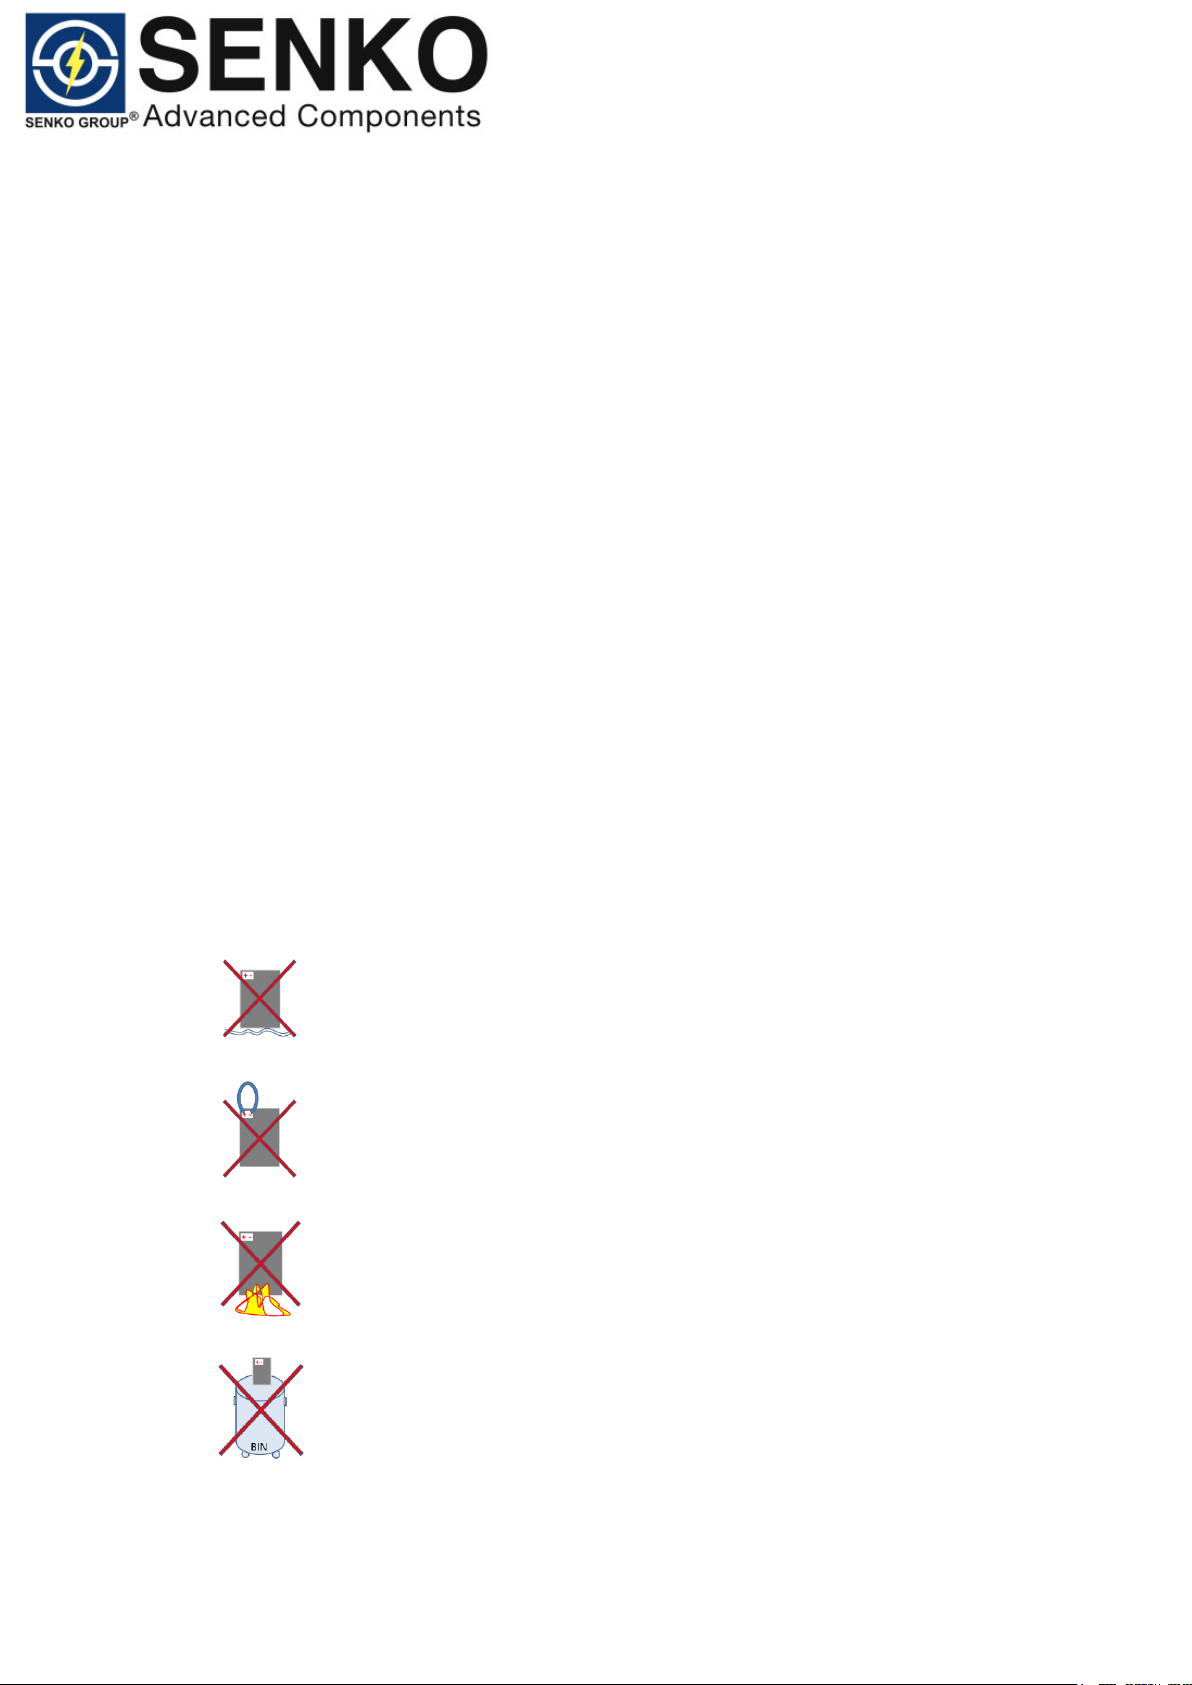
Do not immerse battery in water.
Do not short circuit.
Do not put on fire.
Dispose of or Recycle Responsibly.
Page 5

Date: 08-05-2019
Doc Number: ENG-SP2M-0519-001
5
CAUTION:
RISK OF EXPLOSION IF BATTERY IS REPLACED BY AN INCORRECT TYPE.
DISPOSE OF USED BATTERIES ACCORDING TO THE INSTRUCTIONS.
DISPOSAL
All electrical and electronic products including batteries should be disposed of
separately from the municipal waste stream via designated collection facilities
appointed by the government or the local authorities.
3. Certification
FCC
This device complies with part 15 of the FCC Rules. Operation is subject to the
following two conditions: (1) This device may not cause harmful interference, and (2)
this device must accept any interference received, including interference that may
cause undesired operation.
Changes or modifications not expressly approved by the party responsible for
compliance could void the user’s authority to operate the equipment.
NOTE: This equipment has been tested and found to comply with the limits for a Class
B digital device, pursuant to part 15 of the FCC Rules. These limits are designed to
provide reasonable protection against harmful interference in a residential installation.
This equipment generates, uses and can radiate radio frequency energy and, if not
installed and used in accordance with the instructions, may cause harmful interference
to radio communications. However, there is no guarantee that interference will not
occur in a particular installation. If this probe does cause harmful interference to radio
or television reception, which can be determined by turning the probe off and on, the
user is encouraged to try to correct the interference by one or more of the following
measures:
Reorient or relocate the receiving antenna.
Increase the separation between the probe and receiver.
Consult the manufacturer/distributor dealer or an experienced radio/TV
technician for help.
Page 6

Date: 08-05-2019
Doc Number: ENG-SP2M-0519-001
6
Industry Canada
This device complies with Industry Canada licence-exempt RSS standard(s).
Operation is subject to the following two conditions: (1) this device may not cause
interference, and (2) this device must accept any interference, including interference
that may cause undesired operation of the device.
Le présent appareil est conforme aux CNR d'Industrie Canada applicables aux
appareils radio exempts de licence. L'exploitation est autorisée aux deux conditions
suivantes : (1) l'appareil ne doit pas produire de brouillage, et (2) l'utilisateur de
l'appareil doit accepter tout brouillage radioélectrique subi, même si le brouillage est
susceptible d'en compromettre le fonctionnement.
CAN ICES-3(B)/NMB-3(B)
Japan
ARIB T66 certified. Registration Number R210-115178.
Japanese translation of this user manual will be supplied.
CE
R&TTE:
This device complies with the tests and standards as stipulated in the R&TTE Directive.
RF: ETSI EN 300 328 V2.1.1 (2016-11)
EMC: EN 62311:2008
Draft ETSI EN 301 489-1 V2.2.0 (2017-03)
Draft ETSI EN 301 489-17 V3.2.0 (2017-03)
LVD: EN 62368-1:2014
U/NZ
RCM registered.
Certificate Number: RCMP17375 001
EMC Regulations (Battery)
EN 55032:2015
EN 61000-3-2:2014
EN 61000-3-3:2013
EN 55024:2010 + A1:2015
EN 61000-4-2:2009
EN 61000-4-3:2006 + A1:2008 + A2:2010
EN 61000-4-4:2012
EN 61000-4-5:2014
EN 61000-4-6:2014
EN 61000-4-8:2010
EN 61000-4-11:2004
Page 7
Date: 08-05-2019
Doc Number: ENG-SP2M-0519-001
7
4. Introduction
The Smart Probe 2 Inspection Probe is a portable video microscope with an automated
IEC 61300-3-35 End-Face Inspection App, used to inspect fiber ends. The microscope
can be connected with a WiFi or USB connection to platforms or with a WiFi connection
to mobile smart devices (Android or iOS).
5. Hardware Overview
5.1 Features
Captive dust/protective cap.
5h operation from rechargeable battery.
Wide range of inspection tips.
Manual Fcous.
Auto and Manual centering of fiber.
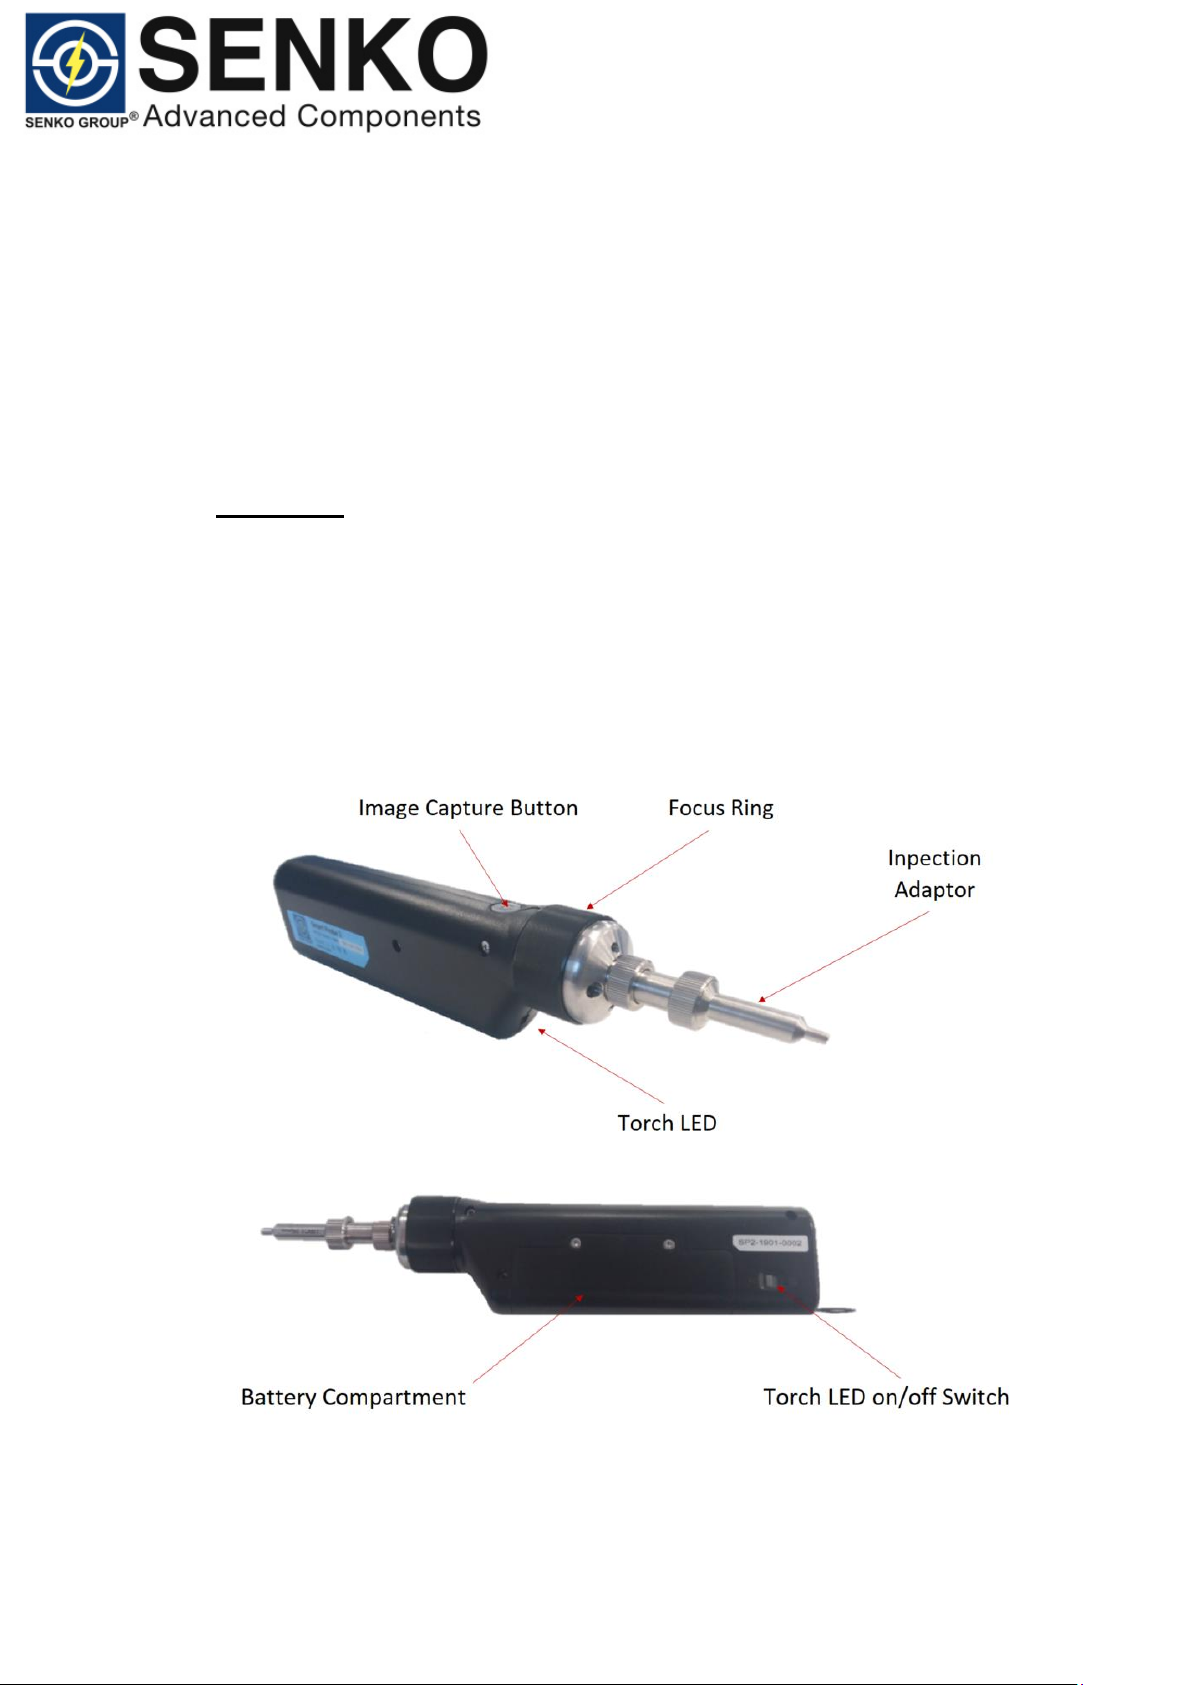
Capture button.
LED.
Page 8
Date: 08-05-2019
Doc Number: ENG-SP2M-0519-001
8
5.2 Specification and Accessories
Smart Probe 2
Magnification
200x/400x
Field of View
512 x 384 um
Focus method
Manual
Communication Interface
Wifi802.11 / USB 2.0
Power
Built in Lithium battery 2hr charge time
Operating Temp.
-10℃ ~ 50℃
Storage Temp.
-20℃ ~ 50℃
Relative humidity
95%
Weight
188g inc battery
Size
195(L) x 40(W) x 25(H) mm
Software Platforms
Android 4.2 & above, iOS 9.3 & above
Page 9
Date: 08-05-2019
Doc Number: ENG-SP2M-0519-001
9
6. Basic Operation
6.1 Charging
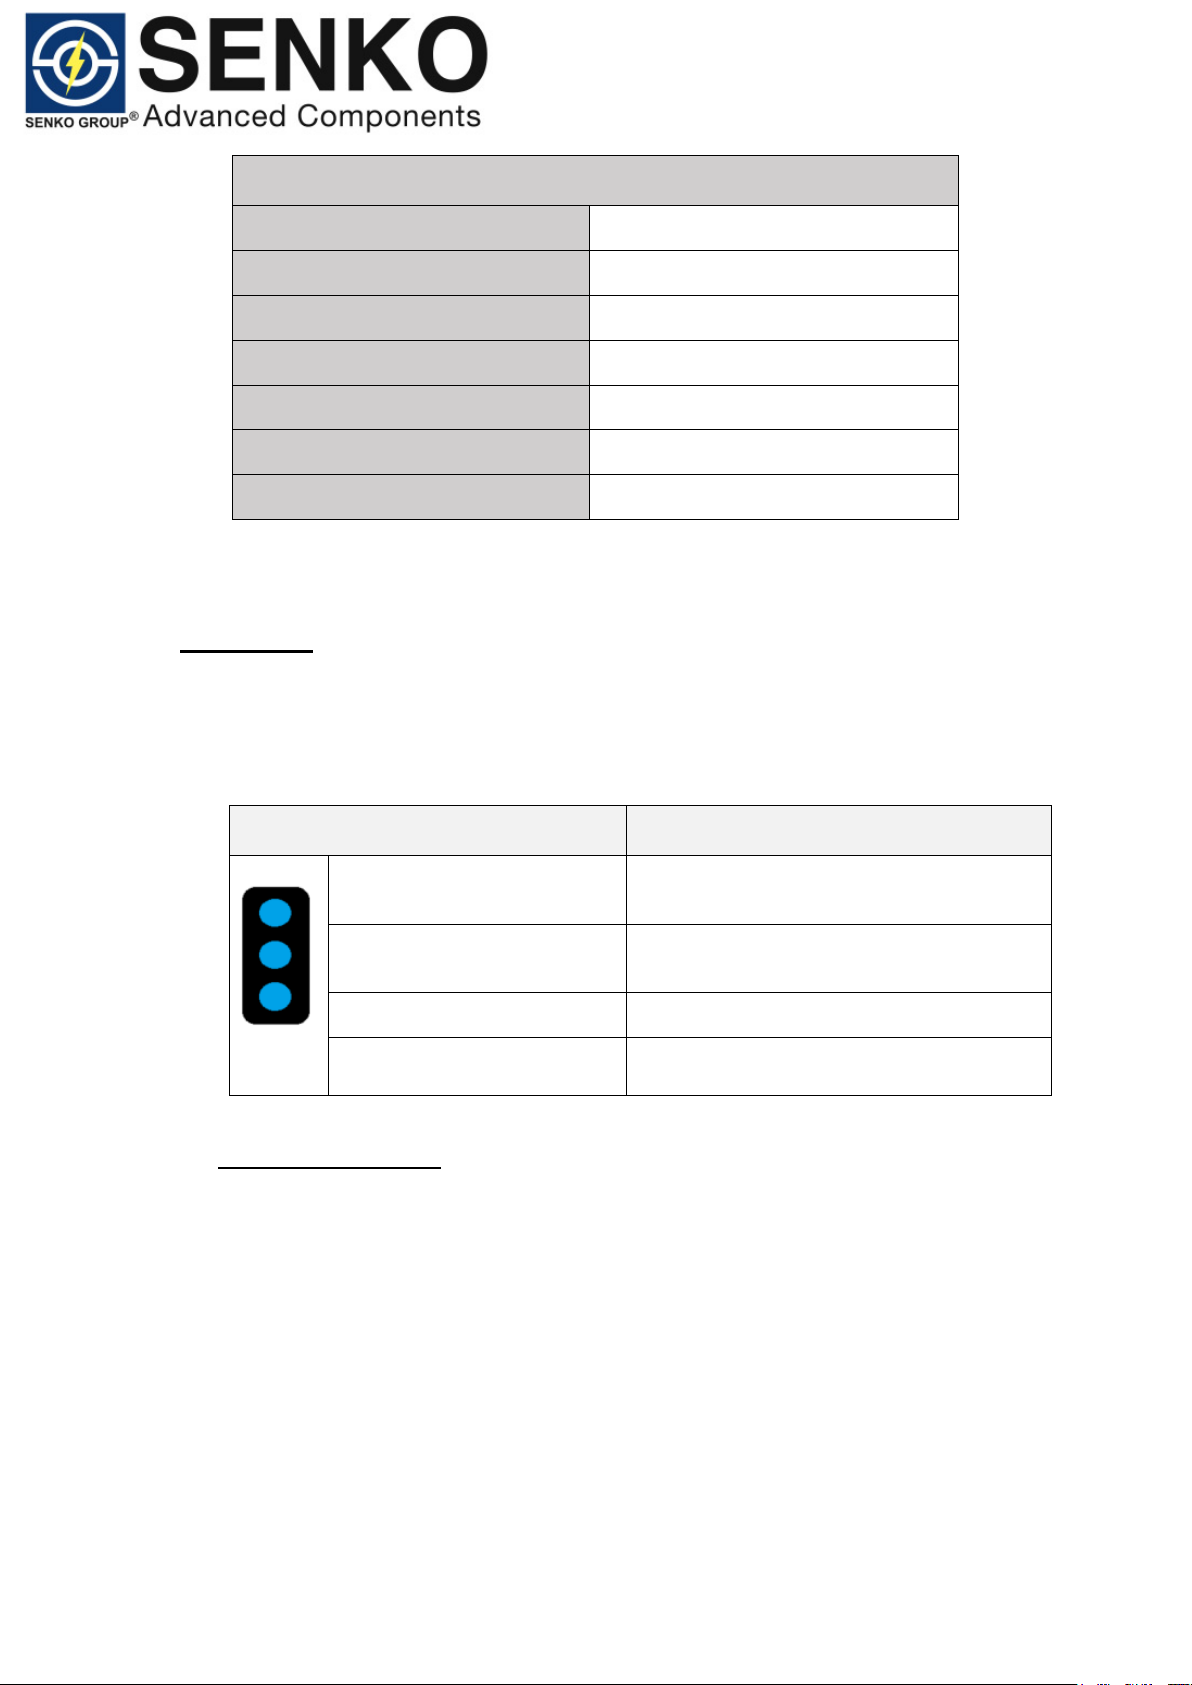
Connect the probe to the supplied USB charger, or to a USB port of a PC using the supplied
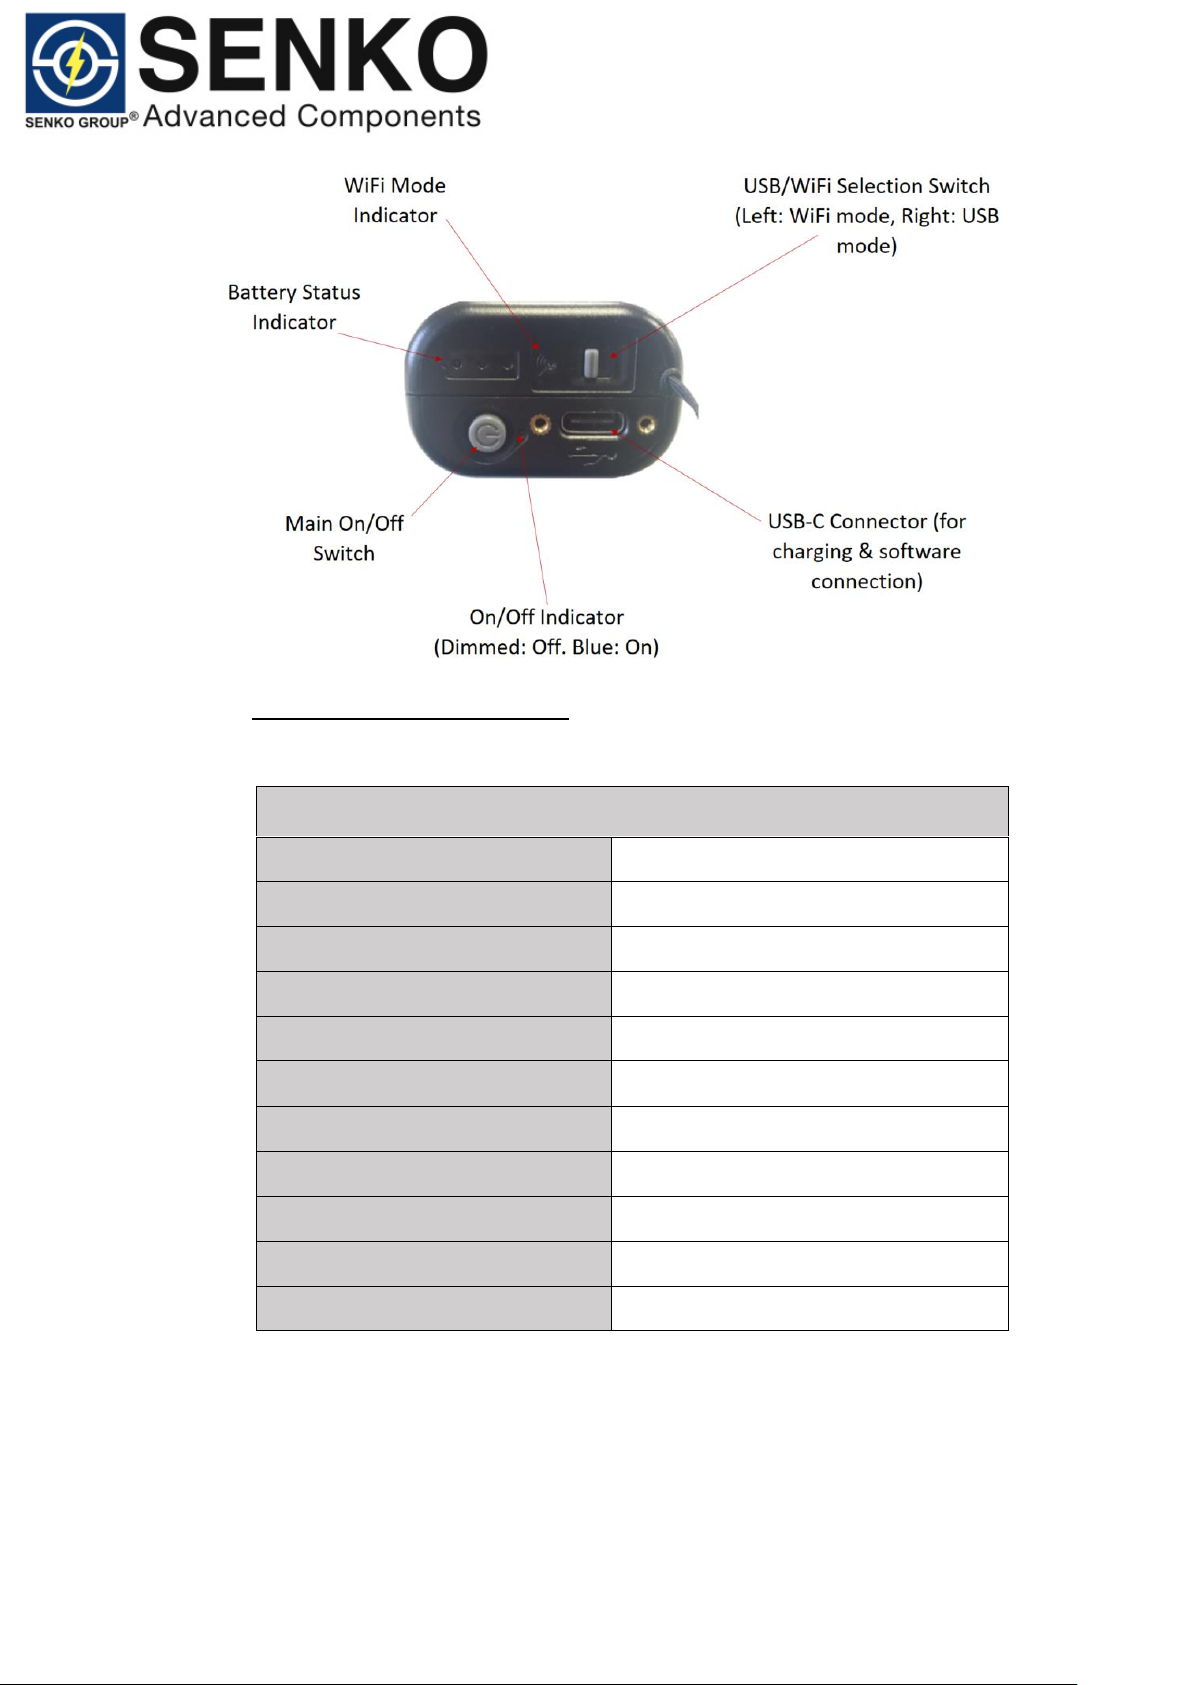
USB cable. The Battery Status Indicator (comprises of 3 white LEDs) shows charging
status as below.
Battery Status Indicator Pattern
Meaning
Only Led # 1 Lights up & blinking
Low battery. Instrument will turn off automatically if
not recharged.
All 3 LEDs light up in running
mode
Instrument is being charged. Max charging time
needed is 2.5 hrs.
All 3 LEDs light up continually
Instrument is fully charged.
All 3 LEDs light up & blinking
Battery connection error.
6.2 Replacing the battery
The instrument is powered by a specific built-in Lithium battery which can be replaced
as shown below. Please contact SENKO for replacement battery.
1. Remove 2 screws, using a special screw driver to open battery cover.
2. Pull out battery from the battery compartment.
3. Insert new battery at an angle and plug the contacts of the battery into the
connector in the correct orientation.
4. Place battery cover and screws back on the probe.
5. Charge battery.
Accessories
Tips
1.25m male, 2.5mm male
Wrist strap with protective cap
1 set
USB charger with international adaptors
1 set
USB cable
Type A – Type C
Tip storage case
Up to 5 tips
Carrying case with waist strap
1 set
QA certificate
1 set
Page 10
Date: 08-05-2019
Doc Number: ENG-SP2M-0519-001
10
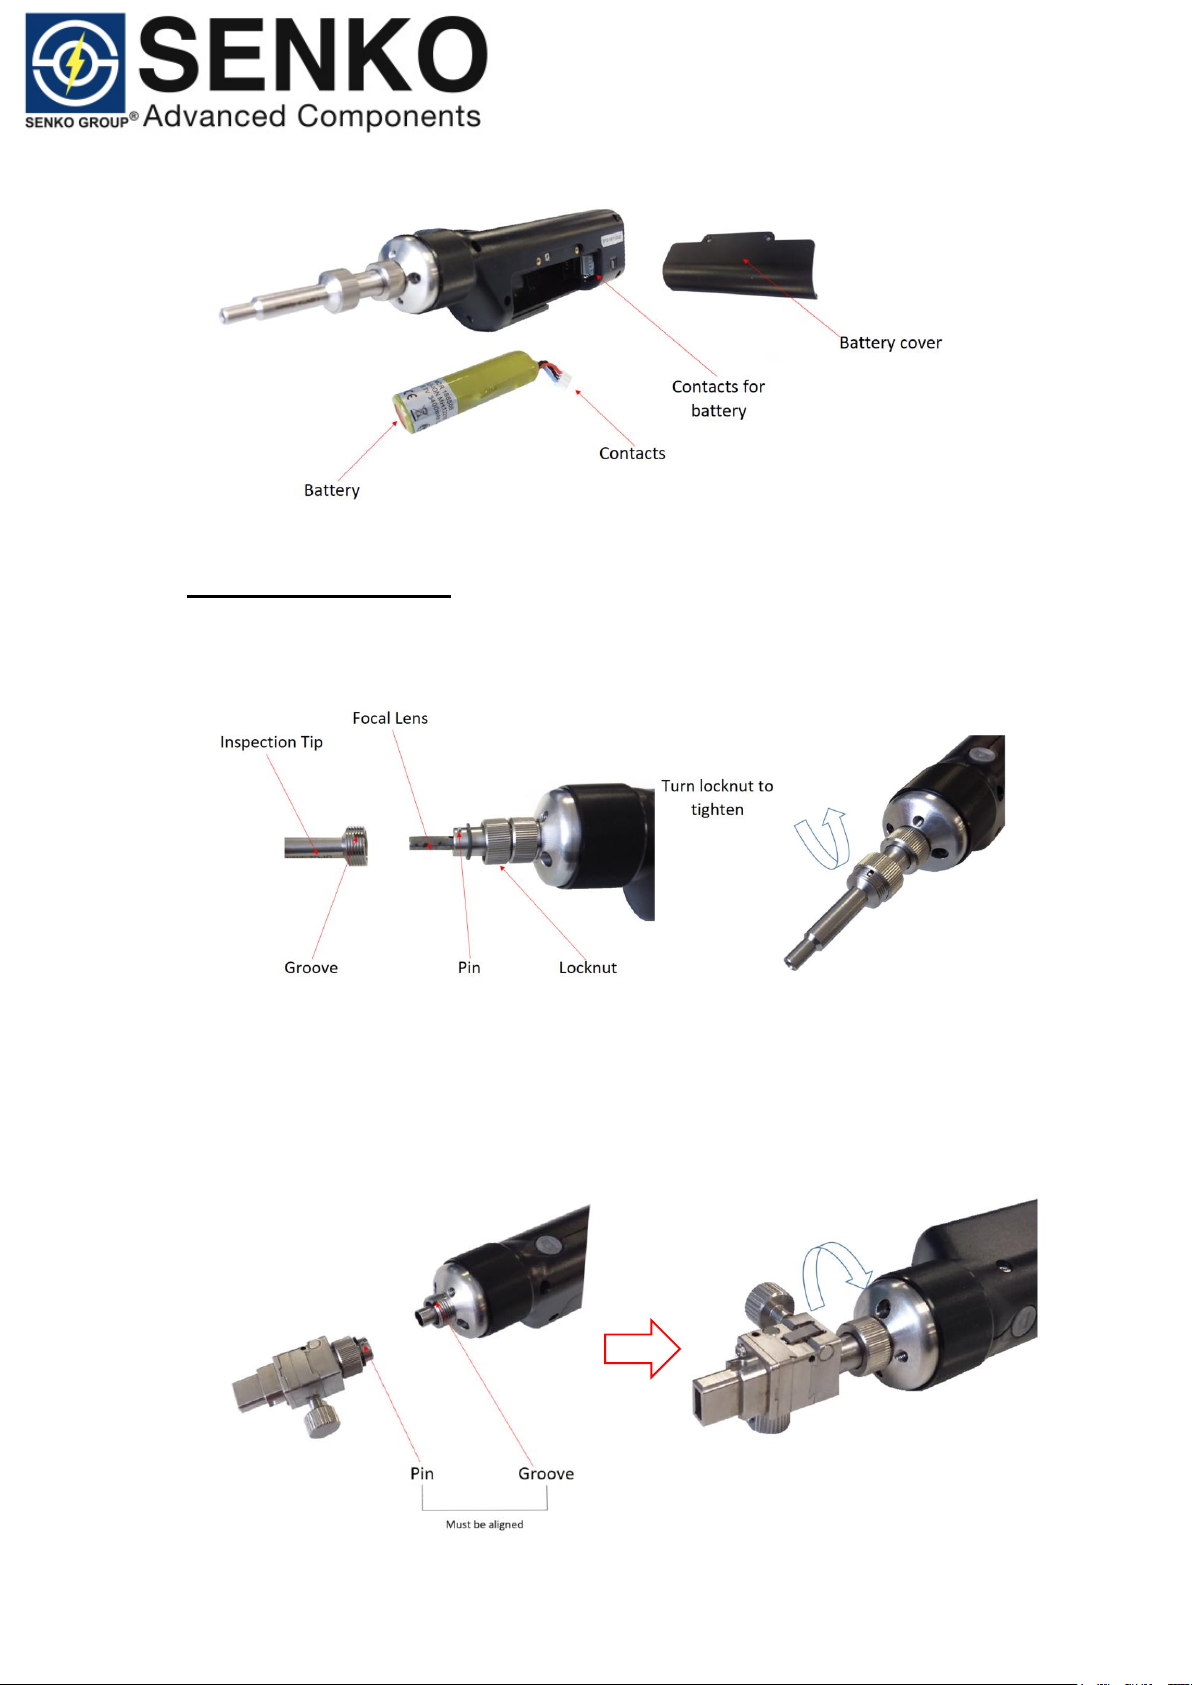
6.3 Installing Inspection Tips
Place inspection tip over focal lens, make sure that the pin is aligned into the grove,
tighten locknut by turning it ANTI-CLOCKWISE as shown below.
MPO Inspection Tips
Remove focal lens holder. Place MPO inspection tip on the probe, make sure that pin
on the inspection tip is aligned into the groove. Tighten locknut by turning it
CLOCKWISE as shown below.
Page 11
Date: 08-05-2019
Doc Number: ENG-SP2M-0519-001
11
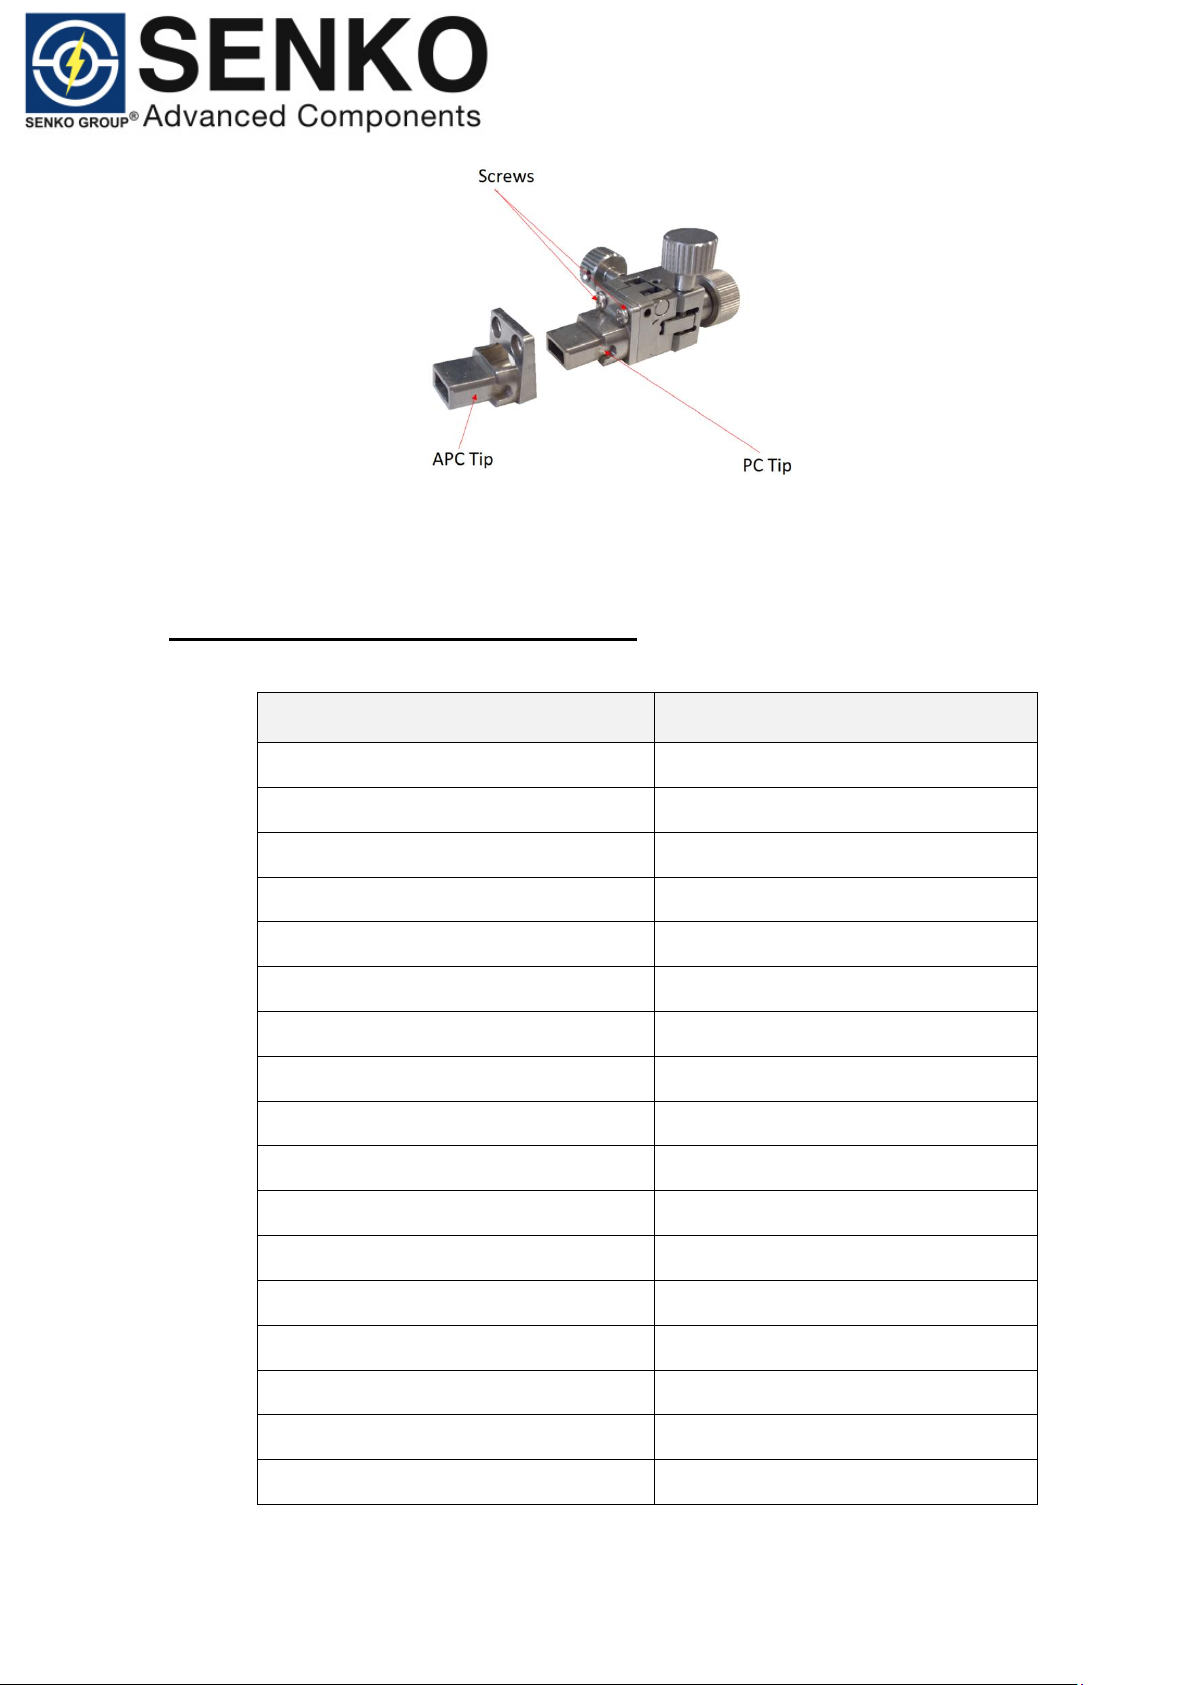
Please note: MPO inspection tip come with both PC and an APC tips which are
interchangeable by loosening/tightening 2 screws as shown above.
6.4 Optional Interchangeable Inspection Tips
Description
Part Number
1.25mm PC Male Universal Tip
SCK-SPT2-PC125-M
2.5mm PC Male Universal Tip
SCK-SPT2-PC250-M
1.25mm APC Male Universal Tip
SCK-SPT2-APC125-M
2.5mm APC Male Universal Tip
SCK-SPT2-APC250-M
SC APC In Adapter Tip
SCK-SPT2-SC-APC-F
SC UPC In Adapter Tip
SCK-SPT2-SC-UPC-F
FC APC In Adapter Tip
SCK-SPT2-FC-APC-F
FC UPC In Adapter Tip
SCK-SPT2-FC-UPC-F
LC UPC In Adapter Tip
SCK-SPT2-LC-UPC-F
MU UPC In Adapter Tip
SCK-SPT2-MU-UPC-F
ST UPC In Adapter Tip
SCK-SPT2-ST-PC-F
MPO APC Female Tip,12/24
SCK-SPT2-MPO-APC-F
MPO PC Female Tip, 12/24
SCK-SPT2-MPO-PC-F
E2000 UPC Female Tip
SCK-SPT2-E2000-UPC-F
E2000 UPC Male Tip
SCK-SPT2-E2000-UPC-M
E2000 APC Female Tip
SCK-SPT2-E2000-APC-F
E2000 APC Male Tip
SCK-SPT2-E2000-APC-M
Page 12
Date: 08-05-2019
Doc Number: ENG-SP2M-0519-001
12
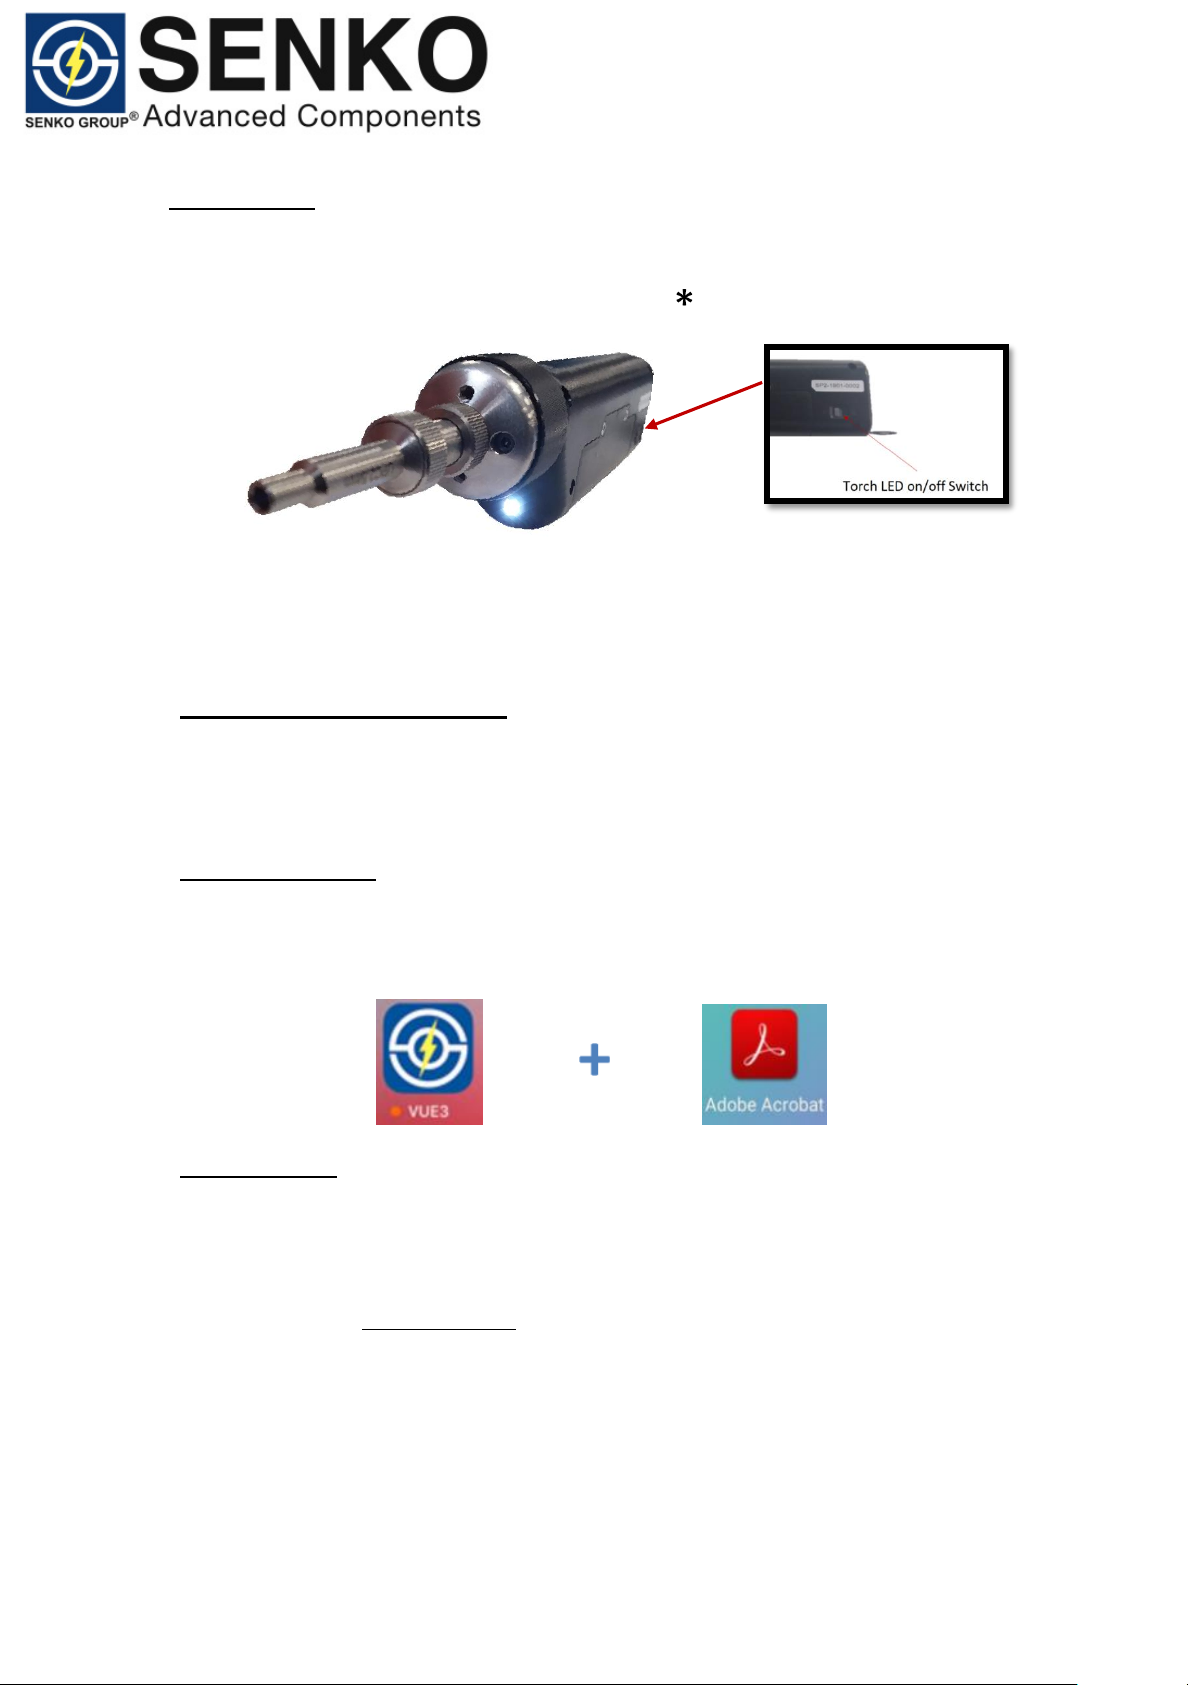
6.5 Torch LED
The built-in Torch LED can be turned on to assist works in dark or low light conditions.
To turn light on, flip Torch LED on/off Switch to .
7.0 Software Download and Initial Set Up
7.1 Required Operating System
Android Lollipop 4.2 & above.
iOS 9.3 & above.
7.2 Getting Started
Download Vue3 App from the Google Play (Android), App Store (iOS).
Download Adobe Acrobat Reader.
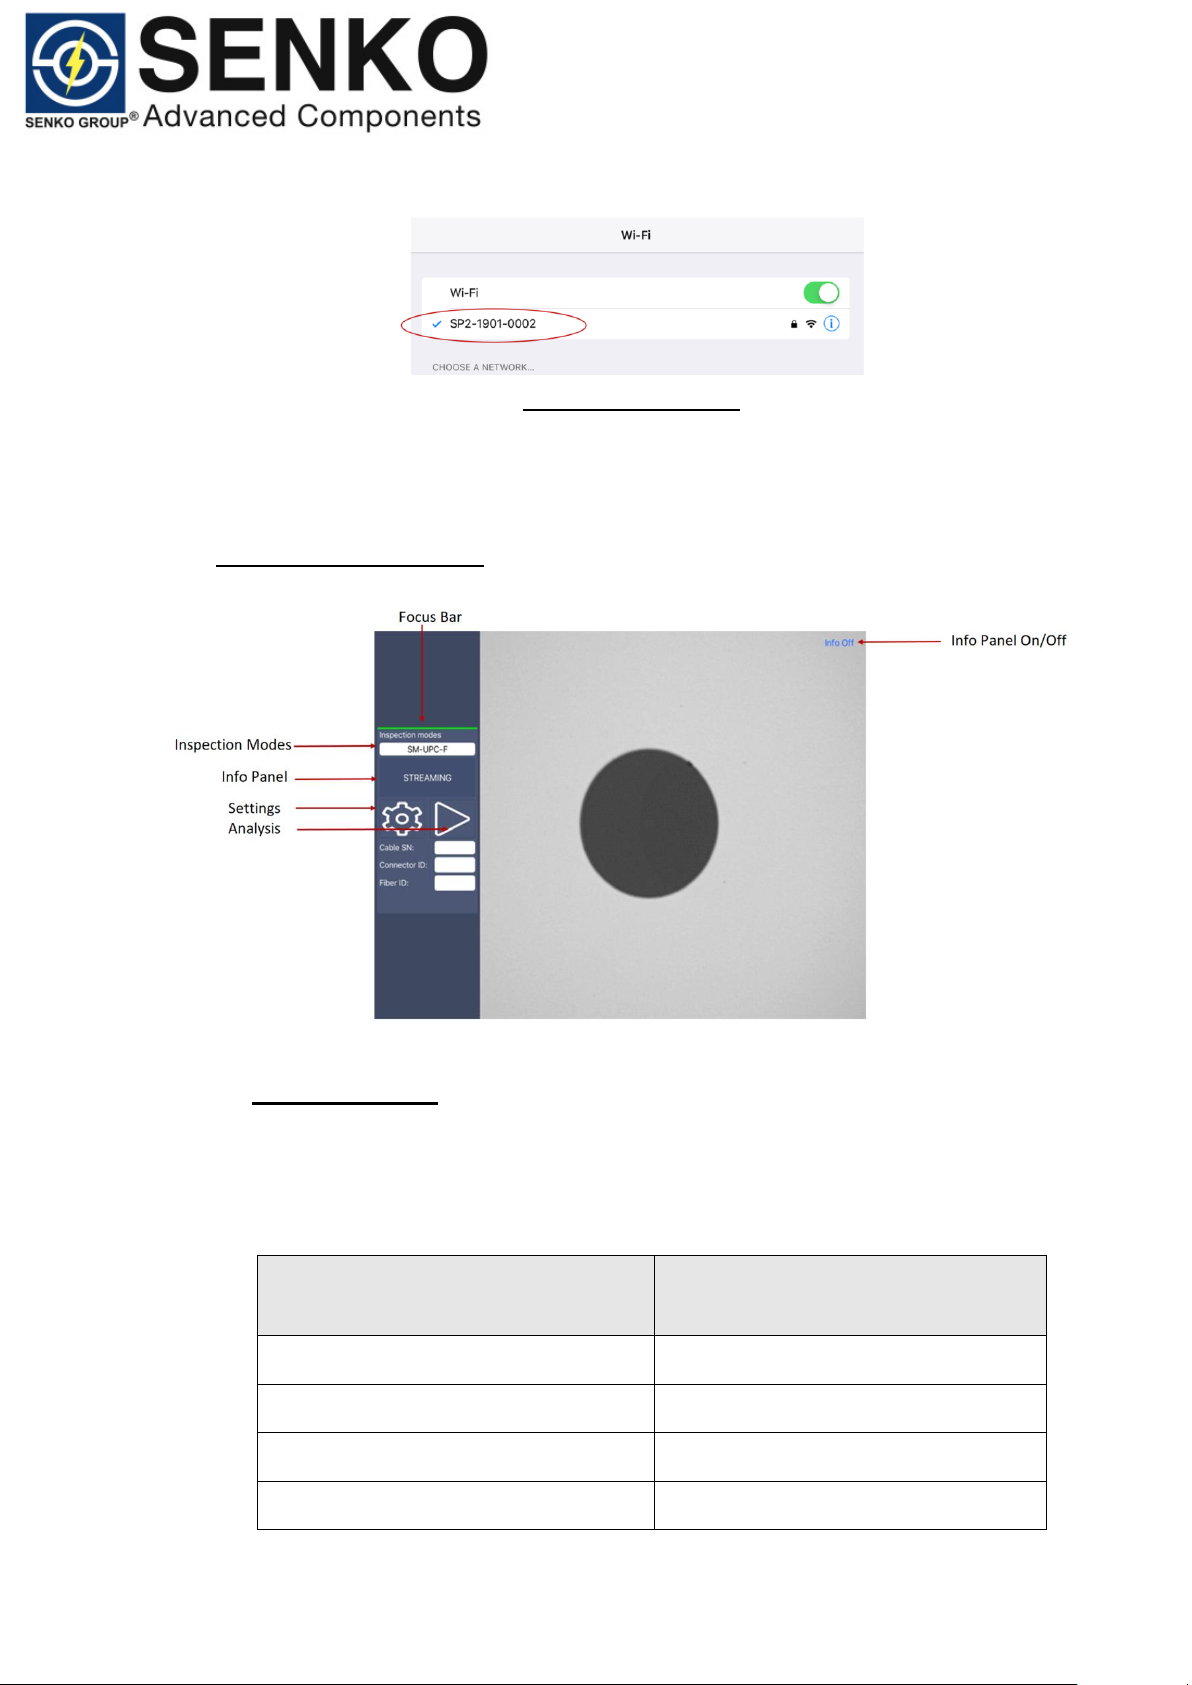
7.3 WiFi Set-up
All SENKO probes are identified by their serial numbers (prefixed SSID “SP2-XXXXXXXX”)
Example: “SP2-1901-0002”
o SP2= Smart Probe 2.
o 1901= Manufacturing ‘Year’ and ‘Month’.
o 0002= Identification Number.
Page 13
Date: 08-05-2019
Doc Number: ENG-SP2M-0519-001
13
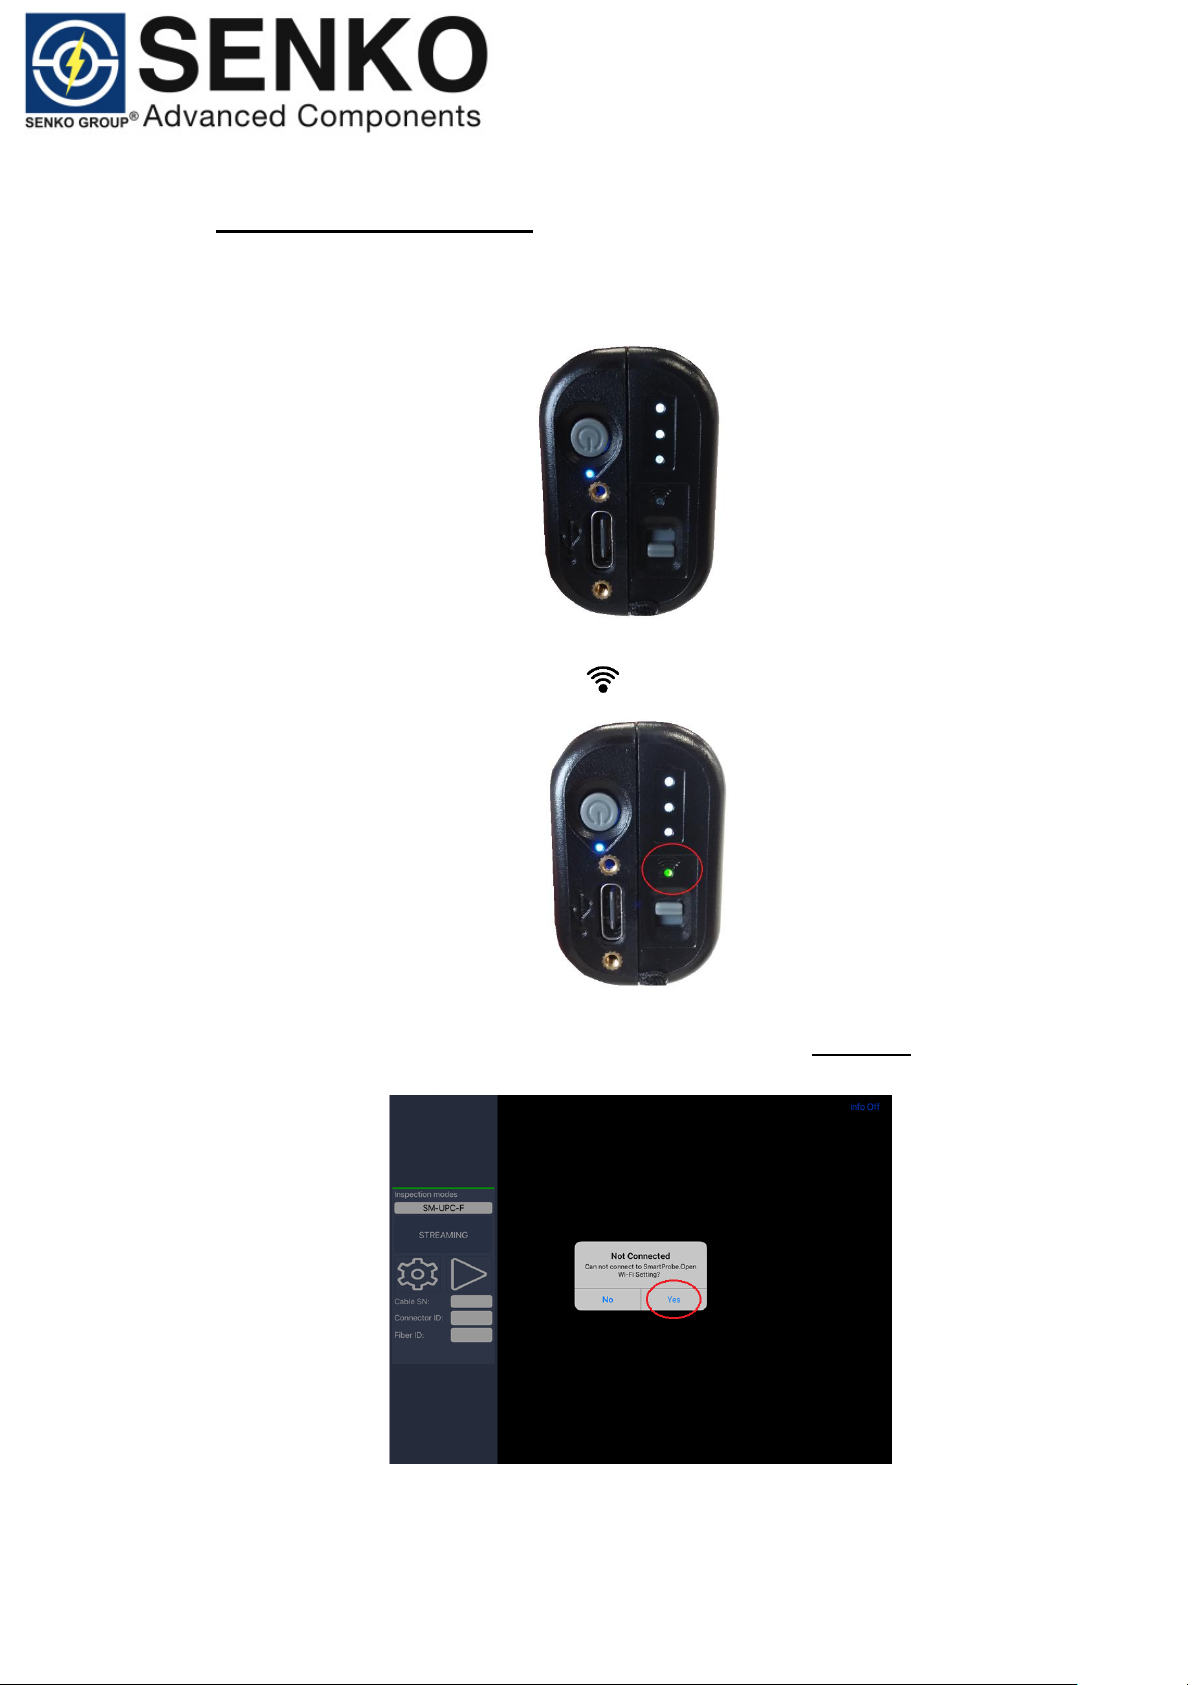
To connect the wireless probe:
1. Turn on the probe by pressing down the Main On/Off Switch. The blue LED
near the switch will light up.
2. Flip WiFi/USB Switch to . Wait until the green LED has lights up
continually.
3. Start the Vue3 application and open WiFi Setting (see below).
Page 14
Date: 08-05-2019
Doc Number: ENG-SP2M-0519-001
14
4. Select the wireless probe you want to work with. Once connected go back
to the Vue3 app.
Wi-Fi Password
(12345678)
8.0 Software Overview
8.1 Functionality Diagram
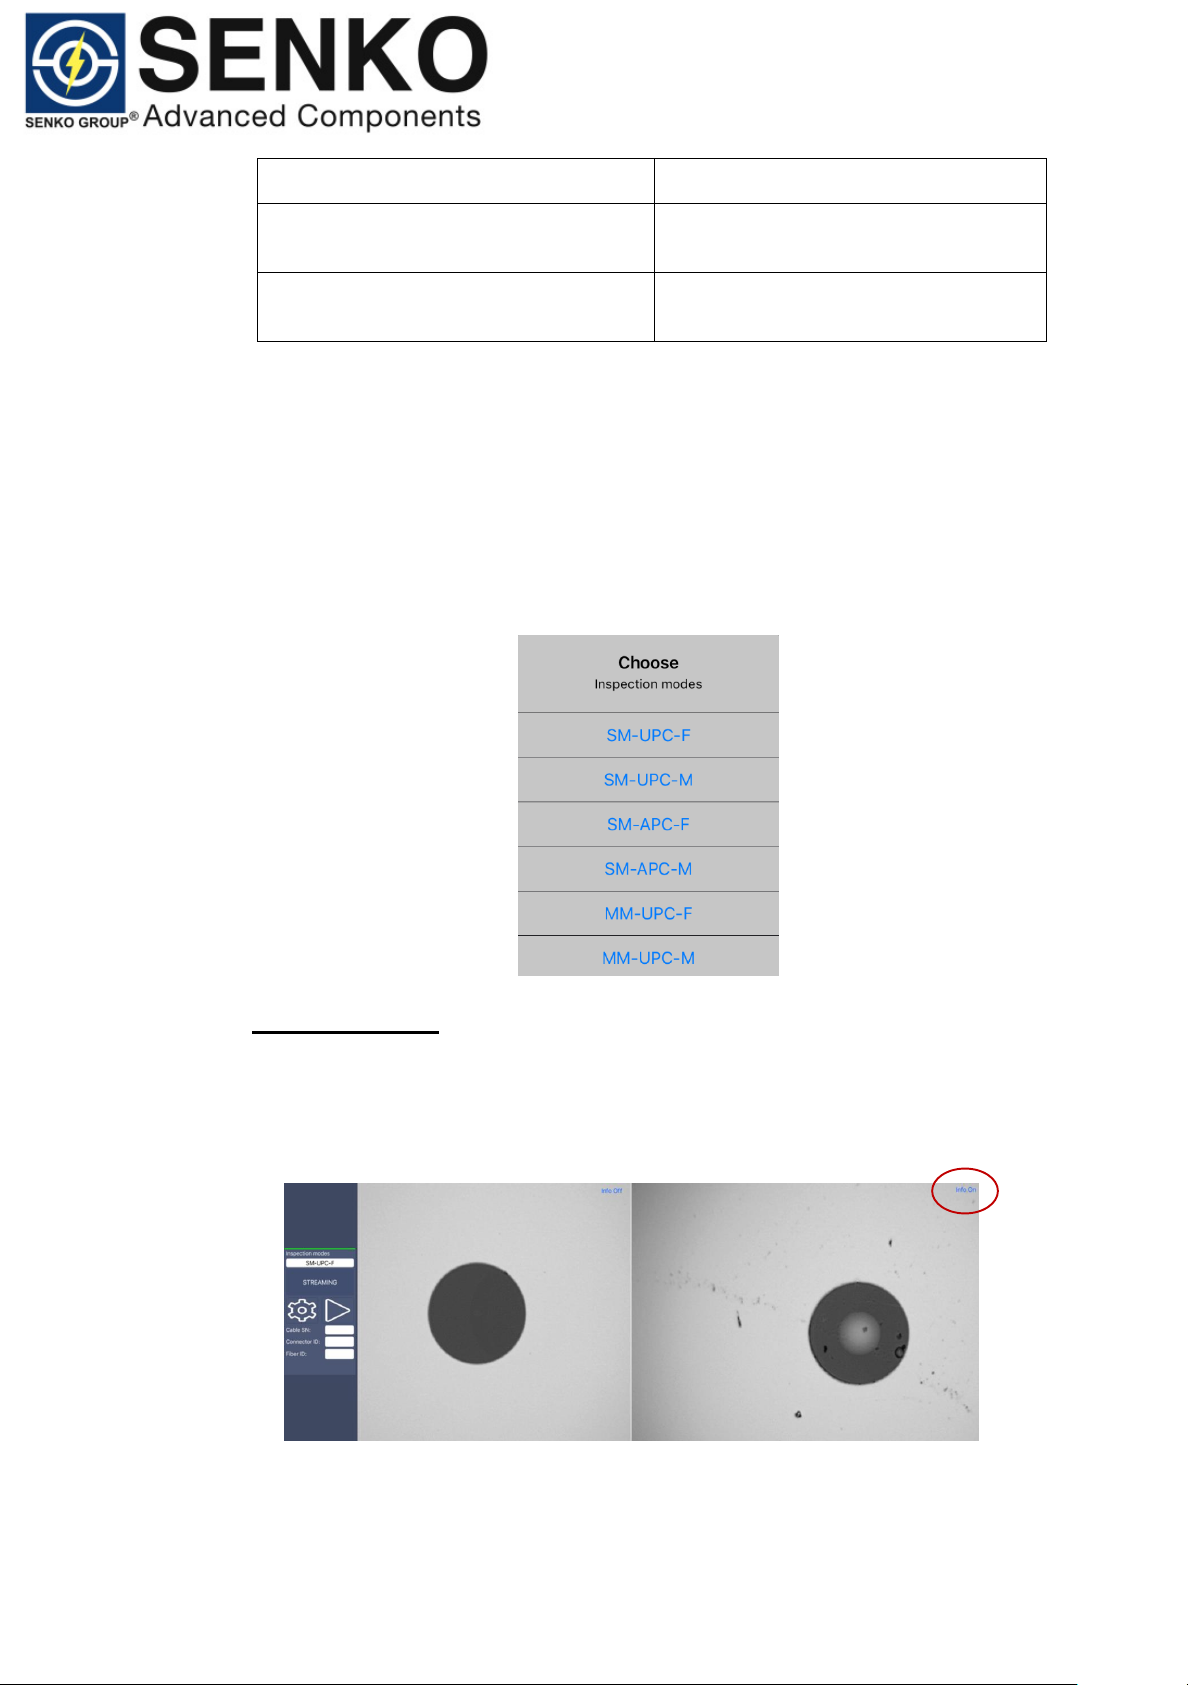
Inspection Modes:
There are 6 inspection modes covering various connector types. Select correct
inspection mode corresponding to connector type (see below).
Inspection Mode
Connector Types
SM-APC-M
(Patchcord)
SC, FC, ST, LC, MU, DIN, CS, E-2000
SM-APC-F
(In-adapter)
SC, FC, ST, MU, DIN, E-2000
SM-UPC-M
(Patchcord)
SC, FC, ST, LC, MU, DIN, CS, E-2000
SM-UPC-F
(In-adapter)
SC, FC, ST, LC, MU, DIN, E-2000, CS
Page 15
Date: 08-05-2019
Doc Number: ENG-SP2M-0519-001
15
MM-UPC-M
(Patchcord)
SC, FC, ST, LC, MU, DIN, CS, E-2000
MM-UPC-F
(In-adapter)
SC, FC, ST, LC, MU, DIN, CS, E-2000
Please note: all 6 inspection modes have specially optimized algorithm settings, tuned to
accommodate various inspection tips. It’s important to select correct inspection mode for
analysis.
To select inspection mode:
1. From the main screen, tap Inspection Mode button.
2. Popup Menu will appear in the middle of the screen. Select correct
inspection mode.
Info Panel On/Off:
To hide info panel:
1. Tap on/off button in the top right corner of the screen.
Page 16
Date: 08-05-2019
Doc Number: ENG-SP2M-0519-001
16
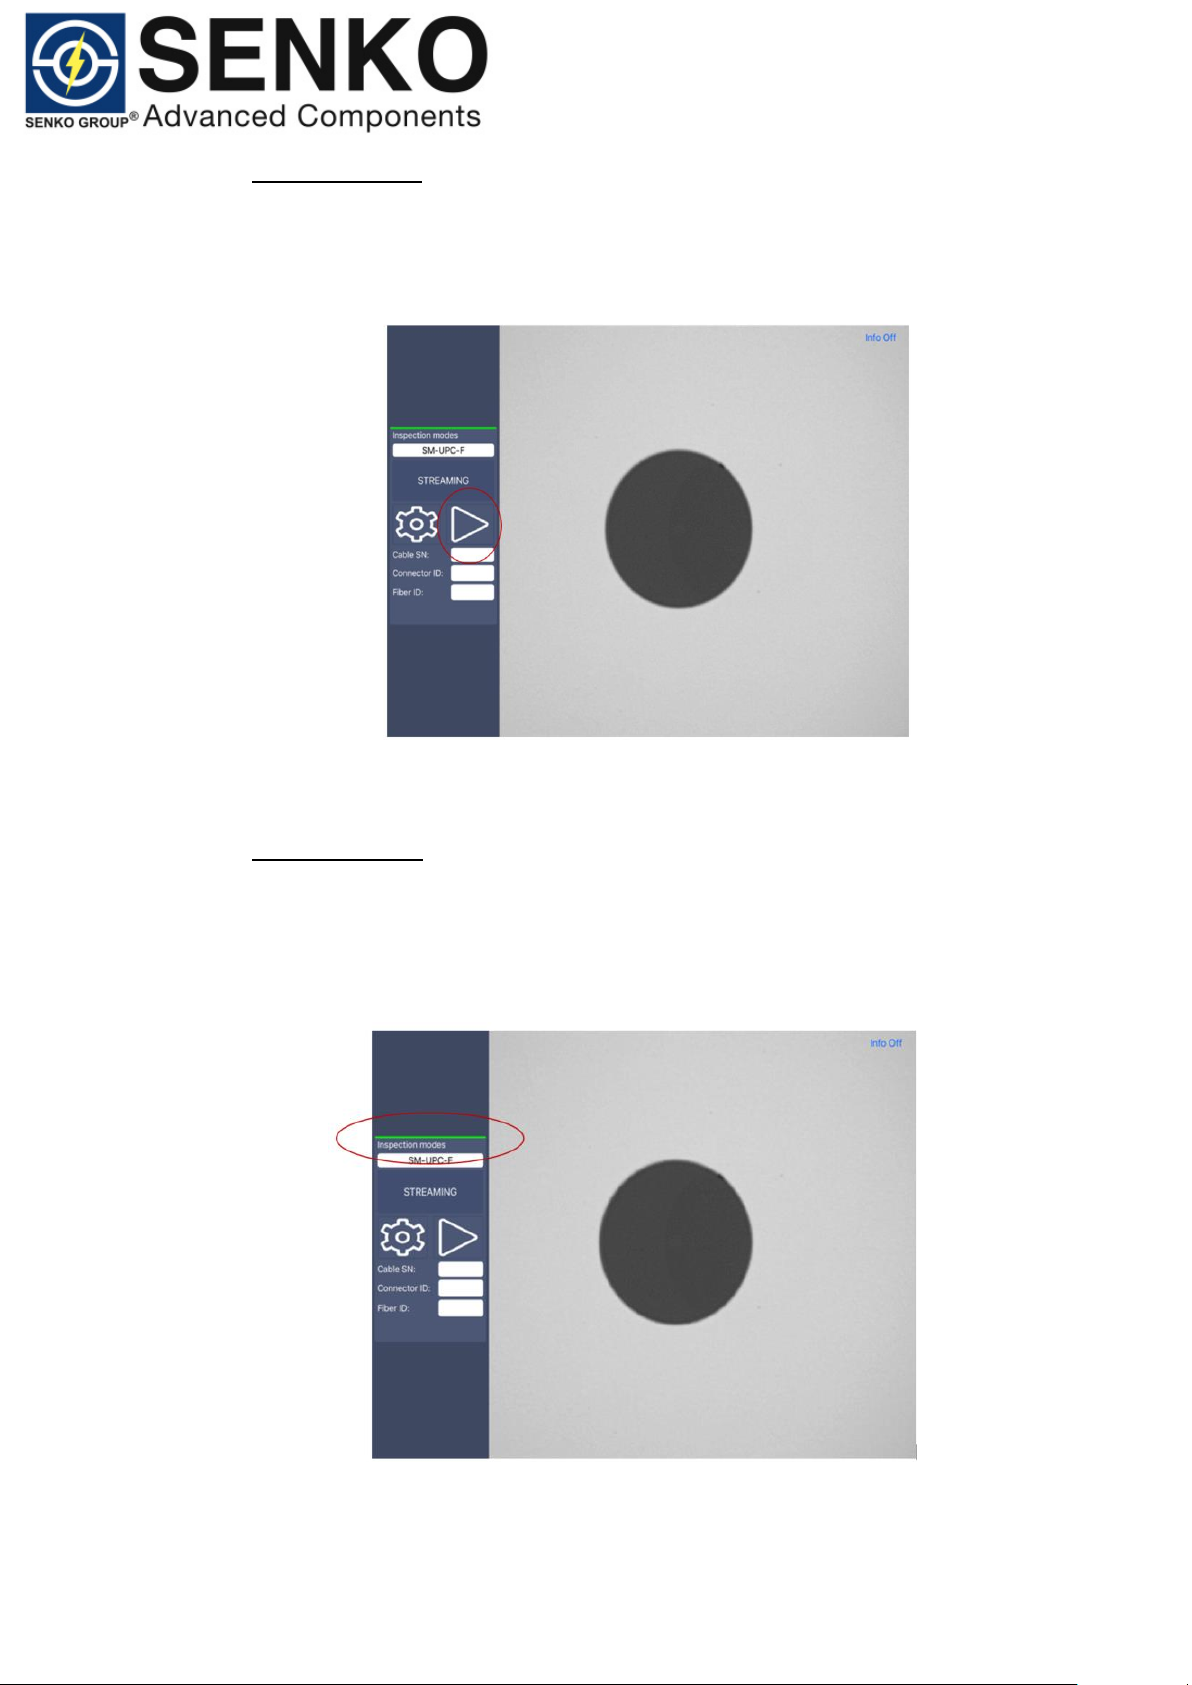
Process Button:
To trigger PASS/FAIL analysis:
1. From the Main Screen, tap process button.
Please note: PASS/FAIL analysis can also be triggered by pressing the ‘capture button’
on the top of the probe.
Focus Indicator:
The focus indicator is displayed in the upper left part of the main window. The focus
bar shows whether the current view is optimized for a capture. A green indicator
shows image that can be captured and analyzed. Analysis will be impossible with
a red indicator.
Page 17
Date: 08-05-2019
Doc Number: ENG-SP2M-0519-001
17
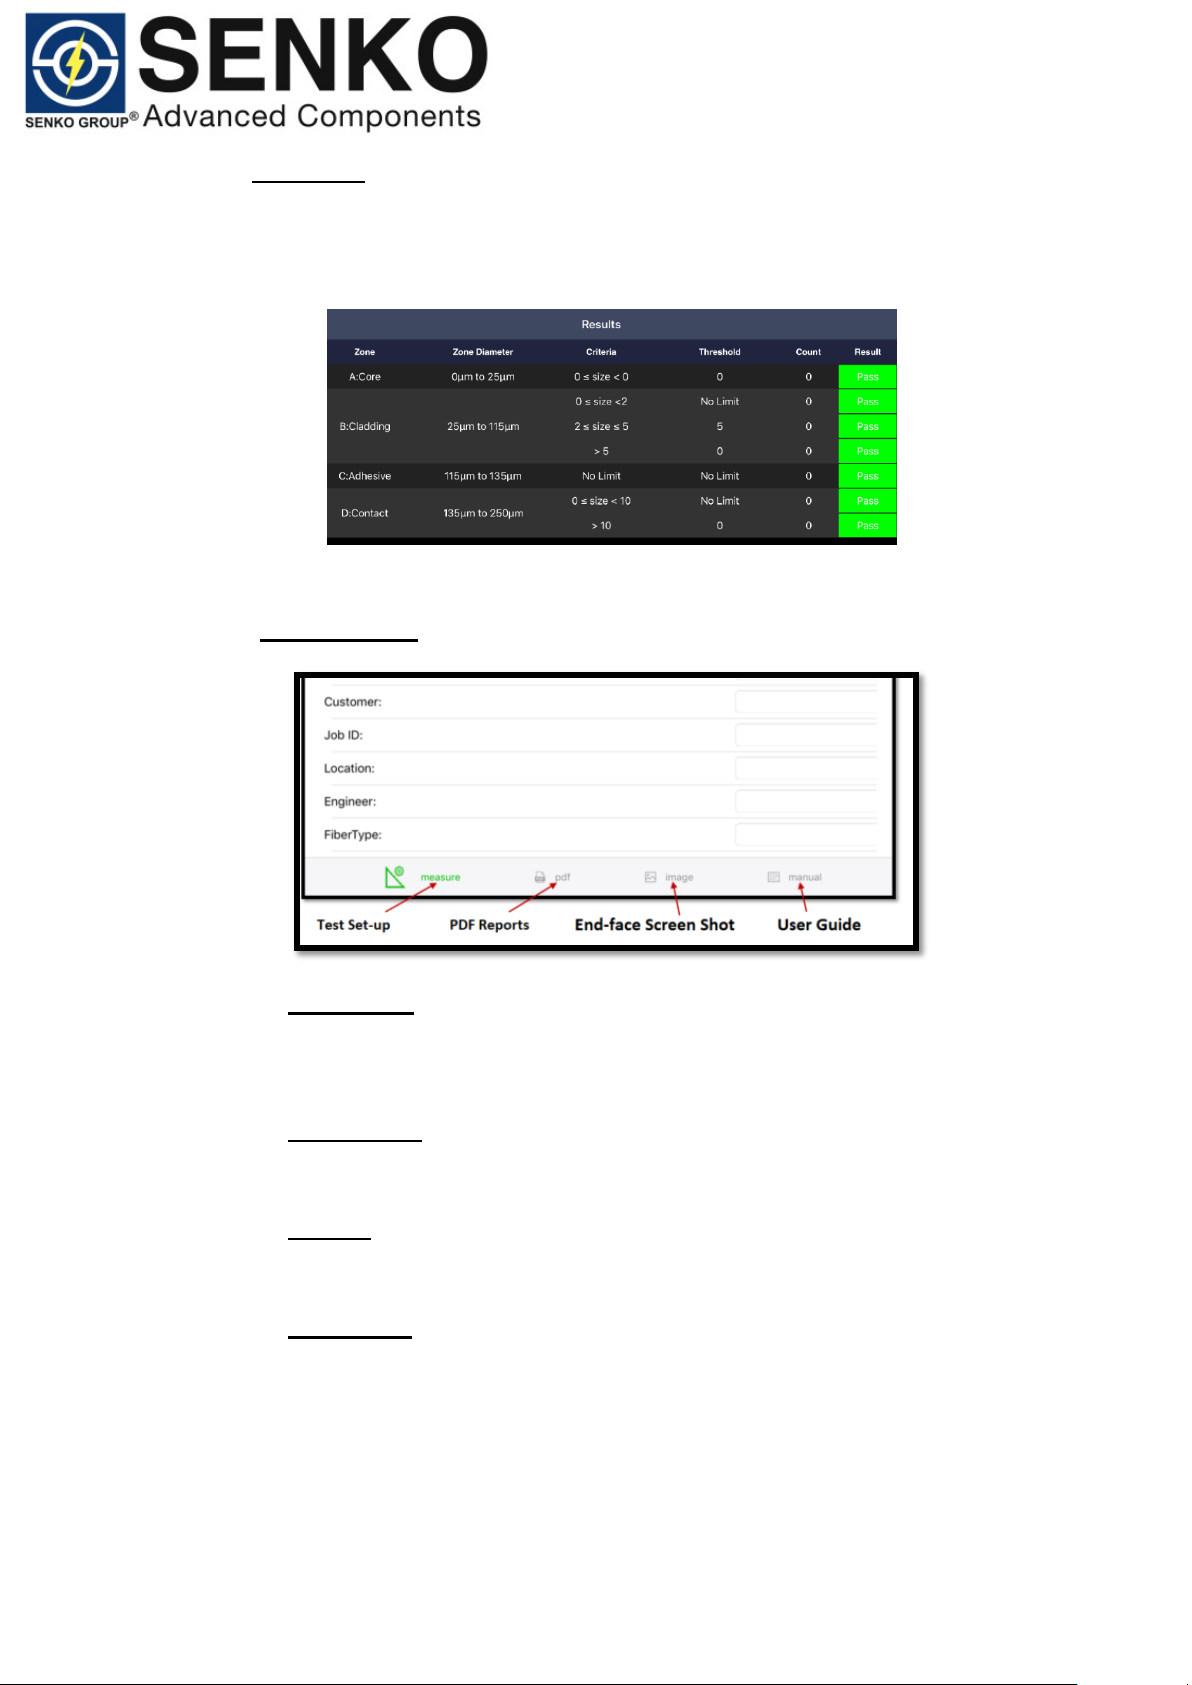
Info Panel:
To access ‘Inspection Results Summary’:
1. From the Main Screen, tap PASS/FAIL button.
Settings Menu:
Test Set-up:
In this section you can create test configurations as per inspection
requirements.
PDF Reports:
In this section you can access all standard & consolidated PDF reports.
Images:
In this section you can access all end-face screen shots.
User Guide:
In this section you can access ‘User Guide’ and support.
Page 18
Date: 08-05-2019
Doc Number: ENG-SP2M-0519-001
18
9.0 Customizing the Software:
Vue3 can be customized in various ways to suite your inspection requirements. You
can set the application to generate an inspection report automatically or manually.
either a single page report or consolidated report (consolidating multiple reports
merged into a single report). During testing you can also add ‘comments’ to your
reports and review them later on.
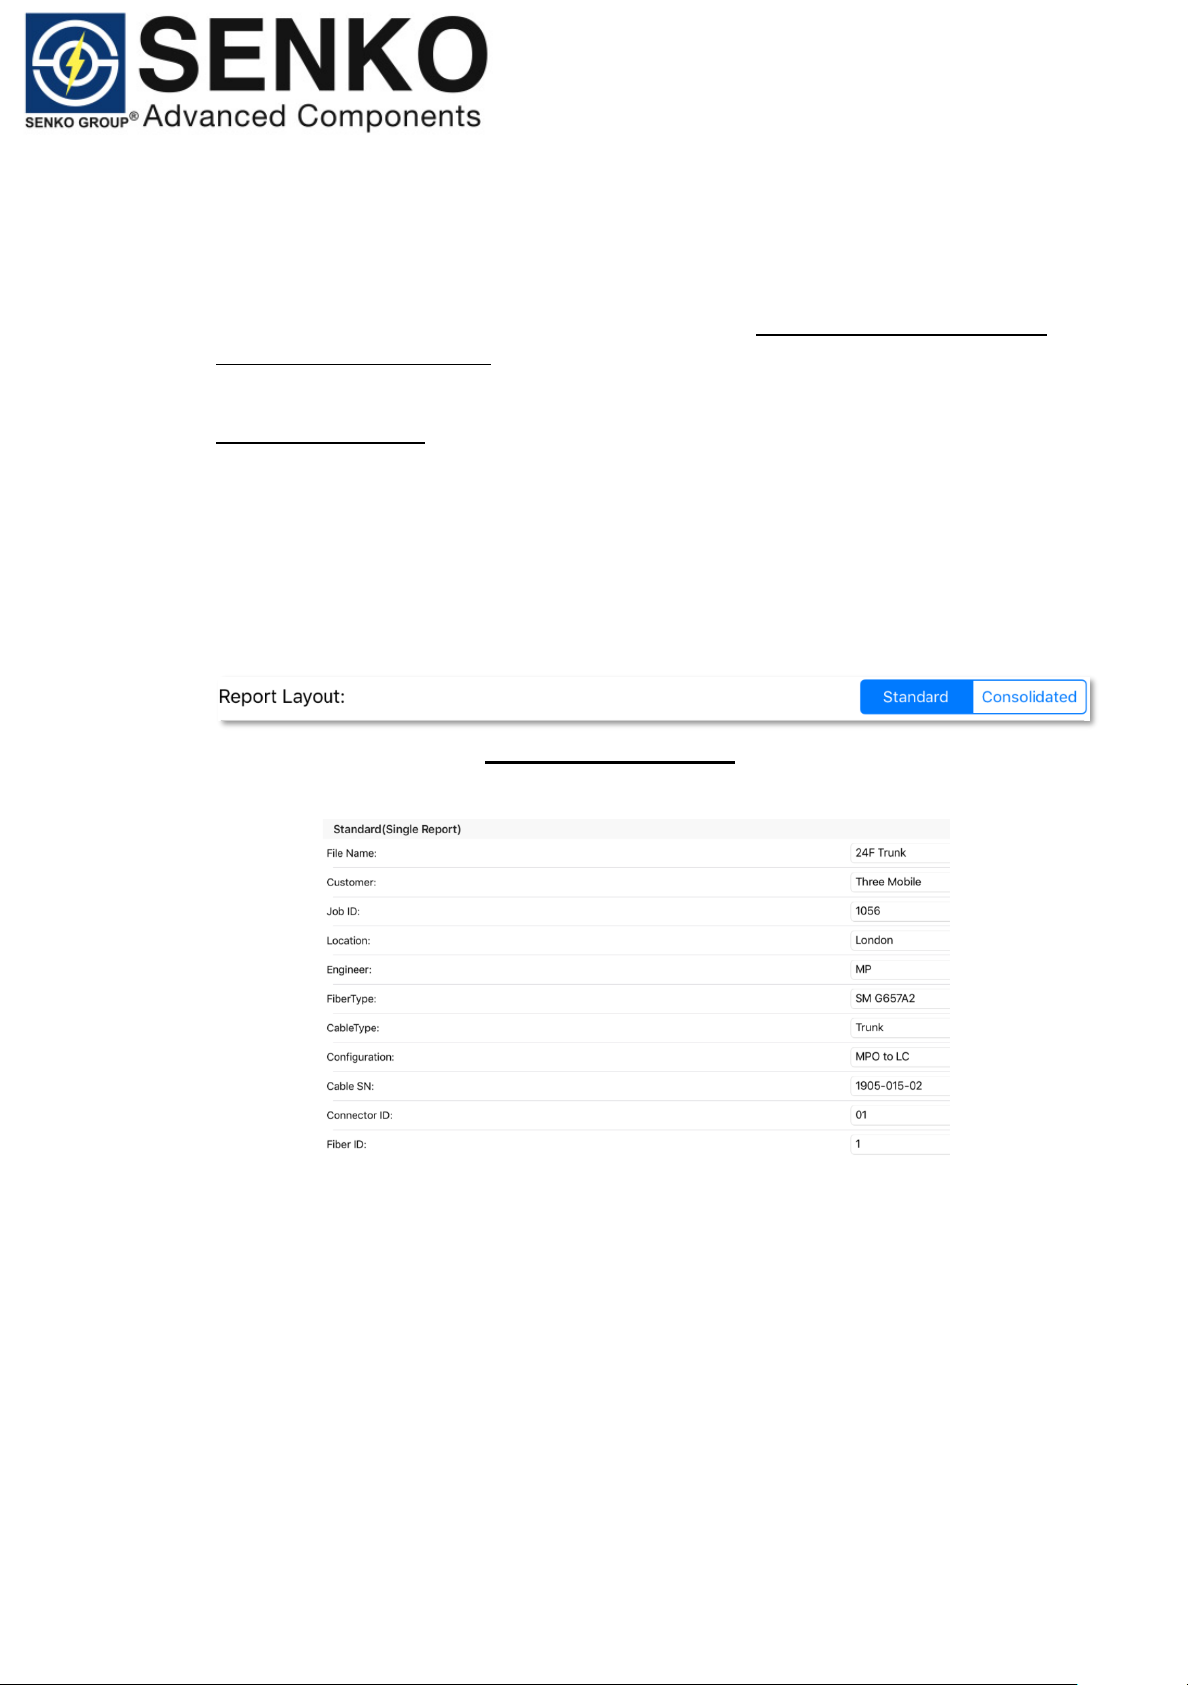
9.1 Standard Report
A standard report is a single page PDF report. The report contains a summary of endface inspection.
To activate standard report:
1. From the Main Menu, tap ‘Settings’ button.
2. Select Standard in ‘Report Layout’.
3. Under heading ‘Standard Single Report’ within the Test Set-up Menu.
Start filling information which you want to include in your test report.
Please note:
(a) As a minimum requirement, ‘Cable SN, Connector ID & Fiber ID’ information
MUST to be provided. The application won’t proceed with inspection if one of the
information is incomplete.
(b) File name: this will become a ‘title’ of the PDF report, followed by date and time
(see below).
Page 19
Date: 08-05-2019
Doc Number: ENG-SP2M-0519-001
19
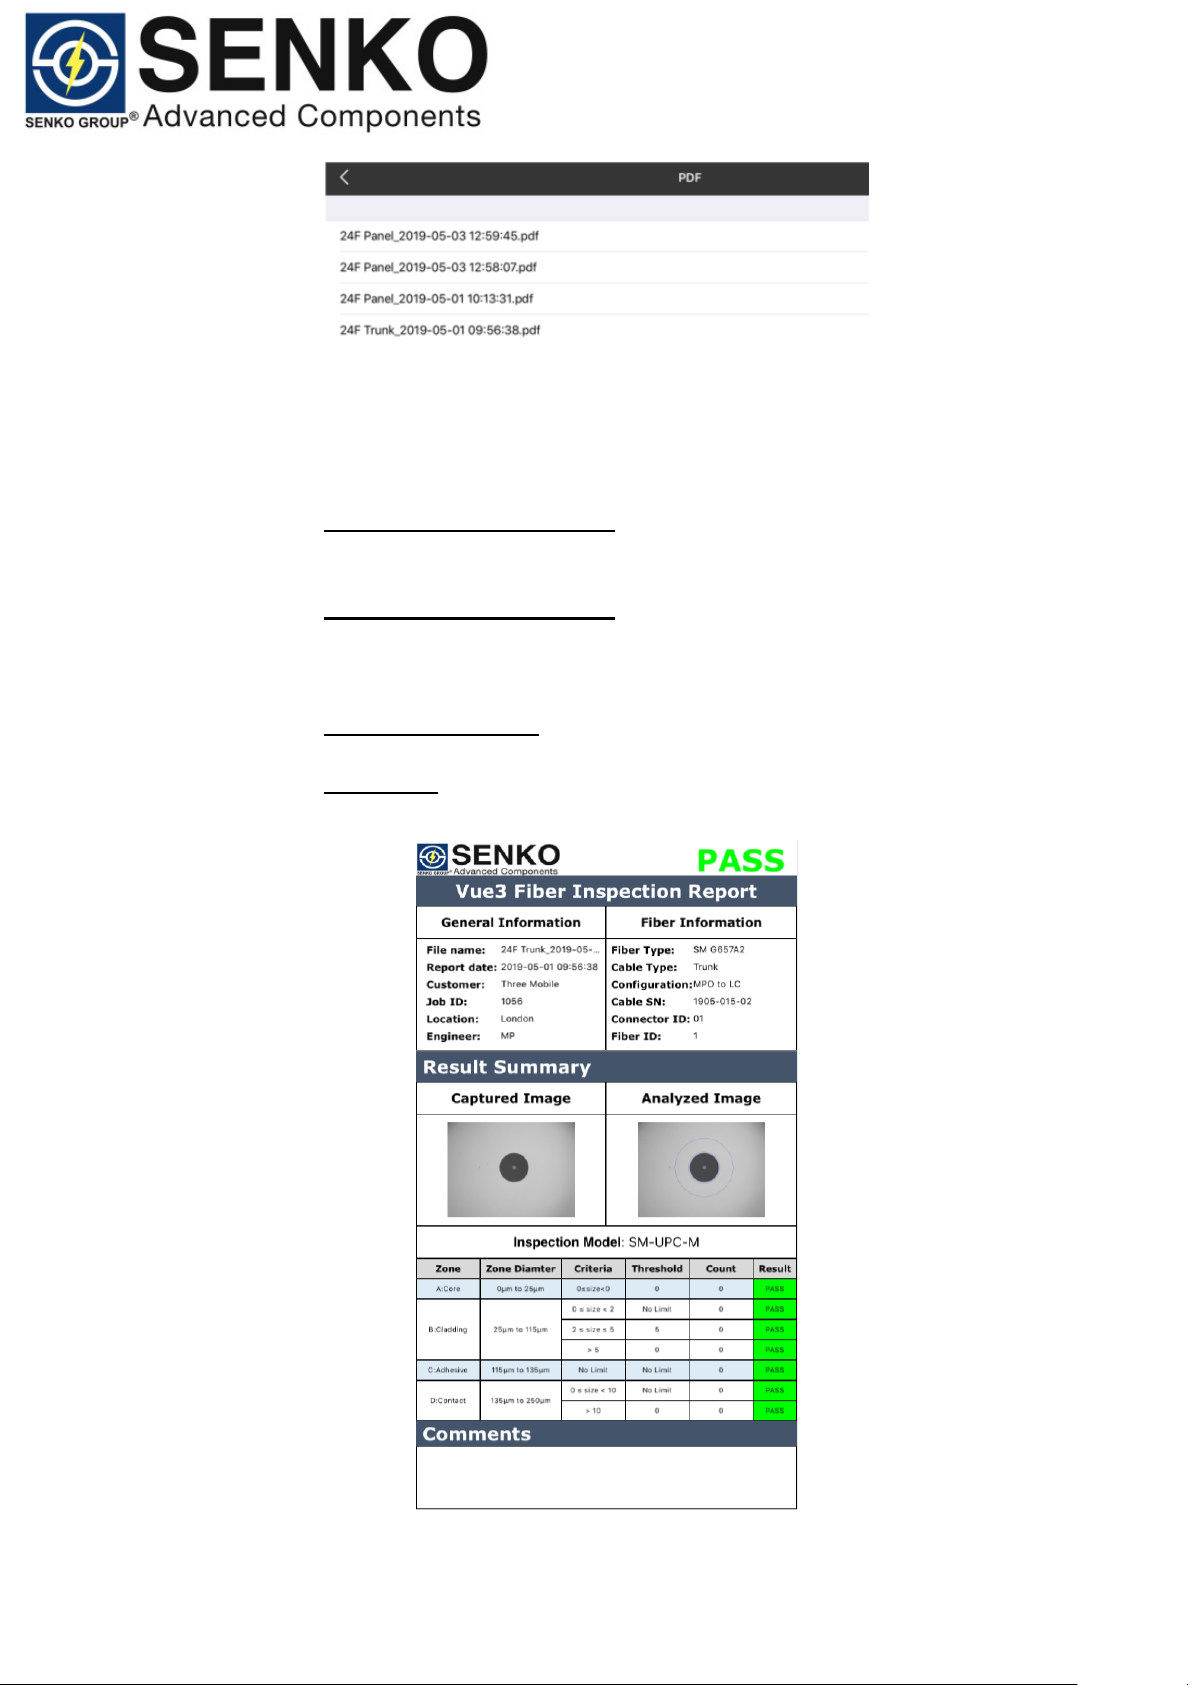
Standard Report Template: (Example)
The standard report structure:
1. General & Fiber information.
This section of the report provides a summary of the test ‘Set-up’
configuration.
2. Captured & Analyzed Image.
The application provides two screen shots of the inspected end-face in the
standard report. First image is a screen shot of the end-face without
software analysis. Second image highlights debris on the fiber surface. On
3. Test Summary Table.
Contains inspection result summary as per IEC 61300-3-35 standard.
4. Comments.
This section contains ‘comments’ entered during testing.
Page 20
Date: 08-05-2019
Doc Number: ENG-SP2M-0519-001
20
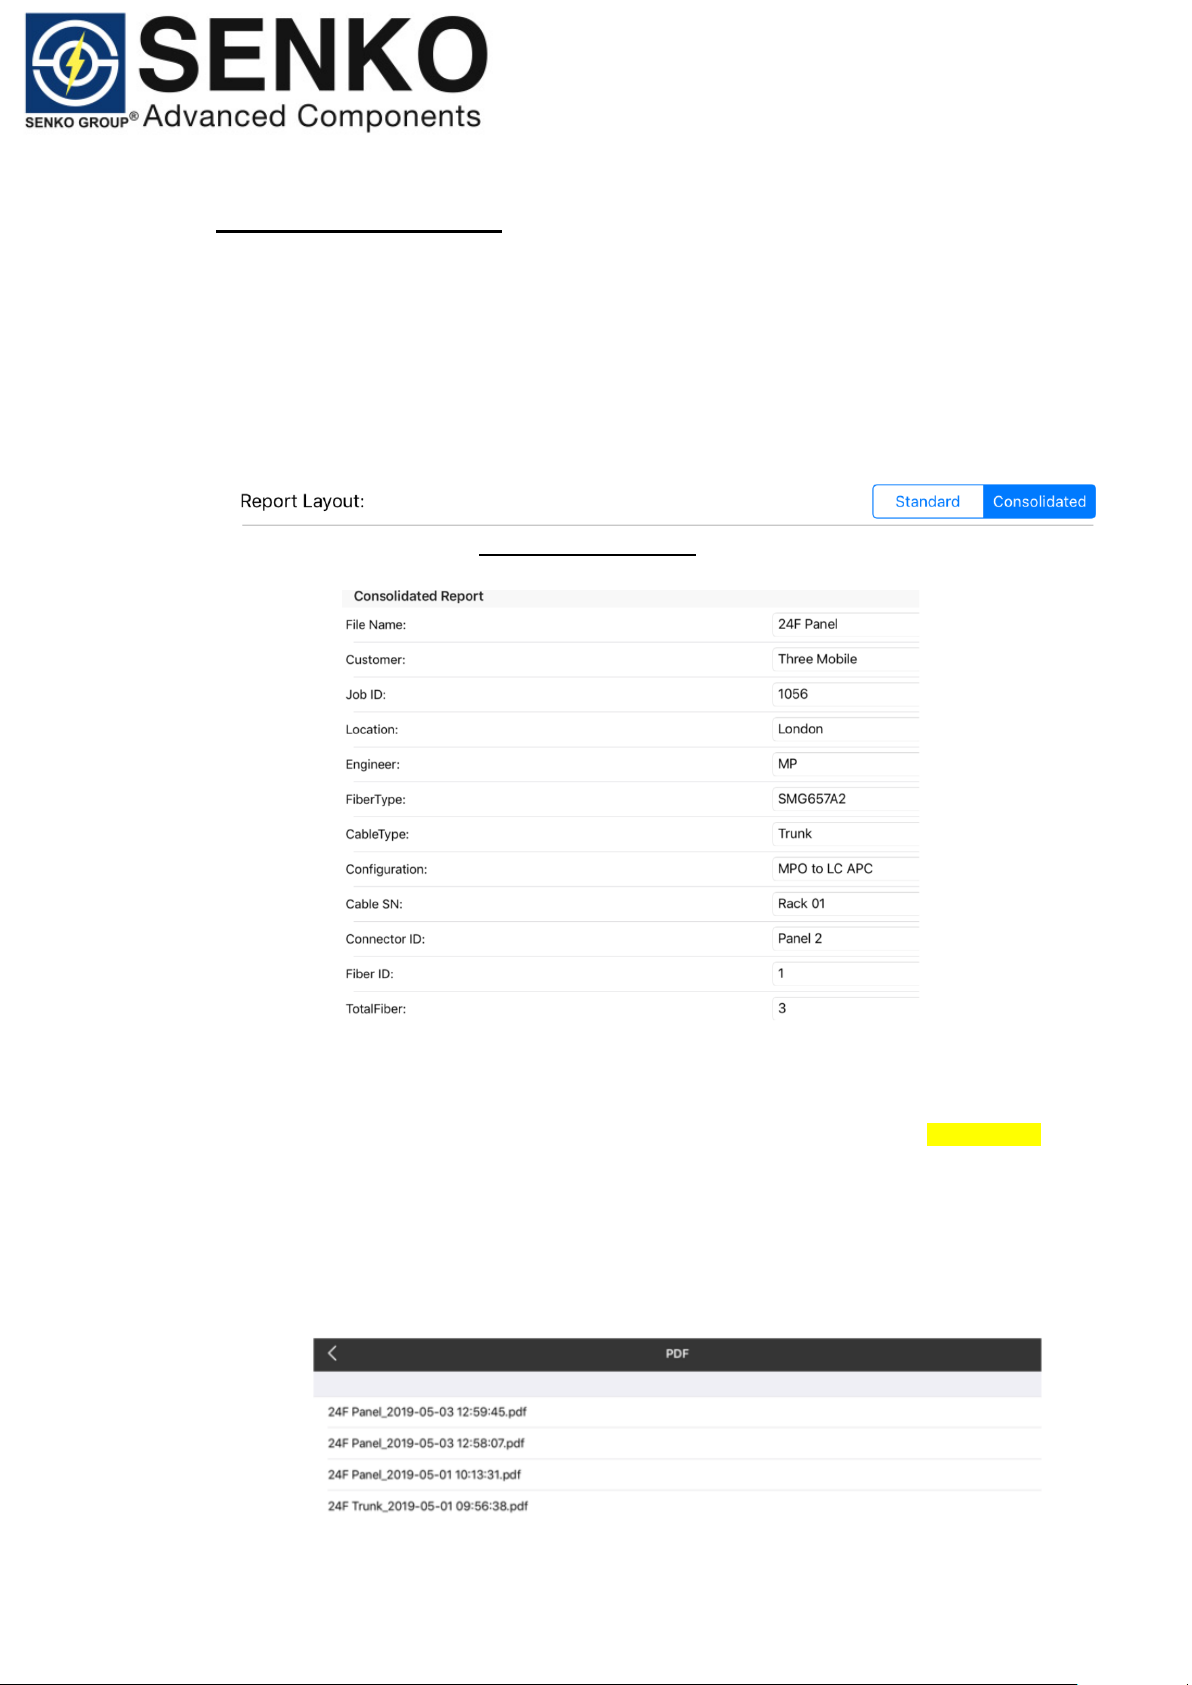
9.2 Consolidated Reporting
This feature allows combining multiple reports into a single PDF file. This feature is
useful when inspecting cable assemblies with a high number of ports e.g (144F trunks).
To activate consolidated report:
1. From the Main Menu, tap ‘Settings’ button.
2. Select Consolidated in the ‘Report Layout’.
3. Under heading ‘Consolidated Report’ within the Test Set-up Menu. Start
filling information which you want to include in your consolidated report.
Please note:
(a) As a minimum requirement, ‘Cable SN, Connector ID, Fiber ID & Total Fibers’
information MUST to be provided. The application won’t proceed with inspection if
information is incomplete.
(b) Total Fibers: this number determines how many fibers will be inspected. If you
want to inspect 144 fibers, enter ‘144’. The application will generate a consolidated
report for 144 individual fibers.
(c) File name: this will become a ‘title’ of the PDF report, followed by date and time.
Page 21
Date: 08-05-2019
Doc Number: ENG-SP2M-0519-001
21
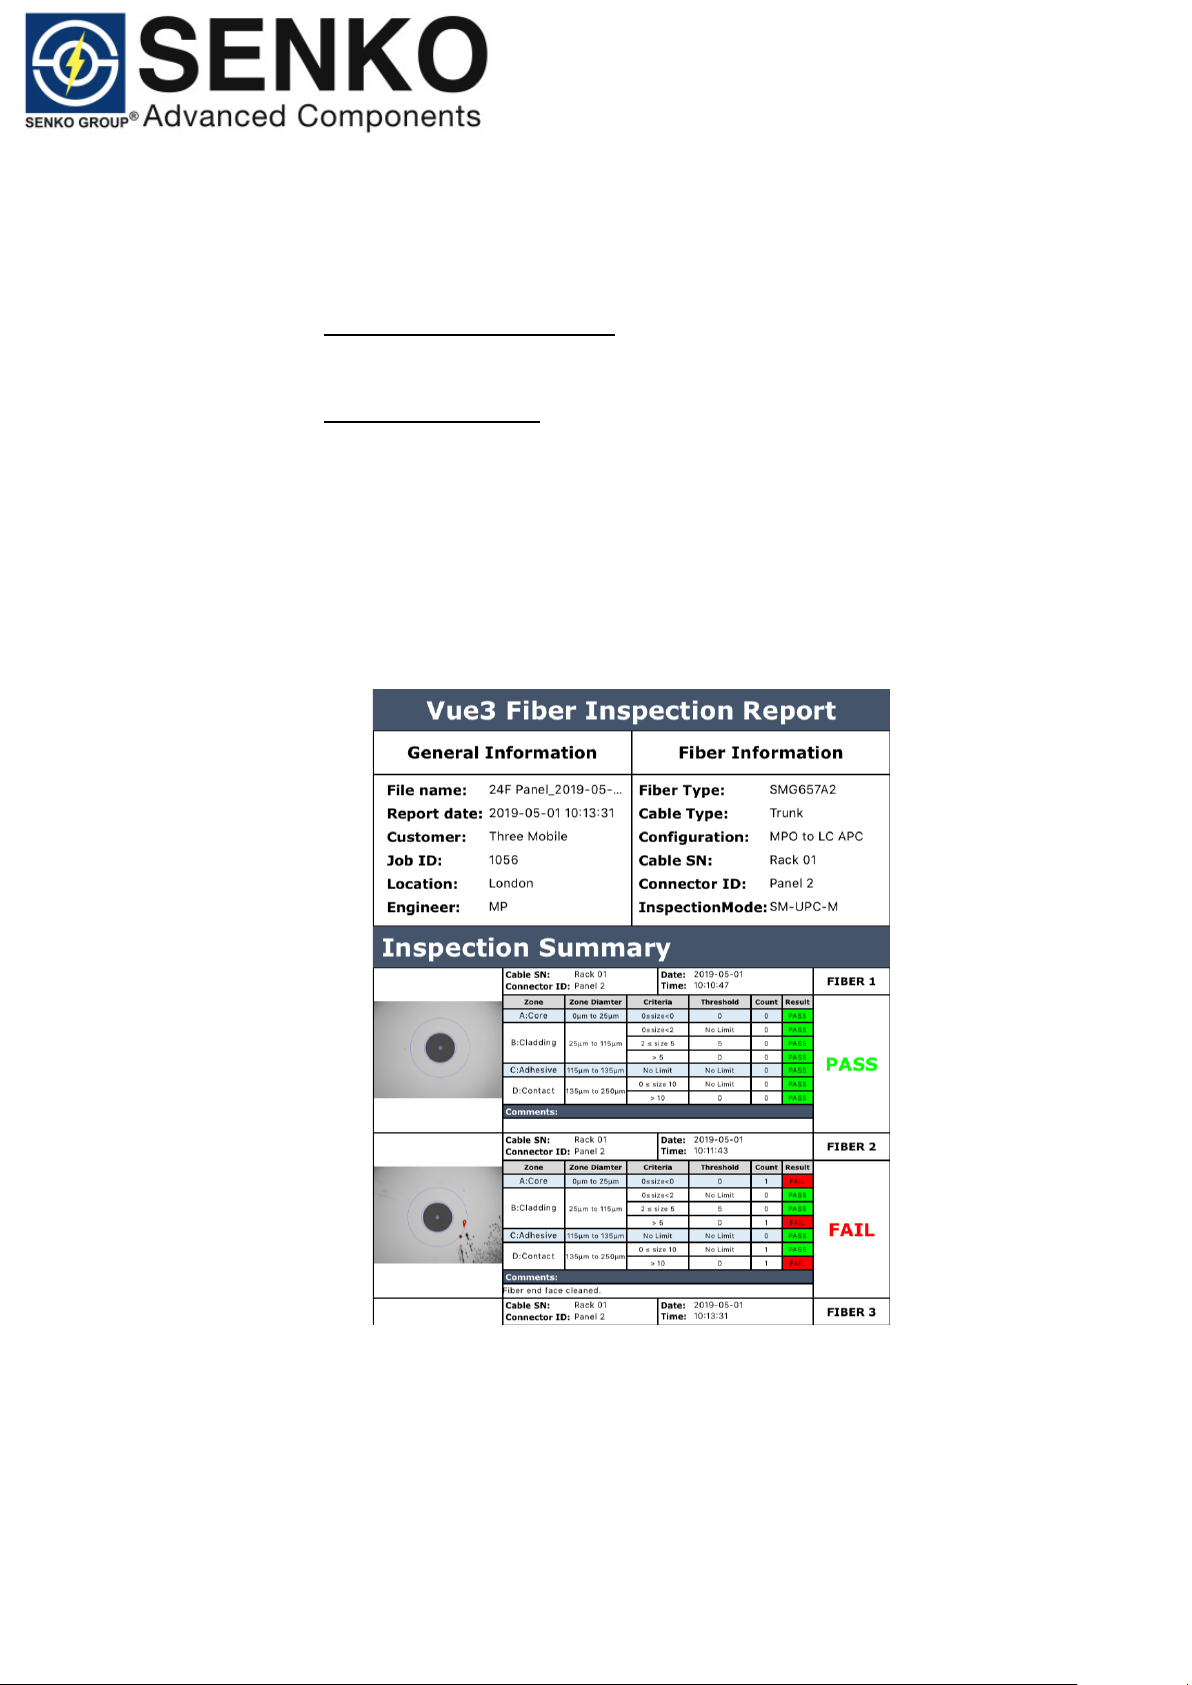
Consolidated Report Template: (Example)
Consolidated report structure:
1. General & Fiber information.
This section of the report provides a summary of the test ‘Set-up’
configuration.
2. Inspection Summary.
Contains the following information:
1. Fiber ID.
2. Cable SN and Connector ID.
3. Date and Time.
4. Test Results Table (As per IEC 61300-3-35)
5. Inspection Result (PASS/FAIL)
6. Comments Section.
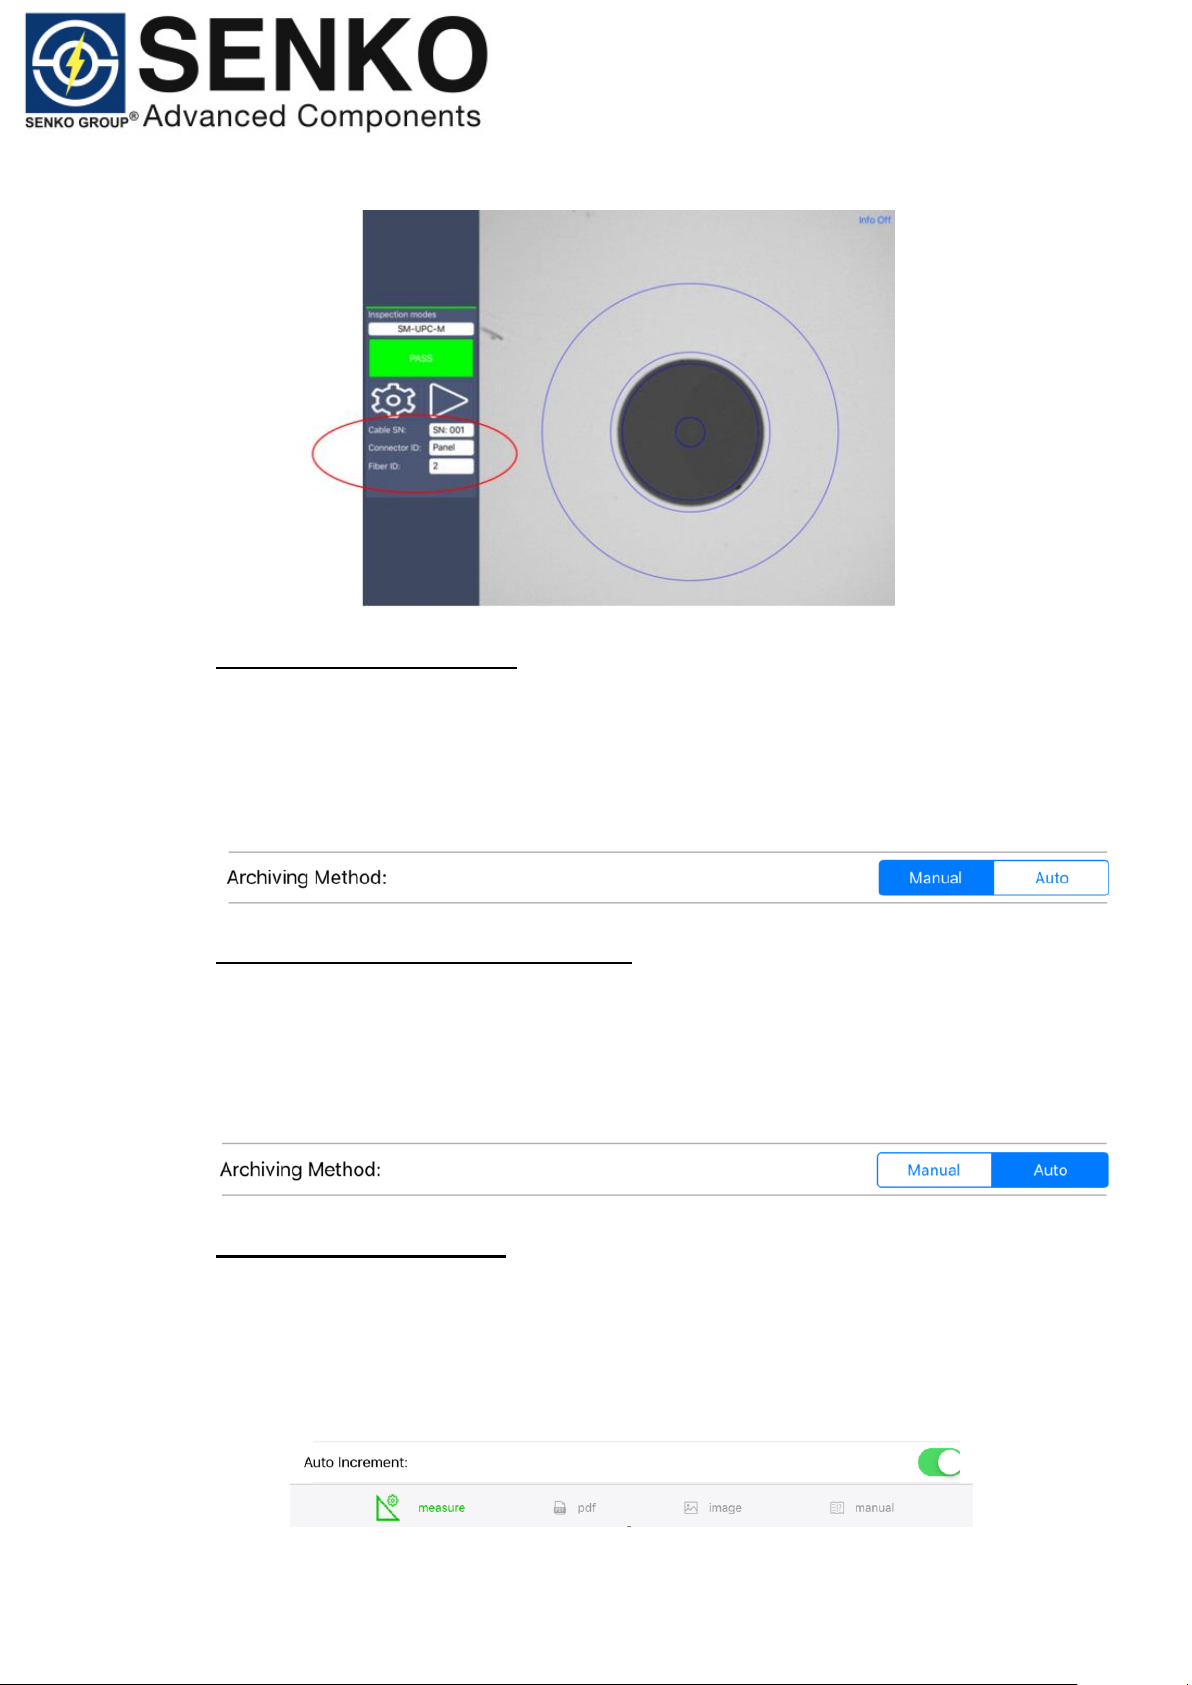
Please note: when you change Cable SN or Connector ID information during testing,
this will be recorder on the consolidated PDF report. The ‘Fiber ID’ will automatically
go back to ‘1’. This can be adjusted manually from the main screen (see below).
Page 22
Date: 08-05-2019
Doc Number: ENG-SP2M-0519-001
22
9.3 Create a Report Manually
To save files manually:
1. From the Main Menu, tap ‘Settings’ button.
2. Select ‘Manual’ in Archiving Method.
9.4 Activate Automated Report Creation
To save files automatically:
1. From the Main Menu, tap ‘Settings’ button.
2. Select ‘Auto’ in Archiving Method.
9.5 Activate Auto Increment
To enable auto increment:
1. From the Main Menu, tap “Settings” button.
2. At the bottom of the Main Menu, tap “Auto”.
Page 23
Date: 08-05-2019
Doc Number: ENG-SP2M-0519-001
23
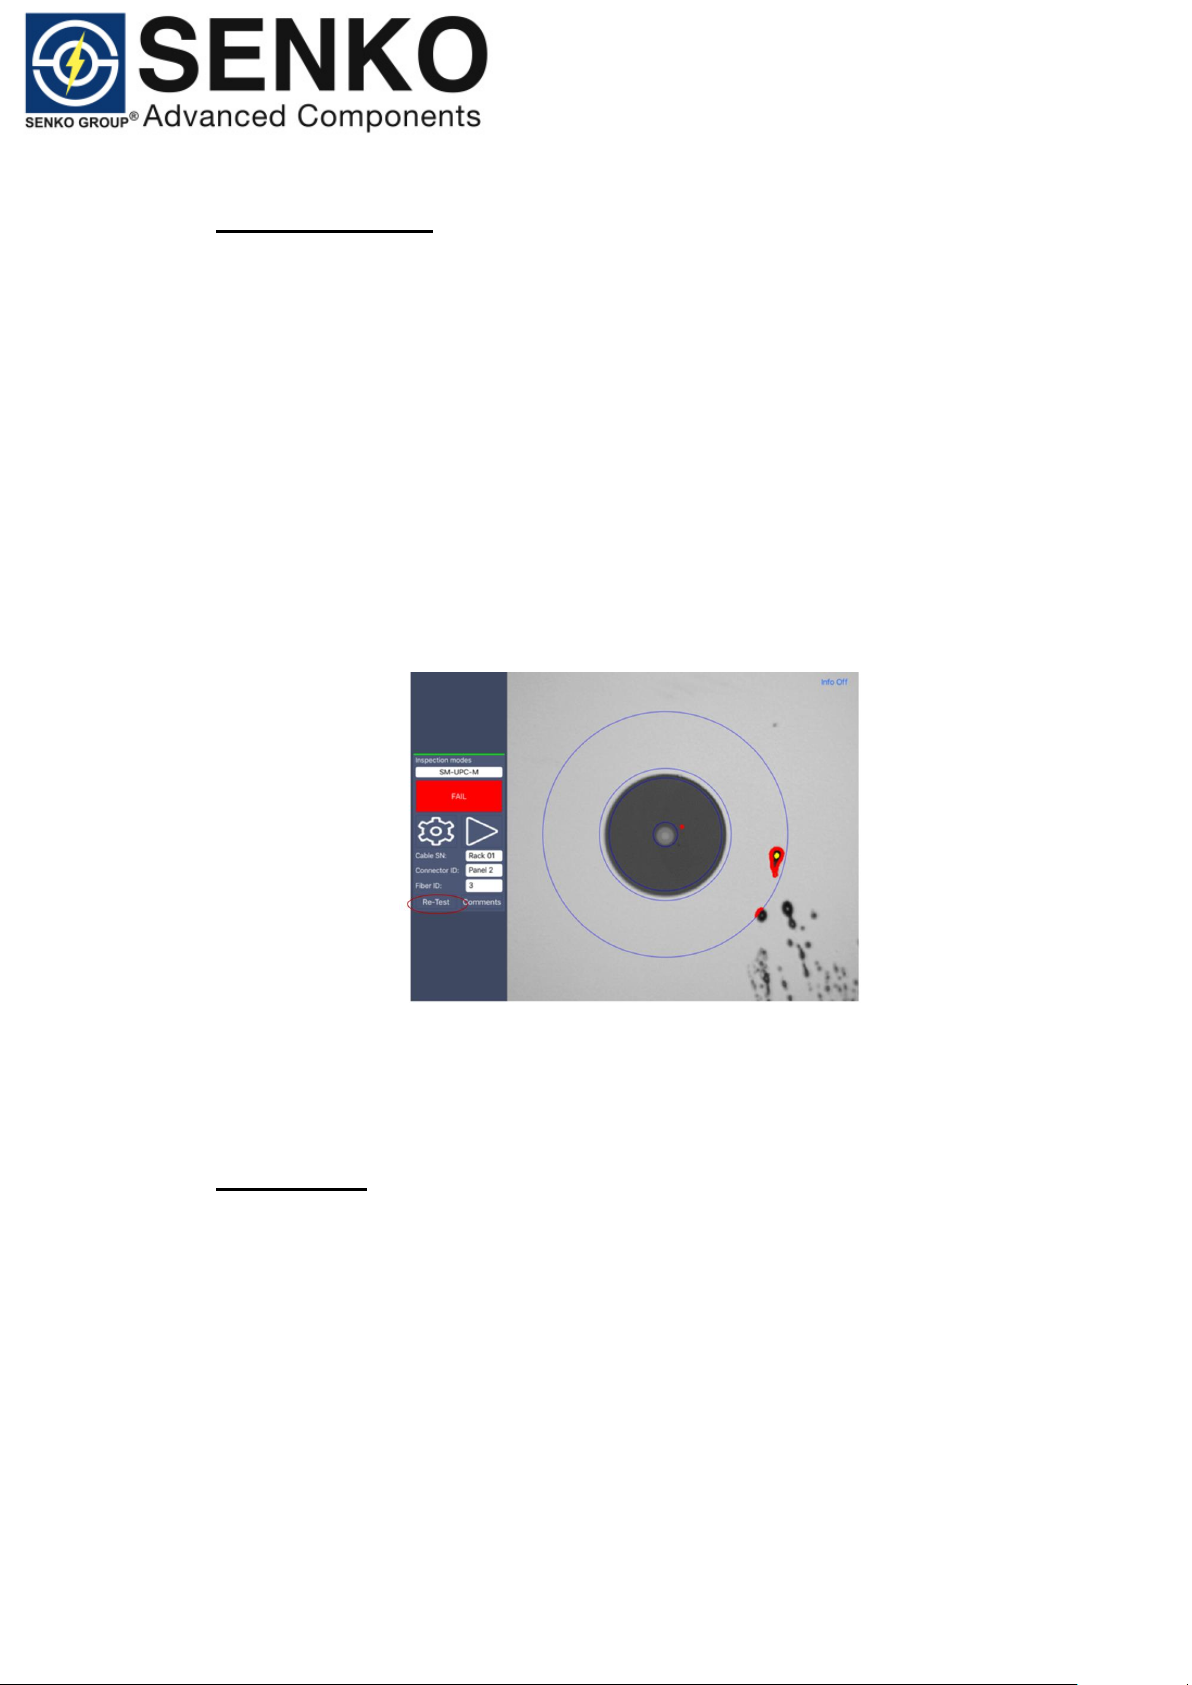
9.6 Re-Test Function
The application allows for retesting of fibers that have failed testing after results are
displayed.
When re-test future is enabled the fiber can be re-inspected up to 3 times. During this
time, the ‘Fiber ID’ will not increase until you get a ‘PASS’ result and save the report.
On the third inspection, you have an option to add & save ‘comments’ on the report.
Once saved, you can continue with your testing.
To retest a fiber:
1. Remove connector and clean fiber end face.
2. Plug in connector back into the probe, tap “Re-Test” button.
3. If you get a PASS result, you can continue with your testing.
4. If you get a FAIL result, repeat first two steps again.
Please note: on the 3rd inspection, the application will ask you to add & save comment on the
PDF report (Optional). You can save comment and continue with your testing. Alternatively, if
you are dealing with a stubborn contamination, you can continue re-testing fiber until you get a
PASS result.
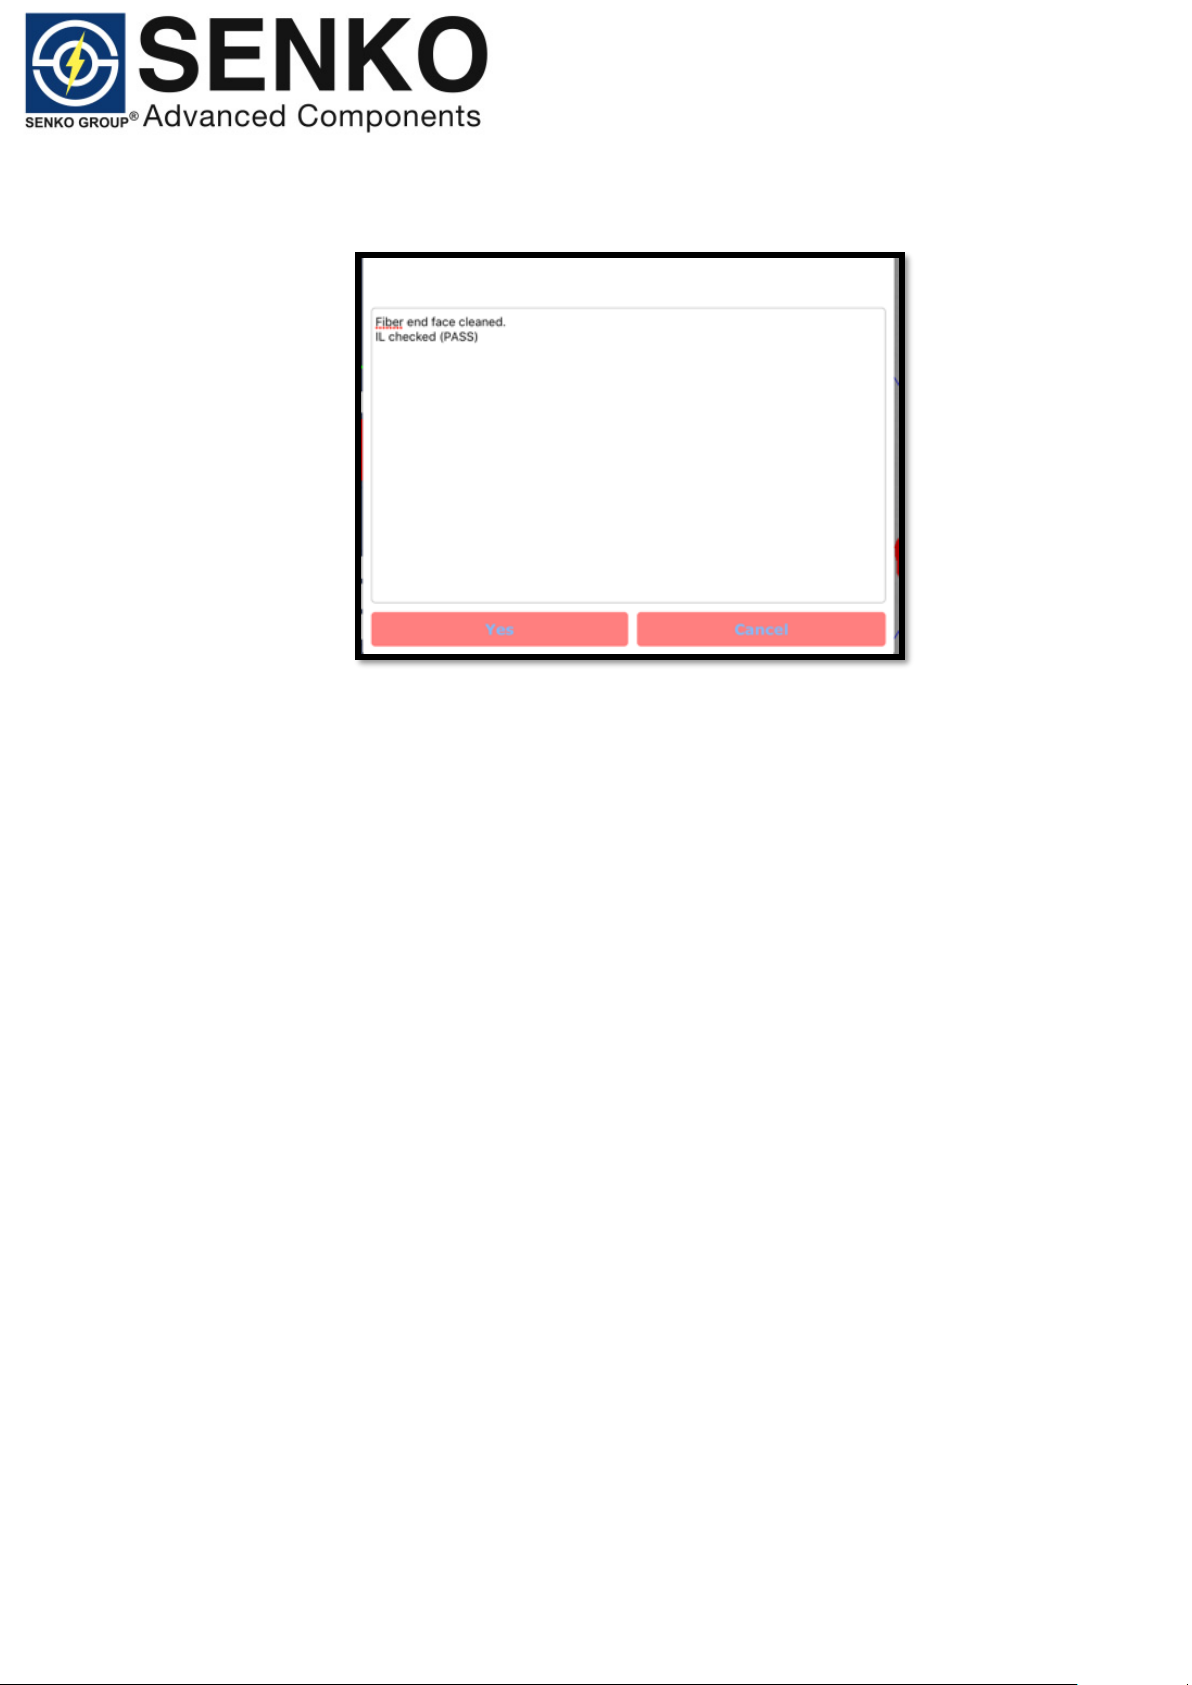
9.7 Comments
When you get a ‘FAIL’ test result, the application allows you to save comments in the
PDF report.
To add comments: (FAIL Result)
1. From the Main Screen, tap ‘Comments’ button.
2. Popup menu will appear in the middle of the screen. Put your comments
in the ‘Comments Section’.
3. Select ‘Yes’ to save the report or ‘Cancel’.
Page 24
Date: 08-05-2019
Doc Number: ENG-SP2M-0519-001
24
10. Inspecting Fiber Ends and Analyzing Captures
To inspect fiber end face:
1. Install inspection tip on the probe.
2. Insert connector into the probe tip.
3. Turn on the probe and start Vue3 application.
4. Once connected, adjust focus to optimize live image for a capture. Use the
‘focus bar’ as reference point. A green indicator shows that the image can
be captured and analyzed.
5. Choose correct ‘Inspection Mode’ for analysis (see section 8.0 Software
Overview ‘Inspection Mode’ pages 14-15)
6. Optimize test configuration for your test, from the main menu, tap ‘Settings’
followed by ‘Test Set-up’.
7. In the ‘Test Set-Up’ menu, pre-select ‘Report Layout’ and ‘Archiving
Method’ (see section 9.3 & 9.4 page 22).
8. Depending on your test set-up (Standard or Consolidated report), start
filling in the information that you want to include in your PDF report e.g. File
Name, Customer Name, Job ID, Location, Engineer, Fiber Type, Cable
Type, Configuration, Cable SN, Connector ID, Fiber ID, Total Fibers.
9. Activate or Disable ‘Auto Increment’ according to your preference.
10. Return to the ‘Main Menu’.
11. Press the ‘Capture Button’ on the probe or tap ‘Analysis Button’ to trigger
PASS/FAIL analysis.
12. If the fiber is dirty, remove it from the probe, clean it and re-inspect it. You
might want to use ‘Re-Test’ function or add ‘Comments’ on the PDF report
(see section 9.6 and 9.7 pages 23).
Page 25
Date: 08-05-2019
Doc Number: ENG-SP2M-0519-001
25
13. Once you are satisfied with the inspection, move on to the next connector.
14. To view & analyze PDF reports, tap ‘Setting Button’ followed by ‘PDF
Reports’.
11. Extracting Files
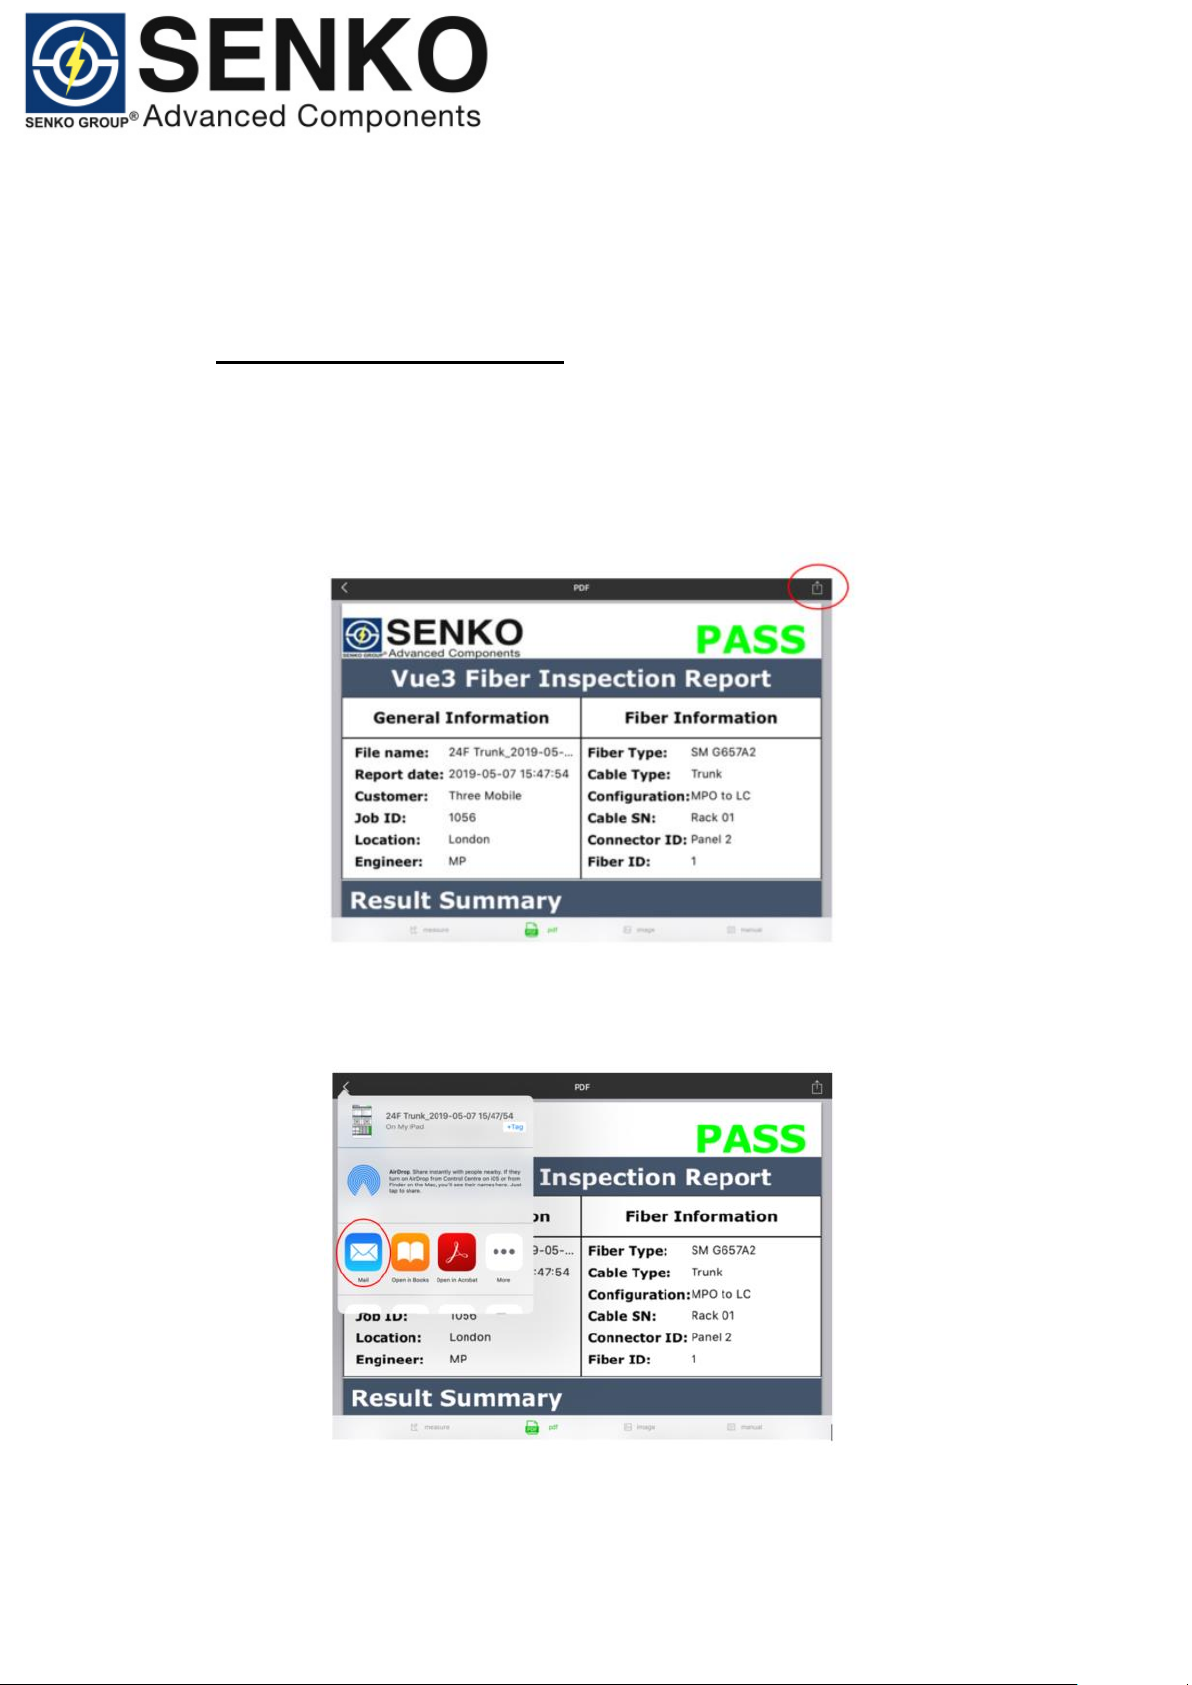
To extract PDF reports or images.
Email: (PDF Reports)
1. From the Main Menu, tap ‘Settings’.
2. In Main Settings Menu, select ‘PDF Reports’.
3. Select report which you wish to extract from the app.
4. Once you open PDF report, tap the icon in the top right corner (see below).
5. Select ‘Mail’ option. The application will automatically upload your
report/image onto you ‘Email App’.
Page 26
Date: 08-05-2019
Doc Number: ENG-SP2M-0519-001
26
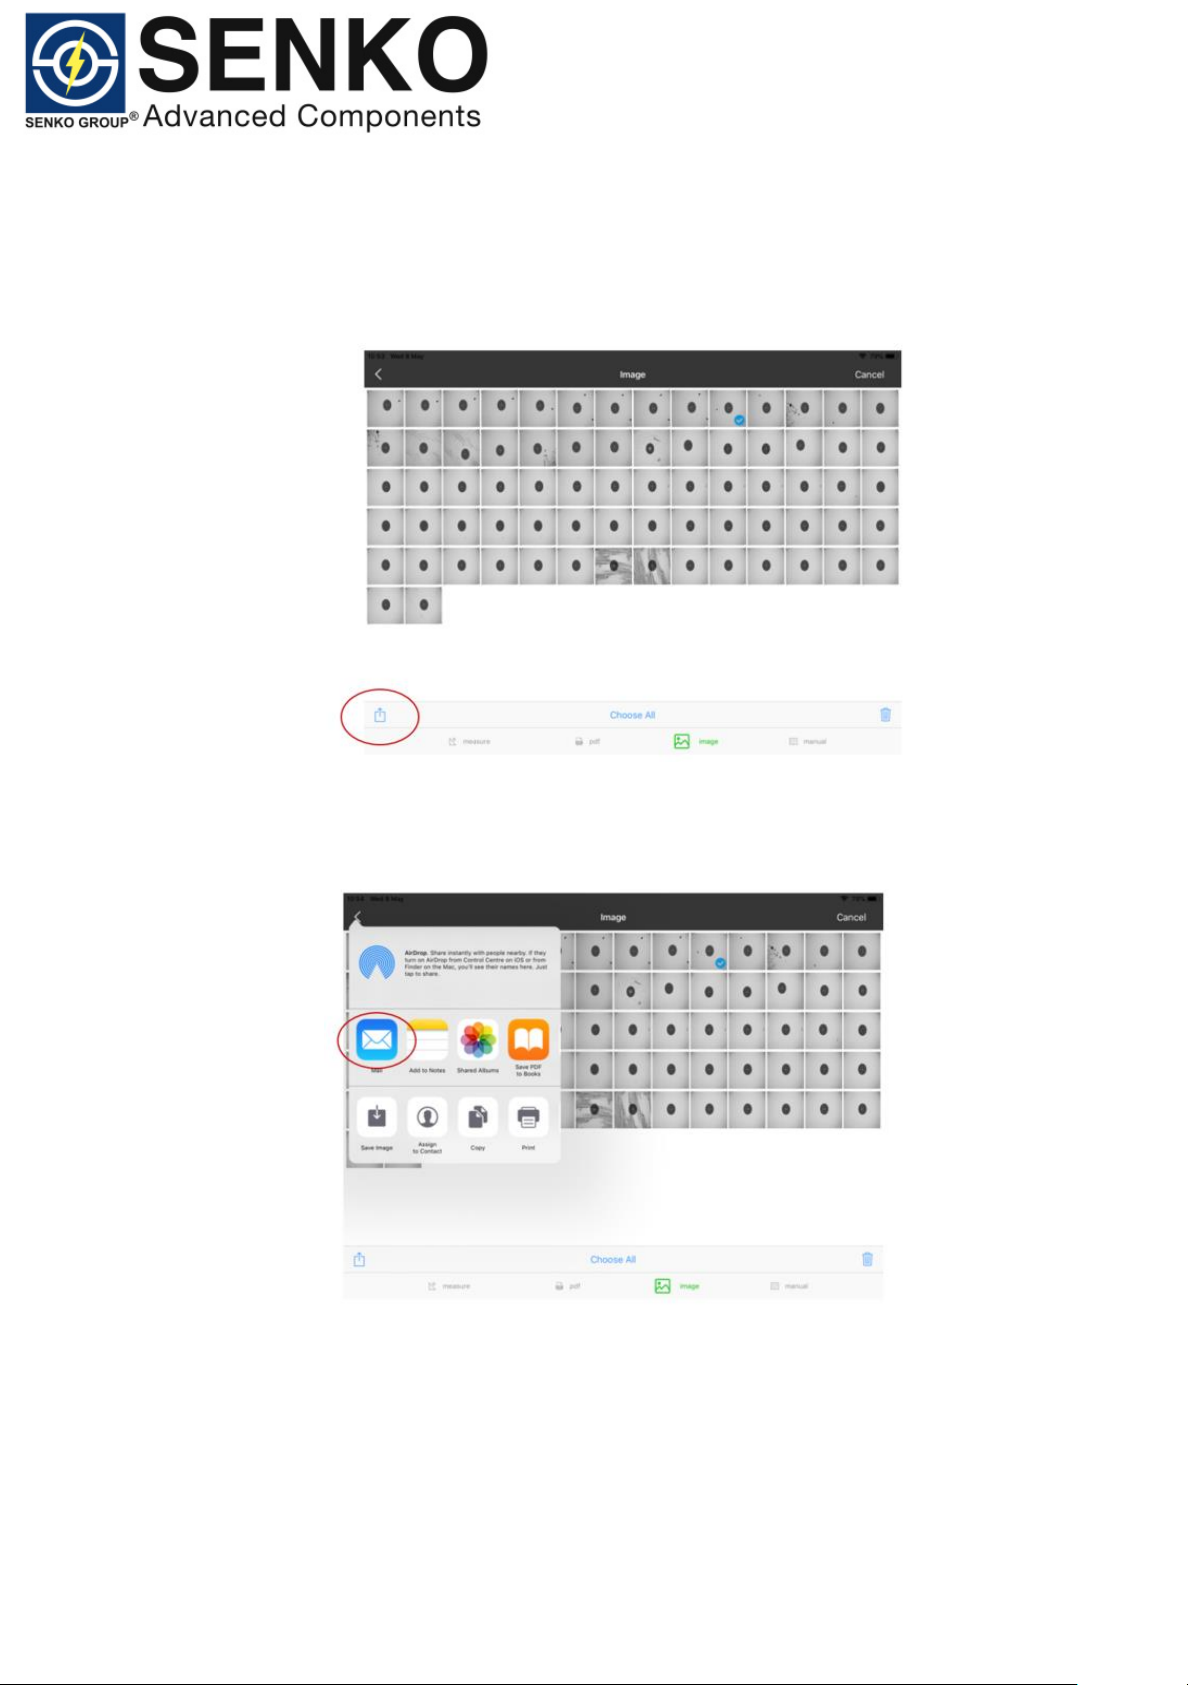
Email: (Images)
1. From the Main Menu, tap ‘Settings’.
2. In the Main Settings Menu, tap ‘Images’.
3. Select the image you wish to send from the app.
6. Select ‘Mail’ option. The application will automatically upload your
report/image onto you ‘Email App’.
USB: (PDF Reports & Images)
1. Insert the USB cable into the USB port on the computer.
2. From your computer, select ‘Smart Probe’ folder.
a. PDF Reports (Reports Folder)
b. Images (within the Smart Probe Folder)
3. When files are selected, right click and select ‘Copy’.
Page 27

Date: 08-05-2019
Doc Number: ENG-SP2M-0519-001
27
4. Navigate to the USB drive, then right-click and select ‘Paste’.
12. Warranty
Senko Advanced Components. (“Senko”) warrants its Smart Probe range of
products free from defects in material and workmanship under normal use, for
of one year from the date of purchase. Subject to the conditions and limitations
set forth below, Senko will at its discretion, either repair or replace any part of
its products that prove defective by reason of improper workmanship or
materials. The warranty becomes effective from the date of shipment.
Limitations of Warranty
This warranty does not include non-Senko installed components. This limited
warranty does not cover any damage to the product that results from abnormal
mechanical or environmental conditions, abuse, accident, improper installation,
misuse, insufficient or excessive electrical supply, natural disaster, or any
unauthorized disassembly, repair, or modification.
This limited warranty also does not apply to any product on which the original
product label has been altered, obliterated or removed, has not been handled
or packaged correctly or has been sold as second-hand. This limited warranty
covers only replacements for defective Senko products, as described above.
Senko does not cover under warranty and is not liable for any loss of data or
any costs associated with diagnosing the source of system problems or
installing, removing or servicing Senko products. This warranty excludes 3rd
party software, connected equipment or stored data. In the event of a claim,
Senko’s sole obligation shall be to repair or replace our product with its
equivalent or the best possible substitute.
Under no circumstances shall Senko be liable in any way to the user for
damages, including any lost profits, lost savings or other incidental or
consequential damages arising out of the use of, or inability to use, the Senko
products.
Senko reserves the right to revise or update its products, software, or
documentation in keeping with technological advances without obligation to
notify any individual or entity.
13. Service and Support
To send equipment for service or repair:
1. Contact your distributor or SENKO directly. Support personnel will
determine if the equipment requires repair.
Page 28

Date: 08-05-2019
Doc Number: ENG-SP2M-0519-001
28
2. If equipment must be returned to SENKO, support personnel will
issue a Return Material Authorization form (RMA) and provide an
address to return.
3. Pack the equipment in its original shipping material. Include a report
fully detailing the problem.
4. Return the equipment to the address provided on the RMA
document. Please include RMA document with the Smart Probe.
 Loading...