

Page 1
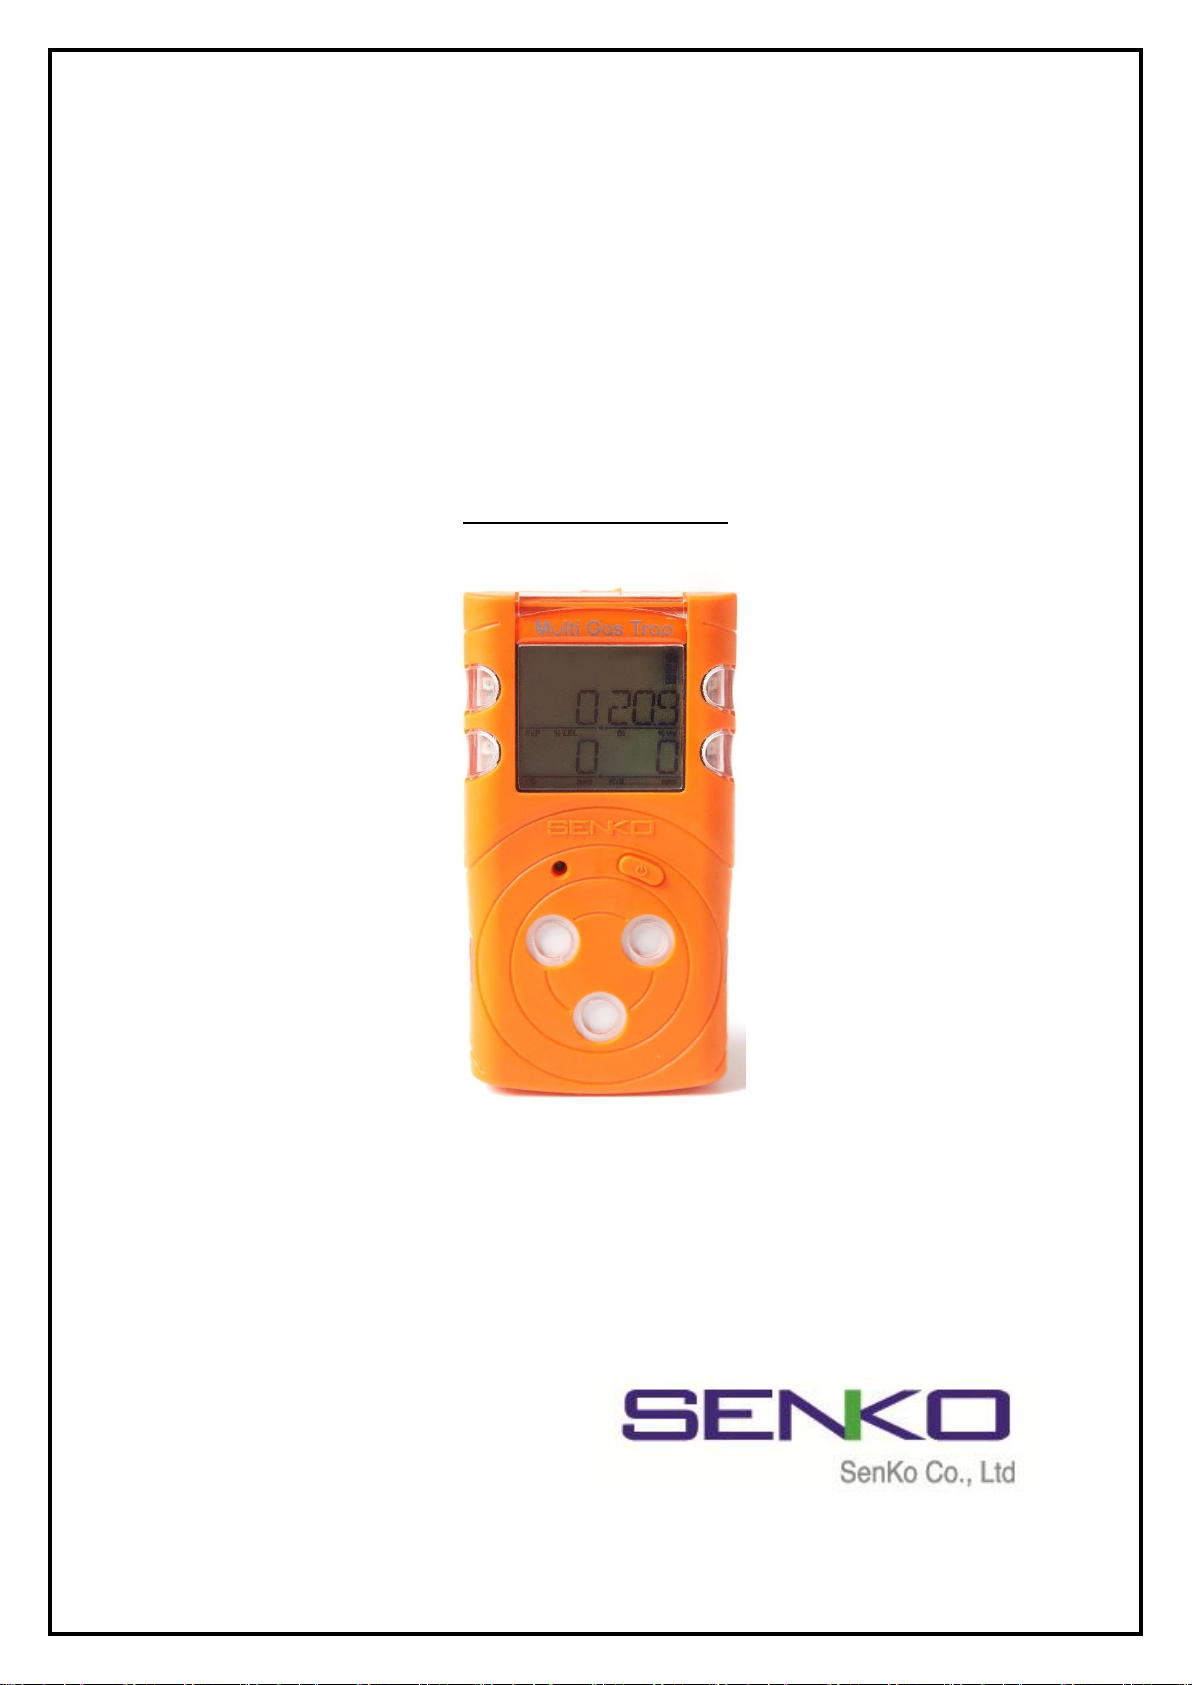
MODEL: MGT
(Portable Multi Gas Detector)
User Manual
Page 2

Product Overview
MGT is a portable multi gas detector to warn the dangerous environment related to the gases.
The detector indicates the concentration of 4 gases (oxygen, carbon monoxide, hydrogen sulfide,
combustible gas) simultaneously on the LCD monitor. It is easy and simple to operate. The device
alerts the workers of the danger by alarm, LED, vibration when the concentration exceeds the
safety gas levels. The device shows the gas concentration in real time and identify the maximum
and minimum concentration. The settings values can be modified through SENKO IR-LINK (option).
Warning
Please do not replace or change the parts. In this case, we do not guarantee the warranty and
safety even though it is under warranty.
Please remove any debris on the surfaces of the sensor, LED or buzzer hole before use.
Test the performance of the gas sensor through the gas beyond the alarm level regularly.
Test the device on a regular basis whether its LED, alarm and vibration function properly.
Use the device under the conditions instructed, including the temperature, humidity and
pressure range. The use environment outside the instruction may cause malfunction or failure.
The sensors inside the device may indicate the gas concentration differently according to the
environment such as temperature, pressure and humidity. Please make sure to calibrate the
detector under the same or similar environment to the specification.
Extreme changes in temperature may cause drastic changes of the gas concentration. (e.g.
using the detector where there is a huge gap between the inside and outside temperature)
Please use the device when the concentration becomes stable.
Severe pressure or impact may cause drastic changes of the gas concentration. Therefore,
please use the device when the concentration is stable. Severe pressure or impact may cause
also malfunction in the sensor or the device.
The alarms are set according to the international standard and must be changed by an
authorized expert.
Charging or replacing the battery should be done in a safe area where there is no risk of
explosion or fire. Changing the sensor or battery with improper replacements, which are not
authorized by the manufacturer, may invalidate the warranty.
IR communication should be done in a safe area where there is no risk of explosion or fire.
Caution
Please use after reading the manual carefully.
The device is not a measurement device, but a gas detector.
Please stop using and consult the manufacturer if the calibration fails continuously.
Please test the device every 30 days under the atmospheric environment of clean air without
gases.
Clean the exterior of the device with soft cloth and do not clean it with chemical detergent.
2
Page 3

Contents
Contents .......................................................................................................................................................................................... 3
1. Product Overview .............................................................................................................................................................. 4
2 Activation ............................................................................................................................................................................... 5
2.1. Switch On ................................................................................................................................................................. 5
2.2. Switch Off ................................................................................................................................................................ 5
3. Mode ....................................................................................................................................................................................... 6
3.1. Measuring Mode .................................................................................................................................................. 6
3.2. Display Mode ......................................................................................................................................................... 6
3.2.1 Display Mode in Detail ................................................................................................................................. 7
3.3. Alarm Display ......................................................................................................................................................... 8
3.4. Initialization of detected concentrations ................................................................................................... 9
3.5. Check on Alarm Value ....................................................................................................................................... 9
3.5.1 Initial Setting Concentration Levels ........................................................................................................ 9
3.6. Dates and Time .................................................................................................................................................. 10
4. Event Log ............................................................................................................................................................................ 11
5. Calibration .......................................................................................................................................................................... 11
5.1. Fresh Air Calibration ........................................................................................................................................ 11
5.2. Standard Gas Calibration ............................................................................................................................... 12
6. Specification ...................................................................................................................................................................... 13
3
Page 4
MGT User Manual
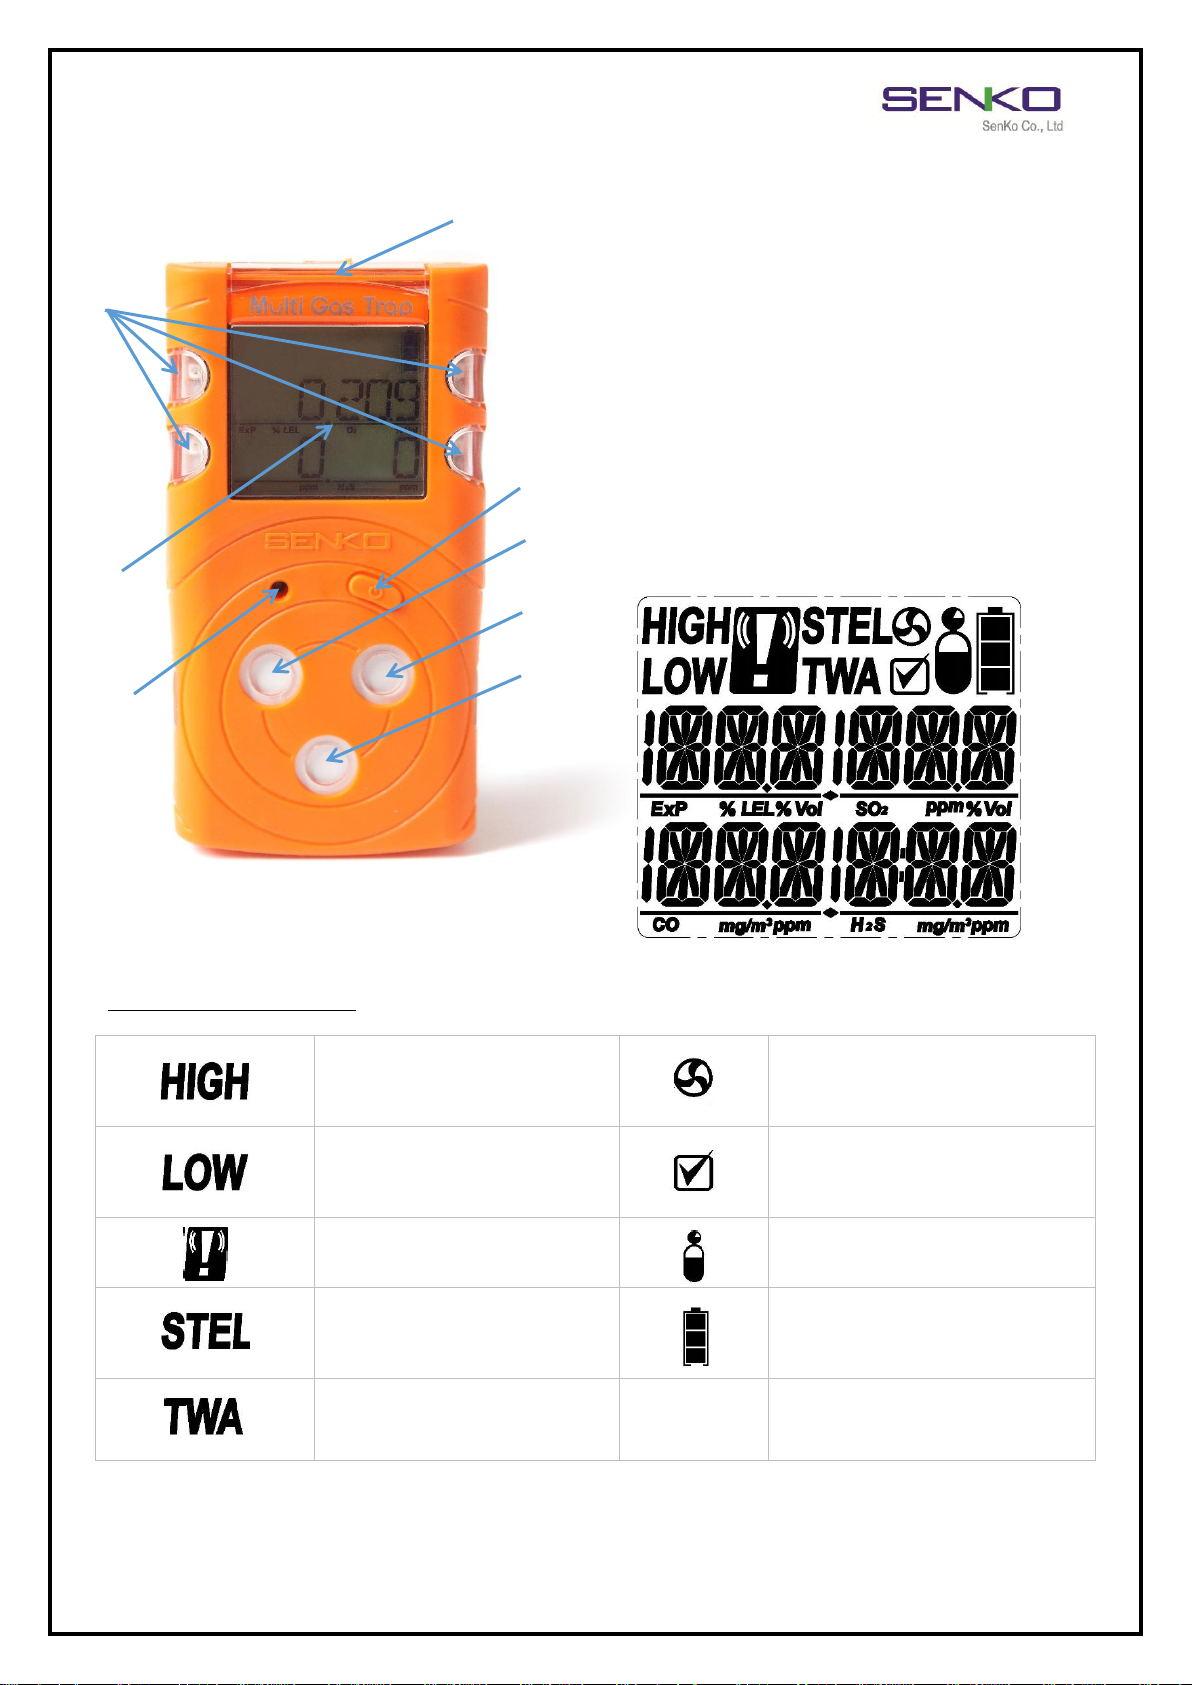
High Alarm
Fresh Air Calibration
Low Alarm
Device Stabilization &
Calibration Succeeded
Alarm Condition
Standard Gas Calibration
STEL Alarm
Remaining Battery
TWA Alarm
1. Gas sensor (O
2
)
2. Gas sensor (LEL)
3. Gas sensor (Dual : CO & H
2
S)
4. Key
5. IR Port
6. Alarm LED
7. LCD display
8. Buzzer
7 1 8
6 5 4 2
3
1. Product Overview
LCD display symbols
4
Page 5
MGT User Manual
<Caution> A proper calibration is always required before using the device at the work site. The user shall
check whether the device is properly sensing the levels of dangers of gases and make sure whether the
detecting section of the device is not blocked with materials impairing the detection.
Initial Setting Mode
Gas Measuring Mode
2 Activation
2.1. Switch On
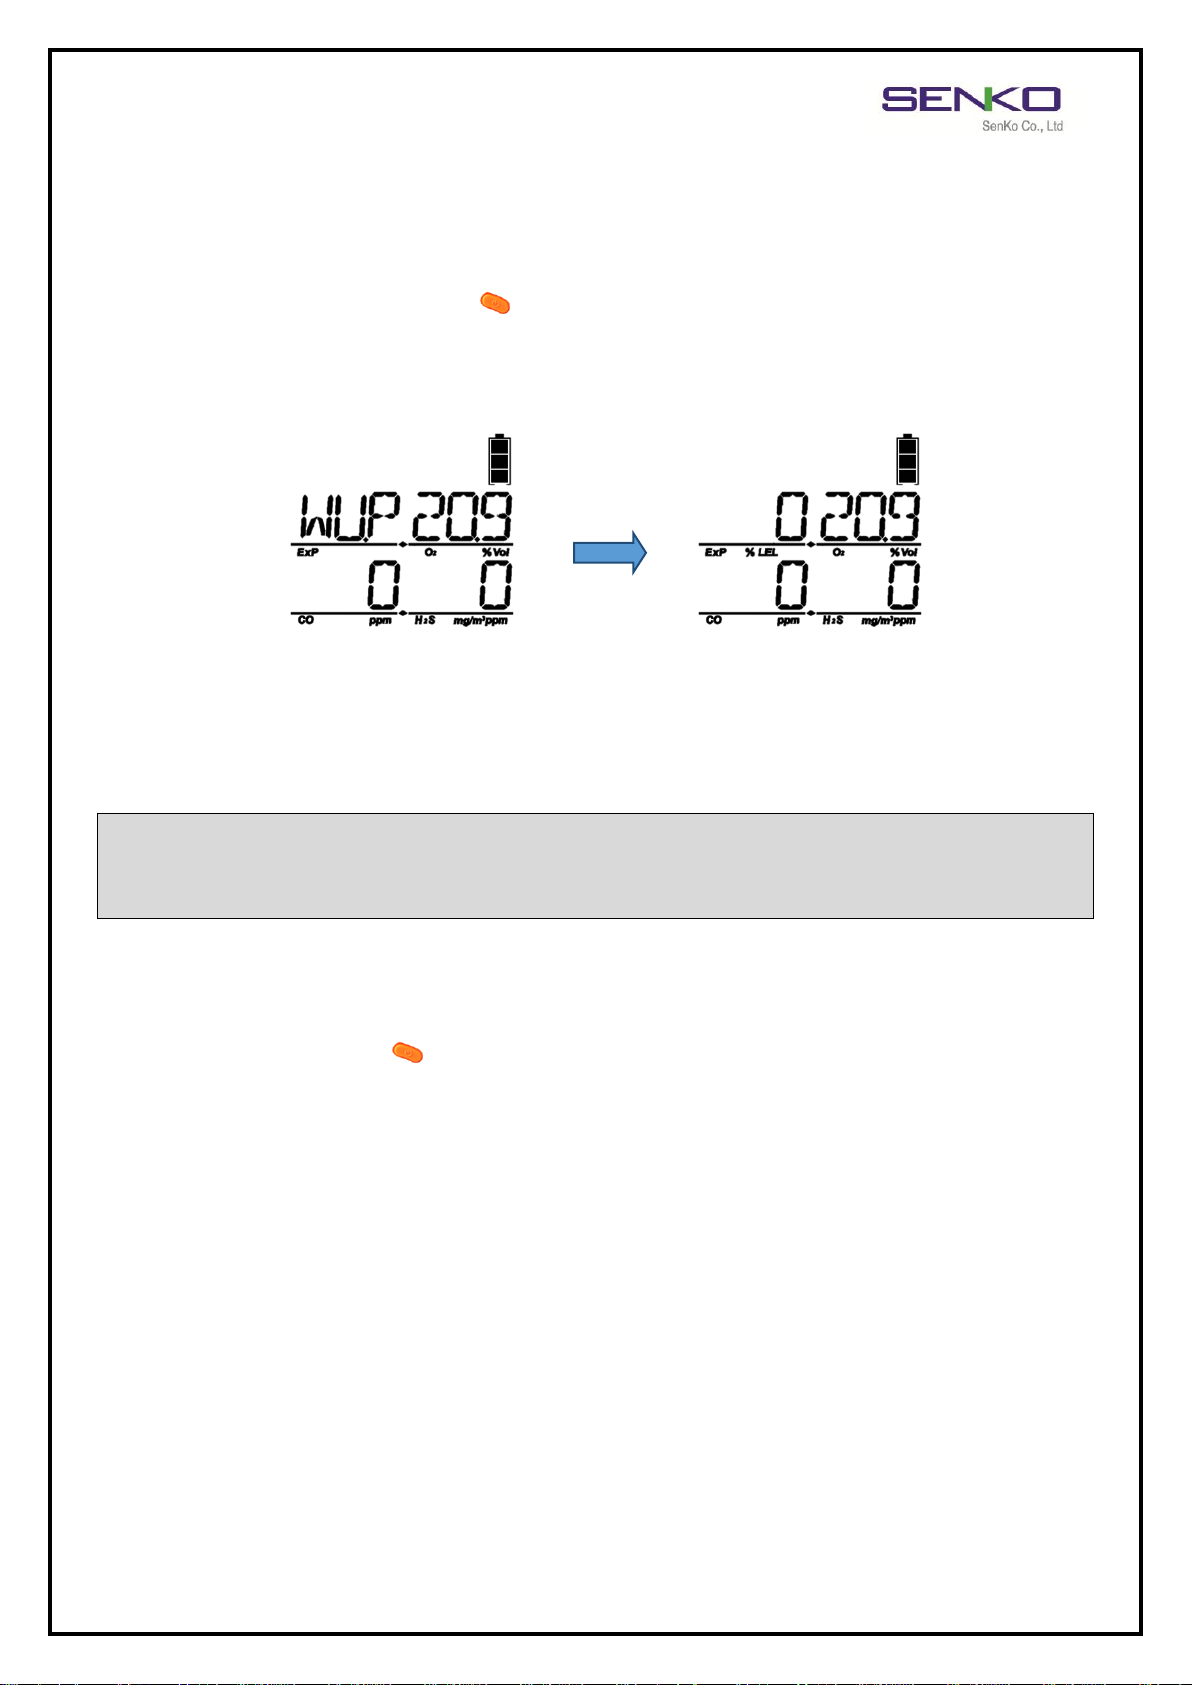
Press and hold down the KEY button( ) and the device will be switched on along with the three
seconds countdown.
(The device will be switched on only when you keep pressing the button for longer than three seconds.)
Once activated, the device will enter the warm up stage to stablize sensors. The warm up process is
completed, the device is ready to detect gases.
2.2. Switch Off
Keep pressing the KEY button( ) and the 3, 2 and 1 in the mentioned order will appear on the monitor
and finally the device will be switched off.
(The device will not be switched off only unless you keep pressing the button for longer than three
seconds.)
5
Page 6
MGT User Manual
3. Mode
3.1. Measuring Mode
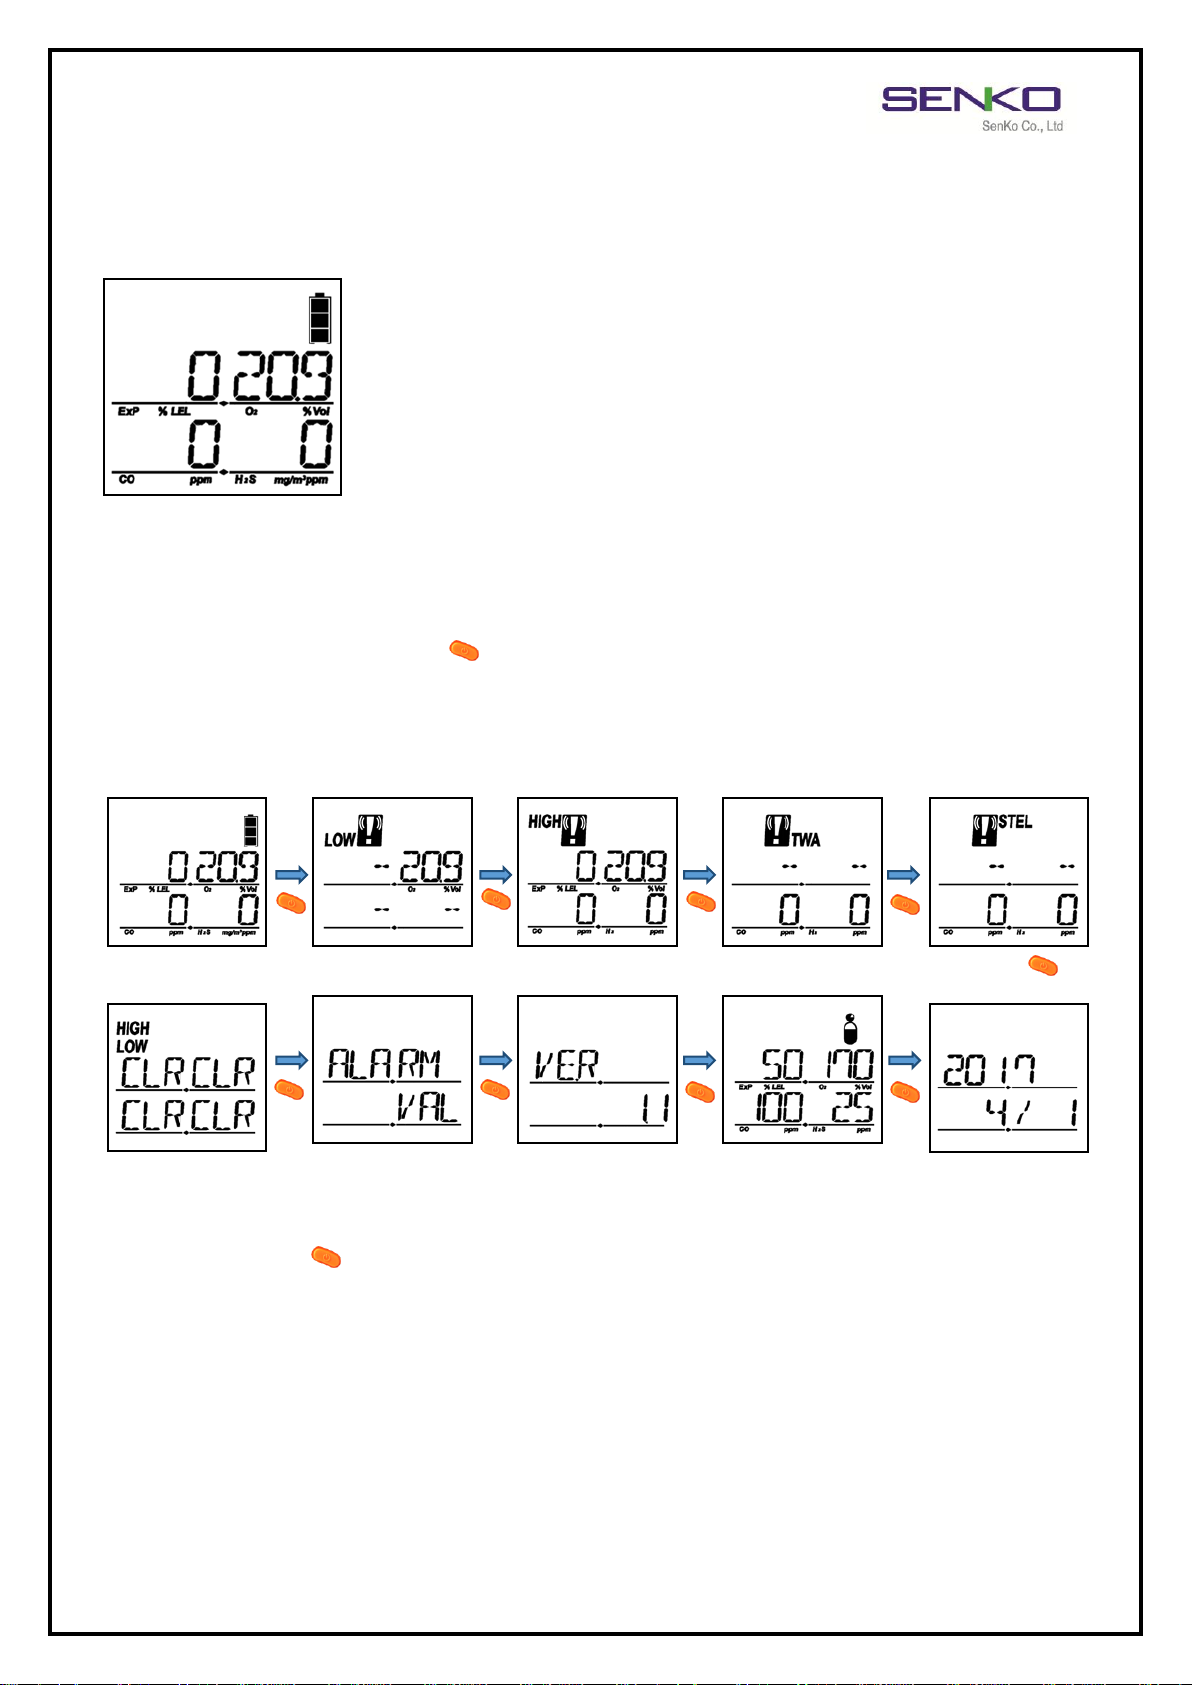
If the device goes into the normal measuring mode after stabilization, the gas
concentration and the battery power level are displayed on the LCD monitor.
Oxygen is displayed in %vol, combustible gases in %LEL and H2S, CO in PPM
unit. When the concentration levels change, the value is displayed in real time,
and when the levels exceed the threshold for either LOW alarm or HIGH alarm
(or TWA/STEL), the display icons of
and the alarm, LED and vibration activates.
When the device goes to a safe area, the concentrations detected by the device declines and the alarm
stops. Even after going to a safe area after the alarms set off, the icon of the alarm does not go away,
and you must push the KEY button ( ) to make it go away.
LOW, HIGH, TWA
or
STEL
blinks regularly
3.2. Display Mode
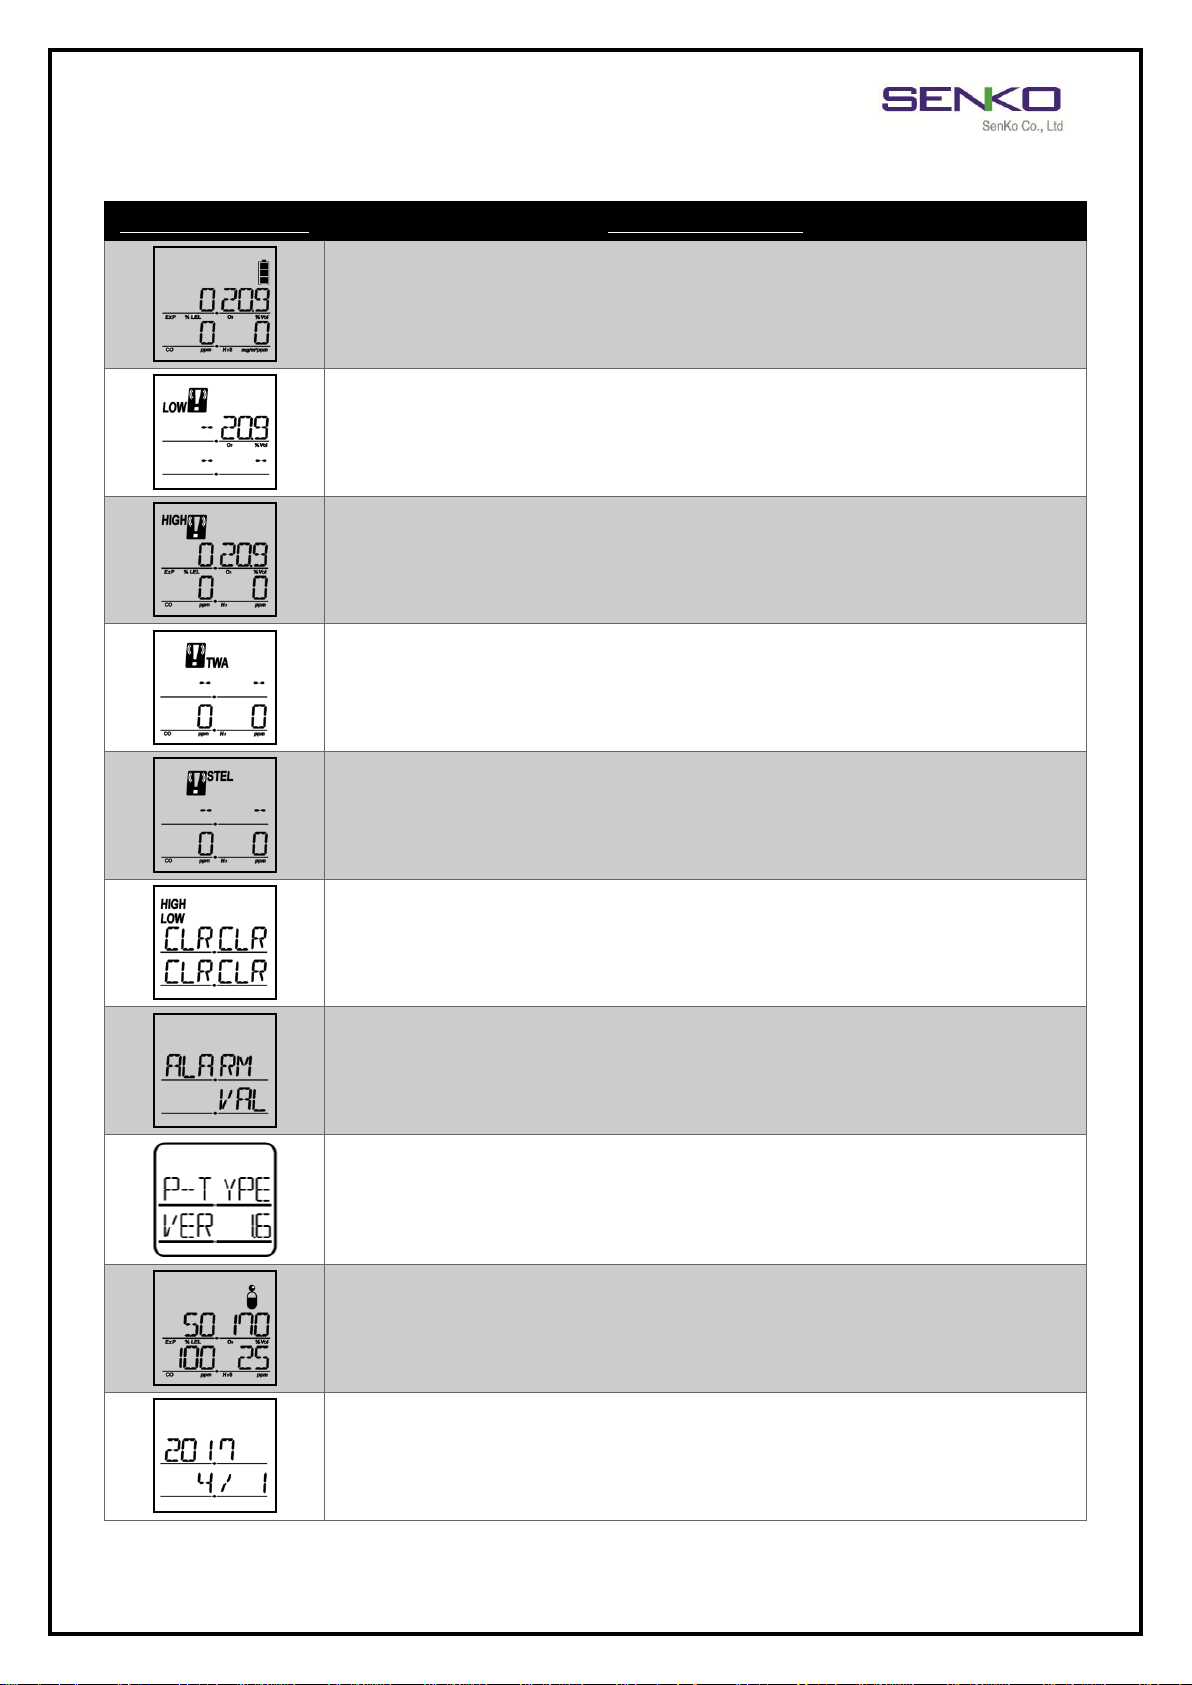
The displays in ten different modes as above are shown in the measuring mode every time when you
press the KEY button( ).
6
Page 7
MGT User Manual
LCD Display Images
Description in Detail
Measuring Mode (Basic Display)
Display the current gas levels of the atmosphere and the battery power
level
A minimum gas concentration detected by the device.
*In an ambient air, the Oxygen level normally indicates 20.9%vol.
A maximum concentration detected by the device.
*In an ambient air, the Oxygen level normally indicates 20.9%vol.
Acceptable hourly average exposure levels of the toxic gases for the
last eight hours (Time Weight Average)
Acceptable average exposure levels of the toxic gases for the last 15
minutes (Short Term Exposure Limit)
Clear the previous Low, High (Peak), TWA, STEL values.
Check the current setting values manually.
(Low alarm, High alarm, TWA, STEL)
Check the firmware version and type (N type or P type)
Check on set SPAN calibration levels
Mode for ZERO calibration and SPAN calibration
Current Date and Time
3.2.1 Display Mode in Detail
7
Page 8
MGT User Manual
Type
Set-Off Condition
LCD Display
Alarm Sound & Vibration Display
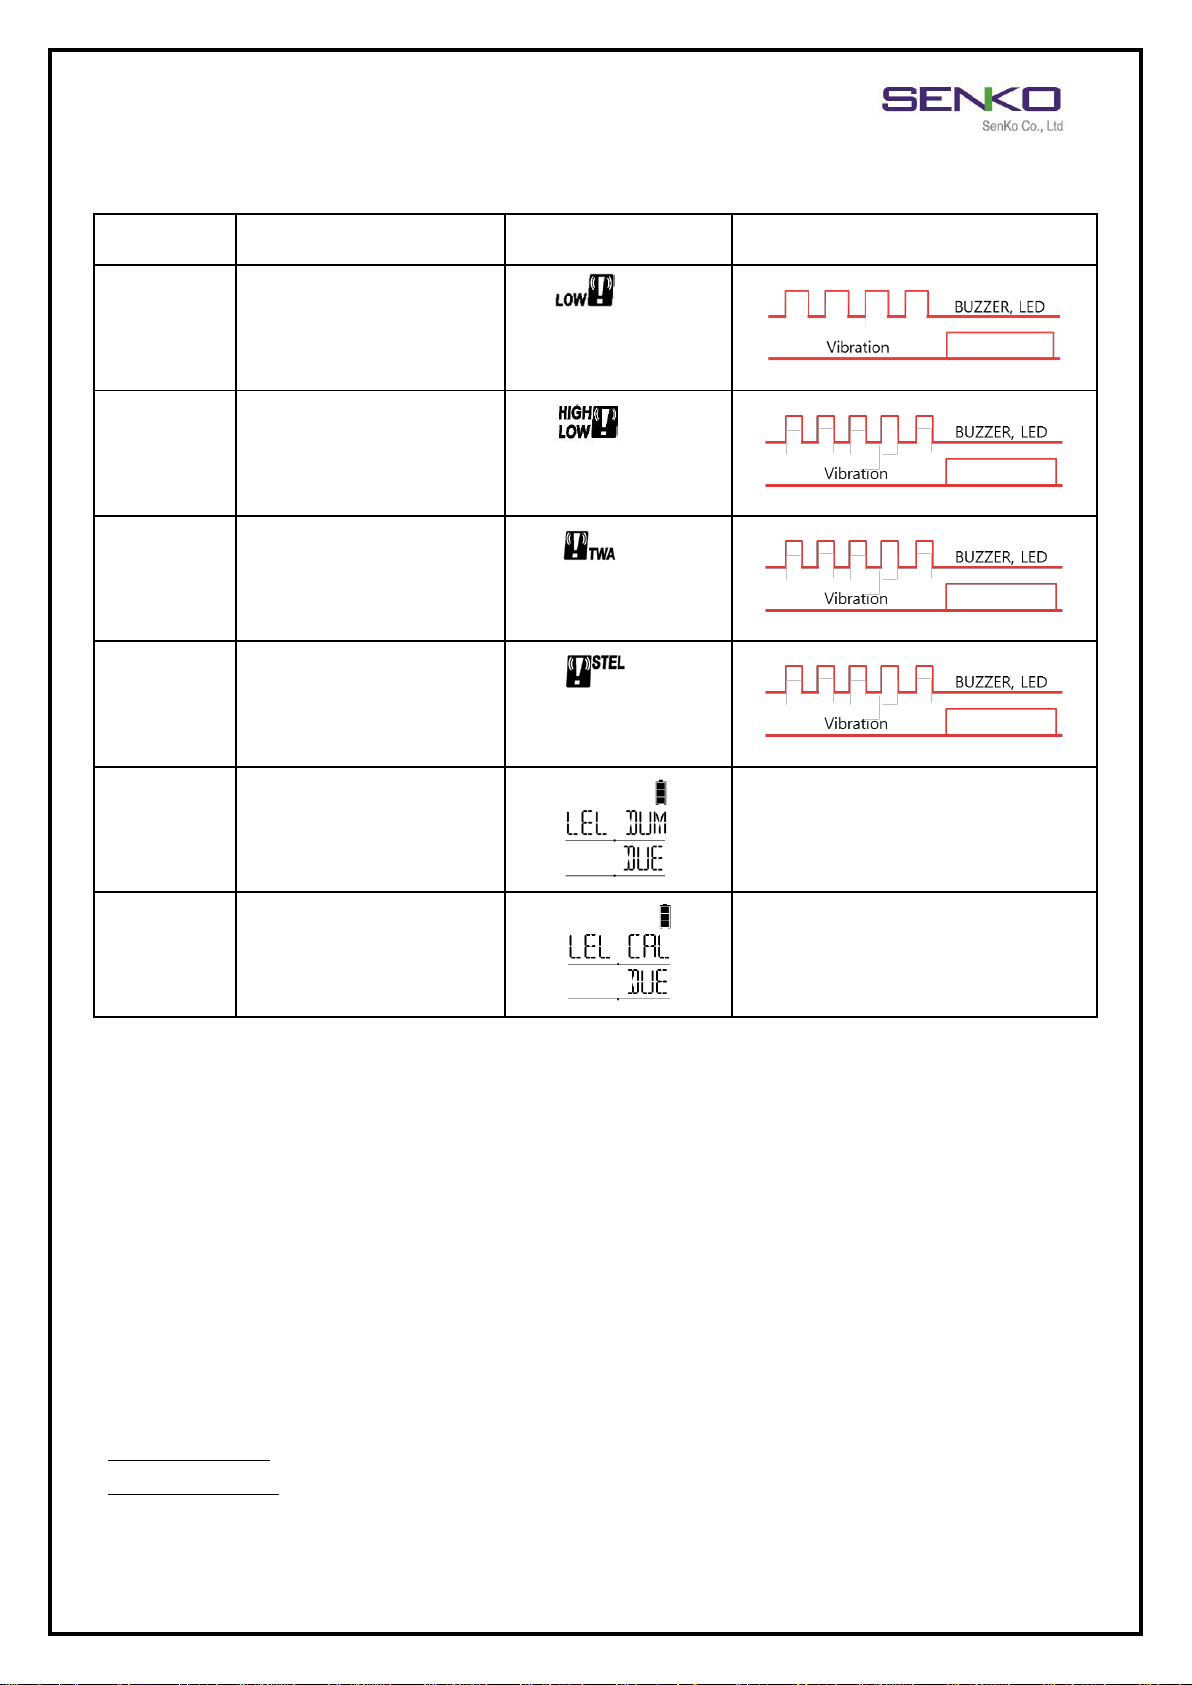
LOW Alarm
Exceed LOW alarm value
icon &
gas concentration
levels displayed
HIGH Alarm
Exceed HIGH alarm value
icon &
gas concentration
levels displayed
TWA Alarm
When exceeding TWA
alarm value
icon &
gas concentration
levels displayed
STEL Alarm
When exceeding STEL
alarm value
icon &
gas concentration
levels displayed
Bump Test
Request Date for
Bump Test
Stops after Bump Test
Execute
Calibration
Request Date for
Calibration
Stops after Calibration
3.3. Alarm Display
LOW Alarm Sets Off : When the user presses Key after noticing that the LOW alarm sets off, the sound
stops, but the vibration and LED alarm remain.
HIGH Alarm Sets Off : The user must leave the area immediately, and the sound alarm/vibration/LED
alarm stops when the device goes to a safe area where the concentrations are normal.
TWA Alarm Sets Off : The alarm sets off when the hourly average levels of the gas concentration for the
last eight hours exceed the TWA concentration, and the sound alarm/vibration/LED alarm stop when the
gas concentration levels reach the alarm set-off value as the user goes to a safe area.
STEL Alarm Sets Off : The alarm sets off when the hourly average levels of the gas concentration for the
last 15 minutes exceed the STEL concentration, and the sound alarm/vibration/LED alarm stop when the
gas concentration levels reach the alarm set-off value as the user goes to a safe area.
Bump Test Interval (SENKO IR-LINK Options): Notices the user on a regular basis to check the device.
Calibration Interval (SENKO IR-LINK Options): Notices the user on a regular basis to calibrate the sensor
.
8
Page 9
MGT User Manual
Inflammables (Ex)
Oxygen (O2)
Carbon Monoxide
(CO)
Hydrogen Sulfide
(H2S)
LOW
10 %LEL
19%
30 ppm
10 ppm
HIGH
30 %LEL
23%
60 ppm
20 ppm
TWA
30 ppm
10 ppm
STEL
200 ppm
15 ppm
<Caution> The values of different gases in the device are set based on the international standards. As
such, the alarm set-off values for each gas can be modified upon the approval and monitoring of the
supervisor. The modification may be done through SENKO IR-LINK (options).
3 sec.
3 sec.
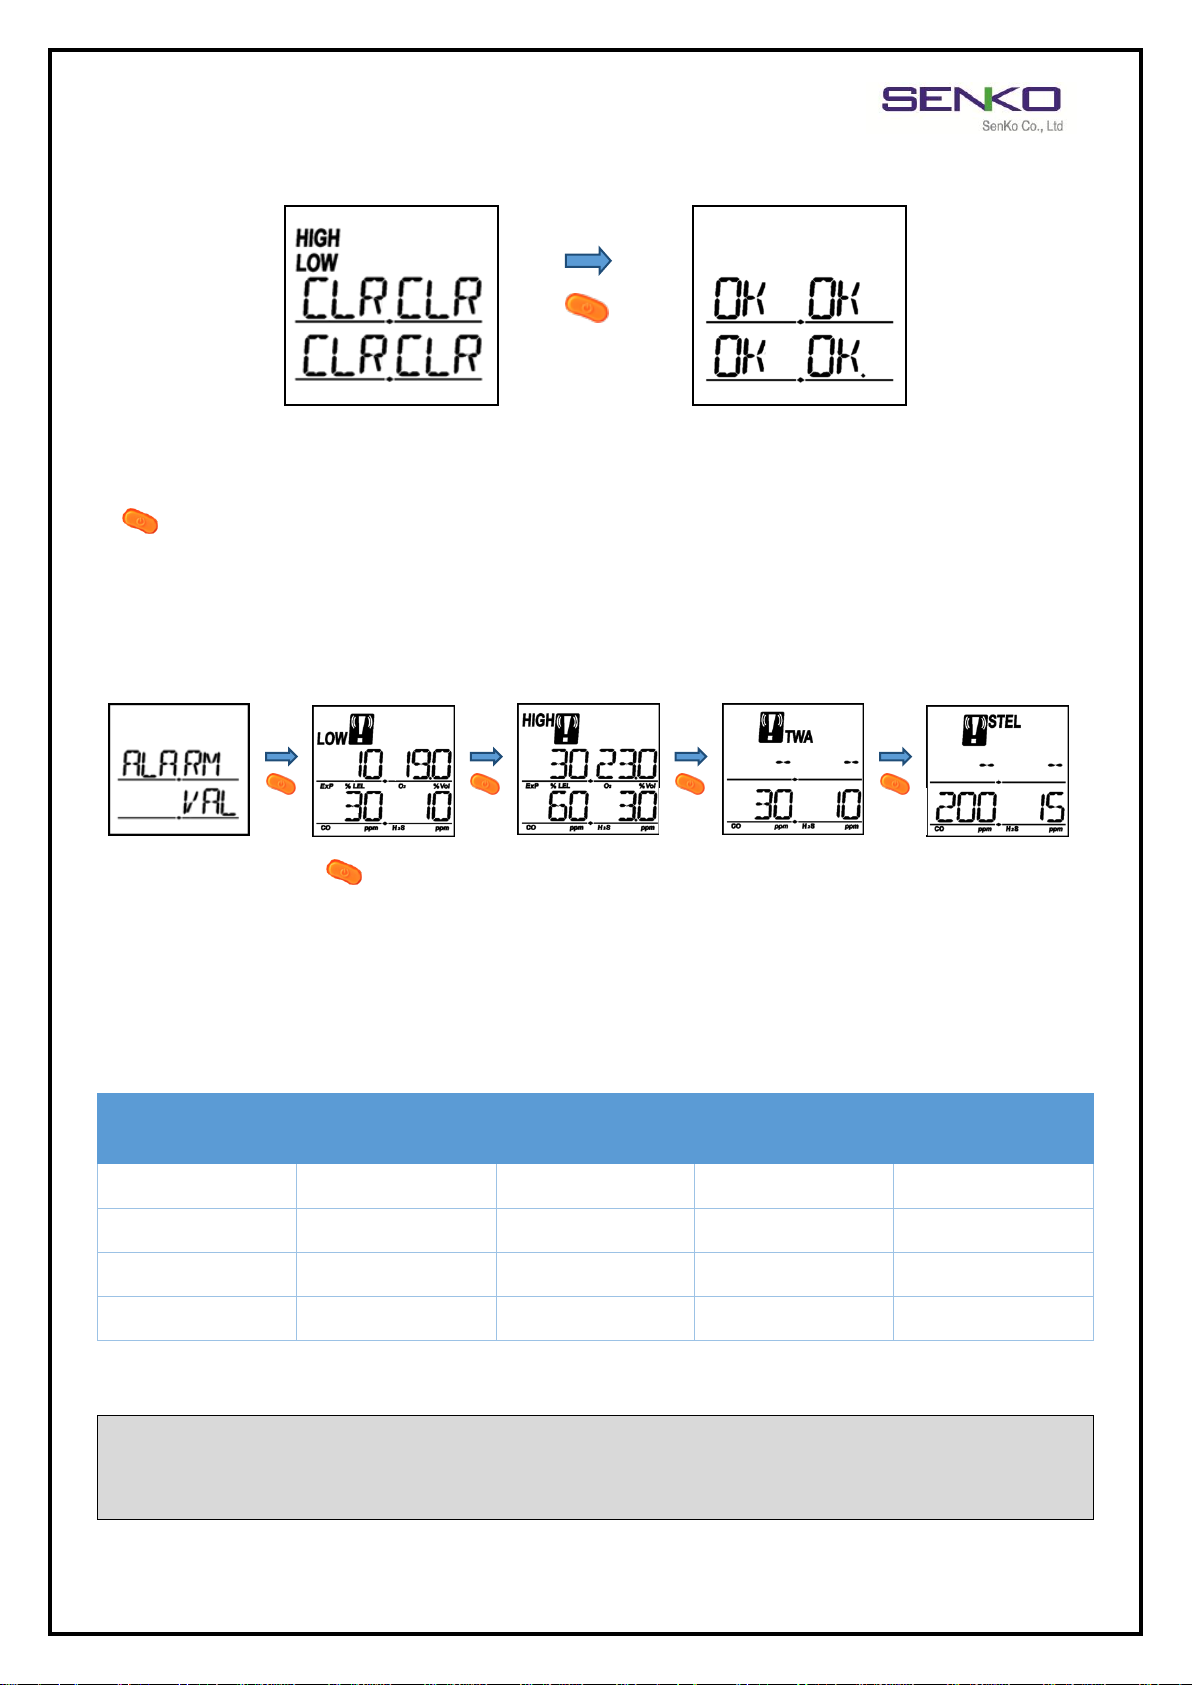
3.4. Initialization of detected concentrations
You can see the minimum and maximum values for the concentration levels detected by the device as
well as the high TWA and STEL value on the display, and the values can be initialized. Press KEY button
( ) for three seconds on the CLR(Clear) mode on the LCD monitor, and the OK will appear on the LCD
monitor to notify the completion of the initialization.
3.5. Check on Alarm Value
Press the KEY button ( ) for three seconds under the
ALARM VAL
mode and the set value for the
LOW alarm is displayed. Press the KEY button one time each to set the alarm set-off value for HIGH alarm,
LOW alarm, TWA and STEL alarm in the mentioned order.
3.5.1 Initial Setting Concentration Levels
* The set values can be modified on PC through SENKO IR-LINK (options).
9
Page 10
MGT User Manual
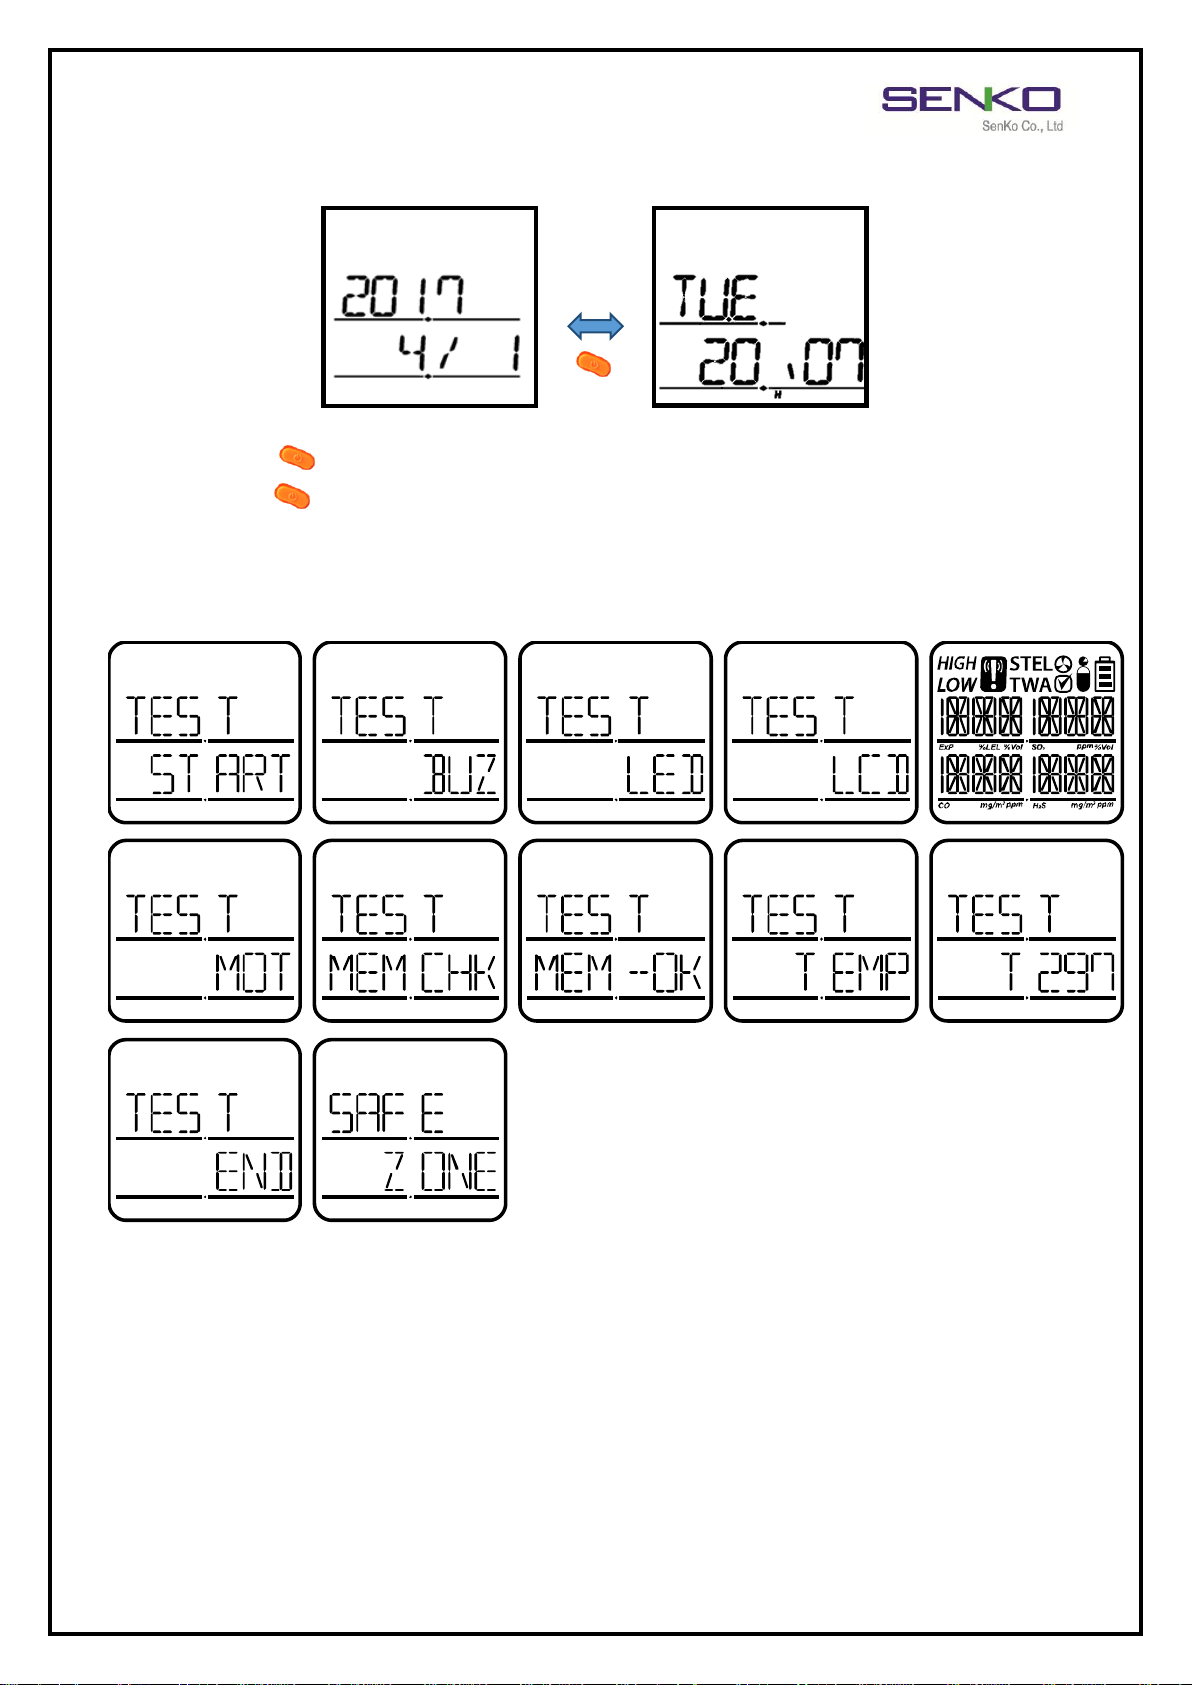
3.6. Dates and Time
3 sec.
Press the button ( ) under the (YY/MM/DD) mode for 3 seconds and the day/time mode will appear.
Press the button ( ) again for 3 seconds under the (D/T) mode and it will go back to previous mode.
* The current time shall be automatically synched with that of the PC when linked with SENKO IR-LINK.
3.7. Self Test
Press and hold the button for 3 seconds. The device will start the self test checking buzzer, LED, LCD,
Motor, Memory, and Temperature.
10
Page 11
MGT User Manual
Log Categories
Log Details
EVENT(High, Low, TWA, STEL) Alarm
Occurrence time, Duration, Alarm Type, Gas Concentration, Serial Number
BUMP TEST Log
Test date, Pass/non-pass, Calibration Gas Concentration, Detected Concentration
Calibration Log
Date of the Calibration, Type, Calibration Gas Concentration, Detected
Concentration
Data Log
Time, Date of executing IR-LINK, Concentration, Alarm Types, Options
<Caution> The initial calibration is executed at SENKO CO. Ltd. before device release. The calibration
values are saved in the device which means inaccurate calibration may impair the accuracy of the device
performance. Normally, the calibration should be done once a year after the purchase and regularly every
six months thereafter.
<Caution> Because it is calibrated on the assumption that oxygen concentration is 20.9%vol, the
combustible gas is 0%LEL, and the toxic is 0ppm in the normal fresh atmosphere, fresh air calibration
must be conducted in the absolutely clear air without any impact of other gases. Fresh air calibration in
the airtight spaces therefore is not recommended. Make sure to avoid operation under the work
environment where people may inhale gases.
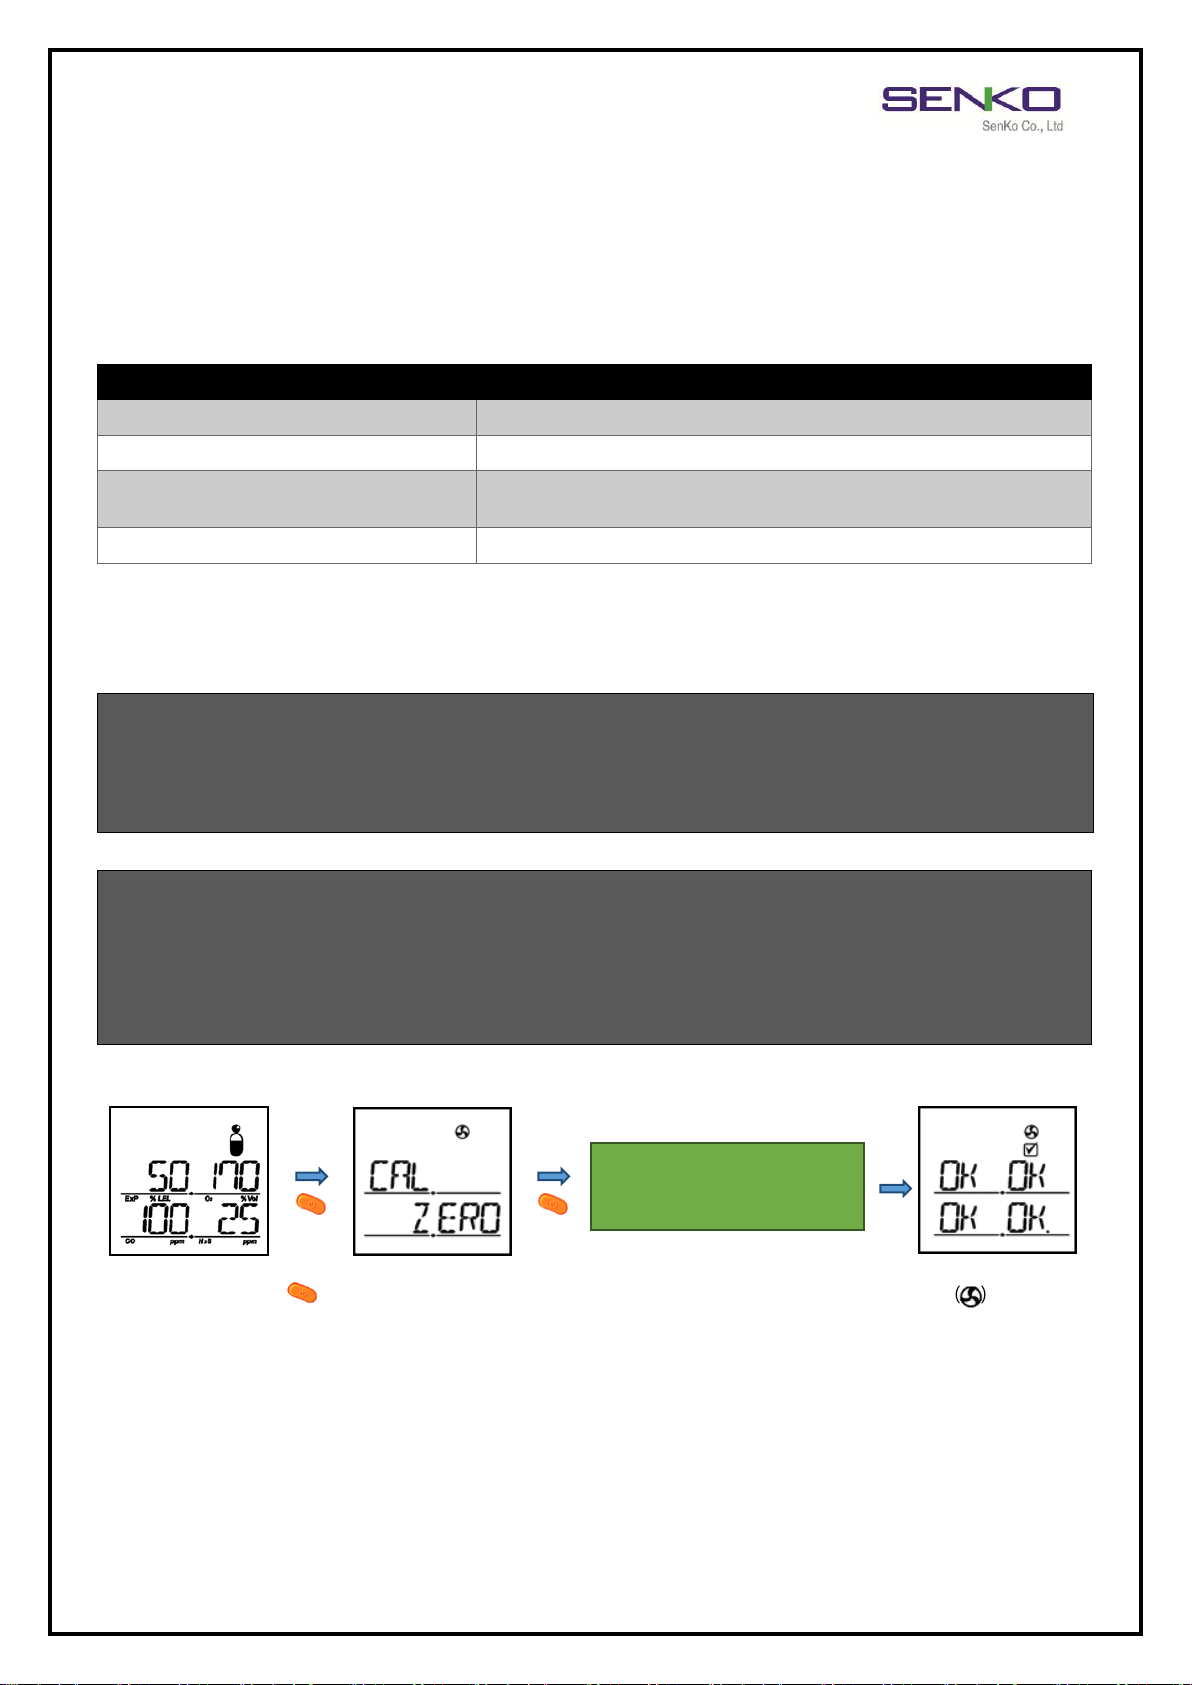
3 sec.
3 sec.
10 seconds countdown
(ZERO ADC currently displayed)
4. Event Log
Up to 30 events may be saved and when the list exceeds 30, the oldest data will be automatically deleted.
The saved data can be checked when transmitting it to PC through SENKO IR-LINK.
Data log records the operation status every second and normal data logs do not last more than 2 months.
5. Calibration
5.1. Fresh Air Calibration
Press KEY button ( ) for 3 seconds under the gas calibration value mode and the icon ( ) signifying
fresh air calibration will appear on the LCD monitor with the phrase “CAL ZERO.” Press for another 3
seconds to do fresh air calibration and it takes 10 seconds to calibrate. Press the button during the
calibration process to stop the calibration. If you press the button upon the completion, It will return to
the fresh air calibration mode, and if you don’t press the button, it automatically enters the measure
mode.
11
Page 12
MGT User Manual
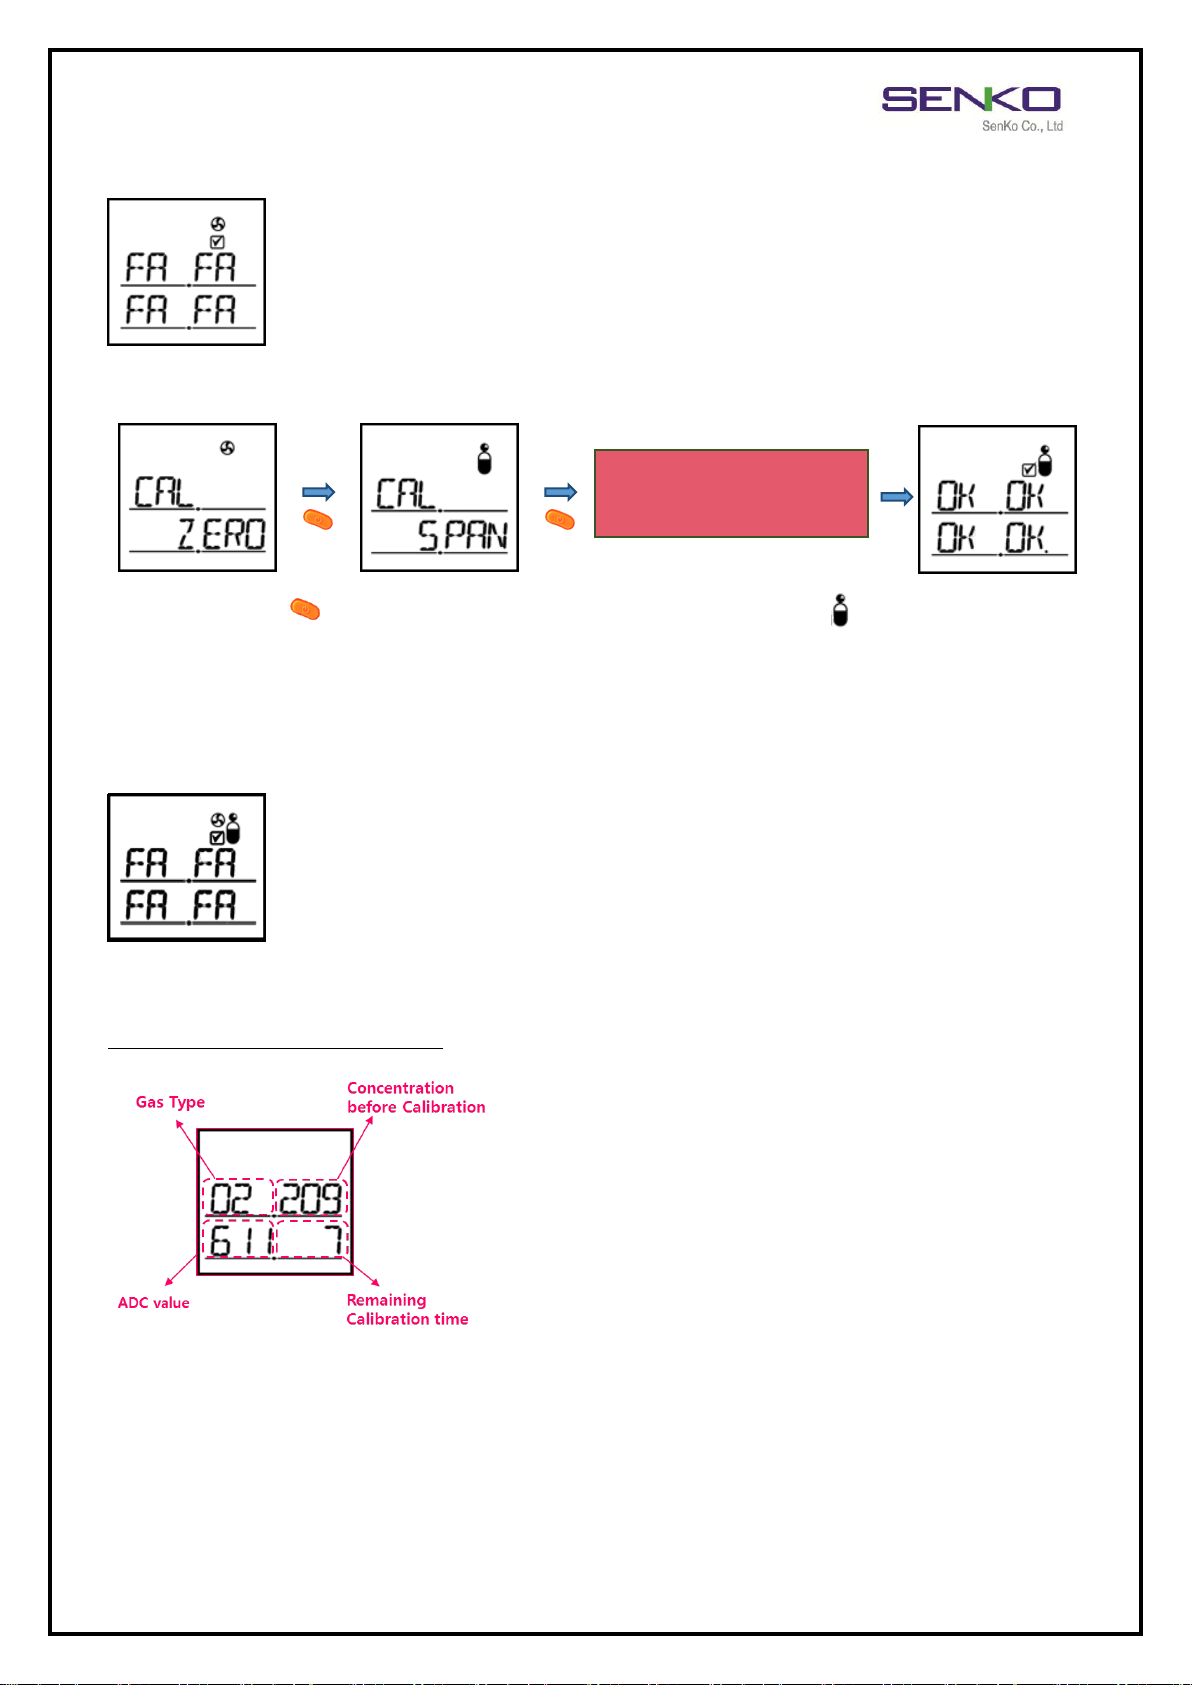
3 sec.
90 seconds countdown
(SPAN ADC currently displayed)
If the calibration fails, FA(Fail), not OK, appears on the LCD. Press the button to enter
the initial fresh air calibration mode and it changes into the measure mode if you do
not press the button for 3 seconds. If FA continues, please consult SENKO or the store
you purchased as it may require the replacement of the sensor or repair of the device.
5.2. Standard Gas Calibration
Press KEY button ( ) under the fresh air calibration mode and the icon ( ) signifying standard gas
calibration will appear on the LCD monitor with the phrase “CAL SPAN.” Press for 3 seconds to do the
standard gas calibration and it will be completed automatically in 90 seconds. Press the button during the
calibration to stop. If you press the button upon the completion, It will return to the initial standard gas
calibration mode, and if you don’t press the button, it automatically enters the measure mode.
If the calibration fails, the phrase FA(Fail), not OK, appears on the LCD. Press the button
to enter the initial fresh air calibration mode and if you do not press the button, it
changes into the measuring mode. If FA continues, please consult SENKO or the store
you purchased as it may require the replacement of the sensor or repair of the device.
Display for Calibration Count
12
Page 13
MGT User Manual
Combustible
Oxygen
Carbon Monoxide
Hydrogen Sulfide
Concentration
50%LEL(CH4)
17 %Vol
100 ppm
25 ppm
Model
MGT
Measure Gas
Combustible
O2
CO
H2S
Detecting
Method
Diffusion / Sampling(with Sampling Pump(option))
Measure
Mechanism
Catalytic (MGT-P)
NDIR (MGT-N)
Electrochemical
Electrochemical
Electrochemical
Range
0~100 %LEL
0~30 %vol
0~500 ppm
0~100 ppm
Sensor life
> 5 years
< 2 years
> 2 years
> 2 years
Response Time
15sec/90%scale
15sec/90%scale
30sec/90%scale
30sec/90%scale
Accuracy
3%/ Full Scale
Resolution
1%LEL
0.1 %vol
1 ppm
0.1 ppm
Operation
Front Key
Display
Digital LCD display, LCD Backlight, Indicator LED
Initial Standard gases concentration for calibration
* The concentration for calibration may be modified on PC through SENKO IR-LINK (options).
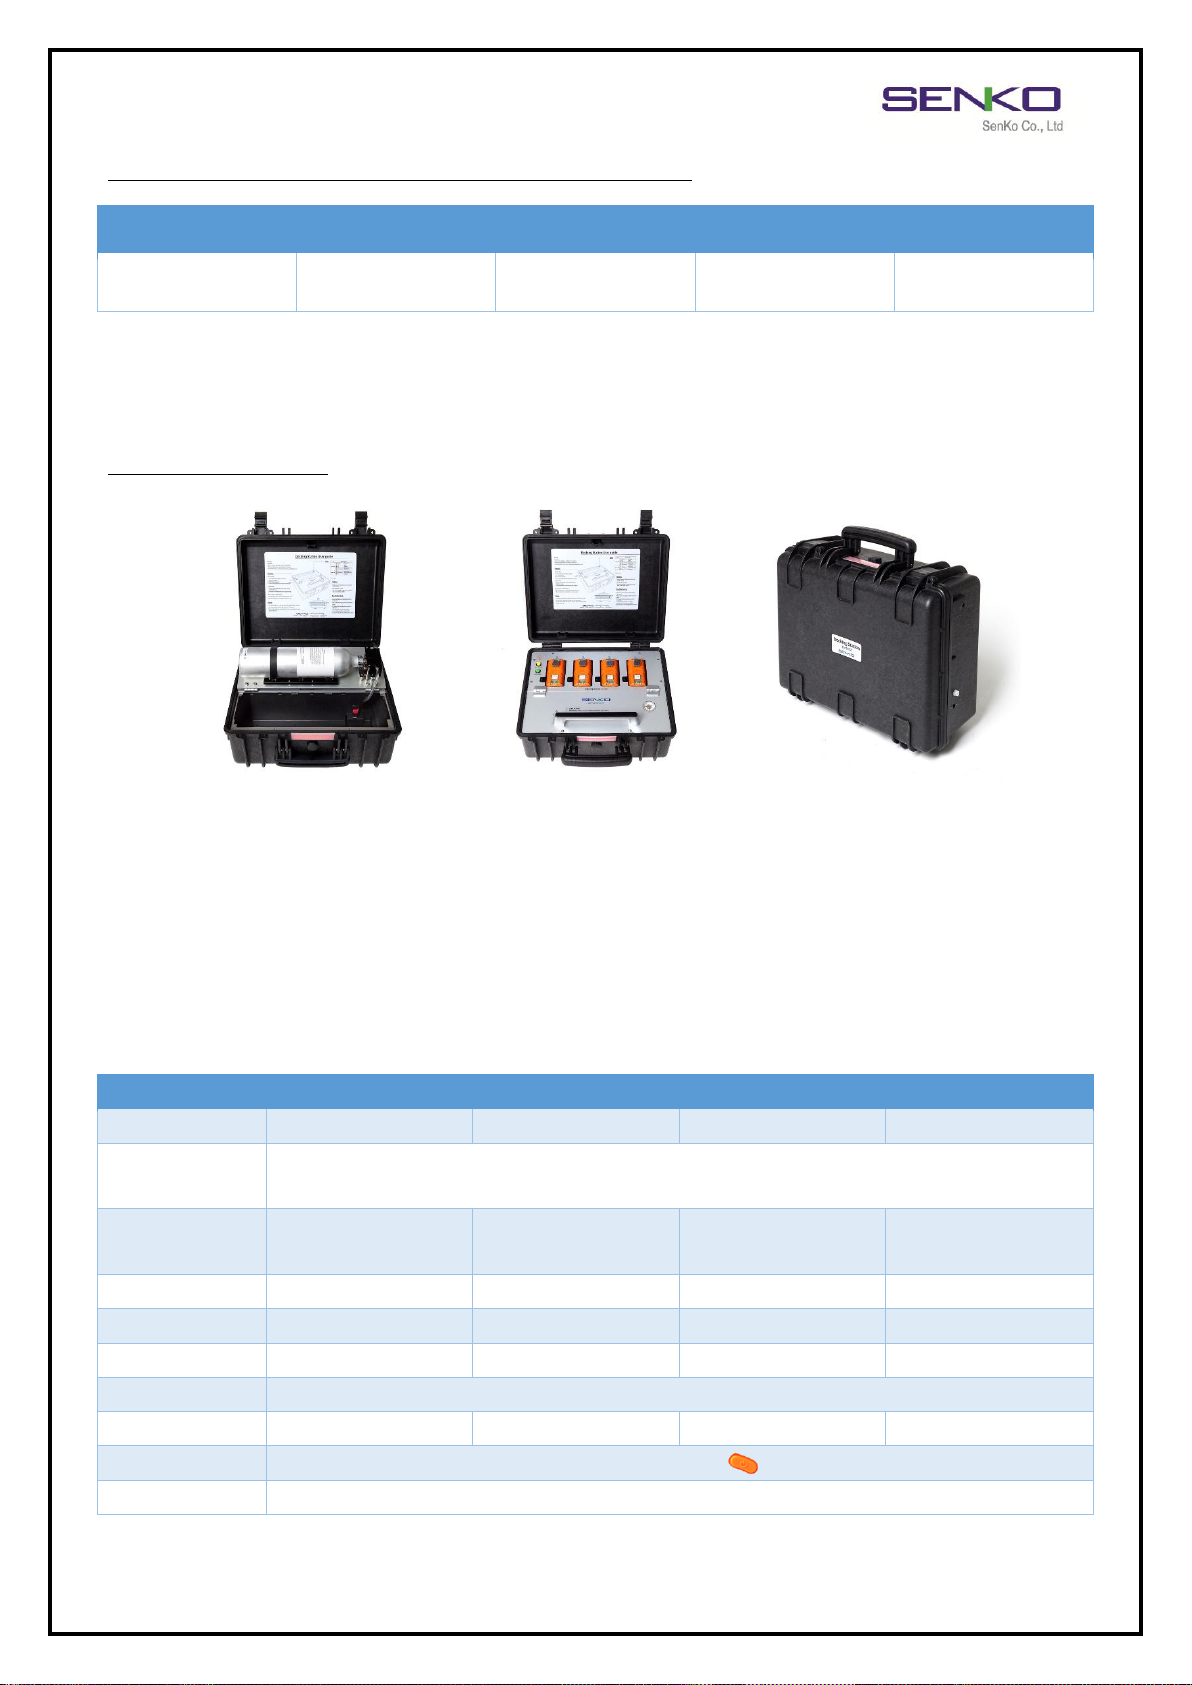
DOCKING STATION
Standard gas calibration can be easily done through Docking Station (option), which holds gas inside.
* Docking Station is used to determine whether the devices functions properly by the bump test before
using MGT in the work site.
6. Specification
13
Page 14
MGT User Manual
Alarm
Visual : LCD alarm display, LCD Backlight,
Indicator LED Audible / buzzer (90dB at 10cm)
Data Saving
Event Log : 30 EA, Calibration Log : 30 EA
Bump Log : 30EA, Data log Two Months or longer
How to Fix
Belt Clip
Temperature
-20˚C ~ +50˚C
Humidity
10 to 95% RH(Non-condensing)
Battery Type
Manufacturer: SAMSUNG SDI, Product Name: ICP103450S, Type: Lithium-Ion Charger
Nominal Voltage : 3.7V , Nominal Capacity: 2000mAh , Max Charging Voltage: 6.3V
Battery Duration
(MGT-P : 24 Hours, MGT-N : 2 Months)
Case
Rubber-base PC Case
Size
(W x D x H) 60 x 40 x 118mm
Weight
240 g
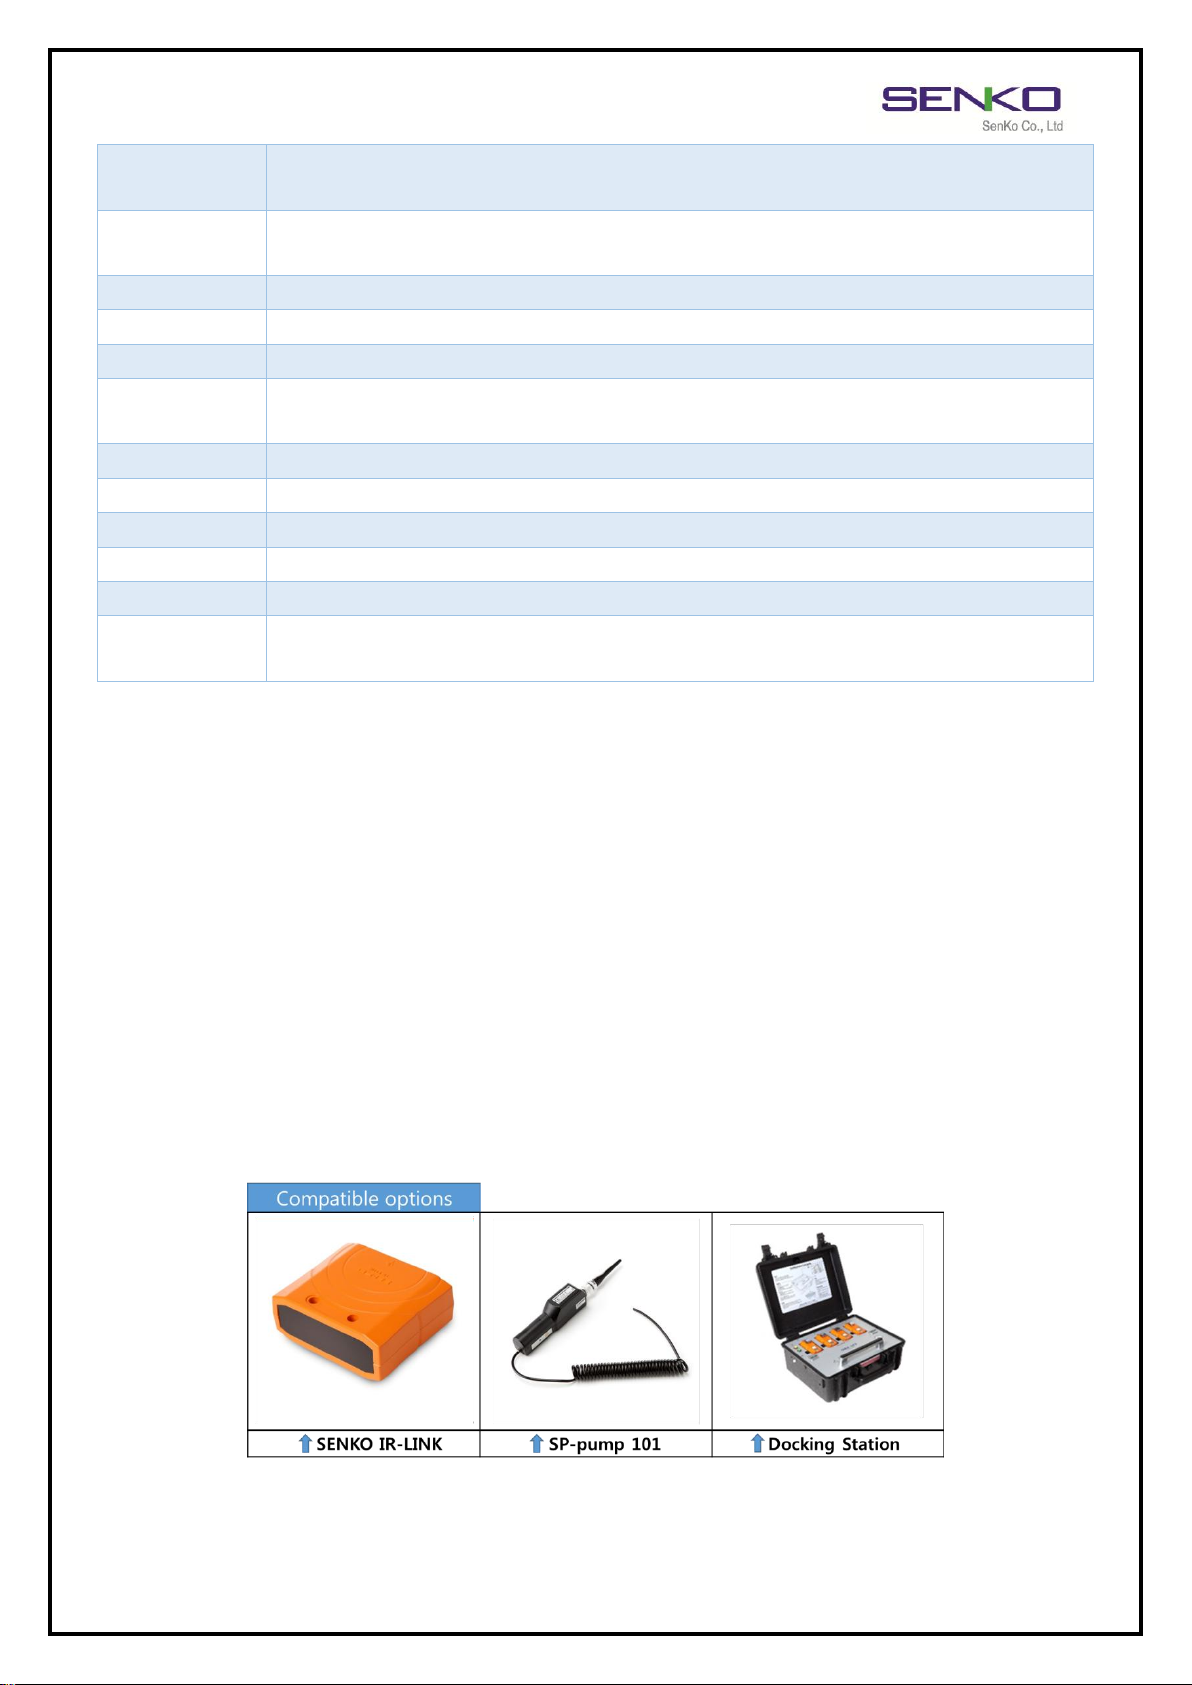
Options
SP-PUMP101 (Sampling pump), SENKO IR-LINK, Docking-Station
Certification
MGT-P : Ex d ia IIC T4, IP 67
MGT-N : Ex ia IIC T4, IP 67
14
Page 15
MGT User Manual
Limited Warranty
SENKO warrants this product to be free of defects in workmanship and materials-under normal
use and service-for two years from the date of purchase from the manufacturer or from the
product’s authorized reseller.
The manufacturer is not liable (under this warranty) if its testing and examination disclose that the
alleged defect in the product does not exist or was caused by the purchaser’s (or any third party’s)
misuse, neglect, or improper installation, testing, or calibrations. Any unauthorized attempt to
repair or modify the product, or any other cause of damage beyond the range of the intended
use, including damage by fire, lightening, water damage or other hazard, voids liability of the
manufacturer.
In the event that a product should fail to perform up to manufacturer specifications during the
applicable warranty period, please contact the product’s authorized reseller or SENKO service
center at +82-31-492-0445 to repair/return information.
73, Oesammi-ro 15 beon-gil, Osan-si, Gyeonggi-do, 18111, South Korea
Tel : +82-31-492-0445 Fax : +82-31-492-0446
Email : [email protected] Web : www.senko.co.kr
 Loading...