

Page 1

Table of Contents
Copyright and Legal Information.................................................................................... iii
Chapter 1 The Basics....................................................................................................................... 1
Chapter 2 Phone Calls .................................................................................................................. 27
Chapter 3 Settings and Profiles...................................................................................................... 42
Chapter 4 Contacts ....................................................................................................................... 55
Chapter 5 Messaging .................................................................................................................... 62
Chapter 6 Now! Screen.................................................................................................................79
Chapter 7 Calendar and Tasks ...................................................................................................... 83
Chapter 8 Camera ........................................................................................................................ 90
Chapter 9 Image Editor ................................................................................................................. 95
Chapter 10 Camcorder ................................................................................................................. 100
Chapter 11 MP3 Player .................................................................................................................104
Chapter 12 RealOne™ Player ........................................................................................................ 108
Chapter 13 Internet and WAP........................................................................................................ 112
Chapter 14 Games ....................................................................................................................... 123
Chapter 15 Managing Applications ............................................................................................... 127
Chapter 16 Extras .........................................................................................................................133
i Sendo X User Guide
Page 2

Chapter 17 Connectivity................................................................................................................ 142
Chapter 18 Accessories ................................................................................................................. 147
Chapter 19 Troubleshooting.......................................................................................................... 152
Table of Contents
Safety Information ...................................................................................................... 158
Regulatory Compliance and SAR Statements................................................................ 164
End User Licence Agreement ....................................................................................... 172
Warranty Statements...................................................................................................175
Declaration of Conformity ...........................................................................................181
ii Sendo X User Guide
Page 3

Copyright and Legal Information
Copyright and Legal Information
The wireless phone described in this guide is
approved for use on the GSM and GPRS networks
operating on the 900, 1800 (DCS/PCN) and 1900
(PCS) bands. It is approved for use in the country
where it was originally sold and may be approved
for use in other countries.
Part No. 8E30-0H011-50000, Edition 0.1 (Draft).
Copyright © Sendo 2003. All rights reserved.
SENDO is a trademark of Sendo International and/
or its affiliates. Reproduction, transfer, distribution or
storage of part or all of the contents in this document
in any form without the prior written permission of
Sendo is prohibited.
T9® Text Input is a registered trademark of Tegic
Communications. All rights reserved. T9 Text input is
licensed under one or more of the following U.S.
Patents: 5,818,437, 5,953,541, 5,945,928,
6,011,554 and additional patents are pending
worldwide. Complying with all applicable copyright
laws is the responsibility of the user.
Java and all Java-based trademarks and logos are
trademarks or registered trademarks of Sun
Microsystems, Inc. in the U.S and other countries.
The names of actual companies and products
mentioned herein may be the trademarks of their
respective owners.
This product includes software licensed from
Symbian Ltd © 1998-2003.
This product contains software licensed from Atelier.
Copyright © 2003 Atelier, All rights reserved.
Contains portions of Copyright © 2001 Symbian
Ltd.
This product contains software copyright © Beatnik,
Inc. 1996-2002.
Quick View Plus® for Symbian © 1999-2002
Stellent Chicago, Inc. All rights reserved.
Disclaimer
The information contained in this User Guide is
written for the Sendo model X phone. Sendo
reserves the right to make changes and
improvements to the products and any of the
features of the products described in this document
without prior notice.
THE CONTENTS OF THIS DOCUMENT ARE
PROVIDED "AS IS". EXCEPT AS REQUIRED BY
APPLICABLE LAW, NO WARRANTIES OF ANY KIND,
EITHER EXPRESS OR IMPLIED, INCLUDING, BUT
NOT LIMITED TO, THE IMPLIED WARRANTIES OF
MERCHANTABILITY AND FITNESS FOR A
PARTICULAR PURPOSE, ARE MADE IN RELATION TO
THE ACCURACY, RELIABILITY OR CONTENTS OF
THIS DOCUMENT. SENDO RESERVES THE RIGHT
TO REVISE THIS DOCUMENT OR WITHDRAW IT AT
ANY TIME WITHOUT PRIOR NOTICE. UNDER NO
CIRCUMSTANCES SHALL SENDO BE RESPONSIBLE
FOR ANY LOSS OF DATA OR INCOME OR ANY
SPECIAL, INCIDENTAL, CONSEQUENTIAL OR
INDIRECT DAMAGES HOWSOEVER CAUSED.
iii Sendo X User Guide
Page 4

Export Information
FCC/Industry Canada Notice
This phone may be subject to export regulation of
the United Kingdom and other countries. Diversion
contrary to law is prohibited. You must comply with
all applicable export laws, restrictions and
regulations of the United Kingdom or foreign
agencies or authorities, and shall not export, or
transfer for the purpose of reexport, the phone or
any part of the phone in violation of any applicable
restrictions, laws or regulations, or without all
Copyright and Legal Information
necessary approvals.
For Your Safety
You should observe and follow the guidelines given
in this manual for the safe and efficient use of your
phone. Failure to comply with these guidelines and
requirements may void your warranty and may
invalidate any approvals given to the phone. Please
see the Safety Information section of this manual
before you use the phone.
Approved Accessories Warning
Use only batteries, chargers and accessories
approved by Sendo for use with this phone model.
The use of any other types may invalidate any
warranty applying to the phone, and may be
dangerous. For availability of approved accessories,
please check with your dealer or visit
www.sendo.com.
When you disconnect the power cord of any
accessory, grasp and pull the plug, not the cord.
This phone may cause TV or radio interference (for
example, when using the phone in close proximity to
receiving equipment). The FCC or Industry Canada
can require you to stop using the phone if such
interference cannot be eliminated.
This device complies with part 15 of the FCC rules.
Operation is subject to the condition that this device
does not cause harmful interference.
Network Services
A number of features included in this guide are
called Network Services. They are special services
provided by wireless service providers. Before you
can take advantage of any of these Network
Services, you must subscribe to these service(s) from
your home service provider and obtain instructions
for their use. Some of these network services may
not be available when roaming on a network other
than your home network.
iv Sendo X User Guide
Page 5

Standby and Talktime Information
Memory
Copyright and Legal Information
Your phone incorporates features that are new to the
mobile phone world. These include camera and
camcorder facilities, Email, advanced graphic
games, music & video reproduction and browsing
the Internet. To enhance the quality of reproduction
we have also incorporated a 65,536 -colour display.
The way you use this display and the features will
affect the performance of the battery and how long it
lasts between charge cycles. We have quoted
standby times and talk times that show the minimum
and maximum performance you can expect from the
battery under normal network conditions and with
the default settings as set by the factory. However,
you should be aware that playing games
(particularly with the backlight continuously switched
on), using the camera and camcorder, listening to
music and watching videos will shorten the time
available for standby and to make and receive
telephone calls.
Operation times also vary depending on network
conditions, SIM settings, charging and battery
condition, how you use your phone, and other
factors.
Your phone contains an internal memory device that
stores the software required to operate the mobile
phone, communicate with the GSM/GPRS network
and provide the user interface. We have also
included some features in this internal memory to
run additional devices, such as the camera,
camcorder, and attachable keyboard, and some
additional games and utilities. Unlike some other
mobile phones you can also load your own games
and other applications into the phone from, for
example, websites such as:
http://www.sendo.com/shop
You should be aware that the amount of internal
memory available in the phone is finite and may be
insufficient to store large numbers of applications
and media files. We have provided an additional
external memory feature on the phone that provides
more resource on which to store games, photos,
video clips and applications.
You can add to the memory capacity of your phone
by inserting a memory card.
z Warning: Remember to back up your data
frequently. Always back up all data and
programs before sending your phone in for
repair.
v Sendo X User Guide
Page 6

1
Chapter 1 The Basics
The Basics
Introduction
This chapter will help you to familiarise yourself with
your Sendo X phone, enabling you to get the most
out of it.
Topics covered here include:
• How to get your phone ready for use.
• What different parts of the phone do.
• How to navigate around your phone.
• How to enter text and numbers on your phone.
• Actions which are common to different features in
your phone, for example, organising items using
folders.
• Where to get additional help about using your
phone.
In addition to telephony, your phone is equipped
with a wide range of business and entertainment
features.
The phone has a number of Personal Information
Management features, which can help you to keep
on top of a busy schedule. These include a
Calendar, Tasks feature, Contacts and Email, all of
which can be synchronised easily with your personal
computer.
The phone’s Now! screen gives speedy access to
your Calendar, Contacts, and Messages whenever
you need them - even while a call is in progress! You
can also add links to frequently used websites,
documents, and other types of file to the Now!
screen, so that all your favourites can be accessed
from the same place.
Entertainment features include:
• Camera (with flash) and Camcorder (with
sound), making it simple to take photos and
record video clips at the touch of a button, which
you can then send to your friends.
• RealOne™ player, and to watch video clips and
listen to streaming audio on the internet.
• An MP3 player and stereo headset enabling you
to listen to high quality MP3 music.
• Internet connectivity, and web browsing with the
Internet and WAP browsers. Content can be
downloaded to your phone from the Internet,
and also via wireless Bluetooth
connections.
• A selection of Java™
download further games from the Internet, for
example, from http://www.sendo.com/shop.
games. You can also
®
or infrared
Getting started
Before you can use your phone you must:
• Insert the SIM (Subscriber Identity Module) card
supplied by your service provider.
• Charge the battery.
• Install the Companion CD.
These simple steps are described on the next few
pages.
1 Sendo X User Guide
Page 7
1
The Basics
z Tip: You will have been supplied with a Quick
Start Guide with your Sendo X phone. This
guide provides simple step-by-step information
on getting started with your phone. Also, the
interactive tutorial (the Sendo X Experience) on
the Companion CD provides a demonstration
of the basic features of your phone.
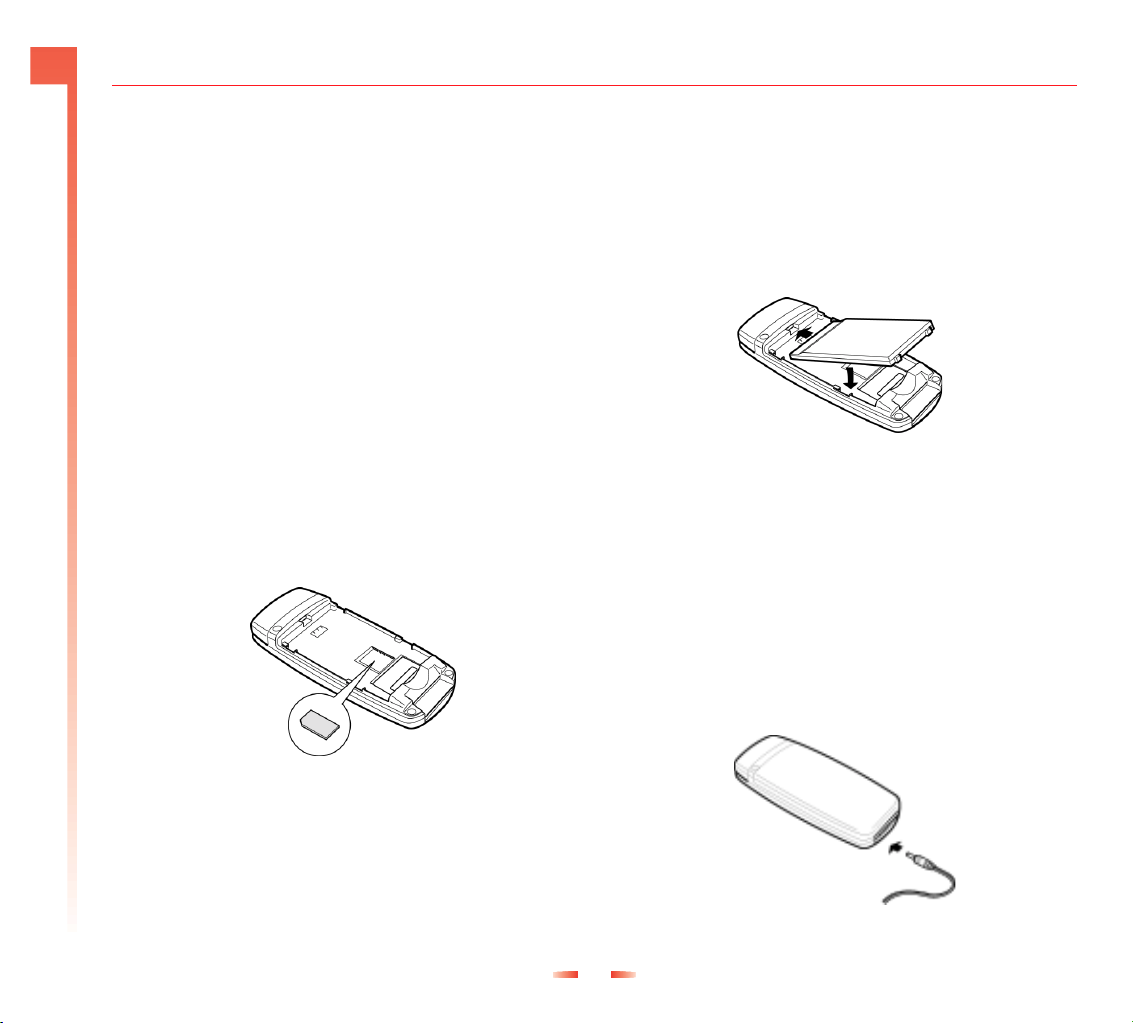
Inserting the SIM card
1. Remove the back cover of the phone - press
down on the raised Sendo logo near the bottom
of the phone, slide the cover down and lift off.
2. Remove the SIM from its packaging as detailed
in the instructions provided with the SIM. Slide
the SIM into the socket, with the logo facing you
and the cutout towards the top of the phone (as
shown below). Make sure that the gold-coloured
contacts of the card are touching the contacts of
the phone.
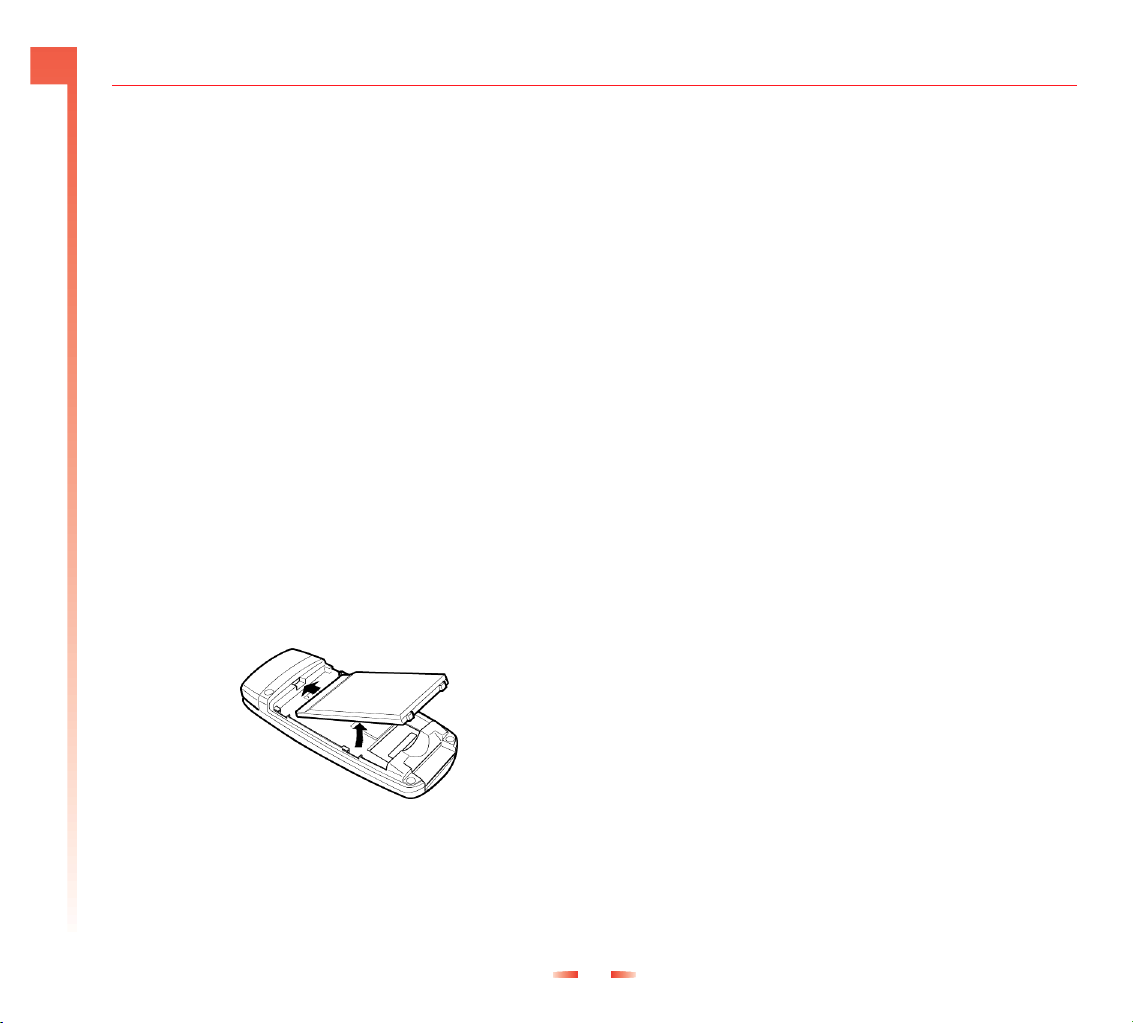
3. Insert the battery with the label facing up. Align
the tabs at the top of the battery with the tabs on
the back of the phone. Slide into place and press
down.
If you need to remove the battery, ensure your phone
is switched off, pull the small tab at the bottom of the
phone and lift the battery out.
4. Replace the cover. Place the cover onto the back
of the phone and slide the cover into place
making sure the tabs click into place.
Charging the battery
You must charge the battery for at least 4 hours
before you use the phone for the first time. After this,
the battery will normally take around 2 to 3 hours to
charge.
1. Insert the connector on the charger lead into the
connector at the base of the phone.
z Note: Keep all SIM cards out of small children’s
reach. The SIM card is easily damaged by
scratches or bending, so be cautious when
inserting and removing the card.
2 Sendo X User Guide
Page 8
1
The Basics
2. Plug the charger into a mains AC socket. When
charging commences, the battery icon will
change into a charger cable icon (insert icon).
When the battery is fully charged, the battery
icon will reappear and you can disconnect the
charger.
z Note: When the battery is completely
discharged it may take some time for the battery
charging icon (insert icon) to appear after you
have connected the charger.
Once you connect the charger, you can switch your
phone on. If the battery is completely empty, it may
take a few minutes before you can make or receive a
call once you plug the phone into a charger.
Charging and discharging
Please observe the following precautions regarding
the use of batteries and related equipment.
Note
Note that a new battery's full performance is achieved only after
two or three complete charge and discharge cycles. Operation
times provided vary depending on network conditions, SIM
settings, charging and battery condition, how you use your
phone, and other factors. Some activities, such as playing
games, accessing the Internet or using other features, reduce talk
and standby time.
The battery can be charged and discharged hundreds of times,
but it will eventually wear out. When the operating time (talk time
and standby time) is noticeably shorter than normal, it is time to
buy a new battery.
Note
Use only batteries approved by Sendo and recharge your battery
only with the chargers approved by Sendo. When a charger is
not in use, disconnect it from the power source. Do not leave the
battery connected after the battery indicator shows that the
battery is full, or for longer than a single day, since overcharging
may shorten its life. If left unused a fully charged battery will
discharge itself over time.
Do not attempt to discharge the battery by any other means.
Use the battery only for its intended purpose.
Never use any charger or battery that is damaged or worn out.
Do not short circuit the battery. All batteries can cause property
damage, injury or burns if a conductive material such as jewelry
or keys comes into contact with the exposed terminals. The
material may complete an electrical circuit and become quite
hot. Exercise care in handling your phone battery. For example,
avoid carrying your phone battery loose in a pocket or purse.
This product is designed for use with Sendo-approved batteries
only. Use of unapproved batteries may be dangerous and may
cause damage to the battery or the phone and may void your
warranty.
Leaving the battery in hot or cold places, such as in a closed car
in summer or winter conditions, may reduce the capacity and
lifetime of the battery. Always try to keep the battery between
15°C and 25°C (59°F and 77°F). A phone with a battery that has
been exposed to temperature extremes may temporarily not
work, even when the battery is fully charged.
Dispose of the battery properly. Comply with all local laws or
regulations in disposing of your battery. Do not dispose of
batteries in a fire.
3 Sendo X User Guide
Page 9

1
The Basics
Installing the Companion CD
The Companion CD provides:
• Sendo PC Connect software for performing
synchronisation between your Sendo X phone
and PC (see Connecting to your PC on Page 146).
• Companion software to help you learn how to
use your phone and add to/customise your
phone’s features.
z Note: The software requires a minimum
specification on your PC. See the Minimum PC
system requirements on Page 4 section below
for details.
To install the software on your PC, simply insert the
CD into your CD drive. The autorun feature will
launch the installation process automatically. Simply
follow all on-screen instructions.
z Note: If autorun is not set on your PC, then
please browse to the CD in Windows Explorer,
and run the companion.exe file.
We recommend that you register your phone with
Sendo. A link is provided in the Companion
software.
Once installed, launch the Companion software
using your normal method in Windows.
Minimum PC system requirements
Some features of your Sendo X phone package,
require a PC. The following is a list of the minimum
PC system requirements:
General requirements:
• Microsoft Windows® XP (Professional and Home
Editions), 2000, ME, 98, or 98SE.
• An internet browser (for web links only).
• Adobe® Acrobat® Reader® (included on the
Companion CD).
• VGA or compatible video graphics adapter
• CD-ROM drive.
• Keyboard.
• Mouse or compatible input device.
Additional Sendo PC Connect requirements:
• Compatible Personal Information Manager (such
as Microsoft Outlook® 98) as detailed in the
Connecting to your PC on Page 146 section. This
is required for PC synchronisation of e-mail,
calendar, contacts, and tasks.
• 65 MB of available hard disk space.
• Available infrared port, USB port or Bluetooth
connection.
4 Sendo X User Guide
Page 10
1
s
Getting to know your phone
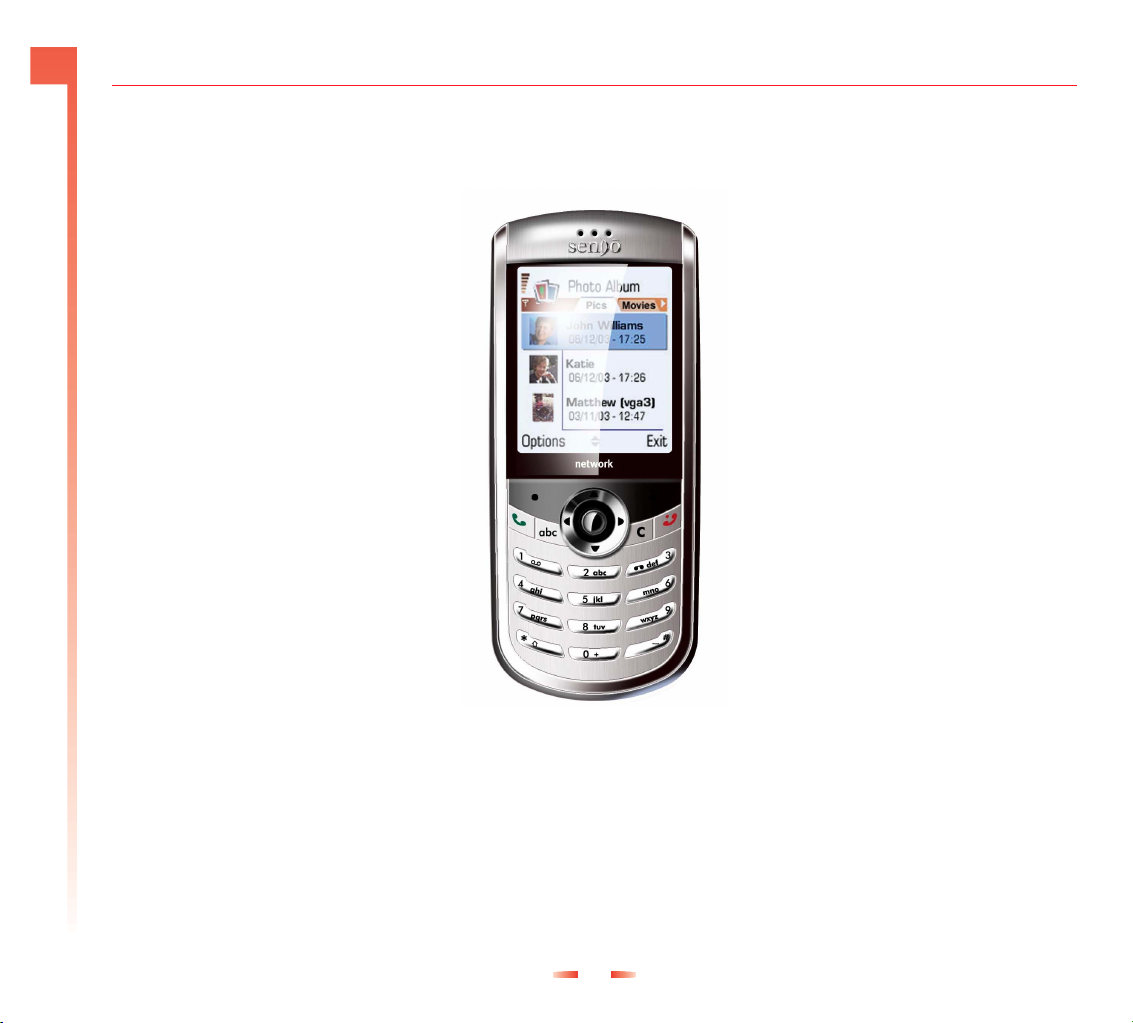
Figure 1 Your phone layout - front view
The Basics
Wrist/Neck Strap Hook
Headset Connector
Earpiece
Menu Key
Loudspeaker
Left Soft Key
Call Key
Edit Key
Voicemail
Asterisk Key (*)
Accessory Connector
Charger Connector
Call Key
External Antenna
Connector
Camera Lens
Self Portrait Mirror
Flash
Infrared (IrDA) Port
Power Key
Voice Key
Colour Screen
5-way Joypad
Right Soft Key
End Key
Clear Key
Launch Camera
Numeric Keypad
Hash Key (#)
International Acces
Key (+)
Microphone
5 Sendo X User Guide
Page 11
1
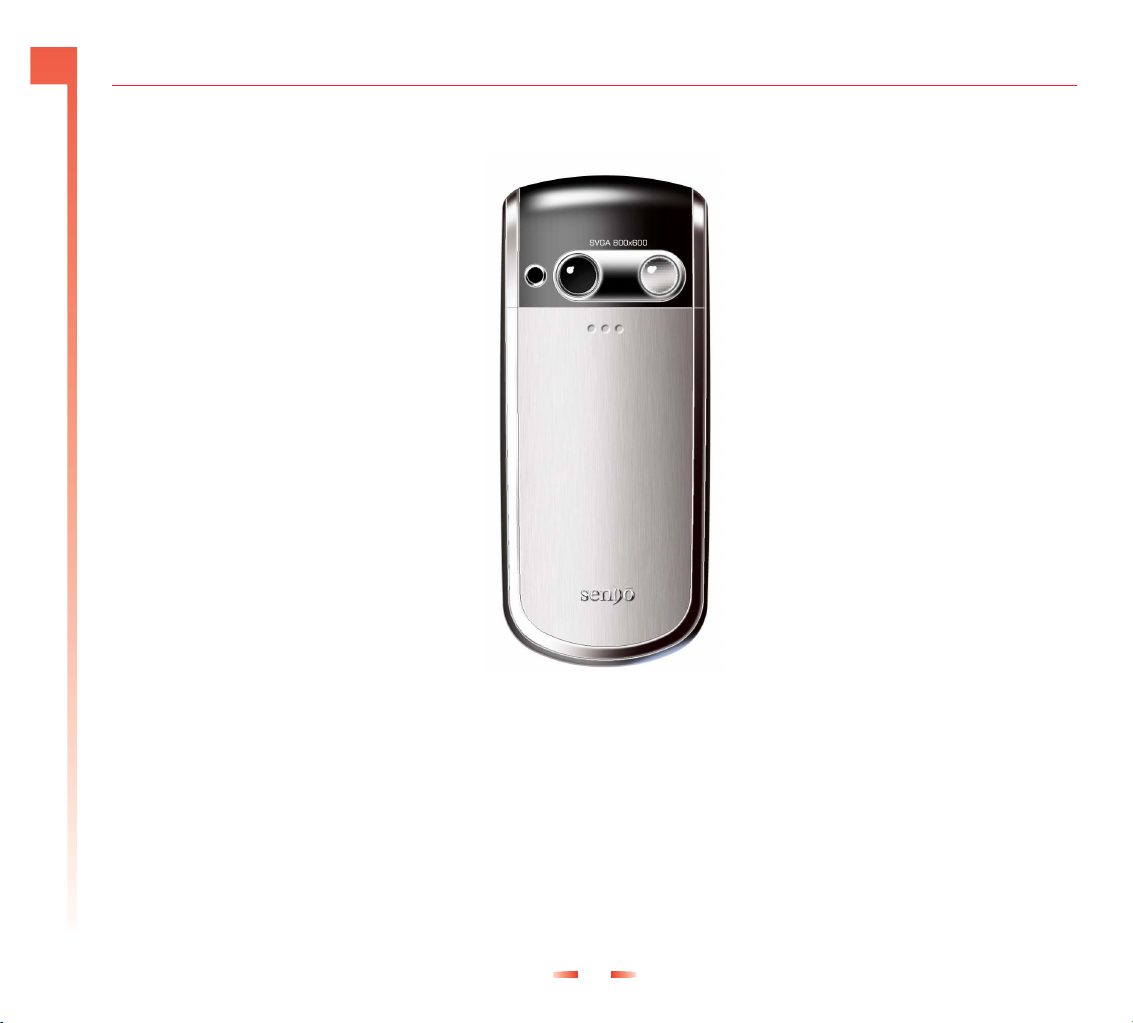
Figure 2 Your phone layout - rear view
The Basics
External Antenna
Connector
Camera Lens
Self Portrait Mirror
Flash
6 Sendo X User Guide
Page 12

1
The Basics
Switching your phone on and off
• Press the Power key p to turn your phone on.
• Press and hold the Power key p to turn your
phone off.
Speakers
The phone has two speakers:
1. Earpiece - provides the speaker functionality for
voice calls.
2. Loudspeakers - provides the speaker
functionality for voice calls (in speakerphone
mode), ring tones and device/software sound
effects.
z Warning: Do not hold the loudspeakers to your
ear when using speakerphone or audio modes.
Microphone
• Speak into the microphone during a call or to
record a voice memo or voice tag. You don’t
need to speak directly into the phone when
you’re using speakerphone mode.
Volume
• Control the volume of the earpiece and the
loudspeaker by pressing the left [ joypad key
(decrease volume) or the right ] joypad key
(increase volume). This can be done during a
call, or when a volume control view is displayed.
Display
• The phone has a colour screen, 176 x 220 pixels
in size.
• The top of the display shows a title bar, where
you can see status indicators about your phone’s
current mode, or the name of the current activity
or active feature.
• The bottom of the display shows which
commands are currently assigned to the phone’s
soft keys (see Soft keys on Page 8).
• The rest of the display shows the main screen
data. The screen display changes depending on
what you are currently doing with the phone.
When you switch on your phone, the Now! screen
is displayed.
Headset connector
• Use to connect a stereo headset. You can use a
headset to make and receive voice calls or to
listen to music and other audio. See Accessories
on Page 147 for details of using a stereo headset.
7 Sendo X User Guide
Page 13

1
The Basics
Now! screen
• The Now! screen displays lots of useful
information, such as whether you have any new
messages, and whether you have missed any
calls. You can customise your Now! screen to add
photos, and links to your favourite websites. See
Now! Screen on Page 79 for more information.
z Note: The Now! screen can be fully customised.
Therefore your Now! screen may contain
additional or different information to the
examples shown in this guide.
Date and time
The phone displays the current date and time in the
Now! screen. See Date and time settings on Page 48
for details of how to reset the date and time.
Changing profiles
A profile is a set of instructions for how the phone
alerts you to incoming calls and messages. There
are 5 profiles predefined on your phone - you can
edit the profiles so that they work best for you. For
more information about profiles see Profiles on
Page 53.
Voice key
• Use the Voice key t for voice dialling, to record
voice tags, and to record notes and other sound
clips.
Soft keys
• There are two soft keys on your phone – left g
and right d. They are located directly below
the display screen. Each soft key performs the
command which is displayed immediately above
it on the screen. These commands change
depending on which screen is in use.
Menu key
• The Menu key s takes you to the Menu screen,
from where you can open any of the phone’s
features.
• Press the Menu key s in the Menu screen to take
you back to the Now! screen.
• Press and hold the Menu key s to show a list of
all features which are currently in use. You can
then use this list to move quickly between
features.
!
To change your profile
1. While the phone is switched on, do a short press
on the Power key p.
2. The profile currently being used has a tick
displayed next to it. Use the up : and down ;
joypad keys to select the profile you want to use
and press OK g.
8 Sendo X User Guide
Page 14

1
The Basics
Call key
The Call key c:
• Answers an incoming call.
• Dials a phone number you have entered using
the numeric keypad, or a speed dial.
• Opens the call history Log feature when pressed
from the Now! screen.
• Dials a phone number you have selected from
the call history Log.
• Redials the most recently dialled number when
pressed twice from the Now! screen.
• Places a call on hold to answer a second
incoming call (if you are subscribed to a Call
Waiting service).
• Switches between an active call and a call that is
on hold.
End key
The End key f:
• Ends active data calls at any time.
• Ends a voice call when one party is on the line,
and ends the active call when multiple parties are
connected.
z Note: Conference calling is a Network Service.
Edit key
The Edit key e:
• Changes the text entry mode when inputting
data.
• Marks items in a list.
Clear key
The Clear key r:
• Backspaces over one or more characters when
you are in a text field, deleting them.
• Displays the previous screen.
z Note: In some cases you may have to press the
appropriate soft key to return to the previous
screen.
5-way joypad
• Use the joypad to move up :, down ;, left [,
or right ] (for example, in a menu or a text
field).
• The Select key A is at the centre of the joypad.
Press it to confirm a selection. The Select key’s
functionality is similar to pressing Enter on a
computer keyboard.
• Many games use the joypad - see their specific
instructions.
Numeric keypad
• Use to enter numbers and characters.
Asterisk key
• Pressing and holding the Asterisk key * switches
between text and numeric input modes. In
multitap text or predictive text modes, a short
press switches between caps, caps lock and
lowercase entry.
9 Sendo X User Guide
Page 15

1
The Basics
Hash key
• Press and hold the Hash key # to display a list of
symbols when you are in input mode.
Voicemail shortcut key
• To call your voice mailbox, press 1 followed by
Call f, or from the Now! screen, do a long
press on 1.
z Note: Voicemail is a Network Service. Check
with your service provider for more information.
Camera shortcut key
• To launch the Camera from the Now! screen,
press and hold 3.
WAP shortcut key
• To launch the WAP browser from the Now!
screen, press and hold 2.
Antenna
• Your phone has an internal antenna which is
located on the rear of the phone, above the
battery compartment.
External antenna connector
• This is located on the back of the phone. Use this
to connect to a different antenna; for example, a
car kit could plug into this to use with an antenna
mounted on the outside of your car.
Infrared (IrDA) port
• Align the infrared (IrDA) port with the infrared
port on another device to exchange information
between your phone and the other device.
Accessory connector
• Use this connector to attach included or optional
accessories, such as the USB cable or foldable
keyboard.
Charger connector, or in-car charger
• Plug the approved charger in here.
z Warning: Contact with the antenna affects call
quality and may cause the phone to operate at
a higher power level than otherwise needed.
For best results, avoid covering the antenna
area with your hand.
10 Sendo X User Guide
Page 16
1
Feature list
The Basics
z Note: The list of features shown in your phone’s Menu screen may not be identical to the list given below.
Icon Feature Description
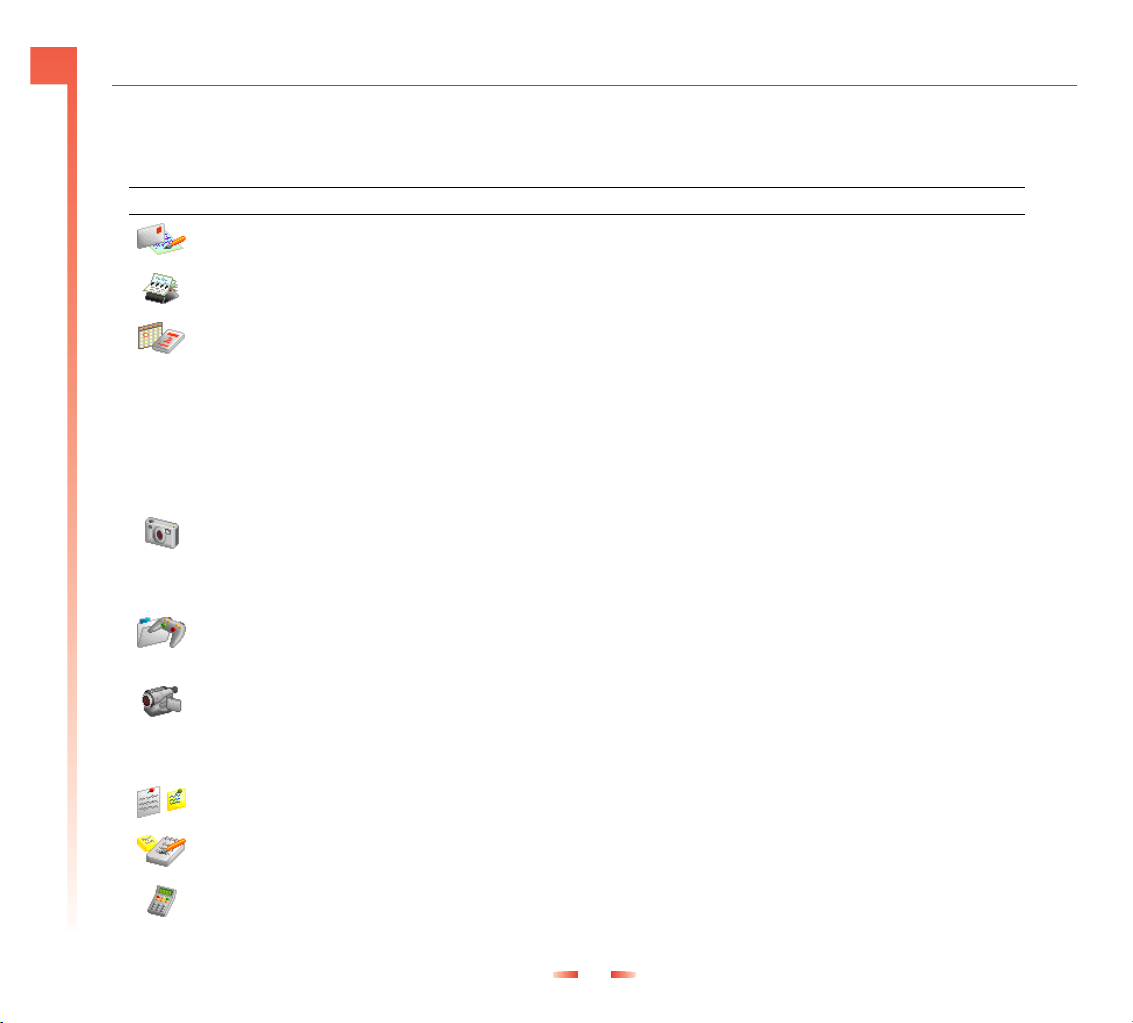
Messaging Send, read and manage SMS (text) messages, MMS (multimedia) messages, and Emails.
Contacts Edit, store and view all your contact details.
Calendar Edit, store and view all your appointments.
Internet Browse the Internet with the Opera browser.
WAP Use WAP Internet services.
Instant messaging * See if your friends and family are online, and communicate with them faster than Email or text
Camera Use your phone as a camera whenever, wherever.
Photo Album Store and manage your photos.
Games Play advanced games. Your phone includes:
Camcorder Record video clips with sound, and play them back.
RealOne Player Play MP3, other audio files, and video clips with the built-in RealOne Player.
Tasks Store a list of outstanding tasks.
Notes Write memos and other text notes.
Calculator Do calculations on the move.
messages.
Sendo Pinball
Sendo Farm
There may be other games in the Games folder, if you have downloaded games to your phone.
11 Sendo X User Guide
Page 17

1
Icon Feature Description
Profiles Change the way that your phone responds to incoming calls and messages.
The Basics
Settings Set the defaults for your phone.
SIM toolkit * Operator services that may be contained on the SIM card (such as traffic, news or shopping
Doc viewer View different types of document, such as .doc, .xls, and .pdf files.
Bluetooth Connect to another compatible device via a Bluetooth connection to send or receive data.
Infrared Connect to another compatible device via an infrared connection to send or receive data.
Modem Use your phone as a modem for your laptop computer or another device. Normally located in
Log Tells you about your phone’s call history. Normally located in the Tools folder in the Menu
SIM Contacts Access any contact details that are stored on your SIM card. Normally located in the Tools
Speed dial Set up and view speed dials. Normally located in the Tools folder in the Menu screen.
Program Manager Manage any extra features that you have downloaded. Normally located in the Tools folder in
Java Apps. Manage any Java applications that you have downloaded. Normally located in the Tools folder
Memory card Access the phone’s memory card, if you have one. Normally located in the Tools folder in the
services).This may not be installed on your phone. Check with your service provider for details.
Normally located in the Connectivity folder in the Menu screen.
Normally located in the Connectivity folder in the Menu screen.
the Connectivity folder in the Menu screen.
screen.
folder in the Menu screen.
the Menu screen.
in the Menu screen.
Menu screen.
Recorder Record voice notes, voice tags, or even your own ring tones. Normally located in the Extras
Clock An alarm clock, which tells you what time it is in different time zones around the world.
folder in the Menu screen.
Normally located in the Extras folder in the Menu screen.
12 Sendo X User Guide
Page 18
1
Status Indicators
The Basics
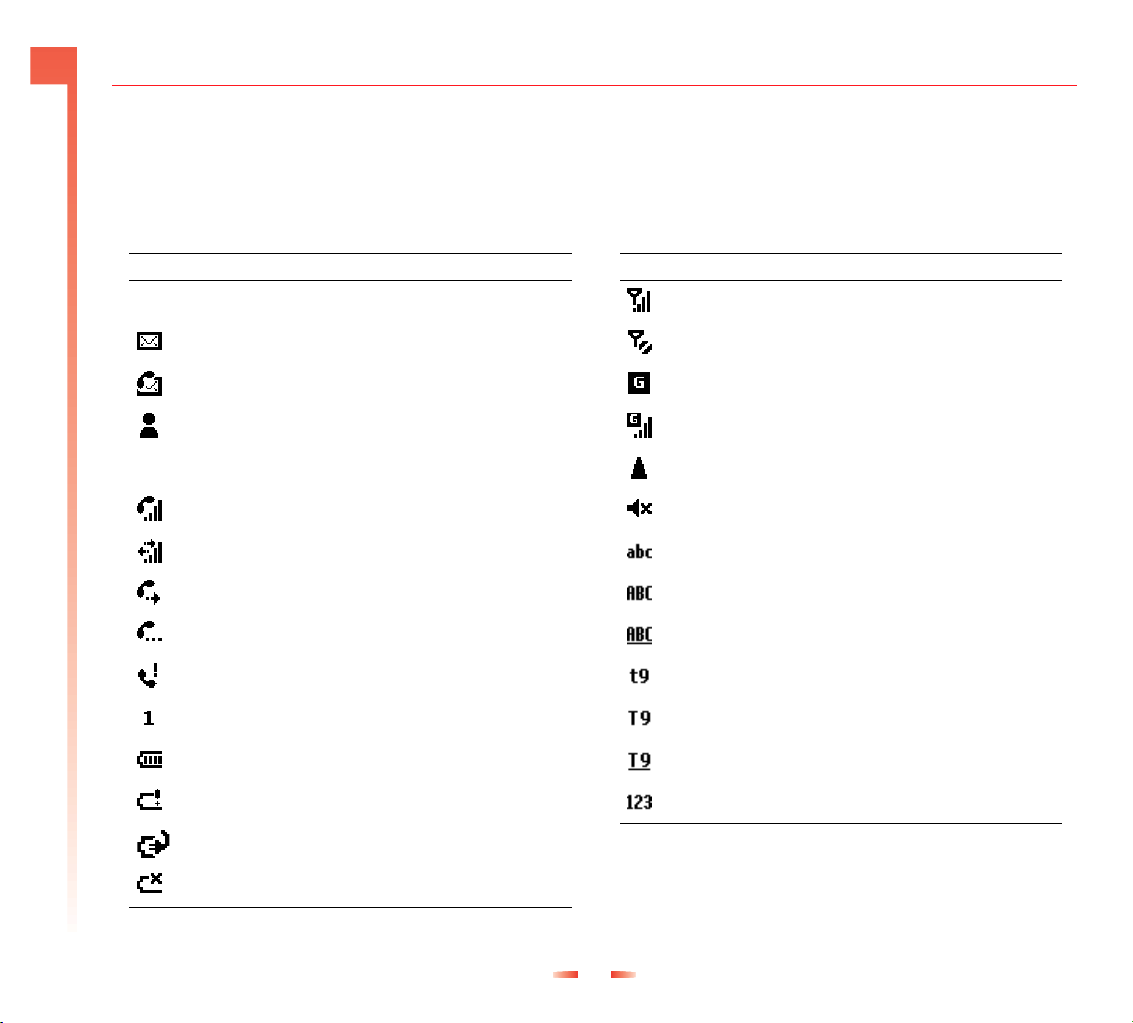
Status indicators are displayed in the title bar at the
top of the phone’s display. The following table lists
some of the common status indicators and their
meanings.
Indicator Meaning
New SMS, MMS or cell broadcast message
New Email
New voicemail
New instant message
Camera flash is active
Voice call active
Data call active
Call forwarding /Call Divert
Call on hold
Missed call
Line 1
Battery level
Low battery
Battery charging
Indicator Meaning
Signal strength
No signal
GPRS available
GPRS in use
Roaming
Ringer off
Multitap text input mode, lowercase
Multitap text input mode, uppercase
Multitap text input mode, caps lock
T9 predictive text input mode, lowercase
T9 predictive text input mode, uppercase
T9 predictive text input mode, caps lock
Numeric input mode
No battery
13 Sendo X User Guide
Page 19

1
Navigation
The Basics
The following section describes the different ways of
navigating around your phone to accomplish tasks
quickly and easily.
Using the 5-way joypad
Use the joypad to navigate horizontally and
vertically on the screen and to move the selection
focus, so you can select the item you want.
The following table shows what actions you can take
using the joypad:
Action Navigation
Press Up : Moves the selection focus upward on the
Press Down ; Moves the selection focus downward on the
Press Right ] Moves the selection focus right on the
Press Left [ Moves the selection focus left on the screen,
Press Select A Confirms a selection that you’ve made.
screen, or scrolls up in a list.
screen or scrolls down in a list.
screen, or moves the cursor right through
characters in a text field.
or moves the cursor left through characters
in a text field (without deleting characters).
Using the navigation bar
The navigation bar is displayed just above the main
screen data, and is an aid to horizontal navigation
using the left
The navigation bar displays tabs with small arrows
to indicate that there are more views, folders, or files
to move to horizontally. (insert screen shot of
navigation bar)
[ and right ] joypad keys.
Using lists and grids
On your phone, you will find that many features use
lists and grids to display information.
• Lists are displayed vertically, and are navigated
using the up : and down ; joypad keys.
• Grids can be navigated both horizontally and
vertically, using all of the directional joypad keys.
The Menu screen displays the phone’s features in
grid format.
(insert screen shot of Menu screen)
Using the Now! screen
The Now! screen is displayed automatically when
you turn on your phone, or when your phone is
turned on but idle.
It is designed to allow you quick and easy access to
many of your phone’s key features, and allows you
to add your own links to phone features, web sites,
photos, games, or whatever you use most often.
See Now! Screen on Page 79 for more information.
Using the Menu screen
Your phone comes pre-installed with many features
that you can start using right now. For more
information about installing additional features on
your phone, see Managing Applications on
Page 127.
The Menu screen displays a grid of icons which
represent all of the currently installed features.
z Note: If your network provides a SIM Toolkit to
access special services or features on your SIM
14 Sendo X User Guide
Page 20

1
The Basics
!
!
card, the toolkit is added to the Menu list. The
name, icon and contents of the toolkit are totally
dependent on your service provider. The name
changes to indicate the type of service, for
example “Information”. For more details,
contact your service provider.
To open a feature from the Menu screen
1. From the Now! screen, press the Menu key s.
z Tip: Press the Menu key s to switch between
the Now! screen and the Menu screen.
2. Scroll to the feature you want using the
directional joypad keys.
3. Press Select A, or press Options g and select
Open.
z Note: Only nine feature icons will fit on the
screen at a time. If more features are available,
you can see them by using the up : and down
; joypad keys to scroll through the grid.
To close a feature
• Press Options g and select Exit.
Or:
• Use the right soft key d where it is labelled Exit
or Back to step back out of the current feature.
Rearranging the Menu screen
You can rearrange the order of the Menu screen as
you like. For example, you may want to move a
feature which you use frequently, to the top of the
grid.
!
To move a feature
1. Highlight the Menu icon you wish to move, using
the joypad.
2. Press Options g and select Move. A tick
appears next to the feature you have selected.
3. Navigate the screen using the joypad to where
you want to position the icon.
4. Press OK g to confirm the move.
Switching between features
If you have more than one feature open at a time,
you can switch between them by pressing and
holding the Menu key s. This causes a list of
currently open features to appear. You can then
scroll through the list using the joypad and select the
feature you want to go to by pressing Select A.
Using the Clear key
The Clear key r is used to navigate back to a
previous view, screen or feature, and also as a
backspace key when you are inputting text.
!
To go back to the previous screen
• Press the Clear key r.
15 Sendo X User Guide
Page 21

1
!
The Basics
!
!
To backspace and remove one character in a text
field
• Press the Clear key r.
To backspace and remove multiple characters in a
text field
• Press and hold the Clear key r.
Navigating with the soft keys
On many screens, the left soft key gis labelled
Options. Pressing the Options soft key g displays
the Options menu - a list of options that are relevant
to the screen you are viewing.
To access menu options
1. Press Options g.
2. Select the menu option you want using the
joypad, and press Select A, or Select g.
z Tip: From the top of a menu, press the up :
joypad key to move the selection focus straight
to the bottom of a menu.
To leave the Options menu without making a
selection, press d Cancel.
The right soft key d is often labelled Back or Exit.
Pressing Back d or Exit d has the same effect as
pressing the Clear key r, i.e., it takes you back to
the previous view, screen or feature.
Common actions
You may notice that the pre-installed features on
your phone share a common “look and feel”, for
example:
• menus are set out and navigated in the same
way
• colour schemes are the same
• the softkeys perform the same commands
This common design should make using the
different features on your phone easier.
The table below shows a list of commands from the
Options menu which are common to most features
on the phone (apart from those which you have
installed yourself). You can access these commands
by pressing Options g.
16 Sendo X User Guide
Page 22

1
The Basics
Select this To
Open Open any highlighted item (feature, document,
picture, list item, etc.).
Edit Open any item for editing, e.g., contact details.
Rename Rename any item (folder, document, picture,
video clip, etc.).
Delete Delete any item. You will be prompted to
choose whether you are sure you want to delete
the item, to avoid things being deleted
accidentally.
Mark Mark several items in a list so that you can
perform an action on all of them at once. This
is useful for deleting or moving items, for
instance. A marked item has a tick displayed
next to it.
Unmark Remove the tick from previously marked items.
Create folder Create a new folder to store items in. You will
be asked to key in a name for the folder.
Move to folder Move an item or items to an existing folder. A
list of all existing folders is displayed, which you
can select from.
Find Search for the location of an item (file, picture,
contact, etc.). The phone suggests the closest
name matches, which will be narrowed down
as you type in more characters.
Entering text and numbers
You can enter text and numbers on your phone using
the keypad. Your phone supports three input modes
for entering text and numbers:
• Multitap - normal text entry mode.
• T9 - predictive text entry mode.
• Numeric - number entry mode
z Note: When you select a field that requires text
or numeric entry, the phone automatically
defaults to the appropriate input mode. The
status indicator on the title bar shows the input
mode you are currently using.
z Note: Some networks may not support all
language dependent characters.
!
To switch input modes
• Press and hold the Hash # key until the status
indicator for the input mode you want is
displayed in the title bar.
• To switch between uppercase and lowercase text,
do a short press on the Hash # key.
z Tip: To set predictive text input on or off when
writing text, press the Hash # key twice in
quick succession.
Entering text in Multitap mode
When you are in Multitap mode (sometimes called
multipress mode), you enter a letter by pressing the
number key on which the letter is printed.
17 Sendo X User Guide
Page 23
1
The Basics
!
z Note: Most keys have extra characters as well as
those printed on the key.
Press the key repeatedly until the required character
is displayed. The letter entered most recently is
underlined until you have completed the key presses
for the letter and moved on to the next one.
For example:
• To enter the letter “i” press 444.
• To enter the word “maria,” press 6, 2,
777, 444, 2.
If a word you are entering contains two consecutive
letters which are located on the same key, pause
after entering the first letter and wait until the
underline disappears before entering the next letter.
For example:
• To enter the word “anna,” press 2, 66
pause until the underline disappears, press
66 again and then press 2.
z Tip: You can avoid this wait by pressing the right
] joypad key after entering the first character.
To enter punctuation in Multitap mode
• Press 1 repeatedly to cycle through common
punctuation, or
• Press the Asterisk key * to display a list of
special characters. Select the symbol you want
using the joypad and press Select A or OK g.
Entering text in T9 mode
To save time when you are writing a message you
can use Tegic T9 predictive text entry. This is a builtin dictionary feature which guesses words by the
sequence of letters you are typing.
If you use T9, you only have to press each key once.
The letters change as you type, so it is important that
you ignore what is displayed on the screen until you
have finished typing completely.
For example, to enter the word "maria" you can spell
out the word with just five key presses, 6 2
7 4 2.
T9 Text input recognises that the most commonly
used word matching that numeric sequence is
"maria".
If the word which you are typing shares the same
sequence of keys with another word, the wrong word
may be displayed, but you can still select the correct
word:
• Press the Asterisk key * repeatedly to display all
matches one at a time, or
• Press the Edit key (insert symbol) and select
Dictionary then Matches from the pop-up menus,
to display all the matches in a scrollable list.
Press Select A to confirm your choice and insert a
space.
If a
? character appears after a word that you have
?
typed, it means that it is not in the phone’s
dictionary. You can add a word to the dictionary by
18 Sendo X User Guide
Page 24

1
The Basics
!
!
pressing Spell g, keying in the word using
multitap mode, and pressing Save g.
You can also add a new word to the dictionary, or
edit a word, by pressing the Edit key (insert symbol)
and selecting Dictionary, followed by:
•Insert word - add a word up to 32 characters in
length using multitap text entry.
•Edit word - edit a word that is active (underlined).
To switch T9 mode on and off
• Press the Edit key (insert symbol) and select
Dictionary on to activate predictive text for all
features in the phone where you can enter text.
• Press the Edit key (insert symbol) and select
Dictionary off to turn off predictive text for all
features in the phone where you can enter text.
To enter text using T9 mode
1. Press and hold the Hash # key until the T9
indicator appears on the title bar.
2. Enter the key sequence that represents the word
you want to write. Remember to ignore what you
see on screen until you’ve finished typing.
3. Press Select A to accept the word displayed on
the screen and enter a space after it, or press *
to scroll through other matching words, and
select the one you want with Select A.
4. If you don’t see the word you need, press the Edit
key (insert symbol) and select Dictionary,
followed by Insert word.
!
To enter a number in T9 mode
• Press and hold the desired number key, or
• Press the Edit key (insert symbol) and select Insert
number. Key in the number required and press
OK g.
!
To enter punctuation in T9 mode
• Press 1 repeatedly to cycle through common
punctuation, or
• Press the Asterisk key * to display a list of
special characters. Select the symbol you want
using the joypad and press Select A or OK g.
Entering numbers in Numeric mode
Press and hold the Asterisk key * to switch to
Numeric mode and then just press the number(s)
you want to enter on the keypad. If a field only
permits a numerical entry, the input mode
automatically switches to Numeric mode.
Miscellaneous input tasks
!
To enter a space
• In Multitap or T9 mode, press 0.
!
To start a new line
• Press 0 three times.
!
To change between uppercase and lowercase
• When using either Multitap or T9, press the Hash
# key to change between uppercase and
lowercase.
19 Sendo X User Guide
Page 25

1
z Tip: When you are in any text mode, the first
letter of a sentence is automatically capitalised.
!
The Basics
To enter a sy m b o l
• Press and hold the Asterisk * key, select the
symbol you want, and then press OK g.
!
To enter an asterisk *, or a Hash sign #
• Switch to Numeric mode, and press either * or
# on the keypad.
!
To delete characters
1. Press Clear r to backspace and delete a single
character.
2. Press and hold Clear r to delete an entire text
field.
!
To enter the plus (+) sign for international calls
• Press and hold 0.
Securing your phone
You can secure your phone by locking the keypad,
the entire phone, or the SIM card.
z Tip: You should keep a record of any codes or
passwords that you need to unlock your phone,
but make sure they are securely stored, away
from the phone.
!
To lock you r k e y p a d
• From the Now! screen, press the left soft key g
and then press Asterisk *.
Or
• Do a short press on the Power key p, and
select Lock keypad.
The keypad is now locked.
z Note: You can still receive calls and make
emergency calls when the keypad is locked.
However, one key emergency dialling ('the 9
key') does not operate.
!
To unlock your keypad
• Press Unlock g and then press Asterisk *.
z Note: Locking your keypad does not prevent
unauthorised use of the phone.
Locking your phone
Locking your phone helps to prevent access to
personal data. If you switch the phone lock function
on, your phone automatically locks after a specified
time of inactivity. You must enter your phone lock
pass code before you can use the phone again.
z Note: You can still receive calls and make
emergency calls when the phone is locked.
Locking the keypad
The keypad lock turns off the keypad functionality.
This is useful if, for example, your phone is turned on
and stored in your pocket, so that you avoid
accidental key presses.
z Warning: If you forget your pass code, you may
not be able to access your phone again without
potential data or application loss. This only
applies to applications you have added to the
phone yourself. For instructions on how to reset
your phone, see Total Re s et on Page 2 1.
20 Sendo X User Guide
Page 26

1
!
The Basics
!
!
!
To set up phone lock defaults
1. From the Menu screen, scroll to the Settings icon
and press Select A.
2. Select Security, then Phone and SIM, and then
select Lock code to enter a new, 5 digit pass
code. You must input the existing lock code first,
then you will be asked to enter your new lock
code twice. Press OK g when you have
finished.
3. Select Autolock period and enter a time period
(in minutes) after which the phone will
automatically lock itself, if no keys have been
pressed, or select None to disable the autolock.
To lock your phone
1. Press the Power key p and select Lock phone
from the list of options displayed.
2. Key in your 5-digit lock code, using the numeric
keypad. Press OK g.
To unlock your phone
1. Press Unlock g.
2. Key in your 5-digit lock code, using the numeric
keypad. Press OK g.
To turn off phone autolock
1. From the Menu screen, scroll to the Settings icon
and press Select A.
2. Select Security, then Phone and SIM, and then
Autolock period. Select None to disable the
autolock.
Locking the SIM card
Locking your SIM card should prevent use of the
phone to make a call, but you can still turn it on and
make emergency calls. When you switch your phone
on, you may be prompted for your PIN1 password,
which you must enter correctly before you can use
your phone.
If you forget your PIN1 password, you must enter a
PUK (Personal Unlock Key). This may be listed in the
information that you received with your SIM card or
it may only be available from your service provider.
z Note: Sendo cannot provide your PUK code.
Contact your service provider for information.
!
To lock t h e S I M c a r d
1. From the Menu screen, scroll to the Settings icon
and press Select A.
2. Select Security, then Phone and SIM, and then
switch the PIN code request setting to On. Press
OK g.
!
To unl o c k t h e S I M c a r d
1. From the Menu screen, scroll to the Settings icon
and press Select A.
2. Select Security, then Phone and SIM, and then
switch the PIN code request setting to Off. Press
OK g.
Total Reset
There is a function which allows you to reset your
phone; that is, restore all the settings and defaults
that were in place when you purchased it.
21 Sendo X User Guide
Page 27

1
The Basics
!
z Warning: This function removes all applications
and data from the internal phone memory that
you may have added. Any applications or data
on a memory card will NOT be lost.
You should only use this function if you have no
other alternative. For example, if you have forgotten
or lost the passwords to unlock your phone or you
have installed an application which has damaged or
corrupted the phone.
z Tip: If you synchronise with your PC regularly,
you should be able to retrieve your Outlook
data, for example Contacts, Calendar and so
on, when you synchronise with your PC again.
z Tip: Use the Backup feature in the Sendo PC
Connect software when you add any new
applications, or after changing a lot of data.
You could then use the Restore feature, also in
the Sendo PC Connect software, to minimise
data loss.
Reset your phone
1. Turn the phone off. If you can’t turn your phone
off in the normal way, you must remove the
battery for several minutes and then reinsert it.
2. Plug in the charger. The phone will begin to
charge in off mode.
3. Press and hold the 5 key.
4. Whilst still holding the 5 key, press p.
5. A screen is displayed while the phone switches
on - but keep holding number 5 until the
following screen appears:
(insert screen shot of total reset screen)
6. Press the green tick soft key d to confirm the
reset.
7. The phone will now start up as normal. It may
take several minutes for the Now! screen to be
displayed. During this time, the display will not
change - do not remove the charger or switch
the phone off.
Memory
Your phone has a finite amount of internal memory
available, but if you have a memory card (MMC or
SD format) you can use it to supplement your
phone’s internal memory.
Shared memory
Some features on the phone share the same
memory:
• Contacts
• Messaging
• Photo Album
• Video Album
• RealOne Player
• Calendar
• Ta sk s
• Any downloaded features, including Java games.
Using any of these features will leave less memory
available for other features to use.
22 Sendo X User Guide
Page 28
1
The Basics
!
If you use any of these features excessively, your
phone may display a message warning you that the
memory is running low. In this case, you should
delete some of the objects that are using up the
memory (photos, video clips, sound clips, Emails,
MMS messages, downloaded games, etc.).
Memory cards
You can use a memory card to store multimedia
objects such as photos, video clips, sound files, and
to back up information from the phone’s memory.
z Note: Keep all memory cards out of the reach of
small children.
To insert a memory card
1. Remove the back cover of the phone - press
down on the raised Sendo logo near the bottom
of the phone, slide the cover down and lift off.
2. Insert the memory card in its slot, label side up,
as shown in the figure below. Make sure that the
card is firmly in place.
Using a memory card
If you have a memory card in your phone, you can
access it from the Tools folder in the Menu screen.
Before you can use a memory card for the first time,
you must format it.
!
To format a memory card ready for use
1. Use the joypad to scroll to Tools in the Menu
screen and press Select A.
2. Scroll to Memory card and press Select A.
3. Press Options g and select Format mem.
card.
4. You will be prompted whether you want to
format the memory card. Press Yes g.
z Warning: Formatting a memory card will delete
all data.
3. Replace the cover. Place the cover onto the back
of the phone and slide the cover into place
making sure the tabs click into place.
23 Sendo X User Guide
Page 29

1
The Basics
Memory card options
When you open the Memory card feature, the
following list of commands can be accessed by
pressing Options g:
Select this To
Backup phone
mem.
Restore from card Restore information from the memory
Format mem.
card
Memory card
name
Set password Set a password that will lock your memory
Change password Change the memory card password.
Remove password Remove the memory card password. This
Unlock memory
card
Mem. in use Check how much memory is available on
Help Activate the context-sensitive help facility.
Exit Exit the Memory card feature.
Back up information from the phone’s
memory to the memory card.
card to the phone’s memory.
Format the memory card before using it
for the first time.
Allocate a name to the memory card, or
change a name already given.
card against unauthorised use. If you then
try to use the memory card in a different
phone, you will require the password. The
password can be up to 8 characters long.
Note that passwords are not available on
all memory card types.
effectively unlocks a memory card, and
means that it can then be used in another
phone without a password.
Unlock a password-protected memory
card. You will be required to enter the
password before the card is unlocked.
the memory card, and how the consumed
memory is being used.
Where to find more information
The following table is a guide to finding information
to help you use your phone.
Information about Source
Making a phone call. See the Quick Start Guide in the
box, or for more detailed
information see Making a call on
Page 2 7.
What features the phone is
supplied with.
Additional features that can
be installed on the phone.
Connecting to and
synchronising with a
personal computer.
How to use a feature. Look at the relevant section in
Text entry. See Entering text and numbers on
Up-to-date information on
your Sendo phone.
Support. http://www.sendo.com/support
Accessories. http://www.sendo.com/shop and
See Feature list on Page 11 for a
full list of pre-installed features.
See the accompanying
Companion CD, or go to:
http://www.sendo.com/shop.
See Connecting to your PC on
Page 1 46.
this guide, or use the phone’s
Help facility. See Context-
sensitive help on Page 25 for
more information.
Page 1 7.
http://www.sendo.com
the Companion.
24 Sendo X User Guide
Page 30

1
The Basics
!
Context-sensitive help
Your phone has a Help facility, which you can refer
to should you have any problems working out how
any of your phone’s feature work.
To activate the Help facility
1. In the Menu screen, use the joypad to scroll to
the Help icon, and press Select A.
2. A list of all the phone’s features for which help is
available will appear. Use the up : and down
; joypad keys to scroll to the feature that you
need help with, and press Select A.
3. A list of available Help topics for the feature is
displayed. Use the joypad and Select A key to
open the one that you want.
4. Press Back d to go back to the previous
screen, or use the Options g menu to
navigate back to the previous lists.
z Tip: Press the right ] joypad key to go to an
alphabetical index of all Help topics, from which
you can select.
25 Sendo X User Guide
Page 31

1
The Basics
!
!
Searching the Help facility
If you are not sure where to look in the Help to find
what you require, you can do a search for a
particular word.
To do a keyword search
1. Press Options g and select Search by
keyword.
2. Type in the word which you are looking for. The
phone will search the Help facility and display
any matches, from which you can then select.
Using Help within a feature
You can activate the Help facility from within most of
your phone’s features, without having to go to the
Menu screen.
To use Help from within a feature
1. Press Options g and select Help.
2. The first page of Help information for the feature
is displayed.
3. If there is more than one Help topic, you can use
the left and right joypad keys to scroll through all
the topics. This is indicated in the navigation bar.
For instance 1/7 means that there are 7 Help
topics, and you are currently viewing the first.
4. Use the Options g menu to do a keyword
search, or to take you to a topic or Help category
list.
26 Sendo X User Guide
Page 32

2
Chapter 2 Phone Calls
This chapter explains how to make and receive
phone calls, view your call history, and create
shortcuts to make dialling numbers even quicker
Phone Calls
and easier.
Making a call
There are several ways to make a call; the easiest is
to simply key in a phone number.
!
To ma k e a c a l l
1. Enter the phone number using the numeric
z Note: You should always enter a phone number
(Insert screenshot of Call Progress screen)
2. Press Call c to call the number.
3. To adjust the volume during a call press the right
4. Press End f to end the call, or to cancel the call
z Note: Pressing End f will always end an active
Making a call from Contacts
You can make calls quickly to numbers stored in
your Contacts directory, either from the Contacts
keypad.
in the complete international format including
the international access code (this varies by
country), the country code, the area or city code
and the phone number.
] joypad key to increase, and the left [ joypad
key to decrease the volume level.
attempt.
call, even if another feature is in use.
feature, or directly from the Now! screen using name
dialling.
For more information about creating and using your
Contacts directory, see Contacts on Page 55.
!
To make a call from Contacts
1. From the Menu screen, select Contacts (insert
icon) using the joypad.
2. Scroll through the list of Contacts using the up
: and down ; keys on the joypad until the
contact you require is highlighted.
3. Press Call c to call the contact.
z Note: If the selected contact has more than one
phone number stored, e.g. work, home, mobile,
open the contact card by pressing Select A,
then use the joypad to highlight the number you
require, before pressing Call c.
Making a call from the SIM Contacts
You can make a call to a phone number stored in
your SIM card. Your SIM contacts can be accessed
from the Contacts feature, or from Tools in the main
menu.
!
To make a call from the SIM Contacts
1. From the Menu screen, select Contacts using the
joypad.
2. Press Options g and select SIM Contacts to
display a list of contacts stored in the SIM card, if
there are any.
3. Select a contact in the normal way and press
Call c to make the call.
27 Sendo X User Guide
Page 33

2
Phone Calls
z Note: You can also display the SIM Contacts list
by selecting Tools from the main Menu screen,
and selecting SIM Contacts from the list of
options.
Making a call from the Log
The call history Log stores and displays the last 20
calls made, received, and missed (a maximum of 60
calls in total).
!
To make a call from the Log
1. Open the Log in one of the following ways:
• From the Now! screen, highlight Messages, scroll
to the Missed Calls line, and press Select A.
• From the Now! screen, do a short press on
Call c.
• From the Menu screen, open the Tools folder, and
select Log.
2. Use the left [ and right ] joypad keys to
change between the 3 available lists:
• Missed calls.
• Received calls.
• Dialled numbers.
3. Use the joypad to highlight the number or
contact to call, and press Call c.
Making a call using a recently dialled number
You can make a call to someone you have called
recently directly from the Now! screen, without
having to go to the Log.
!
To redial the last number called
• From the Now! screen, press Call c twice.
!
To make a call using a recently-dialled phone
number
1. From the Now! screen, press Call c to display
a list of recently dialled phone numbers.
2. Using the up : and down ; joypad keys, select
the number to call and press Call c again.
Making a call from a hyperlink
You can make a call directly from a hyperlink
(highlighted and underlined) phone number,
received in an Email, MMS, or SMS.
!
To make a call from a hyperlink
While the message is open, highlight the hyperlink
phone number using the joypad, and press Select A
to make the call.
28 Sendo X User Guide
Page 34

2
Phone Calls
Calling your voice mailbox
The voice mailbox is an answering service where
callers who are unable to reach you can leave voice
messages.
z Note: Voicemail is a Network Service, so you
should contact your service provider in the case
of any problem.
z Tip: Your phone will display a voice message
waiting indicator (insert icon) in the title bar at
the top of the screen to let you know when you
have new voicemail.
!
To listen to your voicemail messages
1. Press 1 to dial your voice mailbox number.
z Note: If you are prompted to enter the voice
mailbox number, type it in using the numeric
keypad, and press OK g. You can find out
this number from your service provider.
2. Press Call c.
You can change your voice mailbox number from
the phone’s call settings. See Call divert settings on
Page 51 for more information.
Making emergency calls
Calls to emergency service numbers can be made
under any circumstances, even if the keypad, phone,
and/or SIM card is locked.
z Note: Some networks may require that a valid
SIM card has been properly inserted in the
phone before you can make an emergency call.
!
To make an emergency call
• If the phone is not on, switch it on. Dial the
emergency number appropriate to your location,
and press Call c.
z Note: Official emergency numbers vary by
location (for example 999 in the UK, 911 in the
US, or 112 in many countries). When travelling
you should determine the relevant emergency
number/s. This phone, like any other wireless
phone, operates using radio signals, wireless
and landline networks as well as userprogrammed functions that cannot guarantee
connection in all conditions. Do not rely solely
on your wireless phone for emergency
communications. Remember that to make or
receive calls, the phone must be switched on
and in a service area with adequate signal
strength. Emergency calls may not be possible
on all wireless phone networks or when certain
network services and/or phone features are in
use. Check with your local service providers.
Using automatic redial
You can set up your phone so that if a phone
number you try to call is engaged, a series of redial
attempts are automatically made. See Call settings
on Page 44 for more details.
Having problems making a call?
Check to make sure that your phone contains a valid
SIM card and that the phone is turned on, unlocked,
and in the service area of your service provider’s
network.
29 Sendo X User Guide
Page 35

2
Phone Calls
Shortcuts
Your phone enables you to create shortcuts which let
you call frequently-used phone numbers quickly and
easily.
These shortcuts include one-key dialling, and voice
dialling.
Speed dialling
Once you have set up a speed dial you can make a
phone call by only pressing one or two keys.
z Note: You can only create speed dials for phone
numbers which are stored in Contacts.
!
To create a speed dial for a phone number
1. Open the Contacts directory from the Menu
screen.
2. Using the joypad and Select A key, open the
correct contact card and highlight the phone
number which you want to set up a speed dial
for.
3. Press Options g and select Add speed dial.
4. Key in the number, from 2 - 99, which you want
to use for this speed dial.
z Note: Speed dial 1 1 is reserved for
voicemail access and cannot be changed.
z Note: The number 3 cannot be used as a speed
dial, as key 3 3 is used as a shortcut to
activate the Camera.
5. Press Assign g.
z Tip: You can also create speed dials for Web
addresses and Email addresses that are stored
in Contacts.
!
To make a call using a speed dial
1. Enter the one or two digit speed dial number that
you have assigned to the required phone
number, using the numeric keypad.
2. Press Call c to make the call.
!
To make a call using one-key dialling
From the Now! screen, simply press and hold the
number key associated with the phone number you
wish to dial, until the call is started. There is no need
to press Call.
z Tip: If the speed dial has two digits, do a short
press on the first number key, then press and
hold down the second.
z Note: One-key dialling only works if the
phone’s one-key dialling setting is switched on.
See Call settings on Page 44 for more
information.
Viewing and deleting speed dials
Once you have set up speed dials, you can view or
delete them using the Speed Dial list.
!
To view you r sp e e d d i a l s
1. From the Menu screen, scroll to the Too l s icon
and press Select A.
2. Scroll to and select Speed Dial.
All the speed dials you have set up are listed.
30 Sendo X User Guide
Page 36

2
!
Phone Calls
To delete a speed dial
1. From the Menu screen, scroll to the Tools icon
and press Select A.
2. Scroll to and select Speed Dial.
3. Select the speed dial to delete, then press
Options g and select Remove.
4. You will be prompted whether you want to
remove the speed dial. Press Yes g.
z Note: It is not possible to edit a speed dial. If
you want to amend a speed dial number, you
should delete it and then create a new one.
Voice dialling
Your phone lets you use voice dialling in two ways:
• Digit voice dialling - speak the phone number
that you wish to dial, digit by digit, into the
phone.
• Record a voice tag and attach it to a phone
number in your Contacts directory. You can then
dial that number by repeating the voice tag
phrase into the phone.
z Warning: Do not use the voice dialling features
for emergency calls. At times of stress, your
voice may not be clear enough for the phone to
recognise.
Digit voice dialling
Digit voice dialling lets you make a call by simply
speaking the number into the phone.
!
To make a call using digit voice dialling
1. Press and hold the Voice key
on the side of the phone.
2. When prompted by the message on screen and
an audio alert, speak the digits of the phone
number clearly into the phone. You should not
leave pauses between the digits.
z Note: To use digit voice dialling, you must have
switched the digit voice dialling setting to On in
the phone’s call settings. See Call settings on
Page 44.
3. Press the Call c key to call the number.
4. Press the End f key to end the call.
z Warning: Do not use this feature for emergency
calls. At times of stress, your voice may not be
clear enough for the phone to recognise.
, which is located
t
Voice tags
Voice tags are not language dependent. Any clearlyspoken word or phrase can be used as a voice tag. It
is easier for the phone to recognise longer voice
tags. For example, you may want to record a
person’s first and last name instead of just their first
name, providing that the tag is shorter than
1.5 seconds.
z Tip: Voice tags are sensitive to background
noise, so record them in a quiet place.
!
To create a voice tag for a phone number
1. Open the Contacts directory.
31 Sendo X User Guide
Page 37

2
Phone Calls
2. Use the joypad and Select A key to open a
contact card and select the phone number to set
up a voice tag for.
3. From the Options g menu, select Add voice
tag and press Select A.
4. You will be prompted to press Start g, then
speak the voice tag word(s), after a tone is
heard. When you hear the audio sound, speak
the voice tag clearly into the microphone.
5. If the voice tag is successful, confirmation is
displayed on screen.
z Tip: You can also create voice tags for Web
addresses and Email addresses that are stored
in Contacts.
!
To make a call using a voice tag
1. Press and hold the Voice key
on the side of the phone.
2. When prompted by the message on screen and
an audio alert, say the voice tag word. The
number is dialled.
3. If the phone misinterprets the word, you will be
prompted to try again. Press Yes g to try the
voice tag again or No d to display the
Contacts list and make the call from there.
, which is located
t
Viewing and deleting voice tags
Once you have set up voice tags, you can view or
delete them from the Contacts directory.
!
To view your voice tags
1. Open the Contacts directory.
2. Press Options g and select Contacts info, then
Voice tags.
All the voice tags you have set up are listed.
!
To delete a voice tag
1. Open the Contacts directory.
2. Use the up : and down ; joypad keys to select
the contact who’s voice tag you want to delete,
and press Select A.
3. Press Options g and select Voice tag, then
Delete.
4. You will be prompted whether you want to
permanently delete the voice tag. Press Yes g.
z Note: To add a different voice tag to a contact,
follow the steps shown above, but select
Change instead of Delete.
z Note: If you delete a contact, the associated
voice tag is also deleted.
z Warning: Do NOT rely on voice tags for dialling
emergency numbers. In emergencies, stress can
cause changes in your voice, which may result
in the phone not recognizing the command.
32 Sendo X User Guide
Page 38

2
Advanced dialling options
The following information covers advanced dialling
options.
Phone Calls
Making international calls
International calls require a country code to be
included in the phone number. The country code is
separated from the rest of the number sequence by
a plus sign (+).
!
To insert an international country code
Press and hold 0 until the plus sign (+) appears.
z Note: You can insert a plus sign directly into a
contacts number or dial it from the keypad.
!
To insert a three second pause in a dialling sequence
Some international calls require a three second
pause in the dialling sequence for the call to be
processed successfully.
1. Open the Contacts directory.
2. Use the joypad to select the required contact,
press Select A, and then select the phone
number to modify.
3. Press Options g and select Edit.
4. Use the joypad to move the cursor to the point in
the phone number where the pause needs to be
inserted.
5. Press Options g and select Insert Pause. The
letter p appears in the number; indicating where
the three second pause will appear in the
dialling sequence.
6. Press OK g.
!
To insert a manual pause in a dialling sequence
Some phone numbers require a pause longer than
three seconds in the dialling sequence. You can
insert a pause so that the dialling sequence is
paused for as long as you require, and resumed
again by pressing Call c.
1. Open the Contacts directory.
2. Use the joypad to select the required contact,
press Select A, and then select the phone
number to modify.
3. Press Options g and select Edit.
4. Press the left [ or right ] joypad keys to move
the cursor to the point in the phone number
where the dialling sequence must pause before
proceeding.
5. Press Options g and select Insert Wait. The
letter w appears in the number, indicating where
the pause occurs in the dialling sequence.
6. Press OK g.
z Note: When you make a call using Insert Wait,
the first numbers are dialled, and you must
press Call c to continue the dialling sequence.
33 Sendo X User Guide
Page 39

2
Sending DTMF signals
DTMF (Dual Tone Multi Frequency) signals are the
tones that you hear when you press the keys on the
Phone Calls
numeric keypad. DTMF signals allow you to send
data to computerised telephony systems, e.g. a
password or PIN code.
!
To send DTMF signals
1. While a call is in progress, press Options g
and select Send DTMF.
2. Input the digits you require using the numeric
keypad, and press OK g.
z Tip: If you have a frequently used DTMF
associated with one of your contacts, e.g. an
account number, you can add it to the contact
card and access it from the contact. This saves
you having to type out the number every time.
See Contacts on Page 55 for more information.
Receiving a call
When you receive a call, an Incoming Call message
is displayed showing the phone number of the caller.
The caller’s name and photo will also be displayed,
if the information is in your Contacts list.
You can choose to answer the call, reject it, or just
ignore it. If you miss an incoming call, or choose to
ignore it, a record of the call will be stored in the
phone’s Log.
(Insert screenshot of Incoming Call screen)
z Note: Caller ID, sometimes called CLI, or
Calling Line Identification, is a network service
that can help identify incoming calls even if the
caller is not in your contact list. Contact your
service provider for further details.
!
To answer an incoming call
• On the Incoming Call screen, press Call c or
Answer g.
z Tip: You can set the phone up so that an
incoming call is answered by pressing any key.
z Tip: If the phone is connected to a handsfree or
car kit, you can set the phone up to answer
incoming calls automatically after five seconds.
To activate either of these features go to the phone’s
call settings. See Call settings on Page 44 for more
information.
!
To silence an incoming call
• On the Incoming Call screen, press Silence d.
This will mute the ring tone. The call can then be
answered, rejected, or ignored, as normal.
z Tip: If you do not want to be disturbed by your
phone ringing, but you still want to be able to
receive calls, you can change the phone’s active
profile so that the Incoming call alert is set to
Silent. You may want to do this before a
business meeting, for example. See Profiles on
Page 53 for more information about changing
the phone’s active profile.
34 Sendo X User Guide
Page 40

2
!
Phone Calls
To reject an incoming call
• On the Incoming Call screen, press End f or
press the right soft key d twice. The first press
will silence the ring tone, and the second will
reject the call.
z Note: If your Incoming call alert is set to Silent,
you only need to press Reject d to reject a
call.
z Tip: If you reject a call, the caller can be
automatically connected to your voicemail
service, if you are subscribed to this network
service.
!
To end a call
• Press End f to disconnect the call.
Call barring
Call barring is a network service that enables you to
block calls which you do not wish to receive. If you
are subscribed to this service (contact your service
provider if you’re not sure), you can define which
types of call you want to block from Call barring in
the phone’s call settings. See Call barring settings on
Page 50 for more information.
Ignoring an incoming call
If you choose to ignore an incoming call, details of
the call will be stored in the phone’s call history Log.
Diverting incoming calls
You can choose to divert incoming calls to a different
number, for instance if your number is busy.
If you have a voicemail service (check with your
service provider), you can forward calls on to your
voice mailbox.
Call diverting can be set up from Call divert in the
phone’s call settings. See Call divert settings on
Page 51 for more information.
35 Sendo X User Guide
Page 41

2
Multiple calls
Call Waiting
Phone Calls
If an incoming call is received while a call is already
in progress you will remain connected to the first
call, but you will be notified that a new call is
incoming.
z Note: This is only the case if you subscribe to a
!
To answer a new call using Call Waiting
• Press End f to end the call in progress, then
z Note: If you do not press End f before
!
To reject a Call Waiting call
• Press Reject d to reject the new incoming call,
!
To switch between two calls
Select Swap d to put the active call on hold, and
activate the call on hold.
z Tip: You can place a call on hold at any time by
Call Waiting network service. Check with your
service provider.
press Answer g or Call c to answer the new
call.
answering the new call, the first call will be put
on hold.
while keeping your current call in progress.
selecting Hold from the Options g menu,
regardless of whether there is another call
waiting. Press Options g and select Unhold to
reactivate the call.
Conference calls
Your phone allows you to engage in conference
calls, so you can talk with up to five other callers at
the same time.
z Note: Conference calling is a network service.
Check with your service provider to find out
whether you are subscribed.
!
To make a conference call
1. Make a call to the first participant, in the normal
way.
2. Press Options g and select New call. Enter the
phone number of the next participant and press
OK g. The first call is automatically put on
hold.
3. When the new call has been answered, press
Options g and select Conference. This joins
the first participant into the conference call.
4. To add more participants (maximum number is
six, including yourself), repeat steps 2 and 3,
then select Add to conference.
!
To have a private conversation during a conference
call
1. Press Options g and select Conference then
Private.
2. Scroll to the participant who you want to talk
privately with, and press Private d.
z Note: The conference call is put on hold while
you conduct your private conversation, but the
other participants can still continue talking to
each other.
36 Sendo X User Guide
Page 42

2
3. Press Options g and select Conference then
!
Phone Calls
To drop a participant from a conference call
1. Press Options g and select Conference then
2. Scroll to the participant who you want to drop
!
To end a conference call
Press End f to terminate the conference call.
In-call options
Many of the features on your phone can be used
while a call is in progress. Access them as normal
from the Menu screen or from the Now! screen.
Using the Now! screen
Your phone lets you navigate and use the Now!
screen as normal while a call is in progress.
This feature enables you to perform lots of useful
tasks while you are on the phone, for example:
• Browse the Calendar and enter a meeting or
• Browse your Contacts list and add a new contact.
• Browse your Tasks list and add new tasks.
• Open and read a document.
To access the features of the Now! screen while a
call is in progress, press the Menu key s. To return
Add to conference to return to the conference
call.
Drop participant.
from the conference call and press Drop d.
appointment.
to the call progress screen, press To call d from
the Now! screen.
See the Now! Screen on Page 79 chapter for more
information about using the Now! screen and all its
features.
Call options
While a call is in progress, you can select Options
g to list common in-call tasks.
The following table shows the menu options
available when a call is in progress.
z Note: Some of these options are only available
when multiple calls are in progress, or during a
conference call.
Select this To
Hold Place the active call on hold.
Unhold Activate the call currently on hold.
End Disconnect a call.
New Call Create a new call during an active call.
Swap Switch between two calls.
Conference Join together all existing calls. You must be
subscribed to this service; check with your
service provider for details.
Tran sf er Connect the active call with an incoming call or
a call on hold, and end your connection.
Save Contact Create a contact card for the caller.
End all calls Disconnect multiple calls at the same time.
Call timer Display the current call duration.
Send DTMF Send a DTMF signal.
Speakerphone Switch to speakerphone mode.
37 Sendo X User Guide
Page 43

2
Select this To
Mute Mute the microphone for the active call. The
Phone Calls
Unmute Turn the microphone back on for the active call.
Volume Adjust the volume of the phone’s loudspeaker.
Handsfree Activate and deactivate the handsfree mode.
Reviewing your calls
The phone’s Log feature lets you view information
about phone calls you have made and received. For
example, you can check who has called you recently,
or the cost of calls that you’ve made.
z Note: The Log also monitors other types of
event registered by the phone, e.g. SMS, MMS,
or data calls. You can filter the Log so that just
one type of event information is displayed.
Recent calls
The phone registers the phone numbers of received,
missed, and dialled calls. The phone stores the last
20 calls in each of these categories.
!
To view the recent calls lists
1. Open the Log application in one of the following
ways:
• From the Now! screen, highlight Messages, scroll
to the Missed Calls line, and press Select A.
• From the Now! screen, do a short press on Call
c.
other party cannot hear anything you say, but
you can still hear the other party.
• From the Menu screen, open the Tools folder and
select Log.
2. Use the left [ and right ] joypad keys to switch
between the following 3 lists:
Select this To
Received calls Display the last 20 calls that the phone has
Missed calls Display the last 20 calls made to the phone
Dialled
numbers
received (whether answered, diverted, or
rejected).
that were missed, or ignored.
Display the last 20 calls that were made from
the phone.
Each list entry contains the date and start time of the
call, the caller’s name (if available) and the caller’s
number. The oldest calls are automatically deleted
from the list to make room for the most recent.
The following options are available from pressing
Options g while viewing a recent calls list:
z Note: Most of the options in the table require
you to highlight an entry in the list first, using
the joypad.
Select this To
Call Make a call to the selected entry. See Making a
call from the Log for more information.
View contact View the contact card of the selected entry.
Send message Send an Email, SMS, or MMS message to the
Delete Delete the selected entry from the list.
Clear list Delete all entries from the list.
selected entry.
38 Sendo X User Guide
Page 44

2
Phone Calls
Select this To
Add to contacts Add the entry to the Contacts list. You can
either create a new contact card, or add the
number to an existing one.
Call duration
The phone’s call duration feature provides you with
detailed information regarding the length of your
incoming and outgoing calls.
z Note: The actual time invoiced for calls by your
service provider may vary depending upon, for
example, network features, rounding off billing
or taxes.
The following call timers can be viewed:
Call Timer Details
Last call Displays the duration of your last call.
Dialled
numbers
Received calls Displays the accumulated duration of all
All calls Displays the accumulated duration of all calls.
z Note: You can reset your call timers to zero at
any time.
!
To view call duration
1. Open the Log.
2. Press Options g and select Call duration.
z Tip: You can choose which call timers you wish
to be displayed, by selecting Filter timers from
the Options g menu.
Displays the accumulated duration of all
outgoing calls.
incoming calls.
z Note: The actual time invoiced for calls by your
wireless service provider may vary, depending
upon network features, rounding-off for billing,
etc.
!
To reset call timers
1. Open the Log.
2. Press Options g and select Clear counters.
3. Select the timer(s) you want to clear.
4. Press Select A.
Call costs
You can look at the cost of your last call, and of all
calls that you have made since the last counter reset.
z Note: This feature is only available if you have
subscribed to this network service. Contact your
service provider for more information.
!
To view call costs
1. Open the Log.
2. Press Options g and select Call costs.
z Note: The actual invoice for calls and services
from your service provider may vary, depending
upon network features, rounding-off for billing,
etc.
!
To reset the call costs counter
1. Open the Log.
2. Press Options g and select Clear counters.
3. Select the counter(s) you want to clear.
4. Press Select A.
39 Sendo X User Guide
Page 45

2
Phone Calls
Setting a call cost limit
This feature enables you to set a maximum limit for
your outgoing call costs which cannot be exceeded.
If your accumulated calls do exceed this cost, you
will not be able to make any further calls (with the
exception of Emergency calls) until the call cost
counter is reset, or the call cost limit is changed or
switched off.
See Log settings for more information.
GPRS data counter
This allows you to check the amount of data (in
kilobytes) sent and received during packet data
(GPRS) connections.
z Note: This service may not be available on your
phone. Contact your service provider if you are
unsure.
!
To view GPRS data counter
1. Open the Log.
2. Press Options g and select GPRS counter.
!
To reset the GPRS data counter
1. Open the Log.
2. Press Options g and select Clear counters.
3. Select the counter(s) you want to clear
4. Press Select A.
General log
The Log stores details of all communication events,
e.g. phone calls, Emails, text messages.
The details which the Log displays include the sender
or recipient’s name and phone number, and the
service provider or access point.
z Note: You can choose how long the details of
an event are stored for.
!
To filter the Log
1. Press Options g and select Filter.
2. Select which type of filter you want to view, and
press Select A.
!
To clear the entire Log
1. Press Options g and select Clear log.
2. You will be prompted whether you want to
permanently clear the log details. Press Yes g.
z Note: The GPRS counter reset feature may not
be available on your phone. Contact your
service provider for more information.
40 Sendo X User Guide
Page 46

2
Log settings
The following Log settings are available:
Select this To
Phone Calls
Log duration Set the length of time which log
information is stored for: 0, 1, 10, or
30 days. After this time, details are
erased in order to free memory.
Show call duration Enable/disable the current duration of
an active call to be displayed on screen.
Show costs in units/
currency
Set charging
currency
Call cost limit Set a call cost limit which cannot be
Select whether call costs are displayed
in units or in currency.
Specify the monetary value of a unit.
exceeded.
41 Sendo X User Guide
Page 47

3
Chapter 3 Settings and Profiles
This chapter looks at the different settings on your
phone, and how to change them.
Viewing and changing settings
You can easily view and change the settings to suit
your requirements, and to give your phone a
Settings and Profiles
personal touch. For example, you can change the
sounds used for ring tones, notifications, and
reminders, select your own image to display as
background wallpaper for the Now! screen, set up
call diverting to manage your calls more efficiently,
and more.
!
To vie w s e t t i n g s
1. From the Menu screen, use the joypad to
navigate to the Settings icon, and press
Select A.
2. A list of different categories of settings is
displayed. Use the up : and down ; joypad
keys to scroll through the list, and press Select A
to open the settings category of your choice.
!
To change a setting
1. Scroll to the setting you want to change and
press Select
depending on the setting type:
• Switch between options if there are only two, for
instance, On/Off, or Yes/No .
• Open a list of options which you can select from
using the joypad and Select A.
A to do one of the following,
t
• Open an editor, which you can type into using
the numeric keypad, for example, to enter a
password.
• Open a slider view (see Figure 3, below). Use the
left [ and right ] joypad keys to decrease or
increase the value, respectively. This can be used,
for example, to set the contrast.
Figure 3 Slider control
(insert screenshot of slider control in setting)
• Open a volume control view (see Figure 4,
below). Use the left [ and right ] joypad keys
to decrease or increase the value, respectively.
This is used exclusively for setting the volume
level, of ring tones for example.
Figure 4 Volume control
(insert screenshot of volume control in setting)
42 Sendo X User Guide
Page 48

3
Settings and Profiles
Phone settings
In Phone settings, you can change language and
display options.
General
Select General from the Phone settings list to display
the following settings:
• Phone language - Change the language used by
your phone in all display texts.
z Note: The languages installed on your phone
will depend on which country the phone was
purchased in. If you select the Automatic option,
the phone will set the language according to the
information on your SIM card.
• Writing language - Change the language used to
input text. This affects the characters available on
each key, the predictive text dictionary, and the
special characters produced by pressing the
Asterix * key.
z Note: You must switch the phone off and back
on again to activate changes to language. The
languages selected apply to every feature in
your phone. It is possible to set the phone
language to be different to the writing
language.
•Dictionary - Set predictive text to On or Off, for
all features in the phone that include text input.
You can also change this setting when you are
about to input text, by simply pressing the Edit
key (insert graphic) and selecting Dictionary, then
On or Off.
z Note: The predictive text dictionary is not
available for all languages.
•Welcome note or logo - The welcome note or
logo is displayed briefly when you switch the
phone on. Select Default to use the default image
or animation that was pre-installed on your
phone. Select Image to pick a picture from the
Photo Album to replace the default, or select Te xt
to write your own welcome note (maximum of 50
characters).
• Orig. phone settings - Reset the phone’s settings
to their original values. You need to input the lock
code to do this.
z Note: Not all settings can be restored to their
original values.
Display
Select Display from the Phone settings list to display
the following settings:
• Contrast - Turn the contrast of the display up or
down.
• Colour palette - Change the colour scheme used
on the display.
• Screen saver timeout - Set the amount of time
after which the screen saver is activated, if the
phone is switched on, but no keys have been
pressed. When the screen saver is active, the
display is cleared and the screen saver bar
appears.
• Screen saver - Select what is shown on the screen
saver bar: the time and date, or a text that you
43 Sendo X User Guide
Page 49

3
Settings and Profiles
have composed yourself. The screen saver
consists of a bar, which moves around the screen
at 60 second intervals. It also shows how many
calls you have missed, and how many new
messages have been received.
z Note: Press any key to de-activate the screen
saver.
Call settings
In Call settings, you can change the settings which
affect how calls are made and received. For
example, you can set up voice dialling and speed
dialling options.
Select Call settings to display a list of the following
settings:
• Send my caller ID - This network service allows
you to select whether your phone number should
be displayed (Yes) or hidden (No) from the
person who you are calling. The third option, Set
by network, will leave setting the value to the
network operator or service provider when you
make a subscription.
z Note: Check with your service provider to find
out if this service is available.
• Call waiting - Call waiting is a network service
which informs you if a new call comes in while
another call is active. Select Activate to activate
the call waiting service, Cancel to de-activate it,
or Check status to check whether call waiting is
active or not.
z Note: Check with your service provider to find
out if this service is available.
• Automatic redial - If you select On, your phone
will make a maximum of ten attempts to re-dial a
number after an unsuccessful call attempt. Select
Off to turn automatic redial off.
z Note: You can stop the redialling process by
pressing the End f key.
• Summary after call - Select On if you want the
phone to briefly display the duration and cost of
a call when it has ended. To display the cost, you
must have the Call cost limit option activated for
your SIM card. See Setting a call cost limit on
Page 40.
• One key calling - Switching this setting to On
enables you to make a call by simply pressing
and holding one key, after you have set up a
Speed dial for the phone number. See Speed
dialling on Page 30 for more information.
• Digit voice dialling - Switching this setting to On
enables you to make phone calls by speaking the
digits of a phone number into the phone. See
Digit voice dialling on Page 31 for more
information.
•Anykey answer - Switching this setting to On
enables you to answer an incoming call by
pressing any key, rather than only being able to
use Send c, End f, and the soft keys. Select
Off to disable this function.
• Line in use - This setting is only shown if the SIM
card supports more than one phone line. Select
which line you want to use to make calls and
44 Sendo X User Guide
Page 50

3
Settings and Profiles
send text messages, or select Disable to prevent
line selection.
z Note: Check with your service provider to find
out if this service is available.
Connection settings
The easiest way to automatically configure your
GPRS, WAP, Email and Internet connection settings is
to visit http://www.sendo.com/config. The Sendo
Easy Configurator sends an SMS message to your
phone containing the settings you require to start
using these services.
Check with your service provider to see if a data
connection has already been set up for you, and if
over-the-air (OTA) configuration is supported.
Access points
An access point is where your phone connects to the
Internet, via a data call (GSM) or a packet data
connection (GPRS).
There are three different types of access point that
you can define:
• MMS access point.
• Browser access point.
• Internet access point (IAP).
Check with the service provider which type of access
point is required for the service you wish to access.
Select Access points from the Connection settings list
to view a list of all current access points. If there are
no access points defined, you will be asked if you
want to create one.
!
To create a new access point
1. Press Options g and select New access point.
2. Select Use default settings to use the default
settings, or Use existing settings to use an
existing access point’s settings as a starting
point.
3. Fill in all the required fields carefully with the
information obtained from your service
provider. Start at the top of the list and use the
down ; joypad key to scroll through the fields.
The fields that you must fill in will vary according
to the type of data connection you wish to make,
and the type of access point. Fill in all fields
marked with a red asterisk, or that are marked
Must be defined. The table below shows all
possible fields, with a brief explanation of each.
4. Once you have finished, press Back d to save
the new access point settings and return to the
Access points list.
Select this To
Connection
name
Give a descriptive name to the connection.
45 Sendo X User Guide
Page 51

3
Settings and Profiles
Select this To
Data bearer Select the data connection type:
GSM data - Standard GSM (Global System for
Mobile) data transmission.
High speed GSM - High speed GSM (Global
System for Mobile) data transmission.
GPRS - Faster data transmission service, for
which a fee will be charged.
Ensure that your service provider supports the
type of data connection that you are trying to
set up.
Access point
name
Dial-up number Enter the modem telephone number of the
User name Enter a user name. This may be needed to
Prompt password Select Ye s to be prompted for a new password
Password Enter a password. This may be needed to
Authentication Select Normal, or Secure.
Gateway IP
address
Homepage Enter either the service address, or the address
This is required to set up a connection to the
GPRS network. Obtain this from your service
provider.
access point (for GSM data only).
access some services, and should be obtained
from the service provider.
every time you make a data connection, or No
to save the password entered on the phone.
access some services, and should be obtained
from the service provider. Passwords are
usually case-sensitive. When you type in a
password, the characters that you have typed
are displayed very briefly, before being
replaced by asterisks (*), for security purposes.
To type a number in a password, press the Edit
key and select Insert number.
Enter the IP address of the browser gateway.
You can obtain this from your service provider.
of the multimedia messaging centre,
depending on the access point type required.
Select this To
Connection
security
Session mode Select Permanent, or Temporary.
Data call type (For GSM data only). Select from Analogue,
Maximum data
speed
Select Ye s to use Transport Layer Security (TLS)
for the connection. Check with your service
provider for more information.
ISDN v.110, or ISDN v.120. ISDN connections
are digital, and faster than an analogue
connection. However, you should check with
your Internet and network service provider(s)
whether ISDN connections are supported.
(For GSM data only). Set a maximum speed
for data transmission - you can choose from a
range of values. Faster rates of data
transmission may cost more - check with your
service provider.
You can enter further, advanced data connection
settings, by pressing Options g and selecting
Advanced settings. The following advanced options
are available:
Select this To
Phone IP address The IP address of your phone. Contact
your Internet service provider to obtain IP
addresses.
Primary name
server
Second name
server
Server number Enter a number for the server.
Port number Enter a number for the port.
Use PPP
compression
The IP address of the primary DNS
(Domain Name Service) server. A DNS is a
service that translates website names, e.g.
http://www.sendo.com, into IP addresses.
The IP address of a secondary DNS server.
If you select Ye s, this may speed up data
transfer. Contact your service provider for
more details.
46 Sendo X User Guide
Page 52

3
Settings and Profiles
Select this To
Use login script Select Yes if you want to use a login script.
Login script Enter a login script.
Modem
initialisation
!
To edit an access point
Controls your phone using modem AT
(attention) commands. Contact your
service provider for more information.
1. Use the joypad to scroll to the access point to be
edited.
2. Press Select A, or press Options g and select
Edit.
3. Change the fields required, and press Back d
when you have finished.
!
To delete an access point
1. Use the joypad to scroll to the access point to be
deleted.
2. Press Options g and select Delete. You will be
prompted whether you want to delete the access
point. Press Yes g.
GPRS
GPRS (General Packet Radio Service) is a fast and
efficient way of transmitting data over the mobile
network.
• GPRS connection - Select When available to
transmit data via the GPRS network wherever
possible, or When necessary to only use GPRS
when it is required.
•Access point - The name of the access point is
required when you are using your phone as a
packet data modem to your personal computer.
See Connecting to your PC on Page 146 for
further information about using your phone as a
modem.
Data call
The data call settings affect all access points using a
GSM or high speed GSM data connection.
Select Data Call from the Connection settings list to
display the following setting:
•Online time - Select User defined to set a period
of time in minutes after which a data connection
will be disconnected if no keys are pressed.
Alternatively, select Unlimited if you do not want
the data call to disconnect in this way.
z Note: You need to subscribe to the GPRS
service, and may be charged for using this
service. Contact your service provider for more
information.
Select GPRS from the Connection settings list to
display the following settings:
47 Sendo X User Guide
Page 53

3
Settings and Profiles
Date and time settings
Use the date and time settings to change the time
and date, as well as changing the format in which
time and date information is displayed.
You can also select to have the date, time, and time
zone updated automatically when you travel abroad.
z Note: Automatic update is a network service.
Contact your service provider to find out about
subscribing to this service.
Select Date and time settings to display the following
settings:
Select this To
Time Enter the current time.
Date Enter the current date.
Date format Decide how the date should be formatted, e.g.
DD:MM:YY.
Date
separator
Time format Decide how the time should be formatted, e.g.
Time
separator
Clock type Select an Analogue or Digital clock display.
Automatic
update
Choose how the fields in a displayed date
should be separated, e.g., by a colon (:) or a
line (|).
24-hour or 12-hour clock.
Choose how the fields in a displayed time
should be separated, e.g., by a colon (:) or a
line (|).
Switch the setting On to have the date, time,
and time zone updated automatically, if you
subscribe to this network service.
Security settings
Use the security settings to enable the phone lock
and the PIN lock for the SIM card. You can also view
any digital security certificates that may be stored in
your phone.
Phone and SIM
Select Phone and SIM from the Security settings list to
display the following settings:
• PIN code request - Switching this setting to On
means that every time you switch the phone on,
you will be required to enter your PIN code
before you can use the phone (except to make an
emergency call).
z Note: You may not be able to deactivate the PIN
code request. Check with your service provider
if you are not sure.
•PIN code - Change your PIN (Personal
Identification Number) code. The (4 to 8 digit)
PIN code protects your SIM card against
unauthorised use. Your PIN code should be
provided with the SIM card.
•PIN2 code - Change your PIN2 code. This is an
additional (4 to 8 digit) PIN code used to access
certain services. Not all SIM cards have a PIN2
code.
•Lock code - Change your lock code. This is a (5
digit) code used to lock the phone to stop others
using it, or to prevent keys being pressed
accidentally, for example, when the phone is in
your pocket.
48 Sendo X User Guide
Page 54

3
Settings and Profiles
z Note: The default lock code for your phone is
12345. For security purposes, you should
change this code immediately, and keep the
new code secret.
• Autolock period - Enter a time period (in minutes)
after which the phone will automatically lock
itself, if no keys have been pressed, or select
None to disable the autolock.
• Lock if SIM changed - Select Yes if you want the
phone to request the lock code if a new,
unrecognised SIM card is inserted.
• Fixed dialling - This allows you to restrict
outgoing calls to certain phone numbers only
(always including the number of emergency
services). To add numbers to this list, press
Options g and select New contact or Add from
Contacts.
z Note: Not all SIM cards support fixed dialling,
so this setting may not be available on your
phone.
• Closed user group - This is a network service that
restricts both incoming and outgoing calls to a
limited group of phone numbers (always
including the number of emergency services).
Contact your service provider for more details.
• Confirm SIM services - Select Yes to display a
confirmation message on screen when you are
using a SIM card service, or No to disable these
messages.
!
To lock you r p h o n e
• Press the power key p and select Lock phone
from the list of options displayed.
!
To unlock your phone
• Key in your 5-digit lock code, using the numeric
keypad.
Certif. management
When you select Certif. management from the
Security settings, a list of authority certificates is
displayed (if there are any on your phone). An
authority certificate may have come from a web site
that you have browsed to, or from software that you
have installed on the phone. These certificates are
used to verify the source of the web site or software
concerned.
z Warning: Although the use of certificates
reduces security risks when accessing web
content or installing software, the existence of a
certificate in itself does not guarantee complete
security. All certificates should be checked for
authenticity before being trusted.
!
To authenticate a certificate
• Use the joypad to highlight the required
certificate, and select Certificate details from the
Options g menu. The Certificate Management
feature will check the validity of the certificate,
49 Sendo X User Guide
Page 55

3
Settings and Profiles
and may display one of the following warning
notes:
Warning Explanation
Certificate not
trusted
Expired
certificate
Certificate not
valid yet
Certificate
corrupted
!
To change the trust settings of a certificate
You have not set any features to use the
certificate.
The validity period for the certificate has
expired.
The validity period for the certificate has
not yet begun.
The certificate is not correct and cannot be
used. Contact the certificate issuer.
• Use the joypad to highlight the required
certificate, and select Trust settings from the
Options g menu. The phone features which
may use the certificate are displayed, for instance
Program Manager (installing software) or Internet
(accessing web sites). Select OK g to make the
setting.
z Warning: Do not change these settings unless
you are completely sure about the validity of the
certificate and the trustworthiness of its owner.
!
To delete a certificate
• Use the joypad to highlight the required
certificate, and select Delete from the Options
g menu.
Call barring settings
With call barring you can restrict the types of call that
your phone can make, and receive.
z Note: Call barring is a network service. Check
with your service provider about the availability
of this service.
When you open the call barring settings, a list of call
barring options is displayed, including:
• Outgoing calls - Bar all outgoing calls.
• International calls - Bar all calls to international
numbers.
•Incoming calls - Bar all incoming calls.
• Incoming calls when abroad - Bar all incoming
calls only if you are in another country.
z Note: You may still be able to make calls to
emergency services even if you have barred
outgoing calls, depending on the network.
Check with your service provider.
!
To set up call barring
1. Open the Call barring settings.
2. Use the joypad to scroll to the call barring option
you want to activate.
3. Press Options g and select Activate, then Enter
passwd.
4. You will be prompted to enter your barring
password, which you can obtain from your
service provider.
5. Press OK g to activate the call barring service.
You can cancel call barring by pressing Options g
and selecting Cancel, or select Check status to see
whether call barring is activated or not.
50 Sendo X User Guide
Page 56

3
Settings and Profiles
To switch off all call barrings, press Options g and
select Cancel all barrings.
Change your barring password by pressing Options
g and selecting Edit barrings passw.
Call divert settings
Use the call divert settings to set a phone number to
divert calls to, for example, your voice mailbox.
z Note: Call divert is a network service - check
availability with your service provider.
When you open the call divert settings, a list of call
diversion options is displayed:
Select this To
All voice calls Divert all incoming voice calls.
If busy Divert incoming calls if a call is currently
active.
If not answered Divert incoming calls after the phone has rung
for a specified length of time. You can select a
time period you want to elapse before
diverting, from 5 to 30 seconds.
If out of reach Divert incoming calls when the phone is
switched off, or out of network coverage.
If not available Activate the above 3 diverts, i.e., divert
incoming calls if the phone is busy, if the call
isn’t answered within a set amount of time, or
if the phone is out of network coverage.
All fax calls Divert all fax calls.
All data calls Divert all data calls.
2. Use the joypad to scroll to the call divert option
you want to activate.
3. Press Options g and select Activate.
4. Select whether you want calls to divert to a voice
mailbox, or another number. You will be asked
to enter the number using the numeric keypad.
Press OK when you have finished.
z Note: Press Options g and select Check
status to see whether a call diversion is activated
or not.
!
To set cancel a call divert
1. Open the Call divert settings.
2. Use the joypad to scroll to the call divert option
you want to cancel.
3. Press Options g and select Cancel to switch a
call diversion off, or Cancel all diverts to switch
off all call diversions.
!
To set up a call divert
1. Open the Call divert settings.
51 Sendo X User Guide
Page 57

3
Settings and Profiles
Network settings
When you open the network settings, the following
options are displayed:
• Network selection - Select Automatic if you want
the phone to automatically search for, and select,
an available cellular network to use. Select
Manual to display a list of available networks
from which you can select manually.
z Note: Some service providers allow users of
other service providers to use their networks,
however, you will not be able to use all
networks. Contact your service provider for
further information.
• Cell info display - Select On if you want the
phone to indicate when it is used in a cellular
network based on Micro Cellular Network (MCN)
technology.
Accessory settings
When you open the Accessory settings, a list of your
phone’s accessories is displayed. This will vary
depending on what accessories your phone was
provided with, but may include things like headset or
keyboard.
The setting options available will vary according to
which accessories appear in the list. To open an
accessory setting, use the joypad to scroll through
the list to the accessory of your choice, and press
Options g to display the setting options available.
These may include:
• Default profile - Select the phone profile to be
activated when you attach an accessory to your
phone. See Profiles on Page 53 for more
information.
• Automatic answer - Select On to set your phone
so that incoming calls are automatically
answered after five seconds (e.g., if you are using
a hands-free kit).
52 Sendo X User Guide
Page 58

3
Settings and Profiles
Profiles
Profiles are used to configure how your phone
notifies you of all events such as incoming calls, an
approaching appointment, or new messages.
You can use Profiles to quickly change how you
receive all notifications, based on your situation. For
example, you may not want the phone to ring at all
if you are in a meeting, but still want to hear
calendar reminders.
Your phone is supplied with a set of preset profiles,
which you can customise to suit the way you use your
phone. These are:
• General
• Silent
• Meeting
• Outdoor
• Pager
The default profile is General. If you select to use a
different profile, its name will be displayed at the top
of the Now! screen.
!
To view Profiles settings
There are 3 different ways of accessing the phone’s
profiles:
• From the Menu screen, use the joypad to scroll to
the Profiles icon and press Select A.
• From the Menu screen, use the joypad to scroll to
the Settings icon and press Select A. Scroll to
Profiles settings, and press Select A.
• Do a short press on the Power p key (when the
phone is switched on).
!
To activate a profile
1. Open the Profiles list, as described above.
2. Use the joypad to scroll to the profile you want to
activate.
3. Press Options g and select Activate.
!
To customise a profile
1. Open the Profiles list, as described above.
2. Use the joypad to scroll to the profile you want to
customise.
3. Press Options g and select Personalise.
4. A list of fields that you can customise are
displayed. Use the up : and down ; joypad
keys to scroll through the list and press Select A
to change a setting.
(insert screenshot of General profile settings list)
53 Sendo X User Guide
Page 59

3
Settings and Profiles
The following table shows a list of settings that you
can change in each profile:
Select this To
Ringing tone Select a ring tone from the list of ring tones
Incoming call
alert
Ringing volume Adjust the volume level of the ring tone, and
Message alert
tone
Vibrating alert Select On to make the phone vibrate when a
Keypad tones Select On if you want a tone to sound when
Warning tones Select a warning tone from the list provided.
Alert for Select All calls if you want the phone to alert
Profile name Give the preset profile a new name of your
stored on the phone. To listen to a ring tone
just highlight it using the joypad. Press any key
to stop the sound.
Select how the phone notifies you of an
incoming call, e.g. Ringing for a normal ring
tone, or Ascending to play a ring tone with
gradually increasing volume.
message alert tone.
Select how the phone notifies you that a new
message has been received.
call is incoming, and when a new message
has been received.
you press a key on your phone.
This tone will be played whenever a warning
message appears on your phone, for instance,
if the battery is running low.
you to all calls, or select from a list of your
contact groups (if you have created any) if you
want the phone to only alert you to incoming
calls from members of that contact group. See
Creating Contact groups on Page 60 for more
information about contact groups.
choosing. You cannot rename the General
profile.
54 Sendo X User Guide
Page 60

4
Chapter 4 Contacts
Contacts
Contacts is like an address book built into your
phone, where you can store names, phone
numbers, and addresses, as well as other useful
information.
Using Contacts
You can set up a contact card for each person or
business you communicate with. This “card” stores
lots of information about the contact, for example,
multiple phone numbers, Email and street
addresses, web page addresses, plus more personal
information, such as birthdays and anniversaries.
You can also add a personal ring tone, voice tag,
and a thumbnail image to a contact card.
z Warning: You should store all contact phone
numbers in international GSM format. That is,
the international access code (+), the country
code without leading zeros, city or area code
and phone number. For most countries,
including the leading zero in the country code
will cause the call to fail, however it is required
for others. Please check locally.
You can make a call and send SMS, MMS and Email
messages directly from a contact card. Contact
groups can be created, so that you can send text
messages or Emails to several contacts at once.
Contact information stored in your SIM card can be
accessed from Contacts. SIM contacts can be
exported to Contacts, and vice-versa.
You can also synchronise Contacts with your
personal computer, or a server, to keep your contact
information up-to-date in all locations.
Contacts directory
When you open the Contacts feature, all of your
current contacts are displayed in a list, in
alphabetical order. You can use the up : and down
; joypad keys to scroll through the Contacts
directory.
(insert screenshot of Contacts directory)
z Tip: You can access useful information about
your Contacts directory, such as how many
contacts are stored and how much memory
your contacts consume, by selecting Contacts
info from the Options g menu, then selecting
Memory.
Contact cards
A contact card displays all of the information that
you have entered for a contact, such as name of the
person or business, phone numbers, Email
addresses, and more. From a contact card, just
select a phone number and press Call c to call
that contact. You can also select an Email address
and press Select A to start writing a message.
(insert screenshot of contact card)
You can create a new contact card to add to
Contacts at any time.
55 Sendo X User Guide
Page 61

4
Contacts
!
To add a new contact
1. From the Menu screen, scroll to the Contacts
icon with the joypad and press Select A.
2. Press Options g and select New contact.
3. Enter the details for the contact such as name,
phone numbers and Email address. Use the up
: and down ; joypad keys to move through
the fields and enter as much or as little
information as you want.
4. Press Done d.
z Note: You must enter full phone numbers
including the international access code (+) and
country code. Remember you must leave the
leading zeros out of the country code for most
countries.
!
To add a new contact from the Now! screen
1. Type the full phone number of the new contact
you wish to add.
2. Press Options g and select Add to contacts
then Create new.
3. Scroll to the type you would like to associate
with this number (Home, Mobile, Fax, Pager,
etc.) and press Select A.
4. Enter the details for the contact such as name,
phone numbers and Email address. Use the up
: and down ; joypad keys to move through
the fields and enter as much or as little
information as you want.
5. Press Done d.
!
To add a new contact from a call
1. While the call is in progress, press Options g
and select Add to contacts then Create new.
2. Enter the details for the contact such as name,
phone numbers and Email address. Use the up
: and down ; joypad keys to move through
the fields and enter as much or as little
information as you want.
3. Press Done d.
z Note: You can continue with your call
throughout this process.
!
To view a contact card
1. Open the Contacts directory.
2. Select the contact to view, using the joypad, and
press Select A.
z Tip: To open a contact card quickly, without
having to scroll through your Contacts directory,
enter the first few characters of the contact’s
name or phone number. Once the desired
contact is displayed, highlight it and press
Select A.
!
To edi t a c o n t a c t
1. Open the contact card required.
2. Press Options g, and select Edit.
3. Make the changes, and press Done d.
z Tip: You can add, remove, and rename fields in
a contact card using the Options g menu. To
remove a redundant field, select Delete detail,
56 Sendo X User Guide
Page 62

4
Contacts
to add a new field, select Add detail, or to
change a field label, select Edit label.
!
To delete a contact
1. From the Contacts directory, highlight the
contact you want to delete, using the joypad, or
open the contact card.
2. Press Options g, and select Delete. You will be
asked whether you are sure you want to
permanently delete this contact - press Ye s g.
z Tip: To delete numerous contact cards at once,
you can mark all the items you want to delete,
before selecting Delete. See Common actions.
!
To call a contact from a contact card
• Select the phone number to call, using the joypad
keys, and press Call c, or press Options g,
and select Call.
!
To send an SMS or MMS message from a contact
card
1. Select the phone number to use, and press
Select A.
2. Select Create message, then choose either Short
message or Multimedia message.
3. Enter your message in the body text field.
4. Press Options g and select Send.
!
To send an Email from a contact card
1. Select the Email address to use, and press Select
A.
2. Enter your message in the body text field.
3. Press Options g and select Send.
Further options when viewing a contact card
As well as editing and deleting contact entries, the
Options menu offers a number of further options, as
detailed below:
Select this To
Call Call a phone number stored on the contact
Create
message
Assign/
remove speed
dial
Add voice tag Create a shortcut to a phone number, Email
Ring tone Set a ring tone for the contact.
Defaults Make the selected phone number or Email
Copy to SIM Copy the contact details to your SIM card. See
Send business
card
Edit Modify information in the contact card,
Delete Remove the whole contact card from the
card.
Send an Email or text message to the contact.
Create a shortcut to a phone number, Email
address, or Web URL by assigning one or two
keypad numbers as a speed dial. For more
information about creating speed dials, see
Speed dialling.
address, or Web URL by assigning a recording.
For more information about creating voice
tags, see Voice t ag s.
address the default for the contact.
Copying between Contacts and SIM.
Send the contact card information via text
message, Email, or via an infrared or Bluetooth
connection. See Connectivity for more
information.
including adding a thumbnail image.
Contacts directory.
57 Sendo X User Guide
Page 63

4
Contacts
!
To assign default numbers and addresses
1. Open the required contact card, or create a new
one, as shown above.
2. Press Options g and select Defaults.
3. Use the joypad to scroll to the field you want to
assign, for example Phone number, and press
Assign g.
4. Scroll through the list of numbers or addresses
shown, and highlight the one you want to set as
the default.
5. Press Select A.
z Note: When you view the contact card again,
the default phone number, address, etc., which
you have set up will be underlined.
!
To add a thumbnail image to a contact card
1. Open the required contact card, or create a new
one, as shown above.
2. Press Options g and select Edit.
3. Press Options g again and select Add
thumbnail.
4. The thumbnail images stored in your Photo
Album will be displayed - use the joypad to scroll
through them and press Select A to choose the
thumbnail to attach.
!
To assign a ring tone to a contact card
1. Open the required contact card, or create a new
one, as shown above.
2. Press Options g and select Ring tone.
3. A list of available ring tones will appear - scroll
to the one you want to choose, and press Select
A.
z Tip: To remove an assigned ring tone from a
contact card, press Options g and select Ring
tone, then select Default tone from the list.
z Note: You can assign a ring tone to a group of
contacts. See Creating Contact groups. If a
contact has been assigned two different ring
tones, one individually, and one as part of a
contact group, whichever was assigned most
recently will be used.
z Note: When you have attached a thumbnail
image to a contact card, if that contact calls
your phone, the image will be displayed on the
Incoming Call screen next to the contact’s
name.
58 Sendo X User Guide
Page 64

4
Contacts
Calling a contact
Once a phone number is stored in Contacts, you
can call it quickly and easily.
!
To call a contact from the Contacts directory
1. From the Menu screen, select Contacts (insert
icon) using the joypad.
2. Scroll through the list of Contacts using the up
: and down ; keys on the joypad until the
contact you require is highlighted.
3. Press Call c to call the contact.
z Note: If the selected contact has more than one
phone number stored, e.g. work, home, mobile,
open the contact card by pressing Select A,
then use the joypad to highlight the number you
require, before pressing Call c.
Shortcuts to calling a contact
If your Contacts directory is very long, having to
scroll through pages of names to find a contact is
inconvenient. There are a number of shortcuts
available from the Now! screen to make it quicker
for you to call a contact.
3. If the phone misinterprets the word, you will be
prompted to try again. Press Yes d to try the
voice tag again or No g to display the
contacts list and make the call from there.
z Warning: Do NOT rely on voice tags for dialling
emergency numbers. In emergencies, stress can
cause changes in your voice, which may result
in the phone not recognizing the command.
!
To call a contact using speed dialling
See Speed dialling to find out how to set up a speed
dial for a number.
1. Enter the one or two digit speed dial number that
you have assigned to the required phone
number, using the numeric keypad.
2. Press Call f to make the call.
!
To call a contact using voice dialling
See Voice ta gs to find out how to set up a voice tag
for a contact.
1. Press and hold the Voice key
on the side of the phone.
2. When prompted by the message on screen and
an audio alert, say the voice tag word.
, which is located
t
59 Sendo X User Guide
Page 65

4
Contacts
Creating Contact groups
You can create as many contact groups as you like.
A contact group can act as a distribution list, making
it quicker to send Emails and text messages to
multiple recipients.
!
To open the Groups list
• From the Contacts directory, press the right ]
joypad key to open the Groups list.
!
To create a contact group
1. Open the Groups list, as described above.
2. Press Options g and select New group.
3. Enter the name of the group when prompted
using the numeric keypad, or leave the default
name Group.
4. Press OK g. The group name will now appear
in the Groups list.
!
To add a new member to a contact group
1. Open the Contacts directory.
2. Use the joypad to scroll to the contact to be
added to your group.
3. Press Options g and select Add to group.
4. A list of all your existing groups is displayed. Use
the joypad to scroll to the group that the contact
is to be added to, and press Select A.
!
To add multiple members to a contact group
1. Open the Groups list.
2. Scroll to the group you want to add contacts to,
and open it by pressing Select A.
3. Press Options g and select Add members.
4. A list of your contacts is displayed. Use the
joypad to scroll to the contacts you want to add
to the group.
5. Press Select A to mark the contact - a tick mark
will appear next to the contact.
6. Repeat this action for all contacts to be added to
the group.
7. Press OK g.
!
To remove members from a contact group
1. Open the Groups list.
2. Scroll to the group you want to remove members
from, and open it by pressing Select A.
3. Scroll to the contact you want to remove from the
group.
4. Press Options g and select Remove from
group.
5. Press Yes g to remove the contact from the
group.
!
To assign a ring tone to a contact group
1. Open the Groups list.
2. Scroll to the group you want to assign the ring
tone to, and open it by pressing Select A.
3. Press Options g and select Ring tone.
4. A list of available ring tones will appear - scroll
to the one you want, and press Select A.
z Tip: To remove an assigned ring tone from a
contact group, press Options g and select
Ring tone, then select Default tone from the list.
60 Sendo X User Guide
Page 66

4
Contacts
Copying between Contacts and SIM
When you create contacts and add them to the
Contacts application, they are stored in your
phone’s shared memory, not in your SIM card.
However, Contacts enables you to copy contact
details to your SIM card, and vice-versa, and to
access the contacts stored on your SIM card
independently.
!
To copy information from Contacts to SIM
1. In the Contacts directory, use the joypad to select
the contact card required, and press Select A.
2. Highlight the field(s) on the contact card which
you want to copy to SIM.
3. Press Options g and select Copy to SIM direct.
!
To view your SIM contacts directory
• In the Contacts directory, press Options g and
select SIM Contacts. A list of the contacts stored
in your SIM card is displayed.
!
To copy information from SIM to Contacts
1. Open the SIM contacts directory, as described
above.
2. Select the contact(s) you want to copy.
3. Press Options g and select Copy to Contacts.
61 Sendo X User Guide
Page 67

5
Chapter 5 Messaging
This chapter shows you how to create, send, receive,
and manage different types of message:
• SMS (Short Message Service) - Text messages.
Messaging
• MMS (Multimedia Message Service) - Messages
that may contain text, graphics, animations,
photos, audio files, and video clips.
• Email - You can use your phone to send and
receive Email messages, that can also contain
attachments such as photos, audio and video
clips, and written documents.
• Instant messages - tbc
The Messaging feature also allows you to receive
messages and data from other sources:
• Cell broadcast - your service provider may send
you information about, for instance, local
weather or traffic conditions. Contact your service
provider to find out what information is available
via cell broadcast.
• Service messages - also known as pushed
messages, these are messages from your service
provider notifying you about available services,
or providing other information. Service messages
are downloaded from the Internet.
• Beamed messages - messages which have been
sent via an Infrared or a Bluetooth connection.
At the top of the list is the New Message function,
which provides a shortcut to sending an SMS, MMS
or Email message.
The rest of the list shows the default Messaging
folders:
Folder Description
Inbox Contains received SMS and MMS messages.
My folders Enables you to organise your messages, sent
Mailbox Used to receive and manage Emails.
Drafts Stores unfinished or unsent messages.
Sent Stores the last 15 messages sent from your
Outbox A temporary storage place for messages
Reports Provides a delivery report of the SMS and
and received, into folders. You can create
you own message folders, and organise
them as you please.
phone.
being sent.
MMS messages that you have sent.
Use the joypad and Select A key to open a folder.
z Tip: Once you have opened a folder, you can
navigate through the different folders using the
left [ and right ] joypad keys.
!
To access Messaging
1. From the Now! screen, use the joypad to scroll to
Messages.
Using Messaging
When you open the Messaging feature, a list of
options is displayed.
(Insert screenshot of Messaging opening screen)
2. Highlight the first line (the New Messages line),
and press Select A, or select Open from the
Options g menu, to open your Messaging
Inbox.
62 Sendo X User Guide
Page 68

5
z Note: You can also open Messaging from the
Menu screen, by scrolling to the Messaging icon
and pressing Select A.
Messaging
Creating and sending messages
This section looks at how to create and send
different types of messages from your phone.
Creating a new message
You can create and send a new SMS, MMS or Email
message in a number of ways:
• From Messaging, using the New Message
shortcut.
• From Messaging, selecting Create Message from
the Options g menu.
• From a contact card in Contacts.
• From any screen where Send is listed in the
Options g menu. For example, you can send a
photograph to a friend directly from the Camera.
SMS messages
You can send and receive SMS messages of up to
160 GSM characters, or 70 Unicode characters.
GSM characters are used for all the Latin based
languages, whereas non-Latin characters use
Unicode characters which take up more space.
If an SMS message you send or receive is any longer,
it is automatically broken down into several small
SMS messages, which are joined together as one
SMS message when all of the small SMS messages
have been received.
z Note: When you send a long SMS message, if
the phone receiving the messages is not
concatenated SMS enabled, then the messages
are separate and not necessarily in the correct
order.
It is quick and simple to send SMS messages, which
also have the following benefits:
• SMS messages are sent instantly.
• SMS messages can be sent or received while a
phone call is active.
• SMS messages can be sent to more than one
person at a time.
• Most mobile phones support SMS, so most
recipients can read SMS messages you send.
z Note: SMS messages cannot be used to send or
receive attachments (such as photos).
!
To send an SMS message from Messaging
1. In Messaging, select New Message, or, press
Options g and select Create message.
2. Select Short message from the list of options by
pressing Select A.
3. Enter the phone number of the recipient in the
To : field using the numeric keypad. You can
enter as many numbers as you like, but each
one must be separated by a semi-colon (;). Press
the Hash key # to insert a semi-colon.
z Tip: If the message recipient’s phone number is
stored in Contacts, you do not need to type the
number. Just press Select A, or press Options
g and select Add recipient to take you to your
63 Sendo X User Guide
Page 69

5
Contacts directory. Select one or more contacts
to send the message to, then press OK g to
go back to the message screen.
Messaging
4. Press the down ; joypad key to move to the
message field.
5. Write your message using the numeric keypad.
See Entering text and numbers for more
information.
z Tip: In the navigation bar, the message length
indicator shows you how many more characters
you can enter before an additional message will
be required. For example, 20 (2) means that
you have 20 characters left for the text to be
sent as 2 SMS messages.
6. Send your completed message by pressing Call
f or press Options g and select Send.
!
To send an SMS message from Contacts
1. Use the up : and down ; joypad keys to select
a contact card and press Select A.
2. Select the phone number to use, and press
Select A.
3. Select Create message, then choose Short
message.
4. Enter your message in the body text field.
5. Press Options g and select Send.
are editing a message. When you save the message,
its sending settings are also saved.
MMS messages
You can use your phone to send multimedia
messages - these are text messages which may
contain images (photos, graphics, animations),
audio files, and even video clips.
MMS connection
Before you can begin sending and receiving MMS
messages you must have set up data connections
which allow you to connect to the Internet. The
fastest and easiest way to configure your phone is to
visit http://www.sendo.com/config to automatically
configure your settings. The Sendo Easy
Configurator sends an SMS message to your phone
containing the settings you require. Alternatively, you
can ask your service provider to send you this
information (if available).
z Note: These settings may have already been
configured on your phone by your service
provider. Check with your service provider for
details.
See Connection settings for details of how to
configure your phone’s connection settings for
Internet access.
SMS sending options
To change how a message is sent, press
Options g and select Sending options when you
Sending MMS messages
You can send an MMS message directly from your
phone to any other compatible device.
64 Sendo X User Guide
Page 70

5
z Note: Only devices that offer compatible
multimedia message or Email features can
receive and display multimedia messages.
Messaging
!
To send an MMS message from Messaging
1. In Messaging, select New Message, or, press
Options g and select Create message.
2. Select Multimedia message from the list of
options by pressing Select A.
3. Enter the phone number of the recipient in the
To : field using the numeric keypad. You can
enter as many numbers as you like, but each
one must be separated by a semi-colon (;). Press
the Hash key # to insert a semi-colon.
z Tip: If the message recipient’s phone number is
stored in Contacts, you do not need to type the
number. Just press Select A, or press Options
g and select Add recipient to take you to your
Contacts directory. Select one or more contacts
to send the message to, then press OK g to
go back to the message screen.
4. Press the down ; joypad key to move to the
message field.
5. Write your message using the numeric keypad.
See Entering text and numbers for more
information.
6. Press Options g and select Insert. The
following list of options is displayed:
Select this To
Image Insert any image that is currently stored in the
phone into the message.
Select this To
Video clip Insert any video clip that is currently stored in
the phone into the message.
Sound clip Insert any sound clip that is currently stored in
New image Launch the Camera, take a photograph, and
New video clip Launch the Camcorder, record a video clip,
New sound
clip
Te mp l a te Insert a predefined text string into the
the phone into the message.
insert it into the message.
and insert it into the message.
Launch the recorder, record a sound clip, and
insert it into the message.
message.
7. Use the joypad and Select A key to select which
type of multimedia object to insert into the
message.
8. You can preview how the MMS message will
look, before sending it, by pressing Options g
and selecting Preview message.
(insert screenshot of MMS previewed message)
z Note: You can re-order the components of your
MMS message, for example, place the text
underneath an image, by selecting Objects
from the Options g menu. You can also
remove components from the Objects view.
9. Send your completed message by pressing Call
c or press Options g and select Send.
!
To send an MMS message from Contacts
1. Use the up : and down ; joypad keys to select
a contact card and press Select A.
65 Sendo X User Guide
Page 71

5
2. Select the phone number to use, and press
Select A.
3. Select Create message, then choose Multimedia
Messaging
message.
4. Enter your message in the body text field.
5. Press Options g and select Insert, then select a
multimedia object to insert (see previous table).
6. Press Options g and select Send.
SMS sending options
To change how a message is sent, press
Options g and select Sending options when you
are editing a message. When you save the message,
its sending settings are also saved.
Adding multimedia objects to a message
z Note: You can insert a combination of text,
image, and sound clip, or text and video clip,
but you cannot insert an image and a video clip
into the same message.
!
To add an image to an MMS message
1. Press Options g, select Insert, then Image.
2. A list of all stored images is displayed. Use the
joypad and Select A key to choose which image
to add.
z Note: When you send an image via MMS, you
can select whether to send it in large or small
size. The default size is small, but you can
change this by selecting Sending options from
the Options g menu, and changing the
Image size field using Select A. Remember that
a large image will require more memory to be
available on the recipient’s phone than a small
image.
!
To add a video clip to an MMS message
1. Press Options g, select Insert, then Video clip.
2. A list of all stored video clip files is displayed.
Use the joypad and Select A key to choose
which video clip to add.
!
To add a sound clip to an MMS message
1. Press Options g, select Insert, then Sound clip.
2. A list of all stored sound clip files is displayed.
Use the joypad and Select A key to choose
which sound clip to add.
z Note: When a sound clip has been added to an
MMS message, a (insert icon) icon appears in
the navigation bar to indicate that the message
contains sound.
!
To take a photo and send it via MMS
1. Press Options g, select Insert, then New
image.
2. The Camera will be activated. Use the screen as
a viewfinder, and press Select A to take a
photo.
3. Press Select A again to insert the new photo into
the MMS message
z Tip: A quicker way to send a new photo via
MMS message is by simply taking a picture
66 Sendo X User Guide
Page 72

5
using the Camera, then selecting Send from the
Options g menu.
!
Messaging
To record a video clip and send it via MMS
1. Press Options g, select Insert, then New video
clip.
2. The Camcorder will be activated. Use the screen
as a viewfinder, and press Select A to start
recording a video clip. See Recording a video
clip for more information.
3. Once the recording is complete, press Select A
again to insert the new video clip into the MMS
message
z Tip: A quicker way to send a new video clip via
MMS message is by simply recording a video
clip using the Camcorder, then selecting Send
from the Options g menu.
!
To record a sound clip and send it via MMS
1. Press Options g, select Insert, then New
sound clip.
2. The recorder will be activated. Press Select A to
start recording a sound clip. See Recorder for
more information on recording sound clips.
3. Once the recording is complete, press Select A
again to insert the new sound clip into the MMS
message.
You can use your phone to send and receive Email
messages, which may also contain items such as
photos, audio and video clips, and written
documents.
Email connection
Before you can begin sending and receiving Email
messages, you must have set up data connections
which allow you to connect to an Email server. The
fastest and easiest way to configure your phone is to
visit http://www.sendo.com/config to autoconfigure
your settings. The Sendo Easy Configurator sends an
SMS message to your phone containing the settings
you require. Alternatively, you can ask your service
provider to send you this information (if available).
z Note: These settings may have already been
configured on your phone by your service
provider. Check with your service provider for
details.
Supported formats
Your phone’s mail client supports POP3 and IMAP4
mail servers, MIME attachments and SMTP for
sending mail.
Sending Emails
You can send Email messages from your phone to
any other compatible device.
!
To send an Email from Messaging
1. In Messaging, select New Message, or, press
Options g and select Create message.
2. Select E-mail from the list of options by pressing
Select A or OK g.
67 Sendo X User Guide
Page 73

5
3. Enter the Email address of the recipient in the To :
field using the numeric keypad. You can enter as
many addresses as you like, but each one must
Messaging
be separated by a semi-colon (;). Press the Hash
key # to insert a semi-colon.
z Tip: If the recipient’s Email address is stored in
Contacts, you do not need to type it out. Just
press Select A, or press Options g and select
Add recipient to take you to your Contacts
directory. Select one or more contacts to send
the message to, then press OK g to go back
to the message screen.
4. Press the down ; joypad key to move to the
message field.
5. Write your message using the numeric keypad.
See Entering text and numbers for more
information.
6. Send your completed message by pressing
Call c or press Options g and select Send.
z Note: Email messages are automatically placed
in the Outbox before sending. If something
goes wrong when the phone attempts to send it,
the Email will be left in the Outbox, with the
4. Enter your message in the body text field.
5. Press Options g and select Send.
Email attachments
You can attach many different types of file to an
Email message, for example:
• Images.
• Video clips.
• Sound clips.
• Notes.
• Written documents.
z Tip: You can add multimedia objects (images,
video clips, and sound clips) and notes to an
Email message in exactly the same way as you
would add them to an MMS message, by
pressing Options g and selecting Insert.
!
To add Email attachments
1. From your open Email, press Options g and
select Attachments.
2. The Attachments view is displayed. From here,
you can select the following:
status Failed.
Select this To
!
To send an Email from Contacts
1. Use the up : and down ; joypad keys to select
a contact card and press Select A.
2. Select the Email address to use, and press
Select A.
3. Select Create message.
Add Attach a file to the Email message.
View Open the selected file and view it, in an
appropriate application.
Remove Remove an attached file from the Email.
3. Send the Email as normal by pressing Call c or
press Options g and select Send.
68 Sendo X User Guide
Page 74

5
z Tip: You can send files by Email without having
to open the Messaging application, whenever
the Options g menu contains Send, then Via
Messaging
e-mail.
Special text messages
Your phone lets you send and receive the following
types of predefined text message:
• Picture messages (a text message containing a
small, black and white graphic).
• Business cards (contact card data).
• Calendar notes (entries from the Calendar
application).
!
To send a picture message
1. Open the Photo Album application.
2. Press Options g and select Picture msgs.
3. Use the joypad and Select A key to select the
graphic to send
4. Press Options g and select Send.
!
To send a business card
1. Open the Contacts application.
2. Open the contact card which you want to send.
3. Press Options g and select Send business
card.
4. Select the sending method (Via SMS, Via Email,
etc.), and send in the normal way.
!
To send a calendar note
1. Open the Calendar application.
2. In the Day view, highlight the entry which you
want to send.
3. Press Options g and select Send.
69 Sendo X User Guide
Page 75

5
4. Select the sending method (Via SMS, Via Email,
etc.), and send in the normal way.
Messaging
Inserting predefined text into messages
You can save time when writing SMS, MMS, and
Email messages, by inserting predefined text. Your
phone comes with some predefined text strings
(templates) already set up, and you can create your
own to include the words and phrases that you use
most often.
!
To insert predefined text into a message
1. When the cursor is in the message field, at the
point you want to insert predefined text, press
Options g and select Insert, then Te mpla te .
2. A list of predefined text strings is displayed. Use
the up : and down ; joypad keys to select the
text you want to insert into your message and
press Select A.
!
To create or modify a predefined text string
1. In Messaging, open My folders.
2. Highlight Templates, and press Select A.
3. Press Options g and select New template, or
highlight one of the existing templates and press
Select A to open it for editing.
4. Type in your text string, and press Done d.
Instant Messaging
tbc
Receiving messages
This section deals with how you are notified when
you receive messages, and how you can view and
manage the messages that you receive.
Message notifications
Your phone makes a sound to alert you when a new
message arrives (unless you have set the phone’s
profile to Silent). You can change the sound alert by
changing the profile settings. See Profiles for more
information.
The number of unopened messages of all types is
displayed in Messages in the Now! screen, with a
closed envelope icon displayed alongside.
In the title bar at the top of the Now! screen,
different icons are displayed to notify you of different
types of new message (SMS, Email, voicemail, etc.).
These are listed in Status Indicators.
Inbox
All messages you receive (except Email) are
displayed in the Inbox. The most recently received
messages are displayed at the top.
(insert screenshot of inbox)
!
To view your Inbox
1. From the Now! screen, use the joypad to scroll to
Messages.
2. Highlight the first line (the New Messages line),
and press Select A, or select Open from the
Options g menu.
70 Sendo X User Guide
Page 76

5
z Note: You can also open your Inbox from the
Menu screen, by scrolling to the Messaging icon
and pressing Select A, and then selecting
Messaging
Inbox.
2. You will be prompted whether you want to delete
the message or not. Press Yes g.
There are a number of available options when
viewing a received message, depending on the
message type:
Handling new messages
It is easy to open, delete, forward, and reply to
messages in your Inbox.
!
To open a message
1. Open the Inbox, as described above.
2. Select the message to open using the up : and
down ; joypad keys and press Select A.
z Tip: Use the up : and down ; joypad keys to
scroll through the message and the left [ and
right ] joypad keys to move to the previous or
next message in the folder.
!
To reply to a message
1. While the received message is open, press
Options g and select Reply.
z Tip: Select Reply then To all to copy the address
of the sender and all Cc: field recipients to the
To : field of the new message.
!
To forward a message
1. While the received message is open, press
Options g and select Forward.
2. Enter the phone number to forward the message
to in the To field. Press Send d.
!
To delete a message
1. Press Options g and select Delete.
Select this To
Reply Create a new message in response to a
Forward Forward a received message to another
Call Call the message sender, or a phone
View image View a received image.
Save image Save a received image to memory.
Play sound clip Listen to a received sound clip.
Save sound clip Save a received sound clip to memory.
Play video clip Watch a received video clip.
Save video clip Save a received video clip to memory.
Objects View a list of all the different multimedia
Attachments View a list of files sent as Email attachments.
Message
details
Move to folder Move a message to a different folder, for
Copy to folder Copy a message to a different folder.
received message. The sender’s phone
number or Email address is copied to the To :
field.
party. The message contents are copied to
an editor, where you should fill in the To :
field.
number included in a message, by pressing
Call
f.
objects received in an MMS message.
View detailed information about a received
message.
example My Folders, or a new folder that
you have created.
71 Sendo X User Guide
Page 77

5
Select this To
Add to contacts Copy the sender’s details to Contacts, either
to a new or an existing contact card.
Messaging
Find Search the message for phone numbers,
Email addresses, or internet addresses.
• To listen to the sound clip again, press Options
g and select Play sound clip.
!
To watch a video clip
• If the MMS message contains a video clip, the
phone’s RealOne Player will be automatically
Receiving MMS messages
You can recognise an MMS message from its icon
(insert icon).
When you open an MMS message, you can read the
text, view an image or video clip, and hear a sound
clip simultaneously.
activated. See Playing media files for information
about playing video clips.
• To play the video clip again, press Options g
and select Play video clip.
Receiving Email
New Email messages can be accessed by opening
Receiving multimedia objects
Press Options g and select Objects to display a list
of multimedia objects (image, video clip, sound clip)
contained in an MMS message.
From the Objects view, you can use the joypad and
Select A key to select the object of your choice, and
then perform the following options:
Select this To
Open Open the multimedia file, e.g. display an
image, using the full screen.
Save Store the multimedia file in the phone’s
memory, e.g. store an image in Photo Album.
Send Send the multimedia file to another compatible
device, via MMS, Email, or via an infrared or
Bluetooth connection.
the Mailbox folder in Messaging.
z Note: If you attempt to open the Mailbox
without having first set up your Email account
details, you will be prompted to do so.
You can create up to six separate mailboxes for your
different Email accounts.
When you create a new mailbox, the name that you
give to the mailbox automatically replaces Mailbox
in the main Messaging view.
Opening the Mailbox
When you open the Mailbox folder, you have two
choices:
• Connect to your Email server to access new
Emails.
!
To listen to a sound clip
• View previously retrieved Emails off-line.
• If the MMS message has sound, use the left [
and right ] joypad keys to control the volume,
or press Stop d to stop the sound.
72 Sendo X User Guide
Page 78

5
!
To view new Emails
1. In the main Messaging view, use the joypad to
highlight Mailbox, and press Select A.
Messaging
2. You will be prompted whether you want to
Connect to mailbox? Press Yes g.
z Tip: Another way to connect to the mailbox is to
press Options g and select Connect.
3. Once the connection is open, press Options g
and select Retrieve. You can choose to retrieve:
• New - retrieve all new Emails.
• Selected - retrieve all Emails which have been
marked.
• All - retrieve all Emails from the mailbox.
4. Scroll to the Email you want to view and press
Select A to open it.
z Tip: You can save an Email to a folder of your
choice by pressing Options g and selecting
Copy.
5. To close the connection to the Email server, press
Options g and select Disconnect.
Viewing Emails off-line
Once you have retrieved your Emails from the
mailbox, you can close the connection to the Email
server and view your Emails off-line. This may help
you to save on connection costs.
In off-line mode, you can read, reply to, forward,
and delete Emails.
!
To view Emails offline
1. Retrieve your Emails from the Mailbox, as shown
above.
2. In the main Messaging view, use the joypad to
highlight Mailbox, and press Select A.
3. You will be prompted whether you want to
Connect to mailbox? Press No d.
!
To reply to an Email
• While the received Email is open, press Options
g and select Reply.
z Note: Select Reply then To a l l to copy the
address of the sender and all Cc: field recipients
to the To : field of the new message.
!
To forward an Email
1. While the received Email is open, press Options
g and select Forward.
2. Enter the Email address to forward the message
to in the To : field. Press Send d.
!
To delete an Email
1. Press Options g and select Delete.
2. Select Phone only to delete an Email from your
phone, but leave it on the Email server, or Phone
and server to delete an Email from both your
phone and the Email server.
3. You will be prompted whether you want to delete
the Email or not. Press Yes g.
73 Sendo X User Guide
Page 79

5
Email attachments
You can tell if a received Email has any attachments
by the (insert icon) icon. When an Email containing
Messaging
an attachment is open, press Options and select
Attachments to open the Attachments view. From
!
To save an Email attachment
• In the Attachments view, press Options g and
select Save. The attachment will be saved to the
appropriate phone feature. For example, photos
are saved to the Photo Album.
here, you can retrieve and view the attachments,
save them to the phone’s memory, delete, or send
them to another recipient.
z Warning: Email attachments may contain
viruses and may be harmful to your phone or
personal computer. Do not open any Email
attachments unless you are sure about the
trustworthiness of the sender.
Receiving special text messages
Your phone can receive many pre-defined types of
text message which contain specific data.
!
To open a special text message
• Open the Inbox.
• Use the joypad to highlight the message you
want to view.
!
To view an Email attachment
1. If the attachments indicator is dimmed, it means
that the attachment has not been retrieved from
the mail server. Highlight the attachment, and
select Retrieve from the Options g menu.
2. Press Options g and select Attachments to
take you to the Attachments view.
3. Use the joypad to scroll to an attachment and
press Select A. If you are connected to the mail
server, the attachment is retrieved and opened. If
you are offline, you will be prompted whether
you want to retrieve the attachment. Pressing
Yes g will start a connection to the Email
server.
• Press Select A.
The following types of message can be received:
Special message
type
Picture message A message containing an image.
Business card A message containing contact details.
Ring tone A message containing a sound file
Operator logo A message from your service provider
Calendar entry A message containing details of a
WAP message A message containing an internet
E-mail notification Informs you how many Emails are in
Details
which can be used as a ring tone for
your phone.
containing a logo (CLI).
meeting, appointment, or other
calendar event.
address.
your remote mailbox.
74 Sendo X User Guide
Page 80

5
!
Special message
type
Settings You can receive messages containing
Messaging
!
To save data from a special text message
Details
various types of settings data, for
instance Email settings, or access
point settings for MMS messaging.
• To save data received in one of these messages,
for example, a ring tone, or a picture, press
To download a service message
1. Highlight the message and press Select A.
2. Press Download message g. A connection to
the Internet is made, if required, and the
message is downloaded.
3. Press Back d to return to the Inbox.
z Note: You can also view service messages from
the Opera browser. See Service messages.
Options g and select Save.
z Note: Depending on the type of data, different
save options may be available, for example
Save business card, Save to calendar, etc.
Receiving cell broadcasts
You can receive messages on topics such as local
weather and traffic conditions from your service
provider. Cell broadcast messages are displayed in
the Inbox when received, and are denoted by the
(insert icon) icon. They can be viewed in the same
way as normal SMS messages.
Receiving service messages
Viewing messages on a SIM
You can view messages stored in a SIM card by
copying them to your Inbox.
!
To import messages from a SIM card
1. From the main Messaging screen, press Options
g and select SIM messages.
2. Select the message you want to copy using the
joypad.
z Tip: To import multiple messages, select Mark
from the Options g menu.
3. Press Options g and select Copy.
4. A list of folders is displayed. Select which folder
Service (or “pushed”) messages are sent by your
service provider over the Internet. They are displayed
in the Inbox when received, and are denoted by the
(insert icon) icon.
you want to copy the message(s) to, and press
OK g.
The messages are imported – the next time you
check your Inbox, all the messages you have copied
from your SIM card are displayed.
z Note: You cannot export anything from your
phone’s Inbox to a SIM card.
75 Sendo X User Guide
Page 81

5
Messaging Settings
The Messaging feature has a range of different
Messaging
settings, relating to the different message types. To
access these settings, press Options g from the
main Messaging view, and select Settings, followed
by the settings type, e.g. Short message.
Settings for SMS messages
SMS (short) messages are delivered to your phone
through a message service centre, the number for
which is obtained from your service provider. You
can define more than one message centre and select
which one to use.
!
To add a new short message centre
1. From the Short message settings list, select
Message centres.
2. Press Options g and select New msg.centre.
3. Enter a name for the service centre and press
OK g.
4. Press the down joypad key ; then Select A and
enter the message service centre number.
5. Press OK g.
6. To use the new message centre, press Back d
twice to go back to the Short message settings
view, select Msg. centre in use, and select the
new message centre from the list.
The full range of SMS settings is listed below:
Select this To
Message
Centres
Msg. centre in
use
Receive report Set to Ye s to see the status of sent messages in
Message
validity
Message sent asSend a message as text, Email, fax, or paging.
Preferred
connection
Reply via same
ctr.
View the text message service centres that have
been defined, or add a new service centre.
Select which service centre is used to handle
your text messages.
the Log.
Set a maximum amount of time allowed for a
message to reach a recipient. If the recipient
cannot be reached within the time, the
message is removed from the message service
centre.
These options may not all be available - check
with your service provider.
You can send SMS messages via the normal
GSM network, or via GPRS, if supported by the
network.
If set to Ye s, when a recipient replies to your
message, the reply is sent using the same
message service centre. This may not be
possible between different operators.
76 Sendo X User Guide
Page 82

5
Settings for MMS messages
Select this To
Messaging
Preferred
connection
Secondary
conn.
Multimedia
reception
On receiving
msg.
Allow anon.
messages
Receive
adverts
Receive report Set to Yes to see the status of sent messages in
Deny report
sending
Message
validity
Select the access point for connection to the
multimedia message service centre.
Select a secondary connection.
Select from:
Only in home net. - MMS messages can only
be received when you are in your home
network
Always on - MMS messages can always be
received
Off - MMS messages cannot be received.
Select from:
Retr. immediately - retrieve received MMS
messages immediately
Defer retrieval - save received messages to be
retrieved later
Reject message - reject MMS messages. The
service centre will delete any received MMS
messages.
Select No to reject messages from anonymous
senders.
Select whether or not you want to receive
advertisements via MMS message.
the Log.
Select Yes to stop the phone from sending
reports of received MMS messages.
Set a maximum amount of time allowed for a
message to reach a recipient. If the recipient
cannot be reached within the time, the
message is removed from the message service
centre.
Select this To
Image size Select the size of images sent in MMS
messages:
Small - maximum size 160 x 120 pixels
Large - maximum size 640 x 480 pixels.
Speaker Select which speaker sounds received via MMS
will be played through
Settings for Email
Select this To
Mailbox
name
Access point
in use
My mail
address
Outgoing
mail server
Send
message
Send copy to
self
Include
signature
User name Enter your user name, obtained from your
Password Enter your password. If you leave this field
Enter the name of the mailbox to be used.
The Internet Access Point (IAP) used for the
selected mailbox.
Enter your Email address, obtained from your
service provider. The address must contain the
@ character.
Enter the IP address or host name of the
computer that sends your Email.
Select when Email is sent from your phone.
Immediately - a connection to the mailbox is
started when you press Send.
During next conn. - the Email is sent next time
you connect to the server.
Select Yes to send a copy of all your sent Emails
to your own Email address.
Select Yes to include a signature in your Emails,
and to create or edit the signature text.
service provider
blank, when you try to connect to the Email
server you will be prompted for your password.
77 Sendo X User Guide
Page 83

5
Select this To
Incoming
mail server
Messaging
Mailbox type Select the Email protocol - POP3 or IMAP4.
Security Secure the connection to your remote mailbox.
APOP secure
login
Retrieve
attachment
Retrieve
headers
Enter the IP address or host name of the
computer that receives your Email.
Used with POP3 only, to encrypt the sending of
passwords to the remote Email server.
Select No to retrieve Emails without their
attachments.
Used with IMAP4 only, you can define the
number of Email headers to retrieve to the
phone.
Settings for service messages
Settings for cell broadcast
Contact your service provider to find out whether you
can receive cell broadcast, and which topics are
available.
Select this To
Reception Select On if you want to receive cell broadcast
messages, and Off if you do not.
Language Select All to receive cell broadcast messages in
To pi c
detection
any language, or specify the language(s) of
your choice.
Select On to save the topic number
automatically when you receive a message with
a new topic.
Contact your service provider to find out more
details about service messages. The following
settings are available:
Select this To
General message settings
These settings apply to all types of message. Select
Other from the Messaging settings list to access the
following:
Service
messages
Authentic.
needed
Select On if you want to receive service
messages, and Off if you do not.
Select Yes to receive service messages only if
they can be authenticated, or No to allow any
service messages.
Select this To
Save sent
messages
No. of saved
msgs.
Memory in
use
Select Yes to save a copy of all sent messages
into the Sent folder.
Define how many messages can be stored in
the Sent folder at a time. If the limit is reached,
the oldest message will be deleted to make
room for a new one.
Define whether to use the phone’s memory, or
a memory card, if one is available.
78 Sendo X User Guide
Page 84

6
Chapter 6 Now! Screen
The Now! screen acts as your phone’s home page.
When you switch your phone on, the Now! screen
will appear, and will be displayed until you choose to
activate another feature or go to another screen.
Now! Screen
Exiting a feature will take you back to the Now!
screen, as will pressing the Clear r key or Back/
Exit d repeatedly.
Your phone’s Now! screen has advantages over the
“idle” screen of many other mobile phones, as it
gives you quick and easy access to many of your
phone’s key features, and allows you to add your
own links to phone features, web sites, photos,
games, or whatever you use most often.
(insert a screenshot of the Now! screen)
Navigating the Now! screen
The Now! screen has three different views or panes,
which you can navigate between using the left [
and right ] joypad keys:
•My Pane - Status information (such as calls,
appointments, messages, etc.) as well as your
own links to phone features.
• Favourites - Links to web and WAP pages as well
as files such as photos, sounds and music.
•History - A history of recently used features.
In each pane, use the up : and down ; joypad
keys to scroll through the sections, known as plugins, and use the Select A key to open a link.
z Note: The content of the Now! screen’s three
panes may not be exactly the same as that
shown in this guide. Content which is specific to
your service provider is not described here, and
information about such content should be
obtained from your service provider.
Plug-ins
The sections displayed in each of the panes are
known as plug-ins. You can add, remove and move
these plug-ins as needed. See the Personalising the
Now! screen section for more details.
The plug-ins available are as follows:
• Callendar - Links and status information for the
Calendar.
•Call record - Links and status information for the
Call log.
• Cell broadcast - Links and status information for
cell broadcast messages.
•Messaging - Links and status information for
SMS, MMS and Email messages.
• Recent actions - Links and status information for
recently used features.
•Sim services - Links and status information for
any SIM services, if any, that your operator
provides.
• Content plug-ins - Links to features and files.
79 Sendo X User Guide
Page 85

6
Using the soft keys
You can press Options g from the Now! screen at
any time to display a list of available commands.
Now! Screen
Pressing the right soft key d will take you
immediately to whichever feature a shortcut has
been set up to - this is indicated by the label above
the soft key, for instance, if Camera is displayed,
pressing the right soft key will open the Camera. You
can set this shortcut to any feature you like.
!
To set the right soft key shortcut
1. Press Options g and select Pane settings.
2. From the Settings list, select Right selection key.
3. A list of phone features is displayed. Use the
joypad to scroll to the feature that you want to
create a shortcut to (probably the feature that
you use most often), and press Select A.
Making calls from the Now! screen
There are a number of ways that you can make a
call, while the Now! screen is displayed:
• Type in the phone number, using the numeric
keypad.
• Press a key that you have assigned a speed dial
to.
• Use a voice tag.
• Use voice digit dialling.
See the Phone Calls chapter for further information
about making and receiving calls.
Accessing features from the Now! screen
You can access some features quickly from the Now!
screen, without having to go to the Menu screen.
z Note: You can add links to other phone features
(applications) to the My pane and Favourites
pane, so that you can access the features that
you use most from the Now! screen. See
Personalising the Now! screen.
!
To open your Inbox (SMS/MMS)
• Use the joypad to scroll to a Messages line under
the Messages plug-in, and press Select A.
!
To open your Mailbox (Email)
• Use the joypad to scroll to the Check e-mail line
under the Messages plug-in, and press Select A.
!
To open the Log
• Use the joypad to scroll to a Calls line under the
Call record plug-in, and press Select A.
!
To open t h e C a l e n d a r
• Use the joypad to scroll to a Calendar line under
the date heading, and press Select A.
!
To open the Tasks feature
• Use the joypad to scroll to a Tasks line under the
date heading, and press Select A.
80 Sendo X User Guide
Page 86

6
Now! screen Options menu
The following commands are available by pressing
the Options g key:
Now! Screen
Select this To
Wrap off /
Wrap on
Application link Insert a link to a feature (application) into
Open Activate the feature or other link that is
Delete link /
Delete Favourite
Pane settings Personalise your Now! screen by
Insert pane Add a new pane to the Now! screen.
Delete pane Remove the current pane from the Now!
Help Activate the context-sensitive Help feature.
Turn the text wrap feature of the current
pane off/on.
the current pane. This menu option is not
available from the Favourites pane.
currently highlighted.
Remove a link to a feature, web site, or
other object.
Note: Some of the links that your phone
was supplied with cannot be deleted.
changing the display. See Personalising
the Now! screen.
screen.
Personalising the Now! screen
You can personalise your Now! screen by selecting
your own background image, by customising the
layout, and by creating links to phone features,
websites, photos, video clips, sound clips,
documents, etc.
Press Options g and select Pane settings to display
the following settings:
•Pane name - Set the name of the current pane to
something more personal.
• Wallpaper - You can choose an image from the
Photo Album to use as background wallpaper for
a pane. The image will fill the whole screen area,
but you will still be able to see the foreground
data clearly.
•Pane order - Select the order of the panes
displayed in the Now! screen.
• Right selection key - Choose the feature for the
right soft key when the pane is displayed.
•Default pane - Select which p[ane is diplayed by
default when the phone is switched on.
•Text colour - Select the colour. of the text for this
pane.
• Select plug-ins - Select the plug-ins to display in
this pane.
• Content Links - Select the content to display in
this pane.
•Plug-in order - Select the order of the plug-ins
displayed in this pane.
81 Sendo X User Guide
Page 87

6
Favourites Pane
You can adapt the Now! screen to suit the way you
use your phone, by creating your own links in the
Now! Screen
Favourites pane.
This gives you quick and easy access to your
favourite things, for example:
• Your most frequently visited web sites.
• Your favourite games.
• Your favourite photos, video clips, and sound
• Useful documents.
• The phone features which you use most.
When you have added a new link, it will be
displayed in the Favourites panel.
!
To add a link to the Favourites pane
1. While using a feature such as the Photo album,
clips.
press Options g, and select Add to Favourites.
82 Sendo X User Guide
Page 88

7
Chapter 7 Calendar and Tasks
This chapter shows you how the phone’s Calendar
and Ta sk s features can help you stay organised.
Using Calendar
Use the Calendar to organise your business and
Calendar and Tasks
personal schedules. You can keep track of your
meetings and appointments, birthdays,
anniversaries, and other events and set an alarm to
remind you of upcoming events.
You can view the Calendar by day, week, or month.
!
To access Calendar
• From the Now! screen, use the joypad to scroll to
the Calendar line (insert icon) under the date
heading, where your next calendar entry is
displayed, and press Select A.
or
• From the Now! screen, press Options g and
select Go to calendar.
or
• From the Menu screen, use the joypad to scroll to
the Calendar icon, and press Select A, or press
Options g and select Open.
3. Select one of the following from the menu list,
using the joypad and Select A key:
Select this To
Meeting
(add icon)
Memo
(add icon)
Anniversary
(add icon)
Create an appointment with a specific date
and time.
Create a general reminder note for a
specified day.
Create a reminder for a birthday, anniversary
or other special date. Anniversary entries are
repeated every year.
4. Enter information in the fields displayed. Use the
joypad to scroll between fields.
5. Press Done d to save the entry to the
Calendar.
z Tip: To create a new calendar entry quickly from
the Day or Week calendar views, just type in any
character from the numeric keypad. This
automatically begins the New entry process.
z Note: If you decide you do not want to create an
entry while you are composing it, just press
Options g and select Delete.
!
To create a new calendar entry
1. Open the Calendar, as instructed above.
2. Press Options g and select New entry.
83 Sendo X User Guide
Page 89

7
Calendar and Tasks
Calendar entry fields
When you create a new calendar entry, the following
fields are displayed:
Field Description
Subject Enter the title of, or a description of, the event.
Location Where the event is taking place (this field is
optional).
Start time What time the event starts.
End time What time the event finishes.
Start date What date the event starts.
End date What date the event finishes.
Alarm Select On or Off, depending on whether you
want a reminder for the event.
Alarm time At what time you want to be reminded of an
event.
Alarm date On what date you want to be reminded of an
event.
Repeat Set up a recurring event, for example a
monthly staff meeting.
Repeat Until What date do you want the recurring entry to
finish.
Synchronisation Choose what should happen to an entry when
you synchronise the Calendar with your
personal computer.
2. In the Repeat field, press Select A to activate the
repeat function.
3. Select how often you want to event to recur.
Choose from:
• Daily
• Weekly
• Fortnightly
• Monthly
• Annually
z Tip: You can also create entries which recur at
an interval of any number of days or weeks, for
example, every 3rd week on Thursday, or
weekly on Tuesday and Friday. This allows your
Calendar data to be synchronised easily with
PC-based calendar applications which include
these options.
4. Input a date in the Repeat until field, if you want
the recurring event to end after a specific date.
5. Press Done d to save the entry to the
Calendar. The (insert symbol) symbol is
displayed next to the entry to indicate a recurring
event.
Recurring entries
You can create a recurring entry in the Calendar for
an event which happens at regular intervals, for
example, weekly.
!
To create a recurring entry
1. Create an entry in the normal way (see above).
!
To view a calendar entry
1. Open the Calendar.
2. Select the entry you wish to view, using the up :
and down ; joypad keys to scroll, and press
Select A.
84 Sendo X User Guide
Page 90

7
Calendar and Tasks
!
To edit a calendar entry
1. Open the Calendar.
2. Select the entry you wish to view, using the up :
and down ; joypad keys to scroll, and press
Select A.
3. Make the necessary changes in the entry fields,
and press Done d.
z Note: If the entry you are editing is a recurring
event, you can select from All occurrences (all
repeated entries are changed) or This entry only
(only the current entry is changed).
!
To delete a calendar entry
1. Open the Calendar.
2. Highlight the entry you wish to view, using the up
: and down ; joypad keys to scroll.
3. Press Options g and select Delete.
4. You will be prompted whether you want to
permanently delete the entry. Press Ye s d.
z Note: If the entry you want to delete is a
recurring event, you can select from All
occurrences (all repeated entries are deleted) or
This entry only (only the current entry is deleted).
z Tip: Delete old Calendar entries regularly in
order to free up shared memory in your phone.
Viewing your schedule
You can view your schedule in different ways:
• Day
• Week
• Month
Day view
You can use the Day view to view events on a given
day.
!
To view your schedule in Day view
1. Open the Calendar.
2. Press Options g and select Day view.
!
To go to a different day
1. Press Options g and select Go to date.
2. Enter the date that you want to view using the
numeric keypad, and press OK g.
z Note: You can use this method to go to a
different date from Week or Month view as well.
Week view
The Week view displays your schedule for the current
week.
The Week view below displays the hours from 9:00
am to 4:00 pm on the left hand side of the screen.
(insert screenshot of week view)
Move up : or down ; with the joypad to display
all 24 hours.
85 Sendo X User Guide
Page 91

7
Calendar and Tasks
Press the left [ joypad key to scroll through previous
weeks or press the right ] joypad key to scroll
through future weeks.
z Tip: When you go to Week view, the hours last
shown are displayed, until you change them.
!
To view appointments for the week
1. Open the Calendar.
2. Press Options g and select Week view.
Month view
The Month view displays an overview of your
monthly schedule.
The following symbols are used to indicate a day’s
events:
• (insert symbol) - a morning appointment.
• (insert symbol) - an afternoon appointment.
• (insert symbol) - morning and afternoon
appointments.
• (insert symbol) - an all-day event or anniversary.
• (insert symbol) - morning and afternoon
appointments and an all-day event or
anniversary.
• (insert symbol) - the currently selected date is
indicated by a red box.
You can move up : with the joypad to scroll
through previous months and down ; to scroll
through future months.
(insert screenshot of Month view)
!
To view your schedule for the month
1. Open the Calendar.
2. Press Options g and select Month view.
Calendar view settings
Press Options g and select Settings to change the
Calendar settings:
Select this To
Default view Choose which view is displayed when you open
Week starts on Change the starting day of the week.
Week view title Change the title of the Week view to be the
the Calendar.
week number, or the dates.
Calendar reminders
You can set a reminder for a Calendar entry so that
you will be notified before the event.
z Tip: You can select the way in which the phone
alerts you to reminders by changing the phone’s
Profile settings. See Profiles. For example, you
might prefer the phone to vibrate rather than
produce an audible alert.
!
To set a calendar reminder
1. Create or open a Calendar entry
2. Scroll to the Alarm field and press Select A, then
select On.
3. Scroll down to the Alarm time and Alarm date
fields which have now appeared, and fill them in
with the time and date you want the reminder to
commence.
86 Sendo X User Guide
Page 92

7
Calendar and Tasks
4. Press Done d.
When you receive a reminder, you have two options:
1. Press Stop g to dismiss the reminder (the item
will still remain on your calendar, but you won’t
receive any further reminders)
2. Press Snooze d to be reminded again at five
minute intervals until you press Stop g.
The alarm duration if you do not press either soft key
is 60 seconds.
Sending and receiving Calendar information
When you have created a new calendar entry on
your phone, you can synchronise the Calendar with
your desktop PC, or with a server, to keep your
schedule information up-to-date in all locations. You
can also send and receive calendar information via
SMS, via Email, or via an infrared or Bluetooth
connection.
See the Messaging and Connectivity chapters for
more information about sending and receiving data.
Using Tasks
A task is a personal or work-related project,
assignment, or errand, which you can track through
to completion. You can also add your tasks to the
Calendar, so that when you look at your schedule,
you can see your outstanding tasks as well as your
appointments, meetings and other events.
The Tasks list
The Tasks list displays your “things to do” list. An
item is followed by an exclamation mark if it has
been marked as high priority and a down arrow if it
has been marked as low priority. Overdue tasks are
displayed bold and red. Completed tasks are
displayed with the corresponding check box marked.
z Note: If you synchronise Tasks with your desktop
PC, completed tasks are removed from your
phone after synchronisation. They are displayed
in grey with a strikethrough on your desktop PC.
(Insert screenshot of tasks list)
Chinese Lunar calendar
If you select Show Lunar data from the Options g
menu, the calendar will display Chinese Lunar
calendar information about the date currently
selected, in addition to the information normally
displayed.
87 Sendo X User Guide
Page 93

7
Calendar and Tasks
Using the Tasks list
!
To access Tasks
• From the Now! screen, use the joypad to scroll to
the Ta sk s line (insert icon) under the date
heading, and press Select A.
or
• From the Now! screen, press Options g and
select Go to tasks.
or
• From the Menu screen, use the joypad to scroll to
the Ta sk s icon, and press Select A, or press
Options g and select Open.
!
To cre a t e a n e w t a s k
1. Open Task s, as outlined above.
2. Press Options g and select New task.
3. Enter information in the fields displayed. Use the
joypad to scroll between fields.
z Tip: To set the priority of a task, highlight the
Priority entry field and press Select A then
choose from High, Normal, or Low.
4. Press Done d.
z Note: If you decide you do not want to create a
task while you are composing it, just press
Options g and select Delete.
!
To ed i t a t a s k
1. Open the Tasks list.
2. Select the entry you wish to view, using the
joypad and Select A key.
3. Make the necessary changes in the entry fields,
and press Done d.
!
To delete a task from the Tasks list
1. Open the Tasks list.
2. Highlight the task you want to delete, using the
joypad.
3. Press Options g and select Delete.
Tasks entry fields
When you create a new task, the following fields are
displayed:
Field Description
Subject Enter the title of, or a description of, the task.
Due date What date the task should be completed by.
Priority Select whether the task has high, normal, or
low priority.
Synchronisation Choose what should happen to a task entry
when you synchronise Tasks with your personal
computer.
Completing a task
Once you have completed a task, rather than
deleting it, you can choose to mark the task as
complete. A tick will then appear next to the task to
indicate that it is now done.
z Note: If a task is overdue, and has not been
marked as complete, an Overdue task icon
(insert icon) is displayed next to the task.
88 Sendo X User Guide
Page 94

7
!
To mark a task as complete
1. Open the Tasks list.
2. Scroll to the task you want to mark using the up
: and down ; joypad keys.
3. Press Options g and select Mark as done.
Calendar and Tasks
Adding a task to the Calendar
This feature is very useful as it means you can
include outstanding tasks in your schedule as well as
meetings and other events.
!
To add a task to the Calendar
1. Open the Tasks list.
2. Select the task to be added to the Calendar, or
create a new one.
3. Press Options g and select Add to calendar.
4. A New entry screen from the Calendar feature
will pop up, with the relevant fields already filled
in.
5. Press Done d to complete the action.
Sending and receiving Tasks information
When you have created a new task on your phone,
you can synchronise Tasks with your desktop PC, or
with a server, to keep your schedule information upto-date in all locations. You can also send and
receive calendar information via SMS, via Email, or
via an infrared or Bluetooth connection.
See the Messaging and Connectivity chapters for
more information about sending and receiving data.
89 Sendo X User Guide
Page 95

8
Chapter 8 Camera
Camera
This chapter explains how operate the phone’s builtin digital camera with flash, how to send photos that
you have taken, and how to organise and edit your
pictures in the phone’s Photo Album.
z Note: Obey all local laws governing the
recording of images.
Camera
The digital camera enables you to take pictures
wherever and whenever you like. You can snap your
friends, family, or even yourself, and the built-in LED
flash unit lets you take pictures day or night. The
Camera is simple to use, and produces high-quality
digital images in a choice of sizes.
Pictures are saved directly to the Photo Album, where
you can rename and reorder them as you please.
The Photo Album also has fun editing facilities, so
you can morph images, add borders and text
captions, and make lots of other enhancements to
your favourite pictures.
You can send your photos by MMS, Email, or via a
Bluetooth or infrared connection. You can also
transfer photos to your personal computer using
Sendo PC Connect (see Connecting to your PC on
Page 146).
z Note: If you receive a call when you are using
the Camera, the Incoming Call screen is
displayed. You can accept or reject the call as
you would normally. If you accept the call, the
Camera screen is displayed again when the call
ends. If you reject the call, the Camera screen is
redisplayed immediately.
Taking a photo
(Insert screenshot of viewfinder with image counter)
!
To take a photo
1. Activate the Camera from the Now! Screen by
pressing Camera d, or press and hold
numeric key 3 3, the Camera shortcut key.
z Note: The Camera can only be accessed by
pressing the right soft key d if the label
Camera is displayed above it. This may not be
the case on your phone.
z Note: You can also activate the Camera from
the Menu screen, by scrolling to the Camera
icon and pressing Select A.
2. Holding the phone upright, use the screen as the
viewfinder for your picture.
z Tip: To take a photo of yourself, turn the phone
round so the camera lens is facing you. Look at
the self-portrait mirror near the lens, and
position your reflection in the centre of the
mirror. When you take a photo, your image will
be aligned correctly.
3. Press Select A to take the photo. The picture is
displayed on screen.
To take further photos, press Select A to re-activate
the viewfinder, and repeat steps 2 and 3.
z Note: Your photos are automatically saved to
the Photo Album. If you do not want to save a
picture, press Options g and select Delete.
You will be prompted to confirm whether you
90 Sendo X User Guide
Page 96

8
Camera
are sure that you want to delete the image –
press Yes g or No d accordingly.
Sending a photo
Once you have taken a photo, you can send it to
your friends straight away.
!
To send a photo
1. Select Options g.
2. Scroll down to the Send option and press
Select A.
3. Scroll through the sub-menu to select a method
of sending your picture and press Select A.
Options are:
• Via MMS
• Via e-mail
• Via infrared
• Via Bluetooth
To find out how to send pictures via a Bluetooth or
infrared connection, see Connectivity.
4. If you have selected Via MMS or Via e-mail, a
new message screen is displayed. Send your
message in the normal way. For more
information see Creating and sending messages
on Page 63.
Camera options
The Options menu in the Camera screen contains
the following commands:
Select this To
Camcorder Launch the Camcorder.
Delete Delete an image.
Send Send an image to a recipient via MMS, Email,
Rename
image
Go to images Open the Photo Album. See the Photo Album
Edit picture Open the Image Editor. See the Image Editor
Settings Change the Camera settings. See the Settings
Help Activate the context sensitive help function.
Exit Close the Camera.
or via a Bluetooth or infrared connection.
Rename an image file.
section in this chapter for details.
chapter for details.
on Page 91 section below.
Settings
Selecting Settings from the Options menu gives you
a scrollable list of settings that you can change:
Select this To
Image quality Choose the level of picture quality - High,
Normal, or Basic.
High - produces the best quality images, but
consume the most memory.
Basic - produces images of slightly lower
quality, but use far less memory so you can
store more of them.
Normal - falls between High and Basic in terms
of both quality, and memory consumption.
91 Sendo X User Guide
Page 97

8
Camera
Select this To
Default image
name
Image store Select whether you want to store photos in the
Set a base name that will automatically be
given to all new images, e.g. “Picture”.
Subsequent pictures taken will be named
”Picture(01)”, “Picture(02)”, etc., until the base
name is changed. If you do not set a base
name, pictures will be given the base name
“Photo” by default.
phone memory, or in a memory card, if you
have one.
Camera mode
When taking a picture, you can choose from three
different Camera modes, which define the size and
orientation of your photo. Use the left [ and right
] joypad keys to switch between the different
modes.
(Insert screenshots of images in different modes)
Select this To
Landscape Take a standard landscape picture, 640 x 480
Portrait Take a smaller, icon-sized, portrait picture (80 x
Night Take a picture when lighting conditions are
The viewfinder resolution is 160 x 120 pixels in
Portrait and Night modes, and 80 x 96 pixels in
Portrait mode.
pixels (VGA).
96 pixels) which can be added to a contact
card.
poor, using the built-in LED flash. The flash
features red-eye minimisation. Picture size and
orientation is the same as Landscape mode.
scaled down in order to fit the screen. This
means that they will appear less detailed than
when viewed on a higher resolution screen,
such as a personal computer.
Memory consumption
Photographs use shared memory (see Shared
memory on Page 22 for more information). The
higher the resolution, the more memory a picture
will use. Portrait pictures take up very little memory,
as they are so small.
The quality setting also affects memory – pictures
taken with the quality set to High will use the most
memory.
You can also store photos on a memory card, if you
have one.
z Note: There may be a limit to the memory size
of pictures that you can send in an MMS
message. Check with your service provider for
details.
Timeout
To save the phone’s battery, the Camera viewfinder
will automatically switch itself off after 60 seconds if
you have not pressed any keys. To re-activate the
viewfinder, press Select A, or select Continue from
the Options g menu.
z Note: When viewing pictures taken in Portrait or
Night modes on your phone, the images will be
92 Sendo X User Guide
Page 98

8
Photo Album
Camera
In the Photo Album, you can store, view and
manage your pictures: photos taken with the
Camera, and images that you have received from
other sources.
z Note: The Camera produces JPEG pictures, but
• GIF 87a/89a.
• WBMP – Wireless bitmap.
• MBM – Symbian bitmap format.
• BMP - Standard bitmap format.
• TIFF/F – Class F support only.
• JPEG
• OTA - e.g. CLI and Operator logos.
• EXIF
Storing your pictures
It’s easy to build your own image management
system, by creating and deleting folders to store your
pictures in, and moving pictures to whichever folder
you like.
z Note: See Common actions on Page 16 to find
Your pictures appear in the Photo Album as a list of
thumbnail images.
(Insert screenshots of photo album thumbnails in list
and grid styles)
the following image file types can also be stored
in the Photo Album:
out how to create and delete folders, and how
to mark and move items to folders.
Use the Options g menu to manage your images:
Select this To
Open Display the currently highlighted photo on the
Send Send the currently highlighted photo via MMS,
Thumbnails Select how you want the thumbnails to be
Sort by Choose how you want to order your pictures:
Delete image Delete the currently highlighted photo from
Rename
image
Show details View information about the currently
Add to
favourites
screen.
Email, or via a Bluetooth or infrared
connection.
displayed - in a list or in a grid. The
screenshots above show thumbnails in both
layouts.
- By date and time.
- By image title.
memory.
Rename the currently highlighted photo. You
will be asked to type in the new name that you
have chosen for the image, and to confirm the
name change.
highlighted photo:
- Name.
- Date and time taken.
- Size.
- Image format.
Display the currently highlighted photo in the
Favourites panel in the Now! screen. See
Favourites Pane on Page 82 for more
information.
Viewing your pictures
!
To view your pictures
1. Browse through the image thumbnails using the
joypad.
93 Sendo X User Guide
Page 99

8
Camera
2. To open an image press Select A, or press
Options g and select Open.
3. When an image is open, use the left [ and right
] joypad keys to view the previous or next
picture in the current folder.
z Note: Animated GIF files are opened in the
same way. The animation is played only once,
after which the displayed image is fixed. To
replay the animation, the image must be closed
and re-opened.
The picture is scaled to fit into the central section of
the screen. You can select Full Screen from the
Options g menu to expand the picture to fill the
entire screen.
Zooming
To zoom in/out on an image, select the Zoom in and
Zoom out commands in the Options g menu. The
zoom ratio is not stored when the image is closed.
z Note: You cannot perform zooming on a GIF
animation while it is playing.
Panning
Use the joypad to pan around the image when
zooming, or in full screen mode, to focus on one
particular part of the image.
Rotation
You can rotate an image by selecting Rotate, then
Left or Right from the Options g menu. The image
will revert to its original orientation when it is closed.
Editing your pictures
You can enhance your photos and images with text,
icons, frames and effects. To edit a picture, select
Edit picture from the Options g menu. See the
Image Editor chapter for information on how to use
this feature.
Sending your pictures
You can send pictures from the Photo Album via
MMS, Email, or via an infrared or Bluetooth
connection at any time, in exactly the same way as
you would send a photo you have just taken with the
Camera. See Sending a photo on Page 91 for more
information.
z Note: You can send your p i ctures to an online
photo album (tbc).
Receiving pictures
Your phone can receive pictures via MMS, as Email
attachments, or via a Bluetooth or infrared
connection. These pictures can be saved to the Photo
Album, as long as the image type is compatible (see
Storing your pictures on Page 93 for a list of
supported image types).
To save an image received via MMS or Email, select
Save picture from the Options g menu while the
message is open.
See Connectivity for more information on receiving
data via a Bluetooth or infrared connection.
94 Sendo X User Guide
Page 100

9
Chapter 9 Image Editor
This chapter explains how to use the Image Editor
feature to enhance your photos and images with
text, icons, frames and effects, as well as create new
images.
Image Editor
The Image Editor produces JPEG images, but the
following image file types can be opened:
• GIF 87a/89a.
• WBMP – Wireless bitmap.
• MBM – Symbian bitmap format.
• BMP - Standard bitmap format.
• TIFF/F – Class F support only.
• JPEG
• OTA - e.g. CLI and Operator logos.
• EXIF
Starting/Exiting the Image Editor
!
To start the Image Editor
1. From the Menu screen, scroll to the Image Editor
icon and press Select A. The start up screen is
displayed.
2. Select the Open image option to open an
existing image or select Create image to create a
new image. These options are described further
below.
!
To open an image
1. Select Open image.
2. Use the joypad to browse the list of images from
the Photo Album.
3. Press Select A to open an image.
The image is opened in the main view of the Image
Editor, ready for editing.
z Note: If the image in the Photo Album is copy-
protected, it cannot be opened in the Image
Editor.
!
To create a new image
1. Select Create image.
2. A new image is opened in the main view of the
Image Editor, ready for editing.
!
To exit the Image Editor
1. Press Options g and select Exit when in the
main view, or press Exit d when in the start up
screen.
2. You will be asked to confirm the action. Press
Ye s g to exit.
Image Editor main view
In the Image Editor main view you can edit, preview,
save and send your images.
!
To preview an image
1. Press Options g and select Preview to hide the
object selector.
2. To display the object selector again after
preview, press Select A.
!
To save an image
1. Press Options g and select Save.
95 Sendo X User Guide
 Loading...