

Page 1
CAR CD / MP3/WMA PLAYER
RDS RECEIVER
CD788
e
13
022706
ITEM CODE : 345827
CD788
Page 2
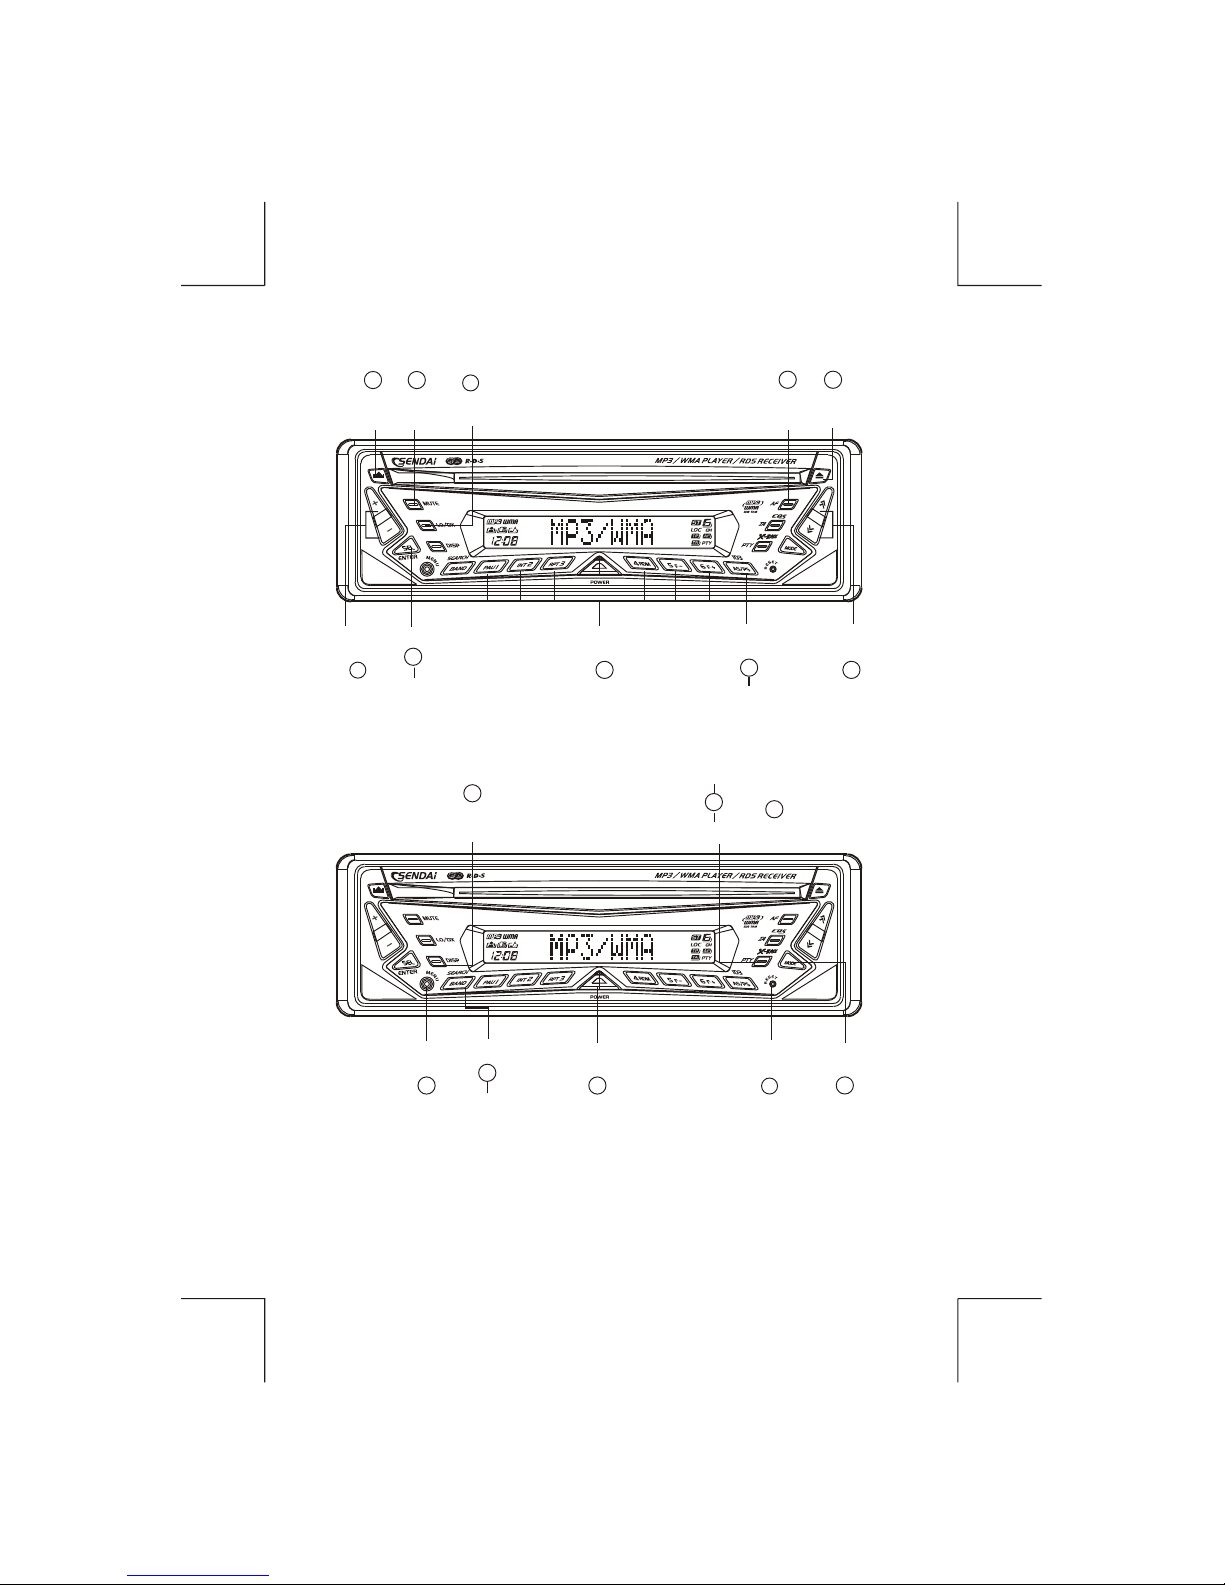
CONTROL AND FUNCTION KEYS
16
VOLUME
UP/DOWN
BUTTON
4
EJECT
BUTTON
POWER
BUTTON
DISPLAY
BUTTON
RESET
BUTTON
18
BAND
BUTTON
MP3
SEARCH
BUTTON
TUNING UP/DOWN
TRACK UP / DOWN
BUTTONS
PRESET STATIONS BUTTONS
(M1~M6)
MENU
BUTTON
11
15
12
8
9
AUTOMATICALLY
STORE / PRESET
SCAN (AS/PS) BUTTON
MP3-ID3-TAG
INFORMATION BUTTON
PANEL
RELEASE
BUTTON
SELECT
BUTTON
MP3 ENTER
BUTTON
MODE
BUTTON
MUTE
BUTTON
14
3
1
10
2
AF
BUTTON
PTY
BUTTON
5
6
7
13
IX-BASS
BUTTON
TA BUTTON/
EQ5 BUTTON
17
LO/DX
BUTTON
E - 1
CD788
CD788
Page 3
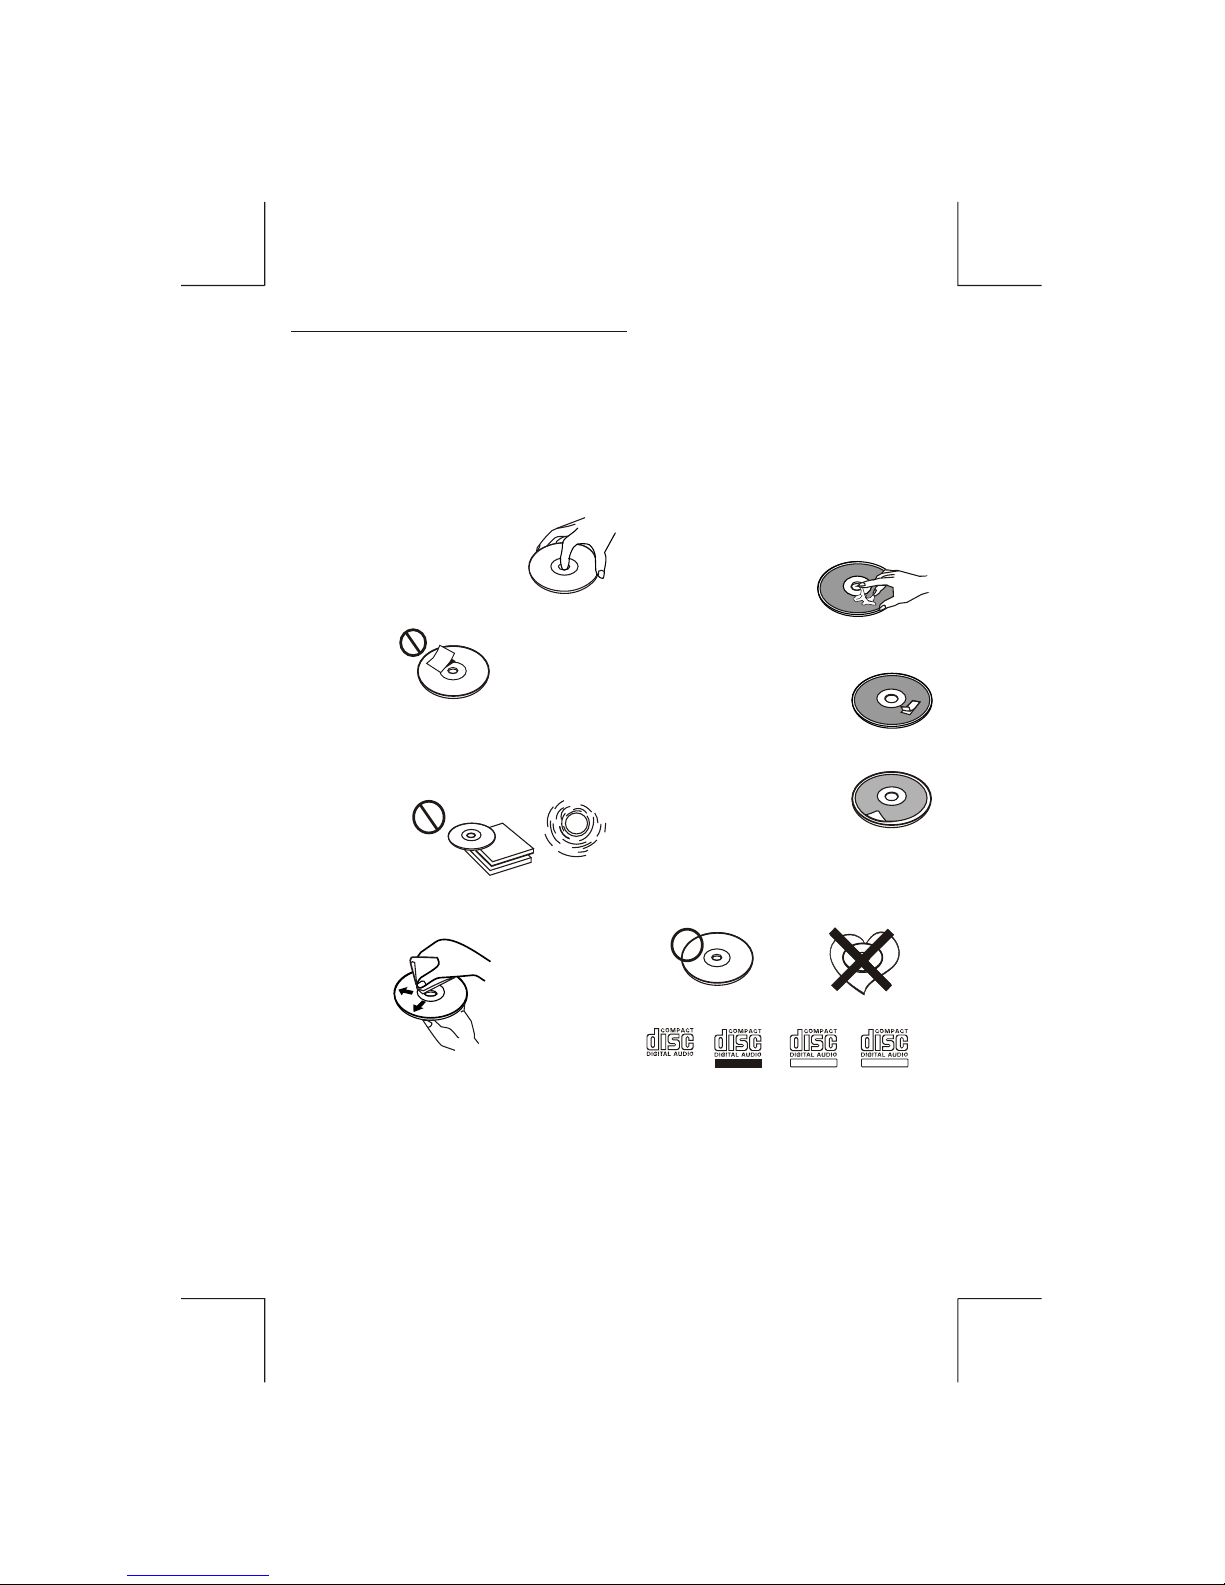
1.HANDLING COMPACT DISCS
MOISTURE CONDENSATION
NOTES ON CDs
P. 2
P. 3
P. 4
P. 1
P. 5
P. 6
P. 7
1.
2.
3.
4.
5.
NOTES ON DISCS
There are paste residue.
Ink is sticky (P.5).
Stickers that are beginning
to peel away, leaving a
sticky residue (P.6).
Labels are attached (P.7).
On a rainy day or in a very damp area, moisture may condense on the lenses inside the unit.
Should this occur, the unit will not operate properly. In such a case, remove the disc and wait for
about an hour until the moisture has evaporated.
A dirty or defective disc may cause sound
dropouts while playing. To enjoy optimum
sound, handle the disc as follows.
Handle the disc by its edge. To keep the disc
clean, do not touch the surface (P.1).
If you use the discs explained below, the
sticky residue can cause the CD to stop
spinning and may cause malfunction or ruin
your discs.
Do not use second-hand or rental CDs that
have a sticky residue on the surface (for
example, from peeled-off stickers or from
ink, or glue leaking from under the stickers).
Do not stick paper or tape on the disc (P.2).
Before playing, clean the discs with an
optional cleaning cloth. Wipe each disc from
the centre out (P.4).
Do not use solvents such as benzine,
thinner,commercially available cleaners, or
antistatic spray intended for analog discs.
Do not expose the discs to direct sunlight or
heat sources such as hot air-ducts, or leave
them in a car parked in direct sunlight where
there can be a considerable rise in
temperature inside the car (P.3).
Do not use rental CDs with old labels that
are beginning to peel off.
Do not use your CDs with labels or stickers
attached.
**************
*******
*******
*******
*******
*******
*******
*******
*******
****
*******
*******
*******
*******
Do Not Use Special Shape CDs
Be sure to use round shape CDs only for
this unit and do not use any special shape
CDs. Use of special shape CDs may cause
the unit to malfunction.(P.8).
Be sure to use CDs with disc mark
Only for this unit.
RECORDABLE
REWRITABLE
P. 8
CD-Rs and CD-RWs which have not
undergone finalization processing cannot
be played. (For more information on
finalization processing, refer to the manual
for your CD-R/CD-RW writing software or
CD-R/CD-RW recorder.) Additionally,
depending on the recording status, it may
prove impossible to play certain CDs
record on CD-R or CD-RW.
E - 2
TEXT
Page 4
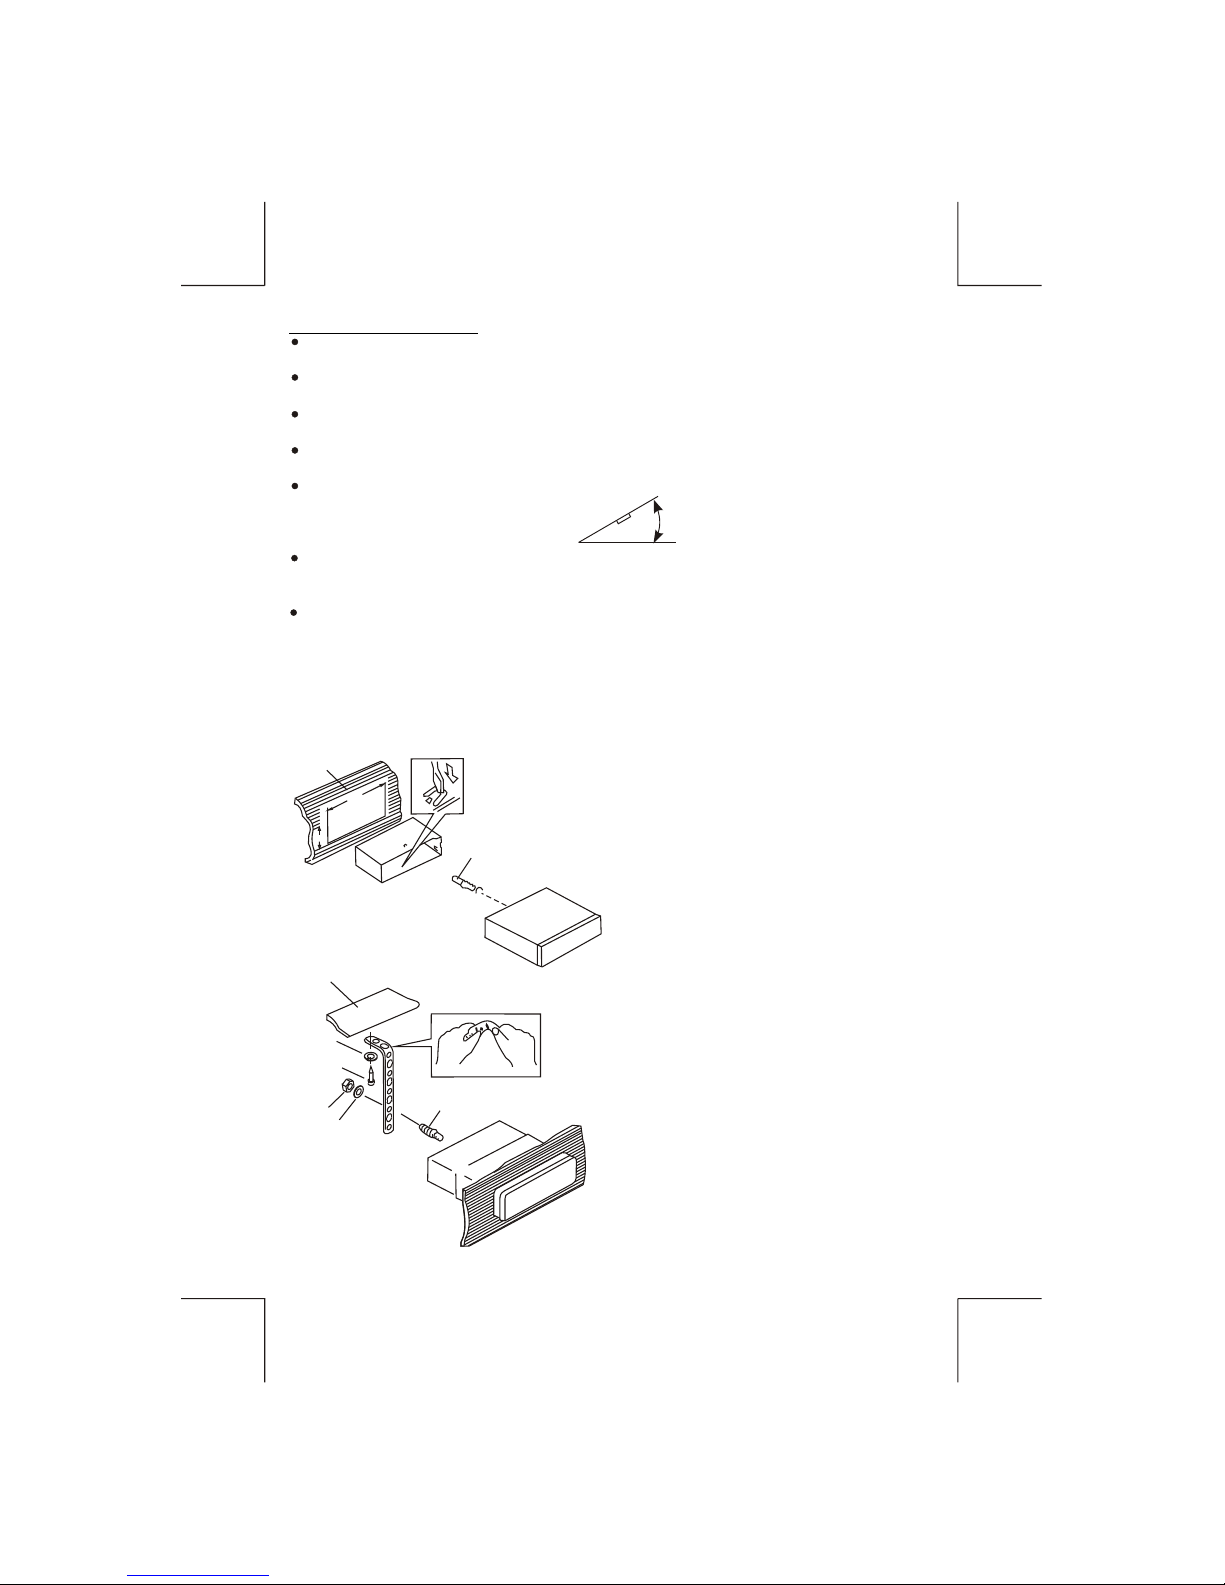
2. INSTALLATION
Before finally installing the unit, connect the wiring temporarily and make sure it is all
connected up properly and the unit and system work properly.
Use only the parts included with the unit to ensure proper installation. The use of
unauthorized parts can cause malfunctions.
Consult with your nearest dealer if installation requires the drilling of holes or other
modifications of the vehicle.
Install the unit where it does not get in the driver's way and cannot injure the passenger if
there is a sudden stop, like an emergency stop.
If installation angle exceeds 30° from horizontal, the unit might not give its optimum
performance.
Avoid installing the unit where it would be subject to high temperature, such as from direct
sunlight, or from hot air, from heater, or where it would be subject to dust dirt or excessive
vibration.
Be sure to remove the front panel before installing the unit.
DIN FRONT/REAR-MOUNT
This unit can be property installed either from “Front” (conventional DIN Front-mount) or “Rear”(DIN
Rear-mount installation, utilizing threaded screw holes at the sides of the unit chassis). For details,
refer to the following illustrated installation methods A and B.
DIN FRONT-MOUNT (Method A)
Installation the unit
1. Dashboard
2. Holder
After inserting the half sleeve into the
dashboard, select the appropriate tab
according to the thickness of the
dashboard material and bend them
inwards to secure the holder in place.
3. Screw
1
7
4
2
3
5
6
1. Dashboard
2. Nut (5mm)
3. Spring washer
4. Screw (5x25mm)
5. Screw
6. Support Strap
Be sure to use the support strap to secure
the back of the unit in place. The strap can
be bent by hand to the desired angle.
7. Plain washer
182
53
1
2
3
E - 3
30°
Page 5
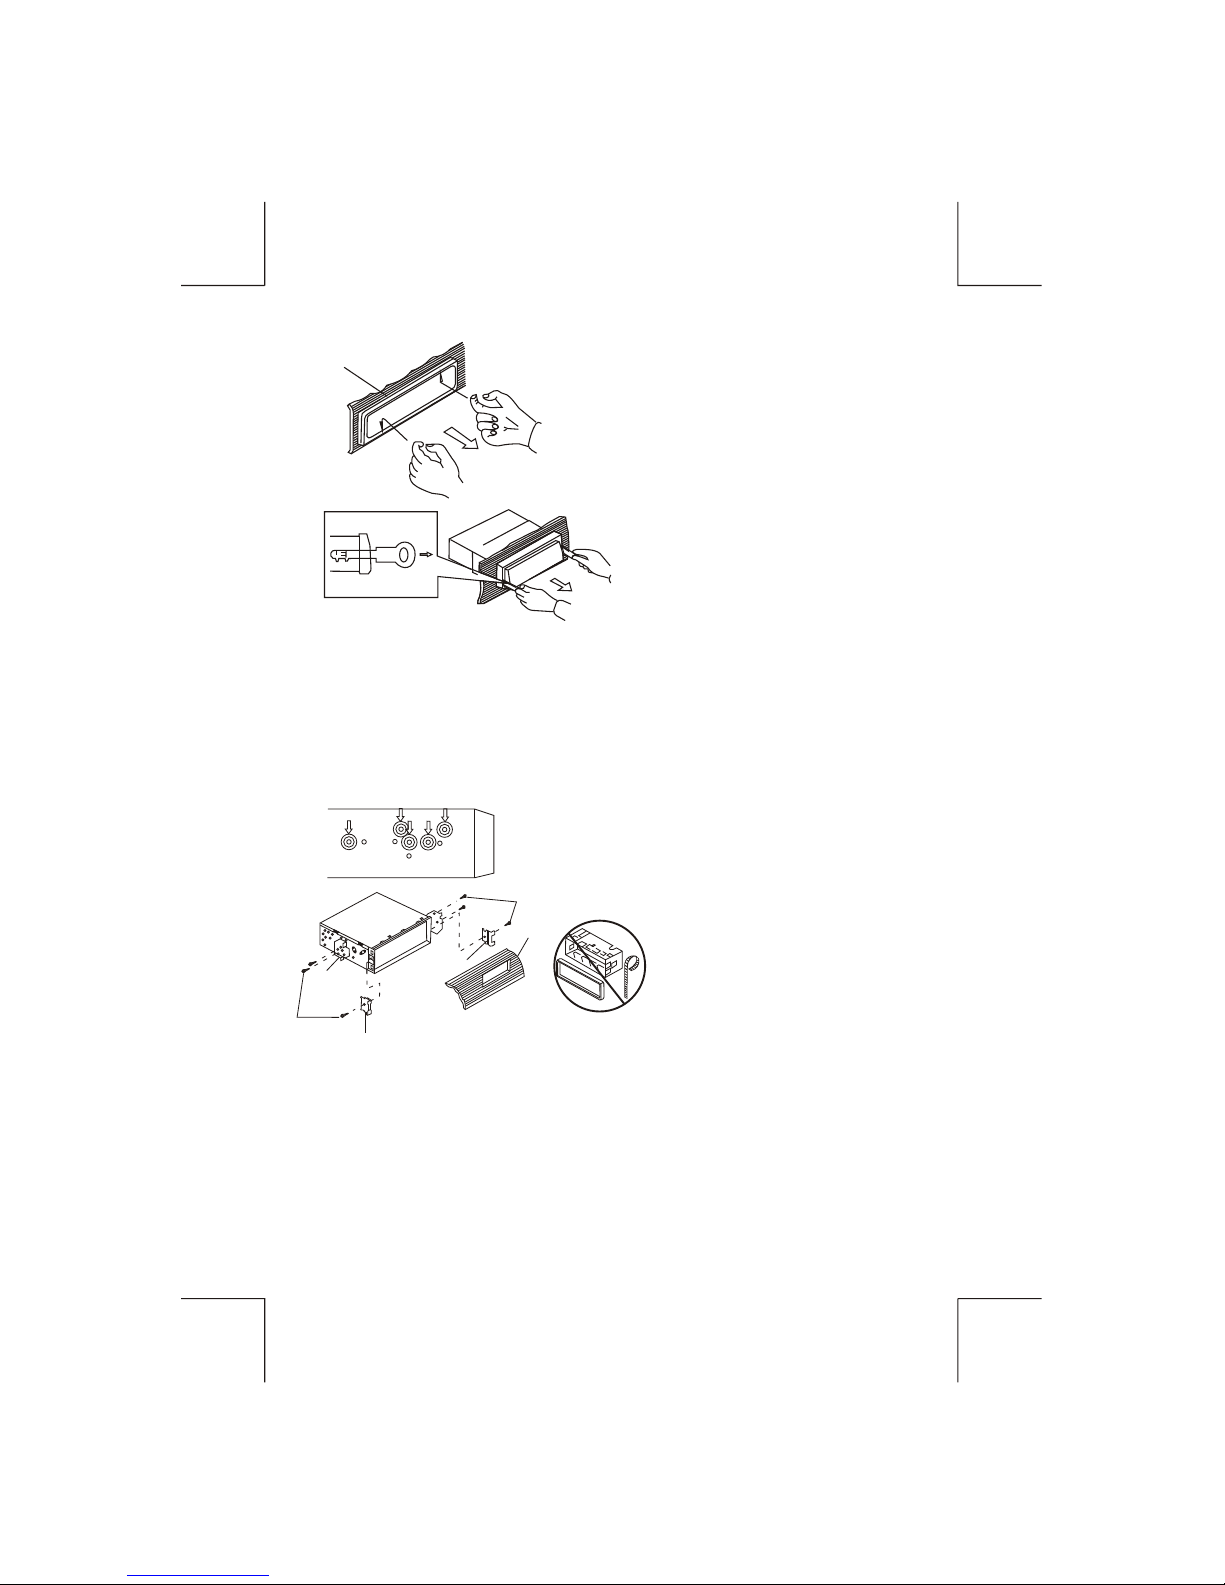
DIN REAR-MOUNT (METHOD B)
Installation using the screw holes on the sides of the unit.
Fastening the unit to the factory radio mounting bracket.
1. Select a position where the screw
holes of the bracket and the screw
holes of the main unit become
aligned (are fitted) and tighten the
screws at 2 places on each side.
2. Screw
3. Factory radio mounting bracket.
4. Dashboard or Console
5. Hook (Remove this part)
Note: the mounting box, outer trim ring,
and half-sleeve are not used for method
B installation.
5
2
4
3
2
5
a. Frame
b. Insert fingers into the groove in the
front of frame and pull out to remove
the frame. (When re-attaching the
frame, point the side with a groove
down wards and attach it.)
c. Insert the levers supplied with the
unit into the grooves at both sides of
the unit as shown in figure until they
click. Pulling the levers makes it
possible to remove the unit from the
dashboard.
Trim Plate Installation:
Push the trim plate against the chassis until it is fitted.
You must do this before you install the front panel, otherwise it can't be attached.
Removing the unit
a
b
c
E - 4
Page 6
E - 5
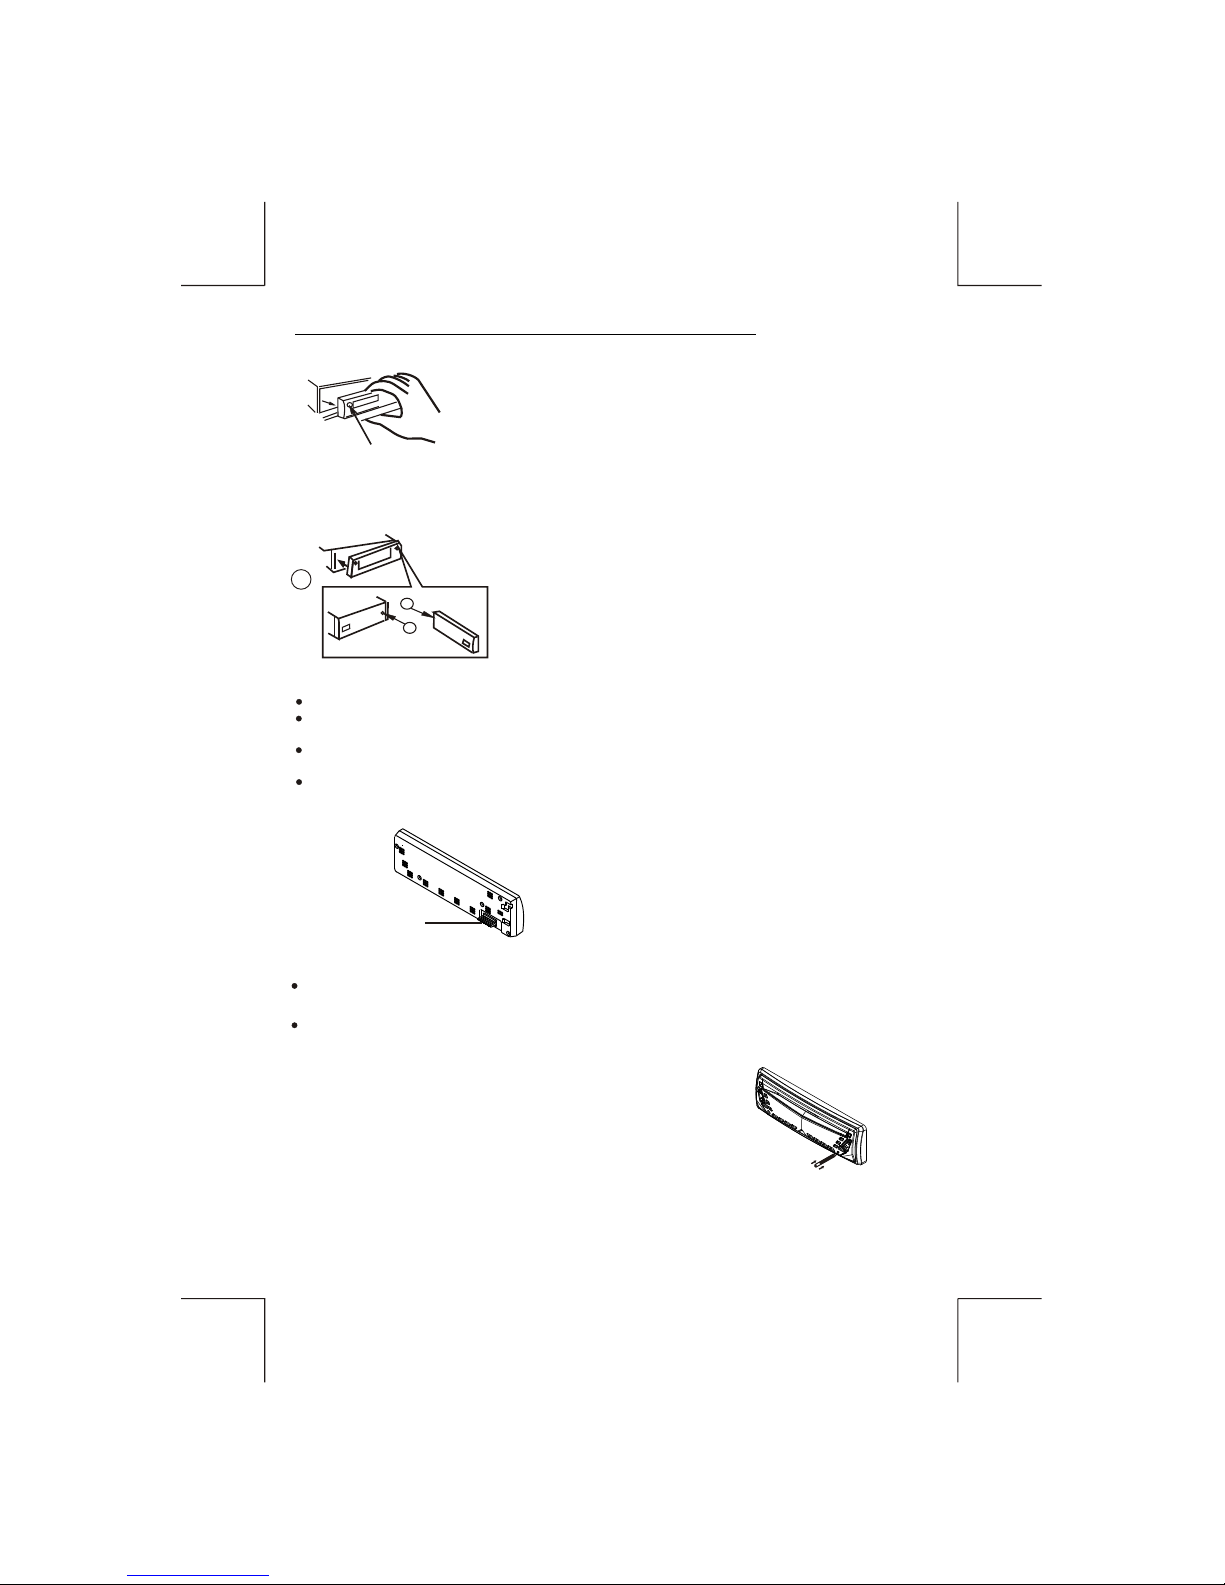
3. DETACHABLE CONTROL PANEL (D.C.P.)
Removing The Detachable Control Panel (D.C.P.).
1. Turn the power off
2. Press the D.C.P. release button
3. Remove the D.C.P.
PANEL RELEASE
BUTTON
B
A
2
Attaching the DCP
CAUTION
1. Attach the panel at the right side first, with
point B on the main unit touching point A on the
D.C.P. (As shown on the digram).
2. Then press the left side of D.C.P. onto the main
unit until a “click” sound is heard.
DO NOT insert the D.C.P from the left side. Doing so may damage it.
The D.C.P can easily be damaged by shocks. After removing it, place it in a protective case and be careful not
to drop it or subject it to strong shocks.
When the release button is pressed and the D.C.P is unlocked, the car's vibrations may cause it to fall. To
prevent damage to the D.C.P, always store it in a protective case after detaching it.
The rear connector that connects the main unit and the D.C.P is an extremely important part. Be careful not to
damage it by pressing on it with fingernails, pens, screwdrivers, etc.
Note:
If the D.C.P is dirty, wipe off the dirt with soft,
dry cloth only. And use a cotton swab soaked
in isopropyl alcohol to clean the socket on the
back of the D.C.P.
RESETTING THE UNIT:
Use a pencil or any non-metalic object to press & hold the reset button for five seconds to
reset the unit.
Long press the eject button for more than 6 seconds to reset / resume the CD Deck
mechanism.
Socket
Page 7
E - 6
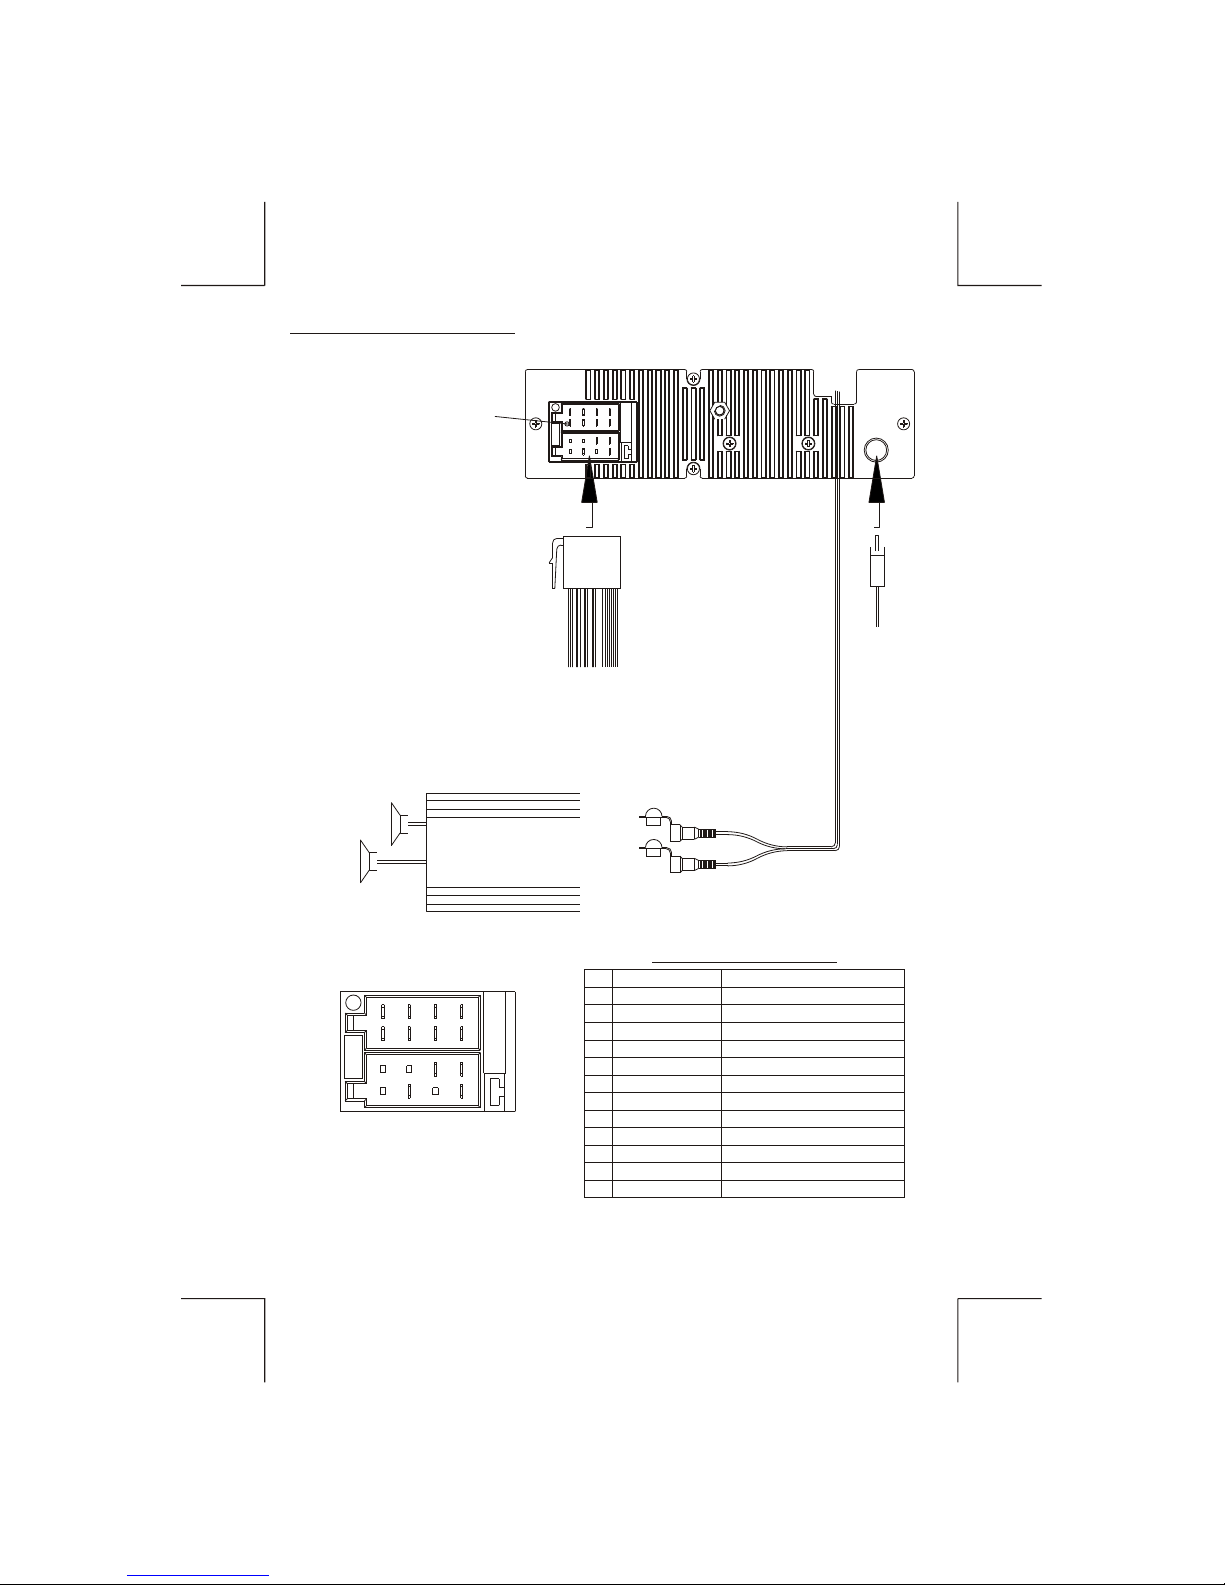
4. WIRING DIAGRAM
FEMALE WITH MALE TERMINAL
ISO CONNECTOR 4PIN+8PIN
FUSE
SOCKET
ISO CONNECTOR
FUSE
5
6
31
2 4
7
8
5
6
31
2 4
7
8
Figure 1
CONNECTOR A
CONNECTOR B
REAR LINE OUT
L-CH
R-CH
RED
WHITE
GREY
(See Figure 1)
AMPAMP
AMPLIFIER WIRING
(SEE AMPLIFIER INSTRUCTIONS)
ANTENNA
EXTENDER
CABLE
ISO CONNECTOR WIRING CHART
GROUND
FUNCTION/LABEL
BATTERY(+)
POWER ANTENNA
IGNITION(ACC)
RIGHT REAR SPEAKER (+)
RIGHT FRONT SPEAKER (+)
LEFT FRONT SPEAKER (+)
LEFT FRONT SPEAKER (-)
RIGHT FRONT SPEAKER (-)
LEFT REAR SPEAKER (-)
LEFT REAR SPEAKER (+)
RIGHT REAR SPEAKER (-)
BLACK
A8
B1
B8
B6
B5
B4
B3
B7
B2
VIOLET
GREEN/BLACK
WHITE/BLACK
GREEN
GREY/BLACK
VIOLET/BLACK
WHITE
GREY
A5
A7
A4
PIN
WIRE COLOR
YELLOW
RED
BLUE
Page 8

2. MODE BUTTON (MODE)
E - 7
Press this button to remove the control panel.
5. BASIC OPERATIONS
14. PANEL RELEASE BUTTON (REL)
1. POWER ON/OFF BUTTON ( )
Press POWER button or any other button on the front of the radio (except Open/Eject)to
turn the unit on. Press POWER button again to turn the unit off.
3. MUTE BUTTON ( MUTE )
Press the mute button momentarily to mute the audio volume, and "Mute" will flash in the
display. Press the mute button again to restore volume to the previous setting.
4. VOLUME DOWN / UP BUTTON
To increase the volume, press the volume up button to decrease the volume, press volume
down button counter clockwise. When volume is adjusted, the volume level will be shown
on the display panel as a number ranging from 0 (lowest) to 46 (highest).
Bass
Press the AUDIO SELECT button twice, then press the volume down / up button to adjust
Bass from -6 to +6. "0” represents a flat response.
Treble
Press the AUDIO SELECT button three times, then press the volume down / up button to
adjust Treble from -6 to +6. "0” represents a flat response.
10. AUDIO SELECT BUTTON(AUDIO/ENTER)
Press the AUDIO button , the display will be displayed first option is Volume, followed by
Bass( only if EQ5 is currently deactivated), Treble( only if EQ5 is currently deactivated),
Balance, Fader and back to Volume. When adjusting audio functions, the unit will
automatically exit audio control mode after 5 seconds of inactivity.
Press MODE button to select a different mode of operation as indicated on the display
panel. Available modes include Tuner, CD, MP3,WMA
Page 9
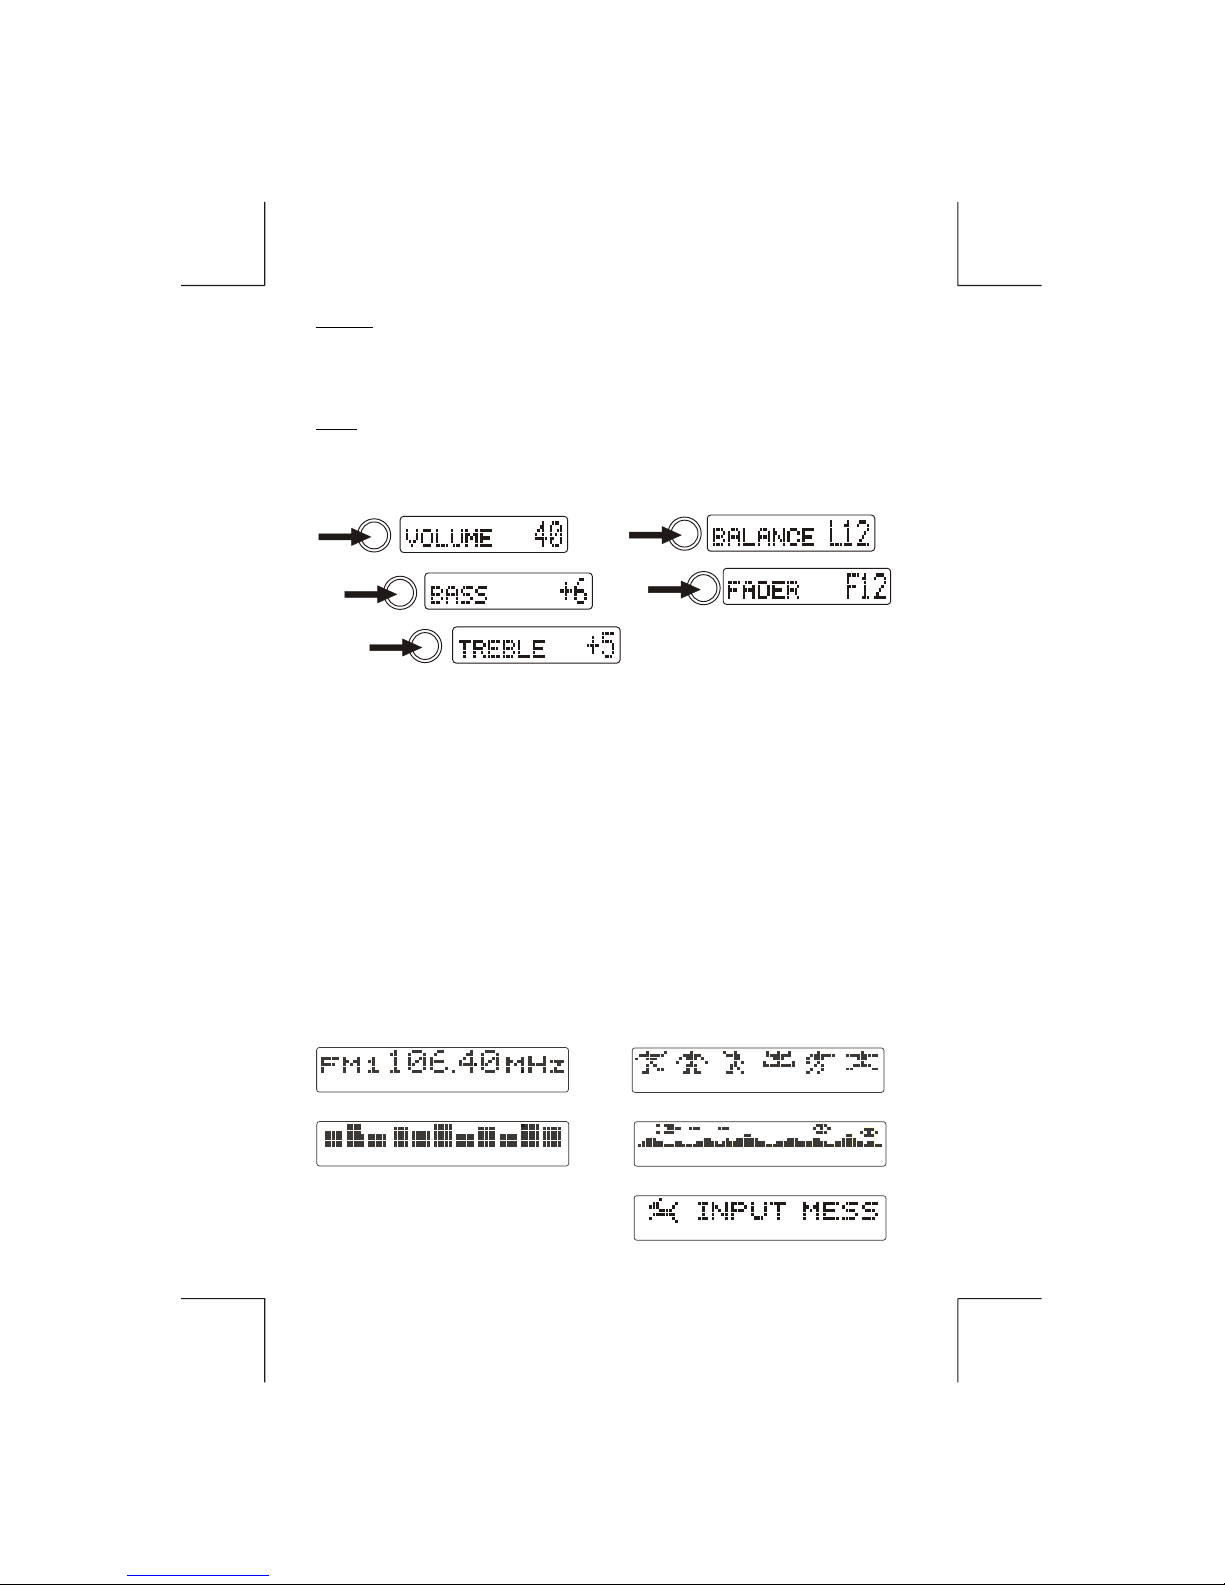
Fader
Press the AUDIO SELECT button five times, then press the Volume down / up button to
adjust the fader between the front and rear speakers from R12 (full rear) to F12 (full front).
"C00” Represents a center fader level between the front and rear speakers.
PRESS
1
PRESS
2
3
4
5
8. DISPLAY (DISP)
Press DISPLAY momentarily to navigate through the following animation options:
EQ animation, Animation Display , PTM (personal text message) and back to the default
display. The selected animation will appear in the display when the unit is turned on.
E - 8
Balance
Press the AUDIO SELECT button four times, then press the Volume down / up button to
adjust the balance between the right and left speakers from R12 (full right) to L12 (full left).
“C00” Represents a center balance level between the right and left speakers.
Default Display
EQ Animation
Animation 1(Option)
Animation 2 (Option)
Personal Text Message
7. IX-BASS BUTTON (IX-BASS)
Press & hold the iX-BASS button to activate the iX-BASS feature. When listening to music at
Iow volume levels, this feature will boost the bass and treble ranges to compensate for the
characteristics of human hearing. When this feature is activated, "iX-BASS On" will appear in
the display momentarily. Press & hold the iX-BASS button again to select "iX-BASS Off". The
iX-BASS icon will appear and remain in the display when the iX-BASS feature is activated.
6. PRESET EQUALIZER BUTTON (EQ5)
The equalizer function applies preset sound effects to the unit's audio output signal. Press
& hold EQ5 button to enter into the EQ5 mode, then press the EQ5 button repeatedly to
step through the following equalizer options: Off, Pop, Jazz, Classical, Beat and Rock. The
equalizer options will appear in the display as they are accessed.
When the equalizer function is activated, the most recently selected bass/treble levels can
not be adjusted. When the equalizer function is not active, the unit will return to the most
recently Selected bass and treble levels.
PRESS
PRESS
PRESS
Page 10

Contrast
The contrast level of the display is set at "CONTRAST 05" by default. Press the volume
down/up button to adjust the contrast level from 00 to 10.
Dimmer
The dimmer feature of the display is set to "DIMMER High" by default. Press the volume
down/up button to turn the dimmer to the Iow setting.
Clock Format
This option allows selection of a 12 hour or 24 hour clock format. "CLK FORMAT 12H" is the
Default setting. Press the volume down/up button to change to the 24 hour clock format.
Time Set
The time on the clock will be set to 12:00 as the default. Program the current time by Press
the volume up button to adjust the minutes and counterclockwise press the volume down
button to adjust the hours.
AREA (TUNER FREQUENCY SPACING)
This option allows the selection of the frequency spacing appropriate for your area. "AREA
Europe." is the default setting. Press the volume down/up button to select the U.S.A. Latin
America or Orit options.
Programmable Turn-on Volume (VOL PGM)
This option allows selection of the volume level the radio will automatically assume when
first turned on. "VOL PGM 12 " is the default setting, which will turn the radio on at the
volume level selected when the unit was last turned off.
To program a specific volume level for the radio to turn on at, press the volume down/up
button to select "VOLUME LEVEL”. Within 5 seconds.
Beep Tone
The beep tone feature allows the selection of an audible beep tone to be heard each time a
button is pressed on the face of the radio. "BEEP TONE On" is the default display. Press the
volume down/up button to select the "BEEP TONE Off" option.
E - 9
17. MENU FUNCTION LIST (MENU)
Press MENU for more than 3 seconds to access the menu. "Menu" will appear in the
display momentarily. Navigate the menu by pressing MENU momentarily to move forward
to the next option. The menu can also be navigated by using the Tuning Up or Tuning
Down Button to move to the next or previous option. Once the desired option appears in
the display, adjust that option by press the volume down / up button within 5 seconds. The
following options are adjusted through this menu feature.
Page 11

Personal Text Message
Press the MENU button will see the “PTM” on the display ,this will allow the user to input
his favor .greeting note on the display. The “INPUT MESSAGE” will be displayed by default.
User is allowed to input max. 20 letters or symbols for the “PTM” to be displayed on the
LCD.
When “PTM” is displayed on the display, Press “ENTER” button to start up the “PTM” enter
procedure. Rotate the encoder volume to input A to Z 0-9, +/- ! etc. Press “ENTER” button
to confirm the first letter input. Repeat the procedure enter the rest of the others letter input.
If you want to change the inputted letters , you can press Tuning up /down button to move,
the cursor backwards to change the inputted letters. If no more button pressing after 7
seconds the inputted letters will be automatically set as PTM. The previous PTM will be
erased automatically once a new PTM is inputted.
Press “DISPLAY” button sequential (Frequency -> Spectrum -> Animation 1 -> Animation
2 -> PTM ). The inputted Message will scrolling through the LCD continuously until a new
operation of the unit has been inputted.
Illumination Color (COLOR)
This option allows selection between two colors for the backlight illumination of the unit.
"COLOR 1" is the default display and will illuminate the unit in blue backlight. press the
volume down/up button to select "COLOR 2”,, which will illuminate the display in red
backlight.
Selectable Clock Display (CLK ON LCD)
When the selectable clock display feature is activated, the clock and default greeting note
will appear in the display when the radio is turned off but the ignition switch is still on . "CLK
ON LCD On" is the default display for this option. To select that the clock and greeting not
be displayed when the unit is powered off, press the volume down/up button to select "CLK
ON LCD Off".
Key Illumination On/Off (KEY LIGHT)
The Key Light on/off feature controls how the front panel buttons illuminate when the unit is
turned off, but the ignition switch is on. When the Key Light feature is activated with the unit
turned off and the ignition turned on, the front panel buttons will illuminate. When the Key
Light feature is deactivated with the unit turned off and the ignition switch turned on, the
front panel buttons will not illuminate.
E - 10
Page 12
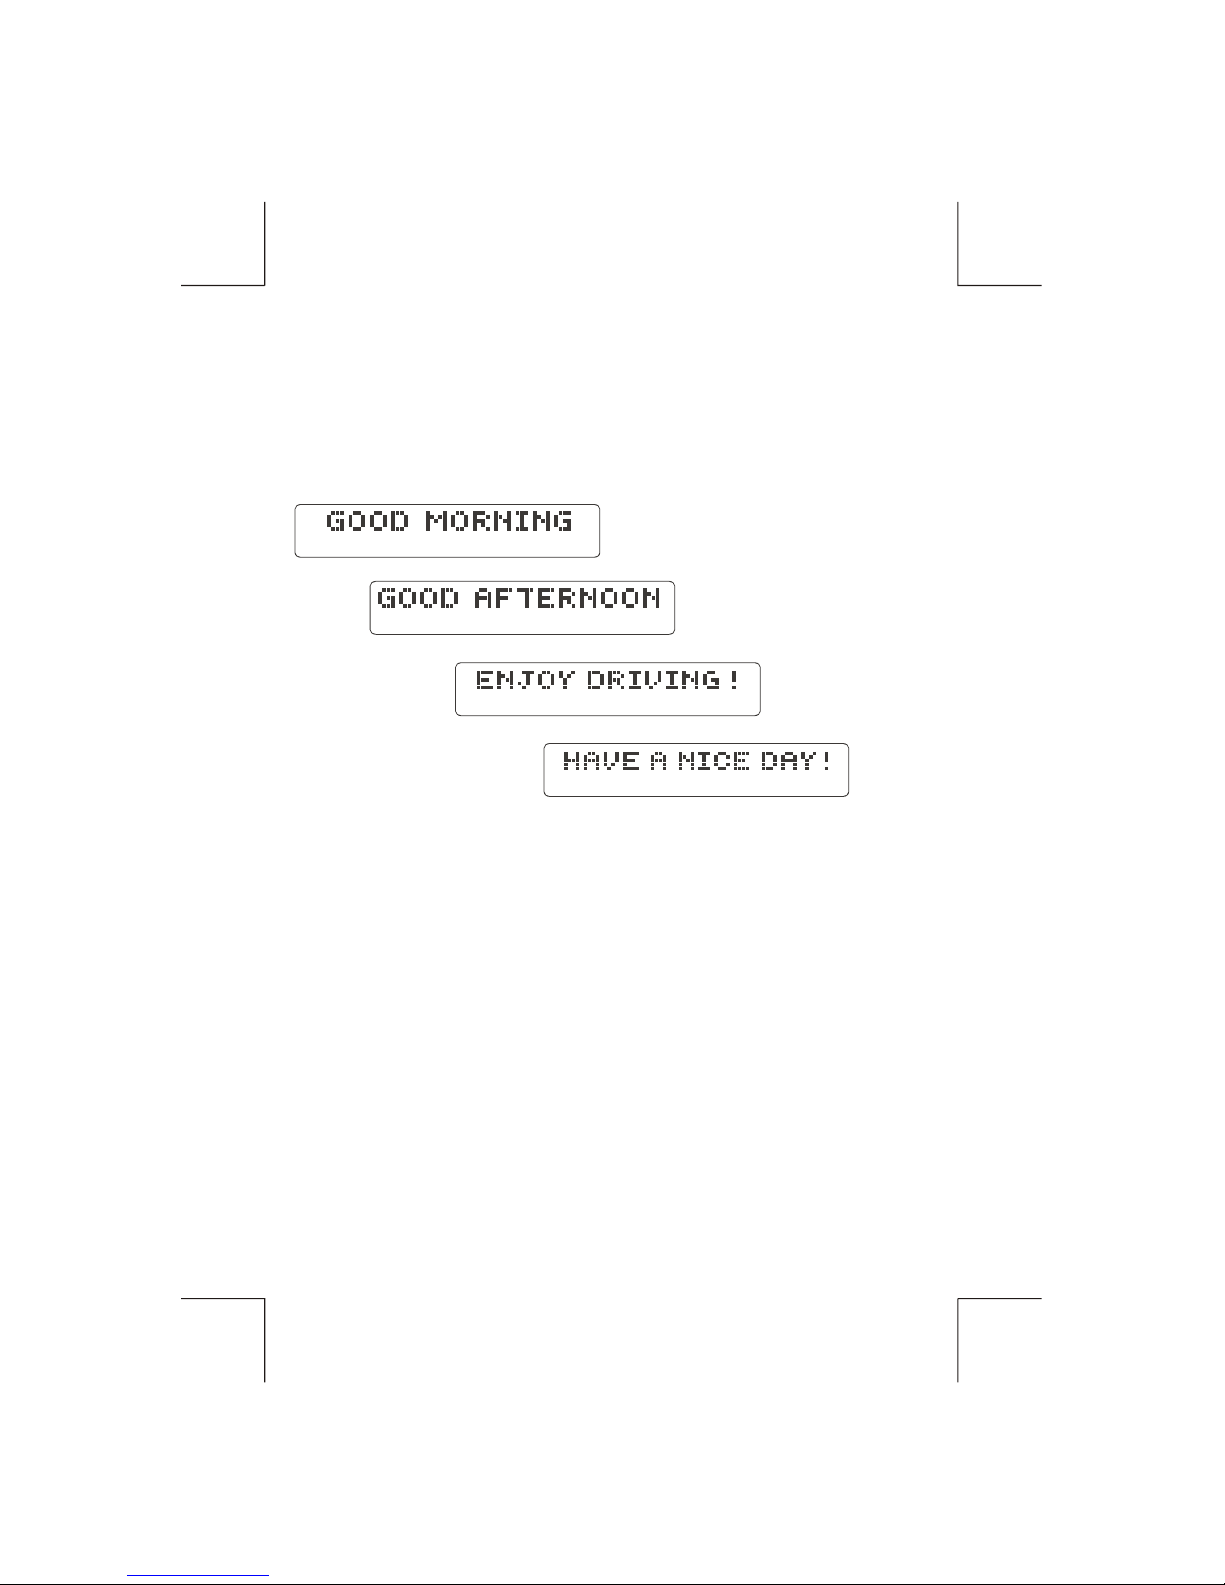
IGNITION OFF CLOCK RECALL
The user can recall to display the clock time by press DISPLAY button, even when ignition is off.
E - 11
GREETING NOTE
There are three different greeting note displayed on LCD base on different condition.
1.When the unit is powered on, one of three greeting will display based on the time of day:
Good Morning, Good Afternoon or Good Evening.
2. When the unit is powered off but the ignition remains on, the LCD will scroll through the
following messages if the selectable clock display feature is activated: “Enjoy Driving! Have
a Safe Trip!”
3. When the ignition is turned off, the message "See you! Have a nice day!” will be displayed
Before the unit turns off completely.
Page 13

Manual Tuning
Press the Up Tuning or Down Tuning button for more than 3 seconds to move the radio
frequency number up or down one step.
Auto Seek Tuning
Press the Up Tuning or Down Tuning button for less than 3 seconds to move to next station
automatically.
6. TUNER OPERATION
Recall a Station
Select a band (if needed). Press a preset button to select the corresponding stored station.
E - 12
11. TUNING UP/DOWN BUTTON ( )
12. PRESET STATIONS BUTTON
Six numbered preset buttons store and recall stations for each band.
Store a Station
Select a band (if needed), then select a station. Hold a preset button for 3 seconds. The
preset number will appear in the display.
Automatically Store
Automatically select 6 strong stations and store them in the current band. Select a band (if
needed). Press AS/PS button for more than three seconds. The new stations replace
stations already stored in that band.
Preset Scan
Scan stations stored in the current band. Select a band (if needed). Press AS/PS button for
less than 3 seconds. The unit will pause for ten seconds at each preset station. Press
AS/PS button again to stop scanning when the desired station is reached.
STEREO
The unit will automatically pick up a stereo signal, when available. When in stereo mode,
the ST icon appears in the display. When no stereo signal is available, the unit will
automatically revert to mono operation, and no icon will be displayed.
13. AUTOMATICALLY STORE / PRESET SCAN (AS/PS)
9. BAND BUTTON (BAND/SEARCH)
Press BAND to change between FM bands and AM(MW) bands. Each band stores
up to 6 preset stations.
16. LOCAL/DISTANCE BUTTON(LO/DX)
This feature is used to designate the strength of the signals at which the radio will stop
during automatic tuning. "Distance" is the default, allowing the radio to stop at a broader
range of signals. To set the unit to select only strong local stations during automatic
tuning,press this button until "Local" appears in the display.
Page 14

7. CD PLAYER OPERATION
INSERT AND EJECT CD
Insert a CD label-side up with the unit turned on, and the disc will begin to play. Press the Eject
button to stop CD play and eject the CD. The unit does not have to be turned on to eject
the CD.
PAUSE BUTTON (PAU)
Press the pause button to suspend disc play. Press the pause button again to resume disc
Play.
TRACK SELECT
Press the Up Tuning or Down Tuning button ( ) for less than one second to advance
to the next track on the CD, The selected track number will appear on the display. Press and
hold the Up Tuning or Down Tuning button ( ) for more than one second to fast
forward or fast reverse through the disc. CD play starts when the button is released.
REPEAT BUTTON (RPT)
Press REPEAT BUTTON (RPT) during disc play to continuously repeat the track. Press REPEAT
BUTTON (RPT) again to stop Repeating.
RANDOM BUTTON (RDM)
Press RANDOM BUTTON (RDM) during disc play to play all tracks on a CD in random, shuffled
order. Press RANDOM BUTTON (RDM) again to stop random play.
INTRO SCAN BUTTON (INT)
During disc play, press INTRO SCAN BUTTON (INT) to play the first 10 seconds to each track
on the disc. When the desired track is reached, press INTRO SCAN BUTTON (INT) again to end
the scan and play the selected track.
E - 13
Page 15

MP3/WMA SECTION
E - 14
RDS functions
- AF Alternative Frequencies
- CT Clock Time
- EON Enchanced other Network
- PI Program identifications
- PS Program service name
- PTY Program Type
- REG Regional Change
- TA Traffic Announcement
- TP Traffic program
By pressing AF button < 3 seconds to select AF ON/OFF. “AF ON” or “AF OFF” will show &
remain on the LCD segment for 5 seconds.. Under AF “On” mode, if the tuned in station
signal is getting weak, the unit will automatically switches to a different frequency on the
same network with stronger signal.
Note1: Regardless of AF & TA is ON or Off, from MW Tuner mode switches to CDP/CDC/AUX
modes, the unit auto switched to FM mode.
Note2: Factory Default setting is “AF ON”
8. RDS OPERATION
1. AF Function
2. TA Function
By pressing TA button < 3 seconds, turn switch on TA standby mode. “TA ON” will show &
remain on the LCD segment for 5 seconds & the TA icon will light up on the LCD. In the
stand by mode, when a traffic announcement broadcast starts, the traffic announcement
broadcast will be received as top priority regardless of the function mode. When a traffic
announcement starts, “TRAFFIC INFO” will show on the LCD, press the TA button can
cancelled the broadcast reception while a traffic announcement broadcast is being received.
The unit will go back to the previous mode and TA goes into stand by mode again. When
the TP icon is not light up for 60 seconds. A beep Alarm tone is heard and the LCD will show
“Lost TP, TA”. TA seek will automatic activate and searches to another TA station.
Note1: TA auto seek mode will only operate when TA seek is switched “ON” in the RDS
menu.
Note2: TA interrupt does not function when in MW mode.
Note3: From MW mode switches to CDP. The unit automatic switches to FM mode. And if
user switched mode from CDP back to tuner mode. The unit is remained on FM
mode not at AM mode. This function is activated only under TA was switched on. If
under TA “Off” mode, switches CDP back to Tuner mode. It is remained on MW
mode.
Note4: Regardless AF & TA ON or Off. From MW Tuner mode switches to CDP modes. The
unit auto switched to FM mode.
3. PTY Function
Pressing PTY button < 3 seconds to goes into PTY select mode. “PTY” icon will light up on
the LCD. The user now has 5 seconds to select the desired PTY item by using volume
up/down button. Once selected the PTY item, user have 5 seconds to press “SELECT” or
“TUNE UP or TUNE DOWN” buttons < 3 seconds to seek for the selected PTY item. The
LCD will display “PTY SEEK”. If no station with the selected PTY broadcast can be received,
the LCD will display “No Match PTY” and blinks for 5 seconds then returns to the previous
mode.
The unit is equipped with the following RDS function:
Page 16
MP3/WMA SECTION
E - 15
User can store his favor PTY into the preset memory M1 to M6. After selected a PTY item,
long press any one of the preset memory button can store the selected PTY. To recall the
stored PTY item by switching on PTY mode then press preset memory < 3 seconds, the unit
will automatically search the stored PTY station in the preset memory
Note: Factory default stored for PTY preset memory.
M1/News, M2/Information, M3/Pop Music, M4/Sports, M5/Classics, M6/Finance.
4. RDS MENU
To access the RDS-MENU press the SELECT button > 3 seconds. The following list of
features can be selected
- Auto Seek All / RDS
- TA Seek On / Off
- TA Volume 0-40 (default 18)
- Regional On / Off
Steps to access Menu items :
1) To access the RDS MENU press the SELECT button > 3 seconds.
2) “RDS-MENU” will be displayed on display for 2 seconds, and then “Auto Seek” appears
on display.
3) To navigate through the MENU use the >>| or |<< buttons to navigate down or up
through the menu items. Or Press SELECT BUTTON repeatedly to view the menu item
sequential.
4) Use the Volume up/down button to adjust the selected menu item.
5) After the selected menu item(s) has been changed and no other operation have been
made, a 5 second time-out will resume the head unit to the previous mode.
Music Group
Speech Group
POP , ROCK
NEWS, AFFAIRS, INFO
CLASSICS,O THER
CULTURE, SCIENCE, VAR IE D
JAZZ, COUNTRY
EASY, LIGHT
SPORT, EDUCATE, DRAMA
NATION, OLDIES
SOCIAL, RELIGION, PHONE IN
FOLK
TRAVEL, LEISURE, DOCUMENT
WEATHER,FINANCE, CHILDREN
Page 17

MP3/WMA SECTION
E - 16
TA Volume “18” will be displayed by default. The user now has 5 seconds to adjust by
using volume up/down button from “0-40”. When TA function is activated, if a TA program is
tuned in at the volume level set regardless of the volume of the other source at the time.
Note: When the unit tuned into a TA program. The volume level can only be increased but
cannot be decreased.
Features description of RDS-Menu Items :
Auto Seek “RDS” will be displayed by default. The user now has 5 seconds to adjust by
using volume up/down from “RDS” to “ALL”. If “ALL” is selected, during the Auto Seek
tuning mode, the unit will stop at all radio station including Non RDS station regardless AF
and TA is switched on. If “RDS” was selected and the AF is on, during the Auto Seek tuning
mode. The unit will stop at only RDS station.
TA Seek “On” will be displayed by default The user now has 5 seconds to adjust by using
volume up / down from “On” to “Off”. If selected “On” mode, when a received station does
not have TP information for 60 seconds, the unit automatic search to next station which
does not have the same station (PI), but has the TP information. When a TP information get
lost at the current station over the default retune time (60 seconds), the unit start to search to
next same PI station. When the same PI station does not catch in 1 cyclic search, the unit
retunes to next station with TP information.
If “Off” is selected, when a received station dose not have TP information for 60 seconds, a
Double Beep Sound (Alarm) is output and the LCD will be displayed “Lost TP TA” but the
retune mode is not activated.
Note: This function only activate when “TA” switches on mode.
- Auto seek RDS/All
- TA seek On/Off
- TA Volume
REGIONAL “OFF” will be displayed by default. The user now has 5 seconds to adjust by
using volume up/down button from “off” to “On” . If “on” is selected when the AF search or
PI seek, it will implemente to station which have all the PI codes which are the same as
current station.. If “off” is selected, when AF search or PI seek the regional code in the
format PI code will be ignored. A regional station is possible to be received.
Note: The Regional function On/Off Setting is valid when the “AF” function is “on”
- Regional On/Off
Page 18

E - 17
9. MP3/WMA OPERATION
MP3 and WMA (Windows Media Audio) music files are digital audio files that are compressed to
allow more files on a single CD. This unit can play MP3/WMA directly from files contained on a
CD-R/RW using the buttons on the receiver.Depending on the media type and recording method,
some CD-R/RW's may be incompatible with this unit. The unit supports
playback of MP3/WMA and CDDA (CDA), Mixed-Mode CDs and CD-Extra (including multisession
discs), but discs on which the session has not been closed will not play.
Notes on MP3/WMA Play
This unit can play MP3 (MPEG1, 2, 2.5 Audio Layer 3). However, the MP3 recording media and
accepted formats are limited. When writing MP3/WMA, pay attention to the following
restrictions.
Acceptable Media
The MP3/WMA recording media acceptable to this unit are CD-ROM, CD-R and CD-RW. When
using CD-RW, use full format rather than quick format to prevent malfunction.
Acceptable Medium Formats
The following formats are available for the media used in this unit. The maximum number of
characters used for file name including the delimiter (".") and three-character extension are
indicated in parentheses.
ISO 9660 Level 1 (11 characters)
ISO 9660 Level 2 (31 characters)
Joliet (31 characters)
Romeo (31 characters)
Up to 200 characters can be displayed in the long file name format. For a list of available
characters, see the instruction manual of the writing software and the section “Entering File and
Folder Names” below. The media reproducible on this unit has the following limitations:
Maximum number of nested folders: 8
Maximum number of files per disc: 999
Maximum number of folders per disc: 255
MP3/WMA written in the formats other than the above may not be successfully played and their
file names or folder names may not be properly displayed.
MP3/WMA Encoder and CD Writer Settings
Use the following settings when compressing audio data in MP3 data with the MP3 encoder.
Transfer bit rate : 32- 320 kbps
Sampling frequency : 32,44.1,48 kHz(WMA) 16,22.05,24,32,44.1, 48kHz (MP3)
When using a CD writer to record MP3/WMA up to the maximum disc capacity, disable
additional writing. For recording on an empty disc up to the maximum capacity at once, check
disc at once.
Entering ID3 Tag
This unit supports ID3 tag versions 1.0 and 1.1.
The unit also supports CD-TEXT encoded discs for Album, Track and Artist Title information.
Entering File and Folder Names
Names using the code list characters are the only file names and folder names that can be
entered and displayed. Using any other character will cause the file and folder names to be
displayed incorrectly. The unit recognizes and plays only files with the MP3/WMA extension.
Note: A file name entered with characters not on the code list may not play correctly.
Page 19
E - 18
Writing Files into a Medium
When a medium containing MP3/WMA data is loaded, the unit checks all data. If the medium
contains many folders or non-MP3/WMA files, MP3/WMA play will be delayed, it may take time
for the unit to move to the next file, and searches may not be performed smoothly. Loading
such a medium may produce loud noise and cause damage to the speakers. Do not attempt
to play a medium containing a non-MP3/WMA file with the MP3/WMA extension or a
medium containing non MP3/WMA files.
Electronic Shock Protection
40 seconds for CDDA (CDA)
120 seconds for MP3 recorded at 44.1kHz, 128kbps
200 seconds for WMA recorded at 44.1kHz, 128kbps
Bit Rates
The unit supports bit rates from 32 - 320 kbps.
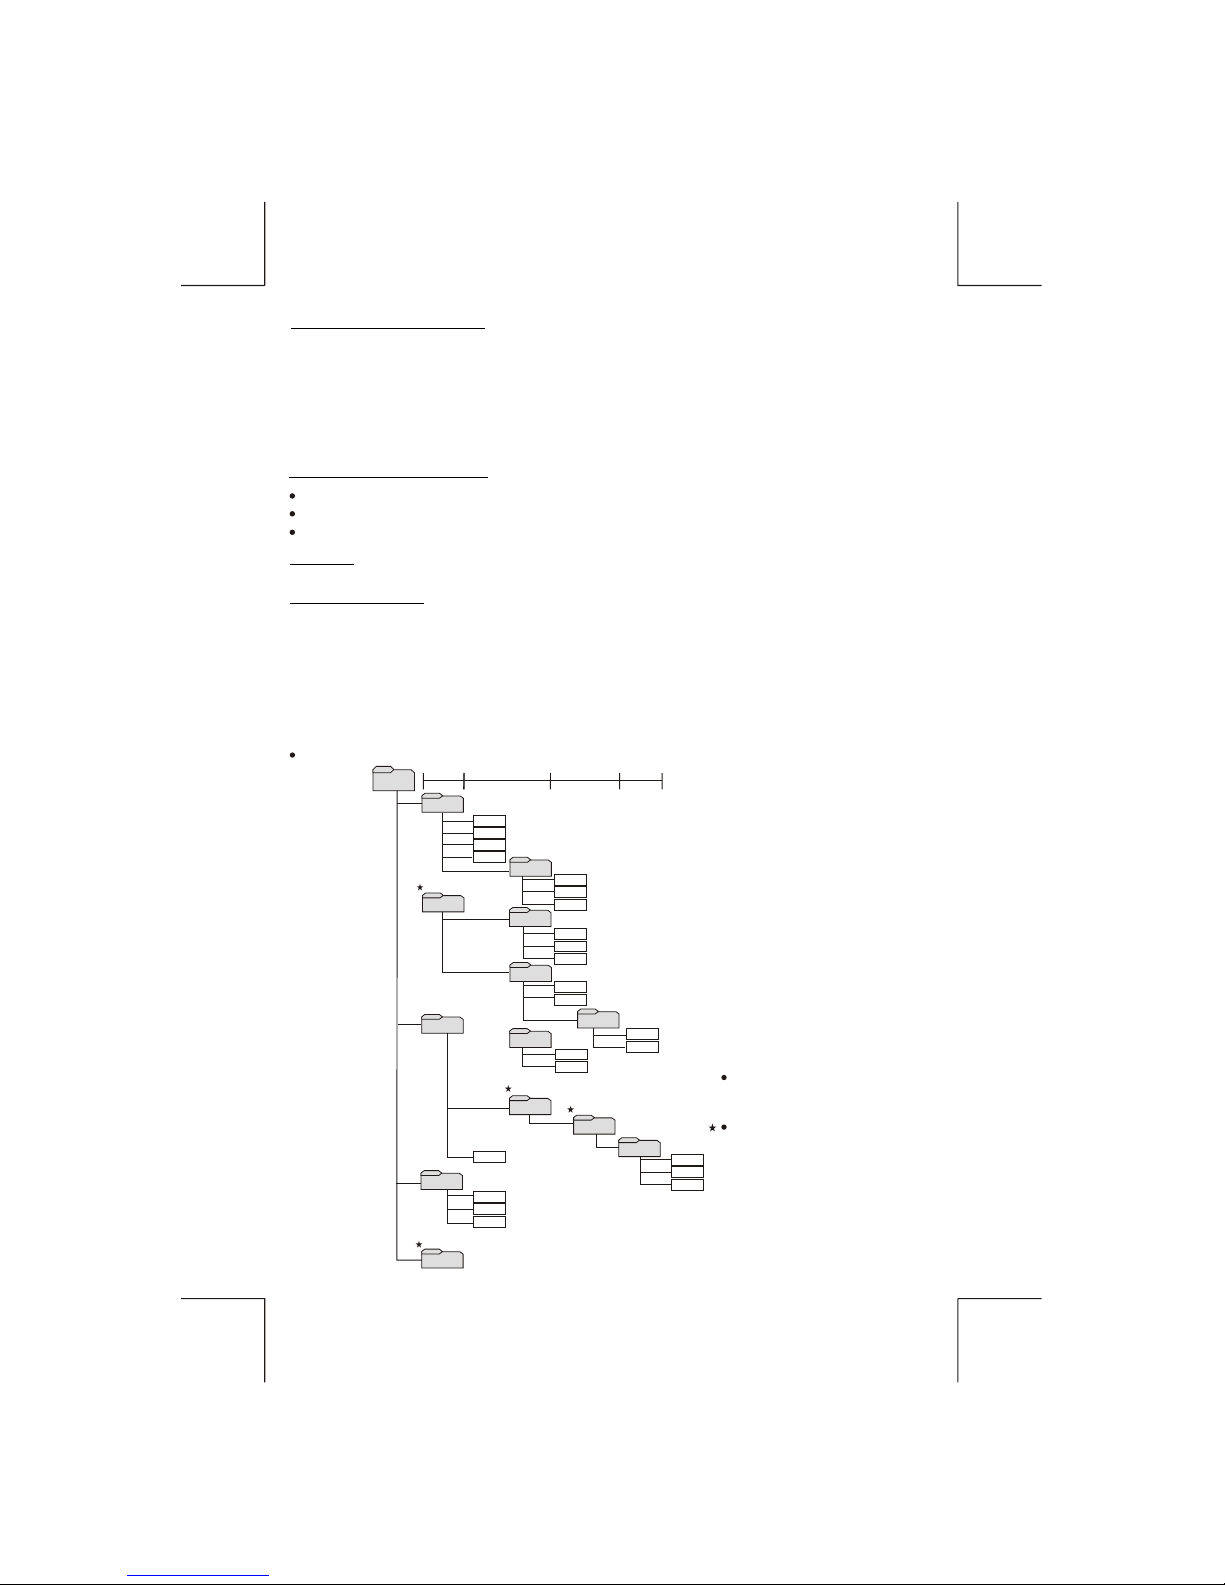
MP3 Playing Order
When selected for play, Folder Search, File Search or Folder Select, files and folders are
accessed in the order in which they were written by the CD writer. Because of this, the order in
which they are expected to be played may not match the order in which they are actually
played. You may be able to set the order in which MP3/WMA are to be played by writing them
onto a medium such as a CD-R with their file names beginning with play sequence numbers
such as "01" to "99". For example, a medium with the following folder/file hierarchy is subject to
Folder Search, File Search or Folder Select as shown below.
ROOT
01
04
05
06
07
08
02
03
X
X
X
X
09
1 LEVEL 2 LEVEL 3 LEVEL 4 LEVEL
001.MP3
002.MP3
003.MP3
004.MP3
“NOT DISPLAY”
“NOT DISPLAY”
“NOT DISPLAY”
“NOT DISPLAY”
009.MP3
010.MP3
011.MP3
012.WMA
013.WMA
014.WMA
015.MP3
016.MP3
017.MP3
018.MP3
019.MP3
020.MP3
005.MP3
006.MP3
007.MP3
008.MP3
021.WMA
022.WMA
023.WMA
An outline of a CD-ROM with MP3/WMA is shown below. Subfolders are shown as folders in the folder currently selected.
The equipment assigns folder
numbers. The user can not assign
folder numbers.
It is not possible to check folders that
do not include MP3/WMA files.
(These folders will be skipped without
displaying the folder number and
name)
Page 20

FILE/FOLDER PLAY
There are three different play methods as following:
Press M2 button more than 3 seconds during playing MP3/WMA disc for “intro play” all
files of the current folder. Intro play should restart from the first song of the current folder,
after all files in the current files have been intro-played.
To disable current folder “intro play”, long press M2 button more than 3 seconds
Press M2 button less than 3 seconds is “intro play” all files on the disc. Intro play should
re-start at the very first file of the disc after all files in the disc has been intro played.
To disable all files “intro play”, press M2 button less than 3 seconds
File/Folder Intro play:
Press M3 button more than 3 seconds during playing MP3/WMA disc for “repeat play” all
files of the current folder. And keep on repeat playing the current folder until “repeat play” is
disabled.
To disable current folder “repeat play”, long press M3 button more than 3 seconds
Press M3 button less than 3 seconds to “repeat play” the current file. And keep on repeat
Playing the current file until the “repeat play” is disabled.
To disable current file “repeat play”, press M3 button less than 3 seconds
File/Folder Repeat play :
Press M4 button more than 3 seconds during playing MP3/WMA disc to “random play” all
files of the current folder.
To disable current folder “random play”, long press M4 button more than 3 seconds
Press M4 button less than 3 seconds is “random play” all files on the disc.
To disable all file “ random play”, press M4 button less than 3 seconds.
File/Folder Random play:
E - 19
Page 21
MP3/WMA FILE OR FOLDER SEARCHING (volume down/up button)
During MP3 or WMA files playback, press MP3 search button (Band Button) twice
LCD will display “Navigate search”, Press “Audio Select” key or press volume down/up button
to enter the “Navigate search”.
Press volume down/up button until LCD displayed “06”,
Short Press MP3 enter key (Audio Select Button) to go into folder “06”
(Note: If MP3 enter key is press more than 3 seconds. The first file “015.MP3 “ will start
playing)The “015.MP3” file will be displayed on the LCD,
Press volume down/up button until LCD displayed “016 MP3”
(Note: Press the “AS/PS” button will allow a quick return back to folder “06” or press volume up
button backward to “06”
Long press MP3 enter key (Audio select Button) to confirm play “016 MP3” file
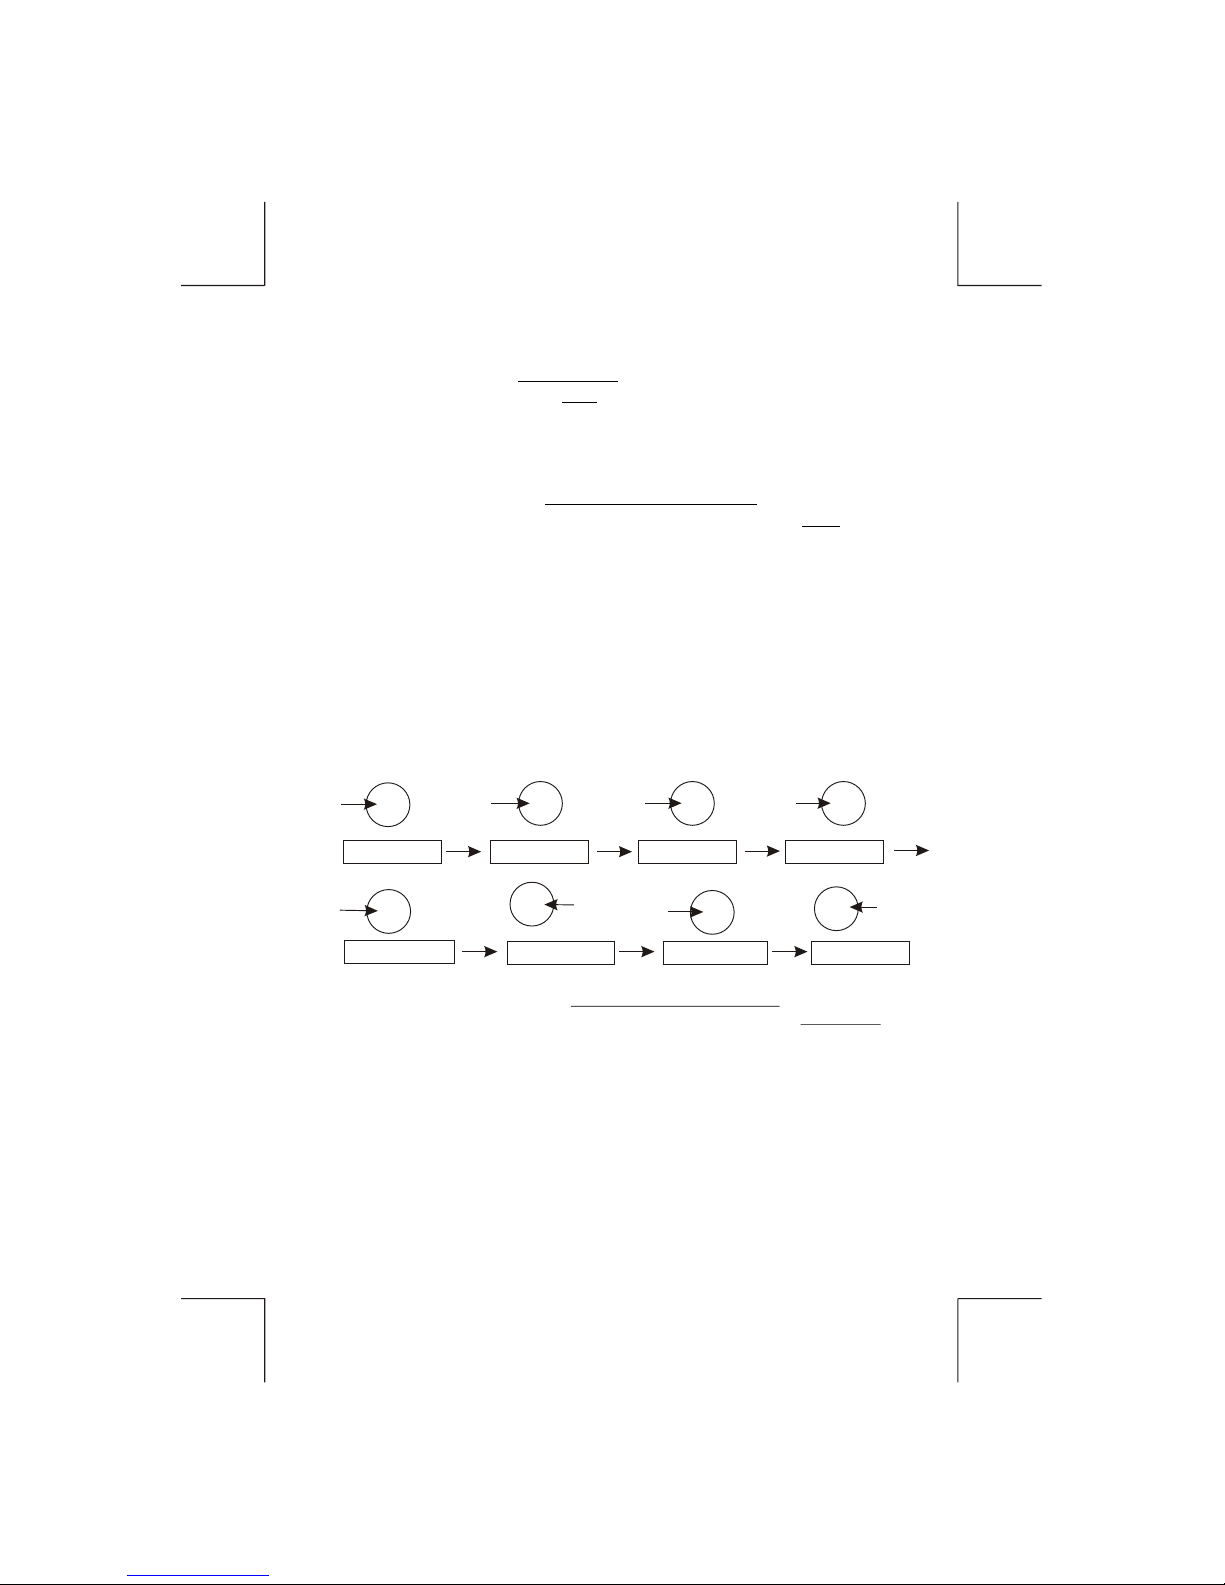
The Folder Navigate sequence on Display is like following;
The unit allows end user have three different method for the file / folder searching.
1)Direct file number searching. “014 MP3 file”
Press MP3 search button (Band button) once
LCD will display “number search”, Press “Audio Select” key or press volume down/up button
to enter the “Number search”.
Press volume down up button until “014”
Long Press MP3 enter button (Audio Select button) to confirm & play file “014”
2) Folder /files Navigate searching. Folder “06 “ & File “016 MP3”
LCD
DISPLAY
LCD
DISPLAY
PRESS
VOLUME UP
BUTTON
01
02
03 04
05
06
PRESS
AUDIO SEL
BUTTON
015. MP3 016. MP3
3) Direct alphabetical input searching . Folder “06” & File “016 MP3”
During MP3 or WMA files playback, press MP3 search button (band button) three times
LCD will display “alphabet search” ,Press “Audio Select” key or press “volume down/up button”
to enter the Alphabetical search.
Press volume down / up to input “06”
Press volume button to “0” and short press “Audio Select” to input next “6” by press volume
button.
(Note: Track up/down button use as the cursor to move to the next or the previous alphabet
input.)
Long press “Audio select” key to confirm the input of “06” and “06” will be display on the LCD.
Short press MP3 enter key (Audio select button) to go into folder “06” .
Press volume down/up button will able to navigate through “015 MP3” -> “016 MP3”
Long Press “Audio Select” key to confirm to play “016 MP3” .
PRESS
VOLUME UP
BUTTON
PRESS
VOLUME UP
BUTTON
PRESS
VOLUME UP
BUTTON
PRESS
VOLUME UP
BUTTON
PRESS
VOLUME UP
BUTTON
+
+ + +
+
AUDIO
SEL
+
AUDIO
SEL
PRESS
AUDIO SEL
BUTTON
E - 20
Page 22
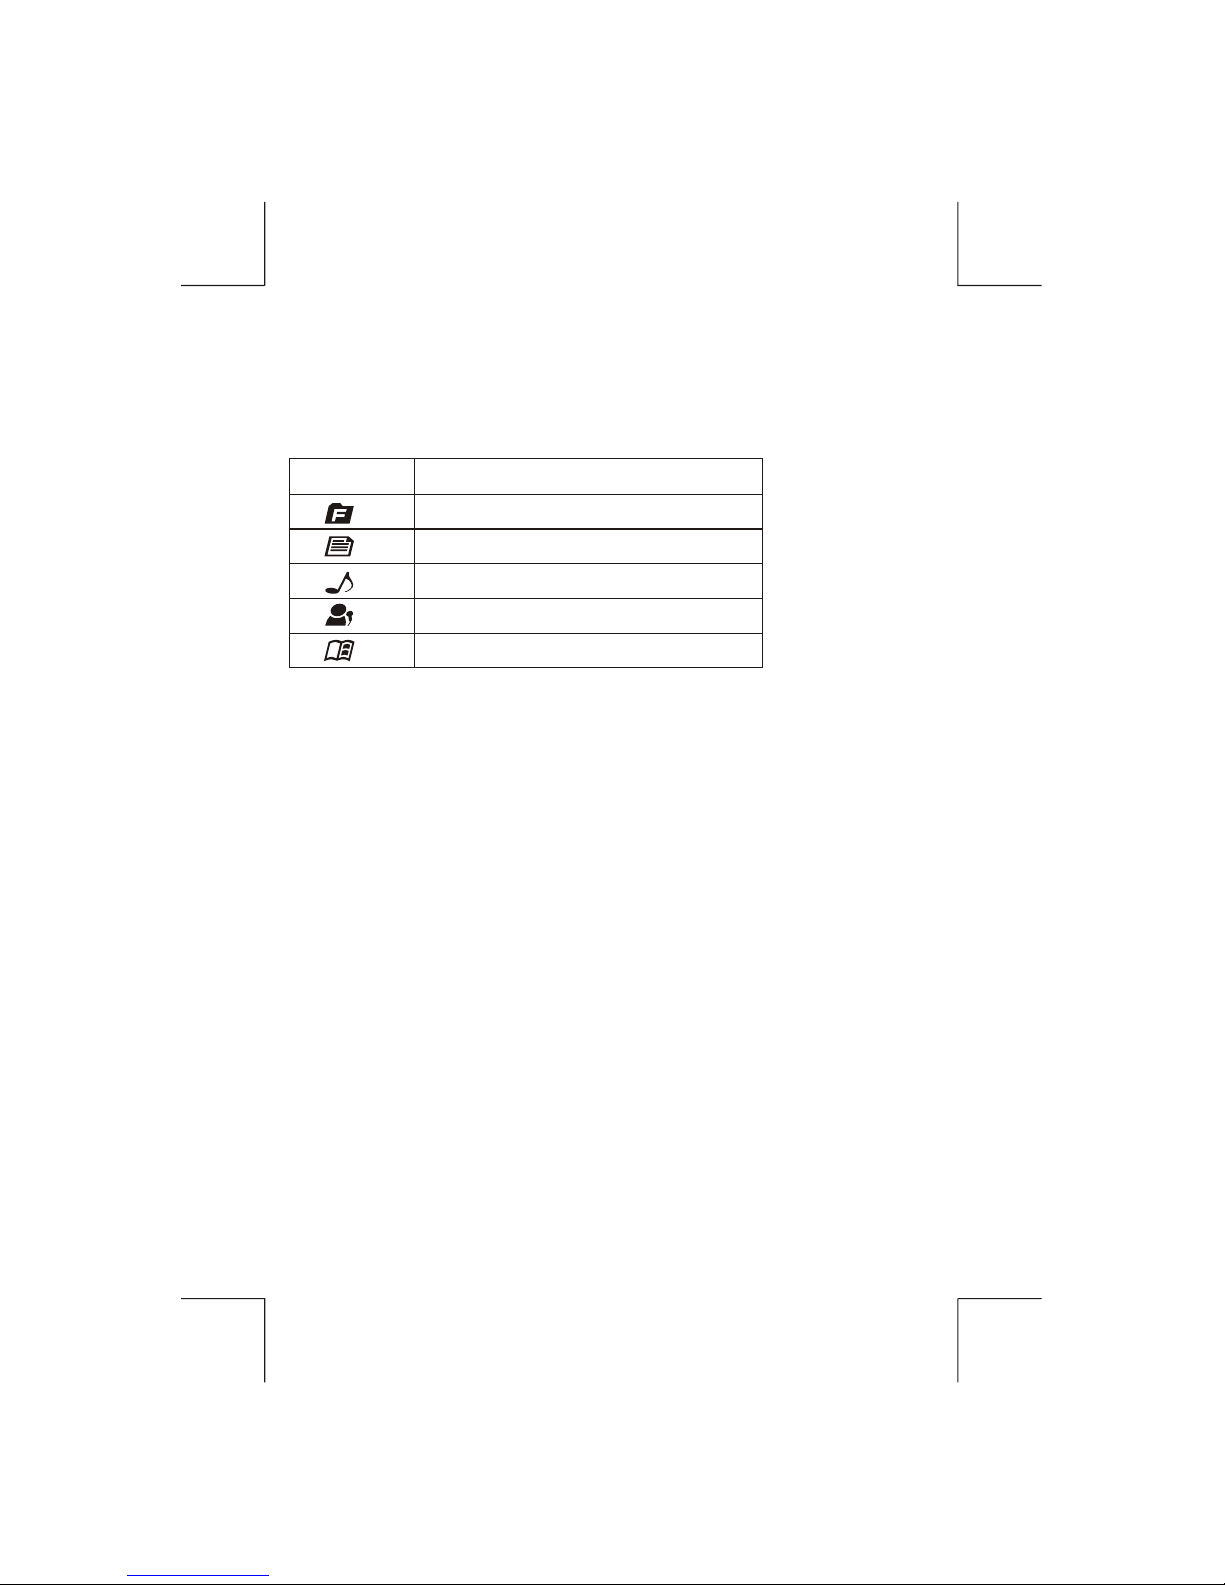
ID3 INFORMATION DISPLAY
If any MP3/WMA file recording with ID3 Tag information. The ID3 information such like Album
title, Track title, Artist Title will be displayed and automatic scrolling through the LCD while the
file is playing. User also allows pressing the AS/PS button repeatedly to view the ID3 tag
information manually.
E - 21
ICON DESCRIPTION
FOLDER ICON
FILE ICON
TRACK ICON
ARTIST ICON
ALBUM ICON
NOTE OF ID3 ICONS ON DISPLAY
Page 23

E - 22
GENERAL
AM/MW
Power Supply
Polarity
Speaker impedance
Power Output
Frequency Range
Intermediate Frequency
Usable Sensitivity
Stereo Separation
S/N Ratio
DC 11 -14V
Negative Ground
4 ohms
4 x 40W
87.5-108 Mhz
10.7 MHz
Better than 15dB at S/N 30 dB
25 dB at 1KHz
50 dB
10.SPECIFICATIONS
CD PLAYER
REMARK :
Specifications subject to change without notice.
RADIO SECTION
FM
System
Usable disc
Sampling frequency
No of quantization bits
Frequency
Number of channels
S/N Ration
Compact disc audio system
Compact disc
44.1KHz
1bit
5-20,000Hz
2 stereo
70dB
Frequency Range
Intermediate Frequency
Usable Sensitivity
S/N Ratio
522-1620 Khz
450KHz
Better than 45dB
40 dB
Page 24
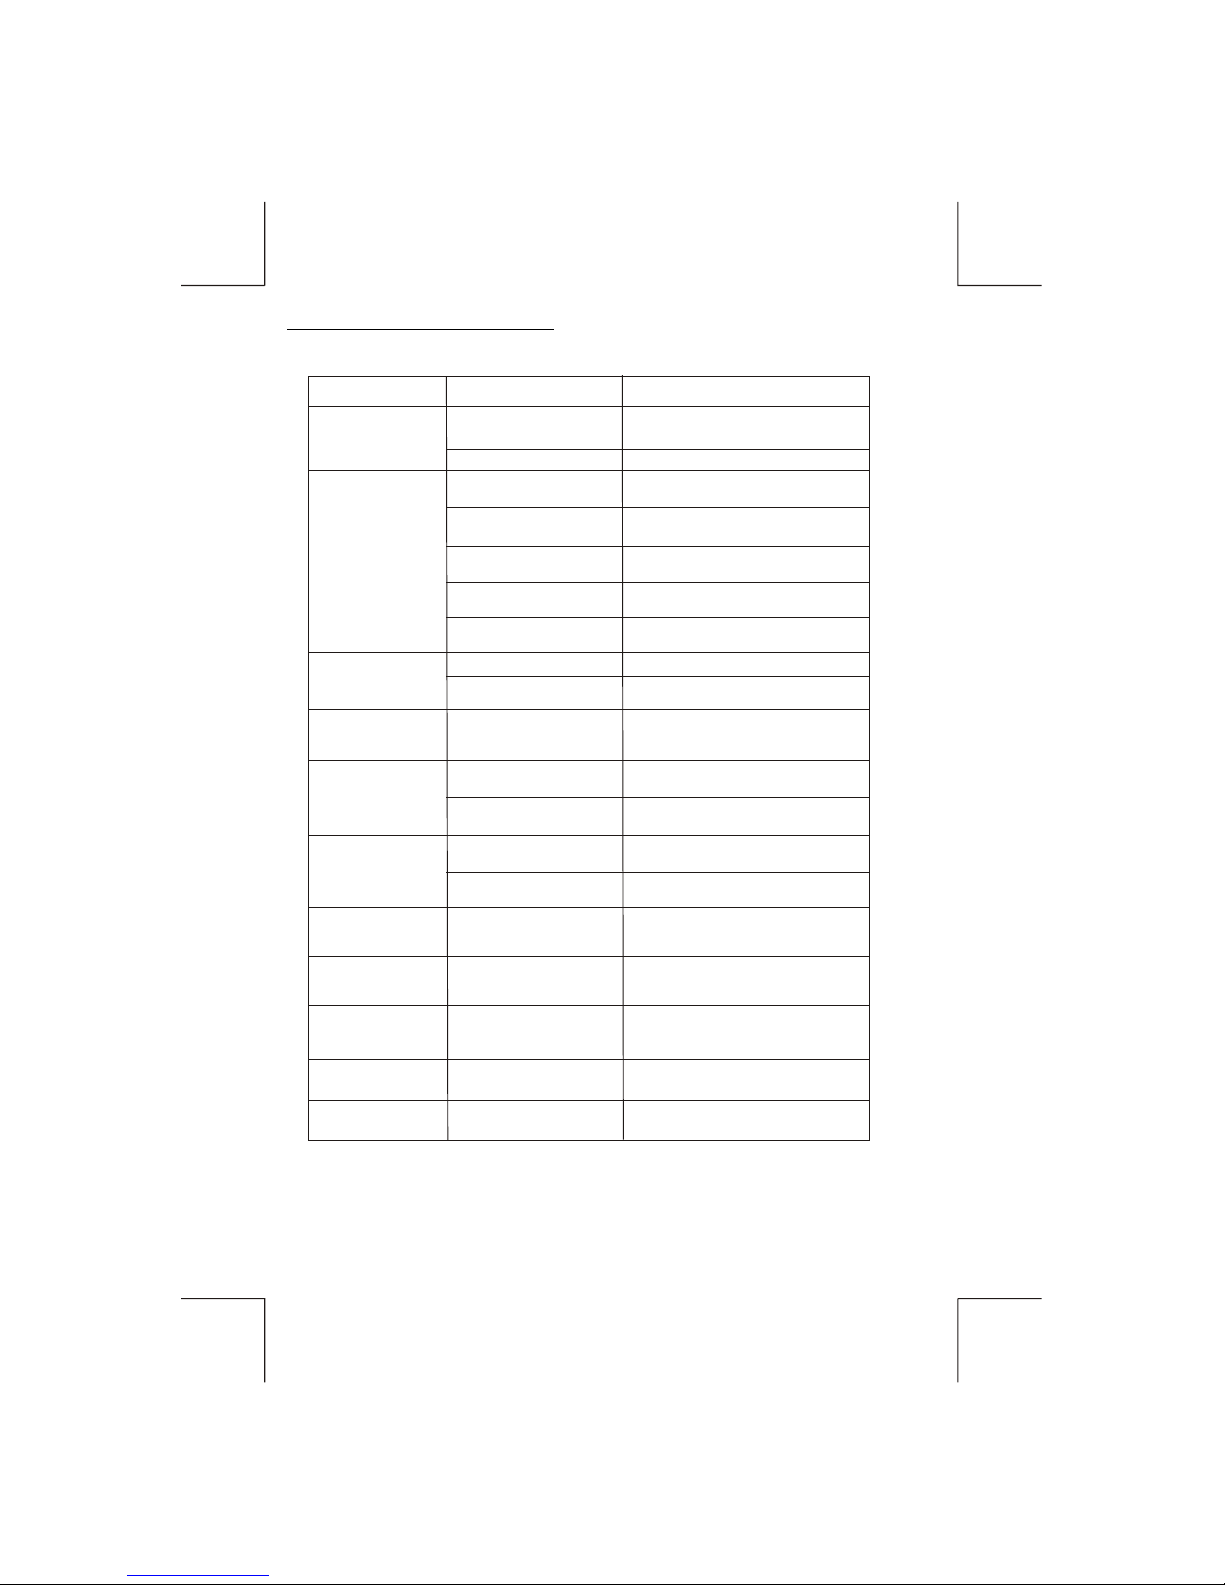
ERROR 1
ERROR 2
ERROR 3
No File
Disc Error
Mechanism Error
Servo Focus Error
Servo Tracking Error
No file Format supports for
Playback on the disc
Maybe disc dirty / disc scratched
/disc upside down.
Press the reset button to correct the problem.
If the error code does not disappear, consult
your nearest service dealer.
Replace the disc.
Replace the disc.
Press the reset button to correct the problem.
If the error code does not disappear, consult
your nearest service dealer.
Press the reset button to correct the problem.
If the error code does not disappear, consult
your nearest service dealer.
Symptom
Cause
Solution
No power
The car ignition is not on.
If the power supply is properly connected
to the car accessory terminal, switch the
ignition key to “ACC”
Disc cannot be
loaded or ejected
The fuse is blown.
Replace the fuse.
Presence of CD disc inside
the player.
Remove the disc in the player, then
put a new one.
Inserting the disc in reverse
direction.
Insert the compact disc with the
label facing upward.
Compact disc is extremely
dirty or defective disc.
Clean the disc or try to play a new one.
Temperature inside the car is
too high.
Cool off or until the ambient temperature
returns to normal.
Condensation.
Leave the player to off for an hour or so,
then try again.
Volume is in minimum.
Adjust volume to a desired level.
Wiring is not properly
connected.
Check wiring connection.
The operation keys
do not work
No sound
The built-in microcomputer is
not operating properly due to
noise.
Press the RESET button.
Front panel is not properly fixed into
its place
Sound skips.
The installation angle is
more than 30 degrees.
Adjust the installation angle to less
than 30 degrees.
The disc is extremely dirt or
defective disc.
Clean the compact disc. Then try to play a
new one.
The antenna cable is not
connected.
Insert the antenna cable firmly.
The signals are too weak.
Select a station manually.
The radio does not
work.
The radio station
automatic selection
does not work.
11.TROUBLE SHOOTING
Before going through the check list, check wiring connection. If any of the problems persist
after check list has been made, consult your nearest service dealer.
E - 23
 Loading...