

Page 1
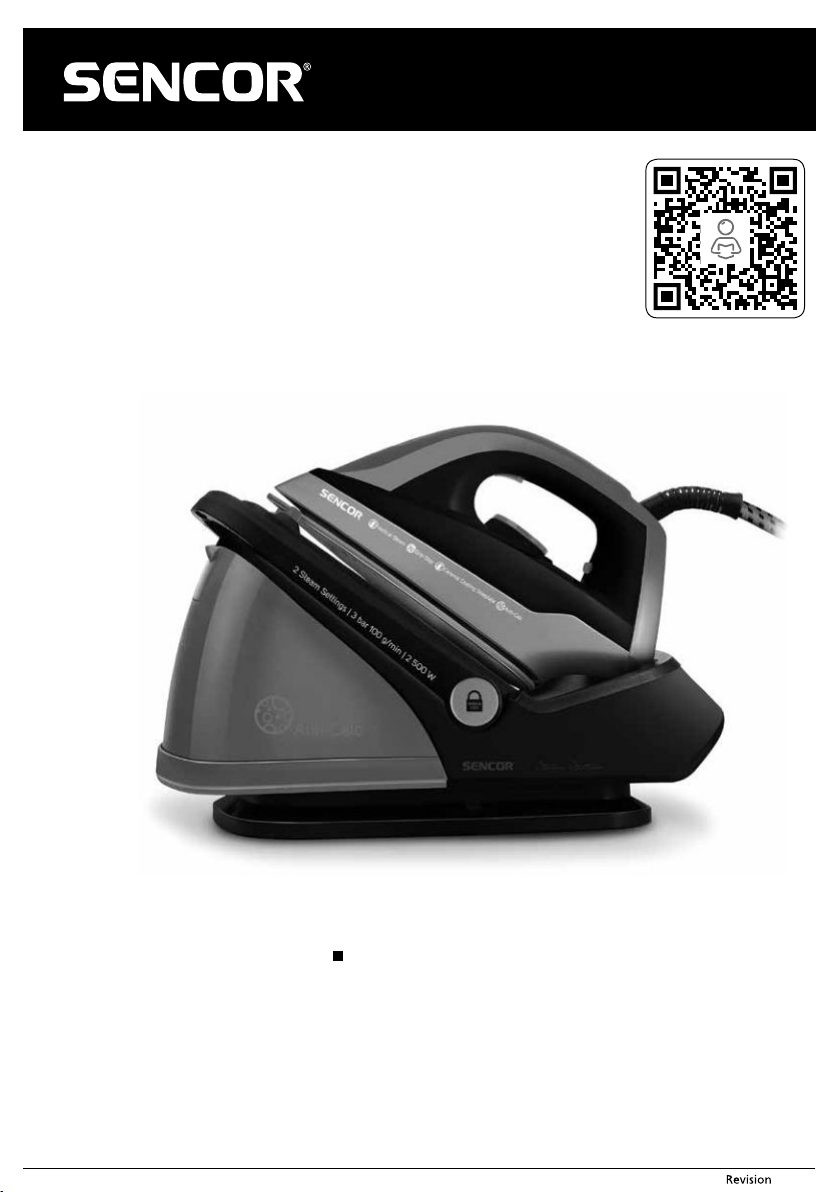
SSI 0710VT
Copyright © 2019, Fast ČR, a.s.
EN Steam station
Translation of the original manual
- 1 -
11/2019
Page 2

EN
Steam station
Important safety instructions
READ CAREFULLY AND STORE FOR FUTURE USE.
General warnings
■ This appliance may be used by children 8 years of age and older and by persons
with physical or mental impairments or by inexperienced persons, if they are
properly supervised or have been informed about how to use the product in asafe
manner and understand the potential dangers.
■ Children must not play with the appliance. Cleaning and maintenance performed
by the user must not be performed by unsupervised children.
■ In the event that the power cord is damaged, have it repaired at aprofessional
service centre to prevent causing adangerous situation. It is forbidden to use the
appliance if it has adamaged power cord.
■ Always disconnect the power plug of the steam station from the power socket
when leaving it without supervision, when filling up or emptying the water tank
and when you have finished using it.
■ The water tank lid must not be open when ironing. The refilling of the water tank
is described in chapter FILLING THE WATER TANK.
■ The steam station must not be left within the reach of children younger than 8
years of age, when it is connected to mains electricity or while it is cooling down.
■ The steam station must not be left without supervision when connected to
apower socket.
■ The steam station and the iron may be used only on astable, even surface. When
putting the iron aside away from the steam station, check that the surface on
which it is located is stable.
■ The water tank lid must not be open when ironing.
■ Neither the steam station nor the iron may be used if it has fallen on the floor,
exhibits visible signs of damage or if it is leaking.
Electrical safety
■ Before connecting this steam station to apower socket, make sure the voltage
stated on its rating label corresponds to the voltage in your power socket.
■ Connect the steam station only to aproperly grounded power socket. Do not use
an extension cord.
■ Do not touch the steam station and the iron with wet or damp hands when it is connected to apower socket.
■ Always disconnect the steam station from the power socket when leaving it
without supervision, when filling up or emptying the water tank and when you
have finished using it.
Copyright © 2019, Fast ČR, a.s.
- 2 -
11/2019
Page 3

■ Prior to disconnecting the steam station from the power socket, always turn off
the steam station using the appropriate button.
■ To avoid potential injury by electrical shock, do not clean the steam station or the
iron under running water, do not spray it with water and do not submerge it in
water or any other liquid.
■ Ensure that power cord does not come into contact with water, moisture or the
hot surfaces of the steam station or iron.
■ Do not place heavy items on the power cord. Make sure the power cord does not
hang over the edge of atable or that it is not touching a hot surface or sharp
objects.
■ Disconnect the steam station from the power socket by gently pulling the plug,
and not the power cord itself. Otherwise, this could damage the power cord or the
socket.
■ Do not pull or carry the iron by the power cord.
■ To avoid the danger of injury by electrical shock, do not repair the steam station or
iron yourself or make any adjustments. Have all repairs performed at an authorised
service centre. By tampering with the product you risk voiding your legal rights
arising from unsatisfactory performance or quality warranty.
■ Always turn off the steam station and disconnect it from the power socket when
you have finished using it.
Safety during use
■ This steam station is designed for home use. Do not use it in industrial surroundings
or outdoors.
■ Do not place the steam station or the iron on or near an electric or gas stove or
other sources of heat.
■ To carry the steam station use the carry handle exclusively.
■ Never iron clothing on abody.
■ Do not touch the hot ironing surfaces. Otherwise, this could cause burns.
■ Do not touch the iron rest surface on the steam station if the iron was placed on it
directly before use. The surface may be very hot.
■ Never fill the water tank directly underneath awater tap with the entire steam
station. To fill directly underneath awater tap, always slide the water tank out of
the steam station. Never add vinegar, descaling agents or other additives to the
water tank.
■ Prior to cleaning or any other handling of the steam station that you have
disconnected from the power socket, allow the soleplate of the iron to cool down.
Copyright © 2019, Fast ČR, a.s.
- 3 -
11/2019
Page 4
SSI 0710VT
A
10
9
7
8
1
B
2
3
5
4
3
2
6
C
5
6
1
4
Copyright © 2019, Fast ČR, a.s.
5
- 4 -
4
1
reset
7
3
2
11/2019
Page 5
1
4
D
6
2
3
5
Copyright © 2019, Fast ČR, a.s.
- 5 -
11/2019
Page 6
Steam station
EN
User'smanual
DESCRIPTION OF THE APPLIANCE AND ACCESSORIES
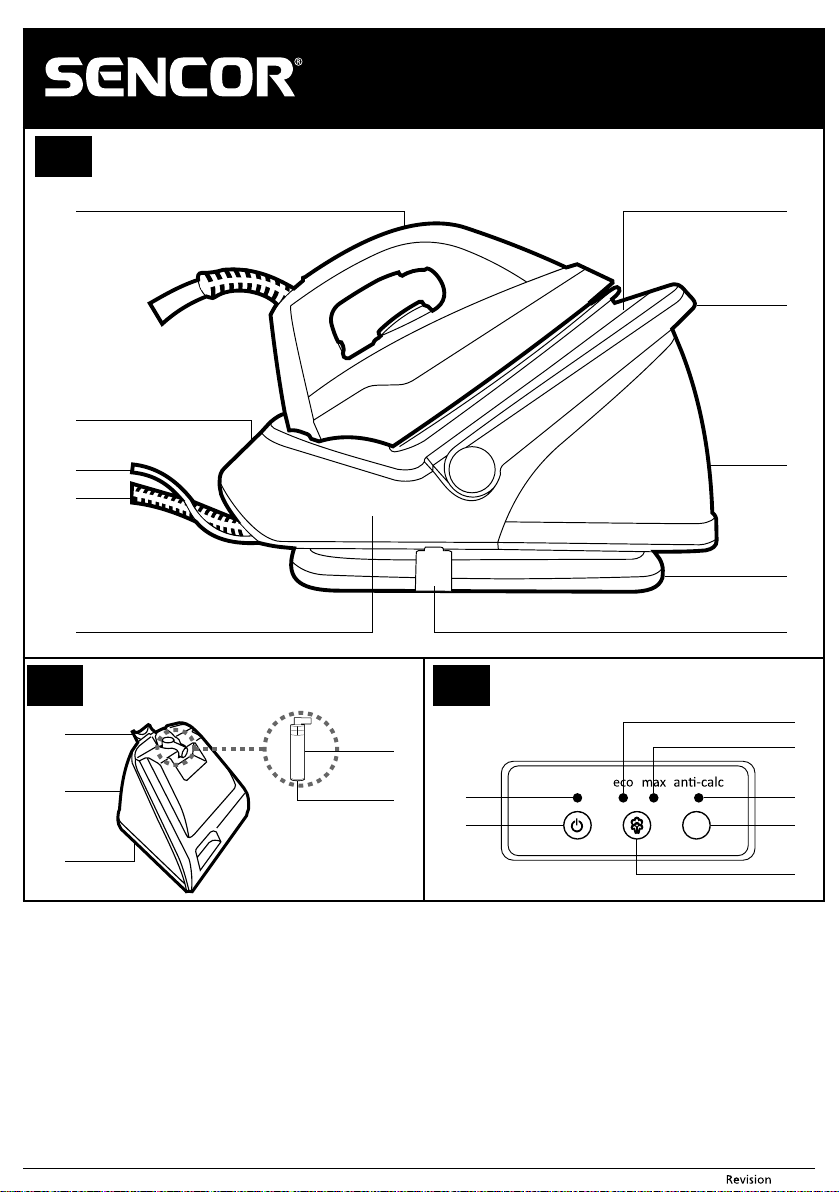
A1 Steam station
Stand with compartment for power
cord and steam hose
A3 2-litre water tank
A4 Carry handle
A5 Iron rest surface
A6 Holder for steam hose and power
cord
A7 Power cord
A8 Steam hose
A9 Control panel
A10 Iron
B1 Water tank unit
B2 Filling opening lock
B3 Cassette with filter against limescale
and dirt
B4 Spring latch
Serves to release and attach the
water tank to the steam station.
BEFORE FIRST USE
■ Prior to using this appliance, please read the user’smanual thoroughly, even in cases,
when one has already familiarised themselves with previous use of similar types of
appliances. Only use the appliance in the manner described in this user’smanual.
Keep this user’smanual in asafe place where it can be easily retrieved for future use.
In the event that you hand this appliance over to somebody else, make sure to also
include this user’smanual.
■ We recommend saving the original cardboard box, packaging material, purchase
receipt and responsibility statement of the vendor or warranty card for at least the
duration of the legal liability for unsatisfactory performance or quality. In the event
of transportation, we recommend that you pack the appliance in the original box
from the manufacturer.
■ Before first use, remove all packaging materials including promotion stickers
and labels from the steam station and iron. Wipe the soleplate D3 with alightly
dampened cloth before first use and then wipe dry.
PREPARATION BEFORE IRONING
■ Sort the laundry according to international symbols shown on the textiles or
according to the fabric types.
SYMBOL FABRIC TYPE
Synthetics (acrylic, acetate,
polyester, viscose, etc.)
Cotton with addition of other
types of fibres; silk, wool, wool
with addition of other types of
Corduroy, cotton, denim
USING THE STEAM STATION
FILLING THE WATER TANK
■ Before filling the water tank A3, check that the steam station is disconnected from
the power socket.
■ The steam station is intended for use with tap water. Limescale deposits may quick ly
form, if you live in an area with hard or very hard water. Therefore, to extended the
lifetime of the iron, we recommend using amix ture of 50% tap water and 50%
distilled water.
Attention:
Never add water softeners, vinegar, starch, descaling agents, perfumes
or other additives to the water.
■ Position the steam station on astable, even surface. Hold the steam station A1 with
one hand and press the spring latch B4 on the underside of the water tank A3 with
the other, and then slide out the water tank A3. Slide out the filling opening lock B2
and fill up the water tank A3 with water. When doing this, ensure that you do not fill
past the level marked as MAX.
B5 Cassette plug
C1 On/Off button
C2 Steam mode selection button
C3 Limescale protection system reset
button
C4 Power On indicator
C5 Power-saving mode indicator
(ECOmode)
C6 MAX steam output indicator
(MAXmode)
C7 Replacement of limescale and dirt
filter required indicator
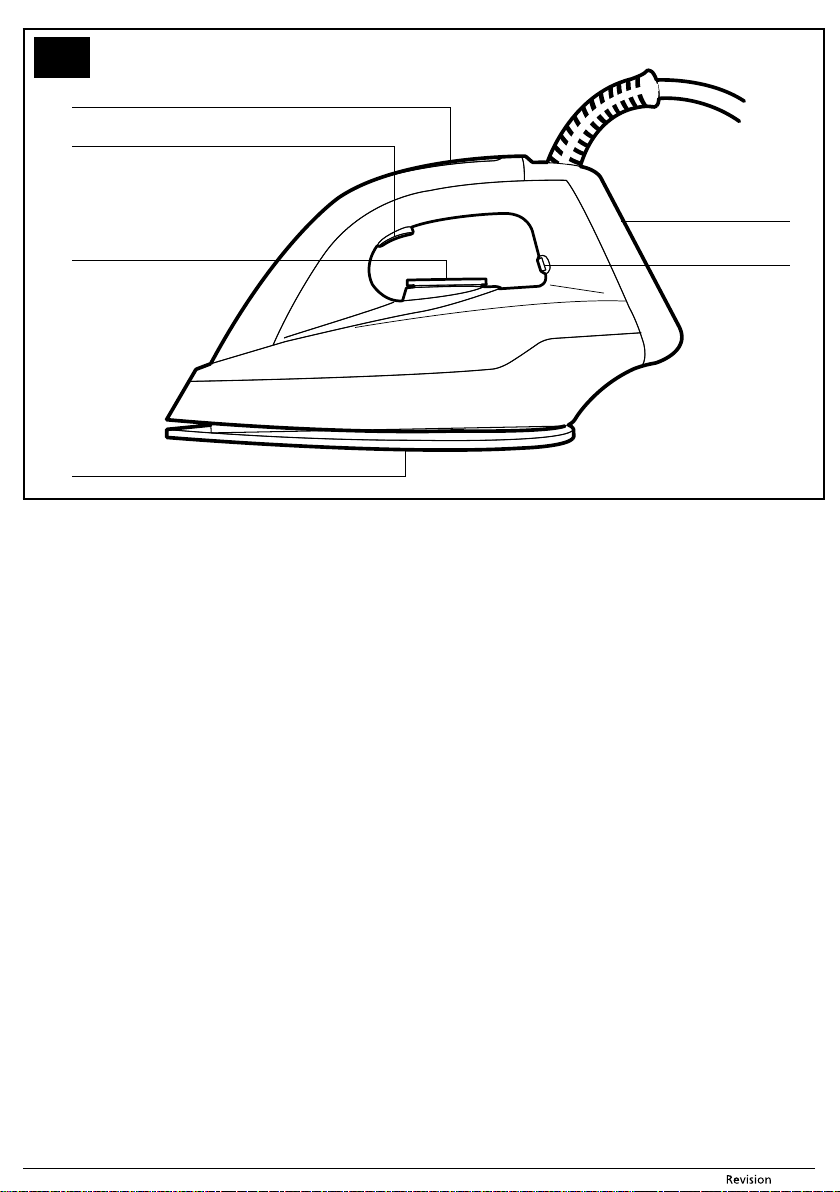
D1 handle
D2 Temperature dial with automatic
steam regulator
D3 Soleplate
D4 Steam button
D5 Temperature indicator
D6 Rest surface
fibres, etc.
Flax
Fabrics, that should not be ironed
maximum temperature
SETTING THE
TEMPERATURE
•
Low temperature
••
Medium temperature
•••
High temperature
MAX
■ The water tank A3 can also be filled up without sliding it out of the steam station A1.
In such acase, tilt open the filling opening lock B2 and fill the water tank A3 with
water up to the MAX mark using asuitable container.
Note:
The non-stop system enables water to be added to the water tank A3
even while the steam station is in operation without having to turn it
■ Insert the water tank A3 back into the steam station A1. Correct insertion of the
TURNING ON
■ Connect the power cord of the steam station to apower socket. Indicator C4 will
■ Using the temperature dial D2 on the iron, set the desired temperature. Temperature
PUTTING THE IRON ASIDE WHILE IRONING
You may put the iron aside while ironing on the rest surface D6 on the underside of the
iron or on to rest surface A5 on the steam station A1.
IRONING WITHOUT STEAMING
■ This function enables the iron to be used with or without water in the tank A3.
■ Set the temperature dial D2 on the iron A10 to MIN and wait until indicator D5 turns
IRONING WITH STEAM
■ The steam station is equipped with two steam release intensity levels:
ECO: This mode is intended for sufficient steam output for standard ironing with
MAX: This mode is intended for maximum steam output for demanding or vertical
■ If you wish to iron with steam, set the temperature dial D2 on the iron A10 to an
■ Press button C2 on the control panel A9 to select steam mode ECO or MAX and wait
■ Holding down button D4 on the iron, will start releasing steam while ironing.
■ If you wish to stop releasing steam, release button D4.
■ We recommend to select the ECO mode for all standard ironing tasks. Only when
IRONING WITH VERTICAL STEAM
■ The steam station can also be used when ironing hanging textiles (e.g. curtains,
■ Set the temperature dial D2 on the iron A10 to MAX and wait until indicator D5
off.
water tank A3 is accompanied by an audible click from the spring latch B4.
be lit and indicator C6 will start flashing, which indicates that the steam station is
heating up. Once the indicator C6 is lit permanently, the steam station is ready for
use.
indicator D5 will be lit indicating that the iron is heating up. Once the iron’s internal
thermostat reaches the correct temperature, indicator D5 will turn off.
off.
low power use; it uses less steam and saves power without affecting the
ironing result. Selection of the ECO mode is indicated by agreen illumination
of indicator C5.
ironing. Selection of the MAX mode is indicated by ablue illumination of
indicator C6.
Attention:
In order to iron with steam, the water tank A3 must be filled with water.
appropriate temperature and wait until indicator D5 turns off.
Note:
Indicator D5 may turn on and off while ironing, indicating that
temperature is automatically being maintained without interruption
to the ironing process.
until the indicator of the selected mode remains permanently lit.
Note:
When steam ironing after selecting the steam mode on a cold
steam station, it is necessary to hold down button D4 on the iron
for approximately 2 minutes in order for steam to evenly spread
throughout the entire steam circuit system.
ironing linen fabrics, strong silk or similar fabrics is it recommended to select the
MAX mode.
garments hanging on coat hangers, etc.).
turns off. Position the iron into avertical position. Use one hand to gently tension
the fabric and vertically move the iron vertically from bottom up and press button
D4 to release steam.
Tip:
When ironing cotton or linen textiles, gently place the iron with the
soleplate D3 on to the fabric. When ironing finer or delicate textiles,
keep the iron approximately 2 cm off the fabric.
Do not use the steam function for silk and synthetics so as not to
damage the fabric.
Attention:
Never point the steam at people!
Copyright © 2019, Fast ČR, a.s.
- 6 -
11/2019
Page 7
LIMESCALE PROTECTION SYSTEM
■ This steam station is equipped with an Anti-Calc system, which limits the formation
of limescale deposits inside the steam station and the iron. It is also equipped with
an automatic sensor, which informs you about the need to replace the limescale
filter When the filter is clogged, indicator C7 will be lit. If this happens, proceed
according to the instructions in chapter Replacement of the limescale and dirt filter.
TURNING OFF
■ When you have finished using it, set the temperature dial D2 on the iron A10 to MIN
and place the iron on the rest surface A5. Disconnect the power cord of the steam
station from the power socket and wrap it, together with the steam hose, around
the stand A2. Secure the power cord and hose in place using holder A6. Allow the
soleplate D3 and the rest surface A5 to cool down. After the iron has cooled down,
clean it according to the instructions in chapter Cleaning and maintenance.
TIPS FOR QUALITY IRONING
■ Do not fill the washing machine drum with too much laundry, otherwise it will be
overly crumpled up. You can also avoid overly crumpled laundry by setting a lower
spin drying speed.
■ If you are ironing fabrics from blended materials (e.g. 40 % wool and 60 % synthetic
material), set the temperature according to the material which is ironed at alower
temperature.
■ If you do not know the composition of the fabric, identify the suitable temperature
setting by ironing apiece of the fabric from the underside. Start by setting a low
temperature and gradually increase it until the ideal temperatures is achieved.
■ Never iron over places that have sweat marks or other stains. The high temperature
fixes the stain in place, making it difficult to remove.
■ To avoid silk, wool and synthetic fabrics from being shiny after ironing, iron them
from the underside.
■ Some materials are easier to iron when they are lightly damp.
■ Spray fine fabrics before ironing them or iron them under alightly dampened wiping cloth.
CLEANING AND MAINTENANCE
CLEANING AFTER EVERY USE
■ Before cleaning, turn off the iron according to the instructions in chapter Using
the steam station. The steam station must be disconnected from the power socket
and cooled down. Slide the water tank A3 out of the steam station, empty out any
remaining water into the sink and insert the water tank A3 back into the steam
station.
■ In the event that the soleplate D3, the surface of the steam station A1 or the surface
of the iron A10 is dirty, wipe these surfaces with alightly dampened cloth and then
wipe dry.
■ For cleaning, do not use steel wool, solvents or cleaning products with an abrasive
effect, etc. to prevent damaging the surface being cleaned. When cleaning, never
submerge the steam station or iron in water.
REMOVING LIMESCALE DEPOSITS
■ Despite the fact that the steam station automatically identifies the need to remove
deposits, which is shown by indicator C7, we recommend that you clean the iron at
least once per month.
■ Make sure that the steam station is turned off using the On/Off button C1 and that it
is disconnected from the power socket. Pour approximately 1 litre of clean water into
the water tank A3. Connect the steam station to apower socket, set the temperature
dial D2 on the iron to MIN and wait until indicator D5 turns off.
■ Hold the iron in ahorizontal position above the sink and press button D4 and hold
it down for approximately 1 minute to pump the water from the steam station into
the iron. Once steam and hot water starts coming out of the soleplate D3, set the
temperature dial D2 to the highest temperature level. Then repeatedly press button
D4 and tilt the iron slightly from side to side several times until the water tank A3
is completely empty. Together with the released steam and water, also limescale
deposits from the inner parts of the soleplate D3 will be removed. You may repeat
this process once more if necessary.
■ Use button C1 to turn off the steam station, disconnect it from the power socket and
allow it to cool down. In the event that the soleplate D3 or the surface of the iron is
dirty, wipe with alightly dampened cloth and then wipe dry.
REPLACEMENT OF THE LIMESCALE AND DIRT FILTER
■ Check that the steam station is turned off using the C1. Take the water tank A3 our
of the steam station and slide the cassette with filter B3 out of it. Using asuitable
implement, e.g. asmall flat screwdriver, clip open the plug B5 from the underside
of the cassette B3 and take out the filter. Depending on the condition of the filter,
either clean it out thoroughly or replace it with anew one. Click the plug B5 back in
and insert the cassette B3 into the water tank A3. Insert the water tank A3 into the
steam station A1. Turn on the steam station using the On/Off button C1 and press
button C3 to reset the limescale protection system.
STORAGE
When you have finished ironing, pour out any unused water from the water tank A3
(careful, it may be hot), or allow it to evaporate and place the iron on the rest surface
A5 to cool down. Turn off the steam station using the On/Off button C1. Wind the
power cord and the steam hose around the stand A2 and secure them in place using
holder A6. Put the steam station in asuitable location so that it cannot be tipped over.
TECHNICAL SPECIFICATIONS
Rated voltage .................................................................................................................................. 230 V
Rated frequency........................................................................................................................50/60 Hz
Rated power input ..................................................................................................................... 2 500W
Steam output ..........................................................................................................................100 g/min
Water pressure .................................................................................................................................3 bar
Length of the power cord ..............................................................................................................3 m
Weight (without water) ...............................................................................................approx. 1.3 kg
Changes to text and technical parameters are reserved.
INSTRUCTIONS AND INFORMATION REGARDING THE
DISPOSAL OF USED PACKAGING MATERIALS
Dispose of used packaging material at asite designated for waste in your municipality.
DISPOSAL OF USED ELECTRICAL AND ELECTRONIC
EQUIPMENT
waste disposal. Ask your local authorities or collection facility for more details. In
accordance with national regulations penalties may be imposed for the incorrect
disposal of this type of waste.
For business entities in European Union states
If you want to dispose of electric or electronic appliances, ask your retailer or supplier
for the necessary information.
Disposal in other countries outside the European Union.
This symbol is valid in the European Union. If you wish to dispose of this product,
request the necessary information about the correct disposal method from the local
council or from your retailer.
This symbol on products or original documents means that used
electric or electronic products must not be added to ordinary
municipal waste. For proper disposal, renewal and recycling hand over
these appliances to determined collection points. Alternatively, in
some European Union states or other European countries you may
return your appliances to the local retailer when buying an equivalent
new appliance. Correct disposal of this product helps save valuable
natural resources and prevents potential negative effects on the
environment and human health, which could result from improper
This product meets all the basic requirements of EU directives related
to it.
Copyright © 2019, Fast ČR, a.s.
- 7 -
11/2019
 Loading...