

Page 1
SRC 330
USER’S MANUAL
NÁVOD K OBSLUZE
NÁVOD NA OBSLUHU
FELHASZNÁLÓI KÉZIKÖNYV
INSTRUKCJA OBSŁUGI
Radioclock with alarm and inner temperature
Radiobudík s pokojovým teploměrem
Rádiobudík s izbovým teplomerom
Rádiós ébresztő szobai hőmérővel
Radiobudzik z termometrem pokojowym
Page 2
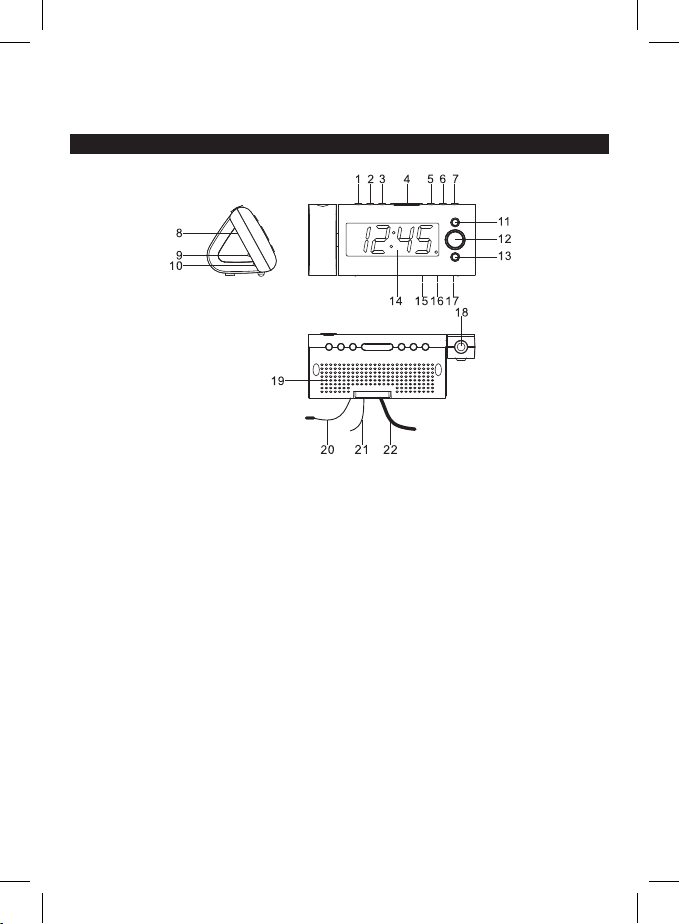
FUNCTION AND CONTROLS
1. MEMORY.SET / MEMORY+ / DISPLAY LIGHT AUTO ON/OFF / NAP
2. ALARM 1 O N / OFF SET
3. ALARM 2 O N / OFF SET
4. SNOOZE / SLEEP / DIMMER
5. CLK.ADJ. (TIME SET) / TEMP
6. << / TUNE - / YEAR /MONTH/DAY
7. >> / TUNE + / DST/C-F
8. FOCUS ADJUSTMENT FOR PROJECTION UNIT
9. PROJECTION TIM E 180° FLIP BUTTON
10. PROJECTION ON/O FF BUTTON
11. VOLUME UP / DISPL AY AUTO CHANGE ON/OFF
12. ON / OFF
13. VOLUME DOWN
14. DISPLAY
15. BATTERY COMPARTMENT (REAR OF UNIT)
16. RESET
17. RATING LABEL (REAR OF UNIT)
18. PROJECTION UNIT
19. SPEAKER
20. TEMPERATURE SENSOR (IN DOOR TEMPERATURE)
21. FM ANTENNA
22. AC POWER CORD
EN - 1
Page 3
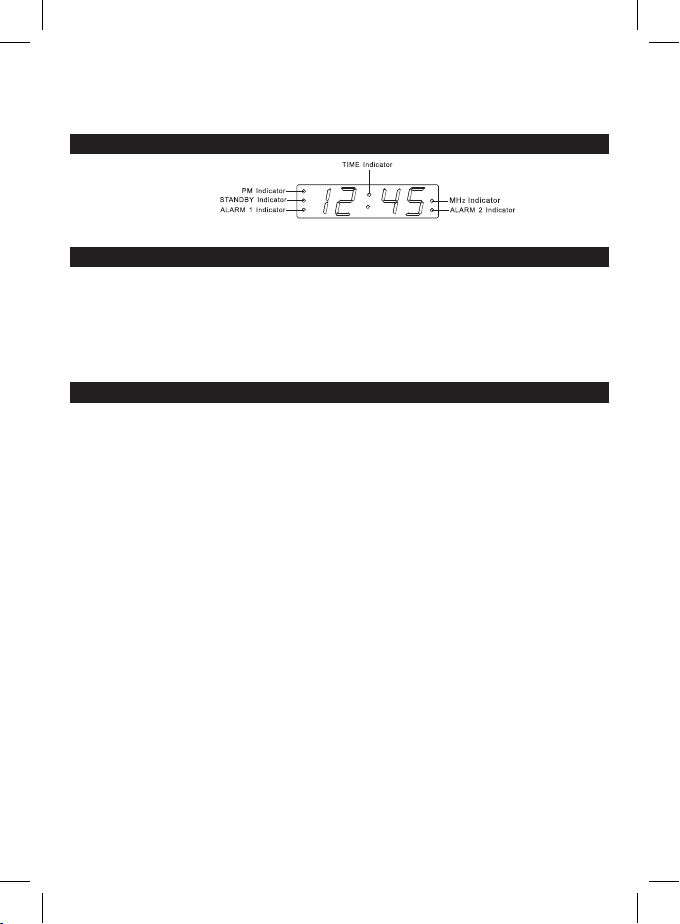
LED DISPLAY
Plug the AC power cor d to a household out let AC source. This uni t is equipped with a b attery bac k up system,
it requires a 3V CR 2032 flat lithium batter y (not included). Inser t the battery in the batter y compar tment,
making cer tain that the pos itive and negative (+ and -) batte ry terminal s are attached t o the corresp onding
terminals on the p late in the batter y compar tment. If an AC power fa ilure occurs , the clock auto matically
switches to the bat tery power su pply, the clock and tim er mem
resumes, the cl ock switches ba ck to AC again.
ory contin ue running. When t he AC power
GETTING STARTED
Press the RESET button (16) locates on the back o f unit after AC plug in.
- The unit will displ ay full segment for 2 se conds, then it w ill enter the norma l mode.
1. TIME AND CALENDAR MANUAL SETTING
A. Setting Time and Calendar – Pre ss Time set butto n (5) in normal mode and kee p depress over 2 sec onds
POWER CONNECTION
to enter time set mode, af ter enter the setting mode, press T ime set button (5) to cha nge the mode
as follows :
Normal → Year → Month → Day → 12/24 H → Re al time Hour → Real ti me Min → Normal
Action (during dat a adjustment):
- Press << / Tune - button (6) to adjust data back ward.
- Press >> / Tune + button (7) to adjust dat a forward.
- Keep depress << or >> button fo r 2 seconds to enab le auto forwar d.
B. Setting Alarm 1 and Alar m 2 – Press alarm set but ton (2/3) during no rmal mode and keep d epress over
2 seconds to enter al arm set mode, af ter enter the setti ng mode, press ala rm set button (2 /3) to change
the
mode cycle as foll ows :
Normal → AL 1 H our → AL 1 Min → AL 1 wee kday Alarm → AL 1 wake bee p → AL 1 wake radio → AL 1
wake radio volume → Nor mal
Normal → AL 2 H our → AL 2 Min → AL 2 wee kday Alarm → AL 2 wake bee p → AL 2 wake radio → AL 2
wake radio volume → Nor mal
EN - 2
cycle
Page 4
Select alarm weekday mode as follows
1-5 : Monday to Friday
1-7 : Whole week
6-7 : Saturday & Sunday
1-1 : One day of week
Action (during dat a adjustment) :
- Press << / Tune - button (6) to adjust data backward.
- Press >> / Tune + button (7) to adjust data forward.
- Keep depress << or >> button for 2 seconds to enable auto forward.
2. SETTING ALARM OUTPUT ON/OFF
Press MEMORY.SET / MEMORY+ / DISPLAY LIGHT AUTO ON/OFF / NAP
button (1) to the Auto off mode, alarm wake up the display is auto turn on.
Press alarm 1 on/off set button (2) to toggle on and off alarm output function.
Press alarm 2 on/off set button (3) to toggle on and off alarm output function.
3. ALARM DURATION AND SNOOZE FUNCTION
Alarm Duration – Beep alarm or radio alarm will continue output for 30 minutes if no key press, then it will
stop automatically and wait for same alarm time on nex t day.
Action for Snooze :
- During alarming, press Snooze button (4) will enable snooze function, Beep alarm or Radio alarm will
stop.
- Snooze interval is 9 minute (not include second offset)
- Snooze will continue unless press ON/OFF but ton (12) to alarm off of Buzzer alarm or Radio Alarm stop
automatically after 30 minutes.
Press MEMORY.SET / MEMORY+ / DISPLAY LIGHT AUTO ON/OFF / NAP button (1) to the Auto off
mode, during alarming display auto turn on, press snooze / sleep button (4) will enable snooze function,
buzzer alarm or radio / display will stop & off.
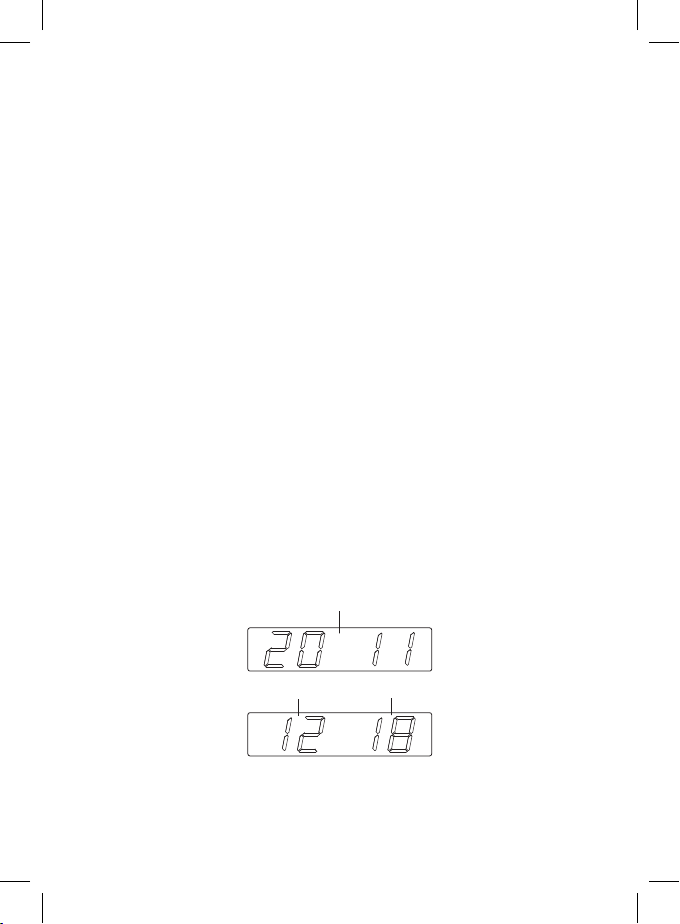
4. CHANGE DISPLAY CONTENT
Press << / Tune - / YEAR/MONTH/DAY button (6) during normal can switch to display Year / Month / Day,
after 5 seconds timeout and return back to display time.
YEAR Indicator
MONTH Indic ator DAY Indicator
EN - 3
Page 5

Press the ON/O FF button (12) to turn the unit on.
LISTENING TO RADIO
Use the Tune + or Tune – button to select the d esired FM statio n. If you press and hol d the Tune + or Tune –
button for one s econd, then rele ase, the unit will auto matically sca n to the next broadc asting statio n.
Press the ON/O FF button (12) to turn the radio OFF.
To set / recall the ra dio preset s
Press the ON/O FF button (12) to turn the unit ON.
Use the Tune + or Tune - button to select the d esired FM statio n.
Press the memor y / memory + button; “P01” will blin k
Press the memor y / memory + button again to set th e preset.
Repeat steps 2 throug h 4 to set more presets .
The unit can pres et 10 stations totally f or FM.
When “P01-P10” i s blinking, pres s the Tune+ or Tune- button to select t he preset number.
When recallin g preset station s, press memor y / memory + to s elect the pres et number.
Sleep ope ration
When listening to r adio, press Snooze / S leep button (4) to enter sleep m ode. You can just adjust the sle ep
timer from 9 0 mins to 15 mins by pressing th e Snooze / Sleep but ton
after the sele cted time.
NAP timer f unction (co unt down tim er)
During radio of f mode, press M EMORY.SET / MEMORY+ / DISPLAY LIGHT AUTO ON /OFF / NAP but ton
(1) to turn on NAP mode, the NAP t ime will keep by 5 seco nds, within 5 sec onds and press M EMORY.SET /
MEMORY+ / DISPLAY LIGHT AUTO ON/ OFF / NAP butto n (1) button can change the durat ion from 90 mi n –
10 min.
The alarm buzz er will sound for 3 0 min and then shut of f automatical ly. To stop the alarm buzzer, press the
button (12).
ON/OFF
Press the MEMO RY.SET / MEMORY+ / DISPLAY LIGHT AUTO ON/OFF / N AP button (1) has no effect du ring
alarm operatio n. Press ON/OFF b utton (12) to cancel NAP func tion.
in the display.
(4). The unit will automatica lly turn off
EN - 4
Page 6

Frequency range FM: 87.5 – 108 MHz
SPECIFICATIONS
Battery bac kup : 3V (CR2032 Flat Lithium bat tery x 1) not included
Power supply : AC230V 50Hz
Dimensions: 188 x 82 x 72 mm
Weight: 420 g
Colour options:
SRC 330 GN – green display and sides
SRC 330 OR – orange display and sides
RESET
The reset button is l ocated on the back of u nit. Use a ballpoint pen to p ress it whenever you chan ge the
batteries, or un it is not perfor ming as expected. Thi s will return all sett ings to default value, and you w ill lose
any stored data (alarm and clock
PROJECTION UN IT
Focus setting : Adj ust the projectio n clock bright ness/focu s by turning the bright ness/foc us adjustment wheel
unit the projected t ime is clearly sho wn on the ceiling or wal l.
To flip projected image by 180°, press 180° flip button.
NOTE: PROJECTS TIM E IMAGE ON THE C EILING OR WALL OF A DA RKENED ROOM .
MAXIM UN PROJECTION DI STANCE IS 3-9 FEE T.
Note:
- Ensure that the FM antenna is c ompletely unrolle d and extended for best FM r eception.
settings).
EN - 5
Page 7

WARNING
1. No naked flame sourc es, such as lighted c andles, shoul d be placed on the ap paratus.
2. Do not place the pr oduct in clos ed bookcases or r acks without pro per ventilation.
3. Where the mains pl ug is used as the disc onnect devic e, the disconne ct device shall re main readily
operable.
4. The ventilation sh ould not be impede d by covering the venti lation openings w ith items, such as
newspapers, ta ble-cl oths, curt ains, etc.
5. It shall not be expose d to dripping or spl ashing and that no obj ects filled with li quids, such as vases , shall
be placed on the a pparatus.
6. Do not connect FM antenna to outside ante nna.
7. The unit should not b e exposed to direct s unlight, very h igh or low temperatu re, moisture, vibr ations or
placed in dust y environment.
8. Do not use abrasive, b enzene, thinner or ot her solvents to cle an the surfac e of the unit. To clean, wipe it
with mild non- abrasive deterg ent solution and c lean soft cl oth.
9. Never attempt to inser t wires, pins or other such object s into the vents or ope ning of
10. Di sconnect devi ce warning : Mai ns plug is used as the c onnection, s o it should always remai n ready
operate.
11. Bat teries shal l not be exposed to exces sive heat such as sunshi ne, re or the like.
12. Cla ss 1 LED product.
the unit.
CAUTION
Danger of explosi on if batter y is incorrec tly replaced.
Replace only wit h the same or equival ent type.
EN - 6
Page 8
INSTRUCTIONS AND INFORMATION REGARDING THE DISPOSAL OF USED PACKAGING
MATERIALS
Dispose of packaging material at a public waste disposal site.
DISPOSAL OF USED ELECTRICAL AND ELECTRONIC APPLIANCES
The meaning of the symbol on the product, its accessory or packaging indicates that this product
shall not be treated as household waste. Please, dispose of this product at your applicable collection
point for the recycling of electrical & electronic equipment waste. Alternatively in some states of the
European Union or other European st ates you may return your products to your local retailer when
buying an equivalent new product. The correct disposal of this product will help save valuable natural
resources and help in preventing the potential negative impact on the environment and human
health, which c ould be caused as a result of improper liquidation of waste. Please ask your local
authorities or the nearest waste collection centre for further details. The improper disposal of this
type of waste may fall subject to national regulations for nes.
For business entities in the European Union
If you wish to dispose of an electrical or electronic device, request the necessary information from
your seller or supplier.
Disposal in other countries ou tside the European Union
If you wish to dispose of this product, request the necessary information about the correct disposal
method from local government departments or from your seller.
This product meets all the basic EU regulation requirements that relate to it.
Changes to the text, design and technical speci cations may occur without prior notice and we reserve the
right to make these changes.
© Copyrigh t 2012, FAST ČR, a. s. Revision 07/2012
EN - 7
 Loading...