

Page 1

SRC 190
USER’S MANUAL
NÁVOD K OBSLUZE
NÁVOD NA OBSLUHU
FELHASZNÁLÓI KÉZIKÖNYV
INSTRUKCJA OBSŁUGI
Alarm radio clock
Radiobudík
Rádiobudík
Rádiós ébresztőóra
Budzik radiowy
Page 2

EN - 1
Page 3

FUNCTION AND CONTROLS
1. ON –OFF / ALARM OFF
2. << / TUNE - / YEAR/MONTH-DAY / TEMPERATURE / C-F / BETWEEN
DISPLAY CONTENTS ON-OFF/ SKIP BACK BUTTON
3. >> / TUNE + / SKIP FORWARD / NAP / DST
4. SNOOZE / SLEEP / DIMMER / POWER SAVING
5. TIME SET / MEMORY / MEMORY+
6. ALARM 1 ON - OFF SET / VOLUME DOWN
7. ALARM 2 ON - OFF SET / VOLUME UP
8. ALARM 1 INDICATOR
9. PM INDICATOR
10. TIME INDICATOR
11. ALARM 2 INDICATOR
12. SPEAKER
13. FM ANTENNA
14. TEMPERATURE SENSOR (IN DOOR)
15. BATTERY COMPARTMENT (BOTTOM OF UNIT)
16. AC POWER CORD
17. RATING LABEL
EN - 2
Page 4
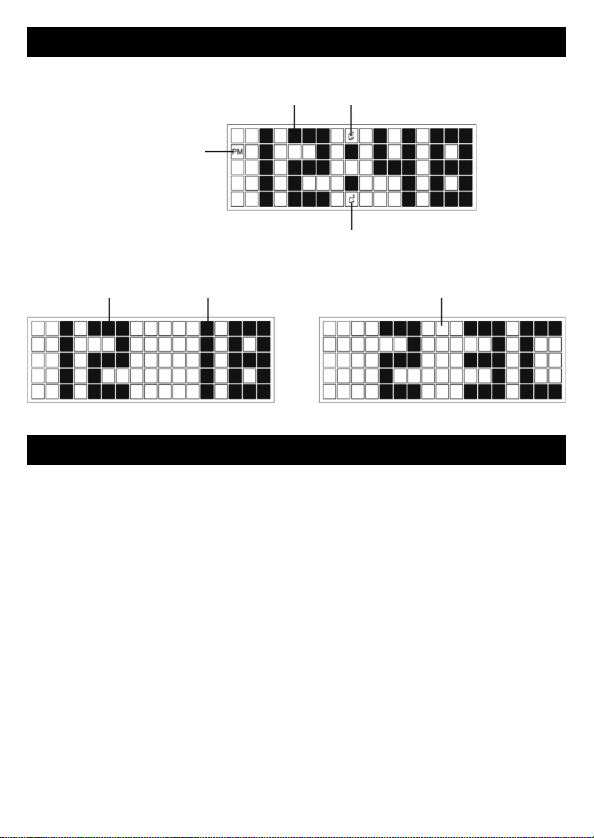
LED DISPLAY MODE
PM Indicator
MONTH Indicator DAY Indicator TEPMERATURE Indicator
TIME Indicator ALARM 1 Indicator
ALARM 2 Indicator
GET STARTED
• Select a proper place for the device such as a dry, and even non slip
area where you can easily operate the device.
• Inserting the Battery (Backup)
INSTALLING/REPLACING THE BACK-UP BATTERY
This unit is equipped with a battery back-up system, requiring one DC3V
CR2032 lithium battery (not included) to maintain the time/calendar settings
and radio presets during AC power outage.
1. Unscrew and remove the BATTERY COMPARTMENT COVER.
2. Install one fresh CR2032 lithium battery into the battery compartment
following the polarity diagram on the BATTERY COMPARTMENT
COVER. Use only the specifi ed size and type of battery.
3. Replace the BATTERY COMPARTMENT COVER and tighten its screw.
EN - 3
Page 5

Note:
The unit will operate without a battery installed but your time & alarm setting
and radio presets will be lost and will have to be reset in the event of power
interruption or failure.
IMPORTANT:
Be sure that the battery is installed correctly. Wrong polarity may damage
the unit and void the warranty. For best performance and longer operating
time, we recommend the use of good quality alkaline battery.
AC POWER CONNECTION
Plug the AC power cord into a household outlet AC source.
SETTING THE CALENDAR AND TIME
1. In standby mode, press and hold the Time set button (5) for about 2
seconds to enter the calendar/time set mode.
2. The year indicator will fl ash on the LED DISPLAY for up to 30 seconds
prompting for a new entry.
3. While the display is fl ashing, repeatedly tap the unit buttons (2), (3) to
adjust to the correct year. Press and hold the unit (2), (3) button faster
scanning backward or forward. Tap the unit button (5) to confi rm.
4. Repeat steps #2 to #3 to adjust the month, day, time format, current
hour and fi nally current minute in the same way.
Notes:
The display sequence in calendar / time set mode will be as follows:
Year → Month → Date → 12/24 Hour Time Format → Real Time Hour
→ Real Time Min → Normal Time
To check the year while current time is displayed, tap the unit button (2)
once. The LED DISPLAY will change to year display for 5 seconds and then
revert to current time automatically.
To check the date while current time is displayed, tap the unit button (2)
twice. The LED DISPLAY will change to date display for 5 seconds and then
revert to current time automatically.
EN - 4
Page 6

Make sure the hour is set so that the PM indicator is displayed correctly for
afternoon/night times.
SWITCHING THE UNIT ON/OFF
Press the unit on/off button (1) to switch the unit on or off.
VOLUME ADJUST
Press the unit (6) and (7) button to set the desired volume level. The volume
level reading will appear in the LED DISPLAY.
DIMMER CONTROL
In radio off mode, press the DIMMER button (4) allows you to set the
brightness of the LED display to high, low 2 levels.
1. The clock display with dimmer low is the default setting.
2. It will consume more power if you set the clock display with dimmer
higher.
TOGGLE TEMPERATURE DISPLAY BETWEEN
°C (CELSIUS) AND °F (FAHRENHEIT)
1. Press the device to standby mode using the unit button (1).
2. Press the unit button (2) to display the temperature.
3. While the temperature is displayed, press the unit button (2) for about 3
seconds to switch between °C and °F.
RADIO TUNING
1. In standby mode, Press the unit on/off button (1) to turn the unit ‘On’.
2. The LED DISPLAY will show the radio frequency for about 5 seconds
and then revert to normal time display.
AUTOMATIC SEARCH FOR RADIO STATIONS
To automatically search for stations with strong signals, press and hold
the main unit button (2) and (3) until the frequency readout on the display
EN - 5
Page 7

begins to scan. Release the button. The tuner will stop on the fi rst strong
station it fi nds.
MANUAL SEARCH FOR RADIO STATIONS
1. Tap the unit (2) and (3) button repeatedly to choose your desired radio
station.
2. Tap the unit (6) and (7) button to set the desired volume level. The
volume level reading will appear in the LED DISPLAY.
Notes:
• Use manual tuning to select weaker stations that might be skipped
during automatic tuning.
• If the automatic tuning does not stop on the exact frequency of the
station, for example, it stops on 88.9 MHz instead of 88.8 MHz, use
the manual tuning method to “fi ne tune” to the exact frequency of the
desired station.
HINTS FOR BEST RECEPTION
To insure maximum FM tuner reception, unwrap and fully extend the
EXTERNAL FM WIRE ANTENNA for best FM radio reception.
TO SET/RECALL RADIO STATION PRESETS
1. Press the unit button (2) and (3) select the desired radio station.
2. Press and hold the unit button (5) the next available preset memory
number will fl ash on the LED display. (Note: “P01” will fl ash in the
display if you are programming presets for the fi rst time.)
3. Press the unit button (2) and (3) to change to the desired preset number
P01 thru P10.
4. Repeat steps 1 through 3 to preset up to10 FM stations.
5. To recall one of the preset stations already programmed, Press the unit
button (5) repeatedly until you reach the desired preset number/radio
station.
SETTING THE ALARMS (AL1 AND AL2)
You can select either a Beeper Alarm or the FM Radio as the alarm source.
The setting sequence for ALarm is as follows:
EN - 6
Page 8

SETTING THE ALARM 1 (BEEPER)
Normal Time→ AL 1 Hour → AL 1 Min → AL 1 weekday Alarm → AL 1
beeper → Normal Time.
SETTING THE ALARM 1 (RADIO)
Normal Time → AL 1 Hour → AL 1 Minute → AL 1 weekday → AL 1 beeper
→ AL 1 radio → AL 1 fi nal radio volume → Normal Time.
SETTING THE ALARM 2 (BEEPER)
Normal Time→ AL 2 Hour → AL 2 Min → AL 2 weekday Alarm → AL 2
beeper → Normal Time.
SETTING THE ALARM 2 (RADIO)
Normal Time → AL 2 Hour → AL 2 Minute → AL 2 weekday → AL 2 beeper
→ AL 2 radio → AL 2 fi nal radio volume → Normal Time.
In standby mode, tap the AL1 (or AL2) button to show the preset alarm time.
1.
2. Press and hold the AL1 (or AL2) button again for about 2 seconds until
the Hour Indicator on the LED DISPLAY fl ashes. Press the (2) or (3)
button to obtain the desired Alarm Hour.
3. Tap the AL1 (or AL2) button again to advance to the Minute Indicator.
Press the (2) or (3) button to obtain the desired Alarm Minutes.
4. Tap the AL1 (or AL2) button again to advance to the Weekday Indicator.
Press the (2) or (3) button to select the desired Alarm Weekday mode
as follows:
1-5: Monday to Friday
1-7: Whole week
6-7: Saturday & Sunday
1-1: One day of week (you need to further select 1 for Monday,
2 for Tuesday and so on)
5. Tap the AL1 (or AL2) button again to advance to select the Alarm source
between Beeper or Radio.
Notes:
• If you want to choose radio as the alarm source, you need to set the
radio to your desired radio station in radio mode fi rst.
• After selecting the Radio as the alarm source during alarm setting,
you need to select FM radio and the preset alarm volume level
EN - 7
Page 9

(up to maximum level 15). When the radio is turned ‘On’ at the preset
alarm time, the radio will begin to sound at a low volume and gradually
increases to the preset volume level.
Note: it is not possible to adjust the volume level during the radio alarm.
If volume adjustment is needed, you must turn ‘Off’ the radio fi rst, and
then turn it ‘On’ again using the POWER ON/STANDBY button. The
alarm will also be stopped immediately.
6. Press the AL1 (or AL2) button to fi nish setting and exit to normal time
display.
7. To disable ALARM 1 (or 2) from automatically sounding on the
upcoming days, press and hold the AL1 (or AL2) button for about
2 seconds, the corresponding AL1 (or AL2) INDICATOR will go off.
8. To resume ALARM 1 (or 2) from automatically sounding on the
upcoming days, press and hold the AL1 (or AL2) button for about
2 seconds, the corresponding AL1 (or AL2) INDICATOR will turn on
and the alarm(s) will sound the following day at the set time.
TURNING OFF THE ALARM
When the preset alarm time is reached, the AL1 (or AL2) INDICATOR will
fl ash on the LED DISPLAY and the beeper alarm or radio will sound for
30 minutes unless interrupted by pressing SNOOZE. To stop the alarm
immediately, tap the corresponding AL1 (or AL2) button or POWER ON/OFF
button. The alarm will ring again at the same alarm time on the following
day, or when set to go off based on your Alarm settings.
SNOOZE FUNCTION
When the alarm source is sounding, press the SNOOZE button to suspend
the alarm and activate the snooze function. The Alarm will temporarily stop
and sound again 9 minutes later but the AL1 (or AL2) indicator will keep
fl ashing.
Notes:
• This manual snooze operation can be repeated again and again.
• To turn off the snooze function before it ends, tap the corresponding
AL1 (or AL2) button or the ON –OFF / ALARM OFF button. The AL1
(or AL2) INDICATOR will stop fl ashing.
EN - 8
Page 10

SLEEP OPERATION
The sleep timer allows you to turn the unit off after a designated time has
elapsed.
1. While listening to the radio, tap the SLEEP button and sleep time ‘90’
(minutes) appears in the LED DISPLAY.
2. Repeatedly tap the SLEEP button to select a sleep timer of 90, 60, 30
or 15 minutes. Wait for about 10 seconds after your selection for the
unit to confi rm the selection, the unit will play for the selected length of
time then turn itself ‘Off’ automatically.
3. To cancel the sleep timer, repeatedly tap the SLEEP button until you
see the current time in the LED DISPLAY after last sleep timer option
(15 minutes).
This function can be cancelled with the button (1).
4. To turn the unit ‘Off’ before the selected sleep time, press and the on /
off button at any time.
Note:
There is no sleep indicator in this unit. To check the remaining sleep time,
tap the SLEEP button once.
NAP ALARM
The nap alarm can be used for e.g. a short “nap”. The function only
operates in standby.
• Press the unit button (3) to select the time after which the device will
beep. Select from 90 to 10 minutes or OFF (off) in steps of 10 minutes.
• After the selected time has elapsed, an increasingly fast beep will
sound. Use the unit button (1) to turn off the beep.
DAYLIGHT SAVING TIME (DST) MODE
If daylight saving time (DST) is available in the summer time in your State,
you may use this option to adjust to the correct time easily.
1. In standby mode, press and hold the unit DST button (3) for 2 seconds
to advance the displayed time by one hour.
2. To cancel DST mode, repeat the above operation.
EN - 9
Page 11

ALTERNATE DISPLAY BETWEEN TIME AND
TEMPERATURE MONTH-DATE DISPLAY
1. In radio off mode, press and hold the unit button (2) for about 3 seconds
until “ON” appears in the LED DISPLAY.
2. The DISPLAY will alternate between the current Time for 10 seconds
and month- date for 5 seconds and temperature for 5 seconds as
follows:
TIME
Indicator
MONTH
Indicator
DAY
Indicator
TEMPERATURE
Indicator
Display for 10 second Display for 5 second
To cancel this function, press and hold the unit button (2) for about 3
seconds until “OFF” appears on the LED DISPLAY. The DISPLAY will switch
back to normal time display.
Note:
If you replace the battery, do not disconnect AC plug from AC outlet.
Otherwise, current time and alarm will be initialized.
Display for 5 second
RESETTING
If the system does not respond or exhibits erratic or intermittent operation,
you may have experienced an electrostatic discharge (ESD) or a power
surge that triggered the internal microcontroller to shut down automatically.
If this occurs, simply disconnect the ac power cord and remove the system
backup battery, wait for at least 3 minutes and then setup the unit again as
if it is a brand new unit.
EN - 10
Page 12

WARNING
1. No naked fl ame sources, such as lighted candles, should be placed on
the apparatus.
2. Do not place the product in closed bookcases or racks without proper
ventilation.
3. The mains plug is used as the disconnect device, the disconnect device
shall remain readily operable.
4. The ventilation should not be impeded by covering the ventilation
openings with items, such as newspapers, table-cloths, curtains, etc.
5. It shall not be exposed to dripping or splashing and that no objects fi lled
with liquids, such as vases, shall be placed on the apparatus.
6. Do not connect FM antenna to outside antenna.
7. The unit should not be exposed to direct sunlight, very high or low
temperature, moisture, vibrations or placed in dusty environment.
8. Do not use abrasive, benzene, thinner or other solvents to clean the
surface of the unit. To clean, wipe it will mild non-abrasive detergent
solution and clean soft cloth.
9. Never attempt to insert wires, pins or other such objects into the vents
or opening of the unit.
10. Batteries shall not be exposed to excessive heat such as sunshine, fi re
or the like.
11.
Attention should be drawn to the environmental aspects of battery disposal.
12. Do not dispose this product into usual household garbage at the end of
its lifecycle; hand it over to a collection center for recycling the electrical
and electronic appliances. By recycling, some of the materials can
be reused. You are making an important contribution to protect our
environment. Please inquire your community administration for the
authorized disposal center.
SPECIFICATIONS
Frequency range: FM 87.5 – 108 MHz
Temperature Sensor Range: 32 °F to 122 °F (0°C to +50°C)
Battery backup: 3V (CR2032 Flat Lithium battery x 1)
Power supply : AC230V 50Hz
Power consumption: 5W
Dimensions: 161 x 72 x 64 mm
Weight: 390 g
(not included)
EN - 11
Page 13

INSTRUCTIONS AND INFORMATION REGARDING THE
DISPOSAL OF USED PACKAGING MATERIALS
Dispose of packaging material at a public waste disposal site.
DISPOSAL OF USED ELECTRICAL AND ELECTRONIC
APPLIANCES
The meaning of the symbol on the product, its accessory
or packaging indicates that this product shall not be treated
as household waste. Please, dispose of this product at your
applicable collection point for the recycling of electrical
& electronic equipment waste. Alternatively in some states of
the European Union or other European states you may return
your products to your local retailer when buying an equivalent
new product. The correct disposal of this product will help save
valuable natural resources and help in preventing the potential
negative impact on the environment and human health, which
could be caused as a result of improper liquidation of waste.
Please ask your local authorities or the nearest waste collection
centre for further details. The improper disposal of this type of
waste may fall subject to national regulations for fi nes.
For business entities in the European Union
If you wish to dispose of an electrical or electronic device, request
the necessary information from your seller or supplier.
Disposal in other countries outside the European Union
If you wish to dispose of this product, request the necessary
information about the correct disposal method from local
government departments or from your seller.
This product meets all the basic EU regulation requirements that
relate to it.
Changes to the text, design and technical specifi cations may occur without
prior notice and we reserve the right to make these changes.
© Copyright 2015, FAST ČR, a. s. Revision 07/2015
EN - 12
Page 14

EN
Warranty conditions
Warranty car d is not apart of the dev ice packaging.
This p roduct is w arranted f or the period of 24 mon ths from t he date of pur chase to t he end-user. Warr anty
is limited to t he fol lowing cond ition s. Warr anty is r efer red onl y to the c ustomer go ods using for commo n
domestic use. Th e claim for service can b e applied eit her at dealer ’sshop where the prod uct wa s bought,
or at below mentione d authorize d ser vice shops. The end-u ser is o bligated to set up aclaim immediately
when t he defects app eared but only till t he end of warr anty perio d. The end us er is obligated to c ooperat e
to certify the claiming defec ts. Only com pleted and clean (accor ding to hygienic standards ) product
will be accepted. In case of eligible warranty claim the warranty period will be prolonged by the period
from t he date of claim application till the date of tak ing over the produc t by end -user, or the date the
end- user is obligated to take it over. To obtain the service under this warranty, end-user is obliga ted to
certify his claim w ith du ly completed followin g documents: rec eipt, c ert ificate of warrant y, cer tificate
of installation.
This w arranty is void es pecially i f apply as follow s:
Defe cts w hich were put o n sale.
Wear-o ut or damage caused by common use.
The product was d amaged by unprofessional or wrong installatio n, use d in cont rary to the appli cabl e
inst ruction manual, u sed in c ontr ary to l egal enactment and common proc ess of use or u sed for
another pur pose which has been designed for.
The product was damaged b y uncared- for or insufficie nt maint enance.
The product was damaged b y dirt, accident of f orce m ajeure (natu ral disast er, fire, and floo d).
Defe cts on functionality cause d by low dualit y of sign al, electromagnetic f ield interf erence etc .
The product was mechanically damag ed (e.g. broken button, fall ).
Damage caused by use of unsuitable media, fillings, expendable supplies (batteries) or by unsuitable
work ing conditions (e.g. high tempera tures, high humidity, quake s).
Repair, modification or oth er failure action to t he product by unauthorized per son.
End-user d id not prove enough his right to claim (time and plac e of purchas e).
Data on pres ented documents d iffers from data on p roducts.
Case s when t he claiming pr oduc t cannot be indentif ied according to th e pres ented documents (e.g.
the serial number or the warranty seal has been damag ed).
Authorized ser vice cent ers
Visit ww w.sencor.eu for detailed in form ation a bout au thorized s erv ice center s.
EN - 13
 Loading...