

Page 1
LED TV
SLE 65US800TCSB
SLE 55US800TCSB
SLE 50US800TCSB
SLE 43US800TCSB
USER’S MANUAL
EN
Page 2

Page 3
Contents
PLEASE, READ THESE INSTRUCTIONS BEFORE STARTING TO OPERATE THE
TELEVISION. STORE IT FOR LATER REFERENCE. NOTE DOWN THE MODEL NUMBER
AND THE SERIAL NUMBER OF THE TV SET. LOOK AT THE LABEL ON THE BACK
COVER AND PASS THE INFORMATION PROVIDED THERE TO YOUR DEALER IN CASE
THAT YOU WOULD NEED SERVICING.
Contents
1. Important safety instructions ..................................................................................................................3
1.1. Important safety instructions ................................................................................................................... 7
2. Installation ...................................................................................................................................................8
2.1. Attaching the stand....................................................................................................................................8
2.2. Wall-Mounting Instructions ......................................................................................................................9
3. Controls and connections ...................................................................................................................... 10
4. Specifications ............................................................................................................................................ 12
5. Remote controller .................................................................................................................................... 13
5.1. Using the Remote Control Button ........................................................................................................ 13
6. Getting Started with webOS TV .......................................................................................................... 14
6.1. Boot Guide ..................................................................................................................................................14
6.2. Home Tutorial .............................................................................................................................................14
6.3. Manage Home ......................................................................................................................................... 15
6.4. Connecting to the Network .................................................................................................................... 16
6.5. Connecting to the Network .....................................................................................................................17
6.6. Managing Your LG Account ................................................................................................................... 18
7. Enjoy Live TV ........................................................................................................................................... 19
7.1. Making the Most of Live Menu ............................................................................................................. 19
7.2. Viewing Guide ........................................................................................................................................... 19
7.3. Checking Programme Info ..................................................................................................................... 20
7.4. Recording................................................................................................................................................... 20
7.5. Using TV Scheduler ..................................................................................................................................21
7.6. Playing Recorded TV Programs ............................................................................................................21
8. Connecting external devices ................................................................................................................ 24
8.1. Using Home Dashboard .........................................................................................................................24
8.2. Connecting USB .......................................................................................................................................24
8.3. Watching Computer Screen on TV ..................................................................................................... 25
9. Making the most of Smart TV .............................................................................................................27
9.1. Surfing the Internet on TV .....................................................................................................................27
10. Settings ..................................................................................................................................................... 29
10.1. Quick Settings ......................................................................................................................................... 29
10.2. Programmes .............................................................................................................................................29
10.3. Connection ..................................................................................................................................................31
10.4. General .........................................................................................................................................................31
10.5. Accessibility .............................................................................................................................................. 34
10.6. Support....................................................................................................................................................... 35
EN
EN 1
Revision 06/2021Copyright © 2021, Fast ČR, a. s.
Page 4
Important safety instructions
EN
1. Important safety instructions
To be able to use this product properly, read this user's manual carefully and keep it
for future reference. If you plan to give (sell) this device to athird person, include all
documentation, including this manual, with the transaction.
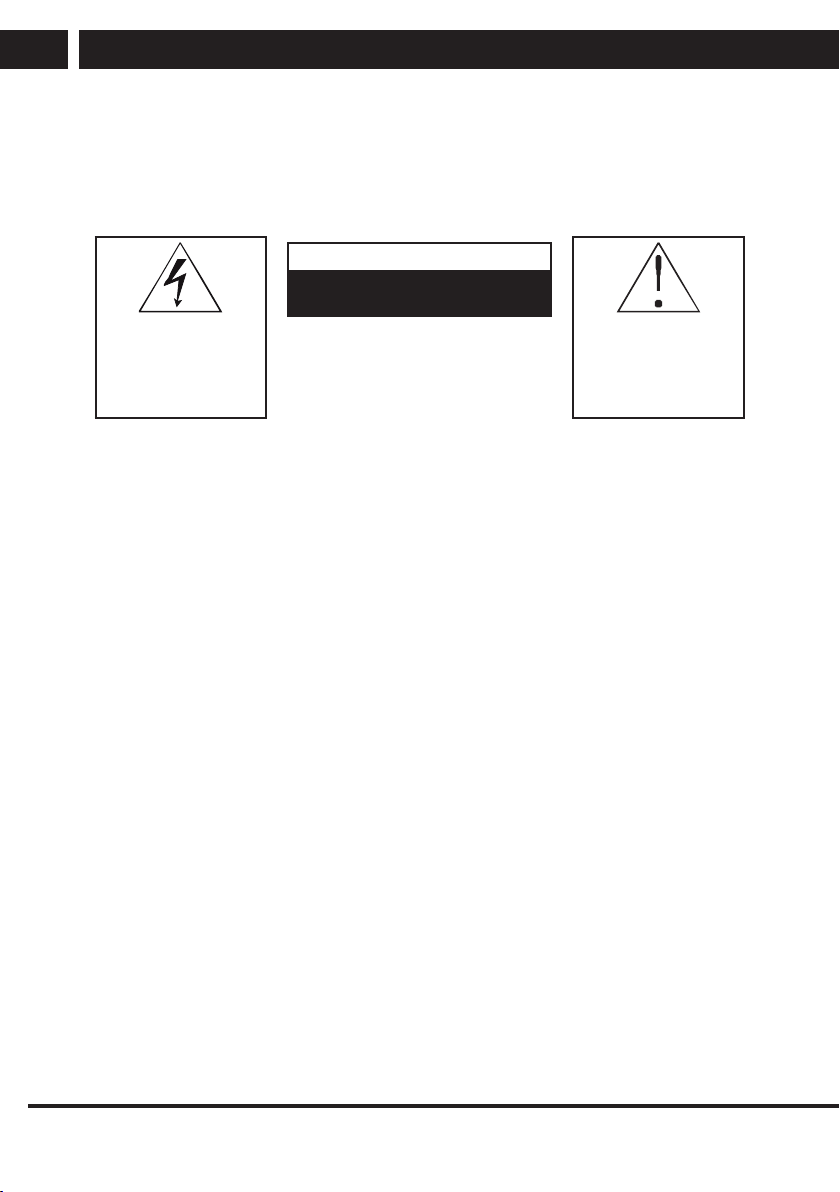
ATTENTION
RISK OF ELECTRIC SHOCK – DO
The lightning symbol
inside atriangle indicates
the device has dangerous
voltage that may cause
electric shock.
TO REDUCE THE RISK OF ELECTRIC SHOCK,
DO NOT REMOVE THE COVER (OR BACK SIDE).
THERE ARE NO PARTS INSIDE WHICH COULD
BE REPAIRED BY THE USER. FOR REPAIRS AND
SERVICE, CONTACT AN AUTHORIZED SERVICE
General safety instructions
• Please read this manual carefully before using the device. Follow this manual and
the instructions inside.
• Heed all warnings.
• Follow all instructions.
• Use only the attachments and accessories specified by the manufacturer.
• OPEN FLAMES, FOR EXAMPLE ABURNING CANDLE, SHALL NOT BE PLACED
ON THE DEVICE. DO NOT PLACE HOT OBJECTS OR OBJECTS WITH AN OPEN
FIRE ON THE DEVICE, FOR EXAMPLE CANDLES OR NIGHT LAMPS. HIGH
TEMPERATURES MAY MELT PLASTIC COMPONENTS AND CAUSE FIRE.
• Use the device in temperate climate.
• The manufacturer and vendor of the device are in not in any way liable for any direct
or indirect damages caused by not following the instructions for installation, setup,
operation, maintenance and cleaning of the device mentioned in this manual.
• Protect the device against impacts, falls, blows, shocks, vibration, moisture and dust.
• Prior to granting children consent to use the device, they shall become familiar with
the proper and safe use of the player, corresponding to their age. If the device has
aheadphone jack, do not use headphones set to maximum volume. Risk of hearing
damage or loss.
Installation, control
• Install the device according to the instructions in the manual.
• Leave free space around the device, it is necessary for proper air circulation. It helps
to dissipate the heat generated by the operation of the device. By covering the air
vents of the cabinet, you risk overheating and damage of the device. You must
ensure that the air circulation will not be prevented by covering the air vents with
e.g.newspaper, tablecloth, curtain, etc. Follow the installation instructions in the
manual.
NOT OPEN!
CENTRE.
The exclamation point
symbol inside an isosceles
triangle indicates important
operation and repair
instructions in the included
device documentation.
2 EN
Copyright ©
2021, Fast ČR, a. s.
Revision 06/2021
Page 5

Important safety instructions
• This device shall not be kept in aclosed area, such as alibrary or shelf, provided
sufficient ventilation cannot be provided or the manufacturer's instructions cannot be
followed.
• Do not place any objects into the air vents or any other holes. Risk of touching
components with dangerous voltage or shorting parts that could cause fire or electric
shock. Do not pour any liquids into the device. Do not install the device in direct
sunlight, or close to heat sources, like radiators, heat exchangers, stoves or other
appliances (including amplifiers) producing heat. High temperatures shorten the life of
the electronic components of the device significantly. Do not use and do not leave the
device near an open fire.
• The device must not be exposed to dripping or running water and you must not place
upon it objects filled with liquid, e.g. vases. Protect the device against becoming wet,
sprayed on or poured on by any liquid, do not leave or install the device outdoors. Do
not use the device outdoors. You risk electric shock or fire by not adhering to these
instructions.
• Do not use the device close to water.
• Handle the glass panels and cover of the device with care. The glass screen can
break on impact and cause serious injury.
• Make sure the power cord is not stepped on or compressed, especially near the plug
and point leading from the device or adapter. The power plug (adapter) is used to
disconnect the system and must be easy to access.
• Do not use adevice with adamaged power cord or plug. If the power cord or plug is
damaged, turn off the device, disconnect it from the power supply and contact your
authorized repair shop. Only aprofessional can replace adamaged power cord or
plug. Under no circumstances should you attempt to replace the power cord or plug
yourself.
• Do not attempt to bypass the safety function of the polarized plug. If the plug cannot
be plugged into your socket, refer to an electrician to replace your obsolete socket.
Before plugging the device into the socket make sure the voltage in your socket
corresponds with the voltage on the label of the device or power adapter. If you are
not sure of the type of power source you have in your home, refer to your vendor or
local power company.
• Before switching, make sure that all network connections are made properly and in
accordance with the manufacturer's instructions. Switch the device off and unplug it
from the socket before plugging in or changing the connection of the device.
• Remember to always unplug the plug (adapter) from the socket before unplugging
the power cord.
• Plug the power cord into an independent socket. Do not overload wall sockets using
extension cords or unified sockets. Risk of electric shock.
• Hold the power cord by the plug and not by the cable when pulling out from the
socket.
EN
EN 3
Revision 06/2021Copyright © 2021, Fast ČR, a. s.
Page 6
Important safety instructions
EN
• Disconnect the power cord from the power outlet during thunderstorms, or when not
in use for alonger period of time. Avoid carrying the device from acool environment
into awarm environment or vice versa, or operating the device in amoist
environment. Air moisture may condense in some areas within the device case and
may cause the device to become temporarily inoperable.
• In this case, leave the device in awarm and well-ventilated area and leave for
1–2hours until the moisture evaporates. The device can be normally used again.
Be especially cautious when using the device for the first time during acool season
immediately after purchasing. Do not place the device on an unstable cart, stand,
console or table. The device can fall and cause serious injury to children or adults or
seriously damage the device and other objects. Only carts, stands or tables defined
by the manufacturer or sold with the device shall be used. Any assembly work with
the device shall be carried out according to the manufacturer's instructions and shall
use assembly accessories recommended by the manufacturer.
• Do not lean against the device, do not lean over or use the device as astep. Avoid
quick movements. Make sure children do not play with the machine.
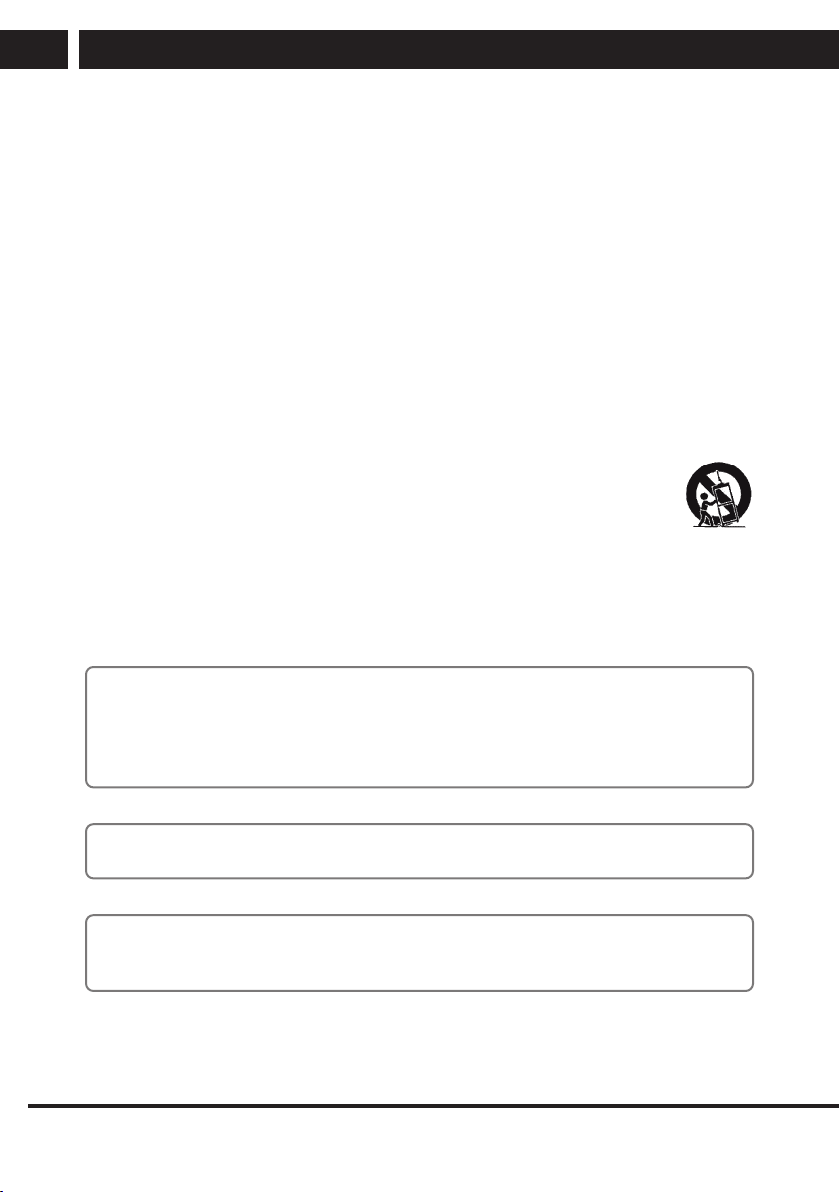
• Be careful when moving the device when placed on acart. Suddenly
stopping, using excessive force and uneven surfaces may cause the cart
holding the device to tip over.
• Under no circumstances are the manufacturer or vendor liable for any
direct or indirect damage caused by the failure to observe the instructions for
installation, configuration, operation, treatment and cleaning of this device included
within this manual.
• Protect the device against impacts, falls, blows, shocks, vibration, moisture and dust.
Do not expose the device to extreme temperatures or humidity.
4 EN
Copyright ©
Note:
If the device is powered by an adapter, only use the AC adapter and power cord
included with the device. Do not use defective sockets. Make sure the cord is properly
plugged into the socket. If the cord is loose, an electric arc can cause fire. Refer to
aqualified electrician to replace sockets.
Note:
Plug the device into aproperly grounded sockets with protective grounding pin only.
Note:
If you plan to mount the device to awall or ceiling, follow the instructions of the
manufacturer and the user's manual for the given system.
2021, Fast ČR, a. s.
Revision 06/2021
Page 7
Important safety instructions
Repairs and maintenance
• To avoid risks of electric shock or fire, do not remove the device from the case – the
case does not contain components that the user could repair or adjust without the
necessary equipment and qualification. Refer to aprofessional service centre if your
device requires service.
• In the event of any unusual occurrences during the use of the device, e.g. smelling
the characteristic smell of burning insulation or even seeing asmoke, turn the device
off immediately, disconnect the power supply and wait with continuing use of the
device until you learn the result of its inspection by the service personnel.
• Leave all service to qualified service personnel. Service is necessary when the device
is damaged in any way, for example in case of damage to the power cord, spilling
liquid on the device, intrusion of foreign objects into the device, when the device is
exposed to rain or moisture, if the device does not function in the usual manner or if
it fell.
• When repairing or replacing acomponent of the device, make sure the repair
technician used spare parts defined by the manufacturer to ensure the replaced
components have the same features as the original. Unauthorized replacements can
cause fire, electric shock or other risks.
• Prior to cleaning, moving or other maintenance work, unplug the cord (adapter) from
the socket.
• Clean the device with adry cloth only. Do not use gasoline, thinner or other solvents
or abrasives, scouring pads, or sponges with scouring pads to clean the device.
Note:
Do not throw the device into your common household waste. Respect laws and
regulations when disposing of the machine.
EN
Remote controller and battery
• Do not expose the remote controller or battery to direct sunlight, or close to heat
sources, like radiators, heat exchangers, stoves or other appliances (including
amplifiers) producing heat. Do not use and do not leave the device near an open fire.
Make sure the sensor is not exposed to intense light (e.g. sunlight) or fluorescent tube
light, which could lower the efficiency and reliability of the remote controller.
• The remote controller or battery must not be exposed to dripping or running water
and objects filled with liquid, e.g. vases, shall not be placed on the device. Protect the
remote controller against becoming wet, sprayed or poured on by any liquid. Do not
use outdoors. Failure to respect these instructions can lead to the remote controller or
battery becoming damaged.
• Do not use the device close to water.
• The impact the battery disposal has on the environment shall be monitored carefully.
• Using the batteries incorrectly can result in leakage and corrosion. Follow the
following instructions to ensure proper remote control operation:
– Do not insert the batteries in the wrong direction.
– Do not charge, heat, open or short the batteries.
Revision 06/2021Copyright © 2021, Fast ČR, a. s.
EN 5
Page 8
Important safety instructions
EN
– Do not throw batteries into afire.
– Do not leave dead batteries in the remote controller.
– Do not combine various types of batteries or old and new batteries.
– If you do not use the remote controller for alonger period of time, remove the
batteries to prevent damaging the remote controller by the batteries leaking out.
– If the remote controller does not work correctly or its range decreases, replace all
batteries with new ones.
– If there is an electrolyte leakage from the batteries, have the remote control
serviced by an authorized technician.
NOTICE:
To prevent risk of fire or electric shock, do not expose the device to rain or
moisture.
NOTICE:
The batteries must not be exposed to excessive heat, for example sunlight, fire,
etc.
This symbol indicates the device has double insulation between dangerous
voltage from the network and user-accessible parts. Replace parts with identical
spare parts only.
1.1. Important safety instructions
If a television is not positioned in a sufficiently stable location, it can be potentially
hazardous due to falling. Many injuries, particularly to children, can be avoided by taking
simple precautions such as:
• Using cabinets or stands recommended by the manufacturer of the television.
• Only using furniture that can safely support the television.
• Ensuring the television is not overhanging the edge os the supporting furniture.
• Not placing the television on tall furniture (for example, cupboards or bookcases)
without anchoring both the furniture and the television to a suitable support.
• Not standing the televisions on cloth or other materials placed between the television
and supporting furniture.
• Educating children about the dangers of climbing on furniture to reach the television
or its controls.
• Keep small accessories out of reach of children so they are not mistakenly
swallowed.
6 EN
Copyright ©
2021, Fast ČR, a. s.
Revision 06/2021
Page 9
Installation
2. Installation
Install the stand as described below, or if you want to mount it to a wall, please contact a
professional installer.
Please ensure the TV is not plugged into the wall socket and furthermore we recommend
to get another person to assist in the following task.
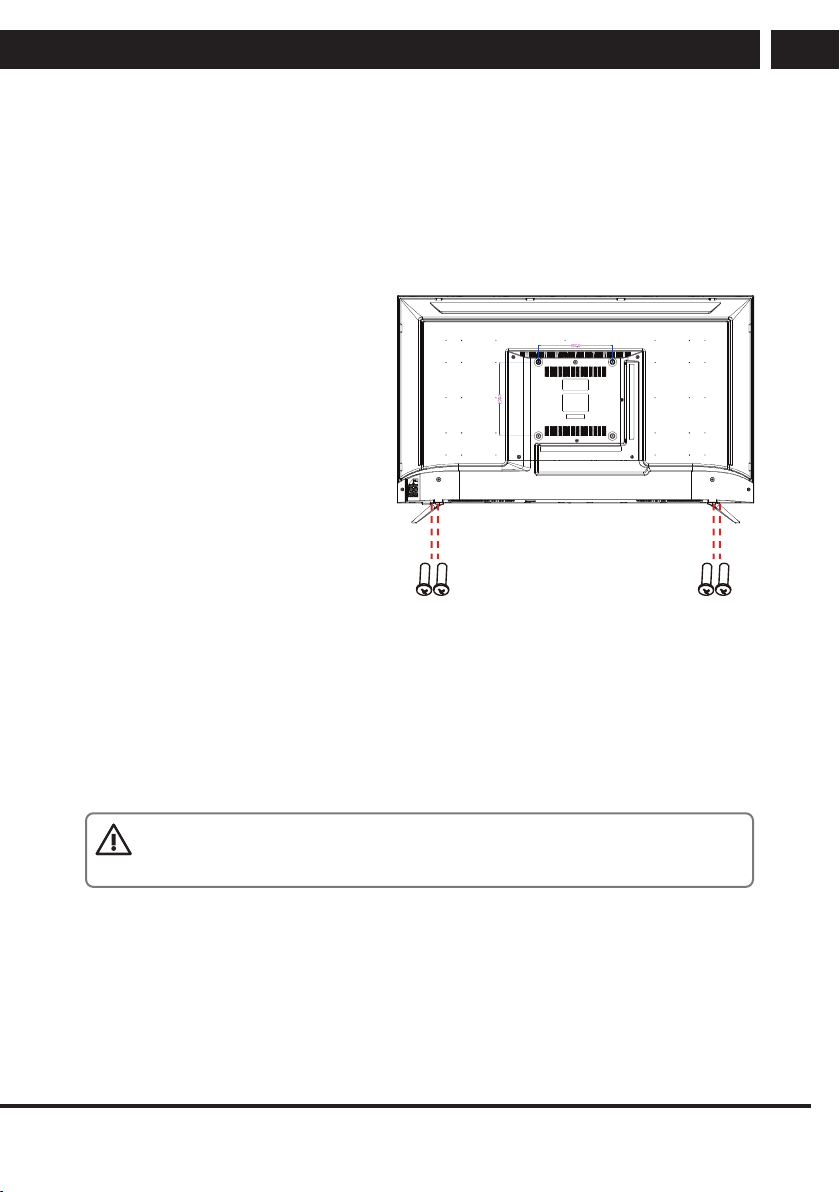
2.1. Attaching the stand
Step 1
Place a soft cushioned material
on top of a flat surface to prevent
damaging the screen panel. Then
place the TV screen flat on top,
with the screen side facing down,
as illustrated on the right.
Step 2
Align the stand leg to the
installation point, as illustrated
below.
EN
Step 3
Tighten the screws (supplied) with
a panel, as illustrated on the right.
CAUTION!
Do not apply excessive force as this may damage the screw holes.
EN 7
Revision 06/2021Copyright © 2021, Fast ČR, a. s.
Page 10
Installation
EN
2.2. Wall-Mounting Instructions
Please ensure the TV is not plugged into the wall socket and furthermore we recommend
to get another person to assist in the following task.
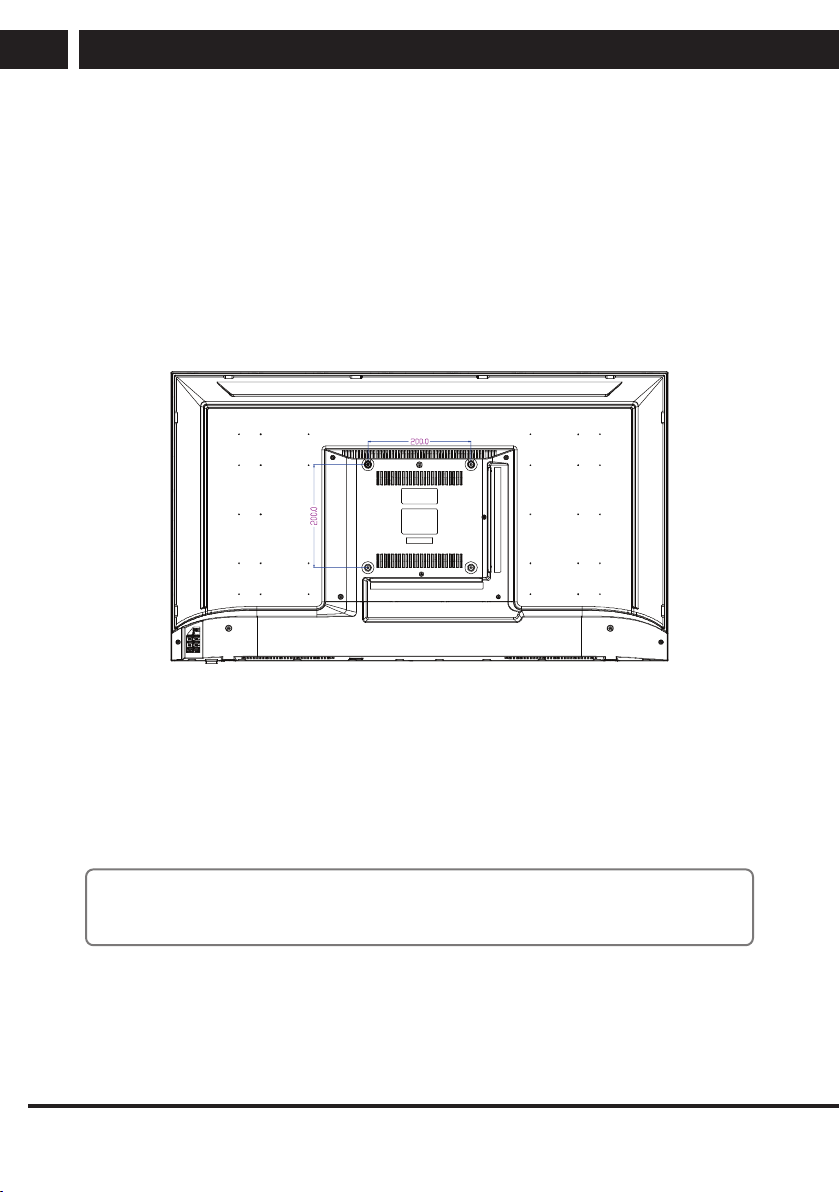
• We recommend you use a professional installer as we assume no liability for any
eventual damage to the product or injury to yourself if you mount the TV on your
own.
BACK OF TV
VESA PATTERN: 200 × 200 mm
8 EN
Copyright ©
Note:
If you are wall-mounting the TV, this should be done by a qualified installer.
2021, Fast ČR, a. s.
Revision 06/2021
Page 11
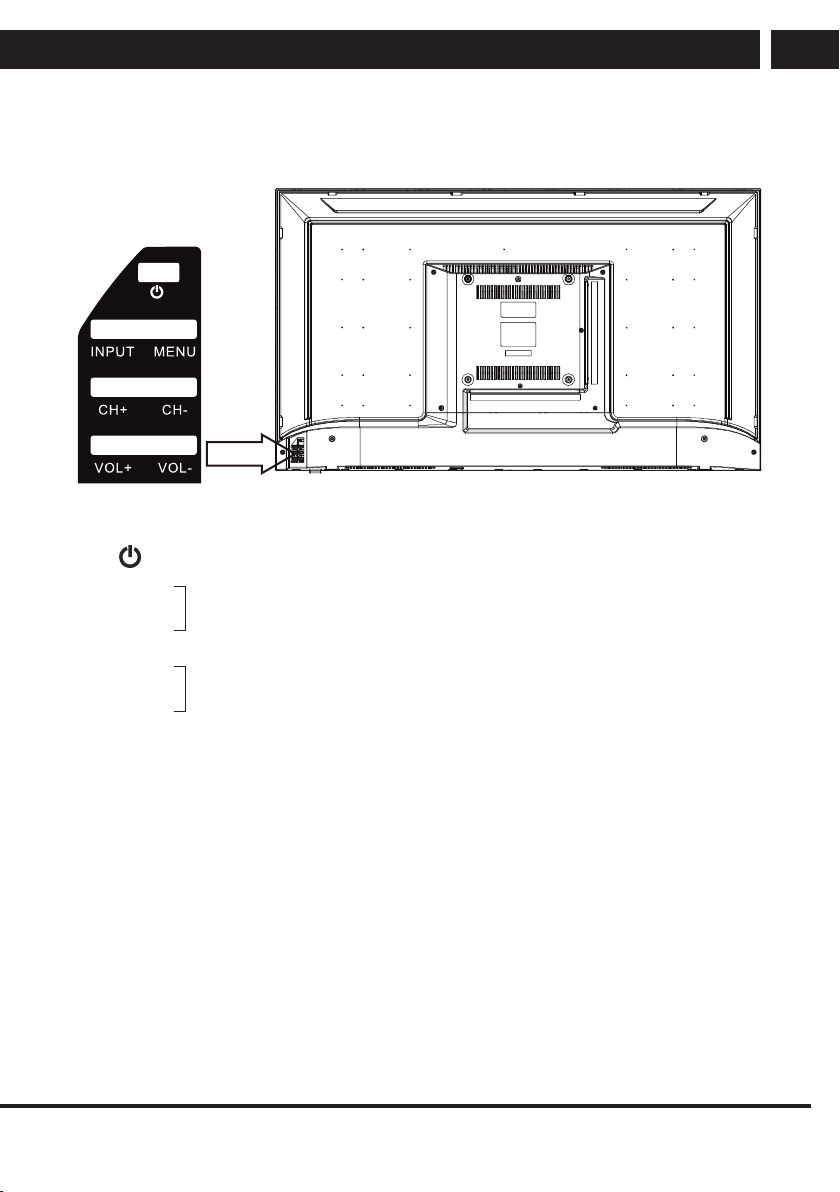
3. Controls and connections
1 Turn on/off
2 VOL-
VOL+/-: Adjust Volume.
3 VOL+
Controls and connections
EN
4 CH-
VOL+/-: Adjust Volume.
5 CH+
6 MENU Into or exit from menu
(Use CH+/- button select item, VOL+/- button adjust item).
7 INPUT Source Select.
EN 9
Revision 06/2021Copyright © 2021, Fast ČR, a. s.
Page 12
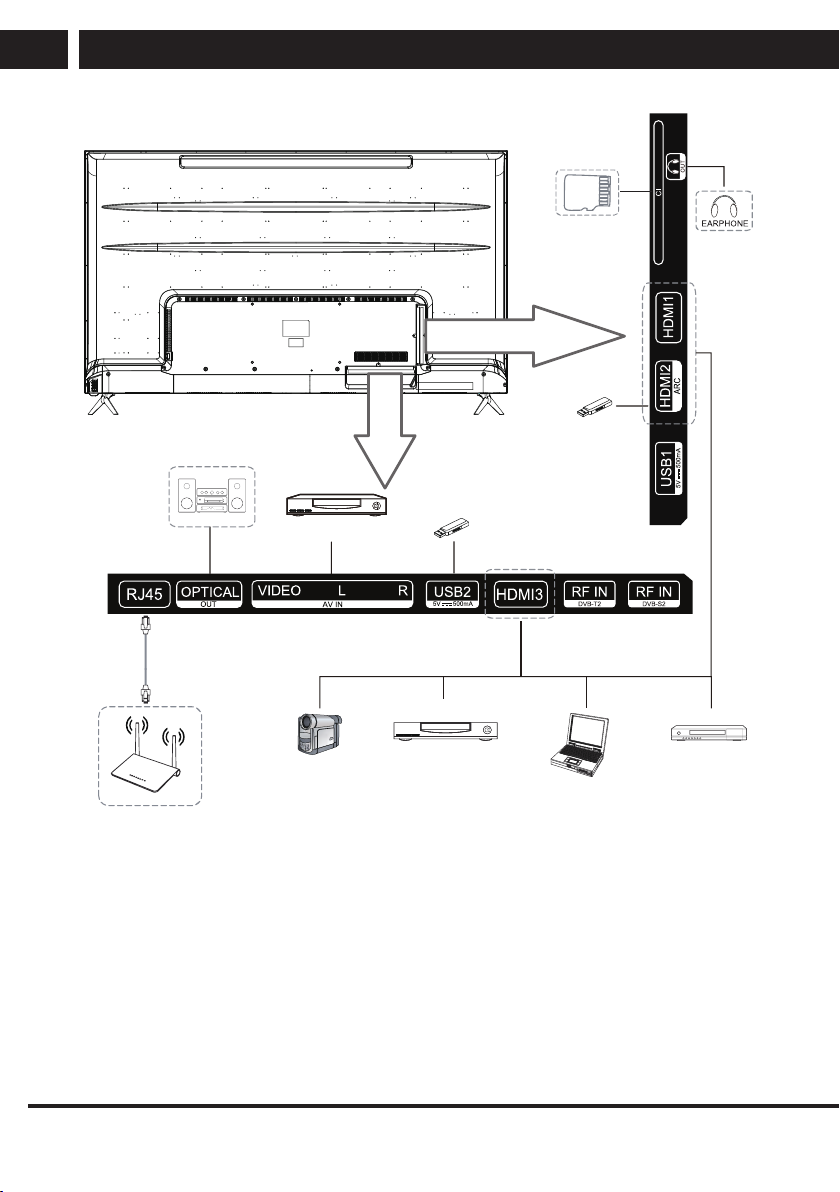
Controls and connections
EN
USB
USB
DVD player
10 EN
Copyright ©
RJ45
2021, Fast ČR, a. s.
Camcorder
DVD player Blu-ray disc
PC (HDMI-output)
player
Revision 06/2021
Page 13
Specifications
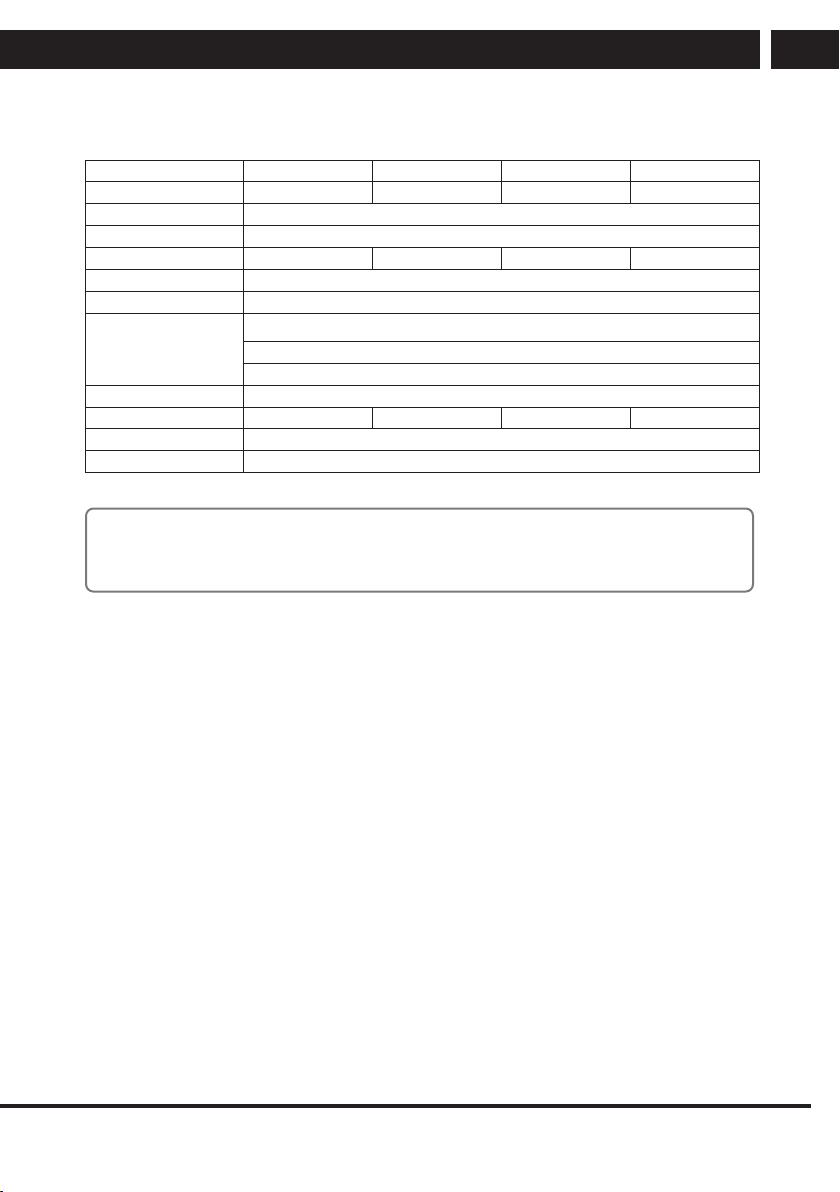
4. Specifications
Model SLE 43US800TCSB SLE 50US800TCSB SLE 55US800TCSB SLE 65US800TCSB
Display Size 43” Diagonal(max.) 50” Diagonal(max.) 55” Diagonal(max.) 65” Diagonal(max.)
Operating System Powered by webOS 5.0
Resolution 3840 x 2160
Luminance 220 cd/m
Colours 1.07 Billion
Aspect Ratio 16 : 9
Multimedia Playback
Format under
USB Mode
Power Source 100-240V~ 50/60Hz
Power Consumption 75W 110W 150W 165W
Controller Power DC 3V (Two AAA size batteries)
Work Temperature 0 °C – 40 °C
Note:
• Design and specification are subject to change without notice.
• Weight and Dimension shown are approximate.
2
Music: MP3, M4A, AAC,WMA
Movie: AVI,MP4,MPG,MKV,MOV,DAT, VOB,RM,RMVB
Photo: JPG, BMP, PNG
220 cd/m
2
280 cd/m
2
300 cd/m
2
EN
EN 11
Revision 06/2021Copyright © 2021, Fast ČR, a. s.
Page 14
Remote controller
EN
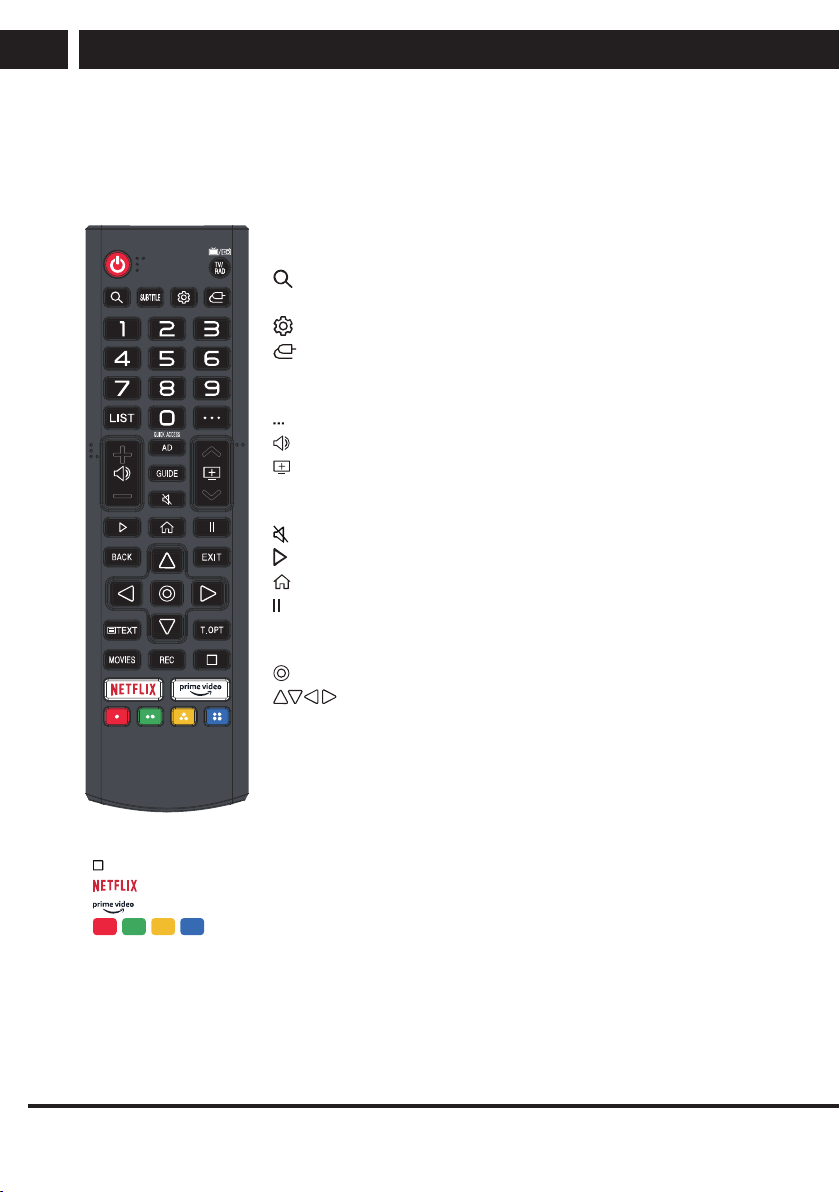
5. Remote controller
5.1. Using the Remote Control Button
POWER: ON/OFF.
TV/RAD: Switch to TV or Radio.
: Search.
SUBTITLE: Enable/disable subtitles.
: Enters the Quick Settings menu.
: Selects an input source.
0-9: Number selection key.
L I S T: The QUICK ACCESS edit screen appears.
: It displays the additional buttons on the remote control.
: It adjusts the volume level.
: You can change the programme.
AD: Turn the AD switch on or off.
GUIDE: You can check the programme.
: Mutes the sound.
: Play.
: Displays the Home menu.
: Pause.
BACK: Move to the previous step.
EXIT: Closes the menu.
: Select current option thats highlighted.
TEXT: Open the TEXT.
T.O P T: Open the function menu of TEXT.
MOVIES: Search Movies
REC: Launch Record.
: RIGHT/LEFT UP/DOWN buttons
to navigate the on-screen menus.
: Launch Live Playback.
: go to Netflix.
: go to prime video.
: Corresponds to various colour functions in the menu or teletext.
The marks and positions of the remote control buttons may vary depending on the model.
12 EN
Copyright ©
2021, Fast ČR, a. s.
Revision 06/2021
Page 15
Getting Started with webOS TV
6. Getting Started with webOS TV
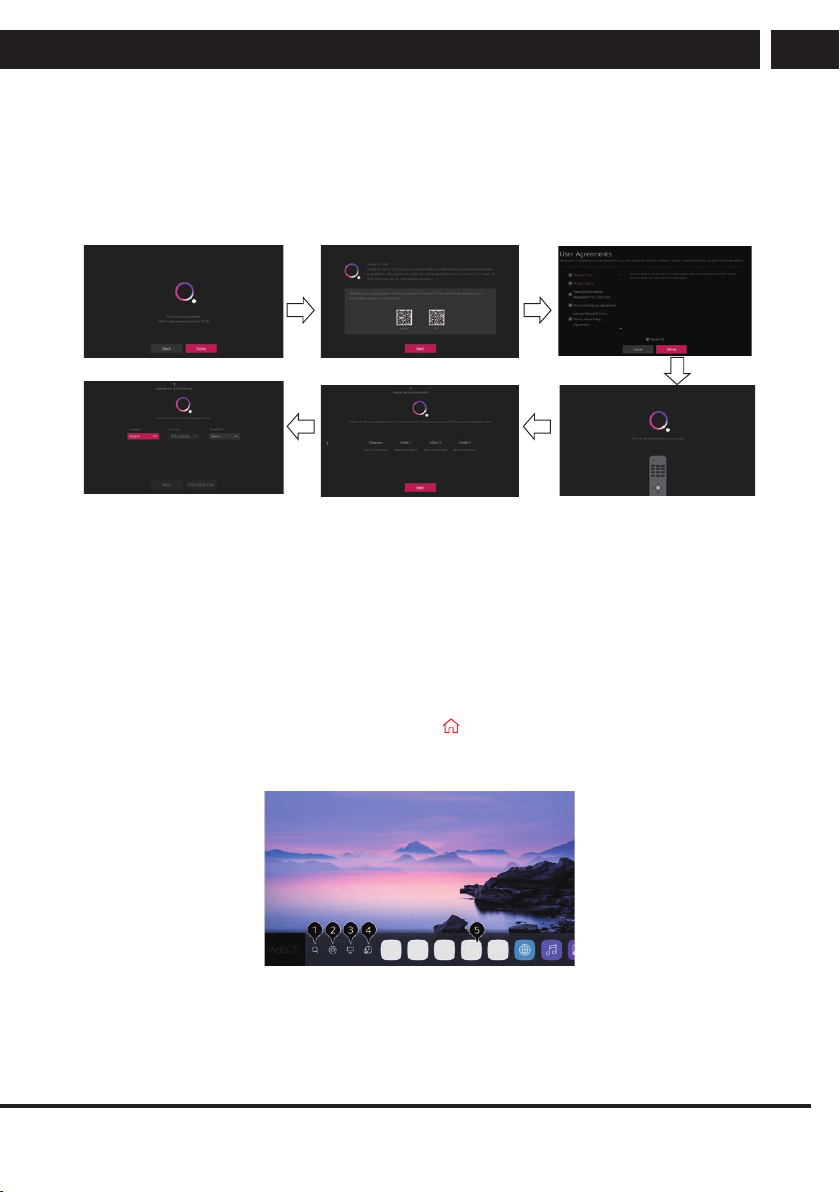
6.1. Boot Guide
6.1.1. Choose region and language
1. When you turn on the TV for the first time, the default country is UK and the
language is English;
2. You can use the remote control to change the default country and language
according to the boot prompt.
EN
6.2. Home Tutorial
6.2.1. Using the Home Feature of the webOS TV
You can open the Home screen by pressing the button on your remote control.
You can combine frequently used apps on a single screen and use whichever you want at
any time.
1. Launch Search.
To see the details, click the Enjoying Content Store Content Search in User Guide.
2. Move to the Home Dashboard.
Revision 06/2021Copyright © 2021, Fast ČR, a. s.
EN 13
Page 16
Getting Started with webOS TV
EN
You can select or control a device (mobile, external device, Home IoT Devices, etc.) connected to
the TV.
For more information, see Connecting External Devices Using Home Dashboard in
User Guide.
3. Move to the TV input you used recently.
4. Move to the recently used app.
Long-press the button on the remote control or focus on the Recents.
You can run or close a recently used app in the list provided in the Preview area at
the top.
5. You can run, move, and delete the apps installed on your TV.
Focus on each App area. It provides the Preview at the top.
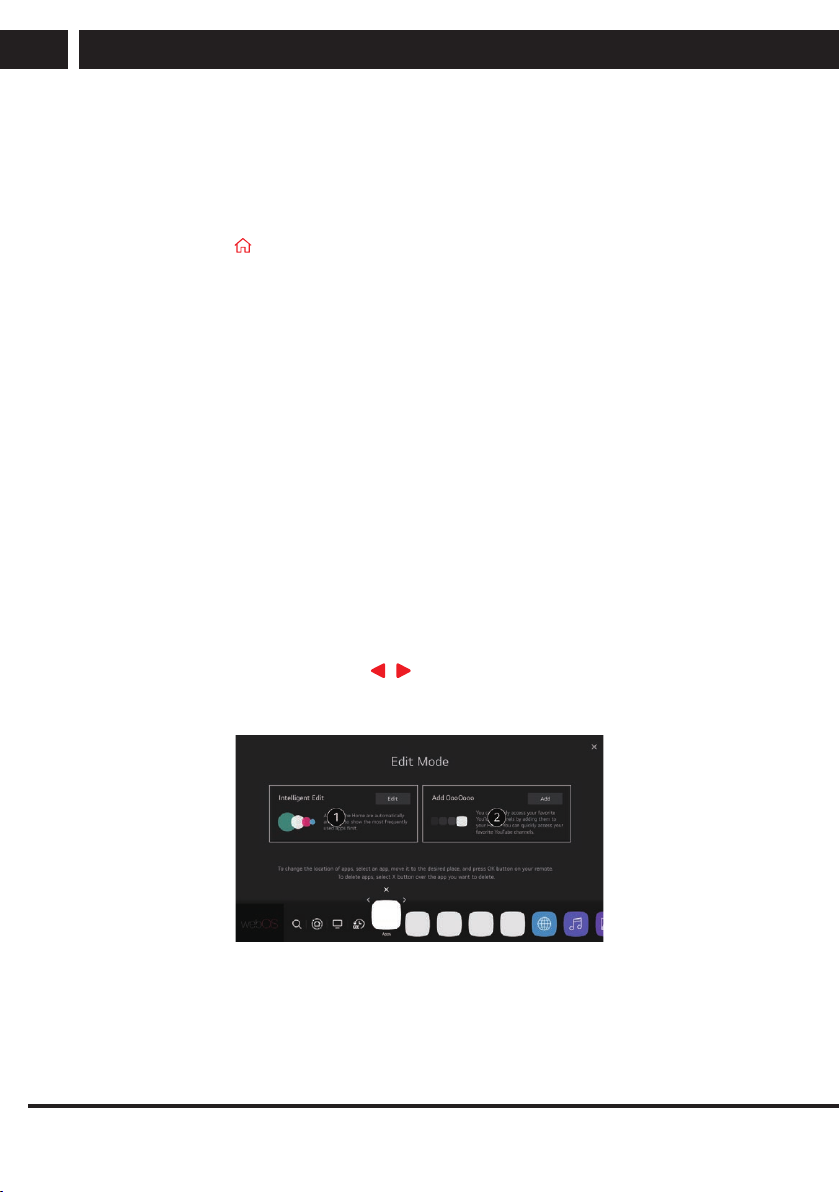
6.3. Manage Home
6.3.1. Manage webOS TV Home
You can view a list of all apps installed on your TV, change their positions, or delete them.
1. Select the app you want to edit, and press and hold the Wheel (OK) button on the
remote control.
This will activate the app edit mode.
Or you can select the Edit mode button at the right corner of the Home list to enter
the App Edit mode.
2. To move the app to your desired position, go to the position and press the Wheel
(OK) button.
To delete an app, select the App Delete icon above the app.
You can move and delete as many apps as you wish before exiting the edit mode.
You can also move apps with the / buttons on your remote control.
3. After the editing is done, press the Close at the top right to exit the App Edit mode.
The default TV app cannot be edited.
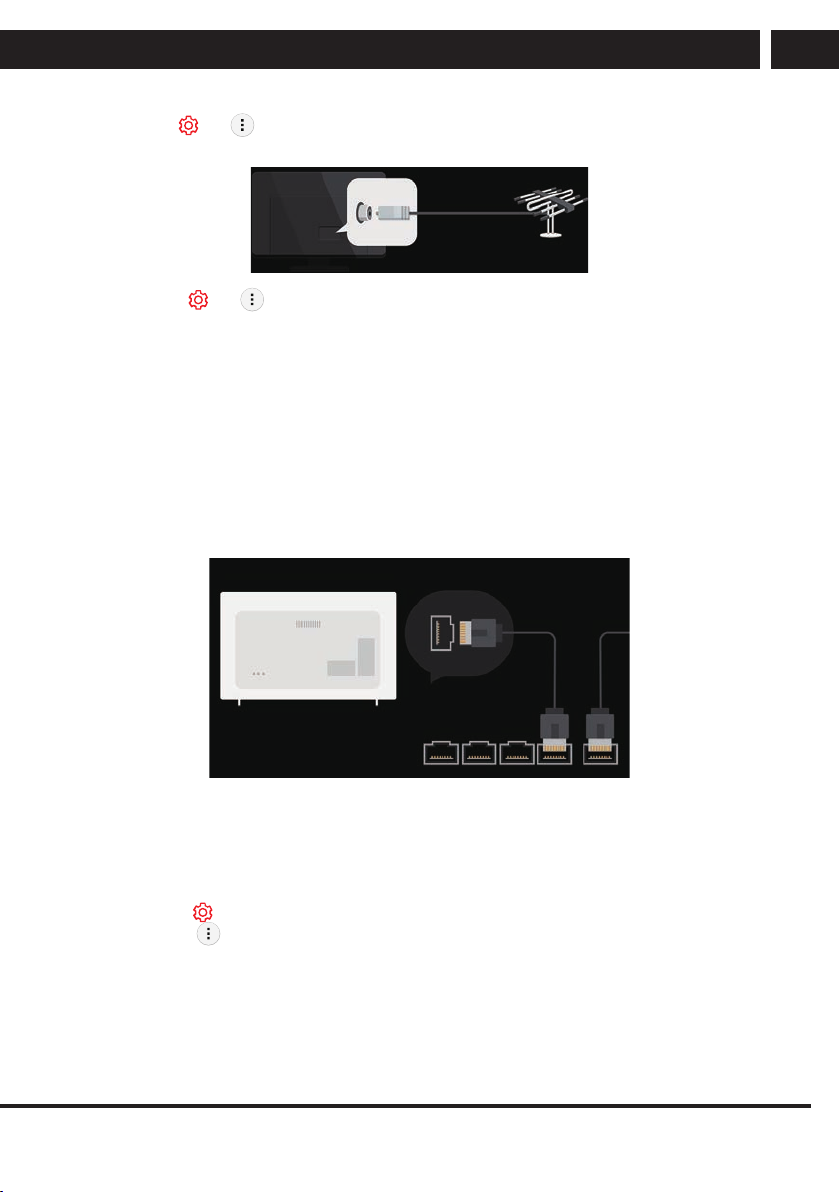
6.3.2. Live TV Preparation
1. Connect the broadcast antenna to the TV.
You can also connect a piece of equipment that can receive broadcasting such as a
set-top box instead of the antenna.
14 EN
Copyright ©
2021, Fast ČR, a. s.
Revision 06/2021
Page 17
Getting Started with webOS TV
Launch t Connection t Device Connection Settings Universal Control
Settings
2. Start the t t Programmes Programme Tuning (Programme Tuning &
Settings) Auto Tuning.
Finds and adds only programmes being broadcast.
6.4. Connecting to the Network
6.4.1. Connecting to the Network
If you configure settings for the network, you can use various services such as online
contents and applications.
6.4.2. Setting a Wired Network
EN
1. Connect the LAN port of the TV and the router using a LAN cable.
The router should be connected to the Internet beforehand.
If the router supports DHCP, the TV is automatically connected to the network when
you connect the TV to the network with a LAN cable.
If the Network Is Not Automatically Connected
2. Press the button on the remote control.
3. Select t Connection t Network Connection Settings
Wired Connection (Ethernet).
EN 15
Revision 06/2021Copyright © 2021, Fast ČR, a. s.
Page 18
Getting Started with webOS TV
EN
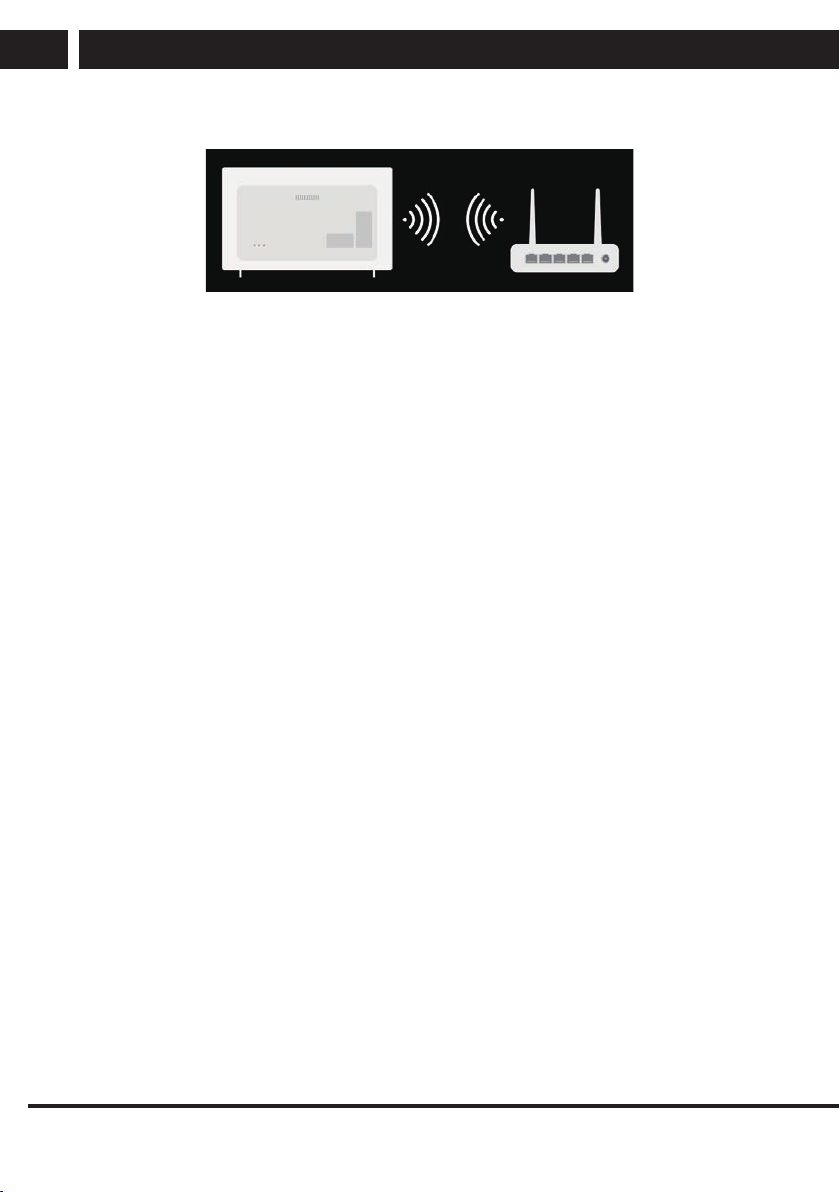
6.4.3. Setting a Wireless Networ
1. Turn on the power of the router connected to the Internet.
2. Press the Settings button on the remote control.
3. Select All Settings icon Connection Network Connection Settings Wi-Fi Connection.
4. When the network search is complete, the list of networks available for connection is
shown.
5. Select a network to connect.
If your wireless LAN router is password protected, enter the password configured for
the router.
6.5. Connecting to the Network
6.5.1. Network Setting Warnings
1. Use standard LAN cable (connect to Cat7 or higher with RJ45 connector, 10 Base-T,
or 100 Base TX LAN port).
2. Resetting the modem may fix some network connection problems. Turn the power
OFF, disconnect and reconnect it, and then turn the power on to solve the problem.
3. The manufacturer is not responsible for any network connection problems or any
faults, malfunctions, or errors caused by network connection.
4. The network connection may not work properly because of network settings or the
Internet service provider.
5. DSL service must use a DSL modem; and cable service must use a cable modem.
Since only a limited number of network connections may be available, TV network
setting may not be used depending on the contract with Internet service provider.
(If the contract does not allow more than one device per line, only the alreadyconnected PC may be used.)
6. A wireless network can experience interference from other devices that use the 2.4
GHz frequency (wireless phone, Bluetooth device, or microwave oven). Although
interference can also happen when using the 5 GHz frequency, it is less likely to
occur.
7. The wireless environment can make wireless network service run slowly. Failure to
turn off all local home networks may cause excessive traffic on some devices. The
access point device must support wireless connections and wireless connection
feature must be enabled on the device to have AP (access point) connection. Contact
the service provider for availability of wireless connections on the access point.
16 EN
Copyright ©
2021, Fast ČR, a. s.
Revision 06/2021
Page 19
Getting Started with webOS TV
8. Check SSID and security settings of the AP. Refer to the appropriate documentation
for SSID and security settings of the AP.
9. Invalid settings of network devices (wired/wireless line sharer, hub) can cause the TV
to operate slowly or not operate properly. Install the devices correctly according to the
appropriate manual and network.
10. The connection method may differ depending on the AP manufacturer.
11. To solve a problem related to this function, refer to the Troubleshooting section of
User Guide
6.6. Managing Your LG Account
6.6.1. Creating LG Account
In Account Management, you can use your email address to create a new LG account.
Alternatively, you can create and log in to an LG account using the ID and password of an
external service account.
Press the
Select t General Account Management t LG Account Sign In.
Select Create Account. Read and accept the Terms of Service.
Enter ID and password. Your ID must be your email address.
Enter your date of birth.
If you select OK, a verification link is sent to the email address you entered. Please
complete the email verification within the validity period.
If email verification is successful, an LG account is created and you can log in with this
account information.
Some models may not be supported.
Internet connection is required to create an account.
Required information may vary depending on the country.
You may be restricted from the service depending on your age.
To solve a problem related to this function, refer to the Troubleshooting section of User
Guide.
Managing Your LG Account
You can manage the information of your LG account.
Press the button on the remote control.
Go to t General Account Management to log in.
Personal Information
You can view or edit your information of the account currently logged in.
You can change the password or press Edit to edit your personal information.
Some models may not be supported.
button on the remote control.
EN
EN 17
Revision 06/2021Copyright © 2021, Fast ČR, a. s.
Page 20
Enjoy Live TV
EN
7. Enjoy Live TV
7.1. Making the Most of Live Menu
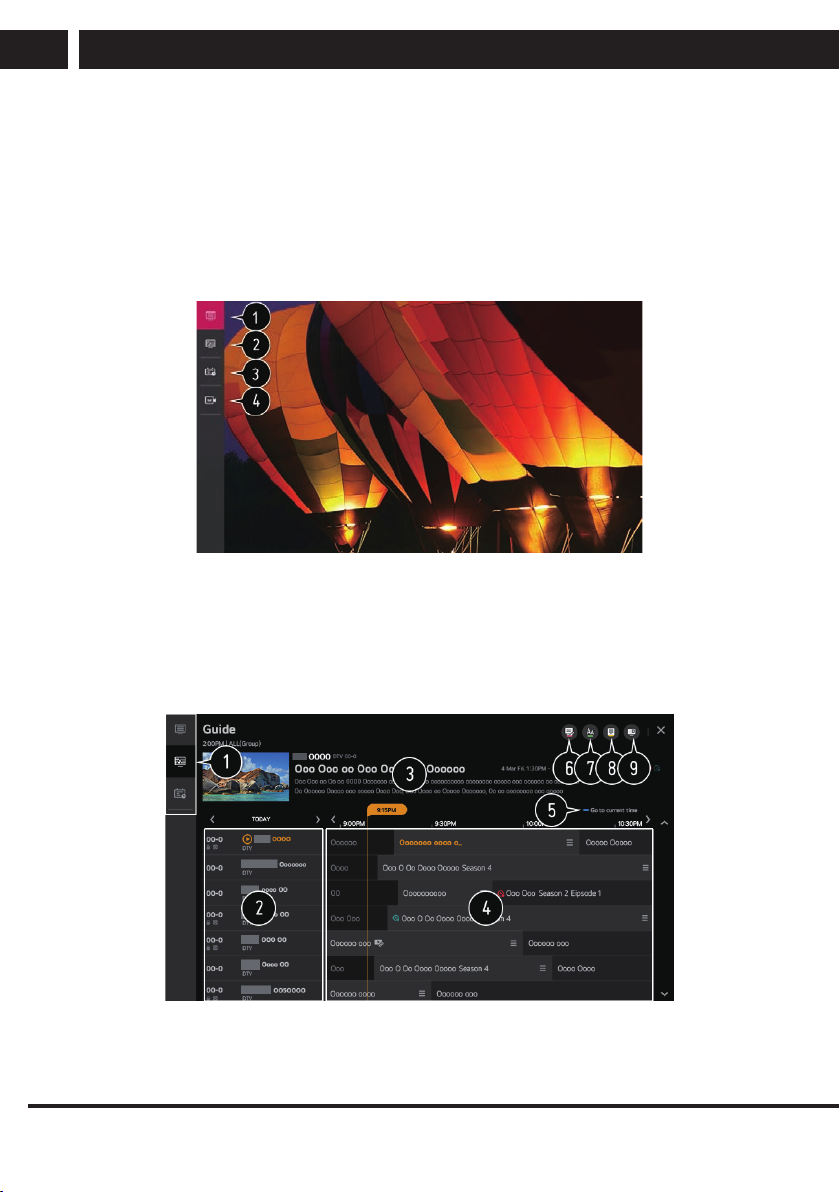
Using Live Menu
You can use the relevant features with ease when watching TV broadcasts.
Press the LIST button on the remote control.
Or press the Wheel (OK) button on the remote control and select Programmes.
7.2. Viewing Guide
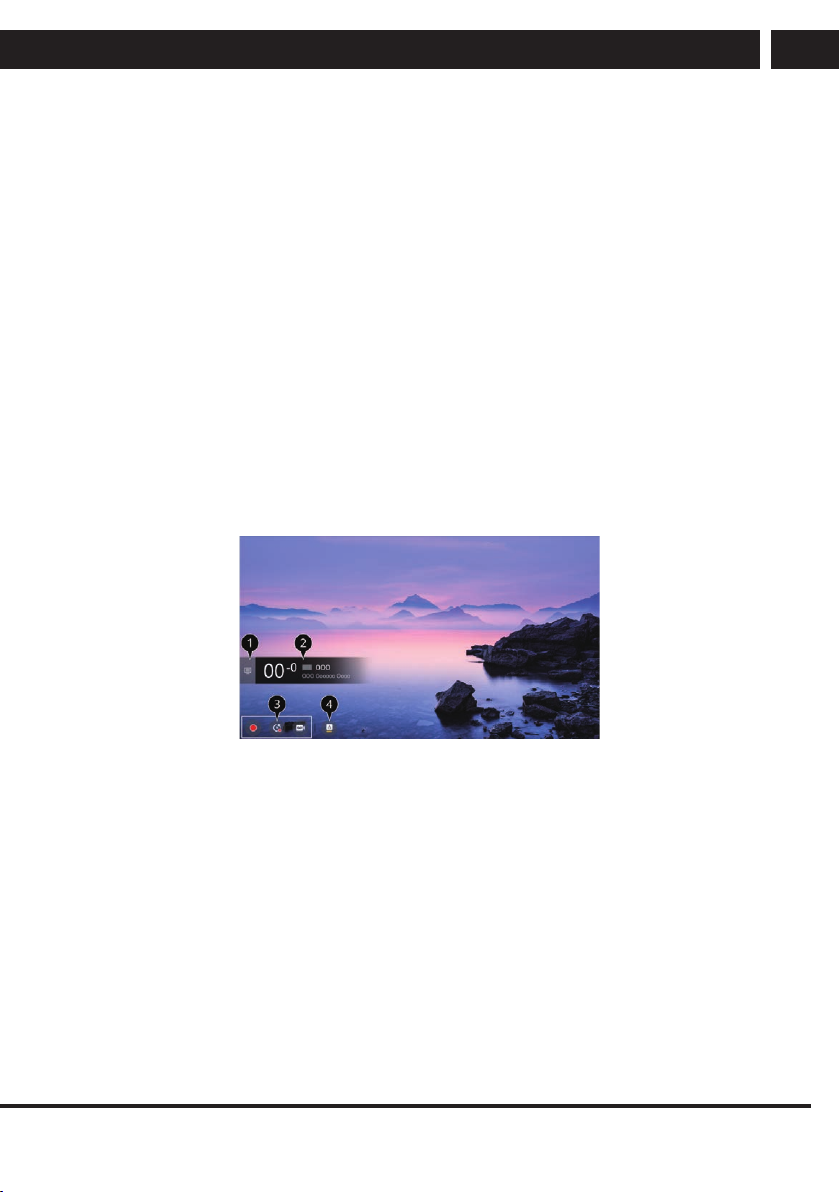
Viewing TV Guide
You can view programmes and the schedule of each programmes.
Press the remote control's LIST button, and select the Guide tab on the left side of the
screen.
1. Click on each area, and you can move to the app.
2. You can view information on the programme and broadcaster.
18 EN
Copyright ©
2021, Fast ČR, a. s.
Revision 06/2021
Page 21
Enjoy Live TV
3. You can view information about the programme you are currently watching as well as
the focused programme information.
4. Select the See Details button or the title of the desired programme. You can view
more information on the programme and perform Watch/Record (only available on
certain models) or Reminder/Scheduled Recording (only available on certain models),
etc.
5. You will be taken to the programme list for the current date and time.
6. Launch Programme Manager.
7. You can change the size of the programme list to adjust the number of programmes
displayed on the screen.
8. Sets the filter.
9. You can turn on/off Mini TV.
Programme information is not displayed for programmes with no provided broadcast
information.
7.3. Checking Programme Info
Viewing Programme Information
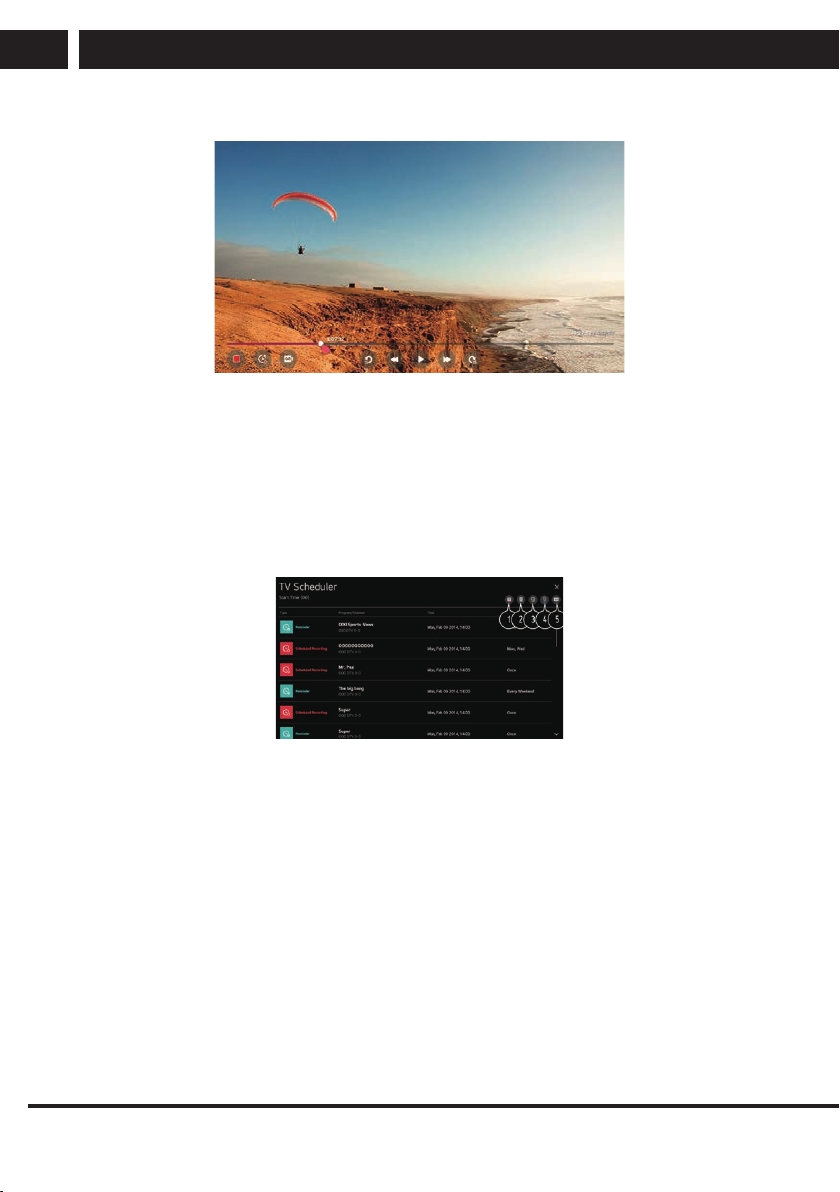
During watch the Live broadcast, press the Wheel (OK) button. The Programme Banner
appears.
EN
Move to the Programmes.
To see the details, click the Enjoy Live TV Making the Most of Live Menu in User Guide.
It displays the information about the programme you are watching.
7.4. Recording
Using the Recording Functions
With the LG webOS TV, you can use recording functions.
Using Instant Recording
1. Connect a USB HDD or USB stick to a USB port.
2. It is recommended that you record to a USB HDD.
3. During watch the Live broadcast, press the Wheel (OK) button.
4. Press the Start Recording button at the bottom of the screen.
If you want stop the recording, press the Stop Recording button
EN 19
Revision 06/2021Copyright © 2021, Fast ČR, a. s.
Page 22
Enjoy Live TV
EN
7.5. Using TV Scheduler
Using the TV Scheduler
You can enter the time and date of a programme to schedule watching or recording it at
the set time.
Press the remote control's LIST button, and select the TV Scheduler tab on the left side of
the screen.
Select the TV Scheduler at the top right.
You can change the alignment order or apply the filter.
You can set the Delete Mode.
You can set the New Scheduled Recording.
You can set the New Reminder.
Launch Guide.
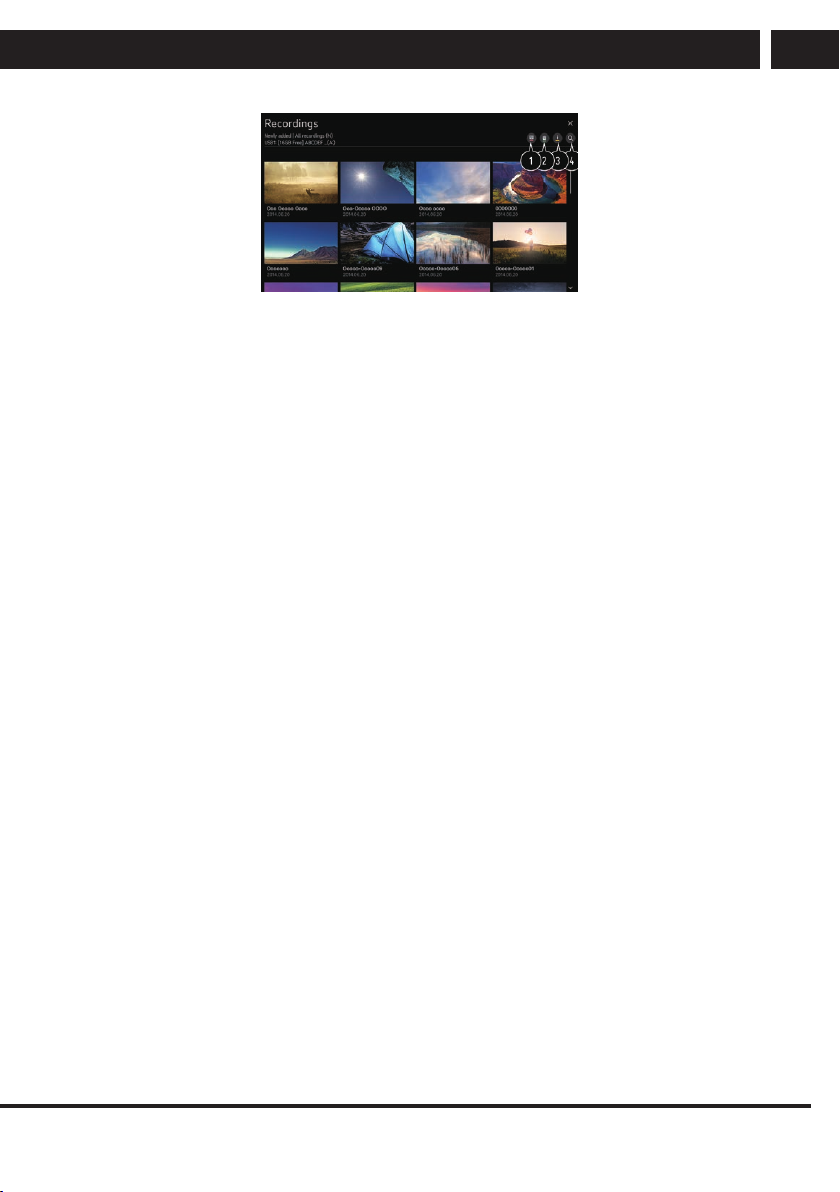
7.6. Playing Recorded TV Programs
Managing Recordings
You can view and play recordings stored on storage devices by using the Recordings app.
Press the remote control's LIST button, and select the Recordings tab on the left side of
the
screen.
Select the Recordings at the top right
20 EN
Copyright ©
2021, Fast ČR, a. s.
Revision 06/2021
Page 23
Enjoy Live TV
7.6.1. TELETEXT
To Use Teletext
Teletext is a free service provided by the TV station that offers text-based information
about TV programmes, news and weather.
The teletext decoder of this TV can support the SIMPLE, TOP and FASTEXT systems.
Press the More Actions button on the remote control.
Select Teletext.
The TELETEXT window appears.
To view TV broadcasts and TELETEXT at the same time, press the More Actions button
on the remote control and select Teletext.
Colour button
To select the preceding or following page.
Number button
Enters the page number to move to.
Programmes (Programmes) Up/Down Button
To select the preceding or following page.
Some models may not be supported.
EN
7.6.2. HbbTV
Learn More about HbbTV
HbbTV (Hybrid Broadcast Broadband TV) is a new broadcasting standard that enables
super-teletext type services, delivered by a broadcast TV programme, to be integrated or
linked to online services delivered over broadband to a connected Smart TV. Consumers
are therefore able to access various online services such as catch-up TV, Video on
Demand (VOD), programme related applications and other rich information services in
addition to traditional digital teletext services, all directly on to the TV in a seamless
experience. HbbTV services can be activated in a number of ways, the most popular
being pressing the Red. Users typically explore services with the traditional navigation
keys (including the OK button and the Red, Green, Yellow, Blue). The current version of
the HbbTV specification also includes support for “adaptive streaming” of video over a
broadband connection thus guaranteeing the best possible image quality for the viewer.
For more information about HbbTV, visit www.hbbtv.org
Some models may not be supported.
To Use HbbTV
Revision 06/2021Copyright © 2021, Fast ČR, a. s.
EN 21
Page 24

Enjoy Live TV
EN
Settings All Settings icon Programmes HbbTV
Sets HbbTV to On.
Enjoy a wide variety of content from HbbTV enabled services.
Service features may be limited when the TV is not connected to the internet.
The functionality and quality of the HbbTV service may vary depending on the quality of
your broadband connection.
HbbTV services are not guaranteed to be available for all programmes – only those that
your broadcaster choses to support.
22 EN
Copyright ©
2021, Fast ČR, a. s.
Revision 06/2021
Page 25
Connecting external devices
8. Connecting external devices
8.1. Using Home Dashboard
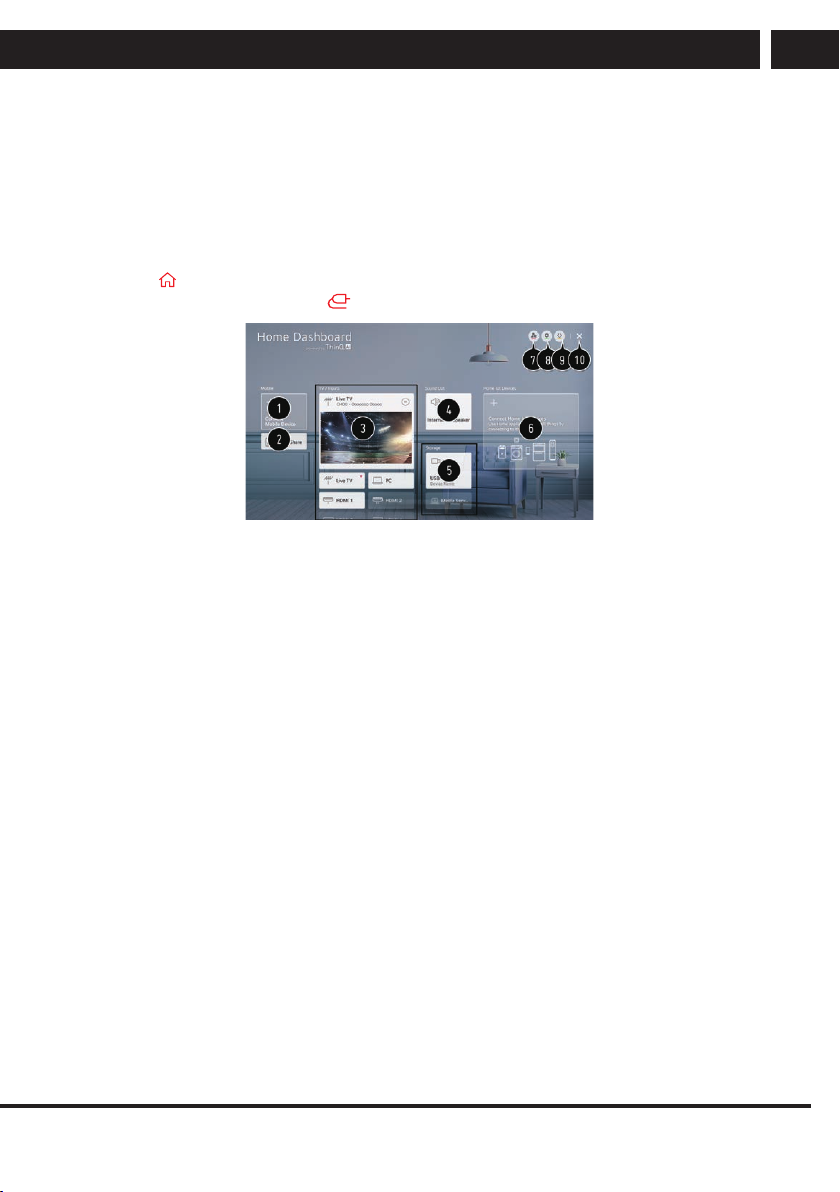
Using Home Dashboard
You can select or control a device (mobile, external device, Home IoT Devices, etc.)
connected to the TV.
Press the button on the remote control and select Home Dashboard.
You can also press and hold the button on the remote control.
You can check and select the smart device connected with the LG ThinQ app.
Please refer to Connecting External Devices Connecting Smart Devices in User Guide for
more information on the action.
You can play sound from a smart device connected via Bluetooth.
Please refer to Connecting External Devices Playing Sound from a Smart Device through
the TV’s Speakers in User Guide for more information on the action.
You can check and select the external device connected through the external input port or
network.
The currently selected output speaker is displayed, and you can navigate to the output
speaker settings screen.
You can view and select the connected storage device.
You can check and control the device connected via the Home IoT.
Please refer to Connecting External Devices Connecting Home IoT Devices in User Guide
for more information on the action.
You can easily control your device by presetting the desired operations.
Sign In : You can log in/out to and from the LG ThinQ account you created on mobile.
Edit : You can edit the name of the device connected to Inputs or Home IoT Devices or
configure the related settings.
It refreshes the device list.
Exit the Home Dashboard.
Available settings vary depending on the model or region
EN
8.2. Connecting USB
Connecting USB
EN 23
Revision 06/2021Copyright © 2021, Fast ČR, a. s.
Page 26

Connecting external devices
EN
Connect a USB storage device (USB HDD, USB stick) to the USB port on the TV to enjoy
the content files stored on the USB storage device on your TV.
Tips for Using a USB Storage Device
A USB storage device that has a built-in automatic recognition programme or uses its
own driver might not be recognisable.
Some USB storage devices may not be supported or may not work properly.
If you use a USB extension cable, the USB storage device may not be recognised or may
not work properly.
Please use only USB storage devices formatted with the FAT32 or NTFS file system
provided by Windows OS.
It is recommended that you use an external USB HDD with a rated voltage of 5 V or less
and a rated current of 500 mA or less. If you use a device requiring a higher voltage/
current than the rated voltage/current, it may not operate properly due to lack of current.
It is recommended that you use a USB hub or USB storage device with a power supply.
We recommend using a storage device with a capacity of 32 GB for the USB memory
and 2 TB or less for the USB hard disk.
If a USB HDD with power-saving function does not work, turn the hard drive off and
on again to make it work properly. See the owner’s manual for the USB HDD for more
information.
Data on a USB storage device may be damaged, so it is recommended that you back up
any important files. Users are responsible for data management. The manufacturer bears
no responsibility.
Press the
button on the remote control. To remove the USB storage device, press the
Eject button, which appears at the top when you focus on the USB storage device you
want to remove.
If you disconnect the USB storage device without selecting Eject, an error may occur in
your TV or storage device.
When you connect a USB storage device of a file system not supported by the TV to the
USB IN port, the format message appears. To use the connected USB storage device, you
should format the device first.
After format, all the data of USB storage device will be deleted and formated as NTFS or
FAT32 file system.
Press and hold the button on your remote control. Select the connected USB from
Home Dashboard t Storage and select the Format button to format the USB storage
device.
When connecting a USB storage device, a random file/folder can be created to provide
Smart TV services such as the saving and retrieving of thumbnail images.
8.3. Watching Computer Screen on TV
To See the PC Screen on the TV
Connect Wireless
Enable Screen Share mode on the PC. Your TV will be displayed in the list of available
devices.
24 EN
Copyright ©
2021, Fast ČR, a. s.
Revision 06/2021
Page 27

Connecting external devices
Select your TV and request connection.
After the connection is established, the TV will display the screen of the connected
device.
It is recommended that you always update your device to be connected to your TV to the
latest OS version for a reliable connection.
It is recommended that you use this function at close range.
Start Screen Share faster by having your mobile device or PC connected to the same
network as the TV.
Though it can be connected without a wireless router, connecting your device to a 5 GHz
router is recommended because the performance can be affected by the surrounding
wireless environment.
The response rate may vary depending on the user’s environment.
It’s differ from Windows version. For more information on the device you want to connect
to, refer to its user guide.
If connection fails repeatedly, turn off the TV and the device you want to connect to, then
turn them back on and try again.
Connect wired
Connect the PC with TV by HDMI cable.
EN
EN 25
Revision 06/2021Copyright © 2021, Fast ČR, a. s.
Page 28
Making the most of Smart TV
EN
9. Making the most of Smart TV
9.1. Surfing the Internet on TV
Using the Web Browser
You can enter the website when you input the web address on the URL bar.
If you input the search word, it will find the information about search word base on the
search engine.
Press the button on the remote control.
Run the Web Browser application.
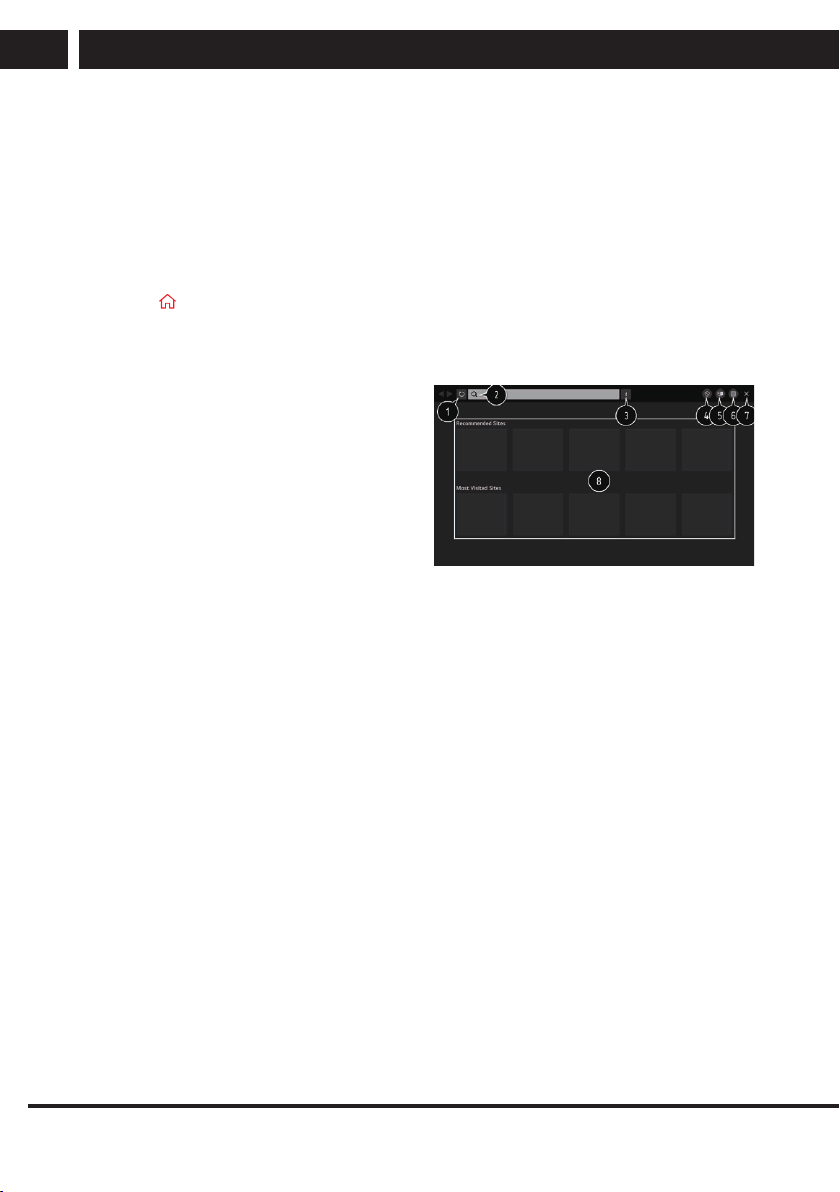
1. You can refresh the web page you are
viewing.
2. You can type in a web address to
navigate to a specific website or enter
a search term directly.
3. You can view the tabs that are
currently open.
4. You can block ads within the web page
you are viewing.
However, this button is only displayed
if Menu icons
Settings Use Block Ads feature is set to On.
5. Split the screen to display the TV screen. You can browse web pages while watching
TV.
6. You can zoom in or out on the screen while browsing the website.
Add to bookmarks : You can add the website you are currently viewing to your
Favourites.
History : You can view and delete the website visit history.
Bookmarks : You can view and delete the list of websites you have added to your
Favourites.
Settings : You can change the web browser settings.
7. Exit the Web Browser.
8. The new tab screen shows a list of Recommended Sites and Most Visited Sites.
If you do not want Recommended Sites to be displayed, set Menu icons Settings Show
Recommended Sites to Off.
Recommended Sites may vary by country and is only available in certain countries.
The Web Browser app on your TV is a browser for TV, so it may work differently than the
browser for your PC.
Some contents may not be played properly.
Flash Plug-in is not supported, and only HTML5 media is supported.
Plug-in installation is not supported.
Media in formats other than JPEG/PNG/GIF may not be played.
26 EN
Copyright ©
2021, Fast ČR, a. s.
Revision 06/2021
Page 29

Making the most of Smart TV
Apps may be forced to shut down if the TV runs out of memory.
The fonts provided on the TV are used. Depending on the content, characters may look
different from PC or mobile browsers.
File and font downloads are not supported.
Caution is required because malicious or phishing sites are not automatically blocked.
Some functions of Web Browser may not be supported temporarily due to external
factors.
The website can be accessed through the TV's Web Browser app, so care needs to be
taken about children's access to harmful online contents.
You can lock the Web Browser app to prevent access to harmful online contents.
Configure the settings in Settings All Settings icon General Safety Application Locks.
If you experience problems while using Web Browser, refer to Troubleshooting in User
Guide.
EN
EN 27
Revision 06/2021Copyright © 2021, Fast ČR, a. s.
Page 30
Settings
EN
10. Settings
10.1. Quick Settings
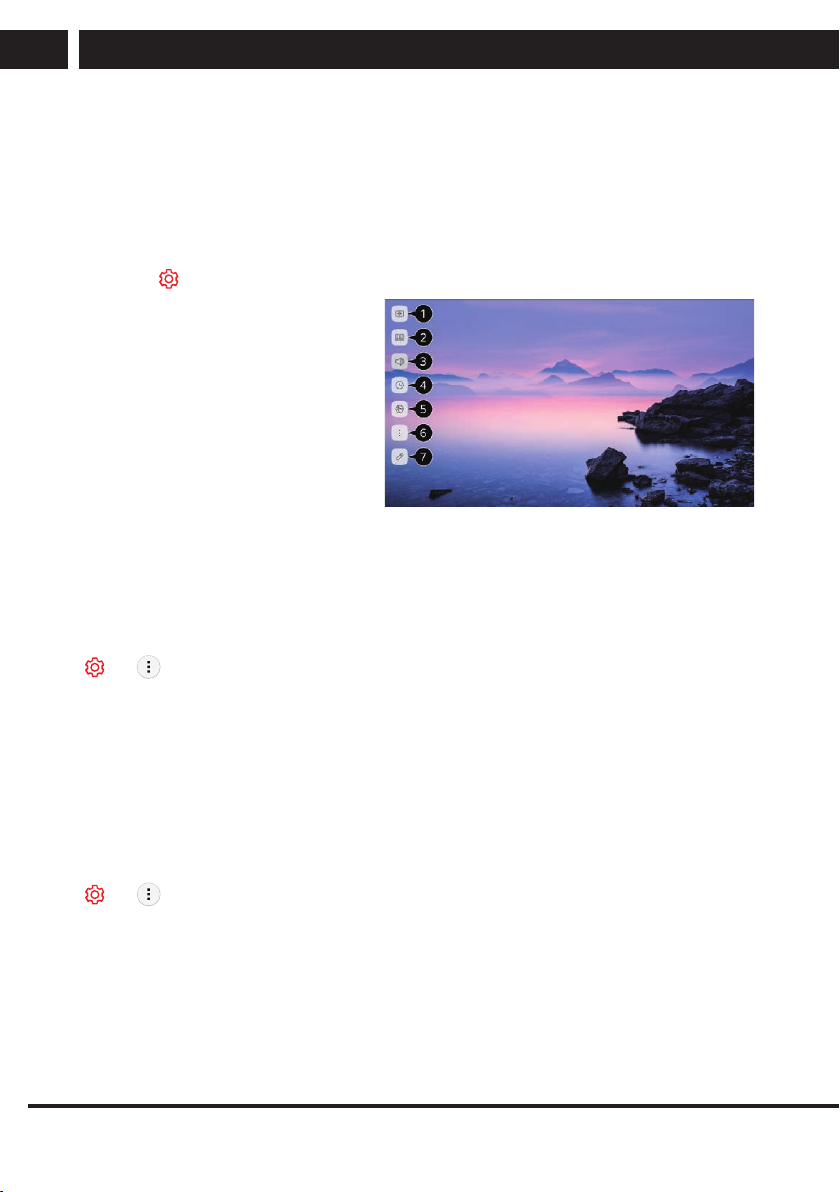
To Use Setting Function Quickly
Set of light-weight controls quickly and simply such as Picture Mode, Sound Out, Sleep
Timer and so on.
Press the
You can set Picture Mode.
You can set Sound Mode.
You can choose Sound Out.
You can set Sleep Timer.
Move to the Connection screen.
You can set more options.
You can add/delete the quick setting
items or change their order.
After entering each item, press
and hold the Wheel (OK) button
on the remote control to go to the
corresponding menu
10.2. Programmes
Auto Tuning
Automatically Setting Up Programme
t t Programmes t Programme Tuning t Auto Tuning
Automatically tunes the programmes.
Initiate Auto Tuning.
Set Auto Tuning following screen instructions.
If Input Source is not connected properly, programme registration may not work.
Auto Tuning only finds programmes that are currently broadcasting.
If Safety is turned on, a pop-up window will appear asking for password.
button on the remote control.
Manual Tuning
To Use Manual Programme Tuning
t t Programmes t Programme Tuning (Programme Tuning & Settings) t
Manual Tuning
This function is for manually searching and saving programmes.
For digital broadcasting, signal strength and signal quality can be checked.
Signal Test
To Use the Signal Test
28 EN
Copyright ©
2021, Fast ČR, a. s.
Revision 06/2021
Page 31
Settings
t t Programmes t Programme Tuning (Programme Tuning & Settings) t
Signal Test
Shows the MUX and Service information etc.
Signal test is only available in Antenna or Cable mode.
Programme Manager
Edit Programmes
You can edit the selected programmes from all the stored programmes or add/delete them
to/from the favourite programmes.
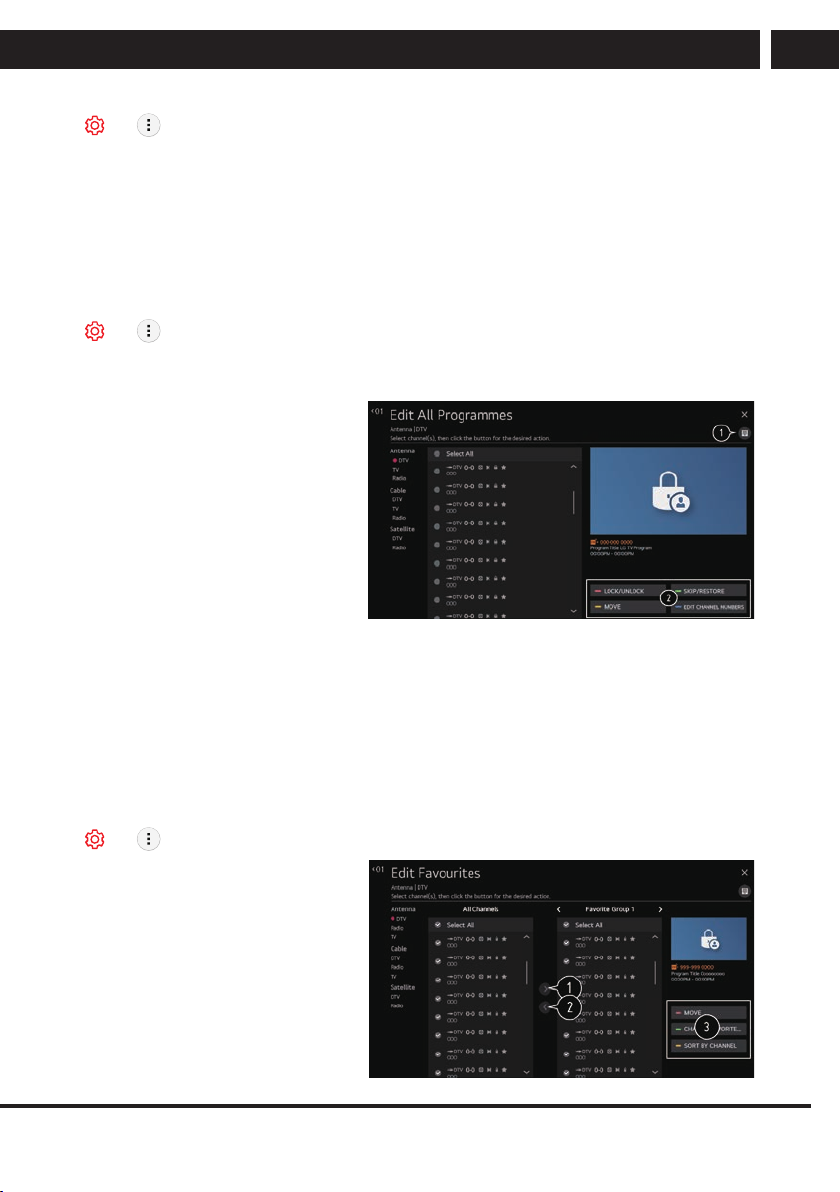
Edit All Programmes List
t t Programmes t Programme Manager t Edit All Programmes
You can lock or unlock the selected programmes from all the stored programmes, or you
can set them to be skipped when switching programmes.
1. Set the sorting option.
2. Lock/Unlock: Lock the
selected programmes
or unlock the locked
programmes.
Skip / Restore : Set the selected
programmes to be skipped when
switching programmes,
or disable the skipping option of
the programmes previously set to
be skipped.
Move : Move the selected programmes.
Edit Programme Numbers : Change the numbers of the selected programmes.
Delete : Delete the selected programmes.
Available features may vary depending on the broadcast signal.
For a model that supports satellite programmemes, you can manage the satellite
programmes in Edit Satellite Programmes (Advanced).
EN
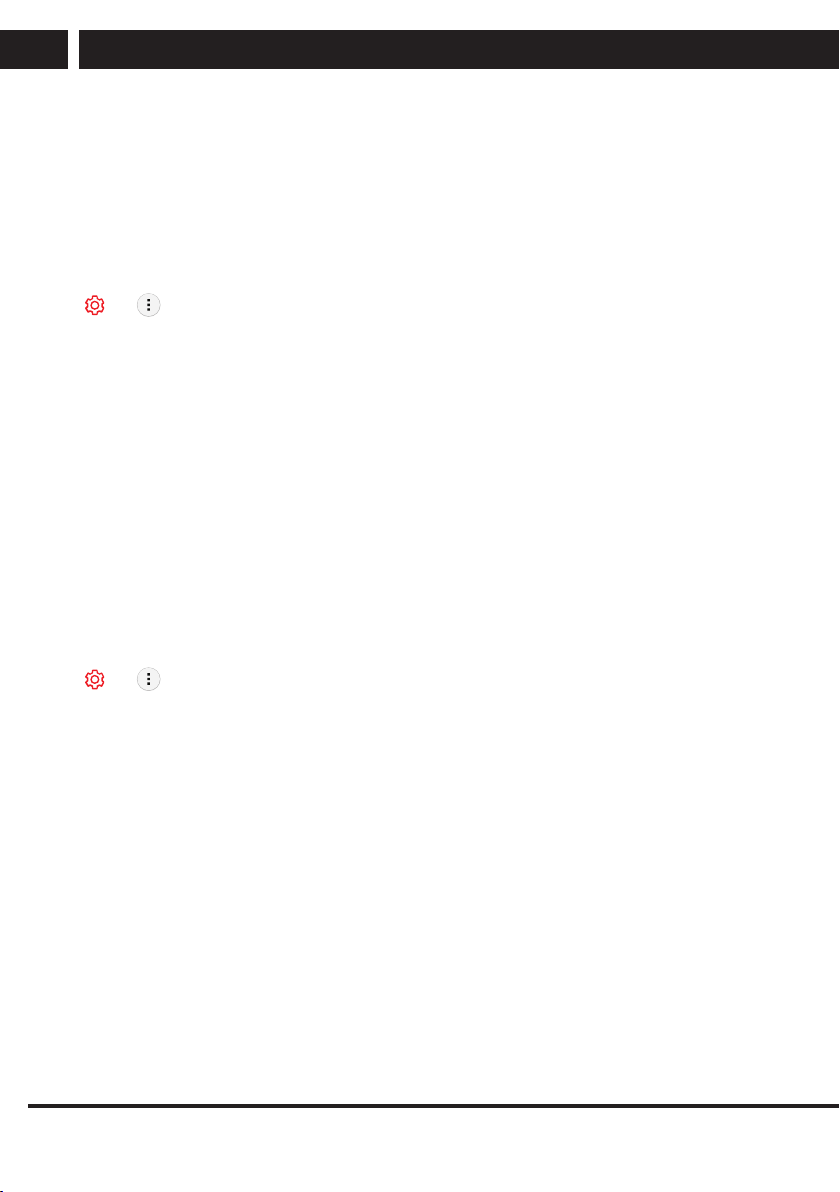
Edit Favourite Programmes List
t t Programmes t Programme Manager t Edit Favourites
You can add/delete desired programmes to/from the favourite programmes, change their
positions, etc
1. Select the desired
programmes from the all
programmes list and press
the button to add them to the
favourite programmes list.
Revision 06/2021Copyright © 2021, Fast ČR, a. s.
EN 29
Page 32
Settings
EN
2. Delete the selected programmes from the favourite programmes list.
3. Move : Select one or more programmes in the Preferred Programmes list, press the
Move button, and then select the position to move it to. The selected programmes
will move to the position you selected. Change Group Name : Change the name
of the favourite programmes list. Sort by Programme : Sorts the list of favourite
programmes by programme.
Multi Feed
t t Programmes t Multi Feed
You can watch the desired angle on the TV through the broadcast that filmed from various
angles.
Some models may not be supported.
HbbTV
Learn More about HbbTV
HbbTV (Hybrid Broadcast Broadband TV) is a new broadcasting standard that enables
super-teletext type services, delivered by a broadcast TV programme, to be integrated or
linked to online services delivered over broadband to a connected Smart TV.
To see the details, click the Enjoy Live TV t HbbTV in User Guide.
Some models may not be supported.
10.3. Connection
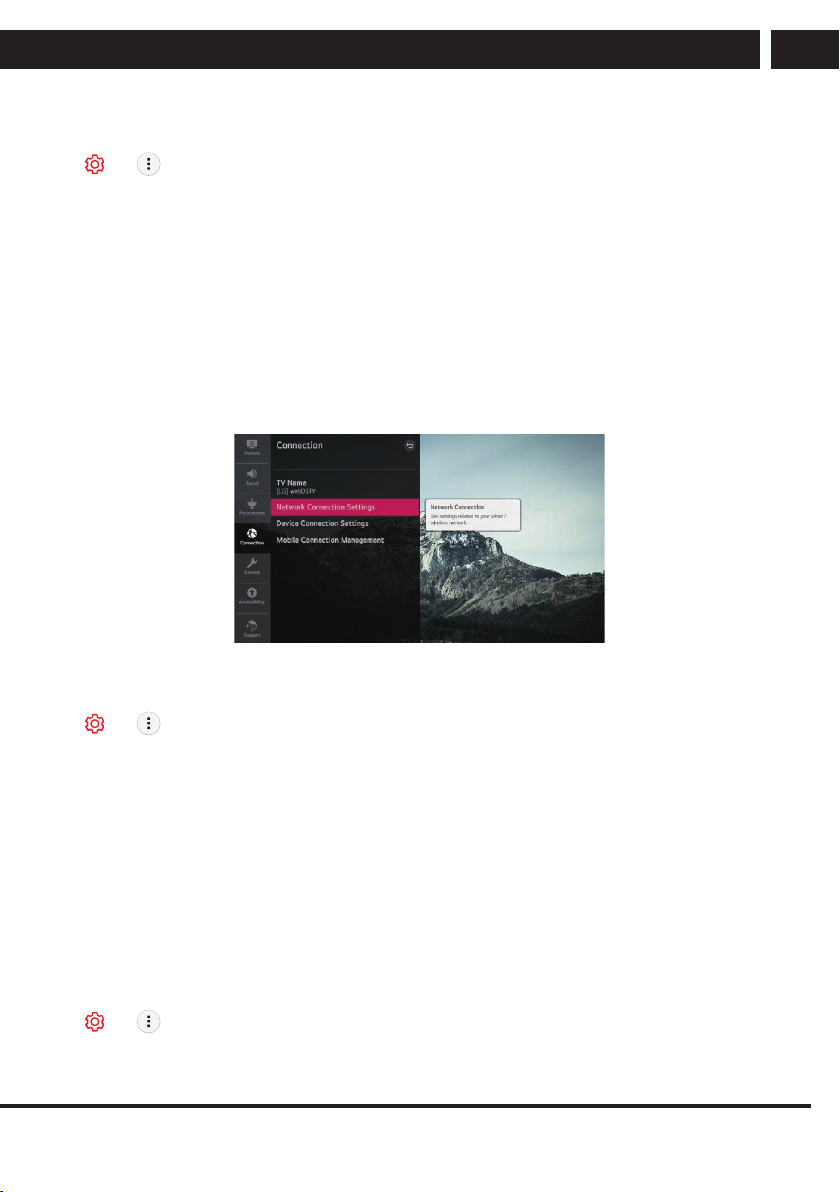
Network Connection Settings
Network Connection Settings
t t Connection t Network Connection Settings
If you configure settings for the network, you can use various services such as online
contents and applications.
Setting a Wired Network
Select Wired Connection (Ethernet).
If the router connected to the network supports the DHCP feature, connecting the TV and
router by wire will automatically connects to the network. If the automatic setup is not
supported, you can select Edit to manually set up the network connection.
Setting a Wireless Network
Select Wi-Fi Connection.
If you have set the TV up for a wireless network, you can check and connect to the
available wireless Internet networks.
10.4. General
Language
Configuring Language Settings
30 EN
Copyright ©
2021, Fast ČR, a. s.
Revision 06/2021
Page 33
Settings
t t General t Language
You can choose the menu language displayed on the screen and the audio language of
the digital broadcast.
Menu Language
You can select one of the menu languages to be displayed on the screen. The language
for the speech recognition will be automatically set to the selected language for the menu.
The speech recognition is only applied to some models.
Primary Audio Language / Secondary Audio Language
You can choose the language you want when watching a digital broadcasting programme,
which includes multiple audio languages.
For programmes that do not support multiple languages, the default will be used.
Applies to Digital broadcasting.
Keyboard Languages
Select the language to use the on-screen keyboard.
To Set Teletext Language
Sets Teletext language.
To see the details, click the Enjoy Live TV TELETEXT in User Guide.
In Digital Mode Only
Location
Setting the Location
t t General t Location
You can change the location setting of your Smart TV.
Address Setting
You can set the Region and City of your TV.
Broadcast Country
You can set the broadcast country on your TV.
Service Area Postcode
This function is used to set the broadcast location of the TV by entering your postcode.
Services Country
If you don’t set the Set Automatically, you can select the country manually.
You must set the country manually when you are not connected to the network.
The configurable items differ depending on model.
EN
Time
t t General t Time
You can check the time or configure related settings.
Set Automatically
The TV time is automatically set to the time of digital broadcasting information sent from
the broadcasting station or the time sent from the server.
Time / Date / Time Zone
You can manually set the time and date if the automatically set current time is incorrect.
Revision 06/2021Copyright © 2021, Fast ČR, a. s.
EN 31
Page 34

Settings
EN
If you set the time manually with the antenna connected, schedule information,
programme guide, etc. may not function correctly.
Custom Time Zone
When select the Custom in Time Zone, Custom Time Zone menu is activated.
Timers
Sleep Timer
Sets the TV to turn off at a specified time.
If you do not want to use Sleep Timer, select Off.
Power On Timer
Set Power On Timer to On.
The TV is turned on and displays the set channel at the set time.
Time : Set the time at which to turn the TV on.
Timer Repeat : Set the day of the week. Set the option to None to operate the feature
only once.
Input : Set an external input to display when the power is turned on.
Timer Programme : Set a channel to display when the power is turned on. This option
can be set only when Input is set to TV.
Volume : Set audio volume to use when the power is turned on.
Power Off Timer
Set Power Off Timer to On.
The TV is turned off at the set time.
Time : Set the time at which to turn the TV off.
Timer Repeat : Set the day of the week. Set the option to None to operate the feature
only once.
4 Hours Auto Power Off
If you do not press any button for 4 hours after the TV is turned on by a feature such as
Power On
Timer, the TV will be turned off automatically.
To ensure the TV does not automatically turn off, set 4 Hours Auto Power Off to Off.
Some models may not be supported.
To use Power On Timer/Power Off Timer, set the time correctly.
If Timer Repeat of Power On Timer/Power Off Timer is set to None
If the time set in the Power On Timer is passed while watching TV, the power will turn
on automatically when it reaches the set time and the TV is turned off on the next day or
later.
If the time set in the Power Off Timer is passed while TV is in standby, the power will
turn off automatically when it reaches the set time while watching TV on the next day or
later.
Account Management
Managing Your LG Account
In Account Management, you can use your email address to create a new LG account.
For more information, see Getting Started with webOS TV Account Management in User
Guide.
32 EN
Copyright ©
2021, Fast ČR, a. s.
Revision 06/2021
Page 35
Home Settings
Home Settings
t t General t Home Settings
Home Auto Launch
You can set Home to launch automatically when turning on the TV.
Home Promotion
You can turn on or off the advertisements on the Home screen.
The configurable items differ depending on model.
Settings Help
To Use Settings Help
Settings All Settings icon General Additional Settings Settings Help
If you select the setting menus, you will see the hints of the settings. Turn on/off
description box in Settings.
Settings
EN
Eco Mode
Using ECO Mode
t t General t Additional Settings t Eco Mode
Set power options to reduce energy consumption.
Auto Power Off
Set the TV to turn off automatically when there has been no user input for a specified
amount of time.
HDD Eco Mode
If you set the mode to On, the USB HDD connected to the TV will go into power-saving
mode when it has been left unattended for an extended period of time.
The configurable items differ depending on model
10.5. Accessibility
Audio Description
Menu for the Visually Impaired
t t Accessibility t Audio Description
The contents on the screen will be described with voice for visually impaired viewers.
Revision 06/2021Copyright © 2021, Fast ČR, a. s.
EN 33
Page 36
Settings
EN
You can use this function if the broadcasting company supports Audio Description for the
visually impaired.
Some models may not be supported.
High Contrast
Changing the Menu to High-Contrast Screen
t t Accessibility High Contrast
When this feature is set to On, it adjusts the background of some of the menus on the
screen and font colours to highlight the contrast between the light and dark areas.
Grayscale
t t Accessibility t Grayscale
Change the colour of the menu on the screen to black and white tone to make its
ambiguity very clear.
Set to On.
Hard of Hearing
To Set Hard of Hearing
Press the
button on the remote control.
Select Accessibility.
Set Subtitles to On.
Set Hard of Hearing to On.
A caption will be provided for the hearing-impaired.
When the Hard of Hearing is turned On, it will be prioritized over the general captions.
Some models may not be supported.
Subtitles
To Set Subtitle
t t Accessibility Subtitles
View subtitles when the TV station provides subtitled programming.
Change Subtitles to On and select subtitle setting.
Some models may not be supported.
Applies to Digital broadcasting.
10.6. Support
Software Update
t t Support Software Update
Uses software update to check and obtain the latest version.
Allow Automatic Updates
If set to On, updates will be proceeded automatically without asking when there is a new
update after a version check.
Check for updates
34 EN
Copyright ©
2021, Fast ČR, a. s.
Revision 06/2021
Page 37
Settings
When checking for the latest update version, you can only perform updates if an update
file of a later version is available. The TV automatically checks your software version but,
if necessary, you can perform a manual check.
The configurable items differ depending on model.
The latest version can be obtained via digital broadcast signals or internet connections.
Changing the programme while downloading the software via digital broadcast signal
interrupts the download process. Returning to the initial programme allows downloading
to resume.
If software is not updated, certain functions may not work properly.
In some countries, Allow Automatic Updates is not displayed if you are not connected to
the Internet.
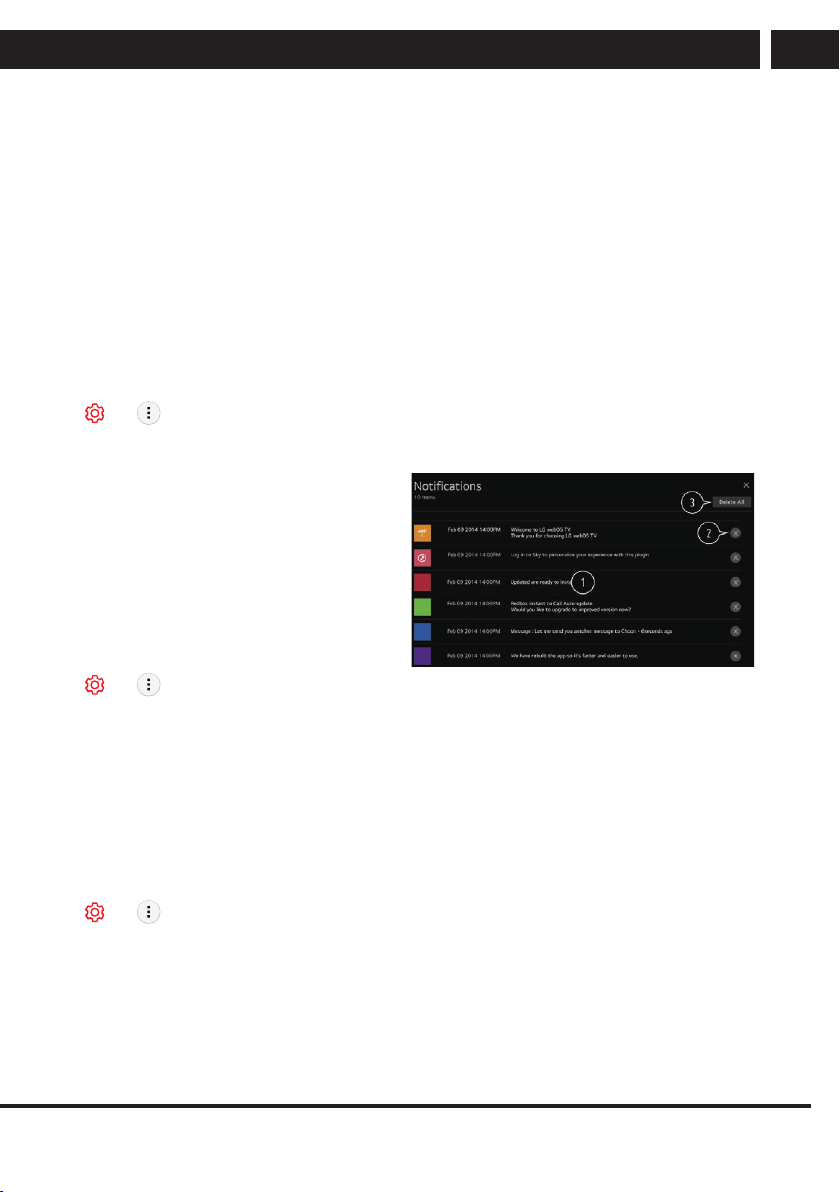
TV Information
t t Support t TV Information
You can view information including Model, Serial Number, Device Name.
You can check the details by selecting
the desired
item. If it supports shortcuts, you can
launch the app.
You can delete notifications.
You can delete all notifications
EN
Additional Settings
t t Support Additional Settings
User Agreements
These are the terms and conditions for privacy for the use of Smart TV-related services.
Legal Notice
It's a legal notice for services provided via TV.
Open Source Software Notice
You can view the instructions for each item.
Reset to Initial Settings
Restoring the Default Settings
t t Support t Reset to Initial Settings
Return TV to its initial settings. This will revert all settings to their default values.
After reset, the TV will automatically turn off and on.
If Safety is set to On, you should type the password to Reset to Initial Settings.
Do not turn off the power during initialization.
We recommend that you reset the TV to Reset to Initial Settings before you sell it or
transfer it to a third party.
EN 35
Revision 06/2021Copyright © 2021, Fast ČR, a. s.
Page 38
Information sheet
EN
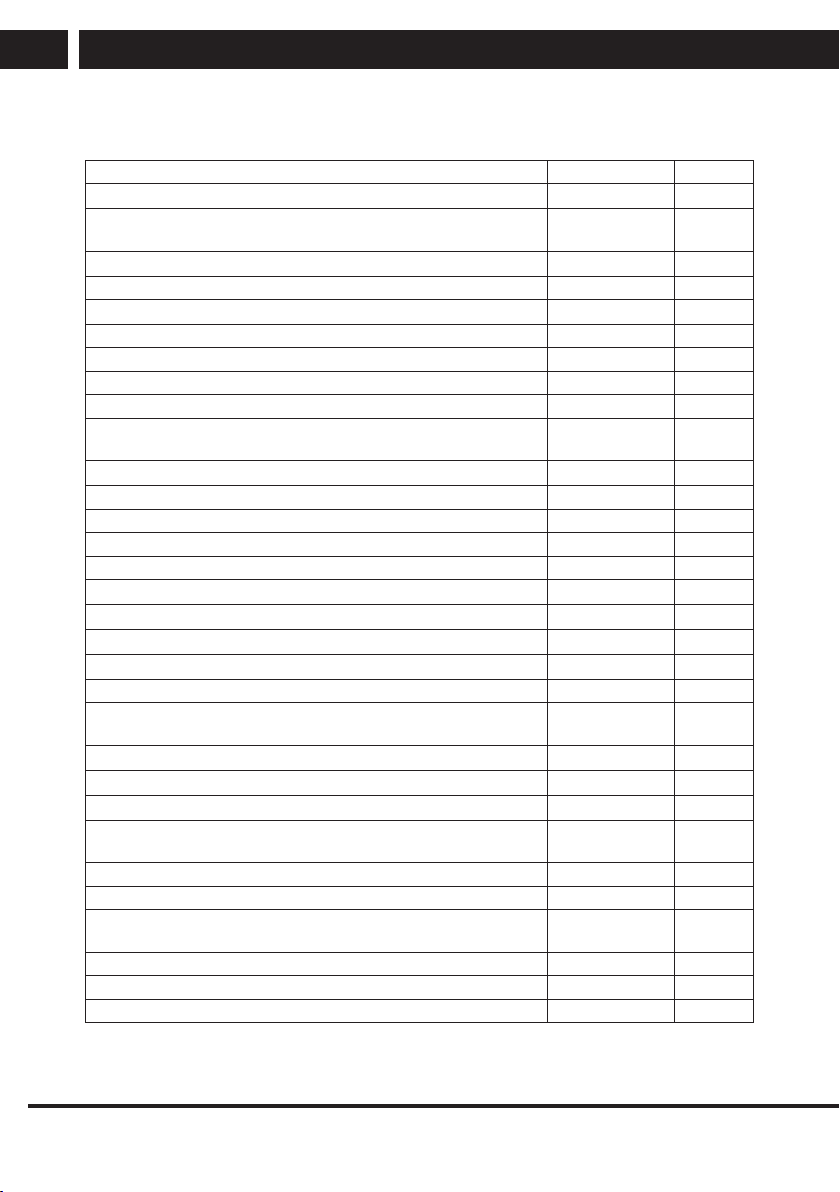
11. Information sheet
Information Value Unit
1. Supplier's name or trademark SENCOR
2. Identification mark of the model
3. Energy efficiency class for standard dynamic range (SDR) G
4. Power consumption in on state for standard dynamic range (SDR) 65.0 W
5. Energy efficiency class in High Dynamic Range (HDR) mode G
6. Power consumption in High Dynamic Range (HDR) mode 65.0 W
7. Off state, power input 0.0 W
8. Standby power input 0.3 W
9. Power consumption in mains standby mode 0.3 W
10. Electronic display category
11. Aspect ratio 16 : 9
12. Screen resolution (in pixels) 3,840 x 2,160 pixels
13. Screen diagonal 108.0 cm
14. Screen diagonal 43 inches
15. Visible screen area 4,982.7 cm2
16. Panel technology used LED LCD
17. Available Automatic Brightness Control (ABC) No
18. Available voice recognition sensor No
19. Available room occupancy detector No
20. Image refresh rate 60 Hz
21. Minimum guaranteed availability of software and firmware
updates (to)
22. Minimum guaranteed availability of spare parts (to)
23. Minimum guaranteed product support (up to):
24. Type of power supply: Internal
i Standardized external power supply (as part of the product
package), standard name
Input voltage - V
Output voltage - V
ii Suitable standardized external power supply (if not included in the
product package)
Required output voltage - V
Required supplied current - A
Required current frequency - Hz
SLE
43US800TCSB
Television
receiver
-
-
36 EN
Copyright ©
2021, Fast ČR, a. s.
Revision 06/2021
Page 39
Information sheet
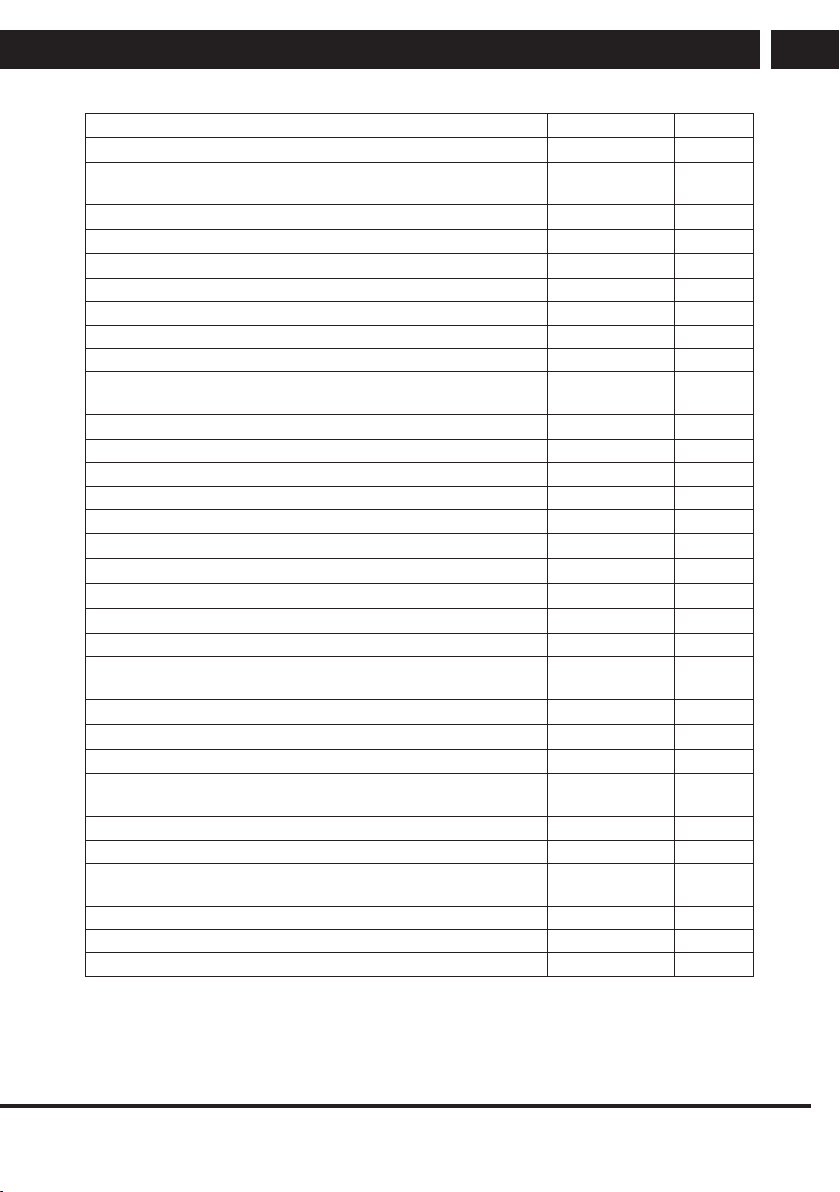
Information Value Unit
1. Supplier's name or trademark SENCOR
2. Identification mark of the model
SLE
50US800TCSB
3. Energy efficiency class for standard dynamic range (SDR) G
4. Power consumption in on state for standard dynamic range (SDR) 77.0 W
5. Energy efficiency class in High Dynamic Range (HDR) mode G
6. Power consumption in High Dynamic Range (HDR) mode 84.0 W
7. Off state, power input 0.0 W
8. Standby power input 0.3 W
9. Power consumption in mains standby mode 0.3 W
10. Electronic display category
Television
receiver
11. Aspect ratio 16 : 9
12. Screen resolution (in pixels) 3,840 x 2,160 pixels
13. Screen diagonal 126.0 cm
14. Screen diagonal 50 inches
15. Visible screen area 6,754.8 cm2
16. Panel technology used LED LCD
17. Available Automatic Brightness Control (ABC) No
18. Available voice recognition sensor No
19. Available room occupancy detector No
20. Image refresh rate 60 Hz
21. Minimum guaranteed availability of software and firmware
updates (to)
22. Minimum guaranteed availability of spare parts (to)
23. Minimum guaranteed product support (up to):
24. Type of power supply: Internal
i Standardized external power supply (as part of the product
package), standard name
-
Input voltage - V
Output voltage - V
ii Suitable standardized external power supply (if not included in the
product package)
-
Required output voltage - V
Required supplied current - A
Required current frequency - Hz
EN
EN 37
Revision 06/2021Copyright © 2021, Fast ČR, a. s.
Page 40
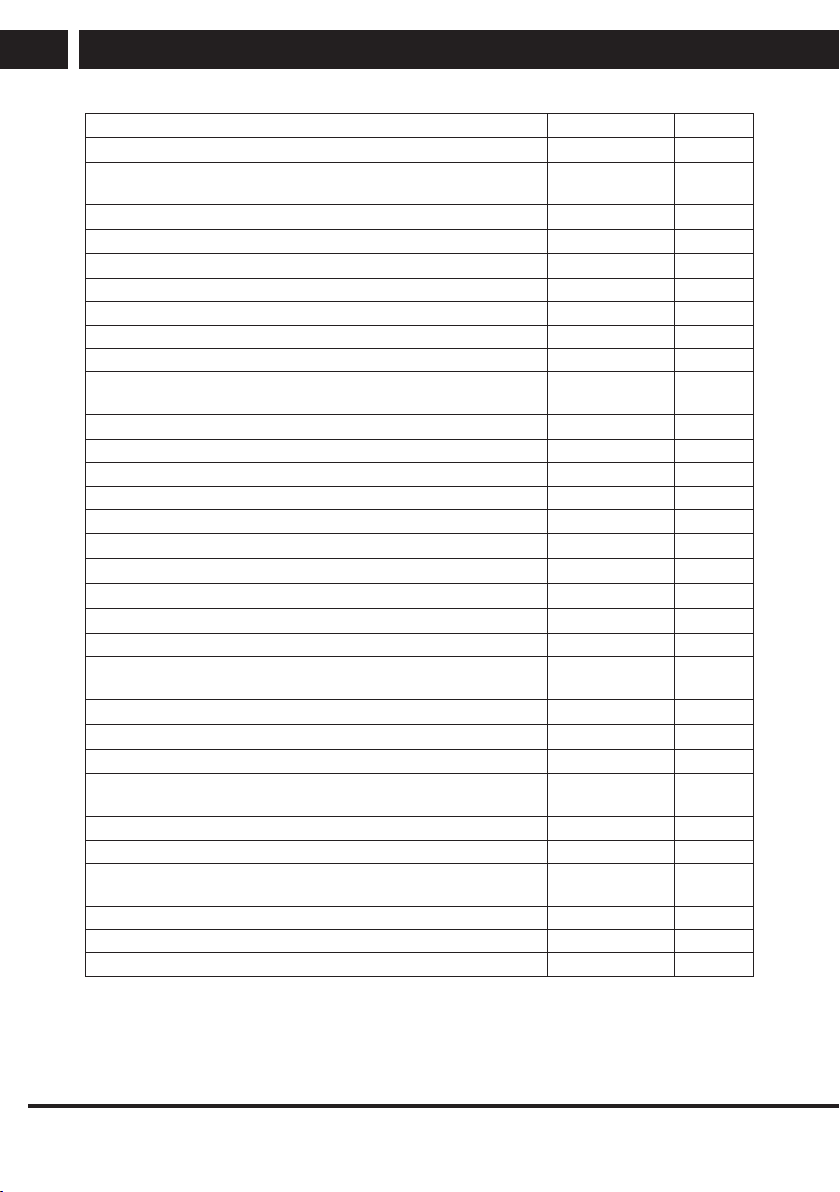
Information sheet
EN
Information Value Unit
1. Supplier's name or trademark SENCOR
2. Identification mark of the model
3. Energy efficiency class for standard dynamic range (SDR) G
4. Power consumption in on state for standard dynamic range (SDR) 101 W
5. Energy efficiency class in High Dynamic Range (HDR) mode G
6. Power consumption in High Dynamic Range (HDR) mode 101 W
7. Off state, power input 0.0 W
8. Standby power input 0.3 W
9. Power consumption in mains standby mode 0.4 W
10. Electronic display category
11. Aspect ratio 16 : 9
12. Screen resolution (in pixels) 3,840 x 2,160 pixels
13. Screen diagonal 139.0 cm
14. Screen diagonal 55 inches
15. Visible screen area 8,486.2 cm2
16. Panel technology used LED LCD
17. Available Automatic Brightness Control (ABC) No
18. Available voice recognition sensor No
19. Available room occupancy detector No
20. Image refresh rate 60 Hz
21. Minimum guaranteed availability of software and firmware
updates (to)
22. Minimum guaranteed availability of spare parts (to)
23. Minimum guaranteed product support (up to):
24. Type of power supply: Internal
i Standardized external power supply (as part of the product
package), standard name
Input voltage - V
Output voltage - V
ii Suitable standardized external power supply (if not included in the
product package)
Required output voltage - V
Required supplied current - A
Required current frequency - Hz
SLE
55US800TCSB
Television
receiver
-
-
38 EN
Copyright ©
2021, Fast ČR, a. s.
Revision 06/2021
Page 41
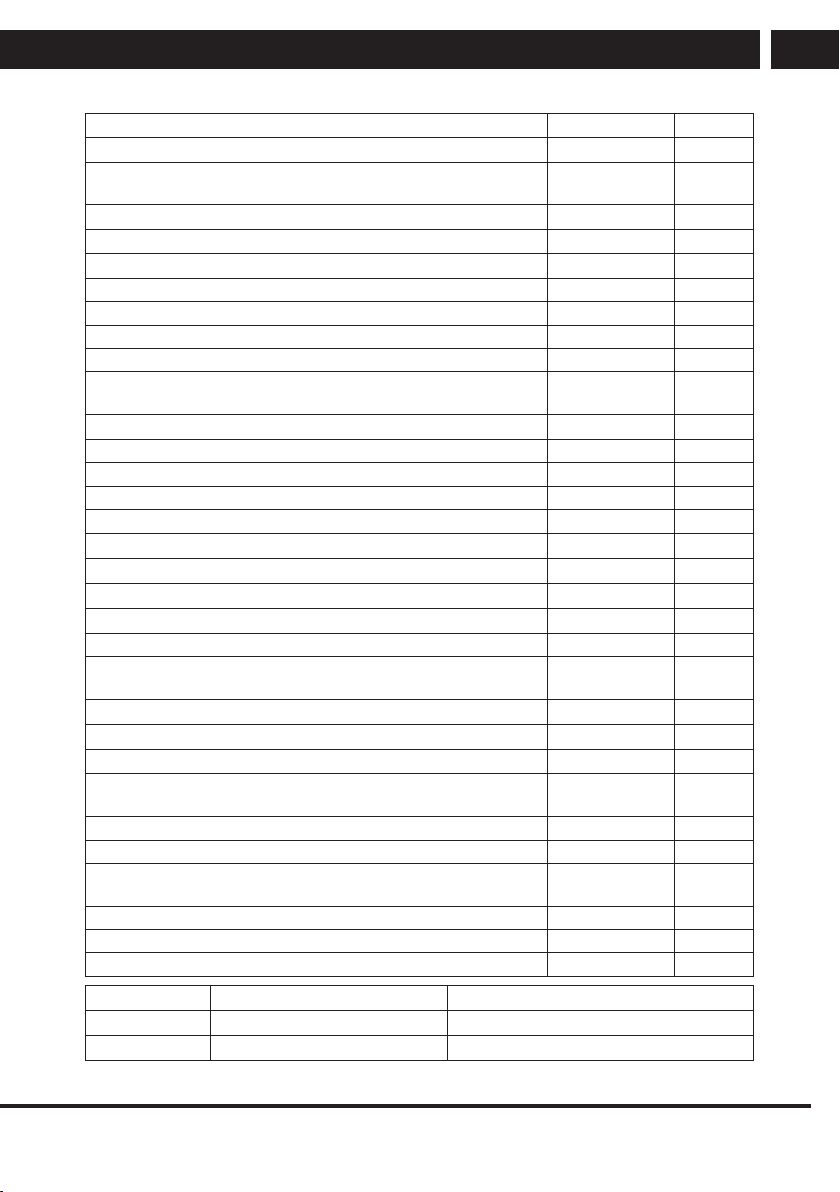
Information sheet
Information Value Unit
1. Supplier's name or trademark SENCOR
2. Identification mark of the model
3. Energy efficiency class for standard dynamic range (SDR) G
4. Power consumption in on state for standard dynamic range (SDR) 111 W
5. Energy efficiency class in High Dynamic Range (HDR) mode G
6. Power consumption in High Dynamic Range (HDR) mode 131 W
7. Off state, power input 0.0 W
8. Standby power input 0.3 W
9. Power consumption in mains standby mode 0.3 W
10. Electronic display category
11. Aspect ratio 16 : 9
12. Screen resolution (in pixels) 3,840 x 2,160 pixels
13. Screen diagonal 164.0 cm
14. Screen diagonal 65 inches
15. Visible screen area 11,478.1 cm2
16. Panel technology used LED LCD
17. Available Automatic Brightness Control (ABC) No
18. Available voice recognition sensor No
19. Available room occupancy detector No
20. Image refresh rate 60 Hz
21. Minimum guaranteed availability of software and firmware
updates (to)
22. Minimum guaranteed availability of spare parts (to)
23. Minimum guaranteed product support (up to):
24. Type of power supply: Internal
i Standardized external power supply (as part of the product
package), standard name
Input voltage - V
Output voltage - V
ii Suitable standardized external power supply (if not included in the
product package)
Required output voltage - V
Required supplied current - A
Required current frequency - Hz
Bluetooth
WiFi Band
Version 5.0
Maximum transmitter power
100mW at 2,4GHz – 2,4835GHz
2.4 GHz and 5GHz
SLE
65US800TCSB
Television
receiver
-
-
EN
EN 39
Revision 06/2021Copyright © 2021, Fast ČR, a. s.
Page 42
Settings
EN
INSTRUCTIONS AND INFORMATION REGARDING THE DISPOSAL OF USED PACKAGING
MATERIALS
Dispose of packaging material at a public waste disposal site.
DISPOSAL OF USED ELECTRICAL AND ELECTRONIC APPLIANCES
The meaning of the symbol on the product, its accessory or packaging indicates
that this product shall not be treated as household waste. Please, dispose of
this product at your applicable collection point for the recycling of electrical &
electronic equipment waste. Alternatively in some states of the European Union
or other European states you may return your products to your local retailer
when buying an equivalent new product.
The correct disposal of this product will help save valuable natural resources
and help in preventing the potential negative impact on the environment and
human health, which could be caused as a result of improper liquidation of
waste. Please ask your local authorities or the nearest waste collection centre
for further details. The improper disposal of this type of waste may fall subject to
national regulations for fines.
For business entities in the European Union
If you wish to dispose of an electrical or electronic device, request the necessary
information from your seller or supplier.
Disposal in other countries outside the European Union
If you wish to dispose of this product, request the necessary information about
the correct disposal method from local government departments or from your
seller.
Hereby, FAST ČR a.s. declares that the radio equipment type
SLE 65US800TCSB, SLE 55US800TCSB, SLE 50US800TCSB and SLE
43US800TCSB is in compliance withDirective2014/53/EU.
The full text of the EU declaration of conformity is available at the following
internet address: www.sencor.eu
Changes to the text, design and technical specifications may occur without prior notice
and we reserve the right to make these changes.
40 EN
Copyright ©
2021, Fast ČR, a. s.
Revision 06/2021
 Loading...