

Page 1
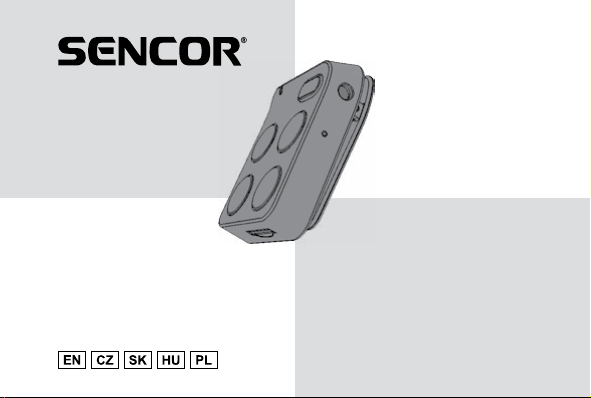
SFP 1460
User‘s manual MP3 PLAYER
Návod k obsluze MP3 PŘEHRÁVAČ
Návod na obsluhu MP3 PREHRÁVAČ
Használati útmutató MP3-LEJÁTSZÓ
Instrukcja obsługi ODTWARZACZ MP3
Page 2

Before operating this unit, please read all instructions.
Než začnete toto zařízení používat, přečtěte si všechny pokyny.
Skôr ako začnete toto zariadenie používať, prečítajte si všetky pokyny.
Mielőtt használatba veszi ezt a készüléket, olvassa el az összes utasítást.
Zanim zaczniesz używać tego urządzenia, przeczytaj wszystkie polecenia.
Page 3

• Elegant appearance and easy to use.
• Multi-Code Player – Supporting MP3, WMA, formats.
• USB disk not requiring further installation of drivers – applies to operating systems Windows 2000/XP and newer, and Mac OS X 9.2
and newer.
MAIN FUNCTION
IMPORTANT
DON’TS
• Do not place naked ames, such as lighted candles on or near the product.
• Do not place objects lled with liquids, such as vases on or near the product.
• Do not use or store this product in a place where it is subject to direct sunlight, heat, excessive dust or vibration.
• Do not keep or store this product in wet conditions for long period.
• Do not clean this product with water or other liquids.
• Do not block or cover the slots and holes in the product.
• Do not push foreign objects into the slots or holes in the product.
• Do not attempt to open or repair this device yourself. Entrust repairs to a specialised service centre.
• Keep plastic bags out of children‘s reach.
• Before using this product, read and follow all warnings and instructions.
• When used by a child, make sure the recommended volume level is adhered to.
• This product is intended for household use only and not for commercial or industrial use.
• Do not expose to dripping or splashing.
• No naked ame sources, such as lighted candles, should be placed on the product.
• Ventilation should not be impeded by covering ventilation openings with items such as newspapers, table cloths, curtains and the
like.
SAFETY INSTRUCTIONS
EN - 1
Page 4
• Make sure the unit is adjusted to a stable position. Damage caused by using this product in an unstable position or by failure to
follow any other warning or precaution contained within this user manual will not be covered by warranty.
WARNING
• Never remove the casing of this apparatus.
• Never place this apparatus on the other electrical equipment.
To prevent possible hearing damage, do not listen at high volume levels for long periods.
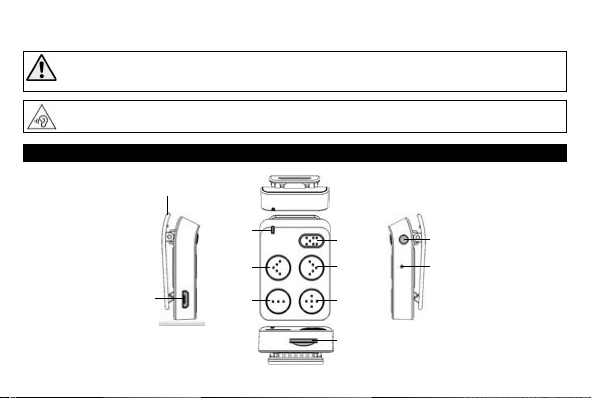
KEY AND CONNECTION FUNCTIONS
1
3
5
2
7
4
6
8
11
9
10
EN - 2
Page 5

No. Description Function
1 Clip
2 Micro USB Port For PC connection / Charge
3 Status LED Indicator (Red and Blue) For charging and play status
4
Button
5
Button
6
Button
7 – Button Volume down
8 + Button Volume up
9 Earphone Output Jack 3.5mm earphone set connection
10 Reset Button For hardware reset
11 Memory Card Slot For external Micro SD Memory Card
Player has an internal, non–user-replaceable rechargeable lithium battery. For best results, the rst time you use the player, let it
charging for about 2 ~ 3 hours or until the charging LED long light from blinking before you use it.
IMPORTANT:
The player may continue to drain energy from the battery when switched to stand by mode, so when it is not used for an extended
period of time, it is necessary to charge it at least once per month.
ABOUT PLAYER’S BATTERY
On/Off, Play/Pause
Back Track / Fast-Backward
Next Track / Fast-Forward
EN - 3
Page 6

You can recharge the Player’s battery in two ways:
By connecting the player to a computer or using a USB charger (not included).
1. The Status LED will light blinking in red when the USB power source connected.
2. When the battery is fully charged, the Status LED will switch to long light red from blinking.
CHARGING MODE
PC CONNECTION MODE
1. CONNECT PLAYER TO COMPUTER
1.1 Connect player to Windows OS computer with the USB cable, then “USB Mass Storage Device” is detected and related
driver is installed by your computer. A removable disk drive will display in “My computer” folder, user can operate Read and
Write function. And the battery is charging in background. (for Windows 2000 / XP System or above)
1.2 Or, connect player with MAC OS X computer, then an “Untitled” icon will display on the desktop indicating the player is a
removable disk, user can operate Read and Write function. And the battery is charging in background. (For MAC OS X 9.2
or above)
NOTE:
In USB power charger or PC connection mode, the player can play music if you press or press and hold the button.
2. DISCONNECTING THE PLAYER FROM THE COMPUTER
Please safely remove the player when it is in computer connection mode, otherwise, the data stored in the Player might be lost.
2.1 If you’re using a Windows OS PC, you can disconnect the player in My Computer or by clicking the “Safely Remove
Hardware” icon in the Windows system tray.
2.2 If you’re using a Mac OS PC, you can also disconnect player by dragging the player icon on the desktop to the Trash.
2.3 And now, is safe to disconnect the player with your computer, unplug the USB connector from player and then your computer.
2.4 If you accidentally disconnect player without disconnect it, reconnect it to your computer.
EN - 4
Page 7

GETTING START PLAYER
1. ON / OFF
1.1 Plug-in earphone set into player’s earphone output jack;
1.2 Press and hold the button, until the Status LED light up in blue, to power On the player.
1.3 The blue light will switch to blinking and then the music will play in seconds automatically.
1.4 To turn Off the Player; press and hold the button until the status LED light fast blinking and then the Player will switch
Off in seconds.
NOTE:
If no any supported music le at the player’s memory; the status indicator light will be ashing fast and then will go Off, and the player
will turn Off in seconds automatically.
2. PLAY / PAUSE MUSIC
2.1 Press button to pause the playing music.
2.2 Press it again to resume.
2.3 If player is in pause state for 3 minutes, it will be turned to standby Off automatically.
3. ADJUST VOLUME
3.1 Press the +/– button to increase or decrease the volume.
3.2 Press and hold +/– button to increase or decrease volume level continuously.
3.3 For the purpose of hearing protection, a sound signal is made in the headphones when the default setting level is
reached that may exceed 85 dB and upon every increase in volume thereafter. Press button to accept the warning
and enter into the volume control for increase the level and until to maximum level.
4. PLAY NEXT / PREVIOUS MUSIC
4.1 In playing mode;
4.2 Press the
button to play the next track.
EN - 5
Page 8

4.3 Press the button to play the previous track.
5. FAST MOVE FORWARD / BACK
5.1 Hold down the button to move quickly forward.
5.2 Hold down the
• Playing mode: Blue light ashing once per second.
• Pause mode: Blue light ashing 2 seconds once.
• PC connecting mode: Blue light will ash when data transferring.
• Red light ashing once per second. (In charging)
• In charging Mode: Red light ashing once per second. (In charging)
• Charging completed: Red light bright
• Low battery in 20%: Red light ashing.
This player allows you to play those support media les from Micro SD memory card. Also, it will increase the mobile hard-disk memory
capacity of the player if you use this option.
• Turn OFF the player and then insert the memory card into player’s memory card slot; ensure that the memory card is inserted rmly
and with the correct side.
• Now you can turn ON the player, the player will reading and searching the supported music les from memory card / internal
memory, once found music will play automatically.
• Player will give priority to external memory card when it has been inserted into memory card slot, and then play the built-in memory.
• Before you want to take out the memory card from player, please turn OFF the player.
button to move quickly back.
INDICATOR LED LIGHT FUNCTION
INSERT MICRO SD MEMORY CARD
EN - 6
Page 9

In some circumstances, the device may encounter dead halt during use. This device has design with built-in a mini tact switch in a hole
which located at right side on device. It can provide reset function to restart the device.
TO RESET:
• Carefully insert an unfolded paper clip or a similar thin, and if possible blunt, instrument (0.8 – 1 mm) into the hole until you touch
the barrier. Actually that is the tact switch button surface.
• Then add a bit of force and you will get a click sound and feeling return from switch. The device is reset and restart in seconds.
RESET THE PLAYER
TROUBLESHOOTING
Play cannot turn ON • Check whether battery have enough energy.
No sound is heard • Check whether Volume is set to “minimum” and connect the headphone plugs rmly.
Upload / Download of music
les fails.
• Check whether the headphone plug is dirty.
• Corrupted WMA / MP3 may make a static noise and the sound may cut off. Make sure that the
music les are not corrupted.
• Check whether music les format are support.
• Check whether player’s USB connector is connected with computer properly.
• Check whether driver is installed correctly.
• Check whether the player’s memory is in full.
EN - 7
Page 10

TECHNICAL SPECIFICATIONS
Unit Dimension 47.5mm (H) x 32 mm (W) x 17 mm (D)
Unit Weight 15 g
Interface USB 2.0 (High Speed)
Memory Capacity Flash memory: 4 GB
Memory Card Slot
Rechargeable Battery Lithium 3.7V 110mAh (Play Time: 5~6.5 hours)
Supported formats
Headphones
Audio File Type MP3, WMA
Operating Temperature 0°C to 40°C
Operation System Windows 2000 / XP or newer, MAC OS X 9.2 or newer
For Micro SD Memory Card
(Support up to 16GB possible)
MP3 32Kbps – 320Kbps
WMA 32Kbps – 384Kbps
Headphone power output 2 mW x 2 (at 32 Ohm)
Frekvenční rozsah 20 Hz – 20 000 Hz
Odstup signál/šum 80 dB
EN - 8
Page 11

INSTRUCTIONS AND INFORMATION REGARDING THE DISPOSAL OF USED
PACKAGING MATERIALS
Dispose of used packaging material at a site designated for waste in your municipality.
DISPOSAL OF USED ELECTRICAL AND ELECTRONIC EQUIPMENT
This symbol on products or original documents means that used electric or electronic products must not be added to ordinary
municipal waste. For proper disposal, renewal and recycling hand over these products to determined collection points. Or as
an alternative in some European Union states or other European countries you may return your products to the local retailer
when buying an equivalent new product.
Correct disposal of this product helps save valuable natural resources and prevents damage to the environment caused
by improper waste disposal. Ask your local authorities or collection facility for more details. In accordance with national
regulations penalties may be imposed for the incorrect disposal of this type of waste.
For business entities in European Union states
If you want to dispose of electric or electronic appliances, ask your retailer or supplier for the necessary information.
Disposal in other countries outside the European Union
This symbol is valid in the European Union. If you wish to dispose of this product, request the necessary information about the correct
disposal method from the local council or from your retailer.
This product meets all the basic requirements of EU directives that apply to it.
Changes in the text, design and technical specications may change without prior notice and we reserve the right to make these
changes.
EN - 9
Page 12

EN
Warranty conditions
Warra nty card is no t a part of the de vice pac kaging.
This produc t is warrant ed for t he period of 24 months from the date o f purchas e to the e nd-u ser. Warranty i s limited
to the f ollo wing c ondit ions. Warran ty is re ferred only t o the customer goo ds using for c ommon domestic use. Th e
claim f or service can b e appl ied eit her at d ealer’s shop where the product was bought, o r at bel ow ment ioned
autho rize d ser vic e shop s. The e nd-u ser i s oblig ated t o set up a c laim immediately w hen th e defe cts a ppea red but
only ti ll the e nd of warranty perio d. The e nd use r is obl igat ed to co oper ate to c ertify the claiming def ect s. Only
comp lete d and clean (ac cord ing to hy gienic s tand ards) produ ct wil l be ac cept ed. In c ase of e ligible war ranty c laim
the wa rrant y period will b e prolonged by the p eriod f rom the date o f claim appli cation til l the date of taking ov er the
produ ct by en d-u ser, or th e date t he end -user is obligat ed to ta ke it ove r. To obtain th e ser vice under t his wa rrant y,
end- user i s obligate d to cer tify h is cla im with duly comple ted fo llow ing documents: receipt, ce rtif icat e of warranty,
certificate of installation.
EN - 10
Page 13

This w arranty is v oid especi ally if appl y as follo ws:
Defects w hich we re put on sale.
Wear-out or damage ca used b y comm on use .
The produc t was damage d by unprofe ssio nal or wr ong ins tall ation, use d in cont rary to the applic abl e
inst ruct ion manual, u sed in c ontrary to legal e nact ment an d comm on proces s of use o r used for ano ther
purp ose w hich ha s been d esig ned fo r.
The pro duct w as dam aged by uncared- for or insuf ficient maintenan ce.
The pro duct w as dam aged by dirt, a ccident of f orce m ajeur e (natural di saster, fire, a nd flo od).
Defects on f unct ional ity cause d by low d ualit y of signal, el ect romag netic field inter fere nce et c.
The pro duct w as mec hanic ally damag ed (e.g. broken butto n, fall ).
Damage c aus ed by us e of unsuita ble me dia, filling s, exp endab le supplie s (bat teri es) or b y unsuitabl e work ing
condition s (e.g. high temp erat ures, h igh humi dity, q uakes).
Repair, mo dific atio n or oth er failu re act ion to t he pro duct b y unaut hori zed pe rson .
End-u ser did not prove eno ugh his r ight to c laim ( time an d plac e of pur chas e).
Data on p resented d ocum ents d iffers from data on p rodu cts.
Cases w hen the claiming product canno t be indentif ied ac cord ing to the presente d document s (e.g. t he ser ial
numbe r or the w arranty seal has be en dam aged ).
Authorized service center s
Visi t ww w.sen cor.eu f or det ailed information about a uthorized ser vice c ente rs.
EN - 11
 Loading...