

Page 1
SAC MT7007C
EN
MOBILE AIR CONDITIONER
Translation of the original manual
Page 2
SAC MT7007C
Page 3
A
1
2
10
23
4567 8
3
B
4
6
7
5
8
1
9
11
12
Page 4
C
2
1
6
8
5
91011121314
D
7
1
2
3
4
5
6
7
8
E
Page 5
F
G1
H1
H3
G2 G3
H2
Page 6
EN Mobile Air Conditioner
Important safety instructions
READ CAREFULLY AND STORE FOR FUTURE USE.
This symbol indicates that not adhering to
instructions may result in death or serious
injur ies.
WARNING :
To prevent the death or injury of the user or
other persons or damage to property, the
following instructions must be adhered to.
Incorrect use as aresult of not adhering to
instructions may cause death, injuries or
damage.
• This appliance may be used by children 8 years of
age and older and by persons with physical, sensory,
or mental impairments or by persons with alack of
experience or knowledge, if they are properly supervised
or have been informed about how to use the product in
asafe manner and understand the potential dangers.
• Cleaning and maintenance performed by the user must
not be performed by unsupervised children.
• Children must not play with the appliance.
Copyright © 2021, Fast ČR, a.s.
- 1 -
Revision 12/2021
Page 7

• If the power cord is damaged, it must be replaced by an
authorised service centre or by another similarly qualified
person, this will prevent the creation of adangerous
situation. It is forbidden to use the appliance if it has
adamaged power cord.
• The appliance must be stored in amanner that prevents its
mechanical damage.
• The appliance must be stored in awell-ventilated location,
where the dimensions of the room correspond to the
dimensions specified for its operation.
• The appliance must be stored in aroom where an
open flame is not continuously in use (e.g. running gas
appliance) or where there are not sources of ignition (e.g.
running electrical heating element).
• Before connecting the appliance to apower socket, check
that the rated voltage on its rating label matches the
electrical voltage in the power socket.
• Connect the appliance only to aproperly grounded socket.
• The power socket must be freely accessible so that it is
possible to quickly disconnect the power cord from the
power source if necessary.
• The appliance is designed for use at home, in offices and
similar types of areas. Do not use it in very dusty or humid
rooms such as laundries or bathrooms, in areas where
chemical or explosive substances are stored, in industrial
surroundings or outdoors.
• Do not place the appliance in the vicinity of an open flame
or appliances that are sources of heat.
Copyright © 2021, Fast ČR, a.s.
- 2 -
Revision 12/2021
Page 8

• Do not place the appliance on unstable surfaces such as
carpets with very long and thick fibres.
• The appliance may only be used on adry, stable, smooth
and horizontal surface.
• The appliance is equipped with travel wheels, so pay
extra attention when handling it so that it does not fall
downstairs or travel down from sloped areas. If necessary,
secure the wheels using the stoppers.
• Only use original parts to assemble the appliance. Before
starting to assemble the appliance, make sure that it is
turned off and disconnected from the power socket.
• Prior to connecting the appliance to apower socket, make
sure that the appliance is correctly assembled according
to the instructions in this user’smanual.
• Do not touch the appliance with wet or damp hands. This
applies especially when it is connected to apower socket.
• Do not expose the appliance to dripping or spraying water
or submerge it in water or another liquid.
• Do not cover or insert anything into the air inlet or air outlet
openings. Otherwise, this could damage the appliance.
• During operation there needs to be sufficient space for air
circulation of at least 30 cm on all sides of the appliance.
• Do not expose yourself to acold air current for along time.
This could have anegative effect on your health.
• To turn the appliance on or off, always use the appropriate
buttons on the control panel or the remote control. Do not
turn off the appliance by disconnecting the power cord
from the power socket.
Copyright © 2021, Fast ČR, a.s.
- 3 -
Revision 12/2021
Page 9

• Always turn off the appliance and disconnect it from the
power socket when leaving it without supervision, when
not using it and before moving, disassembling, or cleaning
it.
• Do not attempt to remove the outer case of the appliance.
• Disconnect the appliance from the power socket by pulling
on the plug, never pulling on the power cord. Otherwise,
this could damage the power cord or the socket.
• If the power cord or power plug are damaged in any way,
do not use the appliance.
• Store the appliance in avertical position. It may be
transported in avertical position or tilted on the sided. If
you have already used the appliance, check that all the
condensate has been drained. After transporting it, wait at
least 1 hour before using the appliance.
• Do not use the appliance if it is not working correctly if
it has been damaged or has been submerged in water.
To avoid ahazardous situation arising, do not repair the
device yourself or modify it in any way. Have all repairs or
adjustments performed at an authorised service centre. By
tampering with the appliance, you risk voiding your legal
rights arising from unsatisfactory performance or quality
warranty.
• Installation must be performed in accordance with the
installation instructions. Incorrect installation may result in
awater leak, injury by electrical shock or fire.
• To prevent the risk of fire or injury by electrical shock, do
not use this appliance with atimer or any another similar
device that could spontaneously start this appliance.
Copyright © 2021, Fast ČR, a.s.
- 4 -
Revision 12/2021
Page 10

• The appliance must be installed in accordance with
national electrical codes.
• Only use this product for the purposes that are described
in this user’smanual. Otherwise, this may result in
damage or excessive noise and vibrations.
• Use only the accessories and components that are
supplied together with the appliance and the tools
explicitly intended for its installation. The use of nonstandard parts and accessories may result in awater
leak, injury by electrical shock, fire, injury, or damage to
property.
• DO NOT ADJUST the length of the power cord of the unit
and do not use an extension cord for its power supply.
• DO NOT CONNECT the unit to apower socket to which
other electrical appliances are already connected. The
incorrect selection of an electrical power supply may result
in afire or injury by electrical shock.
• Do not cover the cable with acarpet. Do not place carpets,
fillets, or any other floor coverings on the power cord. Do
not locate the cable underneath furniture or appliances.
Lead the cable where nothing will ride over it and where
nobody can trip over it. If this occurs, immediately
disconnect the unit from the power socket.
• If the unit is tipped over during use, turn it off and immediately
disconnect it from the main power supply. Visually check that
the unit has not been damaged in any way.
• In the event of any doubts that the unit has been damaged
in any way, seek assistance from atechnician or customer
service.
Copyright © 2021, Fast ČR, a.s.
- 5 -
Revision 12/2021
Page 11
• The power supply must be disconnected during
athunderstorm to prevent damage to the appliance in the
event of alightning strike.
• Disconnect the power supply to the appliance if it makes
astrange noise or if an odour or smoke is emitted.
Read this user‘smanual.
Warning:
Fire hazard.
SPECIFIC INFORMATION FOR APPLIANCES USING
REFRIGERANT GAS R290
Carefully study any warnings.
CAUTION :
For defrosting and cleaning, do not use any
other tools than those recommended by the
manufacturer.
• This appliance must be placed in an area without any
continuous source of ignition (for example an open fire, gas
or electrical appliances in operation).
• Do not puncture or do not burn it.
• Refrigerant gases may be odourless.
• The appliance must be installed, used, and stored in an
area that is greater than 13 m2.
Copyright © 2021, Fast ČR, a.s.
- 6 -
Revision 12/2021
Page 12

• This appliance contains approx. 120 g of refrigerant gas
R290.
• R290 is arefrigerant gas that complies with the European
directives on the environment. Do not puncture any part of
the refrigerant circuit.
• If the appliance is installed, used and stored in anon-
ventilated area, the room must be designed to prevent the
accumulation of refrigerant leaks resulting in arisk of fire
or explosion due to ignition of the refrigerant caused by
electrical heaters, stoves, or other sources of ignition.
• The appliance must be stored in such away as to prevent
mechanical failure.
• Individuals who operate or work on the refrigerant circuit
must have the appropriate certification issued by an
accredited organisation that ensures competence in
handling refrigerants according to aspecific evaluation
recognized by associations in the industry.
• Repairs must be performed based on the
recommendations from the manufacturing company.
Maintenance and repairs that require the assistance
of other qualified personnel must be performed under
the supervision of an individual specified in the use of
flammable refrigerants.
• Check the rating label for the type of refrigerant gas used
in your appliance.
• Do not cover the ventilation slots.
• Compliance with national gas regulations shall be
observed.
Copyright © 2021, Fast ČR, a.s.
- 7 -
Revision 12/2021
Page 13
EN
Mobile Air Conditioner
User'smanual
• Prior to using this appliance, please read the user‘smanual
thoroughly, even in cases, when one has already familiarised
themselves with previous use of similar types of appliances. Only use
the appliance in the manner described in this user’smanual. Keep
this user‘smanual in asafe place where it can be easily retrieved for
future use.
• We recommend saving the original cardboard box, packaging
material, purchase receipt and responsibility statement of the vendor
or warranty card for at least the duration of the legal liability for
unsatisfactory performance or quality. In the event of transportation,
we recommend that you pack the appliance in the original box from
the manufacturer.
. . . . . . . . . . . . . . . . . . . . . . . . . . . . . . . . . . . . . . . . . . . . . . . . . . . . . . . . . . . . . . . . . . . .
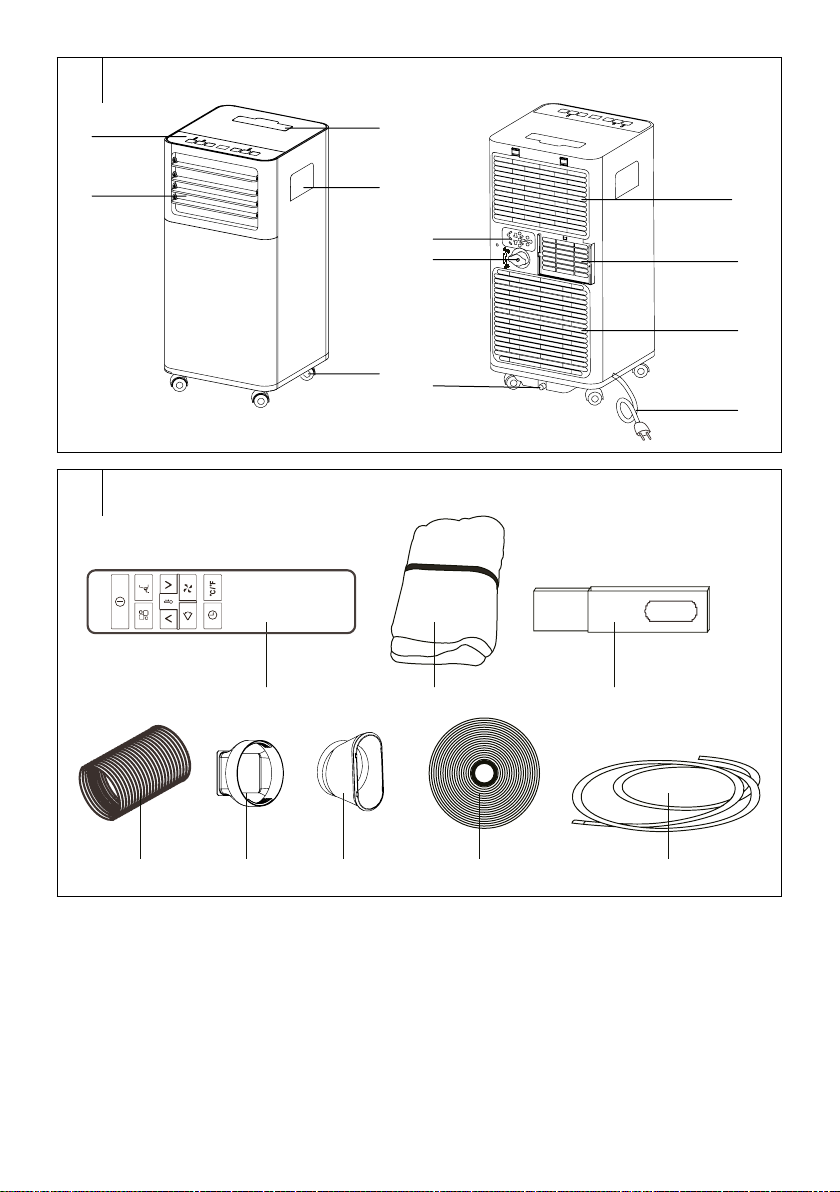
DESCRIPTION OF THE APPLIANCE
A1 Control panel
A2 Air outlet
A3 Remote control storage slot
A4 Handles (located along both
sides)
A5 Travel wheels
A6 Universal power cord plug
plate
A7 Top drain outlet
. . . . . . . . . . . . . . . . . . . . . . . . . . . . . . . . . . . . . . . . . . . . . . . . . . . . . . . . . . . . . . . . . . . .
DESCRIPTION OF THE ACCESSORIES
B1 Remote control
(batteries included)
B2 Sealing kit for roof, sash, and
tilt-open windows:
- textile protection with azip
- tape of self-adhesive velcro
B3 Plastic window set for sliding
and roof windows (screws
included)
. . . . . . . . . . . . . . . . . . . . . . . . . . . . . . . . . . . . . . . . . . . . . . . . . . . . . . . . . . . . . . . . . . . .
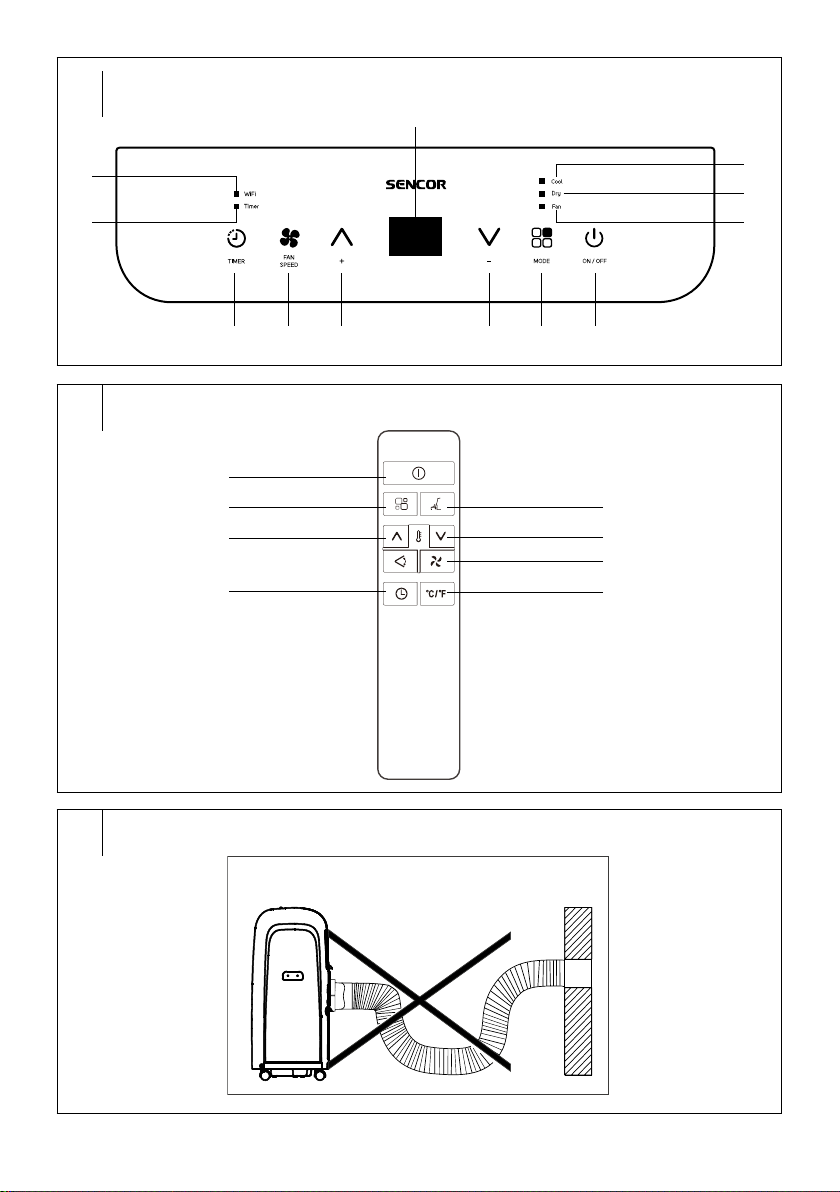
DESCRIPTION OF THE CONTROL PANEL
C1 Timer indicator
C2 Wi-Fi indicator (valid only for
Wi-Fi models)
C5 Display
C6 Cooling mode indicator
C7 Dehumidification mode
indicator
C8 Fan mode indicator
. . . . . . . . . . . . . . . . . . . . . . . . . . . . . . . . . . . . . . . . . . . . . . . . . . . . . . . . . . . . . . . . . . . .
REMOTE CONTROL
button to turn on / off
D1
D2
to select an operation
mode
D3 + button
D4
button to set the timer
button to set the sleep
D5
mode
Note:
The SWING
Copyright © 2021, Fast ČR, a.s.
A8 Bottom drain outlet
A9 Removable grille with filter
(top evaporator air inlet is
located under the grille)
A10 Air outlet to connect the
flexible hose
A11 Bottom air inlet of the
condensation unit
A12 Power cable
B4 Wide flexible hot air exhaust
hose
B5 Inlet hose adaptor
B6 Outlet hose adaptor
B7 Sealing
B8 Drain hose
button to set the timer
C9
button to set the fan speed
C10
C11 + button
C12 – button
button to select an
C13
operation mode
button to turn on / off
C14
D6 – button
button to set the fan speed
D7
D8 °C / °F button to change the
temperature unit
function is available only for certain models.
INSTALLATION
Location of the mobile air conditioner
• Locate the mobile air conditioner on an even, dry, and stable surface
and within reach of agrounded power socket.
• For easier handling, the mobile air conditioner is equipped with travel
wheels A5. Do not use the travel wheels A5 when you need to move
the air conditioner over carpets or similar surfaces. Avoid riding over
objects.
• To achieve optimal efficiency, maintain adistance of at least 45 cm
from the wall or other obstacles.
Warning:
Do not block the air inlet or air outlet.
Note:
Do not use the mobile air conditioner to cool aroom where
computer servers, etc. are located.
Installation, adjustment, maintenance, and repairs must only
be performed by aqualified person.
Installation of flexible hose on to the mobile air conditioner
• The flexibl hose B4 must be connected to the mobile air conditioner
and installed into awindow in accordance with the operating modes
that you wish to set. Install the flexible hose B4 when you wish to
select the operating modes: cooling and dehumidification.
• Extend the flexible hose B4 to the required length. Fix the inlet hose
adaptor B5 on to the end of the flexible hose B4. Place it over the air
outlet A10 and fix it on the air outlet A10 by moving it down.
• Fix the outlet hose adaptor B6 on to the second end of the flexible
hose B4.
Note:
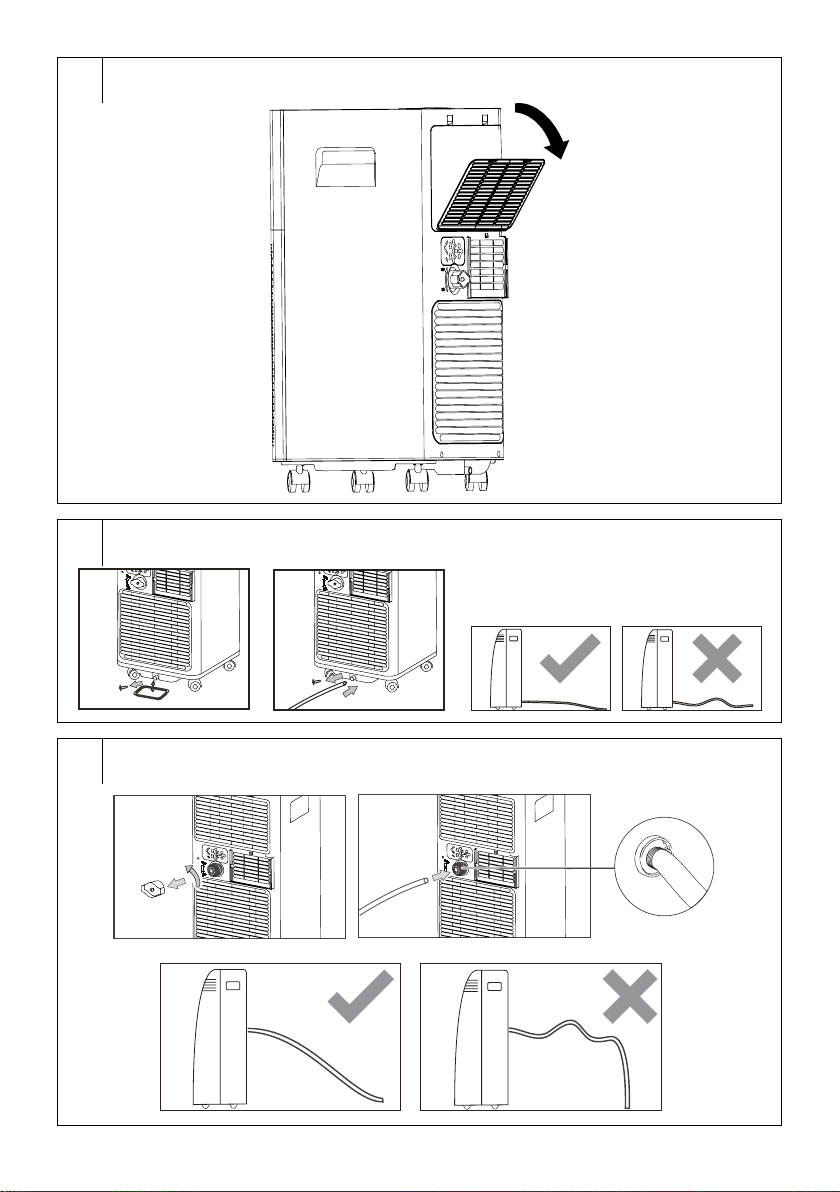
Avoid excessive bending of the hose – see fig. E. To ensure the
proper operation of the mobile air conditioner, it is important
not to overload the hose, or to bend it unnecessarily.
Excessive loading or bending may damage the hose.
Installation of flexible hose into aslide window
• The window insert is designed to be compatible with the majority of
sliding windows (vertical and horizontal). Nevertheless, for certain
types of slide windows it may be necessary to modify the installation
procedure described below.
• Open the sliding window sash and place the window insert into the
window. Adjust the dimensions of the window insert to the width of
the window (on avertical slide window) / height of the window (on
ahorizontal slide window). If necessary, cut away apart of the window
insert if the window is too small. Close the sliding window sash to the
window insert. Insert the flexible hose B4 with attached outlet hose
adaptor B6 into the hole in the window insert.
Installation of flexible hose using the sealing kit
• The sealing kit B2 is suitable for tilt-open, sash and roof windows.
The textile protection is easy to install in the window using the Velcro.
Open the window and into the created crevice install the tape of
Velcro. We recommend that you thoroughly degrease the location
where you will be attaching the tape of Velcro using an appropriate
cleaning agent. Remove the protective paper strip and stick the tape
on to the window frame.
• To be able to insert the flexible hose B4, the textile protection is fitted
with an integrated zip. Open the zip in such alocation that will enable
you to easily insert the flexible hose B4.
• It is not necessary to remove the sealing kit B2 from the window when
not using the mobile air conditioner. The window can be still closed.
- 8 -
Revision 12/2021
Page 14
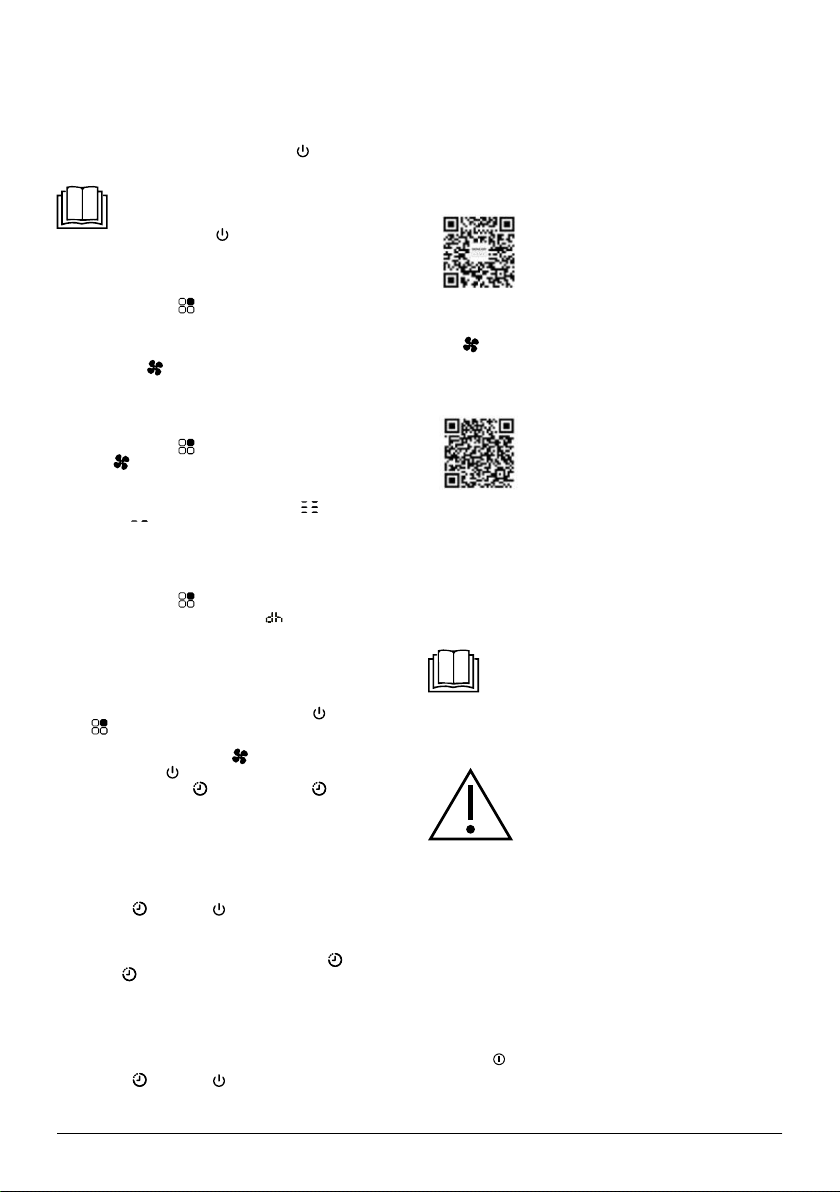
OPERATION OF THE MOBILE AIR CONDITIONER
A. CONTROL PANEL
• Insert the power plug into apower socket. Now, the mobile air
conditioner sets itself to the stand-by mode.
Turning the mobile air conditioner on and off
• To turn on the mobile air conditioner, press the
again to switch the mobile air conditioner to the stand-by mode.
Note:
Never turn off the mobile air conditioner by pulling the
power cord out of the power socket. Turn off the mobile air
conditioner using the
then pull out the power cord.
OPERATING MODES
1. Cooling mode
• Repeatedly press the
is lit. Use the +/- buttons to set the desired temperature. You can set
the temperature in the range from 18 to 32°C. The set temperature is
shown on the display C5.
• Use the button
show “F1”. For High speed, the display will show “F2”. Each time the
button is pressed, the respective indicator will be lit on the control
panel A1.
2. Fan mode
• Repeatedly press the
Use the
High (high speed) – Low (low speed). Each time the button in pressed,
the respective indicator will be lit on the control panel A1 and at the
same time, the respective graphic symbol (“F1”
speed;“F2”
this mode, it is not possible to set the temperature, nor it is necessary
to connect the flexible hose B4 to the mobile air conditioner.
3. Dehumidification mode
• Ensure the flexible hose B4 is connected to the air conditioner.
Repeatedly press the
indicator C7 is lit. The display C5 shows
possible to set the temperature or fan speed. The fan speed is
automatically set.
FUNCTIONS OF THE MOBILE AIR CONDITIONER
1. Automatic turn-on function
• Turn the mobile air conditioner on by pressing the
the
to turn the mobile air conditioner on. Use the +/- buttons to set the
desired temperature and use the
required. Press the
• Now, press shortly once
repeatedly to set the time after which the mobile air conditioner will
turn on automatically. You can set the time of the automatic turn-on
function in the range from 1 up to 24 hours.
• After afew seconds, the set time will be saved in the air conditioner
memory and the automatic turn-on indicator will be lit on the display
C5. Once the set time elapses, the mobile air conditioner will turn on
automatically.
• If you press
function is set, the setting will be automatically cancelled.
2. Automatic turn-off function
• While the mobile air conditioner is running, press the
Press the
mobile air conditioner will turn off automatically. You can set the time
of the automatic turn-off function in the range from 1 up to 24 hours.
• After afew seconds, the set time will be saved in the air conditioner
memory and the automatic turn-off indicator will be lit on the display
C5. Once the set time elapses, the mobile air conditioner will turn off
automatically.
• If you press
function is set, the setting will be automatically cancelled.
to set the speed. For Low speed, the display will
button C10 to set the fan speed in the following order:
symbol for low speed) will be lit on the display C5. In
button C13 to select the operation mode in which you wish
button C9 or button C14 after the automatic turn-on
button C9 repeatedly to set the time after which the
button C9 or button C14 after the automatic turn-off
button C14, wait afew minutes and
button C13 until the cooling indicator C6
button C13 until the fan indicator C8 is lit.
button C13 until the dehumidification
button C14 to turn the mobile air conditioner off.
button wto set the fan speed as
button C9. Press the button C9
button C14. Press it
symbol for high
. In this mode, it is not
button C14. Use
button C9.
3. Change of the temperature unit
• Press and hold +/- buttons simultaneously to change the temperature
unit from°C. to °F and vice versa.
4. Wi-Fi function (valid only for Wi-Fi models)
• You can also control the mobile air conditioner directly from your
smart phone thanks to the “Sencor HOME” application.
• Install the “Sencor HOME” application on to your smart phone.
The application is available for operating systems iOS (App Store)
and Android (Google Play). Further follow the instructions in the
application.
• In order to control the mobile air conditioner using the installed
application, it is necessary the Wi-Fi is turned on.
• While the mobile air conditioner is off (it is in stand-by mode), press
button C10 six times within four seconds to reset the Wi-Fi
the
signal. An audible alert sounds. If the function is on, the indicator C2
will be lit.
• For simpler installation of the control panel of the air conditioner, you
can use the following QR code!
B. REMOTE CONTROL
Inserting and replacing batteries
• Slide out the battery compartment cover, which is located on the rear
side of the remote control. Place two AAA/LR03 (2× 1.5 V) alkaline
batteries into the battery compartment and close the cover.
• When inserting the batteries ensure the correct polarity as shown in
the battery compartment.
• When replacing the batteries, always use batteries of the same type,
never combine old and new batteries or batteries of various types.
Note:
Removing the batteries from the remote control will delete
all the settings. After new batteries are inserted the default
remote control settings as programmed by the manufacturer
will be renewed.
If you do not use the remote control for longer than 2 months,
remove the batteries.
Caution:
Dispose the used batteries according to the local
regulations. Never dispose the batteries together with
the household waste. Do not use old and new batteries
at the same time. Do not use alkaline, standard, and
rechargeable batteries at the same time. Do not throw
batteries into fire. They may explode or leak.
Using the remote control
• For the remote control to work correctly, ensure that the maximum
distance of the remote control from the mobile air conditioner is
not greater than 7 m and that there is no obstacle between the
remote control and the mobile air conditioner that could prevent the
transmission of the signal.
• Point the remote control directly at the mobile air conditioner. The
transmission of the signal is confirmed by ashort sound signal.
• Do not expose the remote control to direct sunlight or high
temperatures. Otherwise, the signal may not be transmitted.
Turning the mobile air conditioner on and off
• Press the
Press it again to switch the mobile air conditioner to the stand-by
mode.
button D1 once to turn the mobile air conditioner on.
Copyright © 2021, Fast ČR, a.s.
- 9 -
Revision 12/2021
Page 15
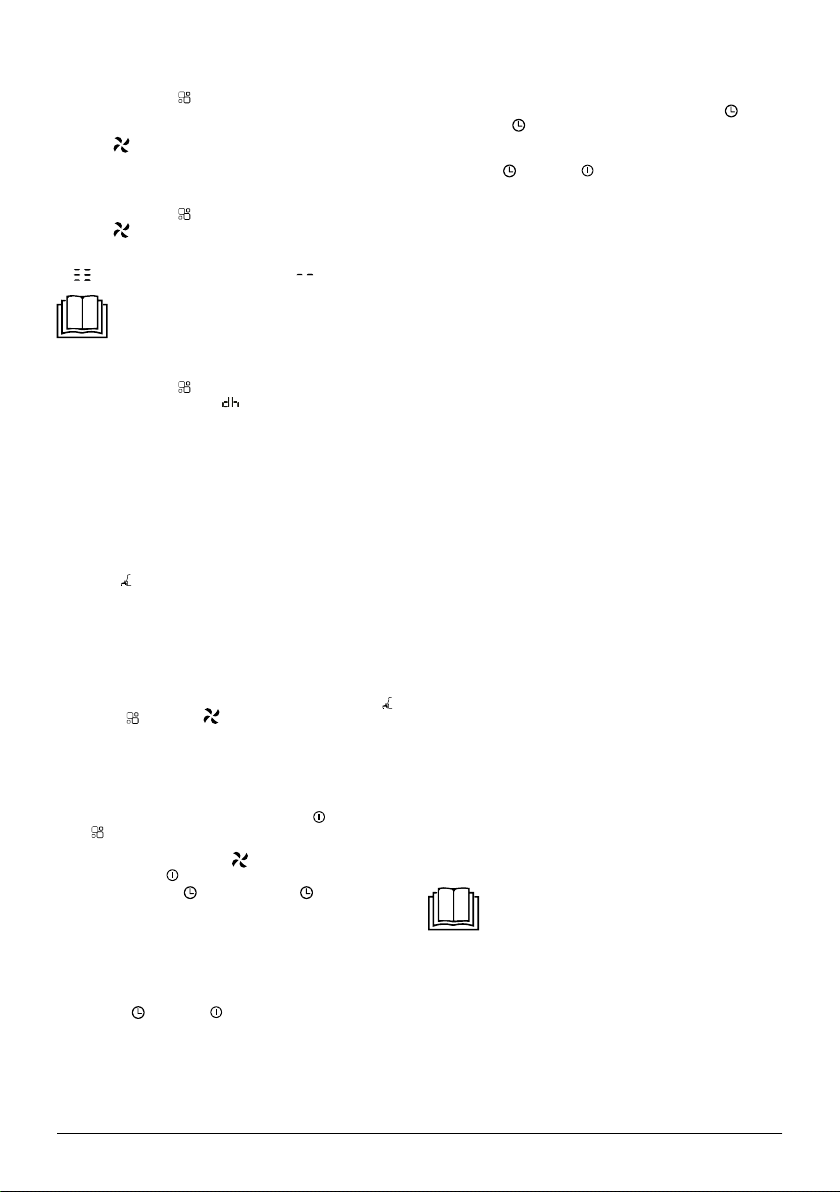
OPERATING MODES
1. Cooling mode
• Repeatedly press the
Use the +/- buttons to set the desired temperature. You can set the
temperature in the range from 18 to 32°C.
• Use the
2. Fan mode
• Repeatedly press the
• Use the
3. Dehumidification mode
• Ensure the flexible hose B4 is connected to the air conditioner.
. . . . . . . . . . . . . . . . . . . . . . . . . . . . . . . . . . . . . . . . . . . . . . . . . . . . . . . . . . . . . . . . . . . .
FUNCTIONS OF THE MOBILE AIR CONDITIONER
1. Sleep function
• The sleep function is used to reduce overnight power consumption
• Select the operation mode – see the previous part of the manual.
• Press the
• When you choose the sleep function, the display illumination C5 will
• When the cooling mode was selected, the temperature will increase
• The sleep function can be cancelled at any time by pressing the
2. AUTOMATIC TURN-ON AND TURN-OFF FUNCTIONS
Automatic turn-on
• Automatic turn-on function enables to set the time after which the
• Turn the mobile air conditioner on by pressing the
• Press shortly once the
• After afew seconds, the set time will be saved in the air conditioner
• If you press
button D7 to set the fan speed in the following order: High
(high speed) – Low (low speed). Each time the button is pressed, the
respective indicator will be lit on the control panel A1 .
button D7 to set the fan speed in the following order:
High (high speed) – Low (low speed). When the button is pressed, the
display C5 will show a graphical representation of the selected speed (
the display will show F1 for low speed and F2 for high speed).
Note:
In the fan mode, it is not possible to set the temperature.
Repeatedly press the
C7 is lit. The display C5 shows
set the temperature or fan speed. The fan speed is automatically set.
when aconstant temperature is not necessary. The function also
ensure comfort while sleeping as the air conditioner operation is
turned down and the display illumination is dimmed.
previously selected mode.
be dimmed and the fan will be automatically set to low speed.
by 1°C. per hour in a2-hour period. This new temperature will be
maintained for six hours and then the mobile air conditioner will be
turned off.
button D5,
mobile air conditioner will turn on automatically.
the
button D2 to select the operation mode in which you wish
to turn the mobile air conditioner on. Use the +/- buttons to set the
desired temperature and use the
required. Press the
repeatedly to set the time after which the mobile air conditioner will
turn on automatically. You can set the time of the automatic turn-on
function in the range from 1 up to 24 hours.
memory and the automatic turn-on indicator will be lit on the display
C5. Once the set time elapses, the mobile air conditioner will turn on
automatically.
function is set, the setting will be automatically cancelled.
button D2 until the cooling indicator C6 is lit.
button D2 until the fan indicator C8 is lit.
button D2 until the dehumidification indicator
. In this mode, it is not possible to
button D5. The mobile air conditioner will operate in the
button D2 or button D7.
button D1. Use
button D1 to turn off the mobile air conditioner.
button D4 or button D1 after the automatic turn-on
button D7 to set the fan speed as
button D4. Press the button D4
Automatic turn-off
• Automatic turn-off function enables to set the time after which the
mobile air conditioner will turn off automatically.
• While the mobile air conditioner is running, press once the
D4. Press the
mobile air conditioner will turn off automatically. You can set the time
of the automatic turn-on function in the range from 1 up to 24 hours.
• If you press
function is set, the setting will be automatically cancelled.
3. CHANGE OF THE TEMPERATURE UNIT
• When the mobile air conditioner is in stand-by mode, press the button
D8 to change the temperature unit from°C. to °F and vice versa.
FLAP ANGLE ADJUSTMENT
• The air outlet A2 is provided by movable flaps. If you need to adjust
the air flow, you can adjust it by hand to the desired angle by moving
up and down.
• Be careful while handling the flaps not to damage them. We
recommend adjusting the flap angle before turning the mobile air
conditioner on.
TIPS FOR CORRECT USE
• To ensure the correct operation of the mobile air conditioner, follow
these recommendations:
- Close all the windows and doors in the room where the mobile air
conditioner is used. When installed the mobile air conditioner semipermanently, you can leave the door slightly open (approx. 1cm) to
guarantee correct ventilation.
- Protect the room from the direct sunshine. Close curtains or roller
blinds to ensure economy operation of the air conditioner.
- Do not block the air inlet or air outlet.
- Ensure there is no source of heat on in the room.
- Never use the mobile air conditioner in very damp rooms, such as
laundries.
- Never use the mobile air conditioner outside.
- Ensure the mobile air conditioner is located on alevel surface. Install
special travel wheel brakes if needed.
. . . . . . . . . . . . . . . . . . . . . . . . . . . . . . . . . . . . . . . . . . . . . . . . . . . . . . . . . . . . . . . . . . . .
MAINTENANCE AND CLEANING
• Before cleaning the mobile air conditioner, turn it off and wait afew
minutes, and then pull the power cord out of the power socket.
Cleaning the air filter
• When the mobile air conditioner is used regularly, it is necessary to
clean the air filter located behind the protective grille A9 at least once
aweek to prevent the fan from being clogged by dust.
• Carefully remove the protective grille and remove the filter – see fig.
F. To remove the dust, use avacuum cleaner. In the event of greater
soiling, hand wash the filter in asolution of lukewarm water (max.
40°C.) and neutral detergent. Then thoroughly rinse under running
water and allow to dry naturally. Do not dry it in aclothes dryer or
in direct sunlight. Once the filter is dry, you can install them back in
their place.
Cleaning the outer case
• To clean the outer case, use asoft wiping cloth dipped in asolution of
lukewarm water and neutral detergent. Then wipe the surface dry.
• When cleaning it, do not spray the mobile air conditioner with water
or any other liquid, do not pour water on it or submerge it in water or in
any other liquid.
• Do not use abrasive cleaning products, solvents, petrol, etc. for
cleaning.
button D4 repeatedly to set the time after which the
button D4 or button D1 after the automatic turn-on
Note:
Do not use the mobile air conditioner without the air filter
properly installed and do not use it with wet or damp air filter.
button
Copyright © 2021, Fast ČR, a.s.
- 10 -
Revision 12/2021
Page 16
Storing the mobile air conditioner
• In order to dry it and to prevent the formation of moulds, leave the
mobile air conditioner running in awarm room in the fan mode for
approximately 12 hours.
• Disconnect the flexible hose B4 and store it in asafe place out of the
reach of children.
• Drain all the condensate from the water tank – see chapter
„Condensate water drainage“.
• Clean the air filter and reinstall it. Wipe the outer case of the mobile air
conditioner. Remove the batteries from the remote control.
• Store the air conditioner in acool, dry, and dark location.
CONDESATE WATER DRAINAGE
• The mobile air conditioner is provided by two drain outlets where each
drains the condensate water from adifferent part of the air conditioner.
In the event of afrequent use of the mobile air conditioner, it is
necessary to regularly check the condensate water status and drain
it. If the dehumidification mode is selected, it is advised to drain the
condensate water using the drain hose B8 which is connected either
to the top drain outlet or bottom drain outlet.
Note:
It is not necessary to drain the condensate water in cooling or
fan modes (provided low humidity in the room). The mobile air
conditioner is designed to increase its efficiency with asmall
amount of water in the condensate tank.
• Condensate water drainage from the bottom drain outlet
• Once the water level in the tank reaches the preset level, the operation
of the mobile air conditioner stops and the display C5 shows “Ft” (full
tank). To drain the condensate water from the air conditioner, proceed
as follows:
1. Disconnect the power plug from the power socket.
2. Carefully re-locate the mobile air conditioner to alocation where the
water may be drained.
3. Underneath the drain outlet A8, place acontainer into which the
condensate water will flow. Carefully remove the plug of the drain
outlet A8. Connect the drain hose B8 and allow the condensate
water to flow out.
4. Once the water tank is empty (condensate water has stopped
flowing), disconnect the drain hose B8 and put the plug back into
the drain outlet A8.
5. Insert the power plug into apower socket and turn on the mobile air
conditioner.
• If you need to ensure the condensate water to be continuously drained
from the mobile air conditioner, it is possible to connect the drain hose
B8 to awaste water drain. Proceed as follows:
1. Disconnect the power plug from the power socket.
2. Remove the plug of the drain outlet A8 – see fig. G1. Connect
the drain hose – see fig. G2. If the length of the drain hose B8 is
insufficient, then it is necessary to purchase alonger hose of the
same type. Never extend the length of the drain hose B8 using
extensions.
3. Connect the end of the drain hose B8 to the waste water drain.
4. Insert the power plug into apower socket and turn on the mobile air
conditioner.
Note:
The drain hose B8 should be installed at the same height
or lower than the drain outlet A8 – see fig. G3. Otherwise,
the condensate water will not be properly drained from the
water tank.
Condensate water drainage from the top drain outlet
• In the dehumidification mode, you can use the top drain outlet A7 for
acontinuous drainage of the condensate water.
1. Disconnect the power plug from the power socket.
2. Remove the plug of the drain outlet A7 – see fig. H1. Connect the
drain hose B8 – see fig. H2. If the length of the drain hose B8 is
insufficient, then it is necessary to purchase alonger hose of the
same type. Never extend the length of the drain hose B8 using
extensions.
3. Connect the end of the drain hose B8 to the waste water drain.
4. Insert the power plug into apower socket and turn on the mobile air
conditioner.
Note:
The drain hose B8 should be installed at the same height
or lower than the drain outlet A7 – see fig. H3. Otherwise,
the condensate water will not be properly drained from the
water tank.
Putting into operation again
• Check that the power cord and plug are not damaged and that the
air filter is clean. Insert anew set of batteries into the remote control.
Proceed according to the instructions in section „Inserting and
replacing batteries“. Install the mobile air conditioner according to
the instructions contained in the preceding part of this user‘smanual
„Installation“.
. . . . . . . . . . . . . . . . . . . . . . . . . . . . . . . . . . . . . . . . . . . . . . . . . . . . . . . . . . . . . . . . . . . .
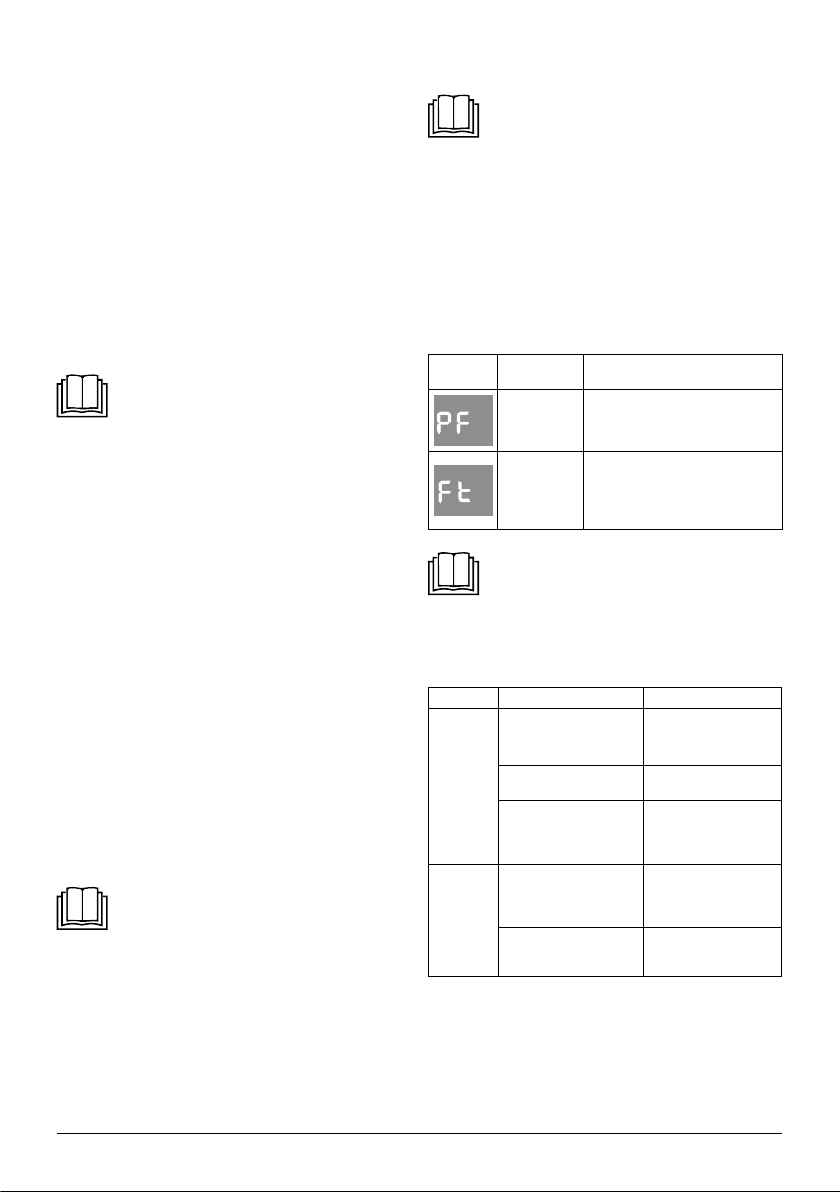
TROUBLESHOOTING
Error message
Shown on
the display
Troubleshooting
• Before contacting an authorised service centre, please check the
Problem Possible cause Remedy
The
mobile air
conditioner
did not turn
on.
The
mobile air
conditioner
runs only
for ashort
time.
Meaning Solution
Defect on the
heat sensor
Full tank
Note:
The drain hose B8 should be installed at the same height
or lower than the drain outlet A7 – see fig. H3. Otherwise,
the condensate water will not be properly drained from the
water tank.
appliance according to the following instructions:
There is no current in the
power socket.
The power plug is not
inserted in apower socket.
The internal safety fuse is
disengaged.
The flexible air exhaust
hose B4 is not connected
or it is blocked.
Air inlets are blocked.
Contact an authorised service centre.
Empty the condensate tank.
Proceed according to the instructions
in section „Condensate water
drainage“ described previously in this
user‘smanual.
Engage the circuit breaker
or, alternatively, try
adifferent power socket.
Connect the power plug to
the power socket.
Wait 30 minutes, and
if the problem persists,
please contact an
authorised service centre.
Turn off the air conditioner,
disconnect the hose,
check that it is not blocked
and reconnect the hose.
Remove the obstacles
preventing air supply to
the inlets.
Copyright © 2021, Fast ČR, a.s.
- 11 -
Revision 12/2021
Page 17
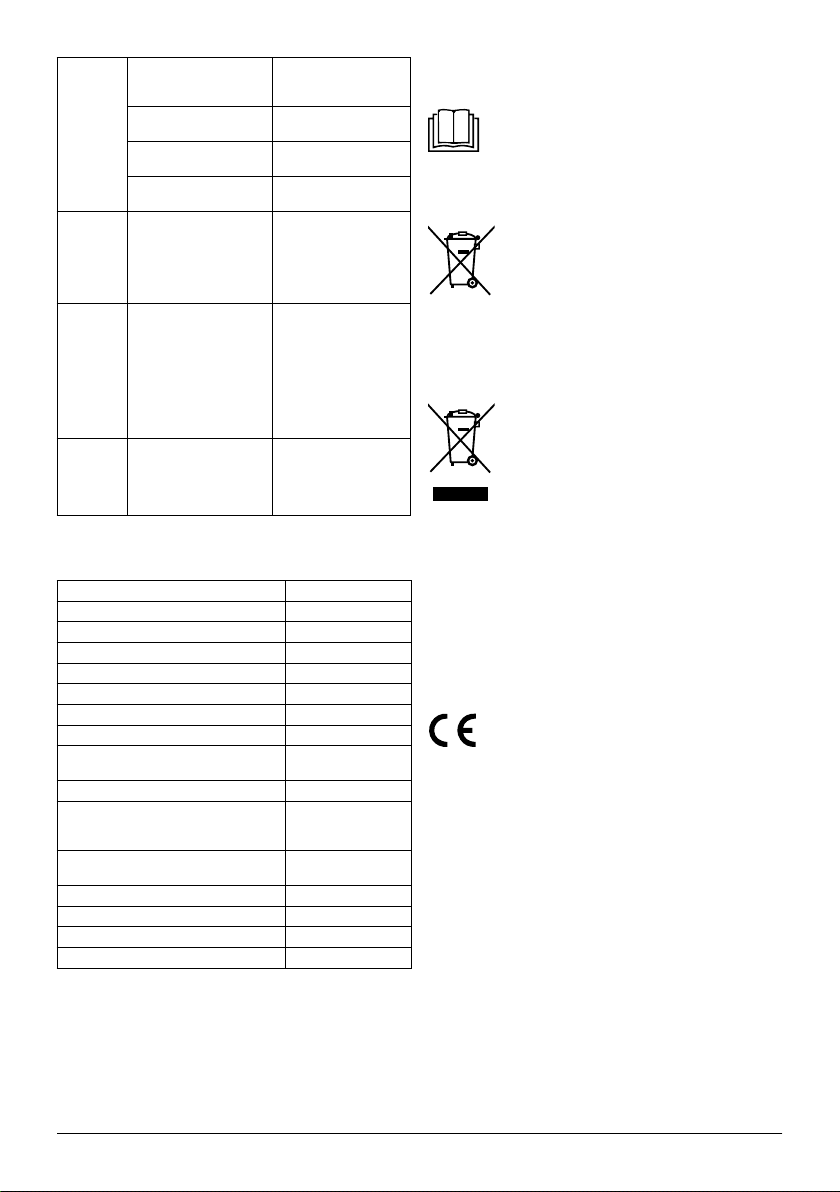
The
mobile air
conditioner
is on, but is
not cooling.
An
unpleasant
odour is
sensed
while it is
running.
The
mobile air
conditioner
turns off
approx. 3
minutes
after it is
turned on
again.
An error
message
appeared
on the
display C5.
The windows and doors of
the room are open and hot
air comes into the room.
There are heat sources on
inside the room.
The flexible air exhaust
hose B4 is not connected.
The room area is too large.
The air filter is clogged with
dirt and dust or animal fur.
The compressor'ssafety
fuse is protecting the air
conditioner against damage
if turned on sooner than
after 3 minutes.
Make sure that all doors
and windows are closed.
If possible remove these
heat sources.
Attach the flexible hose
B4.
Perform adouble-check
of the cooled area.
Turn off the air conditioner
and clean the filter
according to the provided
instructions.
Wait several minutes
and then turn the air
conditioner on again.
Proceed according to the
instructions in section
"Error messages".
. . . . . . . . . . . . . . . . . . . . . . . . . . . . . . . . . . . . . . . . . . . . . . . . . . . . . . . . . . . . . . . . . . . .
TECHNICAL SPECIFICATIONS
Power supply 220 – 240 V~ / 50 Hz
Cooling power 7 kBtu/hour
Power input / Cooling input 930 W/ 780 W
Current consumption 4.3 A
EER cooling factor 2.6 (A)
Dehumidification capacity 0.8 l / hour
Capacity of the built-in condensate tank 0.4 l
Refrigerant type and weight R290/120 g
3
Air flow volume
260 / 200 m
(high/low setting)
/h
Noise level 63 dB (A) (high setting)
Maximum permitted value of excess
operating pressure: Suction / exhaust part of
the cooling circuit
Dimensions of the mobile air conditioner
(w× d × h)
1.2 / 2.3 MPa
320 × 670 × 320 mm
Weight 23.2 kg (net)
Operation temperature (cooling) 18 – 32°C.
Recommended room area (Central Europe) * 21 – 26 m
Recommended room size (Central Europe) * 54 – 67 m
* It is aconversion of the value to the climatic conditions typical for the
Central Europe, for common room with aceiling of astandard height.
The stated values may differ in case of use in the divided rooms, rooms
with multiple heat sources, richly glass or / and poorly insulated rooms.
If you know you are purchasing the mobile air conditioner for aroom
with the above-mentioned features, choose amodel with higher power
for the given area.
2
3
The declared noise emission level of the appliance is 63 dB(A), which
represents alevel Aof sound power with respect to areference sound
power of 1 pW.
Note:
The efficiency of the mobile air conditioner may be reduced
in the event that it is used outside the above-mentioned
operating temperature range.
We reserve the right to change text and technical specifications.
. . . . . . . . . . . . . . . . . . . . . . . . . . . . . . . . . . . . . . . . . . . . . . . . . . . . . . . . . . . . . . . . . . . .
DISPOSAL OF USED BATTERIES
Batteries contain environmentally damaging compounds
and, therefore, do not belong in standard communal waste.
Hand over used batteries for proper disposal at locations
intended for their collection.
INSTRUCTIONS AND INFORMATION REGARDING THE DISPOSAL OF
USED PACKAGING MATERIALS
Dispose of used packaging material at asite designated for waste in your
municipality.
DISPOSAL OF USED ELECTRICAL AND ELECTRONIC EQUIPMENT
This symbol on products or original documents means that
used electric or electronic products must not be added to
ordinary municipal waste. For proper disposal, renewal and
recycling, hand over these appliances to determined
collection points. Alternatively, in some European Union
states or other European countries you may return your
appliances to the local retailer when buying an equivalent
valuable natural resources and prevents potential negative effects on the
environment and human health, which could result from improper waste
disposal. Ask your local authorities or collection facility for more details. In
accordance with national regulations penalties may be imposed for the
incorrect disposal of this type of waste.
new appliance. Correct disposal of this product helps save
For business entities in European Union states
If you want to dispose of electric or electronic equipment, ask your retailer
or supplier for the necessary information.
Disposal in other countries outside the European Union.
This symbol is valid in the European Union. If you wish to dispose of this
product, request the necessary information about the correct disposal
method from the local council or from your retailer.
This product meets all the basic requirements of EU
directives related to it.
Copyright © 2021, Fast ČR, a.s.
- 12 -
Revision 12/2021
Page 18

FAST ČR, a.s.
U Sanitasu 1621
CZ-251 01 Říčany
www.sencor.eu
 Loading...