

Page 1
EN
EN 1
Copyright © 2014, Fast ČR, a. s. Revision 03/2014
Mobile phone
Element P430
USER’S MANUAL
EN
Page 2

Page 3
EN
EN 1
Copyright © 2014, Fast ČR, a. s. Revision 03/2014
Dear customer,
Thank you for purchasing the full-touch controlled Sencor
Element P430 touchscreen mobile phone. This user's manual
is designed to specifi cally describe the functions and properties
of the device. Please read this manual carefully before using
the phone. Familiarize yourself with the information about the
safe and proper use of the device. The description provided in
this manual is based on default phone settings.
Pictures and screenshots may differ. Element P430 is a
smartphone based on the open source Android operating
system platform. Communication and entertainment will be
right at your fi ngertips thanks to the apps pre-installed on the
phone. The number of apps can be expanded via Google Play
or Android Market stores.
NOTICE
The electrical properties of water and liquids, similar to the
properties of the human body, are essential for touch controls
if the touchscreen is wet or contaminated, unevenly in
particular, the touch functionality can be diffi cult, unreliable
or utterly useless. Try keeping the touchscreen clean and
dry.
In non-standard conditions, the hardware buttons, including
the Home button, can provide basic controls.
Remember that water and liquids dampens the
electromagnetic fi eld and sounds.
Page 4

EN
2 EN
Copyright © 2014, Fast ČR, a. s. Revision 03/2014
Important instructions:
Your outdoor phone is designed and tested for outdoor use, with
the protection level reaching IP67, and is completely resistant to
dust (6.) and has protection against its complete immersion into
water, lasting up to 30 minutes and 1 m deep (7.). Make sure to
use all types of phone protection (covers and plugs) and not put
excessive mechanical load on the frame or parts of the phone (pull,
push – also liquids, twist, impacts), which could result in violating
the cohesiveness of the exterior case and moving part seals. Moving
parts and components accessible by the user (SIM and SD card
plugs) shall only be opened in dry environments. The warranty does
not cover moisture, leaking and dustiness, resulting in the failure
to adhere to these conditions, as well as visible damage caused
by using the device. Nevertheless, if an undesirable effect of this
nature occurs, or you have even the slightest doubt about the leaks,
switch the phone off and allow it to sit in a room, dry and warm
environment for several hours (not on sources of heat or radiators) in
the open state – headphone and charging jack plugs and SIM card
area cover. A hard power off is performed by pressing the RESET
button on the side of the phone, this button shall be pressed strongly.
The button needs to be pressed with force to distinguish undesired
pressing action during standard use. If the phone's operation is not
restored to its previous fl awless state, even after many hours of
“drying”, send it to professional repair shop for drying and cleaning. If
the undesired effect described above takes place due to a liquid other
than water penetrating the device, do not attempt to restore phone
operation and have the device cleaned professionally; i.e. effects
resulting from contamination by mixtures and colloids, such as pop
or contaminated waters (may develop undesired conductive paths)
or caustic and volatile liquids (cleaning agents and solvents, can
break up conductive connections). Do not modify and replace sealing
elements (plugs and covers) yourself. Have a professional repair shop
help with this. Otherwise you could reduce the level of protection (IP)
or completely eliminate any of the device's protection. If you discover
deviating functionality or conditions of sealing elements – cracks
due to excessive loading, violating cohesiveness due to the external
environment, for example by solvents or oils, or by wearing showing
signs of increased stiffness or cracks – have these replaced for new
pieces by a professional repair shop also.
Prevent damage and use the phone correctly. It will reward you with
long-term reliable operation.
Page 5

EN
Contents
EN 3
Copyright © 2014, Fast ČR, a. s. Revision 03/2014
Contents
1. Safety instructions .......................................................................... 5
1.1 Safety warning ......................................................................5
1.2 Battery protection ................................................................16
1.3 Cleaning and maintenance ................................................17
2. Getting started ...............................................................................22
2.1 Device ....................................................................................22
2.2 Inserting SIM and MicroSD cards: ..................................23
2.3 Battery ................................................................................... 27
2.4 Switching the phone on and off ......................................30
2.5 Home screen ........................................................................30
2.6 Touchscreen ...........................................................................31
2.7 Locking and unlocking the display ..................................31
3. Basic information and functions ...............................................32
3.1 Using the touchscreen .......................................................32
3.2 Notifi cations and status information displayed ...........33
3.3 Shortcuts and icons ............................................................34
3.4 Folders ...................................................................................35
3.5 Wallpaper .............................................................................. 35
3.6 Using USB mass storage devices ...................................35
3.7 Airplane mode .....................................................................36
3.8 Calling ....................................................................................36
3.9 Contacts .................................................................................39
3.10 Using the touch keyboard .................................................40
3.11 Messages ............................................................................... 41
3.12 E-mail.....................................................................................43
4. Advanced controls ......................................................................... 47
4.1 GPRS/3G .............................................................................. 47
4.2 Wi-Fi ....................................................................................... 47
4.3 Browser ..................................................................................48
4.4 Bookmarks ............................................................................49
4.5 Changing Browser settings ...............................................50
4.6 Bluetoot h ...............................................................................50
Page 6

Contents
EN
4 EN
Copyright © 2014, Fast ČR, a. s. Revision 03/2014
5. Entertainment ................................................................................53
5.1 Taking photos and recording video ................................53
5.2 Listening to Music ...............................................................56
5.3 Listening to FM radio ......................................................... 57
5.4 Google services ....................................................................58
5.5 Using the Maps app .......................................................... 60
5.6 Navigation .............................................................................. 61
5.7 Play Store ..............................................................................61
6. Synchronization .............................................................................64
7. Using other apps .......................................................................... 66
7.1 Calendar app ....................................................................... 66
7.2 Alarm settings ...................................................................... 67
7.3 Using the File Manager app.............................................68
7.4 Calculator ..............................................................................68
7.5 Advanced functions ............................................................68
7.6 Mobile phone management ............................................ 69
7.7 Display settings .................................................................. 69
7.8 Phone services ..................................................................... 71
7.9 Apps .......................................................................................75
7.10 App management ............................................................... 76
7.11 Reset the phone .................................................................. 77
8. Q&A .................................................................................................. 78
9. Technical data ................................................................................ 82
Page 7

EN
Safety instructions
EN 5
Copyright © 2014, Fast ČR, a. s. Revision 03/2014
1. Safety instructions
1.1 Safety warning
Important notice:
• All screenshots provided in the user's manual are for
illustration and can differ from the actual product.
• Step-by-step procedures can differ from those provided in
this manual, depending on the fi rmware version on the
phone.
• Unless stated otherwise, the home screen is the presumed
starting point for all procedures described.
• Functions and additional features can differ depending on
the type of device, used software or service provider.
• The apps and their functionality can differ with respect
to the country, region and used hardware/software.
The manufacturer, importer, distributor or dealer are not
responsible for performance issues caused by third party
apps.
• The manufacturer, importer, distributor or dealer are not
responsible for performance-related or non-compatibility
issues caused by changes to register settings or changes
to the operating system software. Attempts to adapt the
operating system can result in impaired device or app
functionality.
• Software, audio sources, pictures, wallpapers and other
media included with this device can be used for a limited
period based on the license validity. Downloading or using
these for commercial or other purposes may represent a
copyright infringement. Exclusive and sole liability for the
illegal use of such media lies with the user.
• Data services, e.g. sending messages, recording and
downloading, or automatic synchronization or using
localization services may be charged. Refer to your provider
for more detailed information about provided services.
Page 8
Safety instructions
EN
6 EN
Copyright © 2014, Fast ČR, a. s. Revision 03/2014
• The original apps, supplied with the device, can be updated
and their support can be discontinued without prior notice.
• Changes made to the operating system, installing software
from non-offi cial sources and other modifi cations can result
in device failures, damaged or lost data. The warranty does
not apply to defects caused by the actions stated above.
Note on the service provider:
The phone is confi gured from the factory to fully utilize
available services. Your provider can limit or change some
functions, security measures or behaviour of the phone, as
opposed to the description in this manual. Ask your provider
for any changes.
WARNING
• Prevent fires, electric shocks or explosions.
• Do not use damaged electric cables, plugs or
loosened sockets.
• Do not touch the power cable with wet hands; do not
pull the cable when unplugging the charger.
• Do not bend or otherwise damage the power cable.
• Do not use the device while charging and do not
touch the device with wet hands. Do not short-circuit
the charger or device.
• Do not throw the charger or device and do not
expose to impacts.
• Only use a charger approved by the manufacturer to
charge the phone.
• Do not use the device during thunderstorms.
This device can become damaged and increase the risk of
electric shock.
Do not handle a damaged or leaking Lithium-Ion (Li-Ion)
battery.
Page 9
EN
Safety instructions
EN 7
Copyright © 2014, Fast ČR, a. s. Revision 03/2014
Refer to your nearest authorized service centre to safely
dispose of used Li-Ion batteries.
Observe local regulations on how to handle and dispose of
devices and charges.
Only use the battery and charger designed exclusively for your
type of device. Using accessories other than those exclusively
specifi ed may cause serious injury or damage to the device.
Do not throw the battery or device into fi re. Observe all valid
local regulations when disposing of a used battery and device.
Do not put the battery or device into heating units, for example
into a microwave oven, common stove oven or radiator. The
device or battery may explode when overheated.
The device may experience a short circuit or overheat when
exposed to excessive external pressure (e.g. pushing or
perforating).
Protect the device, charger and battery against damage.
Do not expose the device, charger and battery to very low or
very high temperatures. Extreme temperatures may damage
them and reduce the charging capacity and service life of the
device including the battery.
Make sure the battery does not come in contact with metal
objects; the + and – could become connected and result in
temporary or permanent battery damage.
Do not use a damaged charger or battery.
NOTICE
Observe all security notices and regulations for using the
device in areas with issued restrictions. Do not use the device
near other electronic equipment.
The majority of electronic devices transmits signals at radio
frequency. The device can experience interference from other
electronic systems.
Page 10

Safety instructions
EN
8 EN
Copyright © 2014, Fast ČR, a. s. Revision 03/2014
Do not use the device in hospitals or near medical
equipment, which radio signals could interfere
with.
If you use a medical device, refer to the manufacturer of the
medical device before using the phone to ensure the radio
frequency radiation transmitted by the phone does not have
any effect on the medical device.
Do not use the device near a pacemaker!
Use the device at least 15 cm away from a pacemaker as it
may lead to interfering with the pacemaker.
In order to minimize pacemaker interference, use the device
on the side of the body opposite of where your pacemaker is.
If you use a hearing aid, refer to the manufacturer
of this hearing aid to provide information about
radio frequency radiation.
Radio frequency radiation transmitted by the device can
interfere with certain types of hearing aids. Before using this
device, refer to the manufacturer for information about the
impact the radio frequency radiation transmitted by the device
has on the hearing aid.
Detonators, explosion sites
Should you fi nd yourself at an explosion site or area with
instruction signs requesting to switch off “two-way radios”
and “electronic equipment”, switch off your mobile phone or
any other wireless devices to prevent mutual interference with
detonation work.
Do not use the device in an explosive
environment.
In explosive or fl ammable environments, power off the device
and remove the battery.
Page 11

EN
Safety instructions
EN 9
Copyright © 2014, Fast ČR, a. s. Revision 03/2014
Always follow orders, instructions and symbols in explosive
environments.
Do not use the device at fi lling stations, near fuels or
chemicals or in explosive environments.
Do not keep or transport fl ammable liquids, gases or explosive
materials in the same part of the vehicle as the device, its
parts or accessories.
Switch off the device while on board a plane.
The device can interfere with the plane's electronic navigation
equipment.
The device can interfere with car equipment.
The functionality of electronic equipment in cars can be
damaged by radio frequency interference coming from the
device. Refer to the manufacturer for more information.
Motor vehicles
Follow all safety warnings and instructions regarding the use
of mobile devices when driving a motor vehicle.
Your main priority when driving a vehicle is controlling the
vehicle. Do not use the mobile device if prohibited by law. Use
common sense for the your safety and the safety of others
and remember the following recommendations:
• Become familiar with this device and its convenient
functions, such as speed dial or redial. These functions help
reducing the time necessary for dialling or accepting an
incoming call.
• Keep the device at arms length at all times. Make sure you
can use the wireless device without losing sight of the traffi c
situation. Should someone call you at an inconvenient time,
let the call go to voicemail.
• Do not hold calls during heavy traffi c or dangerous weather
conditions. Rain, sleet, snow, ice, as well as heavy traffi c
can be dangerous.
Page 12

Safety instructions
EN
10 EN
Copyright © 2014, Fast ČR, a. s. Revision 03/2014
• Do not take notes or browse for phone numbers while
driving. Taking notes or browsing through contacts distracts
you from your primary responsibility – safe driving.
• Use common sense when calling and always assess the
traffi c situation. Take care of calls while at a standstill, or
prior to entering traffi c. Try planning calls for times when
you will not be on the road.
• Do not engage in stressful or emotionally intensive
conversations, these can distract you from driving. Inform
the person you are talking to that you are driving and aim to
postpone potentially distracting conversations.
• Use the device to call for help if needed. Dial the local
emergency number in the event of a fi re, car accident or
medical emergency.
• Use this mobile device to call help for others in the event
of an emergency. Dial the local emergency number should
you witness a car accident, criminal act or a life-threatening
emergency situation.
• If necessary (should you fi nd yourself in an emergency
situation), contact road service or call road-side assistance.
If you see a broken-down vehicle, which does not represent
any serious threat, a damaged traffi c light, smaller car
accident without injuries, or a stolen car, call the number
designated for reporting such situations.
Proper care and use
Keep the device in a dry area
Moisture and liquids can damage components and circuits of
the device.
Liquids change the colour of the label, indicating water
damage inside the device. The manufacturer can void the
warranty if the device is damaged by moisture or liquid.
Do not start the device if the inside of the device may be wet.
If the device is already on, power off the device. Use a towel
to wipe dry and handover the device to the repair shop.
Page 13

EN
Safety instructions
EN 11
Copyright © 2014, Fast ČR, a. s. Revision 03/2014
Do not use and store the device in areas with a high
concentration of dust or fl ying particles beyond the terms of
the relevant protection level.
Dust or foreign particles can damage the device, which could
result in a fi re or injury by electric shock.
Keep the device on a fl at surface. The device may become
damaged if it falls on the ground.
Keep the device away from areas with excessively low or
high temperatures. We recommend using the device at
temperatures between 5 °C and 35 °C.
Leaving the device in a closed vehicle may result in its
explosion, for the temperature in the vehicle can reach up to
80 °C.
Do not expose the device to direct sunlight or another source
of light for a longer period of time.
Store the battery at temperatures between 0 °C and 45 °C.
Do not keep the device near magnetic fi elds.
Otherwise this could cause the device to malfunction or drain
the battery. Cards with magnetic strips, such as credit cards,
phone cards, passbooks or boarding passes can be damaged
due to the effect of magnetic fi elds. Do not use bags or
accessories with metal handles and make sure the device is
not exposed to magnetic fi elds for a longer period of time.
Protect the device against impacts. Impacts can damage the
device display. If the device is bent or deformed, the phone or
part of the phone can stop working properly.
Do not keep the device near cookers, microwave ovens, hot
kitchen equipment or pressure cookers. This could result in
aleaking battery. The device could overheat and cause a fi re.
Do not use this device or apps until the device overheats.
Long-term skin exposure to an overheated device can lead to
light burns, indicated by red spots or red skin.
Page 14

Safety instructions
EN
12 EN
Copyright © 2014, Fast ČR, a. s. Revision 03/2014
If included in the phone, do not activate the fl ash feature near
people or animals. Using fl ash near the eyes can result in
temporary loss of vision or damage to vision.
Exposure to gleaming light. Leave some light on in the room
when using the device, the display should not be too close
the eyes. Exposure to gleaming light from watching videos or
playing fl ash games for a longer period of time can lead to
seizures or unconsciousness. Should you feel nauseated, stop
using the device immediately.
Motion disorder from excessive use
Performing repeated movements (e.g. pressing buttons,
playing games) can lead to occasionally feeling pain in the
hands, neck, shoulders or other parts of the body. If you use
the device for a longer period of time, hold the device loosely,
press buttons lightly and take regular breaks. Should you feel
uncomfortable during or after using the device, stop using the
device and seek medical attention.
Use batteries, chargers and other accessories approved by the
manufacturer only. Using off-brand batteries or chargers can
shorten their service lives or lead to device failure.
The manufacturer, importer, distributor or dealer are not
responsible for the user's safety if unauthorized accessories
and consumer material are used.
Precautions for ensuring maximum battery and charger life.
Do not charge the device for longer than a day, excessively
charging the battery may shorten the battery life. The batteries
of devices left unused after a period of time a drained and
must be recharged before using again. Unplug the charger
from the power supply when you are not using it. Use the
battery only for its intended purposes.
Page 15

EN
Safety instructions
EN 13
Copyright © 2014, Fast ČR, a. s. Revision 03/2014
Personal safety
Do not attempt to lick the device or battery. This could result
in damaging the device, an explosion or injury. Should the
device be used by children, ensure they are using the device
properly.
Do not put the device or included accessories into your eyes,
ears or mouth. Such behaviour could cause choking or serious
injury. When using the device: hold the device straight, as with
a standard phone; speak directly into the microphone; do not
tamper with the internal antenna.
The quality of the call could be impaired or the values of radio
frequency (RF) transmitted by radiation could change.
Protect your hearing and ears when using headphones. Long
term exposure to high volumes can damage hearing. Exposing
yourself to high pitch sounds while driving could distract
you and cause an accident. Before connecting headphones
to an audio source, always turn the volume down and use
the minimum volume necessary to ensure you can hear
the conversation or music. Static electricity can form within
the headphones in dry areas. To prevent this, limit the use
of headphones in dry areas, or touch a metal object before
connecting the headphones to ensure static electricity is
discharged.
Do not carry the device in your back pocket or by your belt.
You can injure yourself or damage the device in case you fall
down.
Be careful when using the device while walking or other
movement. Always mind your surroundings to prevent injuring
yourself or others. Make sure the headphone cable does not
wind around your hand or nearby objects.
Page 16

Safety instructions
EN
14 EN
Copyright © 2014, Fast ČR, a. s. Revision 03/2014
Do not modify, dismantle or even attempt to repair the device.
Any changes or modifi cations to the device may result in
the validity of the warranty being voided. Should the device
require repairing, bring it to an authorized repair centre. Do not
dismantle or perforate the battery. Risk of explosion or fi re.
Do not paint or apply any stickers on the device. Stickers
or paint could block moving parts and prevent the proper
functionality of the device. If you are allergic to painted or
metal objects of the device, you may experience an allergic
reaction. Should this be the case, stop using the device and
seek medical attention.
Cleaning the device
Wipe the device and charger with a dry towel or material with
rubber surface. Use a cotton tampon to clean battery contacts.
By no means shall you use chemicals and dissolving agents.
By no means shall you use a device with a cracked or damaged
display. You can injure yourself on the cracked glass or plastic.
In this case refer to an authorized repair centre.
Use the device for its intended purpose only.
If you use the device in public, do so in such a manner that
does not bother others.
Do not allow children to use the device. This device is not
atoy. Keep away from children.
Install the mobile device and software with care. Make sure
the mobile device and associated car accessories are properly
and fi rmly fi xed. Do not leave the device or accessories near
or within the air bag area. The incorrect installation of the
wireless device can cause serious injury with the air bag
quickly infl ating.
Page 17

EN
Safety instructions
EN 15
Copyright © 2014, Fast ČR, a. s. Revision 03/2014
This device may only be repaired by qualifi ed personnel.
Having the device repaired by somebody other than qualifi ed
personnel can result in the device being damaged and the
warranty will not apply to necessary repair work.
Handle SIM cards and memory cards with care. Do not remove
the card in the middle of information or data transfers. This
could lead to the loss of data or damaging the card or device.
Protect the card against hard impacts, static electricity and
electric noise from other devices.
Do not touch the gold contacts and poles with your fi ngers or
metal objects. If the card is dirty, wipe it clean with a soft dry
towel.
Distress call service availability
Distress calls in some regions or under certain circumstances
may not be available. Before travelling to distant or under
developed regions, become familiar with alternative methods
you can use to contact distress services.
Secure personal information and important data storage
Remember to backup important data when using the device.
The manufacturer, importer, distributor or dealer are not
responsible for data loss. Backup all data and then reset the
device before disposing. This way you prevent the misuse of
your personal information. Read the license agreement on the
screen when downloading an app. Pay special attention to
apps with access to multiple features or a signifi cant amount
of personal information. Check your accounts on a regular
basis to ensure no unauthorized or suspicious use has taken
place. Should you fi nd that your personal information has been
misused, contact your service provider to remove or change
your account information. In case you misplace your device or
the device is stolen, change the passwords to your accounts
Page 18

Safety instructions
EN
16 EN
Copyright © 2014, Fast ČR, a. s. Revision 03/2014
in order to protect your personal information. Avoid using
apps from unknown sources. Secure your device by using the
screen gesture lock, password or PIN code.
Do not distribute copyrighted materials.
Copyrighted materials shall not be distributed without the
consent of the owner of the content. By doing so is considered
a copyright infringement. The manufacturer, importer,
distributor or dealer are not responsible for any legal matters
arising from the illegal use of copyrighted material.
1.2 Battery protection
Battery information:
Do not place the mobile phone battery in places with
extremely high or low temperatures. This leads to the battery
life being reduced. The battery life of the mobile phone is
limited. Should the capacity of the phone battery decrease
after using the device over a period of time, we recommend
purchasing a new battery from an offi cial supplier and
replacing it.
Information about battery use:
• Make sure the phone is switched off before removing the
battery.
• Handle the battery with care. Connecting the positive (+)
and negative (-) pole of the battery using a conductive
object (e.g. coin or clip) will result in a short-circuit. A
short-circuit can damage the battery and the conductive
object. Make sure the positive and negative poles are never
connected using a conductive object that lies in the vicinity
of the battery.
• Do not throw the battery into a fi re and do not expose it to
high temperatures.
• Do not attempt to dismantle or modify the battery.
• Do not expose the battery to hard impacts or attempt to
open the battery with hard objects.
Page 19

EN
Safety instructions
EN 17
Copyright © 2014, Fast ČR, a. s. Revision 03/2014
• The battery should be placed in a cool and dry area away
from direct sunlight. The battery should bot be exposed to
high temperatures (over 60 °C).
• Stop using the device if you smell an odour coming from the
battery or the battery is overheating.
• Stop using the device immediately should you discover
a crack on the battery, hole in the battery cover of other
damage, including leaking electrolyte.
• If your skin or eyes come into contact with electrolyte, wash
them thoroughly with clean water. Soap wash any areas
that come into contact with your skin.
• Use original batteries only to prevent injuries caused by
improper charging.
• Do not use the li-ion battery if the temperature is too low.
The battery capacity is reduced at lower temperatures.
• Do not clean the battery with water or organic dissolving
agents and do not immerse in water.
• If you do not plan to use the battery for a longer period of
time, check whether the battery is fully charged.
• Return dead batteries to the mobile phone manufacturer or
recycle it at areas designated for recycling used batteries. Do
not throw batteries into the waste bin or freely into nature.
1.3 Cleaning and maintenance
• Do not place the phone, battery or charger in the bathroom
or other places with increased air moisture. Protect the
device against rain.
• Clean the phone, battery and charger with a soft and dry
towel.
• Do not use alcohol, thinner, benzene or other chemical
agents to clean the phone.
• Blocking the phone inputs with dust can lead to a bad
contact and data or power transfer. Clean regularly.
Page 20
Safety instructions
EN
18 EN
Copyright © 2014, Fast ČR, a. s. Revision 03/2014
This symbol indicates the device has double insulation
between dangerous voltage from the network and useraccessible parts. Replace parts with identical spare parts
only.
A product identifi ed with this symbol is only suitable for
use indoors.
Warning:
• Do not power n the device in situations, where using phones
is prohibited, and in areas where the phone can cause
interference or present a risk.
• Keep the mobile phone and its accessories out of reach of
children. Do not allow children to use the mobile phone
unattended.
• Follow the regulations and instructions related to using
wireless devices. Respect the privacy of others and legal
regulations when using wireless devices.
• If you have medical implant devices or instruments, keep
the phone at least 15 cm away from them and while on
a call, hold the phone on the opposite side of where the
instruments are located.
• Follow the instructions provided in the user's manual for
using a USB cable.
Page 21
EN
Safety instructions
EN 19
Copyright © 2014, Fast ČR, a. s. Revision 03/2014
Notes:
Some of the device properties and accessories described in
this user's manual depends on the installed software and
the capacity and confi guration of the local network, and
does not necessarily have to be available or can be limited
by network providers. Thus, the descriptions provided do
not necessarily correspond precisely to the specifi c phone
or accessories, which you purchased. The manufacturer is
not responsible for the quality and legality of any contents,
which you upload or download to the mobile phone, whether
it concerns text, pictures, music, fi lms, additionally installed
software protected by copyright etc. You are liable for
consequences following the installation or using the contents
of the above stated on this mobile phone.
All screenshots, symbols and icons in the user's manual are
simulated. Actual screenshots, symbols and icons may differ.
Step-by-step procedures can differ from those provided in this
manual, depending on the fi rmware version on the phone.
Unless stated otherwise, the home screen is the presumed
starting point for all procedures described.
The phone is a device, the behaviour of which can be altered
by the user via additional apps. Procedures and individual
steps can therefore differ from those contained in this manual.
Note on the service provider:
The phone is confi gured from the factory to fully utilize
available services. Your provider can limit or change some
functions, security measures or behaviour of the phone, as
opposed to the description in this manual. Ask your provider
for any changes.
Page 22

Safety instructions
EN
20 EN
Copyright © 2014, Fast ČR, a. s. Revision 03/2014
Appendix to the user's manual for
the LCD panel
Precautions for displaying static images, red/
blue/green/black dots on the screen
A static image can damage the LCD display permanently.
• Do not leave a static image on the
LCD panel for more than 2 hours.
This may result in a damaged
panel. This is referred to as “screen
burn-in”.
• Similar LCD panel damage can be caused by the static logo
placement of the television station (example).
• Watching television in 4:3 and 14:9 or similar aspect ratios
(formats which do not cover the entire display panel) for
a longer period of time can leave traces on the right or
left edge, or even in the middle of the screen, caused by
differences in light emission. Similar damage can also occur
for DVD playback or playing video games.
• Displaying a static image from video games or a computer
for a longer period of time can result in “image persistence”.
To prevent this effect, reduce the brightness and contrast
levels when displaying static images.
The damage caused by the above-mentioned reasons is not
covered by warranty!
Page 23

EN
Safety instructions
EN 21
Copyright © 2014, Fast ČR, a. s. Revision 03/2014
Red, blue, green, and black dots may appear on the
screen
• This is typical for liquid crystal displays and does not
indicate any problems. LCD screens are made using
precision technology to provide even the fi nest image
details. Several defective pixels can appear on the screen
from time to time, indicated as red, blue, green or black
dots (up to 0.001% of the total pixel count of the screen).
This does not affect the properties and performance of your
device.
Page 24

Getting started
EN
22 EN
Copyright © 2014, Fast ČR, a. s. Revision 03/2014
2. Getting started
This device is resistant against water and dust according to
the IP67 standard and can withstand a 1.5 m high fall on to
plywood. It contains a capacitive touchscreen protected by
glass resistant to scratching. The operating system is Android,
allowing you to access apps from Google services, including
several thousands of additional apps available from the Google
Play. This mobile phone has a robust design. It also allows the
user to surf the web, send text messages, listen to music as
well as other things, supported by a high-capacity battery and
extended memory slot for MicroSD cards up to 32 GB in size.
2.1 Device
1. Volume control buttons
2. Power button (On/Off)
3. Menu button
4. Home button (hardware button)
5. Back button
6. Receiver
7. Receiver jack
8. Micro USB port
9. Reset button
10. Back camera
Page 25
EN
Getting started
EN 23
Copyright © 2014, Fast ČR, a. s. Revision 03/2014
11. Flash
12. Speaker
13. Camera release
14. Front camera
Main functions:
Power button (On/Off): Holding this button down will power
on the phone. While the phone is on, pressing this button
locks/unlocks the screen.
Menu button: Pressing this button displays the menu available
for the current screen.
Home button: Pressing this button returns you to the home
screen. Press and hold the Home button to display recently
used apps.
Back button: This button navigates you back to the previous
screen.
2.2 Inserting SIM and MicroSD cards:
NOTICE
Power off the phone completely before performing operations
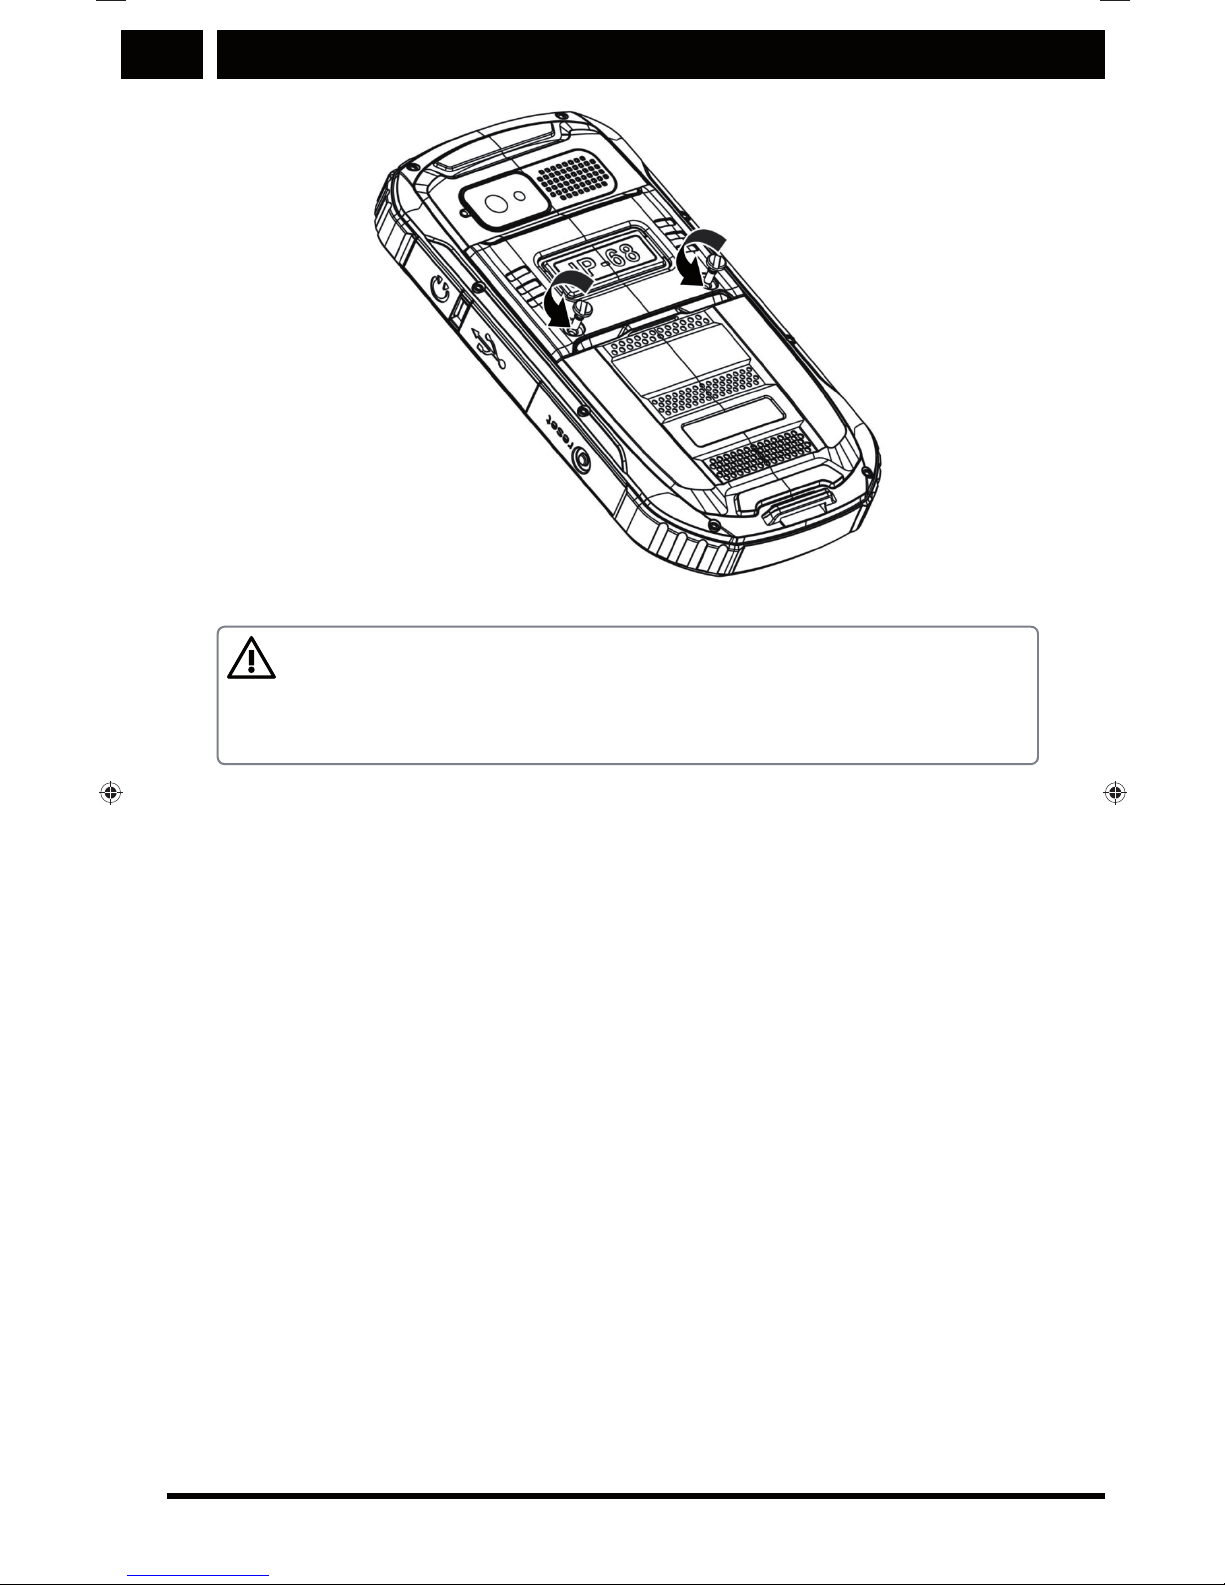
with cards!
1. Remove the battery cover. Loosen the screws on the back
side by turning both screws counter-clockwise until the
cover becomes loose, see image.
Page 26
Getting started
EN
24 EN
Copyright © 2014, Fast ČR, a. s. Revision 03/2014
NOTICE
The phone battery is embedded and cannot be replaced. See
the battery information for more details.
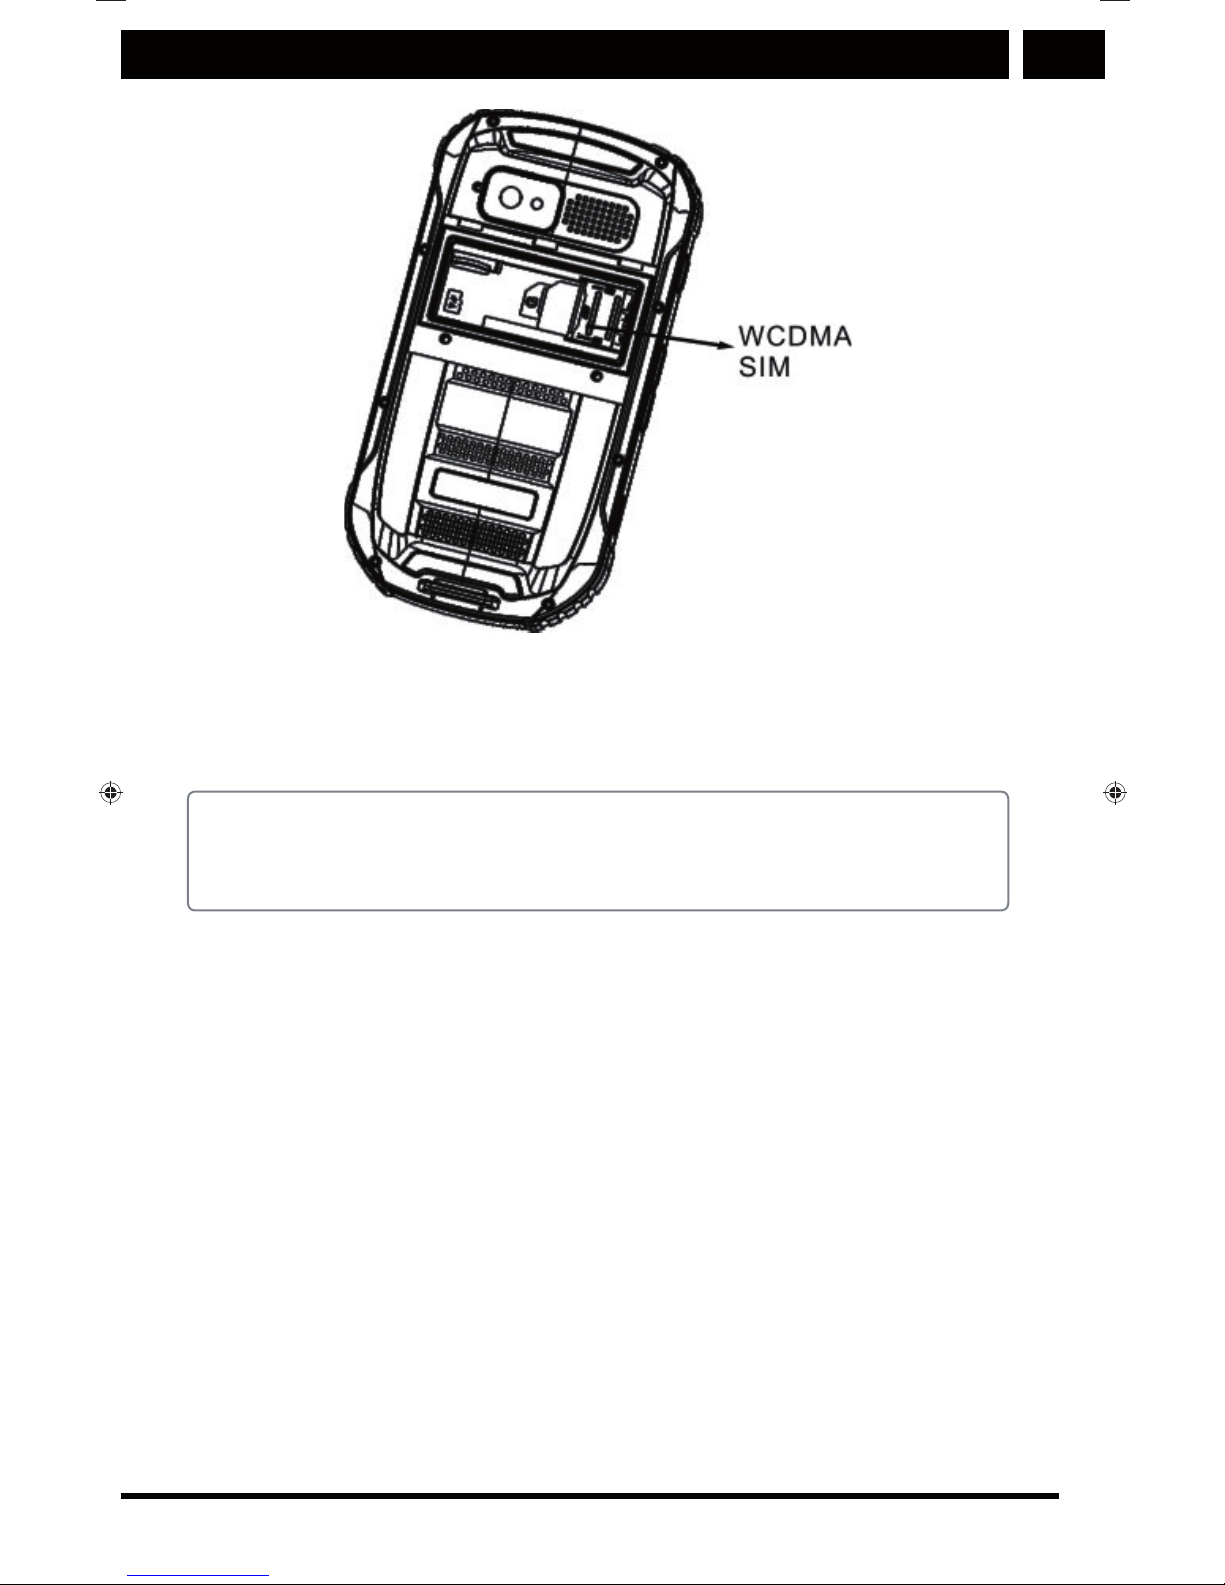
2. Insert the SIM card into the SIM card holder. Insert the SIM
card into its slot so that the contacts align as shown in
fi gure 3:
The top SIM card slot is for SIM cards that support high-speed
WCDMA 3G mobile data.
Page 27
EN
Getting started
EN 25
Copyright © 2014, Fast ČR, a. s. Revision 03/2014
Underneath this slot is the SIM GSM card slot (standard
mobile data speed).
Note:
When inserting the SIM card, make sure the gold-plated
contacts touch in the proper position.
3. Inserting the MicroSD card.
Insert the MicroSD card into the slot, as shown in fi gure 4,
and push gently until you feel the lock click.
When removing the card, push gently until the lock is
released and the spring pushes the MicroSD card slightly
out. Only afterwards can the card be removed.
Page 28

Getting started
EN
26 EN
Copyright © 2014, Fast ČR, a. s. Revision 03/2014
4. Place the battery cover on. Place the back cover on and
secure it by tightening both screws clockwise.
NOTICE
Screws and caps are designed to be compatible with the
included screwdriver, or smaller coin. Be careful to use
adequate force when tightening with a universal performance
screwdriver. Using excessive force can violate the cover
sealing against water/dust, or damage the closing structure.
Page 29

EN
Getting started
EN 27
Copyright © 2014, Fast ČR, a. s. Revision 03/2014
NOTICE
Power off the phone completely before inserting or removing
a SIM or MicroSD card!
2.3 Battery
The phone battery is embedded and cannot be replaced. If the
battery is empty, plug the phone into the charger.
Charging the battery
Before you charge the battery, make sure it is inserted properly
in the phone.
1. Connect the USB cable, included with the phone, to the
charger.
Note:
Use only the chargers and cables specifi ed by the
manufacturer. Unauthorized accessories can cause damage
to the device or the battery to explode.
Page 30

Getting started
EN
28 EN
Copyright © 2014, Fast ČR, a. s. Revision 03/2014
2. Open the USB port cover cap. Connect the included USB
cable into the phone's USB port.
Note:
Do not use inadequate force when connecting the USB
cable.
Mind the proper connector orientation. Attempting to plug
in the connector improperly can result in the port becoming
damaged. The warranty does not cover this repair.
Use the included cable for proper contact with the embedded
phone connector.
3. Plug in the other end of the cable into the charger adapter
and plug it into the socket.
Note:
If the power source is unstable, the touchscreen may not
function properly during the charging cycle.
Page 31

EN
Getting started
EN 29
Copyright © 2014, Fast ČR, a. s. Revision 03/2014
4. Once you are fi nished charging the phone, unplug the
connector from the phone and unplug the charger from
the socket. Seal the connector cover cap back on tightly to
maintain resistance against dust/water.
Note:
If the battery is fully depleted, you will not be able to switch
the device on immediately after connecting it to a charger.
Allow the battery to charge for several minutes before
attempting to power on the device.
For best charging results and battery service life, charge the
battery non-stop until full (100 %), and discharge until you
receive the fi rst low battery notice. Only then should you
recharge the battery.
Battery protection
Battery information:
Do not place the mobile phone in places with extremely
high or low temperatures. This leads to the battery life being
reduced. The battery life of the mobile phone is limited. Should
the capacity of the phone battery decrease after using the
device over a period of time, we recommend purchasing anew
battery from an offi cial supplier and replacing it.
Achieving maximum battery life
Information about battery use:
• Do not attempt to dismantle or modify the battery.
• Do not attempt to unplug or charge the battery any other
way than specifi ed and with the proper charger.
• Do not expose the battery to hard impacts or attempt to
open the battery with hard objects.
• Stop using the phone immediately, should you discover
a crack on the battery, hole in the battery cover of other
damage, including leaking electrolyte.
Page 32

Getting started
EN
30 EN
Copyright © 2014, Fast ČR, a. s. Revision 03/2014
• Do not use the li-ion battery if the temperature is too low.
The battery capacity is reduced at lower temperatures.
• Do not clean the battery with water or organic dissolving
agents and do not immerse in water.
• If you do not plan to use the battery for a longer period
of time, check whether the battery is fully charged and if
necessary, fully charge the battery. Only afterwards should
you power off the phone.
Tip for long battery life on a single charging cycle: only use
systems that you absolutely need. For example, switch off wifi ,
GPS, mobile data, when you do not need these services, lower
the display brightness.
2.4 Switching the phone on and off
Switching the phone on
Press the Power (On/Off) button – (bottom left). Wait until the
system loads completely.
Note:
If your SIM card is protected with a PIN code, this PIN code
shall be entered before you can use the mobile phone.
Contact your carrier for details on the PIN code.
Switching the phone off
Press and hold the Power (On/Off) button. Select Power off
from the menu that appears. Confi rm by pressing OK.
2.5 Home screen
The home screen will appear after logging in or switching on
the phone. The home screen is the default position, giving
the user access to all features of the phone. The home screen
Page 33

EN
Getting started
EN 31
Copyright © 2014, Fast ČR, a. s. Revision 03/2014
contains icons, widgets, shortcuts and other elements. You can
modify the home screen by changing the wallpaper and the
positioning of any given element.
The apps launcher icon is found on the home screen. Tap on
this icon (bottom right) to browse through and launch installed
apps.
2.6 Touchscreen
Touchscreen controls
You can move or delete an icon by swiping it.
Rotating the phone display
The display orientation for most applications changes between
portrait mode to landscape mode, depending on the physical
rotation of the phone.
2.7 Locking and unlocking the display
Locking the display
If the mobile phone is On, lock the display with a short press
of the Power button. The phone is still capable of receiving
text messages and incoming calls while locked.
The display will automatically become locked if you do not
use the phone for a while.
Unlocking the display
Power on the display by pressing the Power button. Then
swipe your fi nger on the screen to the side to unlock the
phone.
Note:
If you have set an unlock gesture, you will be prompted to
draw the unlocking gesture to unlock the phone.
Page 34

Basic information and functions
EN
32 EN
Copyright © 2014, Fast ČR, a. s. Revision 03/2014
3. Basic information and functions
3.1 Using the touchscreen
Touchscreen: Offers an unprecedented amount of options
how to control the phone and apps on the phone. Become
familiar with various types of gestures and corresponding
system responses, allowing you to utilize the full potential
of your phone and prevent inaccurate control (touching an
undesired element etc.). The capacitive touch layer is designed
for human touch, on the other hand, the phone cannot be
controlled, for example, while wearing gloves.
Touch: Used to activate elements on the screen, such as
apps, settings, icons, keys on the touch keyboard and control
buttons on the display. Simply touch the desired point of the
screen gently using your fi nger and lift your fi nger shortly after.
Long press: Touch the desired point of the display with
your fi nger and leave your fi nger on the display for approx.
2seconds. This will display a pop-up window containing
special options or will activate a special feature.
Swipe: Touch the screen with your fi nger and move your
fi nger around without lifting it. This gesture is used to scroll
through menus, switch screens and displayed contents.
Quick swipe: Quickly swipe the screen and lift your fi nger
from the screen. Moving through a list will be carried out much
quicker. If you are moving through a long list, you can stop the
quick swipe action by touching the screen again.
Pinch: Some apps (e.g. Google Maps, Browser or Gallery)
allow zooming in and out by placing two fi ngers on the screen
at once and pinching them open or closed.
Page 35

EN
Basic information and functions
EN 33
Copyright © 2014, Fast ČR, a. s. Revision 03/2014
3.2 Notifications and status information
displayed
Missed calls and received messages (on the left side) and
icons indicating the phone status (on the right) together with
displaying the current time.
Notifi cations Status icons
Status icons
Connected to the GPRS
mobile network
Bluetooth is active
Connected to the 1xRTT
mobile network
Connected to Bluetooth
device
Connected to the EDGE
mobile network
No SIM card
Connected to the 3G
mobile network
Vibrate
Connected to the 4G
mobile network
Silent
Mobile network signal
strength
Battery is very low
Searching for network
coverage
Battery is low
No signal Battery is partially drained
Connected to a Wi-Fi
network
Battery is fully charged
Roaming active Battery is charging
Airplane mode active Receiving location data
from GPS
Page 36

Basic information and functions
EN
34 EN
Copyright © 2014, Fast ČR, a. s. Revision 03/2014
Notification icons
New e-mail Incoming call
New text or multimedia
message
Missed call
Alarm active Speakerphone on
Upcoming event Sound off
Data is syncing Downloading data
Problem with sign-in or
sync
Phone is connected via
USB cable
A screenshot was taken
3.3 Shortcuts and icons
Moving items on the screen
Tap and hold your fi nger on the app icon on the Home screen
until the icon becomes bigger.
Removing items from the screen
Tap and hold your fi nger on the app icon on the Home screen
until the icon becomes bigger.
Widgets
Widgets allow previewing or directly using specifi c apps.
Widgets can be placed on the Home screen as icons or as
windows containing previews. Some widgets are pre-installed
on your device. More widgets can be downloaded from the
Google Play Store. Adding a widget to a screen:
Tap
on the Home screen. Tap on the WIDGETS tab. The
available apps will be displayed.
Page 37

EN
Basic information and functions
EN 35
Copyright © 2014, Fast ČR, a. s. Revision 03/2014
3.4 Folders
Creating a folder
Drag the icon of an app or shortcut to an icon of a similar app.
Tap the left option Add Icon and then tap New folder and
enter the name of the new folder.
Renaming a folder
1. Hold your fi nger on the folder.
2. Tap the right option: Rename the fi le. Type the new folder
name into the folder heading.
3. Click on the Back button once you are done.
3.5 Wallpaper
Changing the wallpaper
Hold your fi nger on the Home screen and tap the Wallpapers
button. The following options for selecting a wallpaper will
appear:
Gallery, which allows the user to select a picture from the
Gallery and set it as the wallpaper.
Live Wallpapers, which allows the user to set a live wallpaper.
Wallpapers, which allows setting a wallpaper from a set
apredefi ned images.
3.6 Using USB mass storage devices
Using the microSD card as a USB mass storage
device
To copy your favourite music and pictures from your PC to the
microSD card, set the card to USB mass storage device.
1. Connect the mobile phone to the PC via the USB cable.
2. Tap Enable USB drive.
Page 38

Basic information and functions
EN
36 EN
Copyright © 2014, Fast ČR, a. s. Revision 03/2014
Note:
Some functions may not be available when USB mass
storage device mode is enabled.
3.7 Airplane mode
At certain times, you may be asked to switch off all wireless
features of your phone. You do not have to switch your phone
off. Switching to Airplane mode will suffi ce.
1. Press and hold the Power (On/Off) button.
2. Tap Airplane mode from the menu that appears.
Airplane mode can also be enabled through Settings, where
you would select Wireless & networks.
3.8 Calling ( )
There are several ways to make a phone call. You can dial the
number directly or select the number from your contact list,
from a website or document containing the phone number.
Incoming calls can be taken or sent to voice mail. You can also
make conference calls with multiple parties.
Making outgoing calls
To make an outgoing call, you can use the Phone application,
or select the number from Contacts or the Call log.
You can return to the Home screen during a call by pressing
the Home button
Note:
Make sure you do not block the microphone with your
fi ngers.
Page 39

EN
Basic information and functions
EN 37
Copyright © 2014, Fast ČR, a. s. Revision 03/2014
Making a call by dialling the number
1. You can begin to dial the phone number after tapping the
phone icon on the Home screen. If you are in the Contacts
or Call log apps, tap on the Phone tab.
2. Enter the phone number using the numerical on-screen
keyboard.
Tip:
This mobile phone supports Smart Dialling, which
automatically searches saved contacts while typing and
displays the list of contacts corresponding to the phone
number. Hide the keyboard to show more results.
3. Once you have entered the phone number or selected a
contact, tap the phone icon .
Note:
For data connections, you can set the network you wish to
use. See “Default network settings”.
Making a call by selecting a contact from the
contact list
1. Tapping on the Contacts icon ( ) displays the contact
list. If you are in the Phone or Call log apps, tap on the
Contacts tab.
2. Choose the contact you wish to call from the list and tap
on the contact.
3. Tap on the phone symbol .
Making a call from the call log
1. Tapping on > Phone ( ) > Call log displays the list of
recent calls. If you are in the Contacts or Phone apps, tap
on the Call log tab
2. Tap on the phone icon by the contact you wish to call.
Page 40

Basic information and functions
EN
38 EN
Copyright © 2014, Fast ČR, a. s. Revision 03/2014
Answer/ignore a call
Answer/ignore an incoming call
As soon as you receive an incoming call, the caller's basic
information will appear on the display, including additional
information saved to the caller within the Contacts app, if
available.
Ending a call
Tapping on the red “hung up” phone symbol
ends the
active call.
Other operations during the call
Conference calls
While already in a call, should you receive another call,
you can pick up the call and add it to the ongoing call. This
feature is referred to as a conference call. You can also make
conference calls with multiple parties.
Switching between calls
While already in a call, should you receive another call, you
can switch between calls.
1. While in multiple calls at the same time, tap on .
2. The other call becomes the active call and the active caller
will be switched to the background.
Using the Call log
The Call log app contains a list of recent incoming and
outgoing calls.
Saving numbers to Contacts
1. From the Home screen, tap on and select the Call log
tab.
2. Tap on the number you wish to add to the contact list.
3. Tap on the Add to contacts option.
Page 41

EN
Basic information and functions
EN 39
Copyright © 2014, Fast ČR, a. s. Revision 03/2014
4. Select from the available options, Save to existing contact
or Create new contact.
Removing a call from the Call log
1. From the Home screen, tap on
and select the Call log
tab.
2. Tap on the left menu and choose Remove. Then select the
call you wish to remove.
3. Press the Menu button and choose Remove from Call log.
Clearing the Call log
1. From the Home screen, tap on and select the Call log
tab.
2. Press the Menu button and then choose Remove (recycle
bin symbol) and OK.
3.9 Contacts
The Contacts app allow saving and managing information (e.g.
phone numbers and addresses) within the contact list. After
saving contact information to your mobile phone, you will have
easy access to people you wish to communicate with.
Launching the Contacts app
If you purchased a new mobile phone and have not yet
added any contacts, the Contacts app will display a message
informing the user about the ways to add contacts to the
phone.
The app can be launched as follows:
Open the Contact list by tapping on
and then on Contacts
(
). From the Home screen, tap on and select the
Contacts tab.
All contacts will be displayed in alphabetical order in a rolldown list.
Page 42

Basic information and functions
EN
40 EN
Copyright © 2014, Fast ČR, a. s. Revision 03/2014
Adding a contact
1. To add a new contact, tap on in the contact lists.
2. Select the desired position to add the new contact.
3. Enter the name of the contact along with detailed contact
information, e.g. phone number or address.
Adding a contact to Favourites
1. Tap on the contact you wish to add to Favourites.
2. Tap on
. The colour then changes to white ( ).
Search contact
1. To search a contact, tap on in the contact list.
2. Enter the name of the contact you wish to search. While
you are typing, contacts corresponding to the search will
begin to appear in the area below the search fi eld.
Edit a contact
Contact information can be edited at any time.
1. Choose the contact you wish to edit from the list and tap
on the contact.
2. Press the Menu button and choose Edit.
3. Contact information is divided into categories according to
the type of information, for example, the contact name,
phone number or e-mail address. Tapping on the given
category will allow you to edit the relevant details.
4. After you have made changes. tap on Done. To cancel any
changed made, press the Back button.
3.10 Using the touch keyboard
Displaying the touch keyboard
The on-screen keyboard is used to enter text. Some apps open
the keyboard automatically.
The on-screen keyboard appears when you tap into a text
fi eld. Press the Back button to hide the on-screen keyboard.
Page 43

EN
Basic information and functions
EN 41
Copyright © 2014, Fast ČR, a. s. Revision 03/2014
Using the on-screen touch keyboard in landscape
mode
In landscape mode, the on-screen keyboard rotates to adapt to
the wider screen.
On-screen keyboard settings
1. Tap > Settings ( ) > Language & keyboard.
2. For the Google keyboard option, tap on and edited the
keyboard settings.
3.11 Messages
The Messages app is used to send and received text messages
(SMS) and multimedia messages (MMS) to other phones
which support SMS and MMS. The E-mail app allows the user
to read and send e-mails.
SMS and MMS
Launching the Messages app
The app can be launched as follows:
Tap
on the Home screen.
Tap
> Messages ( ).
Typing and sending text messages
The Messages app opens where you can create a new
message or continue with the current text message thread.
1. Tap on to start typing a new text or multimedia
message. Tapping on an existing thread opens the
respective thread.
2. Start typing the phone number in the fi eld and select
the contact from the Contacts app. Contacts will begin to
appear, corresponding to the phone number being entered.
You can click on one of the recommended recipients or
continue typing the full phone number.
3. Tap in the text fi eld to begin typing the message.
Page 44

Basic information and functions
EN
42 EN
Copyright © 2014, Fast ČR, a. s. Revision 03/2014
If you press the Back button in the middle of typing
amessage, the message will be saved as a draft to the
message list. Tap on the message to continue typing.
4. After you have fi nished typing the message, tap on
.
Note:
Responses to the message, if available, will be displayed in
the same window. A thread will be created for receiving and
sending additional messages.
Typing and sending multimedia messages
Note:
To send and receive multimedia messages, you must
have an active data plan with your carrier and mobile data
transfers must be enabled on your phone.
1. Tap on the Home screen.
2. Start typing the phone number in the fi eld and select
the contact from the Contacts app.
3. Tap in the text fi eld to begin typing the message.
4. Press the Menu button to display the available options. Tap
on Add subject.
5. Enter the subject of the message.
The mobile phone is now in multimedia message typing
mode.
6. After you have fi nished typing the message, tap on
.
Opening and viewing multimedia messages
1. Tap on the desired thread from the messages list to open
the thread.
2. Tap on the multimedia message to view the message.
3. Swiping your fi nger up and down will switch to the next, or
previous shot.
Page 45

EN
Basic information and functions
EN 43
Copyright © 2014, Fast ČR, a. s. Revision 03/2014
Responding to a message
1. Tap on the desired text or multimedia message thread
from the messages list to open the thread.
2. Tap in the text fi eld to begin typing the message.
3. Tap on
.
Change settings for messages
Press the Menu button from the list of messages. Then tap on
Settings and change the settings.
3.12 E-mail
Note:
A functional internet connection is required for e-mail
communication (WiFi or mobile data) POP3, IMAP or
Exchange.
Launching the E-mail app
The app can be launched as follows:
Tap
> E-mail ( ).
Adding an e-mail account
The e-mail account wizard will guide you through all steps
necessary to set up your account for several popular e-mail
service providers. You can use e-mail, as you are accustomed
to on the computer in the web browser or other e-mail app.
Refer to your provider for information regarding your inbox.
1. Launch the E-mail app. See “Launching the E-mail app”.
2. Enter your E-mail address and Password.
3. Tap on Next. The device automatically recognizes the
e-mail account settings. To set up the account manually,
tap on Manual setup.
Page 46

Basic information and functions
EN
44 EN
Copyright © 2014, Fast ČR, a. s. Revision 03/2014
Note:
If you select Manual settings and do not have the
information necessary to confi gure the e-mail account,
inform your e-mail service provider.
4. Select the type of account (e-mail protocol), which
corresponds to your account. Follow the instructions on
the screen and enter the required information, including
the server, domain, user name, password etc. Continue by
tapping on Next.
Note:
Settings may differ depending on the provider of the e-mail
service you use. Refer to your account provider for details
regarding settings.
5. Set the frequency of checking for new incoming mail and
tap Next.
6. Enter Your name and the Account name.
Note:
The name of the account will be displayed on the E-mail
app screen.
7. Tap on Next.
Once the account is set up, the app will initially display the
Inbox folder.
Adding another e-mail account
1. Once you have created the fi rst e-mail account, press the
Menu button and then tap on Settings.
2. Tap ADD ACCOUNT to create another e-mail account.
3. Repeat steps 2-7 described in chapter “Adding an e-mail
account”
Page 47

EN
Basic information and functions
EN 45
Copyright © 2014, Fast ČR, a. s. Revision 03/2014
Tip:
When adding another e-mail account, you can check “Use
as Default for sending e-mails?” box, which allows using the
added account for all outgoing messages.
Reading e-mails
1. Open an e-mail message by tapping the respective
message in the Inbox.
2. Tap to open the desired folder and tap on an e-mail
within the folder to open.
Typing and sending e-mails
1. While in the Inbox, tap on .
Note:
To use a different e-mail account for sending mail, tap the
fi eld for selecting accounts in the top left corner of the screen
and select the account you wish to use.
2. Enter the e-mail subject and body.
3. To add an attachment to the e-mail, press Menu and then
select Add attachment.
If you press the Back button in the middle of typing a
message, the message will be saved as a draft.
Responding to an e-mail
1. Tap on the e-mail you wish to open and respond to.
2. Tap on or > Reply to all to begin typing your
response.
Removing an e-mail account
1. While in the Inbox, press the Menu button and tap
Settings.
2. Tap on the e-mail account to remove.
Page 48

Basic information and functions
EN
46 EN
Copyright © 2014, Fast ČR, a. s. Revision 03/2014
3. Tap on Remove account.
4. Tap OK.
Change e-mail account settings
You can change the settings for your e-mail account, including
the frequency of checking for incoming mail.
1. While in the Inbox, press the Menu button. Then tap on
Settings and change the settings.
2. Tap on General or on a specifi c e-mail account.
3. Tapping on an option will change the settings.
Note:
Incoming and outgoing mail settings may differ depending
on the provider of the e-mail service you use: POP3, IMAP
or Exchange. The required information can be entered
manually, however, in most cases, the proper e-mail account
confi guration shall be determined from your provider.
Page 49

EN
Advanced controls
EN 47
Copyright © 2014, Fast ČR, a. s. Revision 03/2014
4. Advanced controls
4.1 GPRS/3G
Checking the network connection
1. Tap Apps > Settings.
2. Under WIRELESS & NETWORKS, tap More > Mobile
networks.
3. Tap 3G network to check the network connection.
Note:
The mobile phone automatically reads access points from
the SIM card. For this reason we ask that you do not change
the access point settings. Otherwise the network connection
might not function properly.
If you delete or change the network access point, you can
create a new access point or update the existing access
point. To do so you will need detailed information from your
carrier.
Enabling data
1. Tap Apps > Settings.
2. Under WIRELESS & NETWORKS, tap More > Mobile
networks > Mobile data.
3. Tap your carrier and enable data.
4.2 Wi-Fi
Wi-Fi technology provides wireless access to broadband
internet. To use Wi-Fi on your mobile phone, a wireless access
point (or public hotspot) must be available. Physical obstacles
blocking Wi-Fi signal transmission reduce the signal strength.
Page 50

Advanced controls
EN
48 EN
Copyright © 2014, Fast ČR, a. s. Revision 03/2014
Enabling Wi-Fi
1. Tap Apps > Settings.
2. Under WIRELESS & NETWORKS, tap Wi-Fi and enable
(ON).
Connecting to a wireless network
1. Enable Wi-Fi.
2. A list of local Wi-Fi networks detected will appear under
Wi-Fi networks. Tap on the network you wish to connect
to.
3. If the selected network is open, a connection will be
established automatically.
Note:
If you connect to a secure wireless network, which you
have already used in the past, you will not be prompted
to re-enter your password. You will only have to enter the
password again if you reset the phone to factory settings.
Tip:
You can add a new Wi-Fi network by tapping on the
screen showing available Wi-Fi networks. Similarly, when
the network password changes, you can remove the existing
network name, and upon fi nding the same network, you can
enter the new password.
4.3 Browser
The mobile phone also includes a web browser. The Browser
app can be used to access the internet and browse web pages.
Launching the Browser app
The app can be launched as follows:
• Tap
on the Home screen.
• Tap on Apps > Browser (
).
Page 51

EN
Advanced controls
EN 49
Copyright © 2014, Fast ČR, a. s. Revision 03/2014
Opening a website
1. Enter the website URL.
2. The browser will display suggestions of corresponding
websites while you type in the address. If you see the
website you are looking for in the list, you can tap on the
address and go to the website. Otherwise, complete the
URL entry and tap Go on the on-screen keyboard.
Setting the homepage
1. Press the Menu button in the browser window.
2. Tap Settings > General > Set homepage.
3. Select one of the available options.
To enter a specifi c website, tap on Other and enter the URL.
Confi rm by pressing OK.
4.4 Bookmarks
You can save any given number of bookmarks in the phone.
Adding a bookmark
1. Navigate to the website you wish to add to your
bookmarks.
2. Press the Menu button and choose Save to bookmarks.
The Bookmark this page screen opens.
3. Edit the name of the bookmark accordingly and tap OK.
Opening a bookmark
1. In the browser, press the Menu button and then tap
Bookmarks/History.
2. On the Bookmarks screen, tap the website you wish to
open.
Tapping on the HISTORY tab will display the websites you
visited in the past. Tapping on the SAVED PAGES tab will
display the pages you have saved.
Page 52

Advanced controls
EN
50 EN
Copyright © 2014, Fast ČR, a. s. Revision 03/2014
4.5 Changing Browser settings
Browser settings can be edited to suit your way of browsing
the web.
Press the Menu button and tap Settings to set the page
contents, privacy, security and other settings.
Web page management
While browsing a web page, you can change the display
settings and other features by pressing the Menu button.
Refresh: Tap to refresh the current page.
Forward: Tap to go to the next page.
Stop: Tap to stop loading the current web page.
Homepage: Tap to go to the homepage.
Add to bookmarks: Tap to add the page to bookmarks.
Close: Tap to close the currently viewed page.
Share page: Tap to share the page via either of the selected
apps.
PC version of website: Tap to view the current page as it would
be displayed on a PC.
Bookmarks/History: Tap to display the list of bookmarks,
history and saved pages.
4.6 Bluetooth
This mobile phone supports Bluetooth technology, allowing
wireless connection with a Bluetooth handsfree set as well as
sending photos from the phone to PC.
When using Bluetooth, keep in mind you must be no further
than 10 metres away from the connected devices. Walls
and other electronic devices can interfere with the Bluetooth
connection.
Page 53

EN
Advanced controls
EN 51
Copyright © 2014, Fast ČR, a. s. Revision 03/2014
Enabling Bluetooth
1. Tap Apps > Settings.
2. Under WIRELESS & NETWORKS, tap Bluetooth and
enable (ON).
Note:
As soon as Bluetooth is enabled, Bluetooth devices in reach
are detected, however, the phone is not visible to other
devices.
3. To make the phone visible to other devices, tap on the
name of your phone model from the available options.
Connecting and pairing with a Bluetooth device
The Bluetooth feature enables the following:
Connecting a wireless Bluetooth handsfree set.
Before using the Bluetooth connection, the mobile phone and
Bluetooth device must be paired as follows:
Make sure Bluetooth is enabled.
1. The mobile phone searches for available Bluetooth devices
in the area (you can also do so manually by tapping
SEARCH DEVICES).
2. Tap on the device you wish to pair with (this device must
be in pairing mode).
3. Finish the pairing process by entering the pairing code.
Note:
As soon as the pairing is successful, you will not have to reenter the password when you reconnect to the same device.
Sending files via Bluetooth
1. Tap Apps > File Manager.
2. Tap > Bluetooth and select paired devices from the list.
Page 54

Advanced controls
EN
52 EN
Copyright © 2014, Fast ČR, a. s. Revision 03/2014
Disconnecting and unpairing Bluetooth devices
1. Tap Apps > Settings.
2. Under WIRELESS & NETWORKS, tap Bluetooth.
3. Tap on the
icon next to the connected device and
disconnect the device by tapping on the Cancel pairing
option.
Page 55

EN
Entertainment
EN 53
Copyright © 2014, Fast ČR, a. s. Revision 03/2014
5. Entertainment
Not only is this mobile phone used as a communication
device and personal assistant, it also contains a large number
of entertainment features. It allows the user to take photos,
record videos and audio clips and downloading and listening to
music.
5.1 Taking photos and recording video
The camera allows you to take photos and record videos and
share these fi les.
Launching the camera
Tap Apps > Camera to launch the camera.
The Camera app can also be launched by pressing and
holding the Cameral release on the side of the device
(provided a different function is not allocated to this button).
Close the Camera app by pressing the Back or Home button.
Taking a picture
1. Tap Apps > Camera.
Note:
You can switch between the front and back camera by
tapping
.
2. Compose the image to be captured.
Swipe
to zoom in/out on the photographed image.
Tap
to change the camera settings. The displayed
preview is updated based on the changes made.
3. Tap on the release symbol to take a picture.
Page 56

Entertainment
EN
54 EN
Copyright © 2014, Fast ČR, a. s. Revision 03/2014
Viewing photos
1. Once the picture is taken, a thumbnail of the last photo
will appear in the corner of the app. Tapping on the
thumbnail will display the full-sized photo.
2. The following controls and features are available:
You can share the photo by tapping
and selecting the
sharing app. You can delete a photo by tapping > OK.
To display the more photos and videos in the Gallery app, tap
.
3. You can switch between photos by swiping your fi nger to
the left and right.
Recording videos
1. Tap Apps > Camera.
Note:
You can switch between the front and back camera by
tapping
.
2. Compose the scene you wish to begin your video with.
3. Tap the camera symbol to start recording. The recording
process begins.
Swipe
to zoom in/out on the recorded object.
4. Tap the camera symbol to stop the recording process.
Recording playback
Once the video is recorded, a thumbnail of the last recording
will appear in the bottom right corner of the app. Tapping on
the thumbnail will display the full-sized photo.
Page 57

EN
Entertainment
EN 55
Copyright © 2014, Fast ČR, a. s. Revision 03/2014
Gallery app
The Gallery app automatically searches for pictures and videos
stored on the microSD card. The Gallery app can be used to
categorize photos into folders, view them and edit, play videos
and set a picture as the wallpaper or assigning a photo to
acontact.
Launching the Gallery app
Tap Apps > Gallery to open the Gallery app. Pictures and
videos are shown in the app divided into categories.
View photos
1. In the Gallery app, tap the folder containing the images
you wish to view.
2. Tapping a picture will display the image in full screen
mode.
Tip:
The Image viewer supports automatic screen rotation. As
soon as you rotate the mobile phone, the image will adapt to
the screen orientation.
Image cropping
1. While viewing a picture, press the Menu button and tap
Crop.
2. Use the cropping tool to select the area of the image you
wish to crop.
You can move the image by swiping beyond the cropped area.
The cropping size can be changed by swiping beyond the
boundary of the cropped area.
The cropping size can be changed, without changing the
aspect ratio of the image, by swiping beyond the corner of the
cropped area.
Page 58

Entertainment
EN
56 EN
Copyright © 2014, Fast ČR, a. s. Revision 03/2014
3. Tap OK to save the cropped image. Tap CANCEL to cancel
the changes.
5.2 Listening to Music
Copying music to the microSD card
1. Connect your phone to the computer via USB cable and
set the microSD card as a mass storage device.
2. Open the folder of the connected USB device on the
computer.
3. Create a new folder in the root directory of the microSD
(e.g. Music).
4. Copy your music from the computer to the created folder.
5. After the music is fi nished being copied, follow the
operating system instructions and remove the connected
USB device safely.
6. Disconnect the mobile phone from the PC.
Browsing your Media library
Tap Apps > Music to open the library. The Music app
categorizes music according to TRACKS and GENRES.
Music playback
1. Tap to open the desired category.
2. Tap the track you wish to play.
Tip:
You can use different apps, while playing music, by pressing
the Back button. Music playback will not be interrupted. To
open the playback control panel, open the notifi cation bar
and tap the track name.
Adding music to the Playlist
1. Tap to open the desired category.
2. Tap and hold your fi nger on the track name and then
select Add to playlist.
Page 59

EN
Entertainment
EN 57
Copyright © 2014, Fast ČR, a. s. Revision 03/2014
3. Select the playlist from the menu or choose New playlist.
Playlist playback
1. Tap PLAYLISTS on the music library screen.
2. Tap and hold your fi nger on the playlist you wish to play.
3. Tap Play to begin playing the playlist.
5.3 Listening to FM radio
The FM Radio app allows listening to FM radio stations on
your mobile phone. The headphone cable is used as an FM
antenna and therefore the headphones must be plugged in to
listen to the radio.
Launching the FM Radio app
1. Tap Apps > FM Radio to open the FM Radio app.
2. The FM Radio app can automatically search radio stations,
save them to presets and playing radio stations.
FM Radio tuning
The app allows the following:
Tap or to select a station to listen to.
For manual frequency tuning, tap or .
Add the current station to your Favourites by tapping .
Tap to view your Favourites list.
Activate the speaker by tapping .
Search for available stations by tapping > Search.
Restore playback by tapping .
To pause station playback, tap . Tap to restore.
To change more radio settings, e.g. RDS settings, tap .
Change the settings and confi rm by tapping OK.
Switch the Radio off by tapping > Exit.
Page 60

Entertainment
EN
58 EN
Copyright © 2014, Fast ČR, a. s. Revision 03/2014
5.4 Google services
You must sign in to your Google account in order to use the
Gmail, Google Calendar and other apps providing Google
services. You will also be prompted to sign into your Google
account when downloading apps from the Play Store.
Note:
If there is not SIM card inserted into the phone, you will
not be able to use voice and data services on the mobile
network. You can, however, connect to a Wi-Fi network and
sign into your Google account and use many of the device's
features besides calling.
If your start your phone for the fi rst time without a SIM card,
you will be prompted to connect to a Wi-Fi network and
complete the phone setup (instead of the carrier network). If
you already have a Google account, tap Sign in and enter your
user name and password.
Creating a Google account
If you do not yet have a Google account, you can create one
as follows:
1. Tap Apps > Settings.
2. Under ACCOUNTS select Add account.
3. Choose the Google account by selecting Google.
4. Tap New to create a new account.
5. Enter your name and tap .
6. Enter your user name and tap .
The mobile phone will connect to the Google server and
check whether the user name is available. If the user name is
already in use, you will be prompted to enter a different user
name.
7. Enter your recovery information (secondary e-mail address
and security question) and tap .
Page 61

EN
Entertainment
EN 59
Copyright © 2014, Fast ČR, a. s. Revision 03/2014
8. Select Connect to Google+ if you wish to create
aGoogle+profi le, or Not now to skip this step.
9. Read the terms of agreement and tap
to complete the
registration of your account.
10. Enter the verifi cation code and tap .
11. Enter your credit card information so you can purchase
apps from the Play Store and tap Save. You can skip this
step by choosing Skip.
Using the Gmail app
As soon as you open the Gmail app on the phone, the Inbox
folder will contain e-mails from your Gmail account.
Launching the Gmail app
Tap Apps > Gmail. The list of received mail will be shown. All
e-mails, you wish to keep in your mobile phone, will be in the
Inbox folder.
Switching between accounts
To use a different e-mail account for sending mail, tap the fi eld
for selecting accounts in the top left corner of the screen and
select the account you wish to use.
Composing and sending e-mails
1. While in the Inbox, tap on .
To send an e-mail to multiple recipients, separate each e-mail
address with a comma.
To send a carbon copy or blind carbon copy to additional
recipients, press the Menu button and then select Add Cc/Bcc.
2. Enter the e-mail subject and body.
To attach a photo to an e-mail, press the Menu button and
select Attach picture. Choose the picture to attach.
Page 62

Entertainment
EN
60 EN
Copyright © 2014, Fast ČR, a. s. Revision 03/2014
3. Tap after you have fi nished composing the e-mail.
Responding and forwarding an e-mail
1. While in the Inbox, select the e-mail to respond to or
forward.
2. Tap on Reply ( ), Reply to All ( ) or Forward ( ).
3. Do the following:
If you choose Reply or Reply to all, add a response.
If you choose Forward, select the recipient and add any
additional content you wish to add to the forwarded
message.
4. Tap on .
E-mail search
1. While in the Inbox, tap on .
2. Enter keywords into the fi eld and tap .
Changing Gmail settings
1. While in the Inbox, press the Menu button. Then tap on
Settings and change the settings.
2. Tap on General settings or on a specifi c e-mail account.
3. Tapping on an option will change the settings.
5.5 Using the Maps app
This phone contains a GPS satellite signal receiver. Apart from
this, it is capable of determining your position from available
WiFi networks with an accuracy of up to 50 metres.
To use this function, you will need to install an app that
requires GPS, for example Google Maps.
Enabling access to my location
1. Tap Apps > Settings.
2. Select Location access.
3. Enable access to my location by selecting Access to my
location Google or GPS satellites.
Page 63

EN
Entertainment
EN 61
Copyright © 2014, Fast ČR, a. s. Revision 03/2014
Launching the Maps app
Tap Apps > Maps to open the Maps app.
Searching points of interest
1. While browsing a map, tap .
2. Enter the name of the place you wish to search into the
search fi eld and tap .
Note:
You can select one of the options from the recommended
location list.
3. The search results will appear. Tap on the symbol to
display the name of the place.
4. Use the on-screen buttons to show the location on the
map, get directions and more.
5.6 Navigation
Once you have found your destination, your phone can
navigate you to your destination. The app may require
continuous access to map data via your data connection.
5.7 Play Store
The Play Store provides direct access to applications and
games, which you can download and install on your phone.
Launching the Play Store
1. Tap Apps > Play.
You must be registered to use the store. Read the provider's
terms of agreement.
App search
Sorting apps according to categories: Select the category of
your choice by tapping on the given category and swipe to
scroll through the list. Searching: Tap on .
Page 64

Entertainment
EN
62 EN
Copyright © 2014, Fast ČR, a. s. Revision 03/2014
To show an overview of the apps installed on the phone, press
the Menu button and tap My apps.
Installing apps
Note:
To install an app from sources other than the Play Store, tap
Settings > Security and check Unknown sources, which will
allow installing an app outside of the Play Store.
1. Tap Apps > Play.
2. Select a Store category and then choose the item to
download.
3. The details screen provides more information about the
app, including the user score and reviews. If you move
down to the Developer section, you can view apps from
the same developer or visit the developer's website.
4. Install the app by tapping Install. The mandatory app
EULA will appear on the screen. Read it and tap Accept
and install.
Note:
The downloading progress is shown in the notifi cation bar.
The installation time depends on the size of the application
and data connection speed.
Uninstalling apps
1. On the Google Play Store, press the Menu button and tap
My apps.
2. Tap on the app you would like to uninstall and choose
Uninstall.
3. After being prompted, the app will be uninstalled from the
phone by selecting OK.
Page 65

EN
Entertainment
EN 63
Copyright © 2014, Fast ČR, a. s. Revision 03/2014
Note:
Applications are properly managed under Settings (
) >
Apps.
Page 66

Synchronization
EN
64 EN
Copyright © 2014, Fast ČR, a. s. Revision 03/2014
6. Synchronization
Some apps on the mobile phone (e.g. Gmail) share the same
personal information, which you can add, view and edit on the
computer. If you make a change on the internet, using any of
these apps, the updated information will also appear in the
phone.
This is made possible by Over The Air (OTA) data
synchronization. The synchronization process runs in the
background and does not interrupt mobile phone operation.
User accounts
Contacts, e-mail and other phone data can be synchronized
with multiple Google accounts and also with other types of
accounts depending on the apps installed on the phone.
For example, you can start by adding your personal Google
account and always have your personal e-mails, contacts and
calendar handy. You can then add a work account to keep
your work e-mails and contacts at arm's reach. If necessary,
you can add additional Google accounts or other types of
accounts.
Adding an account
1. Tap Apps > Settings.
2. Under ACCOUNTS, select Add account. A summary of
the synchronization settings and a list of currently synced
accounts will be displayed.
Note:
Some cases may require the user to request login
information from the service administrator. For example, the
account domain or server address will be required.
3. Tap on the type of account to add.
Page 67

EN
Synchronization
EN 65
Copyright © 2014, Fast ČR, a. s. Revision 03/2014
4. Follow the instructions on the screen and enter the
required and optional account information. Most accounts
require a user name and password, however, additional
details depend on the type of account and the provider's
security. Contact the provider for details.
Removing an account
You can remove an account, and all data associated with the
mobile phone, including e-mails, contacts, settings etc. Some
accounts, however, cannot be removed.
1. Select the account type on the Settings screen under
ACCOUNTS.
2. Tap the account to remove.
3. Press the Menu button and choose Remove account.
4. Tap Remove account.
Page 68

Using other apps
EN
66 EN
Copyright © 2014, Fast ČR, a. s. Revision 03/2014
7. Using other apps
7.1 Calendar app
With the Calendar app you can create and manage events,
meetings and appointments. Depending on the settings, the
calendar will sync with the web calendar.
Launching the Calendar app
Tap Apps > Calendar to open the Calendar app. Press the
Menu button to display the settings and adapt the view.
Creating and event
1. From any given screen of the calendar, select the desired
date and press the Menu button and select New event.
2. Enter the name of the event via the on-screen keyboard.
If the event takes place for a duration, set the duration of
the event by adjusting the From and To fi elds.
For special events, e.g. birthday, check All day.
3. Enter the event location and description.
4. You can add participants to the event by entering their
e-mail addresses.
5. The Reminder fi eld is used to set the type of event
reminder. If the event is a reoccurring event, you can set
the reoccurrence frequency in the Reoccurrence fi eld.
6. Tap DONE once you have fi nished with the event setup.
Event reminders
1. From any given screen of the calendar, tap on the event to
display the event details.
2. Tap Add reminder to add an event reminder. Tap the “X”
icon to remove a reminder.
3. Tap the reminder time and enter how long prior to the
event time should the reminder be displayed.
Page 69

EN
Using other apps
EN 67
Copyright © 2014, Fast ČR, a. s. Revision 03/2014
Adapting the Calendar app
From any given screen of the calendar, press the Menu button
and tap Settings > General settings. Select from the following
options:
Hide declined events: Check to hide events you declined the
invitations for. Show the calendar week: Check to show the
calendar week.
Use domestic time: When checked, the times in the calendar
will be displayed according to your home time zone, even
when you are on the road.
Domestic time zone: This option is used to select the time
zone.
Delete search history: Removes all prior searches made.
Reminder sound: Tap to select a ringtone that will sound when
the reminder is displayed.
Default reminder time: Tap to set the default event reminder
time.
Quick responses: Tap to edit the default e-mail text that will be
sent to the participants invited to the event.
7.2 Alarm settings
You can set a new alarm or edit an existing alarm.
Opening the alarm settings
Tap Clock on the home screen or Apps to enter settings,
where you can set the mobile phone alarm by selecting the
alarm icon (
) > Alarm settings. A list of current alarms will
be displayed.
Page 70

Using other apps
EN
68 EN
Copyright © 2014, Fast ČR, a. s. Revision 03/2014
Adding an alarm
1. Tap the “+” symbol on the screen containing the list of
alarms and set a new alarm.
2. To set an alarm:
Set the time by selecting Time. Set the alarm time using the
numerical on-screen keyboard and confi rm with OK. Repeated
alarms can be set by selecting Repeat. Select the days on
which the alarm shall repeat and complete the alarm settings
by pressing OK.
To change the ringtone for an alarm, tap Ringtone. Select one
of the available options and confi rm with OK. If you would
like the phone to vibrate when the alarm goes off, check the
Vibrate option.
If you would like to add a label to an alarm, tap Label.
3. To complete the alarm setup, press Back or Home.
7.3 Using the File Manager app
File Manager
The app enables the user to browse through media storages
(internal memory, SD card), create folders, copy and delete
fi les, search fi les. Multimedia fi les can be viewed and played.
7.4 Calculator
The calculator can be used to solve simple mathematical
problems or use advanced operators to solve more complex
equations.
7.5 Advanced functions
In the Calculator app, press the Menu button and tap the
Advanced functions panel.
Page 71

EN
Using other apps
EN 69
Copyright © 2014, Fast ČR, a. s. Revision 03/2014
7.6 Mobile phone management
Date & time
The time can be set automatically according to the time
provided by the carrier network.
Note:
If the time provided by the network is used, the date, time
and time zone cannot be confi gured manually. The related
time zone can be confi gured by enabling the automatic
date & time in case the phone does not receive the time
information in full.
1. On the Settings screen, click Date & time.
2. Tap to uncheck the Automatic date & time option.
3. Uncheck the Automatic time zone fi eld.
4. Tap on Set date.
5. You can select the time zone from a list by tapping Select
time zone. You can scroll through the list of time zones by
swiping up and down.
6. Tap on Set time.
7. You can toggle between the 24-hour and 12-hour time
format by checking the Use 24-hour format option.
8. Tap Choose date format to specify the format for displaying
dates on the mobile phone.
7.7 Display settings
Brightness
1. On the Settings screen, select Display > Brightness.
2. Dragging the slider to the left decreases the display
brightness, dragging to the right increases the brightness.
3. Tap OK to save the settings.
Page 72

Using other apps
EN
70 EN
Copyright © 2014, Fast ČR, a. s. Revision 03/2014
Note:
To automatically adapt the brightness of the display
depending on the ambient light, tap Automatic brightness.
Sleep mode
In order to save battery power, the display will be switched
off if the user does not use the phone for several minutes.
To extend or reduce the time before the phone falls asleep,
perform the following:
1. On the Settings screen, select Display > Sleep.
2. Set the time when the device shall fall asleep.
Automatic screen rotation
Check this option if you would like the screen to rotate
automatically based on the phone orientation. The screens
of apps enabling rotation (e.g. according to the type of
information displayed) or apps without a defi ned orientation
(e.g. games) will rotate.
Ringtone settings
Activating silent mode
To activate silent mode, under Settings choose Profi les >
Silent. All sounds except for media fi les and alarms will be
muted.
Ringtone volume
The ringtone volume can be adjusted from the Home screen
and while using any app (apart from a call in progress or
music or video playback). Adjust the ringtone volume to the
desired level using the volume control buttons. The ringtone
volume can also be adjusted under Settings.
1. On the Settings screen, select Sound > General > Volume.
2. Dragging the slider to the left decreases the volume,
dragging to the right increases the volume.
Page 73

EN
Using other apps
EN 71
Copyright © 2014, Fast ČR, a. s. Revision 03/2014
3. Tap OK to save the settings.
Changing the ringtone
1. On the Settings screen, select Sound > General >
Ringtone.
2. Tap on the ringtone you would like to use and confi rm with
OK. The ringtone will begin to play after tapping on it.
Setting the vibration response for incoming calls
1. On the Settings screen, select Sound > General.
2. Check the Vibration box and your phone will vibrate when
an incoming call is received.
7.8 Phone services
Default network settings
1. On the Settings screen, select SIM management.
2. On the DEFAULT SIM tap, select Voice calls, Video calls,
Messages or Data services and then select the default
network.
Note:
Check with your mobile carrier for data availability and
service rates.
Changing the network settings
1. On the Settings screen, select SIM management.
2. On the SIM INFORMATION tab, select the network, the
settings of which you would like to update. The following
network settings are available:
Change the SIM name: Tap to change the network name.
Enter the phone number: Tap to enter the phone number.
Page 74

Using other apps
EN
72 EN
Copyright © 2014, Fast ČR, a. s. Revision 03/2014
Activating data services when roaming
1. In Settings, select SIM management > Roaming > Data
roaming.
2. Select the network to use for the data connection.
Note:
Using data roaming can lead to increased charges. Request
pricing information for data roaming from your network
carrier.
Disabling data
1. On the Settings screen, select SIM management > Data
services.
2. Tap Off to disable data.
Securing the mobile phone
To prevent unauthorized use of your mobile phone, there are
several pre-set passwords on the phone and SIM card.
PIN code:
The PIN code (Personal Identifi cation Number, 4-8 numbers)
prevents the unauthorized use of the SIM card. If the PIN code
verifi cation function is active, you will be requested to enter
this code every time the phone is switched on. Should the PIN
code be entered incorrectly three times in a row, the SIM card
will be locked. The following steps describe how to unlock the
card:
• After being prompted on the screen, enter the PUK code.
• Continue by entering a new PIN code and press the OK
button on the screen.
• As soon as you are requested to re-enter the new PIN code,
enter the code and press OK.
• If the PUK code you entered is correct, the SIM card will be
unlocked and the new PIN code will be activated.
Page 75

EN
Using other apps
EN 73
Copyright © 2014, Fast ČR, a. s. Revision 03/2014
WARNING:
If you enter the PIN code incorrectly three times in a
row, the SIM card will be automatically locked. You
will need the PUK code to unlock the card. Your phone
service provider will provide a PUK code.
PUK code:
The PUK code (used to unlock the PIN code and consists of
8 numbers) unlocks the SIM card in the event that the PIN
code is entered incorrectly. This code is provided by the phone
service provider together with the SIM card. Should the PUK
code be entered incorrectly ten times in a row, the SIM card
will be destroyed. Request a new SIM card from your provider.
PIN2 code:
The PIN2 code (4-8 numbers) is also provided by the
phone service provider together with the SIM card and is
used to confi gure fi xed options and other functions. Refer
to your phone service provider for more information about
the availability of these functions. Should the PIN2 code be
entered incorrectly three times in a row, the PIN2 code will be
locked. The PIN2 code will be unlocked after the PUK2 code
is correctly entered. The following steps describe how to renew
the code:
• After being prompted on the screen, enter the PUK2 code.
• Continue by entering a new PIN2 code and press the OK
button on the screen.
• As soon as you are requested to re-enter the new PIN2
code, enter the code and press OK.
PUK2:
The PUK2 code (used to unlock the PIN2 code and consists
of 8 numbers) unlocks some functions of the SIM card in the
event that the PIN2 code is entered incorrectly. This code is
Page 76

Using other apps
EN
74 EN
Copyright © 2014, Fast ČR, a. s. Revision 03/2014
provided by the phone service provider together with the SIM
card. If you do not have the PUK2 code, contact your mobile
service provider. Should the PUK2 code be entered incorrectly
ten times in a row, the functions pertaining to the PUK2 code
will not be available. To activate these functions, contact your
mobile service provider and request a new SIM card.
Setting the PIN code for the SIM card
1. Under settings, select Security > Set up SIM card lock.
2. Check SIM lock.
3. Enter the PIN code and tap OK.
To change the PIN code, tap Set or change PIN.
Note:
Emergency calls can be made using the mobile phone even
without entering a valid PIN code.
Securing your phone with screen lock
To ensure your data is secure, lock your screen and enable the
feature prompting the user to enter a password/gesture which
unlocks your screen each time you power on or wake-up your
phone from standby. Use a suitable password and method so
that you are capable of unlocking the device. If you cannot
unlock the phone (e.g. lost password), you will have to reset
the phone to factory settings, resulting in the loss of all user
data, including access passwords. We therefore encourage you
to backup your data.
1. In Settings, select Security > Screen lock.
2. Select one of the available options. The most popular
options are:
None: The device is not secure.
Swipe: The phone unlocks by swiping the lock icon to the
side.
Page 77

EN
Using other apps
EN 75
Copyright © 2014, Fast ČR, a. s. Revision 03/2014
Gesture: The phone unlocks after correctly entering the
defi ned unlocking gesture.
PIN: The PIN code is used to unlock the phone.
Password: A defi ned password is used to unlock the
phone.
3. Follow the instructions for the relevant option to complete
the setup process.
7.9 Apps
Because the phone is based on the Android operating system,
it's features can be expanded by installing additional apps via
the Google Play or Android Market stores.
There are three ways how to install apps to the
phone:
1. Direct download from the internet. As soon as the
download fi nishes, choose Install from the available
options.
Note:
The app installation method can depend on the browser you
use. Before downloading, make sure an SD card is inserted.
2. Downloading an installation fi le to your computer hard
drive and then installing the app via PC software (e.g.
SnapPea).
3. If you have a fi le manager installed on your phone, the
installation fi le of the APK can be copied to the SD card
and then use fi le manager to navigate to the directory,
where the installation fi le is saved, and tap the installation
fi le.
Page 78

Using other apps
EN
76 EN
Copyright © 2014, Fast ČR, a. s. Revision 03/2014
Note:
To install apps from sources other than Google Play,
you must enable this under Settings > Security > Allow
installation of non-Market application.
WARNING:
Apps downloaded from the internet may come from
unknown sources. To protect your phone and personal
data, download apps from verified sources, such as
Google Play or Android Market stores.
7.10 App management
You can access all installed apps under Settings > Apps > App
management.
Touch an app from the list to receive information about the
app, where you can perform the following actions.
Kill a running app – the app will close without confi rmation.
Uninstall an app which you will no longer use. To free up
memory.
Delete app data, e.g. user accounts, databases, settings etc.
Move app fi les from the internal storage to the SD card and
vice versa.
Delete the cache memory of the app containing temporary
data stored on the phone.
Note:
Uninstalling pre-installed apps is not possible.
Ways to free up phone memory
Uninstall downloaded apps which you do not use any more.
Restart the phone.
Page 79

EN
Using other apps
EN 77
Copyright © 2014, Fast ČR, a. s. Revision 03/2014
7.11 Reset the phone
Back up settings
Your settings and data can be backed up on Google servers
through your Google account. As soon as you purchase your
new phone, you will be able to restore your data and settings
from the backup.
1. On the Settings screen, click Backup & reset.
2. Check the Back up my data box.
Phone reset
1. On the Settings screen, click Backup & reset > Factory
data reset.
2. Real all of the warning information and click on Reset
phone and then on Delete all. The mobile phone will reset
the settings to the original factory settings and the phone
will restart.
Page 80

Q&A
EN
78 EN
Copyright © 2014, Fast ČR, a. s. Revision 03/2014
8. Q&A
Bad signal. Low
signal strength.
Call is breaking
up.
Area with bad
reception (between
large buildings or
trees, inside some
buildings).
Area with bad
reception (radio
interference
or industrial
interference).
Large distance
from base stations
(“transmitters”).
Move as far as
possible away
from the area with
bad reception.
Change the area for
receiving the call
to be closer to the
base station.
Echoes during
the call or noise.
The provider's
network is currently
experiencing
technical diffi culties
or is congested.
Try hanging up and
calling again.
Network
connection error.
Weak reception, SIM
provider network
does not have
coverage.
Choose a different
area.
SIM error. The SIM card is
damaged or inserted
incorrectly.
SIM card contacts
are dirty.
Check that the SIM
card is inserted
correctly or have it
checked. Carefully
clean the SIM card
contacts.
Calls cannot be
made.
Calls are blocked
by the phone or
provider (prepaid
service).
Limited calling only
to certain numbers.
Make sure the
service on the
SIM card is active.
Check the limited
calling options on
the phone.
Page 81

EN
Q&A
EN 79
Copyright © 2014, Fast ČR, a. s. Revision 03/2014
A previously
entered contact is
missing.
Contact list restricted
to SIM or phone only
on. Filtering active.
Switch between
SIM or phone
contacts, cancel
fi lter.
Cannot create
new contact or
save a number.
The contact area on
the SIM or phone is
full.
Check the free
space, switch
between SIM and
phone, delete some
contacts.
A specifi c
provider service
cannot be
activated.
Services can
be unavailable
according to location
or in general.
The service may be
paid.
Make sure your
provider offers the
service in your
location. Check that
you have prepaid
the respective
service.
Bad software or
app functionality.
The software or
app is damaged,
incorrectly
confi gured.
Check settings.
Restart the app.
Backup your data
and return to
factory settings of
the app, or reinstall
the app.
Bad system
component
functionality.
The system
is damaged
or incorrectly
confi gured.
Check settings.
Restart the phone.
Backup your data
and return to
factory settings, or
have and authorized
repair centre
reinstall the entire
phone system.
Page 82

Q&A
EN
80 EN
Copyright © 2014, Fast ČR, a. s. Revision 03/2014
The battery will
not charge.
Damaged or
unsuitable cable,
short connector.
Charging in freezing
or very high
temperatures.
Damaged power
adapter or battery.
Use a different,
new cable. For best
results, charge at
room temperature
or between
0 °C – 40 °C.
Have an authorized
repair centre replace
your adapter or
battery.
Cannot establish
connection with
computer.
Damaged cable or
cable specifi ed for
charging only.
Windows drivers not
installed.
Use the correct
cable with a
longer connector,
designated for
charging and
communication.
Try a different
USB port, update
Windows.
The battery life
for operating the
phone or standby
period is too
short.
The battery was not
fully charged.
The battery service
life has expired.
The phone is in an
area with no signal
coverage.
Charge the battery
completely. Have an
authorized service
centre replace a
dead battery.
A phone that
intensively searches
for signal consumes
more energy.
Important notes:
1. Backup important and personal data before any
installation, changes to the system or its components, or
hardware changes.
Page 83

EN
Q&A
EN 81
Copyright © 2014, Fast ČR, a. s. Revision 03/2014
2. We recommend backing up on a regular basis to avoid
losing important and personal data in case the phone is
damaged or lost.
3. Keep your password, PIN and other security codes a secret
to prevent the misuse of personal data.
Page 84

Technical data
EN
82 EN
Copyright © 2014, Fast ČR, a. s. Revision 03/2014
9. Technical data
Model name Element P430 (IP67 certifi ed smartphone)
Design
parameters
Description Flat, full-touchscreen
Dimensions 145.5 × 73 × 20.8 mm
Weight 256 g
Processor Processor type CPU: MTK 6589 (Quad Core ARM
Cortex A7 1.2GHz)
Networks Mobile network bands
GSM/GPRS/EDGE
– 850/1800/1900MHz
WCDMA/HSPA 850/1900/2100 MHz
DUAL SIM Yes
Processor name MTK MT6589
Input device Touchscreen Finger and single point control
Side buttons Yes
Other buttons Main switch
Display Main display, resolution
and colour range
4.3” (IPS LCD technology),
QHD540x960, 16.7M colours
Camera Camera chip CMOS
Front camera 0.3 MP
Back camera 8.0 MP
Auto-focus Yes
Flash Yes
Memory On-board memory RAM: 1 GB
Flash: 4 GB e-Nand
Extended memory (SD,
MicroSD)
T-Flash card (microSD)
Maximum memory
card capacity (in GB)
32 GB
Sensors Zoom sensor Yes
Light sensor Yes
Accelerometer Yes
Compass Yes
Battery Battery capacity 2800 mAh
Standby time 360 hours
Connectivity Bluetooth version BT2.1
USB version USB 2.0
Charging Micro USB 2.0
WiFi IEEE 802.11 b/g/n
FM radio FM Yes (FM 87,5-108 MHz), antenna in
headphones
Page 85

EN
Technical data
EN 83
Copyright © 2014, Fast ČR, a. s. Revision 03/2014
Accessories Hands-Free set (head-
phones + microphone)
3.5mm wire jack (stereo headphones,
microphone, switch)
Charger connector
(MiniUSB, MicroUSB/
other)
Micro USB 2.0
Speaker Embedded
Adapter model USB 5 V, 500 mA
Package contents USB cable, power adapter, quick start guide
Specifi c functions
Specifi c functions GPS navigation GPS/AGPS
IM communication Yes
E-mail Yes
Maps Yes
Google Street View Yes
Games Yes
Audio recording Yes
Operating system and application program environment
Platform Operation system Android 4.2 Jelly Bean
Organization and
adaptation
Calendar Yes
Notes Yes
Reminders Yes
Alarm Yes
Calculator Yes
Currency converter Yes
Audio recording Yes
Stopwatch Yes
Ringtone profi les Yes
Vibration Yes
Wallpaper Yes
Ringtones Yes
World time zones Yes
Airplane mode Yes
E-book reader Yes
File format
File format Ringtone formats MP3, AAC, AAC+, WMA
Picture formats JPG, BMP, PNG
Music fi le formats MP3, AAC, AAC+, WMA, MPEG4,
OGG
Video fi le formats H264, video streaming, 3GPP,
MPEG4, 3GP codec
Page 86

Technical data
EN
84 EN
Copyright © 2014, Fast ČR, a. s. Revision 03/2014
The above given specifi cations can change without prior
notice.
The CE symbol shown on the unit, in the user's manual
and on the package indicates the unit meets the basic
requirements of guideline R&TTE, 1995/5/EC, Guideline for
low voltage 73/23/EEC. The declaration of conformity can be
found at www.sencor.cz.
Page 87

EN
EN 85
Copyright © 2014, Fast ČR, a. s. Revision 03/2014
INSTRUCTIONS AND INFORMATION REGARDING THE
DISPOSAL OF USED PACKAGING MATERIALS
Dispose of packaging material at a public waste disposal site.
DISPOSAL OF USED ELECTRICAL AND
ELECTRONIC APPLIANCES
The meaning of the symbol on the product, its accessory
or packaging indicates that this product shall not be treated
as household waste. Please, dispose of this product at your
applicable collection point for the recycling of electrical &
electronic equipment waste. Alternatively in some states of the
European Union or other European states you may return your
products to your local retailer when buying an equivalent new
product.
The correct disposal of this product will help save valuable natural
resources and help in preventing the potential negative impact
on the environment and human health, which could be caused
as a result of improper liquidation of waste. Please ask your
local authorities or the nearest waste collection centre for further
details. The improper disposal of this type of waste may fall
subject to national regulations for fi nes.
For business entities in the European Union
If you wish to dispose of an electrical or electronic device, request
the necessary information from your seller or supplier.
Disposal in other countries outside the European
Union
If you wish to dispose of this product, request the necessary
information about the correct disposal method from local
government departments or from your seller.
This appliance complies with EU rules and regulations regarding
electromagnetic and electrical safety.
Changes to the text, design and technical specifi cations may occur
without prior notice and we reserve the right to make these changes.
Page 88

EN
86 EN
Copyright © 2014, Fast ČR, a. s. Revision 03/2014
EN
Warranty conditions
Warranty card is not a part of the device packaging.
This product is warranted for the period of 24 months from the date of purchase to the
end-user. Warranty is limited to the following conditions. Warranty is referred only to the
customer goods using for common domestic use. The claim for service can be applied either
at dealer’s shop where the product was bought, or at below mentioned authorized service
shops. The end-user is obligated to set up a claim immediately when the defects appeared
but only till the end of warranty period. The end user is obligated to cooperate to certify
the claiming defects. Only completed and clean (according to hygienic standards) product
will be accepted. In case of eligible warranty claim the warranty period will be prolonged
by the period from the date of claim application till the date of taking over the product
by end-user, or the date the end-user is obligated to take it over. To obtain the service
under this warranty, end-user is obligated to certify his claim with duly completed following
documents: receipt, certificate of warranty, certificate of installation.
This warranty is void especially if apply as follows:
• Defects which were put on sale.
• Wear-out or damage caused by common use.
• The product was damaged by unprofessional or wrong installation, used in contrary to
the applicable instruction manual, used in contrary to legal enactment and common
process of use or used for another purpose which has been designed for.
• The product was damaged by uncared-for or insufficient maintenance.
• The product was damaged by dirt, accident of force majeure (natural disaster, fire, and
flood).
• Defects on functionality caused by low duality of signal, electromagnetic field interference
etc.
• The product was mechanically damaged (e.g. broken button, fall).
• Damage caused by use of unsuitable media, fillings, expendable supplies (batteries) or by
unsuitable working conditions (e.g. high temperatures, high humidity, quakes).
• Repair, modification or other failure action to the product by unauthorized person.
• End-user did not prove enough his right to claim (time and place of purchase).
• Data on presented documents differs from data on products.
• Cases when the claiming product cannot be indentified according to the presented
documents (e.g. the serial number or the warranty seal has been damaged).
Authorized service centers
Visit www.sencor.eu for detailed information about authorized service centers.
Page 89

www.sencor.cz
Designed in Europe by Sencor®, Made in China
 Loading...