

Page 1
MOBILE PHONE
ELEMENT P006S
USER’S MANUAL
EN
Page 2

Page 3

Contents
Contents
1. Basic information ................................................................................................................4
1.1 Brief description of functions .............................................................................. 4
2. Safety instructions .............................................................................................................5
3. Prior to use ......................................................................................................................... 10
3.1 Designation and description of the phone parts.......................................... 10
3.2 Inserting SIM and memory cards .....................................................................13
3.3 Telephone on/off .................................................................................................. 18
3.4 Charging the battery ........................................................................................... 18
3.5 Security password ............................................................................................... 19
4. Quick calling guide.......................................................................................................... 20
4.1 Making acall ....................................................................................................... 20
4.2 Receiving acall ................................................................................................... 20
4.3 Changing volume during the call ...................................................................20
4.4 End/Reject call .................................................................................................... 20
4.5 Emergency calls ................................................................................................. 20
4.6 Speed dial of extension ......................................................................................21
5. Available functions in the phone menu ......................................................................22
5.1 Messages ...............................................................................................................22
5.2 Contacts .................................................................................................................22
5.3 Calls ....................................................................................................................... 23
5.4 Organizer ...............................................................................................................24
5.5 Multimedia ........................................................................................................... 25
5.6 Settings ................................................................................................................. 28
6. Entering text........................................................................................................................31
7. Care and maintenance ................................................................................................... 32
8. Technical specifications.................................................................................................. 34
EN
Copyright © 2016, Fast ČR, a. s. Revision 04/2017
EN 3
Page 4

Basic information
EN
1. Basic information
1.1 Brief description of functions
Thank you for purchasing the Element mobile phone with colour display.
This manual provides information on the functions, features and operation
of the phone.
The mobile phone is designed for the GSM networks environment; the
phone allows you to operate two SIM cards in standby, but while you use
one SIM card in acall, you can not call from asecond card. In addition to
basic call functions, the phone also offers anumber of useful features, such
as directory, modes of operation, news, audio and video player, camera and
video camera, alarm clock, calculator and other functions that are practical
for work and leisure activities.
The mobile phone meets the GSM criteria and is certified by the competent
authority.
The company reserves the right to change the contents of the manual
without prior notice.
4 EN
Copyright © 2016, Fast ČR, a. s. Revision 04/2017
Page 5
Safety instructions
2. Safety instructions
WARNING:
Pay attention to the following instructions. The manufacturer
does not assume any responsibility towards auser that does
not follow these recommendations or uses the smartphone in
an unsuitable manner. By using the device unsuitably, the user
risks violating the relevant acts.
Read this user's manual carefully before use. Keep the manual
for future reference.
• Always follow the basic safety instructions when using this device to
prevent the risk of fire, electric shock or injury.
• Please read this manual and follow all instructions for use, maintenance
and installation. Do not use the mobile phone for purposes other than
those for which it is intended.
• Failure to observe the rules specified in the user manual or inappropriate
use will result in the invalidation of the warranty and may result in
injury or damage to property. The manufacturer is not liable for any
damages in such cases.
• Use of amobile phone is prohibited in some areas. If you find yourself
in an area where the use of mobile phones is prohibited, follow the
instructions contained in this manual to switch the phone off. Usual
areas where the use of mobile phones is prohibited include: Planes,
petrol stations with flammable fuels, demolition sites, etc. Operating
smartphones can interfere with electronic and medical devices, such as
pacemakers, hearing aids and other medical electronic equipment.
• Switch off the phone whenever near fuel, chemical substances and
explosives. Keep the device away from children.
• Follow the law on the use of mobile phones while driving. The driver is
primarily responsible for the given vehicle. Use the hands-free function
of your smartphone, if available. If driving in poor conditions, stop the
vehicle before making or taking acall.
Copyright © 2016, Fast ČR, a. s. Revision 04/2017
EN 5
EN
Page 6

Safety instructions
EN
• If your phone supports “Aeroplane mode”, enable “Aeroplane mode”
prior to boarding aplane. If your phone does not support this mode,
switch the device off prior to boarding aplane, as your device can
interfere with plane instruments. Please follow the instructions issued
on the plane.
• Always use genuine accessories. Using anon-genuine battery or charger
can result in invalidation of the warranty, cause damage to the phone
and injury to the user.
• Modifying or changing the features of the phone or tampering with the
device is strictly prohibited. Modifying the device can result in serious
failure and damage to property and potentially injure the user. Unless
approved by the manufacturer, updating the operating software is also
classed as amodification.
• Do not connect the battery charger to your smartphone before the
battery is installed. Do not short circuit the battery.
• Charge the smartphone battery in well-ventilated and cooled areas and
away from flammable and explosive materials.
• To prevent demagnetization, keep your smartphone away from magnetic
materials, such as hard drives, credit cards etc.
• Mobile phones are sensitive to external interference, which can seriously
affect functionality; in some environments, mobile phones cannot be
used at all.
• Neither the mobile phone or charger are toys, small parts can be
swallowed by children. The charger and connecting the charger into the
electrical outlet is dangerous to for young children. The charger should
not be used by children.
• Do not unplug the charger by pulling on the power cord – there is arisk
of damaging the power cord/socket and/or charger. Unplug the power
cord by pulling on the charger unit.
• Be particularly careful if the display glass on the phone breaks as sharp
glass parts can cause injury. Do not use adamaged phone and seek
professional help to repair the device.
6 EN
Copyright © 2016, Fast ČR, a. s. Revision 04/2017
Page 7

Safety instructions
• A high volume set on the mobile phone can result in
damage to hearing, be careful when adjusting the volume.
Using your phone to listen to loud music can have serious
consequences. Be careful when adjusting the volume to
listen to music.
• Do not use liquid or aerosol cleaning agents, benzine, solvents or similar
products. Use alightly damped towel for cleaning.
• Do not use the device near water, e.g. in abathtub, shower or pool.
Immersing the device into water can lead to injury by electric shock. Do
not place any containers with water on the device, for example, vases.
• Place the device on stable surfaces. The device may become damaged
if it falls on the ground.
• Do not cover the air vents on the device. These are used to prevent
overheating.
• Keep the device in areas not prone to someone stepping on it.
• Do not place any objects into the air vents. Risk of fire or electric shock.
Do not allow the device to be sprayed with liquid.
• To reduce the risk of electric shock, do not dismantle the device. If your
device requires service or repair, take the device to an authorized service
centre or qualified technician. Opening the device or removing the cover
can uncover areas with dangerous voltage or other risks. Risk of electric
shock when using adevice that is not properly reassembled.
• Do not expose the device to extreme temperatures, e.g. near ahot
radiator or stove or in aheated car.
• Do not place the device on burning objects, such as candles or
cigarettes.
• Do not use the device to report gas leaks near the source of the leak.
• This smartphone is capable of capturing photos, recording video
and sound; respect the relevant laws and regulations for using these
features. Under certain circumstances, capturing photos, video and
sound recordings without permission can be considered as breaking the
law and valid regulations.
EN
Copyright © 2016, Fast ČR, a. s. Revision 04/2017
EN 7
Page 8
Safety instructions
EN
• When using network features, please do not download files infected with
avirus, do not install damaged photos and ringtones. Our company is
not liable for defects caused by the phone behaving abnormally after
downloading files.
• Follow local regulations for disposing of the battery. Recycle if possible.
Do not throw the battery into standard waste.
WARNING
To prevent the risk of fire or injury by electric shock, do not
expose this device to rain or wetness.
DECLARATION: Our company reserves the right to review the contents of
this manual without prior notice.
Notes
Some features and accessories described in this user manual depend on the
software installed and the capacity and configuration of the local network,
and do not necessarily need to be available or can be limited by mobile
carriers. Thus, the descriptions provided do not necessarily correspond
precisely to the specific phone or accessories, which you purchased. The
manufacturer is not responsible for the quality and legality of any contents,
which you upload or download to the mobile phone, whether it concerns
text, pictures, music, films, additionally installed software protected by
copyright etc. You are liable for consequences following the installation or
using the contents of the above stated on this mobile phone.
All screenshots, symbols and icons in the user's manual are simulated.
Actual screenshots, symbols and icons may differ.
Step-by-step procedures can differ from those provided in this manual,
depending on the firmware version on the phone.
Unless stated otherwise, the home screen is the presumed starting point for
all procedures described.
8 EN
Copyright © 2016, Fast ČR, a. s. Revision 04/2017
Page 9
Safety instructions
The phone is adevice, the behaviour of which can be altered by the user
via additional apps. Procedures and individual steps can therefore differ from
those contained in this manual.
Note on the service provider: The phone is configured from the factory
to fully utilize available services. Your provider can limit or change some
functions, security measures or behaviour of the phone, as opposed to
the description in this manual. Ask your provider for any changes.
Appendix to the user's manual
for the LCD panel
Measures for static image; red/blue/green/black spots on the
screen
A static image can damage the LCD display permanently.
• Do not leave astatic image on the
LCD panel for more than 2 hours.
This may result in adamaged
panel. This damage is known as
“screen burn-in”.
The warranty does not apply to screen
damage caused by the reasons stated
above!
Red, blue, green, and black dots may appear on the screen
• This is typical for liquid crystal displays and does not indicate any
problems. LCD screens are made using precision technology to provide
even the finest image details. Several defective pixels can appear on the
screen from time to time, indicated as red, blue, green or black dots (up
to 0.001% of the total pixel count of the screen). This does not affect the
properties and performance of your device.
Copyright © 2016, Fast ČR, a. s. Revision 04/2017
EN 9
EN
Page 10
Prior to use
EN
3. Prior to use
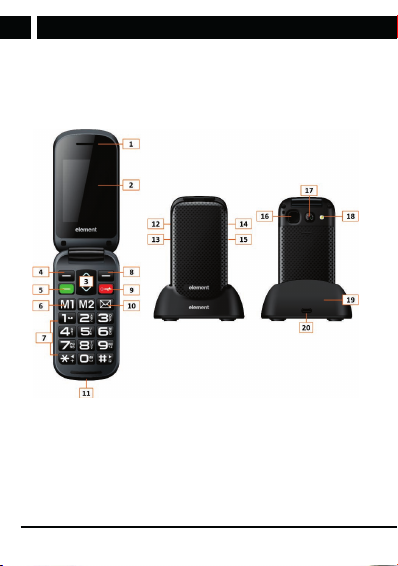
3.1 Designation and description of the phone parts
Device
1. Speaker
2. LCD display
3. Navigation keys
4. Left software button
5. Call button
6. Function keys M1, M2
7. Keyboard
10 EN
Copyright © 2016, Fast ČR, a. s. Revision 04/2017
8. Right software button
9. End call key, phone on/off
10. “Messages” key
11. Contacts for charging in
the stand
12. Volume buttons +/-
13. “Flashlight” button
Page 11
Prior to use
14. Headphones connector
15. Micro USB input for
charging
16. SOS button
17. Camera/Video camera
NOTICE:
Use caution when opening and closing the phone cover. Do
not expose the phone hinge to increased pressure, especially in
case when the cover of the phone is open. Never open or close
the phone using other objects.
18. Flash (LED searchlight)/
flashlight
19. Charging stand
20. Micro USB input in the
charging stand
Phone buttons and their functions
Buttons Functions
Left/right software key 1. Performing functions displayed in the
Navigation keys They correspond to the directional keys up/
Call button 1. By pressing this button, you dial
Button to end the call 1. Press and hold the key to turn the
left/right bottom corner of the screen.
2. In standby mode, the left soft button
activates the menu; use the right
software button to enter your contacts.
down to move in the phone menu.
anumber or accept an incoming call.
2. In the standby mode, press this button
to enter the list of dialled numbers.
phone on/off.
2. Press to return from any screen to the
standby screen.
3. Ending the call or rejecting the
incoming call.
EN
Copyright © 2016, Fast ČR, a. s. Revision 04/2017
EN 11
Page 12
Prior to use
EN
Buttons Functions
Function keys M1, M2 Function keys are used for so-called. speed
“Messages” key In standby mode, press the key to enter the
Number keys/ keyboard Serves to dial or enter numbers and
Button ✱
Button # 1. On screen for text editing, press the #
Volume control button While in standby mode the volume buttons
“Flashlight” button Press and hold to activate/deactivate the
12 EN
Copyright © 2016, Fast ČR, a. s. Revision 04/2017
dialling (option to dial an assigned telephone
number).
list of received messages.
symbols. Press and hold the number “1” to
go to the preset voicemail.
1. In selected phone features the key
“Left” is used as adirectional key,
e.g.when you move between available
options in Settings.
2. From the standby screen, enter ✱ after
entering aphone number to enter the
extension number; enter the extension
number after the “+” sign.
key to switch the text entry method.
2. From the standby screen, press and
hold the # key to switch between the
General and Meeting profiles.
3. In selected phone features the key
“Right” is used as adirectional key;
e.g. when you move between available
options in Settings.
control the sound volume of the phone. You
control the volume of the speaker during
acall with the volume buttons.
LED spotlight (flashlight) at back of the
phone.
Page 13

Prior to use
3.2 Inserting SIM and memory cards
A SIM card must be inserted into the phone before it is first used. Your
network operator will provide the SIM card.
When purchasing services from the mobile network, you receive aSIM card
together with details including your PIN code and the optional services that
are available.
NOTICE:
Do not bend the SIM card and prevent it from being scratched. Do
not expose the SIM card to static electricity, water and dirt. When
inserting and removing SIM cards and the memory card, be
careful not to damage the slots and base plate of the telephone.
WARNING
Prior to handling the cards (SIM, memory card) disconnect the
charger, turn off the phone and remove the battery.
To open the back cover press it with both thumbs on the top third and slide
the cover downwards from the phone’s hinge.
Lift the battery using anail or ablunt object in the lower part of the cutout.
Copyright © 2016, Fast ČR, a. s. Revision 04/2017
EN 13
EN
Page 14

Prior to use
EN
Insert the SIM card in the appropriate slots with contacts facing downwards
so that the contacts on the SIM card touch the built-in SIM contacts in the
phone. Insert the SIM 1 card into the upper right slot, with cut corner located
in the lower right corner of the slot, insert SIM 2 card into the lower left slot,
with the cut corner located in the upper left corner of the slot.
14 EN
Copyright © 2016, Fast ČR, a. s. Revision 04/2017
Page 15

Prior to use
Place the memory card in the slot in the upper left corner of the space
under the battery, which is protected by alocking metal plate. You will
release the locking plate by pressing on it gently amove to the left.
Insert the memory card under the locking plate with the contacts facing
down so that the memory card contacts touch the built-in memory card
contacts in the phone for memory card and the edge with cutouts faces
the top edge of the battery compartment. Properly attached memory card
copies with its cutouts the shape of the slot and can be evenly pressed with
slight pressure into the slot. By attaching the locking plate over the memory
card with slight pressure while moving toward the right you prevent the
plate from moving.
EN
Copyright © 2016, Fast ČR, a. s. Revision 04/2017
EN 15
Page 16

Prior to use
EN
NOTICE:
If the memory card does not work, make sure it is properly
installed and has good contact. The maximum size of supported
memory cards is 8 GB.
When inserting the battery in the phone, first connect the battery contacts
with the contacts located in the phone (at the top) and then gently push the
battery into the battery compartment.
16 EN
Copyright © 2016, Fast ČR, a. s. Revision 04/2017
Page 17

Prior to use
To replace the back cover attach it to the body of the phone so that the
locks of the cover gently fit into the slots on the phone. Then hold the back
cover on the phone and with gentle pressure from the bottom of the phone
push it towards the hinge of the phone until it snaps into place.
EN
Copyright © 2016, Fast ČR, a. s. Revision 04/2017
EN 17
Page 18

Prior to use
EN
NOTICE:
Some phone features such as voice calls, receiving and sending
messages are possible and available only when at least one
SIM card is inserted with activated operator functions and
within reach of awireless network. Check with your provider for
services available on your SIM card and access to its network.
3.3 Telephone on/off
Turn the phone on by pressing and holding the end call button. Turn t he
phone off by pressing and holding the end call button in standby mode.
3.4 Charging the battery
Use for charging the original micro USB cable connected to electrical power
network. Connect the phone or the original charging stand with the cable.
Insert the phone in the charging stand so that the contacts of the phone
and of the stand touch.
The battery icon in the upper right corner of the phone's display starts to
move during charging. When the battery icon stops moving, the battery
charging is complete. If you use the charging stand, the course of charging
is indicated by the LED on the charging stand. Green indicates that the
phone is fully charged.
NOTICE:
Keep the charging contacts of the phone clean. This prevents
oxidation and getting dirt into the charging contacts. The
charging contacts in the stand are fine and sensitive to the
touch. Do not touch the charging contacts with ahand or any
other objects, you will avoid damaging them.
18 EN
Copyright © 2016, Fast ČR, a. s. Revision 04/2017
Page 19

Prior to use
NOTICE:
Use the original charger to ensure reliable mobile phone
operation.
3.5 Security password
• PIN
The PIN is used to make it impossible to use your SIM card illegally.
The PIN code is usually included with the SIM card. If you enter three
consecutive times the wrong PIN, unlock it by entering the PUK code. Your
network operator will provide you with more details.
• PIN2
The PIN2 code must be entered when entering certain features (e.g. Charge
calls); if you enter three consecutive incorrect PIN2 code, unlock it by
entering the PUK2 code. Your network operator will provide you with more
details.
• PUK
When removing alocked PIN code you must enter the PUK code. PUK
code is included with the SIM card. If it is not included, contact your
network operator. If you enter ten times in arow the wrong PUK, the SIM
card cannot be used any longer. Contact your network operator to purchase
anew card. The PUK code cannot be changed. If you lose the code, contact
your network operator.
• PUK2
When removing the locked PIN2 code, you must enter the PUK2 code. If
you enter ten times in arow the wrong PUK2 code, you cannot use the
functions requiring PIN2 code any longer. Contact your network operator to
purchase anew card. The PUK2 code cannot be changed. If you lose the
code, contact your network operator.
EN
Copyright © 2016, Fast ČR, a. s. Revision 04/2017
EN 19
Page 20

Quick calling guide
EN
4. Quick calling guide
In case that when you switch on the phone and the default language is
English, proceed as follows through the telephone Menu: Menu/ Settings/
Phone settings/ Language and here select the required language from the
menu.
4.1 Making acall
In standby mode, using the number keys enter the phone number you want
to dial. When you enter the number, press the dialling button and the call
is made. If you want to make an international call, add before the phone
number the area code.
4.2 Receiving acall
The phone will alert you to an incoming call (with vibration, ringing, etc.);
the display shows the name and telephone number of the caller if your
phone network supports this function. Press the dial key to accept the
incoming call.
4.3 Changing volume during the call
During acall, you can control the speaker volume using the volume buttons
on the left side of the phone. During acall, you can with the phone softkeys
confirm the “SpeakOn” to activate the speaker or “SpeakOff” to turn it off.
4.4 End/Reject call
After completion of the ongoing call end the call by pressing the end call
button.
You can reject the incoming call by pressing the end call button.
4.5 Emergency calls
Call to the emergency services can be made directly without the SIM card.
Different networks use different emergency numbers. Your network operator
will provide details.
20 EN
Copyright © 2016, Fast ČR, a. s. Revision 04/2017
Page 21

Quick calling guide
4.6 Speed dial of extension
To enter apause (e.g. for direct dialling to an extension number) after
entering aphone number, press and hold “✱”. The screen shows the
symbol “P”, then continue to enter the extension number. When dialling,
insert ashort pause between the numbers for the switchboard to recognize
the number correctly.
EN
Copyright © 2016, Fast ČR, a. s. Revision 04/2017
EN 21
Page 22

Available functions in the phone menu
EN
5. Available functions in the phone menu
5.1 Messages
Message service is in fact aservice of the telephone network. This offer
functions properly depending on the type of your SIM card and on the
services provided by your network operator. Prior to using the function,
verify the services of your operator. The message capacity of the SIM card
depends on its type.
Message: You can select amessage to be sent from preset templates
(Options/Templates) or write your own text. How to insert the text is
described in aseparate chapter. Send the message by using the menu
accessible with left soft key (Options / Send).
Inbox: Saves received SMS messages.
Drafts: Stores unsent messages.
Outbox: Stores SMS messages, which were not yet sent.
Sent messages: Stores successfully sent SMS messages.
Delete messages: Allows you to delete all saved messages (e.g. in Inbox,
Outbox, etc.) and to free memory.
SMS setting: It offers the possibility to set SMS for each SIM card, check
memory status or choose the preferred storage for SMS messages.
5.2 Contacts
This function allows you to browse the phonebook, save, edit, and delete
names and phone numbers in the phone and SIM card. Contact your
operator for the capacity of your SIM card. The maximum capacity of the
phone memory is 200 contacts.
Saving new contact
In the list of stored telephone numbers is in first place the item “New
contact”. Use the navigation key up/down to highlight the item “New
contact” and then confirm with the left software key the function Option/
Select. You will be prompted to enter the name and telephone number. To
move between the fields use the navigation key up/down. Save the contact
using the left software key by confirming the function Options/Save.
22 EN
Copyright © 2016, Fast ČR, a. s. Revision 04/2017
Page 23

Available functions in the phone menu
5.3 Calls
Call history
Call history offers the list of calls and the option to delete records. Press
Options in each list to select the desired function for the selected item,
such as Call the selected telephone number, Send SMS, block anumber by
adding it to Blacklist (blacklist) or Delete entry from the call history.
• Missed calls: Displays the last missed calls.
• Outgoing calls: It contains alist of recently dialled numbers.
• Received calls: It contains the list of recently accepted calls.
• All calls: It contains the list of all recent calls.
• Delete the call list: You can delete the records of dialled calls, missed
calls or accepted calls.
Calls setup
Find in the Calls/Settings menu the following functions for each SIM card.
Setting SIM 1/SIM 2 calls
• Call waiting: You can switch this function on or off. After switching it on,
you can receive other incoming calls during acurrent call.
• Call forwarding: After switching on the function you can according
to different conditions in settings choose to switch the incoming call
to voicemail or other numbers (unconditional call forwarding, call
forwarding during unavailability, if it does not answer, if the number is
busy or all calls). Prior to using verify the availability of the function with
your network operator.
• Call blocking: Once activated, you can set it according to various
limited conditions (all outgoing calls, international calls, international
calls except home network, all incoming calls or incoming calls when
roaming) restrict the call under appropriate conditions (must apply to the
network operator).
• Lines: In case that your SIM card supports more lines, you can set
apreferred line. Contact your network operator for more information.
Advanced setting
Allows you to adjust the setting of the following functions:
Copyright © 2016, Fast ČR, a. s. Revision 04/2017
EN 23
EN
Page 24

Available functions in the phone menu
EN
• Blocked numbers (Blacklist): You can turn on or off the rejection of
blocked numbers function (Reject number). You can save in the list of
blocked numbers (Blacklist numbers) up to 20 telephone numbers.
• Auto redial: You can switch this function on or off. When this function
of the phone is on, the phone automatically redials the called number if
the previous call attempt was unsuccessful.
• Talk time alert: You can set asingle or repeated warnings about the
length of the current call when the set time interval (in seconds) passes.
• Answer mode: It offers the option to activate the answering of acall by
opening the cover, press any key, and automatic answering of the call
in handsfree mode.
5.4 Organizer
SOS setting
When the function SOS is activated and the phone numbers are set, when
you press and hold the SOS key the phone emits awarning sound and the
SOS messages will be sent automatically. Once the SOS messages are
sent, the phone automatically calls the preset phone numbers.
SOS numbers: Use this function to set telephone numbers to send SOS
SMS messages. You can set up to 5 telephone numbers. Select an empty
line and press the key to select “Edit”. Choose if you want to select
acontact from the phone directory or enter anumber. Find in the phone
directory the required record using the arrows “up/down” and press “OK”
to save the selected contact. You can always change or remove the saved
contact using the function “Options” for the selected record from the list of
the SOS contacts.
SOS SMS: This function is used to set the text of the emergency SMS
message. Edit the text of the message using the keys 1-9 (the same way as
in the case of aregular SMS message) and save the text. How to enter the
text is described in aseparate chapter.
Warning: Never enter among the phone numbers for SOS messages and
SOS calls the phone numbers of emergency services (112, 150, 155, 158
etc.).
24 EN
Copyright © 2016, Fast ČR, a. s. Revision 04/2017
Page 25

Available functions in the phone menu
Speed dial
You can assign to the function keys and to the number keys 2-9 acontact
from the phone directory to use in the function Speed dialling. Press and
hold the selected key in the standby screen mode to start dialling the
assigned telephone number.
Calendar
You can use this function for asimple display of the days of the calendar.
You can use directional keys to go up/down to another date.
Alarm
You can have up to 5 preset active or inactive alarms. You can adjust the
activation/deactivation of each alarm clock, wake up time, repeat mode
(once, every day, or only on selected days) and the sound of the alarm.
Use the phone keys ✱ (left) and # (right) to move between the alarm clock
status On/Off and for entering the wake up time.
Files
It allows you to view pictures and photos captured on the memory card or
in the phone via the photo album function. It is also possible to rotate the
selected photo or set it up as wallpaper.
Calculator
It allows you making simple mathematical operations. Press repeatedly the
directional keys up/down to select the required mathematical symbol for
calculation. Insert the decimal comma by pressing the key #. Press the left
soft key to display the result.
5.5 Multimedia
Camera
The device is equipped with acamera. For the camera to fully function,
it must have amemory card with free space on it inserted in the camera.
Press the key “0” on the number pad to capture aphoto.
Press the navigation key up/down to zoom in/out the currently captured
photo. When you press the key ✱ or # you can adjust the exposition value
EP before you capture the photo. Press the key “1” to change the resolution
Copyright © 2016, Fast ČR, a. s. Revision 04/2017
EN 25
EN
Page 26

Available functions in the phone menu
EN
of the picture. Press the key “2” to change the quality of the picture. Press
the key “3” to change the colour effects of the picture. Press the key “4”
to change the white balance. Press the key “5” to change the mode of
the scene. Press the key “6” to set the time interval of the automatic
shutter. Press the key “7” to set the required number of pictures during
photographing. Press the key “9” to display/hide the functions indicators
on the display.
Return to the menu by pressing the right software key. Press the left
software key the to display the menu of available functions. To move
between the available options in the individual setting items use the phone
keys ✱ (left) and # (right).
• Go to video/camera: You can switch between the functions camera and
video camera using this function.
• My photo: Enter the photo viewer of saved images.
• Camera settings: You can set selected features of the photo.
• Picture setting: You can set the size and quality of the picture.
• Effects: It allows you to select the colour effect during capture.
• Storage: It is used to set the default storage of the captured images and
video recordings.
Pictures
It is used to view the saved images and their use, sharing, renaming or
erasing.
NOTICE:
Files for display must be stored on amemory card in the folder
“My Photos”.
Video recorder
The phone allows to capture avideo recording and its saving using the
function Camera in the Video Recording mode. For proper function of
the video recorder it is required to have amemory card inserted and set
it as the default storage. Press the key “0” on the number pad to start
26 EN
Copyright © 2016, Fast ČR, a. s. Revision 04/2017
Page 27

Available functions in the phone menu
recording. Press repeatedly the key “0” to stop/resume recording. Stop the
recording by pressing the right software key. You will be prompted to save
the recording.
Press the left soft key to display the menu of available functions to switch
to camera mode, camera settings, video and default storage. To move
between the available options in the individual setting items use the phone
keys ✱ (left) and # (right).
Video
Used to view the stored video recordings. This phone supports video formats
3GP, AVI and MP4.
NOTICE:
Files for playback must be stored on the memory card in the
folder “My videos”.
Music
The phone can play the MP3 files from the memory card and supports
playback in “background”, when you can use other phone function while
listening to music (e.g. News, Calculator). You can stop the “background”
playback in the Music application (Menu/Multimedia/Music) by pressing
the key “5”.
To control the player use the “4” to move to the previous track, press “6”
to move to the next track, press “5” to start / pause playback. To control
volume, use the ✱ and # buttons. To change the type of repeat playback,
use the up navigation key, to change the type of song order use the down
navigation key.
Use the left software key to go to the list of tracks or continue to Settings:
Repeat: Setting t he repeat mode
Shuffle: Setting the shuffle mode
EN
Copyright © 2016, Fast ČR, a. s. Revision 04/2017
EN 27
Page 28

Available functions in the phone menu
EN
NOTICE:
Files for playback must be stored on the memory card in the
folder “My music”.
Voice Recorder
You can use the phone to record sound. For the camera to fully function, it
must have amemory card inserted in the telephone. Press the left software
key (“Options”) to view the option to start recording anew record or alist of
previously saved recordings.
FM Radio
You have to connect the headphones for proper reception of the FM radio,
which serve as the phone antenna. You can call or receive calls when
listening to the radio without limitations. The radio sound is muted during
acall. Press the key “5” to start/pause playback. Use the navigation keys
up/down change the frequency value. Use the keys “4” and “6” to switch
between the saved stations. To control volume, use the ✱ and # buttons.
On the radio play screen, press the left software key to enter the options
menu, where you can do the following:
Stations list: You can save alist of favourite stations and then edit the name
or frequency of the selected station.
Manual tuning: You can manually search for aselect frequency, enter it
and save.
Auto tuning: Starts automatic station search and saves the found station in
the station list.
Settings: Allows you turn on or off listening to the radio in the background.
To move between the available options in the individual setting items use
the phone keys ✱ (left) and # (right).
5.6 Settings
You can adjust the phone setting, like time and date, language, call settings,
etc.
28 EN
Copyright © 2016, Fast ČR, a. s. Revision 04/2017
Page 29

Available functions in the phone menu
Dual SIM
Sets active SIM cards (only the selected SIM or both SIM cards).
Profiles
Preset modes are Common Mode, “Silence” mode “Meeting” mode and
“Outside” mode. Setting up some profiles can be customized.
Type of notification / ringing, ringtone / message tone: Setup of ringtones of
calls and messages for individual SIM cards (SIM1, SIM2).
Ringtone/message volume: Setting the ringer volume, messages tone
volume.
Keyboard and keyboard volume: Setting atype of sound or switching it
off. If you set the option “Human voice”, when you enter numbers on the
standby screen, they will be announced aloud (e.g. when entering aphone
number to dial).
System sounds: Turning system sounds on or off.
NOTICE:
Before you leave the menu, it is necessary to save the
performed changes (Options/Save), otherwise they will be lost.
Telephone
Time and date: You can set the date and time of the phone and also their
display mode.
Language: You can select the language for the phone.
Entering text: you can set the preferred way to enter atext.
Display: allows to set the wallpaper of the standby screen from apreset or
your own pictures, the option to switch on the display of date and time on
the standby screen.
Airplane: The Airplane mode turns off all transmit and receive modes of
the phone (e.g. shutdown of signal GSM /GPRS). Warning: Do not use this
function, but switch off the entire unit.
Other settings: It allows you to adjust the LCD backlight setting. To change
the brightness and time interval, use the phone keys ✱ (left) and # (right).
Copyright © 2016, Fast ČR, a. s. Revision 04/2017
EN 29
EN
Page 30

Available functions in the phone menu
EN
Security
It allows setting of individual SIM cards and phone security.
SIM 1 and 2 security:
• PIN code: Activation and deactivation of the PIN code.
• Change PIN: Change PIN1 code.
• Change PIN2: Change PIN2 code.
Telephone:
• Phone lock: Activation or deactivation of the phone lock. The default
password is “1122”.
• Change password: Change of mobile phone and privacy password.
Restore settings
You can restore default values of part of the phone settings. The default
code to restore the factory setting is: 1122.
NOTICE:
Restoring the factory settings may cause the loss of stored
settings and data.
30 EN
Copyright © 2016, Fast ČR, a. s. Revision 04/2017
Page 31

Entering text
6. Entering text
The device offers several text input modes, you can enter text or data
in your contacts, edit contact records, search for names and write SMS
messages.
If you want to change the way you enter text in the text mode, press the
key “#”. Several keyboard modes can be selected: general (ABC), Czech
(CS), automatically lowercase or uppercase letters, automatically capitalize
the first letter or number mode T9 allowing simplified entry (lowercase “s”
before the name of the keyboard). The selected input method is displayed
in the upper left corner of the screen.
Letters (big, normal)
Enter the editing page, press the key “#” and change the mode of entry to
letter entry (e.g. “abc”), then use the number keys and selected letters will
appear on the screen.
Press anumber key once to enter the first letter printed on the key, press
quickly twice for the second letter. If the letter you want to enter is on the
same key as the previous letter, wait until the cursor appears again, and
then enter the next letter.
For example, if you want to enter “OK”, you should press three times “6”
and thus enter “o”, then double press “5” and the display will show the
letter “k”. Press the right software key to delete the entered text.
Numbers
Go to the editing mode and press the key “#” to change the entry to the
number mode (e.g. “123”). Then use the number pad and the screen will
show the appropriate numbers. Individual buttons 0-9 represent numbers
from 0 to 9. To enter the required number press the corresponding key.
Press the right software key to delete the number.
Enter the punctuation from the list by pressing the key “✱”. For quick
selection of the most often used punctuation marks use the key “1” (press
repeatedly).
Enter aspace in the text by pressing the key “0”.
EN
Copyright © 2016, Fast ČR, a. s. Revision 04/2017
EN 31
Page 32

Care and maintenance
EN
7. Care and maintenance
Battery care
The device is powered by abattery. It is necessary to charge the battery
when it is empty. You can achieve a maximum performance of a new
battery only by charging it when it is fully discharged. If you do not use
the charger, unplug it from the power outlet and from the device. Do not
leave afully charged battery charge for longer than is strictly necessary.
Overcharging may shorten its life. Temperature affects the level to which
the battery can be recharged. Therefore, it is necessary to keep the battery
at room temperature before charging. If the temperature of the battery
exceeds 40 °C, it is not possible to charge it.
Use the battery only for its intended purpose and prevent short-circuiting.
Accidental short-circuiting can occur when ametallic object causes direct
connection of the positive (+) and negative (-) battery terminal. Do not use
damaged battery. Do not leave the battery in hot or cold places. It reduces
its capacity and life. Adevice with ahot or cold battery may not work
temporarily, even when the battery is fully charged.
Do not throw batteries into afire, they could explode. Dispose of them in
accordance with local regulations.
Product care and maintenance
The following recommendations will help to extend the life of your phone.
Keep the device and accessories out of the reach of small children. Keep
the device dry. All types of liquids or moisture will cause disruption of
electronic circuits. Do not store the device in hot places. High temperatures
can shorten the life of electronic devices and warp or melt certain plastics.
Do not attempt to open the device in other ways than as described in this
manual. Improper handling can damage the device. When cleaning the unit,
do not use harsh chemicals or strong detergents.
32 EN
Copyright © 2016, Fast ČR, a. s. Revision 04/2017
Page 33

Care and maintenance
NOTICE:
Use only the supplied or approved replacement accessories.
Non-original accessories may damage your phone and may
constitute breach of warranty conditions.
EN
Copyright © 2016, Fast ČR, a. s. Revision 04/2017
EN 33
Page 34

Technical specifications
EN
8. Technical specifications
Display
Dimensions: 2,4“ TFT
Resolution: 240 × 320 pixels
Chipset
CPU: MTK6261D
Memory
RAM: 32 MB
ROM: 32 MB
Micro SDHC card slot (up to 8 GB)
Camera
Back: 0,08 Mpx (VGA)
Network/Connectivity
Dual GSM 850/900/1800/1900 MHz
Features
FM
Flashlight
Vibration alert
Video and music player, photo viewer
Keyboard lock, SOS emergency call
Calendar, alarm, file manager, calculator
Other
Headphones connector 3,5 mm
Micro USB 2.0
Battery: Li-Ion 700 mAh
Dimensions: 104 × 53 × 18.5 mm
Weight: 95 g
Accessories: charging adapter, USB cable, operating manual, docking and
charging station
34 EN
Copyright © 2016, Fast ČR, a. s. Revision 04/2017
Page 35

Technical specifications
The above given specifications can change without prior notice.
Manufacturer address: FAST ČR, a.s., Černokostelecká 1621
The original version is in Czech.
The CE symbol shown on the unit, in the user's manual and on the
package indicates the unit meets the basic requirements of guideline
R&TTE, 1995/5/EC, Guideline for low voltage 73/23/EEC. The declaration
of conformity can be found at www.sencor.cz.
251 01 Říčany
EN
Copyright © 2016, Fast ČR, a. s. Revision 04/2017
EN 35
Page 36

EN
INSTRUCTIONS AND INFORMATION REGARDING THE DISPOSAL OF
USED PACKAGING MATERIALS
Dispose of packaging material at a public waste disposal site.
DISPOSAL OF USED ELECTRICAL AND ELECTRONIC APPLIANCES
The meaning of the symbol on the product, its accessory or
packaging indicates that this product shall not be treated as
household waste. Please, dispose of this product at your applicable
collection point for the recycling of electrical & electronic equipment
waste. Alternatively in some states of the European Union or other
European states you may return your products to your local retailer
when buying an equivalent new product.
The correct disposal of this product will help save valuable natural
resources and help in preventing the potential negative impact
on the environment and human health, which could be caused
as a result of improper liquidation of waste. Please ask your local
authorities or the nearest waste collection centre for further details.
The improper disposal of this type of waste may fall subject to
national regulations for fines.
For business entities in the European Union
If you wish to dispose of an electrical or electronic device, request
the necessary information from your seller or supplier.
Disposal in other countries outside the European Union
If you wish to dispose of this product, request the necessary
information about the correct disposal method from local
government departments or from your seller.
This appliance complies with EU rules and regulations regarding
electromagnetic and electrical safety.
Changes to the text, design and technical specifications may occur without
prior notice and we reserve the right to make these changes.
36 EN
Copyright © 2016, Fast ČR, a. s. Revision 04/2017
Page 37

EN
Warranty conditions
Warranty card is not a part of the device packaging.
This product is warranted for the period of 24 months from the date
of purchas e to the end-user. Warranty is limit ed to the followin g
condition s. Warranty is r eferred onl y to the c ustomer goods using
for common domestic use. The c laim for ser vice can be applied
either at dealer’s s hop where the product was bought, or at below
mentioned author ized s erv ice shops. The end -us er is ob ligated
to set u p a claim immediately when the defects appeared bu t
only till the e nd of warranty perio d. The e nd use r is obl igated to
coop erat e to certify the cl aiming defec ts. Only complet ed and
clean (acc ordin g to hygienic st andards) pr oduc t will be accepted.
In cas e of eligible warranty claim the warranty period wil l be
prolonged b y the pe riod from the date of c laim applic ation till
the date of taking ov er the p roduct by end-us er, or the d ate the
end- user is obligate d to take it over. To obtain the s erv ice under
this warranty, end -us er is obligat ed to certify his claim wit h duly
comp leted foll owing documents: receipt, c ertificate of warranty,
certificate of installation.
This warranty is void especially if apply as follows:
• Defects which wer e put on sale.
• Wear-out o r damage caused by c ommon use.
• The product wa s damaged by un professional or wrong
inst allation, used in contrary to t he applicable instru ction
manua l, used in contrar y to legal enactme nt and common
proc ess o f use or used f or anot her pu rpose whic h has been
designed for.
Copyright © 2016, Fast ČR, a. s. Revision 04/2017
EN 37
EN
Page 38

EN
• The product wa s damaged by un care d-f or or insufficient
maintenance.
• The product wa s damaged by dirt, ac cide nt of force majeure
(natural disaster, fire, and flood).
• Defects on fu nctionality cau sed by low duality of signal,
electromagnetic field interference etc.
• The product wa s mechanically da maged (e.g. broken button,
fall).
• Damage c aused by us e of unsuitab le media, fillings, expendable
supp lies ( batt eries) or by un suitable workin g condition s (e.g. high
temperatures, high humidity, quakes).
• Repair, modification or other failure action to the produ ct by
unauthorized person.
• End-user did not prov e enough his right to claim (time and pl ace
of purchase).
• Data on presented documents dif fers from data on products.
• Cases w hen the claiming produc t cannot be indentified according
to the p resented d ocum ents (e.g. the serial number or the
warranty se al has b een damaged).
Authorized service centers
Visit www.sencor.eu for de tailed information about auth orized
service centers.
38 EN
Copyright © 2016, Fast ČR, a. s. Revision 04/2017
Page 39

www.sencor.cz
Designed in Europe by Sencor®, Made in China
 Loading...