

Page 1
Tablet
USER'SMANUAL
ELEMENT 7Q001 V2
EN
Page 2

Page 3
Table of Contents
ATTENTION:
THE USER PROPERTIES OF THIS TABLET MAY BE AFFECTED BY THE
SOFTWARE THAT IS INSTALLED. THIS USER'SMANUAL MAY DESCRIBE
FUNCTIONS AVAILABLE ONLY IN DESIGNS DIFFERENT TO YOUR SPECIFIC
MODEL.
CONTENTS
Important safety instructions .................................................................................................................3
1. Included contents .............................................................................................................................8
2. Description of the device ............................................................................................................... 9
3. Basic controls ..................................................................................................................................10
3.1. Turning on / off ................................................................................................................... 10
3.2. Lock mode ............................................................................................................................ 10
3.3. Charging ................................................................................................................................. 11
3.4. Connecting to acomputer and transferring files ......................................................... 12
EN
3.5. Switching inputs .................................................................................................................. 12
3.6. Using microSD cards ......................................................................................................... 12
3.7. Home screen........................................................................................................................ 13
4. WIFI connection .............................................................................................................................15
5. Applications ..................................................................................................................................... 16
5.1. Application manager ...........................................................................................................17
5.2. Contacts .................................................................................................................................17
5.3. Voice search ......................................................................................................................... 18
5.4. Clock ...................................................................................................................................... 18
5.5. Play store ..............................................................................................................................19
5.6. Internet ................................................................................................................................. 20
Revision 08/2015Copyright © 2015, Fast ČR, a. s.
EN 1
Page 4

Table of Contents
EN
5.7. Calendar ............................................................................................................................... 20
5.8. Camera .................................................................................................................................. 21
5.9. Calculator ............................................................................................................................. 22
5.10. Email ..................................................................................................................................... 22
5.11. Music player ....................................................................................................................... 23
5.12. Video player .........................................................................................................................24
5.13. Gallery ...................................................................................................................................24
5.14. Gmail ..................................................................................................................................... 25
6. Troubleshooting...............................................................................................................................27
7. Technical specifications ............................................................................................................... 29
2 EN
Revision 08/2015Copyright © 2015, Fast ČR, a. s.
Page 5
Important safety instructions
Important safety instructions
If you want to use this product correctly, carefully read this user'smanual and store it for
future reference. If you give (sell) the appliance to somebody, please also include all the
documentation together with this appliance, including this user'smanual. The software
installed by the manufacturer and the user may significantly affect the properties of the
device. Follow the instructions and manuals for the installed software.
We reserve the right to make changes leading to improvements in the properties or
operation of the device without prior notice.
We recommend backing up important data on aregular basis as well as before changing
software in any way. Neither the distributor nor vendor is responsible for such loss of data.
This symbol indicates important operating or repair instructions in the
device'sdocumentation.
General safety instructions
• Read this user'smanual. Follow the instructions contained in this user'smanual.
• Heed all warnings.
• Adhere to all instructions.
• Use only accessories determined by the manufacturer.
• An open flame must not be placed on the device, e.g. burning candle.
• Use the device in atemperate climate zone, in domestic conditions, unless expressly
instructed otherwise.
• Under no condition does the manufacturer or the vendor of the device take responsibility
for any direct or indirect damages caused by not adhering to instructions for installation,
setup, use, repair or cleaning of this device as described in this user'smanual.
• Protect the device against being knocked, dropped, hit, shaken and against vibrations,
humidity and dust.
• Do not use excessive force/pressure on any part of the device, namely the buttons,
connectors, touchscreen surfaces.
• Before allowing children to use the device, they must be appropriately to their age,
informed about the correct and safe use of the player.
EN
Practical use
• Protect the device against falls and impacts and protect it against being hit by blunt
or sharp objects. Depending on your typical use of the device, use asuitably rigid or
otherwise soft case/cover.
• Protect the touchscreen surface against scratching and excessive pressure.
• Only install software with the power adapter connected as this will prevent potential
installation errors or damage to the device resulting from an incomplete installation
due to aweek power supply
Revision 08/2015Copyright © 2015, Fast ČR, a. s.
EN 3
Page 6

Important safety instructions
EN
• Do not use the radio function of the device (Wi-Fi, etc.), or completely turn off
thedevice in places where it is required by general or special regulations, for example
in aeroplanes, medical surgeries.
• When using personal medical aids (pacemakers, hearing aids), please inform yourself
about possible restrictions relating to the operation of electronic equipment in their
vicinity and modify your tablet operating mode if necessary.
• In the event of problems with the operation of the device, fully charge the batteries
and perform afactory reset (renew factory settings). Attention: This factory reset will
delete all your personal data, entered accounts, user-installed applications and will
restore the system to the same condition as when it left the factory.
Safe operation
• Install the device according to the instructions in the user'smanual.
• Do not install the device in direct sunlight or near sources of heat, such as heaters,
heat exchangers, stoves or other appliances (including amplifiers) producing heat.
High temperatures may reduce the lifetime of electronic components in the device.
Do not use or leave the device in the vicinity of an open fire.
• The device must not be exposed to dripping or running water and objects filled with
water must not be placed on it, e.g. vases. Protect the appliance against rain, spray
or contact with any other liquid, do not leave or install the appliance outdoors. Do
not use the appliance outdoors. Not adhering to these instructions creates arisk of
electrical shock or fire hazard.
• Before connecting the device'spower adapter to apower socket, check that the
voltage in your power socket corresponds to the voltage on the rating label found on
the power adapter.
• Make sure that the power cord is not stepped on or compressed, particularly near the
power plug, power socket and at the point where it exits the device or the adapter. The
power plug (adapter) is used as adisconnection device and must be easily accessible.
• Firmly insert the power plug into the power socket on the device until it is fully
pushed in. Do not use excessive force to insert the plug.
• Do not handle the tablet while it is charging to prevent mechanically damaging it –
breaking out connectors or breaking cables.
• Remember to always disconnect the power plug (adapter) from the power socket
before disconnecting the power cable from the rear side of the device.
• Disconnect the device or the adapter from the power socket during storms or if you
will not be using it for alonger period of time.
• Avoid moving the device from acold environment to awarm one or vice versa, or
when using the device in avery humid environment. Air humidity may condense on
some components inside the case of the device and the device may stop working
temporarily. If this occurs leave the device in awarm and well ventilated place and
wait 1 – 2 hours until the moisture evaporates and the device can once more be used
as usual. Take care especially during the first use of the player immediately after its
purchase during acold season.
• Do not use the headphones with ahigh volume level over the long term so as to
prevent hearing damage.
4 EN
Revision 08/2015Copyright © 2015, Fast ČR, a. s.
Page 7
Important safety instructions
• Do not use the device during activities requiring concentration, for example driving
transport vehicles, walking on footpaths and other travel ways (roads, railway lines,
escalators, etc.), or work with tools that could cause injuries.
• To achieve the maximum battery lifetime, fully charge the batteries if you will not be
using the device for an extended period of time.
• Under no condition does the manufacturer or the vendor of the device take responsibility
for any direct or indirect damages caused by not adhering to instructions for installation,
setup, use, repair or cleaning of this device as described in this user'smanual.
Repairs and maintenance
• To prevent risk of injury through electrical shock or the creation of afire, do not
disassemble the device or the adapter - there are no parts inside that are repairable
or adjustable by the user without relevant equipment and qualifications. Should the
appliance require adjustment or repair, contact aprofessional service centre.
• Have old batteries replaced at aprofessional service centre in order to maintain the
full functionality of the device and for the ecological disposal of old parts.
• In the case of any unusual events occurring during the use of the device, e.g. if
there is adistinct smell of burning insulation or smoke comes out of the device,
immediately turn off the device, disconnect the device from the power source and do
not use the device until you have received the results of the inspection performed by
the employees of the professional service centre.
• Have all repairs carried out by qualified personnel. Repairs are necessary if the device
has been damaged in any way, for example if the power cord is damaged, liquid was
poured on the device, foreign objects have entered the device, the device has been
exposed to rain or moisture, if the device is not working as usual or if it has fallen.
• Before cleaning, carrying, taking discs and memory cards out of the device or other
maintenance, disconnect the plug (adapter) from the power socket.
• Backup your data before any intervention (maintenance, etc.) is performed.
• Clean the device only with adry cloth.
• For cleaning do not use petrol, thinners or any other solvents or use any abrasive
cleaning agents, steel wool or any sponges with steel wool.
EN
Notes on the USB connector:
USB flash drives must be inserted into the device directly or using the supplied cable.
To prevent data transmission failure or its interference do not use adifferent USB
extension cable. Electrostatic discharges may cause the device to malfunction. In such
acase, the user must restart the device.
Before permanent use of aUSB device, test its ability to communicate with the device
and its data reading and writing speed. The performance of the memory device (e.g.
speed and available space) may, apart from the properties of the memory hardware, also
depend on the software that is used. Find out the properties and hardware demands of
the software that is used.
Revision 08/2015Copyright © 2015, Fast ČR, a. s.
EN 5
Page 8

Important safety instructions
EN
The USB connector is the standard type and is not able to power aUSB device with
ahigh power usage (e.g. hard disk drives HDD). Use devices with independent power
supplies and power them from their own power supplies.
The device was designed to achieve maximum compatibility with memory devices. With
respect to the variety of devices on the market it is not possible to guarantee compatibility
with every USB device. In the event of difficulties try formatting the flash drive directly in
the appliance. If problems persist, use adifferent flash drive.
Due to the wide range of microSD cards / USB devices available on the market it is
not possible to guarantee the compatibility of the device with all microSD cards / USB
devices.
Serial number of the device
The serial number of the device is unique and unequivocally identifies your device.
Enter the serial number of your device together with other details necessary for the
definite identification of your device below.
Serial number: __________________________________________
Date of purchase: _______________________________________
6 EN
Revision 08/2015Copyright © 2015, Fast ČR, a. s.
Page 9

Important safety instructions
Supplement to LCD
Measures to take when astatic image is displayed; red/blue/green pixels on the screen
Astatic image can permanently damage the display part of the television
● Do not leave astatic image on an LCD screen for
longer than 2 hours, because this could damage the
screen. This type of damage is known as "screen
burn-in".
● Damage to the screen resulting from the above
mentioned causes is not covered by the warranty!
Red/blue/green/black pixels may appear on the screen
● This is acharacteristic feature of liquid crystal displays and does not represent
aproblem. LCD screens are manufactured using avery precise technology in order to
achieve avery fine picture resolution. From time to time several inactive pixels may
appear on the screen as apermanently red, blue, green or black pixel (up to 0.001%
of the total number of pixels on the screen). This does not in any way affect the
features and performance of your television.
EN
EN 7
Revision 08/2015Copyright © 2015, Fast ČR, a. s.
Page 10

1. Included contents
EN
1. Included contents
1x tablet
1x micro USB cable
1x quick guide
1x power adapter
Note:
Accessories may change without prior notice.
8 EN
Revision 08/2015Copyright © 2015, Fast ČR, a. s.
Page 11
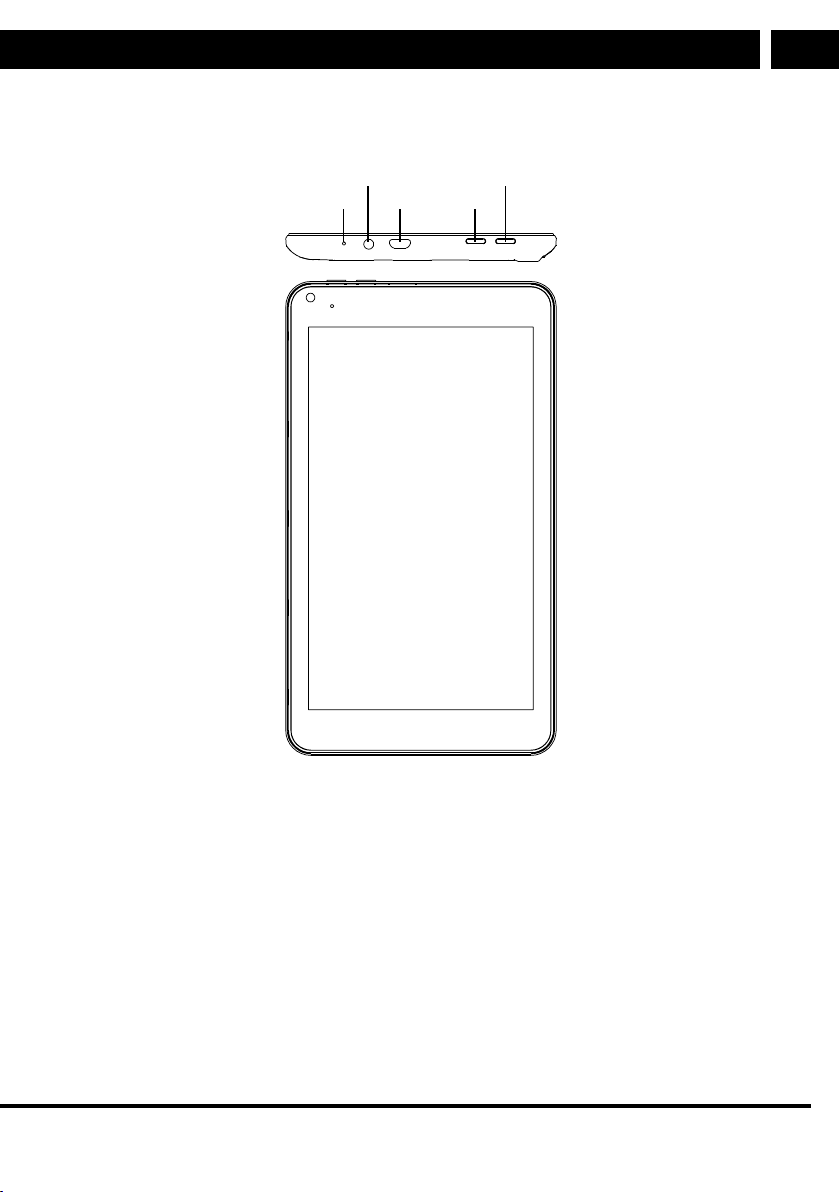
2. Description of the device
2. Description of the device
EN
4
5
3
1
2
1. Main power switch
2. "Home" button (it has the same function at the Home button on the main screen)
3. USB port
4. Headphone socket
5. Microphone
EN 9
Revision 08/2015Copyright © 2015, Fast ČR, a. s.
Page 12

3. Basic controls
EN
3. Basic controls
3.1. Turning on/off
Turning on the device: When the device is turned off, hold down the main power button
for approx. 3 seconds to turn it on. It may take the device some time to turn on after the
button is released. Wait until the device turns on and until the main screen appears.
Turning off the device: During use, press and hold down the power button for about 3
seconds and adialogue box for turning off the device will appear. Confirm that you wish
to turn it off and the tablet will turn itself off.
3.2. Lock mode
Unlocking the screen
When the device is turned on or the screen is turned back on from the energy saving
mode, it is necessary to unlock the device. When the closed lock icon appears, touch and
drag it with your finger to the open lock icon.
Locking the screen
While the screen is unlocked, briefly press the main power button and the system will
automatically activate the energy saving mode and at the same time lock and turn off the
screen.
Note:
The system does not stop running in the energy saving mode, only the LCD screen
is turned off and applications enter alow power consumption mode. Nevertheless,
even this small level of consumption uses up battery power, but more slowly. If you
wish to extend battery life in the sleep mode, do not leave too many applications and
system components (most frequently the Wi-Fi module) running and close them in the
appropriate way.
Setting apassword for unlocking
To increase the level of protection of your personal information, you can set apassword
for unlocking the screen. Enter the menu Settings – Security – Screen lock and here set
the password (usually apattern), which then needs to be confirmed once.
10 EN
Revision 08/2015Copyright © 2015, Fast ČR, a. s.
Page 13

3. Basic controls
3.3. Charging
The charging time for the battery may be several hours, especially for the first charge.
Use only the power adapter supplied for charging the device.
During the changing process, the charging indicator light will be lit (depending on
themodel). The battery power level and the charging process can be monitored on
thedisplay on the battery indicator.
Notes:
• If the tablet has been inactive for along time and the battery discharges
completely, allow it to charge for several minutes before turning it on. The tablet
cannot be turned on with acompletely flat battery as it is necessary to wait for
thevoltage to reach aminimum level to perform asuccessful system start up.
• The battery will charge faster is you do not use the tablet during the charging
process. While charging, some of the power from the adapter is used for running
the device and the charging time is extended.
• Anew battery will reach full capacity after being charged and discharged several
times, usually three times.
• For optimal battery use, charge without interruption until it reaches 100% (Charged)
and start charging only after being prompted by the system (15%). Ifthe device
will be turned off for an extended period of time, first fully charge the battery.
EN
ATTENTION:
For charging the tablet USE the supplied power adapter and USB cable, and do
not charge using acomputer USB connector due to the high power load. When
connected to the computer via USB, power is taken to cover the operation of
thetablet in order to prevent losing the connection due to alow battery capacity.
The energy from astandard USB port is usually not sufficient to satisfactorily
charge the tablet battery. When charging, the tablet draws current, which modern
computers can provide, inform yourself about the parameters of the USB slots on
your computer.
Adhere to the following instructions for the protection of the lithium battery.
• Do not recharge during extremely high temperatures or in direct sunlight.
• The adapter and the device may heat up during the recharging process.
This is normal.
EN 11
Revision 08/2015Copyright © 2015, Fast ČR, a. s.
Page 14

3. Basic controls
EN
3.4. Connecting to acomputer and transferring files
Use the supplied USB cable to connect the tablet to aPC to transfer data.
Whenconnected to acomputer, the system will inform you of this by aicon in
theinformation area.
Now you will be able to transfer and manage data in the tablet (e.g. photographs or
media files). Usually the synchronisation mode (MTP) is used for media, and photos
aretransferred via FTP.
ATTENTION:
Be careful when working in the tablet'smemory. Through careless handling you
could damage apart of the system or your data.
3.5. Switching inputs
The device supports handwriting, numbers and letters and special characters.
Tapanywhere in the text field and akeyboard will appear. The keyboard is used similarly
to acomputer keyboard. An erroneously written character can be deleted using the delete
button (bold left arrow with ahighlighted "x")
Tap on the icon and the screen for changing the input method will appear.
Selecttherespective entry method.
Note:
After newly installing an input method, it is necessary to select
"Settings – Language&inputs – Keyboard & Input method.
3.6. Using microSD cards
• Insert amicroSD card into the microSD card slot. When inserting it, make sure it is
facing the correct way so as to prevent damaging the card. After insertion, thesystem
identifies the contents of the card. In menu – File manager – SD card you can display
the files saved on the microSD card.
• Before removing the card first enter the Menu – Settings – Storage andunmount
themicroSD card from the system. Now you can safely remove the microSD card.
12 EN
Revision 08/2015Copyright © 2015, Fast ČR, a. s.
Page 15

CAUTION
• Do not insert or remove the card using force.
• Do not subject the card to direct sunlight or other effects of heat.
• Do not subject the card to dripping or running water and objects filled with
water must not be placed on it, e.g. vases. Protect it against rain, spray or
contact with any other liquid, do not leave or install it outdoors. Do not use it
outdoors.
• Backup the data stored on the card.
• Do not take the card out while it is being used, i.e. data is being read from
or written to it. Otherwise, you may lose parts of files or complete files.
Recovering them may be difficult or impossible.
3.7. Default screen
Normally, the following icons are shown on the default screen:
• Go back
• Home
• Launched program display
• Time
• Wi-Fi signal
• Battery power level
3. Basic controls
EN
3.7.1. Screen gestures
You can control the screen by tapping, holding, swiping or dragging with just your fingers.
The tablet is also equipped with aG-sensor, which automatically rotates the picture to
portrait or landscape orientation depending on the rotation of the tablet.
Tap – abrief touch launches applications or selects functions inside applications
(activates/deactivates atick box, selects something from alist, activates the keyboard for
text entry, etc.)
Hold – alonger press, namely on application icons, which launches asecondary function
if one is designed by the creator of the application (e.g. moving objects, opening an
additional menu)
Swipe – it is afaster movement without designating an object. Usually for scrolling
through longer text on multiple pages or moving. The speed with which the finger is
swiped across the screen has an effect on the speed and distance of the shift.
Drag – it is used to, for example, move objects, icons, etc. Touch and hold down agiven
object until the drag function is activated (usually the colour or size of the object changes)
and drag it to anew location. There, lift your finger.
Zoom in/out – in applications that support zooming in/out of apicture using fingers
such as photo viewers, internet browsers, email clients, maps, etc. you can use your
fingers, ideally thumb and index finger, to zoom in and out of apicture by simultaneously
touching the screen with both fingers and sliding them towards or away from one another.
Revision 08/2015Copyright © 2015, Fast ČR, a. s.
EN 13
Page 16

3. Basic controls
EN
Rotating – in applications that support zooming in/out of apicture using fingers such as
photo viewers, internet browsers, email clients, maps, etc. you can use your fingers to
rotate pictures, pages, etc. by simultaneously touching the screen with both fingers and
sliding them in the required rotation direction.
Display settings – in the menu Settings – Display you can set the brightness/wallpaper/
automatic rotation/automatic shutdown/font size.
3.7.2. Home panel
The system contains several panels on which the user can place their applications,
aclock, widgets, information windows, etc. The house symbol will move you to the Home
panel, which has two additional panels on the left and right. You can access them by
quickly pulling the panel to the left or right.
Changing the background – tap on any place on the home panel of the screen and
abackground change menu will appear. Select your favourite background and confirm.
Moving application icons on the home panel – tap and hold an icon for afew seconds,
theicon will be marked for moving (it will become larger) and now you can move it to
your desired location.
Moving application icons from panel to panel – tap and hold an application icon for afew
seconds and drag it to the left or right.
Removing application icons – tap and hold an icon for afew seconds and drag it towards
the "x" (usually located in the bottom part of the screen).
14 EN
Revision 08/2015Copyright © 2015, Fast ČR, a. s.
Page 17

4. WIFI connection
4. WIFI connection
Tap on Settings – Wi-Fi to activate the Wi-Fi function. Available Wi-Fi networks will be
shown on the right.
Select the required wireless network and the system will either connect automatically or
request that you enter avalid password, all based on the parameters of the network being
connected to. Find out the password from the network administrator.
For reliability and speed of the connection ensure asufficient Wi-Fi signal level. This level
is indicated by aset of four circular sectors (the more sectors displayed, the stronger the
signal). If the signal is weak, the Wi-Fi router reduces the transmission speed, which may
then be insufficient for certain applications.
Note:
An activated internal Wi-Fi module consumes power even when it is not transferring
data. If you wish to extend the operating time of the battery, deactivate Wi-Fi in the
tablet'ssettings.
EN
EN 15
Revision 08/2015Copyright © 2015, Fast ČR, a. s.
Page 18

5. Applications
EN
5. Applications
Note:
The operating system is under continuous development and its parts may change (namely
the graphical interface) or new parts may be added or old parts removed. Youare regularly
informed about such changes, pay attention to this information. Afterthese changes are made,
the appearance or controls may differ slightly from whatis described in this user'smanual.
Certain applications are already pre-installed when the device is purchased.
Normally, they include:
To launch an application - tap on the selected application to open and launch it.
To close an application – tap on the icon or ESC to close the running application orprogram.
You can also select an application that you wish to close in the application manager.
16 EN
Contacts Store information about contact persons
Voice search Search using avoice input
Clock Show the current time and alarm clock
Play store Fast and easy downloading of applications
Internet Access to the internet and internet search
Calendar Calendar with stored events
Recorder Voice recording
Camera Take photographs
Calculator
Email Send/receive email messages
Revision 08/2015Copyright © 2015, Fast ČR, a. s.
Page 19

5. Applications
File manager Display and manage files and applications, incl. installation
Music player Playback and manage music files
Video player Playback and manage video files
Gallery Display and manage photos
Gmail Send/receive email messages from Gmail
Maps Show locations and amap based on Google Maps
Settings Personal device settings
ApkInstaller Program for the installation of Android applications from
amicroSD card or NANDFLASH
Google Search for information on the Google server using voice or
text
5.1. Application manager
5.1.1. Installation of applications from Play Store
You will find more information further in the user'smanual.
EN
5.1.2. Uninstalling an application
There are two ways to uninstall an application.
1. Tap on Settings (Settings) andselect Applications (Applications).
2. Select the application that you wish to uninstall and select Uninstall (Uninstall).
3. Tap on OK to confirm.
Note:
If you wish to install an application from an unverified source (this is considered to be
every card or the internet) it is necessary to authorise this installation from Unknown
sources in Settings/Security. In such acase, it is up to you to verify the safety of the
application and the absence of viruses.
5.2. Contacts
5.2.1. Opening contacts
Tap on the contacts
sort the contacts according to GROUPS (Groups), ALL (All), FAVOURITE (Favourites). Icons
in the top part of the screen will make it easier to control.
icon to open the contacts. In the top part of the screen, you can
Revision 08/2015Copyright © 2015, Fast ČR, a. s.
EN 17
Page 20

5. Applications
EN
5.2.2. Displaying details
Enter the contacts menu and select acontact whose details you wish to display. Tap in
the left part of the screen to display the details, these will appear on the right.
5.2.3. Adding contacts
• To add agroup, tap on GROUPS (Groups) and then
. Type in the name of
thegroup and the name of anew contact.
• To add acontact manager, tap on ALL (All) and then
. Type in the name of
thecontact, telephone number, email, etc.
• You can also add acontact from applications such as Google, Microsoft Exchange
ActiveSync or using other applications enabling similar synchronisation.
• If you are sending amessage or email to aperson that is not stored in the contacts
list, the system will automatically add this contact as anew contact after the
message is sent. This process can also be managed manually.
Note: If you enter names using national character sets, check that you have this installed
and authorised in Settings/Language. Otherwise the correct display of the names or other
functions (search, etc.) may be limited or disabled.
5.3. Voice search
• Tap on the icon to launch the voice search function.
• On the displayed window, highlight the microphone icon and after it is highlighted
you can search using the voice search. If the system recognises the word, the search
will be launched automatically.
5.4. Clock
1.4.5. Alarm
You can use the device as an alarm and set several alarms at once.
Setting the alarm
• Tap on the icon
• Select "Set Alarm"“ (Set an alarm).
• Set the alarm and tap on "Turn on alarm" (Turn on alarm) to turn on the alarm.
• Then select "Done" (Done) or "Revert" (Back) to cancel the alarm.
Note:
When an alarm is set, aclock icon appears on the screen indicating that one or more
alarms have been set.
To add another alarm, proceed according to the instructions provided above or select
"Settings" (Settings) and select one of the repeat modes.
At the same time you can set the ring tone, vibrations and name of the alarm
18 EN
.
Revision 08/2015Copyright © 2015, Fast ČR, a. s.
Page 21

5. Applications
5.5. Play store
• The Play Store application has many applications, which you can quickly and easily
download on the device.
• Prior to launching an application, check that you have internet access and that it is
activated.
5.5.1. Downloading an application
EN
1. Tap on the
icon and then tap on "Accept" (Accept) in the bottom part of the screen.
Note:
• If you are logging in to the Play store for the first time, it is necessary to register.
Tap on "New" (New).
• If you are already registered, tap on "Existing" (Existing) and enter your registration
details. Then tap on "Done" (Done).
• After logging in for the first time you will be requested to enter your credit card
details. Tap on "Set up credit card" (Set up credit card) and enter the information
about your credit card.
• If you do not wish to use acredit card, tap on "Not now" (Not now) and enter
directly into the store.
2. Select an application that you wish to download from default groups or Applications/
Games in the bottom part of the screen. Likewise, you can search for applications
based on their name using the magnifying glass icon.
3. Select an application that you wish to download, tap on "Download" (Download), then
"Accept&Download" (Accept and download). As soon as the downloading process
starts, the download results information window/bar will appear. As soon as the
application is downloaded, aconfirmation symbol will appear on the information bar.
4. Select the information bar and tap on "Successfully installed" (Successfully installed).
Then tap on "Open" (Open) or on "Uninstall" (Uninstall).
5. Tap on the back icon to return to the Play store to download more applications.
5.5.2. Functions menu
Press the MENU button or call up the main menu to display the function menu of the
Play store application. Here you will find the following functions:
a) Search – search for an application based on aphrase.
b) My applications – here you will find the installed applications
Uninstall apps (Uninstall applications) (the installed application will be shown on
the right) – select an application that you wish to uninstall and select Uninstall
(Uninstall). Then confirm by tapping on OK.
Update apps (Update applications) (from the freely displayed on the right side of
the screen) – select an application that you wish to update and select "Download"
(Download) and then "Accept&Download" (Accept and download).
EN 19
Revision 08/2015Copyright © 2015, Fast ČR, a. s.
Page 22

5. Applications
EN
c) Settings – here there are various functions, e.g. filters, etc.
d) Help – here you will find help if you are having problems.
Note:
Prior to download and installation, the application provides information about how it
will affect the device or your privacy and whether any payments are required for its
use. Read this information carefully before confirming the action.
5.6. Internet
This application is used to access the internet and to browse internet pages.
6.1.5. Starting the internet
Tap on the
icon to display the home page www.google.com.
6.2.5. Options
• Refresh/stop icon – serves to refresh the currently displayed page / to stop loading
the page that is being opened.
• New tab icon – serves to insert the last added tab.
• New incognito tab icon – serves to insert an incognito tab.
• Share page icon – serves to share pages with friends.
• Search on page icon – serves to search for aphrase on the currently displayed page.
• Page information icon – serves to show information about the currently displayed
page.
• Settings icon – serves to display various settings.
5.7. Calendar
Tap on the icon to enter the calendar mode. If you are turning on the calendar for
the first time, you will be requested to enter an Exchange or Google account. Enter the
account'saddress and password and tap on "Next" (Next). Follow the information on the
screen.
5.7.1. Open the calendar
Entered events are displayed in this application. You can sort the entered events according
to: entered agenda, day, week, month, etc.
20 EN
Revision 08/2015Copyright © 2015, Fast ČR, a. s.
Page 23

5. Applications
5.7.2. Creating anew event
• In the displayed menu, open the menu (by pressing abutton or tapping on
thedisplay), select "More" (More) and then "New event" (New event).
• Enter the data and then tap on "Done" (Done).
5.7.3. Managing the calendar
• To edit an entered event, hold down the selected event and when the menu appears,
select "Edit event" (Edit event). After editing, select "Done" (Done).
• To delete an event, hold down the selected event and when the menu appears,
select "Delete event" (Delete event).
• To view an event, hold down the selected event and when the menu appears, select
"View event" (View event).
5.8. Camera
Tap on the icon to enter the camera mode.
1.8.5. Taking photos
EN
• In the camera application, tap on the
tap on the
• To take aphoto, tap on
icon to switch between the front and rear camera.
.
icon to enter the camera mode and then
• The photo will be saved automatically. Tap the bottom right corner to enter agallery
of the taken photos.
• Tap on back to return back to the camera mode. Here, tap on back again to leave the
camera application and to return to the home page.
5.8.2. Recording
• In the camera application, tap on the
icon to enter the video mode for making
recordings.
• Tap on the
icon to start recording and tap on the icon to end it.
• The recording will be saved automatically. Tap the bottom right corner to enter
therecordings list.
• Tap on back to return back to the recording mode. Tap on the
icon to go to
thecamera mode. Here, tap on back again to leave the camera application and to
return to the home page.
Revision 08/2015Copyright © 2015, Fast ČR, a. s.
EN 21
Page 24

5. Applications
EN
5.8.3. Panoramic shots
• In the camera application, tap on the
• Tap on the
icon to start taking panoramic photos and tap on the icon to end
icon to enter the panoramic shot mode.
it. While taking apanoramic shot, slowly move the tablet horizontally. The progress
of the photograph is shown in the bottom part of the screen. If you move too fast, the
progress of the photograph will not appear or will be shown in red.
• The photo will be saved automatically.
• Tap on the
icon to go to the camera mode. Here, tap on back again to leave the
camera application and to return to the home page.
5.9. Calculator
Tap on the icon to enter the calculator application.
5.10. Email
POP3 and SMTP accounts are supported.
5.10.1. Adding anew email account
1. Tap on the
2. On the "Your account" (Your account) screen, tap on "Next" (Next).
3. Tap inside the field for entering the email address and enter an email addresses.
4. Tap on "Done" (Done).
5.10.2. Inbox
icon to enter the email application.
1. Tap on the
icon. If you have one email account set up, then this one will appear.
If you have several accounts, select the one that you wish to open.
2. After selecting an account, tap on "Inbox" (Delivered email).
a) Opening an email: In the inbox, tap on the email that you wish to open. To open
an attachment, tap on "Open" (Open) or on "Save" (Save). If you wish to reply to
the email, select "Reply" (Reply) or "Reply All" (Reply to all). Type in the content
of the email and then tap on "Send" (Send), "Save draft" (Save draft) or "Delete"
(Delete). To delete an email, tap on "Delete" (Delete).
22 EN
Revision 08/2015Copyright © 2015, Fast ČR, a. s.
Page 25

5. Applications
b) Writing anew email: In the inbox, tap on the icon. Tap inside the "To"
(To) field to enter the email address of the recipient, or you can search for
therecipient in the address book. Into the "Subject" (Subject) field, enter the title
of the email message. Then tap inside the "Compose Mail" (Compose mail) field
and write the body of your email. If you need to add an attachment, tap on the
icon and select the file that you wish to add. Once the email ready to be
sent, tap on "Send" (Send).
5.10.3. Editing an account
EN
1. Tap on the
icon.
2. In the inbox, select settings. Set the respective menus on the displayed page.
5.10.4. Removing an account
1. Tap on the
icon.
2. In the inbox, select settings.
3. Select the account that you wish to remove.
4. If the right part of the screen, select "Remove account" (Delete an account).
5. Then select OK.
If you delete an account that was set as the default email account, the email account
following it in the list will automatically be set as the default account.
5.10.5. Setting adefault account
1. Tap on the
icon.
2. In the inbox, select settings.
3. Select an account that you wish to designate as the default account.
4. Tap on "Default Account" (Default account).
5.11. Music player
To play music files, it is necessary to save the files on to amemory card / USB device.
Then insert the memory card / USB device into the device.
5.11.1. Transferring files
To transfer files to amemory card / USB device, it is necessary to connect these to
thecomputer. Using the methods for synchronisation of the media player in the computer
- MTP protocol (see the manual of your computer system) load the files that you wish to
playback on the tablet on to amemory card / USB device.
EN 23
Revision 08/2015Copyright © 2015, Fast ČR, a. s.
Page 26

5. Applications
EN
5.11.2. Playing music
1. Tap on the Play music
icon.
2. Select the album/artist/track/list for playback.
3. To end playback, tap on the
icon.
4. To leave the music player and to return to the previous screen, press the Back (Back)
or Home (Home) button.
Note:
There are several other function available, e.g. show song lyrics, pause and continue
playback, skip to the previous or next track, slow-motion playback, random order
playback, etc.
5.12. Video player - UHD Player.
Playback and manage video files.
5.12.1. Playback of video
1. Tap on the
2. Select avideo that you wish to play from the list and launch its playback.
Note:
There are several other functions available: volume settings, change screen size, fast
forward or fast rewind, playback in small window, add bookmark, etc.
icon.
5.13. Gallery - UHD Player
To open the gallery, tap on the icon on the home page, e.g. open the gallery from
thecamera application.
Note:
If there are too many images or videos stored on the memory card / USB device,
thegallery may take some time to open. So please be patient, this is normal.
24 EN
Revision 08/2015Copyright © 2015, Fast ČR, a. s.
Page 27

5. Applications
5.13.1. Controlling albums
After opening the gallery, tap on the album that you wish to view. Images and video will
be displayed in chronological order. The name of the file will appear in the top part of the
screen. To view the image or video, tap on the given file.
Tap on the selected file and allow the necessary information about the selected file to appear.
To delete the file, tap and hold the selected file and when adialogue box appears, select
the
icon.
5.13.2. Handling images
• Display an image by tapping on it in the gallery.
• To play aslideshow of the images, after the list of images appears, select settings
and then select "Slideshow" (Slideshow).
• To edit and copy images, select an image and then tap on settings. Here select "Edit"
(Edit) or "Copy" (Copy).
• To view more information about the images, select an image and then tap on
settings. Here select "Details" (More information).
• To set an image as awallpaper, select an image and then tap on settings. Here select
"Set picture as" (Select image as) and then select "Wallpaper" (Wallpaper).
5.14. Gmail
Send/receive email messages from Gmail.
EN
5.14.1. Opening aGmail mailbox and entering the inbox
1. Opening aGmail mailbox
Tap on the
icon. When opening the Gmail mailbox, the Google account will appear
in the top part of the inbox. If you have multiple accounts, tap on the current account to
switch accounts.
2. Opening the inbox with the Gmail mailbox running.
The Gmail interface is divided into two parts. In the left part there is alist of all the
delivered emails. In the right part there is the body of the selected delivered email.
3. Switching between accounts
To view the incoming mail, tap on the account number in the top part of the screen.
Every account contains information about the number of unread messages. Select an
account the contents of which you wish to view.
4. Reading messages
• Tap on the conversation that contains the message which you wish to read. The heading
of the message will show the sender, when and to whom the message was addressed
and other information if necessary. The icons show whether the message contains an
attachment. You can use the icon at the top of the screen to save the entire conversation.
• Tap on the next message to view its contents.
Revision 08/2015Copyright © 2015, Fast ČR, a. s.
EN 25
Page 28

5. Applications
EN
5. Attachments
Attachments may be apart of the incoming message. Tap on the attachment to open/
save it to amemory card/USB device.
Note:
The downloading, viewing and storing of various types of attachments depends on
the installed version of an application. It is not guaranteed that all file types will be
supported by all types of devices.
5.14.2. Writing and sending messages
1. In the displayed inbox, select settings and then "Compose" (Compose).
2. Enter the recipient, subject and body of the message and then tap "Send" (Send).
Note:
To compose amessage, icons are also used on the incoming message, i.e. reply, reply
all or forward.
3. To attach an attachment, tap on the icon and select the respective attachment
from the displayed dialogue box.
26 EN
Revision 08/2015Copyright © 2015, Fast ČR, a. s.
Page 29

5. Applications
6. Troubleshooting
ATTENTION:
Under no circumstances attempt to repair the device yourself – this will
constitute abreach of warranty conditions. Do not open the device as there
is arisk of injury by electric shock. If the device malfunctions, first check
thefollowing list of problems and their solutions. If you are not able to remedy
thefault with the help of the following tips, contact your vendor.
The device does not connect to Wi-Fi.
• Check that Wi-Fi works on another device.
• Make sure that the respective Wi-Fi router is within sufficient range of the tablet.
Walls and other obstacles may reduce signal strength.
• Check that you have entered the correct password.
It is not possible to turn on the device.
• The battery is almost flat and it is not possible to turn on the device. Connect
thepower adapter and charge the battery.
• Hold down the main switch for about 10 seconds. Check that the device restarts
normally.
• Check that the power adapter is correctly connected.
EN
Device heating up
• The device heats up during use, when the highest screen brightness is set and while
charging. This is normal.
The system exhibits anomalies and does not work correctly.
• The installation of third-party applications may cause the system not to function.
Hold down the main switch for about 10 seconds to restart the device.
It is not possible to log into email or to download an application.
• Check that the device is connected to Wi-Fi and that the internet is working.
• Check that you have entered the correct log in details for your email website.
• Check that the system time is the same as local time.
It is not possible to record.
• Hold down the main switch for about 10 seconds, then check the recording function.
The operating time is too short.
• Battery life may vary depending on temperature and other parameters. Battery life
will be affected by temperature that is too low or too high. We recommend that you
use the device at normal room temperature.
• The life of the battery depends on the way it is used. High volume, Wi-Fi
andfrequent use may cause the battery to go flat quickly.
Revision 08/2015Copyright © 2015, Fast ČR, a. s.
EN 27
Page 30

5. Applications
EN
No sound is reproduced in the connected headphones.
• Check the volume.
• Use adifferent device to check that the audio file is not damaged.
Colour disproportions of video files or images.
• Hold down the main switch for about 10 seconds to restart the device.
It is not possible to copy files.
• Check that the device is correctly connected to the computer.
• Check the memory status.
• Check the USB cable for damage.
Other problems
• In the event of other problems, perform the following steps before sending the device
to an authorised service centre.
• Step 1: Hold down the main switch for about 10 seconds to restart the device. Check
whether the given function now works correctly.
• Step 2: Perform afactory reset (Settings/Backup&Reset/Factory data reset). Backup
your data before doing this!
28 EN
Revision 08/2015Copyright © 2015, Fast ČR, a. s.
Page 31

7. Technical specifications
Model Element 7Q001
Operating system Android 4.4
Processor Allwinner A33 1.0 G Qual core A7
Screen size 7" multi-touch capacitive screen
Resolution 800 x 480 panel
Basic
specifications
Other functions
Input/Output
Operating temperature -20 - + 65°C
Adapter
Size 192 x 109 x 12 mm
Weight 0.272 kg
Accessories
Memory 512 MB DDR3
Storage 8 GB
External memory MicroSDHC (up to 32 GB)
Camera Front: 0.3 MPx, Rear: 2.0 MPx
G- Sensor Yes
WiFi 802.11b/g/n
Battery 2000 mAh Li-Polymer
Language English, Czech, Slovak, Hungarian, Polish
Clock Yes
Recording Yes
USB2.0 1 x Micro USB 2.0
Headphones 3.5mm stereo headphone jack
Input 100 – 240 V~ 50 / 60 Hz
Output 5 V= 1,5 A
Power adapter, microUSB cable, headphones,
quick user guide
5. Applications
EN
The technical specifications provided above may change without prior notice.
The original version is Czech.
Address of the manufacturer: FAST ČR, a.s., Černokostelecká 1621, Říčany CZ-251 01
The CE symbol displayed on the unit, the user'smanual and on the packaging shows that
the unit meets the basic requirements of the R&TTE directive, 1995/5/EC, and the Low
voltage directive 73/23/EEC. The declaration of conformity can be found at www.sencor.cz.
Revision 08/2015Copyright © 2015, Fast ČR, a. s.
EN 29
Page 32

EN
INSTRUCTIONS AND INFORMATION REGARDING THE DISPOSAL OF
USED PACKAGING MATERIALS
Dispose of used packaging material at asite designated for waste in your municipality.
DISPOSAL OF USED ELECTRICAL AND ELECTRONIC EQUIPMENT
This symbol on products or original documents means that used electric
orelectronic products must not be added to ordinary municipal waste. For
proper disposal, renewal and recycling hand over these products to determined
collection points. Or as an alternative in some European Union states or other
European countries you may return your products to the local retailer when
buying an equivalent new product. Correct disposal of this product helps save
valuable natural resources and prevents damage to the environment caused
by improper waste disposal. Ask your local authorities or collection facility for
more details. In accordance with national regulations penalties may be imposed
forthe incorrect disposal of this type of waste.
For business entities in European Union states
If you want to dispose of electric or electronic appliances, ask your retailer
orsupplier for the necessary information.
Disposal in other countries outside the European Union
This symbol is valid in the European Union. If you wish to dispose of this
product, request the necessary information about the correct disposal method
from the local council or from your retailer.
This product meets all the basic requirements of EU directives
that apply to it.
Changes in the text, design and technical specifications may be made without prior notice
and we reserve the right to make these changes.
30 EN
Revision 08/2015Copyright © 2015, Fast ČR, a. s.
Page 33

EN
Warranty conditions
Warranty card is not a part of the device packaging.
This product is warranted for the period of 24 months from the date of purchase to the end-user. Warranty is limited to
the following conditions. Warranty is referred only to the customer goods using for common domestic use. The claim
for service can be applied either at dealer’s shop where the product was bought, or at below mentioned authorized
service shops. The end-user is obligated to set up a claim immediately when the defects appeared but only till the end
of warranty period. The end user is obligated to cooperate to certify the claiming defects. Only completed and clean
(according to hygienic standards) product will be accepted. In case of eligible warranty claim the warranty period will
be prolonged by the period from the date of claim application till the date of taking over the product by end-user, or
the date the end-user is obligated to take it over. To obtain the service under this warranty, end-user is obligated to
certify his claim with duly completed following documents: receipt, certificate of warranty, certificate of installation.
This warranty is void especially if apply as follows:
Defects which were put on sale.
Wear-out or damage caused by common use.
The product was damaged by unprofessional or wrong installation, used in contrary to the applicable instruction
manual, used in contrary to legal enactment and common process of use or used for another purpose which has
been designed for.
The product was damaged by uncared-for or insufficient maintenance.
The product was damaged by dirt, accident of force majeure (natural disaster, fire, and flood).
Defects on functionality caused by low duality of signal, electromagnetic field interference etc.
The product was mechanically damaged (e.g. broken button, fall).
Damage caused by use of unsuitable media, fillings, expendable supplies (batteries) or by unsuitable working
conditions (e.g. high temperatures, high humidity, quakes).
Repair, modification or other failure action to the product by unauthorized person.
End-user did not prove enough his right to claim (time and place of purchase).
Data on presented documents differs from data on products.
Cases when the claiming product cannot be indentified according to the presented documents (e.g. the serial
number or the warranty seal has been damaged).
Authorized service centers
Visit www.sencor.eu for detailed information about authorized service centers.
EN
EN 31
Revision 08/2015Copyright © 2015, Fast ČR, a. s.
Page 34

EN
32 EN
Revision 08/2015Copyright © 2015, Fast ČR, a. s.
Page 35

Page 36

Designed in Europe by Sencor®, Made in China
 Loading...