

Page 1
WC150XP / WC150RXP /
Senco Products Inc.
8485 Broadwell Road
Cincinnati, Ohio 45244
WC200XP S
Operating Instructions
Instrucciones de Operacion
TAPLERS
Mode d’Emploi
Please visit www.senco.com or call 1-800-543-4596 (North & South America Only) for updated product and parts information.
Por favor visite www.senco.com o llame 1-800-543-4596 (Norte y Sur América solamente) para actualizada del producto y en la parte de información.
S'il vous plaît visitez www.senco.com ou appelez 1-800-543-4596 (Amérique du Nord et l'Amérique du Sud seulement) pour la plus récente information sur le produit.
Warnings for the safe use of this tool are included in this manual.
Los avisos para el uso seguro de esta herramienta están incluidos
en este manual.
Les consignes pour l’utilisation en toute sécurité de cet outil se
trouvent dans ce manuel.
© 2008 by Senco Products, Inc.
NFD84W4X4Y January 6, 2009
Page 2
English Español Français
TABLE OF
CONTENTS
Tool Use 2
Maintenance 6
Troubleshooting 7
Accessories 7
Options 8
Specications 8
EMPLOYER’S
RESPONSIBILITIES
Employer must enforce
compliance with the safety
warnings and all other
instructions which accompany
this tool as shipped from the
manufacturer.
Keep this manual available for
use by all people assigned to
the use of this tool.
For personal safety and
proper operation of this tool,
read and understand all of
these instructions carefully.
TABLA DE
MATERIAS
Uso de la
Herramienta 2
Mantenimiento 6
Identicación
de Fallas 7
Accesorios 7
Opciones 8
Especicaciones 8
RESPONSABILIDADES DEL
EMPLEADOR
El empleador debe hacer cumplir las advertencias de seguridad
y todas las otras instrucciones
que acompañan a esta herramienta como se la despacha
desde el fabricante.
Mantenga este manual disponible para que lo usen todas las
personas destinadas a hacer
uso de esta herramienta.
Por razones de seguridad per-
sonal y la adecuada operación
de esta herramienta, lea y
comprenda todas estas instrucciones cuidadosamente.
TABLE DES
MATIERÈS
Utilisation de l’outil 2
Entretien 6
Dépannage 7
Accessoires 7
Options 8
Spécications 8
RESPONSABILITÉS DE
L’EMPLOYEUR
L’employeur doit faire appliquer les consignes de
sécurité et toutes les autres
instructions qui accompagnent cet outil tel qu’il est livré
par son constructeur.
Ayez ce manuel à la disposition de toutes les
personnes chargées d’utiliser
cet outil.
Pour assurer la sécurité
personnelle et le bon emploi
de cet outil, lisez et assimilez
soigneusement toutes ces
instructions.
Tool Use
English Español Français
Read and understand
“SAFETY INSTRUCTIONS”
manual shipped with this tool
before using tool.
To prevent eye injuries, always
wear OSHA-required "Z87.1"
safety glasses with permanently
attached, rigid, hard plastic side
shields. These safety glasses
must have "Z87.1" printed or
stamped on them. Be sure
everyone in your work area is
wearing the same type of safety
glasses.
Uso de la Herramienta
Antes de usar la herramienta
lea y comprenda el manual
“INSTRUCCIONES DE
SEGURIDAD” despachado
con ella.
Para prevenir lesiones en los
ojos, use siempre los anteojos
de seguridad "Z87.1" requeridos
por OSHA con escudos later-
alés rigidos de plasticó duro y
adheridos permanentemente.
Estos anteojos de seguridad
deben tener "Z87.1" marcado o
impreso en elos. Asegúrese que
toda persona dentro de su area
de trabajo use el mismo tipo de
anteojos
Utilisation de l’Outil
Lisez et assimilez le manuel
“INSTRUCTIONS DE SÉCURITÉ” livré avec cet outil
avant de l’utiliser.
An de protéger vos yeux con-
tre les blessures, portez toujours
des lunettes de sécurité OSHA
"Z87.1" avec caches latéraux
en plastique rigide. La mention
"Z87.1" doit être imprimée ou
poinçonnée sur ces lunettes de
sécurité. Assurez-vous que toute
personne se trouvant prés du secteur de travail porte des lunettes
de sûreté.
2
Page 3
Tool Use
Uso de la Herramienta
Utilisation de l’Outil
English Español Français
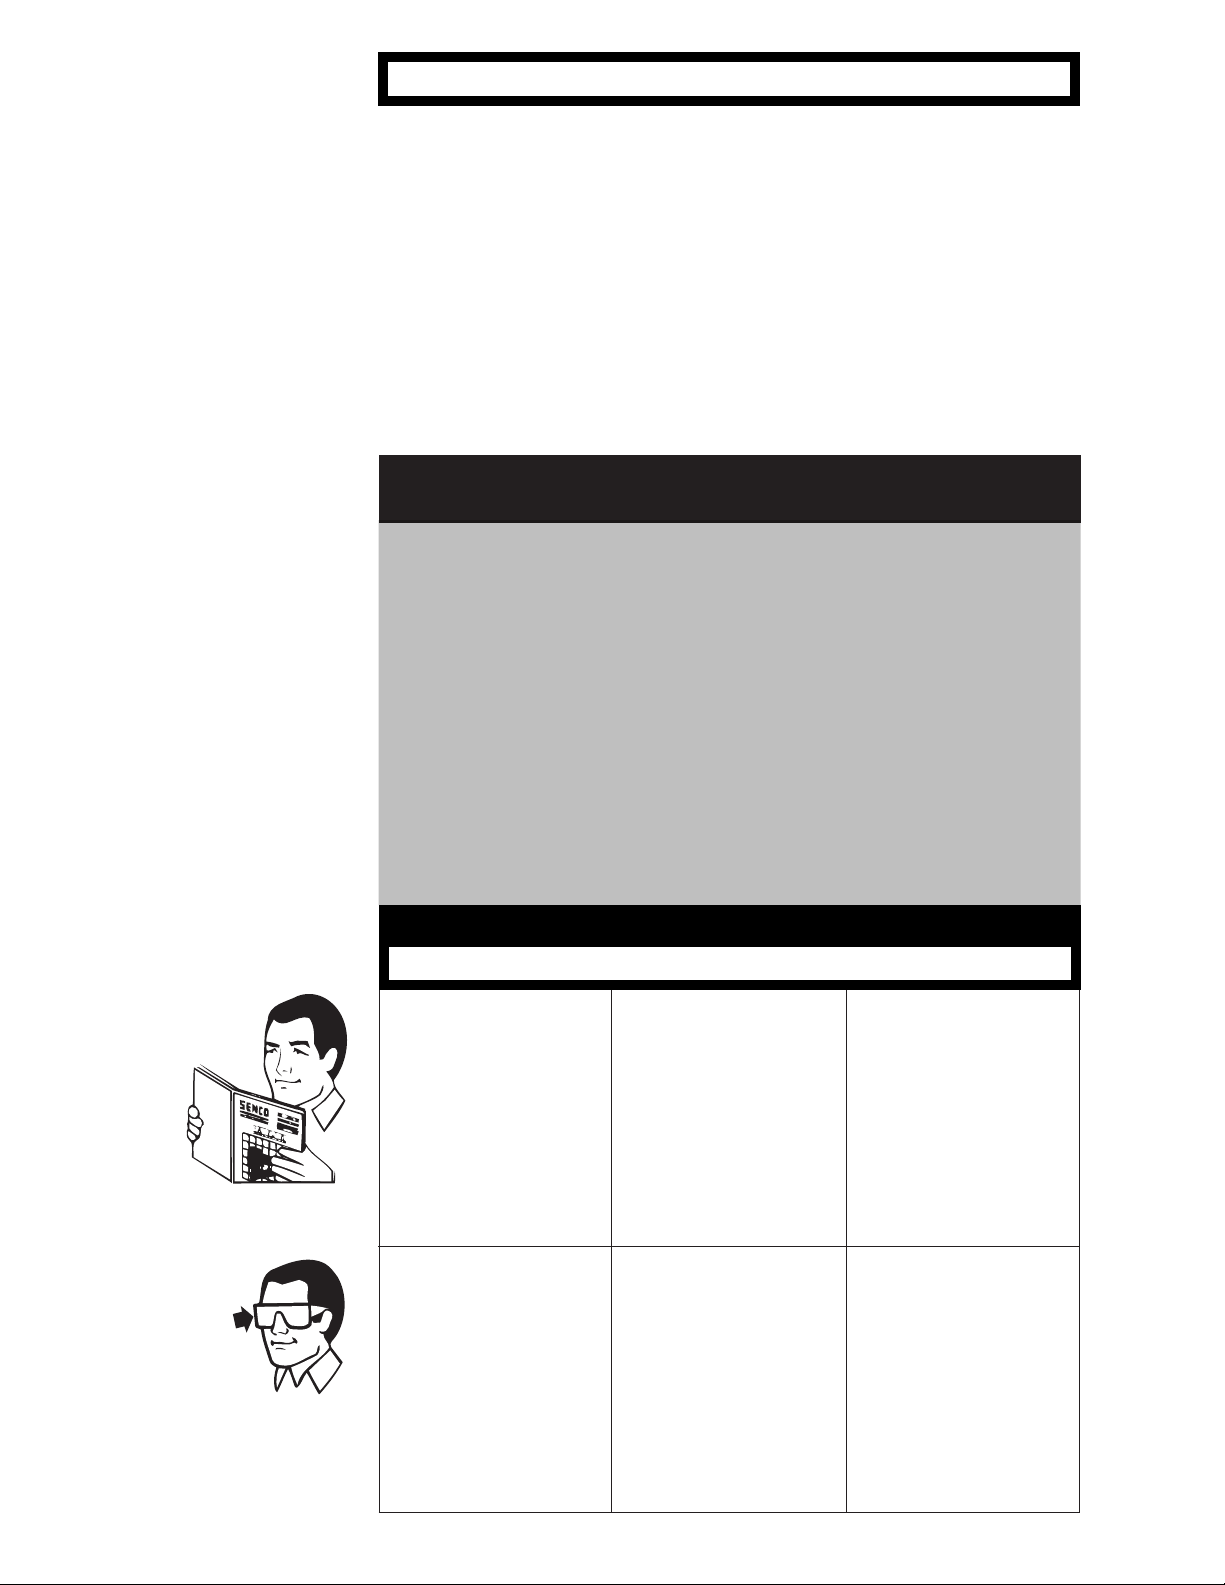
Keep tool pointed away from
yourself and others and connect
air to tool.
Never use a tool that leaks air or
needs repair.
To Load:
Pull feeder shoe back into
“locked” position.
Mantenga la herramienta
apuntando en dirección opuesta
de usted y de otros y conecte el
aire a la manguera.
Nunca use una herramienta que
tenga escapes de aire o que
necesite ser reparada.
Para cargar:
Tire del alimentador hacia atrás
hasta la posición “cerrada”
(“locked”).
Maintenez l’outil pointé à l’écart
d’autres personnes et de vousmême et
raccordez l’air à l’outil.
N’utilisez jamais un outil qui a
des fuites d’air ou qui a besoin
d’être réparé.
Pour charger :
Tirez le sabot de chargeur en
arrière dans la position “verrouillée” (“locked”).
Lay strip of staples onto rail. Do
not load with workpiece contact
(safety element) or trigger
depressed.
Depress feeder shoe lock button
and allow to slide forward.
To adjust safety depth, rotate
locking arm as shown to
release lock.
Ponga la tira sobre la guía.
No cargue con el disparo o la
seguridad oprimidos.
Presione el botón de la cerradura
del zapato del alimentador y
permita para resbalar adelante.
Para ajustar la profundidad del
engrapado, abrir el pestillo.
Mettez une bande d'agrafes sur
le rail. Ne chargez pas avec
le contact établi sur la pièce
(élément de sécurité) ou la
gâchette enfoncée.
Enfoncez le bouton de
verrouillage de semelle de
chargeur et laissez-le glisser en
avant.
P
our effectuer la réglage de la
penetration de l’agrafe, ouvrez
le loquet.
3
Page 4
Tool Use
2
1
2
1
2
1
Uso de la Herramienta
Utilisation de l’Outil
English Español Français
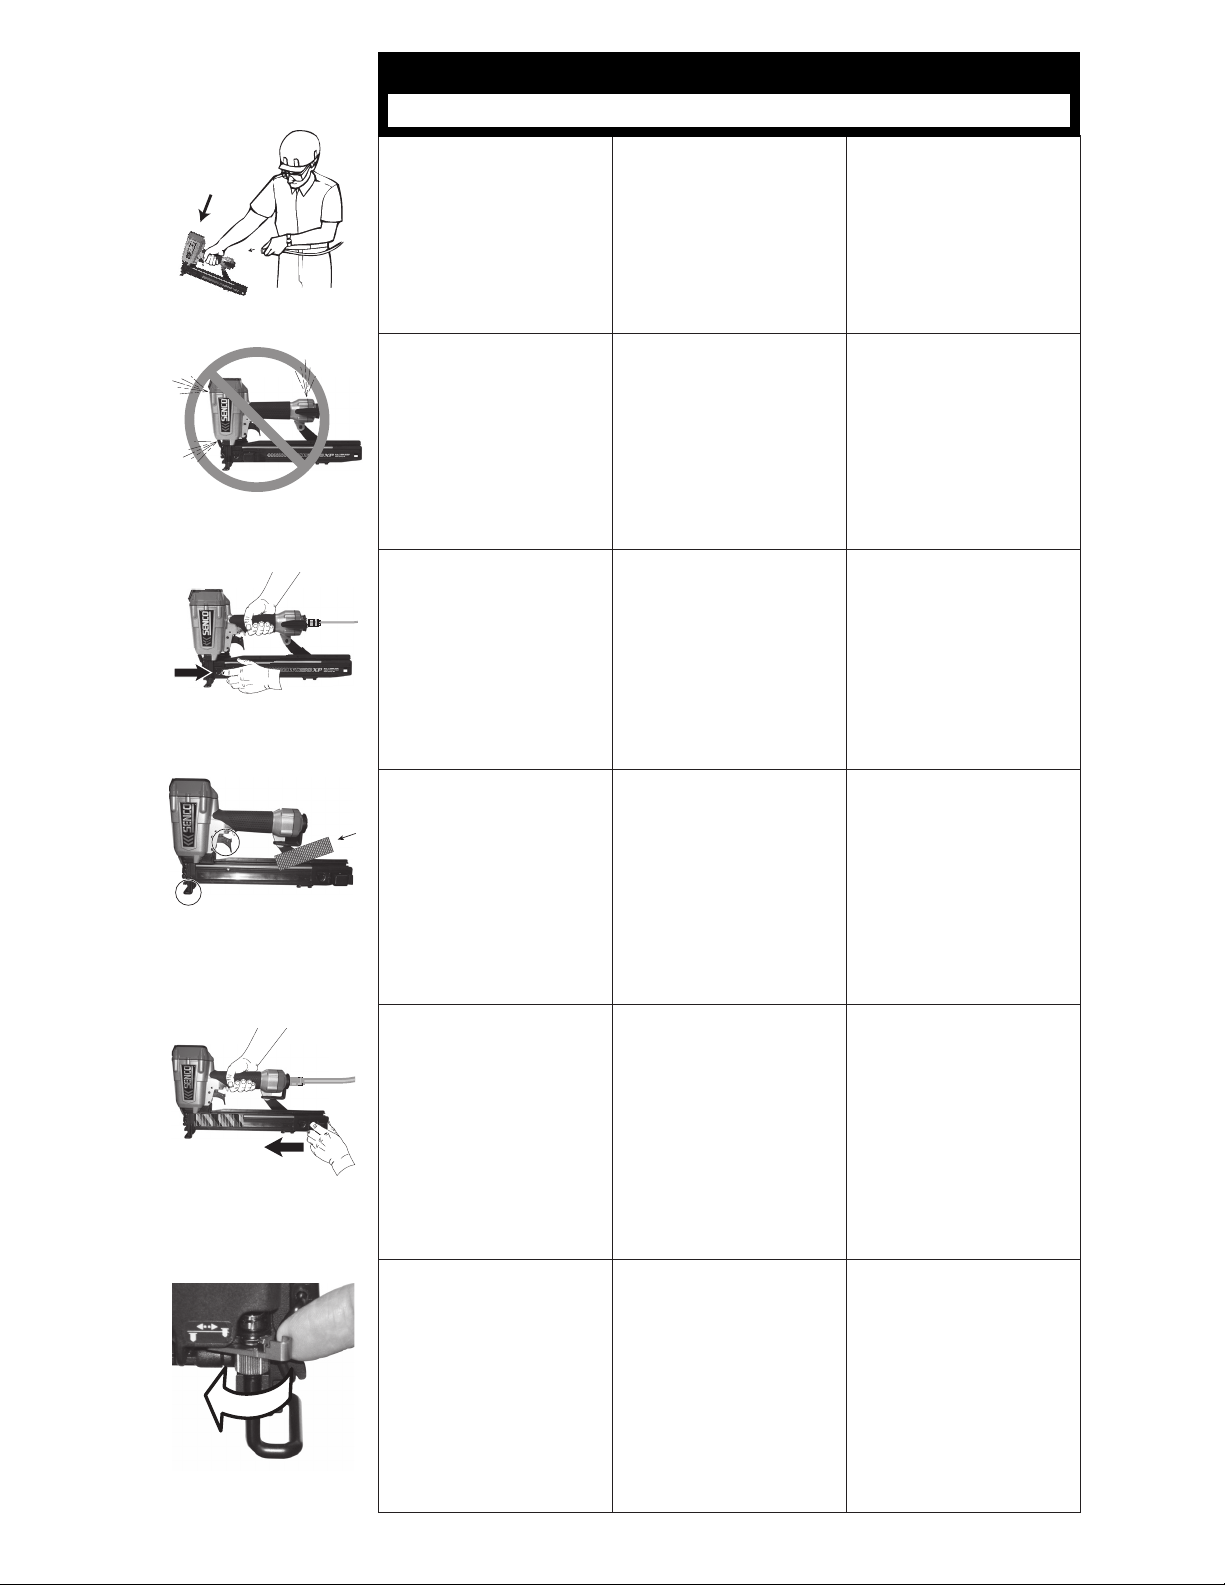
Using the thumb or index nger,
rotate wheel (located on side of
guide body) to adjust the workpiece contact (safety element) to
achieve desired depth.
Press locking arm back into the
locked position.
With a “Sequential" (Dual-Action)
trigger, staples can be driven
two ways:
1) Position workpiece
contact (safety element)
against work surface and pull
trigger...“Sequential" operation.
2) To drive a staple, pull trigger
and push workpiece contact
(safety element) against work
surface. Each time the workpiece contact (safety element) is
pushed against the work surface
a staple will be driven. This
"Contact Actuation" (bottom-re)
mode of operation is preferred
when high production, rapid
fastener placement is desired.
Usando el dedo pulgar o el
dedo indice, rote la manivela
(localizada a un lado de la placa
de nariz) para ajustar el seguro
a la profundidad deseada.
Cierre pestillo.
Las herramientas con gatillo
de accion doble pueden ser
disparadas de dos maneras:
1) Oprima el seguro contra la
supercie de trabajo y apriete el
gatillo...Disparo de gatillo.
2)Para impulsar un clavo, oprima
el disparador y deprima el
elemento de seguridad contra
la supercie de trabajo. Cada
vez que deprima el elemento de
seguridad contra la supercie
de trabajo, impulsará un clavo.
Este modo de operación de
“disparo inferior” o “por rebote”
es el preferido cuando se desea
alta productividad y rápida colo-
cación del clavo.
A l’aide du pouce ou de l‘index,
faire tourner la molette (située
sur´ le cote du front) pour
ajuster la position du palpeur de
sécurité.
Fermer la serrure.
Les appareils équipés de
déclenchement “au touché / par
gâchette” peuvent être utilisés de
2 façons différentes :
1) Déclenchement par “gâchette”
: Appliquer le palpeur de sécurité
de l’appareil à l’endroit désiré et
activer la gâchette.
2)Pour planter un clou, tirez sur
la détente et poussez l’élément
de sécurité contre la surface de
travail. Chaque fois que l’élément
de sécurité est poussé contre
la surface de travail un clou est
planté. Le mode de fonctionnement en “tir continu” est
préférable si vous désirez placer
des attaches rapidement avec
forte productivité.
With a "Sequential (Restrictive)
trigger, staples can only be
driven one way. First depress
workpiece contact (safety element) against work surface then
pull trigger. This feature is helpful
when precise fastener placement
is required.
Read the “Customer Satisfaction
and Safety Reminder” (CSSR) in
the tool and fastener boxes for
safety information regarding the
Contact-Actuation and Sequential triggers. Under certain conditions, the Sequential (restrictive)
trigger may reduce the possibility
of injury to you or to others working with you.
Should a staple jam occur,
disconnect air supply.
Las herramientas con “Gatillo
Restringido” solamente se pueden
disparar con el gatillo. Primero
apriete el elemento de seguridad
contra la supercie de trabajo
y después tire del gatillo. Ésta
característica es útil cuando se
requiere precisión en la colocación
de los sujetadores.
Lea el “Recordatorio de Seguridad
y Satisfacción del Cliente” (CSSR)
en las cajas de sujetadores y de
las herramientas para información
sobre seguridad de los Gatillos
Restringido y de Acción Dual.
Bajo ciertas condiciones, el Gatillo
Restringido puede reducir la posibilidad de heridas a su persona o
a otros que trabajen con usted.
Si se produce un atascamiento
de las sujetadores, desconecte
el suministro de aire.
Avec une gachette “restrictive”,
les clous ne peuvent être tirés
que dans une seule direction.
Appuyer d’abord le palpeur de
sécurité sur la surface de travail,
puis tirer sur la gachette. Cette
fonction est utile pour un placement précis de projectiles.
Lire le “Rappel de Sécurité et
Satisfaction du Client” (CSSR)
dans les boites à outils et xations pour les informations de
sécurité concernant les Détentes
à Double Action et à Restriction.
Dans certaines circonstances, la
Détente à Restriction peut réduire la possibilité de se blesser ou
de blesser d’autres personnes.
Si un enrayage se produit,
coupez l’arrivée d’air.
4
Page 5

Tool Use
Uso de la Herramienta
Utilisation de l’Outil
English
Pull feeder shoe back into
“locked” position and remove
staples.
Release E-Z Clear latch and
open door.
Español
Tire del alimentador hacia atrás
a la posición “cerrada (locked)” y
remueva las grapas.
Suelte el pestillo de alivio fácil
(E-Z) y abra la puerta.
Français
Tirez en arrière le sabot du
chargeur dans la position de
“verrouillage” et enlevez les
projectiles.
Relâchez le loquet trandparent
“E-Z” et ouvrez le volet de front.
Remove jammed fastener. Close
door and latch.
Connect air supply and replace
fasteners. Depress feeder shoe
lock button and allow to slide
forward.
Remueva el sujetador
atascado. Cierre la puerta con
pestillo.
Conecte la línea de aire y
reemplace los sujetadores.
Presione el botón de la
cerradura del zapato del
alimentador y
permita para resbalar adelante.
Enlevez le projectile coinçé.
Fermez le volet de front et le
loquet.
Reconnectez la conduit d’air
comprimé et rechargez le magasin. Enfoncez le bouton de serrure de chaussure de conducteur
et laissez glisser en avant.
5
Page 6

Maintenance
Mantenimiento
Entretien
English Español Français
Read and understand “SAFETY
INSTRUCTIONS” manual
shipped with this tool before
using tool.
All screws should be kept tight.
Loose screws result in unsafe
operation and parts breakage.
With tool disconnected, make
daily inspection to assure free
movement of workpiece contact
(safety element) and trigger. Do
not use tool if workpiece contact
(safety element) or trigger sticks
or binds.
Antes de usar la herramienta
lea y comprenda el manual
“INSTRUCCIONES DE SEGURIDAD” despachado con ella.
Todos los tornillos tienen que
mantenerse apretados. Los
tornillos sueltos pueden producir
una operación no segura y
quebraduras de partes.
Con la herramienta desconec-
tada, haga inspecciones diarias
para asegurar el movimiento
libre del seguro y del gatillo. No
use la herramienta si el seguro o
el gatillo se atoran.
Lisez et assimilez le manuel
“INSTRUCTIONS DE SÉCURITÉ” livré avec cet outil avant
de l’utiliser.
L’outil étant séparé de l’alimen-
tation en air, effectuez une inspection journalière pour assurer
le libre mouvement du palpeur
de sécurité et de la détente.
N’utilisez pas l’outil si le palpeur
de sécurité ou la détente colle
ou se coince.
Toutes les vis doivent être
maintenues serrées à fond. Les
vis desserrées entraînent un
manque de sûreté du fonctionnement et la rupture de pièces.
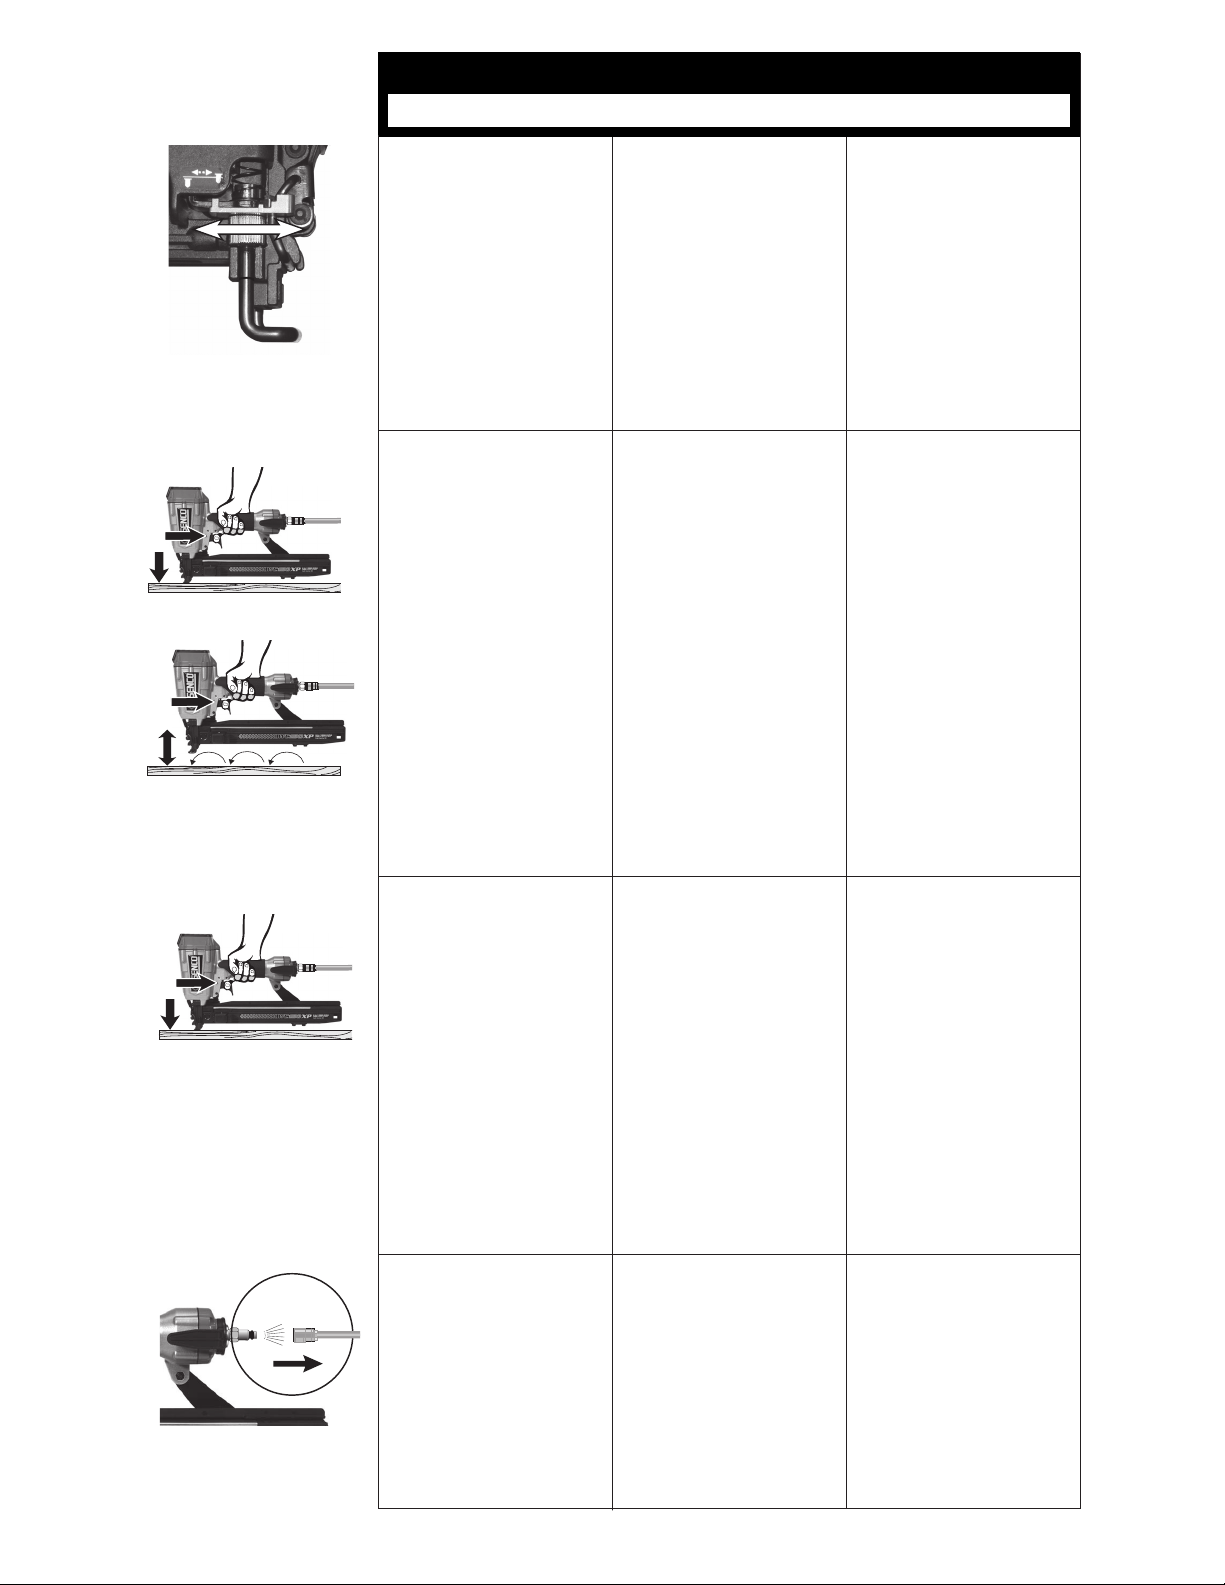
Squirt Senco pneumatic oil (5 to
10 drops) into the air inlet twice
daily. (Depending on frequency of
tool use.) Other oils may damage
O-rings and other tool parts.
Wipe tool clean daily and inspect
for wear. Use non-ammable
cleaning solutions only if necessary – DO NOT SOAK.
CAUTION: Such solutions may
damage O-rings and other tool
parts.
Aplique aceite neumático Senco
en la entrada de aire dos veces
al día. (Dependiendo en la
frecuencia de uso 5 A 10 Gotas.)
Otros aceites pueden dañar los
anillos en “O” y otras piezas de la
herramienta.
Solamente si es necesario use
soluciones para limpieza no
amablés -NO LA REMOJE.
Precaución: Tales soluciones
pueden dañar los empaques y
otras partes de la herramienta.
Avec une burette, placer 5 à 10
gouttes d’huile pneumatique
dans l’arrivée d’air deux fois
par jour. (Dépend de l'intensité
de l'utilisation de l'appareil.)
D’autres huiles pourraient endommager les joints toriques et
d’autres pièces de l’outil.
Nettoyez l’outil chaque jour à
l’aide d’un chiffon et inspectezle pour déceler une éventuelle
usure. Utilisez uniquement des
solvants non inammables
en cas de nécessité – NE LE
FAITES PAS TREMPER!
Attention : De tels produits peuvent endommager les joints et
d’autres pièces de l’appareil.
6
Page 7

Troubleshooting
Identicación de Fallas
Dépannage
English Español Français
B
A = YK0783 Parts Kit
B = YK0784 Parts Kit
Repairs other than those described
here should be performed only by
trained, qualied personnel. Contact
SENCO for information at
1-800-543-4596.
Read and understand “SAFETY
INSTRUCTIONS” manual
shipped with this tool before
using tool.
SYMPTOM
WARNING
Air leak near top of tool /
A
Sluggish operation
SOLUTION
Verify air supply / tighten screws or
install Parts Kit A.
SYMPTOM
Air leak near bottom of tool /
Poor return.
SOLUTION
Clean tool / tighten screws or
install Parts Kit B.
SYMPTOM
Other problems.
SOLUTION
Contact SENCO.
Las reparaciones, fuera de aquellas
descritas aquí, deben de ser llevadas a cabo solamente por personal
entrenado y calicado. Póngase
en contacto con SENCO para
información
1-800-543-4596.
Antes de usar la herramienta lea
y comprenda el manual “INSTRUCCIONES DE SEGURIDAD” despachado con ella.
SÍNTOMA
ALERTA
El aire se escapa cerca de la parte supe-
rior de la herramienta / Operación lenta.
SOLUCIÓN
Apriete los tornillos / Verique el
suministro de aire o instale el
Juego de Partes A (Parts Kit A).
SÍNTOMA
El aire se fuga cerca de la parte inferior
de la herramienta / Mal retorno.
SOLUCIÓN
Apriete los tornillos / Limpié la
herramienta o instale el Juego de
Partes B (Parts Kit B).
SÍNTOMA
Otros problemas.
SOLUCIÓN
Póngase en contacto con SENCO.
AVERTISSEMENT
Les réparations autres que celles
décrites ici doivent être réalisées
uniquement par du personnel
qualié ayant reçu la formation
appropriée. Pour toute information,
prenez contact avec SENCO par
téléphone en appelant Le Distributeur agréé.
Lisez et assimilez le manuel
“INSTRUCTIONS DE SÉCURITÉ” livré avec cet outil avant
de l’utiliser.
SYMPTÔME
Fuite d’air près du sommet
de l’outil / fonctionnement lent.
SOLUTION
Serrez les vis à fond / vériez
l’alimentation en air ou remplacez
les pièces portant la lettre “A”.
SYMPTÔME
Fuite d’air près de la base
de l’outil / retour inadéquat.
SOLUTION
Serrez les vis à fond / nettoyez
l’outil ou remplacez les pièces
portant la lettre “B”
SYMPTÔME
Autres problèmes.
SOLUTION
Prenez contact avec SENCO.
Accessories
English
SENCO offers a full line of accessories for your SENCO tools, including:
Air Compressors
Hose
Couplers
Fittings
Safety Glasses
Pressure Gauges
Lubricants
Regulators
Filters
For more information or a complete
illustrated catalogue of SENCO
accessories, ask your representative
for #MK336.
Accesorios Accessoires
Español Français
SENCO ofrece una línea completa
de Accesorios para sus herramientas SENCO, incluyendo:
Compresores de Aire
Manguera
Conectores Rapidos
Conectores
Anteojos De Seguridad
Manometros
Lubricantes
Reguladores
Filtros
Para mas informacion ó un pour
recevoir un catalogo completo
ilustrado de los Accesorios SENCO,
pregunte a su representante pour el
numero MK336.
SENCO offre une gamme étendue
d’accessoires pour vos outils
SENCO y compris :
Compresseurs
Tuyauterie exible
Raccords
Lunettes de sécurité
Manomètres
Lubriants
Régulateurs
Filtres
Pour plus d’informations ou pour
recevoir un catalogue détaillé des
accessoires proposés par SENCO,
prenez contact avec votre
représentant SENCO (référence
catalogue : #MK336).
7
Page 8

A
25,4 mm
.062"
1,57 mm
1,40 mm
1”
.055”
Options
Opciones Options
English
RESTRICTIVE TRIGGER— This
feature is helpful when precise
fastener placement is required.
Español Français
GATILLO RESTRINGIDO– Esta
característica sirve de ayuda
cuando se requiere una colo-
cación del sujetador precisa.
DECLÉNCHEMENT PAR GA-
CHETTE– Cette caractéristique
s’avère utile quand un placement
de projectiles précis s’impose.
Specications Especicaciones Specications
English
WC150XP
WC150RXP
WC200XP
inches
5
8
/
3
4
/
7
8
/
*
1
*
1 1/
*
1 1/
*
1 3/
*
2
*
A
4
2
4
Español Français
mm
16
20
22
25
32
38
45
50
8
Page 9

TECHNICAL SPECIFICATIONS
English
Minimum to maximum operating pressure
Air Consumption (60 cycles per minute)
Air Inlet
Maximum Speed (cycles per second)
Weight
Staple Capacity
Tool size: Height
Tool size: Length
Tool size: Width: Main Body
WC150XP
70 –120 psi
3.18 scfm
3
/8 in. NPT
10
5 lbs.
160
8 7/
in.
8
15 1/4 in.
3 1/2 in.
4,8–8,3 bar
90 liter
3
/8 in. NPT
10
2,3 kg
160
225 mm
387 mm
89 mm
WC150RXP
70–120 psi
3.18 scfm
3
/8 in. NPT
10
5.5 lbs.
160
8 7/8 in.
15 1/4 in.
4 in.
4,8–8,3 bar
90 liter
3
/8 in NPT
10
2,5 kg
160
225 mm
387 mm
102 mm
WC200XP
70–120 psi
3.45 scfm
3
/8 in. NPT
10
5.3 lbs.
160
10 in.
15 1/4 in.
3 ½ in.
4,8–8,3 bar
97 liter
3
/8 in NPT
10
2,4 kg
160
254 mm
387 mm
89 mm
ESPECIFICACIONES TECNICAS
Español
Presión de operación mínima y máxima
Consumo de aire (60 ciclos por minuto)
Entrada de aire
Velocidad máxima (ciclos por segundo)
Peso
Capacidad de grapas por cargador
Tamaño de la herramienta: Altura
Tamaño de la herramienta: Longitud
Tamaño de la herramienta: Ancho (Cuerpo)
Français
SPECIFICATIONS TECHNIQUES
Pression de travail min. et max.
Consommation d’air (60 cycles par minute)
Prise d’air
Vitesse maximum (cycles par seconde)
Poids
Capacité de agrafes par magasin
Dimensions de l’outil: hauteur
Dimensions de l’outil: longueur
Dimensions de l’outil: largeur: corps de l’appareil
70 –120 psi
3.18 scfm
3
/8 in. NPT
5
5 lbs.
70
8 7/
in.
8
15 1/4 in.
3 1/2 in.
70 –120 psi
3.18 scfm
3
/8 in. NPT
5
5 lbs.
70
8 7/
in.
8
15 1/4 in.
3 1/2 in.
4,8–8,3 bar
90 liter
3
/8 in. NPT
5
2,3 kg
70
225 mm
387 mm
89 mm
4,8–8,3 bar
90 liter
3
/8 in. NPT
5
2,3 kg
70
225 mm
387 mm
89 mm
WC150RXPWC150XP
70–120 psi
3.18 scfm
3
/8 in. NPT
5
5.5 lbs.
70
8 7/8 in.
15 1/4 in.
4 in.
WC150RXPWC150XP
70–120 psi
3.18 scfm
3
/8 in. NPT
5
5.5 lbs.
70
8 7/8 in.
15 1/4 in.
4 in.
4,8–8,3 bar
90 liter
3
/8 in NPT
5
2,5 kg
70
225 mm
387 mm
102 mm
4,8–8,3 bar
90 liter
3
/8 in NPT
5
2,5 kg
70
225 mm
387 mm
102 mm
WC200XP
70–120 psi
3.45 scfm
3
/8 in. NPT
10
5.3 lbs.
160
10 in.
15 1/4 in.
3 ½ in.
WC200XP
70–120 psi
3.45 scfm
3
/8 in. NPT
10
5.3 lbs.
160
10 in.
15 1/4 in.
3 ½ in.
4,8–8,3 bar
97 liter
3
/8 in NPT
10
2,4 kg
160
254 mm
387 mm
89 mm
4,8–8,3 bar
97 liter
3
/8 in NPT
10
2,4 kg
160
254 mm
387 mm
89 mm
9
Page 10

Limited Warranty
SENCO® Pneumatic, DuraSpin®, Cordless Tools
& Compressors
Senco Products, Inc. (“SENCO”) designs and constructs its products using the highest standards of material and workmanship. SENCO
warrants to the original retail purchaser that the following products will be free from defects in material or workmanship for the warranty
period specified below:
SENCO® XP Series-Red Cap SENCO PRO Series SENCO Compressors SENCO PC1194
Flooring Jack
Five years One year One year One year
SENCO® XP Series-Black Cap SENCO DuraSpin® SENCO Cordless Hand Nailers
Two Years One year Two years One Year
SENCO FP502 SENCO Reconditioned Products Gas Cordless
Two Years One Year Two Years
During the warranty period (which begins on the purchase date), SENCO will repair or replace, at SENCO’s option and expense, any product or part that
is defective in materials or workmanship after examination by a SENCO Authorized Warranty Service Center, subject to the exceptions, exclusions and
limitations described below. Any replacement product or part will carry a warranty for the balance of the warranty period applicable to the replaced
product or part. A DATED SALES RECEIPT OR PROOF OF PURCHASE FROM THE ORIGINAL RETAIL PURCHASER IS REQUIRED TO MAKE A
WARRANTY CLAIM. Product registration can be accomplished through on-line Product Registration at www.senco.com or by completing and returning
the postage paid product registration form included with your Operator’s manual/parts chart information, found inside the product carton. To make a
warranty claim, you must return the product, with proper receipt/proof of purchase and return transportation charges prepaid, to a SENCO Authorized
Warranty Service Center. A list of SENCO Authorized Warranty Service Centers can be found at www.senco.com
or by calling 1-800-543-4596 toll free.
SENCO will perform its obligations under this warranty, within a reasonable time after approval of the warranty claim.
Wheelbarrow Compressors:
1. Subject to the exceptions, exclusions and limitations described below, SENCO warrants that the compressor pump will be free from defects in
materials and workmanship for two years after the purchase date.
2. Defective parts of the compressor pump not subject to normal wear and tear will be repaired or replaced, at SENCO's option, during the two
year warranty period. If SENCO determines that repair or replacement is not feasible, SENCO will refund the purchase price less reasonable
depreciation based on actual use.
SENCO Cordless:
1. Subject to the exceptions, exclusions and limitations described below, SENCO warrants that the SENCO Cordless tool will be free from
defects in materials and workmanship for two years after the purchase date.
2. Subject to the exceptions, exclusions and limitations described below, SENCO warrants that the batteries and chargers used with SENCO
Cordless tools will be free from defects in material and workmanship for one year after the purchase date.
WARRANTY EXCLUSIONS
The following warranty exclusions apply:
1. Normal wear parts are not covered under this warranty. Normal wear parts include, for example, isolators, drive belts, air filters, rubber o-rings,
seals, driver blades, piston stops, piston/driver assembly, and fuel stems.
2. This warranty does not cover parts damaged due to normal wear, misapplication, misuse, accidents, operation at other than recommended
speeds or voltage (electric units only), improper storage, or damage resulting during shipping.
3. Products used in production/industrial applications as defined by SENCO are excluded from this warranty.
4. Labor charges or loss or damage resulting from improper operation, maintenance or repairs are not covered by this warranty.
5. SENCO does not warrant the Wheelbarrow Compressor Engine/Motor, but the Compressor Engine/Motor may be covered under a warranty
offered by its manufacturer.
GENERAL WARRANTY CONDITIONS
This warranty will be honored, only if:
A. Clean, dry, regulated compressed air has been used, at air pressure not exceeding the maximum indicated on the tool casting;
B. No evidence of abuse, abnormal conditions, accident, neglect, misuse or improper modifications or storage of the product; and
C. No Deviation from operating instructions, specifications, and maintenance schedules exists (read Operator Manual for use, specifications, and
maintenance instructions).
THIS WARRANTY IS THE ONLY WARRANTY ON THE PRODUCT, AND SENCO DISCLAIMS ALL OTHER WARRANTIES. ANY IMPLIED
WARRANTIES WILL BE LIMITED IN DURATION TO THE APPLICABLE WARRANTY PERIOD SPECIFIED ABOVE. SOME STATES DO NOT ALLOW
LIMITATIONS ON HOW LONG AN IMPLIED WARRANTY LASTS, SO THE ABOVE LIMITATION MAY NOT APPLY TO YOU. YOUR REMEDIES ARE
SOLELY AND EXCLUSIVELY AS STATED ABOVE. SENCO SHALL IN NO EVENT BE LIABLE FOR INCIDENTAL, CONSEQUENTIAL, INDIRECT,
OR SPECIAL DAMAGES. SOME STATES DO NOT ALLOW THE EXCLUSION OR LIMITATION OF INCIDENTAL OR CONSEQUENTIAL DAMAGES,
SO THE ABOVE LIMITATION OR EXCLUSION MAY NOT APPLY TO YOU. IN NO EVENT, WHETHER AS A RESULT OF A BREACH OF
CONTRACT, WARRANTY, TORT (INCLUDING NEGLIGENCE) OR OTHERWISE, SHALL SENCO’S LIABILITY EXCEED THE PRICE OF THE
PRODUCT WHICH HAS GIVEN RISE TO THE CLAIM OR LIABILITY. ANY LIABILITY CONNECTED WITH THE USE OF THIS PRODUCT SHALL
TERMINATE UPON THE EXPIRATION OF THE WARRANTY PERIOD SPECIFIED ABOVE. NO EMPLOYEE OR REPRESENTATIVE OF SENCO OR
ANY DISTRIBUTOR OR DEALER IS AUTHORIZED TO MAKE ANY CHANGE OR MODIFICATION TO THIS WARRANTY.
This warranty gives you specific legal rights, and you may also have other rights which vary from state to state.
REPLACEMENT OF TOOL DUE TO NATURAL DISASTER
SENCO will replace any tool destroyed by an Act of God such as flood, earthquake, hurricane or other disaster resulting only from the forces of nature.
Such a claim will be honored provided that such original retail purchaser had previously submitted a completed warranty registration card for the tool,
and then submits proof of ownership and an acceptable statement describing such Act of God documented by an insurance carrier, police department,
or other official governmental source. To obtain instructions for filing a claim call 1-800-543-4596.
CUSTOMER SATISFACTION
One hundred percent customer satisfaction is our #1 goal. If for any reason the product does not perform to the original purchaser’s satisfaction, it can
be returned to the place of purchase within thirty days with dated sales receipt for a full refund of the purchase price.
©2006, 2007, 2008 by SENCO PRODUCTS, INC.
CINCINNATI, OHIO 45244-1611 USA
www.senco.com
10
Page 11

Notes Notas Marque
English
Español Français
11
Page 12

Notes Notas Marque
English
Español Français
 Loading...