

Senao Networks EAP300 Users Manual

1
11N Multi-Function Access Point
EAP300
11N Multi-Function Access Point
V1.0

1
Table of Contents
1 Introduction .................................................................................................................................................................. 4
1.1 Features and Benefits ..................................................................................................................................................................................... 4
1.2 Package Contents ............................................................................................................................................................................................ 5
1.3 System Requirements ..................................................................................................................................................................................... 6
1.4 Applications ....................................................................................................................................................................................................... 6
2 Before you Begin .......................................................................................................................................................... 8
2.1 Considerations for Wireless Installation .................................................................................................................................................. 8
2.2 Computer Settings (Windows XP/Windows 7) ...................................................................................................................................... 9
2.3 Apple Mac X OS ............................................................................................................................................................................................. 12
2.4 Hardware Installation ................................................................................................................................................................................... 13
3 Configuring Your Access Point ..................................................................................................................................14
3.1 Default Settings ............................................................................................................................................................................................. 14
3.2 Web Configuration ....................................................................................................................................................................................... 15
4 System .........................................................................................................................................................................18
4.1 Operation Mode ............................................................................................................................................................................................ 18
4.2 Status ................................................................................................................................................................................................................. 19
4.3 DHCP ................................................................................................................................................................................................................. 21
4.4 Schedule ........................................................................................................................................................................................................... 24
4.5 Event Log ......................................................................................................................................................................................................... 26
4.6 Monitor ............................................................................................................................................................................................................. 27
5 Wireless .......................................................................................................................................................................28
5.1 Status ................................................................................................................................................................................................................. 28
5.2 Basic ................................................................................................................................................................................................................... 29

2
5.3 Advanced ......................................................................................................................................................................................................... 31
5.4 Security ............................................................................................................................................................................................................. 35
5.5 Filter ................................................................................................................................................................................................................... 41
5.6 WPS (Wi-Fi Protected Setup) .................................................................................................................................................................... 43
5.7 Client List .......................................................................................................................................................................................................... 45
5.8 VLAN .................................................................................................................................................................................................................. 46
6 Network ......................................................................................................................................................................47
6.1 Status ................................................................................................................................................................................................................. 47
6.2 LAN ..................................................................................................................................................................................................................... 48
6.3 Spanning Tree ................................................................................................................................................................................................ 50
7 Management ...............................................................................................................................................................51
7.1 Admin ................................................................................................................................................................................................................ 51
7.2 SNMP ................................................................................................................................................................................................................. 52
7.3 Firmware Upgrade ........................................................................................................................................................................................ 54
7.4 Configure ......................................................................................................................................................................................................... 57
7.5 Reset .................................................................................................................................................................................................................. 58
8 Tools ............................................................................................................................................................................59
8.1 Time Setting .................................................................................................................................................................................................... 59
8.2 Diagnosis .......................................................................................................................................................................................................... 60
8.3 LED Control ..................................................................................................................................................................................................... 61
9 Logout .........................................................................................................................................................................62
Appendix A – FCC Interference Statement .......................................................................................................................63

3
Revision History
Version Date Notes
1.0 2011/06/24 First Release

4
1 Introduction
EAP300 is a multi-functioned 11n product with 3 major multi-functions, is designed to operate in every working
environment for enterprises.
EAP300 is a Wireless Network device that delivers up to 6x faster speeds and 7x extended coverage than 802.11b/g
devices. EAP300 supports home network with superior throughput, performance and unparalleled wireless range.
To protect data during wireless transmissions, EAP300 encrypts all wireless transmissions through WEP data encryption
and supports WPA/WPA2. Its MAC address filter allows users to select stations with access to connect network. In
addition, the function of user isolation protects private network between client users. EAP300 thus is the best product to
ensure network safety for enterprises.
1.1 Features and Benefits
Features Benefits
High Speed Data Rate Up to 300Mbps Capable of handling heavy data payloads such as MPEG video
streaming.
10/100 Fast Ethernet Support up to 100Mbps networking speed.
IEEE 802.11n draft Compliant and backward
compatible with 802.11b/g
Multi-Function, 3 functions
Point-to-point, Point-to-multipoint Wireless
Connectivity
Fully compatible with IEEE 802.11b/g/n devices.
Allowing users to select AP, WDS AP or WDS Bridge mode in various
applications.
Allowing to transfer data from buildings to buildings.

5
Support Multi-SSID function (4 SSID) in AP
mode
WPA2/WPA/ IEEE 802.1x support Powerful data security.
MAC address filtering in AP mode Ensuring secure network connection.
User isolation support (AP mode) Protecting the private network between client users.
Power-over-Ethernet (IEEE802.3af) Flexible Access Point locations and saving cost.
Keep personal setting Keeping the latest setting when firmware upgrade.
SNMP Remote Configuration Management
QoS (WMM) support Enhancing user performance and density.
Allowing clients to access different networks through a single access
point and to assign different policies and functions for each SSID by
manager.
Helping administrators to remotely configure or manage the Access
Point easily.
1.2 Package Contents
The package contains the following items. In case of return, please keep the original box set, and the complete box set
must be included for full refund.
• EAP300
• 12V/1A 100V~240V Power Adapter
• RJ-45 Ethernet LAN Cable
• CD-ROM with User's Manual
• Quick Guide

6
1.3 System Requirements
The following are the minimum system requirements in order configure the device.
• Computer with an Ethernet interface or Wireless Network function.
• Windows, Mac OS or Linux based operating systems
• Internet Explorer or Firefox or Safari Web-Browser Software
1.4 Applications
The wireless LAN products are easy to install and highly efficient. The following list describes some of the many
applications made possible through the power and flexibility of wireless LANs:
a) Difficult-to-wire environments
There are many situations where wires cannot be laid easily. Historic buildings, older buildings, open areas
and across busy streets make the installation of LANs either impossible or very expensive.
b) Temporary workgroups
Consider situations in parks, athletic arenas, exhibition centers, disaster-recovery, temporary offices and
construction sites where one wants a temporary WLAN established and removed.
c) The ability to access real-time information
Doctors/nurses, point-of-sale employees, and warehouse workers can access real-time information while
dealing with patients, serving customers and processing information.
d) Frequently changed environments
Show rooms, meeting rooms, retail stores, and manufacturing sites where frequently rearrange the
workplace.

7
e) Small Office and Home Office (SOHO) networks
SOHO users need a cost-effective, easy and quick installation of a small network.
f) Wireless extensions to Ethernet networks
Network managers in dynamic environments can minimize the overhead caused by moves, extensions to
networks, and other changes with wireless LANs.
g) Wired LAN backup
Network managers implement wireless LANs to provide backup for mission-critical applications running on
wired networks.
h) Training/Educational facilities
Training sites at corporations and students at universities use wireless connectivity to ease access to
information, information exchanges, and learning.

8
2 Before you Begin
This section will guide you through the installation process. Placement of the ENGENIUS EAP300 is very important to
avoid poor signal reception and performance. Avoid placing the device in enclosed spaces such as a closet, cabinet or
wardrobe.
2.1 Considerations for Wireless Installation
The operating distance of all wireless devices cannot be pre-determined due to a number of unknown obstacles in the
environment that the device is deployed. These could be the number, thickness and location of walls, ceilings or other
objects that the wireless signals must pass through. Here are some key guidelines to ensure that you have the optimal
wireless range.
• Keep the number of walls and ceilings between the EnGenius access point and other network devices to a minimum.
Each wall or ceiling can reduce the signal strength; the degradation depends on the building’s material.
• Building materials makes a difference. A solid metal door or aluminum stubs may have a significant negative effect on
range. Locate your wireless devices carefully so the signal can pass through a drywall or open doorways. Materials such
as glass, steel, metal, concrete, water (fish tanks), mirrors, file cabinets and brick will also degrade your wireless signal.
• Interferences can also come from your other electrical devices or appliances that generate RF noise. The most usual
types are microwaves, or cordless phones.

9
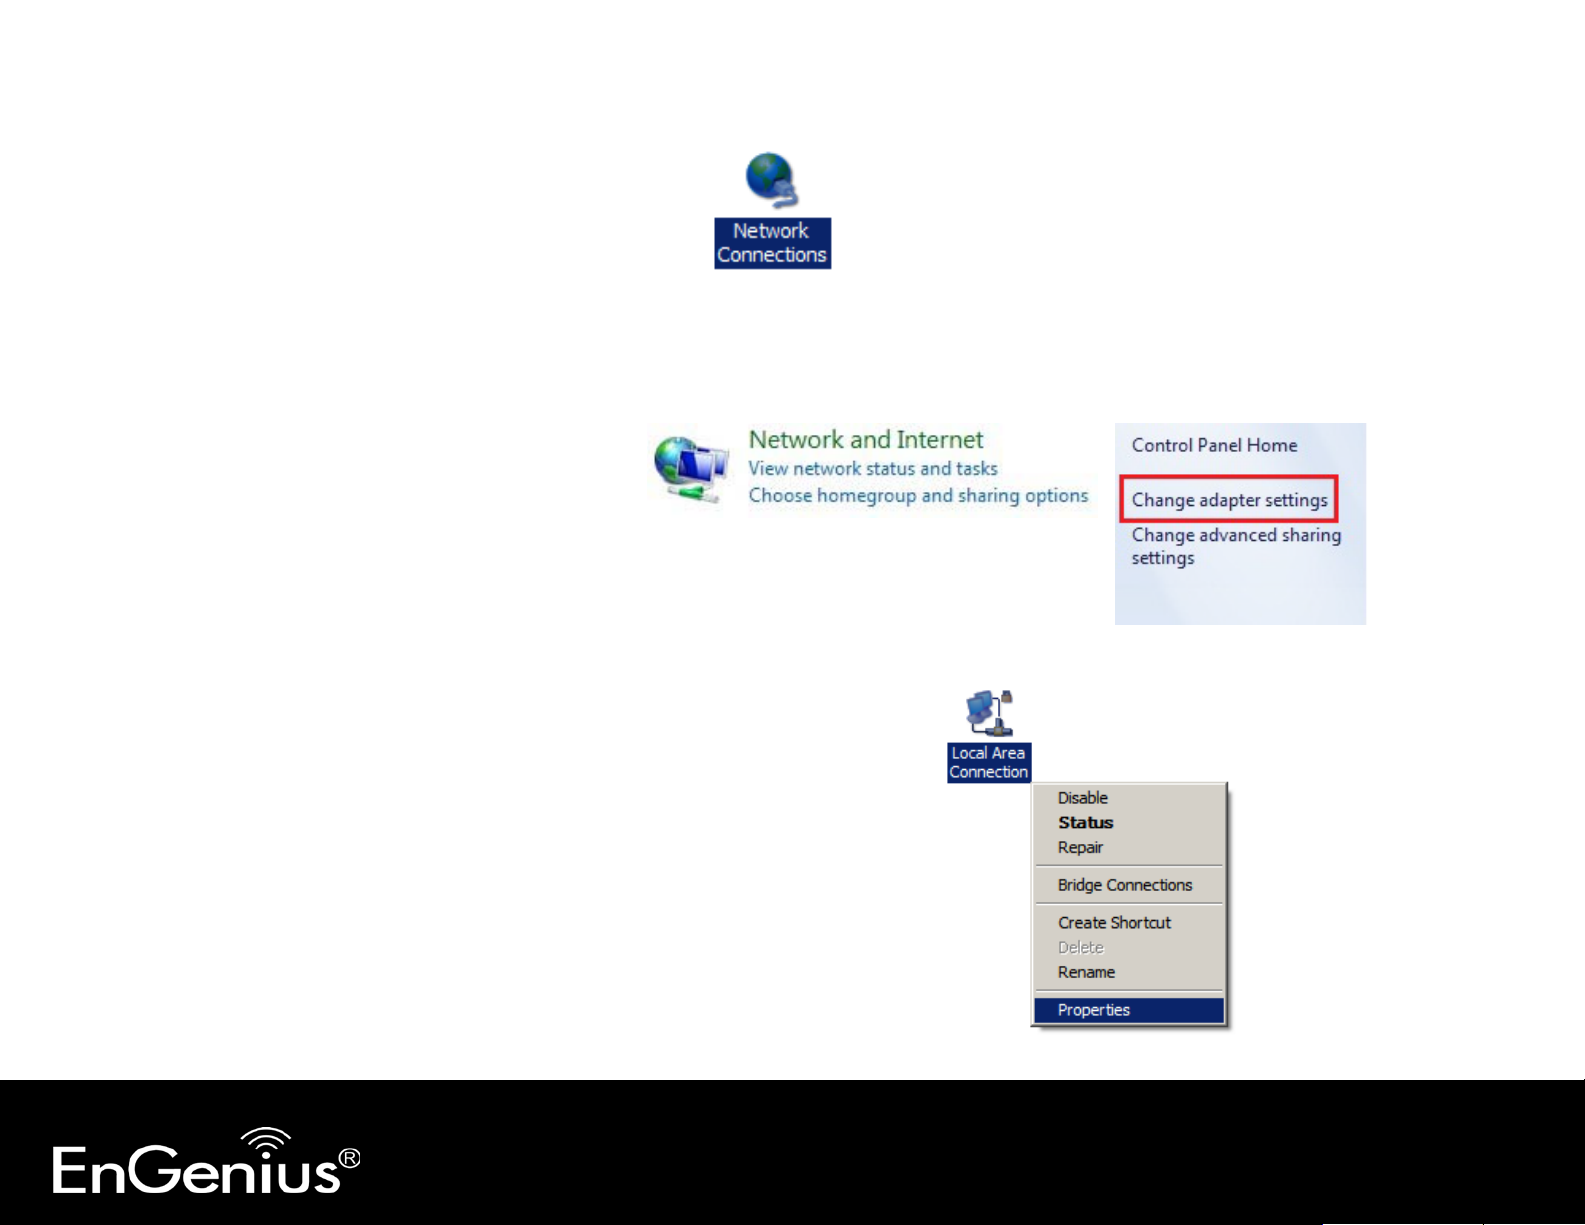
2.2 Computer Settings (Windows XP/Windows 7)
This device can be configured as an Access Point, WDS AP or WDS Bridge. The default IP address of the device is
192.168.1.1 (In Access Point Mode as default). In order to log into this device, you must first configure the TCP/IP
settings of your PC/Notebook.
• Click Start button and open Control Panel.
Windows XP Windows 7
10
• Windows XP, click [Network Connection]
• Windows 7, click [View Network Status and Tasks] then [Change adapter settings]
• Right click on [Local Area Connection] and select [Properties].

11
• Select “Internet Protocol (TCP/IP)” and click [Properties]
• Select “Use the following IP address” and enter IP address and subnet
mask then click [OK].
Note: Ensure that the IP address and subnet mask are on the same subnet as
the device.
For example: Device IP address: 192.168.1.1
PC IP address: 192.168.1.10
PC subnet mask: 255.255.255.0
12
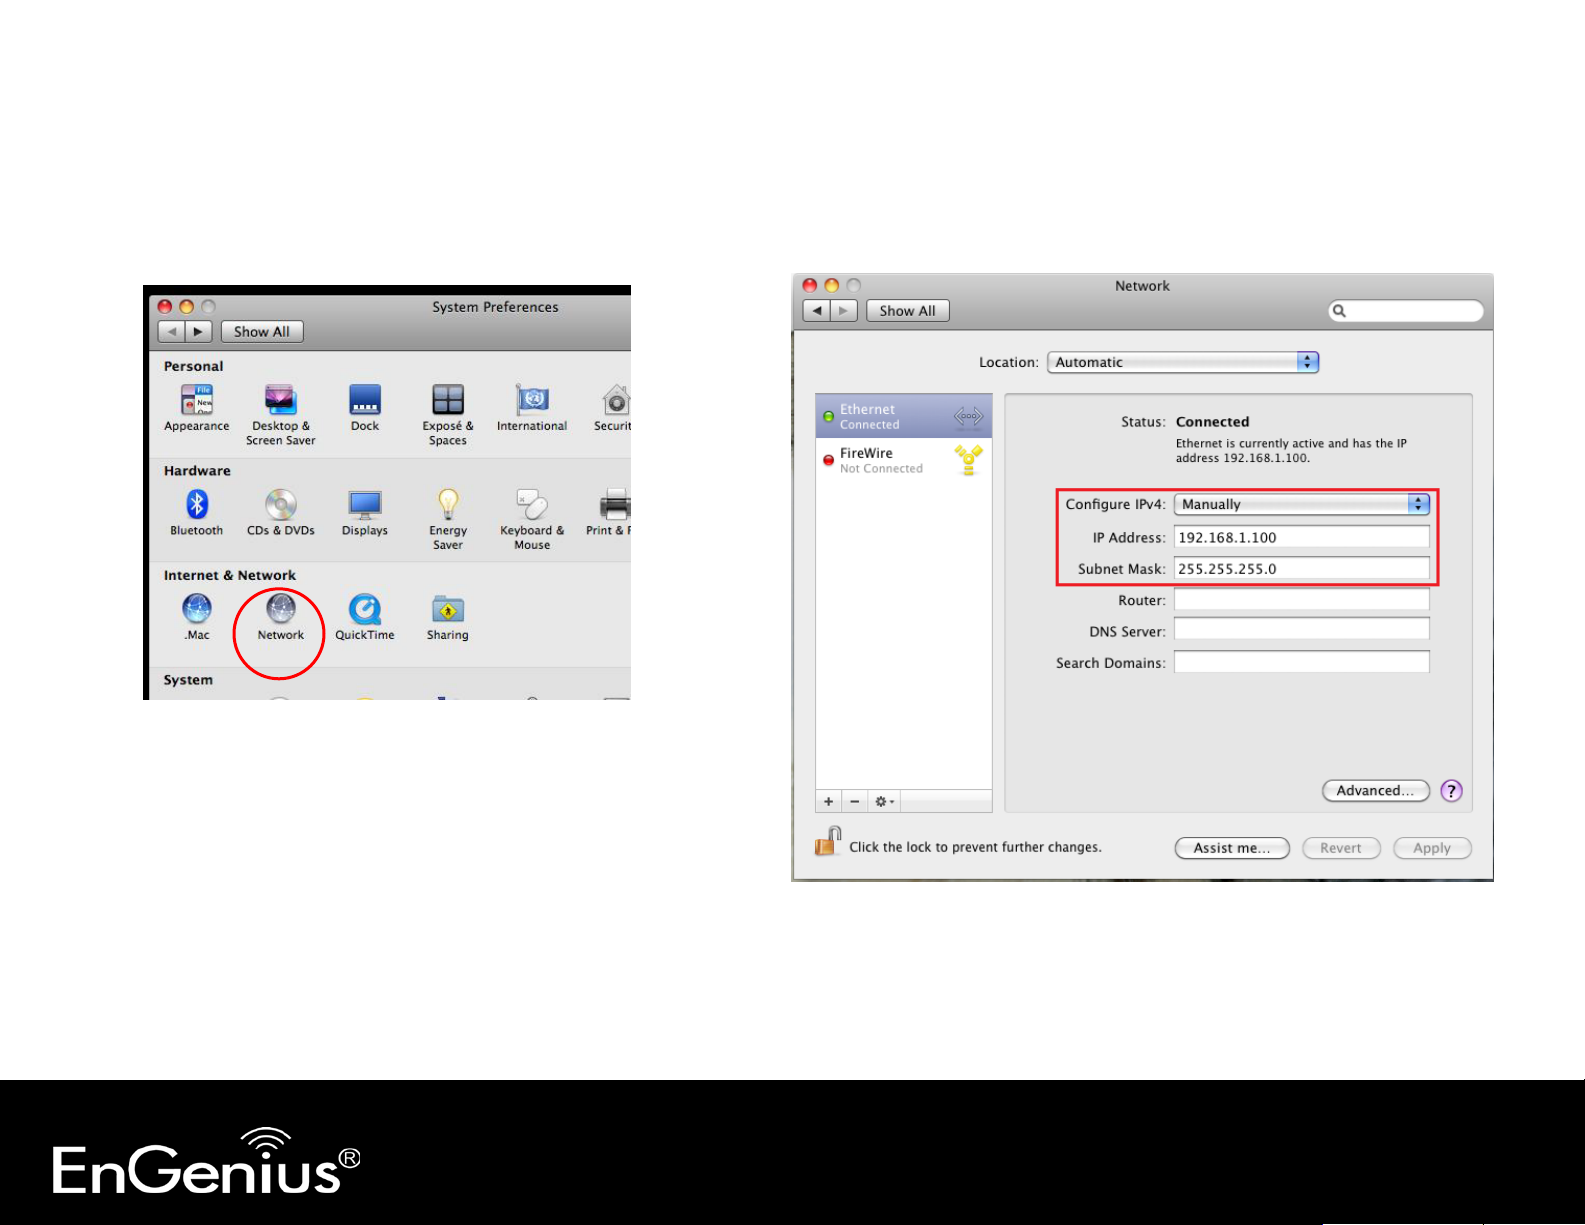
2.3 Apple Mac X OS
• Go to System Preferences > Network
• Under Network setting, select “Manually” and enter IP
address and subnet mask.
• Click Apply when done.
13
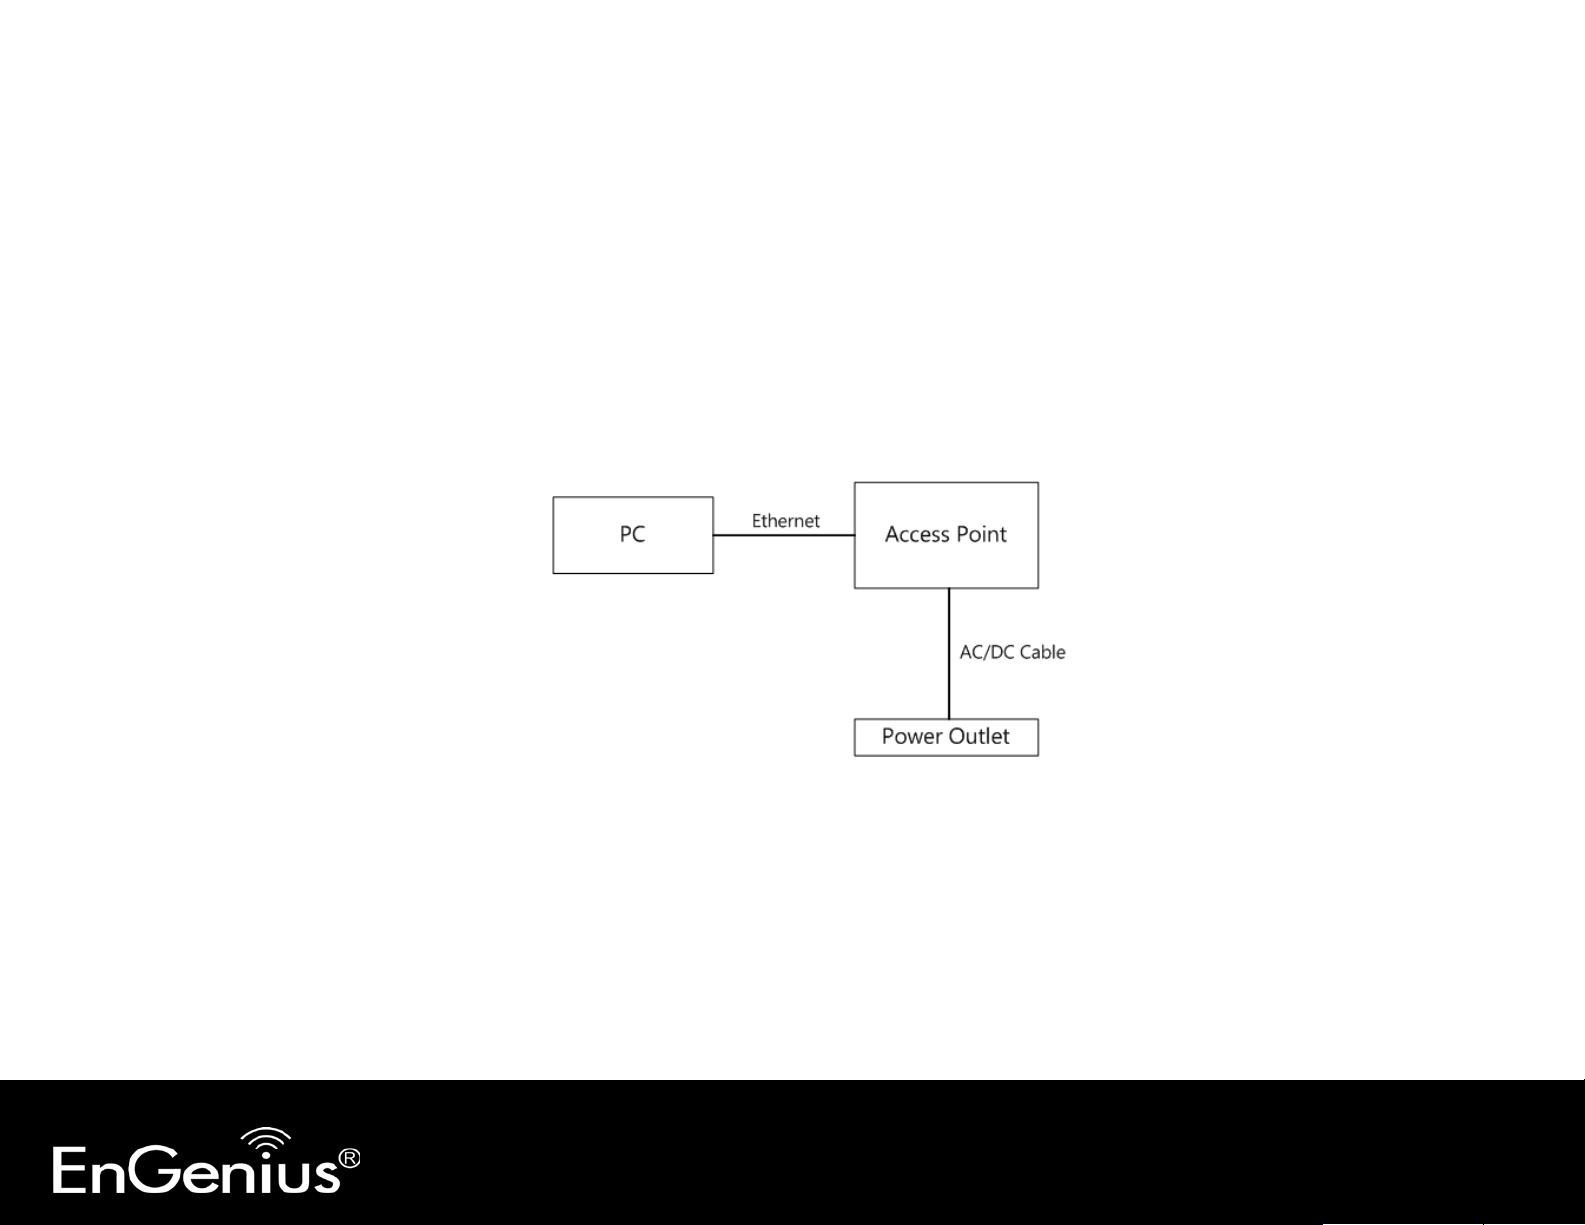
2.4 Hardware Installation
1. Place the unit in an appropriate location after conducting a site survey.
2. Plug one end of the Ethernet cable into the Ethernet port of the device and another end into your PC/Notebook.
3. Insert the DC-inlet of the power adapter into the port labeled “DC-IN” and the other end into the power socket on
the wall.
This diagram depicts the hardware configuration.

14
3 Configuring Your Access Point
This section will show you how to configure the device using the web-based conf iguration interface.
3.1 Default Settings
Please use your Ethernet port or wireless network adapter to connect the Access Point.
Default Settings
IP Address 192.168.1.1
Username / Password admin / admin
Operation Mode Access Point
Wireless SSID EnGeniusxxxxxx
Wireless Security None
Note: xxxxxx represented in the wireless SSID above is the last 6 characters of your device MAC Address. This can be found on the device body
label and is unique for each device.
15
3.2 Web Configuration
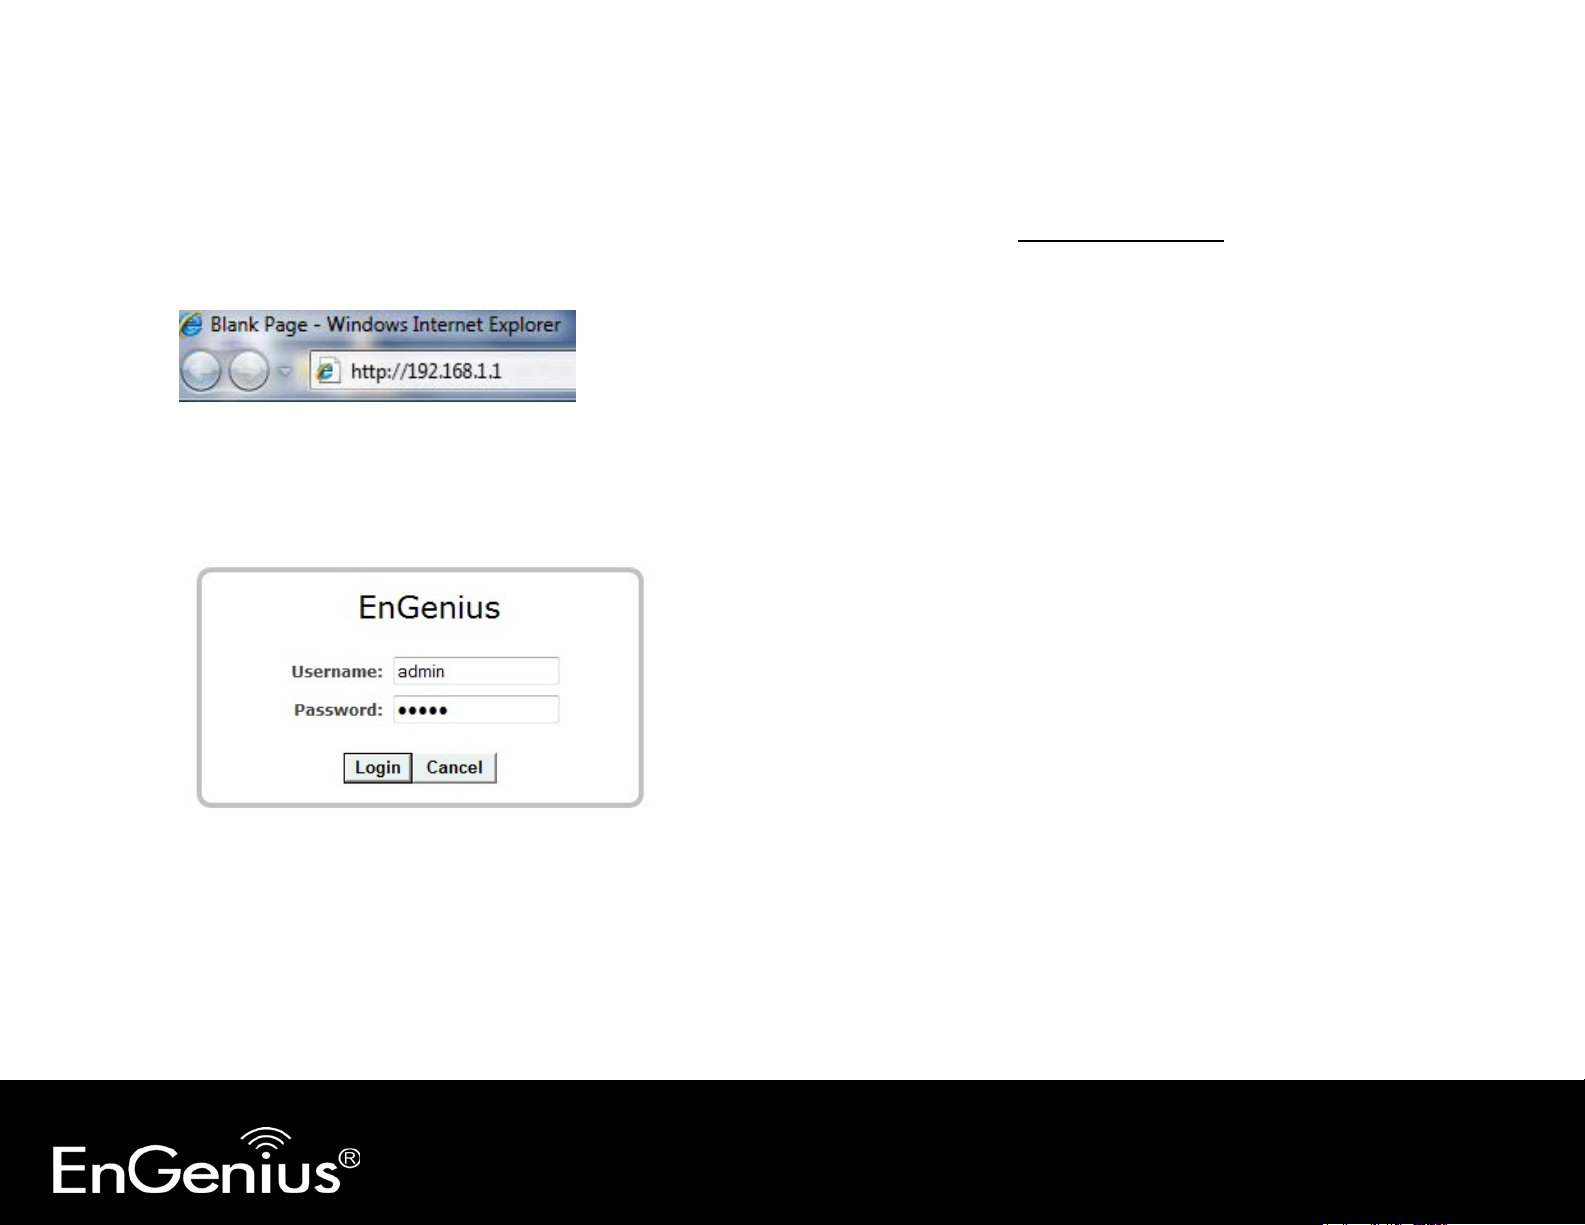
• Open a web browser (Internet Explorer/Firefox/Safari) and enter the IP Address
Note: If you have changed the default LAN IP Address of the Access Point, ensure you enter the correct IP Address.
• The default username and password are admin. Once you have entered the correct username and password, click the
Login button to open the web-base configuration page.
http://192.168.1.1
16
• You will see the following webpage if login successfully.

17
• The navigation drop-down menu on left is divided into seven main sections:
1. System: This menu includes the operation mode, status, DHCP, schedule, event log, and monitor. Through this
section, you can also change the device operating mode, such as Access Point, WDS AP or WDS Bridge.
2. Wireless: This menu includes status, basic, advanced, security, filter, client list and VLAN.
3. Network: This menu includes status, LAN and spanning tree.
4. Management: This menu includes the admin setup, SNMP, firmware upgrade, save/restore backup and device
reset.
5. Tools: Displays the time zone, diagnostics and LED control.
6. Logout: To logout the system. Need to open up a new browser window in order to login again.
18
4 System
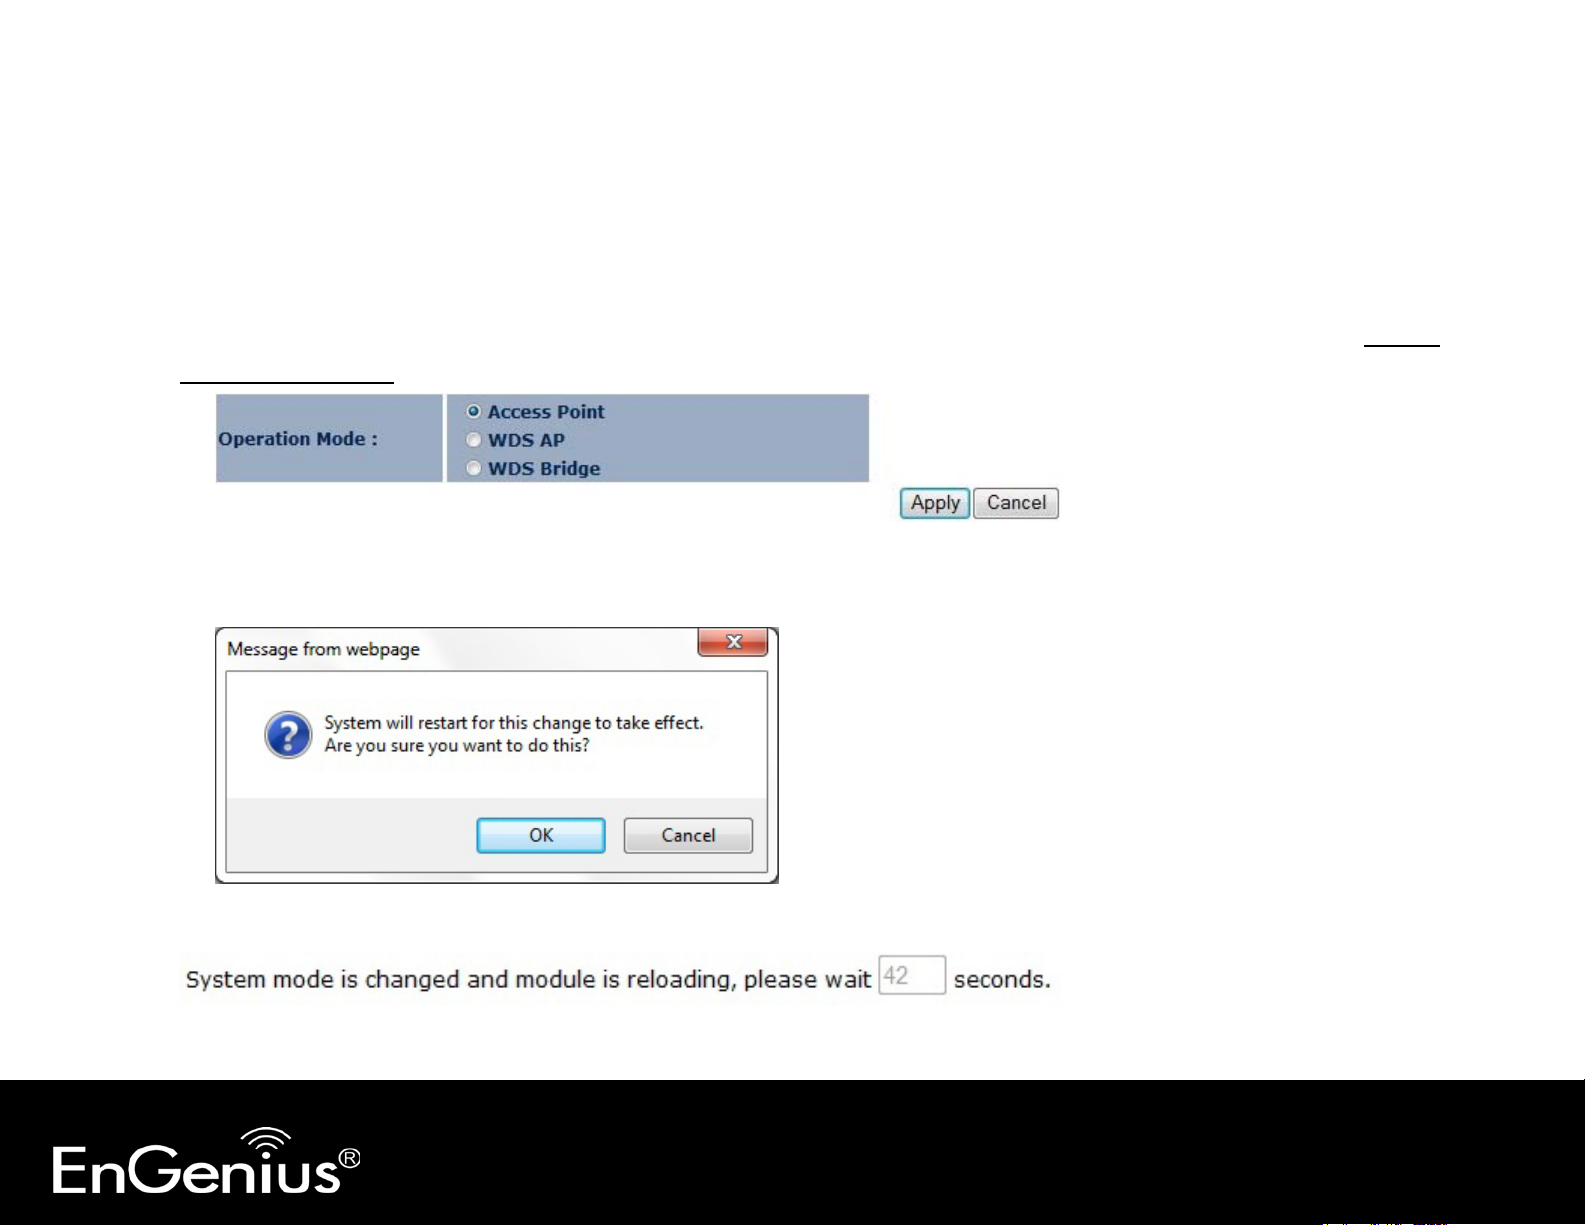
4.1 Operation Mode
Each of the operating modes offers different features. In order to switch the operating mode, select it from the System
>> Operation Mode. There are three operation modes: Access Point, WDS AP and WDS Bridge.
A dialog box will appear to notify you that the system will restart in order for the change to take effect. Click on the OK
button to continue.
Please wait while the device counts down and restarts into the new operating mode.

19
Operation Mode
Hardware Version and
4.2 Status
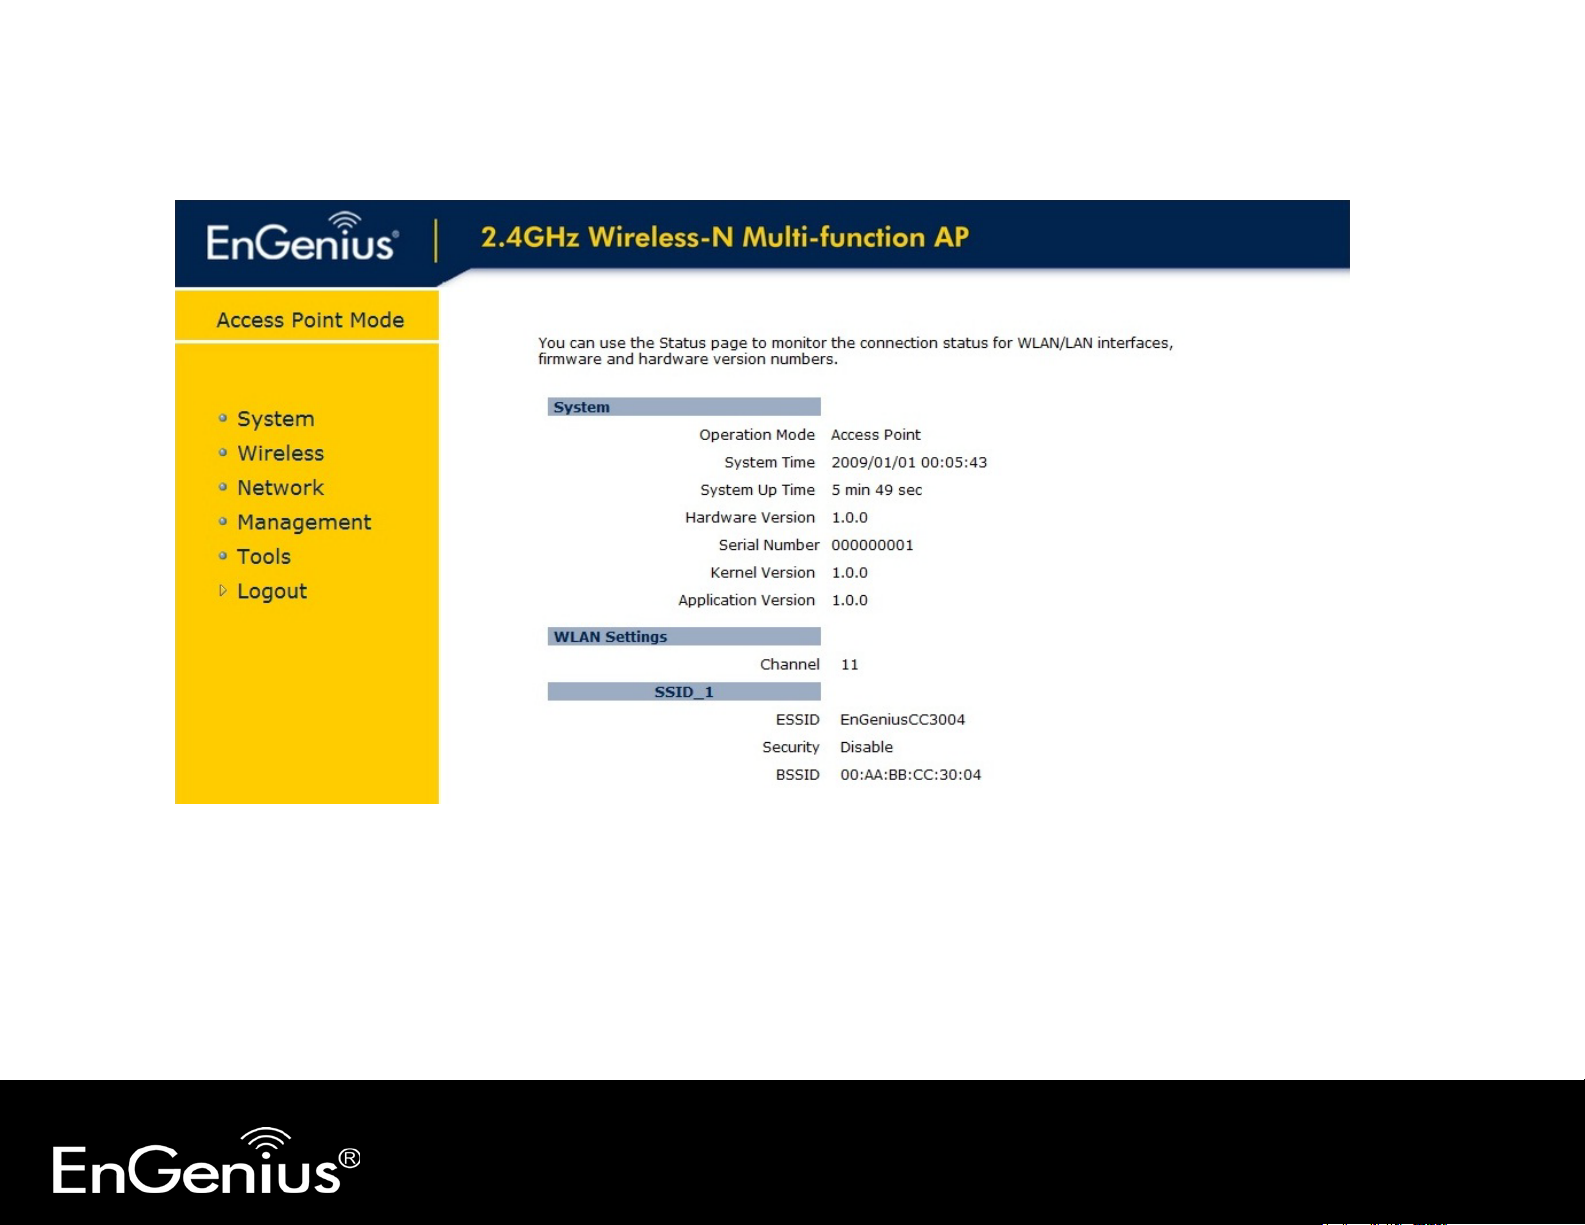
This page will display status of the device.
System
The device is currently in which mode.
System Time The device’s system time.
System Up Time The duration about the device has been operating without powering down or reboot.
Serial Number
Kernel and Application
Version
If this is incorrect, please set the time in the Tools / Time page.
Hardware information for this device.
Firmware information for this device.
20
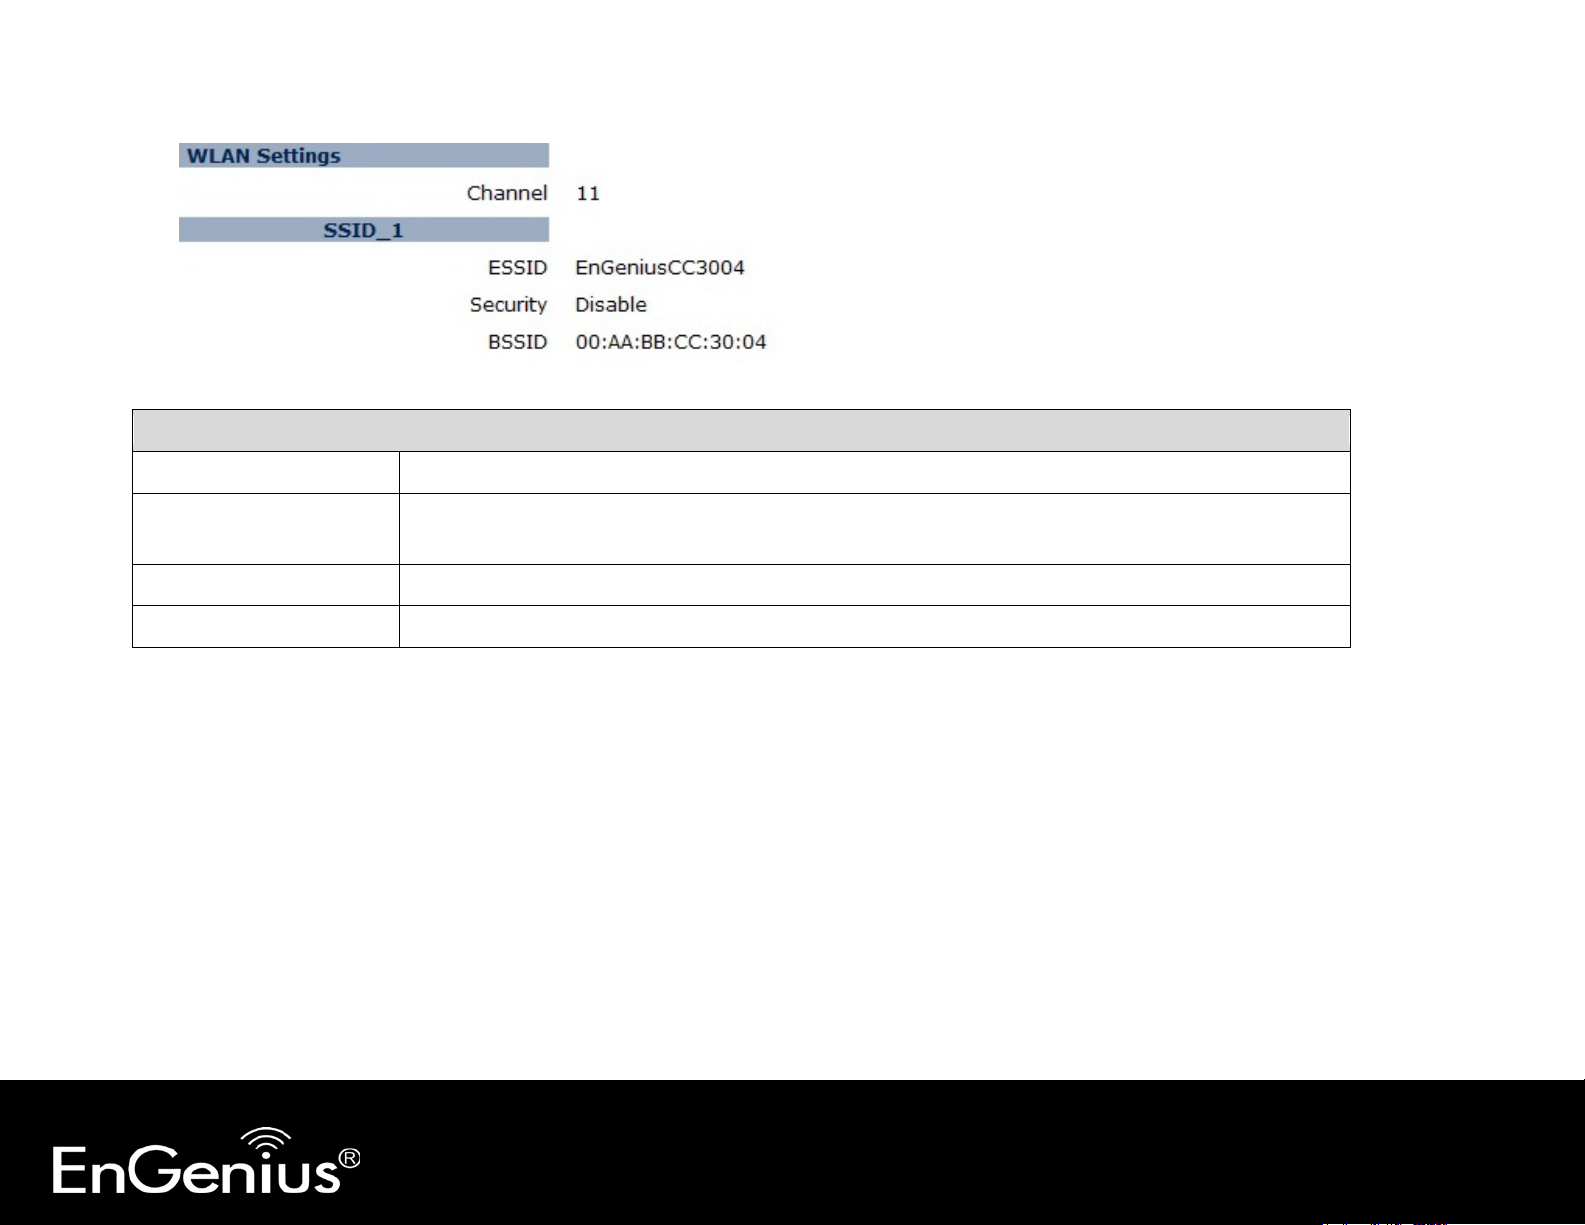
WLAN Settings
BSSID
The MAC address of this SSID.
Channel The wireless channel in use.
ESSID The SSID (Network Name) of the wireless network.
(up to 4 SSIDs are supported)
Security Wireless encryption is enabled for this SSID.
 Loading...