

Page 1

USER’S GUIDE
Table of Contents:
Introduction .............................2
Precautions ..............................3
Overview ................................. 4
Instructions..........................5-9
Specifications........................10
CXGN SERIES
CARDIOID GOOSENECK
MICROPHONE
Troubleshooting ....................11
Warranty .................................12
Page 2

Thank you for choosing Senal.
Senal’s CXGN-series Professional Gooseneck Microphone is designed with a slim and
stylish profile and is optimized for capturing voices. The microphone is perfect for video
conferences, lectures, and meetings due to its frequency response that’s tailored for
intelligibile speech. For noisy or acoustically untreated rooms, the cardioid polar pattern
captures the sound directly in front of it while it reduces off-axis sound and noise.
The CXGN-series microphones integrate into most AV conferencing systems or sound
systems. For quiet and professional audio, balanced output rejects unwanted RF and
EM interference and noise, even over long cable runs. The microphone’s all-metal
construction will ensure long-lasting performance and dependability, even under
demanding conditions. A flange mount and hardware is included for mounting the
microphone to a desktop or podium. For a convenient desktop mounting option, a
weighted microphone base is available separately.
▪ ▪ ▪ ▪ ▪ ▪ ▪ ▪ ▪ ▪ ▪ ▪ ▪ ▪ ▪ ▪ ▪ ▪ ▪ ▪ ▪ ▪ ▪ ▪ ▪ ▪ ▪ ▪ ▪ ▪ ▪ ▪ ▪ ▪ ▪ ▪ ▪ ▪ ▪ ▪ ▪ ▪ ▪ ▪ ▪ ▪ ▪ ▪ ▪ ▪ ▪ ▪ ▪ ▪ ▪ ▪ ▪ ▪ ▪ ▪ ▪ ▪ ▪ ▪ ▪ ▪ ▪ ▪ ▪ ▪ ▪ ▪ ▪ ▪ ▪ ▪ ▪ ▪ ▪ ▪ ▪ ▪ ▪ ▪ ▪
2
Introduction
Page 3

Precautions
• Please read and follow these instructions, and keep this manual in a safe place.
• Keep this product away from water and any flammable gases or liquids.
• Do not attempt to disassemble or repair this product.
• Handle this product with care.
• Use only parts provided by the manufacturer.
• Clean this product with only a soft, dry cloth.
• Make sure that this product is intact and that there are no missing parts.
• All images are for illustrative purposes only.
Precautions
▪ ▪ ▪ ▪ ▪ ▪ ▪ ▪ ▪ ▪ ▪ ▪ ▪ ▪ ▪ ▪ ▪ ▪ ▪ ▪ ▪ ▪ ▪ ▪ ▪ ▪ ▪ ▪ ▪ ▪ ▪ ▪ ▪ ▪ ▪ ▪ ▪ ▪ ▪ ▪ ▪ ▪ ▪ ▪ ▪ ▪ ▪ ▪ ▪ ▪ ▪ ▪ ▪ ▪ ▪ ▪ ▪ ▪ ▪ ▪ ▪ ▪ ▪ ▪ ▪ ▪ ▪ ▪ ▪ ▪ ▪ ▪ ▪ ▪ ▪ ▪ ▪ ▪ ▪ ▪ ▪ ▪ ▪ ▪ ▪ ▪
3
Page 4

Overview
Microphone
capsule
Windscreen
Gooseneck
arm
Flange mount
Locking nut
XLR output
▪ ▪ ▪ ▪ ▪ ▪ ▪ ▪ ▪ ▪ ▪ ▪ ▪ ▪ ▪ ▪ ▪ ▪ ▪ ▪ ▪ ▪ ▪ ▪ ▪ ▪ ▪ ▪ ▪ ▪ ▪ ▪ ▪ ▪ ▪ ▪ ▪ ▪ ▪ ▪ ▪ ▪ ▪ ▪ ▪ ▪ ▪ ▪ ▪ ▪ ▪ ▪ ▪ ▪ ▪ ▪ ▪ ▪ ▪ ▪ ▪ ▪ ▪ ▪ ▪ ▪ ▪ ▪ ▪ ▪ ▪ ▪ ▪ ▪ ▪ ▪ ▪ ▪ ▪ ▪ ▪ ▪ ▪ ▪ ▪ ▪ ▪
4
Overview
Page 5

Setting Up the CXGN Gooseneck Microphone
Each application of the CXGN Microphone will be slightly different.
The following scenarios cover frequently used setups.
Live Lecture/Sound Reinforcement
This is ideal in an auditorium or
house of worship where a voice
needs to be amplified for an
audience.
Note: CXGN microphones need
phantom power in order
to operate.
Video and Audio Conferencing
CXGN microphones are
compatible with most audio and
video conferencing systems. Refer
to the conferencing system’s user
manual for setup instructions.
Mixing console
Phantom
power supply Power amplifier
Remote video
conference system
Power amplifier
Power amplifier
Instructions
▪ ▪ ▪ ▪ ▪ ▪ ▪ ▪ ▪ ▪ ▪ ▪ ▪ ▪ ▪ ▪ ▪ ▪ ▪ ▪ ▪ ▪ ▪ ▪ ▪ ▪ ▪ ▪ ▪ ▪ ▪ ▪ ▪ ▪ ▪ ▪ ▪ ▪ ▪ ▪ ▪ ▪ ▪ ▪ ▪ ▪ ▪ ▪ ▪ ▪ ▪ ▪ ▪ ▪ ▪ ▪ ▪ ▪ ▪ ▪ ▪ ▪ ▪ ▪ ▪ ▪ ▪ ▪ ▪ ▪ ▪ ▪ ▪ ▪ ▪ ▪ ▪ ▪ ▪ ▪ ▪ ▪ ▪ ▪ ▪ ▪
5
Page 6

Powering the CXGN Microphone
The CXGN microphones operate on phantom power. Once connected to the power
source, the CXGN mic is ready to work.
Important! When integrating the CXGN microphone into a video or audio conferencing
system, or using it with a mixing board, make sure that phantom power is enabled.
Using the Windscreen
The CXGN microphone should always be used with the included foam windscreen. It
prevents the vocal pops that occur with the letters P and B, and it protects the mic
capsule from corrosive moisture.
To install the windscreen, slip it over the microphone capsule.
Microphone Placement
The optimum placement for the microphone is 6 to 12 inches from the source.
Ideally, the microphone should be pointed directly toward the source to capture the best
sound.
Always point the microphones away from speakers and other sources of unwanted noise.
▪ ▪ ▪ ▪ ▪ ▪ ▪ ▪ ▪ ▪ ▪ ▪ ▪ ▪ ▪ ▪ ▪ ▪ ▪ ▪ ▪ ▪ ▪ ▪ ▪ ▪ ▪ ▪ ▪ ▪ ▪ ▪ ▪ ▪ ▪ ▪ ▪ ▪ ▪ ▪ ▪ ▪ ▪ ▪ ▪ ▪ ▪ ▪ ▪ ▪ ▪ ▪ ▪ ▪ ▪ ▪ ▪ ▪ ▪ ▪ ▪ ▪ ▪ ▪ ▪ ▪ ▪ ▪ ▪ ▪ ▪ ▪ ▪ ▪ ▪ ▪ ▪ ▪ ▪ ▪ ▪ ▪ ▪ ▪ ▪
6
Instructions
Page 7

Mounting Instructions
A flange mount is included with the CXGN microphone for tabletop or desktop
installation. Follow these steps for mounting the flange to a surface.
1. Place the flange on the mounting surface in the desired location for the microphone.
2. Use a pencil to mark the flange holes and the center
hole on the mounting surface.
3. Remove the flange, and drill a center hole
approximately 1¾ inch (44.5 mm) in diameter
through the mounting surface for the XLR
connector.
4. With a small drill bit, drill three starter holes for the
attachment screws.
5. Replace the flange over the holes, and screw in the attachment screws until the
flange is securely flush against the surface.
Instructions
▪ ▪ ▪ ▪ ▪ ▪ ▪ ▪ ▪ ▪ ▪ ▪ ▪ ▪ ▪ ▪ ▪ ▪ ▪ ▪ ▪ ▪ ▪ ▪ ▪ ▪ ▪ ▪ ▪ ▪ ▪ ▪ ▪ ▪ ▪ ▪ ▪ ▪ ▪ ▪ ▪ ▪ ▪ ▪ ▪ ▪ ▪ ▪ ▪ ▪ ▪ ▪ ▪ ▪ ▪ ▪ ▪ ▪ ▪ ▪ ▪ ▪ ▪ ▪ ▪ ▪ ▪ ▪ ▪ ▪ ▪ ▪ ▪ ▪ ▪ ▪ ▪ ▪ ▪ ▪ ▪ ▪ ▪ ▪ ▪ ▪
7
Page 8
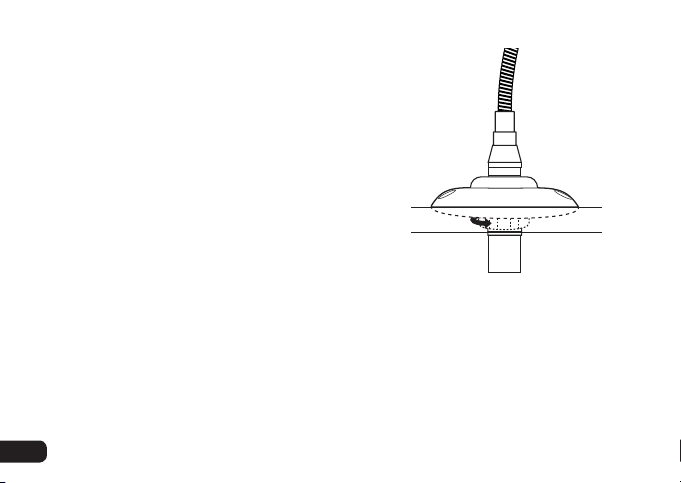
6. From below the surface, partially screw in the
locking nut, but don’t tighten it.
7. Insert the base of the microphone into the
flange until the bottom extends beyond the
bottom of the locking nut.
8. Hold the microphone in place, and tighten the
locking nut until secure.
9. Run an XLR cable underneath the surface,
and connect the female XLR connector to the
gooseneck.
▪ ▪ ▪ ▪ ▪ ▪ ▪ ▪ ▪ ▪ ▪ ▪ ▪ ▪ ▪ ▪ ▪ ▪ ▪ ▪ ▪ ▪ ▪ ▪ ▪ ▪ ▪ ▪ ▪ ▪ ▪ ▪ ▪ ▪ ▪ ▪ ▪ ▪ ▪ ▪ ▪ ▪ ▪ ▪ ▪ ▪ ▪ ▪ ▪ ▪ ▪ ▪ ▪ ▪ ▪ ▪ ▪ ▪ ▪ ▪ ▪ ▪ ▪ ▪ ▪ ▪ ▪ ▪ ▪ ▪ ▪ ▪ ▪ ▪ ▪ ▪ ▪ ▪ ▪ ▪ ▪ ▪ ▪ ▪ ▪
8
Instructions
Page 9

Using the CXGN Microphone with the Base
The CXBS-1 microphone base (sold separately) sits independently on a tabletop, desktop,
or podium. It can be used with a video conferencing system or connected to a mixing
board for sound reinforcement applications.
1. Plug the gooseneck into the XLR input of the base.
2. Connect the XLR cable to the input of a video conferencing system or a mixing
board.
Important! When integrating the CXGN microphone into a video or audio conferencing
system, or using it with a mixing board, make sure that phantom power is enabled.
Instructions
▪ ▪ ▪ ▪ ▪ ▪ ▪ ▪ ▪ ▪ ▪ ▪ ▪ ▪ ▪ ▪ ▪ ▪ ▪ ▪ ▪ ▪ ▪ ▪ ▪ ▪ ▪ ▪ ▪ ▪ ▪ ▪ ▪ ▪ ▪ ▪ ▪ ▪ ▪ ▪ ▪ ▪ ▪ ▪ ▪ ▪ ▪ ▪ ▪ ▪ ▪ ▪ ▪ ▪ ▪ ▪ ▪ ▪ ▪ ▪ ▪ ▪ ▪ ▪ ▪ ▪ ▪ ▪ ▪ ▪ ▪ ▪ ▪ ▪ ▪ ▪ ▪ ▪ ▪ ▪ ▪ ▪ ▪ ▪ ▪ ▪
9
Page 10

Specifications
Transducer
Polar Pattern
Frequency Response
Maximum Input Level
Sensitivity
Output Impedance
Power Requirements
Output Connector
Housing Material
Gooseneck Length (including
base connector)
Gooseneck Diameter
Dimensions (H × W × D)
Flange Mount Diameter
Weight (without ange)
▪ ▪ ▪ ▪ ▪ ▪ ▪ ▪ ▪ ▪ ▪ ▪ ▪ ▪ ▪ ▪ ▪ ▪ ▪ ▪ ▪ ▪ ▪ ▪ ▪ ▪ ▪ ▪ ▪ ▪ ▪ ▪ ▪ ▪ ▪ ▪ ▪ ▪ ▪ ▪ ▪ ▪ ▪ ▪ ▪ ▪ ▪ ▪ ▪ ▪ ▪ ▪ ▪ ▪ ▪ ▪ ▪ ▪ ▪ ▪ ▪ ▪ ▪ ▪ ▪ ▪ ▪ ▪ ▪ ▪ ▪ ▪ ▪ ▪ ▪ ▪ ▪ ▪ ▪ ▪ ▪ ▪ ▪ ▪ ▪
10
Back electret condenser
Cardioid
30 Hz to 18 kHz
120 dB (@1 kHz, THD <1%)
-45 dB ±3 dB (0 dB = 1 V / Pa @1 Hz indicated by open circuit)
200 Ω ±30% (@1,000 Hz)
Phantom power DC 12 to 48 V
XLR 3-pin male
Metal
CXGN-12C: 16.3 in. (41.5 cm)
CXGN-18C: 22.5 in. (57.1 cm)
CXGN-12C: 0.5 in. (12 mm)
CXGN-18C: 0.5 in. (12 mm)
Base: 4 × 3.6 × 5.7 in. (10.2 × 9.1 × 14.5 cm)
0.77 in. (1.95 cm)
CXGN-12C: 4.7 oz. (133.2 g)
CXGN-18C: 7 oz. (198.4 g)
Specications
Page 11

Freaqency Response Graph Polar Pattern
Relative Response in dB
-20
-30
-40
-50
-60
50
20
100 200 500
1K 2K
Frequency in Hertz
5K
10K
300°
270°
240°
20K
330°
210°
0°
180°
30°
60°
150°
Troubleshooting
Problem Solution
The microphone
is connected, but
there’s no sound.
• Make sure both XLR connectors on the cable are fully inserted into the
plugs on the microphone and input device (conferencing system or
mixing board).
• Make sure your microphone is connected to an XLR port with phantom
power, and that the phantom power is turned on.
• Refer to your AV conferencing system’s user manual to ensure the input
settings are correct.
90°
120°
Troubleshooting
▪ ▪ ▪ ▪ ▪ ▪ ▪ ▪ ▪ ▪ ▪ ▪ ▪ ▪ ▪ ▪ ▪ ▪ ▪ ▪ ▪ ▪ ▪ ▪ ▪ ▪ ▪ ▪ ▪ ▪ ▪ ▪ ▪ ▪ ▪ ▪ ▪ ▪ ▪ ▪ ▪ ▪ ▪ ▪ ▪ ▪ ▪ ▪ ▪ ▪ ▪ ▪ ▪ ▪ ▪ ▪ ▪ ▪ ▪ ▪ ▪ ▪ ▪ ▪ ▪ ▪ ▪ ▪ ▪ ▪ ▪ ▪ ▪ ▪ ▪ ▪ ▪ ▪ ▪ ▪ ▪ ▪ ▪ ▪ ▪ ▪
11
Page 12

Two-Year Limited Warranty
This Senal product is warranted to the original purchaser to be free from defects in materials and workmanship
under normal consumer use for a period of two (2) years from the original purchase date or thirty (30) days
after replacement, whichever occurs later. The warranty provider’s responsibility with respect to this limited
warranty shall be limited solely to repair or replacement, at the provider’s discretion, of any product that fails
during normal use of this product in its intended manner and in its intended environment. Inoperability of the
product or part(s) shall be determined by the warranty provider. If the product has been discontinued, the
warranty provider reserves the right to replace it with a model of equivalent quality and function.
This warranty does not cover damage or defect caused by misuse, neglect, accident, alteration, abuse,
improper installation or maintenance. EXCEPT AS PROVIDED HEREIN, THE WARRANTY PROVIDER MAKES
NEITHER ANY EXPRESS WARRANTIES NOR ANY IMPLIED WARRANTIES, INCLUDING BUT NOT LIMITED
TO ANY IMPLIED WARRANTY OF MERCHANTABILITY OR FITNESS FOR A PARTICULAR PURPOSE. This
warranty provides you with specific legal rights, and you may also have additional rights that vary from state
to state.
To obtain warranty coverage, contact the Senal Customer Service Department to obtain a return merchandise
authorization (“RMA”) number, and return the defective product to Senal along with the RMA number and
proof of purchase. Shipment of the defective product is at the purchaser’s own risk and expense.
For more information or to arrange service, visit www.senalsound.com or call Customer Service at 212-594-2353.
Product warranty provided by the Gradus Group.
www.gradusgroup.com
Senal is a registered trademark of the Gradus Group. © 2018 Gradus Group LLC. All Rights Reserved.
GG2
 Loading...