

Page 1

SMART CYCLING HELMET
QUICK START GUIDE
1.0.0
Page 2
RIDE CONNECTED
Blast your favorite tunes, talk over the intercom
with your buddies, hear directions from your
GPS and more, all through your Sena X1 Pro
Smart Cycling Helmet. With built-in Bluetooth®
capabilities, Quad HD camera, HD speakers
and a microphone using Advanced Noise
Control™, technology has never felt so minimal
or freeing.
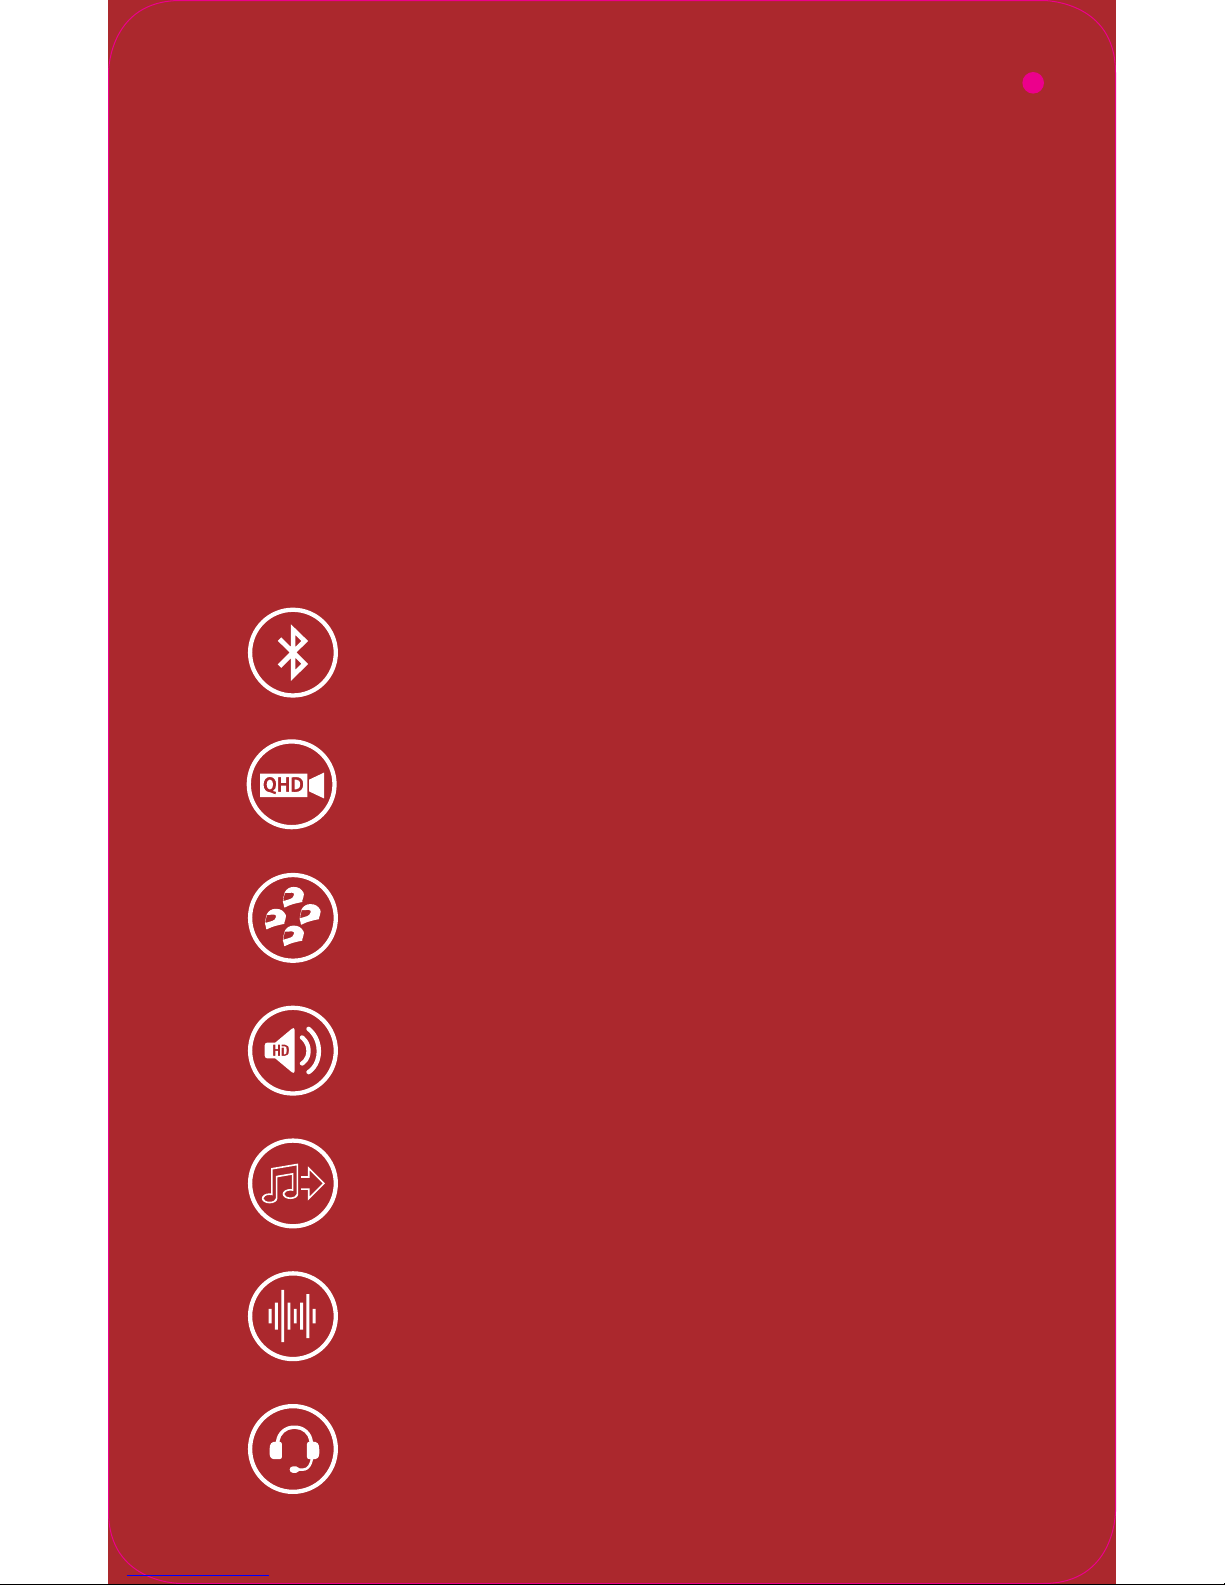
Quad HD Camera Integrated
Bluetooth® Integrated
Four-Way Intercom
Built-in Speakers and Mic
Music Sharing
Advanced Noise Control™
900-Meter Intercom
Page 3
GETTING STARTED
1. This product comes with a Quick Start
Guide, which is a basic version of the User’s
Guide. A FULL VERSION OF THE USER’S
GUIDE CAN BE DOWNLOADED AT
SENA.COM/DOCUMENTS.
2. Update this product for free with the latest
firmware to fully enjoy the new advanced
features built into this product. Visit Sena.
com/device-manager-download/ to see
how to update your product.
3. Users can follow Sena on Facebook,
YouTube, Twitter and Instagram to
receive the most up to date information
on products, helpful tips and all other
announcements regarding Sena products.
GETTING STARTED
SENA Technologies, Inc.
Sena.com
Customer Support: support.sena.com
E-mail: [email protected]
Page 4
QUICK START GUIDE
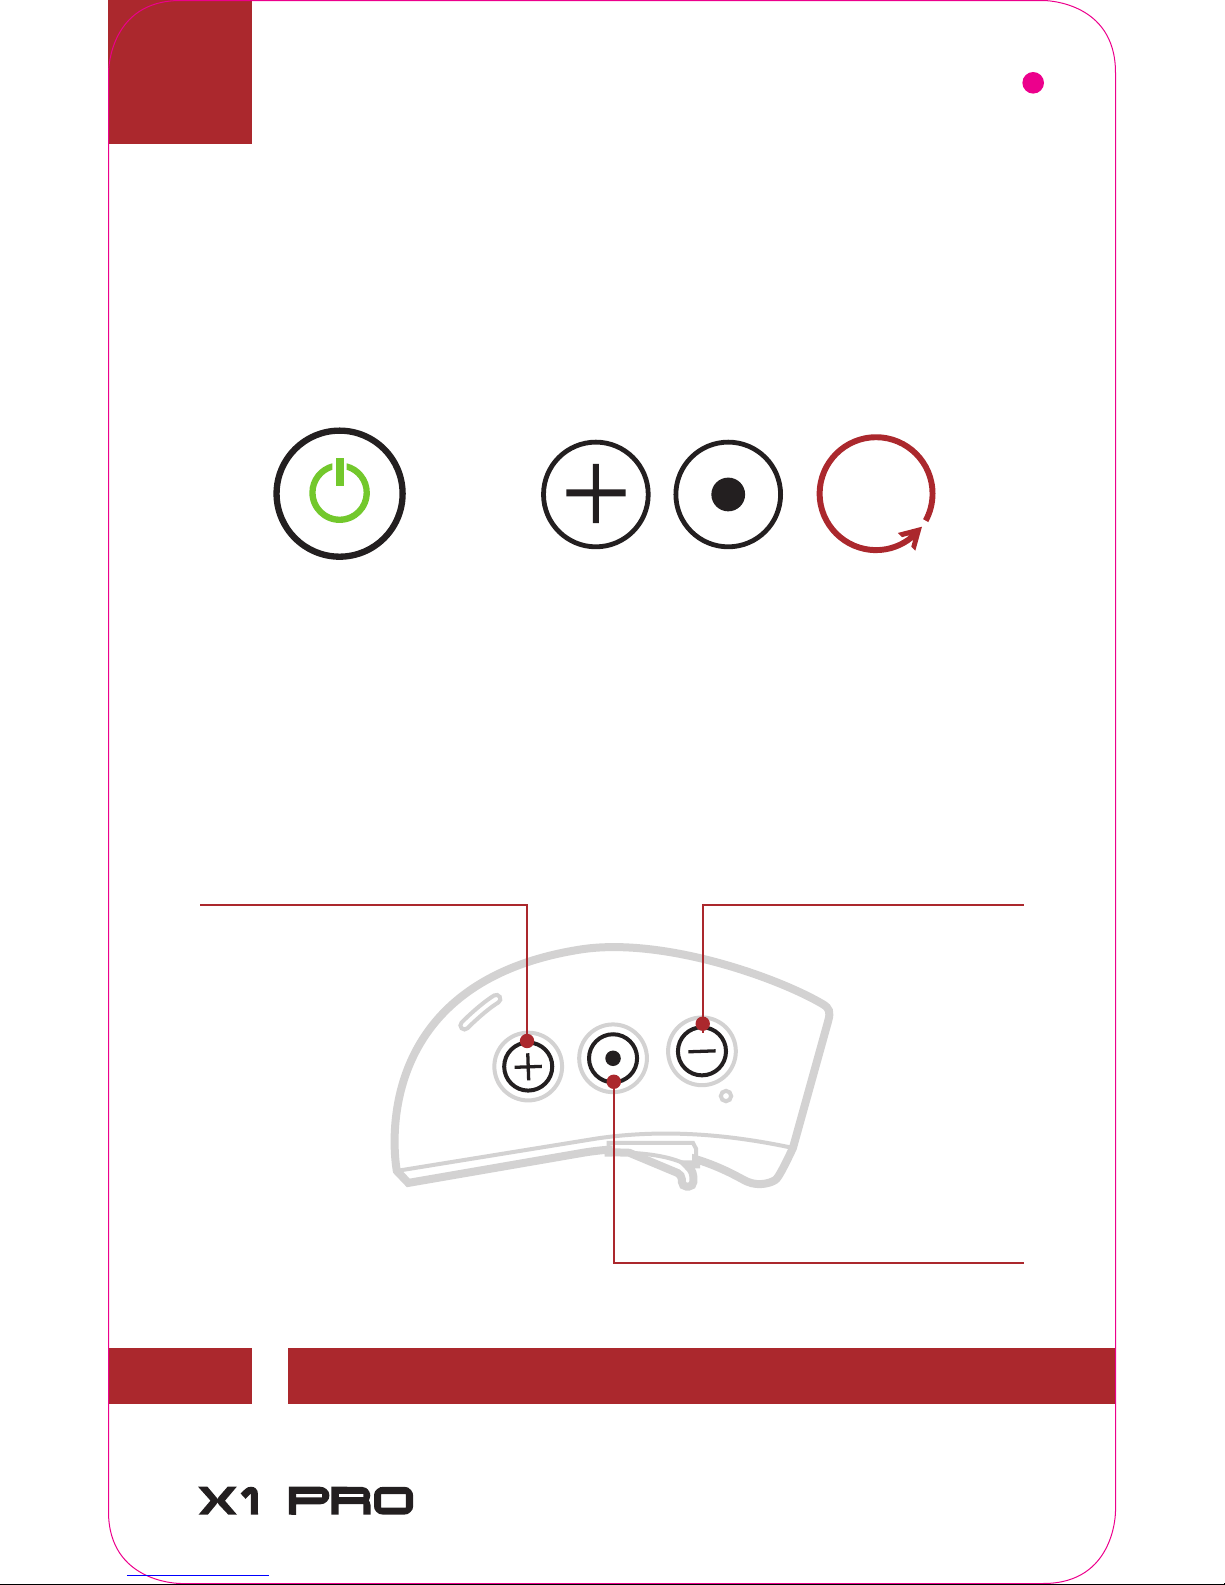
How to Use This Guide
The legend and callouts are here to help you read the
illustrations. New technology can be confusing, but we’ve
created a simple way to perform actions using illustrations.
Function = Button(s) to Tap or Hold
=
1s
HOLD
Buttons
Left Side
(+) Button
(-) Button
Center Button
QUICK START GUIDE
Page 5
QUICK START GUIDE
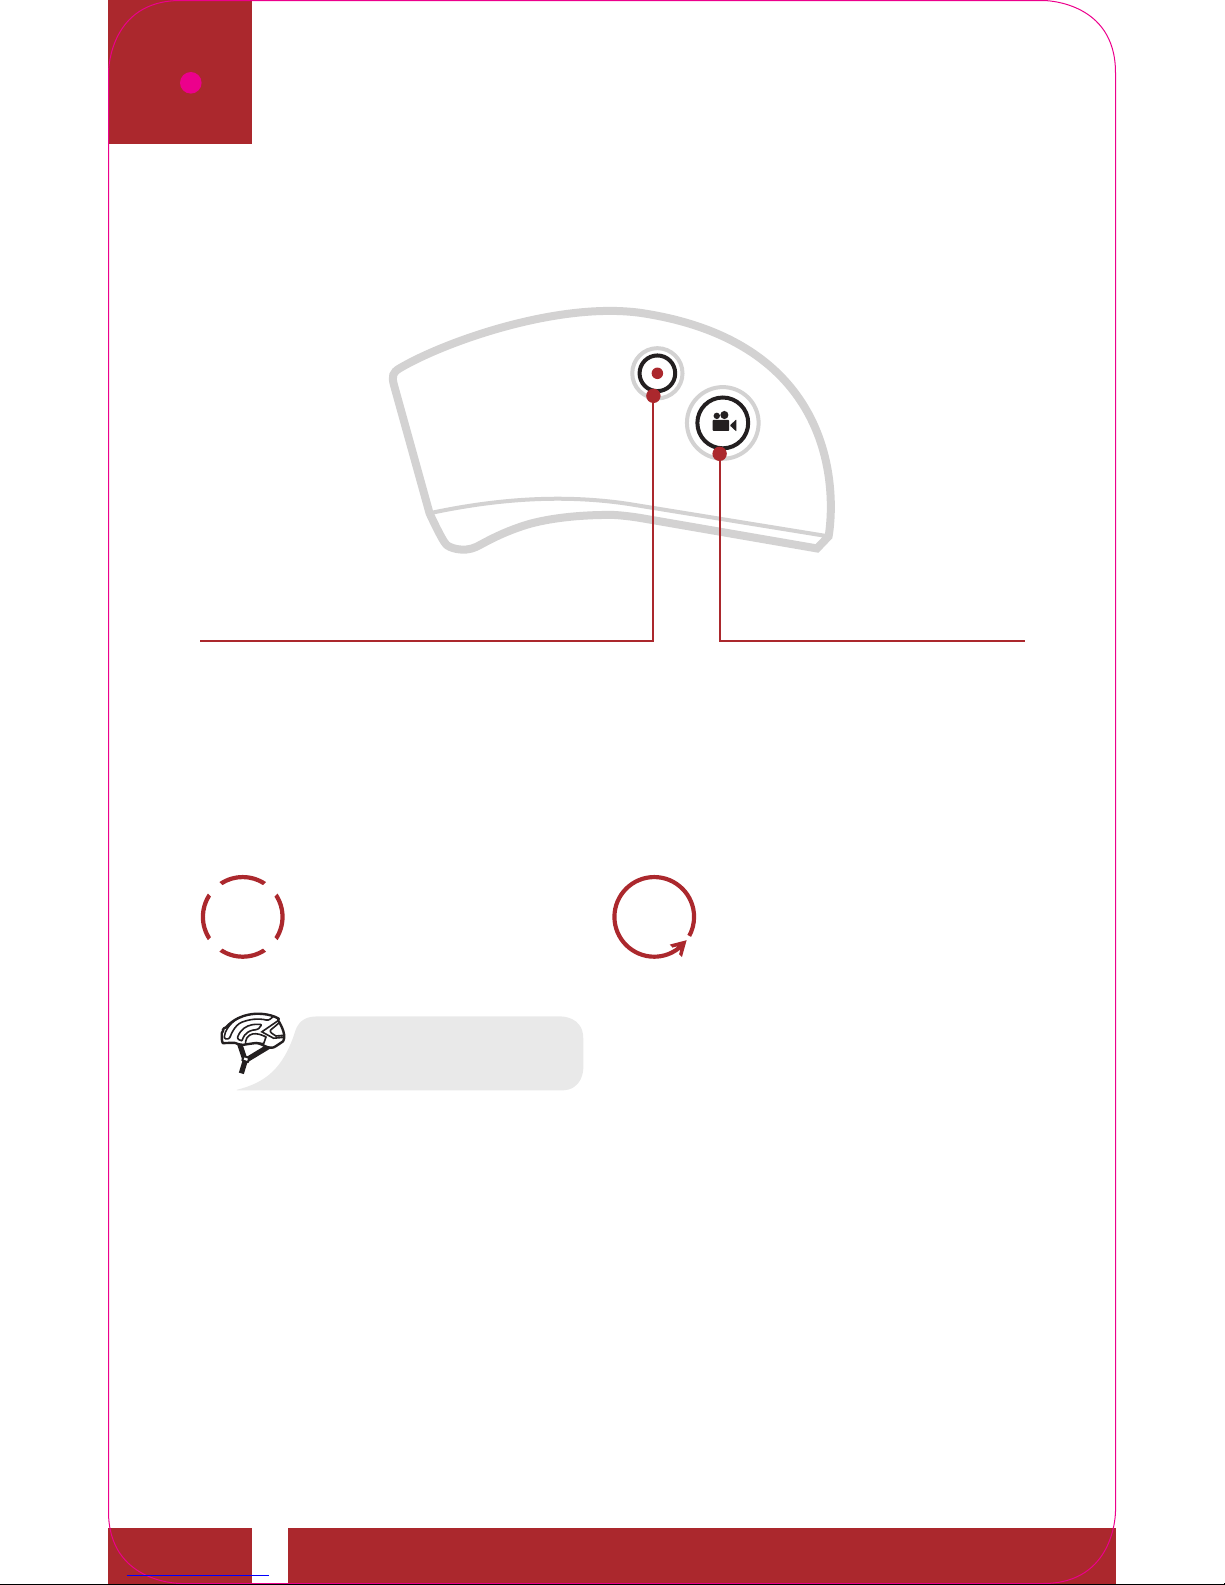
Right Side
Camera Button
Multi-Function Button
Tap button the
specifi ed number
of times
Icon Legend
Press and Hold button
for the specifi ed amount
of time
Audible prompt from
the Bluetooth Module
10 s
HOLD
1x
TAP
“Hello”
Page 6
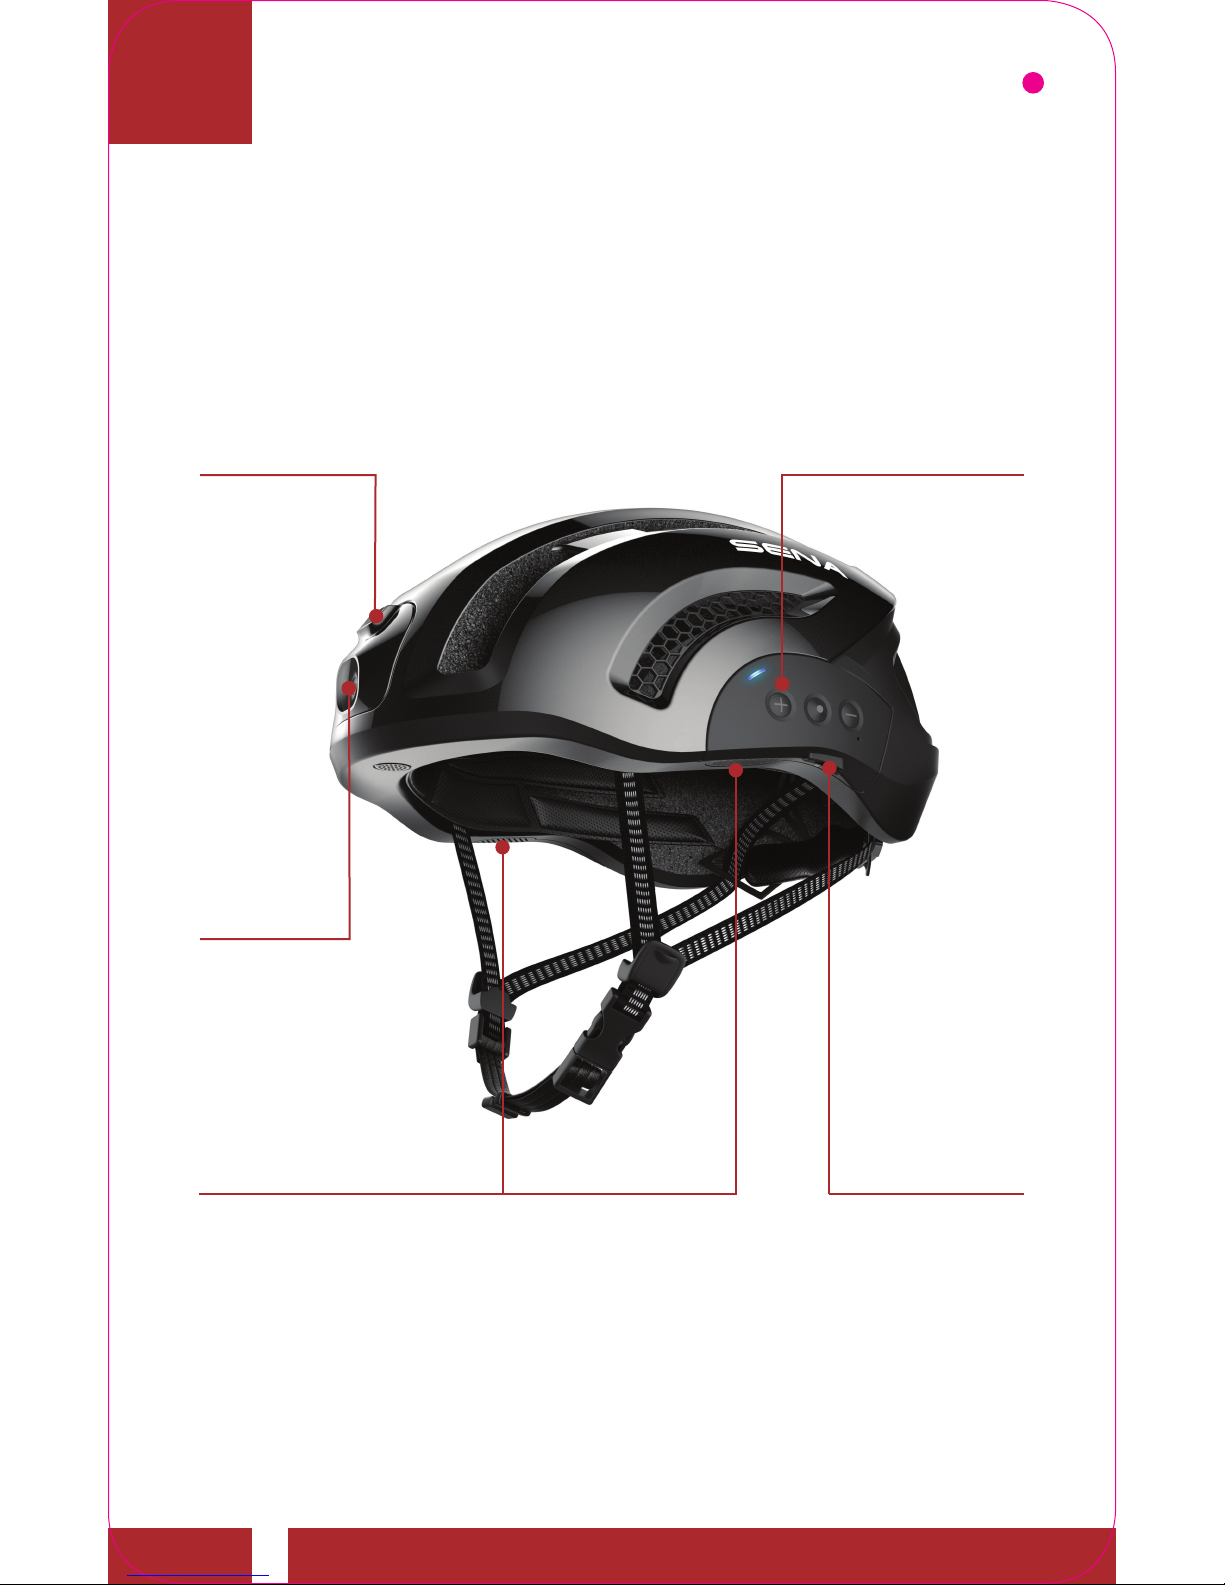
Helmet Structure
Left Side
Bluetooth
Buttons
DC Power
Charging &
Firmware
Upgrade
Port
Speakers
QHD
Action
Camera
MicroSD
Card Slot
QUICK START GUIDE
Page 7
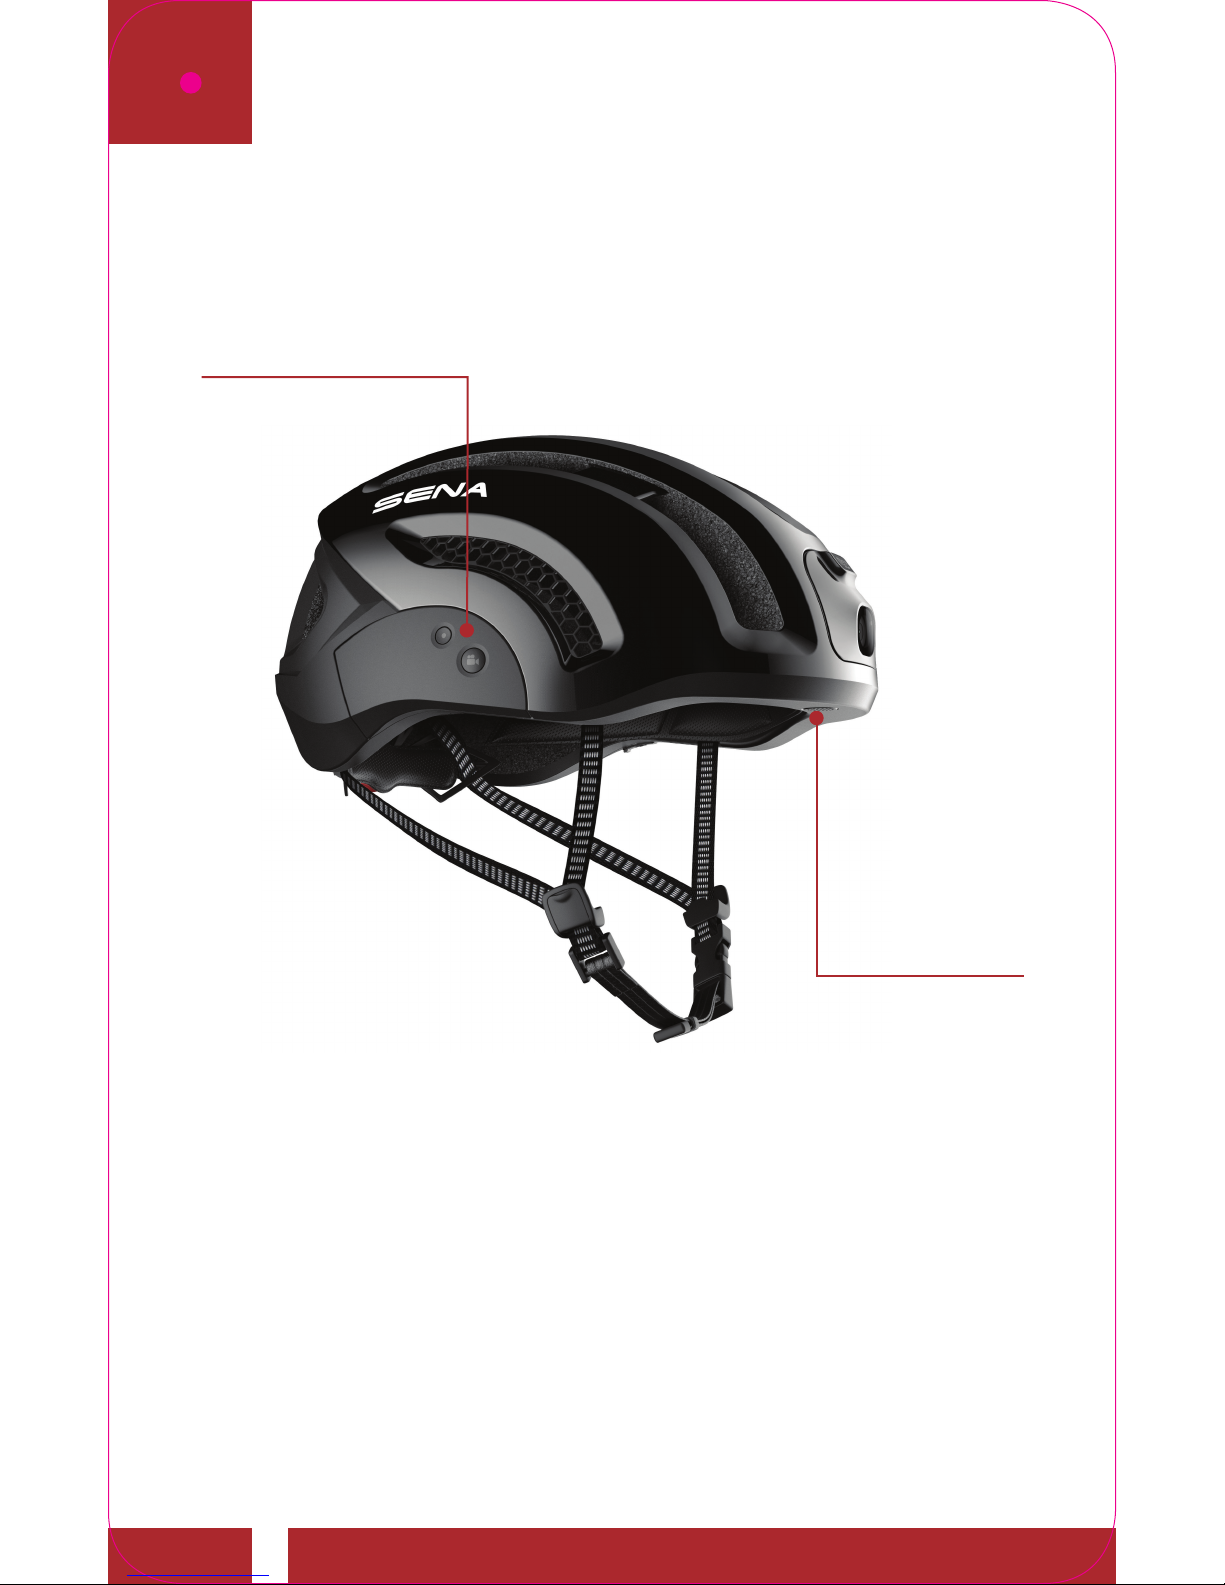
Right Side
Camera Control
Buttons
Microphone
QUICK START GUIDE
Page 8
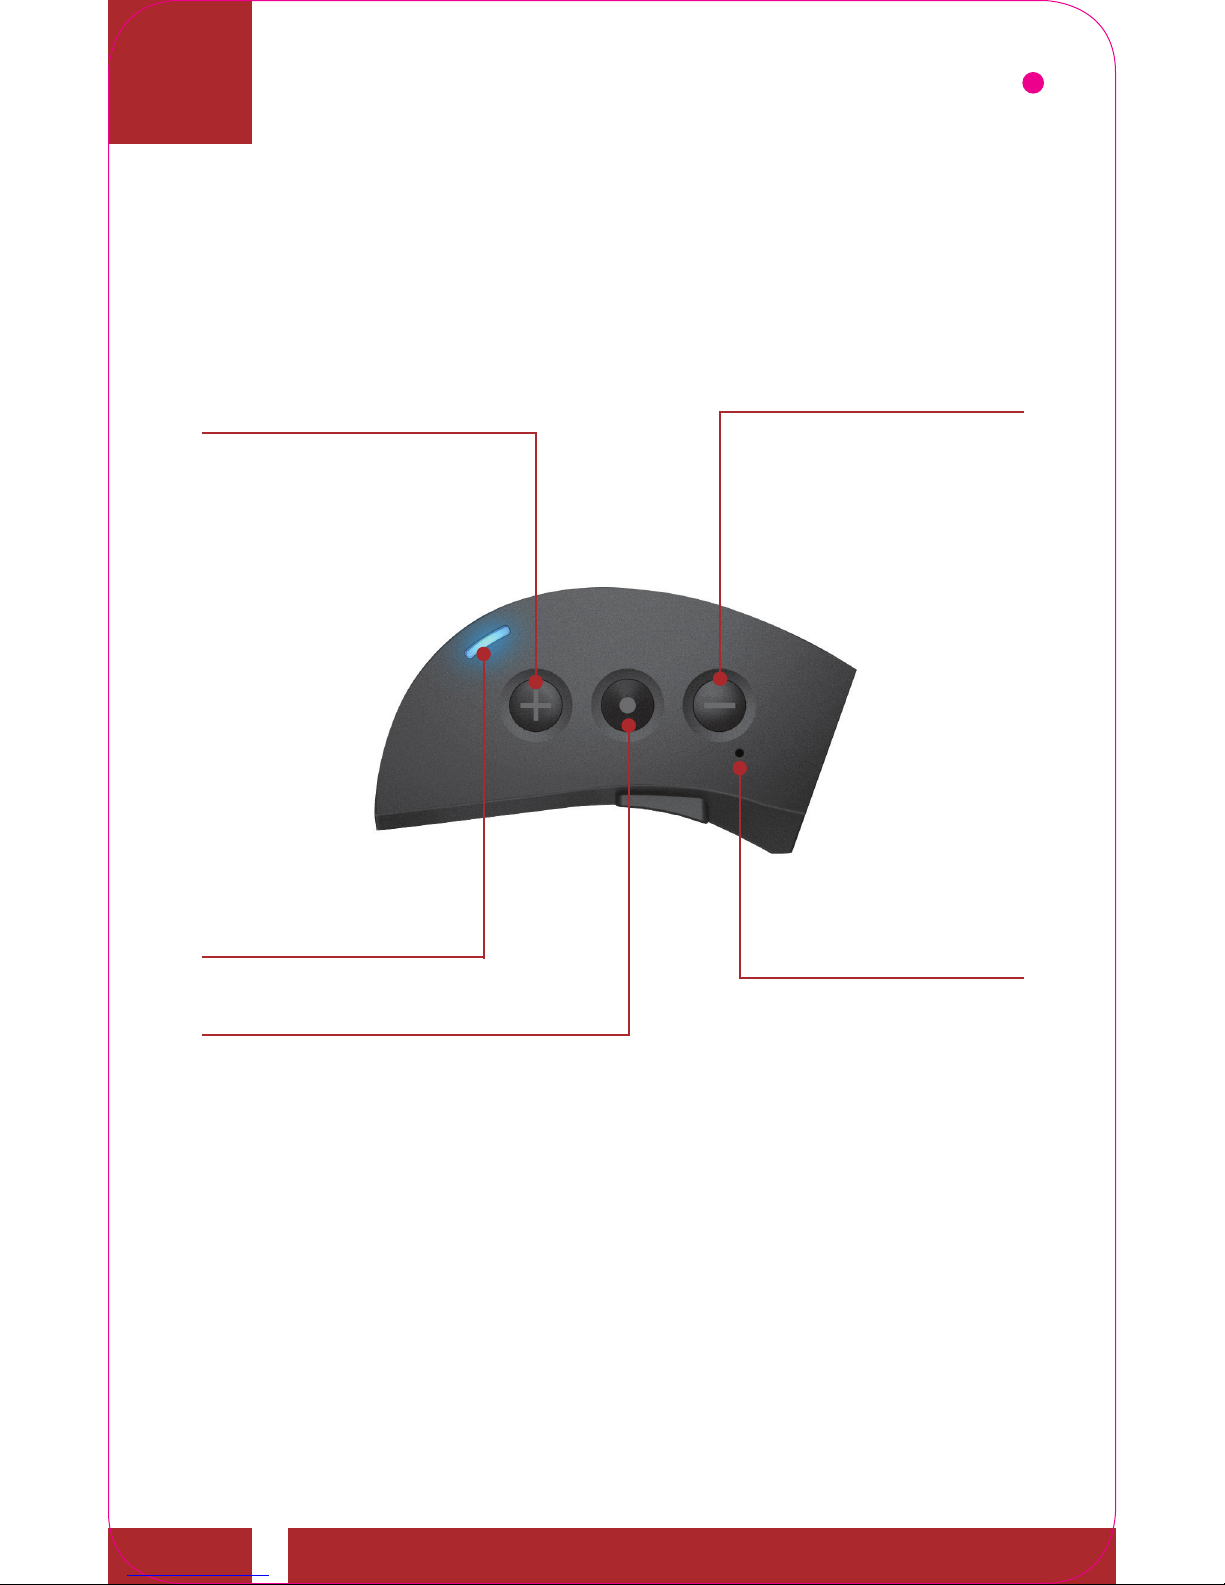
Basic Operation
Left Side
Answer/End Phone Call
Reject an Incoming Phone Call
Start/End Intercom Conversation
Play/Pause Music
Enter Intercom Pairing Mode
Enter Voice Confi guration Settings
(+) Button
(-) Button
Center Button
Increase Volume
Track Forward
Scan Radio Stations
Speed Dial
Decrease Volume
Track Back
FM Radio On/Off
Fault Reset
Button
Blue/Red/Green
LED Lights
QUICK START GUIDE
Page 9
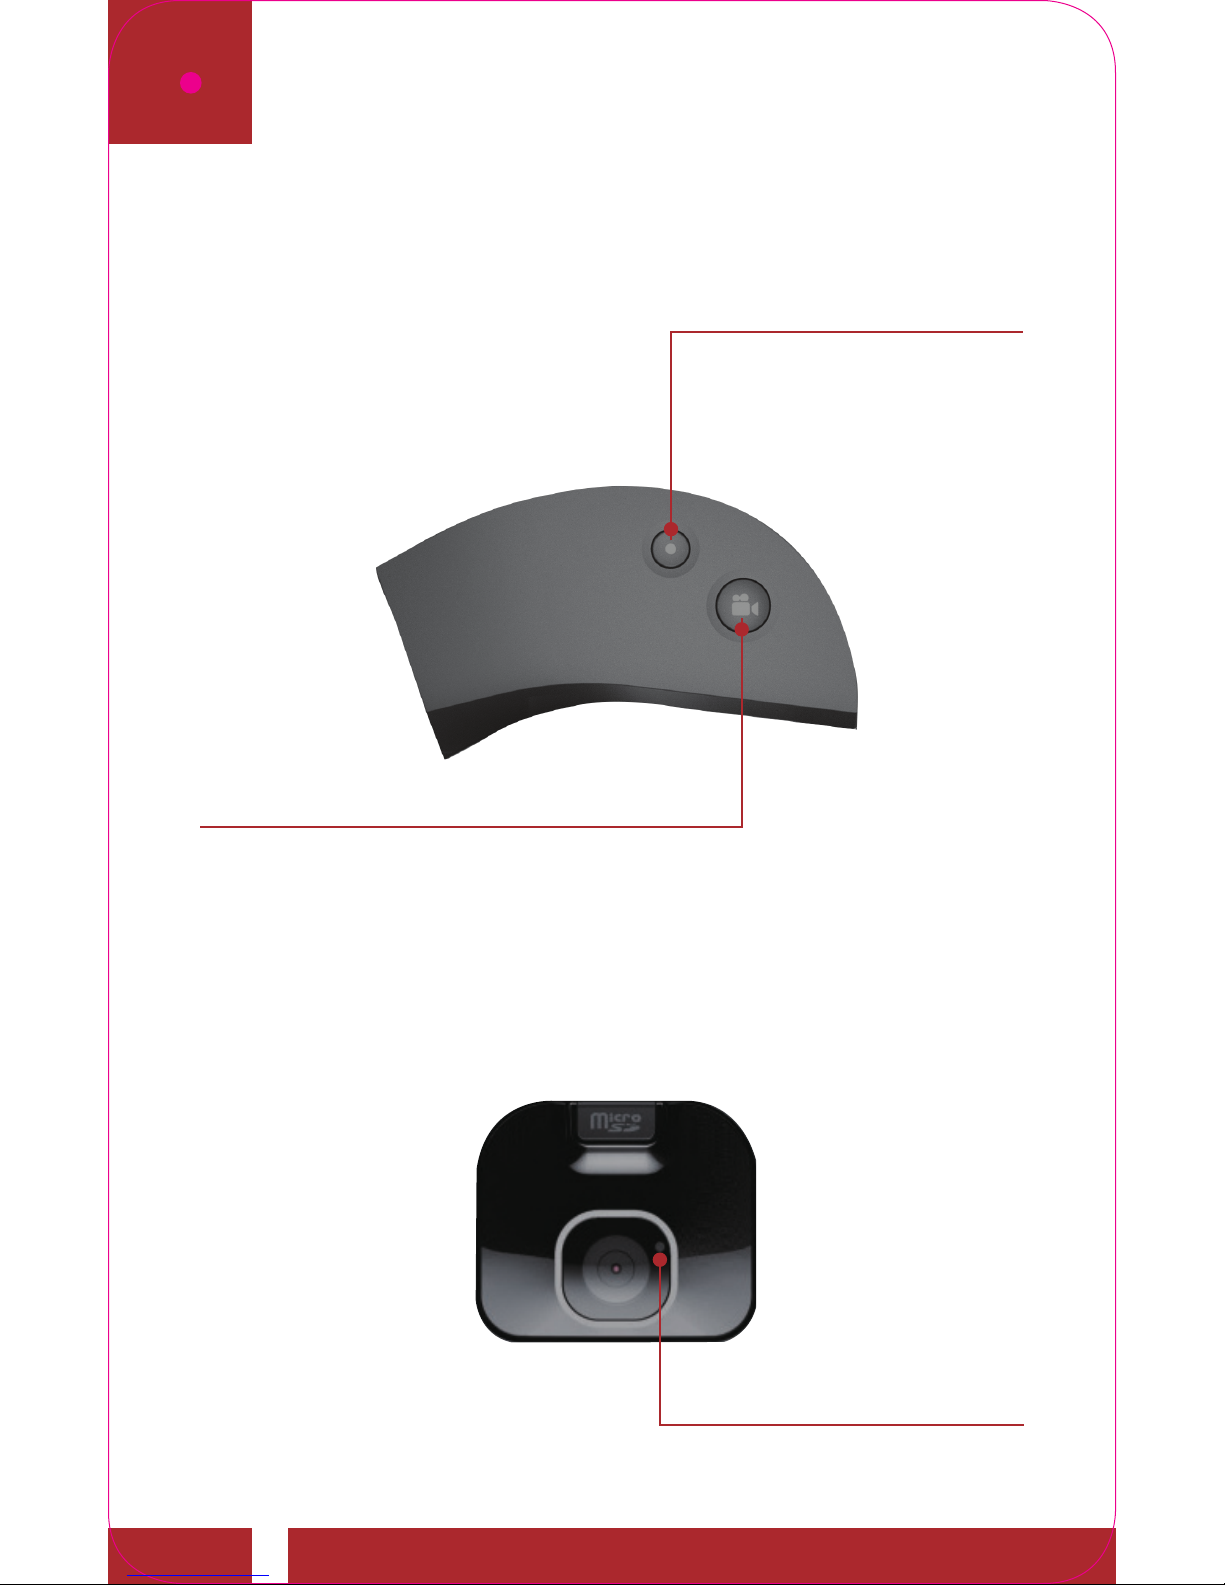
Right Side
Camera Power On/Off
Start/Stop Recording
Multi-Function Button
Camera Button
WiFi Power On/Off
Enter Camera
Confi guration Settings
Front Side
Camera Power On/Off
Start/Stop Recording
Multi-Function Button
Camera Button
WiFi Power On/Off
Enter Camera
Confi guration Settings
Camera LED Lights
QUICK START GUIDE
Page 10
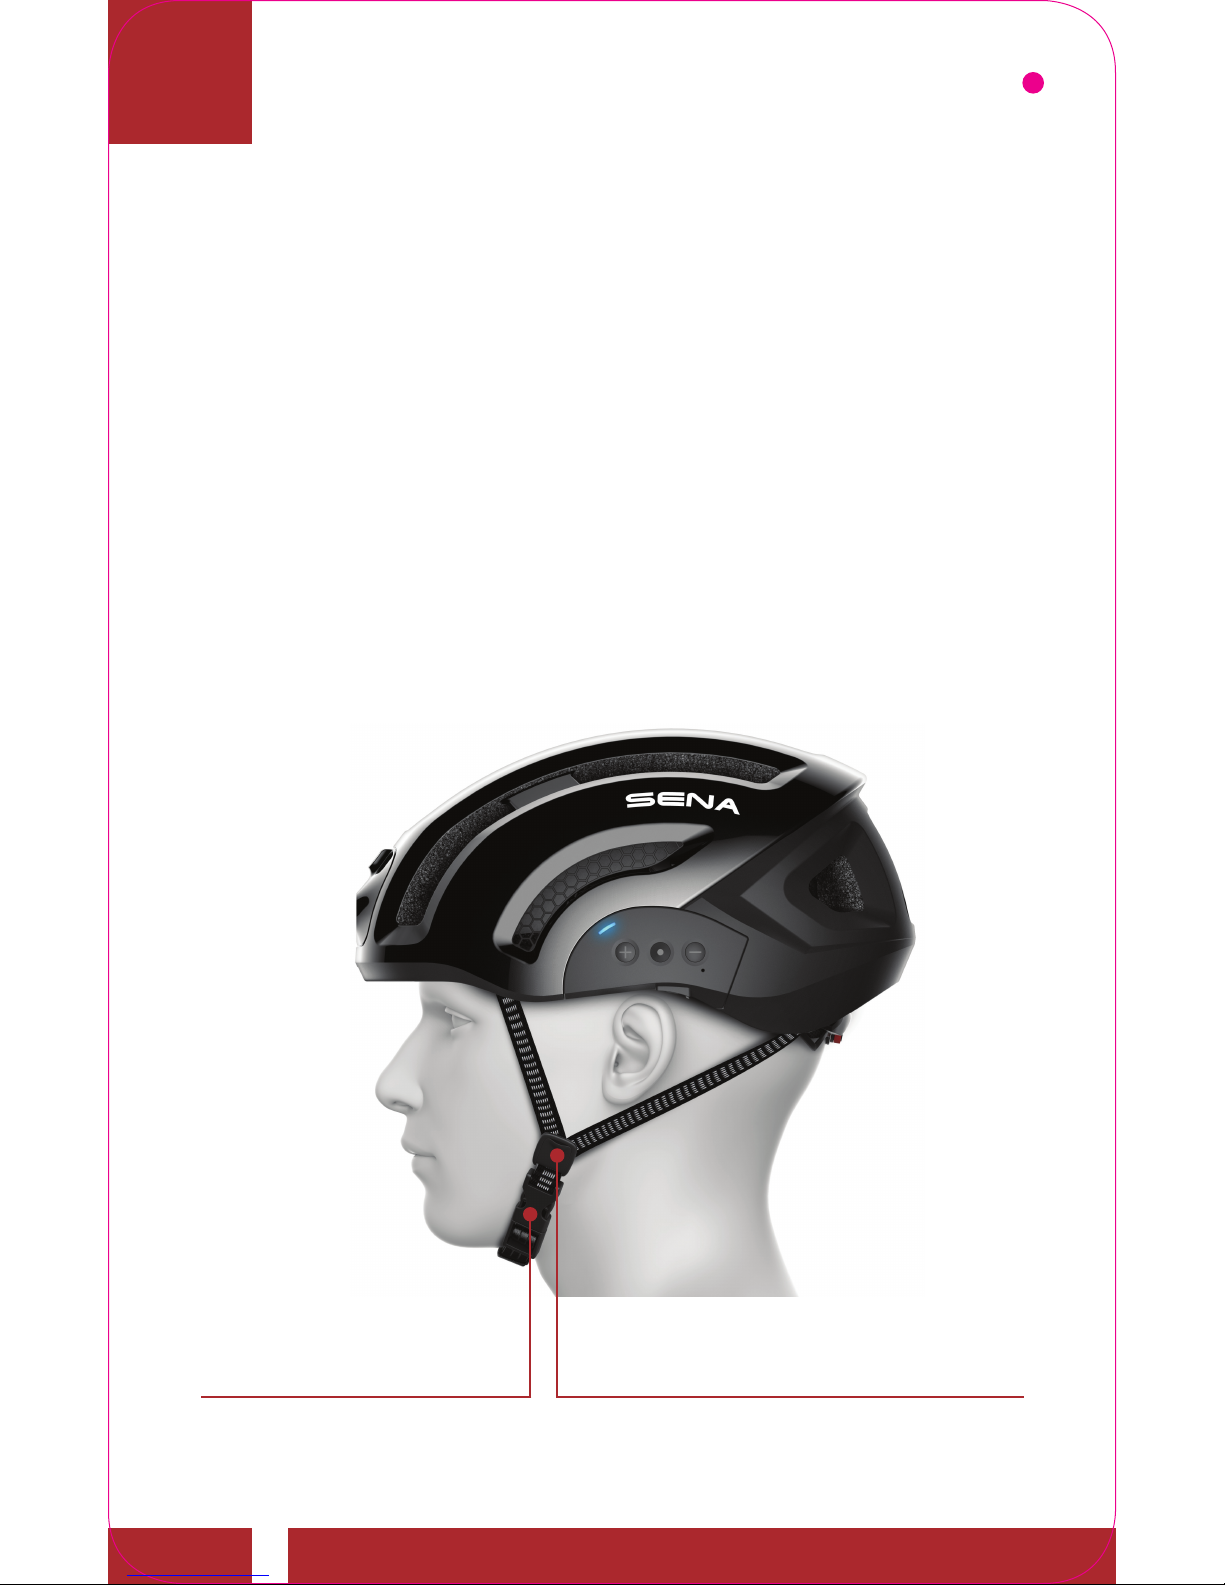
How To Fit the Helmet
1. Position the helmet on your head with the
front covering your forehead.
2. Position the strap adjuster centered, just
below your ears.
3. Position the helmet low on your forehead
with the buckle under the chin and back
against the throat. The straps should fit
comfortably around both ears.
Buckle
Strap Adjuster
QUICK START GUIDE
Page 11
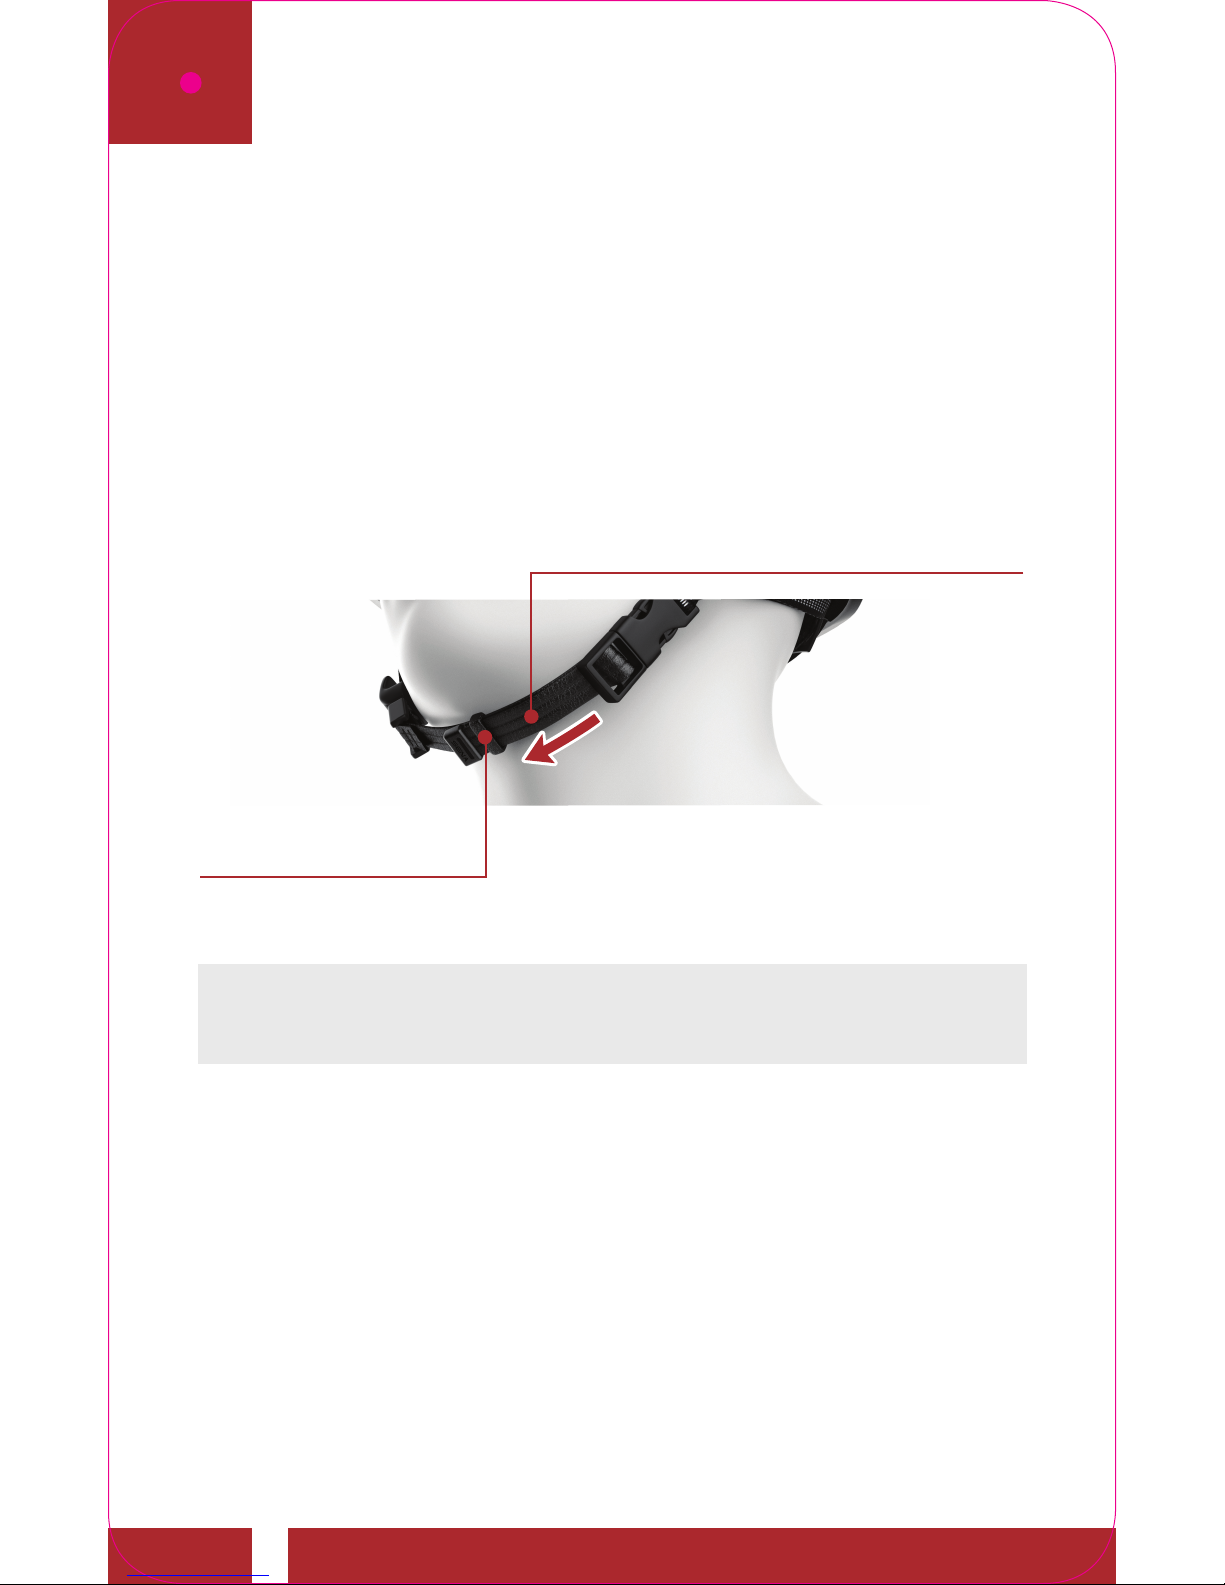
4. Adjust the chinstrap tension at the buckle
so the chinstrap is tight and comfortable
by pulling the chinstrap end through
the buckle to either tighten or loosen as
needed. Use the “O-Ring” to secure the
excess strap.
Chinstrap
O-Ring
Note: Check the chinstrap’s position and tension
regularly to ensure proper fit.
QUICK START GUIDE
Page 12
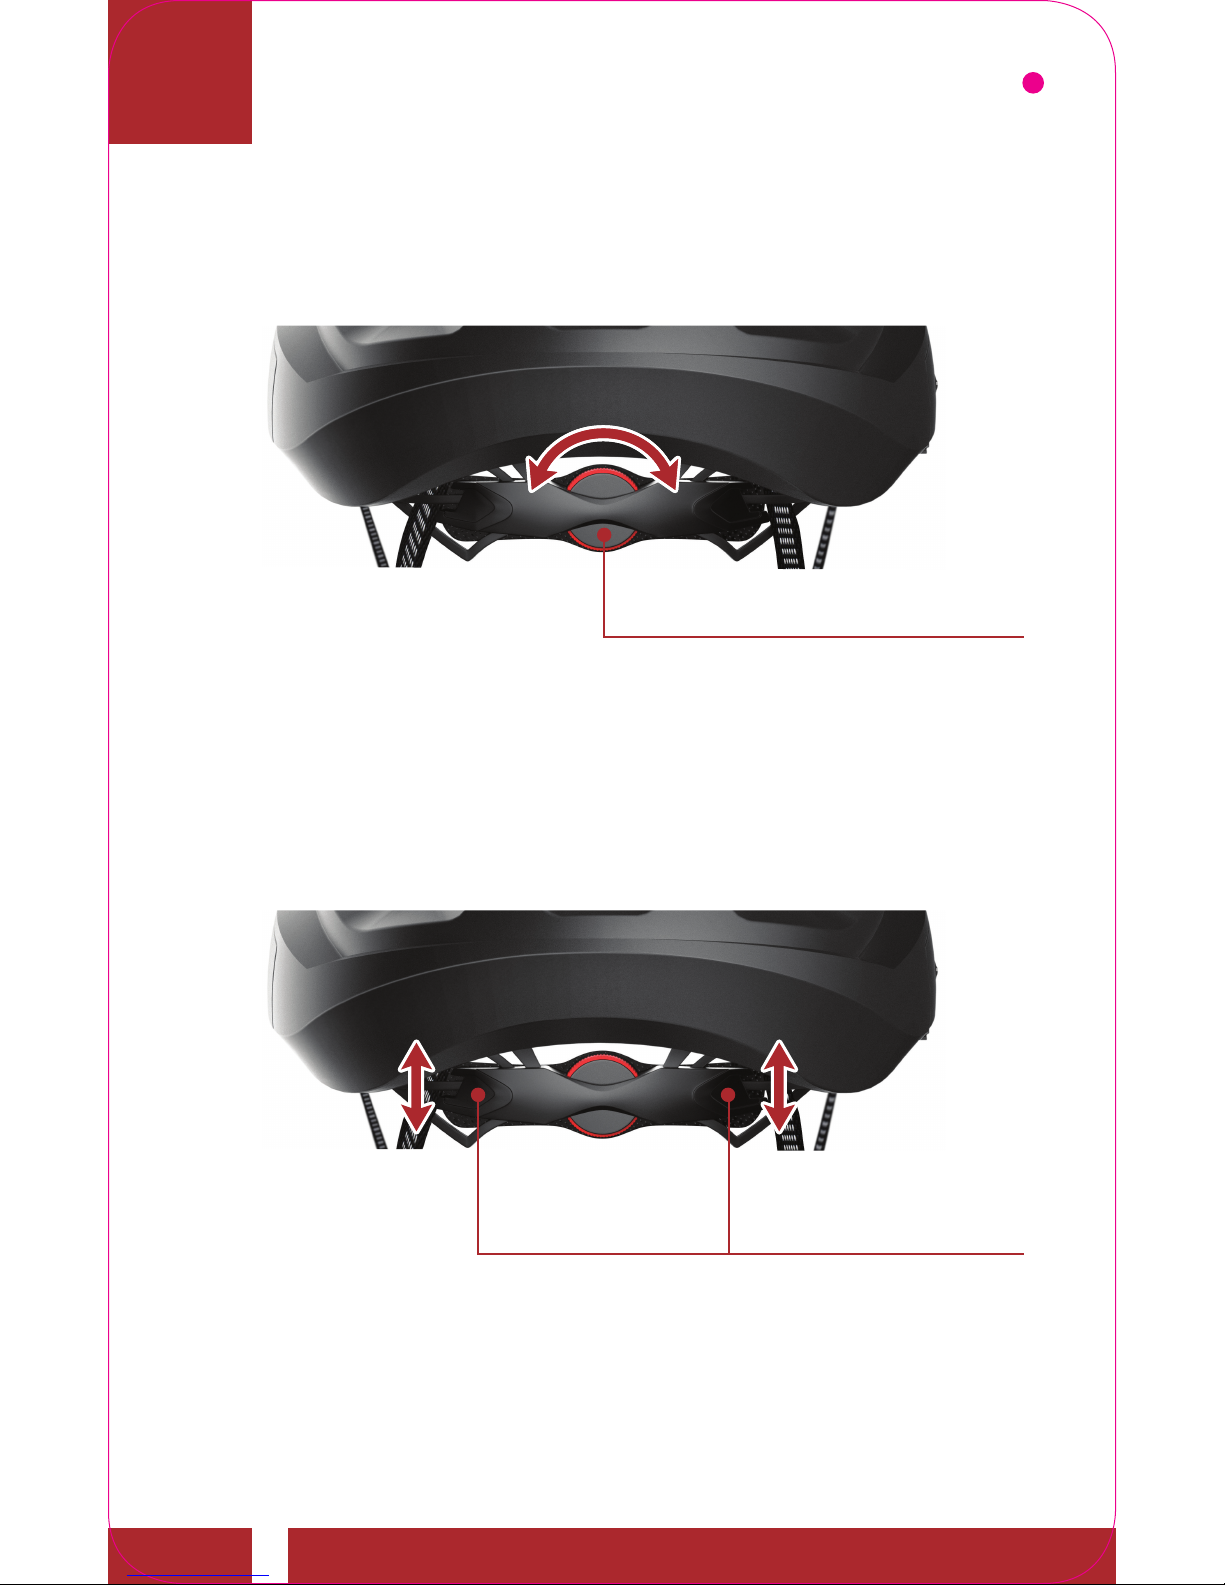
5. Turn the retention system knob clockwise
to tighten or counterclockwise to loosen.
Retention System Knob
6. To change the height of the retention
system, firmly pull or push the retention
system upward or downward to a different
position.
Retention System
QUICK START GUIDE
Page 13
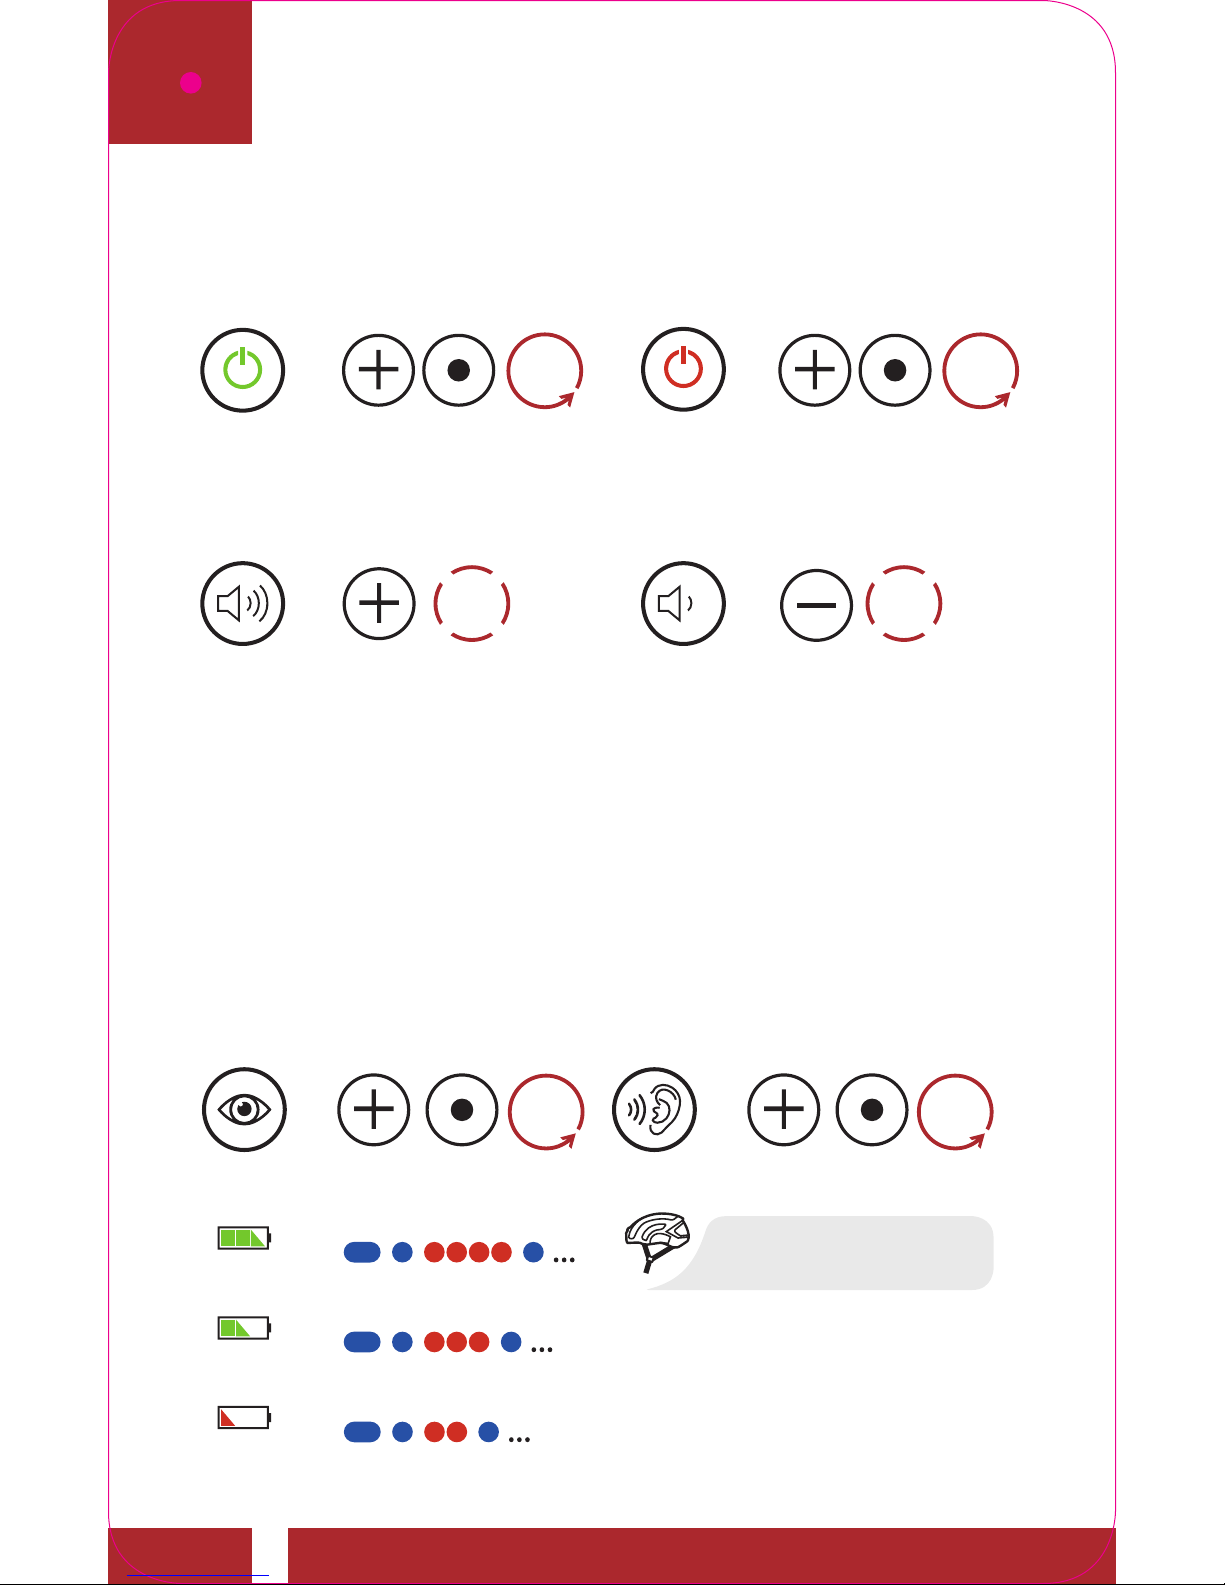
Basic Operations
Powering On Powering Off
=
=
POWER
ON
POWER
OFF
1s
HOLD
1x
TAP
Volume Up
Volume Down
= =
VOLUME
UP
VOLUME
DOWN
1x
TAP
1x
TAP
Checking the Battery Level
There are two ways to check the battery levels, visually
using the LED lights, and audibly. Instructions are for when
powering the Bluetooth Module on.
Visual Method Audible Method
= =
VISUAL
METHOD
AUDIBLE
METHOD
1s
HOLD
3s
HOLD
=
HIGH
=
MED
=
LOW
“Battery level
high/medium/low”
QUICK START GUIDE
Page 14
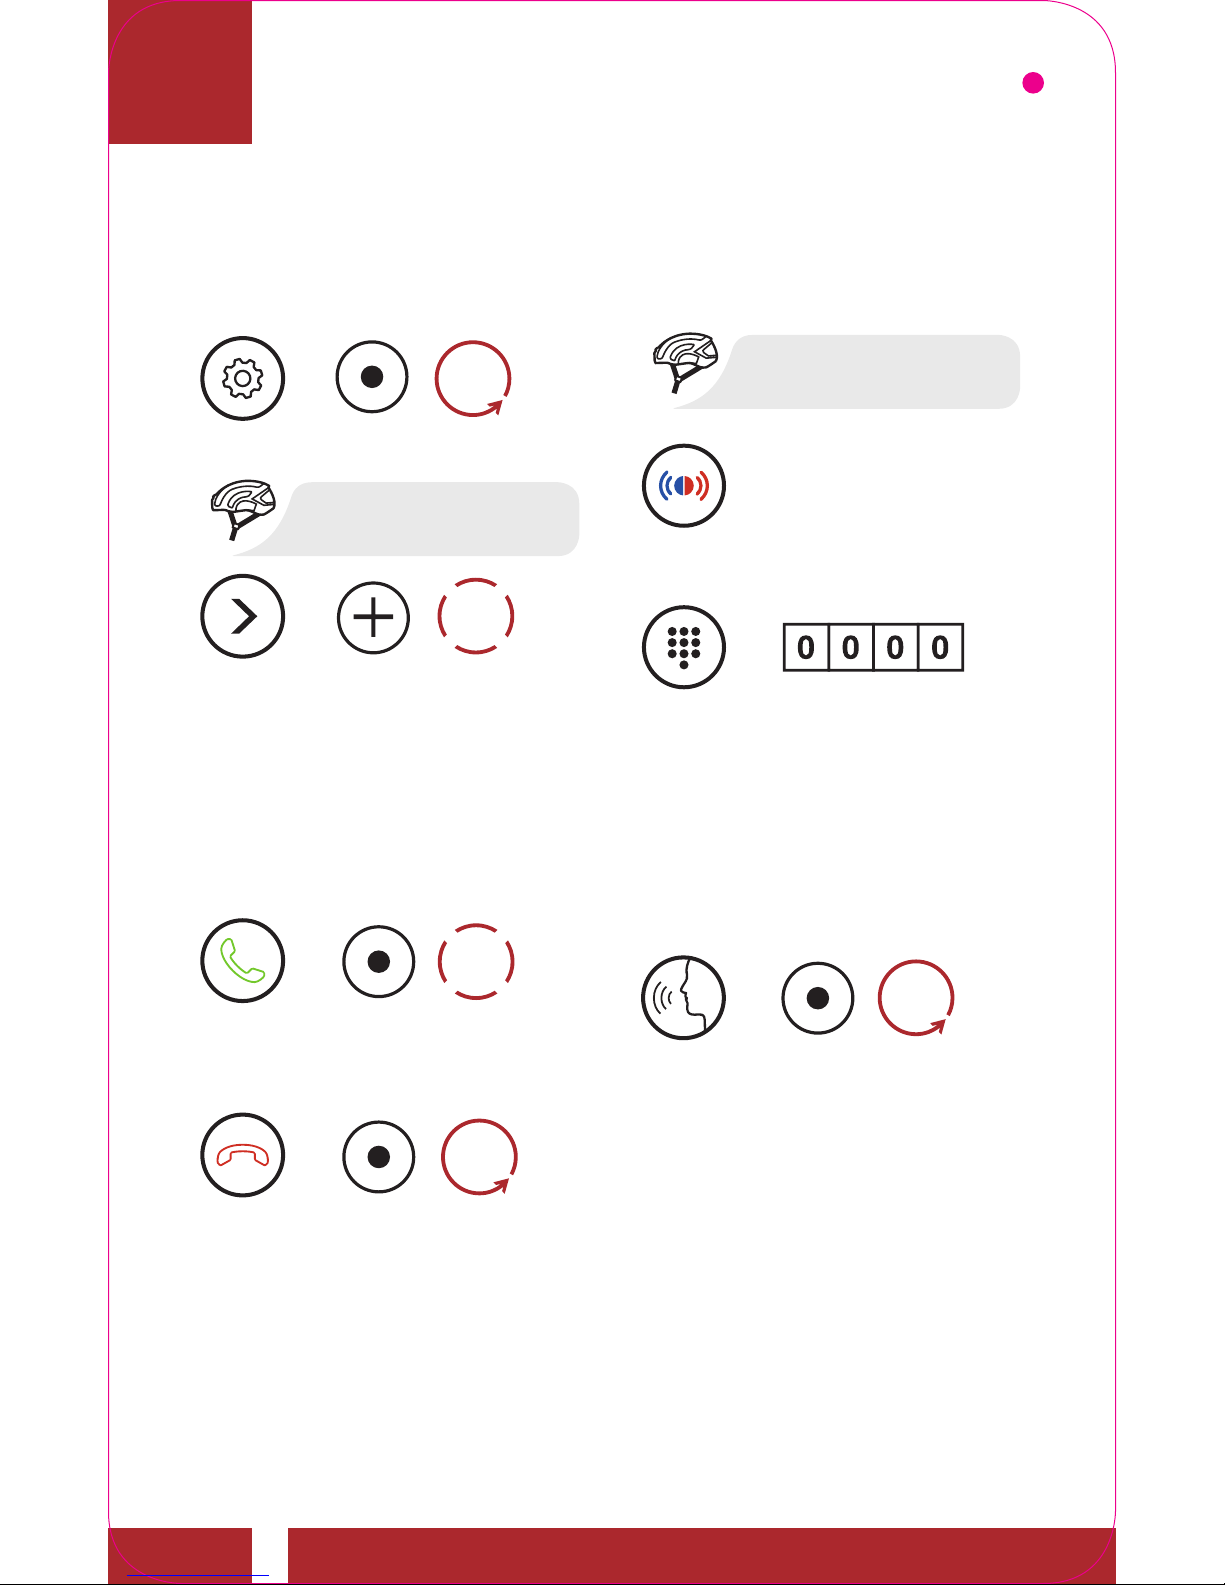
Mobile Phone Pairing Steps continued...
=
=
=
=
CONFIG.
MENU
NAVIGATE
FORWARD
1X
LED
STATUS
PIN
NUMBER
“Phone pairing”
“Confi guration menu”
Alternating blue
and red fl ashing
lights indicate
device is now
discoverable.
1x
TAP
10 s
HOLD
Bluetooth Pairing
(Phone, MP3, GPS)
Answer a Call
End/Reject a Call
ANSWER
END/
REJECT
=
1x
TAP
=
2s
HOLD
Make Call with
Voice Dialer
VOICE
DIAL
=
3s
HOLD
Mobile Phone
QUICK START GUIDE
Page 15
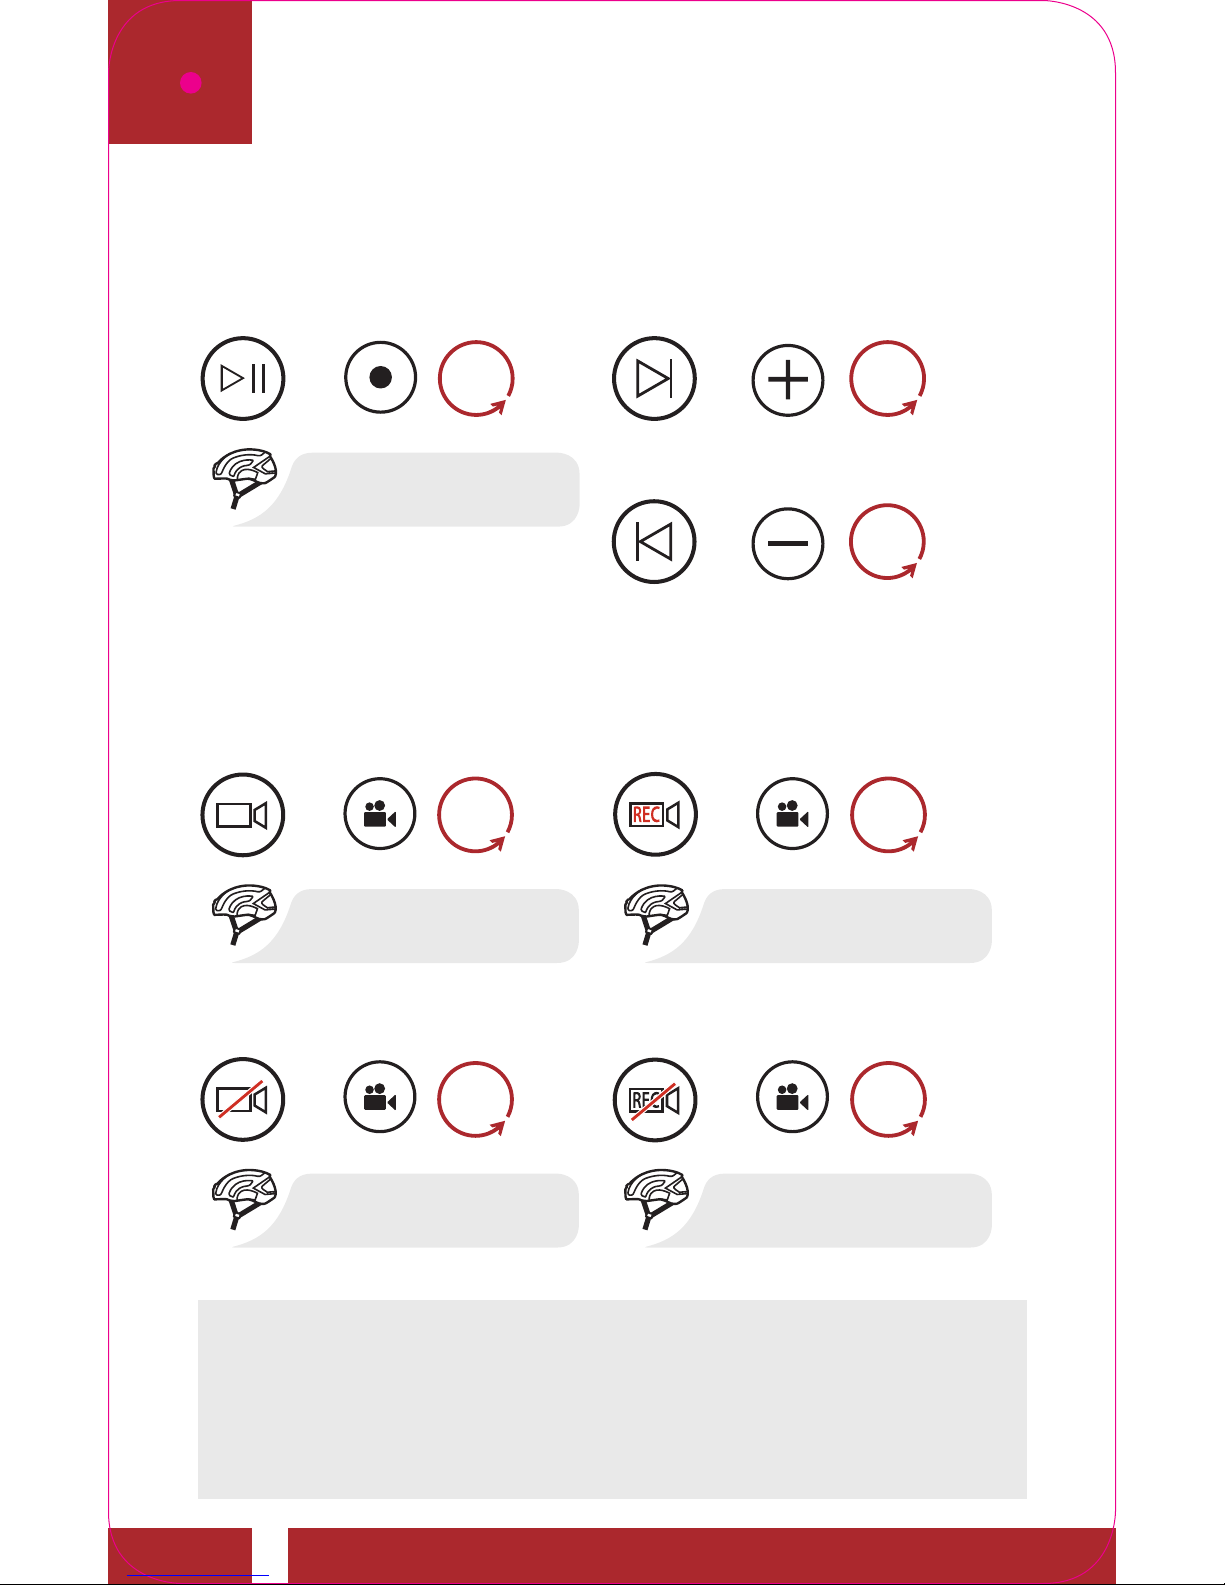
Music Controls
Play/Pause Next Track
Previous Track
= =
=
“[Beep, Beep]”
1s
HOLD
1s
HOLD
1s
HOLD
Camera Controls
Camera On Start Recording
Camera Off
Stop Recording
= =
= =
“[Camera On]” “[Recording]”
“[Camera Off]” “[Recording stopped]”
1s 1s
3s 1s
HOLD HOLD
HOLD HOLD
Note:
• You cannot record videos without a microSD card.
• Your SD card needs to be formatted using the X1 Pro
before using the camera.
QUICK START GUIDE
Page 16
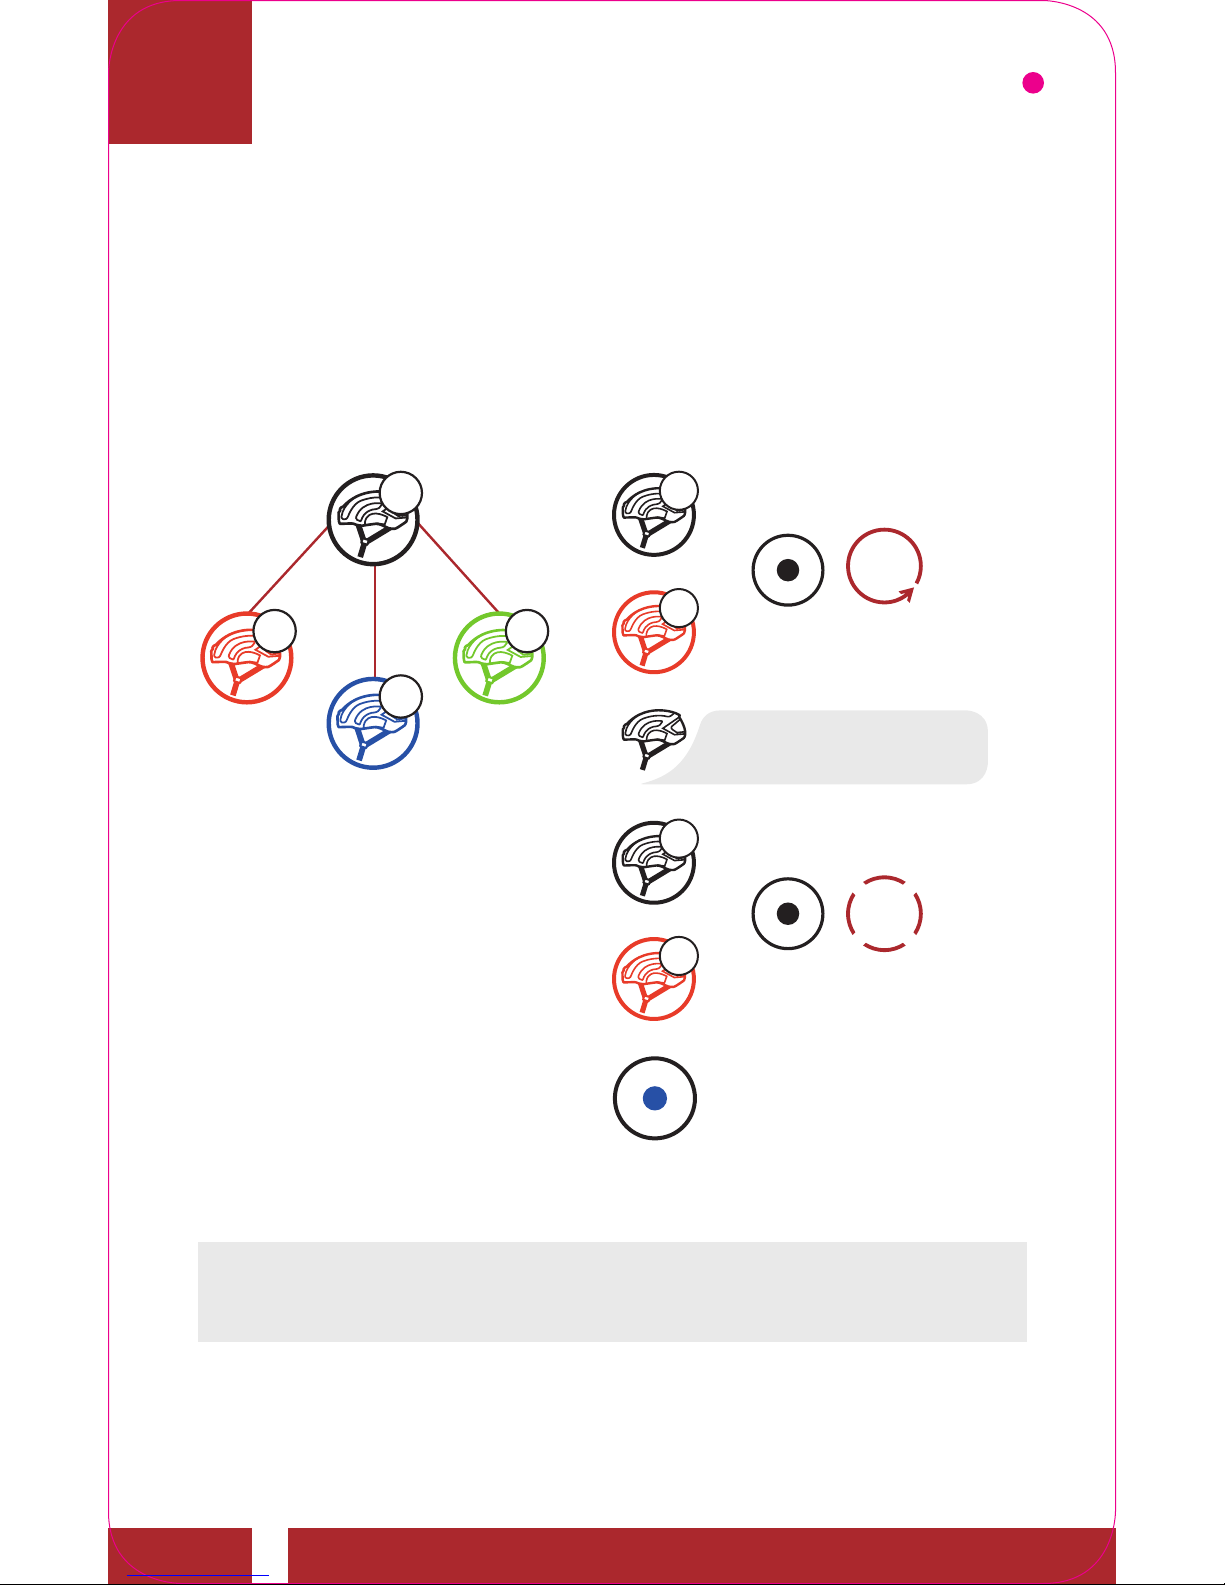
Intercom Pairing
Up to three people can communicate via intercom with
the X1 Pro Smart Cycling Helmet simply by pairing their
headsets.
Pairing with Intercom BIntercom Pairing
and
or
D
=
5s
HOLD
=
“Intercom pairing”
1x
TAP
=
LED
STATUS
Flashing blue LED
confi rms intercoms
are paired.
B
A
B
B
A
A
C
Note: Repeat the following steps to pair with Intercom
Friends C & D.
QUICK START GUIDE
Page 17
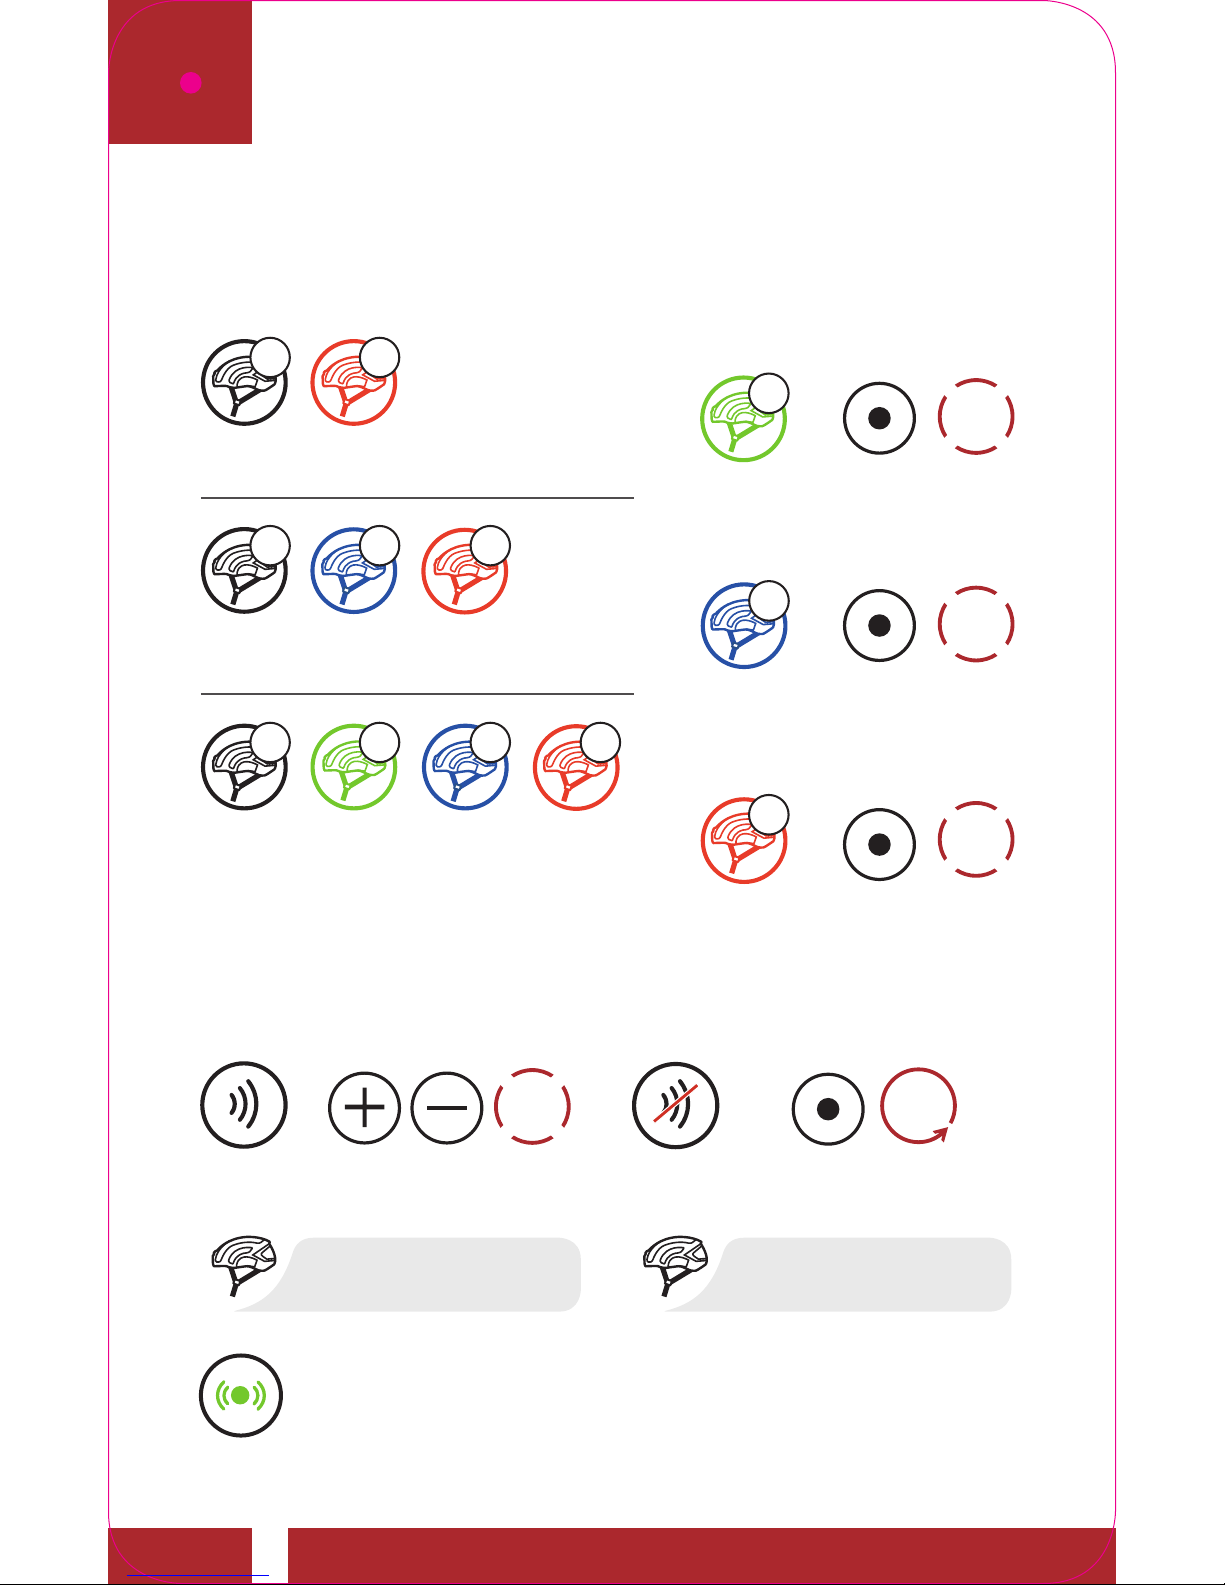
Two-Way Intercom
D
C
B
Start/End with
Intercom Friend 1
Start/End with
Intercom Friend 3
Start/End with
Intercom Friend 2
Last-Come, First-Served
Intercom
Friend 1
Intercom
Friend 1
YOU
YOU
YOU
Intercom
Friend 1
Intercom
Friend 2
Intercom
Friend 2
Intercom
Friend 3
A D
C
C
B
B
=
1x
TAP
=
2x
TAP
=
3x
TAP
A B
A
Group Intercom
Start Group Intercom End Group Intercom
END
GROUP
INTERCOM
START
GROUP
INTERCOM
=
1x
TAP
=
LED
STATUS
Green LED Flashing
“Group intercom”
“Group intercom
terminated”
=
1s
HOLD
QUICK START GUIDE
Page 18
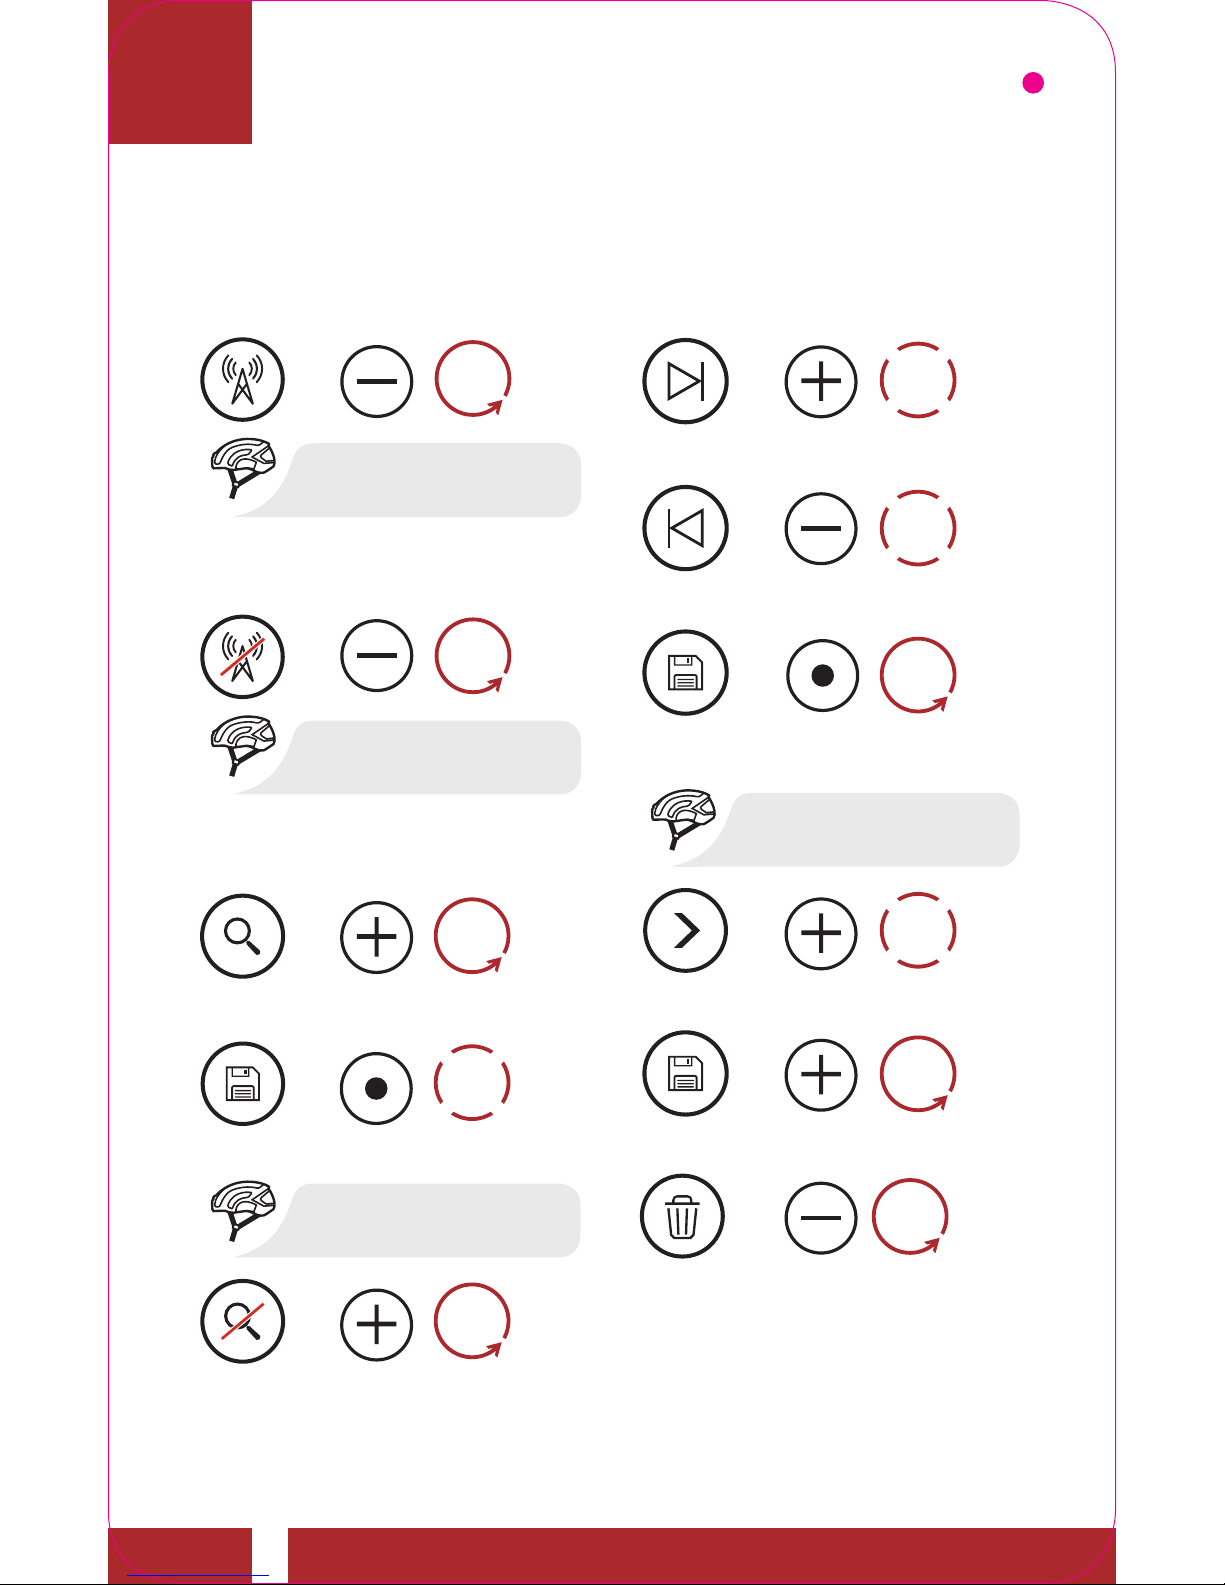
Radio
FM Radio On
FM Radio Off
=
=
1s
HOLD
1s
HOLD
“[Beep, Beep]”
“[Beep, Beep]”
Scan and Save Stations
START
SCANNING
=
1x
TAP
1s
HOLD
STOP
SCANNING
=
1s
HOLD
SAVE
STATION
=
“Preset (#)”
Seek and Save Stations
SEEK
FORWARD
SEEK
BACKWARD
=
=
ENTER
PRESET
MODE
=
3s
HOLD
“Preset (#)”
CHOOSE
PRESET #
=
1x
TAP
1s
HOLD
SAVE TO
PRESET #
=
DELETE
STATION
1s
HOLD
=
2x
TAP
2x
TAP
QUICK START GUIDE
Page 19
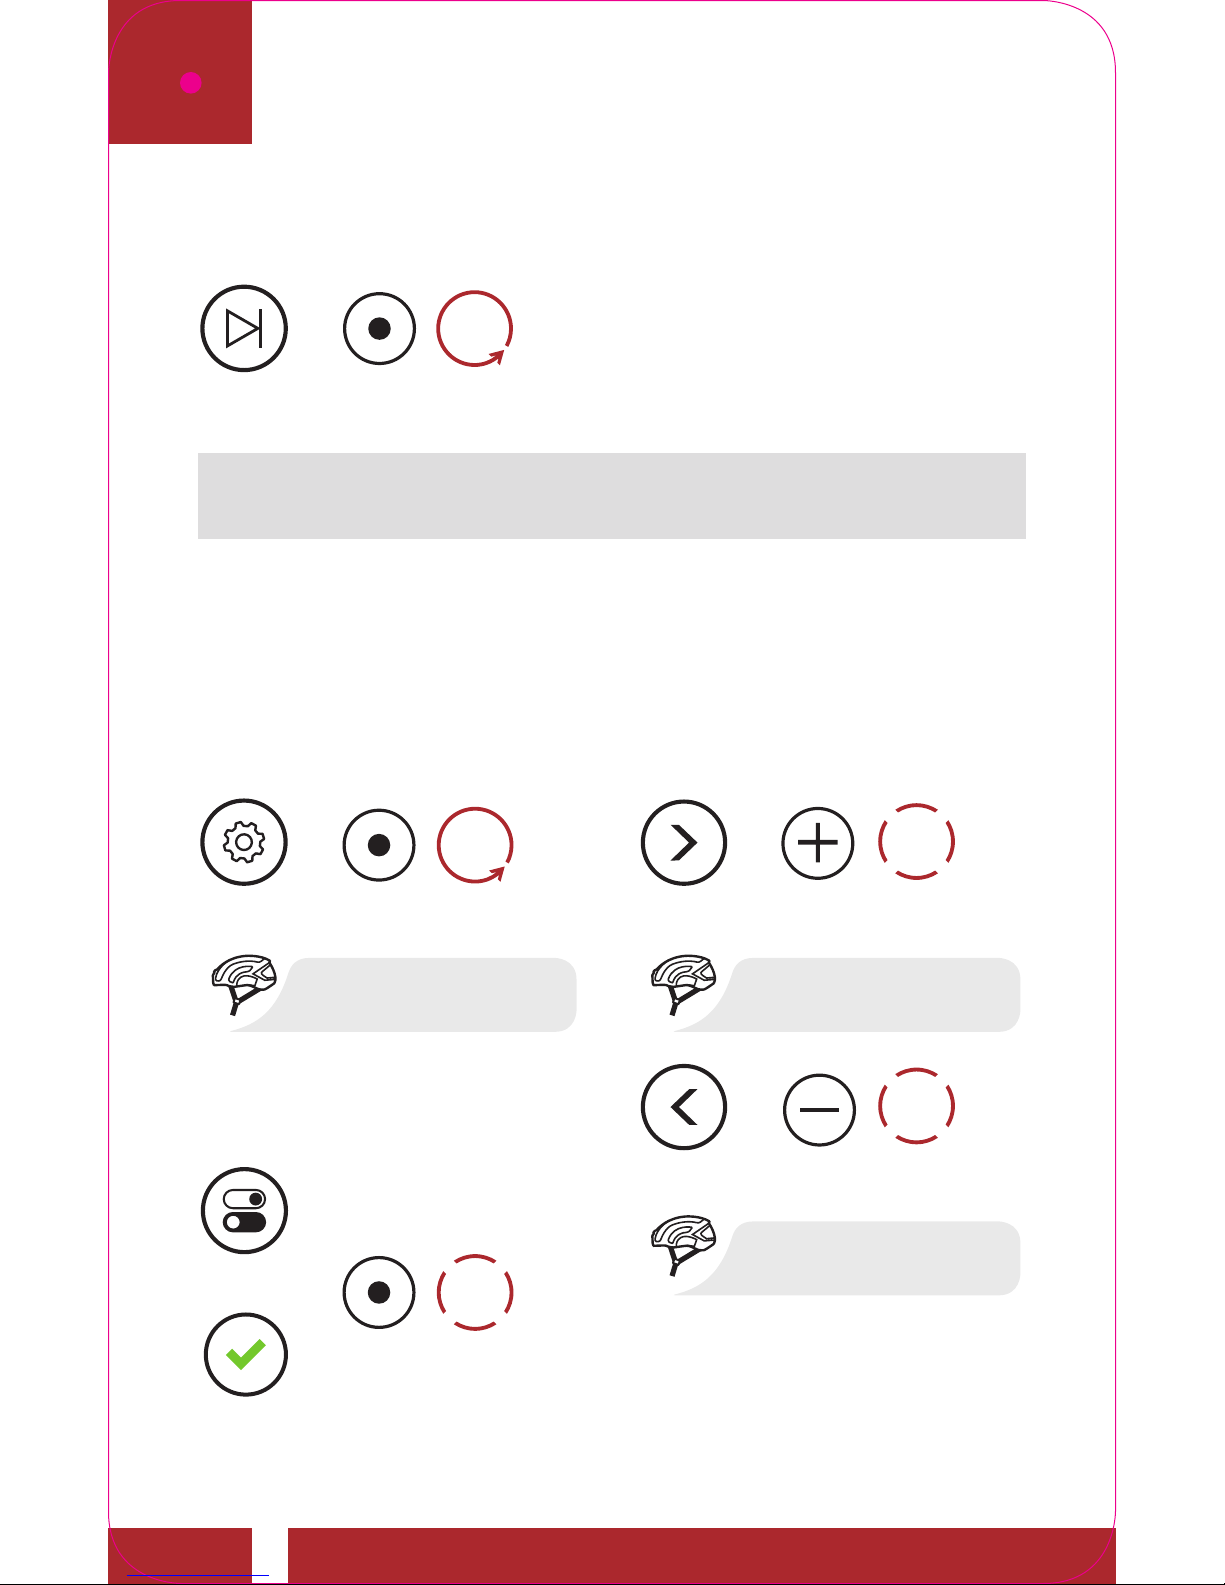
Navigating Preset Stations
=
1s
HOLD
NAVIGATE
FORWARD
Note: You can also use the Sena Device Manager or
the Sena Smartphone App to save the preset stations.
Headset Configuration Menu
Accessing the
Confi guration Menu
Enable/Disable or
Execute Menu Options
Navigating Between
Menu Options
ENABLE/
DISABLE
=
=
10s
HOLD
“Confi guration menu” “[Menu prompt]”
“[Menu prompt]”
NAVIGATE
FORWARD
CONFIG.
MENU
NAVIGATE
BACKWARD
=
1x
TAP
=
1x
TAP
1x
TAP
EXECUTE
QUICK START GUIDE
Page 20
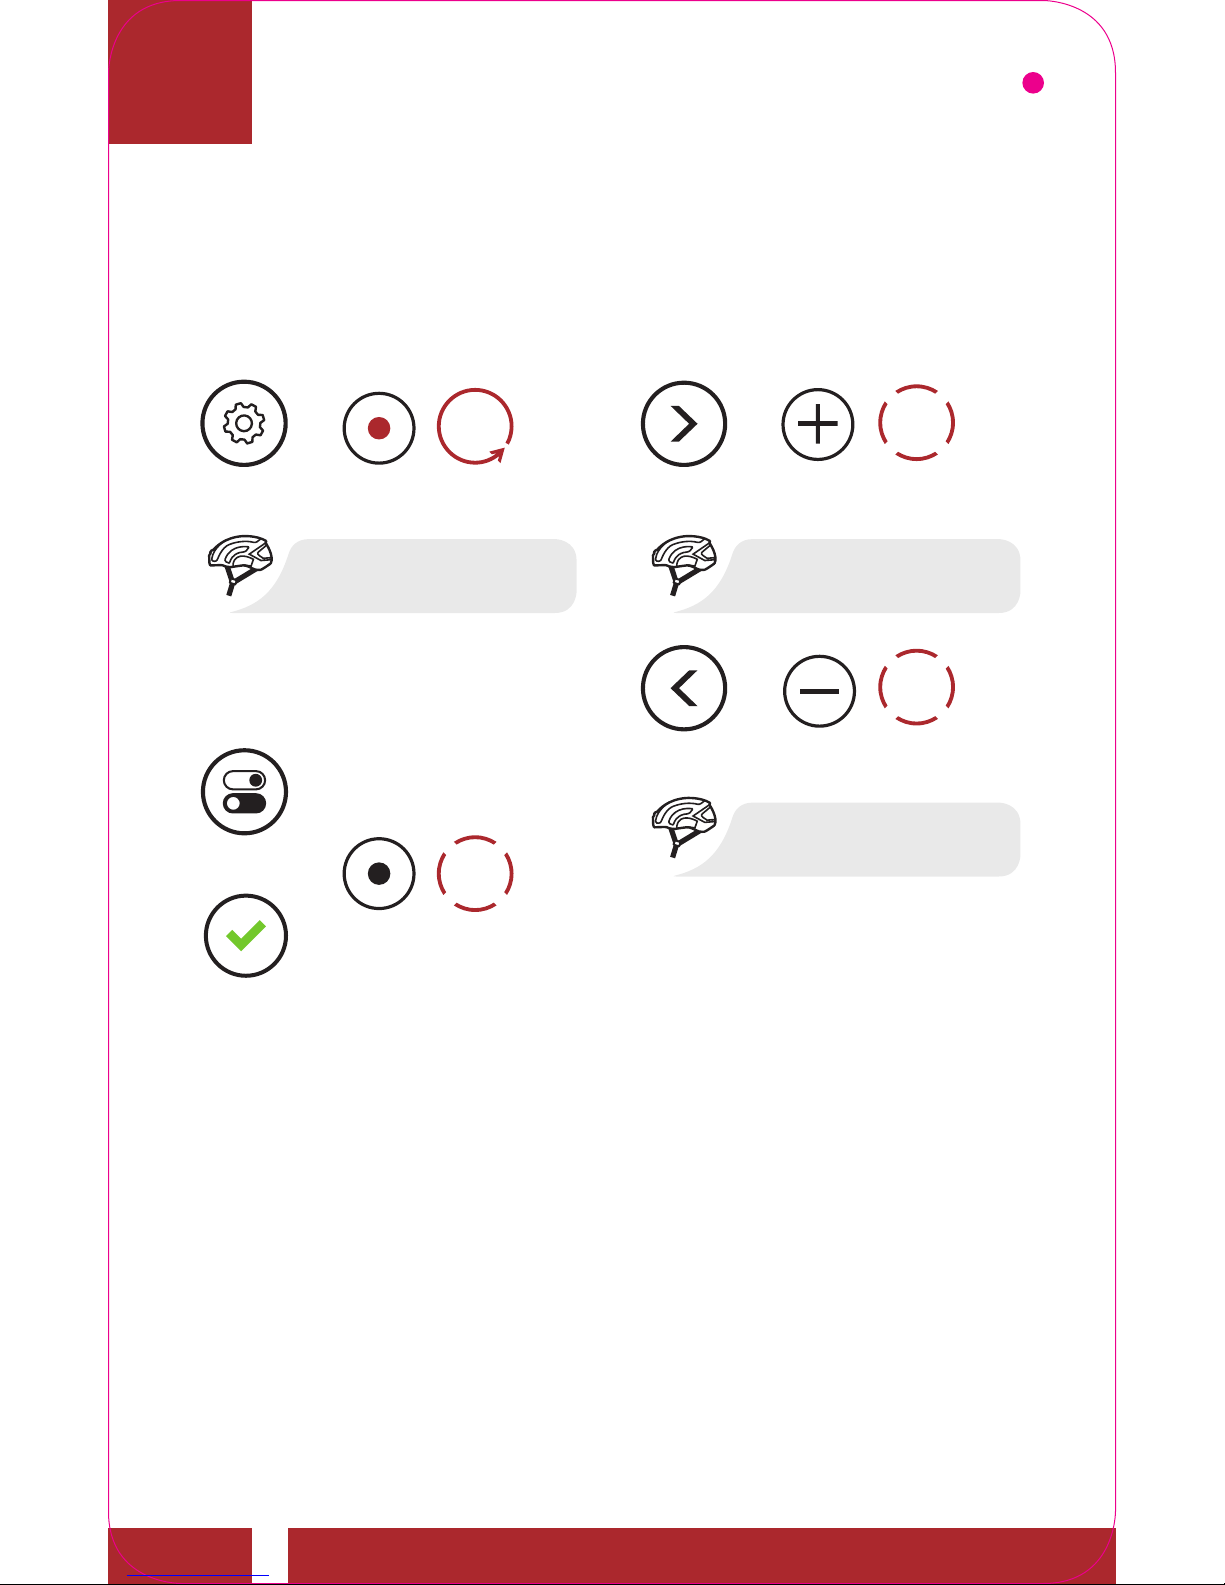
Camera Configuration Menu
Accessing the Camera
Confi guration Menu
Enable / Disable or
Execute Menu Options
Navigating Between
Menu Options
ENABLE/
DISABLE
=
=
3s
HOLD
“Camera Setup” “[Menu prompt]”
“[Menu prompt]”
NAVIGATE
FORWARD
CAMERA
CONFIG.
MENU
NAVIGATE
BACKWARD
=
1x
TAP
=
1x
TAP
1x
TAP
EXECUTE
QUICK START GUIDE
Page 21
Sena Device Manager
The Sena Device Manager allows you to upgrade the
Bluetooth Communication Module’s firmware and
configure its settings directly from your PC or Apple
computer. Using this software, you can assign speed dial
presets, FM radio station presets and more. For more
information on downloading the Sena Device Manager,
please visit Sena.com.
Sena Smartphone App
The Sena Smartphone App allows you to configure the
Bluetooth Communication Module’s settings, as well as
access the User’s and Quick Start Guides. To do so, pair
your mobile phone with your X1 Pro Smart Cycling Helmet
by following the instructions in the “Bluetooth Pairing
(Phone, MP3, GPS)” section in this quick start guide. Run
the Sena Smartphone App and configure the settings
directly from your smartphone. You can download the
Sena Smartphone App for Android and Apple operating
systems from Sena.com/headset-app.
QUICK START GUIDE
Page 22
QUICK START GUIDE
Sena Camera App
The Sena Camera App allows you to see a live preview
from the camera, manage recorded videos as well as
configure the video settings using the built-in WiFi feature
on your X1 Pro Smart Cycling Helmet. To do so, connect
your mobile phone with the X1 Pro Smart Cycling Helmet
by following the instructions provided on the Sena
Camera App. You can download the Sena Camera App for
Android and Apple operating systems.
Page 23
QUICK START GUIDE
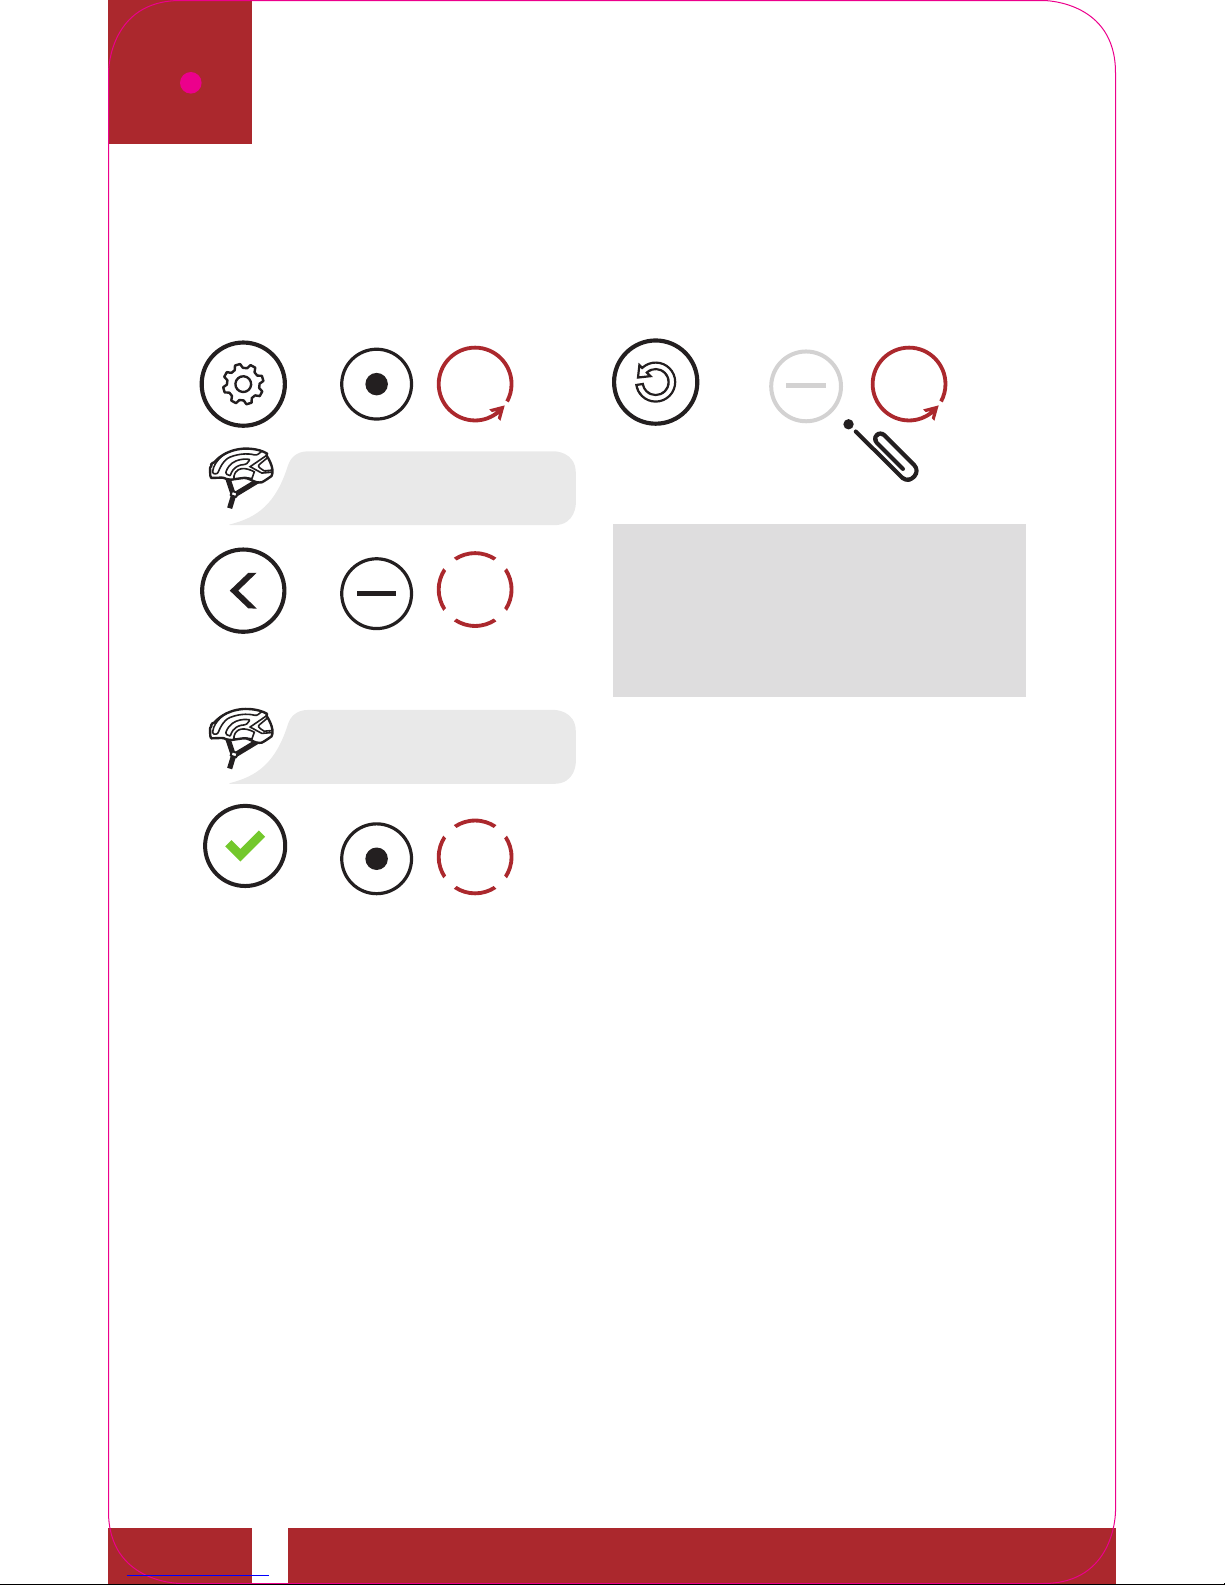
Troubleshooting
Factory Reset
Fault Reset
= =
10s
HOLD
1x
TAP
“Confi guration menu”
“Factory reset”
NAVIGATE
BACKWARD
2X
=
2x
TAP
=
1x
TAP
EXECUTE
Note: Fault Reset will
not restore the Bluetooth
module to factory default
settings.
Page 24
QUICK START GUIDE
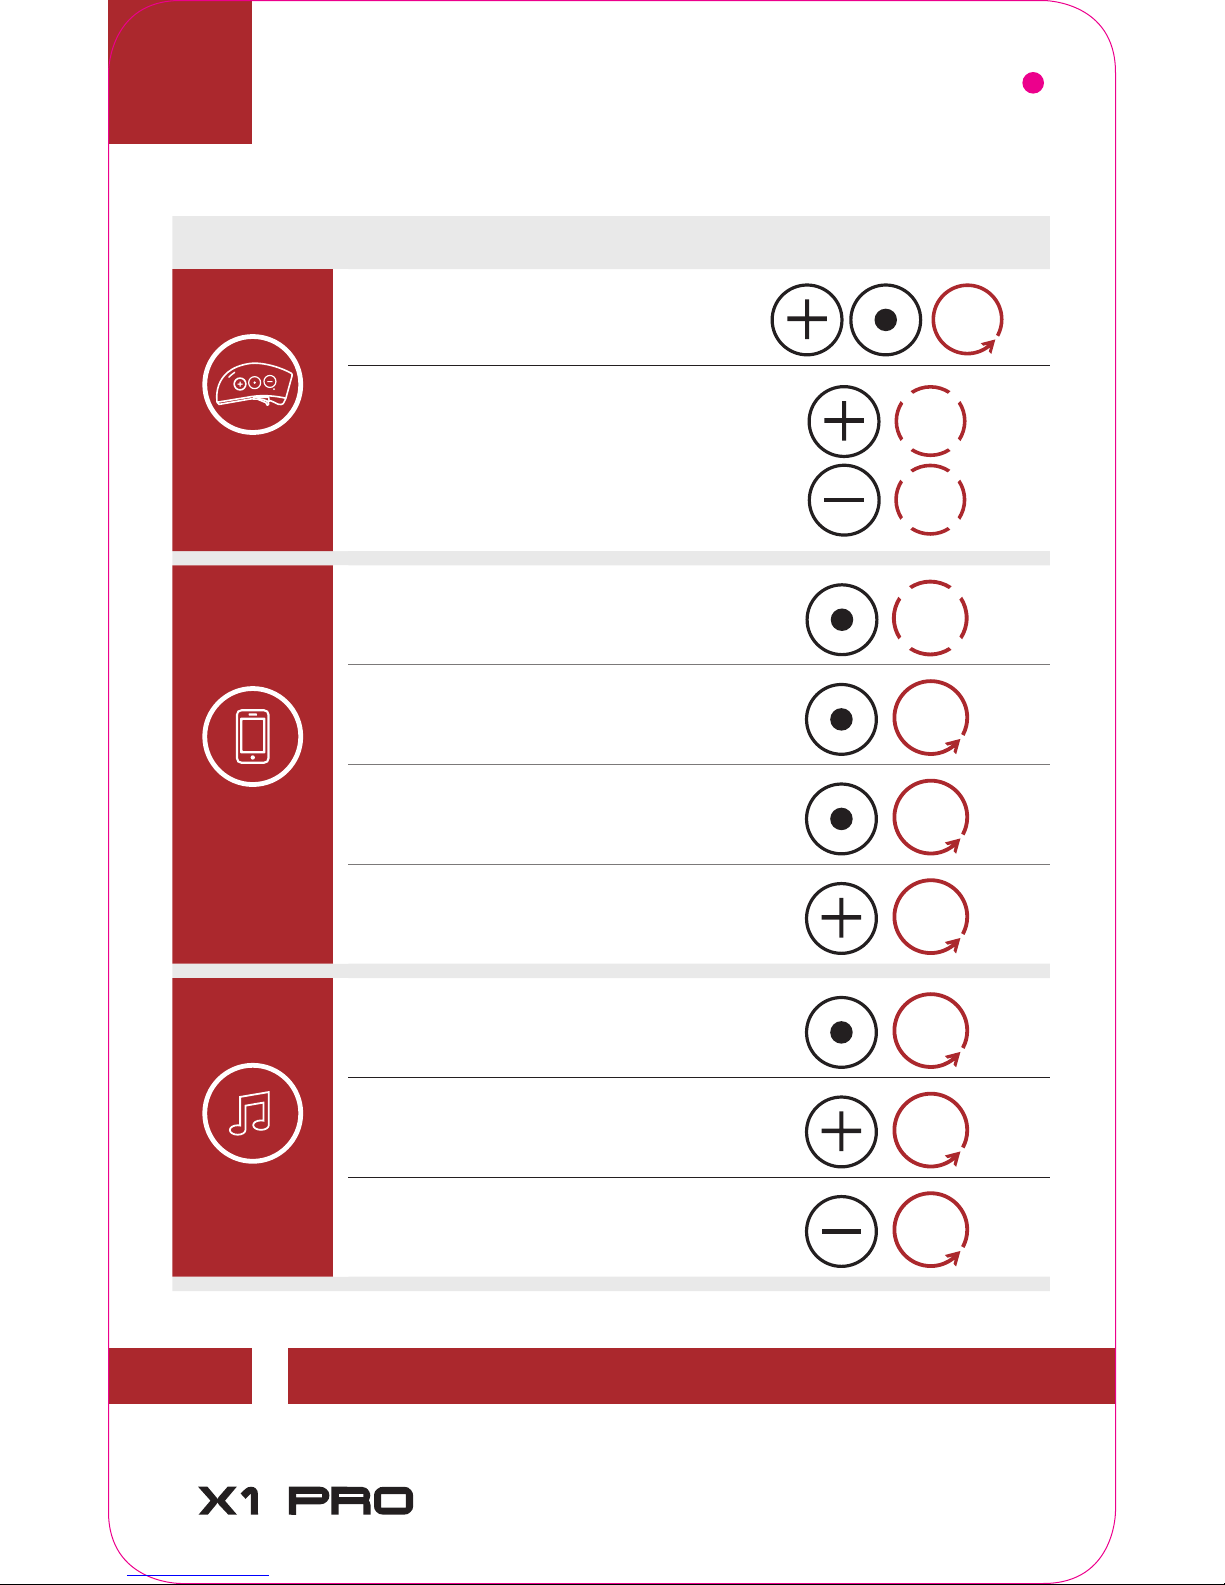
TYPE OPERATION BUTTON COMMANDS
Basic
Operations
Power on/off
1s
HOLD
Volume up/
Volume down
1x
TAP
1x
TAP
Mobile
Phone
Answer phone call
1x
TAP
End/reject phone call
2s
HOLD
Voice dial
3s
HOLD
Speed dial
3s
HOLD
Music
Play/Pause music
1s
HOLD
Track forward
1s
HOLD
Track back
1s
HOLD
QUICK REFERENCE
Page 25
TYPE OPERATION BUTTON COMMANDS
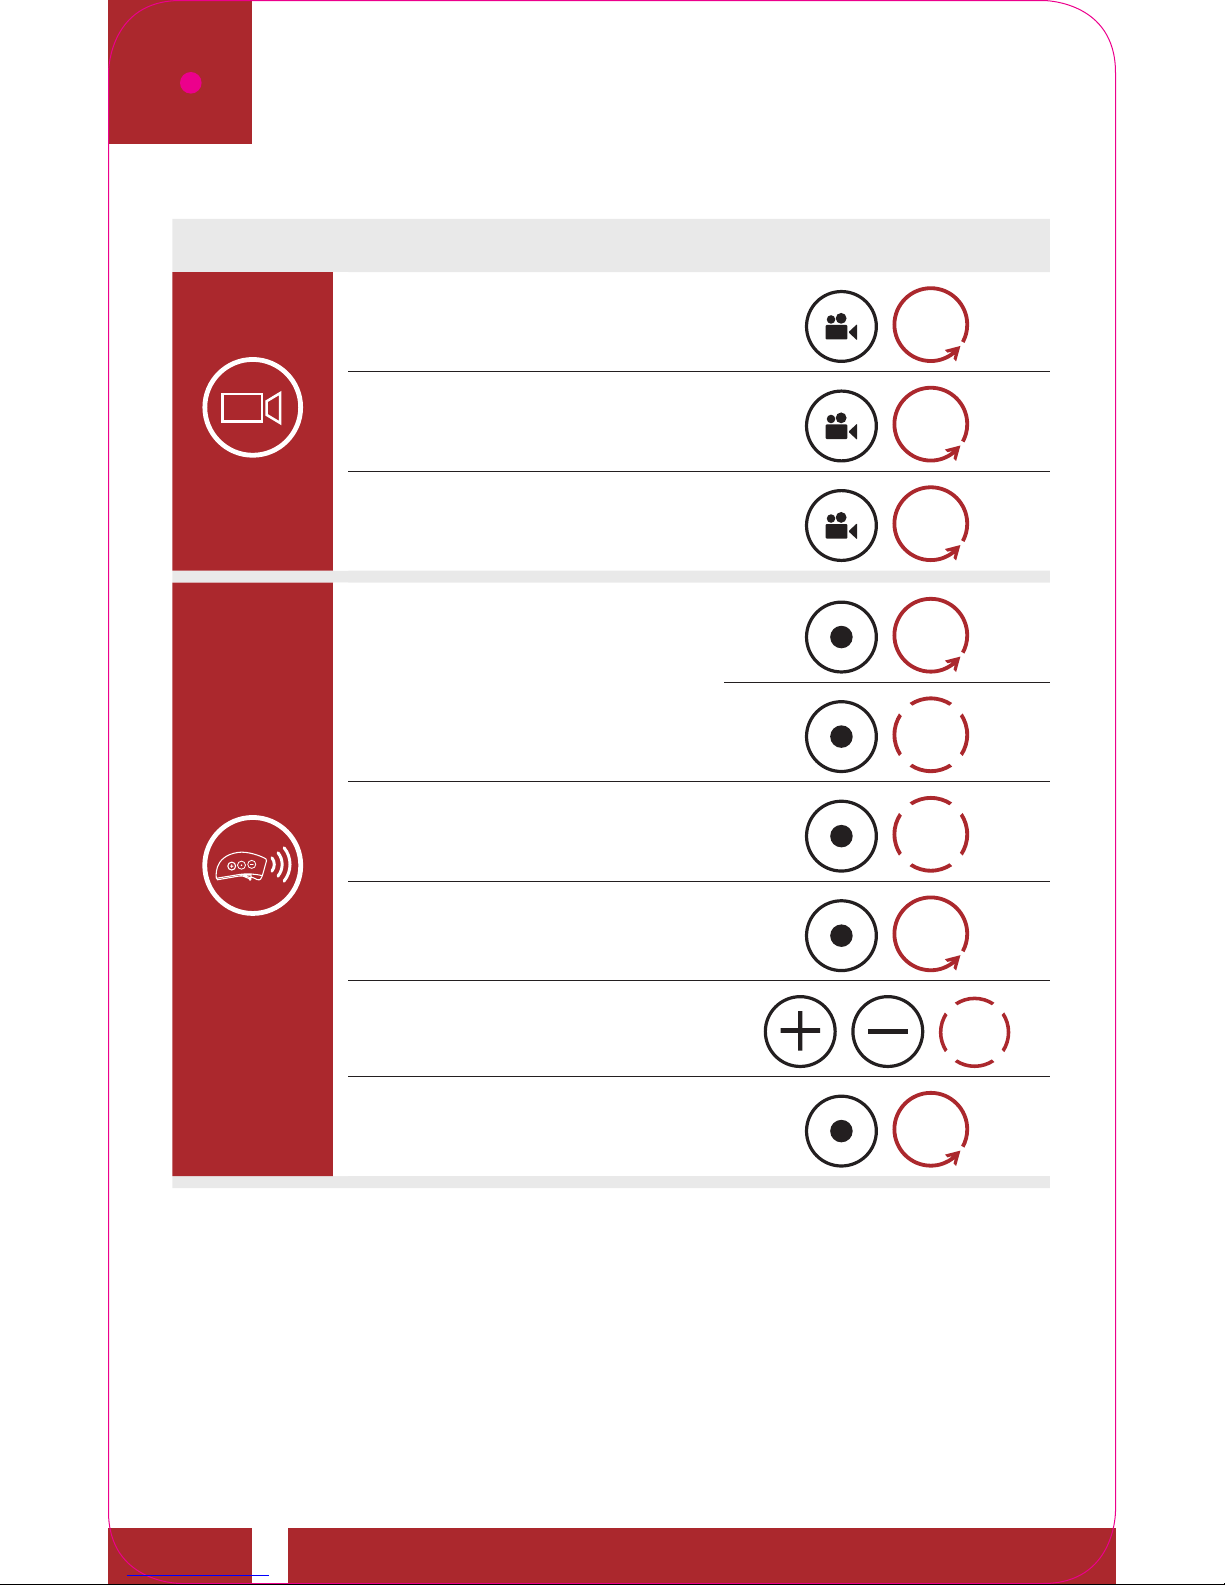
Camera
Camera On
1s
HOLD
Camera Off
3s
HOLD
Start/Stop Recording
1s
HOLD
Intercom
Intercom pairing
5s
HOLD
1x
TAP
Start/end each intercom
1x
TAP
End all intercoms
1s
HOLD
Start group intercom
1x
TAP
End group intercom
1s
HOLD
QUICK REFERENCE
Page 26
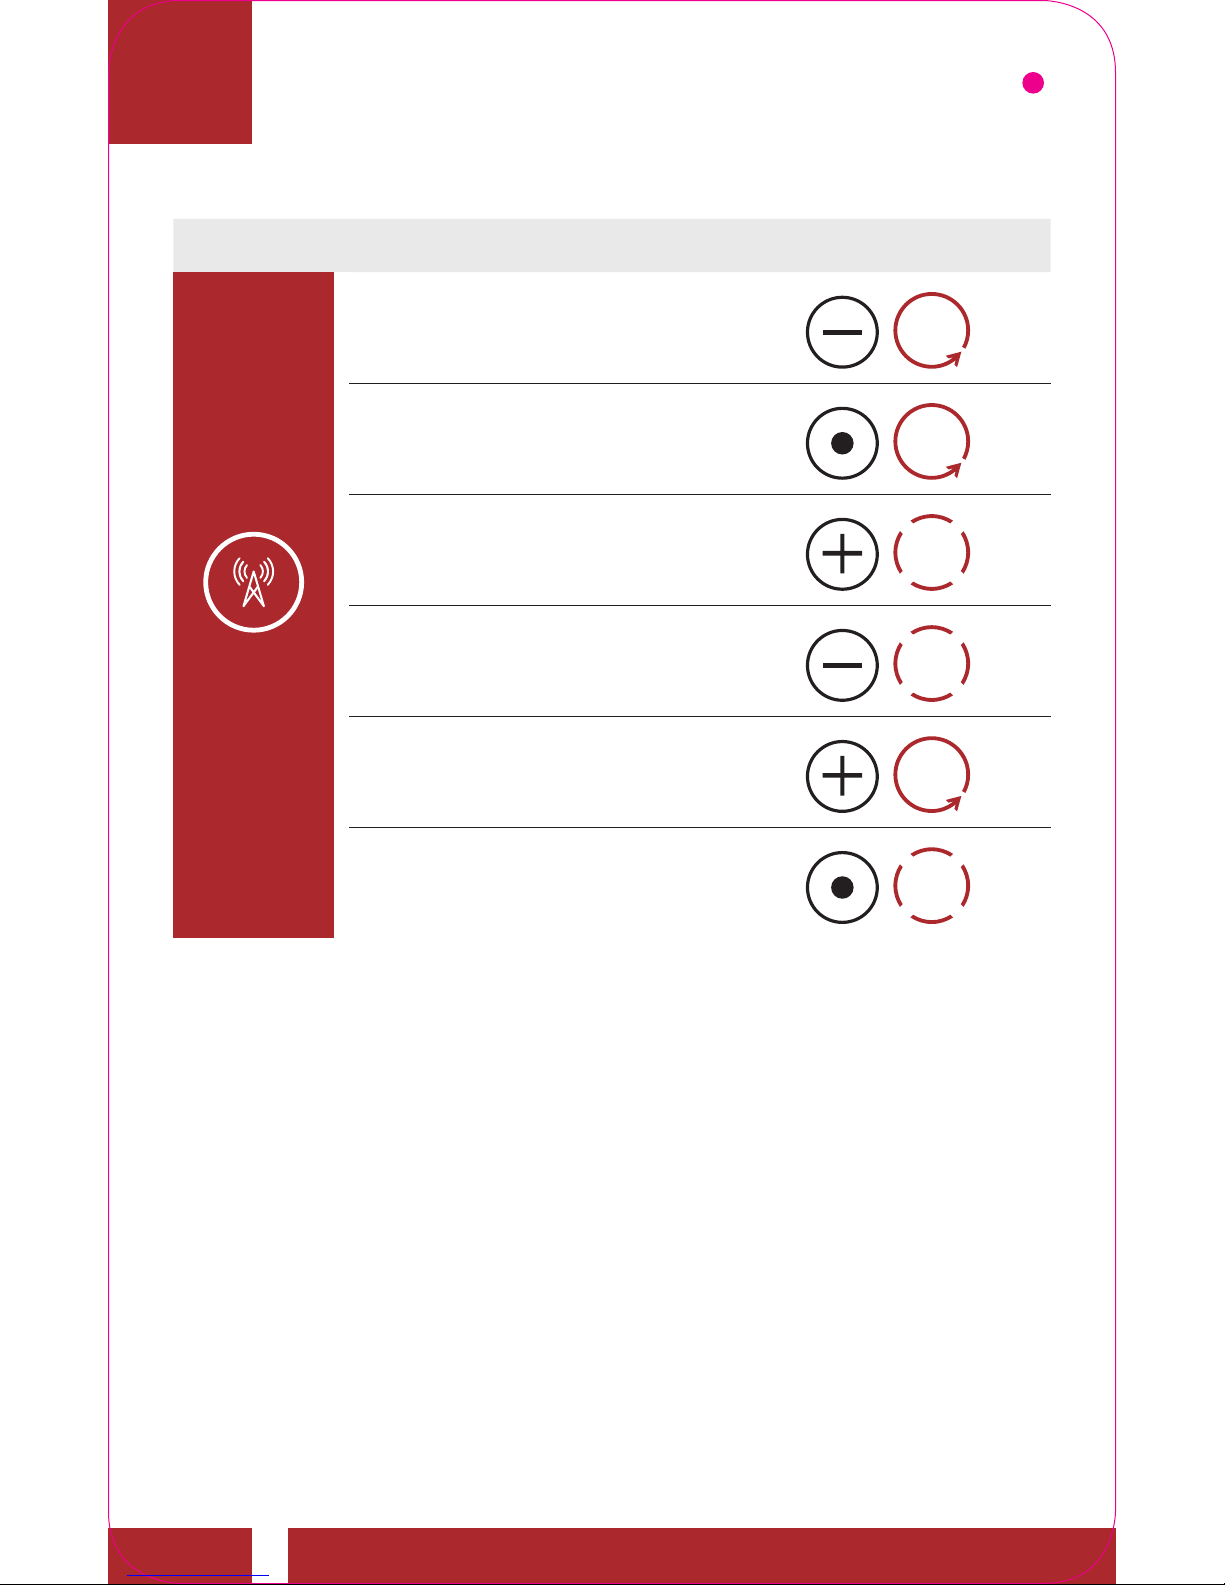
TYPE OPERATION BUTTON COMMANDS
FM Radio
FM radio on/off
1s
HOLD
Select preset
1s
HOLD
Seek stations forward
2x
TAP
Seek stations backward
2x
TAP
Scan up FM band/stop
scanning
1s
HOLD
Save preset while scanning
1x
TAP
QUICK REFERENCE
 Loading...