

Page 1

SENA
MOTORCYCLE MESH COMMUNICATION SYSTEM
Version 2.1.0
USER’S GUIDE
ENGLISH
Page 2

TABLE OF CONTENTS
1. ABOUT THE SPIDER ST1 5
1.1 Product Features 5
1.2 Product Details 6
1.3 Package Contents 7
2. INSTALLING THE HEADSET ON YOUR HELMET 8
2.1 Helmet Installation 8
2.1.1 Using the Clamp Unit 8
2.1.2 Using the Glued Surface Mounting Plate 8
2.2 Installing the Speakers 9
2.3 Installing the Microphone 10
2.3.1 Installing the Wired Boom Microphone 10
2.3.2 Installing the Wired Microphone 12
3. GETTING STARTED 14
3.1 Downloadable Sena Software 14
3.1.1 SENA MOTORCYCLES App 14
3.1.2 Sena Device Manager 14
3.1.3 Firmware Upgrades 14
3.2 Charging 15
3.3 Legend 15
3.4 Powering On and Off 16
3.5 Volume Adjustment 16
3.6 Checking the Battery Level 16
4. PAIRING THE HEADSET WITH OTHER
BLUETOOTH DEVICES 17
4.1 Phone Pairing 17
4.1.1 Initially Pairing the SPIDER ST1 17
4.1.2 Pairing When the SPIDER ST1 is Turned Off 18
4.1.3 Pairing When the SPIDER ST1 is Turned On 18
Page 3

TABLE OF CONTENTS CONTINUED
4.2 Second Mobile Phone Pairing - Second Mobile
Phone and GPS 19
4.3 GPS Pairing 19
5. MOBILE PHONE USAGE 20
5.1 Making and Answering Calls 20
5.2 Speed Dialing 20
5.2.1 Assigning Speed Dial Presets 20
5.2.2 Using Speed Dial Presets 20
5.3 HD Voice (Always On) 21
6. STEREO MUSIC 22
6.1 Playing Music with Bluetooth Devices 22
7. MESH INTERCOM 23
7.1 What is Mesh Intercom? 23
7.1.1 Open Mesh 24
7.1.2 Group Mesh 24
7.2 Starting Mesh Intercom 25
7.3 Using the Mesh in Open Mesh 25
7.3.1 Channel Setting (Default: channel 1) 25
7.4 Using Mesh in Group Mesh 26
7.4.1 Creating a Group Mesh 26
7.4.2 Joining an Existing Group Mesh 27
7.5 Enable/Disable Mic (Default: Enable) 28
7.6 Toggling Open Mesh/Group Mesh 28
7.7 Reset Mesh 28
8. MESH AUDIO MULTITASKING (ALWAYS ON) 29
Page 4

TABLE OF CONTENTS CONTINUED
9. FUNCTION PRIORITY 30
10. CONFIGURATION SETTING 31
10.1 Headset Configuration Menu 31
10.2 Software Configuration Setting 31
10.2.1 Headset Language 32
10.2.2 Audio Equalizer (Default: Off) 32
10.2.3 VOX Phone (Default: Enable) 32
10.2.4 VOX Sensitivity (Default: 3) 32
10.2.5 Intercom-Audio Overlay Sensitivity (Default: 3) 32
10.2.6 Audio Overlay Volume Management
(Default: Disable) 33
10.2.7 Voice Prompt (Default: Enable) 33
11. TROUBLESHOOTING 34
11.1 Fault Reset 34
11.2 Factory Reset 34
Page 5

1. ABOUT THE SPIDER ST1
1.1 Product Features
Bluetooth® 5.2
Mesh Intercom up to 2 km (1.2 mi)*
Audio Multitasking™
Fast Charging
* in open terrain
SPIDER ST1 Motorcycle Mesh Communication System | 5
Page 6
1 ABOUT THE SPIDER ST1
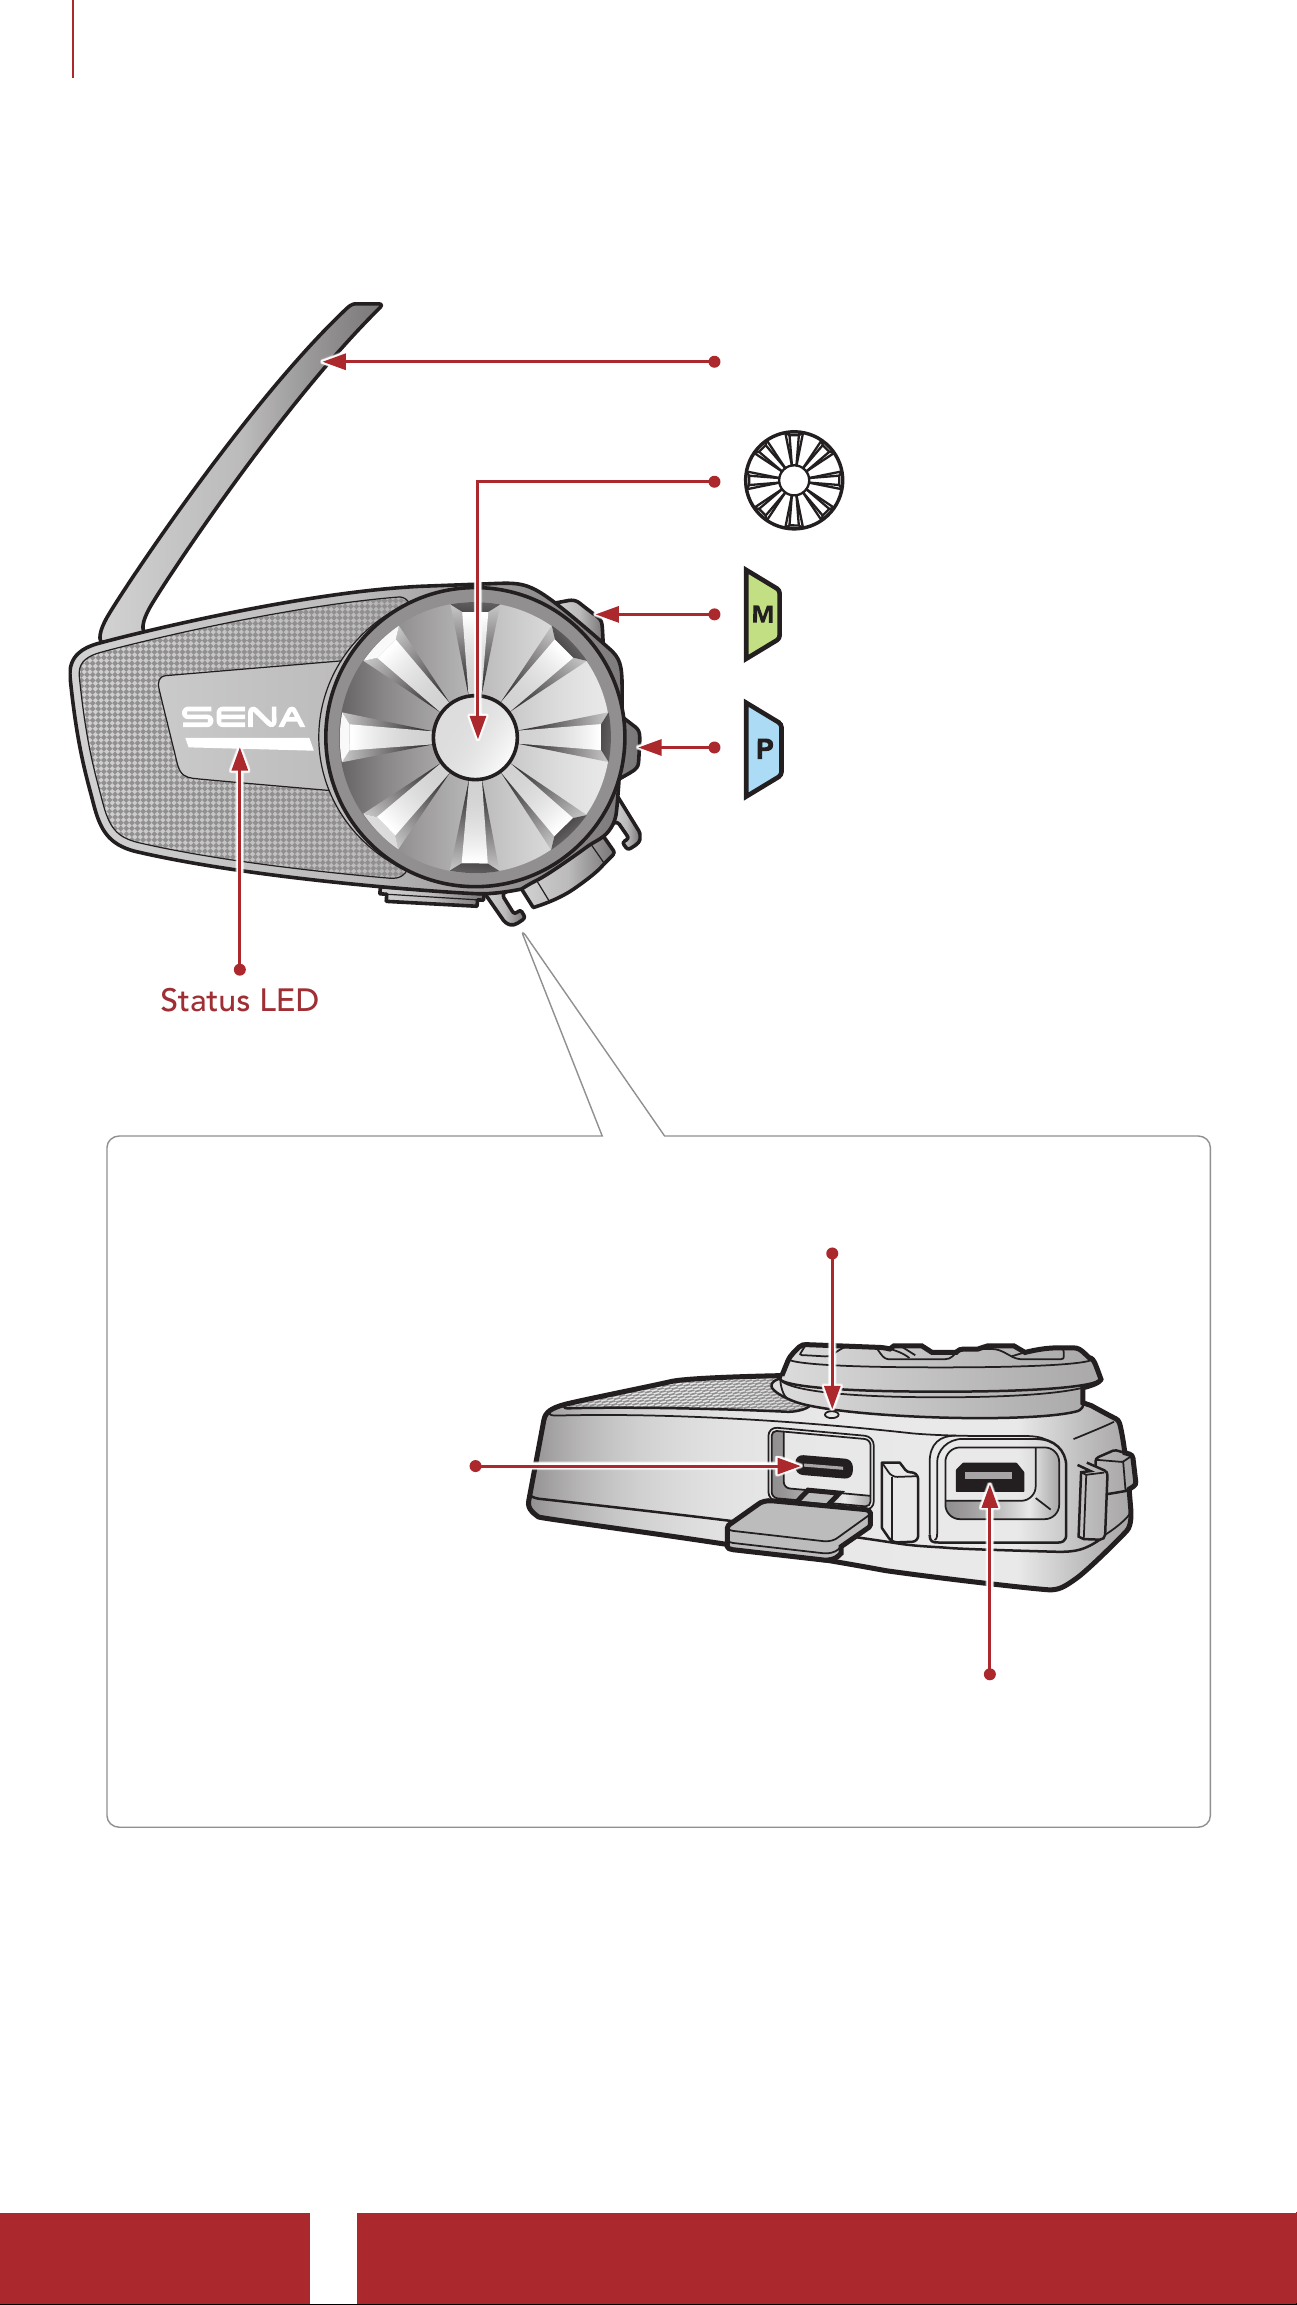
1.2 Product Details
Mesh Intercom Antenna
Jog Dial
Mesh Intercom Button
Status LED
Phone Button
Charging LED
DC Power Charging &
Firmware
Upgrade Port
Speaker and
Microphone Port
SPIDER ST1 Motorcycle Mesh Communication System | 6
Page 7
1 ABOUT THE SPIDER ST1
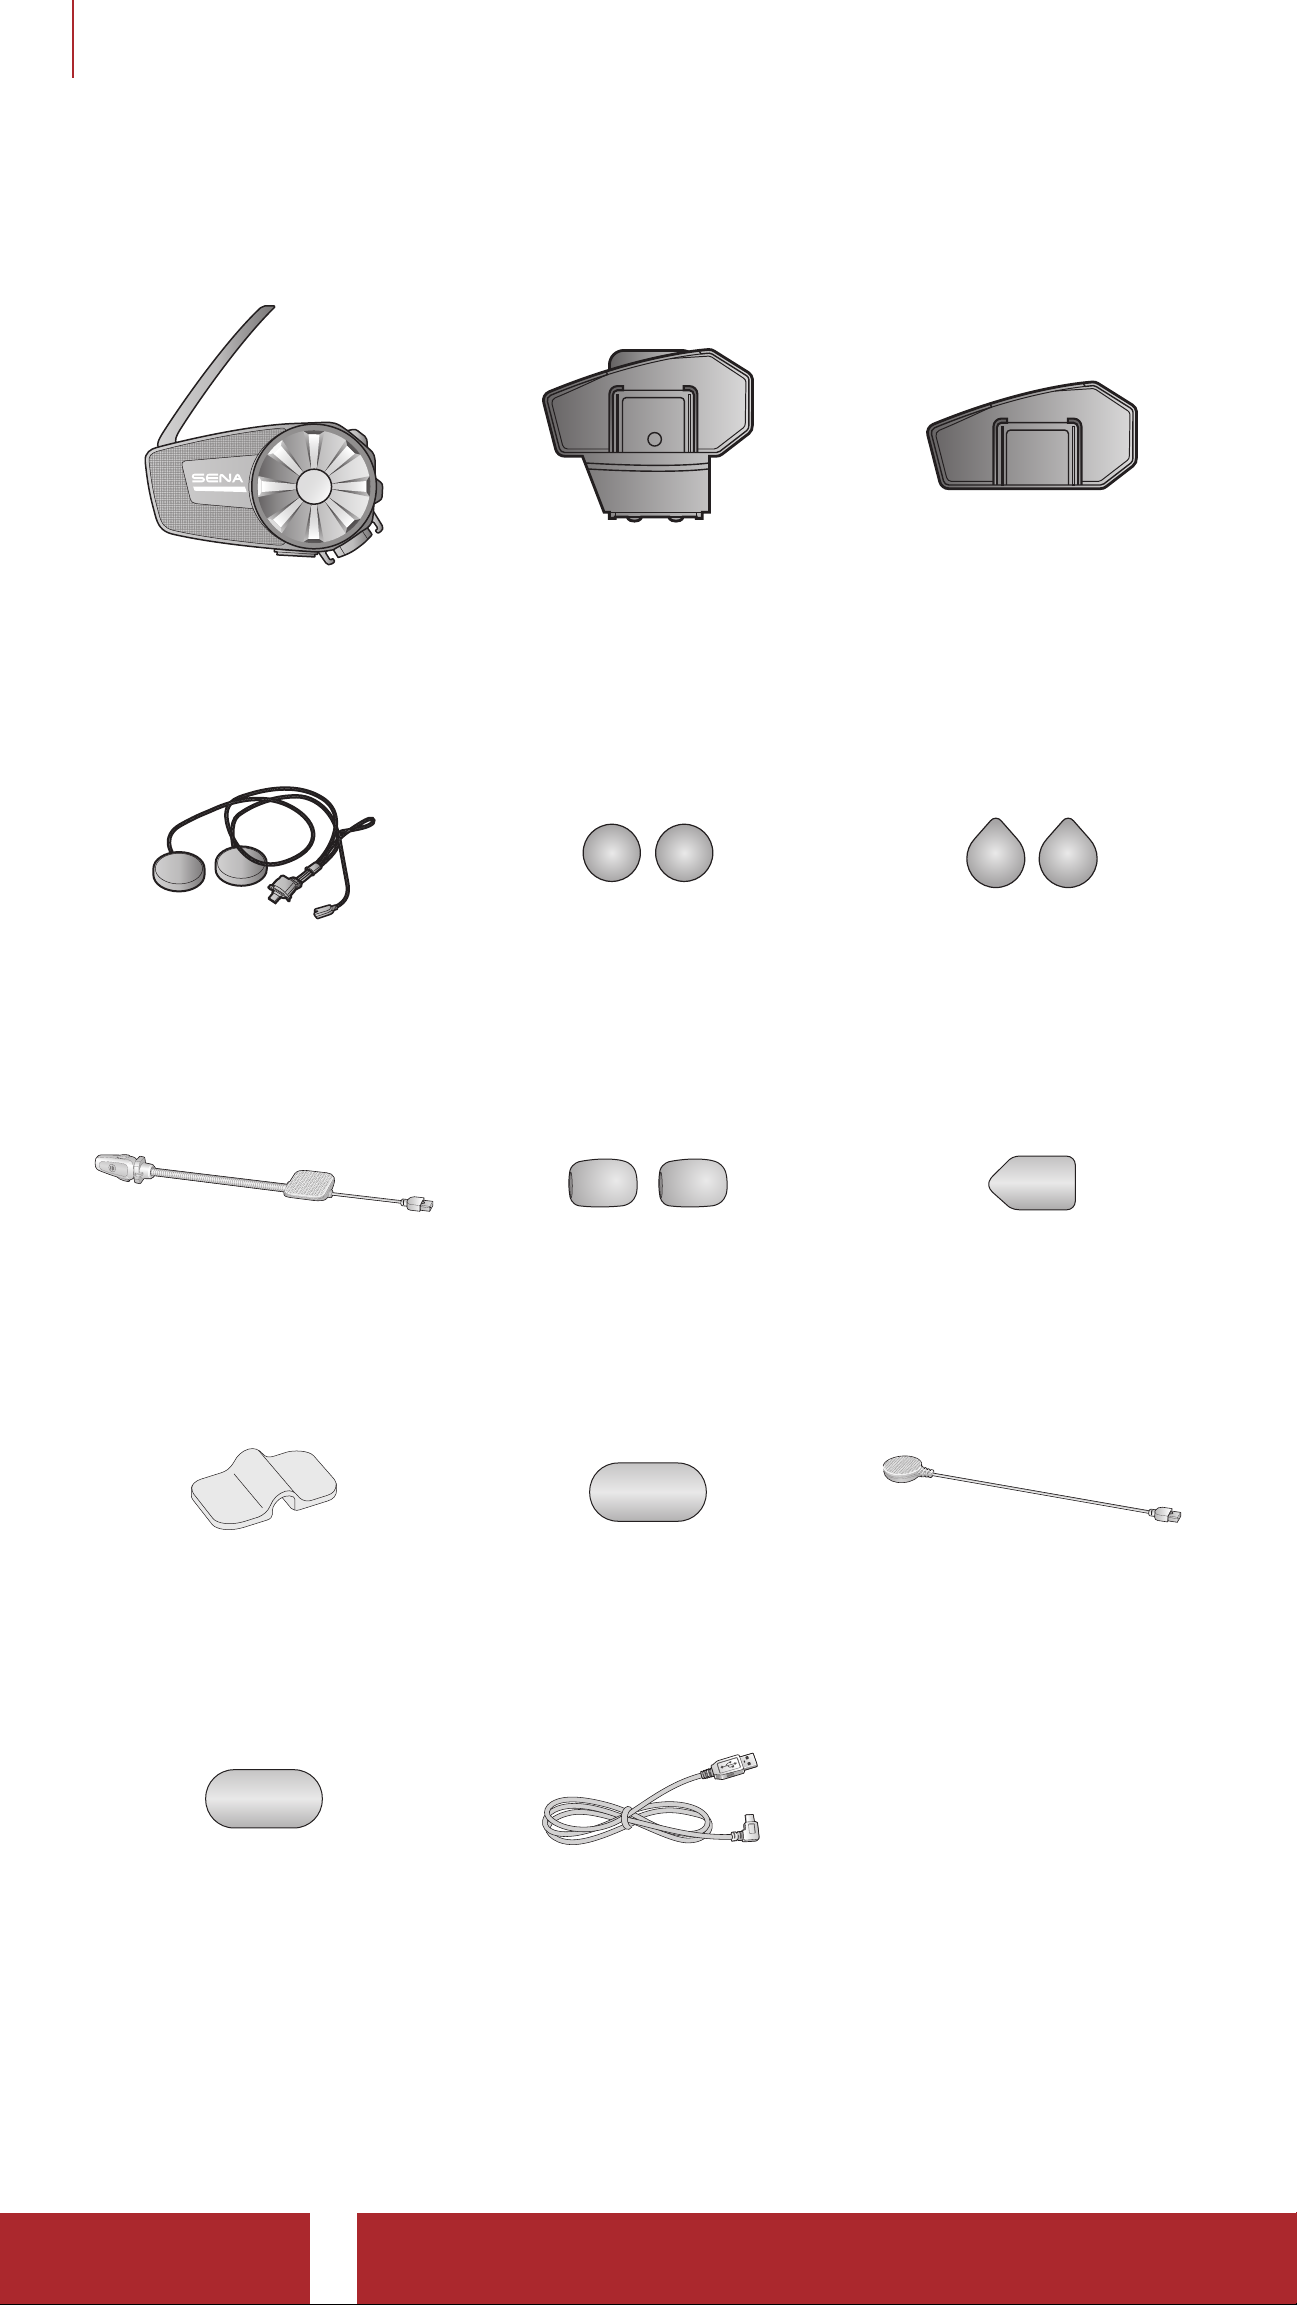
1.3 Package Contents
Headset Main Unit Clamp Unit
Speakers Speaker Pads
Glued Surface
Mounting Plate
Hook and Loop
Fasteners for Speakers
Wired Boom
Microphone
Boom
Microphone Holder
Microphone
Sponges
Hook and Loop
Fastener for Holder
Hook and Loop Fastener
for Boom Microphone
Wired Microphone
Hook and Loop Fastener
for Wired Microphone
USB Power &
Data Cable (USB-C)
SPIDER ST1 Motorcycle Mesh Communication System | 7
Page 8
2. INSTALLING THE HEADSET ON YOUR
HELMET
2.1 Helmet Installation
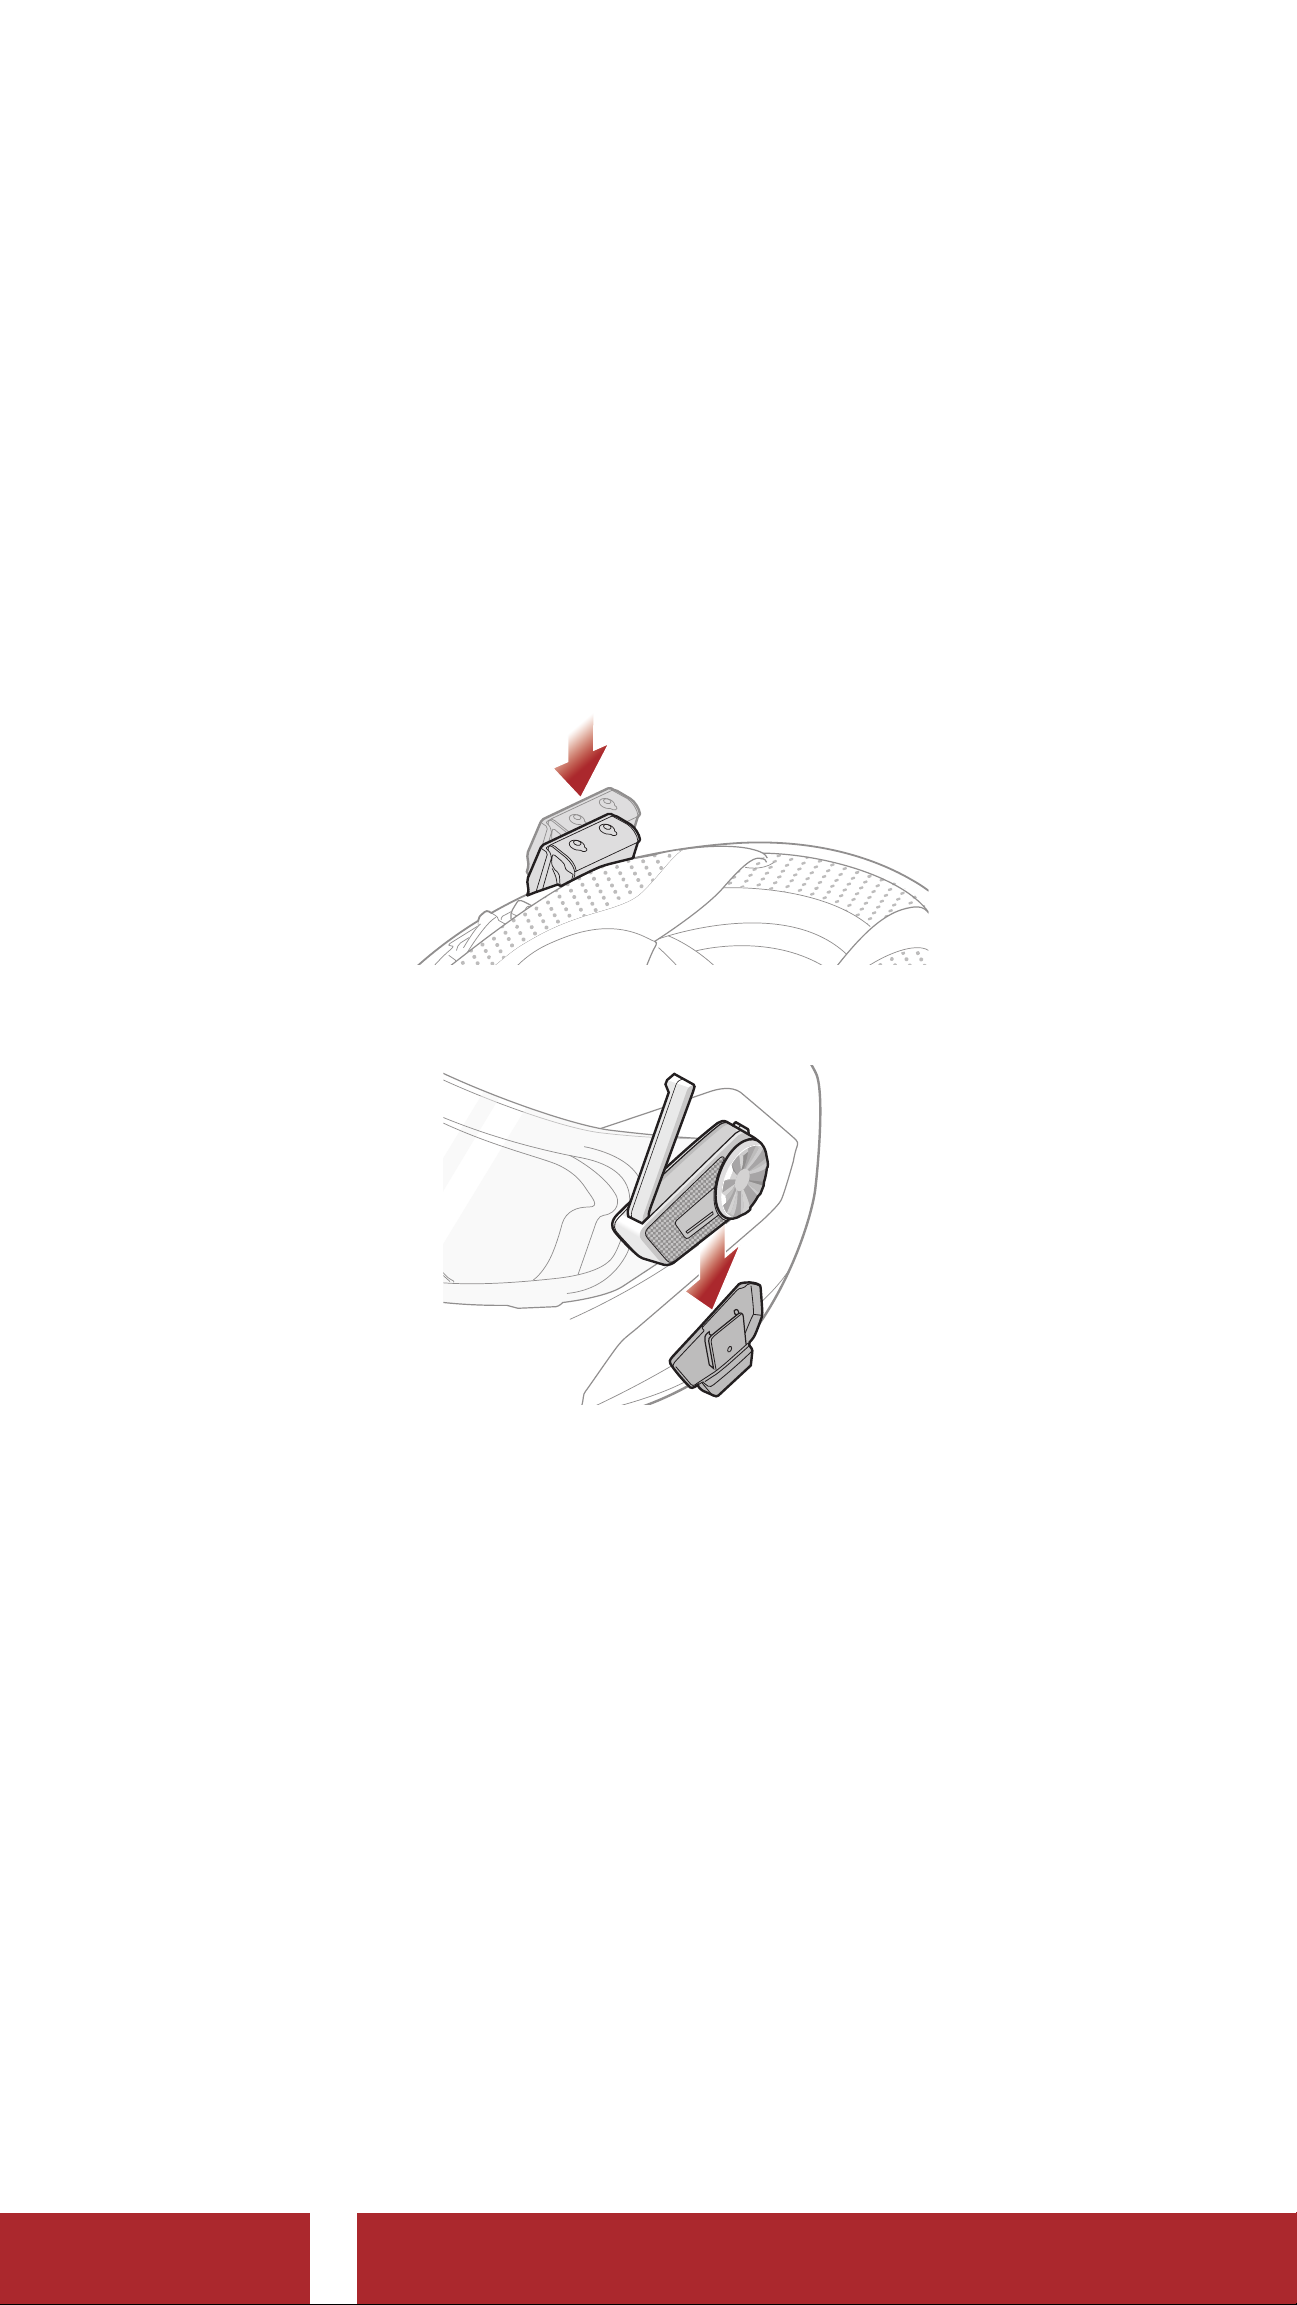
2.1.1 Using the Clamp Unit
1. Insert the back plate of the clamp unit between the internal padding
and external shell of the left side of the helmet.
2. Attach the main unit to the clamp unit until you hear a click.
2.1.2 Using the Glued Surface Mounting Plate
If you cannot install the clamp unit on the helmet, you can use the glued
surface mounting plate to attach the clamp unit to the surface of the
helmet.
1. Clean the area on the left side of the helmet where you will attach
the glued surface mounting plate with a moistened towel and dry
thoroughly.
SPIDER ST1 Motorcycle Mesh Communication System | 8
Page 9
2 INSTALLING THE HEADSET ON YOUR HELMET
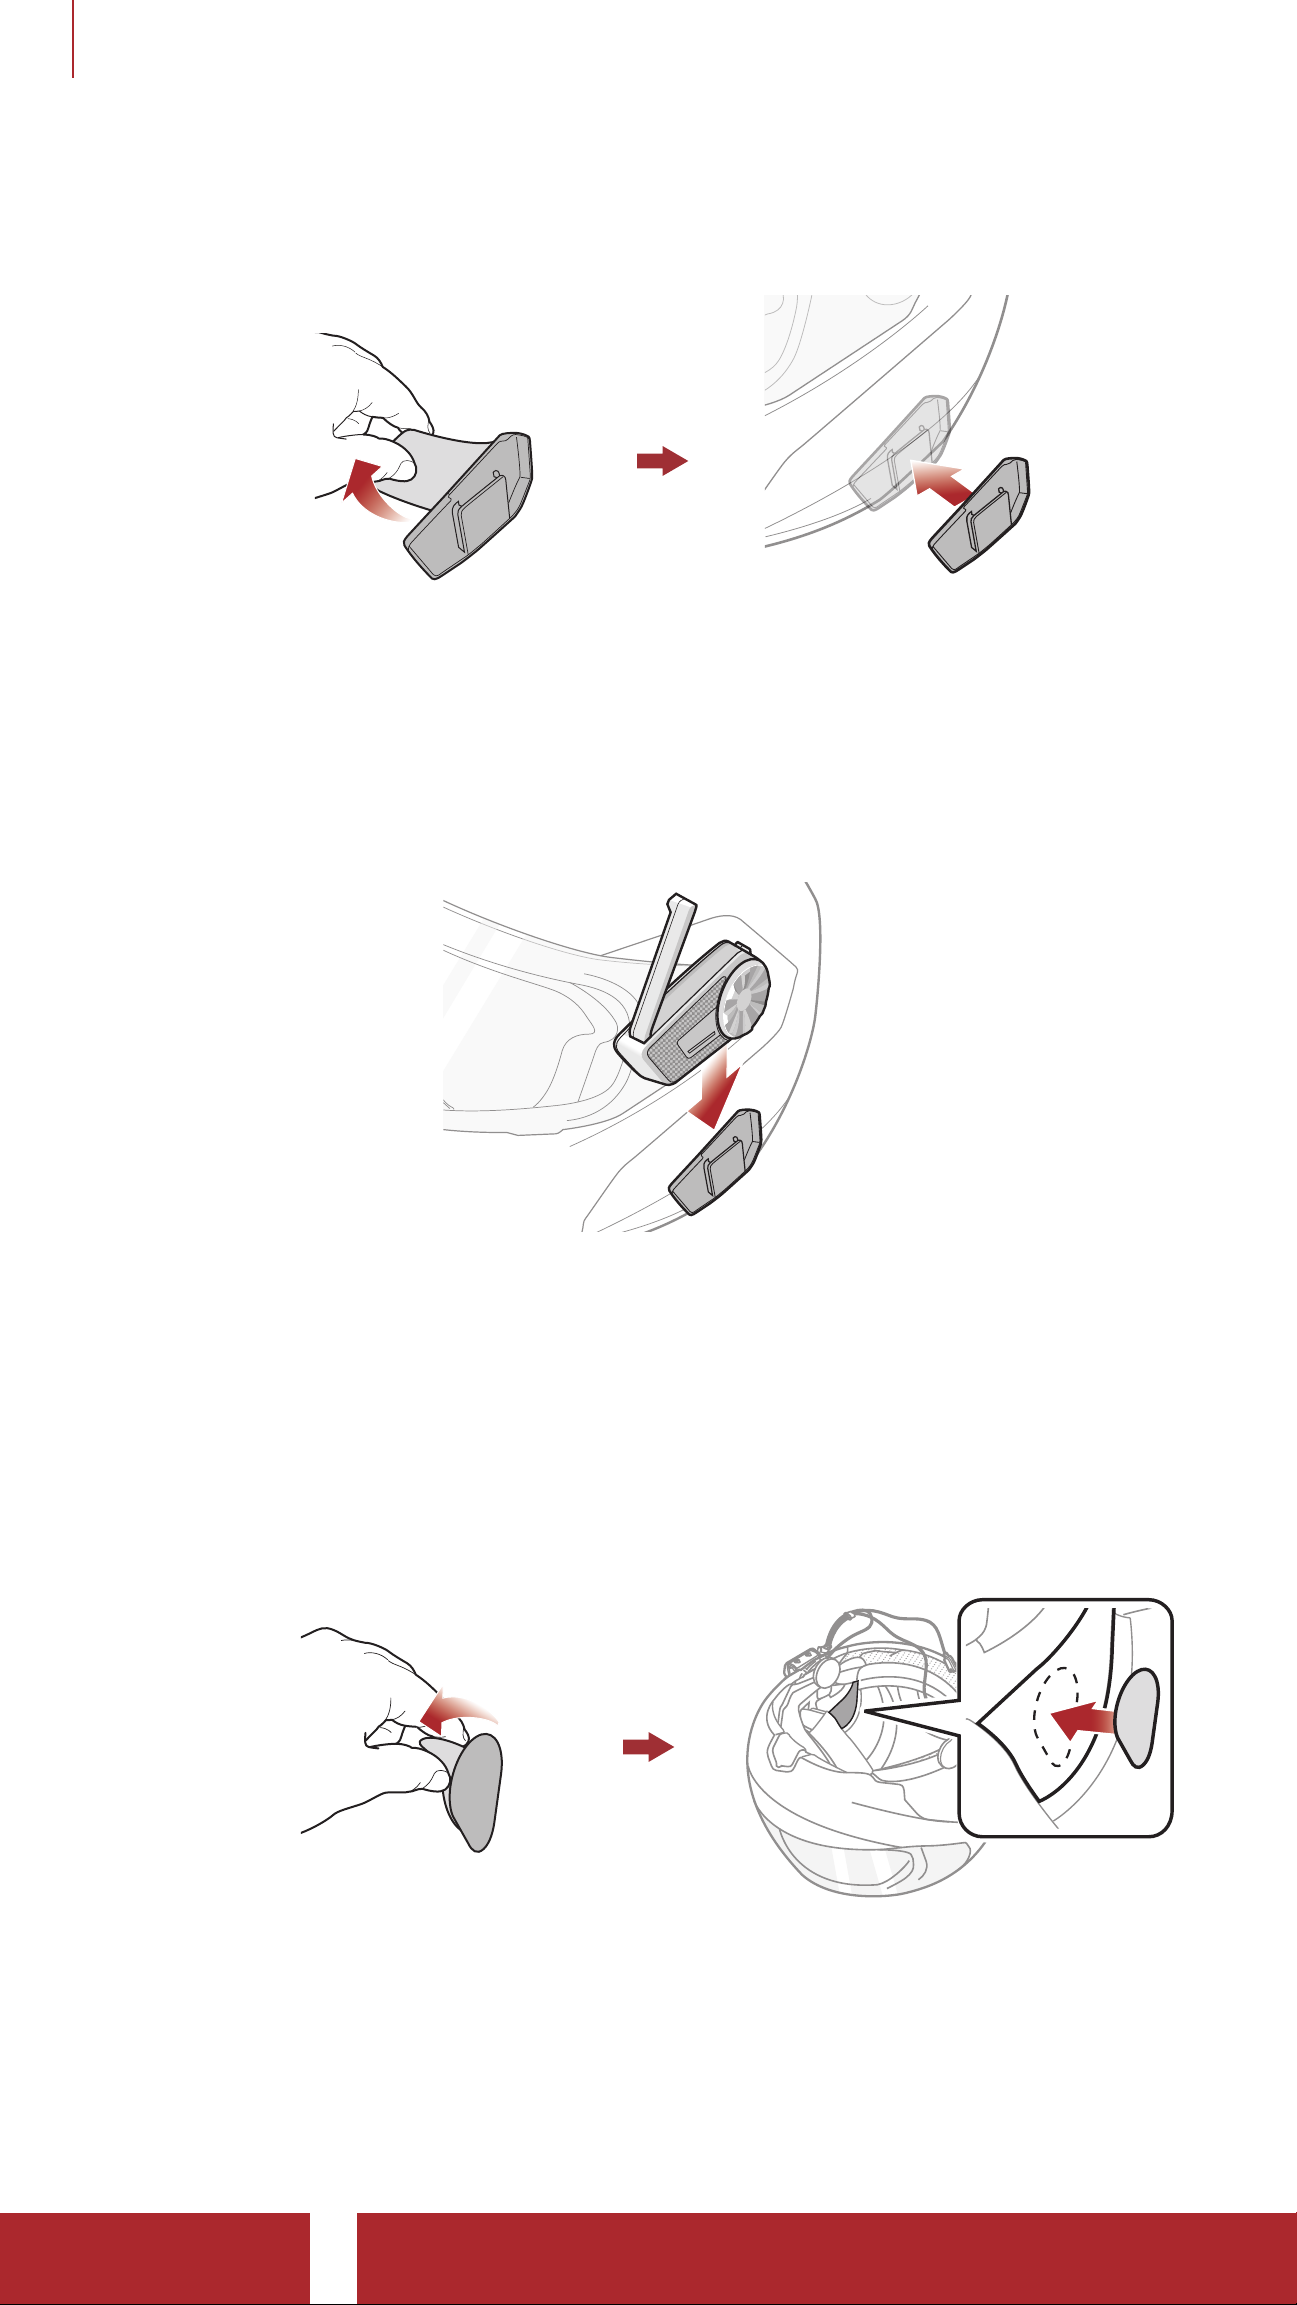
2. Peel off the cover of the adhesive tape of the glued surface mounting
plate and attach it to the helmet.
3. Make sure that the glued surface mounting plate sticks on the helmet
firmly. Maximum adhesion occurs after 24 hours.
4. Attach the main unit to the glued surface mounting plate until you
hear a click.
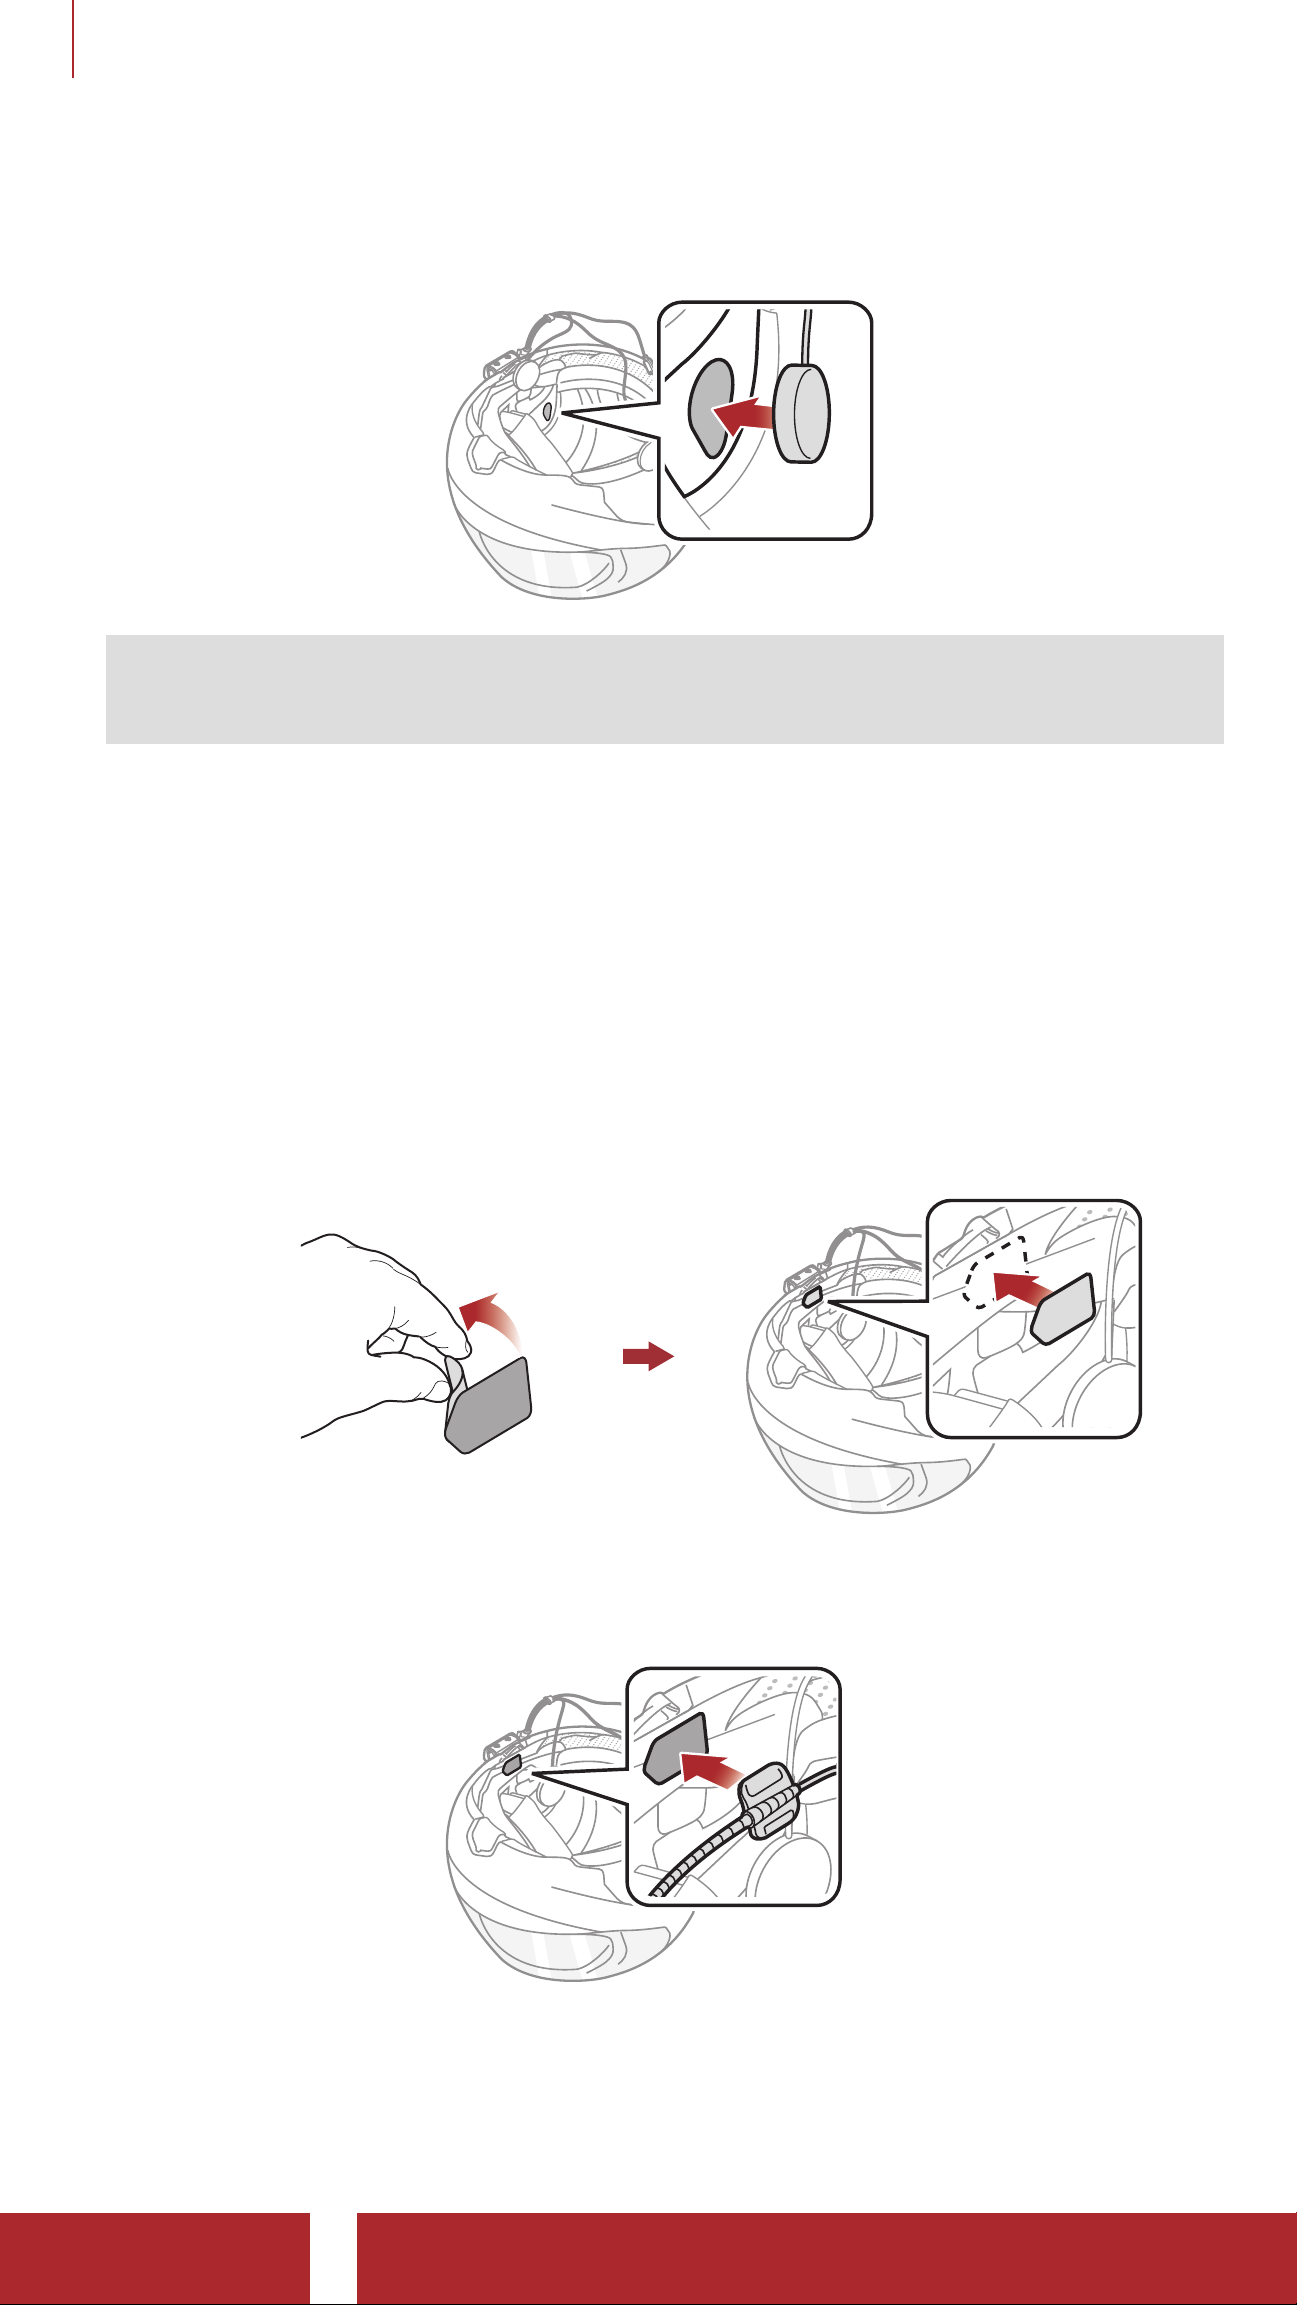
2.2 Installing the Speakers
1. Peel off each cover of the hook and loop fasteners for speakers to
expose the adhesive surface. Then, attach the fasteners to the ear
pockets inside the helmet.
SPIDER ST1 Motorcycle Mesh Communication System | 9
Page 10
2 INSTALLING THE HEADSET ON YOUR HELMET
2. Attach the speakers to the hook and loop fasteners for speakers
inside the helmet.
Note: If the helmet has deep ear pockets, you can use the speaker
pads to bring the speakers closer to your ears.
2.3 Installing the Microphone
2.3.1 Installing the Wired Boom Microphone
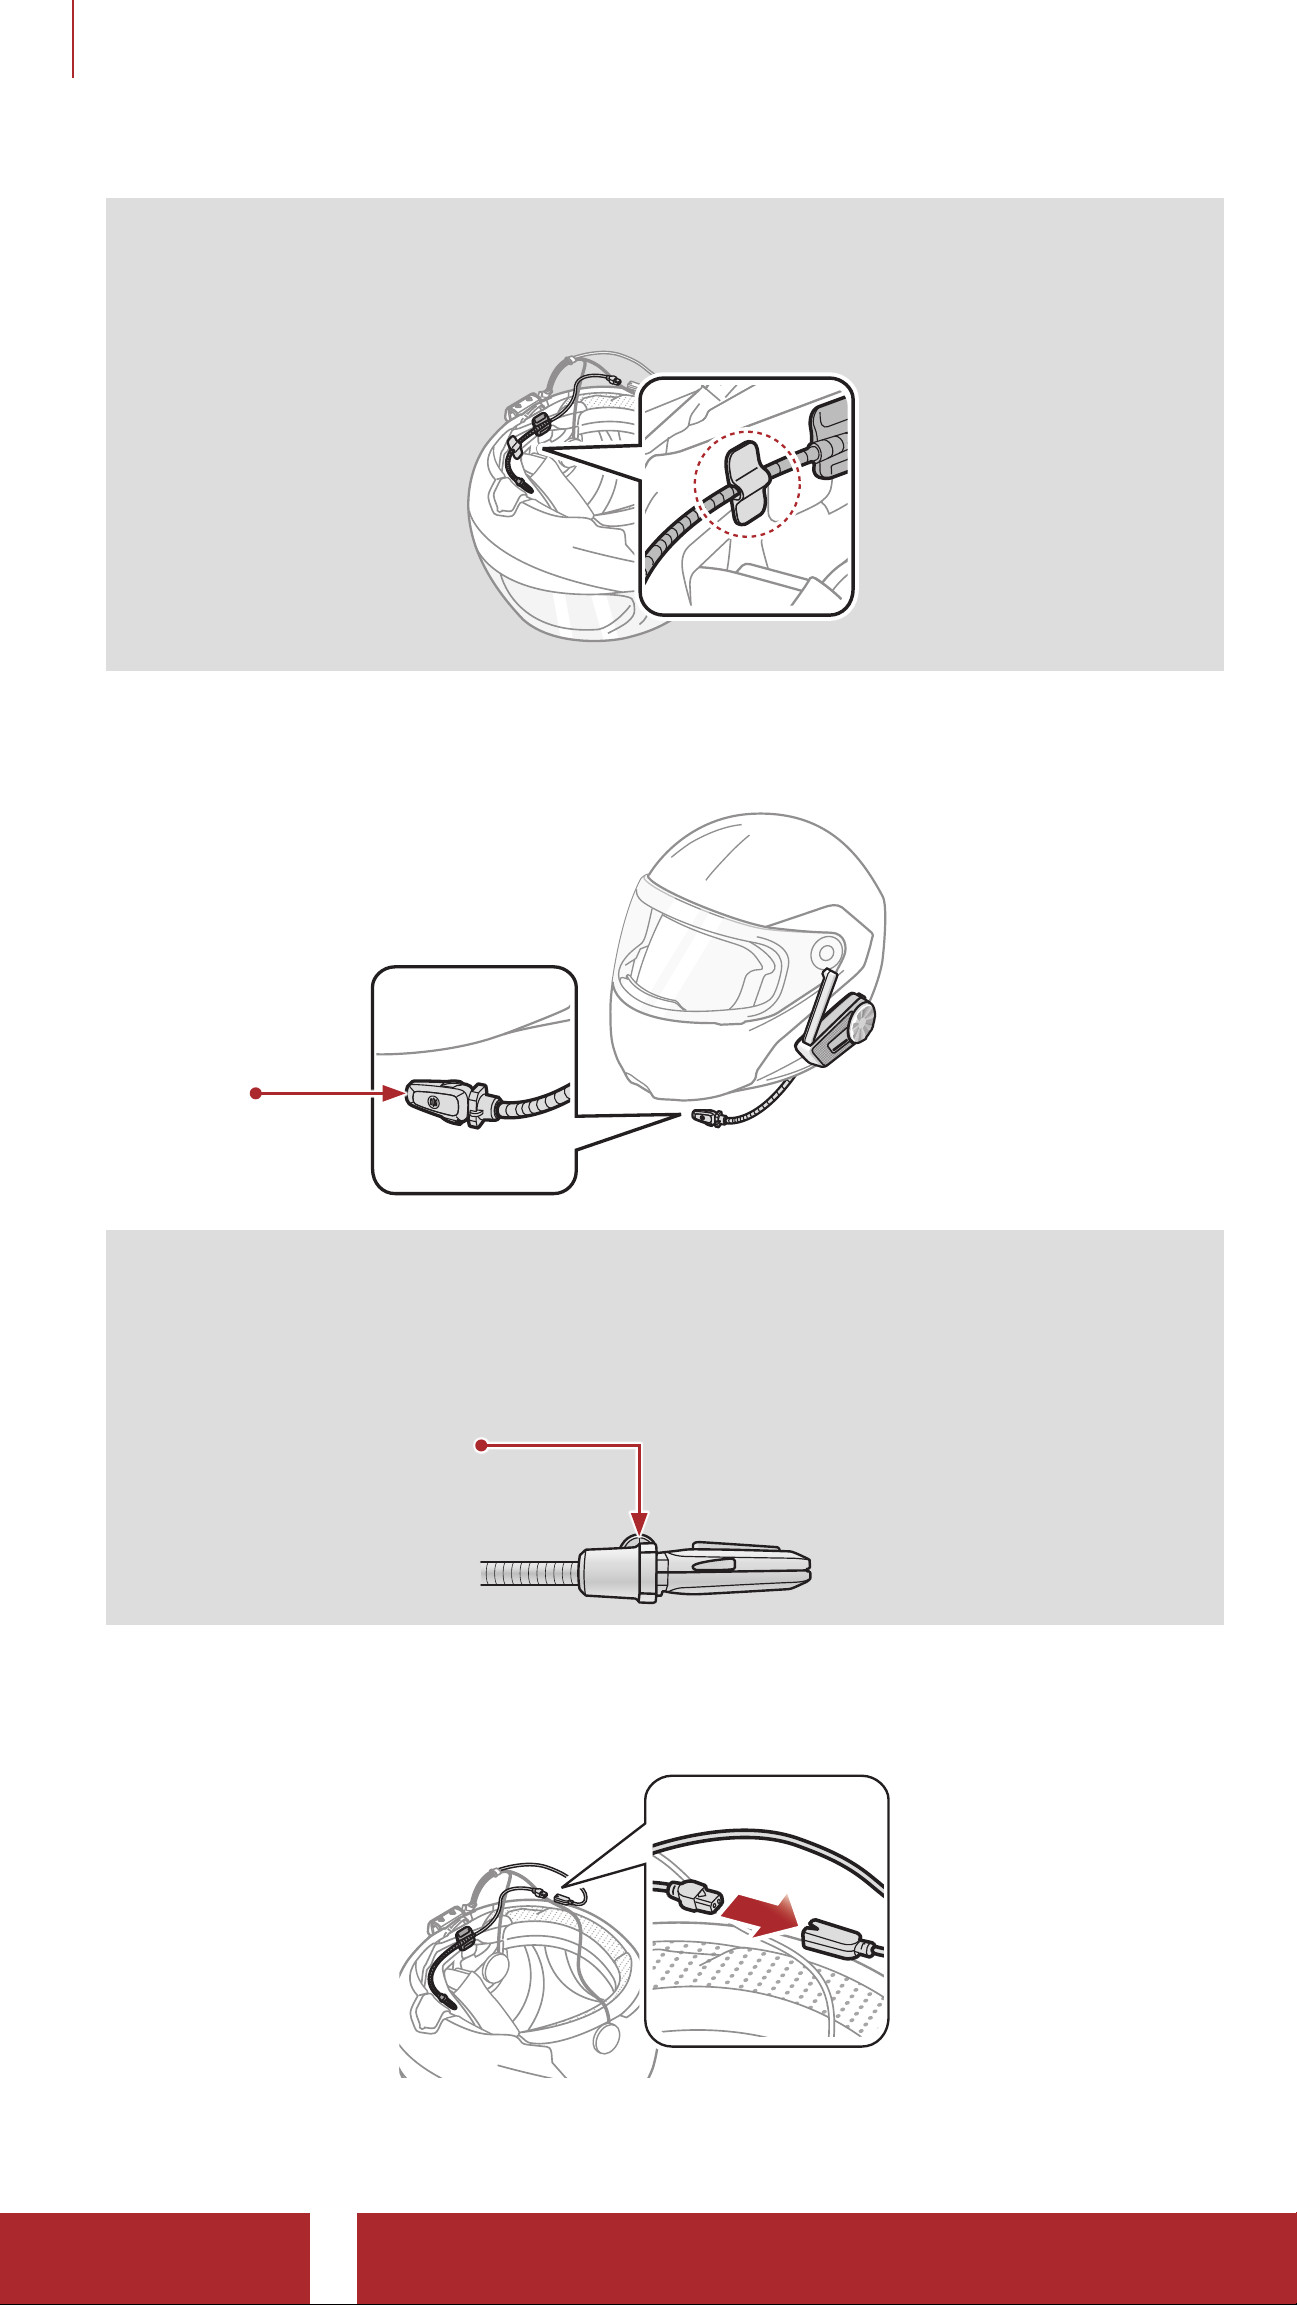
1. Peel off the cover of the hook and loop fastener for wired boom
microphone to expose the adhesive tape. Then, attach the hook and
loop fastener on the inside surface of the left external shell.
2. Attach the wired boom microphone’s mounting plate to the hook and
loop fastener.
SPIDER ST1 Motorcycle Mesh Communication System | 10
Page 11
2 INSTALLING THE HEADSET ON YOUR HELMET
Note: You can use the boom microphone holder after attaching
the hook and loop fastener for boom microphone holder on it to
ensure secure installation.
3. Adjust the head of the microphone so that the tab is facing away from
your mouth.
Tab
Note: Make sure that the microphone is located properly close
to your mouth when you wear the helmet. Adjust the direction of
the microphone so that the fin side of the microphone is facing
outward, away from your lips.
Fin
4. Align the arrows on the microphone and speaker cables and insert
the microphone cable into the microphone connector.
SPIDER ST1 Motorcycle Mesh Communication System | 11
Page 12
2 INSTALLING THE HEADSET ON YOUR HELMET
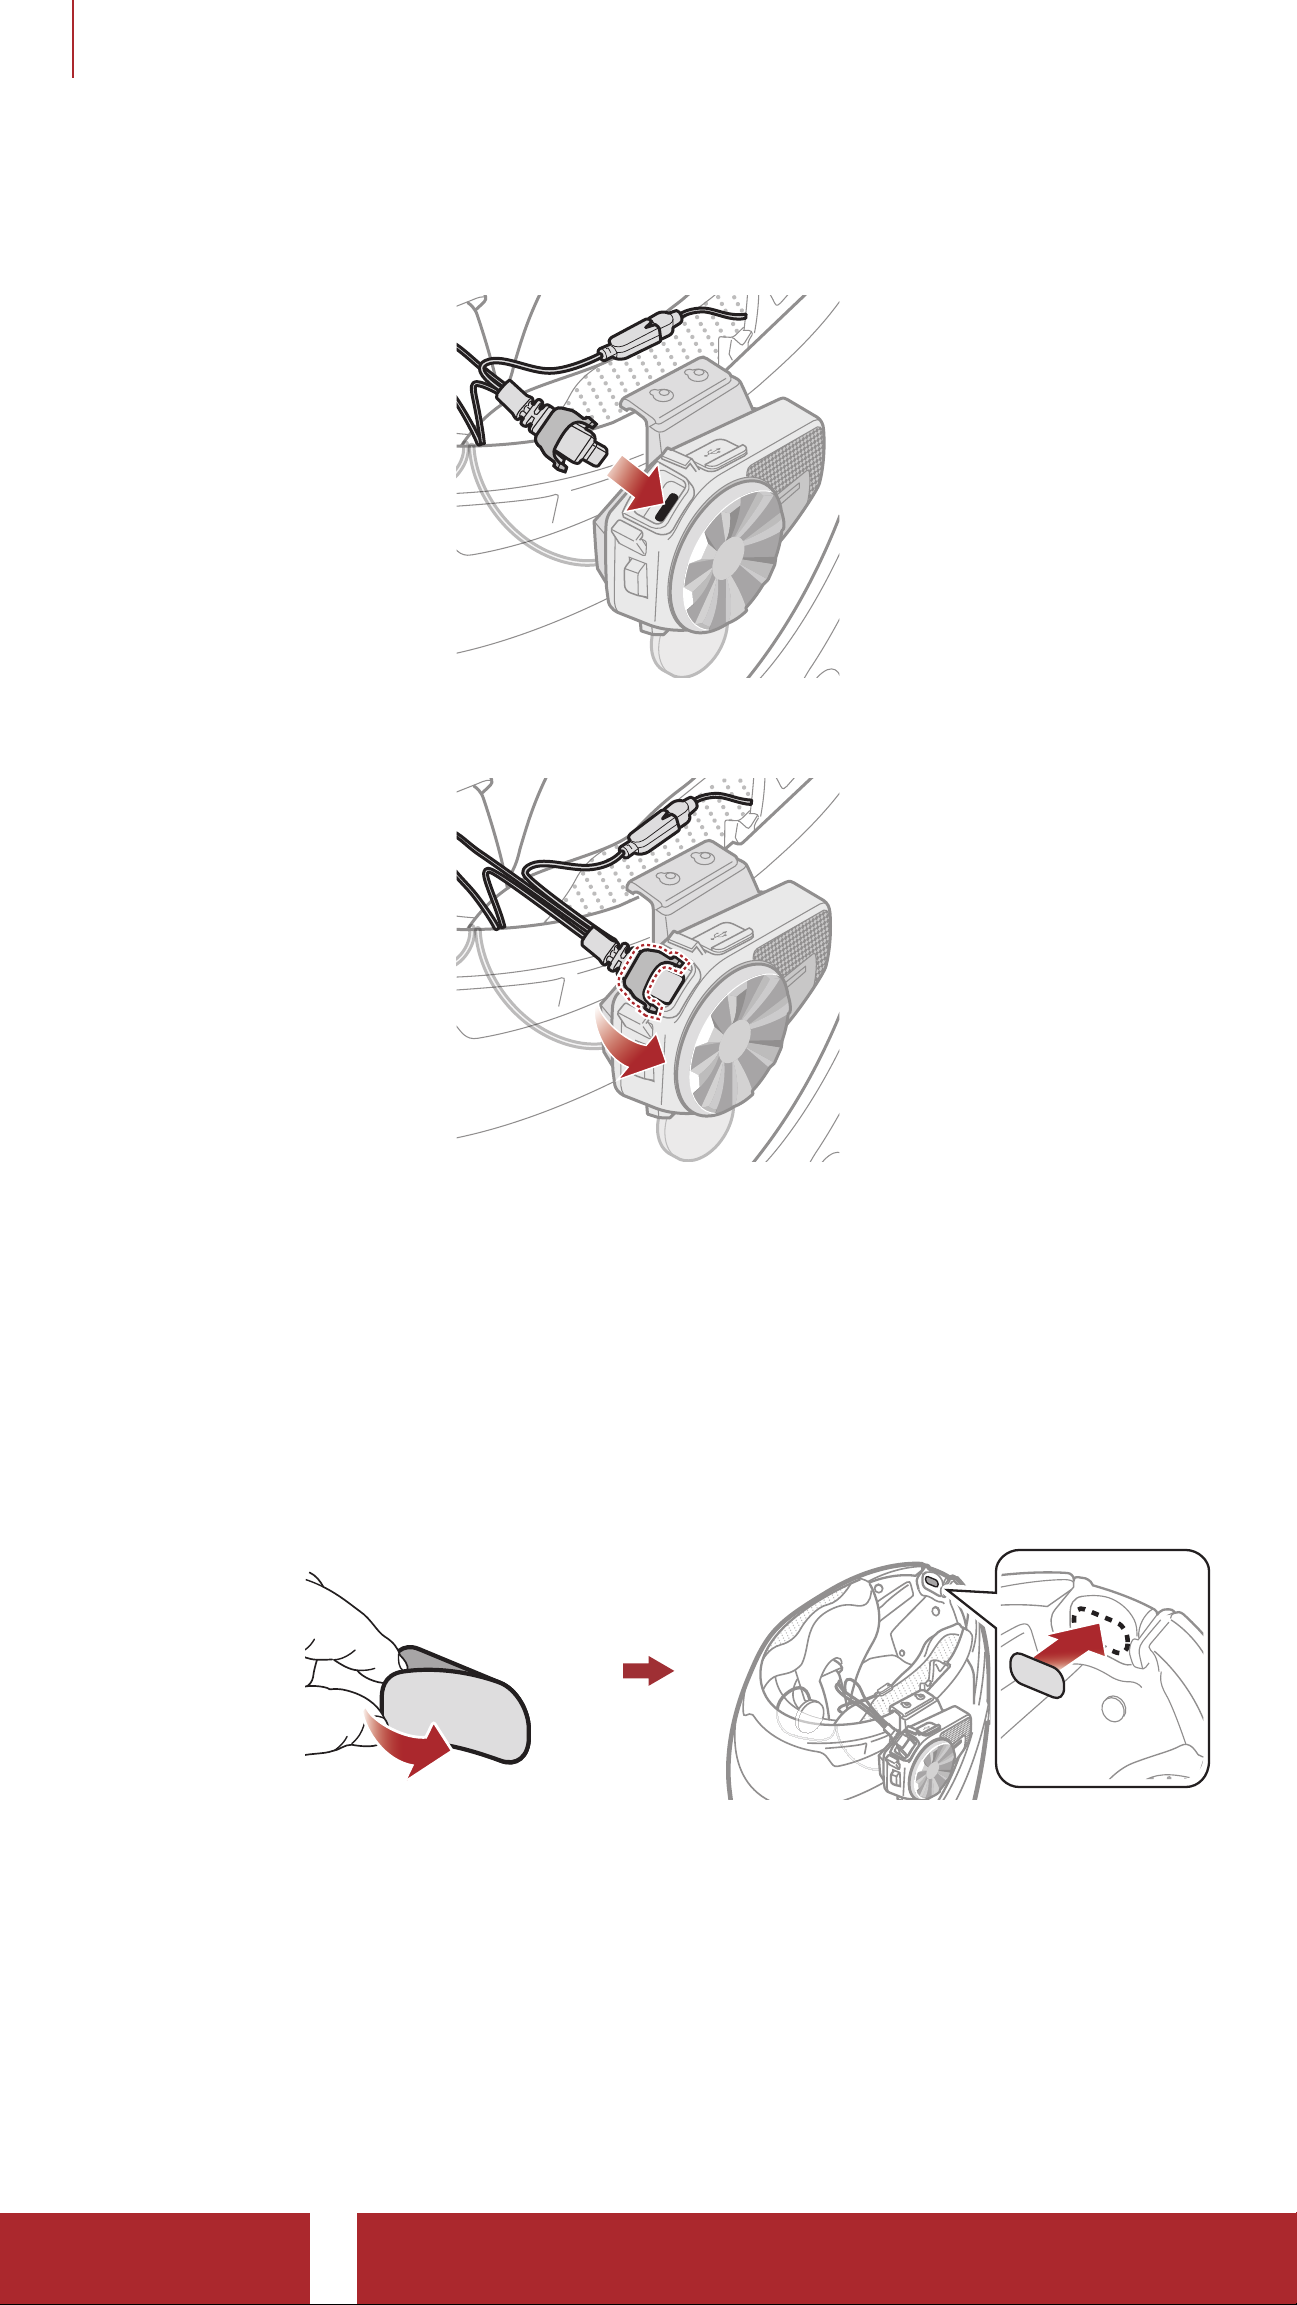
5. Insert the speaker cable into the speaker and microphone port to
connect it to the main unit.
6. Close the cover of the speaker cable to lock the cable to the port.
2.3.2 Installing the Wired Microphone
If you have a full face helmet, you can use the wired microphone.
1. Peel off the cover of the hook and loop fastener for wired microphone
to expose the adhesive tape. Then, attach the hook and loop fastener
on the inside of the helmet’s chin guard.
SPIDER ST1 Motorcycle Mesh Communication System | 12
Page 13
2 INSTALLING THE HEADSET ON YOUR HELMET
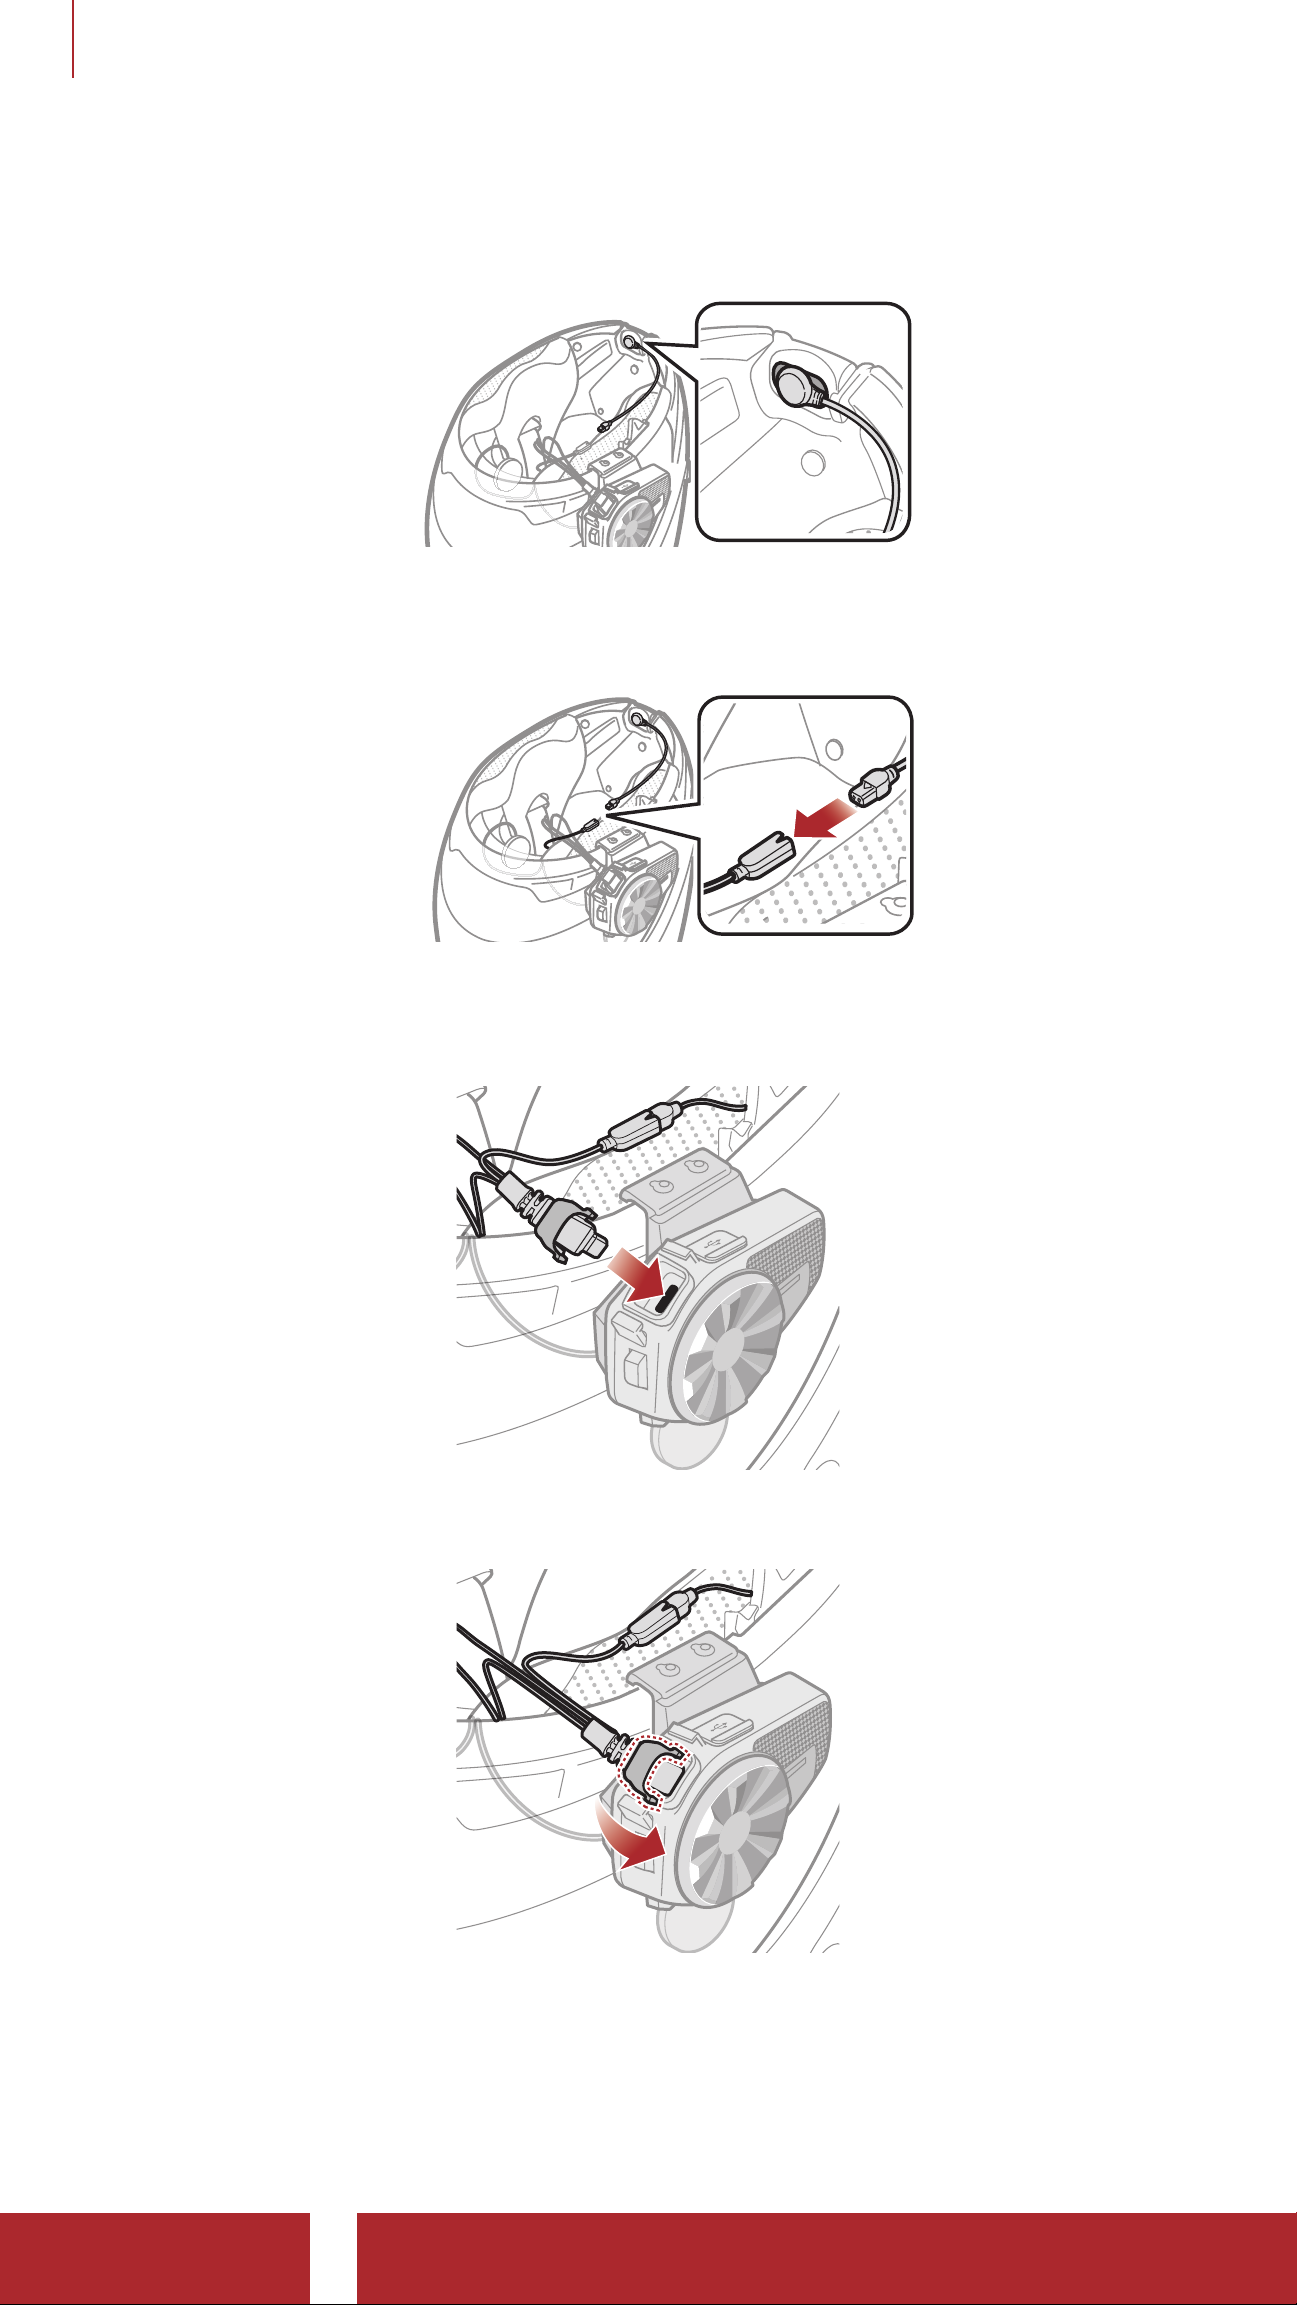
2. Attach the wired microphone to the hook and loop fastener for wired
microphone.
3. Align the arrows on the microphone and speaker cables and insert
the microphone cable into the microphone connector.
4. Insert the speaker cable into the speaker and microphone port to
connect it to the main unit.
5. Close the cover of the speaker cable to lock the cable to the port.
SPIDER ST1 Motorcycle Mesh Communication System | 13
Page 14

3. GETTING STARTED
3.1 Downloadable Sena Software
3.1.1 SENA MOTORCYCLES App
By simply pairing your phone with your headset, you can use the SENA
MOTORCYCLES App for quicker, easier set up and management.
SENA MOTORCYCLES
• Download the SENA MOTORCYCLES App on Google Play Store or
App Store.
3.1.2 Sena Device Manager
The Sena Device Manager allows you to upgrade firmware and
configure settings directly from your PC.
Sena Device Manager
• Download the Sena Device Manager at sena.com.
3.1.3 Firmware Upgrades
The headset supports firmware upgrades.
Please visit sena.com to check for the latest software downloads.
• Download the firmware at
sena.com.
NOTICE
• This
SPIDER ST1 with
• For the operation of the SPIDER ST1 with
lower than 2.0
User Guide (Version 2.0) explains how to operate the
firmware version 2.0 or higher.
a firmware version
, refer to the SPIDER ST1 User Guide (Version
1.1.0) or lower
.
SPIDER ST1 Motorcycle Mesh Communication System | 14
Page 15
3 GETTING STARTED
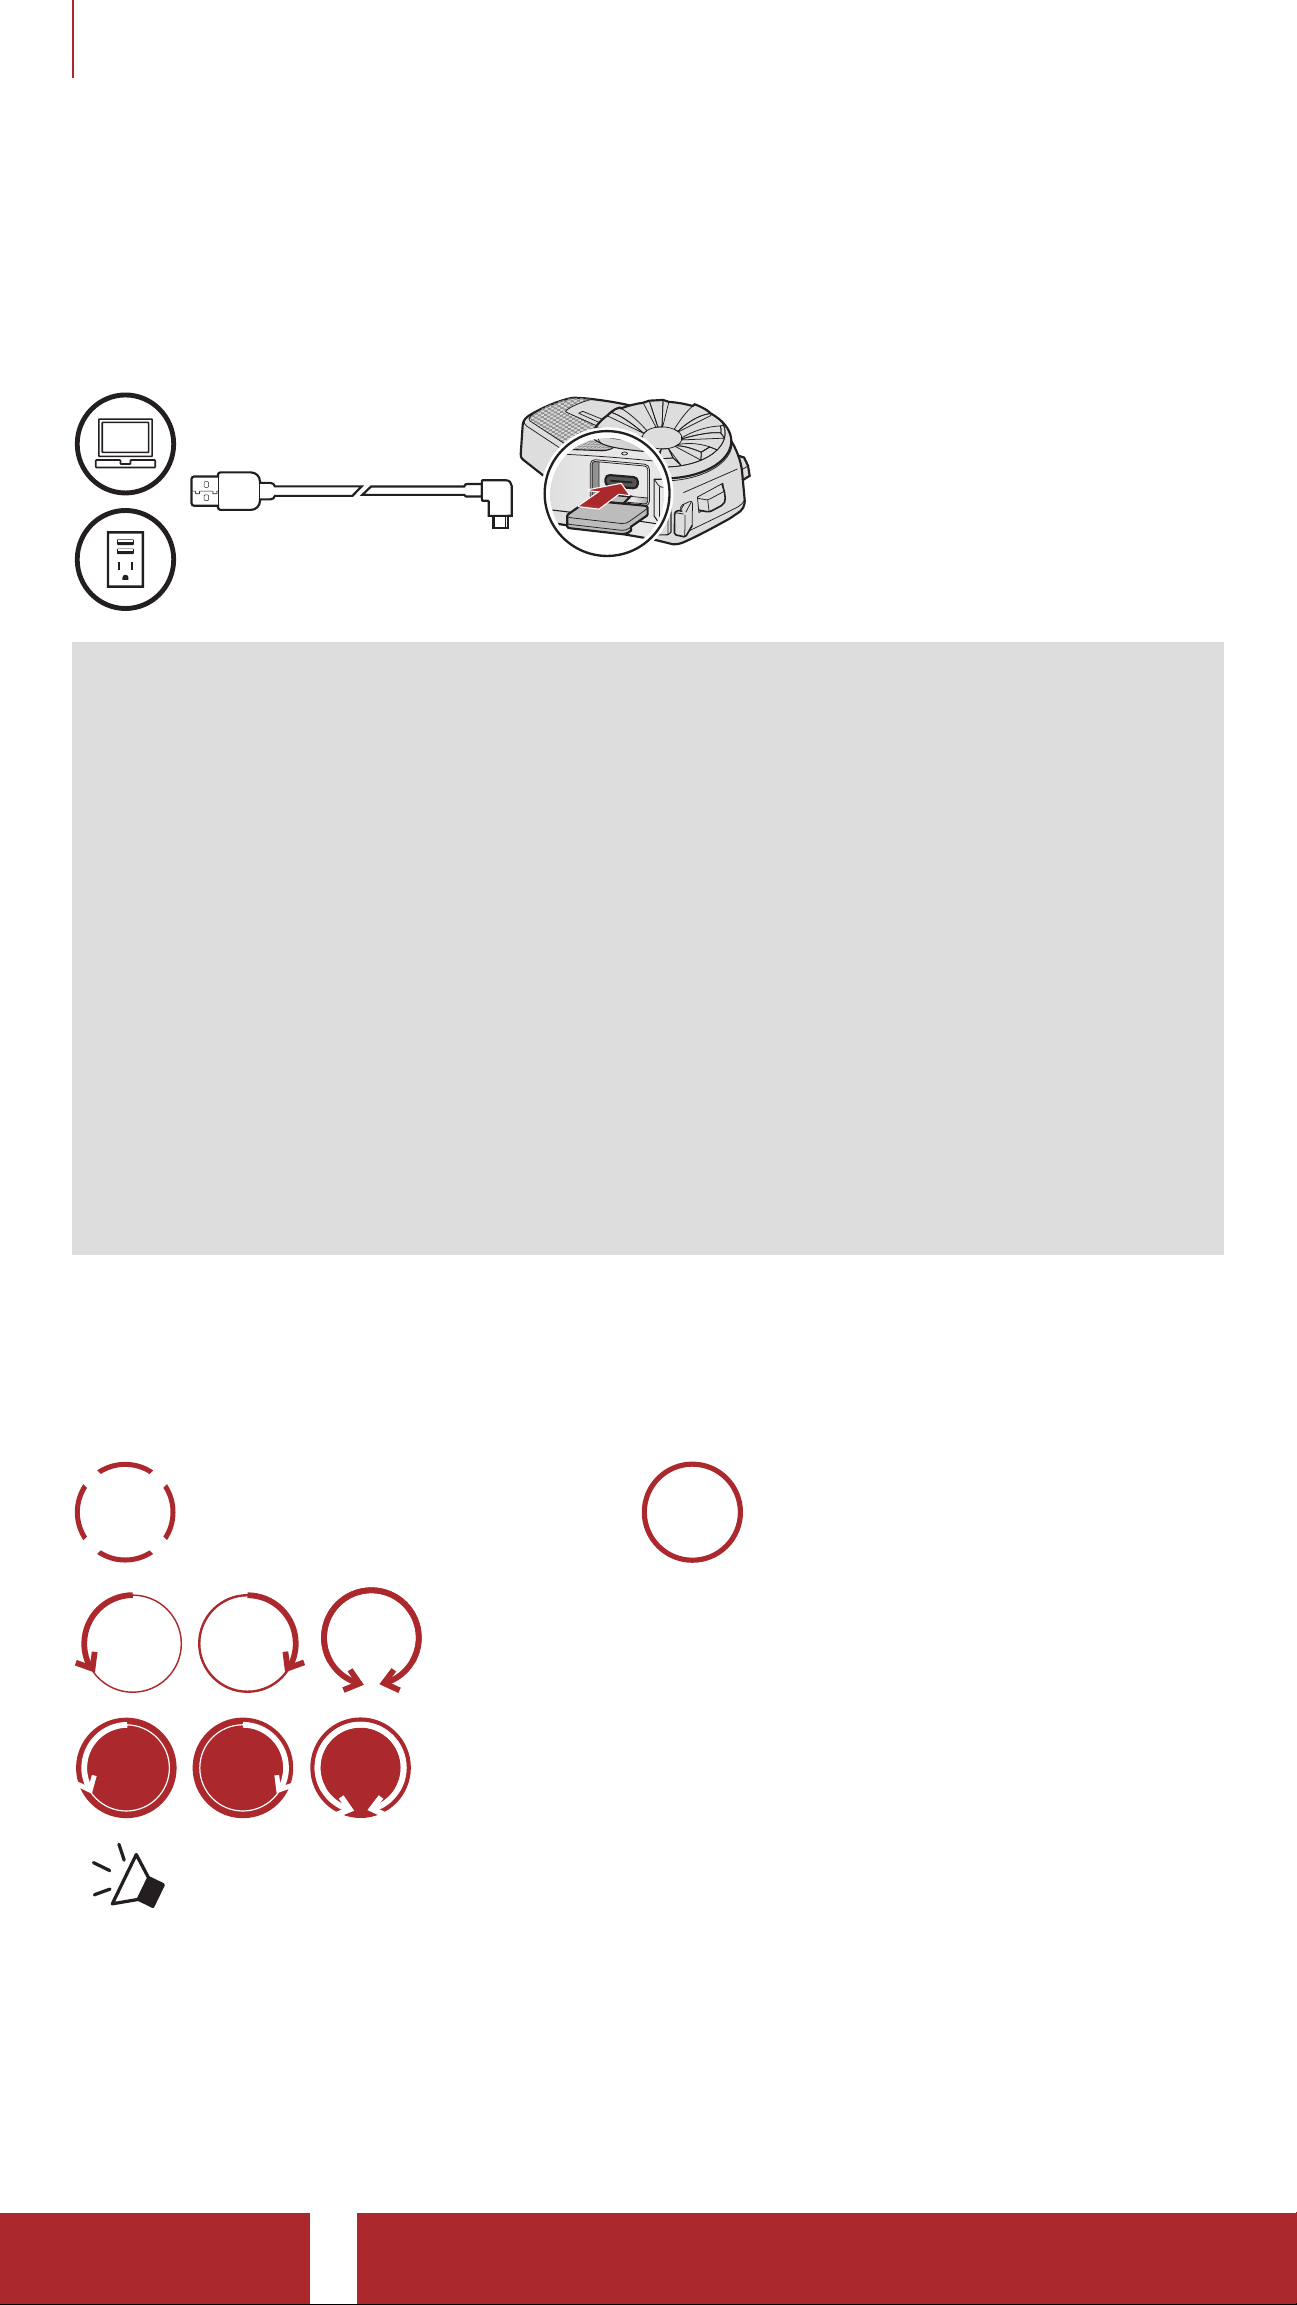
3.2 Charging
Charging the Headset
Depending upon the
charging method, the
headset will be fully
charged in about 2.5 hours.
Note:
• The headset includes a Fast Charging feature which allows it to
charge quickly over a short period of time. For example, a user
can get up to 2.0 hours of Mesh communication after charging the
headset for 20 minutes.
• Any 3rd party USB charger can be used with Sena products if the
charger is approved by either the FCC, CE, IC, or other locally
approved agencies.
• Use of a non-approved charger may cause fire, explosion,
leakage, and other hazards which may also reduce the life time or
performance of the battery.
• The SPIDER ST1 is compatible with 5 V input USB-charged devices
only.
3.3 Legend
TAP
1x
ROTATE
L
ROTATE
L
Tap button/Jog Dial the
specified number of times
ROTATE
R
ROTATE
R
“Hello”
ROTATE
ROTATE
HOLD
10s
Rotate Jog Dial clockwise (right) or
counterclockwise (left).
Rotate while Pressing Jog Dial clockwise (right) or
counterclockwise (left).
Audible prompt
Press and Hold button/Jog
Dial for the specified amount
of time
SPIDER ST1 Motorcycle Mesh Communication System | 15
Page 16
3 GETTING STARTED
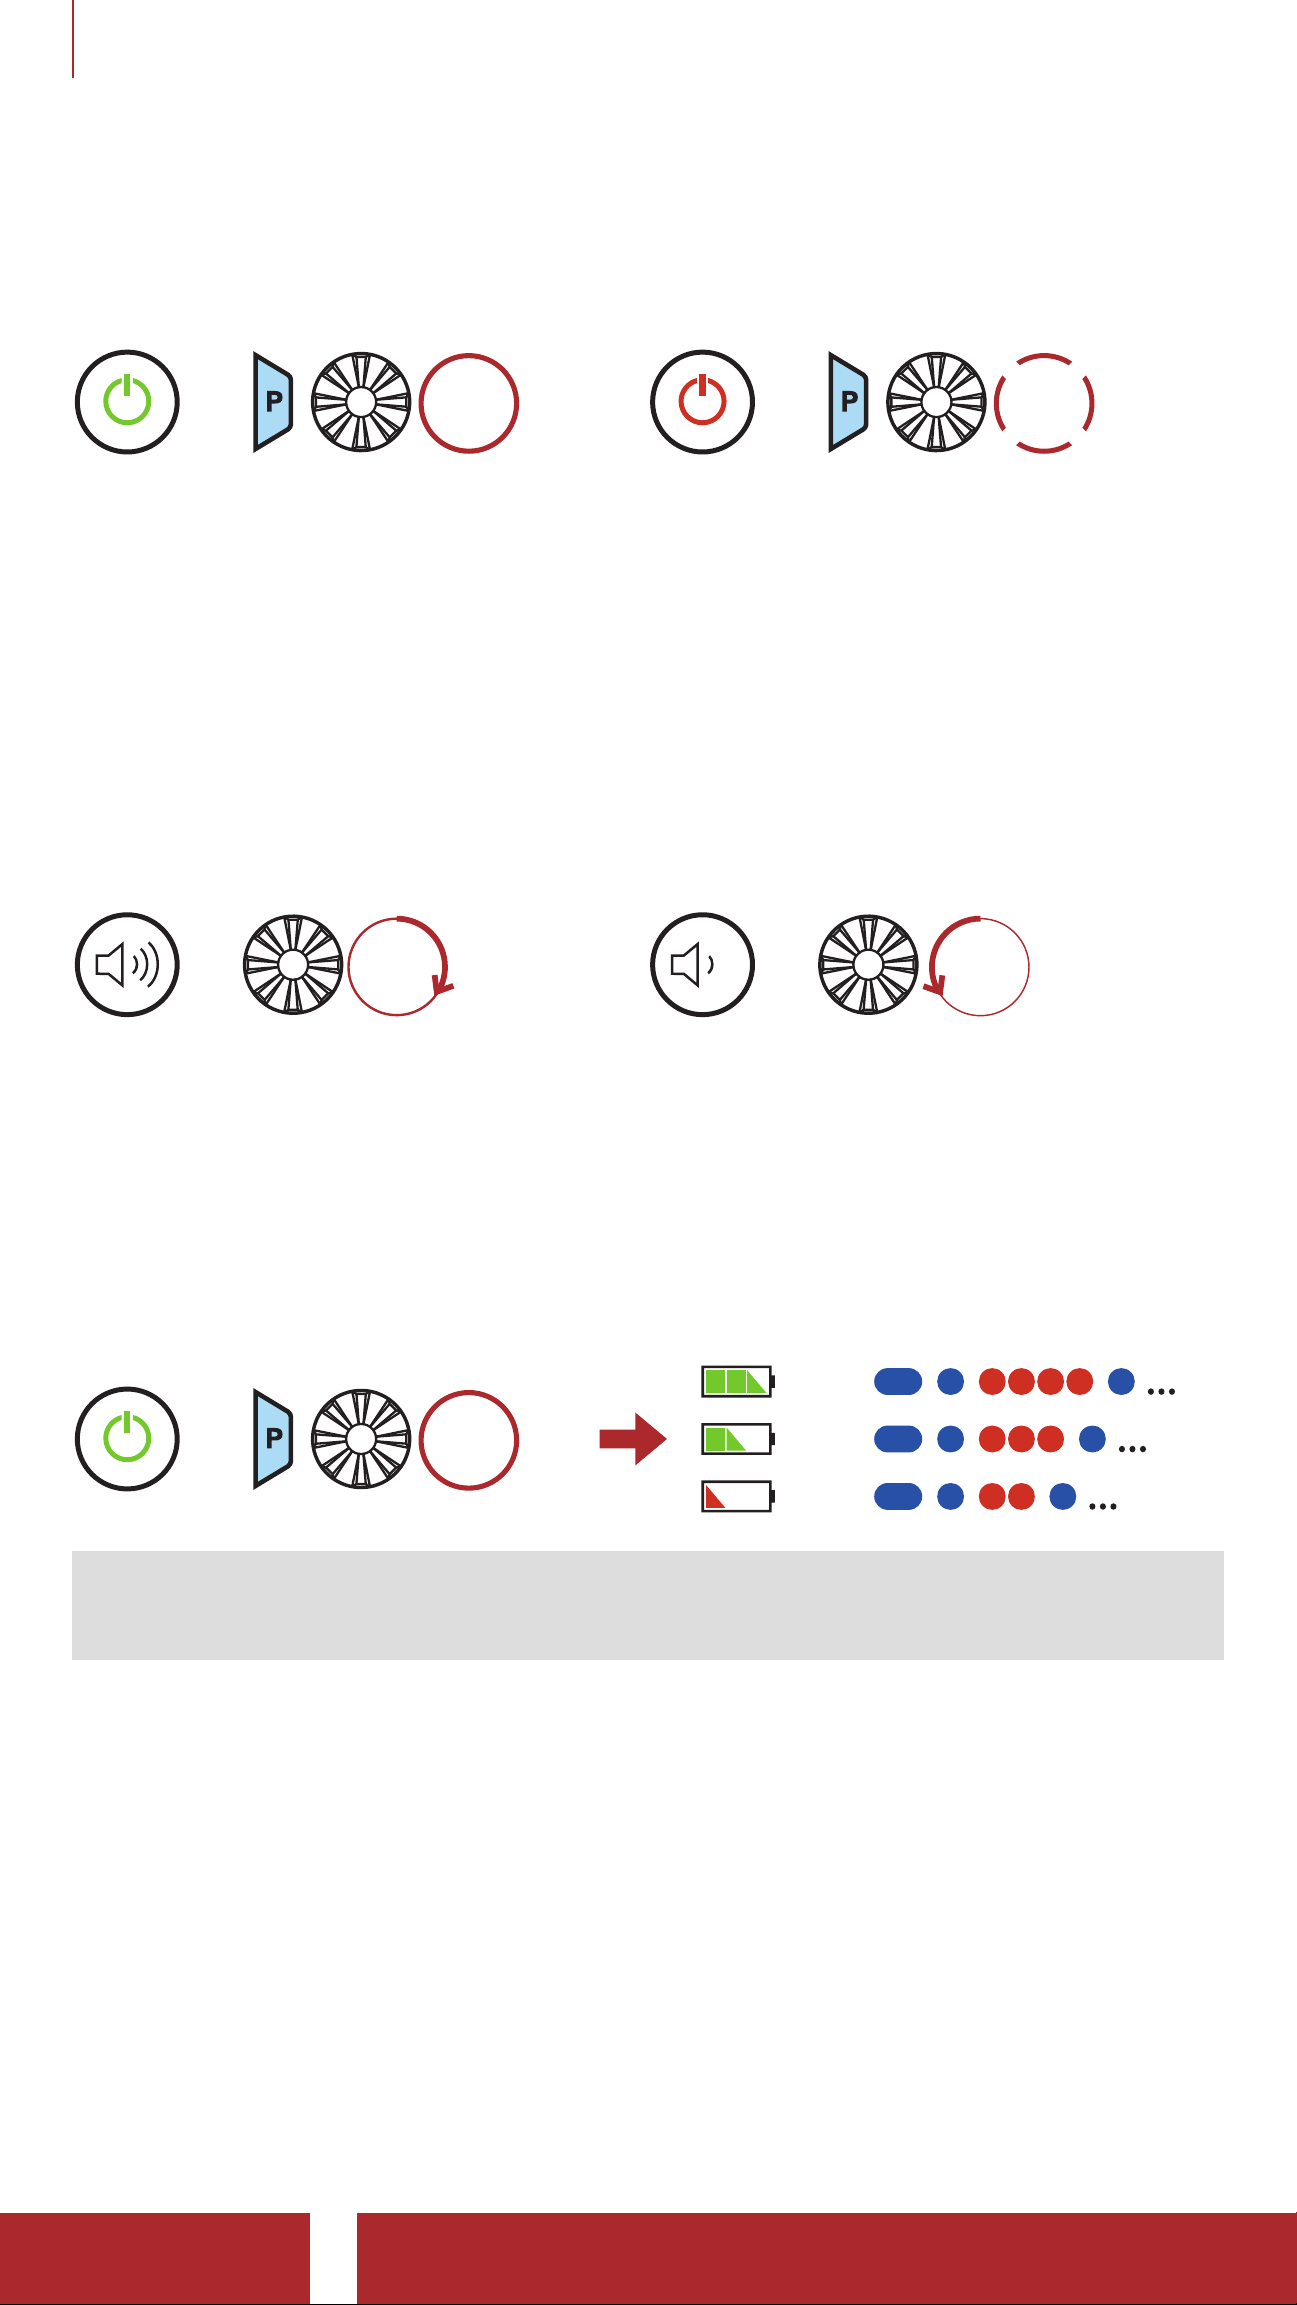
3.4 Powering On and Off
Powering On
HOLD
=
1s
Powering Off
=
TAP
1x
3.5 Volume Adjustment
You can raise or lower the volume by rotating the Jog Dial clockwise
or counterclockwise. Volume is set and maintained independently at
different levels for each audio source (i.e., phone, intercom), even when
the headset is rebooted.
Volume Up
Volume Down
=
ROTATE
=
R
3.6 Checking the Battery Level
Instructions are for when powering the headset on.
Powering On
=
HOLD
=
1s
=
=
ROTATE
L
Note: When the battery is low while in use, you will hear a voice
prompt saying “Low battery”.
SPIDER ST1 Motorcycle Mesh Communication System | 16
Page 17

4. PAIRING THE HEADSET WITH OTHER
BLUETOOTH DEVICES
When using the headset with other Bluetooth devices for the first time,
they will need to be “paired.” This enables them to recognize and
communicate with one another whenever they are within range.
The headset can pair with multiple Bluetooth devices such as a mobile
phone, GPS, or MP3 player via Mobile Phone Pairing, Second Mobile
Phone Pairing and GPS Pairing.
Mobile
Phone
MP3
Player
GPS
Devices
4.1 Phone Pairing
There are three ways to pair the phone.
4.1.1 Initially Pairing the SPIDER ST1
The headset will automatically enter the phone pairing mode when you
initially turn on the headset or in the following situation:
• Rebooting after executing Factory Reset.
1. Press and hold the Phone Button and the Jog Dial for 1 second.
HOLD
=
Blinking
1s
“Phone pairing”
Note:
• The phone pairing mode lasts for 3 minutes.
• To cancel phone pairing, tap the Phone Button or Jog Dial.
SPIDER ST1 Motorcycle Mesh Communication System | 17
Page 18
4 PAIRING THE HEADSET WITH OTHER BLUETOOTH DEVICES
SPIDER ST1
SPIDER ST1
SPIDER ST1
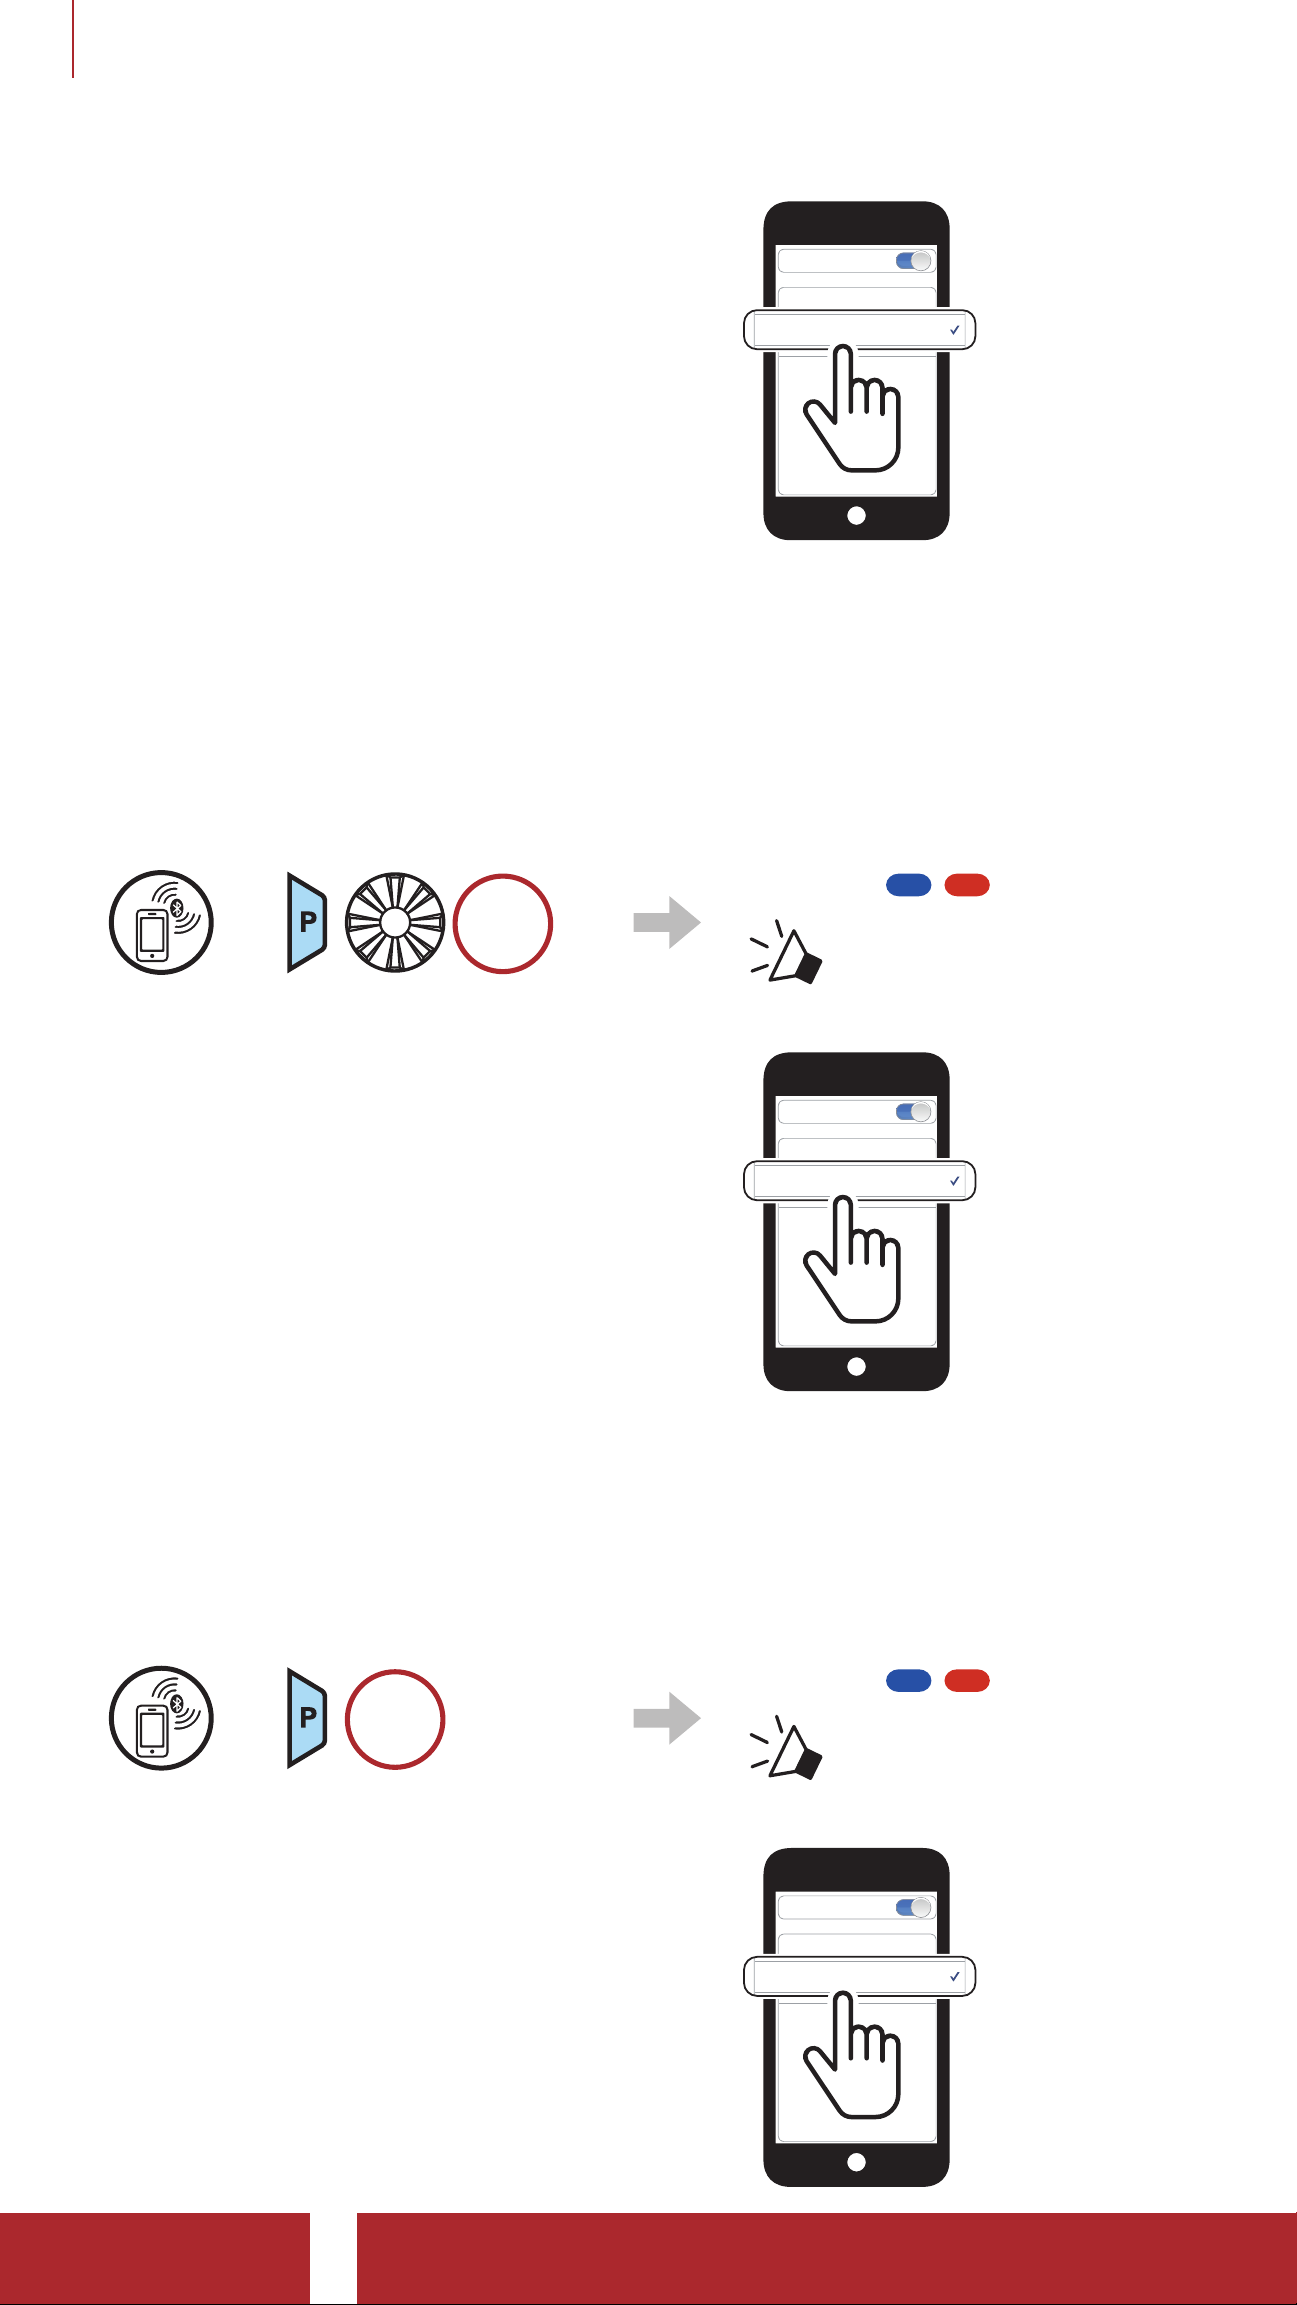
2. Select SPIDER ST1 in the list of
Bluetooth devices detected. If your
mobile phone asks for a PIN, enter
0000.
Bluetooth
Pi
Device B
4.1.2 Pairing When the SPIDER ST1 is Turned Off
1. While the headset is off, press and hold the Phone Button and the
Jog Dial until the LED flashes red and blue alternately and you hear a
voice prompt, “Phone pairing”.
=
HOLD
2. Select SPIDER ST1 in the list of
Bluetooth devices detected. If your
mobile phone asks for a PIN, enter
0000.
Blinking
“Phone pairing”
Bluetooth
Pi
Device B
4.1.3 Pairing When the SPIDER ST1 is Turned On
1. While the headset is on, press and hold the Phone Button for
5 seconds.
HOLD
Blinking
=
5s
“Phone pairing”
2. Select SPIDER ST1 in the list of
Bluetooth devices detected. If your
mobile phone asks for a PIN, enter
0000.
Bluetooth
Pi
Device B
SPIDER ST1 Motorcycle Mesh Communication System | 18
Page 19
4 PAIRING THE HEADSET WITH OTHER BLUETOOTH DEVICES
SPIDER ST1
SPIDER ST1
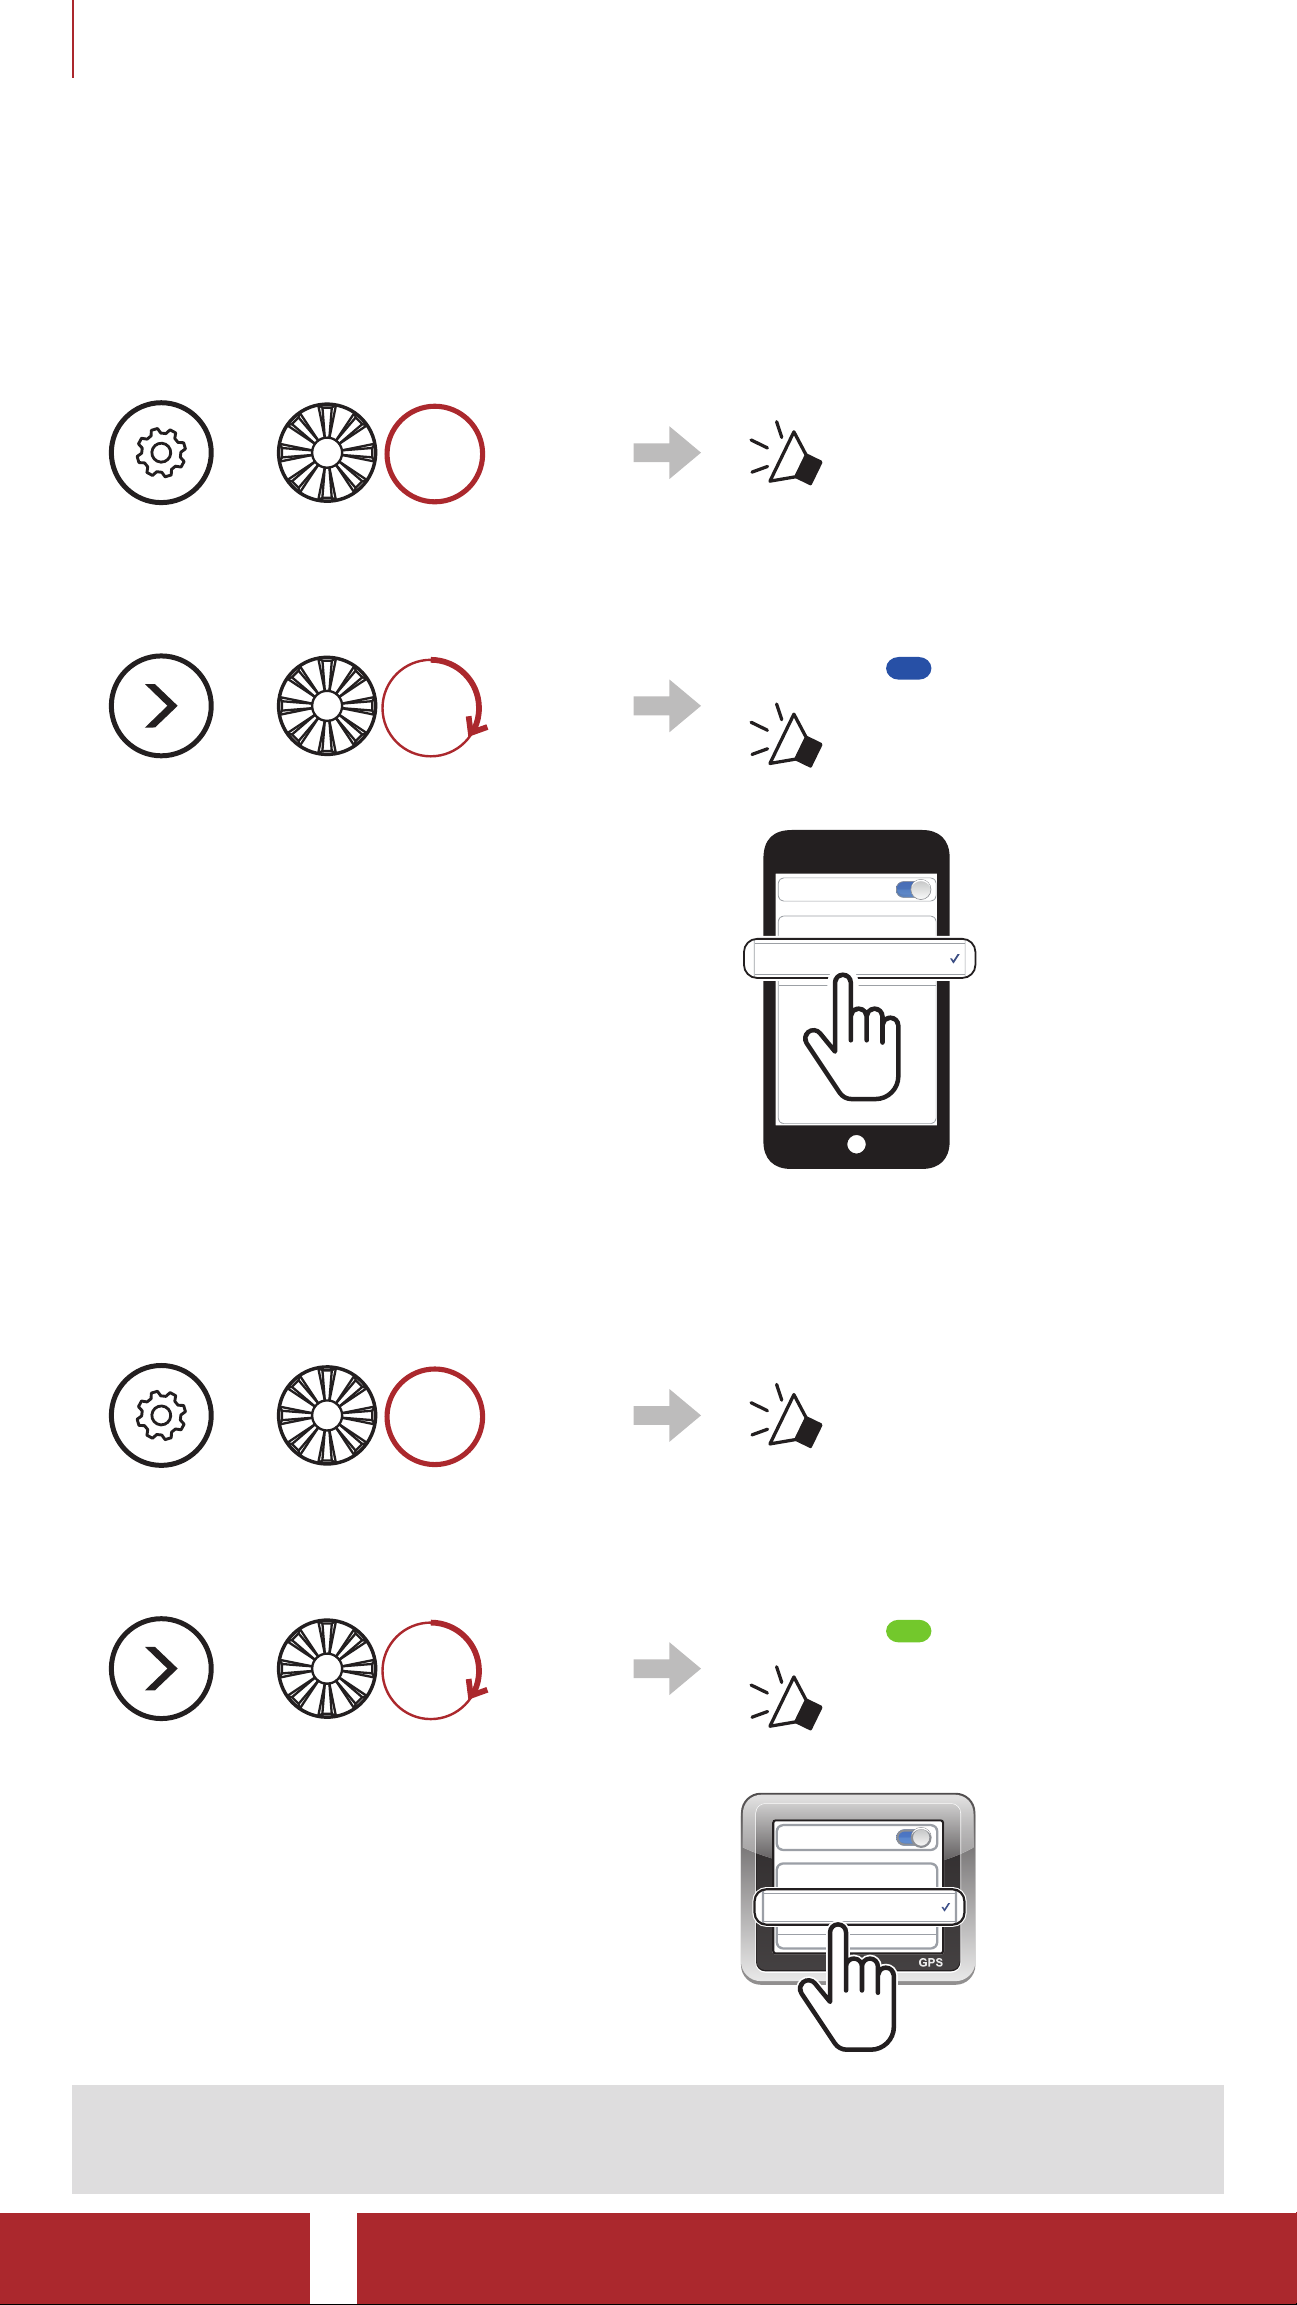
4.2 Second Mobile Phone Pairing - Second Mobile
Phone and GPS
1. Press and hold the Jog Dial for 5 seconds.
HOLD
“ Configuration
=
5s
menu”
2. Rotate the Jog Dial clockwise until you hear a voice prompt, “Second
mobile phone pairing”.
=
ROTATE
R
Blinking
“ Second mobile
phone pairing”
3. Select SPIDER ST1 in the list of
Bluetooth devices detected. If your
Bluetooth device asks for a PIN,
enter 0000.
Bluetooth
Pi
Device B
4.3 GPS Pairing
1. Press and hold the Jog Dial for 5 seconds.
HOLD
=
5s
2. Rotate the Jog Dial clockwise until you hear a voice prompt, “GPS
Pairing”.
Blinking
ROTATE
=
R
3. Select SPIDER ST1 in the list of
devices detected. If your Bluetooth
“ Configuration menu”
“ GPS pairing”
Bluetooth
device asks for a PIN, enter 0000.
Note: If you pair your GPS device via GPS Pairing, its instruction will
interrupt your Mesh Intercom conversations.
Pi
Device B
SPIDER ST1 Motorcycle Mesh Communication System | 19
Page 20
5. MOBILE PHONE USAGE
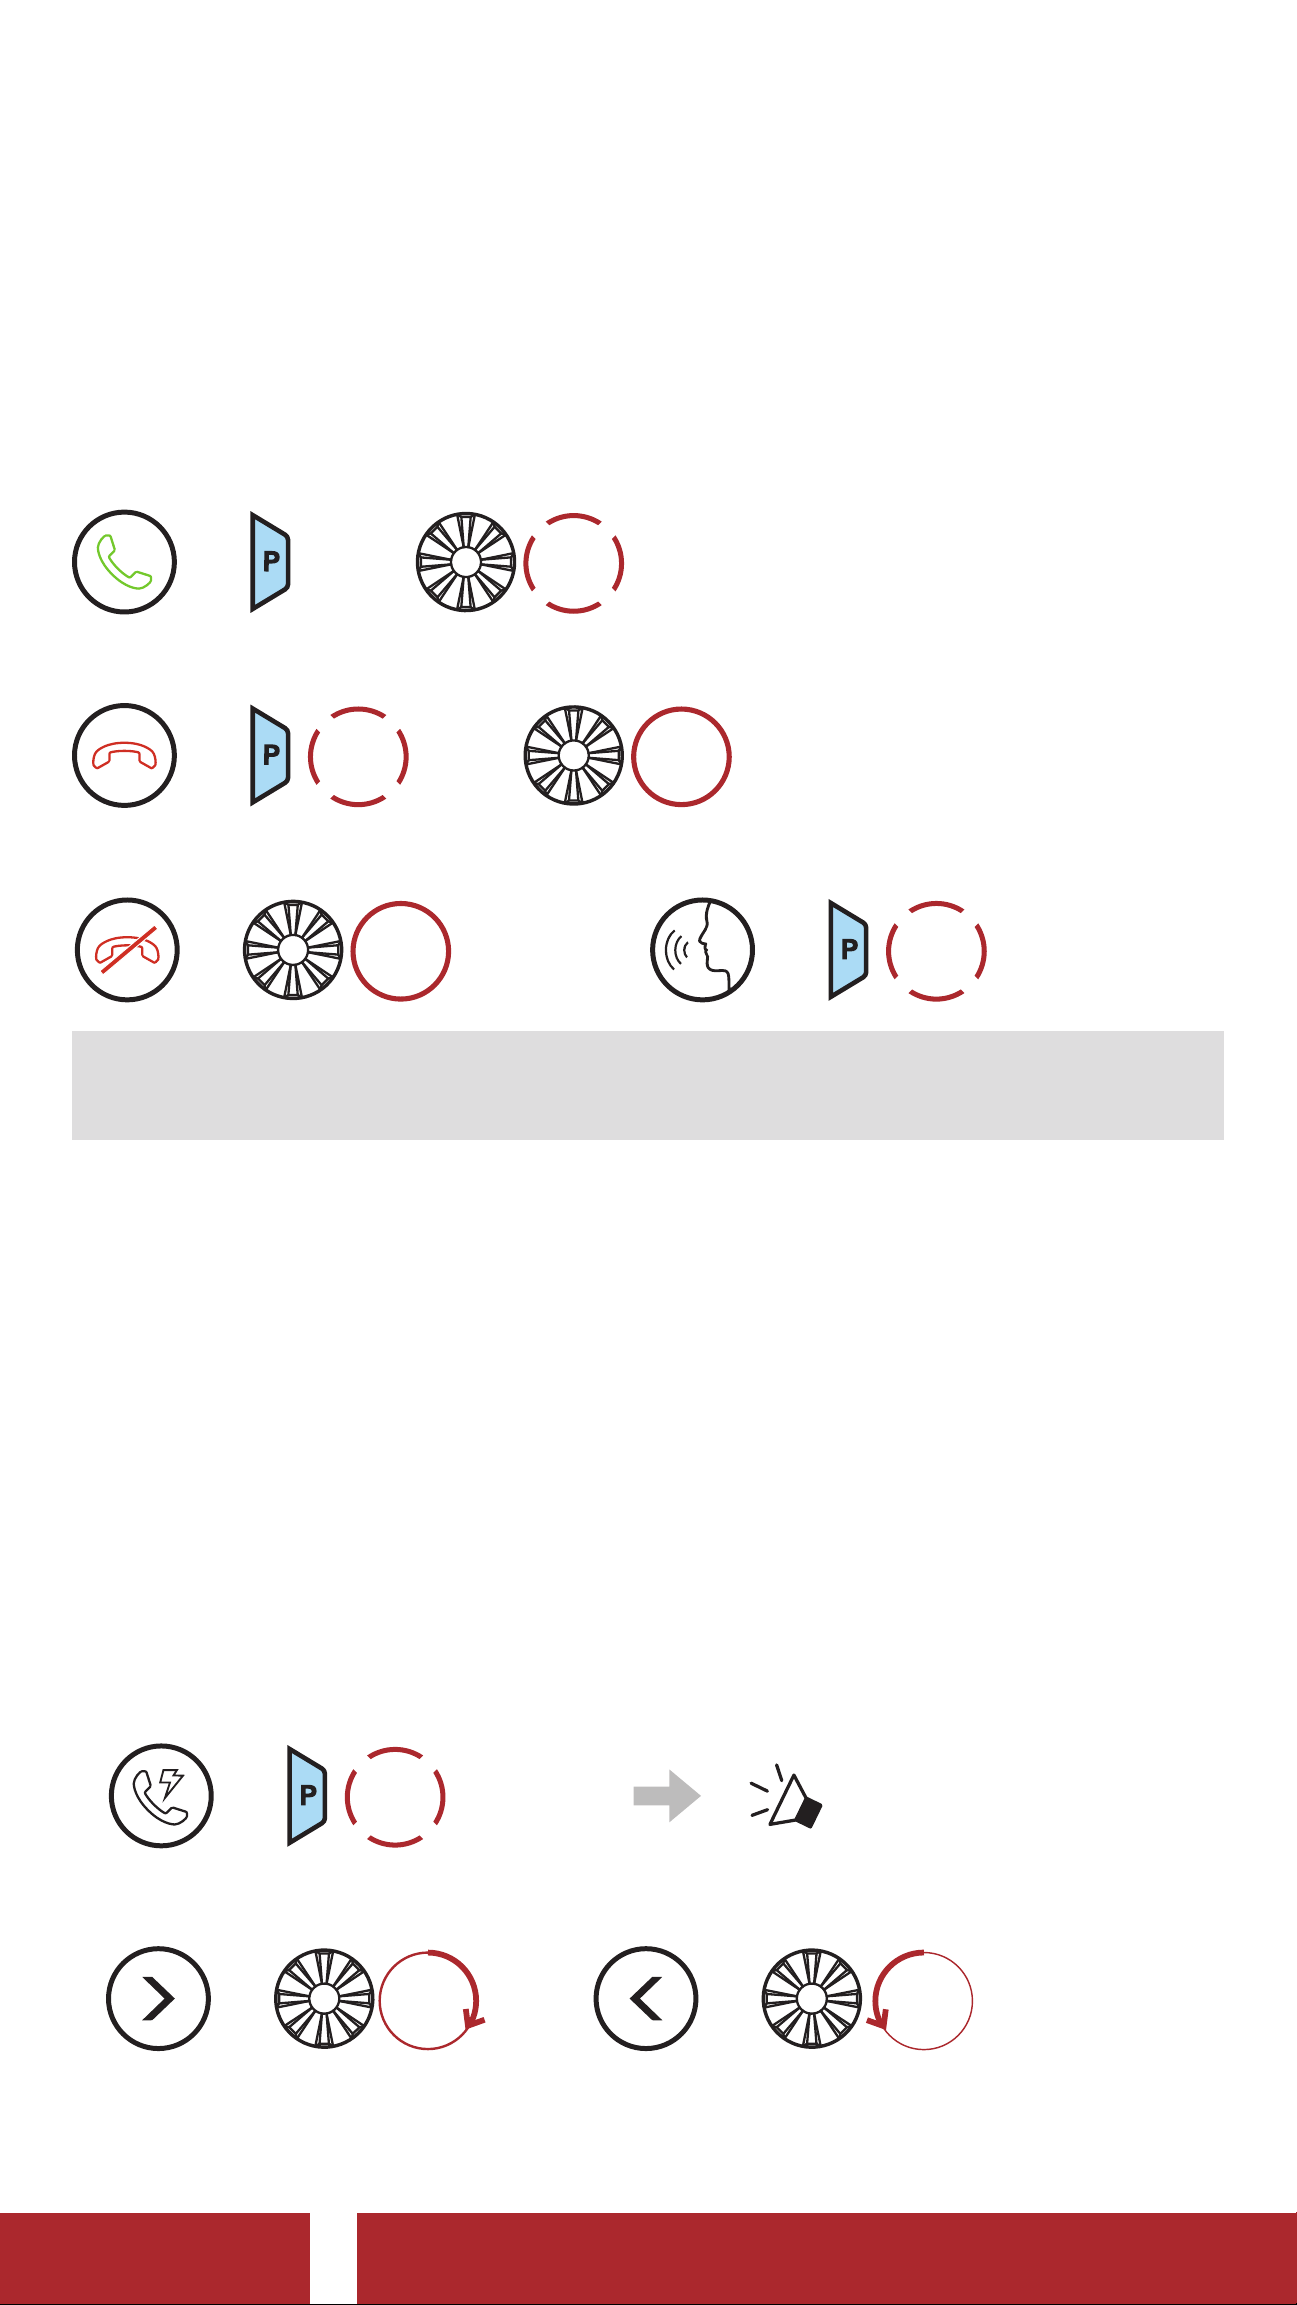
5.1 Making and Answering Calls
Answer a Call
TAP
1x
=
or
End a Call
HOLD
2s
Make a Call with Voice Dialer
=
TAP
1x
in stand by
mode
=
Reject a Call
=
TAP
or
1x
HOLD
2s
Note: If you have a GPS device connected, you will not hear its voice
navigations during a phone call.
5.2 Speed Dialing
5. 2.1 Assigning Speed Dial Presets
Speed Dial Presets could be assigned through the Sena Device
Manager or the SENA MOTORCYCLES App.
5.2.2 Using Speed Dial Presets
1. Enter into the Speed Dial menu.
TAP
=
2x
“ Speed dial”
2. Navigate forward or backward through Speed Dial Preset numbers.
=
ROTATE
R
or
SPIDER ST1 Motorcycle Mesh Communication System | 20
=
ROTATE
L
Page 21

5 MOBILE PHONE USAGE
3. Call one of your Speed Dial Presets numbers.
TAP
=
1x
4. Redial the last number called.
Redial Last Number
TAP
=
1x
“ Speed dial (#)”
“ Last number redial”
5.3 HD Voice (Always On)
HD Voice allows you to communicate in high-definition during phone
calls. This feature increases the quality so that the audio will be crisp
and clear during phone call conversations.
Note: Refer to the manufacturer of your Bluetooth device that will be
connected to the headset to see if it supports HD Voice.
SPIDER ST1 Motorcycle Mesh Communication System | 21
Page 22

6. STEREO MUSIC
6.1 Playing Music with Bluetooth Devices
Play/Pause Music
HOLD
=
Track Forward/Backward
1s
=
ROTATE
R
or
=
ROTATE
L
SPIDER ST1 Motorcycle Mesh Communication System | 22
Page 23
7. MESH INTERCOM
7.1 What is Mesh Intercom?
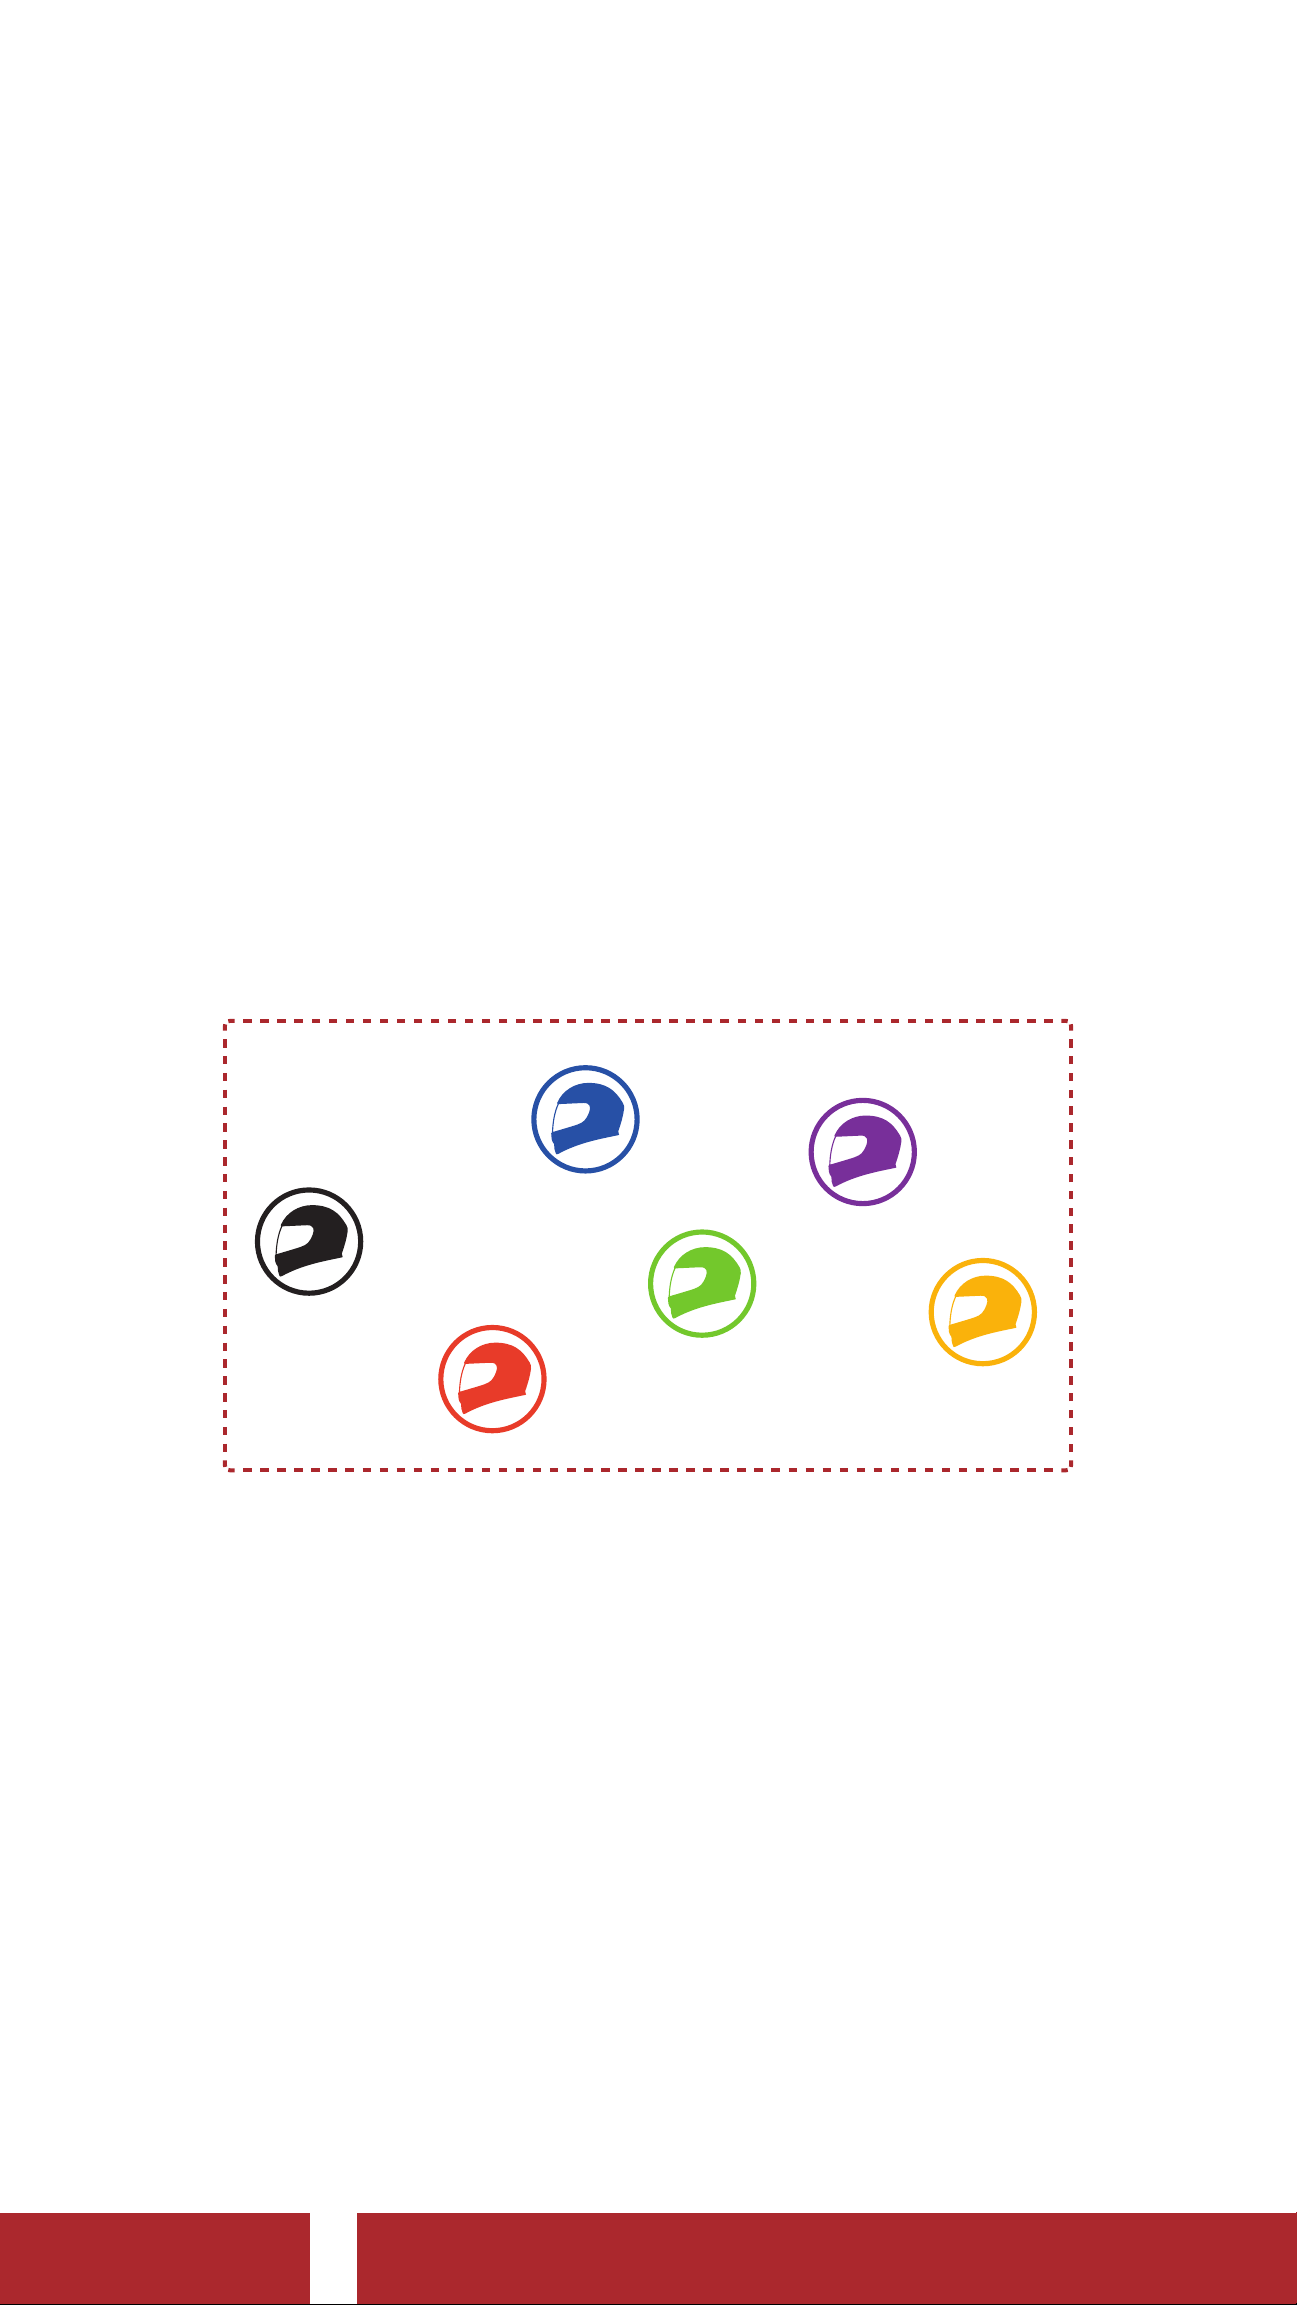
Mesh Intercom™ is a dynamic communication system created by Sena
that provides instant and effortless bike-to-bike communication without
a pre-grouping process. Mesh Intercom allows riders to connect and
communicate with nearby users without the need to pair each headset
together.
The working distance between each SPIDER ST1 in Mesh Intercom
can be up to 2 km (1.2 miles) in open terrain. In open terrain, the Mesh
can be extended up to 8 km (5 miles) between a minimum of six users.
Within the same channel in Open Mesh™ or the same private group
in Group Mesh™, six users can talk at the same time and enjoy the
optimal quality for their conversation.
Mesh Intercom
SPIDER ST1 Motorcycle Mesh Communication System | 23
Page 24
7 MESH INTERCOM
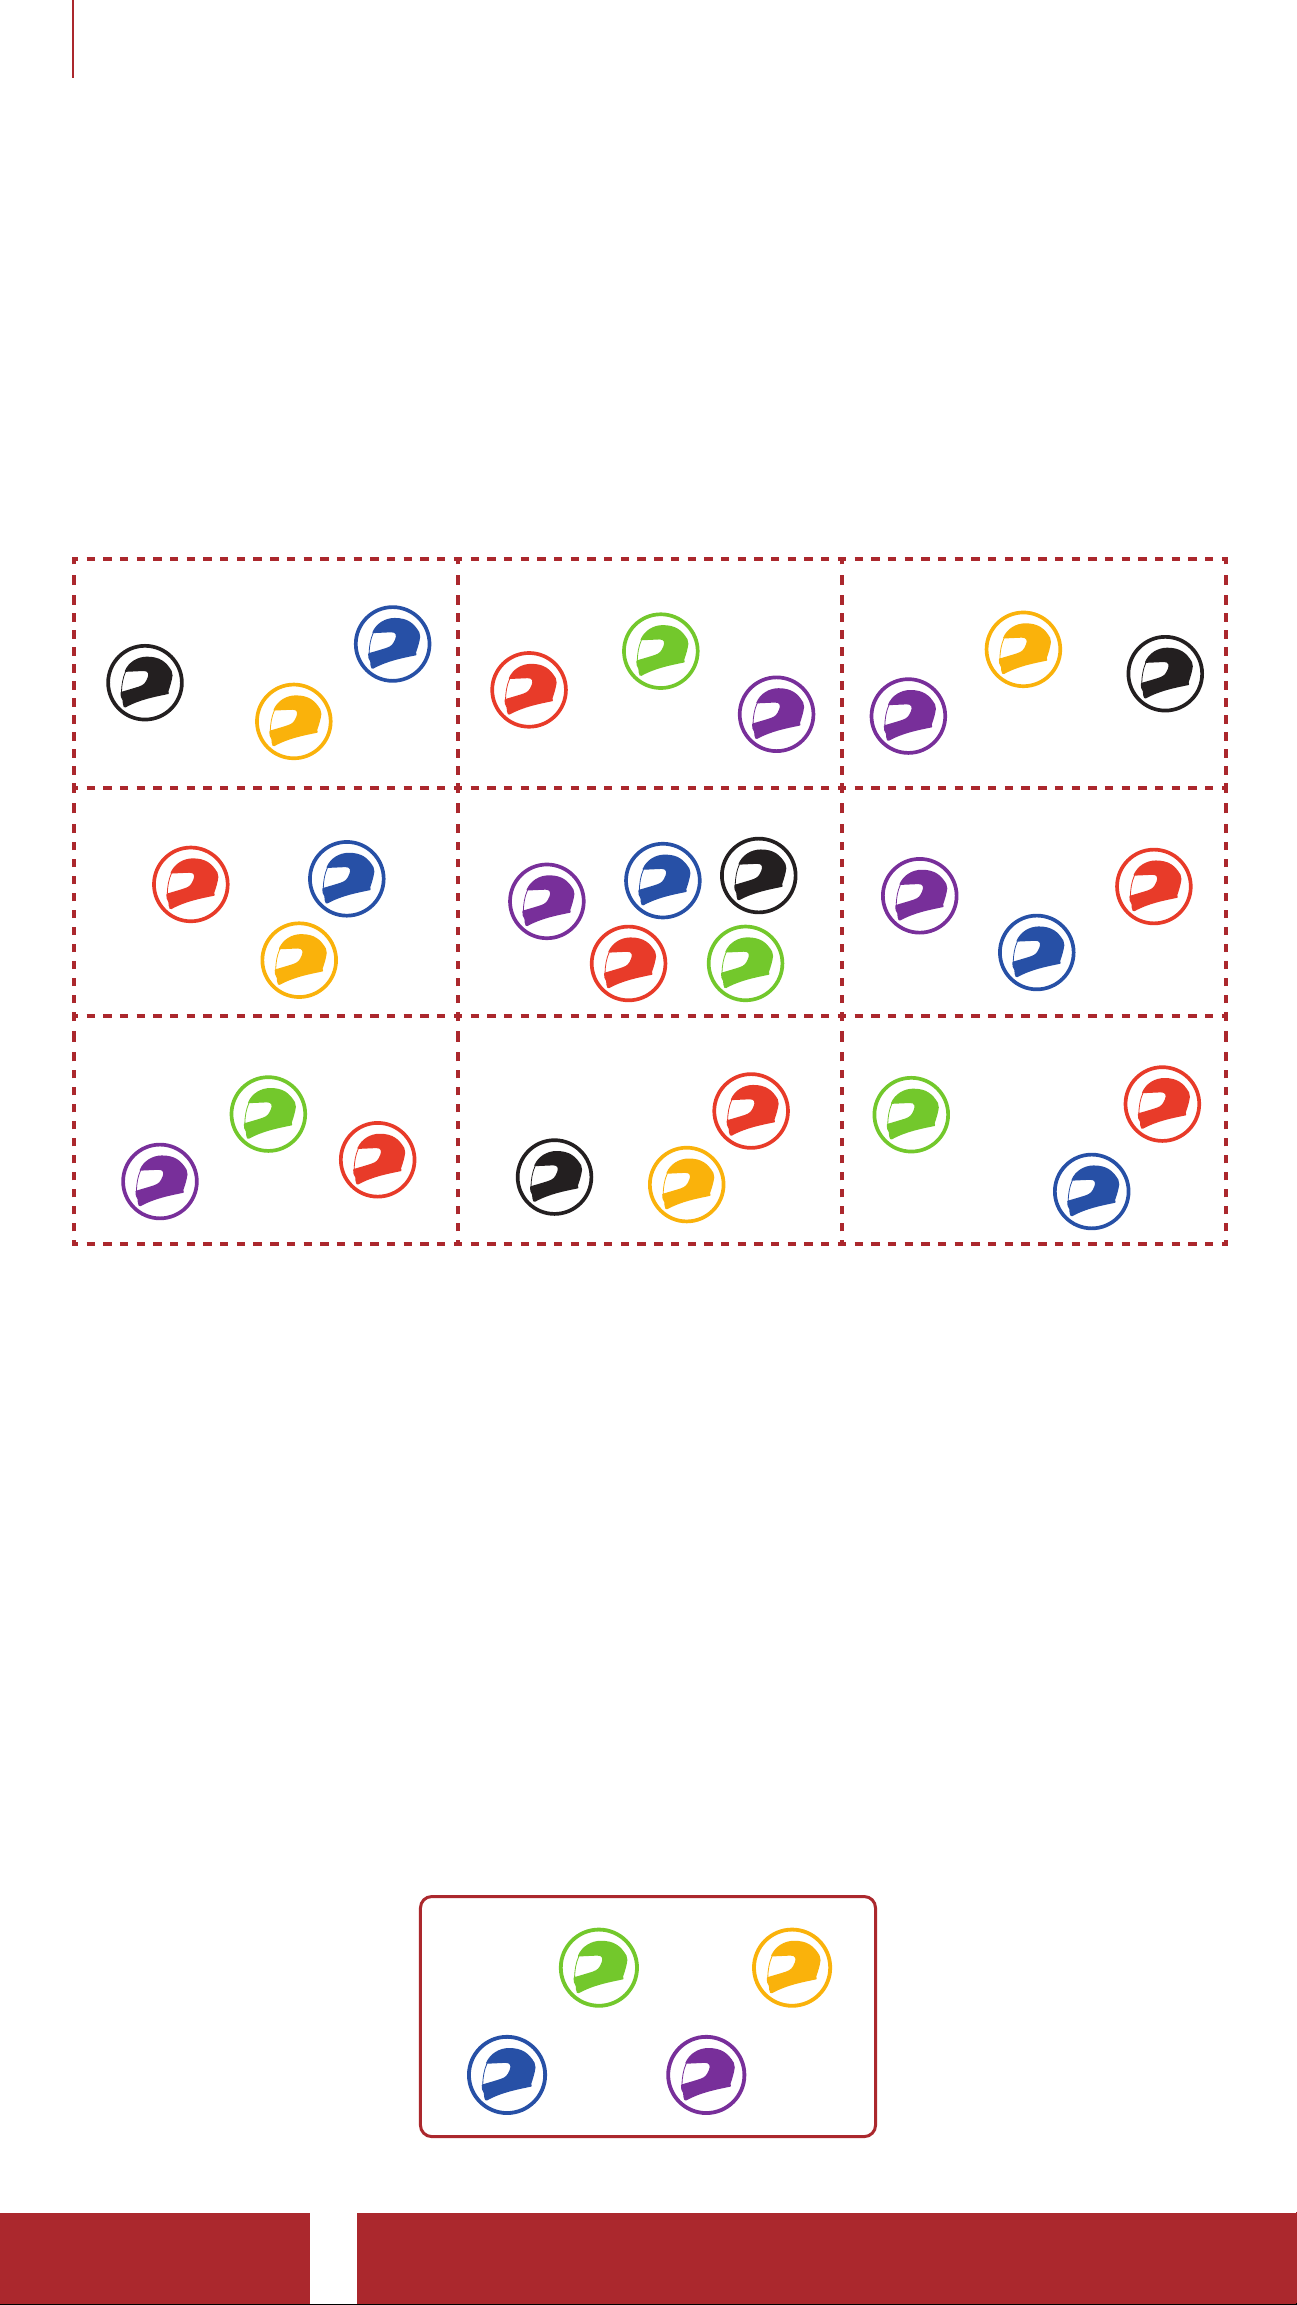
7.1.1 Open Mesh
Open Mesh is an open group intercom function. Users can freely
communicate with each other in the same Open Mesh channel and
select which channel (1-9) to use through the headset.
It can connect with a virtually unlimited number of users in each channel.
Open Mesh
Ch 1 Ch 2 Ch 3
Ch 4 Ch 5 Ch 6
Ch 7 Ch 8 Ch 9
7.1. 2 Group Mesh
Group Mesh is a closed group intercom function that allows users to
join, leave, or rejoin a group intercom conversation without pairing each
headset. Users can freely communicate with each other in the same
private group in Group Mesh.
For closed intercom conversations using Mesh Intercom, a Group
Mesh needs to be created by the users. When users create a private
group in Group Mesh by Mesh Grouping, the headset automatically
switches from Open Mesh to Group Mesh. Up to 24 users can all be
connected in each private group.
Group Mesh
SPIDER ST1 Motorcycle Mesh Communication System | 24
Page 25
7 MESH INTERCOM
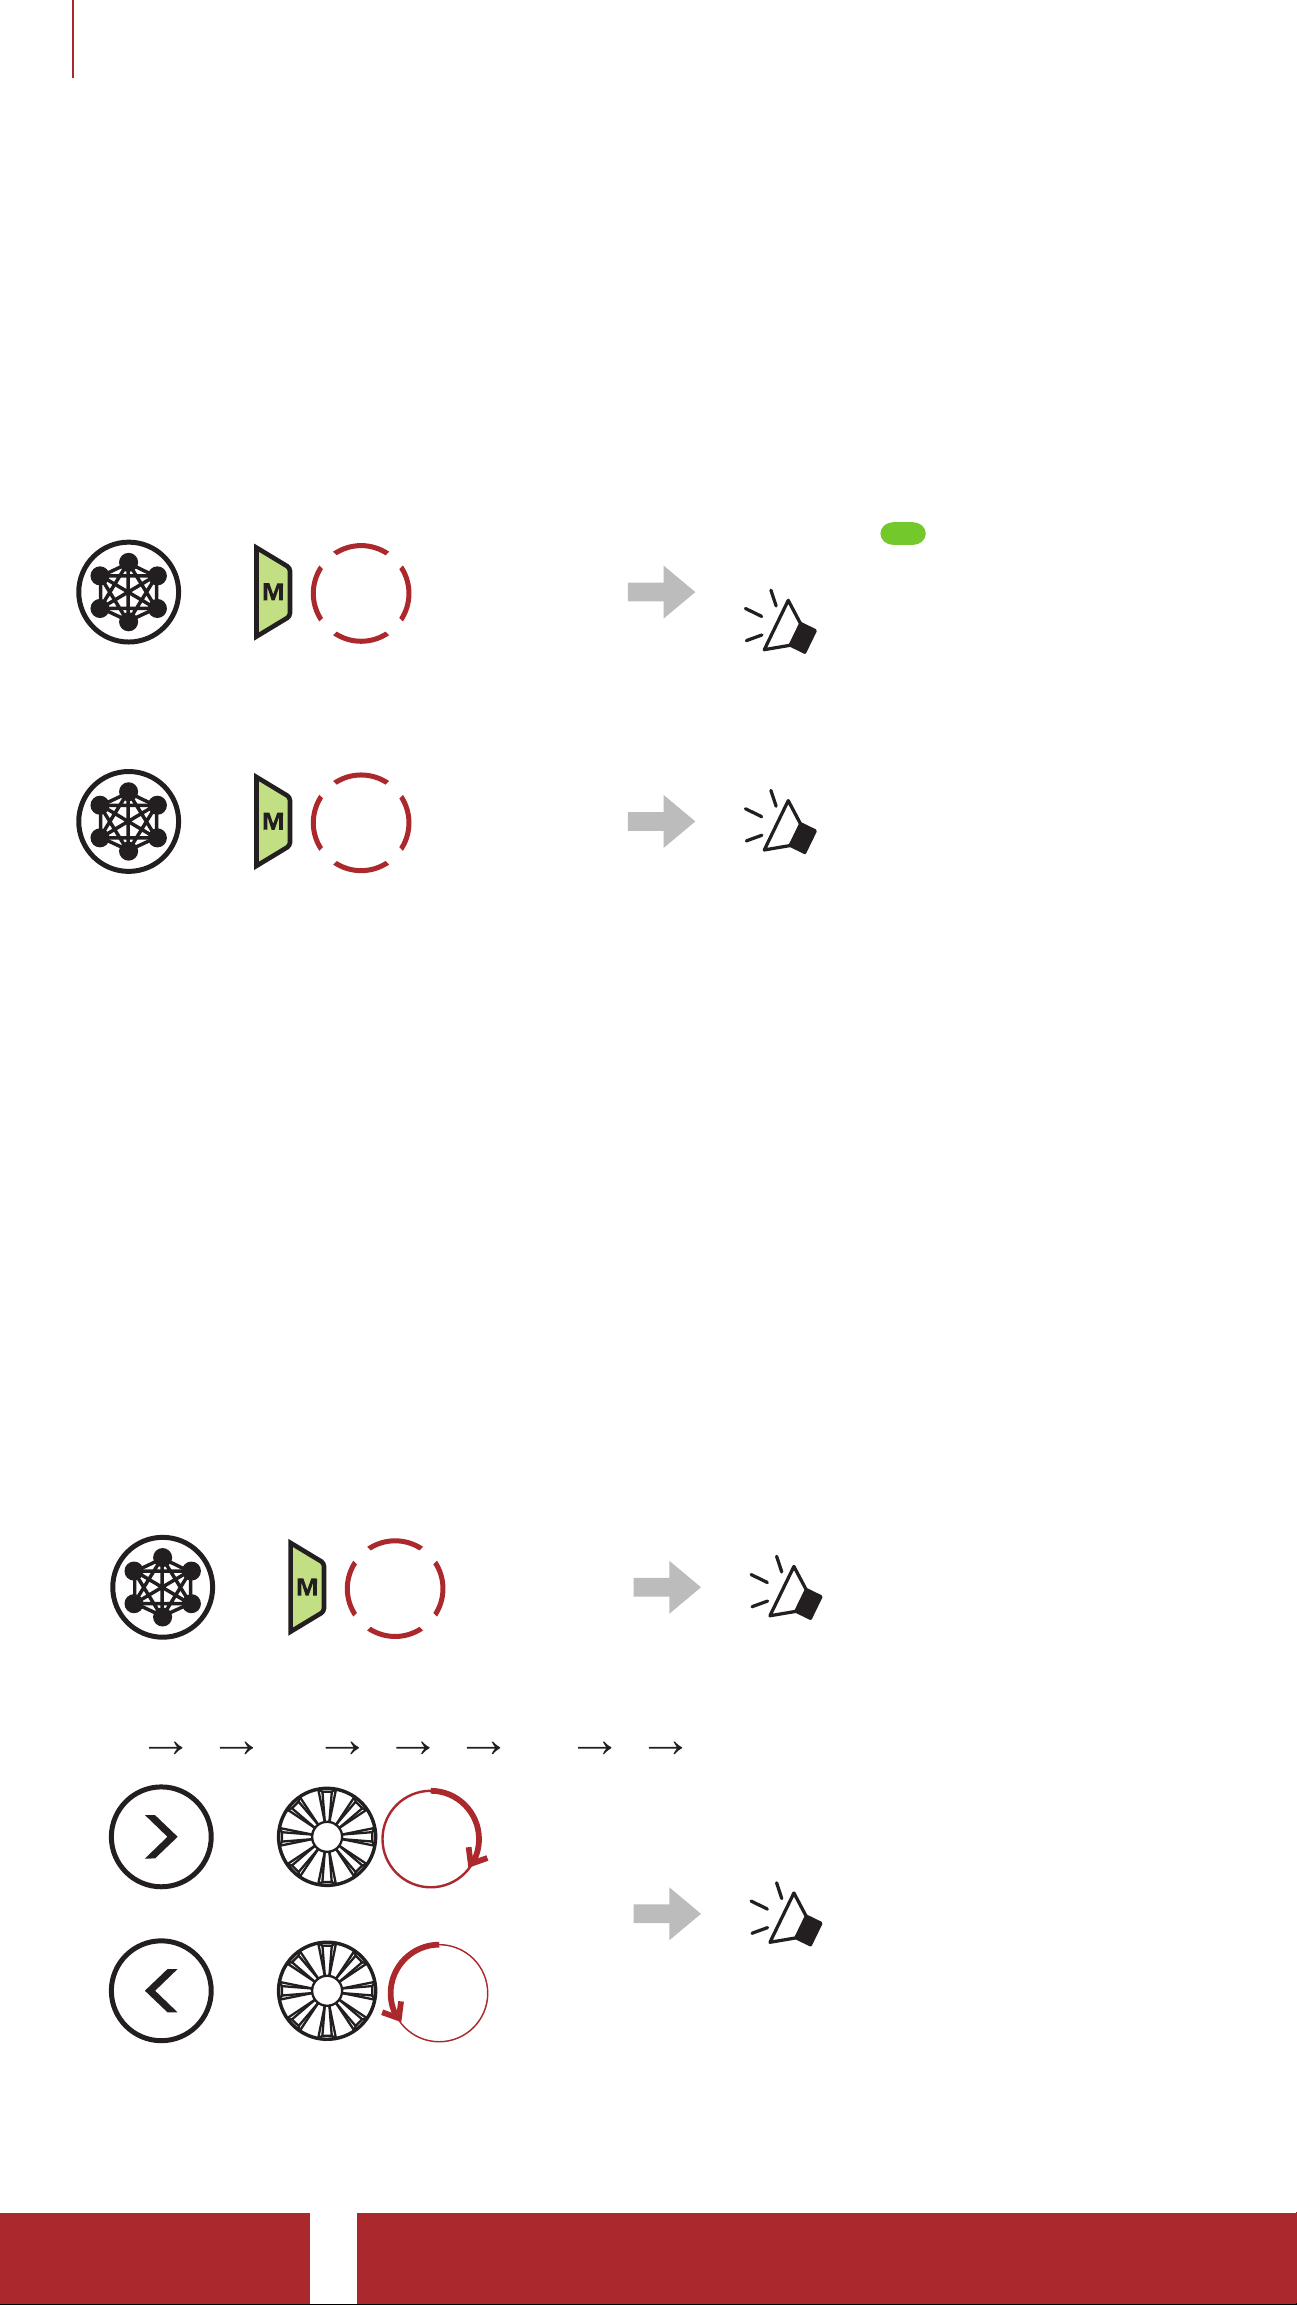
7. 2 Starting Mesh Intercom
When Mesh Intercom is enabled, the SPIDER ST1 will automatically
connect to nearby SPIDER ST1 users and allow them to talk to each
other by pressing the Mesh Intercom Button.
Mesh Intercom On
Blinking
=
TAP
1x
“ Mesh intercom on,
Open Mesh,
channel 1”
Mesh Intercom Off
TAP
=
1x
“ Mesh intercom off”
7.3 Using the Mesh in Open Mesh
When Mesh Intercom is enabled, the headset will be in Open Mesh
(default: channel 1) initially.
7.3 .1 Channel Setting (Default: channel 1)
If the Open Mesh communication experiences interference because
other groups are also using channel 1 (default), change the channel.
You can select from channels 1 to 9.
1. Double tap the Mesh Intercom Button.
TAP
=
2x
2. Navigate between channels.
“ Channel setting, 1”
(1
2 ••• 8 9 Exit 1 •••)
ROTATE
=
R
or
ROTATE
=
L
SPIDER ST1 Motorcycle Mesh Communication System | 25
“#”
Page 26
7 MESH INTERCOM
3. Save the channel.
=
TAP
1x
“ Channel is set,
channel #”
Note:
• Channel Setting always starts with channel 1.
• If you do not press any button for approximately 10 seconds in a
specific channel, the channel is automatically saved.
• The channel will be remembered even if you turn off the SPIDER
ST1.
• You can use the SENA MOTORCYCLES App to change the
channel.
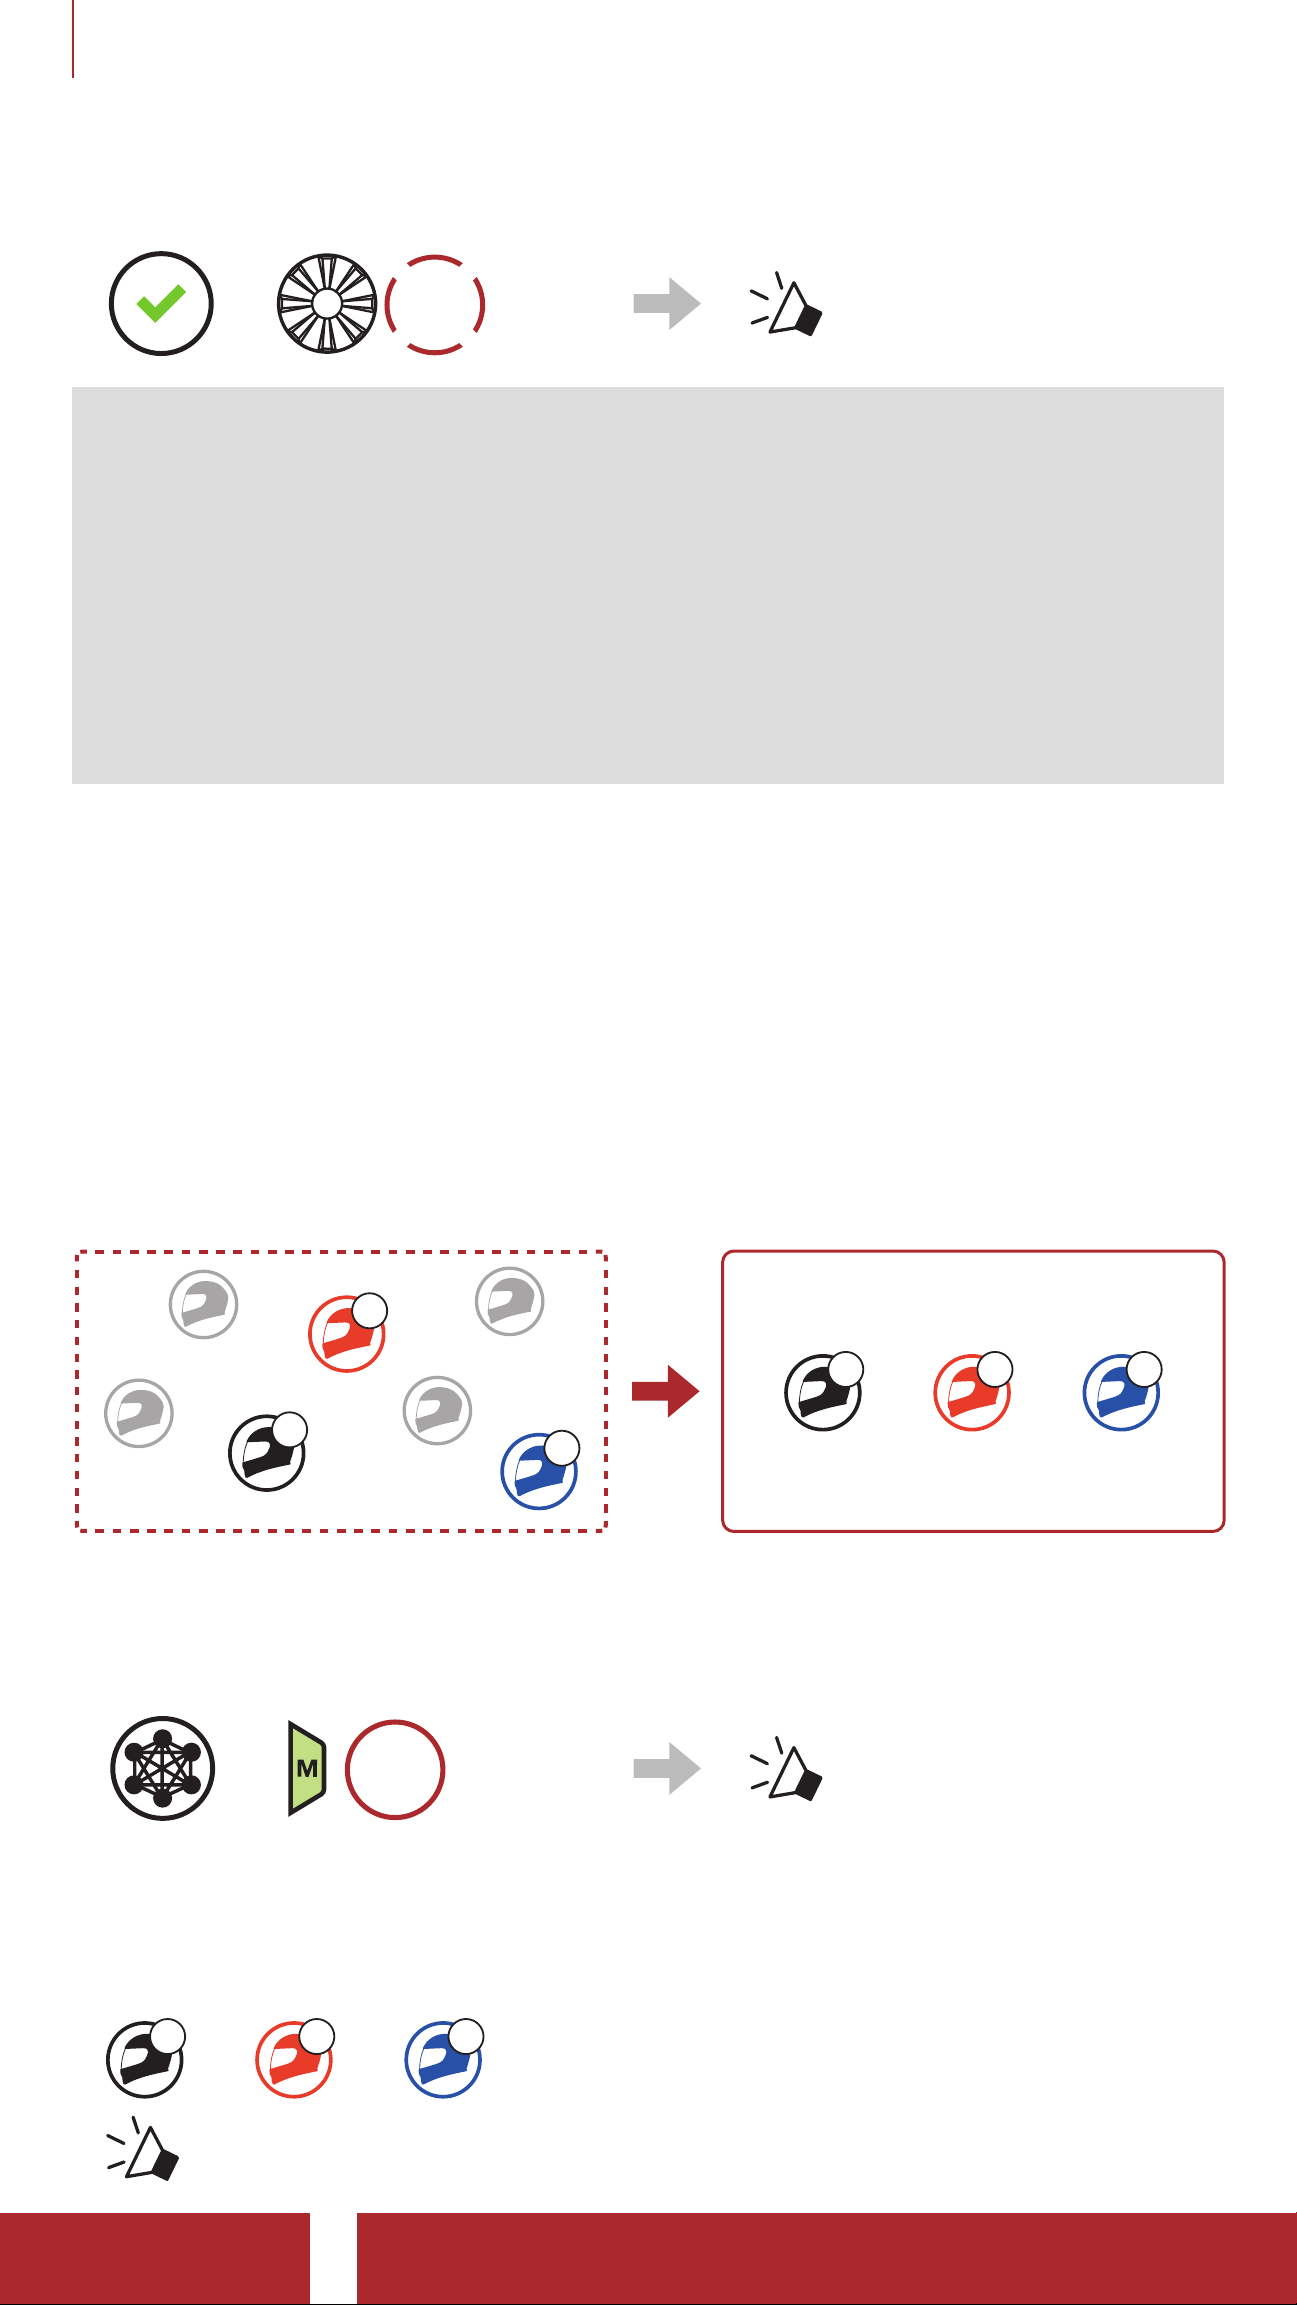
7.4 Using Mesh in Group Mesh
7.4 .1 Creating a Group Mesh
Creating a Group Mesh requires
Open Mesh Group Mesh
B
You
two or more Open Mesh users.
C
You
B C
1. To enter Mesh Grouping to create a Group Mesh, press and hold
the Mesh Intercom Button for 5 seconds on the
headsets.
C)
HOLD
=
5s
2. When Mesh Grouping is completed, the
users (You, B and C) will
users (You, B, and
“ Mesh grouping”
hear a voice prompt on their headset as Open Mesh switches to
Group Mesh.
You
B C
“ Group Mesh”
SPIDER ST1 Motorcycle Mesh Communication System | 26
Page 27
7 MESH INTERCOM
Note:
• If the Mesh Grouping is not completed within 30 seconds, users
will hear a voice prompt, “Grouping failed”.
• If you want to cancel during the Mesh Grouping, tap the Mesh
Intercom Button.
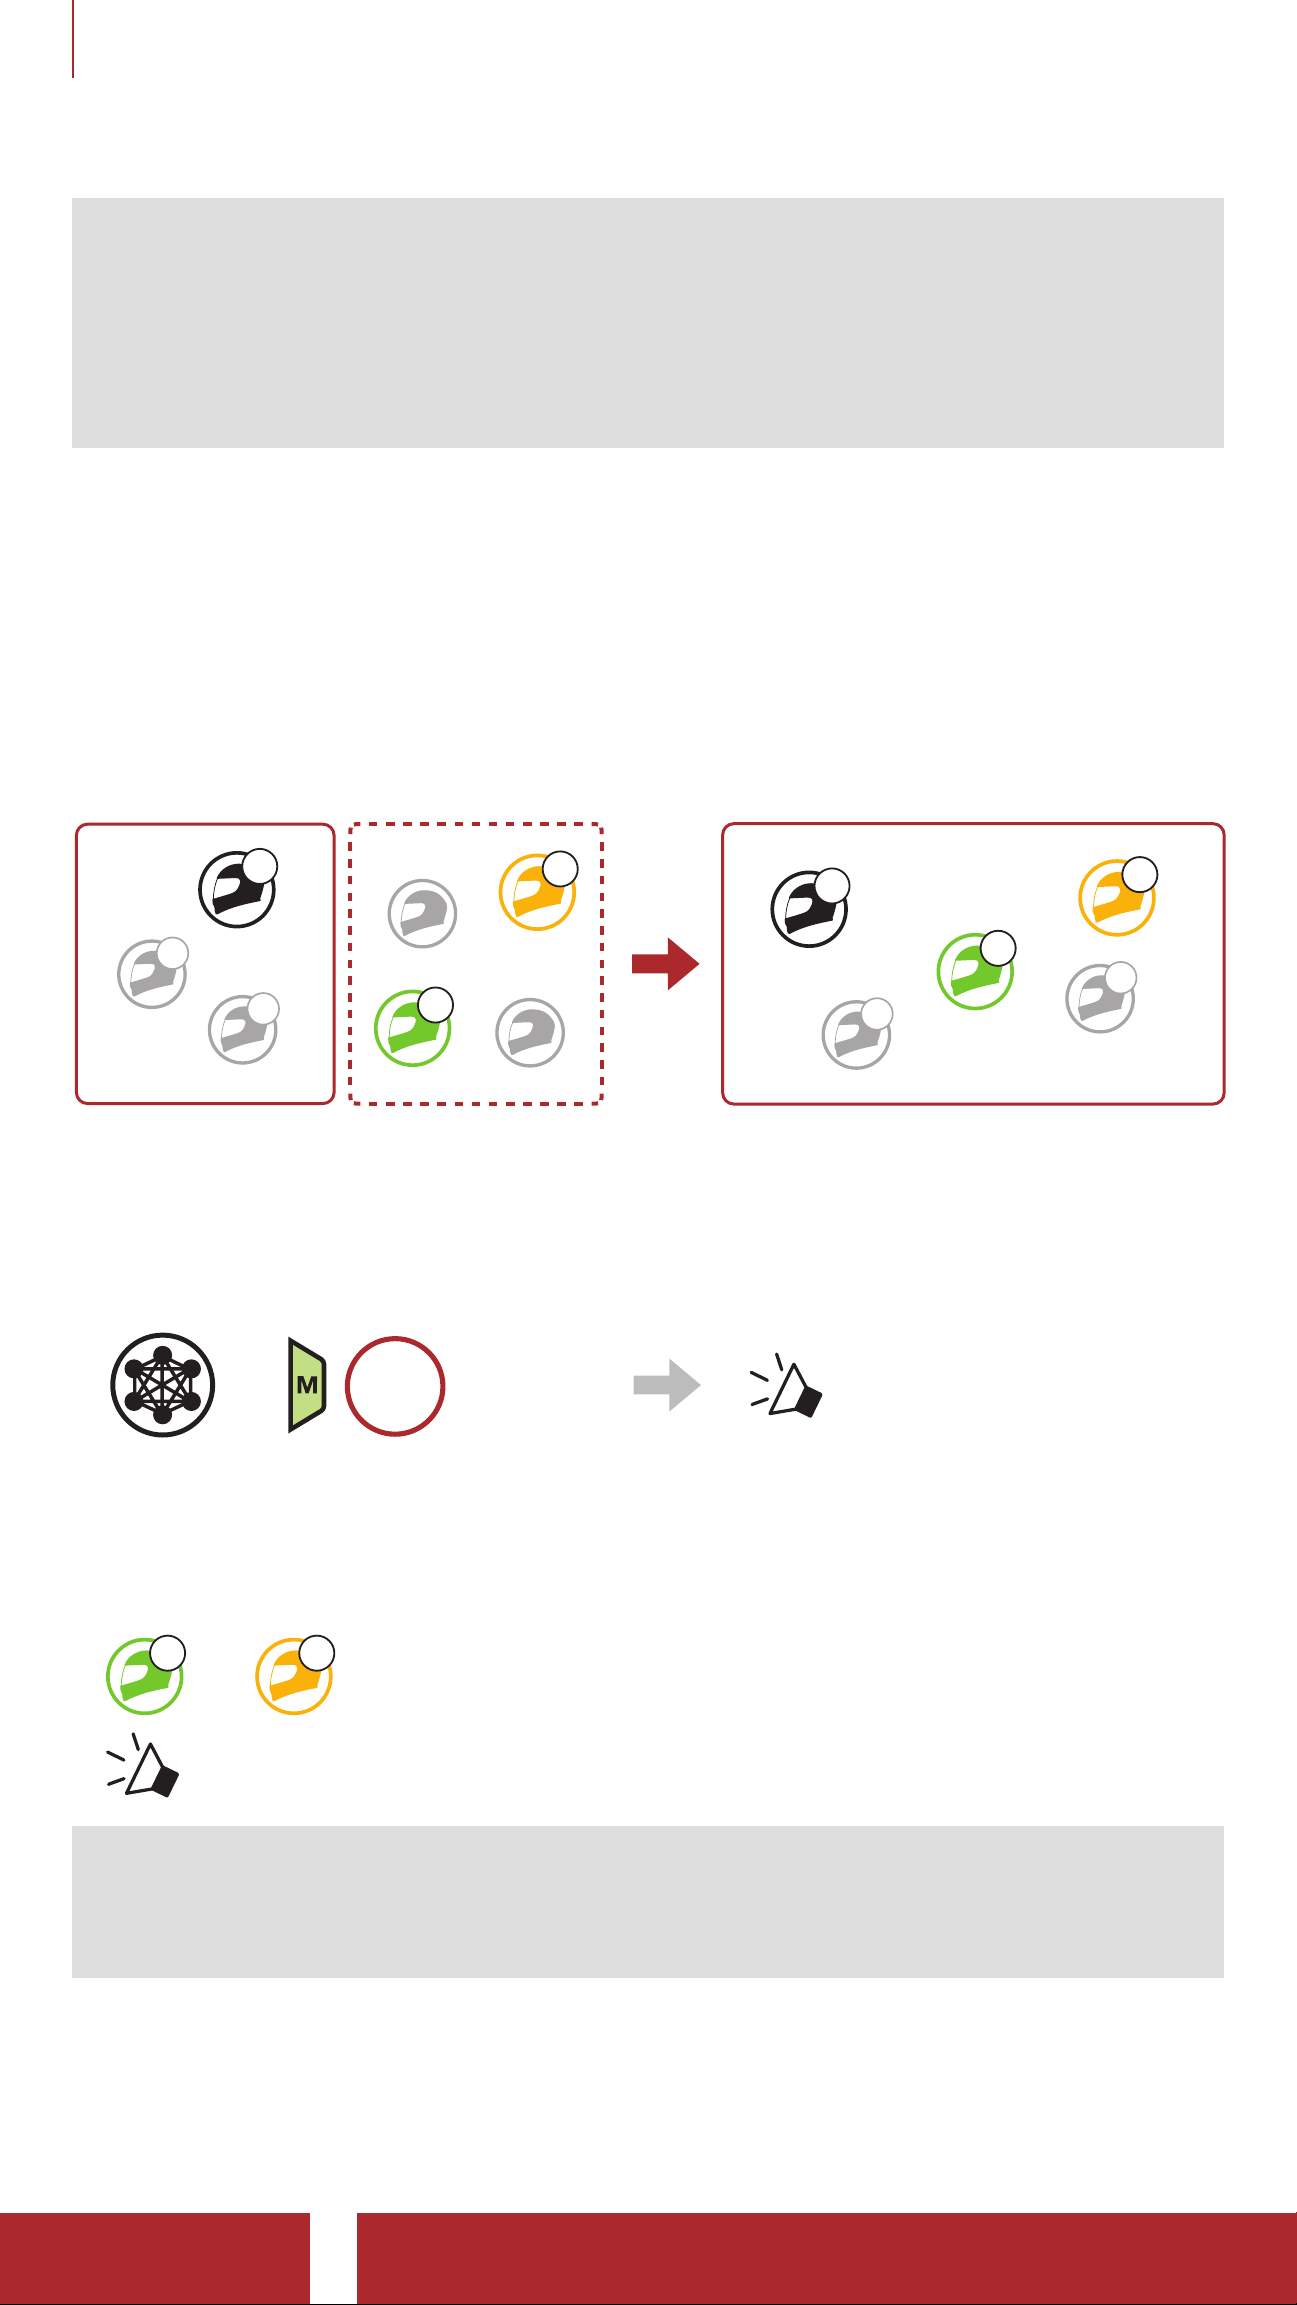
7.4 . 2 Joining an Existing Group Mesh
One of the current users in an Existing Group Mesh can allow new
users (one or more)
in Open Mesh to join the Existing Group Mesh.
Existing
Group Mesh Open Mesh Existing Group Mesh
You
B
C
D
F
You
D
B
F
C
1. To enter Mesh Grouping to join the Existing Group Mesh, press and
hold the Mesh Intercom Button for 5 seconds on the headsets of
one (You) of the current users in the Existing Group Mesh and the
new users (D and F) in Open Mesh.
HOLD
=
5s
2. When Mesh Grouping is completed, the
new users (D and F) will
“ Mesh grouping”
hear a voice prompt on their headset as Open Mesh switches to
Group Mesh.
FD
“ Group Mesh”
Note: If the Mesh Grouping is not completed within 30 seconds, the
current user (You) will hear a low tone double beep and the new users
(D and F) will hear a voice prompt, “Grouping failed”.
SPIDER ST1 Motorcycle Mesh Communication System | 27
Page 28
7 MESH INTERCOM
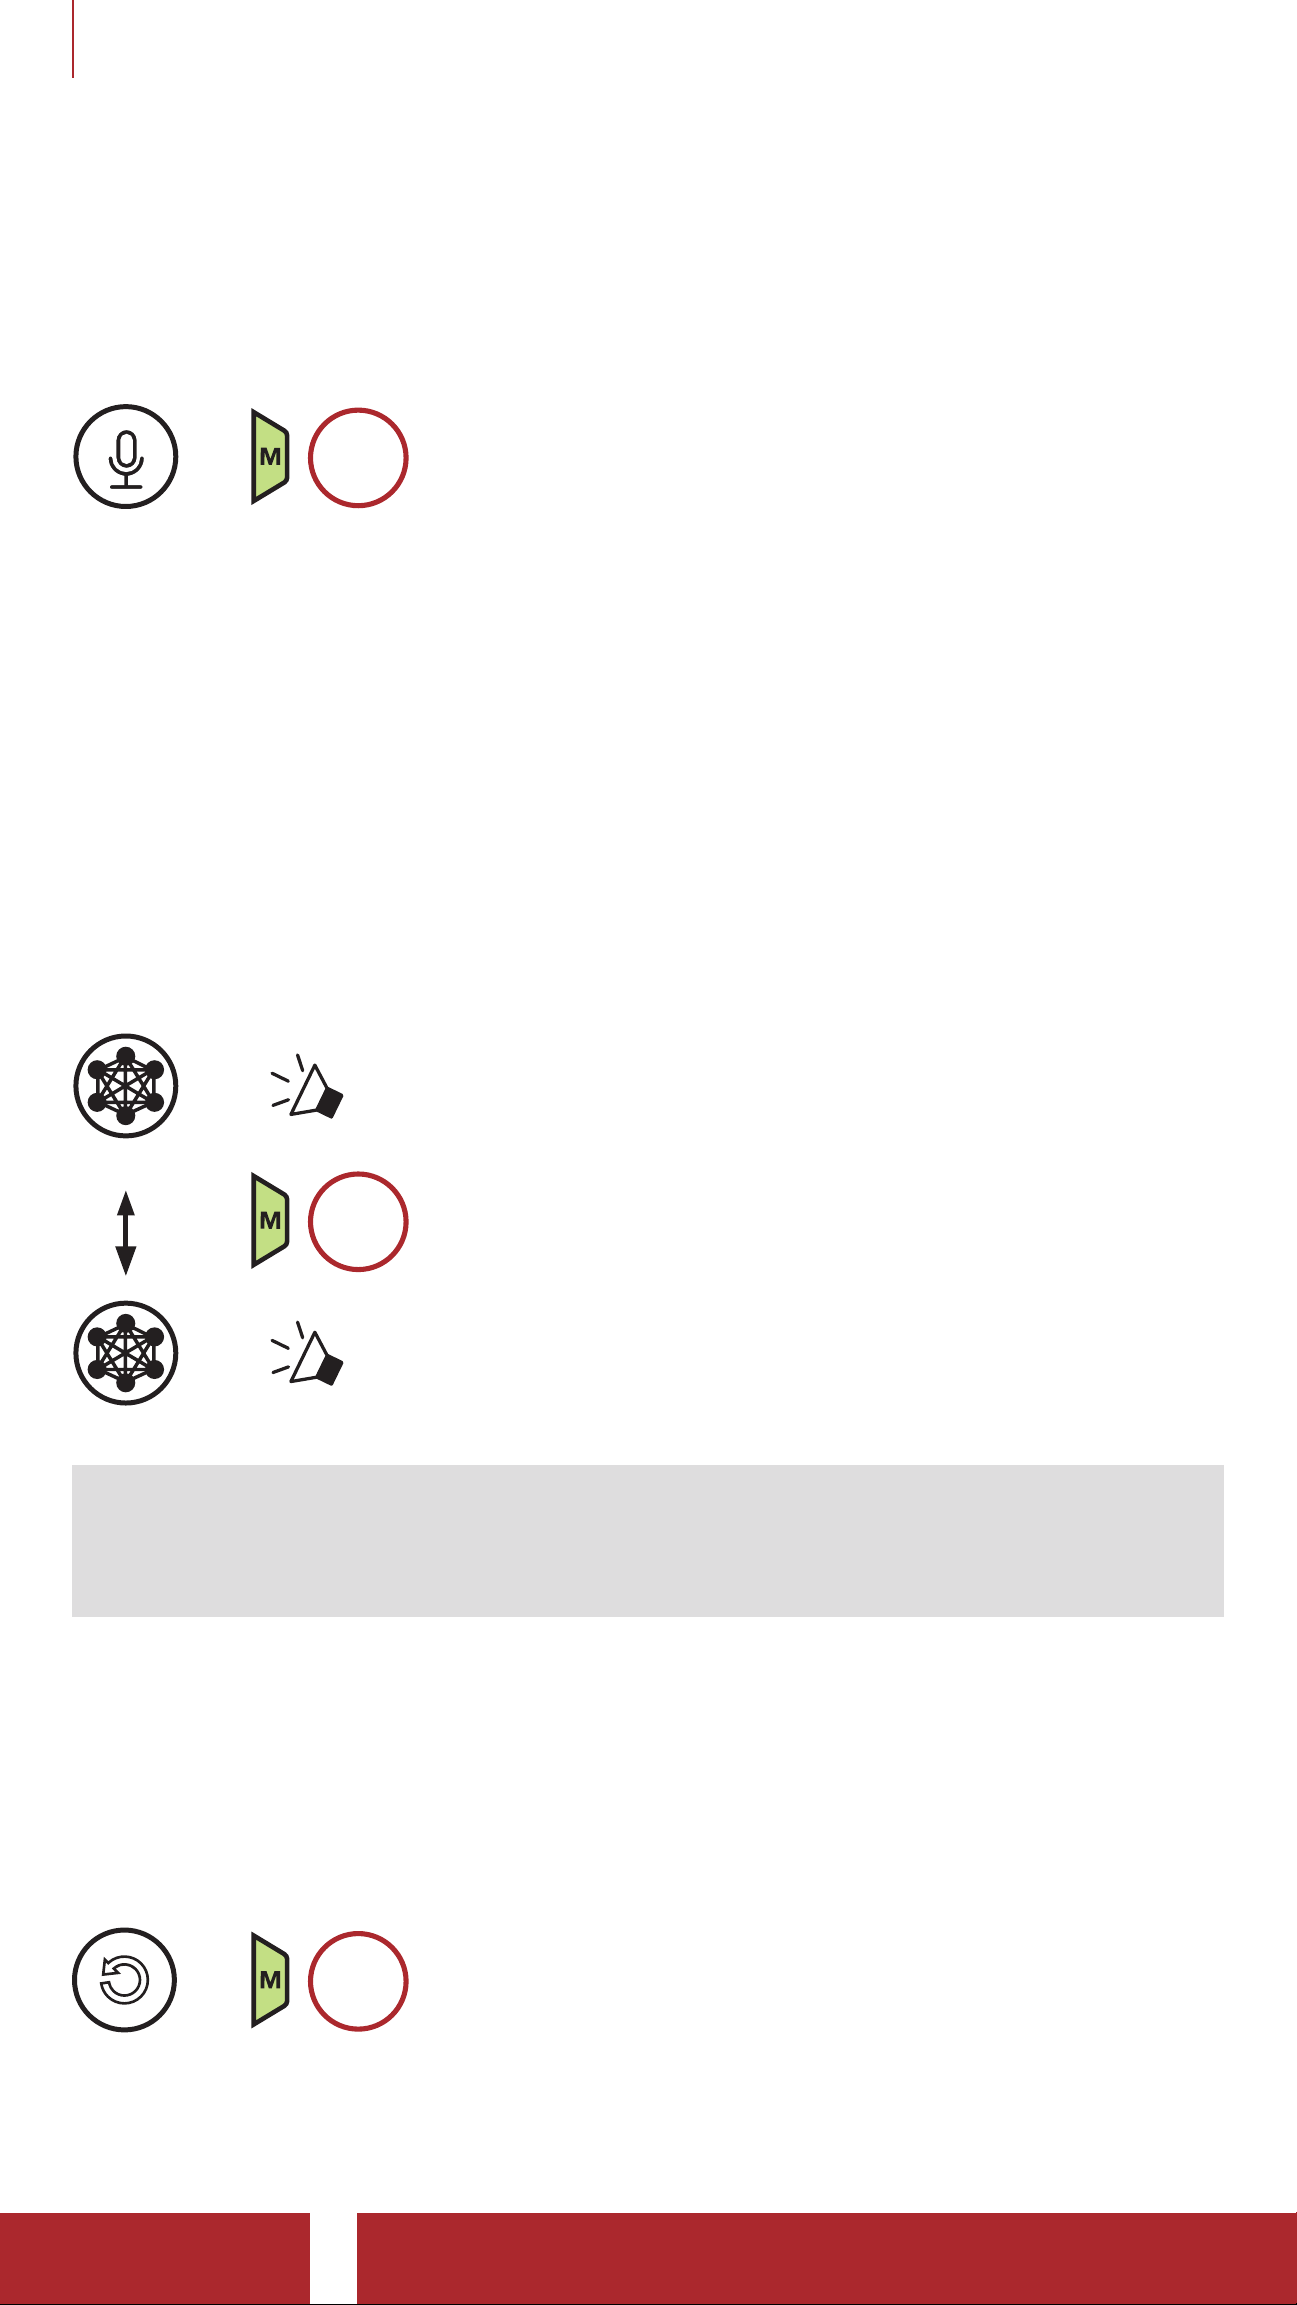
7.5 Enable/Disable Mic (Default: Enable)
Users can enable/disable the microphone when communicating in a
Mesh Intercom.
HOLD
=
1s
7.6 Toggling Open Mesh/Group Mesh
Users are able to toggle between Open Mesh and Group Mesh
without resetting the Mesh. This allows users to keep the Group Mesh
Network connection information while in Open Mesh.
Users can toggle to Group Mesh to communicate with participants from
the stored Group Mesh Network connection information.
Toggle Between Open Mesh and Group Mesh
“Open Mesh”
Open Mesh
HOLD
=
3s
“Group Mesh”
Group Mesh
Note: If you have never participated in Group Mesh, you cannot
toggle between Open Mesh and Group Mesh. You will hear a voice
prompt, “No Group Available”.
7.7 Reset Mesh
If a headset in an Open Mesh or Group Mesh resets the Mesh, it will
automatically return to Open Mesh (default: channel 1).
=
HOLD
8s
SPIDER ST1 Motorcycle Mesh Communication System | 28
Page 29

8. MESH AUDIO MULTITASKING
(ALWAYS ON)
Audio Multitasking allows you to have an intercom conversation while
simultaneously listening to music.
The overlaid audio is played in the background with reduced volume
whenever there is an intercom conversation and will return to normal
volume once the conversation is finished.
The Audio Multitasking can be configured through the Intercom-
Audio Overlay Sensitivity and the Audio Overlay Volume
Management settings.
The Intercom-Audio Overlay Sensitivity and the Audio Overlay
Volume Management settings can be found in the Software
Configuration Setting, accessible through the Sena Device Manager
or the SENA MOTORCYCLES App.
SPIDER ST1 Motorcycle Mesh Communication System | 29
Page 30

9. FUNCTION PRIORITY
The headset prioritizes connected devices in the following order:
(highest) Mobile phone
Mesh Intercom
(lowest) Bluetooth stereo music
A lower-priority function gets interrupted by a higher-priority function.
For example, stereo music will be interrupted by an incoming mobile
phone call.
SPIDER ST1 Motorcycle Mesh Communication System | 30
Page 31
10. CONFIGURATION SETTING
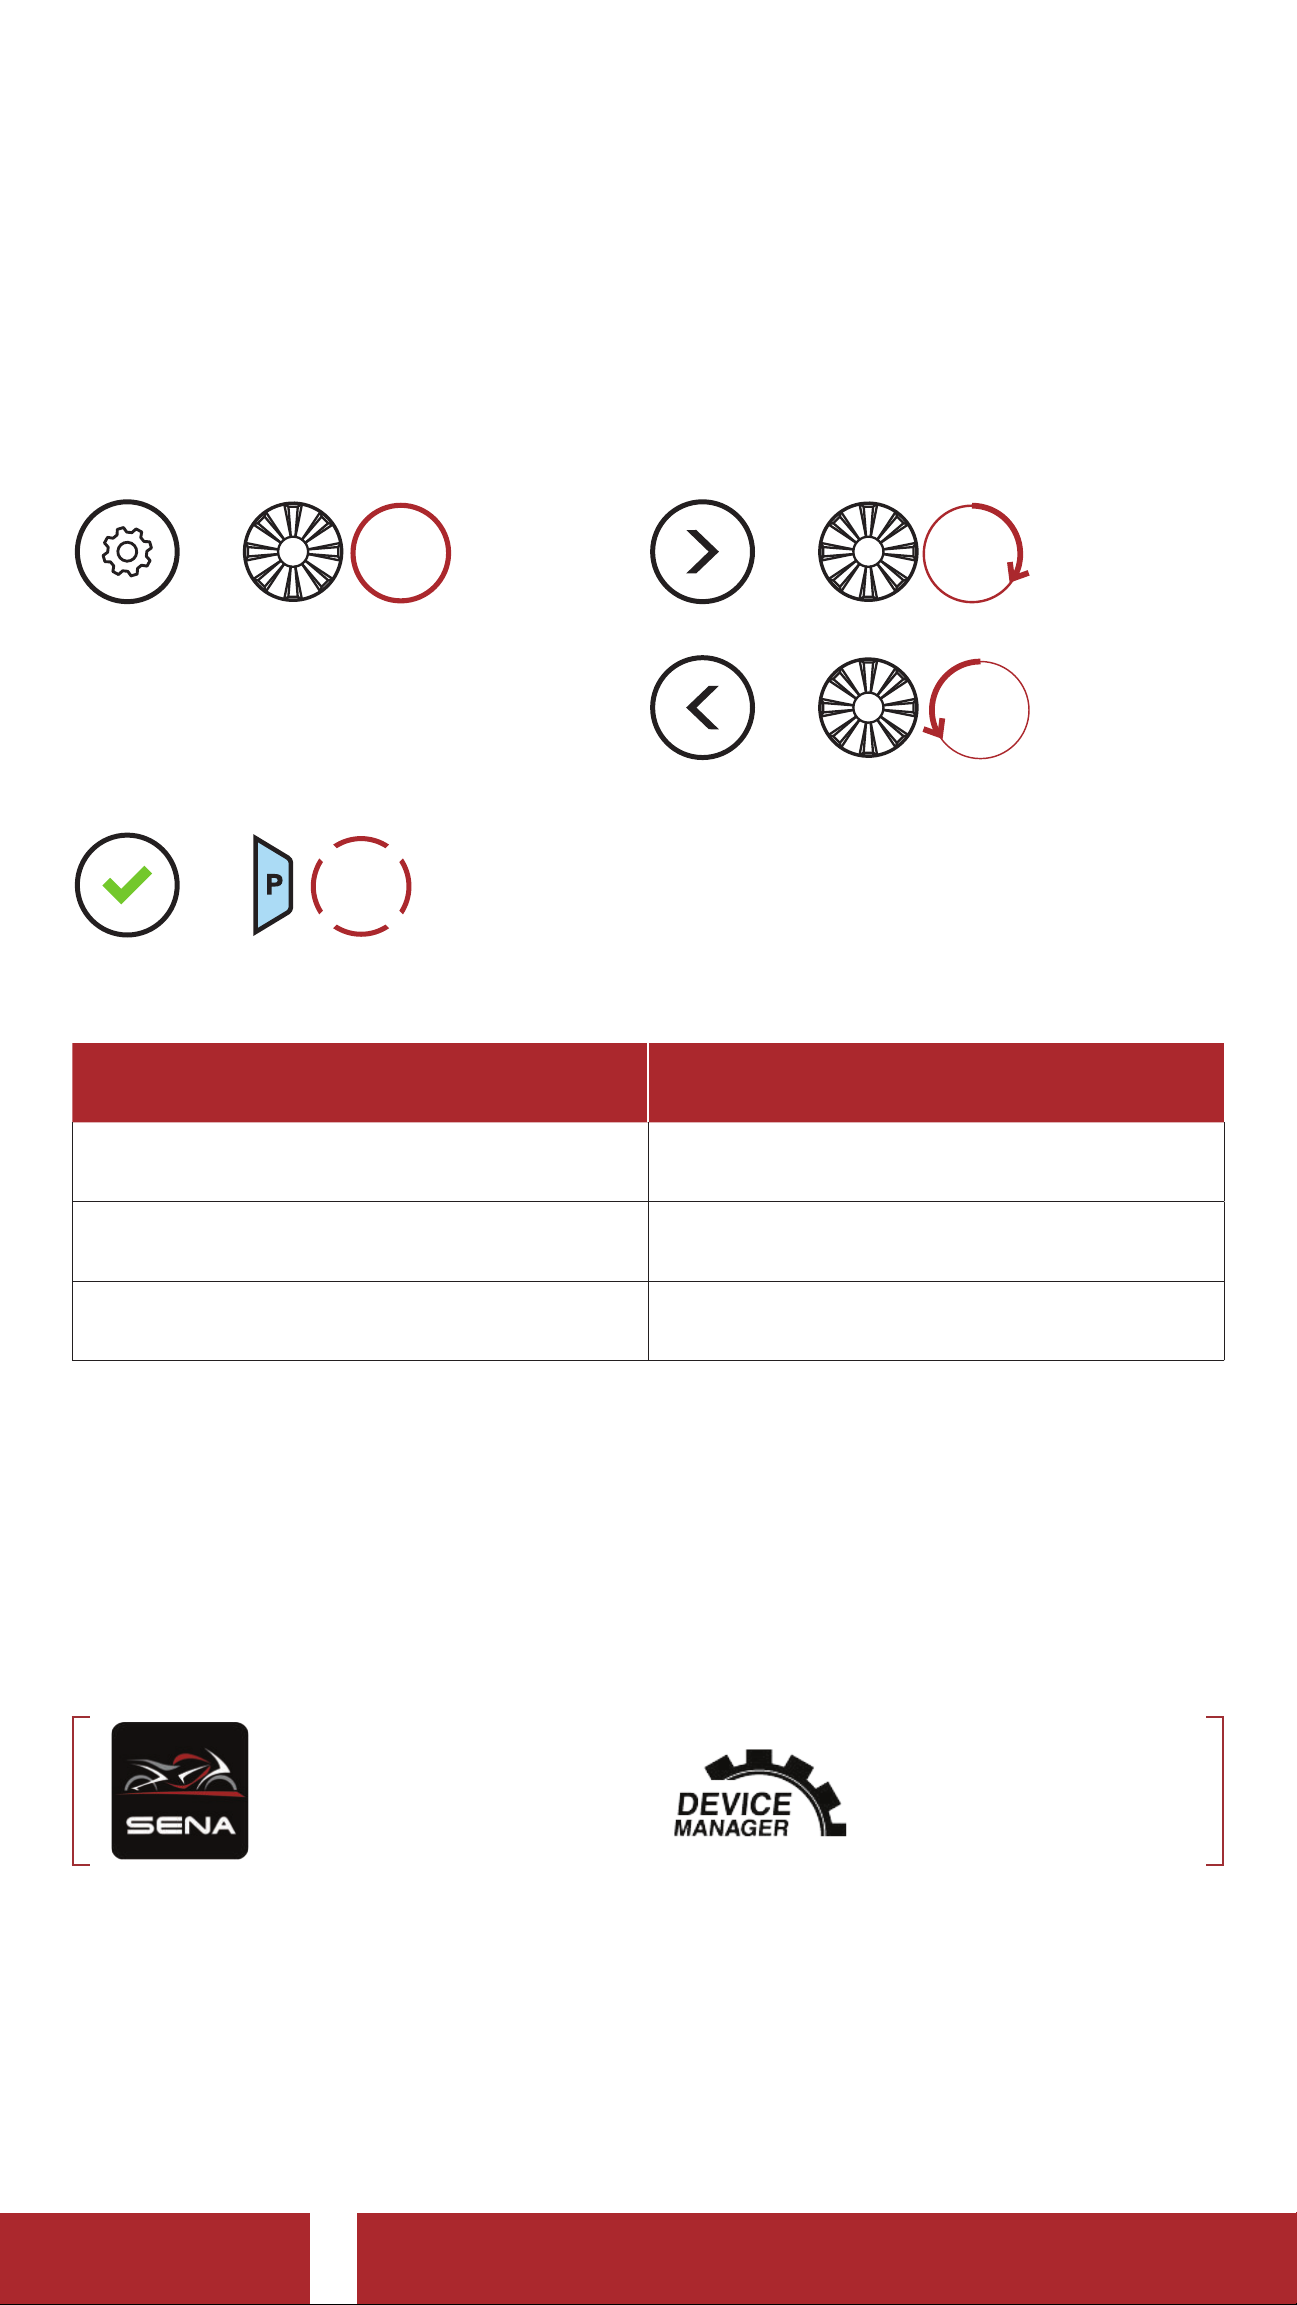
10.1 Headset Configuration Menu
Access the Configuration Menu
HOLD
=
5s
Execute Menu Options
TAP
=
1x
Headset Configuration Menu
Navigate Between Menu Options
ROTATE
=
R
ROTATE
=
L
Voice Configuration Menu Tap the Phone Button
Second Mobile Phone Pairing None
GPS Pairing None
Exit Execute
10.2 Software Configuration Setting
You can change the settings of the headset through the Sena Device
Manager or the SENA MOTORCYCLES App.
SENA MOTORCYCLES Sena Device Manager
SPIDER ST1 Motorcycle Mesh Communication System | 31
Page 32

10 CONFIGURATION SETTING
10. 2.1 Headset Language
You can select the device language. The selected language is
maintained even when the headset is rebooted.
10.2.2 Audio Equalizer (Default: Off)
You can use the Audio Equalizer to increase/decrease the decibel level
of different frequency ranges of audio.
• Balance will adjust all of the frequency ranges to be the same volume
level (0 dB).
• Bass Boost will increase the bass range of audio (20 Hz - 250 Hz).
• Mid Boost will increase the mid range of audio (250 Hz - 4 kHz).
• Treble Boost will increase the high range of audio (4 kHz - 20 kHz).
10.2.3 VOX Phone (Default: Enable)
If this feature is enabled, you can answer incoming calls by voice. When
you hear a ringtone for an incoming call, you can answer the phone
by saying a word such as “Hello” loudly or by blowing air into the
microphone. VOX Phone is temporarily disabled if you are connected
to intercom. If this feature is disabled, you have to tap the Jog Dial or
the Phone Button to answer an incoming call.
10.2.4 VOX Sensitivity (Default: 3)
VOX Sensitivity can be adjusted depending on your riding
environment. Level 5 is the highest sensitivity setting and level 1 is the
lowest.
10.2.5 Intercom-Audio Overlay Sensitivity (Default: 3)
The music will be lowered to play in the background if you talk over the
intercom while the overlaid audio is playing. You can adjust the intercom
sensitivity to activate this background audio mode. Level 1 has the
lowest sensitivity and level 5 has the highest sensitivity.
Note: If your voice is not louder than the sensitivity of the selected
level, the overlaid audio will not be lowered.
SPIDER ST1 Motorcycle Mesh Communication System | 32
Page 33

10 CONFIGURATION SETTING
10.2.6 Audio Overlay Volume Management (Default: Disable)
The music overlaid audio reduces in volume whenever there is
an ongoing intercom conversation. If Audio Overlay Volume
Management is enabled, the volume level of the overlaid audio will not
be reduced during an intercom conversation.
10.2.7 Voice Prompt (Default: Enable)
You can disable Voice Prompts by software configuration settings, but
the following voice prompts are always on.
- Headset configuration settings menu, battery level indicator, speed
dial
SPIDER ST1 Motorcycle Mesh Communication System | 33
Page 34
11. TROUBLESHOOTING
Please visit sena.com for more troubleshooting information.
• Customer Support:
sena.com
11.1 Fault Reset
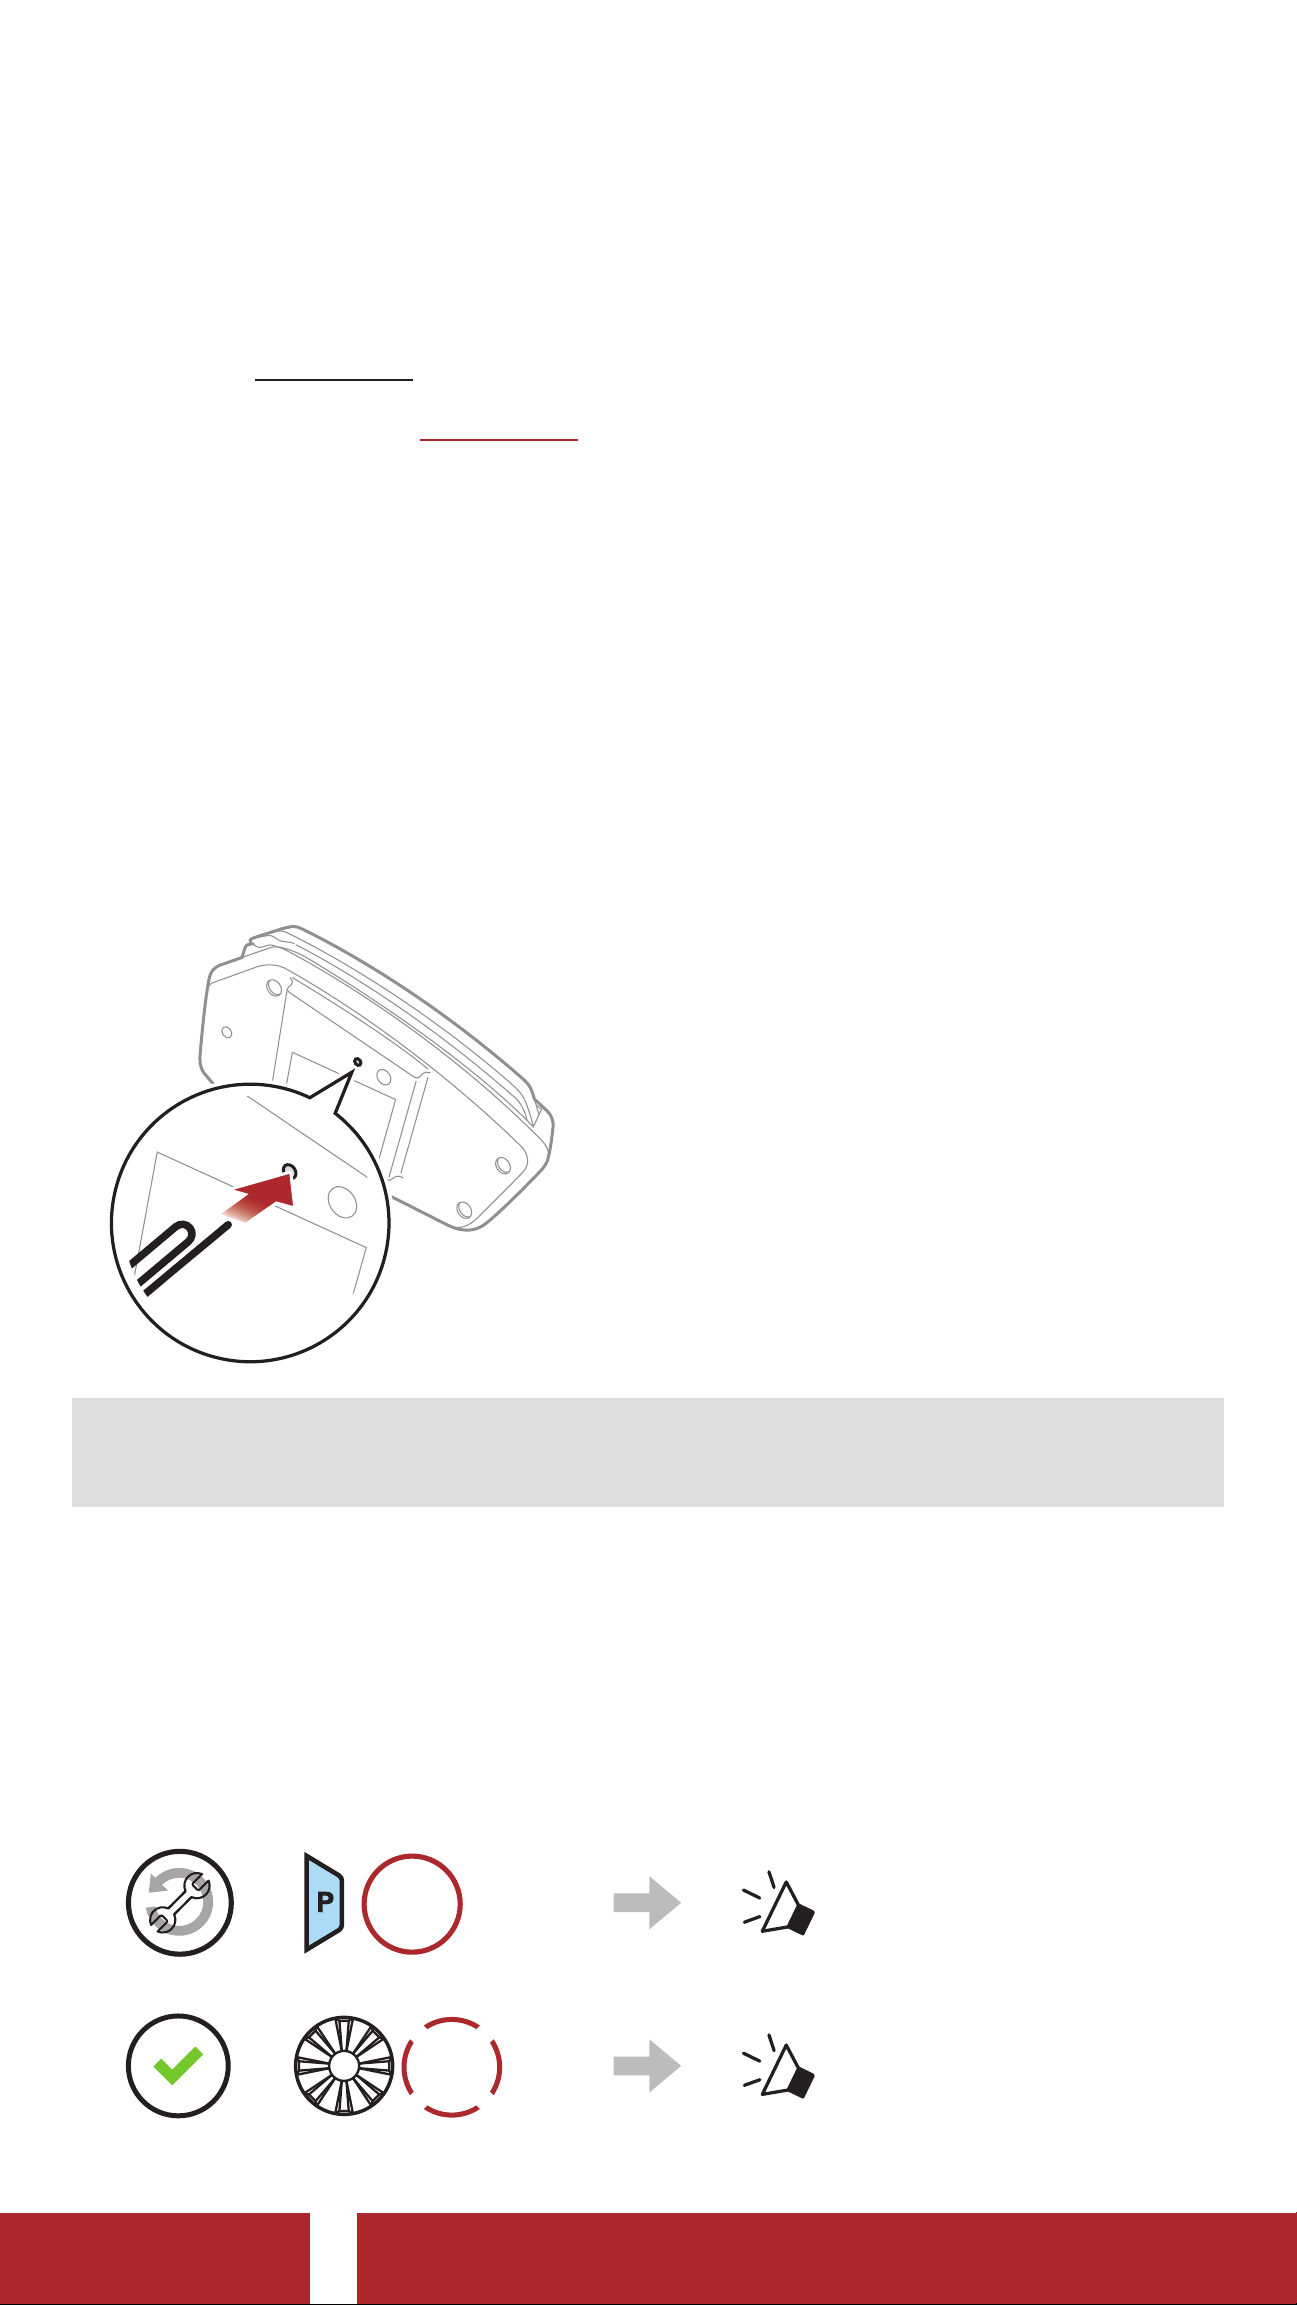
When the headset is not working properly, you can easily reset the unit:
1. Locate the Pinhole Fault Reset Button at the bottom of the main
unit.
2. Gently insert a paperclip into the hole and tap the Pinhole Fault
Reset Button with light pressure. The headset will shut down.
Note: Fault Reset will not restore the headset to factory default
settings.
11. 2 Factory Reset
To erase all of your settings and start fresh, the headset can be restored
to factory default settings using the Factory Reset feature.
HOLD
1.
=
10s
“Factory reset”
2.
=
TAP
1x
“ Headset reset,
good-bye”
SPIDER ST1 Motorcycle Mesh Communication System | 34
Page 35

Copyright © 2022 Sena Technologies, Inc.
All rights reserved.
© 1998–2022 Sena Technologies, Inc. All rights reserved.
Sena Technologies, Inc. reserves the right to make any changes
and improvements to its product without providing prior notice.
Sena™ is a trademark of Sena Technologies, Inc. or its
subsidiaries in the USA and other countries. SF1™, SF2™,
SF4™, SFR™, SRL™, Momentum™, Momentum INC™,
Momentum Lite™, Momentum Pro™, Momentum INC Pro™,
Momentum EVO™, Cavalry™, Latitude SR™, Latitude SX™,
Latitude S1™, 30K™, 33i™, 50S™, 50R™, 50C™, 5S™, 5R™,
5R LITE™, 20S EVO™, 20S™, 10S™, 10C™, 10C PRO™,
ProRide EVO™, 10C EVO™, 10U™, 10Upad™, 10R™, ACS10™,
ACS-RAM™, C1™, 3S™, 3S PLUS™, SMH5™, SMH5-FM™,
SMH5 MultiCom™, SMH10™, SMH10R™, SPH10™, SPH10HFM™, Savage™, Prism Tube WiFi™, Prism™, Bluetooth Audio
®
Pack for GoPro
, Impulse™, R1™, R1 EVO™, R1 EVO CS™,
R2™, R2 EVO™, R2X™, M1™, M1 EVO™, RUMBA™, RC1™,
RC3™, RC4™, Stryker™, Handlebar Remote™, Wristband
Remote™, PowerPro Mount™, Powerbank™, FreeWire™,
WiFi Docking Station™, WiFi Sync Cable™, WiFi Adapter™,
+mesh™, +Mesh Universal™, MeshPort Blue™, MeshPort
Red™, MeshPort Black™, Econo™, OUTRUSH™, OUTRUSH
R™, OUTSTAR™, OUTSTAR S™, OUTFORCE™, OUTRIDE™,
EcoCom™, Parani A10™, Parani A20™, Parani M10™, pi™,
Snowtalk™, Snowtalk2™, SR10™, SR10i™, SM10™, SPIDER
RT1™, SPIDER ST1™, X1™, X1 Pro™, X1S™, Expand™, Expand
Boom™, Bluetooth Mic & Intercom™, Tufftalk™, Tufftalk Lite™,
Tufftalk M™ are trademarks of Sena Technologies, Inc. or its
subsidiaries. These trademarks may not be used without the
express permission of Sena.
®
GoPro
is a registered trademark of Woodman Labs of San
Mateo, California. Sena Technologies, Inc. (“Sena”) is not
affiliated with Woodman Labs, Inc. The Sena Bluetooth Pack
®
for GoPro
manufactured by Sena Technologies, Inc. for the GoPro
is an aftermarket accessory specially designed and
®
Hero3
and Hero4 allowing for Bluetooth capabilities.
The Bluetooth® word mark and logos are owned by the
Bluetooth SIG, Inc. and any use of such marks by Sena is under
®
license. iPhone
and iPod® touch are registered trademarks of
Apple Inc.
Address: 152 Technology Drive Irvine, CA 92618
SPIDER ST1 Motorcycle Mesh Communication System | 35
 Loading...