

Page 1
SMH5
Bluetooth® Headset & Intercom
for Scooters & Motorcycles
www.sena.com
User’s Guide
Page 2

SMH5
© 1998-2016 Sena Technologies, Inc. All rights reserved.
Sena Technologies, Inc. reserves the right to make any changes and improvements to its product without providing prior notice.
™
is a trademark of Sena Technologies, Inc. or its subsidiaries in the USA and other countries. PRISM
Sena
™
, SMH5-FM™, SMH3™, SPH10™, EXPAND™, SPH10H™, SPH10H-FM™, SPH10S™, SR10™, SR10i™, SM10™, EXPAND™, Bluetooth Pack
SMH5
for GoPro
®
are trademarks of Sena Technologies, Inc. or its subsidiaries. These trademarks may not be used without the express permission of
™
, 20S™, 3S™, SMH10™, SMH10R™,
Sena.
®
is a registered trademark of Woodman Labs of San Mateo, California. Sena Technologies, Inc. (“Sena”) is not afliated with Woodman
GoPro
Labs. The Sena Bluetooth Pack for GoPro
®
the GoPro
The Bluetooth
Hero3 allowing for Bluetooth capabilities.
®
word mark and logos are owned by the Bluetooth SIG, Inc. and any use of such marks by Sena is under license. iPhone, iPod
touch are the registered trademark of Apple Inc. Zumo
®
is an after-market accessory specially designed and manufactured by Sena Technologies, Inc. for
™
is a trademark of Garmin Ltd. or its subsidiaries. TomTom™ is the trademark or registered
trademark owned by TomTom International B.V. Other trademarks and trade names are those of their respective owners.
Page 3

SMH5
CONTENTS
1. INTRODUCTION ....................................................................................5
2. PACKAGE CONTENTS .........................................................................6
3. INSTALLING THE SMH5 ON YOUR HELMET ......................................7
4. POWERING ON/OFF AND CHARGING ..............................................10
4.1 Powering On ..................................................................................... 10
4.2 Powering Off...................................................................................... 10
4.3 Charging ........................................................................................... 11
4.4 Low Battery Warning ......................................................................... 11
5. CHECKING THE BATTERY LEVEL.....................................................11
5.1 LED Indicator .................................................................................... 11
5.2 Voice Prompt Indicator ...................................................................... 11
6. PAIRING THE SMH5 WITH BLUETOOTH DEVICES..........................12
6.1 Mobile Phone Pairing ........................................................................ 12
6.2 Bluetooth Stereo Device Pairing ....................................................... 13
6.3 Bluetooth GPS Navigation Pairing .................................................... 13
7. PAIRING WITH SELECTIVE PROFILE: A2DP STEREO OR
HANDSFREE
7.1 A2DP Stereo Music Only ................................................................... 15
7.2 HFP for Phone Call Only ................................................................... 15
.......................................................................................15
8. PAIRING WITH OTHER SMH5 HEADSETS FOR INTERCOM
CONVERSATION
.................................................................................16
9. PAIRING WITH OTHER SENA HEADSET MODELS FOR
INTERCOM CONVERSATION.............................................................17
10. CONFIGURATION SETTING
10.1 Assigning Speed Dial ...................................................................... 18
10.2 Enabling/Disabling Voice Activated Phone Answering .................... 19
Enabling/Disabling V
10.3
10.4 Enabling/Disabling Sidetone ............................................................ 20
Enabling/Disabling Advanced Noise Contr
10.5
10.6 Delete all Bluetooth Pairing Information ........................................... 20
10.7 Exit Voice Conguration Menu ......................................................... 20
............................................................18
oice Prompts .................................................... 19
ol™ ................................ 20
English
Page 4

SMH5
11. USING THE SMH5 .............................................................................21
11.1 Volume Adjustment ........................................................................... 21
11.2 Mobile Phone Call Making and Answering ....................................... 21
11.3 Speed Dialing ................................................................................... 22
11.4 Intercom Conversation ...................................................................... 23
11.5 Intercom and Mobile Phone Call ....................................................... 24
11.6 Intercom Failure ................................................................................ 24
11.7 Intercom Reconnection ..................................................................... 24
11.8 Stereo Music .................................................................................... 25
11.9 Function Priority ................................................................................ 26
Music Sharing
11.10
11.11 Reset to Factory Default Settings .................................................... 26
11.12 Fault Reset
.................................................................................. 26
....................................................................................... 27
12. UNIVERSAL INTERCOM ...................................................................27
12.1 Universal Intercom Pairing ................................................................ 27
12.2 Two-way Universal Intercom ............................................................. 28
13. FIRMWARE UPGRADE .....................................................................28
14. OPERATION QUICK REFERENCE ...................................................29
CERTIFICATION AND SAFETY APPROVALS ........................................30
• FCC Compliance Statement .................................................................... 30
• FCC RF Exposure Statement ................................................................... 30
• FCC Caution ............................................................................................ 30
• CE Declaration of Conformity ................................................................. 30
• Industry Canada Statement ................................................................... 31
• Bluetooth License ................................................................................... 31
• WEEE (Waste Electrical and Electronic Equipment) ............................... 31
SAFETY INFORMATION .........................................................................32
• Product Storage and Management ......................................................... 32
• Product Use............................................................................................. 32
• Battery ..................................................................................................... 33
PRODUCT WARRANTY AND DISCLAIMER ...........................................34
• Limited Warranty ..................................................................................... 34
• Warranty Exclusions ................................................................................ 35
• Warranty Service ..................................................................................... 37
Page 5

SMH5
1. INTRODUCTION
Thank you for choosing the Sena SMH5, Bluetooth Stereo Headset
and Intercom for scooters and motorcycles. With the SMH5, you can
call handsfree on your Bluetooth mobile phone, listen to stereo music
or voice instructions of GPS navigation by Bluetooth wirelessly, and
have intercom conversations in full duplex with a passenger or other
riders.
The SMH5 is compliant with the Bluetooth Specication 3.0
supporting the following proles: Headset Prole, Hands-Free Prole
(HFP), Advanced Audio Distribution Prole (A2DP), and Audio Video
Remote Control Prole (AVRCP). Please check with the manufacturers
of other devices to determine their compatibility with this headset.
Please read this user’s guide carefully before using the headset. Also
check www.sena.com for the latest version of the user’s guide and
additional information related to Sena Bluetooth products.
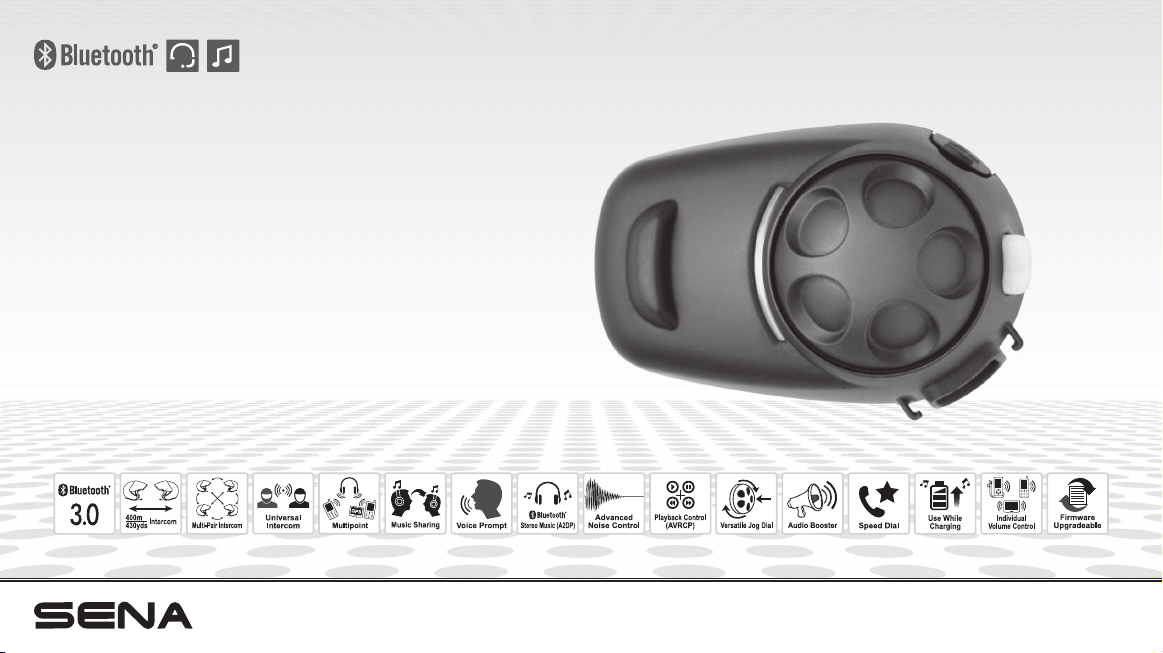
The SMH5 features:
• Bluetooth handsfree for Bluetooth mobile phones
• Bluetooth stereo headset for Bluetooth stereo devices such as MP3
players
• Bluetooth stereo headset for Bluetooth GPS navigations
• Bluetooth intercom up to 400 meters (430 yards)*
• Multi-pair Bluetooth intercom to pair with 3 other headsets
• Firmware upgradeable
• Universal Intercom™
• Multipoint Bluetooth for dual mobile phone
• Speed Dialing
• Sidetone
• Advanced Noise Control™
Key Specications:
• Bluetooth 3.0
• Supporting proles: Headset Prole, Hands-Free Prole (HFP),
Advanced Audio Distribution Prole (A2DP), Audio Video Remote
Control Prole (AVRCP)
* in open terrain
English
5
Page 6
SMH5
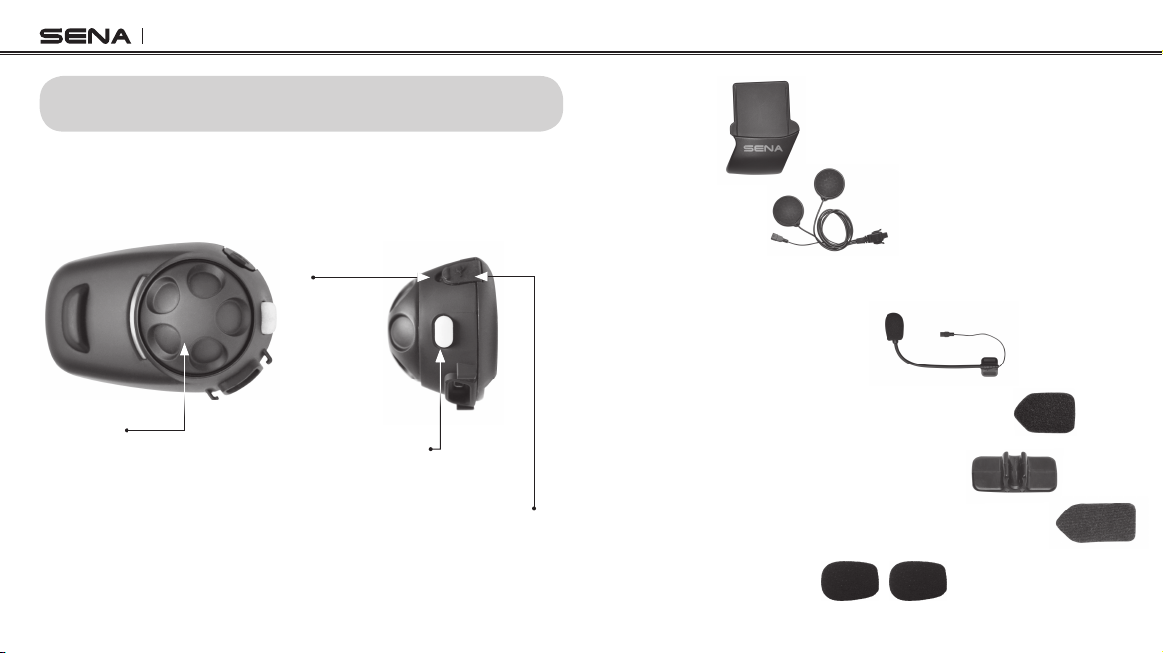
2. PACKAGE CONTENTS
• Headset Main Unit
Jog Dial
DC Power Charging & Firmware Upgrade Port
6
LED
•Charging LED
Phone Button
• Clamp Unit
• Helmet Speakers
• Microphone
- Basic Kit
• Attachable Boom Microphone
• Hook and Loop Fastener for Boom Microphone
• Attachable Boom Microphone Holder
• Hook and Loop Fastener for Boom Microphone Holder
• Microphone Sponges
Page 7
SMH5
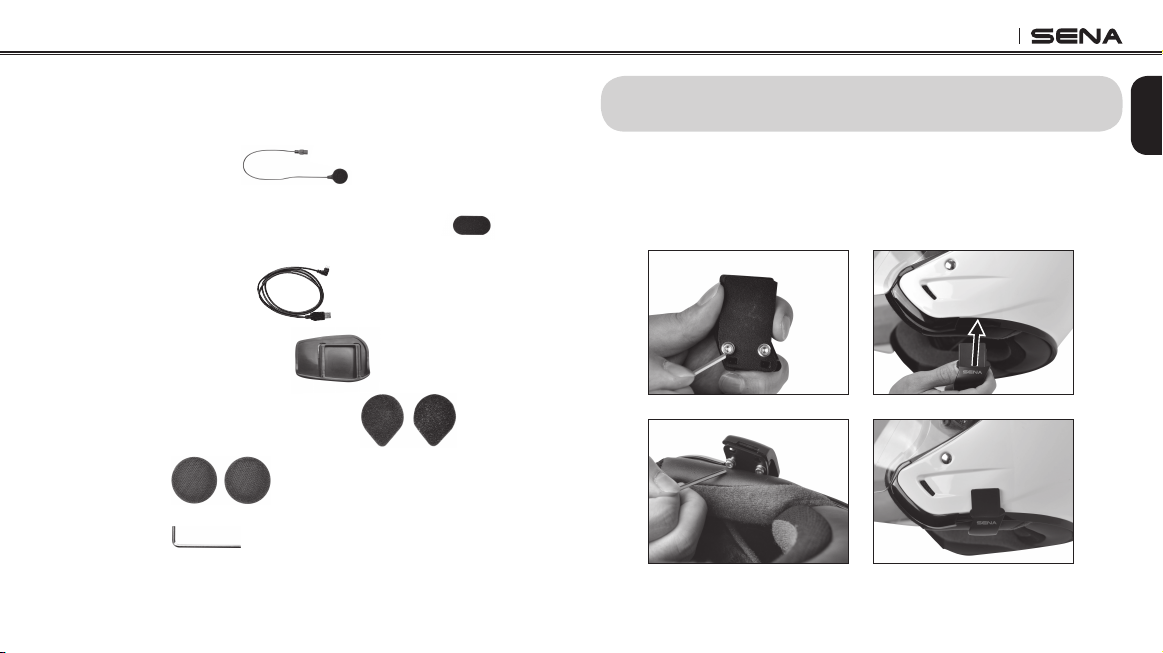
- Full-face Helmet Kit
• Wired Microphone
• Hook and Loop Fastener for Wired Microphone
• USB Power & Data Cable
• Glued Surface Mounting Plate
• Hook and Loop Fasteners for Speakers
• Speaker Pads
• Allen Wrench
3. INSTALLING THE SMH5 ON YOUR HELMET
English
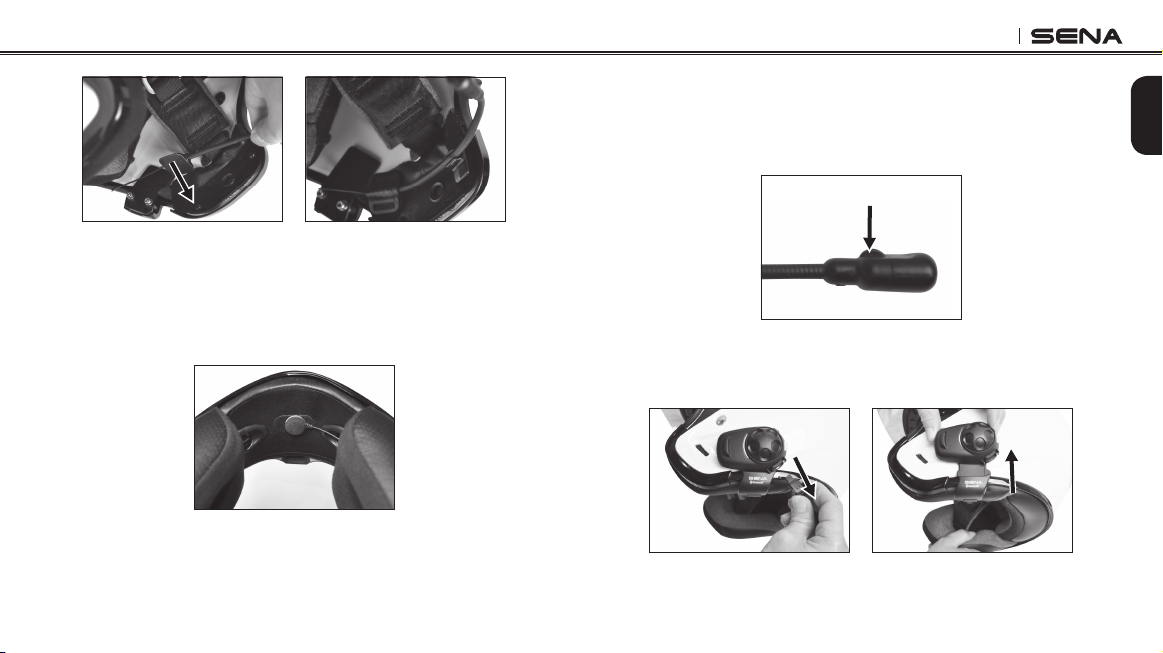
1. Loosen the two screws on the back plate of the clamp using the
enclosed Allen Wrench. Insert the back plate of the clamp unit
between the internal padding and external shell of the helmet, and
tighten the two screws.
Insert
7
Page 8
SMH5
2. Attach the headset main unit to the clamp. Insert the main unit in
the clamp until you feel the click that signals a secure attachment.
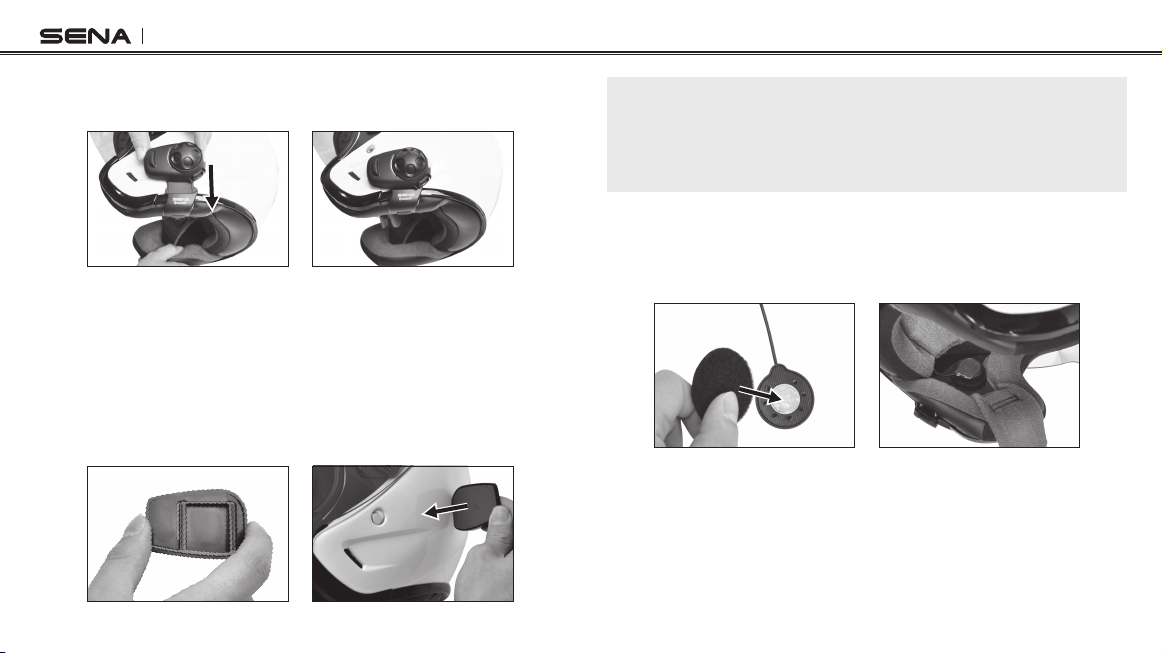
3. If you have any problem mounting the clamp unit on the helmet for
any reason, you may use the glued surface mounting plate which
can be attached to the external surface of the helmet.
• Locate a proper surface on the helmet to attach the unit, clean
the helmet surface location with a moistened towel, and allow to
dry thoroughly.
• Peel off the cover of the adhesive tape of the plate and attach
the unit on the proper surface of your helmet.
8
Note:
Sena recommends the clamp unit over the glued surface mounting plate.
Even though the glued surface mounting plate is provided for convenience,
Sena does not assume any responsibility for use of it. Users may have to
use the glued plate at their own risk and responsibility.
4. Place the helmet speakers along with the hook and loop fasteners,
centered to your ear, in the ear pockets of the helmet. If the helmet
has deep ear pockets, you can use the speaker pads to place the
speakers closer to your ears.
5. Attach the boom microphone included in the “Basic Kit” between
the internal padding and the external shell. The boom microphone
should be mounted on the inside surface of the external shell so
it is facing properly towards your mouth. Please make sure that
the microphone is located close to your mouth when you wear
the helmet. You can use the enclosed hook and loop fastener and
holder for the boom microphone to ensure secure placement.
Page 9
SMH5
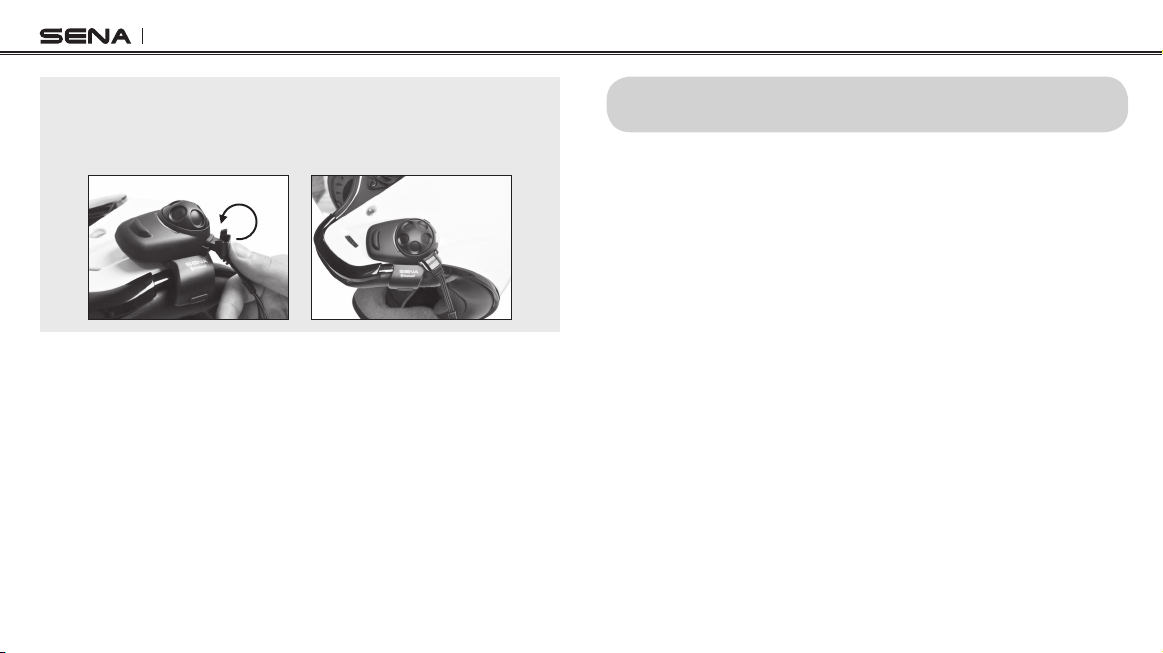
In the case of the wired microphone included in the “Full-face
Helmet Kit”, attach the enclosed hook and loop fastener for wired
microphone to the inside of the chin guard for full-face helmets.
Place the wired microphone on the hook and loop fastener and
attach it to the connector of the speaker cable.
6. When you use the boom microphone included in the “Basic Kit”,
please make sure that the n side of the microphone is facing
outward; away from your lips. You can easily recognize it by
touching the n with your ngers.
n
7. To remove the headset main unit from the clamp, please make sure
to pull out the speaker cable connector from the main unit rst.
Then, remove the main unit from the clamp.
English
9
Page 10
SMH5
Note:
Be sure to connect the speaker cable securely to the main unit. It is strongly
recommended that you insert the cable tightly into the connector housing
while holding the main unit.
10
4. POWERING ON/OFF AND CHARGING
To power on and off the headset, you don’t need to press and hold
any button for several seconds. Just short press the Jog Dial and
the Phone Button simultaneously, and you will get quick on-and-off
convenience.
4.1 Powering On
Press the Jog Dial and the Phone Button at the same time for about
1 second to power on. The blue LED turns on and you will hear
ascending beeps.
4.2 Powering Off
Just short press the Jog Dial and the Phone Button simultaneously,
you don’t need to press and hold for a few seconds. The red LED
turns on for a while until it turns off completely and you will hear
descending beeps.
Page 11

SMH5
4.3 Charging
• To charge the SMH5, use the USB Power & Data Cable included
in the package by plugging into computer’s USB port or USB wall
charger. USB wall charger is not included in the package, but you
can use any USB wall charger in the market.*
• The USB Power & Data Cable is also used for rmware upgrade of
the SMH5.
• You can use any of the standard micro-USB cables which is
mostly adopted by smartphones and general Bluetooth headsets
manufacturers.
• The Charging LED beside the charging port turns on red while
charging, and turns to blue when the headset is fully charged. It
takes about 2.5 hours to be fully charged.
• You can use the SMH5 while charging. It is especially helpful when
you use a cigarette charger for a long road trip.
• A cigarette charger for the SMH5 is separately available as an
optional accessory but you can use any micro-USB car charger in
the market.
4.4 Low Battery Warning
When the battery is low, the blinking blue LED in stand-by mode turns
to red and you will hear mid-tone triple beeps and a voice prompt
saying “Low battery”.
5. CHECKING THE BATTERY LEVEL
English
You can check the battery level in two different ways when the
headset is powering on.
5.1 LED Indicator
When the headset is powering on, the red LED ashes rapidly
indicating the battery level.
4 ashes = High, 70~100%
3 ashes = Medium, 30~70%
2 ashes = Low, 0~30%
5.2 Voice Prompt Indicator
When you power on the headset, keep pressing the Jog Dial and
Phone Button simultaneously for about 3 seconds until you hear
three high tone beeps. Then you will hear a voice prompt indicating
the battery level. However, if you release the buttons as soon as the
headset turns on, you will not hear the voice prompt for the battery
level.
11
Page 12

SMH5
6. PAIRING THE SMH5 WITH BLUETOOTH
DEVICES
Before using the SMH5 Bluetooth headset with any of Bluetooth
devices for the rst time, you need to do the pairing operation. It can
be paired with Bluetooth mobile phones, Bluetooth stereo devices
such as MP3, or motorcycle specic Bluetooth GPS, and with other
Sena Bluetooth headsets. This pairing operation is only required
once for each Bluetooth device, and the headset will remain paired
with the devices and automatically connects to the paired devices
again when they are within range. You will hear a high tone single
beep and a voice prompt when the headset connects to the paired
device automatically: “Phone connected” to a mobile phone,
“Media connected” to a Bluetooth stereo device.
6.1 Mobile Phone Pairing
6.1.1 Mobile Phone Pairing
1. Turn on the SMH5 and press the Phone Button for 5 seconds until
the LED ashes red and blue alternately and you hear multiple
beeps. You will hear a voice prompt saying “Phone pairing”.
2. Search for Bluetooth devices on your mobile phone. Select the
Sena SMH5 in the list of the devices detected on the mobile phone.
3. Enter 0000 for the PIN. Some mobile phones may not ask for the
PIN.
4. The mobile phone conrms that pairing has completed and the
SMH5 is ready to use. You will hear a voice prompt from the SMH5
saying “Your headset is paired”.
5.
If the pairing process is not completed within three minutes, the
SMH5 will return to stand-by mode.
6.1.2 Multipoint Mobile Phones Pairing
You can simultaneously use two mobile phones which use the mobile
phone prole.
1. You can pair the rst mobile phone to the SMH5 by following the
simple procedures in “6.1.1 Mobile Phone Pairing”.
2. To pair the second mobile phone, press the Jog Dial for 5 seconds
again until the red LED is rapidly ashing and you hear multiple
beeps.
3. Within 2 seconds, tap the Phone Button again, then the LED turns
to blue ashing and the beeps turn to high tone double beeps. You
will hear a voice prompt saying “Multipoint pairing”.
4. Search for Bluetooth devices on your mobile phone. Select the
Sena SMH5 in the list of the devices detected on the mobile phone.
5. Enter 0000 for the PIN. Some mobile phones may not ask for the
PIN.
12
Page 13

SMH5
6. The mobile phone conrms that pairing has completed and the
SMH5 is ready to use. You will hear a voice prompt from the SMH5
saying “Your headset is paired”.
6.2 Bluetooth Stereo Device Pairing
1. If the Bluetooth stereo device is integrated with the mobile phone
such as smartphones, you don’t need to pair the SMH5 with it
separately. When the SMH5 is paired with the mobile phone, it is
also paired as a stereo music device.
2. If you have a stand alone Bluetooth stereo device, follow the
pairing procedure separately. The procedure is the same as the
procedure of “6.1 Mobile phone pairing”.
Note:
1. If Bluetooth connection between the headset and a mobile phone is
disconnected, tap the Phone Button to recover the Bluetooth connection
immediately.
2. If Bluetooth connection between the headset and a media player is
disconnected, press the Jog Dial for 1 second to recover the Bluetooth
connection and play.
6.3 Bluetooth GPS Navigation Pairing
You can listen to voice instruction from Bluetooth GPS navigation.
Some GPS systems use mobile phone prole (HFP, Hands-Free
Prole) and others use stereo music prole (A2DP, Advanced Audio
Distribution Prole). Most motorcycle specic GPS systems use
mobile phone prole for turn-by-turn voice instruction. You can
simultaneously use a mobile phone and a GPS which uses mobile
phone prole by one of the following procedures.
6.3.1 Multipoint GPS Pairing
If you use GPS only for turn-by-turn voice instructions, not for
Bluetooth stereo music streaming, multipoint pairing is recommended
for the GPS connection. Multipoint Bluetooth pairing allows the SMH5
to connect two HFP devices at the same time: mobile phone and
GPS navigation. Follow the steps below to pair the GPS using the
multipoint pairing.
1. Turn on the headset and press the Jog Dial for 5 seconds until the
red LED is rapidly ashing and you hear multiple beeps.
2. Within 2 seconds, tap the Phone Button again, then the LED turns
to blue ashing and the beeps turn to high tone double beeps. You
will hear a voice prompt saying “Multipoint pairing”.
3. Search for Bluetooth devices on the GPS navigation screen. Select
the Sena SMH5 in the list of the devices detected on the GPS.
4. Enter 0000 for the PIN.
13
English
Page 14

SMH5
5. The GPS conrms that pairing has completed and the SMH5 is
ready to use. You will hear a voice prompt from the SMH5 saying
“Your headset is paired”.
6. If the pairing process is not completed within three minutes, the
SMH5 will return to stand-by mode.
The pairing diagram for multipoint GPS pairing is shown in the gure
below.
Smart Phone
HFP
Mobile Phone
+
A2DP
SMH5
14
Pairing
HFP
Multipoint
Pairing
Multipoint GPS Pairing
GPS
6.3.2 GPS Pairing as Mobile Phone
If GPS is not only used for turn-by-turn voice instructions but also is
your preferred Bluetooth stereo music source, you can pair the GPS
to the SMH5 by following the simple procedures in “6.1 Mobile Phone
Pairing”. When you do this, the SMH5 thinks the GPS is a mobile
phone. But the SMH5 can directly pair an additional mobile phone.
GPS
HFP
Mobile Phone
+
(A2DP)
Note:
You have to use a motorcycle specific GPS which transmits turn-by-turn
voice instruction to the headset by Bluetooth. Most automotive GPS systems
don’t have this feature.
Pairing
HFP
SMH5
GPS Pairing as Mobile Phone
Multipoint
Pairing
Mobile Phone
Page 15

SMH5
7. PAIRING WITH SELECTIVE PROFILE:
A2DP STEREO OR HANDSFREE
If you have previously paired a mobile phone to the SMH5, you
must clear the previous paring list on both devices; the mobile
phone and SMH5. To clear the pairing list on SMH5, please do a
factory reset described on the page 25.To clear the pairing list on
the mobile phone, please refer to the mobile phone manual. For
most smartphones, delete the Sena SMH5 from the list of Bluetooth
devices in setting menu.
7.1 A2DP Stereo Music Only
1. Turn on the headset and press the Phone Button for 5 seconds
until the LED ashes red and blue alternately and you hear multiple
beeps.
2. Within 2 seconds, tap the Jog Dial again, then the LED turns to
red ashing and the beeps turn to double mid-tone beeps. You will
hear a voice prompt saying “Media selective pairing”.
3. Search for Bluetooth devices on your smartphone. Select the Sena
SMH5 in the list of devices detected on your phone.
4. Enter 0000 for the PIN. Some smartphones may not ask for PIN.
7.2 HFP for Phone Call Only
1. Turn on the headset and press the Phone Button for 5 seconds
until the LED ashes red and blue alternately and you hear multiple
beeps.
2. Within 2 seconds, tap the Phone Button again, then the LED turns
to blue ashing and the beeps turn to multiple mid-tone beeps.
You will hear a voice prompt saying “Phone selective pairing”.
3. Search for Bluetooth devices on your smartphone. Select the Sena
SMH5 in the list of devices detected on your phone.
4. Enter 0000 for the PIN. Some smart phones may not ask for PIN.
15
English
Page 16

SMH5
8. PAIRING WITH OTHER SMH5 HEADSETS
FOR INTERCOM CONVERSATION
A
B D
The SMH5 can be paired with up to three other headsets for Bluetooth
Intercom conversation.
1. Turn on the two SMH5 headsets (A and B) that you would like to
pair with each other.
2. Press and hold the Jog Dial of the headset A and B for 5 seconds
until red LEDs of the both units start to ash rapidly. You will hear a
voice prompt saying “Intercom pairing”.
Simply tap the Jog Dial of any one of the two headsets A or
3.
B (It doesn’t matter that you choose A or B) and wait until the
LEDs of both headsets turn to blue and intercom connection is
automatically established. The two SMH5 headsets A and B are
paired with each other for intercom conversation. If the pairing
process is not completed within one minute, the SMH5 will return
to stand-by mode.
16
C
Pairing A & B
4. You can make other pairings between the headset A and C, and
between the headset A and D by following the same procedure as
above.
A A
B BD D
C C
Pairing A & C Pairing A & D
Page 17

SMH5
5. The intercom pairing queue is ‘Last-Come, First-Served’. If a
headset has multiple paired headsets for intercom conversations,
the last paired headset is set as rst intercom friend. The
previous Intercom friend becomes second intercom friend, and
third intercom friend.
Note:
For example, after the pairing procedures listed above, headset D is the rst
intercom friend of headset A. Headset C is the second intercom friend of
headset A, and headset B is the third intercom friend of headset A.
9. PAIRING WITH OTHER SENA HEADSET
English
MODELS FOR INTERCOM CONVERSATION
The SMH5 can be paired with all other Sena headset models such as
the SMH10 and the SPH10 for intercom conversation. Please follow
the same procedure as above to pair with these headset models.
17
Page 18

SMH5
10. CONFIGURATION SETTING
You can set the conguration of the SMH5 by the voice menu
instruction as below.
1. To enter into voice conguration menu, press and hold the Jog
Dial for 12 seconds until the LED shows solid blue and you hear
high tone double beeps. You will also hear a voice prompt saying
“Conguration menu”.
2. Rotate the Jog Dial clockwise or counter-clockwise to navigate
between the menus. You will hear voice prompts for each menu
items as below.
3. You can enable the feature or execute the command by tapping
the Phone Button, or disable the feature by tapping the Jog Dial.
4. If any button is not pressed within 10 seconds, the SMH5 will exit
the conguration and goes back to stand-by mode.
5. If you want to exit the conguration immediately, rotate the Jog Dial
until you hear a voice prompt saying “Exit conguration”, and
tap the Phone Button.
The voice prompt for each menu item is as below:
(1) Speed dial (5) Noise Control
(2) VOX phone (6) Delete all pairings
(3) Voice prompt (7) Exit conguration
(4) Sidetone
Speed dial
Exit configuration
Delete all pairings
Noise Control Sidetone
VOX phone
Voice prompt
10.1 Assigning Speed Dial
Voice Prompt
Factory Default N/A
Execute Tap the Phone Button
“Speed dial”
1. To assign a phone number as a speed dial, rotate the Jog Dial until
you hear a voice prompt saying “Speed dial”.
18
Page 19

SMH5
2. Tap the Phone Button, and you will hear a voice prompt saying
“Speed dial one” and “Phone connected”.
3. Rotate the Jog Dial to select one of three speed dial numbers and
you hear a voice prompt saying “Speed dial (#)”.
4. Call a phone number you want to assign and you will hear a voice
prompt saying “Save speed dial (#)”. The phone number is
automatically assigned to the selected speed dial number. Then
the phone call will hang up before being connected.
5. To exit the menu, rotate the Jog Dial clockwise or counter
clockwise until you hear a voice prompt saying “Cancel”, and tap
the Phone Button to conrm. You will then hear a voice prompt
saying “Cancel”. If any button is not pressed within 1 minute, the
SMH5 will exit the conguration menu and go back to stand-by
mode.
Note:
1. After assigning a phone number to one of three speed dials, you can
continually assign another phone number to the rest of two speed dials.
2. You can assign phone numbers to speed dials in your PC. Please visit the
Sena Bluetooth web site at www.sena.com for more information.
10.2 Enabling/Disabling Voice Activated Phone Answering
Voice Prompt
Factory Default Enable
Enable Tap the Phone Button
Disable Tap the Jog Dial
“VOX phone”
If this feature is enabled, you can answer incoming calls by simply
saying a word loudly enough. For example, when you hear a series
of beeps for an incoming call, you can answer the phone by saying
“Hello” or any other word loudly. This is enabled from the factory but
you can disable this. If this mode is disabled, you have to tap the Jog
Dial or the Phone Button to answer an incoming call.
10.3 Enabling/Disabling Voice Prompts
Voice Prompt
Factory Default Enable
Enable Tap the Phone Button
Disable Tap the Jog Dial
“Voice prompt”
You can disable voice prompts by conguration setting, but the
following voice prompts are always on.
- Voice prompts for conguration setting menu
- Voice prompts for battery level indicator
19
English
Page 20

SMH5
- Voice prompts for factory reset
10.4 Enabling/Disabling Sidetone
Voice Prompt
Factory Default Disable
Enable Tap the Phone Button
Disable Tap the Jog Dial
“Sidetone”
Sidetone is the sound of your own voice as picked up by your
headset’s microphone and reproduced in your own ear, by your own
speaker. It helps you to naturally speak at the correct level according
to varying helmet noise conditions. If this feature is enabled, you can
hear what you are speaking during an intercom conversation or a
phone call.
10.5 Enabling/Disabling Advanced Noise Control™
Voice Prompt
Factory Default Enable
Enable Tap the Phone Button
Disable Tap the Jog Dial
“Noise control”
When Advanced Noise Control is enabled, the background noise is
reduced during an intercom conversation. When it is disabled, the
background noise is mixed with your voice during intercom.
20
Note:
If you use your SMH5 with the Bluetooth Audio Pack for GoPro or Prism,
you can enable or disable this feature only during Normal Audio Recording
Mode. This feature is automatically disabled while in Ultra HD (UHD) Audio
Mode.
10.6 Delete all Bluetooth Pairing Information
Voice Prompt
Factory Default N/A
Execute Tap the Phone Button
“Delete all pairings”
To delete all Bluetooth pairing information of the SMH5, rotate the Jog
Dial until you hear a voice prompt saying “Delete all pairings”, and
tap the Phone Button to conrm. Tapping the Jog Dial is not available
for this setting.
10.7 ExitVoiceCongurationMenu
Voice Prompt
Factory Default N/A
Execute Tap the Phone Button
“Exit conguration”
To exit voice conguration menu and get back to stand-by mode,
rotate the Jog Dial until you hear a voice prompt saying “Exit
Page 21

SMH5
conguration”, and tap the Phone Button to conrm. Tapping the
Jog Dial is not available for this setting.
Rotate Jog Dial Tap Phone Button Tap Jog Dial
Speed Dial Execute N/A
VOX Phone Enable Disable
Voice Prompt Enable Disable
Sidetone Enable Disable
Advanced Noise
Control
Delete All Pairings Execute N/A
Exit Conguration Execute N/A
Enable Disable
Voice Conguration Menu & Button Operations
11. USING THE SMH5
English
11.1 Volume Adjustment
You can easily adjust the volume by rotating the Jog Dial. You will
hear a beep when the volume reaches maximum or minimum level.
The volume is set and maintained independently at different levels for
each audio source even when you turn off and on the headset. For
example, once you set the volume for mobile phone handsfree, it will
not change even if you adjust the volume when you hear Bluetooth
MP3 music. So you can always maintain the preferred optimum
volume level for each audio source.
11.2 Mobile Phone Call Making and Answering
1. When you have an incoming call, simply tap the Jog Dial or the
Phone Button to answer the call.
2. You can also answer the incoming call by loudly speaking any
word of your choice if Voice Activated Phone Answering is enabled.
(Refer to the next section for details.)
3. To end a call, tap the Jog Dial or the Phone Button, or wait for the
called person to end the call.
4. To reject a call, press the Jog Dial for 2 seconds until you hear a
beep while the phone is ringing.
21
Page 22

SMH5
5. To transfer a call between the mobile phone and the headset during
the phone conversation, press the Phone Button for 2 seconds
until you hear a beep.
6. There are several ways to make a phone call:
• Enter numbers on your mobile phone keypad and make a call.
Then the call is automatically transferred to the headset.
• For some older mobile phones which do not automatically
transfer calls to the headset, press the Phone Button after
entering phone numbers on the mobile phone keypad.
• Tap the Phone Button in stand-by mode to activate the voice
dialing of your mobile phone. For this, the voice dialing feature
must be available on the mobile phone. Refer to your mobile
phone manual for further instruction.
Note:
1. If you are using multipoint mobile phone connection and you have an
incoming call from the second phone during the call of the first phone,
then you may still receive the call from second phone. In this case, the
call from the first phone is on waiting mode. If you end a call, then it will
automatically guide you to the first phone call.
2. If you are using multipoint connection of mobile phone and GPS, you may
not listen to the GPS voice instruction during the phone call.
22
11.3 Speed Dialing
You can quickly make a phone call by using the voice speed dial
menu.
1. To enter into the voice speed dial menu, double tap the Phone
Button and you will hear a mid-tone single beep and a voice
prompt saying “Speed dial”.
2. Rotate the Jog Dial clockwise or counter-clockwise to navigate
between the menus. You will hear voice prompts for each menu
item.
3. Tap the Phone Button or the Jog Dial to select a voice menu among
the followings:
(1) Last number redial (4) Speed dial 3
(2) Speed dial 1 (5) Cancel
(3) Speed dial 2
4. After selecting the last number redial menu, you will hear a voice
prompt saying “Last number redial”. Then, to redial the last
phone call number, tap the Phone Button or the Jog Dial.
5. To call one of the speed dials, rotate the Jog Dial clockwise or
counter-clockwise to navigate between the menus until you hear a
voice prompt saying “Speed dial (#)”. Then, tap the Phone Button
or the Jog Dial.
Page 23

SMH5
6. If you want to exit the speed dial immediately, rotate the Jog
Dial until you hear a voice prompt saying “Cancel”, and tap the
Phone Button or the Jog Dial. If any button is not pressed within 15
seconds, the SMH5 will exit the voice speed dial menu and goes
back to stand-by mode.
Note:
Make sure that you connect the mobile phone and the headset in order to
use the speed dial function.
Answer
End Tap Phone Button or Tap Jog Dial
Reject Press Jog Dial for 2”
Transfer Press Phone Button for 2”
Call Use phone keypad
Speed Dial Double tap Phone Button
Voice Command Tap Phone Button
Tap Phone Button or Tap Jog Dial or Say “Hello”
Mobile Phone Call Button Operations
11.4 Intercom Conversation
1. You can start an intercom conversation with any of intercom friends
by tapping the Jog Dial: single tapping to intercom with the rst
intercom friend, double tapping with the second intercom friend,
and triple tapping with the third intercom friend.
1st Intercom Friend 2nd Intercom Friend
rd
3
Intercom Friend
23
English
Page 24

SMH5
2. To terminate an intercom conversation, single tap the Jog Dial. Any
intercom connection with any intercom friend will be terminated by a
single tapping. A double or triple tapping will do nothing in this case.
Terminate
11.5 Intercom and Mobile Phone Call
1. When you have an incoming mobile phone call during an intercom
conversation, you will hear a ring tone. You can choose whether
to 1) answer the mobile phone call and stop the intercom
conversation, or 2) reject the phone call and stay on the intercom
conversation.
a. To answer the phone call and stop the intercom conversation,
tap the Jog Dial or the Phone Button. When you hang up the
phone call, the intercom will automatically be recovered.
b. To reject the phone call and stay on the intercom conversation,
press the Jog Dial for 2 seconds until you hear a beep.
24
Unlike other motorcycle Bluetooth headsets, this prevents a
user from being dropped out of an intercom conversation by an
incoming mobile call.
2. When you have an incoming intercom call during a mobile phone
call, you will hear 4 high tone beeps, alerting you that there is an
incoming intercom call. You will also hear a voice prompt saying
“Intercom requested”. In this case, the intercom call does not
override the mobile phone call because intercom has lower priority
than mobile call. You have to hang up the mobile phone call to
make or receive an intercom call.
11.6 Intercom Failure
When you try to start an intercom conversation with an intercom
friend who is already having an intercom conversation with another
intercom friend or a mobile phone call with another person, you will
hear a low tone double beep signifying a busy signal. You will also
hear a voice prompt saying “Intercom failed, try again later”. In
this case, you have to try again later. On the other hand, the intercom
friend will hear 4 high tone beeps alerting them that there is an
incoming intercom call.
11.7 Intercom Reconnection
If your intercom friend goes out of range while having an intercom
conversation, you may hear static noise and eventually the intercom
will be disconnected. In this case, the SMH5 automatically tries to
Page 25

SMH5
reconnect the intercom every 8 seconds. You will hear high tone
double beeps until the intercom is reestablished. If you don’t want to
make a reconnection, tap the Jog Dial to stop the attempt.
11.8 Stereo Music
You can listen to stereo music by Bluetooth wireless stereo. The
Bluetooth audio device must be paired with the SMH5 by following the
Bluetooth Stereo Device Pairing instructions described in the previous
chapter. The SMH5 supports the Audio/Video Remote Control Prole
(AVRCP), so if your Bluetooth audio device also supports the AVRCP,
you can use the SMH5 to remotely control music playback. So, you
not only can adjust the volume but also use the functions such as
play, pause, next track and previous track.
o adjust the volume, rotate the Jog Dial.
• T
• To play or pause music, press and hold the Jog Dial for 1 second
until you hear a double beep.
• To track forward or track back, rotate while pressing the Jog Dial
clockwise or counter clockwise.
25
English
Page 26

SMH5
11.9 Function Priority
The SMH5 operates in the following order of priority:
(Highest) Mobile Phone,
Intercom,
Music sharing by Bluetooth stereo music,
(Lowest) Bluetooth Stereo Music
A lower priority function is always interrupted by a higher priority
function. For example, stereo music is interrupted by intercom call,
and intercom conversation is interrupted by incoming mobile phone
call.
11.10 Music Sharing
You can start sharing music with an intercom friend using Bluetooth
stereo music during a two-way intercom conversation. When you
terminate music sharing, you can go back to the intercom conversation.
To start or terminate sharing music, press and hold the Jog Dial for
1 second during an intercom conversation until you hear a double
beep and you and your intercom friend will listen to or terminate
sharing music. To track forward or track back, rotate while pressing
down the Jog Dial clockwise or counter clockwise.
26
Note:
1. Both you and your intercom friend can remotely control music
playback during music sharing such as track forward and track
back.
2. When you have an incoming call, make a phone call, or hear the
turn-by-turn voice instruction of GPS during music sharing, the
function will be paused.
3. In order to share music, make sure that you update both headsets
with the firmware that has the music sharing feature, and enable the
EDR setting in the Sena Device Manager.
11.11 Reset to Factory Default Settings
1. To restore the SMH5 to factory default settings, press and hold the
Phone Button for 12 seconds until the LED shows solid red and you
hear high tone double beeps. You will also hear a voice prompt
saying “Factory reset”.
2. Within 5 seconds, press the Jog Dial to conrm reset. The headset
will be restored to factory setting and switched off automatically.
You will hear a voice prompt saying “Headset reset, good-bye”.
3. If you don’t press the Jog Dial within 5 seconds, the reset attempt
is canceled and the headset returns to stand-by mode. You will
hear a voice prompt saying, “Canceled”.
Page 27

SMH5
11.12 Fault Reset
When the SMH5 is not working properly or is in faulty status for any
reason, you may reset by pushing the pin-hole reset button at the
back of the headset main unit. Insert a paper clip into the reset pinhole and press the reset button for a second with light pressure.
The SMH5 will be switched off after which time, you have to turn
the system back on and try again. However, this will not restore the
headset to factory default settings.
12. UNIVERSAL INTERCOM
English
You can have an intercom conversation with non-Sena Bluetooth
headsets using the Universal Intercom function. Non-Sena Bluetooth
headsets can be connected to the Sena Bluetooth headset if they
support the Bluetooth Hands-Free Prole (HFP). The working distance
may differ depending on the performance of Bluetooth headset that
it is connected to. In general, it is shorter than normal intercom
distance since it uses the Bluetooth Hands-Free Prole.
12.1 Universal Intercom Pairing
The SMH5 can be paired with non-Sena Bluetooth headsets for
Bluetooth intercom conversation. You can pair the SMH5 with only
one non-Sena Bluetooth headset; if you pair with a different non-Sena
Bluetooth headset, the previous pairing list will be removed.
1. Turn on the SMH5 and a non-Sena Bluetooth headset which you
want to pair with.
2. Press and hold the Jog Dial on the SMH5 for 8 seconds until the
blue LED ashes rapidly. You will hear a voice prompt saying
“Universal intercom pairing”.
27
Page 28

SMH5
3. Perform the operation required for handsfree pairing on the nonSena Bluetooth headset (refer to the users’ manual of the headsets
you want to use). The SMH5 will automatically perform pairing with
non-Sena Bluetooth headsets in pairing mode.
12.2 Two-way Universal Intercom
You can initiate the Universal Intercom connection with non-Sena
Bluetooth headsets using the same intercom connection method as
you would between other Sena headsets. You may single tap the Jog
Dial to begin an intercom conversation with the rst intercom friend,
double tap with the second intercom friend, and triple tap with the
third intercom friend.
Non-Sena Bluetooth headsets may initiate the Universal Intercom
connection, activating the voice dialing or using the redialing
operation. You may also disconnect the existing connection by
ending a call operation function (refer to the users’ manual of the
headsets for voice dialing, redialing, and ending a call).
13. FIRMWARE UPGRADE
The SMH5 supports rmware upgrade function. Please visit Sena
Bluetooth web site at www.sena.com to check the latest software
downloads.
28
Page 29

SMH5
14. OPERATION QUICK REFERENCE
Type Operation Button Duration LED Beep
Basic
Function
Mobile
Phone
Intercom
Power-on
Power-off
Volume
adjustment
Answer & end
mobile phone
call
Reject incoming
mobile phone
call while the
phone is ringing
Call transfer
while on the
phone
Voice dialing Phone Button Tapping — —
Speed dial Phone Button
Start & end
intercom
conversation
Phone Button
+ Jog Dial
Phone Button
+ Jog Dial
Jog Dial Rotating — —
Phone Button
/ Jog Dial
Jog Dial 2 sec — —
Phone Button 2 sec —
Jog Dial Tapping — —
1 sec Solid blue
Tapping Solid red
Tapping — —
Double
tapping
— —
Ascending
beeps
Descending
beeps
High tone
beep
Type Operation Button Duration LED Beep
Music
Bluetooth
Pairing
Reset
Play & pause
music
Track-forward &
track-back
Phone pairing Phone Button 5 sec
Multipoint
pairing
Intercom pairing
Universal
intercom pairing
Factory reset
Fault reset Reset Button Pressing — —
Jog Dial 1 sec —
Jog Dial
Jog Dial 5 sec
Phone Button Tapping
Jog Dial 5 sec
Jog Dial of any of the two headsets
Jog Dial 8 sec
Phone Button 12 sec Solid red
Jog Dial within 5 sec to confirm reset
Rotating
while
pressing
— —
Blue & red
alternatively
flashing
Red
flashing
Blue
flashing
Red
flashing
Blue
flashing
Mid-tone
double beeps
Mid-tone single
beep &
High tone triple
beeps
Multiple beeps
High tone
double beeps
Mid-tone
single beep &
double-tone
beeps
—
High tone
double beeps
English
29
Page 30

SMH5
CERTIFICATION AND SAFETY APPROVALS
FCC Compliance Statement
This device complies with part 15 of the FCC rules. Operation is subject to
the following two conditions:
(1) This device may not cause harmful interference, and
(2) This device must accept any inter
interference that may cause undesired operation.
This equipment has been tested and found to comply with the limits for a
Class B digital device pursuant to part 15 of the FCC rules. These limits are
designed to provide reasonable protection against harmful interference in
a residential installation. This equipment generates, uses and can radiate
radio frequency energy and, if not installed and used in accordance with
the instructions, may cause harmful interference to radio communications.
However, there is no guarantee that interference will not occur in a particular
installation. If this equipment does cause harmful interference to radio or
television reception, which can be determined by turning the equipment on
and off, the user is encouraged to try to correct the interference by one or
more of the following measures:
• Reorient or relocate the receiving antennae
• Increase the separation between the equipment and the receiver
• Connect the equipment into an outlet on a circuit different from that to
which the receiver is connected.
30
ference received, including
• Consult the dealer or an experienced radio/TV technician for help.
FCC RF Exposure Statement
This equipment complies with FCC radiation exposure limits set forth for
an uncontrolled environment. End users must follow the specic operating
instructions for satisfying RF exposure compliance. The antenna used for
this transmitter must not transmit simultaneously with any other antenna
or transmitter, except in accordance with FCC multi-transmitter product
procedures.
FCC Caution
Any changes or modications to the equipment not expressly approved by
the party responsible for compliance could void user’s authority to operate
the equipment.
CE Declaration of Conformity
This product is CE marked according to the provisions of the R&TTE
Directive (1999/5/EC). Hereby, Sena declares that this product is in
compliance with the essential requirements and other relevant provisions
of Directive 1999/5/EC. For further information, please consult
sena.com
harmonized within EU. Within the EU this product is intended to be used
in Austria, Belgium, Denmark, Finland, France, Germany, Greece, Ireland,
Italy, Luxembourg, The Netherlands, Portugal, Spain, Sweden, United
Kingdom and within EFTA in Iceland, Norway and Switzerland.
. Please note that this product uses radio frequency bands not
www.
Page 31

SMH5
Industry Canada Statement
This device complies with Industry Canada license-exempt RSS
standard(s). Operation is subject to the following two conditions:
(1) This device may not cause interference.
(2) This device must accept any interference, including interference that
may cause undesired operation of the device.
Bluetooth License
The Bluetooth® word mark and logos are owned by the Bluetooth SIG, Inc.
and any use of such marks by Sena is under license. Other trademarks
and trade names are those of their respective owners.
The product is compliant with and adopts the Bluetooth
®
Specication 3.0
and has successfully passed all interoperability tests that are specied in
the Bluetooth
and other Bluetooth
®
specication. However, interoperability between the device
®
-enabled products is not guaranteed.
WEEE (Waste Electrical and Electronic Equipment)
The crossed-out wheel bin symbol on the product,
literature, or packaging reminds you that all electrical
and electronic products, batteries, and accumulators
must be taken to separate collection at the end of their
working life. This requirement applies to the European
Union and other locations where separate collection
systems are available. To prevent possible harm to the environment or
human health from uncontrolled waste disposal, please do not dispose
of these products as unsorted municipal waste, but hand it in at an
ofcial collection point for recycling.
31
English
Page 32

SMH5
SAFETY INFORMATION
Please ensure that the product is properly used by observing the
warnings and cautions below to prevent any risk and/or damage to
property.
Product Storage and Management
• Keep the product free of dust. It may damage mechanical and
electronic parts of the product.
• Do not store the product in high temperatures as this may reduce
the life span of electronic devices, damage the battery, and/or melt
plastic parts of the product.
• Do not store the product in cold temperatures. Abrupt changes in
temperatures may cause condensation and damage electronic
circuits.
• Do not clean the product with cleaning solvents, toxic chemicals, or
strong detergents as this may damage the product.
• Do not paint the product. Paint may obstruct moving parts or
interfere with the normal operation of the product.
• Do not drop or otherwise shock the product. It may damage the
product or its internal electronic circuits.
• Do not disassemble, repair or modify the product as this may
damage the product and invalidate the product warranty.
32
• Do not store the product in humid environments, especially for long
time storage.
Product Use
• In some regions, it is prohibited by law to ride motorcycles while
wearing headsets or earbuds. Therefore be certain to comply with
all relevant laws in the region before using the product.
• The headset is for motorcycle helmets only. To install the headset,
you must follow the installation instructions shown in the User’s
Guide.
• Use of the product at a high volume for a long period of time may
damage your eardrums or hearing ability. Keep the volume at a
modest level to prevent damage.
• Do not cause impact to the product or touch it with sharp tools as
this may damage the product.
• Do not use the product in high-temperatures or apply heat to the
product as this may cause damage, explosion, or re.
• Keep product away from pets or small children. It may damage the
product.
• In any place where wireless communication is prohibited, such as
hospitals or airplanes, turn off the power and refrain from using the
product. In a place where wireless communication is prohibited,
electromagnetic waves may cause hazards or accidents.
Page 33

• Do not use the product near hazardous explosives. When it is near
any explosion hazards, turn off the power and heed any regulations,
instructions, and signs in the area.
• When using the product, be certain to conform to laws regarding the
use of communications devices while riding.
• Do not put the product where it may hamper the rider's vision or
manipulate it while riding. This may cause trafc accidents.
• Before riding, fasten the product to the helmet, and double-check
that it is fastened. Separation of the product while riding may cause
damage to the product or accidents.
• If the product is damaged, stop using it immediately. It may cause
damage, explosion, or re.
Battery
This product has an irreplaceable rechargeable battery inside.
Therefore, when using the product, make sure to adhere to the
following:
• Never separate the battery from the product as this may damage
the product.
• The battery performance may be reduced over time with usage.
SMH5
•
echarging the battery, make sure to use an approved charger
In r
provided by the manufacturer. Use of a non-approved charger may
cause re, explosion, leakage, and other hazards may also reduce
the life time or performance of the battery.
•
• Do not use cigarette chargers other than the included cigarette
•
• If you apply heat to the batter
• Do not use the product with a damaged battery. It may explode and/
• Never use a damaged charger. It may explode and/or cause
• Battery life may vary depending on conditions, environmental
d party USB charger can be used with Sena products if the
Any 3r
charger is approved by either the FCC, CE, IC or other locally
approved agencies that Sena accepts.
charger to charge the headset.
e the battery at temperatures of 15°C~25°C (59°F~77°F). Higher
Stor
or lower temperatures may reduce the capacity and life of the
battery, or may cause temporary non-operation. Do not use the
product in sub-zero temperature, because it may cause serious
reduction of the battery performance.
y or throw it into re, it may explode.
or cause accidents.
accidents.
factors, functions of the product in use, and devices used with it.
English
33
Page 34

SMH5
PRODUCT WARRANTY AND DISCLAIMER
Limited Warranty
Limited Warranty
Sena Technologies, Inc. (“Sena”) guarantees the product quality based
on the technical specication stated in the product manual, and data
regarding product warranty. Here, product warranty extends to the product
only. Sena will not be liable for any loss, damage of human life, or loss of
property which may result from using the product beyond defective parts
or aws that occur due to problems in manufacture.
Warranty Period
Sena guarantees free-of-charge replacements of defective parts of the
product or aws that may have occurred due to problems in manufacture
for a period of 2 years from the date of initial purchase.
Termination
Quality warranty of the product becomes effective on the date of initial
purchase. In addition, the quality warranty of the product expires when the
warranty period expires. However, in the following cases, the warranty will
be terminated prematurely.
• In the event the product has been sold or transferred to a third party.
• In the event the manufacturer's name, serial number, product label, or
other markings have been modied or removed.
34
• In the event any unauthorized person has tried to disassemble, repair, or
modify the product.
Notice and Waiver
By buying and using this product, you relinquish considerable legal rights
including any claim for compensation for damages. Therefore, be certain
to read and understand the following terms and conditions before using
the product. Use of this product will constitute consent to this agreement,
and forfeiture of rights to all claims. If you do not consent to all the terms
and conditions of this agreement, return the product for a refund.
1. You agree that you, your descendants, legal proxies, successors, or
transferees will not raise permanent volitional request for any suit, claim,
implementation, redemption or similar action from Sena with regard to
any occasion such as difculty, pain, suffering, inconvenience, loss,
injury, or death which may occur to you or a third party during the use
of this product.
2. You must completely understand and accept all risks (including those
occurring due to any careless behavior of yours or others) which may
occur during the use of this product.
3. You are responsible for ensuring that your medical condition permits
usage of the product and that you are in sufcient physical condition
for using any device which can be used with it. In addition, you must
ensure that the product does not limit your abilities and that you are able
to use it safely.
Page 35

SMH5
4. You must be an adult who can take responsibilities for using the product.
5. You must read and understand the following warnings and alerts:
• Sena; together with employees, managers, partners, subsidiaries,
representatives, agents, supporting rms and suppliers, sole sellers
of Sena (collectively referred to as “the company”) recommend that,
before using the product and similar devices of any brands including
its derivative models, you collect any relevant information in advance
and be entirely prepared in terms of weather, trafc situation, and road
conditions.
When you use the pr
•
oduct while you operating any vehicle or
equipment such as motorcycles, scooters, mopeds, ATVs, or quadbikes (hereinafter called as “transportation means”), you must take
complete caution regardless of the location of such operation.
• Use of the product on the road may cause such risks as fracture,
serious disability, or death.
• Risk factors, which may occur when you use the product, may be
due to errors of the manufacturer, its agents, or third parties which are
involved in the manufacturing.
• Risk factors, which may occur when you use the product, may be
unforeseeable. Therefore, you must take full responsibility for any
damage or loss caused by all risk factors which may occur when using
the product.
• When you use the product, use good judgment; never use it under the
inuence of alcohol.
6. You must read and completely understand all terms and conditions
of legal rights and warnings that are involved in using the product. In
English
addition, usage of the product constitutes acceptance of all terms and
conditions regarding waiver of rights.
Warranty Exclusions
Reasons for Limited Liabilities
If you do not return the product after purchasing it, you relinquish all rights
to liabilities, loss, claims, and claims for reimbursement of expenses
(including attorney's fees). Therefore, Sena will not be liable for physical
injury, death, or any loss or damage of transportation means, possessions,
or assets which belong to you or third parties that may have occurred while
you use the product. Further, Sena will not be liable for any substantial
damage not related to the, condition, environment, or malfunction of the
product. All risks related with the operation of the product depend entirely
on the user regardless of its use by the initial purchaser of a third party.
Use of this product may violate local or national laws. In addition, be
aware once again that correct and safe use of the product is entirely your
responsibility.
35
Page 36

SMH5
Limitation of Liability
TO THE FULL EXTENT ALLOWED BY LAW, SENA EXCLUDES FOR
ITSELF AND ITS SUPPLIERS ANY LIABILITY, WHETHER BASED IN
CONTRACT OR TORT (INCLUDING NEGLIGENCE), FOR INCIDENTAL,
CONSEQUENTIAL, INDIRECT, SPECIAL, OR PUNITIVE DAMAGES OF ANY
KIND, OR FOR LOSS OF REVENUE OR PROFITS, LOSS OF BUSINESS,
LOSS OF INFORMATION OR DATA, OR OTHER FINANCIAL LOSS
ARISING OUT OF OR IN CONNECTION WITH THE SALE, INSTALLATION,
MAINTENANCE, USE, PERFORMANCE, FAILURE, OR INTERRUPTION
OF ITS PRODUCTS, EVEN IF SENA OR ITS AUTHORIZED RESELLER
HAS BEEN ADVISED OF THE POSSIBILITY OF SUCH DAMAGES, AND
LIMITS ITS LIABILITY TO REPAIR, REPLACEMENT, OR REFUND OF THE
PURCHASE PRICE PAID, AT SENA’S OPTION. THIS DISCLAIMER OF
LIABILITY FOR DAMAGES WILL NOT BE AFFECTED IF ANY REMEDY
PROVIDED HEREIN SHALL FAIL OF ITS ESSENTIAL PURPOSE. IN ANY
CASE, THE TOTAL COMPENSATION LIABILITIES OF SENA OR ITS SALES
AGENTS SHALL NOT EXCEED THE PRICE PAID FOR THE PRODUCT BY
THE PURCHASER.
36
Liabilities Disclaimer
In addition to damages which may occur due to the use of the product,
Sena will not be liable for damages of the product which occur due to the
following events.
• In the event the product is misused or used for purposes other than its
intended purposes.
• In the event the product is damaged because the user does not follow the
content of the product manual.
• In the event the product is damaged because it has been left unattended
or has undergone any other accident.
• In the event the product is damaged because the user has used any
parts or software which are not provided by the manufacturer.
• In the event the product is damaged because the user has disassembled,
repaired, or modied it in such way as is not explained in the product
manual.
• In the event the product is damaged by a third party.
• In the event the product is damaged due to Acts of God (including re,
ood, earthquake, storm, hurricane or other natural disaster).
• In the event the surface of the product is damaged by use.
Page 37

SMH5
Warranty Service
To obtain product warranty service, send the defective product, at your
expense, to the manufacturer or the seller along with proof of purchase
(a receipt that shows the purchase date, a product registration certicate
of the Website, and other relevant information). Take necessary measures
to protect the product. In order to get a refund or replacement, you must
include the whole package as it was purchased.
Free-of-charge Service
Sena will provide free-of-charge repair or replacement service for the
product when product defects occur within the scope of the product
warranty during the warranty period.
English
37
Page 38

1.4.5
www.sena.com
User’s Guide for Firmware v2.2
 Loading...