

Page 1
SENA
R1 E V O
SMART CYCLING HELMET
Version 1.0.2
USER’S GUIDE
ENGLISH
Page 2

TABLE OF CONTENTS
1. ABOUT THE R1 EVO SMART CYCLING HELMET 5
1.1 General Information 5
1.2 Product Details 6
1.3 Package Contents 6
1.4 Wearing the Helmet 7
1.4.1 How to Wear The Helmet 7
1.4.2 Helmet Fitment Check 9
1.5 Visor Installation 10
2. GETTING STARTED: BLUETOOTH SYSTEM 11
2.1 Downloadable Sena Software 11
2.1.1 Sena Cycling App 11
2.1.2 Sena Device Manager 11
2.2 Button Function 12
2.3 Powering On and Off 12
2.4 Charging 13
2.5 Checking the Battery Level 13
2.6 Volume Adjustment 14
3. PAIRING THE BLUETOOTH SYSTEM WITH
OTHER BLUETOOTH DEVICES 15
3.1 Phone Pairing 15
4. MOBILE PHONE USAGE 16
4.1 Making and Answering Calls 16
5. STEREO MUSIC 17
5.1 Bluetooth Stereo Music 17
Page 3

TABLE OF CONTENTS CONTINUED
6. MESH INTERCOM 18
6.1 What is Mesh Intercom? 18
6.2 Starting Mesh Intercom 19
6.3 Mic Enable/Disable (Default: Enable) 19
6.4 Channel Setting (Default: 1) 19
7. USING THE FM RADIO 21
7.1 FM Radio On/Off 21
7.2 Navigating Preset Stations 21
7.3 Seek and Save Radio Stations 21
7.4 Scan and Save Radio Stations 22
7.5 Temporary Station Preset 22
7.6 Region Selection 22
8. VOICE COMMAND 23
9. LED TAILLIGHT 25
9.1 Using the Voice Command 25
9.2 Using the SENA Button 25
9.3 Using the Sena Cycling App 25
10. FUNCTION PRIORITY AND FIRMWARE
UPGRADES 26
10.1 Function Priority 26
10.2 Firmware Upgrades 26
Page 4

TABLE OF CONTENTS CONTINUED
11. CONFIGURATION SETTING 27
11.1 Bluetooth Configuration Setting 27
11.1.1 Phone Pairing 28
11.2 Software Configuration Setting 28
11.2.1 Channel Setting (Default: channel 1) 28
11.2.2 Voice Prompts (Default: Enable) 28
11.2.3 Voice Command (Default: Enabled) 28
11.2.4 RDS AF Setting (Default: Disable) 28
11.2.5 FM Station Guide (Default: Enable) 29
11.2.6 Sidetone (Default: Disable) 29
11.2.7 Advanced Noise Control™ (Always on) 29
12. TROUBLESHOOTING 30
12.1 Fault Reset 30
12.2 Factory Reset 30
13. MAINTENANCE AND CARE 31
Page 5

1. ABOUT THE R1 EVO SMART
CYCLING HELMET
1.1 General Information
This product is a bicycle helmet. Do not use it for any other purpose
than riding a bicycle. If you use the helmet for anything else, it may not
provide sufficient protection in an accident.
Sena recommends that you choose a helmet which provides the most
coverage, as a helmet that covers more of your head may provide
additional protection. Always wear your bicycle helmet low in the front
to protect the forehead, as this area is most likely to be impacted in
a bicycle crash. Make sure the helmet fits comfortably and is tightly
fastened at all times.
WARNING
• Your helmet will not protect against injury in all types of accidents.
Even while wearing a helmet, low speed accidents may result in
serious head injury or death. A bicycle helmet will not protect
against injuries to the spine, neck or face. In the event of any
impact, do not use this helmet. There may be damage invisible
to you, which may reduce the ability of the helmet to reduce the
harmful effects of a blow to the head. Such helmet should be
returned to Sena for inspection, or destroyed and replaced.
• Do not modify or remove any original part of the helmet. Do not
use heat damaged helmets. Heat damaged helmets will appear to
have uneven or have bubbly surfaces.
• This User’s Guide and the stickers inside your helmet contain
many instructions and warnings about your helmet. It is important
for you to understand everything communicated in them before
your first ride. If you do not, please contact your authorized Sena
Retailer with any questions you may have. Failure to follow any of
the provided instructions or warnings could void your warranty, and
most importantly, could result in severe personal injury or death.
If you are a parent or guardian and this helmet is for your child,
please take the time to read this manual as you should make sure
your child understands everything in this User’s Guide.
R1 EVO Smart Cycling Helmet | 5
Page 6
1 ABOUT THE R1 EVO SMART CYCLING HELMET
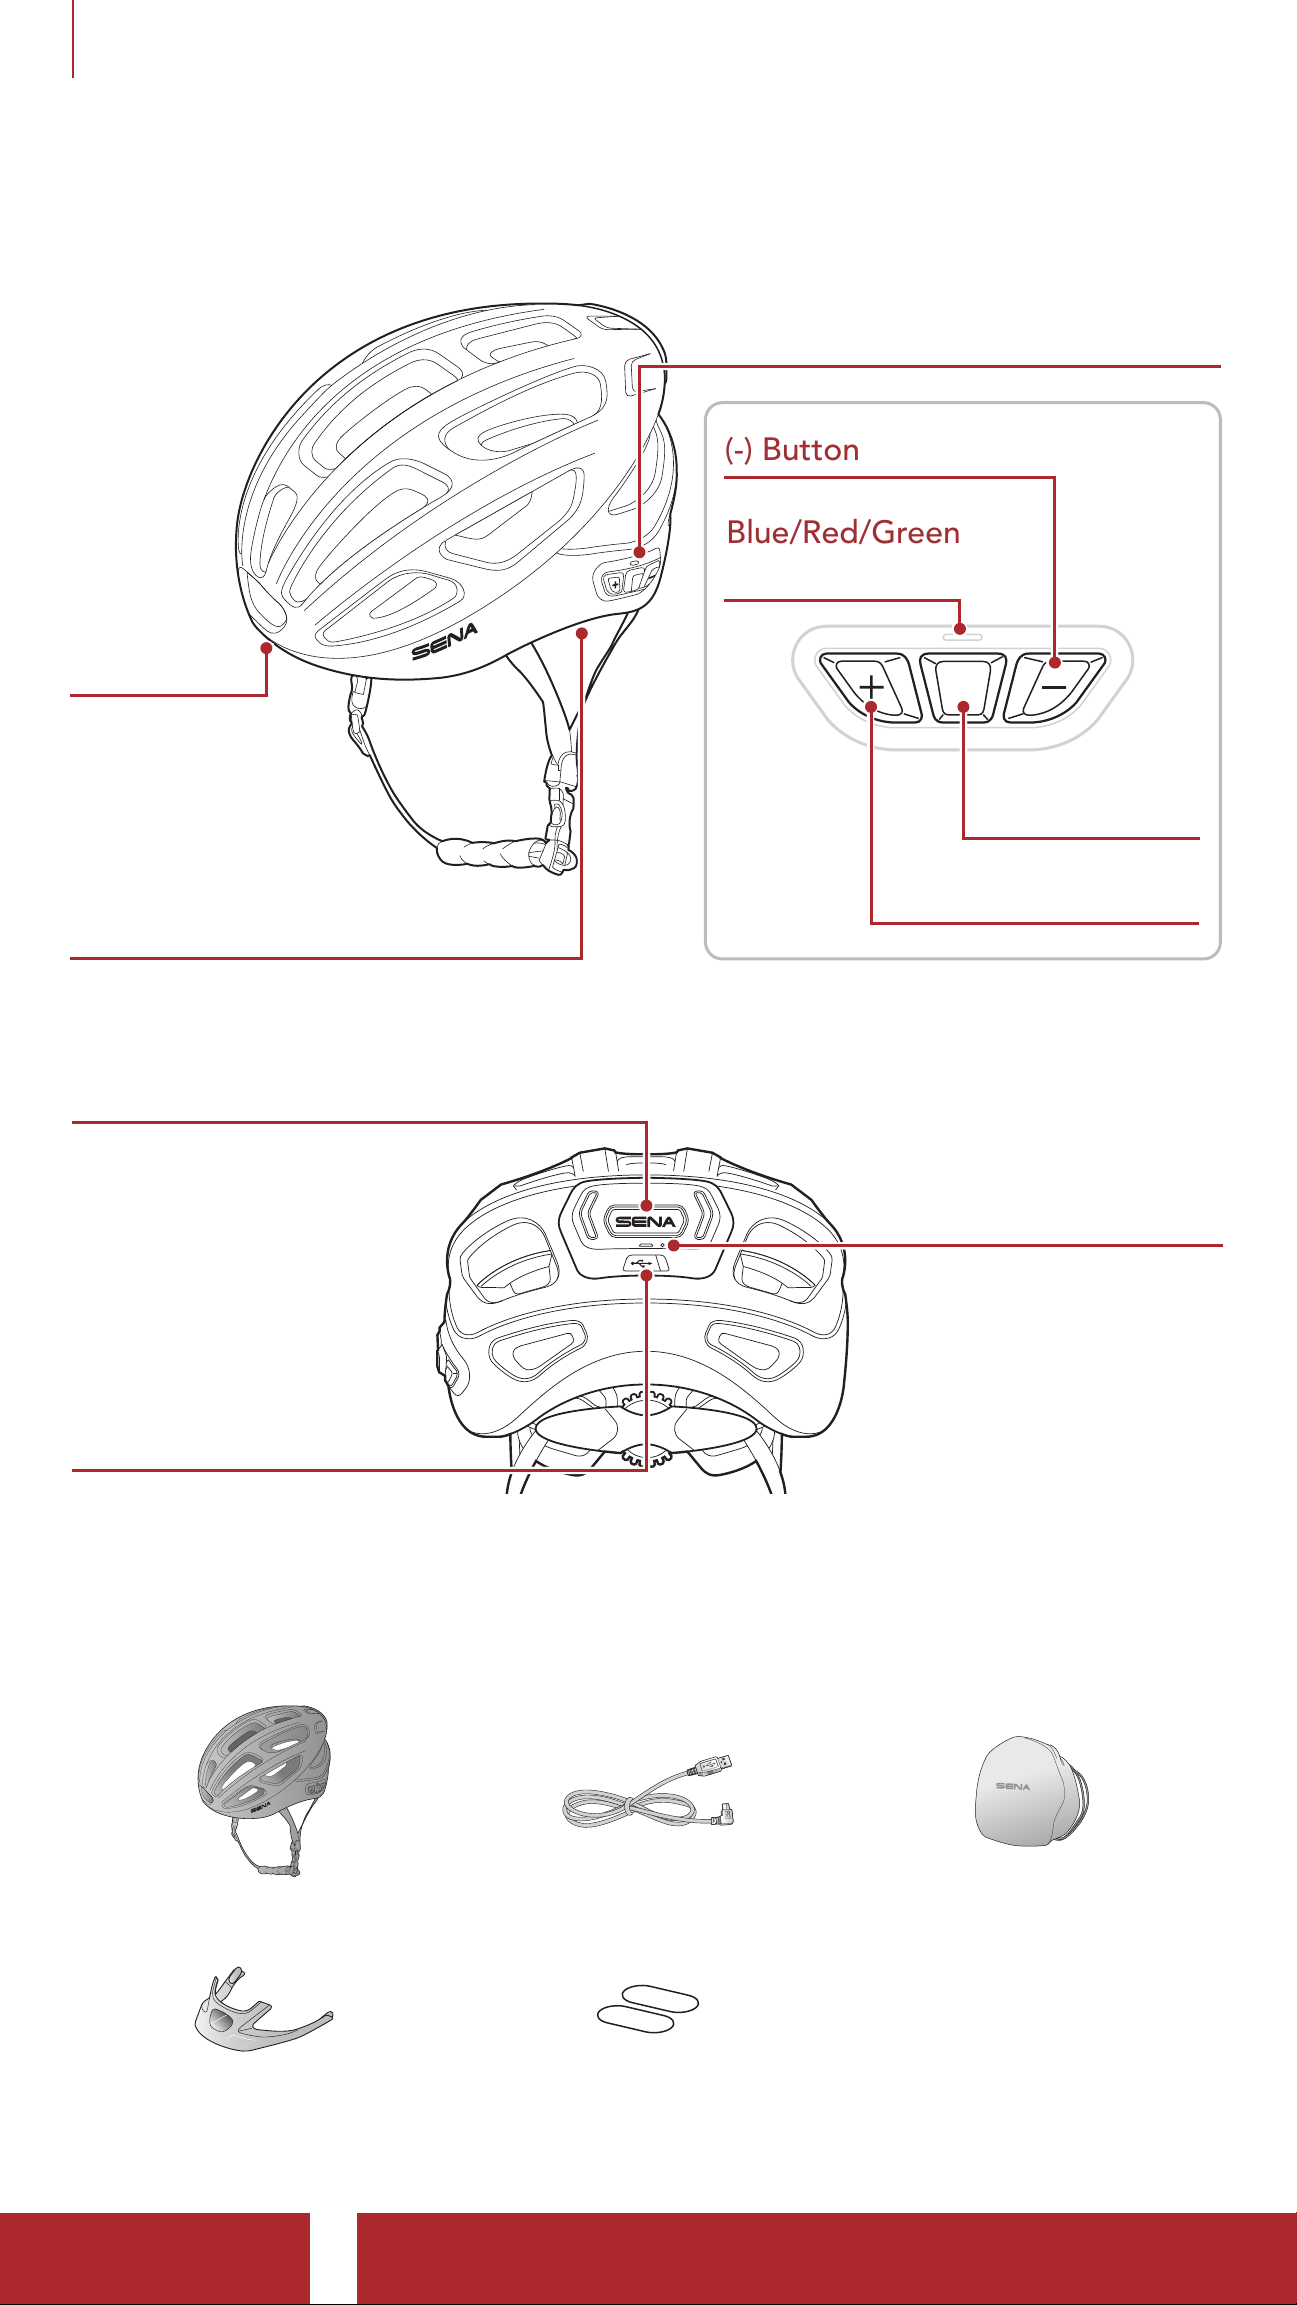
1.2 Product Details
Bluetooth System's Buttons
(-) Button
Blue/Red/Green
LED Lights
Microphone
Speakers
SENA Button
Center Button
(+) Button
Fault Reset Button
DC Power Charging &
Firmware Upgrade Port
1.3 Package Contents
R1 EVO Helmet USB Power & Data Cable Helmet Pouch
Visor Double sided adhesive
tapes (2)
R1 EVO Smart Cycling Helmet | 6
Page 7
1 ABOUT THE R1 EVO SMART CYCLING HELMET
1.4 Wearing the Helmet
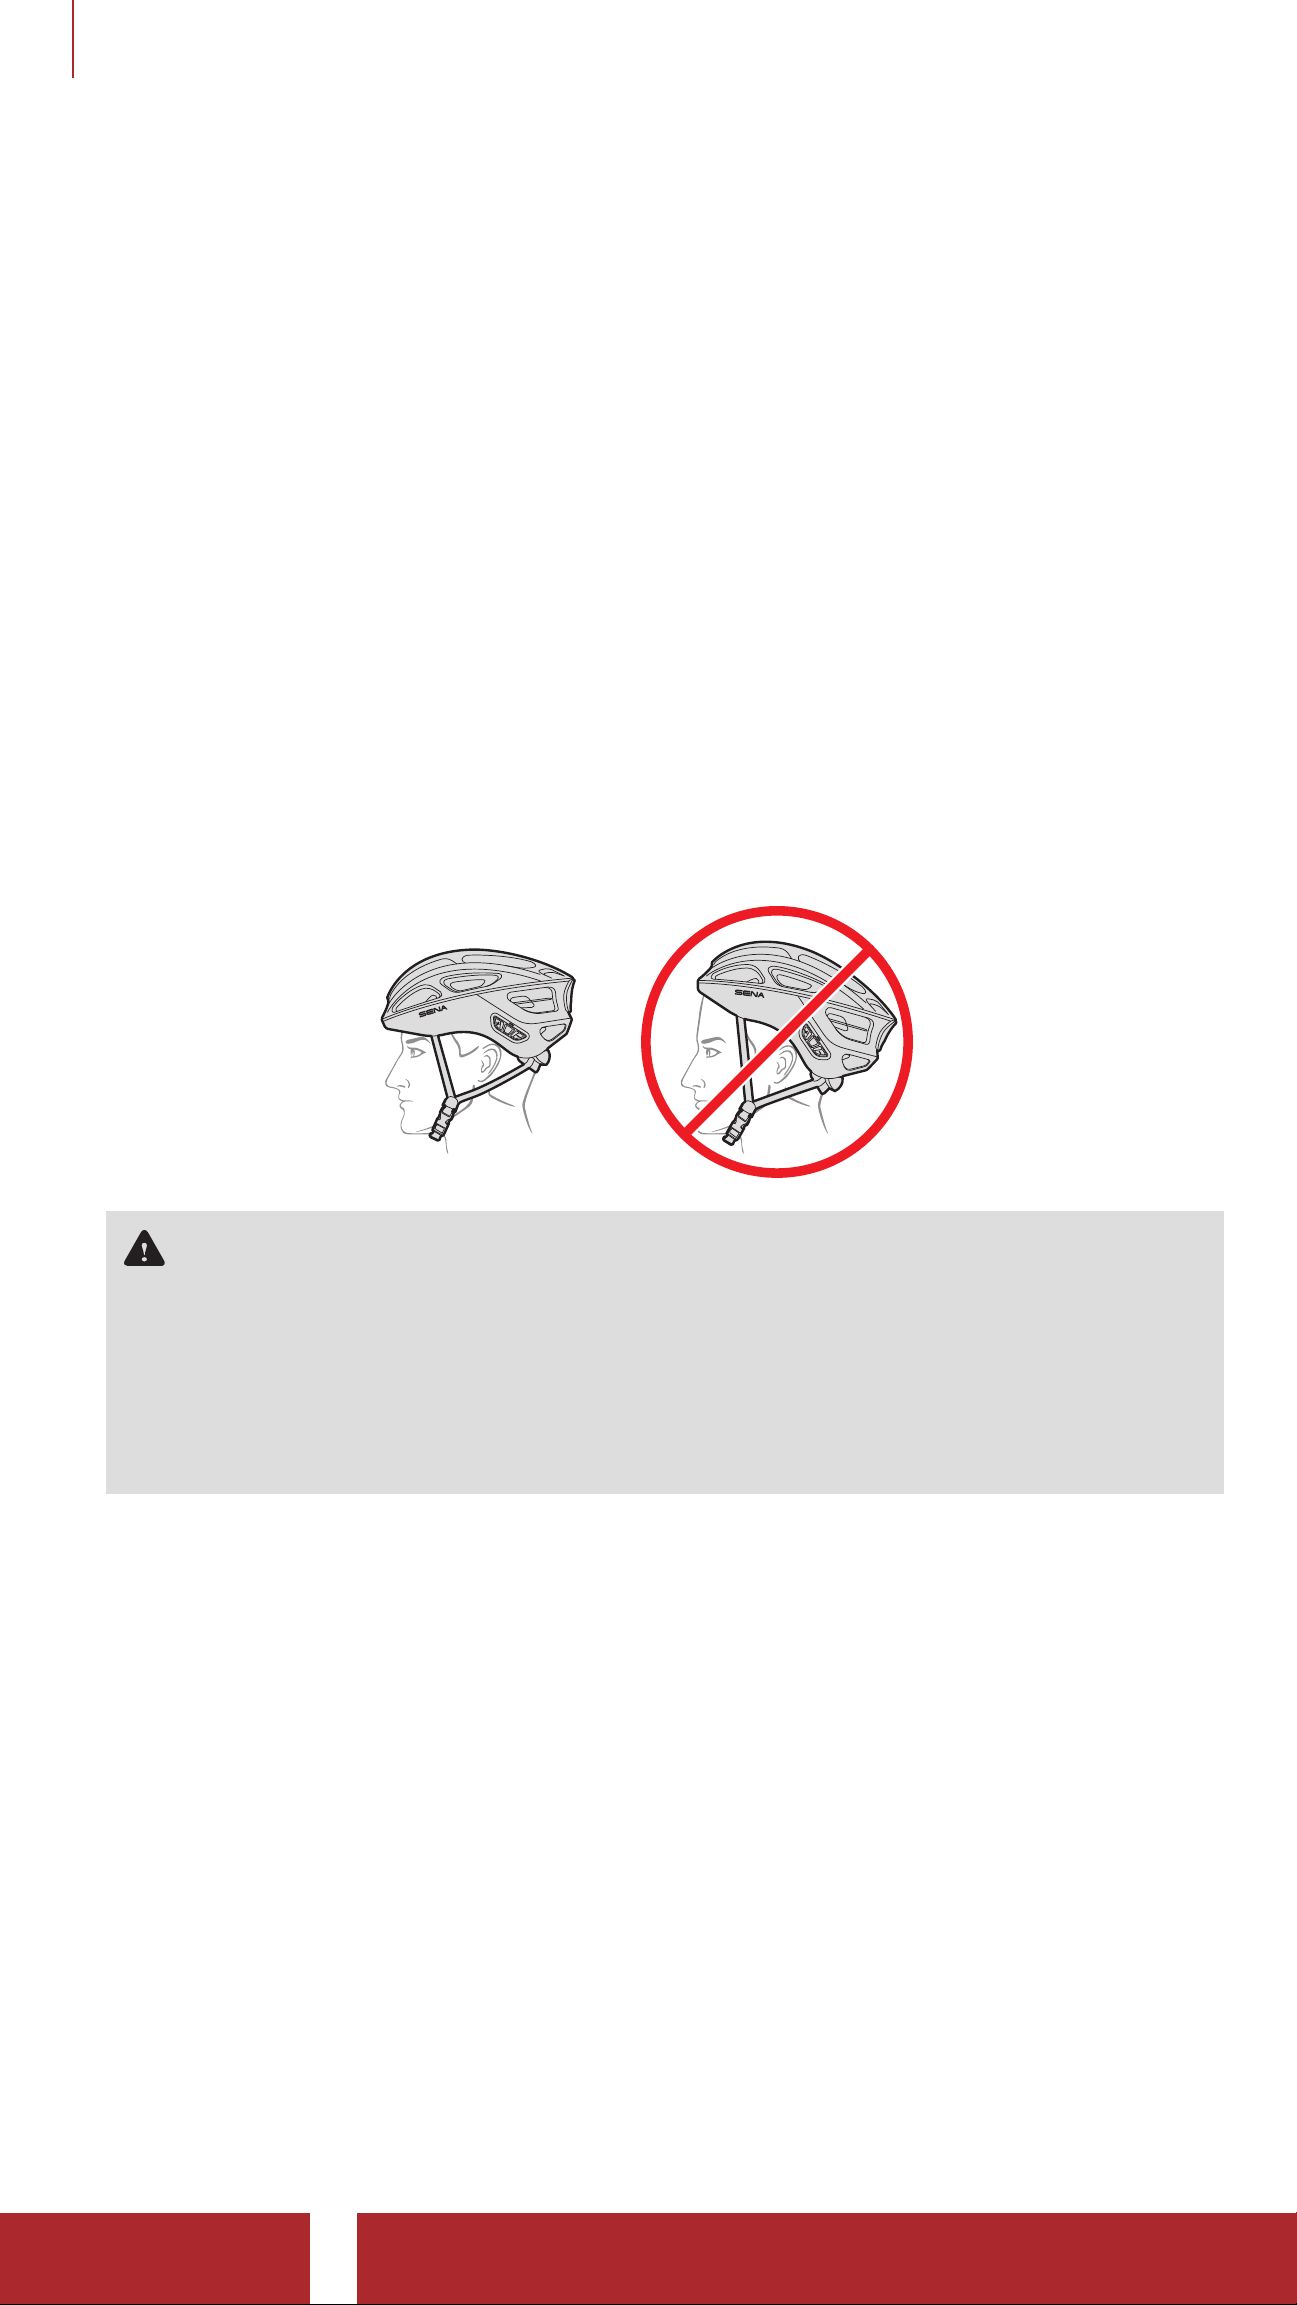
1.4.1 How to Wear The Helmet
For proper use, the helmet must sit level on the head and low on the
forehead. The Sena helmet uses a simple, quick-release buckle system
that, once adjusted, can be buckled and unbuckled without changing
the adjustment. For proper use, the straps must be tight and evenly
tensioned.
To properly wear your helmet:
1. Position the helmet on your head with the front covering your
forehead. If the helmet is tipped back and is not covering your
forehead then the helmet is not in the proper position.
2. Position the strap adjuster centered, just below your ears.
WARNING: Always wear the helmet in the proper position on
your head with the front of the helmet covering your forehead for
maximum protection. Never wear the helmet tipped back as the
helmet will be in the improper position causing your forehead to be
exposed. All fitment adjustments need to be made with the helmet
in the proper position.
3. Position the helmet low on your forehead with the buckle under the
chin and back against the throat. The straps should fit comfortably
around both ears.
4. After removing the chinstrap pad, adjust the chinstrap tension at
the buckle with the strap adjuster in the proper position. Adjust
the tension so the chinstrap is tight and comfortable by pulling the
chinstrap end through the buckle to either tighten or loosen as
needed.
R1 EVO Smart Cycling Helmet | 7
Page 8
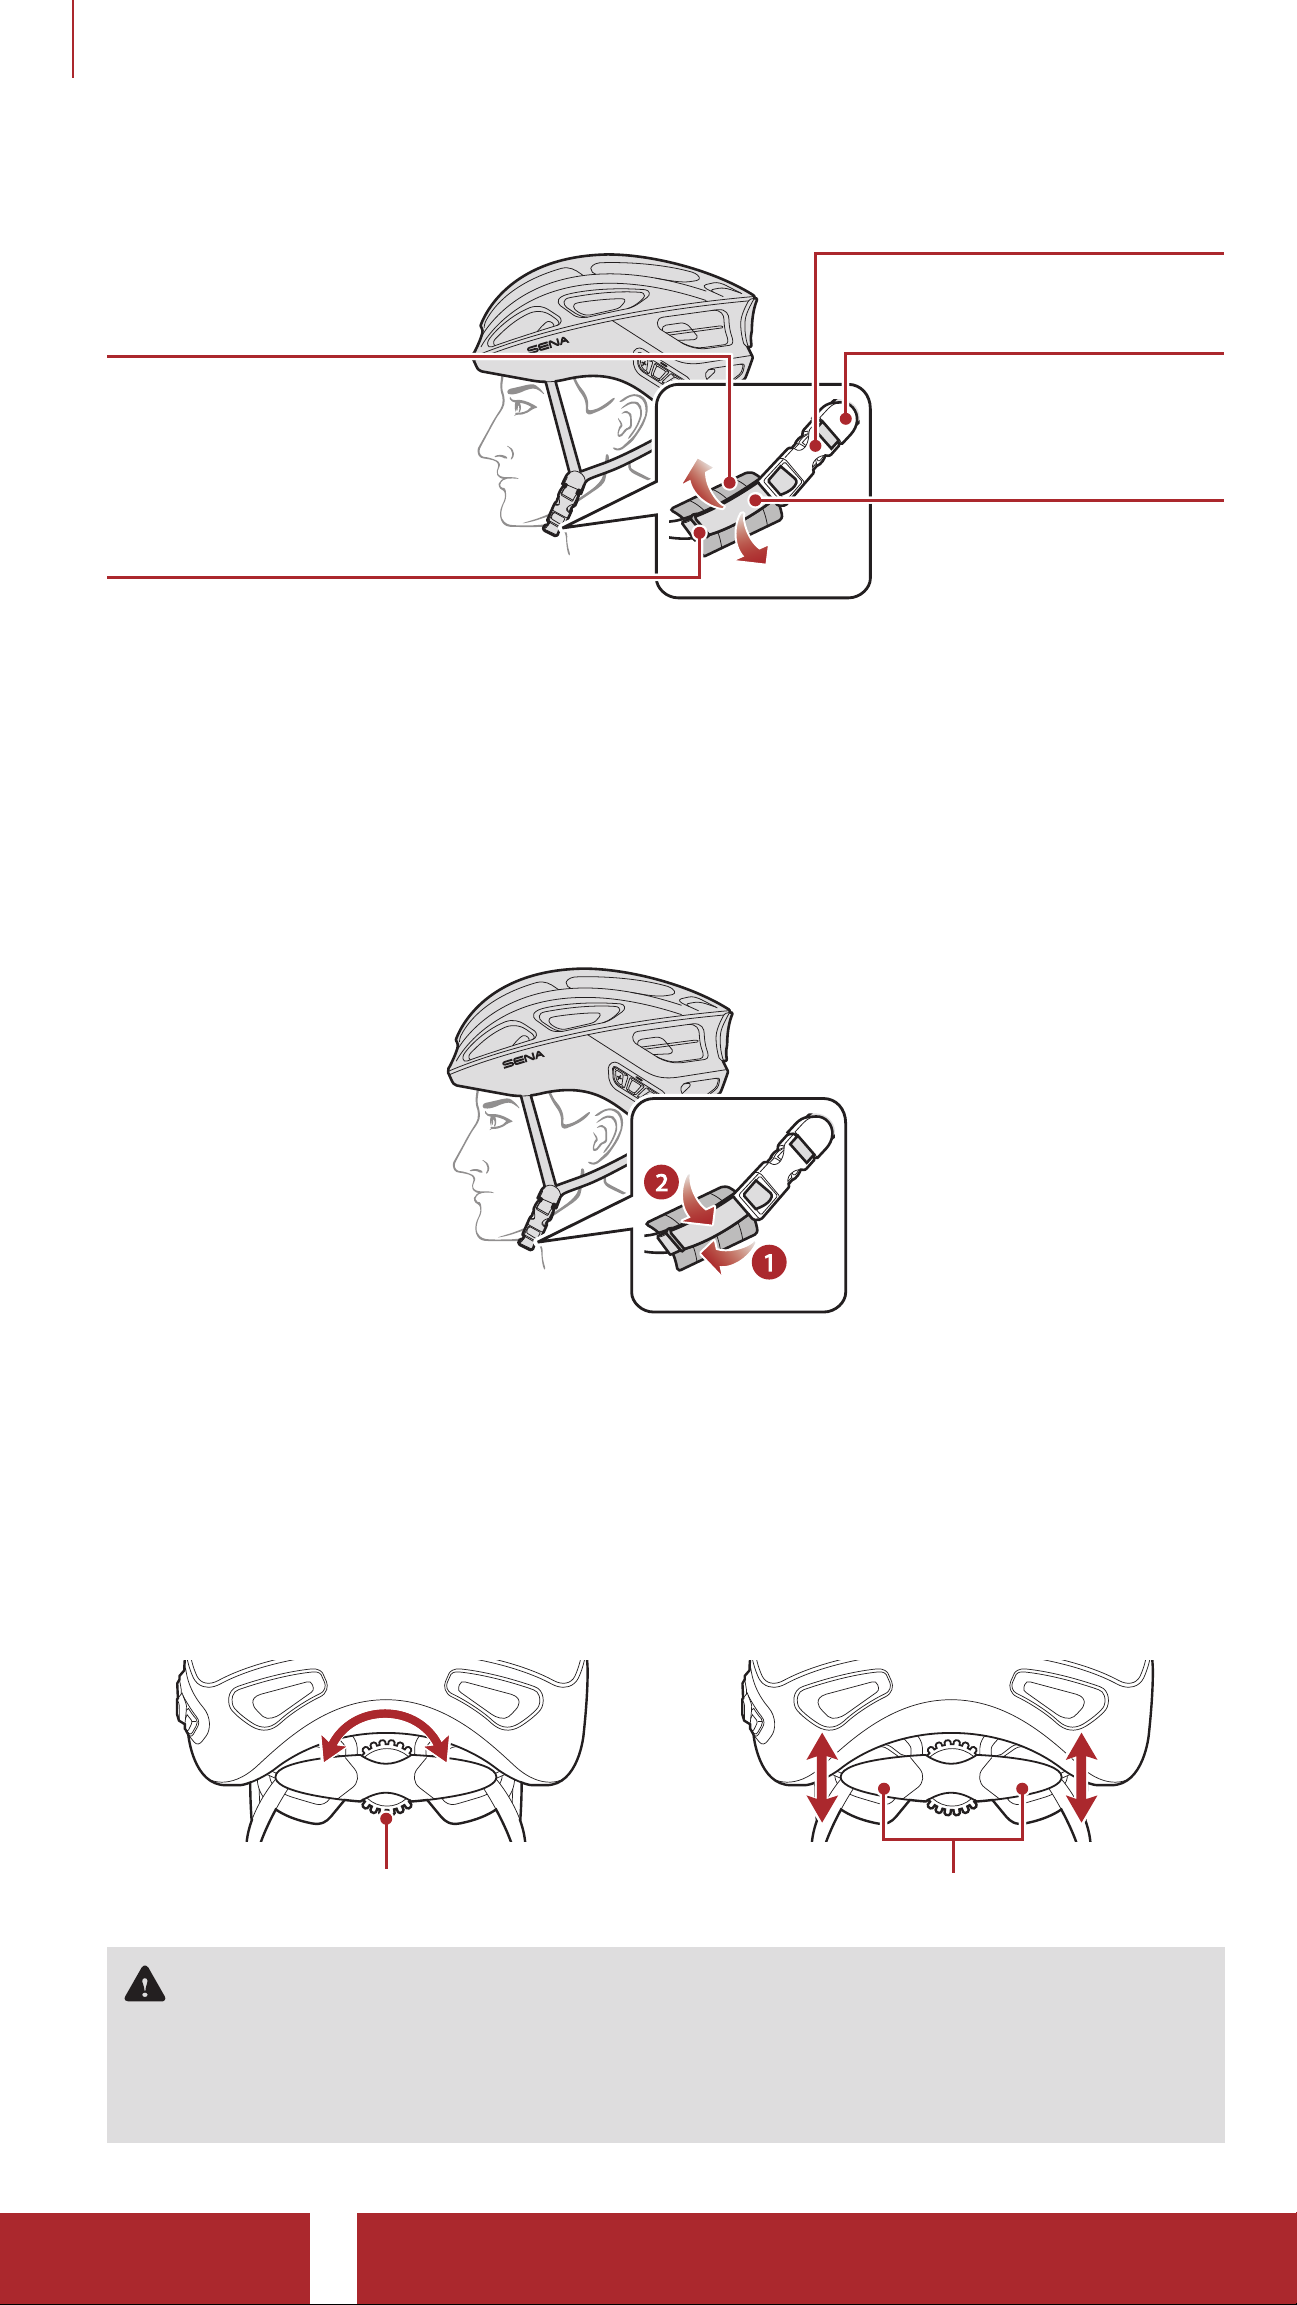
1 ABOUT THE R1 EVO SMART CYCLING HELMET
Buckle
Chinstrap Pad
O-Ring
Strap Adjuster
Chinstrap
5. Secure the excess strap with O-ring and then attach the chinstrap
pad. Always wear the helmet with the chinstrap buckle fastened and
the chinstrap pulled tight and positioned back against the throat.
With the strap buckled and the helmet positioned, you should feel
the chinstrap pull firmly against your chin as you open your mouth.
When properly adjusted the helmet will wrap around your head and
cradle it with firm, but comfortable pressure.
6. Your helmet is equipped with an adjustable retention system which
helps stabilize the helmet in the correct position when you ride. When
wearing the helmet, turn the retention system knob clockwise to
tighten the helmet or counterclockwise to loosen the helmet.
7. To change the height of the retention system, firmly pull or push the
retention system upward or downward to a different position.
Retention System Knob
Retention System
WARNING: For maximum protection, this helmet must be fitted
and attached properly to the wearer’s head in accordance with the
following instructions. If after adjustment the helmet does not fit
properly, do not use the helmet. Return it to the retailer or Sena.
R1 EVO Smart Cycling Helmet | 8
Page 9

1 ABOUT THE R1 EVO SMART CYCLING HELMET
1.4.2 Helmet Fitment Check
With the retention system knob turned clockwise until comfortably tight
and the chinstrap buckled under the chin and back against the throat,
grab the helmet with both hands and try to remove it by rolling the
helmet forward and backward as far as you can. This is an important test
to ensure that the helmet fits correctly. When you do this, you should
feel the chinstrap pull against the underside of your chin and the helmet
will resist any movement. If this isn’t the case, tighten the chinstrap and
try it again until this happens. If you cannot achieve the proper fit, DO
NOT USE THIS HELMET. Replace it with a different size until the correct
fit is achieved.
Also, for a proper Helmet Fitment Check if you can roll the helmet
forward such that it blocks your vision or if you can roll the helmet
backwards such that your forehead is not covered, tighten the chinstrap
and the retention system and try again until you cannot roll the helmet
forward or backwards.
WARNING
• Do not wear anything underneath your helmet, such as a cap,
hood, bundled hair, headphones, or barrettes, as the helmet may
loosen or come off. Do not wear anyone else’s helmet and don’t
loan your helmet to anyone else.
• Always make sure the buckle is properly fastened before you ride.
Failure to follow this instruction could result in serious personal
injury, as the helmet may not stay in position while riding or during
a fall. For proper use, make sure the loose end of the chinstrap is
tucked through the rubber “O” ring.
• Check for proper fit and adjustment often, including each time you
wear it, and periodically during use.
• This helmet has been designed for recreational bicycling. This
helmet has not been approved and is not intended for extreme
uses such as downhill racing at high speeds, jumping or leaping
with a fully suspended bicycle, snow sports, water sports, motor
sports, street hockey, playground activities, or other activities where
face, ear, or greater protection or coverage is desired.
• Always wear a helmet when bicycling. When you get off your
bicycle, remove your helmet. Do not wear a helmet while climbing
trees, in play areas, on playground equipment, or, at any time while
not riding a bicycle. Parents: Instruct children to follow this warning.
Failure to follow this warning could result in serious personal injury,
death or death by strangulation.
R1 EVO Smart Cycling Helmet | 9
Page 10
1 ABOUT THE R1 EVO SMART CYCLING HELMET
1.5 Visor Installation
To protect your eyes from the sun or other bright lights, you can use the
visor. Align the double sided adhesive tapes of the visor with the helmet
and press hard to attach.
R1 EVO Smart Cycling Helmet | 10
Page 11

2. GETTING STARTED:
BLUETOOTH SYSTEM
2.1 Downloadable Sena Software
2.1.1 Sena Cycling App
By simply pairing your phone with your headset, you can use the Sena
Cycling App for quicker and easier set up and management.
• App Features: Mesh Intercom, Music, FM Radio, LED Taillight, Device
settings, Quick Start Guide, and User’s Guide.
• Download
- Android: Google Play Store > ‘Sena Cycling’
- iOS: App Store > ‘Sena Cycling’
2.1. 2 Sena Device Manager
The Sena Device Manager allows you to upgrade the firmware
and configure its settings directly from your PC or Apple computer.
Download the Sena Device Manager from sena.com.
Click Here to Visit sena.com
R1 EVO Smart Cycling Helmet | 11
Page 12

2 GETTING STARTED: BLUETOOTH SYSTEM
2.2 Button Function
Bluetooth System’s Buttons
(-) Button
Blue/Red/Green
LED Lights
SENA Button
Center Button
(+) Button
2.3 Powering On and Off
Powering On
HOLD
=
1s
Powering Off
=
TAP
1x
R1 EVO Smart Cycling Helmet | 12
Page 13

2 GETTING STARTED: BLUETOOTH SYSTEM
2.4 Charging
Charging the Bluetooth System
Depending upon the charging
method, the Bluetooth system will
be fully charged in about 2 hours.
Note:
• The Bluetooth system includes a Fast Charging feature which
allows it to charge quickly over a short period of time. For example,
a user can get up to 3 hours of Mesh communication after charging
the Bluetooth system for 20 minutes.
• Please make sure to take off your helmet while charging. The
Bluetooth system automatically turns off during charging.
• Any 3rd party USB charger can be used with Sena products if the
charger is approved by either the FCC, CE, IC or other locally
approved agencies that Sena accepts.
• The R1 EVO is compatible with 5 V input USB-charged devices
only.
2.5 Checking the Battery Level
Visual Method
=
=
HIGH
=
MEDIUM
=
HOLD
1s
LOW
Note:
• The battery performance may be reduced over time with usage.
• Battery life may vary depending on conditions, environmental
factors, functions of the product in use, and devices used with it.
R1 EVO Smart Cycling Helmet | 13
Page 14

2 GETTING STARTED: BLUETOOTH SYSTEM
2.6 Volume Adjustment
Volume is set and maintained independently at different levels for each
audio source, even when the Bluetooth system is rebooted.
Volume up
=
TAP
1x
Volume down
=
TAP
1x
R1 EVO Smart Cycling Helmet | 14
Page 15

3. PAIRING THE BLUETOOTH SYSTEM
WITH OTHER BLUETOOTH DEVICES
The pairing operation is required only once for each Bluetooth device.
3.1 Phone Pairing
1. Press and hold the (+) Button and Center Button for 10 seconds
when the R1 EVO is turned off.
HOLD
=
10s
2. With your mobile phone in Bluetooth-pairing mode, select Sena R1
EVO in the list of devices detected.
3. If your mobile phone asks for a PIN, enter 0000.
R1 EVO Smart Cycling Helmet | 15
Page 16

4. MOBILE PHONE USAGE
4.1 Making and Answering Calls
Answer a Call
TAP
=
Make a Call with Voice Dialer
=
1x
HOLD
3s
End/Reject a Call
HOLD
=
2s
R1 EVO Smart Cycling Helmet | 16
Page 17

5. STEREO MUSIC
5.1 Bluetooth Stereo Music
Play/Pause Music
=
Next Track
=
HOLD
1s
HOLD
1s
Volume Up/Down
=
Previous Track
=
or
HOLD
1s
TAP
1x
R1 EVO Smart Cycling Helmet | 17
Page 18

6. MESH INTERCOM
6.1 What is Mesh Intercom?
Sena proposes using Mesh Intercom™, which provides instant and
effortless bike-to-bike communication without a pre-grouping process.
Mesh Intercom allows riders to connect and communicate with nearby
users without the need to pair each headset together.
The working distance between each R1 EVO in Mesh Intercom can be
up to 900 meters (0.5 miles) in open terrain. In open terrain, the Mesh
can be extended up to 3.6 km (2.0 miles) between a minimum of 6 users.
A user can select with channel to use (1 - 9) using the headset.
Separate groups can communicate freely within a channel.
Within the same channel in Mesh Intercom, 6 users can talk at the same
time for an optimized conversation.
Mesh Intercom
C
E
A
F
B
B
A
C
D
E A
B B
D
D
C
A
C
Channel 1 Channel 2 Channel 9
R1 EVO Smart Cycling Helmet | 18
Page 19

6 MESH INTERCOM
6.2 Starting Mesh Intercom
When Mesh Intercom is enabled, the R1 EVO will automatically
connect to nearby R1 EVO users and allow them to talk to each other
by pressing the Center Button.
Mesh Intercom On
=
“Mesh intercom on”
TAP
1x
Mesh Intercom Off
=
“Mesh intercom off”
TAP
1x
6.3 Mic Enable/Disable (Default: Enable)
Users can enable/disable the microphone when communicating in a
Mesh Intercom.
Enable/Disable the Microphone
HOLD
=
1s
6.4 Channel Setting (Default: 1)
If the Mesh Intercom communication experiences interference because
other groups are also using channel 1, change the channel. You can
select one of 1 to 9 channels.
1. Enter into the Channel Setting.
TAP
=
2x
“Channel setting, 1”
R1 EVO Smart Cycling Helmet | 19
Page 20

6 MESH INTERCOM
2. Navigate between the channel.
(1
2 ••• 8 9 Exit 1 •••)
=
“#”
3. Save the channel.
=
“Channel is set,
TAP
1x
TAP
1x
or
=
TAP
1x
channel #”
4. To exit the Channel Setting, tap the (+) Button or the (-) Button until
you hear a voice prompt, “Exit”, and tap the Center Button.
Note:
• Channel Setting always starts with channel 1.
• If you do not press any button within for approximately 10 seconds
in a specific channel, the channel will be automatically saved.
• The channel will be remembered even if you turn off the R1 EVO.
R1 EVO Smart Cycling Helmet | 20
Page 21

7. USING THE FM RADIO
7.1 FM Radio On/Off
FM Radio On
HOLD
=
FM Radio Off
1s
7. 2 Navigating Preset Stations
Navigate through Preset Stations
HOLD
=
1s
HOLD
=
1s
7.3 Seek and Save Radio Stations
Seek Stations Forward
TAP
=
Save Stations
You can save current station from the Sena Device Manager or the
Sena Cycling App.
2x
Seek Stations Backward
TAP
=
2x
R1 EVO Smart Cycling Helmet | 21
Page 22

7 USING THE FM RADIO
7.4 Scan and Save Radio Stations
Start Scanning
HOLD
=
1s
Stop Scanning
HOLD
=
1s
Save Stations
You can save current station from the Sena Device Manager or the
Sena Cycling App.
7.5 Temporary Station Preset
The Temporary Preset feature automatically finds and saves the nearest
10 radio stations without changing your existing preset stations. The
temporary preset stations will be cleared when the Bluetooth system
reboots.
TAP
=
3x
7.6 Region Selection
You can select the proper FM frequency range for your location from
the Sena Device Manager or the Sena Cycling App. Using the region
setting, you can optimize the seek function to avoid unnecessary
frequency ranges.
Region Frequency range Step
Worldwide 76.0 ~ 108.0 MHz ± 100 kHz
North America,
South America and Australia
Asia and Europe 87.5 ~ 108.0 MHz ± 100 kHz
Japan 76.0 ~ 95.0 MHz ± 100 kHz
87.5 ~ 107.9 MHz ± 200 kHz
R1 EVO Smart Cycling Helmet | 22
Page 23

8. VOICE COMMAND
The voice command of the Bluetooth system allows you to operate
certain operations by simply using your voice. You can control the
Bluetooth system completely handsfree using the voice recognition.
The voice command function works only with English commands.
Voice Command
TAP
=
or
1x
“Hello Sena”
Speak a voice command from the table below:
Mode Status Function Voice Command
Play/Pause music “Music” or “Stereo”
Turn on/off FM radio “FM radio”
Check battery “Check battery”
Standby /
Music /
Speed dialing “Speed dial [one, two, three]”
FM Radio
Music /
FM Radio
Redial the last call “Redial”
Check connected devices “Connected devices”
Configuration menus “Configuration”
Turn on/off LED “Taillight”
Next track (music) / next
“Next”
preset (FM radio)
Previous track (music) /
“Previous”
previous preset (FM radio)
Stop music / FM radio “Stop”
Turn on/off LED “Taillight”
R1 EVO Smart Cycling Helmet | 23
Page 24

8 VOICE COMMAND
Mode Status Function Voice Command
Mesh Intercom On/Off “Mesh intercom”
Standby /
Mesh
Intercom
End the Mesh Intercom “End intercom”
Turn on/off LED “Taillight”
Note: Voice command performance may vary based on the
environmental conditions including riding speed, helmet type and
ambient noise. To improve the performance, minimize wind noise on
the microphone by using a large microphone sponge and closing the
visor.
R1 EVO Smart Cycling Helmet | 24
Page 25

9. LED TAILLIGHT
There is a Red LED on the back of the helmet to ensure you stand out
on the road.
9.1 Using the Voice Command
LED On
TAP
=
1x
or
=
“Taillight”
“Hello Sena”
LED Off
TAP
=
or
1x
“Hello Sena”
9.2 Using the SENA Button
=
“Taillight”
LED On and Solid
=
Day Flash
=
TAP
1x
TAP
1x
1s~
1s~
Night Flash
LED Off
Note: Do not tap the button continuously.
9.3 Using the Sena Cycling App
=
=
TAP
1x
TAP
1x
1s~
You can control the LED Taillight through the Sena Cycling App.
R1 EVO Smart Cycling Helmet | 25
Page 26

10. FUNCTION PRIORITY AND
FIRMWARE UPGRADES
10.1 Function Priority
The Bluetooth system operates in the following order of priority:
(highest) Mobile phone
Mesh Intercom
FM radio
(lowest) Bluetooth stereo music
A lower priority function is always interrupted by a higher priority
function.
10.2 Firmware Upgrades
The Bluetooth system supports firmware upgrades. You can upgrade
the firmware using the Sena Device Manager. Please visit sena.com to
check for the latest software downloads.
Click Here to Visit sena.com
R1 EVO Smart Cycling Helmet | 26
Page 27

11. CONFIGURATION SETTING
11.1 Bluetooth Configuration Setting
Accessing the Configuration
Menu
HOLD
=
10s
Execute Menu Options
TAP
=
1x
Bluetooth System Configuration Menu
Navigating Between Menu
Options
TAP
=
=
1x
TAP
1x
Voice Configuration Menu Tap the Center Button
Phone Pairing Execute
Factory Reset Execute
Exit Configuration Execute
R1 EVO Smart Cycling Helmet | 27
Page 28

11 CONFIGURATION SETTING
11.1.1 Phone Pairing
1. Execute Phone Pairing.
2. With your mobile phone in Bluetooth-pairing mode, select Sena R1
EVO in the list of devices detected.
3. If your mobile phone asks for a PIN, enter 0000.
11. 2 Software Configuration Setting
You can change the settings of the headset through the Sena Device
Manager or the Sena Cycling App.
11.2.1 Channel Setting (Default: channel 1)
If the Mesh Intercom communication experiences interference because
other groups are also using the channel 1, change the channel. You can
select one of 1 to 9 channels.
11.2.2 Voice Prompts (Default: Enable)
You can disable voice prompts by software configuration settings, but
the following voice prompts are always on.
- Headset configuration settings menu, battery level indicator, speed
dial, FM radio functions
11. 2.3 Voice Command (Default: Enabled)
When Voice Command is enabled, you can use your voice to give a
command the Bluetooth system operate certain operations completely
handsfree. If Voice Command is disabled, you will need to operate all
of the functions using the buttons on the Bluetooth system.
11. 2.4 RDS AF Setting (Default: Disable)
Radio Data System (RDS) Alternative Frequency (AF) Setting allows
a receiver to re-tune to the second frequency location when the first
signal becomes too weak. With RDS AF enabled on the receiver, a radio
station with more than one frequency can be used.
R1 EVO Smart Cycling Helmet | 28
Page 29

11 CONFIGURATION SETTING
11. 2.5 FM Station Guide (Default: Enable)
When FM Station Guide is enabled, FM station frequencies are given
by voice prompts as you select preset stations. When FM Station Guide
is disabled, the voice prompts on FM station frequencies will not be
given as you select preset stations.
11. 2.6 Sidetone (Default: Disable)
Sidetone is audible feedback of your own voice. It helps you to naturally
speak at the correct level according to varying helmet noise conditions.
If this feature is enabled, you can hear what you are speaking during an
intercom conversation or a phone call.
11. 2.7 Advanced Noise Control™ (Always on)
The background noise is reduced during an intercom conversation.
R1 EVO Smart Cycling Helmet | 29
Page 30

12. TROUBLESHOOTING
12 .1 Fault Reset
When the Bluetooth system is not working properly, you can easily reset
the unit:
1. Locate the pinhole reset button below Sena logo at the back side of
the helmet.
2. Gently insert a paper clip into the hole and press and Fault Reset
Button for 1 second with light pressure.
=
FAULT
RESET
12.2 Factory Reset
To erase all of your settings and start fresh, the system can be restored
to factory default settings using the factory reset.
=
=
=
HOLD
10s
TAP
2x
TAP
1x
R1 EVO Smart Cycling Helmet | 30
Page 31

13. MAINTENANCE AND CARE
The inner lining of the helmet is completely removable. Its headliner
can be washed by hand using only water, mild soap, at a maximum
temperature of 30ºC (86ºF), and non-abrasive cloths to clean the
helmet’s shell, pads and retention system. Allow the padding to dry
at room temperature. Store the helmet in a dry, dark, well-ventilated
location, out of the reach of children and animals. High temperatures
(above 110ºF, 43ºC) may melt the helmet’s shell.
WARNING
• Never use gasoline, diesel fuel, thinners or solvents to clean the
helmet. These substances can cause serious damage to the helmet,
even though the resulting damage may not be visible. This helmet
can be damaged by contact with common substances (for example,
certain solvents (ammonia), cleaners (bleach), paints, abrasives)
and this damage may not be visible to the wearer. Do not use this
helmet if it has been exposed to such substances. The full safety
function of the helmet can no longer be guaranteed if exposed to
damaging substances.
• Do not store your helmet in your car or anywhere else near a heat
source. Do not use if the shell has been melted or deformed.
Always position the helmet so that it cannot fall to the floor.
Damage that occurs in this way is not covered by the warranty.
• Do not attach anything to your helmet, including mirrors or lights.
The shell of this helmet is constructed of expanded polystyrene foam.
Ventilation holes may allow harmful objects to pass in the helmet
interior.
The protective capability of your helmet will diminish over time,
dependent upon many factors such as dents, dings, and exposure to
pollution, harmful chemicals and long term exposure to the sun. Sena
recommends that helmets be replaced after five years.
Note: The useful life of your helmet may be less than five years as a
result of exposure to sunlight, rough, handling/storage that results in
dents or cuts or as a result of heavy use.
R1 EVO Smart Cycling Helmet | 31
Page 32

Copyright © 2020 Sena Technologies, Inc.
All rights reserved.
© 1998–2020 Sena Technologies, Inc. All rights reserved.
Sena Technologies, Inc. reserves the right to make any
changes and improvements to its product without providing
prior notice.
Sena™ is a trademark of Sena Technologies, Inc. or
its subsidiaries in the USA and other countries. SF1™,
SF2™, SF4™, SFR™, SRL™, Momentum™, Momentum
INC™, Momentum Lite™, Momentum Pro™, Momentum
INC Pro™, Momentum EVO™, Cavalry™, Latitude
SR™, Latitude SX™, 30K™, 50S™, 50R™, 20S EVO™,
20S™, 10S™, 10C™, 10C PRO™, 10C EVO™, 10U™,
10Upad™, 10R™, 3S™, SMH5™, SMH5-FM™, SMH5
MultiCom™, SMH10™, SMH10R™, SPH10™, SPH10HFM™, Savage™, Prism Tube WiFi™, Prism™, Bluetooth
®
Audio Pack for GoPro
, R1™, R1 EVO™, R1 EVO CS™,
RC1™, RC3™, RC4™, Handlebar Remote™, Wristband
Remote™, PowerPro Mount™, Powerbank™, FreeWire™,
WiFi Docking Station™, WiFi Sync Cable™, +mesh™,
+Mesh Universal™, Econo™, OUTRUSH™, OUTSTAR™,
EcoCom™, SR10™, SR10i™, SM10™, X1™, X1 Pro™,
Expand™, Bluetooth Mic & Intercom™, Tufftalk™, Tufftalk
Lite™, Tufftalk M™ are trademarks of Sena Technologies,
Inc. or its subsidiaries. These trademarks may not be used
without the express permission of Sena.
®
GoPro
is a registered trademark of Woodman Labs of San
Mateo, California. Sena Technologies, Inc. (“Sena”) is not
affiliated with Woodman Labs, Inc. The Sena Bluetooth Pack
®
for GoPro
is an aftermarket accessory specially designed
and manufactured by Sena Technologies, Inc. for the GoPro
Hero3 and Hero4 allowing for Bluetooth capabilities.
The Bluetooth® word mark and logos are owned by the
Bluetooth SIG, Inc. and any use of such marks by Sena
®
is under license. iPhone
and iPod® touch are registered
trademarks of Apple Inc.
Address: 152 Technology Drive Irvine, CA 92618
R1 EVO Smart Cycling Helmet | 32
®
 Loading...