

Page 1
SEMAK HOT CHOCOLATE DISPENSERS – HCD5 & HCD 10
SEMAK AUSTRALIA: FACTORY 18, 87-91 HALLAM SOUTH ROAD, HALLAM VIC 3803
PH 03 9796 4583 FAX 03 9796 4586 WEB WWW.SEMAK.COM.AU
OPERATION AND WARRANTY BOOKLET
Page 2

Page | 2
Table of Contents
General Safety Instructions for All Semak Products ............................................. 4
Semak Hot Chocolate Dispenser Introduction ..................................................... 5
Safety Instructions ............................................................................................... 6
Installation Instructions ....................................................................................... 7
Operating Instructions ......................................................................................... 8
Cleaning & Maintenance Instructions .................................................................11
Troubleshooting..................................................................................................19
Wiring Diagram ...................................................................................................22
Parts Breakdown .................................................................................................23
Spare Parts for the Semak Hot Chocolate Dispenser ..........................................24
Service & Maintenance .......................................................................................24
Electrical Compliance ..........................................................................................24
Warranty .............................................................................................................24
WARRANTY REGISTRATION .................................................................................26
Notes ..................................................................................................................27
Page 3

Page | 3
Page 4

Page | 4
General Safety Instructions for All Semak Products
Do not use the appliance for other than its intended use.
Never leave the appliance unattended when in use.
The appliance should not be used by children or infirm persons and close
supervision is necessary when used near such persons.
Always switch off at power outlet before removing the plug. Remove by holding
the plug – do not pull the cord.
When the appliance is not in use, or prior to cleaning, always switch off the
power and remove the plug.
To avoid the risk of electric shock, do not immerse the plug, cord or any part of
the appliance in water or any other liquid.
Do not use near a stove or heat source and do not let the cord come in contact
with any hot surface.
Do not use the appliance with an extension cord unless that cord has been
checked and tested by a qualified technician or if it is an extension cord that has
been manufactured by a reliable electrical goods manufacturer and has not
been altered in any way.
Do not operate any appliance with a damaged cord or plug, or after the
appliance malfunctions or has been dropped or damaged in anyway. Return to
Semak or an authorised service agent for repair.
CAUTION Hot Surfaces.
NEVER leave the appliance ON unattended.
ALWAYS unplug the dispenser after use.
Page 5

Page | 5
Semak Hot Chocolate Dispenser Introduction
Purpose
The Semak Hot Chocolate Dispenser is designed to produce and dispense Hot Chocolate
Drinks from powdered or liquid chocolate.
Main Components
1.
Bowl Lid
2.
5/10L Bowl
3.
Mixing Auger
4.
Bowl Hook-On Handles
5.
Machine Body
6.
Main Switch
7.
Temperature Control
8.
Lower Body
9.
Mixer
10.
Pan
11.
Lid for boiler tank water level
indicator tray
12.
Boiler tank water level
indicator tray
13.
Dispensing Tap
14.
Drip Tray max level indicator
15.
Drip Tray grid
16.
Drip Tray
17.
Boiler Tank drainage cap
Technical Specifications
Model
HCD5 (5 Litre)
HCD10 (10 Litre)
Dimensions
L280 x D410 x H465 mm
L280 x D410 x H580 mm
Weight
6.8 Kg
7.5 Kg
Electrical
1000W / 240V AC / 50 Hz
1000W / 240V AC / 50 Hz
Max Operating Temp
85°c
Ambient Operating Temp
Min: 10°c Max: 32°c
Bowl Capacity
5 Litre
10 Litre
Number of Bowls 1 1
Page 6

Page | 6
Safety Instructions
Only use the appliance on a flat, level and stable surface.
DO NOT use on a wet surface.
When in operation the tank can get quite warm (up to 85°c) and should be
handled with care.
Be careful not to splatter the contents when pouring to avoid burns. Steam will be
expired when the lid is lifted and care needs to be taken that the lid is lifted in a
way to avoid steam burns of the wrists and hands.
DO NOT touch the Heating Pan as it is extremely hot to avoid burns.
ALWAYS turn off the appliance and allow it to cool down before cleaning.
Use a barely damp cloth to wipe the machine once it has cooled.
DO NOT use caustic substances to clean the appliance and do not allow caustic
substances to make contact with any electrical components of the dispenser.
If the machine goes unused for a long period of time, it should be well stored in a
stationary sealed cabinet protected from the environment and substances.
Due to the risk of scalding, no Children or infirm persons should use the Hot
Chocolate Dispenser under any circumstances.
As the product uses milk goods, it should be cleaned at the end of every day (at a
minimum) and the contents emptied. It is not safe to hold Milk at an elevated
temperature for extended periods of time. The machine should be well sanitised
before further use.
WARNING – This appliance should be used according to the instructions.
MISUSE of this appliance will cause HAZARD.
Page 7

Page | 7
Installation Instructions
1. Place the machine on a flat, firm and solid surface in a well-lit and ventilated
area. Beware of placing the machine too close to water or fire sources.
2. Remove the Hot Chocolate Dispenser from its packaging materials, by opening
the front part of the packing container and lifting the machine up.
3. Thoroughly clean all components before using the machine for the first time.
4. Adequate clearance must be left around the machine to enable personnel to
work without any constraints and allow proper ventilation of the unit.
5. Before inserting the plug into the mains power socket, ensure that the line
voltage corresponds to the units voltage type on its rating plate, and that the
units main power switch is off.
6. Do not operate the unit under any circumstances if the plug or cord of the unit
is damaged. Do not use extension cords, and do not replace the original plug
under any circumstances as this may void the warranty.
HCD
Page 8

Page | 8
Operating Instructions
Starting Up
To start the Hot Chocolate Machine:
1. Make sure the main switch is set to off
2. Take off the lid
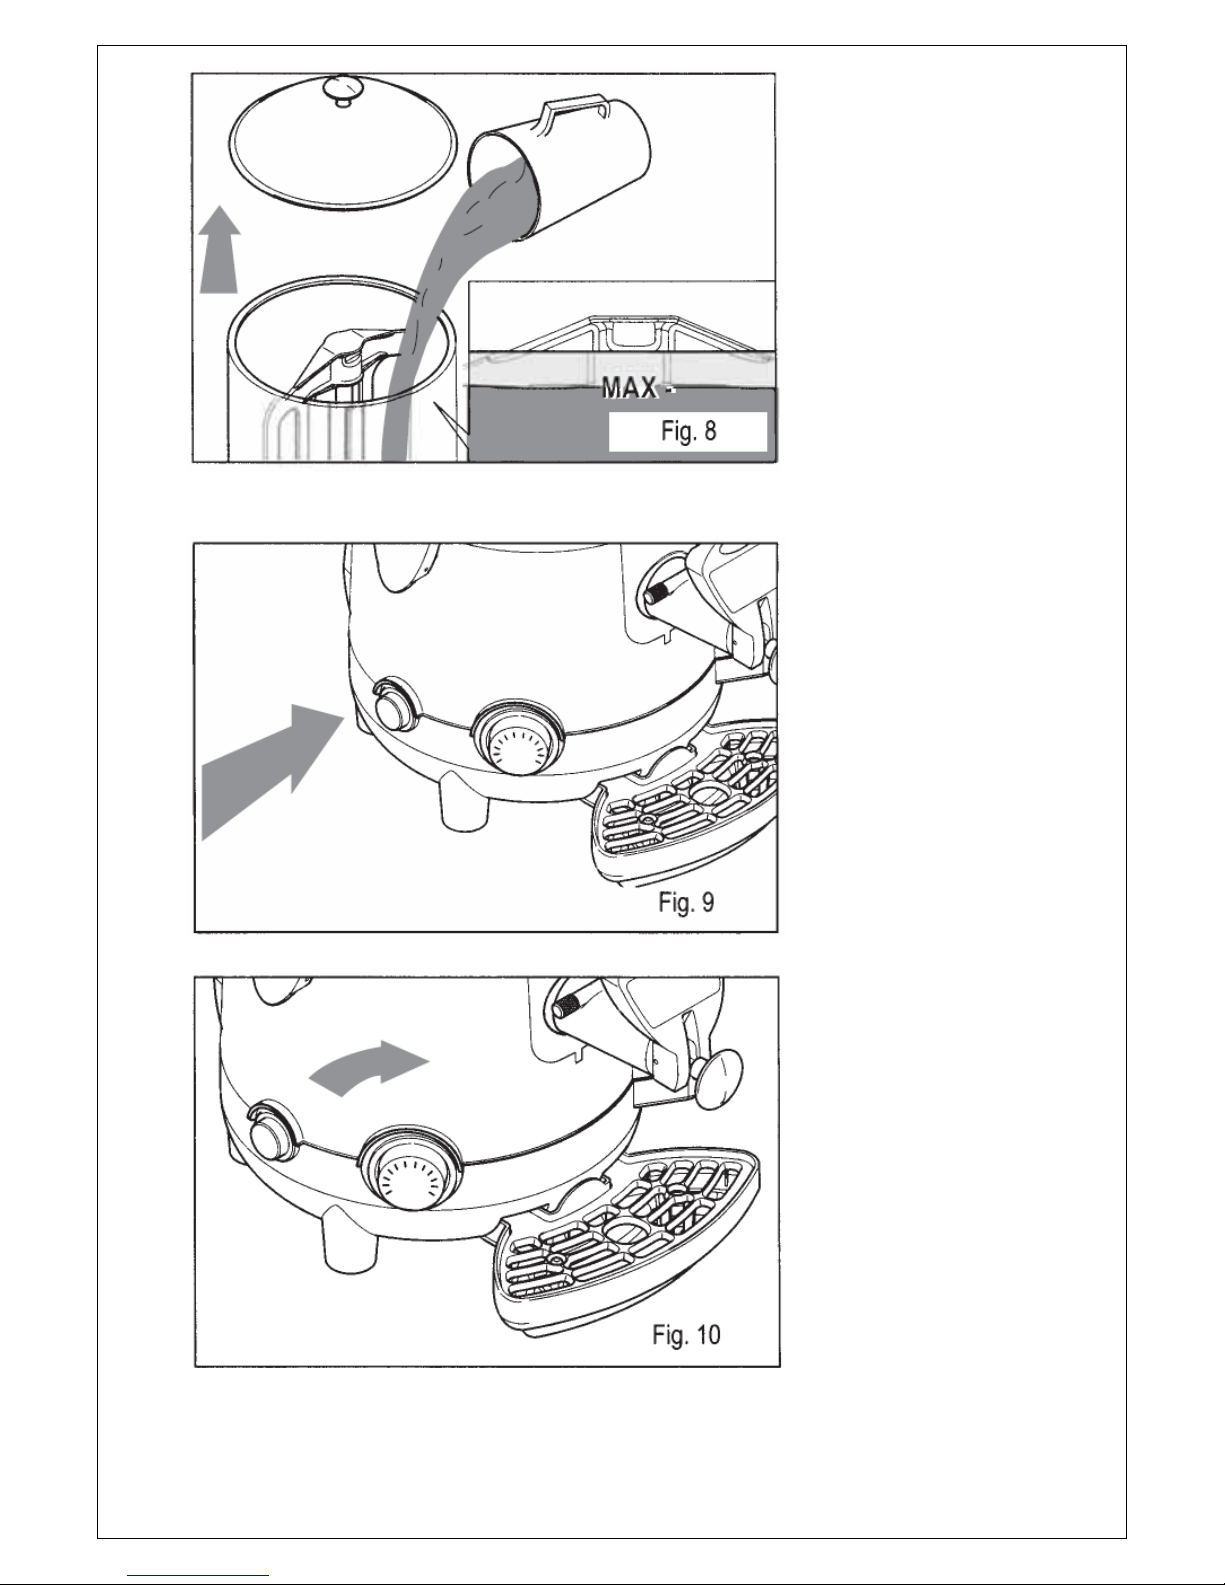
3. Fill the boiler tank with water using the boiler tank level indicator tray, until it
reaches the maximum value indicated on the tray itself (-MAX-). The empty tank
takes approximately 3.25 Litres to fill initially.
4. Remove the lid and pour beverage mix into the bowl. Never exceed the maximum
level which is marked –MAX- on the tray itself. Replace the lid firmly in place.
Page 9
Page | 9
5. Make sure the plug has been inserted into the mains socket.
6. Press the main switch to start the machine. The LED will illuminate (Machine ON).
7. Set the thermostat to the required temperature to heat the product inside the bowl.
8. Check to ensure that the water level never falls below the minimum level marked –
MIN- to prevent the machine from shutting down. Never operate the machine
without water in the boiler as this can damage the heating element.
Page 10

Page | 10
9. If the machine senses that the water has fallen between the minimum level, the level
sensor will turn the machine off. To restore operation use the button on the
underside of the base to reset the unit.
Dispensing the Product
Warning: the product dispensed from the machine has a very high temperature and there is
a risk of scalding. Prevent children and infirm persons from using the unit.
To Dispense Hot Chocolate:
Place a cup beneath the tap
Pull the lever forwards to dispense product until desired quantity.
Gradually release the tap lever so that it returns to closed position.
If the product is especially thick, it is advisable to keep the rod pulled out at the
maximum position, any clogging in the line may be removed by sliding the rod in and
out of the machine.
Warning: never touch the bowl or lid while the machine is operating as they are very
hot and steam rises. Always use the knob when moving the bowl lid.
Page 11

Page | 11
Cleaning & Maintenance Instructions
Ensure the machine is disconnected from the power supply before commencing any
cleaning or maintenance on the Hot Chocolate Dispenser.
Warning: each time the bowl is filled with any type of product (food or sanitising
product), make sure that the mixing rod is present.
Warning: do not commence any cleaning procedure until the machine has cooled
down sufficiently.
Do not use any abrasive clothes or metal sponges to clean the unit, use only a damp
cloth and/or non-abrasive sponge for cleaning.
Warning: only use the supplied cleaning brush to clean the channel connecting the
tank and tap. Do not use this brush to clean other parts.
Do not place any of the parts or components in the dishwasher under any
circumstance.
Clean only with warm water and a sanitising product made from sodium
hypochlorite.
The bowl must be emptied and cleaned every day.
Cleaning & Sanitisation Procedures
After every use of the Hot Chocolate Dispenser, or at the end of every day the following
procedures must be carried out to adequately clean the unit to a food safe standard:
1. Empty the product from the bowl
With the machine switched on, empty out
all of the product still inside the bowl,
using the lever on the tap.
Fill the bowl with water and set
thermostat to 50°c. Operate the appliance
for at least 15-20 minutes, or even longer
to release product residues stuck inside
the bowl. Empty the entire bowl contents
using the lever on the tap.
Page 12

Page | 12
2. Remove the bowl from the machine
Ensure the main switch is off and unit is unplugged
from electrical outlet. Once the unit has
sufficiently cooled down and the bowl is
completely empty:
Take off the lid.
Slide the mixer upwards to remove it, keeping it in
line with the central rod until the bottom slot of
the mixer itself is level with the rotation pin (Fig
15.):
Tilt the mixer and slide it upwards to remove it
completely (Fig 16.):
Unhook the bowl hook-on handles to free the bowl
from the machine body (Fig 17.):
Release the bowl from the machine body, using
two fingers to prise it away from the fixed steel
part of the mixed auger (A) and the others to group
the outer edge of the bowl (B). Gradually pull the
bowl harder until it comes away from its seating.
(Fig 18.):
Slide the bowl upwards using both hands (Fig 19.):
Slide the mixing auger upwards with one hand,
taking care to grip it by the rotation pin (Fig 20.):
Place the bowl on a
flat surface and using
both hands, remove
the gasket by sliding
it upwards in the
direction shown by
the arrow (Fig 21.):
Page 13

Page | 13
3. Remove the tap from the machine
To remove the tap move the rod to the maximum dispensing position (Fig 22.)
Press the button (1) securing the tap to the machine and then remove tap (2) with
both hands, pulling outwards (Fig 23).
4. Clean the pan
Once the bowl and tap have been removed as above, clean the entire surface of the
pan using a damp cloth or non-abrasive sponge (Fig 24.):
Clean the channel connecting the bowl and the tap, using the supplied cleaning brush
(Fig 25). Refit the tap and pour a little water inside the pan. Use the tap to drain out
all of the water from the pan so as to eliminate any small product residues inside the
dispensing channel (Fig 26).
5. Disassemble the removed tap
To clean the inside of the tap more
thoroughly, disassemble it as follows:
Remove the tap as above
Place the tap on a clean flat surface
then loosen and remove the screw
(A) fastening the button to the
machine, then slide out the pin (B)
and relevant spring (C) from the
seating (Fig 27).
Page 14

Page | 14
Pull the rod (D) all the way out from the knob
(E) then push the lever (F) upwards from the
bottom until it comes out from the pin guide
(Fig 28).
Unscrew the knob (E) by turning it
anticlockwise while holding the rod in place
(Fig 29).
Pull out the rod (G) and spring (H) from the tap
body (the pin/gasket assembly (I) will slide out
together with the rod) (Fig 30).
Detach the rod (G) from the pin/gasket
assembly (I) (Fig 31).
Disassemble (by pulling) the pin (L) from the
gasket (M).
Page 15

Page | 15
6. Wash & Sanitise the machines components
All of the components parts previously disassembled (tap, mixer, mixing auger,
gasket, and bowl) must be carefully washed and sanitised as follows:
Fill a container with detergent and hot water (50-60°c), then wash components
with the solution.
Rinse with hot water.
Clean only with warm water and a sanitising product from sodium hypochlorite
diluted in water to obtain an active chloride concentration of 0.02%
Immerse the disassembled component parts in the sanitising solution.
Leave components inside the container of sanitising solution for 30 minutes.
Rinse with clean water.
Clean the bowl lid.
Place the components on a clean surface and dry them.
7. Refit the bowl on the machine
Before assembling the bowl in the machine, check that the seal is correctly
assembled (Fig 33 & 34).
Fit the bowl in place, pushing firmly downward, after moistening the seal with water.
Do not moisten the seal with grease or vaseline (Fig 36 & 37).
Make sure the gasket and bowl are correctly fitted or product can leak increasing the
risk of scalding. Ensure the bowl perfectly fits to the machine edge.
Page 16
Page | 16
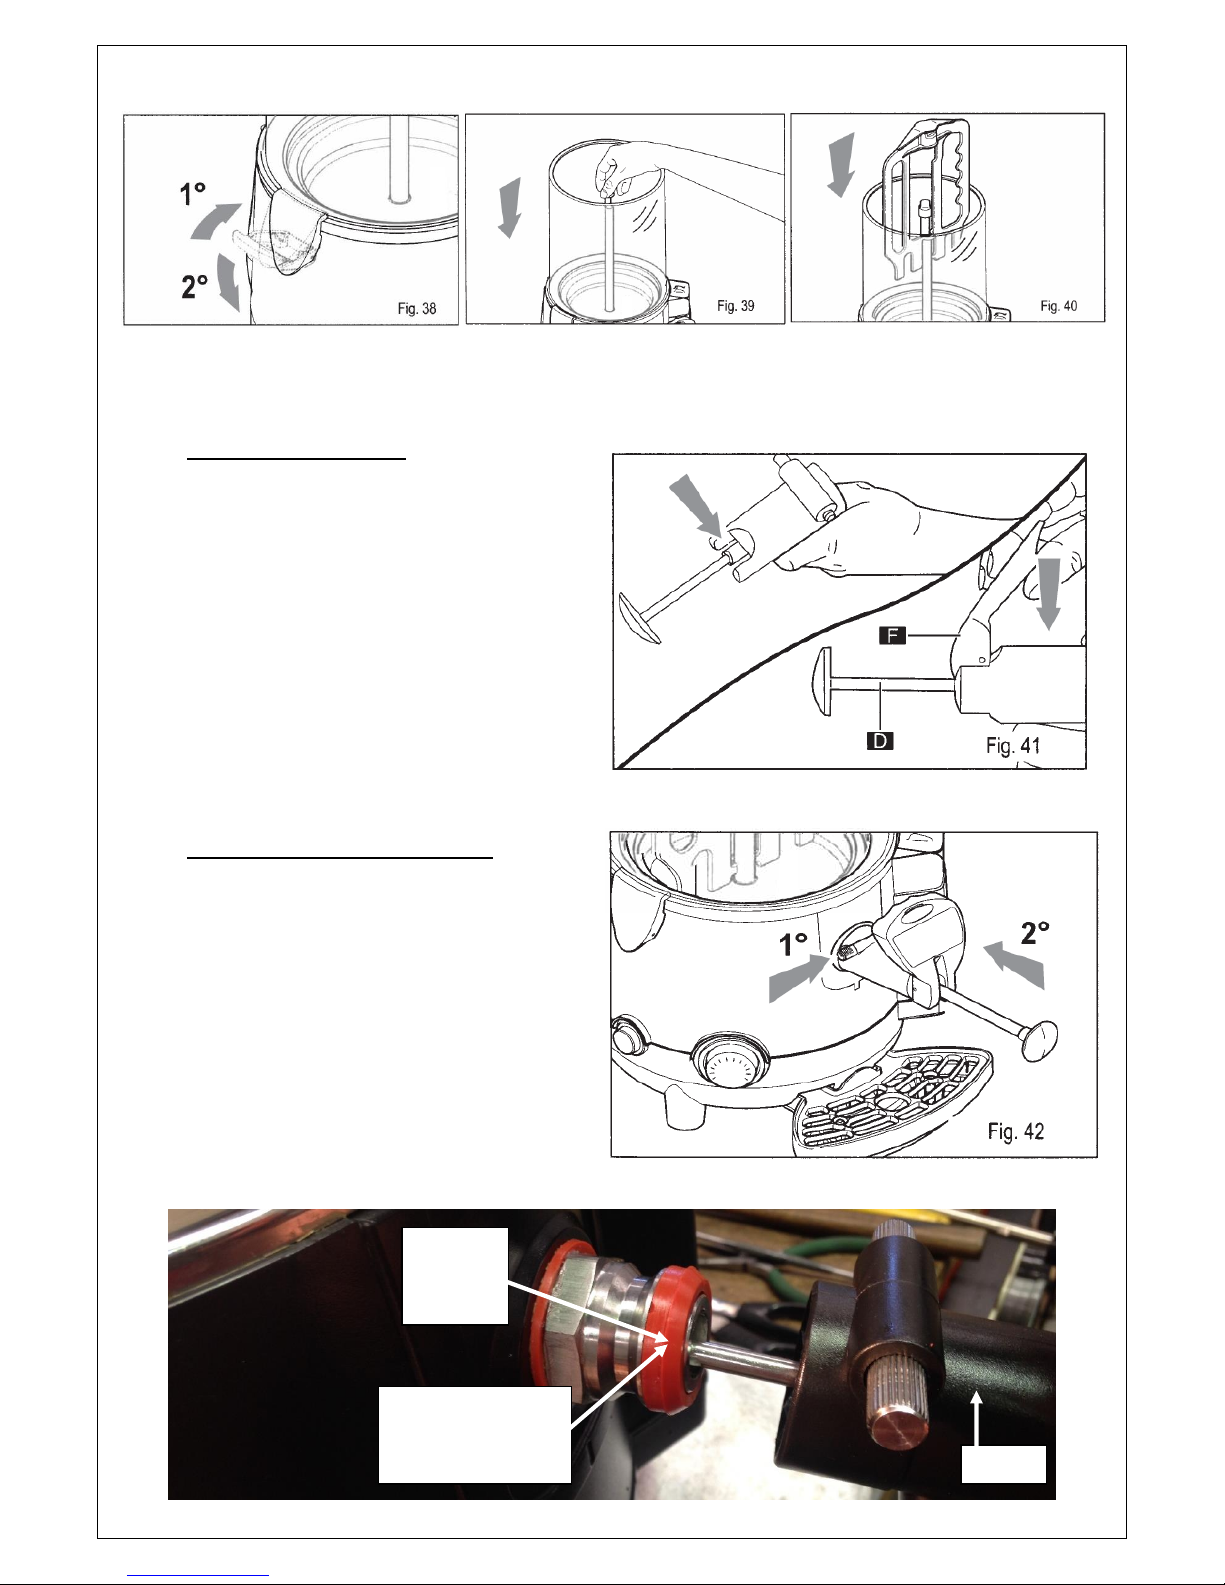
Fix the bowl to the machine body using the relevant hook-on handles (Fig 38).
Insert the mixing auger into its seating (Fig 39) followed by the mixer (Fig 40).
8. Re-assemble the tap
Use a damp cloth to clean the tap
coupling. To reassemble the tap,
carry out in reverse all of the
disassembly steps illustrated
previously (Fig 32 to Fig 27).
To fit the lever (F) push the rod (D)
from inside until the guides protrude;
then insert the lever (F) and slowly
release the rod (D). (Fig 41).
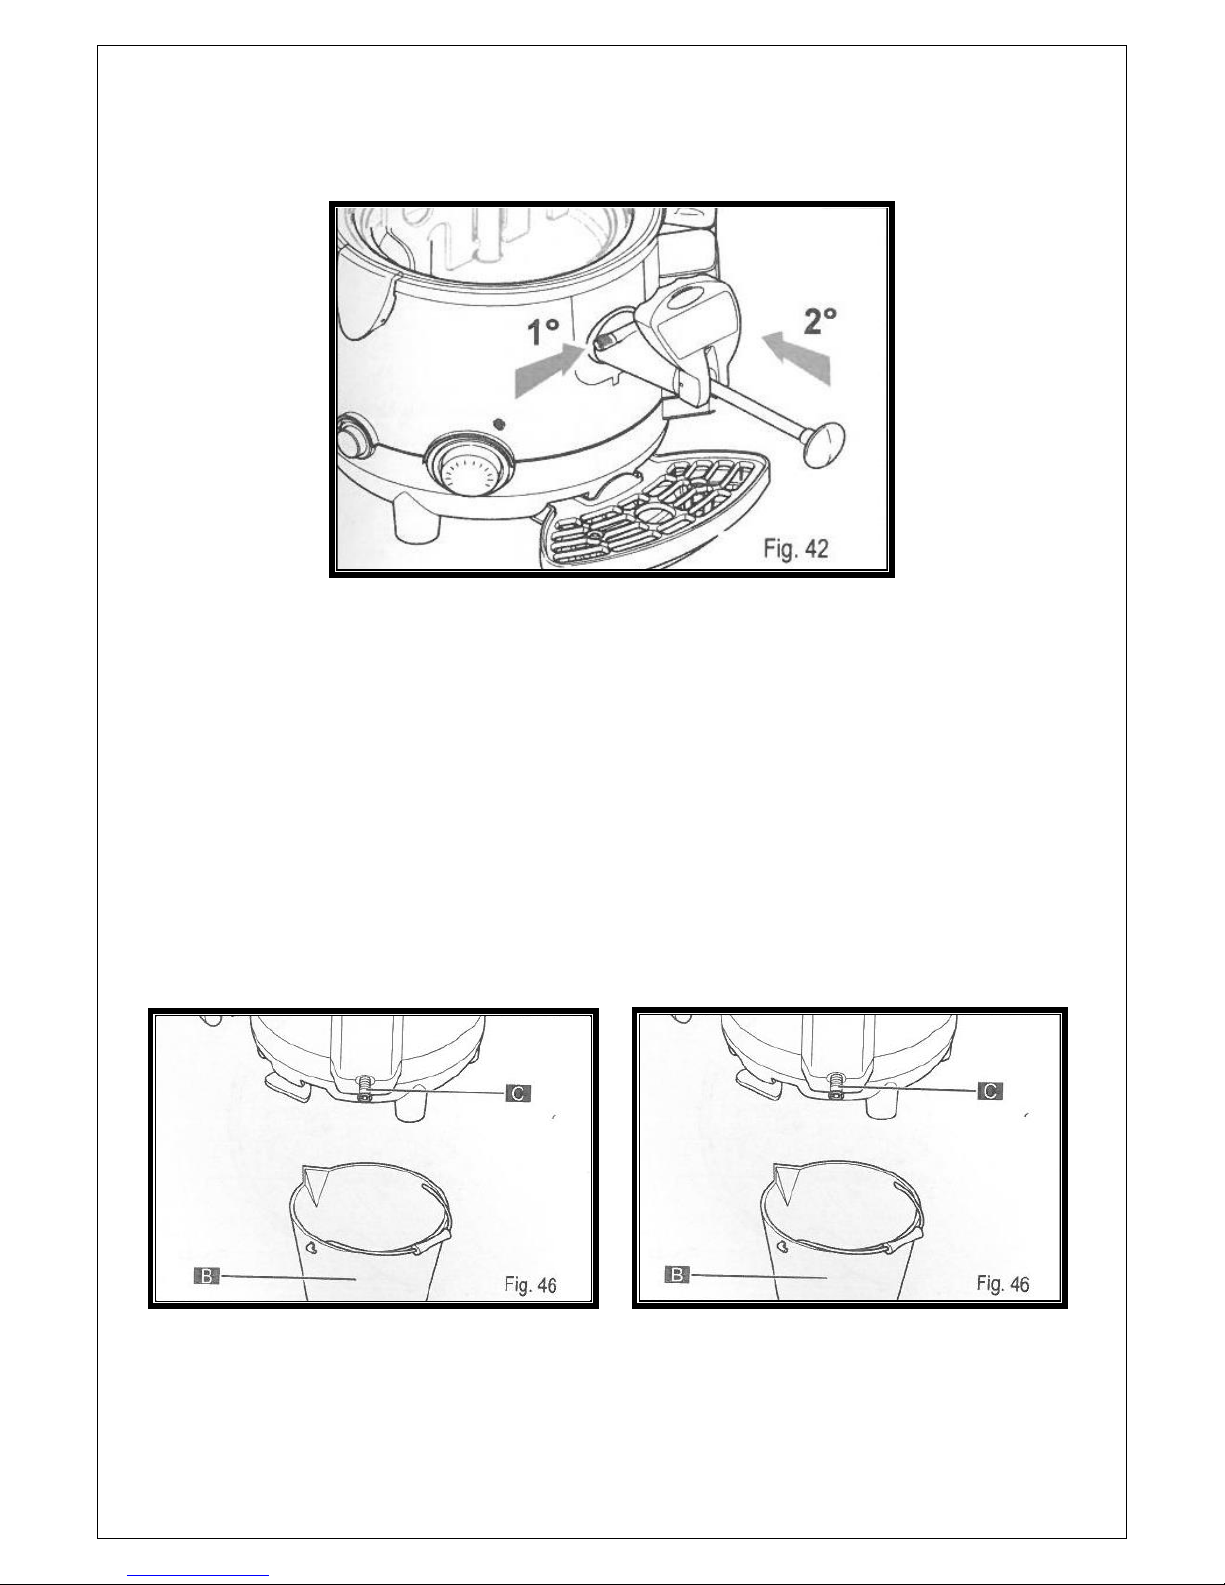
9. Fit the tap onto the machine
To fit the tap correctly back in place:
Hold down the button (1),
making sure that the rod is
completely extracted (2)
Introduce the tap into the seat
provided and push until the
push button returns to its
initial position (Fig 42).
Faucet
Orange
Gasket
of Faucet
Ensure this seal is
in place before
assembly of Faucet
Page 17

Page | 17
10. Perform the sanitising procedure for the inside of the machine
Warning: the thermostat must be set to –OFF- for internal sanitisation
Prepare the sanitising solution (Step 6)
Fill the bowl with the sanitising solution
Leave the solution to act for about 30 minutes and then empty
Rinse the bowl and inside surfaces thoroughly to eliminate all residues of
sanitising solution
11. Clean the drip tray
Note: the drip tray should be
emptied and cleaned daily.
When the red float fitted to
the drip tray grid rises, this
indicated max level and drip
tray should be emptied.
To empty life the tray with grid
and pull it outwards to remove
it from its seating.
Wash the tray and grid
separately with lukewarm
water, then drying all of the
components thoroughly.
Reposition the grid on top of
the tray before securing back into the machine.
12. Clean the bowl lid using a damp cloth
Remove the bowl lid from the machine and
clean the surface using a damp cloth / nonabrasive sponge soaked in sanitising product.
Rinse the lid thoroughly with water and dry
before replacing on machine.
13. Empty out the boiler tank
Warning: while boiler is being emptied the machine
must be unplugged. Do not attempt to empty the
boiler before the machine has sufficiently cooled.
To empty the boiler:
Unplug the machine
Remove the drip tray and cap (A)
Page 18

Page | 18
Place the machine on a flat surface and with the boiler tank water level indicator
tray turned towards the out edge of the support surface
Place a container (B) with a capacity of more
than 3 litres under the bleeder cap (C)
Use a coin or Allen wrench to unscrew the
bleeder cap (C)
Pull out the cap (C) with a firm movement and
wait for all the water to empty out from the
boiler tank (Fig 47).
14. Clean and descale the boiler tank (at least every three months)
The boiler tank needs to be descaled on a regular basis, it is recommended at
least once every three months.
Drain the boiler tank (previous page)
Insert and secure the boiler tank bleeder cap
Insert water plus scale remover for coffee machines into the tank.
Leave the solution to act for the time indicated in the instructions of the
solution itself.
Empty out the solution from inside the boiler tank.
Rinse out the tank with plenty of water, by filling and emptying it two or three
times to ensure the descaling solution is cleared.
Page 19
Page | 19
Troubleshooting
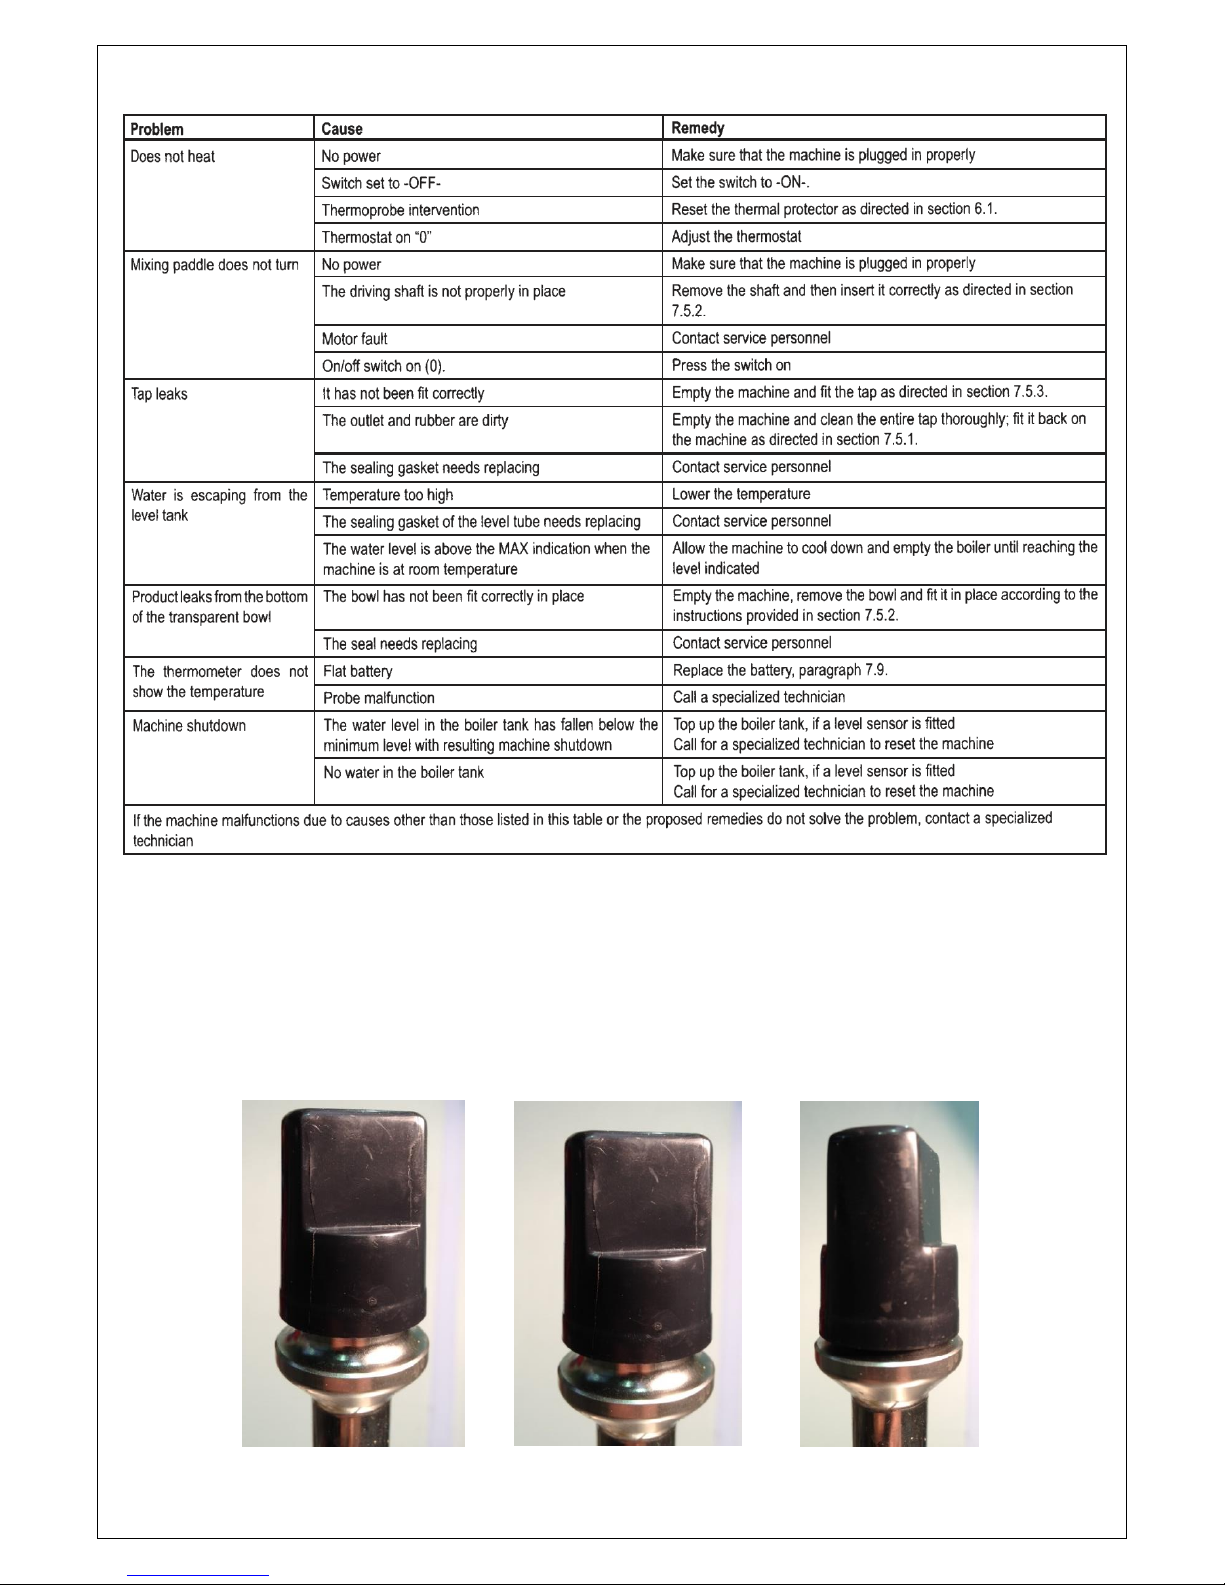
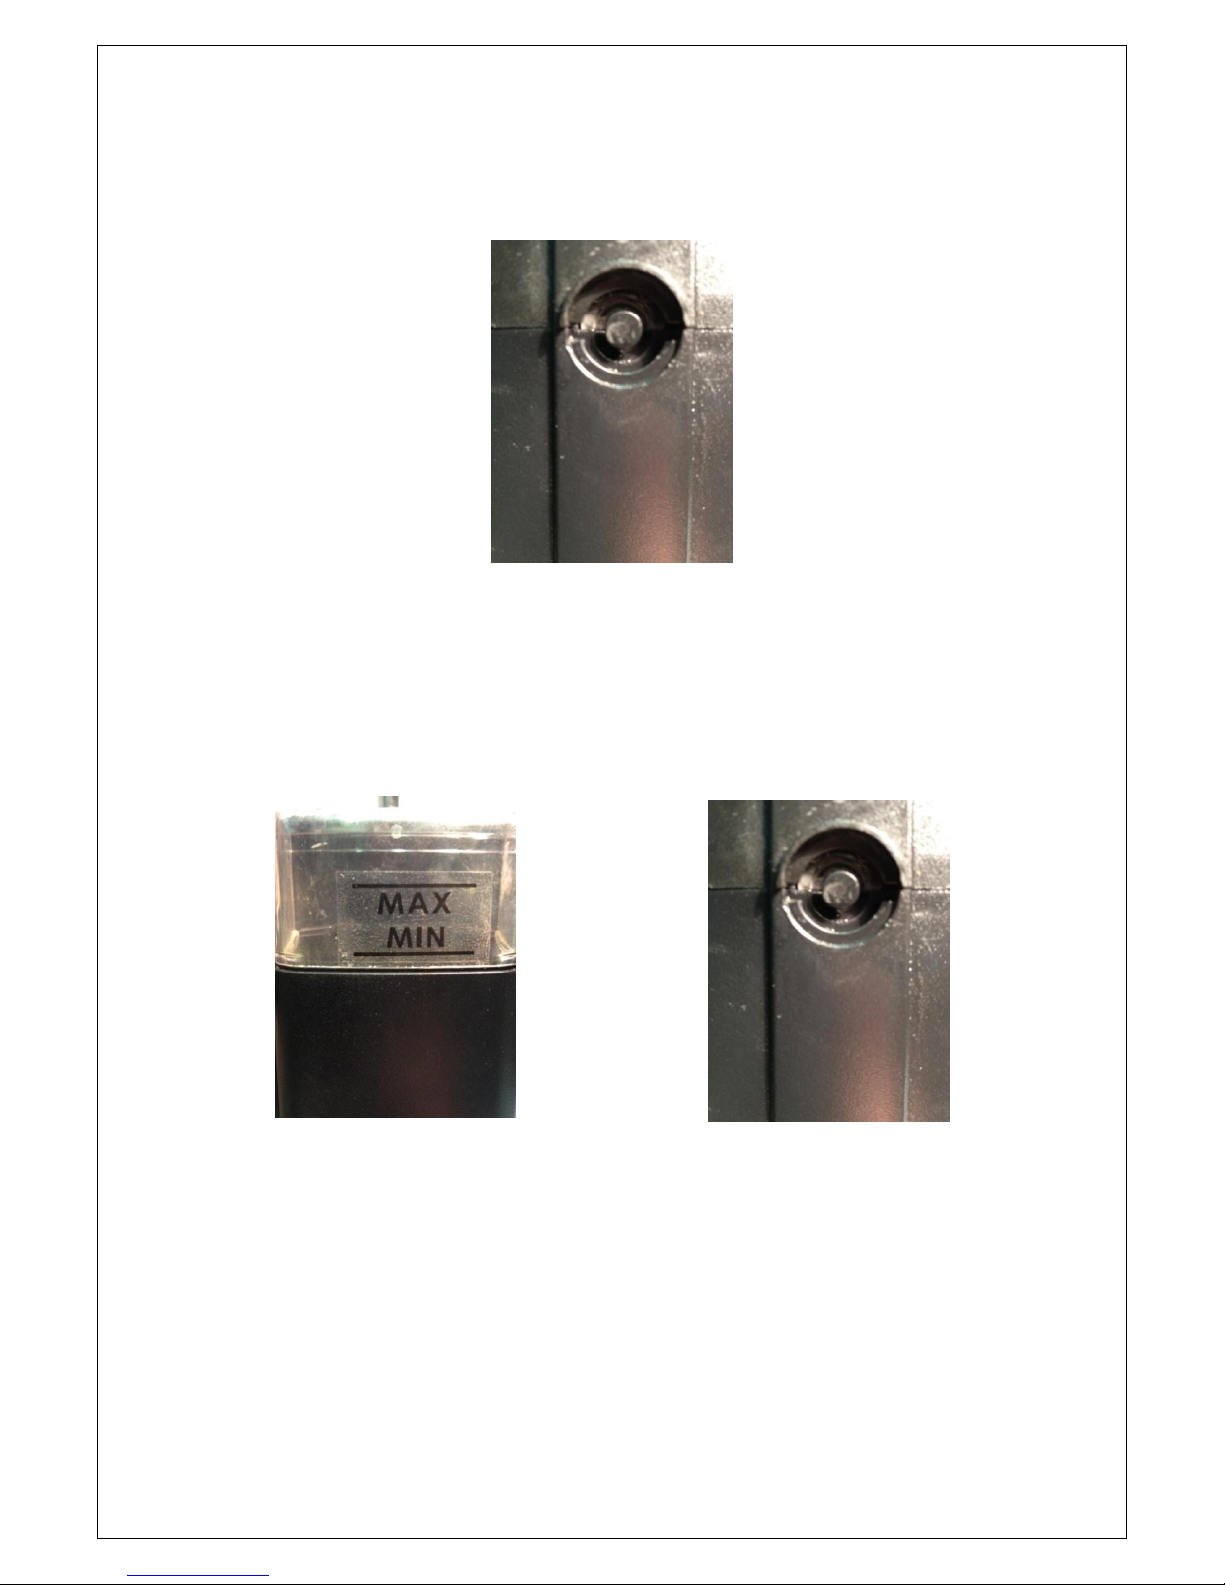
I CAN HEAR THE MOTOR BUT THE SHAFT IS NOT TURNING.
The motor shaft may not be properly engaged in the motor. You will know if this is the case because there
will be a gap between the top of the drive shaft and the plastic drive nut on top of the drive. Gently turn
the shaft by the drive nut until you feel the drive shaft slot into the motor. The pictures below show that
there should be no gap between the drive shaft and the top of the drive. DO NOT USE FORCE AS THIS WILL
VOID WARRANTY.
Incorrect Incorrect Correct
Page 20
Page | 20
THE APPLIANCE IS ON BUT NOT HEATING AND THE SHAFT IS NOT TURNING
The appliance is fitted with an overload switch. The need to use the overload switch DOES NOT indicate that there is
a fault with the machine. The overload switch is designed to prevent the appliance overheating. This may be caused
if the appliance is allowed to boil dry or water has not been replenished often enough. The overload cannot be reset
while the appliance is still hot. Allow to cool – may take some time – before resetting.
If appliance stops working reset by pressing reset button
WHEN I TURN THE CHOCOLATE MACHINE ON IT CUTS OUT AFTER A FEW MINUTES.
Check that the appliance is filled correctly with water. You must fill the water compartment up to the MAX line. If
you do not fill the compartment with enough water then the overload switch in the appliance will trip. If this occurs
it may NOT be possible to reset the overload until the appliance is cool enough which may take some time. This is
not the fault of the appliance as it is working correctly.
Fill Water to MAX Line at all times If appliance stops working reset
Page 21
Page | 21
I CANNOT GET THE TAP ON THE MACHINE AFTER CLEANING
The tap handle needs to be depressed to put the faucet assembly back on the appliance. Make sure the plunger
shaft is fully extracted out of the faucet.
MY TAP IS LEAKING
Check that it has been installed correctly after cleaning.
Ensure that all seals have been correctly placed after cleaning.
Check that parts have not been broken
HOW DO I REMOVE WATER FROM THE WATER TANK?
There is a button on the side of the water tank which is removable for draining the tank. Ensure that you do not lose
this part as it will be impossible to fill the tank without it and will render the appliance unusable.
CAN I USE THE APPLIANCE FOR SOLID CHOCOLATE?
NO. The appliance is to be used for liquid chocolate. Solid chocolate, if allowed to solidify will damage the motor and
VOID WARRANTY.
Page 22
Page | 22
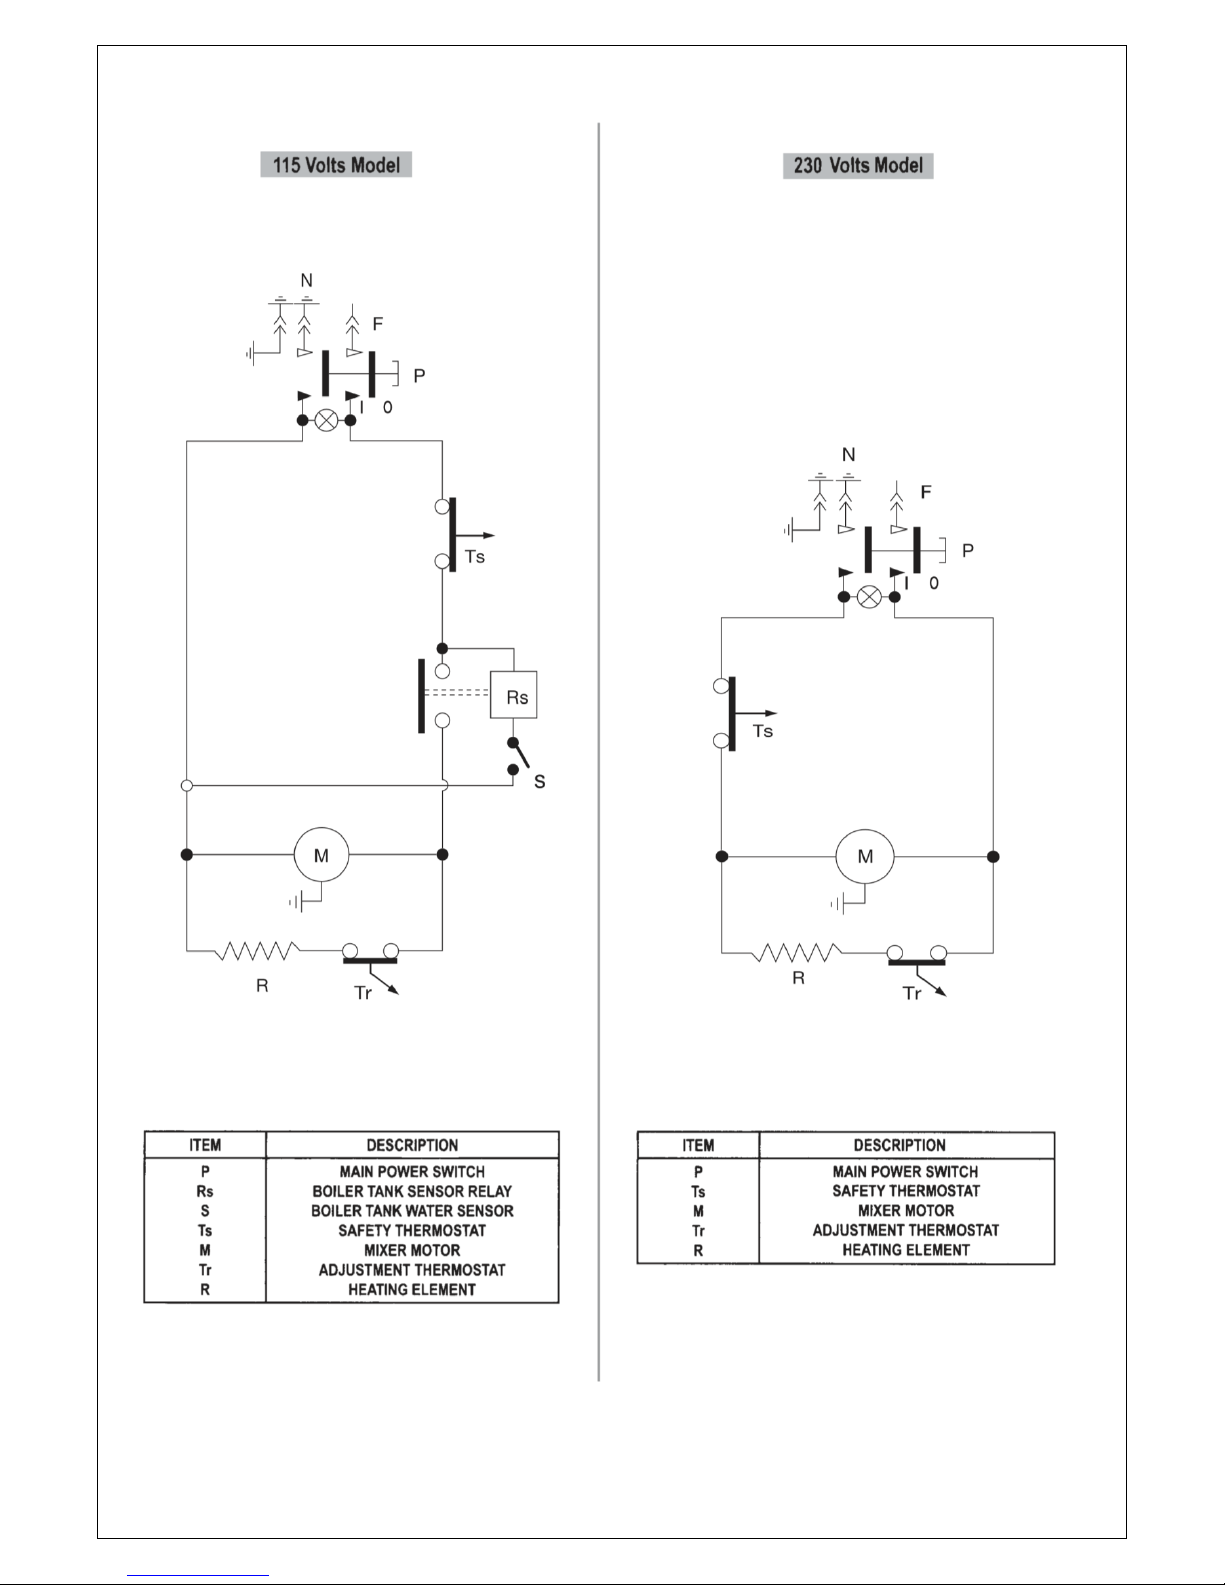
Wiring Diagram
Page 23
Page | 23
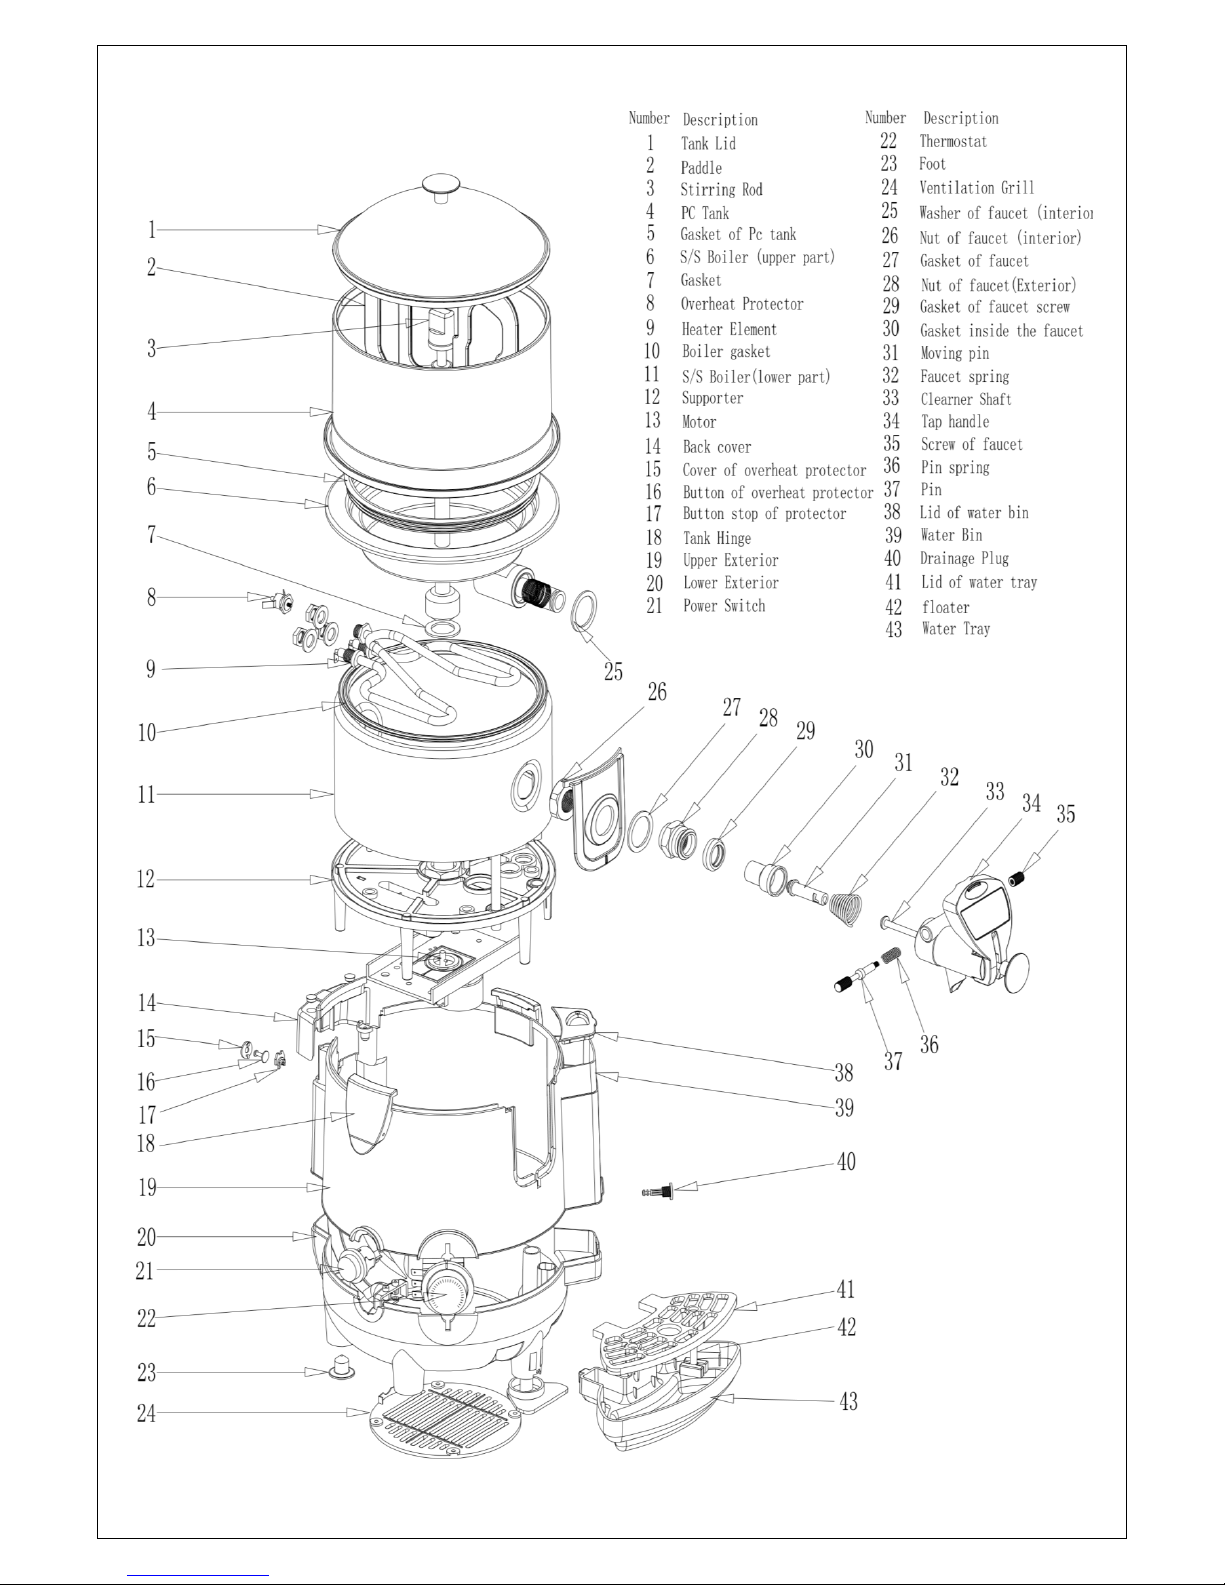
Parts Breakdown
Page 24
Page | 24
Spare Parts for the Semak Hot Chocolate Dispenser
Spare Parts, exploded views and wiring diagrams are available from our webpage. Go
to www.semak.com.au and locate the appliance in the product section for the above
information.
Service & Maintenance
The Semak Hot Chocolate Dispenser does not contain user-serviceable parts. For
Service and Repair, contact Semak for your nearest Authorised Service Agent
The Foodservice Industry is deemed a hostile environment within the scope of
AS/NZS 3760:2003. Semak Hot Chocolate Dispenser MUST be routinely electrically
tested for compliance with this standard if used commercially.
It is recommended that a Food Safety program such as HACCP be employed and that
routine service and repair be undertaken at the time of electrical testing to ensure
the correct operation and function of all parts.
Electrical Compliance
Semak Hot Chocolate Dispensers comply with the following electrical standards:
Warranty
The Semak Hot Chocolate Dispenser is a Commercial appliance. This product is
guaranteed for 1 Year* from the date of purchase against mechanical and electrical
defects. If the fault is deemed caused by MISUSE/ABUSE the terms of the warranty
are invalidated. If the product has been opened or tampered with (i.e. In an attempt
to repair it) the warranty is invalidated. All warranty repairs should be undertaken by
Semak Australia.
It is against company policy to authorize warranty repairs over the phone. Service
Agents will require a work order number from Semak to conduct warranty repairs.
Page 25

Page | 25
SEMAK WARRANTY
THIS WARRANTY APPLIES ONLY TO PRODUCTS MANUFACTURED AND SOLD IN AUSTRALIA
The benefits conferred by this warranty are an alternative to all other rights and remedies
in respect of the product which the consumer has under the Trade Practices Act and similar
State and Territory Laws.
Semak Australia. Warrant each new SEMAK appliance manufactured by SEMAK to be free
from defects in materials or manufacturing process for a period of 2 years from the date of
original purchase.
Should defects due to faulty materials or manufacturing process develop within the
warranty period, the appliance will be repaired without charge providing all conditions of
this warranty are observed.
1. Proof of Purchase and Warranty card must be retained and available on request.
2. This Warranty is void if the equipment has been damaged due to misuses neglect or is
used for a purpose for which it was not suited; and no repairs, alterations or
modifications have been attempted by other than Semak or its authorised Service
Agent.
3. Semak Australia. Reserves the right to reject a claim for warranty if service is required
due to misapplication, improper installation, inadequate wiring, and incorrect voltage
conditions. Under no circumstances shall SEMAK or its agents bear responsibility for
consequential damages of any kind.
4. Where required by Statute or local authority, equipment must be installed by qualified
person in accordance with all relevant regulations. Failure to do this will void product
warranty.
5. Cost of transport of any appliance or part to and from SEMAK or its Service Agent is to
be paid by the owner.
6. A charge will be made where failure is due to neglect, abuse or accidental damage on
the part of the operator, or when no fault can be found or the fault is due to causes
outside the control of Semak Australia.
7. The above does not preclude the purchaser from their Statutory rights as a consumer.
Semak Australia
Factory 18
87-91 Hallam South Road
HALLAM VIC 3803
Ph 03 9796 4583
Fax 03 9796 4586
Email technical@semak.com.au
Page 26

Page | 26
WARRANTY REGISTRATION
Retain for Future Reference
DO NOT SEND
Please complete one registration for each Semak appliance.
You may be required to provide this information when requesting after sales service. Please
staple your proof of purchase to this page.
Company Name: ________________________________________________
Company Address: ________________________________________________
Business Type: ________________________________________________
Contact: ________________________________________________
Phone: ________________________________________________
Fax: ________________________________________________
Email: ________________________________________________
Product: ________________________________________________
Serial Number: ________________________________________________
Date of Purchase: ________________________________________________
Place of Purchase: ________________________________________________
Page 27

Page | 27
Notes
_______________________________________________________________________________________________
_______________________________________________________________________________________________
_______________________________________________________________________________________________
_______________________________________________________________________________________________
_______________________________________________________________________________________________
_______________________________________________________________________________________________
_______________________________________________________________________________________________
_______________________________________________________________________________________________
_______________________________________________________________________________________________
_______________________________________________________________________________________________
_______________________________________________________________________________________________
_______________________________________________________________________________________________
_______________________________________________________________________________________________
_______________________________________________________________________________________________
_______________________________________________________________________________________________
_______________________________________________________________________________________________
_______________________________________________________________________________________________
_______________________________________________________________________________________________
_______________________________________________________________________________________________
_______________________________________________________________________________________________
_______________________________________________________________________________________________
_______________________________________________________________________________________________
Page 28

Page | 28
© Semak 2014
 Loading...