

Including window bracket
Inklusive Fensterhalterung
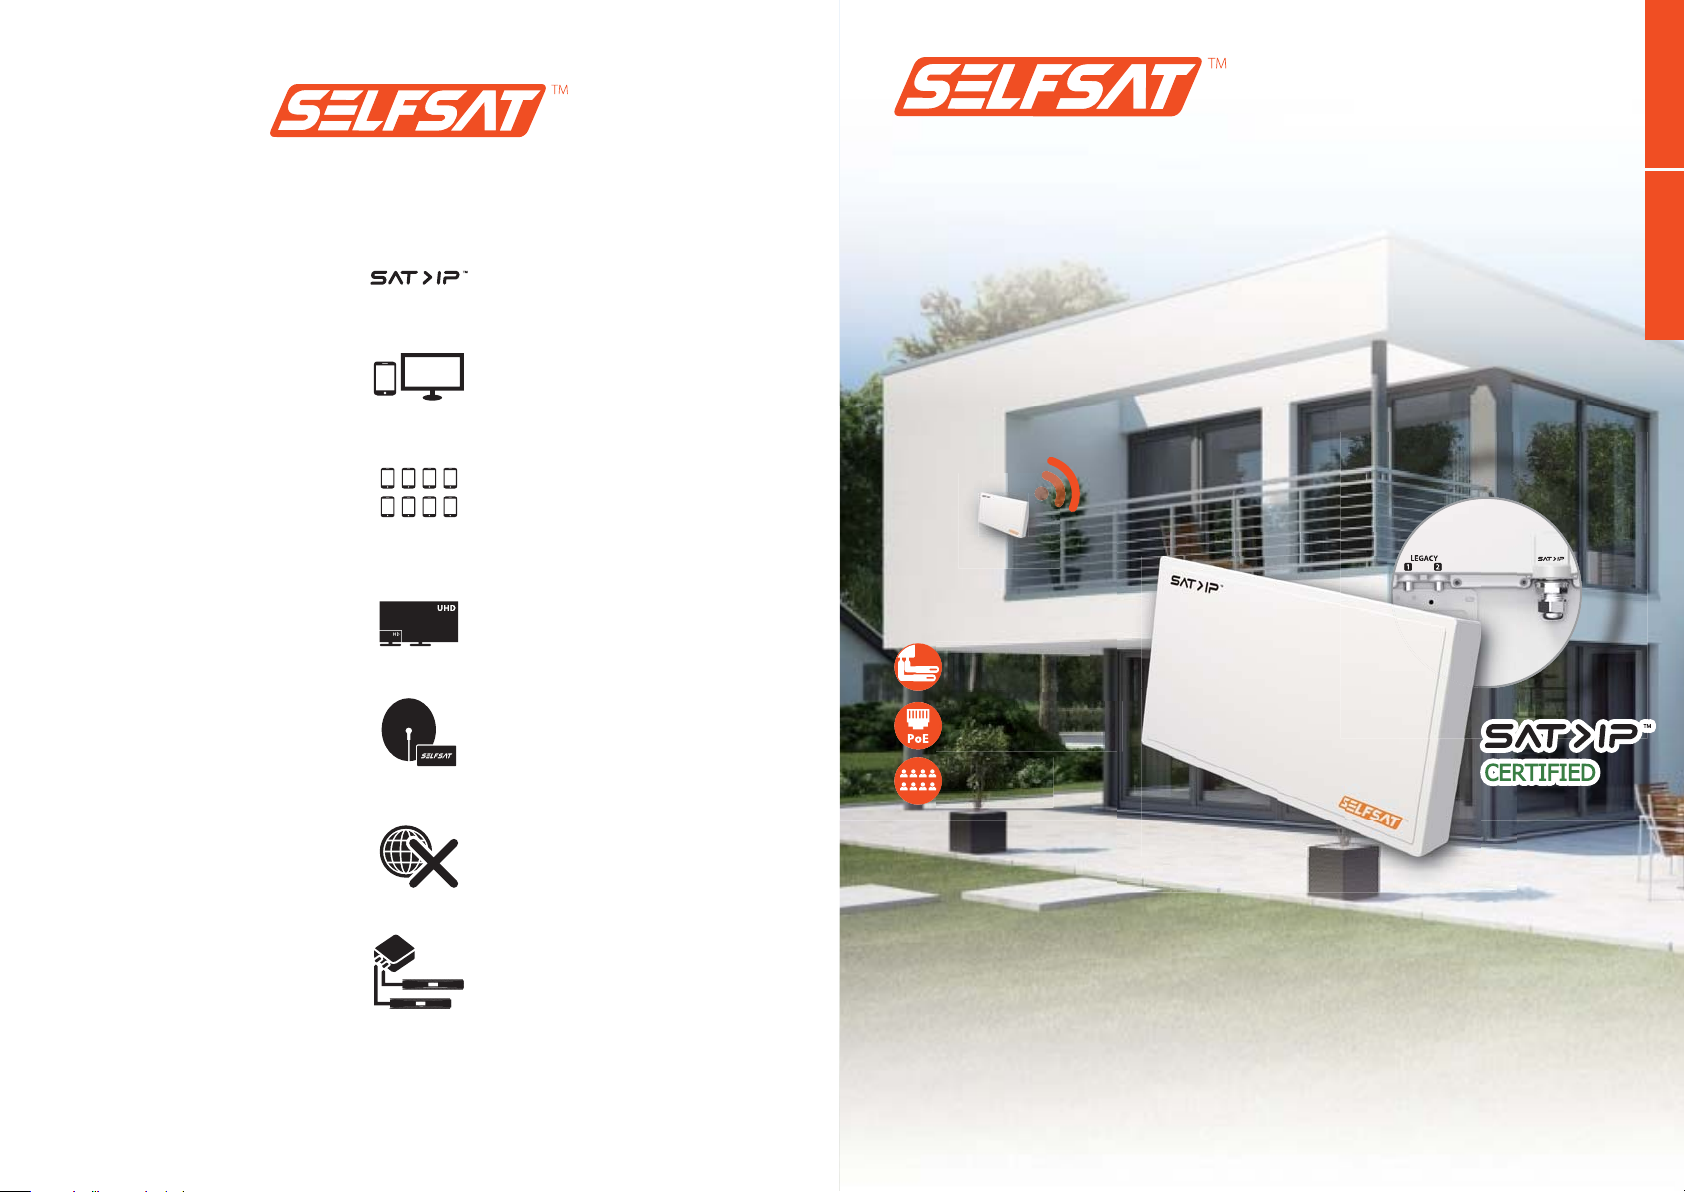
Satellite IP Flat Antenna
Certified by SES
Mobile devices
with Wi-Fi
Up to 8 devices
simultaneously
Support HD & UHD
SAT>IP LNB integrated antenna
Satellite IP Flat Antenna
SELFSAT>IP series
Including window bracket
Including window bracket
Inklusive Fensterhalterung
Inklusive Fensterhalterung
8
S
g
m
n
2 Legacy outputs
i
t
r
o
p
p
u
S
a
r
t
d
e
v
i
c
e
s
B
s
ENG DEU
+
2
C
o
n
v
e
n
t
i
o
n
a
l
S
T
PoE Adaptor included
Compact size
No need Internet
8 User Band
USER’S MANUAL
2 Legacy output for
conventional STB
www.selfsat.com www.selfsat.com
Bedienungsanleitung
Ver 2.0

Contents
ENG
What is SELFSAT>IP series Series Flat Antenna?
Safety Instructions
Box Content
How to Install?
Step 1 : Where to Install?
|
Step 2 : Check Information
|
Step 3 : Installation Choice
|
|
1) Table Stand Type (On a Horizontal Plain)
2) Wall Mounting Type
3) Window Type
4) Clamp on Balcony Type
Step 4 : SELFSAT>IP series Installation and How to Use
1) Connect the SELFSAT>IP series antenna to your traditional DVB-S/S2 STB
a. How to prepare the cable?
b. How to connect the cable to the antenna and the set top box?
2) Connect the SELFSAT>IP series antenna to your home network
a. How to connect Ethernet cable to the antenna?
b. How to connect the antenna to the PoE injector and the WLAN router?
3) Satellite Searching and Fixing the Antenna
4) SELFSAT>IP series (SAT>IP) Client Devices
a. How to download/use the App for iOS/Android Smart Phones and Tablets?
b. How to use the PC Viewer
...................................................................................
.............................................................................................
.........................................................................................
.....................................................................................
..................................................................................
...................................................................................
..............................................................
...................................................................................
..........................................................................................
................................................................................
....................................................
..........................................................................
...................................................
...........................................................
............................................................
..........................................................................
....................................
..........................
.................................
....................................
........................
....................
2
3
4
5
5
5
6
6
6
7
7
8
8
8
8
9
9
9
10
11
11
11
Troubleshooting Check List for Initial Installation
Signal Loss / Rain Fade
...........................................................................
................................
12
12

What is SELFSAT>IP series Series Flat Antenna?
SELFSAT>IP series at antenna is a at satellite antenna with patented and state of the art
technology that can collect satellite signal and pass satellite signal to LNB and STB.
SELFSAT>IP series antenna has the ability to receive live satellite signal to traditional
DVB-S/DVB-S2 STB and also at same time the SELFSAT>IP series antenna can convert the live
FTA(Free to Air) satellite signal to IP streams for up to maximum 8 users to receive and view
live FTA satellite program on any computer or smart devices within the local network. The
SELFSAT>IP series at antenna is connected to the home network environment with a Cat5e
grade or higher grade cable.
TV 1
TV 2
Laptop
1
Smart phone
5
Via WLAN
2
6
PC Via LAN
3
Via WLAN / LAN
Via WLAN / LAN
Via WLAN
2
Tablet PC
7
Via WLAN
Tablet PC
Via WLAN
4
TV 3
8
Via WLAN / LAN
Note
Even though not indicated on the below picture, one PoE injector is required to operate
SELFSAT>IP series. Please follow the installation instruction following in this manual.
Safety Instructions
•
Before using this product please read this manual carefully and follow all the installation, mounting
& orientation instructions correctly.
•
All the instructions should be followed in order to avoid any technical problems.
•
Any electric or magnetic eld close to the SELFSAT>IP series Series may cause a bad reception or even
cut o the signal completely.
•
Do not make any holes on the plastic antenna cover to prevent from water penetration.
•
When handling the antenna, please do it carefully as any impact might cause damage to the electronics.
•
Do not open the cover, any attempt to repair by a non-qualied person can be dangerous and void
the warranty.
•
Any obstacle (buildings, trees, etc....) will block the reception of the signal from the satellite to the
antenna.
•
Do not paint or add any substance on the antenna cover, this will block the reception of the signal
from the satellite.
•
The cable between the antenna and the Satellite receiver should not exceed 30m as it will decrease
the quality of the signal.
•
The use non-isolated jacks will result in a loss of the signal level.
ENG
•
Do not forget to adjust the antenna and the bracket to the cross-polarity.
•
Tighten all the screws of the antenna once you have nished the adjustments.
•
This product contains one SAT>IP LNB with two legacy ports, it is forbidden to add, change or modify
the LNB.
•
For more precise details on the above points or for any information, please ask your retailer or
customer service.
Warning
Antennas improperly installed or installed to an inadequate structure are very susceptible to win
damage. This damage can be very serious or even life threatening. The owner and installer assumes
full responsibility that the installation is structurally sound to support all loads (weight, wind & ice)
and properly sealed against leaks. The manufacturer will not accept liability for any damage caused
by a satellite system due to the many unknown variable applications.
3
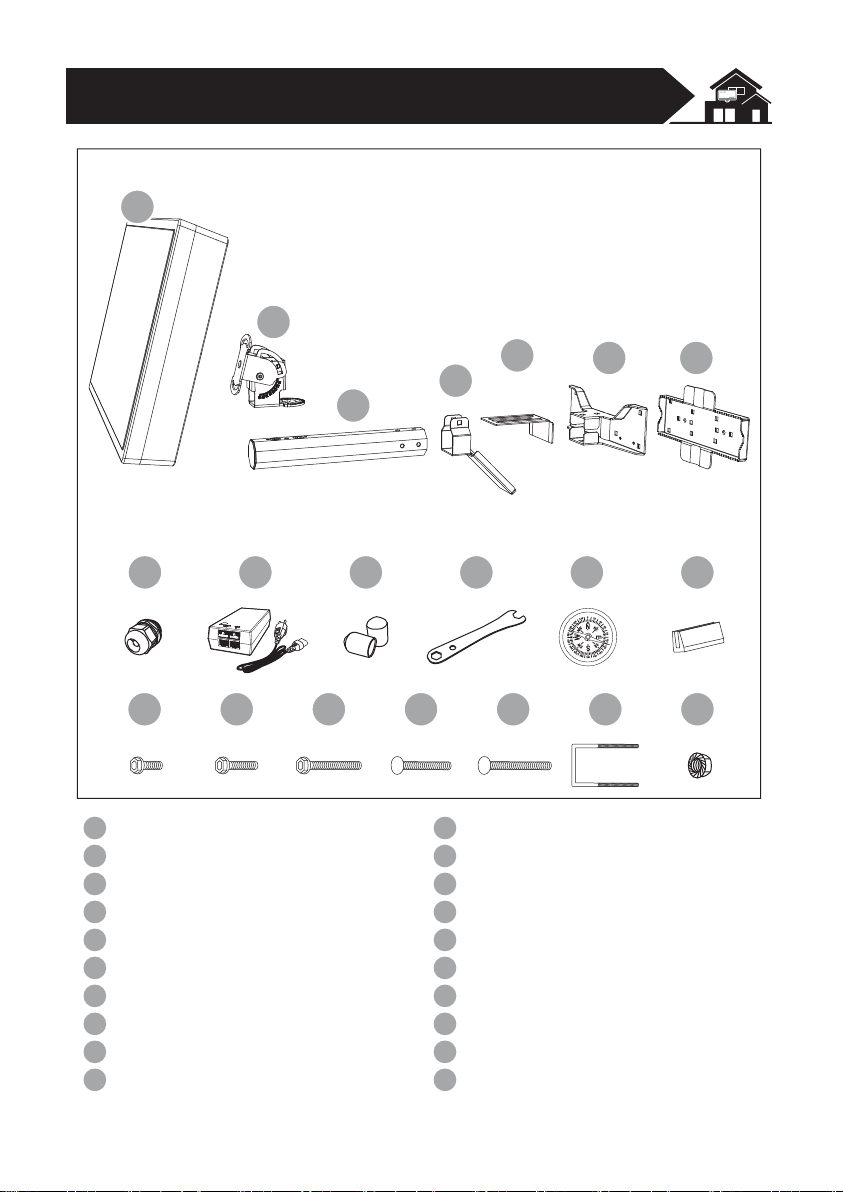
Box Content
A1
B1
B2
B3
B4
B5 B6
C1
C4C3C2
S1 S3S2 S4 S5 N1S6
Antenna
A1
Angle Bracket
B1
Main Support
B2
Window Bracket A
B3
Window Bracket B
B4
Fix Bracket B
B5
Fix Bracket A
B6
Cable gland
C1
(Integrated in the backside of the antenna)
PoE injector
C2
C3
RF connector water-proof cap (×2)
(Integrated in the backside of the antenna)
Spanner
C4
Compass
C5
Rubber (×4)
E1
Screw M4X10 SEMS2 (×4)
S1
Screw M6x18 SEMS2 (×3)
S2
Screw M6X50 SEMS2
S3
Round Head Square Neck Bolt M6x30
S4
Round Head Square Neck Bolt M6x50 (×3)
S5
U-Bolt M6x85 (×2)
S6
Flanged Nut M6 (×7)
N1
C5 E1
4

How to Install?
You will be able to install SELFSAT>IP series easily by yourself by following this
manual step by step.
Before installing your antenna, you have to check that SELFSAT>IP series box contains all the items
listed above in the ‘Box Content’. In the event of any missing parts, please contact your distributor.
Step 1: Where to Install?
In order to receive a signal from the Satellite, SELFSAT>IP series has to be installed in an open loop space
(outside the house or the apartment), in the direction of the satellite towards the equator, for which, you
will need a compass to exactly orient SELFSAT>IP series toward the satellite.
Note
Please take reference to the table of the Azimuth angles specied in the back pages of this manual.
ENG
< Compass >
N 0˚
S 180˚
Satellite position
Azimuth Angle
Note
To ensure an accurate compass reading, stay away from large metal objects, specically electrical
cables and then make multiple readings.
Make sure that there are no obstacles in front of SELFSAT>IP series which can decrease the signal
reception quality, such as buildings or trees (you may keep in mind that trees will grow and may block
the signal).
In order to be able to x and install your antenna easily, you might choose an easy accessible place
without any potential danger for installation.
Think about the way you prefer to place your cable in a discreet way from the SELFSAT>IP series to your
Set top Box. The antenna should not be too distant from your satellite receiver; a cable longer than 30
meters may decrease the quality of the signal.
Bad Quality Signal Reception
Good Quality Signal Reception
5

Step 2: Check Information
In order to install antenna, you need to nd skew, elevation and azimuth angle by referring the table on the
back of the manual. If you can’t nd your location, please refer to the information of the nearest area from
your location. This manual will show you the installation example to receive ASTRA1 satellite in Brest region
of France. The angle information for Brest region is Skew : -19.7, El : 30, Az : 149.6
Step 3: Installation Choice
Depending on the choice of installation position for the SELFSAT>IP series, you can then decide on
the mounting type, all parts are included.
1) Table Stand Type (on a Horizontal Plain)
S2
B1
A1
N1
B1
B5
S2
S1
N1
S4
12
S5
S2
3
2) Wall Mounting Type
12
S5
S2
A1
S2
N1
B1
2
S2
B2
S3
3
B2
N1
B6
S5
4
6
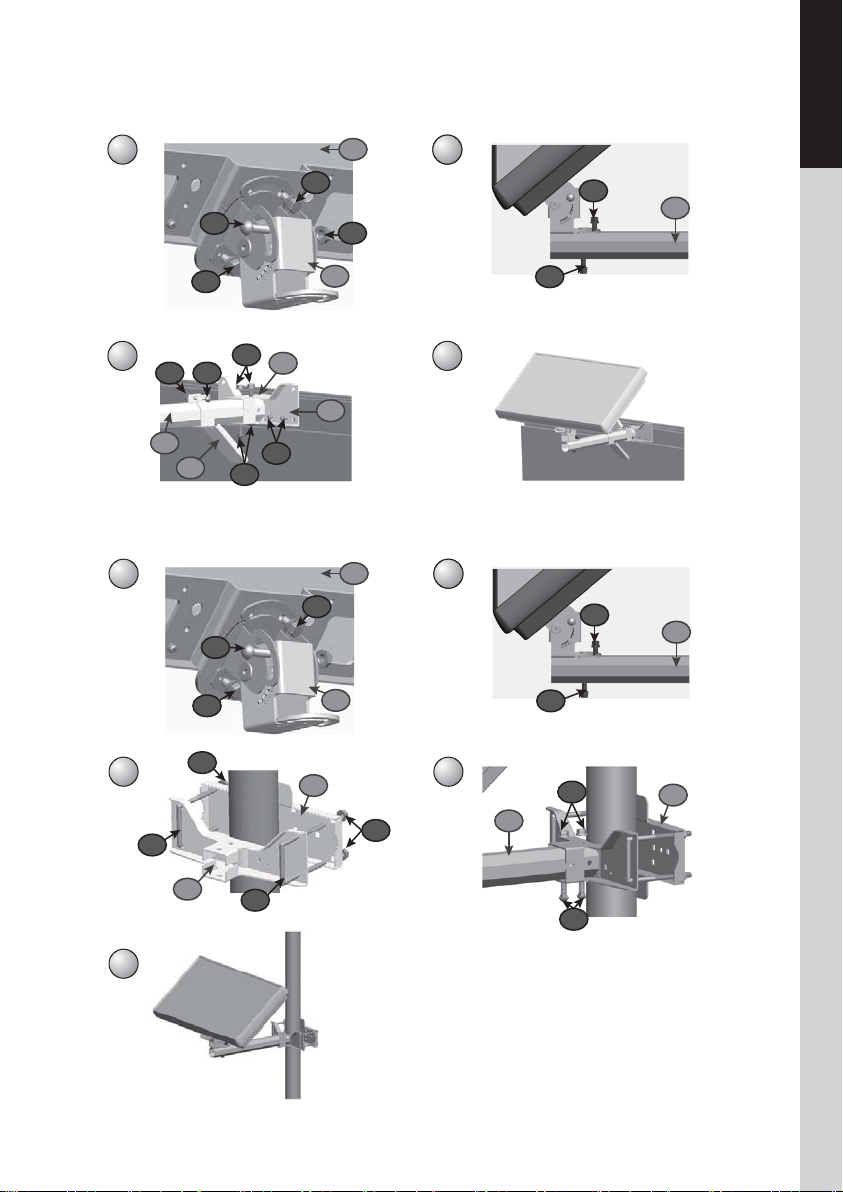
3) Window Type
ENG
S2
B6
B1
A1
N1
2
S2
B2
S3
4
12
S5
S2
B3
N1
S4N1
B4
S1
S5
3
B2
4) Clamp on Balcony Type
12
S5
S2
A1
S2
B1
2
S2
B2
S3
S6
B6
N1
B5
N1
S6
3
4
N1
B2
S5
B5
5
7

Step 4: SELFSAT>IP series Installation and How to Use
Since the SELFSAT>IP series antenna provides two dierent interface: Legacy RF connector and RJ45
LAN connector, the user can select dierent connector upon dierent environment.
LEGACY
12
Note
SELFSAT>IP series antenna includes a protection cap for the legacy outputs. Please put
the protection cap on the legacy outputs when you do not use the ports to prevent water
penetration. Also, when you are using the port, please keep the connector protection cap
and do not lose it.
1) Connect the SELFSAT>IP series antenna to your traditional DVB-S/S2 STB
Once you have installed the antenna in an open loop space or mounted the way you want it to be, the next
step is to connect them all together.
In order to be able to watch your favorite satellite programs, you need to connect your satellite antenna to a
receiver with a cable. The cable between the antenna and the Satellite receiver should not exceed 30m as it
will decrease the quality of the signal. The use of a long or bad quality cable and/or unisolated jacks can cause
lowering the signal level, it would be preferable to use an RG6 Coaxial cable (HF 17VATC or 19VATC cable), in
order to minimize a signal loss.
Just connect the RF coaxial cable from the Legacy 1 or Legacy 2 from the SELFSAT>IP series antenna to your
DVB-S/S2 STB.
a. How to prepare the cable? b. How to connect the cable to the antenna and
the set top box?
CONNECTOR COVER
15mm
8mm
F CONNECTOR
3mm
LEGACY
12
Set-top box
8
TV

2) Connect the SELFSAT>IP series antenna to your home network
The SELFSAT>IP series antenna can be connected to your home Ethernet environment via standard Ethernet
cable [Cat5e or higher grade]. Because the SELFSAT>IP series utilize the SAT>IP technology to convert the
satellite signal to IP stream.
A PoE (Power over Ethernet) injector is needed to provide electricity power to the SELFSAT>IP series unit.
Please follow the diagram below to connect the LAN cable from SELFSAT>IP series antenna to the PoE
injector and from the injector to your home router.
a. How to connect Ethernet cable to the antenna
After you remove the cable glands,
1
plug the Ethernet cable as the picture
ENG
2
3
Assemble the antenna and the cable
Tighten the cable glad to prevent
water penetration
b. How to connect the antenna to the PoE injector and the WLAN router?
IP LNB
LEGACY
12
WLAN router
LAN WAN Power
PoE injector
To
ANTENNAToROUTER
Power
Main LAN (Home network)
Warning
Please make sure you are connecting to the correct port. Incorrect connections from the PoE may cause
damage to your router or network switch.
Note
Please use LAN port only to connect with SELFSAT>IP series. WAN port will be used to use the
outside internet.
9

Note
SELFSAT>IP series Antenna has its own MAC Address.
The MAC address can be found from the backside of the included manual.
Note
Network environment setup:
Because digital video transmission requires stable and fast enough networking
(LAN/WLAN) environment, the SAT>IP technology used in SELFSAT>IP series product
need stable and powerful WiFi router in order to perform well in WiFi environment for
multiple user to use at the same time. SELFSAT>IP series is recommended to be used with
802.11ac or above grade WiFi router to have good user experience.
If you use lower version than 802.11ac router, SELFSAT>IP series might not perform the
optimum operation.
After customer obtains a 802.11ac router, we also recommend customer to try the two
dierent 2.4G and 5G signal (SSID) from the router and see which SSID provide smoother
connection and stays with the better one. Then under this conguration, the user can
enjoy the best performance of SELFSAT>IP series through WiFi.
3) Satellite Searching and Fixing the Antenna
Once all connected, turn on the TV and the Satellite receiver.
Select the Antenna Pointing Menu on your set top box.
You can check signal level on your TV.
Ensure that to choose “LNB : ON”
You will need someone to stay in front of the TV to tell you when the signal is “good” while you’re
outside trying to adjust the antenna the best way possible.
The signal level and quality is indicated on the TV screen and will uctuate and change color according
to the adjustment & movement of the antenna while you are pointing & nding (azimuth, elevation
angle).
The level indicates the power of the signal and the color is the signal reception quality from the chosen
satellite.
Antenna Pointing Menu
Satellite : ASTRA 1
Transponder : 23
LNB : ON
Frequency : 12640
Signal: 0
10

4) SELFSAT>IP series (SAT>IP) Client Devices
The SELFSAT>IP series client is either a software App or a STB-type device that used to receive the SELFSAT>IP
series IP stream.
For tablets or smart phones, the SAT>IP App can be found at the Apple APP Store or Google Play.
For TV’s that may come with the SAT>IP client software embedded in the TV or they may require a separate
hardware client (SAT>IP STB, SAT>IP Dongle) which is connected to the TV.
You can use the LAN port of current router and wired type SAT>IP client (such as SES SAT>IP certied IP-STB)
to use SELFSAT>IP series in the LAN environment rst. Because physical wired LAN environment can provide
stable and dedicated connection/bandwidth so in wired LAN environment, customer can easily enjoy the
SAT>IP technology provided by SELFSAT>IP series antenna.
SELFSAT>IP series Usage Example
WLAN router
LAN
WAN Power
Smart Device
Power
ENG
SELFSAT>IP series & PoE Injector
Laptop
SAT>IP TV
Main LAN (Home network)
SAT>IP Client
TV
a. How to download/use the App for iOS/Android Smart Phones and Tablets?
Download the SAT>IP App such as “Elgato SAT>IP” from Apple App Store or Google Play.
1.
- SAT>IP App allows you to receive unscrambled programs.
Install the App on your iOS or Android device.
2.
Start the App.
3.
b. How to use the PC Viewer
With Microsoft Windows® operating system:
Using the program “DVBViewer”, you can nd a free version at www.satip.info
Within the options menu you can choose your SAT>IP server and change the settings.
Note
Please refer to the attached Quick Guide for detailed information.
If you need the newest information regarding SAT>IP applications and PC programs, go to:
www.satip.info.
11

Troubleshooting Check List for Initial Installation
If the signal is not found, be sure the receiver user manual and the antenna user
manual have been followed closely, check the following:
Make sure all cable connections are correct and each connection is seated / tightened properly.
•
Inspect the inside of each cable connector for dirt or possible connector to case/shield short.
•
Verify the Azimuth, Elevation and Tilt angles for your location by ZIP code.
•
Make sure the Tilt and Elevation pointers are aligned correctly to the scales. Do not use washer or bolt as
•
reference.
Make sure the Tilt adjustment is not changed from the recommended setting for the antenna location.
•
Remove exiting TV-specic components, such as TV splitter, etc; reduce the installation to the basic
•
connections called out in this guide. Such components may not work with the satellite signal and they
may be in the wall where you can’t see them. When in doubt, run RG 6 cable directly to your receiver.
Make sure there are no obstructions (trees, buildings, windows, corner or overhang of your roof, your
•
body or hands) – the signal does not leaves, branches, glass, etc.
RG 6 cable with solid copper center conductor is highly recommended because it has much lower DC
•
voltage drop compared to RG 6 cable with a copper-coated, steel center conductor.
Standard RG 59 cable causes too much DC drop and signal drop; it can not be used to pass the satellite
•
signal. RG 6 coaxial cable must be used.
Some after-market, o-the-shelf add-on components may not be as advertised. They might not work or
•
could cause additional DC drops and signal amplitude attenuation. Remove such components, go back
to the basic connections called out in this manual and re-verify.
Make sure the satellite cable is connected to the “Sat In” jack, not the “Antenna In” jack. The “Antenna In”
•
jack at the back of the receiver is for o-air antenna input or cable TV input.
If all are done correctly but the signal is still not found, change the Elevation adjustment of the antenna
•
slightly (±2°C, the ±4°C from the called-for setting) and repeat the procedure.
Make sure the Access Card from your receiver is fully inserted into the Access Card slot and oriented
•
correctly.
Signal Loss / Rain Fade
•
The satellite signal may lost temporarily due to unusually heavy
rainfall. An optimally aligned antenna, along with the shortest
possible cable run, minimizes the chances of “rain fade.”
Make sure the antenna is mounted securely to prevent it from
•
being blown out of alignment in a heavy wind.
Heavy snow accumulation on the antenna may reduce the
•
satellite signal strength; snow should be swept away as soon as
possible.
Tree foliage growth into antenna’s line-of-sight to the satellite
•
may result in gradual loss of picture.
Installation Using Long Cable
•
For installations where the RG 6 cable runs from the receiver(s) to the LNB far exceeds 100 feet
(150 feet or more), as encountered in a commercial or multi-dwelling building, you need to use
an AC power booster module to bias the LNB.
•
You will also need an additional RF signal amplier to compensate the signal amplitude loss.
Otherwise, your antenna and receiver may not work properly and be subject to frequent
outages in adverse weather. Contact a professional concerning such installations.
12

Inhalt
Um was handelt es sich bei der SELFSAT>IP series Serie Flachantenne?
Sicherheitsanweisungen
Lieferumfang
...........................................................................................
Wie wird sie montiert?
Schritt 1: Wo wird sie montiert?
|
Schritt 2: Daten überprüfen
|
Schritt 3: Wahl der Installati
|
|
1) Tischstand-Typ (auf einer waagrechten Ebene)
2) Wandmontage-Typ
3) Fenster-Typ
............................................................................................
4) Balkonklammer-Typ
Schritt 4: SELFSAT>IP series Installations- und So verwenden
1) Verbinden Sie die SELFSAT>IP series Antenne mit Ihrer herkömmlichen DVB-S/S2 STB
a. Wie ist das Kabel vorzubereiten?
b. Wie wird das Kabel mit der Antenne und der Set-Top-Box verbunden?
2) Verbinden Sie die SELFSAT>IP series Antenne mit Ihrem Heimnetzwerk
a. Wie wird das Ethernet-Kabel mit Antenne verbunden?
b. Wie wird die Antenne mit dem PoE-Injektor und dem WLAN-Router verbunden?
3) Satelliten-Suche und der Befestigung des Antennen
4)SELFSAT>IP series (SAT>IP) Klientengeräte
a. Wie wird die App für iOS/Android Smartphones und Tablets heruntergeladen und benutzt?
b. Wie wird der PC-Viewer benutzt?
........................................................................
.............................................................................
.............................................................................
..................................................................................
..................................................................................
.....................................................
...................................................................................
..................................................................................
..............................................
..................................................................
.........................
.................. ............
..........................................
...............................................
...........................................................
.................................................................
.............
...............
.............
.
2
DEU
3
4
5
5
5
6
6
6
7
7
8
8
8
8
9
9
9
10
11
11
11
Störungsbehebungs-Prüiste für die Erstmontage
Signal Verlust / Regen-Verblassung
.......................................................
..............................
12
12

Was ist die SELFSAT>IP series Serie Flachantenne?
Die SELFSAT>IP series ist eine Flachantenne, entwickelt mit patentierter und modernster
Technologie, die Satellitensignale empfangen und diese an LNB und STB weiterleiten kann.
Die SELFSAT>IP series Antenne besitzt die Fähigkeit Echtzeit-Satellitensignale im herköm-
mlichen DVB-S/DVB-S2 STB Format zu empfangen, und gleichzeitig kann die SELFSAT>IP
series Antenne die Live-FTA (Free to Air) Satellitensignale in IP-Streams für bis zu 8 Nutzer
umwandeln. Damit können die Satellitenprogramme auf jedem Computer und Smart
Device im lokalen Netzwerk angezeigt werden. Die SELFSAT>IP series Flachantenne wird
dem Heimnetzwerk mittels eines Cat5e oder höherwertigem Kabels verbunden.
TV 1
Über WLAN / LAN
1
Smart phone
5
Über WLAN
2
TV 2
Laptop
2
6
PC Über LAN
3
Tablet PC
7
Über WLAN
4
TV 3
8
Über WLAN / LAN
Über WLAN / LAN
Über WLAN
Tablet PC
Über WLAN
Hinweis
Obwohl nicht auf dem Bild unten dargestellt, ist mindesten ein PoE-Injektor notwendig
um das SELFSAT>IP series zu betreiben. Bitte befolgen Sie der Montageanleitung in
diesem Handbuch.

Sicherheitsanweisungen
•
Bitte lesen Sie vor der Verwendung dieses Produkts diese Bedienungsanleitung sorgfältig durch und
befolgen Sie genau alle Montage-, Befestigungs- und Ausrichtungsanweisungen.
•
Alle Anweisungen sollten befolgt werden, um technische Probleme zu vermeiden.
•
Elektrische oder magnetische Felder nahe des SELFSAT>IP series können zu schlechtem Empfang
führen oder sogar den Empfang des Signals ganz verhindern.
•
Machen Sie keine Löcher in die Kunststoabdeckung der Antenne, da diese die Antenne vor Feuchtigkeit schützt.
•
Handhaben Sie die Antenne mit Vorsicht, da Stöße die Elektronik beschädigen können.
•
Önen Sie nicht die Abdeckung. Jeder Reparaturversuch durch nicht qualizierte Personen kann
gefährlich sein und die Garantieansprüche erlöschen lassen.
•
Hindernisse (Gebäude, Bäume, usw.) können den Empfang des Satellitensignals blockieren.
•
Lackieren Sie nicht die Antennenabdeckung oder bringen daran irgendwelche Materialien an, da dies
den Empfang des Satellitensignals blockiert.
•
Das Kabel zwischen der Antenne und dem Satellitenempfänger sollte 30m nicht überschreiten, da
sonst die Qualität des Signals abnehmen wird.
•
Der Gebrauch von nicht-isolierten Steckern führt zu einem Verlust der Signalstärke.
•
Vergessen Sie nicht, die Antenne und die Halterung an die Kreuzpolarität anzupassen.
DEU
•
Ziehen Sie alle Schrauben der Antenne fest, nachdem Sie die Einstellungen abgeschlossen haben.
•
Dieses Produkt enthält ein Universal-LNB mit zwei Schnittstellen. Jegliche Anbauten, Änderungen
oder Modikationen daran sind verboten.
•
Für genauere Einzelheiten zu den oben genannten Punkten oder für weitere Informationen wenden
Sie sich bitte an Ihren Händler oder den Kundendienst.
Warnung
Nicht korrekt oder an eine unpassende Struktur angebrachte Antennen sind leicht durch den Wind
zu beschädigen. Diese Schaden können sehr ernsthafter Natur und sogar lebensgefährlich sein. Der
Eigentümer und Antennen-Installateur übernimmt die volle Verantwortung dafür, dass die Installation strukturell in Ordnung ist, damit sie sämtliche Lasten tragen kann (Gewicht, Wind und Eis) und
gegen lecke Stellen vorschriftsmäßig abgedichtet ist. Der Hersteller übernimmt aufgrund der vielen
unbekannt variierenden Anwendungen keine Haftung für Schaden, die durch ein Satellitensystem
verursacht worden sind.
3

Lieferumfang
A1
B1
B2
B3
B4
B5 B6
C4C3C2C1
C5 E1
S1 S3S2 S4 S5 N1S6
Antenne
A1
Winkelhalterung
B1
Hauptstütze
B2
Fensterhalterung A
B3
Fensterhalterung B
B4
Fixierungshalterung A
B5
Fixierungshalterung B
B6
Kabeldurchführung
C1
(auf der Rückseite der Antenne)
PoE-Injektor
C2
Wasserdichte Kappe für RF-Stecker (×2)
C3
(auf der Rückseite der Antenne)
Schraubenschlüssel
C4
Kompass
C5
Gummi (×4)
E1
Schraube M4X10 SEMS2 (×4)
S1
Schraube M6x18 SEMS2 (×3)
S2
Schraube M6X50 SEMS2
S3
Halbrund-Vierkant-Halsschraube M6x30
S4
Halbrund-Vierkant-Halsschraube M6x50 (×3)
S5
U-Bolzen M6x85 (×2)
S6
Geanschte Mutter M6 (×7)
N1
4

Wie wird sie montiert?
Sie können die SELFSAT>IP series ganz einfach montieren, wenn Sie diese
Anleitung Schritt für Schritt befolgen.
Bevor Sie Ihre Antenne montieren, sollten Sie überprüfen, ob die SELFSAT>IP series Verpackung alle
Bauteile enthält, die oben unter "Lieferumfang" aufgeführt sind. Falls Teile fehlen sollten, kontaktiert Sie
bitte Ihren Händler.
Schritt 1: Wo wird sie montiert?
Um ein Satellitensignal zu empfangen, muss das SELFSAT>IP series im Freien (außerhalb des Hauses
oder der Wohnung), in Richtung des Satelliten zum Äquator hin, montiert werden. Dafür benötigen Sie
einen Kompass um die SELFSAT>IP series genau nach dem Satelliten auszurichten.
Anmerkung
Als Bezug nehmen Sie bitte die Tabelle der Azimut-Winkel, die auf den letzten Seiten dieser Bedienungsanleitung aufgeführt sind.
DEU
< Kompass>
N 0˚
S 180˚
Satellitenposition
Azimutwinkel
Anmerkung
Um ein genaues Ablesen des Kompass zu garantieren, sollten Sie von großen Metallobjekten,
insbesondere elektrischen Leitungen, fernbleiben und den Kompass mehrmals ablesen.
Stellen Sie sicher, dass sich keine Hindernisse, wie Gebäude oder Bäume, vor der SELFSAT>IP series
benden, da dies die Qualität des Signalempfangs verringern kann. (Denken Sie daran, dass Bäume
wachsen und das Signal blockieren können).
Um die Antenne einfach befestigen und reparieren zu können, sollten Sie einen leicht zugänglichen Ort,
ohne irgendwelche Gefahren für die Montage, auswählen.
Überlegen Sie sich einen Weg, um Ihr Kabel auf diskrete Weise vom SELFSAT>IP series zu Ihrer Set-TopBox zu führen. Die Antenne sollte sich nicht zu weit entfernt von Ihrem Satellitenempfänger benden;
Mehr als 30 Meter Kabellänge können die Qualität des Signals vermindern.
Signal wird schlecht empfangen
Signal wird gut empfangen
5

Schritt 2: Daten überprüfen
Um die Antenne zu montieren, müssen Sie die richtige Schrägstellung (Sky), Höhe (Elevation) und den
Azimutwinkel mit Hilfe der Tabelle auf der Rückseite des Handbuchs ermitteln. Wenn Sie Ihren Ort nicht
nden können, nehmen Sie bitte die Informationen des nächstgelegenen Ortes. Dieses Handbuch wird Ihnen
die Montage am Beispiel des Empfangs des ASTRA1 Satelliten in der Region von Brest in Frankreich zeigen.
Der Winkelinformation für die Region Brest: Schrägstellung -19.7, Höhe 30, Azimut: 149,6
Schritt 3: Wahl der Installation
Abhängig von der Lage der Installation der SELFSAT>IP series, können Sie sich jetzt für einen Montagetypen entscheiden, alle Einzelteile sind beigelegt.
A) Tischstand-Typ (auf einer waagrechten Ebene)
S2
B1
A1
N1
B1
B5
S2
S1
N1
S4
12
S5
S2
3
2) Wandmontage-Typ
S2
B1
A1
N1
2
S2
B2
S3
12
S5
S2
3
B2
N1
B6
S5
4
6

3) Fenster-Typ
S2
B6
B1
A1
N1
2
S2
B2
S3
4
12
S5
S2
B3
N1
S4N1
B4
S1
S5
3
B2
4) Balkonklammer-Typ
S2
B1
A1
2
S2
B2
S3
12
S5
S2
DEU
S6
B6
N1
S6
B5
N1
4
N1
B2
S5
B5
3
5
7

Schritt 4: SELFSAT>IP series Installations- und So verwenden
Die SELFSAT>IP series Antenne stellt zwei Schnittstellen zur Verfügung: Der Benutzer kann je nach
Bedarf zwischen RF-Anschluss und RJ45-LAN-Anschluss auswählen.
LEGACY
12
Anmerkung
Der SELFSAT>IP series Antenne liegen Schutzkappen für die Schnittstellen bei. Bitte
setzen Sie die Schutzkappen auf die Anschlüsse, wenn Sie die Schnittstellen nicht benutzen, um das Eindringen von Wasser zu verhindern. Heben Sie die Schutzkappe auf, wenn
Sie die Schnittstelle verwenden und verlieren Sie sie nicht.
1) Verbinden Sie die SELFSAT>IP series Antenne mit Ihrer herkömmlichen DVB-S/S2 STB
Nachdem Sie die Antenne im Freien montiert haben oder sie so befestigt haben, wie Sie es wünschen, wird
im nächsten Schritt alles miteinander verbunden.
Um Ihre Lieblingssatellitenprogramme ansehen zu können, müssen Sie Ihre Satellitenantenne mit einem
Empfänger durch ein Kabel verbinden. Das Kabel zwischen der Antenne und dem Satellitenempfänger sollte
30m nicht überschreiten, da sonst die Qualität des Signals abnehmen wird. Die Verwendung eines Kabel, das
sehr lang oder von schlechter Qualität ist bzw. nicht isolierte Anschlüsse besitzt, kann eine Verminderung der
Signalstärke verursachen, daher sollte Vorzugsweise ein RG6 Koaxialkabel (HF 17VATC oder 19VATC Kabel)
benutzt werden, um Signalverluste zu minimieren.
Verbinden Sie einfach das koaxiale RF-Kabel vom Anschluss 1 oder Anschluss 2 der SELFSAT>IP series
Antenne mit Ihrem DVB-S/S2 STB.
a. Wie ist das Kabel vorzubereiten? b. Wie wird das Kabel mit der Antenne und
der Set-Top-Box verbunden?
8
Anschlussabdeckung
15mm
8mm
F-Stecker
3mm
LEGACY
12
Set-top box
Fernseher

2) Verbinden Sie die SELFSAT>IP series Antenne mit Ihrem Heimnetzwerk
Die SELFSAT>IP series Antenne wird mit Ihrem Heimnetzwerk über ein normales Ethernetkabel [Cat5e oder
besser] verbunden, weil das SELFSAT>IP series die SAT>IP Technologie verwendet, um das Satellitensignal in
einen IP-Stream umzuwandeln.
Ein PoE (Power over Ethernet) Injektor ist notwendig, um das SELFSAT>IP series mit Strom zu versorgen. Bitte
folgen Sie dem Diagramm unten, um das LAN-Kabel von der SELFSAT>IP series Antenne mit dem PoE-Injektor
und vom Injektor mit Ihrem Heimrouter zu verbinden.
a. Wie wird das Ethernet-Kabel mit der Antenne verbunden?
Nachdem Sie die Kabelverschlüsse
1
entfernt haben, stöpseln Sie das
Ethernet-Kabel wie auf dem Bild zu
sehen ein
DEU
2
Verbinden Sie die Antenne und das
Kabel
Ziehen Sie die Kabeldurchführung
3
fest, um das Eindringen von Wasser
zu verhindern
b. Wie wird die Antenne mit dem PoE-Injektor und dem WLAN-Router verbunden?
IP LNB
LEGACY
12
WLAN-Router
LAN WAN Power
PoE-Injektor
To
ANTENNAToROUTER
Stromquelle
Haupt LAN (Heimnetzwerk)
Warnung
Bitte vergewissern Sie sich, dass Sie es mit dem richtigen Anschluss verbunden haben. Eine falsche
Verbindung des PoE kann zu Schäden an Ihrem Router oder Netzschalter führen.
Hinweis
Bitte verwenden Sie den LAN-Anschluss nur zur Verbindung mit dem SELFSAT>IP series.
Der WAN-Anschluss wird zur Verbindung mit dem Internet benutzt.
9

Hinweis
SELFSAT>IP series-Antenne verfügt über eine eigene MAC-Adresse.
Die MAC-Adresse kann von der Rückseite des beiliegenden Bedienungsanleitung.
Hinweis
Einrichtung des Netzwerks:
Da die digitale Videoübertragung eine stabile und schnelle Netzwerkumgebung
(LAN/WLAN) benötigt, braucht die SAT>IP Technologie in Ihrem SELFSAT>IP series
Produkt einen stabilen und leistungsstarken WLAN-Router, um bei der Benutzung durch
mehrere simultane Nutzer im WLAN funktionieren zu können. Es wird empfohlen
SELFSAT>IP series mit einem Router mit 802.11ac oder besser zu verwenden, um eine
gute Leistung zu erzielen.
Wenn Sie etwas Schlechteres als einen 802.11ac Router verwenden, kann SELFSAT>IP
series nicht optimal betrieben werden.
Wir empfehlen Kunden mit 802.11ac Routern, die zwei Frequenzen 2.4GHz und 5GHz
(SSID) am Router auszuprobieren, um festzustellen, welche Frequenz eine bessere
Verbindung bietet und bei dieser zu bleiben. Mit dieser Konguration kann der Verbraucher dann die beste Leistung des SELFSAT>IP series über WLAN genießen.
3) Satelliten-Suche und der Befestigung des Antennen
Nachdem alles verbunden ist, schalten Sie den Fernseher und den Satellitenempfänger ein.
Wählen Sie das Menü für die Antennenausrichtung auf Ihrer Set-Top-Box aus.
Sie können die Signalstärke auf Ihrem Fernsehapparat überprüfen.
Stellen Sie sicher, das „LNB: EIN“ ausgewählt ist.
Sie werden jemanden vor dem Fernseher brauchen, um Ihnen mitzuteilen, wenn das Signal „gut“ ist,
während Sie draußen die Antenne bestmöglich ausrichten.
Die Signalstärke und Qualität sind auf dem Fernsehbildschirm dargestellt und werden schwanken
und die Farbe wechseln, je nach Einstellung & Bewegung der Antenne während Sie die Ausrichtung
vornehmen (Azimutwinkel, Höhenwinkel).
Die Balkenhöhe zeigt die Stärke des Signals an und die Farbe die Signalempfangsqualität des
gewählten Satelliten.
Menü für die Antennenausrichtung
Satellit : ASTRA 1
Transponder : 23
LNB : ON
Häugkeit : 12640
Signal: 0
10

4) SELFSAT>IP series (SAT>IP) Klientengeräte
Der SELFSAT>IP series Klient kann entweder mit einer Softwareanwendung oder einem STB-Gerät verwendet
werden, um den SELFSAT>IP series IP-Stream zu empfangen.
Die SAT>IP App für Tablets oder Smartphones kann im Apple Store oder auf Google Play gefunden werden.
Fernsehgeräte werden entweder mit der integrierten SAT>IP Software ausgeliefert oder benötigen separate
Hardware (STB, Set-Top-Box), die mit dem Fernseher verbunden wird.
Sie können anfangs den LAN-Anschluss Ihres derzeitigen Routers und des verbunden SAT>IP Klienten (z.B. ein
SES SAT>IP zertizierter IP-STB) verwenden, um das SELFSAT>IP series im LAN-Netzwerk zu nutzen. Da ein
physisch verkabeltes LAN-Netzwerk für eine stabile und dedizierte Verbindung/Bandbreite im LAN-Netzwerk
sorgt, kann der Kunde die SAT>IP Technologie der SELFSAT>IP series Antenne ganz einfach verwenden.
SELFSAT>IP series Verwendungsbeispiel
WLAN-Router
LAN
WAN Power
Smart Device
Stromquelle
Haupt LAN (Heimnetzwerk)SELFSAT>IP series & PoE-Injektor
DEU
Laptop
SAT>IP
Fernseher
SAT>IP
Klientengeräte
Fernseher
a. Wie wird die App für iOS/Android Smartphones und Tablets heruntergeladen und benutzt?
Laden Sie die SAT>IP App (z.B. „Elgato SAT>IP“) aus dem Apple Store oder von Google Play herunter.
1.
- Die SAT>IP App erlaubt Ihnen unverschlüsselte Programme zu empfangen.
Installieren Sie die App auf Ihrem iOS- oder Android-Gerät.
2.
Starten Sie die App.
3.
b. Wie wird der PC-Viewer benutzt?
Mit dem Microsoft Windows® Betriebssystem:
Sie können eine kostenlose Version des Programms „DVBViewer“ (www.satip.info) verwenden.
In dem Optionsmenü können Sie Ihren SAT>IP Server auswählen und die Einstellungen ändern.
Hinweis
Bitte ziehen Sie die Kurzanleitung zu Rate für detaillierte Informationen.
Wenn Sie die neusten Informationen zu SAT>IP Anwendungen und PC-Programmen benötigen,
gehen Sie auf: www.satip.info.
11

Störungsbehebungs-Prüiste für die Erstmontage
Wenn das Signal nicht gefunden wird, dann stellen Sie sicher, dass die Anweisungen in der Empfänger-Bedienungsanleitung
und der Antennen-Bedienungsanleitung genau befolgt worden sind, dazu prüfen Sie bitte Folgendes:
Stellen Sie sicher, dass alle Kabelverbindungen korrekt sind und jede Verbindung sitzt / richtig angezogen ist.
•
Überprüfen Sie das Innere der einzelnen Steckverbinder auf Schmutz oder mögliche Kurzschlüsse des Gehäuses
•
oder der Abschirmung.
Verizieren Sie, dass Azimut-, Höhen- und Neigungswinkel zu Ihrer Postleitzahl passen.
•
Vergewissern Sie sich, dass die Neigungs- und Erhebungsanzeiger richtig zu den Skalen ausgerichtet sind.
•
Benutzen Sie nicht die Unterlegscheiben oder Schrauben als Referenz.
Vergewissern Sie sich, dass die Neigungseinstellung nicht von der empfohlenen Einstellung für den Ort der
•
Antenne abweicht.
Entfernen Sie Fernsehgerät-spezische Teile, wie zum Beispiel TV-Splitter, usw.; verringern Sie den Aufbau auf die
•
grundlegendsten Verbindungen, wie in dieser Anleitung beschrieben. Solche Komponenten können möglicherweise nicht zusammen mit dem Satellitensignal betrieben werden und könnten sich in einer Wand benden, wo
sie nicht zu sehen sind. Wenn Sie Zweifel haben, legen Sie ein RG-6 Kabel direkt zu Ihrem Empfänger.
Stellen Sie sicher, dass keine Hindernisse das Signal blockieren (Bäume, Gebäude, Fenster, Ecken oder Dachüber-
•
hange, Ihr Körper oder Ihre Hände) – das Signal kann Blätter, Äste, Glas usw. nicht durchdringen.
Ein RG-6 Kabel mit Kupferkernleiter wird sehr empfohlen, da es einen viel geringeren Spannungsabfall als ein RG-6
•
Kabel mit kupferbeschichteten, Stahlkernleiter hat.
Ein normales RG-59 Kabel verursacht einen zu großen Spannungs- und Signalabfall; es kann nicht zur Weiterlei-
•
tung des Satellitensignals verwendet werden. RG-6 Koaxialkabel müssen benutzt werden.
Einige Zusatzkomponenten aus dem Zubehörmarkt können sich anders als beworben verhalten. Entweder
•
funktionieren sie nicht oder verursachen einen zusätzlichen Spannungsabfall und Signalabschwächung.
Entfernen Sie solche Komponenten, gehen Sie zurück zu den grundlegendsten Verbindungen, wie in dieser
Anleitung beschrieben.
Vergewissern Sie sich, dass das Satellitenkabel mit dem „Sat In“ Anschluss verbunden ist und nicht mit dem
•
„Antenna In" Anschluss. Der „Antenna In" Anschluss auf der Rückseite des Receivers dient dem Anschluss einer
"O-Air"-Antenne oder dem Kabelfernsehen.
Falls dies alles korrekt erfolgt ist, aber immer noch kein Signal empfangen wird, verändern Sie den Erhöhungswin-
•
kel der Antenne leicht (±2°, dann ±4° ausgehend von den geforderten Einstellungen) und wiederholen Sie den
Vorgang.
Stellen Sie sicher, dass die Access-Karte Ihres Receivers komplett im Access-Karten-Schacht eingeführt ist und die
•
Ausrichtung stimmt.
Signal Verlust / Regen-Verblassung
Das Satellitensignal kann aufgrund eines ungewöhnlich starken
•
Regenfalls vorübergehend unterbrochen werden. Eine optimal
abgestimmte Antenne zusammen mit einem kurzen Kabel
minimiert die Wahrscheinlichkeit von Regen-Verblassung.
Stellen Sie sicher, dass die Antenne ordnungsgemäß montiert
•
ist, um Abweichungen durch stärken Wind zu verhindern.
Schneemassen auf der Antenne können die Satellitensignal-
•
stärke verringern; Schnee sollte so bald wie möglich entfernt
werden.
Blattwerk, das in die Sichtlinie des Satelliten wächst, kann zu
•
allmählichem Bildverlust führen.
Montage mit einem langen Kabel
•
Für Aufbauten, bei denen das RG-6 Kabel von Empfänger(n) zum LNB mehr als 30 Meter (45 Meter
und mehr) lang ist, wie in einem Gewerbebetrieb oder einem Mehrfamilienhaus, müssen Sie ein
AC-Power-Booster-Modul benutzen.
•
Zusätzlich benötigen Sie auch einen zusätzlichen RF-Signalverstärker, um den Signalpegelverlust
zu kompensieren.
Ansonsten wird Ihre Antenne und Ihr Empfänger nicht korrekt arbeiten und kann bei ungünstigem
Wetter häug ausfallen. Kontaktieren Sie einen Fachmann bei solchen Montagen.
12
 Loading...