


Automatic Flat Satellite Camping Antenna
I DO IT Co., Ltd.
#637, Smart-Hub Industry-University Convergence Center, 237 Sangidaehak-ro, Siheung-si, Gyeonggi-do, Korea
TEL : +82 31 8041 1500 FAX : +82 31 8041 1550 E-MAIL : sales@selfsat.com
I DO IT France
10 Rue du Platine – Parc d’Activité Zone 3 77176 Savigny-le-Temple – FRANCE
TEL : +33 1 75 18 15 16 FAX : +33 9 57 32 37 20 E-mail : sales@selfsat.com
ENGLISH : User’s manual
DEUTSCH : Bedienungsanleitung
FRANÇAIS : Manuel utilisateur
WFS
www.selfsat.com

Contents
1. General Information
1-1. Proper use and operation
1-2. Package
2. Operating Instruction
2-1. Connection Diagram
2-2. How to Use
2-3. How to Use APP
................................................................................................
...................................................................................
.............................................................................................
.........................................................................................
..............................................................................
2
3
4
5
6
3. Skew adjustment
4. Troubleshooting
................................................................................
..................................................................................
5. Specifications
5-1. Dimension
5-2. Specifications
..............................................................................................
...........................................................................................
6. Caravan/Motorhome Installation
6-1. Required space for installation
6-2. Equipment for installation
6-3. Instruction for installation
.........................................................................
..............................................................................
..............................................................................
8
10
11
12
13
14
15

1. General Information
1-1. Proper use and operation
These instructions describe the functions and operation of CARAVAN PLUS, auto search
satellite system.
Please read the user manual carefully before starting the installation.
Correct and safe operation of the system can only be ensured by following instructions.
•
The unit is programmed to automatically move in a direction that can to receive preset
satellite TV signal. For general operation, ensure that the system is in a position with a
clear view of the sky. If the satellite‘s signal is interrupted by obstacles such as mountains, buildings or trees, no TV signal will be received.
•
Installation must be performed by sufficiently qualified personnel.
•
The manufacturer does not take liability for direct or indirect consequential damage of
the system, motor vehicles or other equipment by reason of unsuitable battery usage
or erroneous installation or wrong wire connection.
•
As the user of this equipment, you are responsible for yourself ensuring compliance
with the relevant laws and regulations of the automotive industry must be observed
and complied with.
•
The power is supplied by a standard vehicle electrical system with a rated voltage of
12VDC. For portable use, optional power adaptor produced by manufacturer must be
used.
•
This product has been designed for fixed installation on vehicles with maximum speeds
of 130 km/h.
•
Use of the equipment for purposes other than its intended use is not permitted. The use
of any other parabolic reflectors or LNBs to those originally installed is not allowed.
•
The product does not require any regular maintenance; all service must be carried out
at approved service centers.
•
For more information on general use of this unit consult local dealer for assistance.
SAFETY NOTE
Failure to follow the user manual may cause damage to the unit or user's vehicle,
and responsible may be liable for further damage to the equipment.
•
The PI BOX must not be exposed to dripping, splashing or other liquids.
•
Do not allow children to play with plastic bags or other packaging materials.
There is a risk of suffocation.
•
The outdoor unit should only be installed on hard surfaces.
•
There is a risk of damage when using the antenna in a storm or strong wind.
•
The driver of the vehicle must visually verify that the antenna is fully folded by
inspecting the antenna unit before driving off.
•
Avoid cleaning user's vehicle with the mounted satellite system in a
drive-through car wash or a car wash with a high-pressure cleaner.
ENGLISH - 2

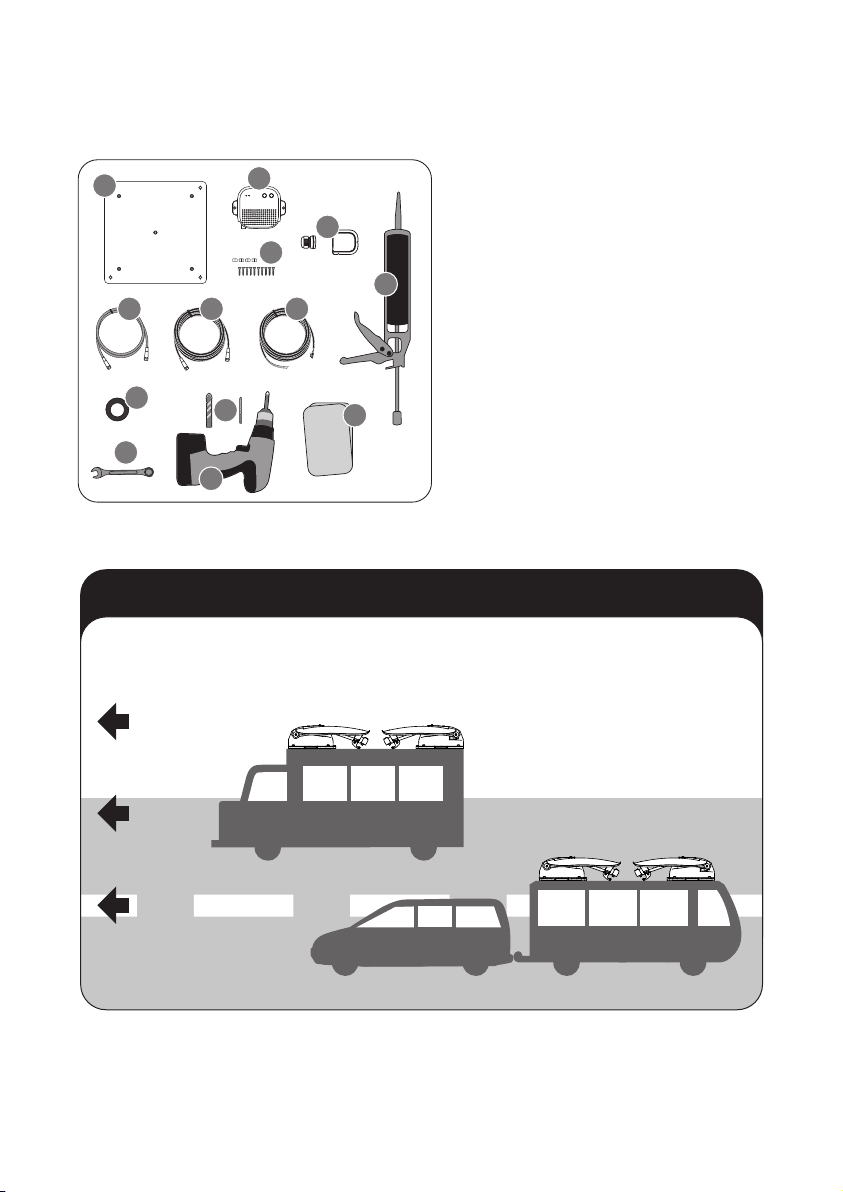
1-2. Package
1
Main Unit
Mounting plate
PI Box
M4x20 screw (10)
M8 locking nut (4)
WARNING
3
4
7
9
8
5
2
6
Cable holder/gland
PI cable
Signal cable (x2 for twin output)
Power input cable
User Manual
Open the box and remove the
packaging material. When taking
the main unit from the box, hold
it by the body, not the reflector,
and lift it straight up.
Check the correct operating
voltage of the power supply
before commissioning. Please
uses the device included in the
package or use the manufacturer's authorized power supply.
10
ENGLISH - 3

2. Operating Instruction
2-1. Connection Diagram
Main Unit
Signal Cable (12m)
PI Box
PI Cable (1.5m)
STB
TV
Power input cable
12V DC adapter
(over 40W)
Battery
or
ENGLISH - 4
Signal Cable (12m)
2nd STB
TV
※ For twin output model

2-2. How to Use
HOME LED
POWER LED
HOME button
POWER button
Fixed hole
to unit
If the antenna does not find a satellite for 10 minutes, the antenna returns to its HOME position.
d.
Want to search for satellites again, reboot the PI BOX.
e.
2. Power off
Press POWER button
a.
Press and hold the power button of the PI BOX for more than 2 seconds, the power is turned off
regardless of the state of the antenna.
1. Search satellites
When powered on by pressing the PI BOX's
power button, after about 10 seconds, the
antenna starts searching for pre-programmed
or most recently received satellite.
※
Power
to STB
The pre-programmed satellite is ASTRA1,
which can be changed to the desired
satellite via the APP
When the antenna is in the HOME position, it
a.
starts searching for satellite.
When the antenna is pointing towards the
b.
satellite, it will not move.
When the antenna is in a different position
c.
than in the case of a and b above, it first
moves to the HOME position and then starts
searching for satellite.
Press HOME button
b.
When the home button of PI BOX is pressed the antenna moves to the HOME position and the power
is automatically turned off after about 60 seconds (the POWER LED and the HOME LED will blink
alternately for 60 seconds)
Ignition Occurrred
c.
When ignition occurs in the vehicle, the antenna automatically moves to the HOME position and
power off after 60 seconds. (If the PI BOX is turned off at this time, it will automatically turn on and
then perform the operation.)
WARNING
If the PI BOX is powered off and the vehicle is moved while the antenna is not in the
HOME position, the antenna may be damaged.
Before moving the vehicle, first check the condition of the antenna, and turn off
after is fully folded to the HOME position.
ENGLISH - 5

2-3. How to Use APP
Download the app from the App Store (Android/iOS)
A.
Search for SELFSAT on the App Store and download "SAT
CONNECT" app
Before using this app, need to activate BT and GPS
※
function on your smart device.
Pairing the antenna with App
B.
Check the MAC Address at your antenna unit (on the
step 1.
antenna or PI box / User manual)
When you run the downloaded application, a connect-
step 2.
able antenna unit is automatically detected
Select the one that matches your antenna MAC Address
step 3.
(The MAC address of CARAVAN PLUS is GS-xx:xx:xx )
Click the 'connect' button to complete BT connection
step 4.
between your antenna unit and smart device
ENGLISH - 6

Basic Features
C.
Setting button
Firmware version, language setting can be checked
Status display window
Indicates the current status of the antenna
Satellite selection window
Select a satellite to search. The pre-programmed satellite is ASTRA1,
which can be changed to the desired satellite via the APP
Used to move the antenna to the HOME position
The orange lamp blinks while moving to the HOME, and the green
lamp turns on after it has completely moved to the HOME position
Used to searching satellites
Select the desired satellite and press the button, the antenna will
search for it. While searching for a satellite, the orange lamp flashes,
and when a satellite is found, the green lamp lights up
F/W Update
Used to update the firmware of the antenna
ENGLISH - 7

3. Skew adjustment
All LNBs require their rotational angle
(skew) to be set within certain limits in
order to the best signal quality received.
The actual "skew angle" depends on the
satellite and your location. Refer to the
satellites you want to receive and your
location in the image below and adjust
the skew accordingly.
Accuracy is not critical, so small tolerances are acceptable. Turning the LNB
little by little to find the position that
maximizes the signal quality of the
satellites on your TV screen, and then fix
the LNB.
Turksat @ 42.0°E Astra2 @ 28.2°E
-10 -5
-15
-20
-25
-30
-35
-40
-45
-50
-5
-10
-15
-20
-25
-30
-35
0
-90+90
0
5
10
15
20
-10
-15
-20
-25
-30
Astra3 @ 23.5°E Astra1 @ 19.2°E
0
-5
10 105 5
0
-5
15
-10
20
-15
-20
25
-25
-30
15
20
25
30
35
ENGLISH - 8

HotBird @ 13.0°E Eutelsat 9 @ 9.0°E
-5 0 0
-10
-15
-20
-25
-30
5
-5
10
-10
15
-15
20
25
30
-20
35
Astra4 @ 4.9°E Thor @ 0.8°W
5 0
0
10
15
20
-5
25
5
10
15
20
25
30
35
5
10
15
20
-10
-15
-5
30
35
-10
40
45
-15
25
30
35
40
Eutelsat 5W @ 5.0°W Hispasat @ 30.0°W
0
-5
5
10
15
20
25
30
35
40
45
5
10
15
20
25
30
35
40
45
50
55
ENGLISH - 9

4. Troubleshooting
There are a number of common issues that can affect the signal reception quality or
the operation of the unit. The following sections address these issues and potential
solutions.
A. No function when power on the antenna
i.
Check again all the cable connections have been made correctly.
-
Connection between the power and the PI box.
-
Connection between the PI box and antenna.
Check if the power input cable has been damaged.
ii.
Check that the POWER input cable and the battery polarities(+/-) are connected correctly.
iii.
Check if the PI Box is powered on (Check Power LED of PI BOX is on)
iv.
B. Fail to search the satellite
Satellite signals can be blocked or degraded by buildings, trees.
i.
Make sure there are no obstructions in a southward direction.
Turn the PI BOX off and then back on again.
ii.
C. Mechanical problems
i.
If the antenna does not move into desired position.
-
Try to power OFF/ON again.
ii.
If the antenna makes a noise whilst remaining static.
-
Try to power OFF/ON again. If problem persists, please contact local dealer/shop for assistance.
D. Other issues
i.
If the system has been improperly wired, it will not operate properly.
Contact local dealer/shop for assistance of cable damage.
ENGLISH - 10

5. Specications
5-1. Dimension
Main Unit
573 mm
149 mm
MAX 540 mm
MIN 149 mm
PI box
102 mm
35 mm
280 mm
129 mm
105 mm
316 mm
508 mm
34 mm
28 mm
85mm
102 mm
ENGLISH - 11

5-2. Specications
Model
Input Frequency
Polarization
Antenna Gain
Dish Size (W x D)
Size (W x D x H)
Weight
Output
LNB
Input Voltage
Output Frequency
L.O. Frequency
CARAVAN PLUS
10.7 ~ 12.75 GHz
Vertical & Horizontal
35.0 dBi @ 12.7 GHz
573 mm x 450 mm (with edge)
573 x 508 x 149 mm
5.5 kg
1 or 2 (optional)
950 ~ 2,150 MHz
9.75 / 10.6 GHz
DC 12 V
Power Consumption
11 W (normal) / 30W (max)
3.6 W (stand-by)
ENGLISH - 12

6. Caravan/Motorhome Installation
6-1 . Required space for installation
Take care, that there is enough space for the fold CARAVAN PLUS, just as for the
operation range (cruising radius).
508 mm
450 mm
Driving direction
797 mm
930 mm
573 mm
248 mm
369 mm
465 mm
479 mm
365 mm
149 mm
369 mm
ENGLISH - 13

6-2. Equipment for installation
12
11
2
4
3
8
13
1
56 7
9
10
Installation of direction
1.
Mounting plate
2.
PI BOX
3.
M4× 20 screw (10), M8 locking nut (4)
4.
Cable gland / Cable holder
5.
PI cable
6.
Signal cable (x2 for twin output)
7.
Power input cable
8.
Silicone
9.
Masking tape
10.
Spanner
11.
2mm drill bit, 16mm drill bit
12.
Power drill
13.
Cleaner
Driving direction
O
X
ENGLISH - 14
O
X

6-3. Instruction for installation
1
FRONT
2
Locate a suitable location to place the mounting plate on the vehicle roof
3
Attach masking tape outside of the mounting
plate by 5mm away from the plate edges
5
Place the mounting plate on the silicone and
make 5 holes (2mm) with a power drill
7
Clean the surface where will place the
mounting plate with a cleaner
4
Put aside the mounting plate to apply silicone
within the attached tape line but leave 2cm
inward gap from the line
6
Apply silicone on the holes
8
Fix with five(5) of M4 x 20 screws on holes
made
Re-apply silicone to cover screwed bolts
ENGLISH - 15

9
10
Apply silicone around mounting plate edge
11
Remove masking tape and allow to dry
13
Parts required, spanner, four(4) nuts
15
Clean away the excess silicone
12
Prepare to place the antenna on to the four
upright bolts
14
Driv
i
ng Direction
After checking the driving direction, place the
antenna on the mounting plate
16
Fit the nuts on each of the 4 bolts on the
mounting plate
Tighten the four nuts with a spanner to secure
the antenna
ENGLISH - 16

17
approx. 30cm
Connect the signal cable to the antenna port, place the bottom of the cable holder in a position
that does not interfere with the operation of the antenna, and apply masking tape 5 mm from the
outside of the bottom of the cable holder
18 19
Drill a hole that the minium size for the cable
can pass through in the center of the tape
marking (16mm or less)
Pass the signal cable through the hole (two
cables for twin output)
20
approx. 30cm
Insert the signal cable, cable holder, and cable gland as shown in the picture above, and assemble
it into the cable gland.
2221
Place the assembled cable holder inside the
tape marking and drill three(3) of 2mm holes
Fix cable holder with three(3) of M4 x 20
screws on drill holes made
ENGLISH - 17

2423
Apply silicone around cable holder and on the
top of screws for waterproof
Connect cables to the ports of the antenna,
remove masking tape and tidy silicone before
dry
2625
Ignition
12V DC
Prepare the power input cable to connect the
battery and PI BOX
Match the power input cables polarities to the
battery polarities, red to red / black to black
and white cable to ignition port of vehicle
27
STB
approx.1.5m
Fix the PI BOX in an appropriate place using two(2) M4x20 screws, and connect the power cable
and PI cable
ENGLISH - 18


Inhaltsverzeichnis
1. Allgemeine Informationen
1-1. Bestimmungsgemäße Verwendung
1-2. Lieferumfang
2. Verpackungsinhalt
2-1. Anschlussplan
2-2. Bedienungsanweisungen
2-3. Wie benutzt man die App
..........................................................................................
.........................................................................................
.............................................................................
.............................................................................
....................................................................
2
3
4
5
6
3. Skeweinstellung
4. Fehlerbehebung
.................................................................................
...........................................................................
5. Technische Daten
5-1. Abmessungen
5-2. Technische Daten
.........................................................................................
......................................................................................
6. Wohnwagen / Wohnmobil Installationsanleitung
6-1. Platzbedarf für die Installation
6-2. Ausrüstung für die Installation
6-3. Installationsanleitung
........................................................................
........................................................................
................................................................................
8
10
11
12
13
14
15

1. Allgemeine Informationen
1-1. Bestimmungsgemäße Verwendung
Diese Anleitung beschreibt die Funktionen und die Bedienung von CARAVAN PLUS,
der automatischen Satellitensuchanlage.
Bitte lesen Sie die Bedienungsanleitung vor Beginn der Installation sorgfältig durch.
Nur wenn Sie die Anweisungen befolgen, kann ein korrekter und sicherer Betrieb der
Anlage gewährleistet werden.
•
Das Gerät ist so programmiert, dass es sich automatisch in eine Richtung bewegt, in der
es das voreingestellte Satelliten-TV-Signal empfangen kann. Achten Sie beim allgemeinen
Betrieb darauf, dass sich die Anlage an einem Ort mit freier Sicht zum Himmel befindet.
Wenn das Satellitensignal durch Hindernisse wie Berge, Gebäude oder Bäume unterbrochen wird, kann kein Fernsehsignal empfangen werden.
•
Die Installation muss von ausreichend qualifiziertem Personal durchgeführt werden.
•
Der Hersteller übernimmt keine Haftung für direkte oder indirekte Folgeschäden des
Systems, von Kraftfahrzeugen oder anderen Geräten aufgrund von ungeeigneter
Batterieverwendung oder fehlerhafter Installation oder falschem Kabelanschluss.
•
Als Benutzer dieses Geräts sind Sie selbst dafür verantwortlich, dass Sie die Einhaltung der
einschlägigen Gesetze und Vorschriften der Automobilindustrie beachten und eingehalten werden.
•
Die Stromversorgung erfolgt über ein Standard-Bordnetz mit einer Nennspannung Diese
12VDC. Für den portablen Einsatz muss ein optionales, vom Hersteller produziertes
Netzgerät verwendet werden.
•
Dieses Produkt ist für den festen Einbau in Fahrzeuge mit einer Höchstgeschwindigkeit
von 130 km/h ausgelegt.
•
Die Verwendung des Geräts für andere als die vorgesehenen Zwecke ist nicht zulässig.
•
Die Verwendung von anderen Parabolspiegeln oder LNBs als den ursprünglich installierten ist nicht zulässig.
•
Das Produkt erfordert keine regelmäßige Wartung, alle Wartungsarbeiten müssen in
zugelassenen Servicezentren durchgeführt werden.
•
Für weitere Informationen über die allgemeine Verwendung dieses Geräts wenden Sie
sich bitte an Ihren Händler vor Ort.
SICHERHEITSHINWEIS
Die Nichtbeachtung der Bedienungsanleitung kann zu Schäden am Gerät oder am
Fahrzeug des Benutzers führen und der Verantwortliche kann für weitere Schäden am
Gerät haftbar gemacht werden.
•
Die PI BOX darf keinen Wassertropfen /-spritzern oder anderen Flüssigkeiten ausgesetzt
werden.
•
Lassen Sie Kinder nicht mit Plastiktüten oder anderen Verpackungsmaterialien spielen. Es
besteht Erstickungsgefahr.
•
Das Außengerät sollte nur auf harten Oberflächen installiert werden.
•
Bei Verwendung der Antenne bei Sturm oder starkem Wind besteht Beschädigungsgefahr.
•
Der Fahrer des Fahrzeugs muss sich vor Fahrtantritt visuell vergewissern, dass die Antenne
vollständig eingeklappt ist, indem er die Antenneneinheit inspiziert.
•
Vermeiden Sie es, das Fahrzeug des Benutzers mit der montierten Satellitenanlage in einer
Durchfahrtswaschanlage oder einer Waschstraße mit einem Hochdruckreiniger zu reinigen.
Deutsch - 2

1-2. Lieferumfang
1
Haupteinheit
Montageplatte
PI Box
Schraube M4x20 (10)
M8 Sicherungsmutter (4)
WARNUNG
3
4
7
9
8
5
2
6
Kabelhalter / Kabelverschraubung
PI-Kabel - 1,5 m
Signalkabel - 12m (x2 für 2 Ausgänge)
Stromversorgungskabel
Bedienungsanleitung
Öffnen Sie den Karton und
entfernen Sie das Verpackungsmaterial. Wenn Sie das Hauptgerät aus
der Verpackung nehmen, halten Sie
es am Körper, nicht am Reflektor,
und heben Sie es gerade nach oben.
Prüfen Sie vor der Inbetriebnahme
die korrekte Betriebsspannung des
Netzteils. Bitte verwenden Sie das
im Lieferumfang enthaltene Gerät
oder verwenden Sie das vom
Hersteller autorisierte Netzteil.
10
Deutsch - 3

2. Verpackungsinhalt
2-1. Anschlussplan
Haupteinheit
Signalkabel (12 m)
PI Box
PI-Kabel (1,5 m)
STB (Empfänger)
Fernseher
Stromeingangskabel
Auto Batterie
oder
12V DC-Adapter
(über 40W)
GERMAN- 4
Signalkabel (12 m)
Zweite STB
Fernseher
※ Bei der Twinantenne

2-2. Bedienungsanweisungen
HOME LED
POWER LED
HOME-Taste
POWER-Taste
Befestigungsloch
zu empfänger
Zur Haupteinheit
Wenn die Antenne 10 Minuten lang keinen Satelliten findet, kehrt die Antenne in ihre HOME-position
d.
zurück.
Möchten Sie erneut nach Satelliten suchen, starten Sie die PI BOX neu.
e.
2. Ausschalten
Drücken Sie die POWER-Taste
a.
Halten Sie die POWER-Taste der PI BOX länger als 2 Sekunden gedrückt, der Strom wird unabhängig
vom Zustand der Antenne ausgeschaltet.
Drücken Sie die HOME-Taste
b.
Wenn der HOME-Taste der PI BOX gedrückt wird, bewegt sich die Antenne in die HOME-Position und
der Strom wird nach ca. 60 Sekunden automatisch ausgeschaltet (die POWER-LED und die HOME-LED
blinken 60 Sekunden lang abwechselnd)
1. Suche die Satelliten
Nach dem Einschalten durch Drücken der
Power-Taste der PI BOX beginnt die Antenne
nach ca. 10 Sekunden mit der Suche nach
vorprogrammierten oder zuletzt empfangenen
Satelliten.
Der vorprogrammierte Satellit ist ASTRA1,
※
der über die APP auf den gewünschten
Satelliten geändert werden kann.
a.
Power
b.
c.
Wenn sich die Antenne in der HOME-position(Ausgangsposition) befindet, beginnt sie
mit der Suche nach Satelliten.
Wenn die Antenne auf den Satelliten zeigt,
bewegt sie sich nicht.
Befindet sich die Antenne in einer anderen
Position als bei a und b oben, bewegt sie sich
zunächst in die HOME-position und beginnt
dann mit der Suche nach Satelliten.
Zündung eingeschaltet
c.
Bei Zündung im Fahrzeug fährt die Antenne automatisch in die HOME-posution und schaltet sich
nach 60 Sekunden ab. (Wenn die PI BOX zu diesem Zeitpunkt ausgeschaltet ist, wird der Vorgang
nach dem automatischen Einschalten ausgeführt.)
WARNUNG
Wenn die PI BOX ausgeschaltet und das Fahrzeug bewegt wird, während sich die Antenne
nicht in der HOME-position befindet, kann das Produkt beschädigt werden.
Bevor Sie das Fahrzeug bewegen, überprüfen Sie zuerst den Zustand der Antenne und
schalten Sie sie aus, nachdem sie vollständig in die HOME-position eingeklappt ist.
Deutsch - 5

2-3. Wie benutzt man die App
Laden Sie die App aus dem App Store herunter
A.
(Android/iOS)
Suchen Sie im App Store nach "SELFSAT" und laden Sie die App
"SAT CONNECT" herunter
Bevor Sie diese App verwenden, müssen Sie die BT-
※
und GPS-Funktion auf Ihrem Smart-Gerät aktivieren.
Antenne mit App koppeln
B.
Schritt 1.
Überprüfen Sie die MAC-Adresse an Ihrer Antenneneinheit (auf der Antenne oder PI-BOX / Bedienungsanleitung)
Schritt 2.
Schritt 3.
Schritt 4.
Wenn Sie die heruntergeladene Anwendung ausführen,
wird automatisch eine anschließbare Antenneneinheit
erkannt
Wählen Sie die MAC-Adresse Ihrer Antenne aus
(Die MAC-Adresse von CARAVAN PLUS ist GS-xx:xx:xx )
Klicken Sie auf die Schaltfläche „Verbinden“, um die
BT-Verbindung zwischen Ihrer Antenneneinheit und
Ihrem Smart-Gerät herzustellen
Deutsch - 6

Grundfunktionen
C.
Einstelltaste
Firmware-Version, Spracheinstellung kann überprüft werden
Statusanzeigefenster
Zeigt den aktuellen Status der Antenne an
Satellitenauswahlfenster
Wählen Sie einen Satelliten zum Suchen aus. Der vorprogrammierte Satellit ist ASTRA1, der über die APP auf den gewünschten
Satelliten geändert werden kann
Wird verwendet, um die Antenne in die Ausgangsposition
zu bewegen
Die orangefarbene Lampe blinkt während der Fahrt zur Home-Position und die grüne Lampe schaltet sich ein, nachdem sie
vollständig in die Home-Position gefahren ist
Wird verwendet, um Satelliten zu suchen
Wählen Sie den gewünschten Satelliten aus und drücken Sie die
Taste, die Antenne sucht danach. Während der Suche nach einem
Satelliten blinkt die orangefarbene Lampe, und wenn ein Satellit
gefunden wird, leuchtet die grüne Lampe
F/W-Update
Wird verwendet, um die Firmware der Antenne zu aktualisieren
Deutsch - 7

3. Skeweinstellung
Bei allen LNBs muss der Drehwinkel (Skew)
innerhalb bestimmter Grenzen eingestellt
werden, um die beste Signalqualität zu
erhalten.
Der tatsächliche "Skew winkel" hängt vom
Satelliten und Ihrem Standort ab. Beziehen
Sie sich auf die Satelliten, die Sie empfangen
möchten, und Ihren Standort im Bild unten
und passen Sie den Skew entsprechend an.
Die Genauigkeit ist nicht kritisch, daher sind
kleine Toleranzen akzeptabel. Drehen Sie
das LNB nach und nach, um die Position zu
finden, die die Signalqualität der Satelliten
auf Ihrem Fernsehbildschirm maximiert, und
befestigen Sie dann das LNB.
Turksat @ 42.0°E Astra2 @ 28.2°E
-10 -5
-15
-20
-25
-30
-35
-40
-45
-50
-5
-10
-15
-20
-25
-30
-35
0
-90+90
0
5
10
15
20
-10
-15
-20
-25
-30
Astra3 @ 23.5°E Astra1 @ 19.2°E
0
-5
10 105 5
0
-5
15
-10
20
-15
-20
25
-25
-30
15
20
25
30
35
Deutsch - 8

HotBird @ 13.0°E Eutelsat 9 @ 9.0°E
-5 0 0
-10
-15
-20
-25
-30
5
-5
10
-10
15
-15
20
25
30
-20
35
Astra4 @ 4.9°E Thor @ 0.8°W
5 0
0
10
15
20
-5
25
5
10
15
20
25
30
35
5
10
15
20
-10
-15
-5
30
35
-10
40
45
-15
25
30
35
40
Eutelsat 5W @ 5.0°W Hispasat @ 30.0°W
0
-5
5
10
15
20
25
30
35
40
45
5
10
15
20
25
30
35
40
45
50
55
Deutsch - 9

4. Fehlerbehebung
Es gibt eine Reihe von häufigen Problemen, die die Signalempfangsqualität oder den
Betrieb des Geräts beeinträchtigen können. Wenn ein Problem mit dem Caravan Plus
auftritt, lesen Sie zuerst diese Anleitung zur Fehlerbehebung.
A. Keine Funktion beim Einschalten der Antenne
i.
Überprüfen Sie noch einmal, ob alle Kabelverbindungen richtig hergestellt wurden.
-
Verbindung zwischen Strom und PI-Box.
-
Verbindung zwischen PI-Box und Antenne.
ii.
Überprüfen Sie, ob das Stromeingangskabel beschädigt ist.
iii.
Überprüfen Sie, ob das
angeschlossen sind.
iv.
Prüfen Sie, ob die PI Box eingeschaltet ist (Prüfen Sie, ob die Power-LED der PI BOX leuchtet)
B. Fehler beim Suchen des Satelliten
Satellitensignale können durch Gebäude oder Bäume blockiert oder beeinträchtigt werden.
i.
Stellen Sie sicher, dass sich in südlicher Richtung keine Hindernisse befinden.
Schalten Sie die PI BOX aus und dann wieder ein.
ii.
C. Mechanische Probleme
i.
Wenn sich die Antenne nicht in die gewünschte Position bewegt.
-
Versuchen Sie erneut, die PI BOX aus-/einzuschalten.
Stromversorgungskabel
und die Batteriepolaritäten (+/-) richtig
ii.
Wenn die Antenne Geräusche macht, ohne sich zu bewegen.
-
Versuchen Sie erneut, die PI BOX aus-/einzuschalten.
Wenn das Problem weiterhin besteht, wenden Sie sich bitte an einen lokalen Händler/Shop, um
Hilfe zu erhalten.
D. Andere Probleme
i.
Wenn das System falsch verkabelt wurde, funktioniert es nicht richtig.
Wenden Sie sich an einen lokalen Händler/Shop, um Hilfe bei Kabelschäden zu erhalten.
Deutsch - 10

5. Technische Daten
5-1. Abmessungen
Haupteinheit
573 mm
149 mm
MAX 540 mm
MIN 149 mm
PI box
102 mm
35 mm
280 mm
129 mm
105 mm
316 mm
508 mm
34 mm
28 mm
85mm
102 mm
Deutsch - 11

5-2. Haupteinheit
Modell
Eingangsfrequenz
Polarisation
Antennengewinn
Reflektorgröße (W x D)
Abmessungen (W x D x H)
Gewicht
Ausgang
LNB
Spannungsversorgung
Ausgangsfrequenz
L.O. frequenz
CARAVAN PLUS
10.7 ~ 12.75 GHz
Horizontal / Vertikal
35.0 dBi @ 12.7 GHz
573 mm x 450 mm (mit Kanten)
573 x 508 x 149 mm
5.5 kg
1 or 2 (optional)
950 ~ 2,150 MHz
9.75 / 10.6 GHz
DC 12 V
Stromverbrauch
11 W (normal) / 30W (max)
3.6 W (Bereitschaft)
Deutsch - 12

Wohnwagen / Wohnmobil
6.
Installationsanleitung
6-1 . Platzbedarf für die Installation
Achten Sie darauf, dass für den klappbaren CARAVAN PLUS ebenso wie für den
Aktionsradius (Reichweite) ausreichend Platz vorhanden ist.
508 mm
450 mm
797 mm
930 mm
Fahrtrichtung
573 mm
248 mm
369 mm
465 mm
479 mm
365 mm
149 mm
369 mm
Deutsch - 13

6-2. Ausrüstung für die Installation
1.
1
56 7
9
10
2
3
11
12
4
8
13
Montageplatte
2.
PI BOX
3.
Schraube M4× 20 (10), Mutter M8 (4)
4.
Kabelverschraubung / Kabelhalter
5.
PI-Kabel
6.
Signalkabel (x2 für Doppelausgang)
7.
Stromeingangskabel
8.
Silikon
9.
Abdeckband
10.
Schraubenschlüssel
11.
2mm Bohrer, 16mm Bohrer
12.
Bohrmaschine
13.
Reiniger
Installation der Richtung
Fahrtrichtung
O
X
Deutsch - 14
O
X

6-3. Installationsanleitung
1
FRONT
2
Suchen Sie einen geeigneten Ort, um die
Montageplatte auf dem Fahrzeugdach zu
platzieren
3
Bringen Sie das Abdeckband außerhalb der
Montageplatte mit einem Abstand von 5 mm
von den Plattenkanten an
5
Legen Sie die Montageplatte auf das Silikon
und bohren Sie 5 Löcher (2 mm) mit einer
Bohrmaschine
Reinigen Sie die Oberfläche, auf der die
Montageplatte platziert wird, mit einem
Reiniger
4
Legen Sie die Montageplatte beiseite, um Silikon
innerhalb der angebrachten Klebebandlinie
aufzutragen, aber lassen Sie 2 cm Abstand von
der Linie nach innen
6
Silikon auf die Löcher auftragen
7
Mit fünf (5) M4 x 20 Schrauben an den
Löchern befestigen
8
Tragen Sie Silikon erneut auf, um die
Schraubenbolzen abzudecken
Deutsch - 15

9
10
Silikon um die Kante der Montageplatte
auftragen
11
Abdeckband entfernen und trocknen lassen
13
Benötigte Teile, Schraubenschlüssel, vier (4)
Muttern
15
Entfernen Sie überschüssiges Silikon
12
Bereiten Sie vor, die Antenne auf die vier
aufrechten Schrauben zu setzen
14
Fahrtrichtung
Nachdem Sie die Fahrtrichtung überprüft
haben, legen Sie die Antenne auf die
Montageplatte
16
Bringen Sie die Muttern an jeder der 4
Schrauben an der Montageplatte an
Ziehen Sie die vier Muttern mit einem
Schraubenschlüssel fest, um die Antenne zu
sichern
Deutsch - 16

17
ca. 30cm
Schließen Sie das Signalkabel an den Antennenanschluss an, platzieren Sie die Unterseite des
Kabelhalters in einer Position, die den Betrieb der Antenne nicht beeinträchtigt, und bringen Sie
Abdeckband 5 mm von der Außenseite der Unterseite des Kabelhalters entfernt an
18 19
Bohren Sie ein Loch, durch das die Mindestgröße für das Kabel in der Mitte der Bandmarkierung passen kann (16 mm oder weniger).
Führen Sie die Signalkabel durch die Löcher
(bei Einheiten mit zwei Ausgängen führen Sie
zwei Kabel nacheinander durch).
20
approx. 30cm
Setzen Sie das Signalkabel, den Kabelhalter und die Kabelverschraubung wie in der Abbildung
oben gezeigt ein und montieren Sie sie in der Kabelverschraubung.
2221
Platzieren Sie den montierten Kabelhalter
innerhalb der Klebebandmarkierung und
bohren Sie drei (3) von 2 mm Löchern
Kabelhalter mit drei (3) M4 x 20 Schrauben an
den Bohrlöchern befestigen
Deutsch - 17

2423
Tragen Sie Silikon um den Kabelhalter und auf
die Oberseite der Schrauben auf, um
wasserdicht zu sein
Schließen Sie die Kabel an die Anschlüsse der
Antenne an, entfernen Sie das Abdeckband
und reinigen Sie das Silikon vor dem Trocknen
2625
Zündung
12V DC
Bereiten Sie das Stromeingangskabel vor, um
den Akku und die PI BOX zu verbinden
Passen Sie die Polaritäten der Stromeingangskabel an die Polaritäten der Batterie an, rotes
an rotes / schwarzes an schwarzes und weißes
Kabel an den Zündanschluss des Fahrzeugs
27
STB (Empfänger)
PI-Kabel 1,5m
Befestigen Sie die PI BOX mit zwei (2) M4x20-Schrauben an einer geeigneten Stelle und verbinden
Sie das Stromkabel und das PI-Kabel
Deutsch - 18


Table des matières
1. Informations générales
1-1. Utilisation et fonctionnement
1-2. Accessoires Inclus
......................................................................................
2. Instructions de fonctionnement
2-1. Diagramme de connexion
2-2. Comment utiliser?
2-3. Comment utiliser l'APP ?
.....................................................................................
.........................................................................
.............................................................................
...............................................................................
2
3
4
5
6
3. Réglage de l'inclinaison
4. Dépannage
.........................................................................................
....................................................................
5. Spécifications
5-1. Dimension
5-2. Spécifications
..............................................................................................
...........................................................................................
6. Installation de Caravane/Camping-car
6-1. Espace requis pour l'installation
6-2. Matériel pour l'installation
6-3. Instructions pour l'installation
......................................................................
............................................................................
........................................................................
8
10
11
12
13
14
15

1. Informations générales
1-1. Utilisation et fonctionnement
Ces instructions décrivent les fonctions et le fonctionnement de CARAVAN PLUS, système de
recherche automatique par satellite.
Veuillez lire attentivement le manuel d'utilisation avant de commencer l'installation.
Le fonctionnement correct et sûr du système ne peut être garanti que par les instructions suivantes.
•
L'appareil est programmé pour se déplacer automatiquement dans une direction qui peut
recevoir le signal de télévision par satellite préréglé. Pour un fonctionnement général,
assurez-vous que le système est dans une position avec une vue dégagée du ciel. Si le signal du
satellite est interrompu par des obstacles tels que des montagnes, des bâtiments ou des arbres,
aucun signal TV ne sera reçu.
•
L'installation doit être effectuée par du personnel suffisamment qualifié.
•
Le fabricant décline toute responsabilité pour les dommages consécutifs directs ou indirects du
système, des véhicules à moteur ou d'autres équipements en raison d'une utilisation inappropriée de la batterie ou d'une installation erronée ou d'une mauvaise connexion des câbles.
•
En tant qu'utilisateur de cet équipement, vous êtes responsable de vous assurer que la conformité avec les lois et réglementations en vigueur de l'industrie automobile doit être observée et
respectée.
•
L'alimentation est fournie par un système électrique de véhicule standard avec une tension
nominale de 12VDC. Pour une utilisation portable, un adaptateur d'alimentation en option
produit par le fabricant doit être utilisé.
•
Ce produit a été conçu pour une installation fixe sur des véhicules à une vitesse maximale de 130
km/h.
•
L'utilisation de l'équipement à des fins autres que l'usage auquel il est destiné n'est pas autorisée.
•
L'utilisation de tout autre réflecteur parabolique ou LNB à ceux installés à l'origine n'est pas
autorisée.
•
Le produit ne nécessite aucun entretien régulier ; tout service doit être effectué dans des centres
de service agréés.
•
Pour plus d'informations sur l'utilisation générale de cet appareil, consultez votre revendeur local
pour obtenir de l'aide.
REMARQUE DE SÉCURITÉ
Le non-respect du manuel d'utilisation peut endommager l'appareil ou le véhicule
de l'utilisateur, et le responsable peut être tenu responsable de dommages
supplémentaires à l'équipement.
•
La Boîtier PI ne doit pas être exposée à des gouttes, des éclaboussures ou d'autres liquides.
•
Ne laissez pas les enfants jouer avec des sacs en plastique ou d'autres matériaux d'emballage. Il y a un risque d'étouffement.
•
L'unité extérieure ne doit être installée que sur des surfaces dures.
•
Il existe un risque de dommages lors de l'utilisation de l'antenne par temps d'orage ou de
vent fort.
•
Le conducteur du véhicule doit vérifier visuellement que l'antenne est complètement
repliée en inspectant l'unité d'antenne avant de prendre la route.
•
Évitez de nettoyer le véhicule de l'utilisateur avec le système satellite monté dans un
lave-auto en voiture ou un lave-auto avec un nettoyeur haute pression.
Français - 2

1-2. Accessoires Inclus
1
Unité principale
Plaque de montage
Boîtier PI
Vis M4x20 (10)
Écrou de blocage M8 (4)
AVERTISSEMENT
3
4
7
9
8
5
2
6
Support de câble/ presse-étoupe
Câble de PI - 1,5m
Câble de signal - 12m
(x2 pour double sortie)
Câble d'entrée d'alimentation
Manuel d'utilisation
Ouvrez la boîte et retirez le matériel
d'emballage. Lorsque vous retirez
l'unité principale de la boîte, tenez-la
par le corps, pas par le réflecteur, et
soulevez-la vers le haut.
10
Français - 3
Vérifiez la tension de fonctionnement
correcte de l'alimentation électrique
avant la mise en service. Veuillez
utiliser l'appareil inclus dans
l'emballage ou utiliser l'alimentation
électrique autorisée par le fabricant.

2. Instructions de fonctionnement
2-1. Diagramme de Connection
Unité principale
Câble de signal (12 m)
Boîtier PI
Câble de PI (1,5m)
STB (Récepteur)
Tél é
batterie du véhicule
Câble d'entrée d'alimentation
ou
adaptateur 12V DC
(plus de 40W)
Câble de signal (12 m)
2ème STB
Tél é
※ Pour le modèle
à double sortie
Français - 4

2-2. Comment utiliser?
Voyant LED de HOME
Voyant LED de POWER
Bouton HOME
Bouton POWER
trou de fixation
Port d'alimentation
Câble de PI vers récepteur
Câble de signal vers l'unite principale
d.
Si l'antenne ne trouve pas de satellite pendant 10 minutes, l'antenne revient à sa position d'HOME.
e.
Vous voulez à nouveau rechercher des satellites, redémarrez la PI BOX.
2. Éteignez
Appuyez sur le bouton POWER
a.
Appuyez et maintenez enfoncé le bouton d'POWER de la Boîtier PI pendant plus de 2 secondes,
l'alimentation est coupée quel que soit l'état de l'antenne.
1. Rechercher le satellites
Lorsqu'elle est allumée en appuyant sur le
bouton d'POWER de la Boîtier PI, après environ
10 secondes, l'antenne commence à rechercher
le satellite préprogrammé ou le plus récemment reçu.
Le satellite préprogrammé est ASTRA1,
※
qui peut être remplacé par le satellite
souhaité via l'APP.
Lorsque l'antenne est en position d'HOME,
a.
elle commence à rechercher le satellite.
Lorsque l'antenne est dirigée vers le satellite,
b.
elle ne bougera pas.
Lorsque l'antenne est dans une position
c.
différente que dans le cas de a et b ci-dessus,
elle se déplace d'abord vers la position
d'HOME, puis commence à rechercher le
satellite.
Appuyez sur le bouton HOME
b.
Lorsque le bouton d'HOME de la Boîtier PI est enfoncé, l'antenne se déplace vers la position d'HOME
et l'POWER est automatiquement coupée après environ 60 secondes (le voyant d'POWER et le voyant
d'HOME clignotent alternativement pendant 60 secondes)
L'allumage s'est produit
c.
Lorsque l'allumage se produit dans le véhicule, l'antenne se déplace automatiquement vers la
position initiale et s'éteint après 60 secondes.
(Si le Boîtier PI est éteint à ce moment-là, il s'allumera automatiquement puis effectuera l'opération.)
AVERTISSEMENT
Si la Boîtier PI est éteinte et que le véhicule est déplacé alors que l'antenne n'est pas
en position d'HOME, le produit peut être endommagé.
Avant de déplacer le véhicule, vérifiez d'abord l'état de l'antenne et éteignez-la une
fois qu'elle est complètement repliée dans sa position d'HOME.
Français - 5

2-3. Comment utiliser l'APP ?
Téléchargez l'application depuis l'App Store (Android/iOS)
A.
Recherchez SELFSAT sur l'App Store et téléchargez l'application
"SAT CONNECT"
Avant d'utiliser cette application, vous devez
※
activer les fonctions BT et GPS sur votre appareil
intelligent.
Couplage de l'antenne avec l'application
B.
Vérifiez l'adresse MAC sur votre antenne
étape1.
(sur l'antenne ou la boîte PI / Manuel d'utilisation)
Lorsque vous exécutez l'application téléchargée, une
étape2.
antenne connectable est automatiquement détectée
Sélectionnez celle qui correspond à l'adresse MAC de
étape3.
votre antenne
(L'adresse MAC de CARAVAN PLUS est GS-xx:xx:xx )
Cliquez sur le bouton « connecter » pour terminer la
étape4.
connexion BT entre votre antenne et votre appareil
intelligent
Français - 6

Fonctionnalités de base
C.
Bouton de réglage
Version du micrologiciel, le réglage de la langue peut être vérifié
Fenêtre d'affichage d'état
Indique l'état actuel de l'antenne
Fenêtre de sélection des satellites
Sélectionnez un satellite à rechercher. Le satellite préprogrammé
est ASTRA1, qui peut être remplacé par le satellite souhaité via l'APP
Utilisé pour déplacer l'antenne à la position d'HOME
Le voyant orange clignote pendant le déplacement vers la maison
et le voyant vert s'allume une fois qu'il s'est complètement déplacé
vers la position HOME
Habitué à rechercher des satellites
Sélectionnez le satellite souhaité et appuyez sur le bouton,
l'antenne le recherchera. Lors de la recherche d'un satellite, le
voyant orange clignote, et lorsqu'un satellite est trouvé, le voyant
vert s'allume
Mise à jour F/W
Utilisé pour mettre à jour le firmware de l'antenne
Français - 7

3. Réglage de l'inclinaison
Tous les LNB nécessitent que leur angle de
rotation (skew) soit défini dans certaines
limites afin d'obtenir la meilleure qualité de
signal reçu.
L'« angle d'inclinaison » réel dépend du
satellite et de votre emplacement. Reportez-vous aux satellites que vous souhaitez
recevoir et à votre emplacement dans
l'image ci-dessous et ajustez l'inclinaison en
conséquence.
La précision n'est pas critique, de petites
tolérances sont donc acceptables. Tournez
le LNB petit à petit pour trouver la position
qui maximise la qualité du signal des
satellites sur votre écran de télévision, puis
fixez le LNB.
Turksat @ 42.0°E Astra2 @ 28.2°E
-10 -5
-15
-20
-25
-30
-35
-40
-45
-50
0
-5
-10
-15
-20
-25
-30
-35
0
-90+90
5
10
15
20
-10
-15
-20
-25
-30
Astra3 @ 23.5°E Astra1 @ 19.2°E
0
-5
10 105 5
0
-5
15
-10
20
-15
-20
25
-25
-30
15
20
25
30
35
Français - 8

HotBird @ 13.0°E Eutelsat 9 @ 9.0°E
-5 0 0
-10
-15
-20
-25
-30
5
-5
10
-10
15
-15
20
25
30
-20
35
Astra4 @ 4.9°E Thor @ 0.8°W
5 0
0
10
15
20
-5
25
5
10
15
20
25
30
35
5
10
15
20
-10
-15
-5
30
35
-10
40
45
-15
25
30
35
40
Eutelsat 5W @ 5.0°W Hispasat @ 30.0°W
0
-5
5
10
15
20
25
30
35
40
45
5
10
15
20
25
30
35
40
45
50
55
Français - 9

4. Dépannage
Il existe un certain nombre de problèmes courants qui peuvent affecter la qualité
de réception du signal ou le fonctionnement de l'appareil. Si un problème survient
avec le Caravan Plus, reportez-vous d'abord à ce guide de dépannage.
A. Aucune fonction lors de la mise sous tension de l'antenne
i.
Vérifiez à nouveau que toutes les connexions des câbles ont été effectuées correctement.
-
Connexion entre l'alimentation et le boîtier PI.
-
Connexion entre le boîtier PI et l'antenne.
Vérifiez si le câble d'entrée d'alimentation a été endommagé.
ii.
Vérifiez que le câble d'entrée POWER et les polarités (+/-) de la batterie sont correctement
iii.
connectés.
Vérifiez si la Boîtier PI est sous tension
iv.
(Vérifiez que le voyant d'alimentation de la Boîtier PI est allumé)
B. Échec de la recherche du satellite
Les signaux satellites peuvent être bloqués ou dégradés par des bâtiments, des arbres.
i.
Assurez-vous qu'il n'y a pas d'obstacles en direction sud.
Éteignez la Boîtier PI puis rallumez-la.
ii.
C. Problèmes mécaniques
i.
Si l'antenne ne se déplace pas dans la position souhaitée.
-
Essayez d'éteindre/allumer à nouveau.
ii.
Si l'antenne fait du bruit tout en restant statique.
-
Essayez à nouveau de mettre hors/sous tension.
Si le problème persiste, veuillez contacter votre revendeur/magasin local pour obtenir de l'aide.
D. Autres problèmes
i.
Si le système a été mal câblé, il ne fonctionnera pas correctement.
Contactez votre revendeur/magasin local pour obtenir de l'aide sur les dommages de câble.
Français - 10

5. Spécications
5-1. Dimension
Unité principale
573 mm
149 mm
MAX 540 mm
MIN 149 mm
Boîtier PI
102 mm
35 mm
280 mm
129 mm
105 mm
316 mm
508 mm
34 mm
28 mm
85mm
102 mm
Français - 11

5-2. Spécications
Modèle
Fréquence d'entrée
Polarisation
Gain de l'antenne
Taille du réflecteur (W x D)
Dimensions (W x D x H)
Poids
Sortie
LNB
Energie requise
Fréquence de sortie
L.O. fréquence
CARAVAN PLUS
10.7 ~ 12.75 GHz
Horizontale/ Vericale
35.0 dBi @ 12.7 GHz
573 mm x 450 mm (avec bord)
573 x 508 x 149 mm
5.5 kg
1 or 2 (optionnelle)
950 ~ 2,150 MHz
9.75 / 10.6 GHz
DC 12 V
Consommation d'énergie
11 W (normal) / 30W (max)
3,6 W (veille)
Français - 12

6. Installation de caravane/camping-car
6-1. Espace requis pour l'installation
Veillez à ce qu'il y ait suffisamment d'espace pour le pli CARAVAN PLUS, tout comme
pour la plage de fonctionnement (rayon de croisière).
508 mm
450 mm
797 mm
930 mm
573 mm
l'arrière du véhicule
248 mm
369 mm
465 mm
479 mm
365 mm
149 mm
369 mm
Français - 13
6-2. Matériel pour l'installation
1
56 7
9
10
2
3
11
12
4
8
13
1.
2.
3.
4.
5.
6.
7.
8.
9.
10.
11.
12.
13.
Installation de direction
Plaque de montage
Boîtier PI
Vis M4×20 (10), Écrou de blocage M8 (4)
Presse-étoupe / Support de câble
Câble PI
Câble de signal (x2 pour double sortie)
Câble d'alimentation
Silicone
Ruban de masquage
Clé
Foret de 2 mm, Foret de 16 mm
Perceuse électrique
Nettoyeurr
O
l'arrière du véhicule
X
Français - 14
O
X

6-3. Instructions pour l'installation
1
FRONT
2
Trouvez un endroit approprié pour placer la
plaque de montage sur le toit du véhicule
3
Fixez le ruban de masquage à l'extérieur de la
plaque de montage à 5 mm des bords de la
plaque
5
Placez la plaque de montage sur le silicone et
faites 5 trous (2mm) avec une perceuse
électrique
Nettoyez la surface où va placer la plaque de
montage avec un nettoyant
4
Mettez de côté la plaque de montage pour
appliquer du silicone dans la ligne de ruban
fixée, mais laissez un espace de 2 cm vers
l'intérieur de la ligne
6
Appliquer du silicone sur les trous
7
Fixer avec cinq (5) vis M4 x 20 sur les trous
réalisés
8
Réappliquer du silicone pour couvrir les
boulons vissés
Français - 15

9
10
Appliquer du silicone autour du bord de la
plaque de montage
Nettoyez l'excès de silicone
11
Retirer le ruban de masquage et laisser sécher12Préparez-vous à placer l'antenne sur les
13
Pièces requises, clé, quatre (4) écrous
15
quatre boulons verticaux
14
l'arriè
r
e du véhicule
Après avoir vérifié le sens de la marche, placez
l'antenne sur la plaque de montage
16
Monter les écrous sur chacun des 4 boulons
de la plaque de montage
Français - 16
Serrez les quatre écrous avec une clé pour
fixer l'antenne

17
environ 30 cm
Connectez le câble de signal au port d'antenne, placez le bas du support de câble dans une
position qui n'interfère pas avec le fonctionnement de l'antenne et appliquez du ruban de
masquage à 5 mm de l'extérieur du bas du support de câble
18 19
Percez un trou que la taille minimale du câble
peut traverser au centre du marquage du
ruban (16 mm ou moins)
Faites passer les câbles de signal à travers les
trous (pour les unités à double sortie, faites
passer deux câbles un par un).
20
approx. 30cm
Insérez le câble de signal, le support de câble et le presse-étoupe comme indiqué sur l'image
ci-dessus, et assemblez-le dans le presse-étoupe.
2221
Placez le support de câble assemblé à
l'intérieur du marquage du ruban et percez
trois (3) trous de 2 mm
Fixez le support de câble avec trois (3) vis M4
x 20 sur les trous de perçage effectués
Français - 17

2423
Appliquez du silicone autour du support de
câble et sur le dessus des vis pour imperméabiliser
Connectez les câbles aux ports de l'antenne,
retirez le ruban de masquage et rangez le
silicone avant de sécher
2625
allumage
12V DC
Préparez le câble d'entrée d'alimentation pour
connecter la batterie et la Boîtier PI
Faites correspondre les polarités des câbles
d'alimentation aux polarités de la batterie,
câble rouge à rouge / noir à noir et blanc au
port d'allumage du véhicule
27
STB (Récepteur)
Câble de PI - 1,5m
Fixez la Boîtier PI à un endroit approprié à l'aide de deux (2) vis M4x20, et connectez le câble
d'alimentation et le câble PI
Français - 18
 Loading...