

Page 1
Instruction Manual for Intelligent USB Charger with Built in Socket
Applicable Codes
• Smooth: SSL579, SSL580, SSL581
• Square: SQ-USB-1, SQ-USB-2, SQ-USB-3
• Metal Clad: LG9099MB-USB, LG9098MB-USB
• 5M: DSL160, DSL161, DSL260, DSL261, DSL360, DSL361, DSL460, DSL461, DSL560, DSL561, DSL660, DSL661, DSL960, DSL961
• 7MPRO: 7MPRO-161, 7MPRO-261, 7MPRO-361, 7MPRO-461, 7MPRO-561, 7MPRO-661
General Information
These instructions contain important information regarding safety. They should be read carefully and should be retained for future reference. The
company will not accept responsibility for any injury, damage or loss which may arise due to incorrect installation, operation or maintenance due to
non-adherence to these instructions. This product must be installed in accordance with the latest edition of the IEE wiring regulations and building
regulations. Read these instructions carefully before commencing installation. If in doubt, consult a qualified electrician.
Introduction
This product is a wall socket with USB charger function, which is our patented product. With more and more mobile phones and other similar devices
able to be charged via a USB socket there is no longer a need to find a charger and/or travel adaptor, just install one to two of these and its ‘plug and
charge’. USB sockets are suitable for charging and powering mobile phones, Blackberry, iPods, iPhones, PDAs, MP3 players, game consoles, digital
cameras and more. If the current is over 2.1A or the battery is fully charged, it will trip off automatically to protect the device. The USB socket complies
to safety requirements, including BS1363, and EN60950.
Any device can be charged in either USB socket but some appliances that draw a larger charging current such as notebooks, iPads etc. will recharge
more quickly if connected to the larger capacity output.
Instruction
• Before commencing work, isolate the mains power supply and remove the fuse in the fuse box or switch off the circuit breaker in the consumer unit.
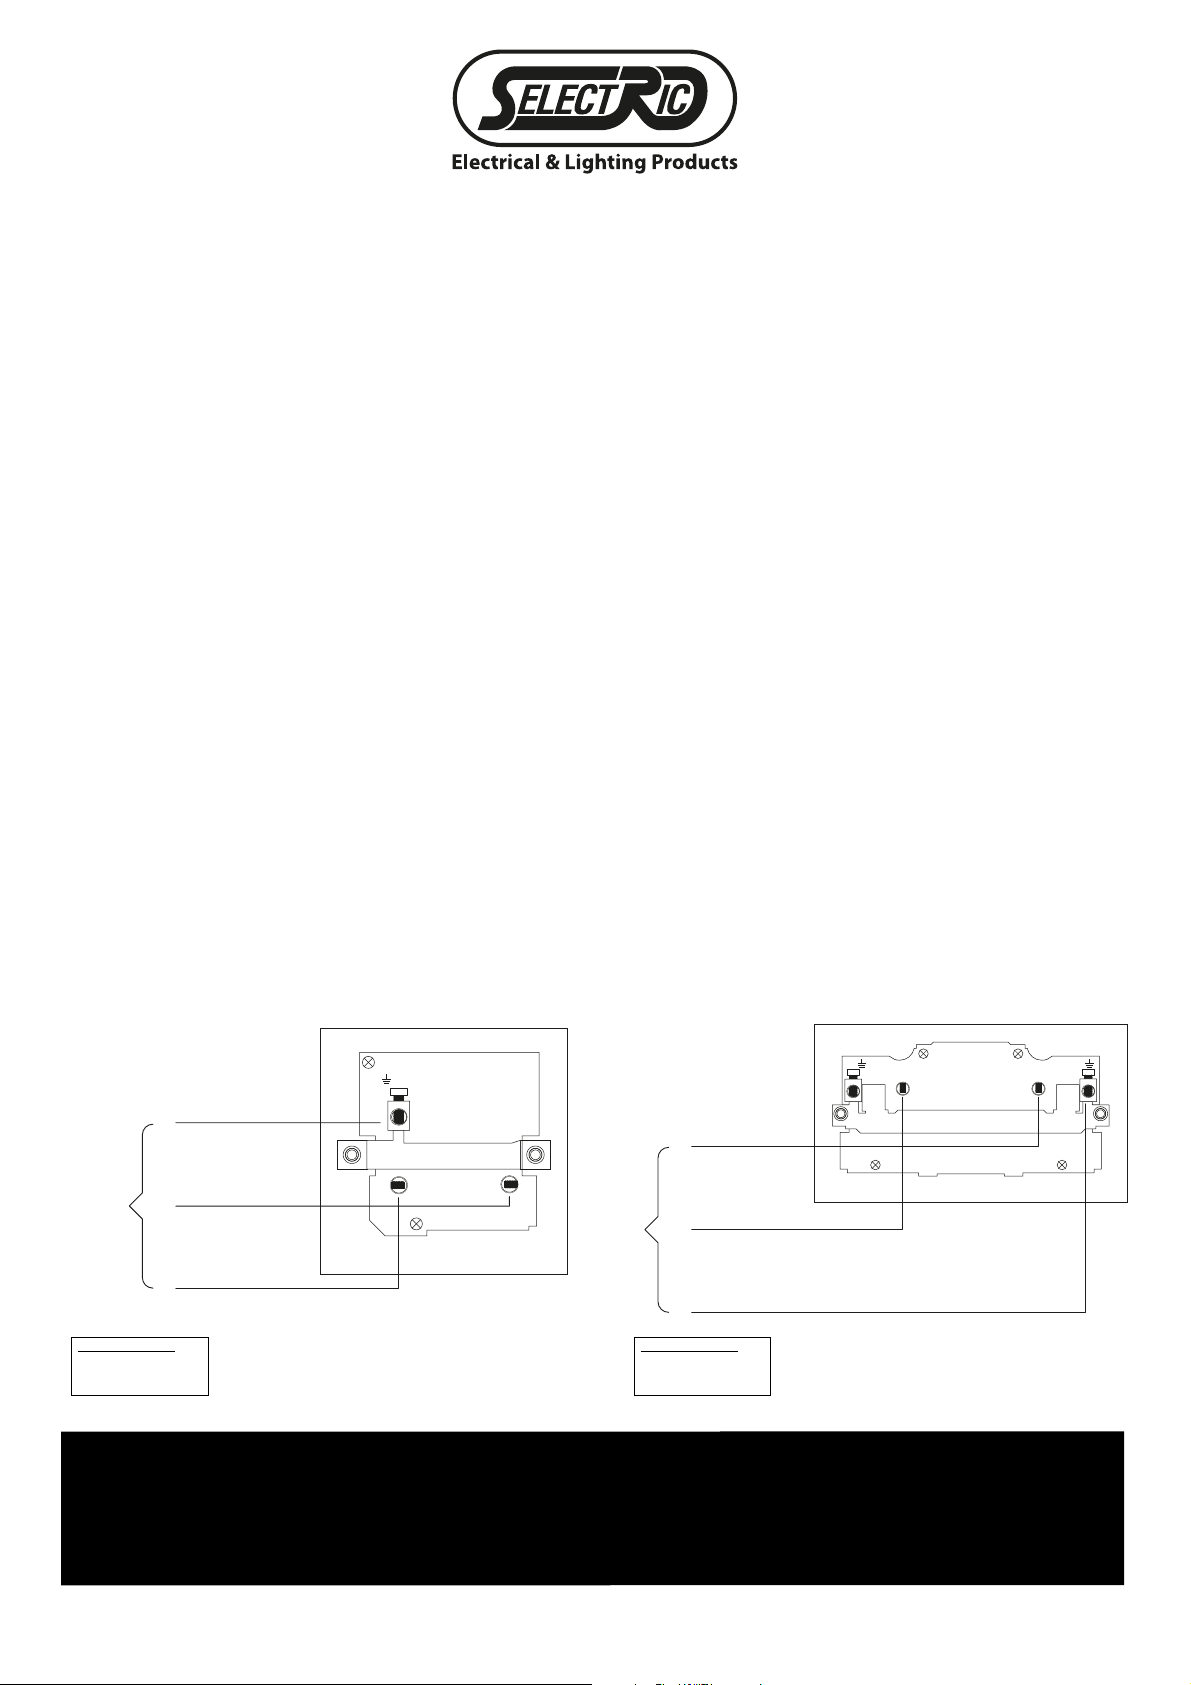
• Pass cable through the entry holes / glands and connect as per the relevant diagram below.
• Should an Earth loop connection be required, use the earth terminal block in the back box. All Earth connections must be made and maintained.
• When installation is correctly completed, re-connect mains supply.
Technical Information
• Dimensions: 1 gang - 86mm x 86mm, 2 gang 86mm x 146mm
• Working voltage : 13A, 230V
• USB Output, 1A or 2.1A where applicable
Wiring Diagrams
• 1 gang • 2 gang
E
EARTH
E
N
SUPPLY
POLARITY CONNECTIONS
BROWN (RED) TO L − LIVE
BLUE (BLACK) TO N − NEUTRAL
GREEN / YELLOW (BARE EARTH
WIRES) TO E − EARTH
SUPPLY
N
L
POLARITY CONNECTIONS
BROWN (RED) TO L − LIVE
BLUE (BLACK) TO N − NEUTRAL
GREEN / YELLOW (BARE EARTH
WIRES) TO E − EARTH
NEUTRAL
LIVE
L
13A 250V ~
NEUTRAL
N
LIVE
L
EARTH
E
L N
EE
13A 250V ~
Safety - Suitable only for indoor installations Before starting any electrical work always switch off at the mains. If in any doubt consult a qualified electrician
Ensure that the earth is connected otherwise it will be unsafe. Wire / Wiring colours in accordance with IEE Wiring Regulations
Important - Please ensure to use the gasket supplied when installing this product. The gasket fits between the product & the wall & it prevents the possibility of
discolouration of the metal face plate due to moisture in your wall after fresh wallpaper / plastering
Maintenance - To help maintain the original finish of this product, wipe a soft cloth over the face plate periodically
Tel: +44 (0)161 745 7777 Fax: +44 (0)161 745 2777 / 736 2555 E.mail: [email protected] Web: www.selectricuk.co.uk
LGA Europe Limited, Cow Lane, Oldfield Road, Salford, Manchester, M5 4NB England
 Loading...