

Seitz roundshot, 6x17 Digital Instruction Manual
Instruction Manual Seitz 6x17 Digital - version 2.0 - August 2008 - © by Seitz Phototechnik AG / Switzerland www.roundshot.ch page 0
Seitz 6x17 Digital with Seitz D3 / D3-2500 Digital Scan Back
Software release:
4.05 (March 2013)
Instruction
Manual
Instruction Manual Seitz 6x17 Digital - version 2.0 - August 2008 - © by Seitz Phototechnik AG / Switzerland www.roundshot.ch page 1
Please note throughout the document that “Seitz D3 digital scan back” applies equally to the “Seitz D3 2500
digital scan back”. Differences between the two versions are mentioned wherever relevant and necessary.

CONTENTS
Page
1. System Overview
1.1 Seitz 6x17 Digital 4
1.2 Other compatible cameras 5
1.3 Computer / tablet PC 5
1.4 Accessories 6
2. How To Get Started
2.1 Step 1: Get the camera ready 8
2.2 Step 2: Get the computer ready 12
2.2.1 With tablet PC 12
2.2.2 With other computers 13
2.3 Step 3: Select shoot settings 19
2.4 Step 4: Adjust your settings 20
2.5 Step 5: Save the image 20
3. Seitz Roundshot D3 Software
3.1 Shoot menu 21
3.1.1 Shoot settings 24
3.1.2 Focusing Assistant 27
3.1.3 Zoom 28
3.1.4 Fit on screen 28
3.1.5 White balancing pipette 29
3.1.6 Load/save profile 29
3.1.7 Histogram 30
3.1.8 Start/stop 31
3.1.9 Save 31
3.2 Parameter menu 32
3.2.1 Colour 33
3.2.2 Save 34
3.2.3 Lens 35
3.2.4 Camera parameters 36
3.2.5 External devices 38
3.2.6 Scheduler 40
3.2.7 HDR 41
3.2.8 Custom 43
3.2.9 Info 44
Instruction Manual Seitz 6x17 Digital - version 4.05 - May 2013- © by Seitz Phototechnik AG / Switzerland www.roundshot.ch page 2

Page
4. Tips & resources (how to...)
4.1 … obtain the best sharpness 45
4.2 … control the exposure 47
4.3 … use variation with manual exposure 50
4.4 … compute the capture time 52
4.5 … minimise noise at image capture 52
4.6 … shift 53
4.7 . . . use a USB GPS device 54
4.8 . . . program the scheduler 56
4.9 . . . read + edit metadata 59
CONTENTS
7. Technical data 96
Impressum
98
5. Workflow
5.1 Introduction 64
5.2 RAW workflow: Seitz raw converter 65
5.3 RGB workflow 76
5.4 HDR workflow 78
5.5 Additional post production in Photoshop 85
6. Maintenance
6.1 Power supply: AC power adaptor and battery charger 88
6.2 Reset of scan back 89
6.3 Camera maintenance 90
6.4 “Club D3” 92
6.4.1 International warranty + product registration 92
6.4.2 Software + firmware updates 93
6.5 Return of equipment / recycling 95
Instruction Manual Seitz 6x17 Digital - version 4.05 - May 2013- © by Seitz Phototechnik AG / Switzerland www.roundshot.ch page 3
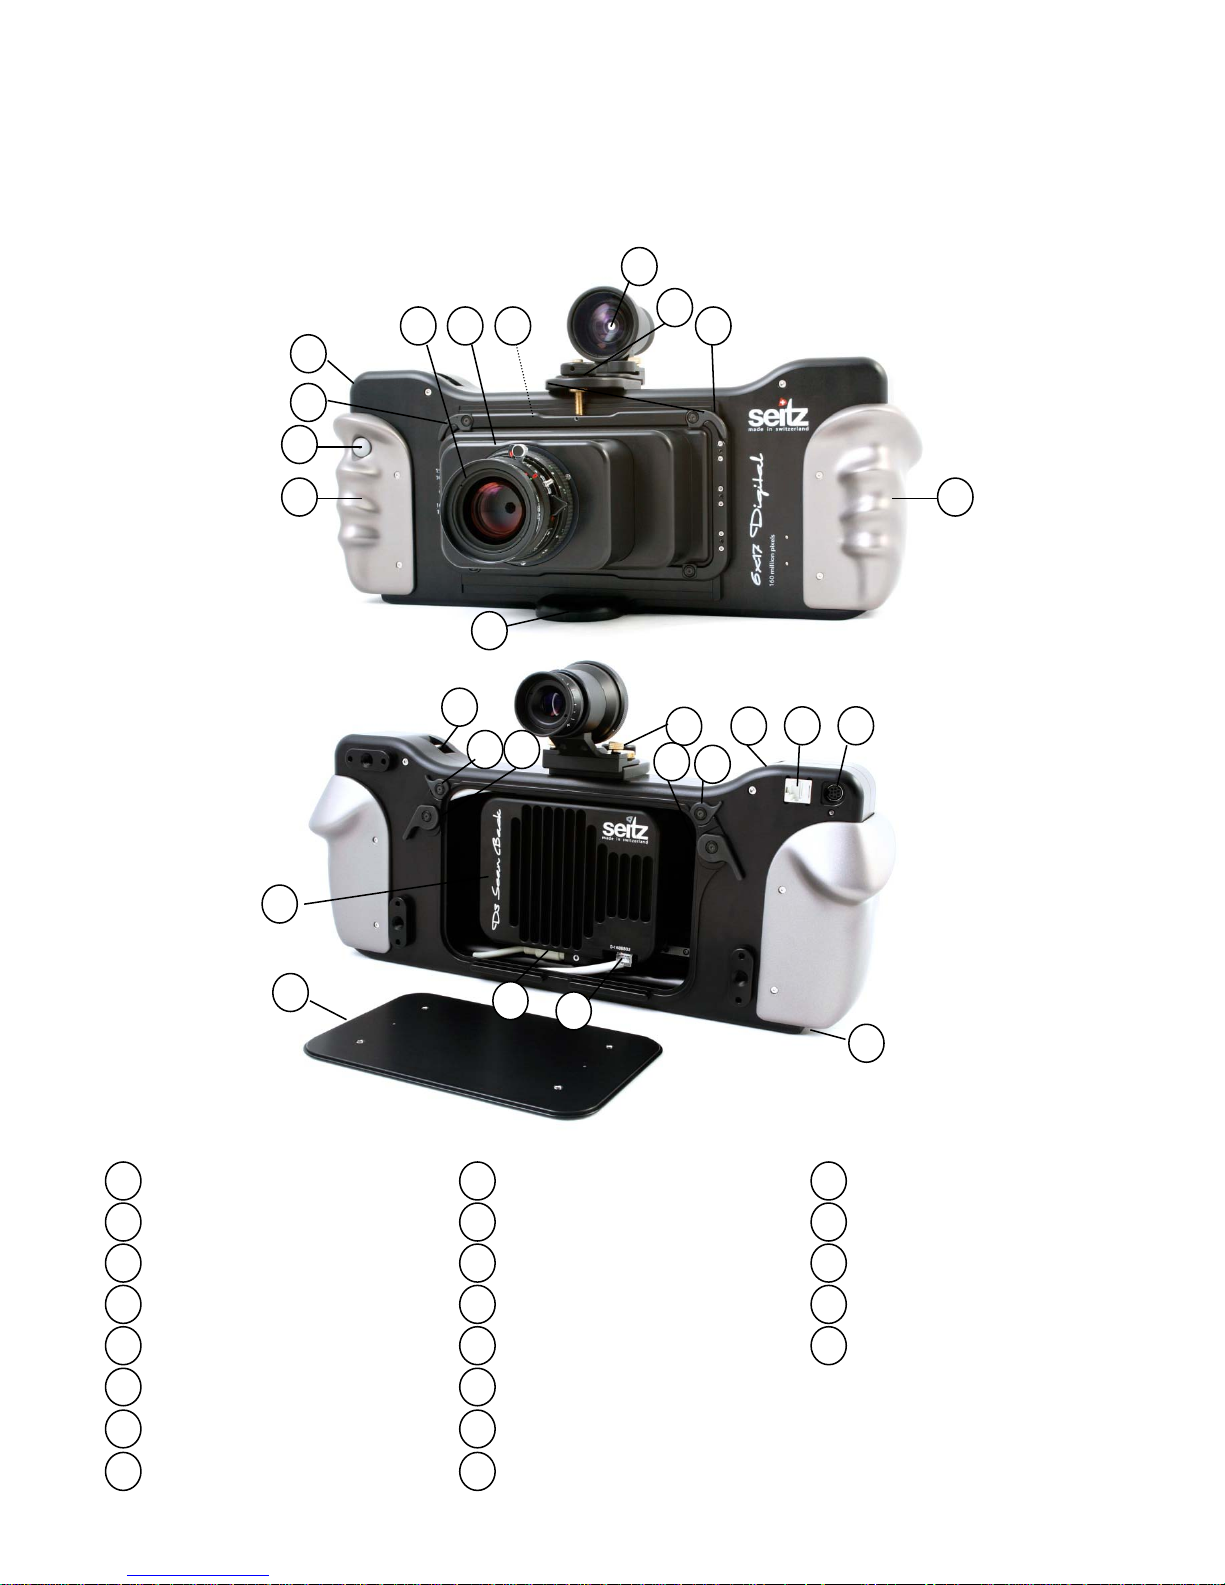
1. System Overview
1.1 Seitz 6x17 Digital
1
2
3
4
5
6
Camera body
7
8
9
10
11
12
13
14
15
16
17
18
19
20
21
Lens
Lens tube
Lens adaptor*
Lens brackets
Viewfinder
Viewfinder release
Shift wheel
Hand grips
Release + on button
Tripod mount
Attachment for neck strap
Ethernet socket
Power socket
Loading gate brackets
Brackets to attach compact
computer
Loading gate
Digital scan back
Power cable/connector
Ethernet cable/connector
Battery + battery charger
socket
1
2 3 4 5
5
6
7
9 9
10
8
11
12
12
15
15
17
13 14
18
19
20
16
16
21
* For Linhof 617 and Fuji 617 lenses
Instruction Manual Seitz 6x17 Digital - version 4.05 - May 2013- © by Seitz Phototechnik AG / Switzerland www.roundshot.ch page 4
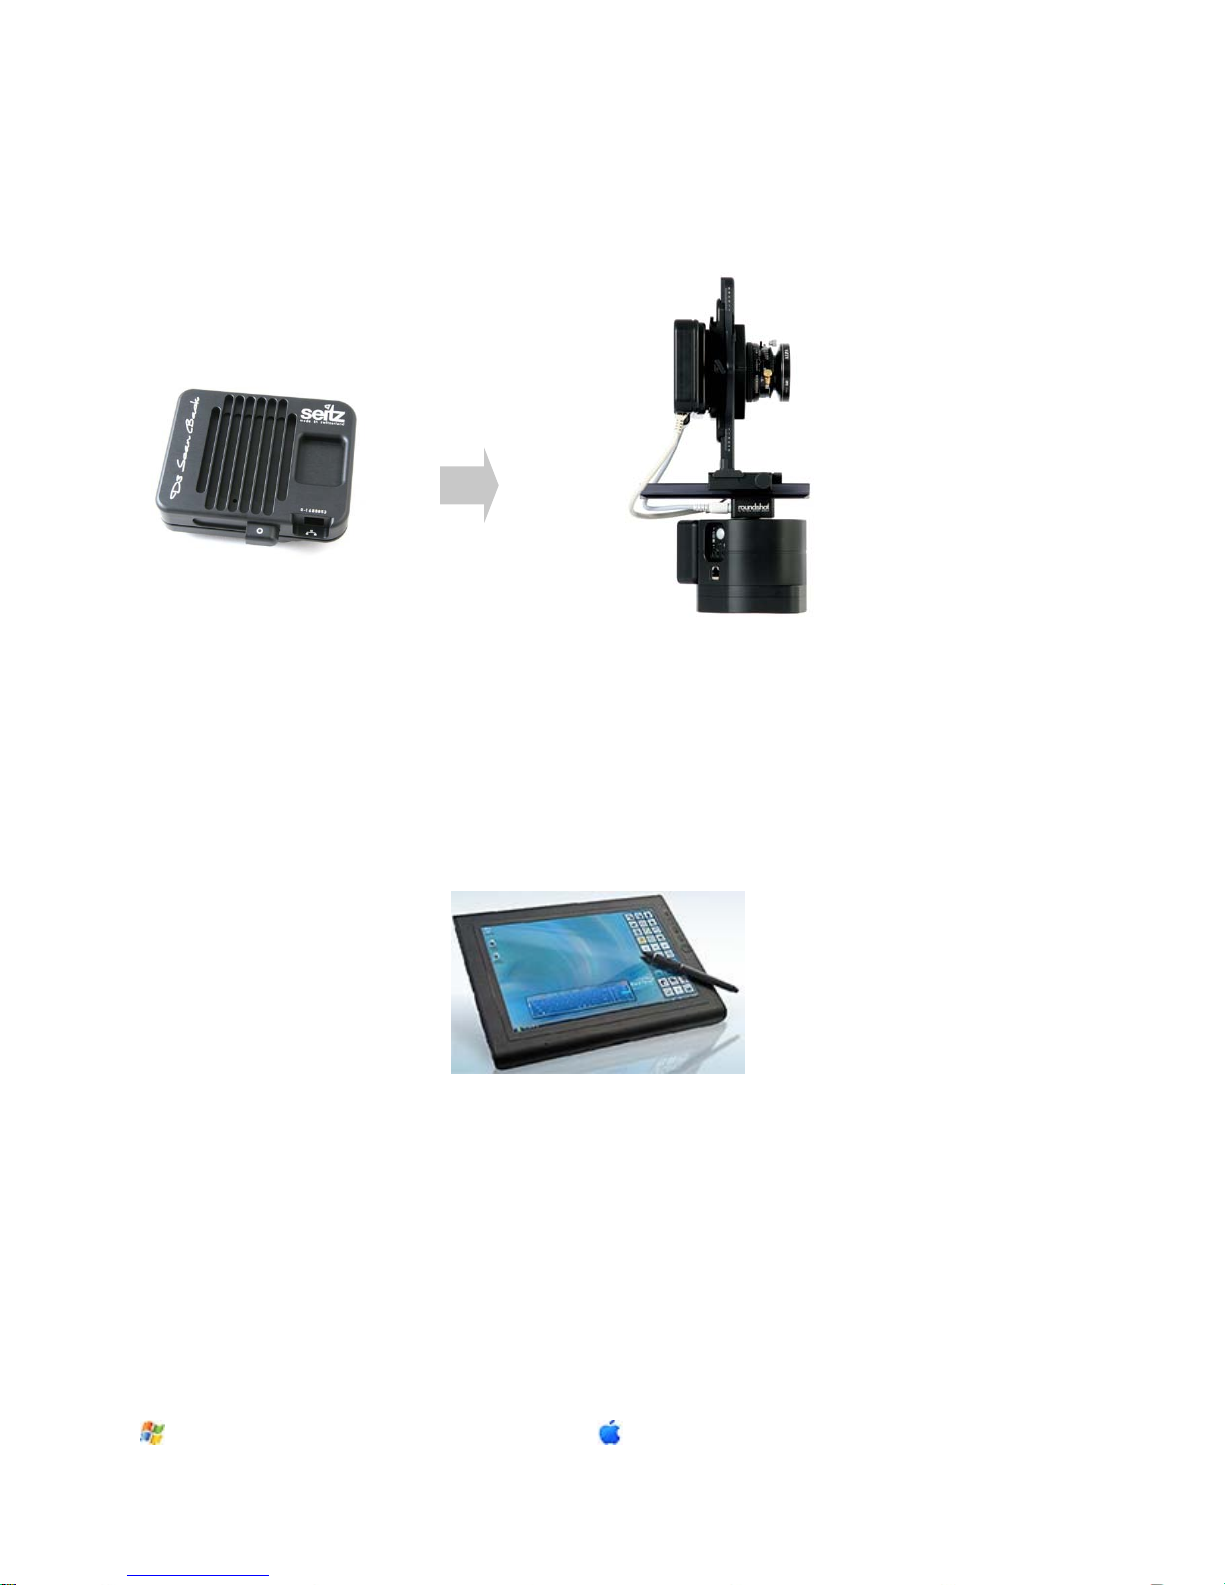
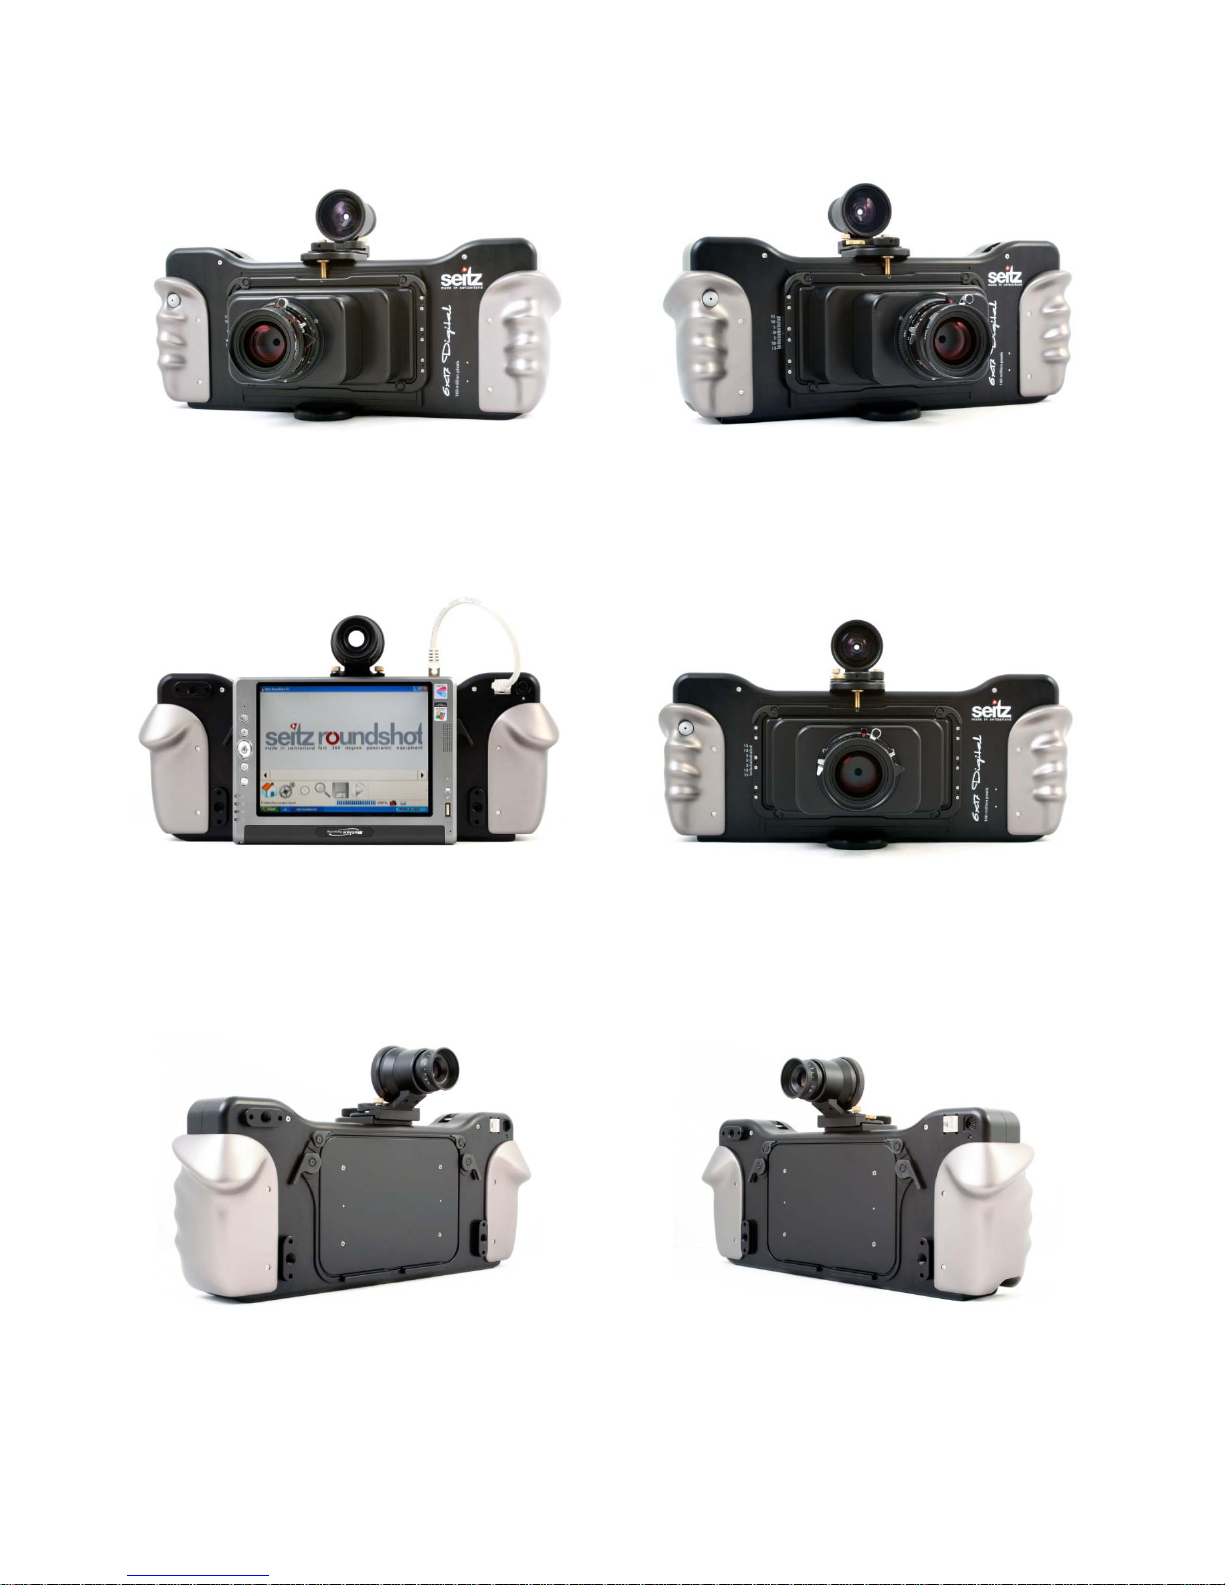
1.2 Other compatible cameras
The Seitz D3 Digital Scan Back can be removed from the Seitz 6x17 Digital and attached
to other camera bodies. At the moment of release of this manual it can be used with:
Roundshot D3
The D3 software detects the attached camera and adapts its software parameters
automatically (for example, the image format).
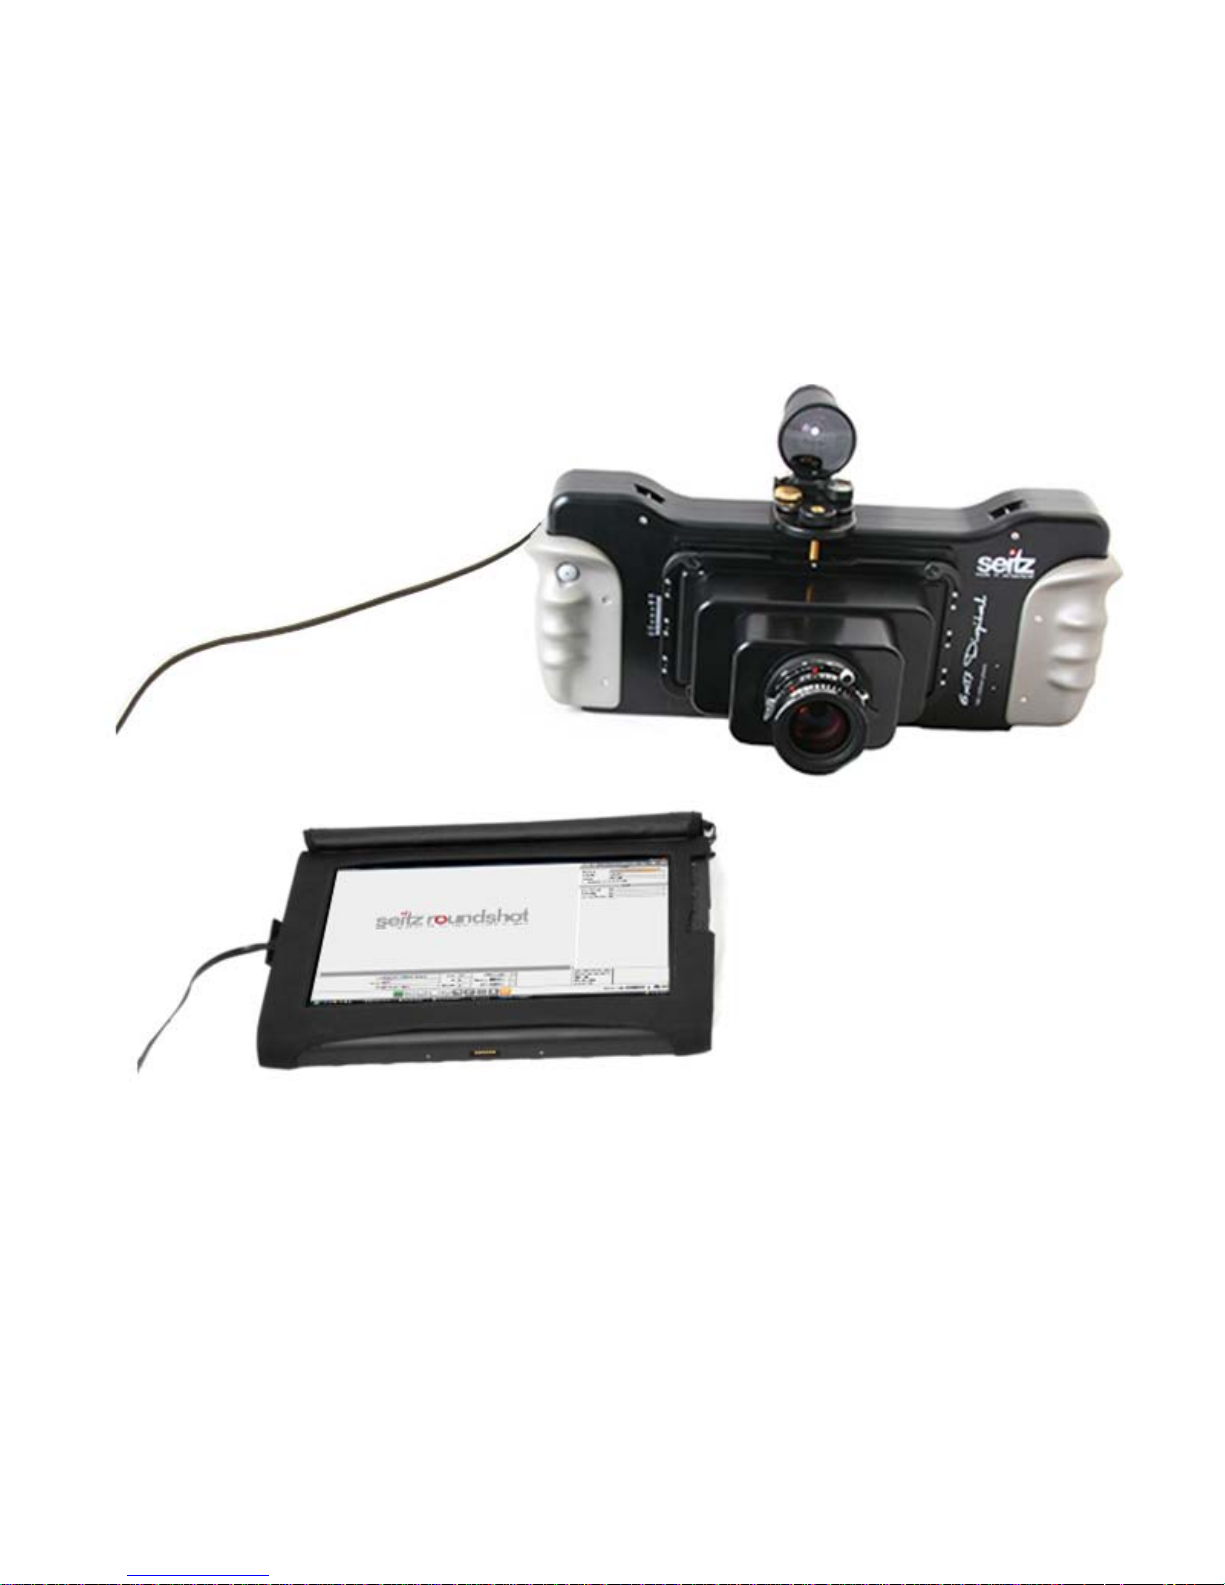
1.3 Computer / tablet PC
The camera is controlled by a connected computer (tablet PC) which also serves to
visualise and store the images. For best convenience we recommend using a tablet PC
with touch screen, for example a Motion Tablet PC:
It is also possible to use the camera with other computers. Important factors when
selecting a suitable computer are:
- Speed of operating system (32-bit or 64-bit) – ideally 64-bit machines
- speed of the processing unit (dual core, quad core)
- available RAM,
- Gigabit Ethernet (for fast image transfer)
- size and speed of the hard disks (preferrably fast SSD drives for fast image saving)
Currently the following operating systems can be used (both 32-bit and 64-bit):
• Windows XP
• Windows VISTA
• Windows 7
With Intel processors only:
• Mac OS 10.5
• Mac OS 10.6
Instruction Manual Seitz 6x17 Digital - version 4.05 - May 2013- © by Seitz Phototechnik AG / Switzerland www.roundshot.ch page 5
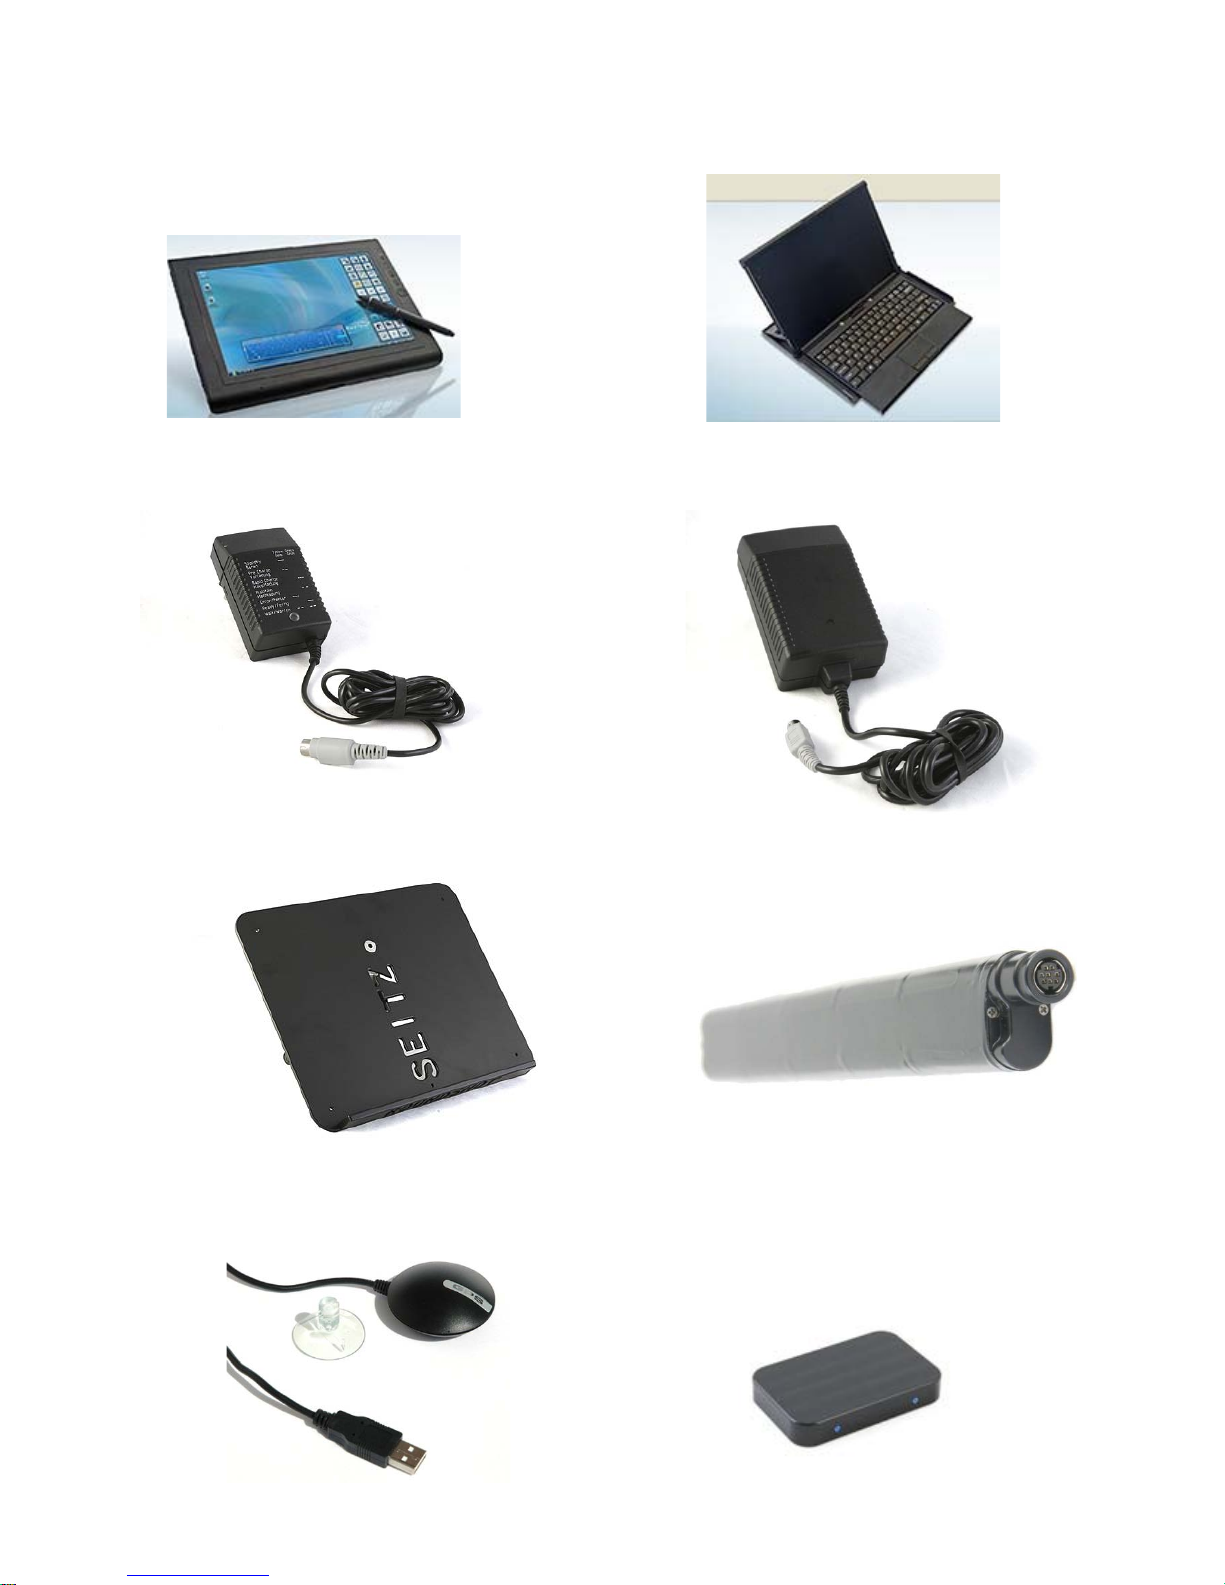
1.4 Accessories
Battery charger Power supply (mains adaptor)
Laptop holder to attach on a tripod
Tablet PCs and accessories:
NiMh battery 12V 4.5A
USB GPS device: GlobalSat BU-353 USB
Front glass cover for the
Seitz D3 digital scan back
Mobile Keyboard for Motion J3400
Motion J3400
Instruction Manual Seitz 6x17 Digital - version 4.05 - May 2013- © by Seitz Phototechnik AG / Switzerland www.roundshot.ch page 6

1.4 Accessories (continued)
Power plugs for different countries:
Viewfinder:
Continental Europe United Kingdom
North America (USA,
Canada, Mexico) & Japan
Australia & New Zealand
Viewfinder masks:
(interchangeable for different lenses)
Instruction Manual Seitz 6x17 Digital - version 4.05 - May 2013- © by Seitz Phototechnik AG / Switzerland www.roundshot.ch page 7
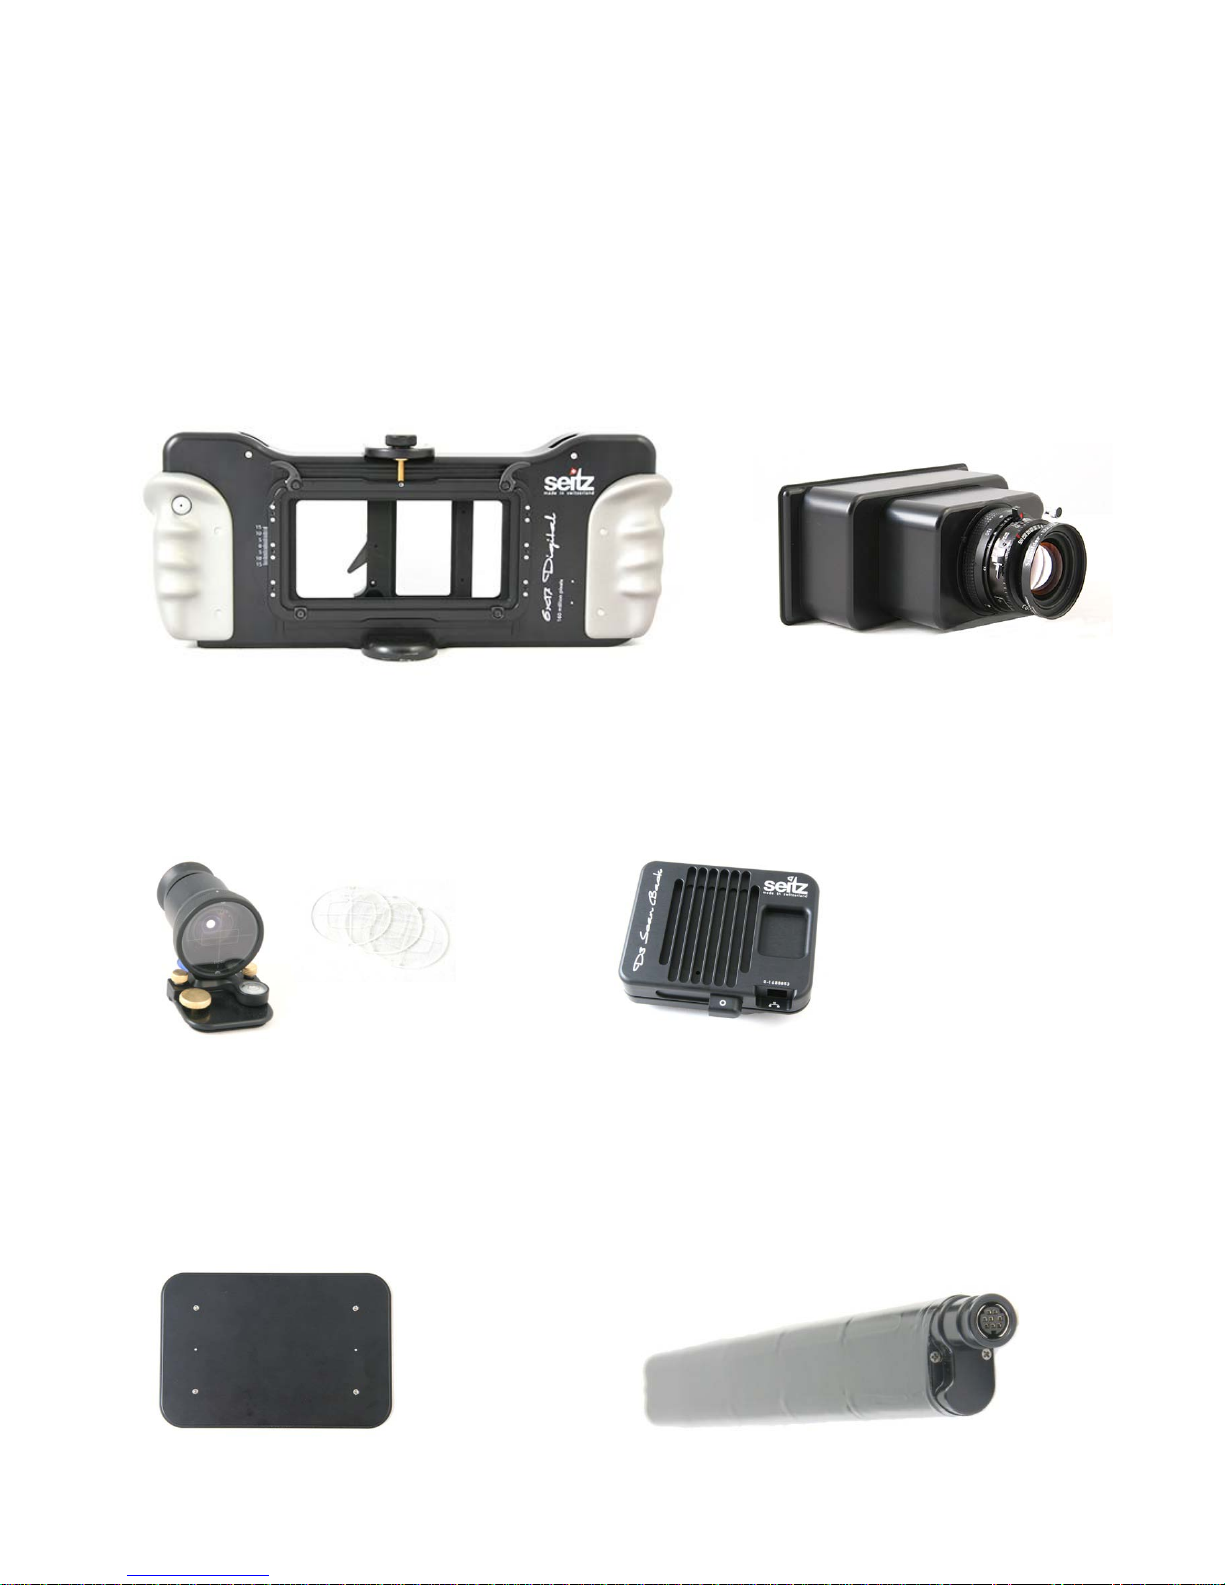
2.1 Step 1: Get the camera ready
2. How To Get Started
Camera body Lens / lens adaptor
Viewfinder and
viewfinder masks
(exchangeable)
Digital scan back
Loading gate Battery
Instruction Manual Seitz 6x17 Digital - version 4.05 - May 2013- © by Seitz Phototechnik AG / Switzerland www.roundshot.ch page 8
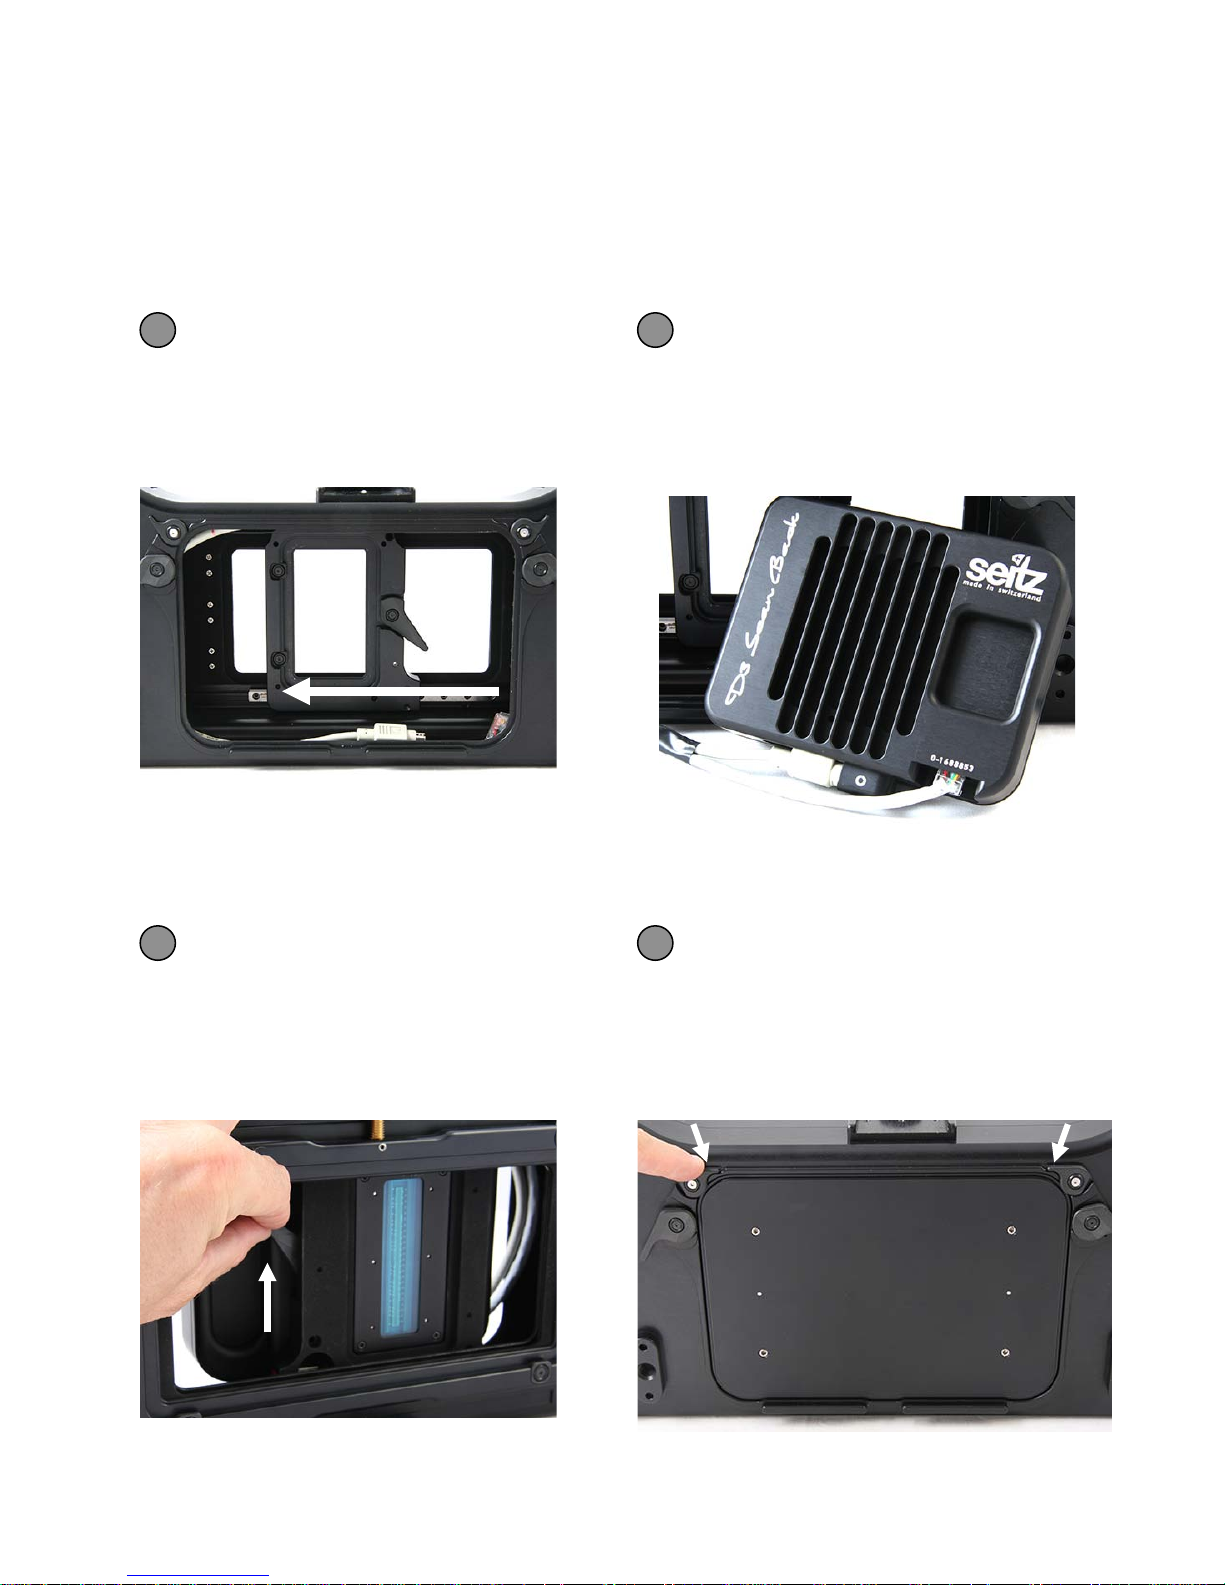
Slide the holder for the digital
scan back to the middle of the
camera body
Connect the ethernet and power
cables that are inside the camera
body with the digital scan back
1 2
2.1 Step 1: Get the camera ready (continued)
The Seitz 6x17 Digital camera is delivered fully assembled. When disassembled it can
be reassembled in the following way:
Insert the digital scan back into
the Seitz 6x17 Digital camera
body and attach it with the lever
Attach the loading gate and close it
with the loading gate brackets
3 4
Instruction Manual Seitz 6x17 Digital - version 4.05 - May 2013- © by Seitz Phototechnik AG / Switzerland www.roundshot.ch page 9

2.1 Step 1: Get the camera ready (continued)
5
Attach the lens and close the lens brackets firmly
Place the correct viewfinder mask
within the viewfinder
6
Attach the viewfinder on the camera
7
Turn anticlockwise to
open
(clockwise to
close)
Instruction Manual Seitz 6x17 Digital - version 4.05 - May 2013- © by Seitz Phototechnik AG / Switzerland www.roundshot.ch page 10
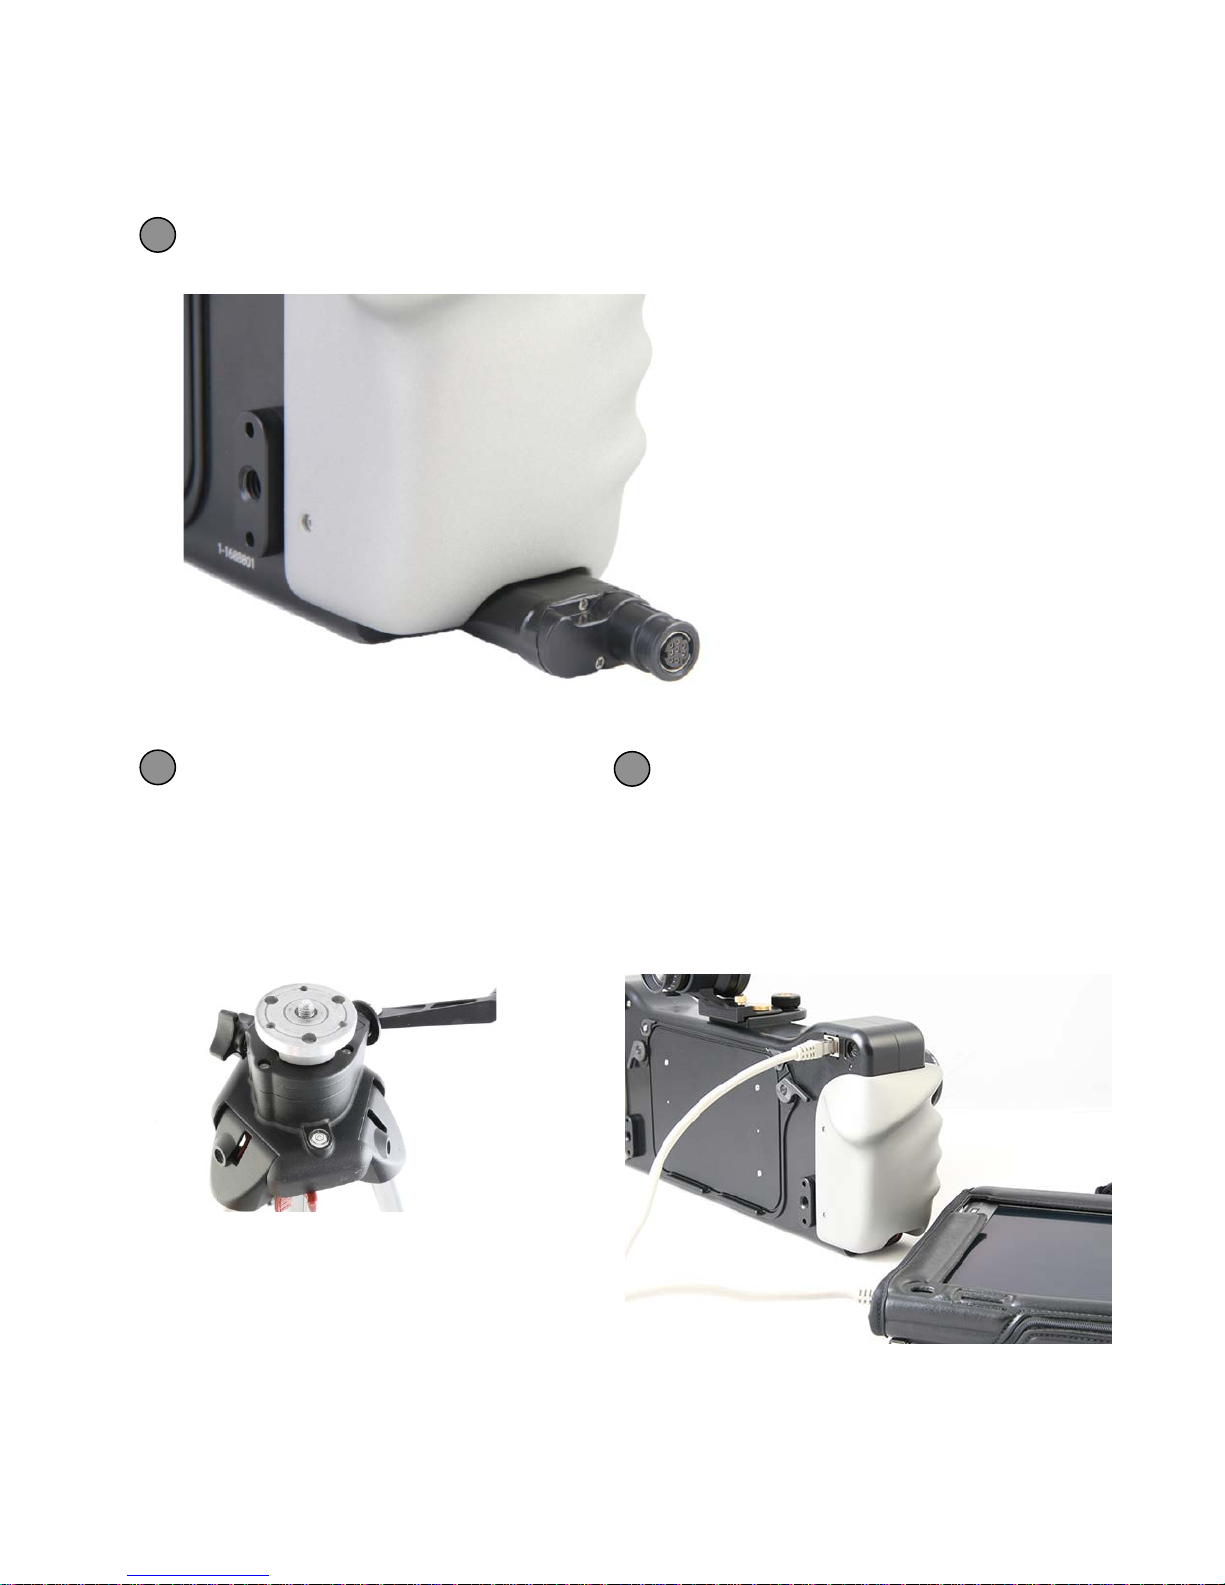
2.1 Step 1: Get the camera ready (continued)
Place the camera on a solid
tripod. The Seitz 6x17 Digital
camera comes with a large (3/8‘‘)
thread. For smaller tripods (1/4‘‘
thread) can be inserted into the
camera bottom plate.
Connect the 3m ethernet cable*
by inserting it in the ethernet
socket on the camera and the
computer**:
* The ethernet cable can be of any distance
** It is also possible to operate the camera in a network
9
10
Insert the battery to the camera body
8
Instruction Manual Seitz 6x17 Digital - version 4.05 - May 2013- © by Seitz Phototechnik AG / Switzerland www.roundshot.ch page 11
2.2 Step 2: Get the computer ready
For cameras supplied with a tablet PC the Seitz Roundshot D3 software is already
installed on the tablet PC and the network configuration is complete.
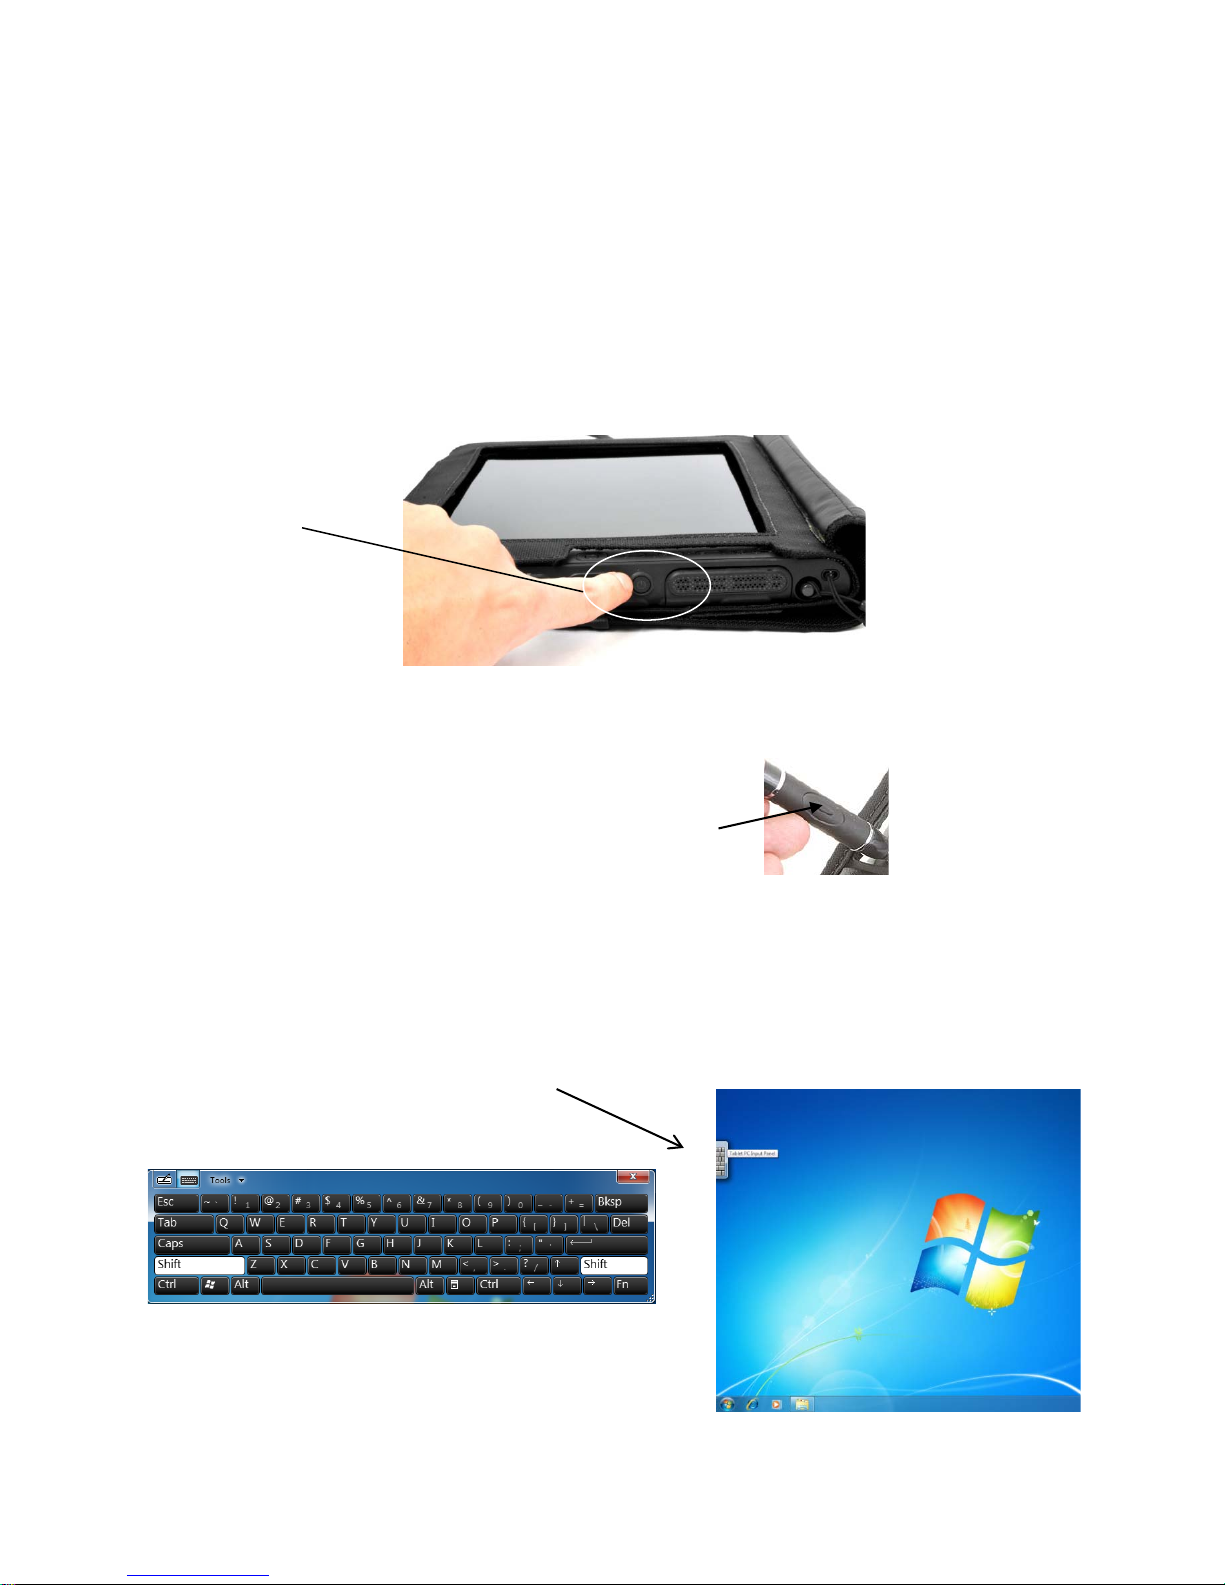
Start the tablet PC by pushing the on/off button on the right side of the computer.
The start-up takes approximately one minute:
„on/off“ button
2.2.1 With tablet PC (supplied with camera)
The tablet PC is operated with the supplied digital pen via touch screen. To activate
the „right mouse click“ press the button and hold:
When the computer has been idle and goes to standby, it can be reactivated by
pushing the on/off button.
If a password for the tablet PC has been set and the tablet PC is already part of a
domain, the logon screen will appear.
Activate the electronic keyboard by sliding the digital pen over the left margin of the
screen..
„right mouse click“
electronic keyboard Windows 7
Instruction Manual Seitz 6x17 Digital - version 4.05 - May 2013- © by Seitz Phototechnik AG / Switzerland www.roundshot.ch page 12

2.2 Step 2: Get the computer ready
The program directory contains two folders:
• HMI (Human Machine Interface)
• PDS (D3 Imaging Server)
The „Human Machine Interface“ represents the graphical user interface by which the
camera is controlled and the images are displayed. The „D3 Imaging Server“ handles
all image data.
Create the following shortcuts on your desktop:
Starts the Seitz Roundshot D3 software
Double click the icon. The program set-up will
start automatically and the software will be
installed in the following directory:
C:\Program Files\Seitz\Digital3
For all other computers download the latest software version from the „Club D3“
website (www.roundshot.ch
) and load the Seitz Roundshot D3 installer program (exe)
on your computer. For more information on how to access the „Club D3“ website
please refer to section 6.4.
Shortcut to the Digital3 images folder
(to C:\Program Files\Seitz\Digital3\PDS\images)
2.2.2 With all other computers
Important: Make sure to install the software using an account which has administrator
rights.
SeitzRoundshot-4.0-windows-installer.exe
Instruction Manual Seitz 6x17 Digital - version 4.05 - May 2013- © by Seitz Phototechnik AG / Switzerland www.roundshot.ch page 13
2.2 Step 2: Get the computer ready
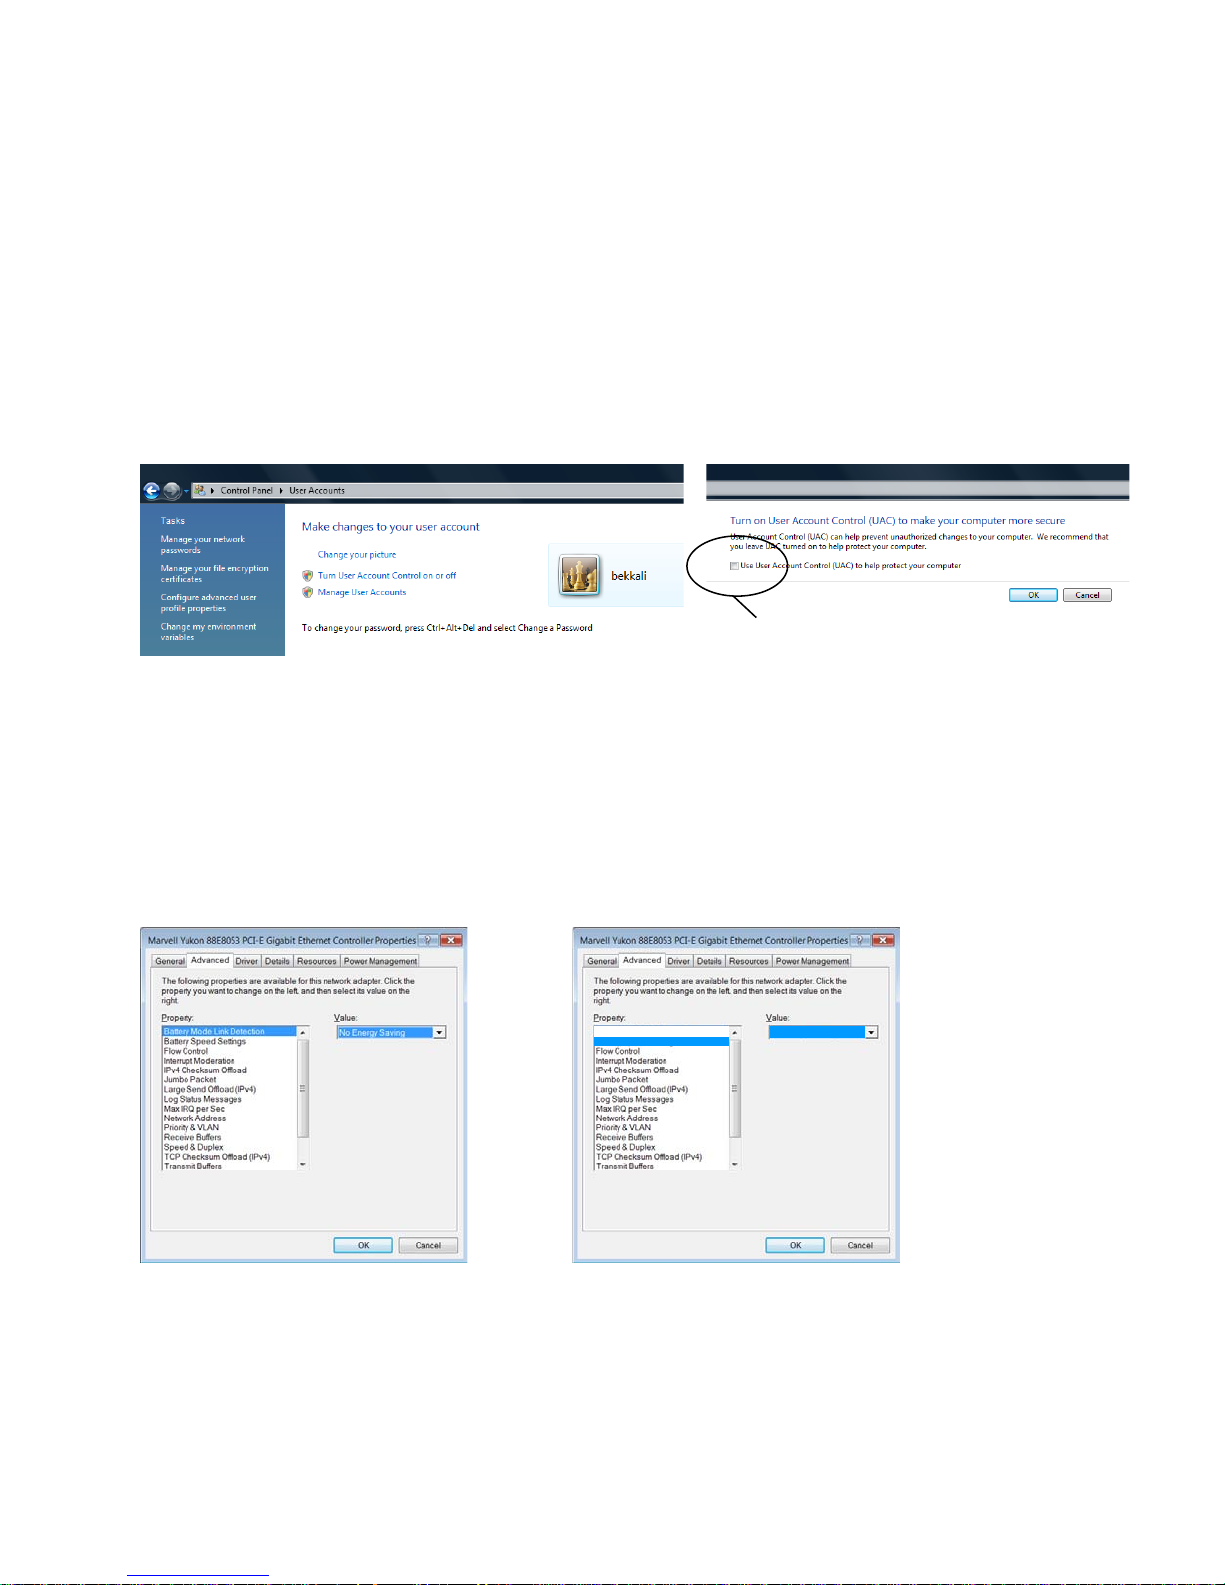
Deactivate User Account Control for Windows VISTA and Windows 7
Windows VISTA has an additional security layer built in which prompts the user before
execution of an application. To run the Seitz Roundshot D3 software this additional
security layer needs to be turned off. Open control panel, select user account, select
“Turn user account control on or off”, deselect the “Use user account control”:
2.2.2 With other computers (continued)
Set up gigabit ethernet controller for maximum speed (Windows XP , VISTA or 7)
By default the gigabit ethernet controller card in Windows XP or VISTA is set to
maximum battery saving. To connect to the camera quickly and to allow a maximum
transfer speed it is necessary to change the battery speed and link detection speed.
Open the device manager, right mouse-click on properties of the gigabit ethernet
controller, select tab “Advanced”:
Turn off all non-essential computer functions and adjust screen brightness
Functions such as WLAN and bluetooth are not essential for image-taking and should
therefore be turned off. This can be done most easily in the computer BIOS when
starting up the computer (for tablet PCs right mouse click, select “BIOS”). The screen
settings for a Motion tablet PC can be set using the Motion dashboard (click button on
the right of the screen).
deselect
Batter y M ode Lin k D etec ti o n
Batter y Speed S etting s
Full S peed
Instruction Manual Seitz 6x17 Digital - version 4.05 - May 2013- © by Seitz Phototechnik AG / Switzerland www.roundshot.ch page 14
2.2 Step 2: Get the computer ready (continued)
2.2.2 With all other computers (continued)
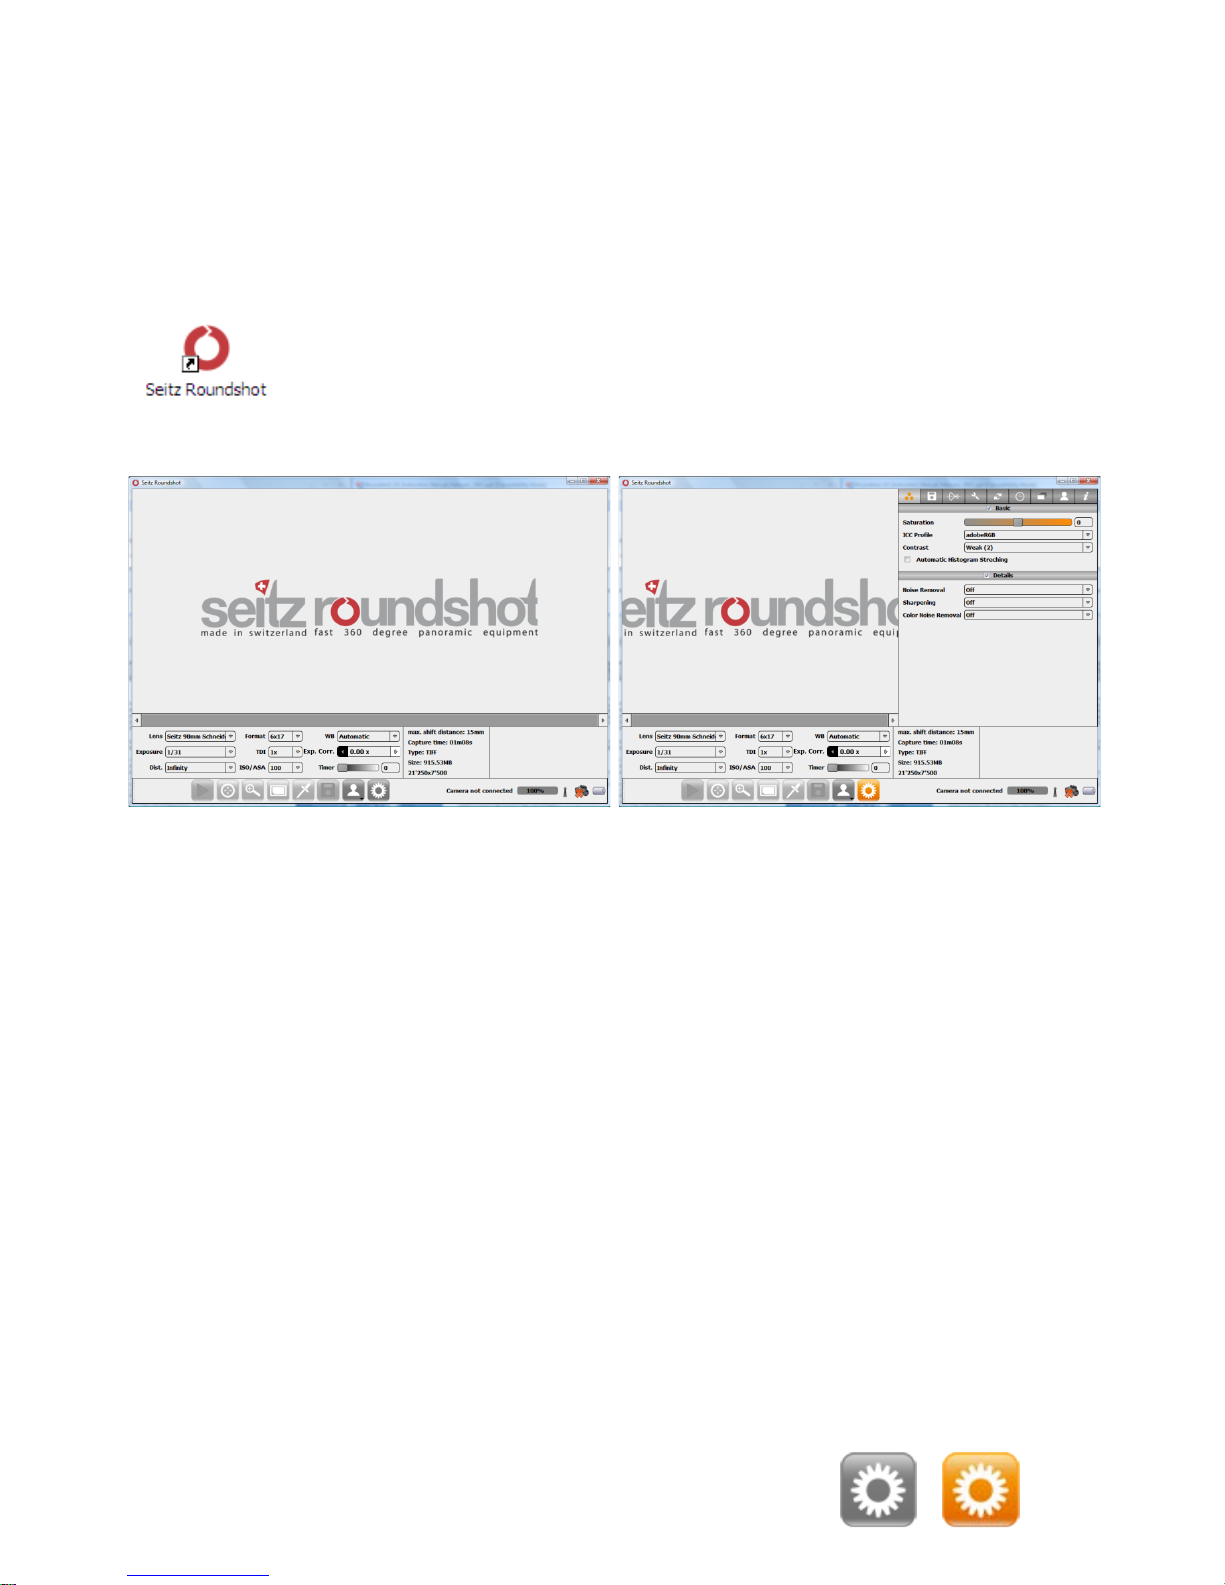
Shoot menu Parameter menu
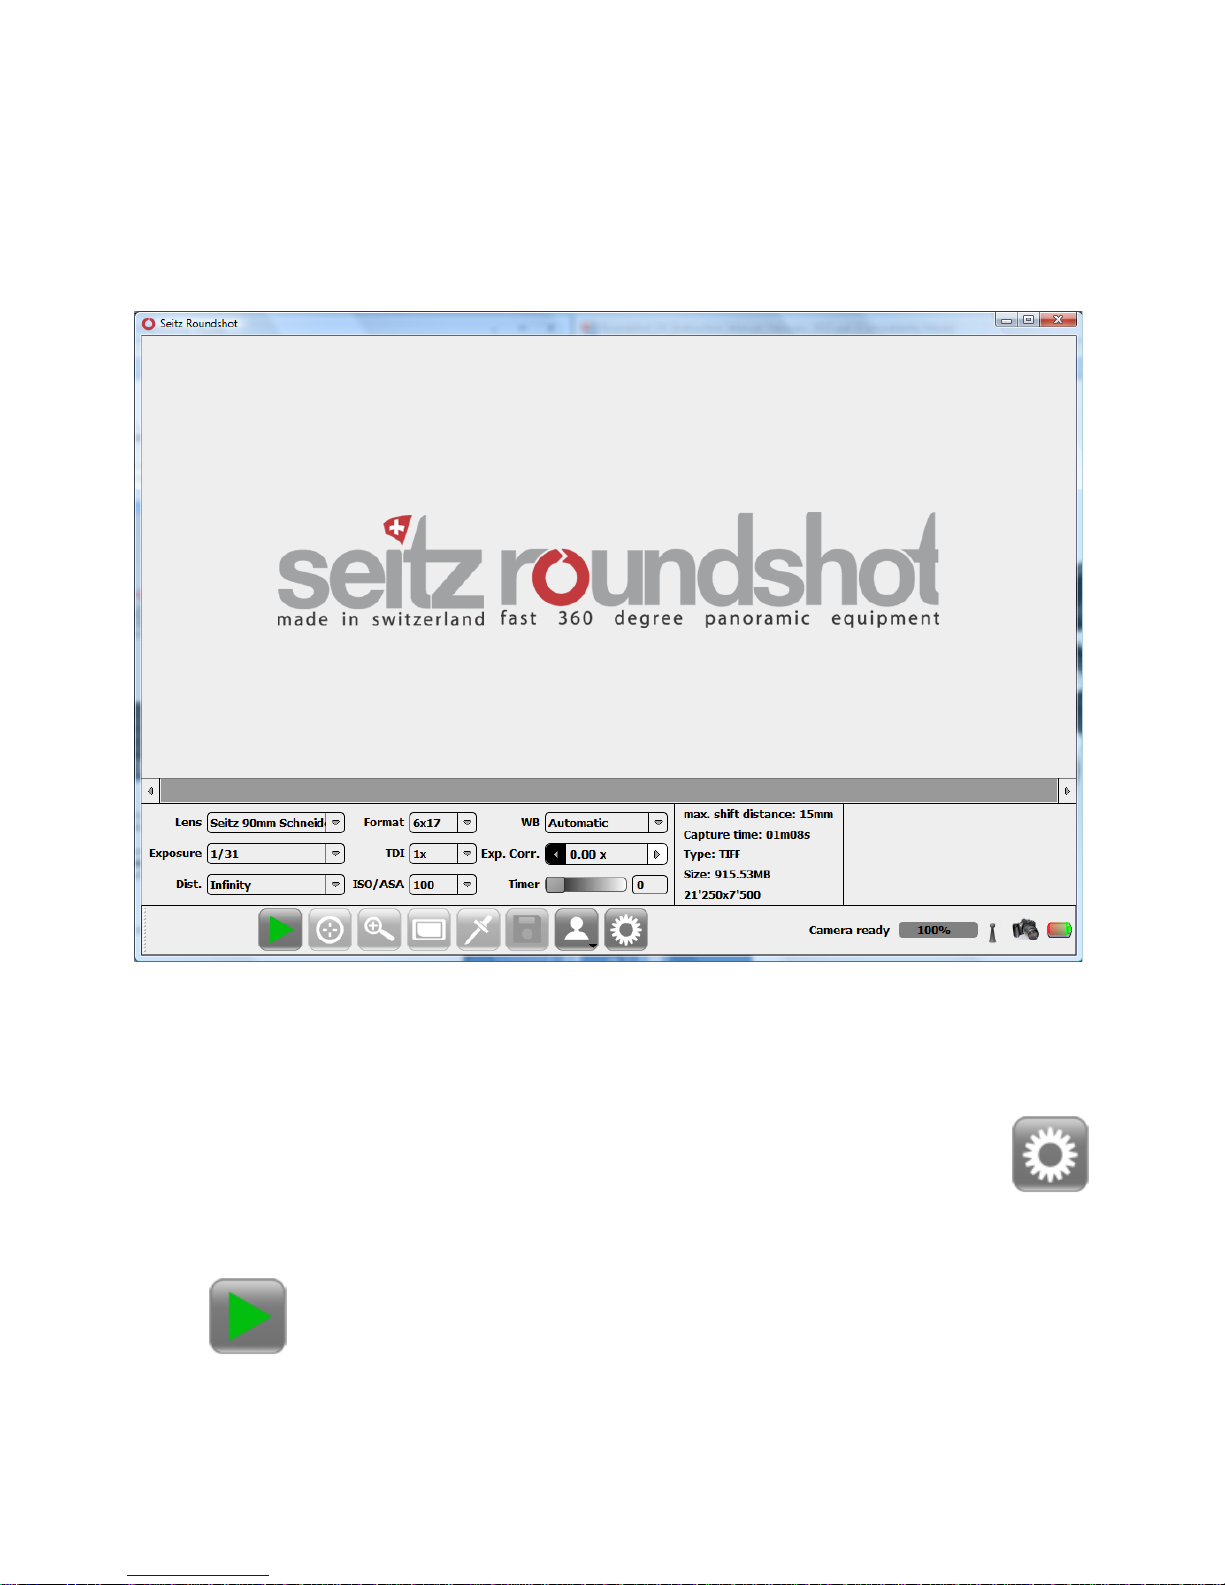
Start the Seitz D3 software by double-clicking the shortcut on the desktop:
The software opens directly in the “Shoot” menu:
The “Shoot” menu is used for operating the camera, image taking, displaying
previews, and saving. It also allows quick access to most frequent image capture
parameters such as lens (favourite lens list), exposure time, white balancing mode or
ISO/ASA. Camera status information such as connection or battery level and image
data such as histogram or size is indicated in the information tab.
To open or close the “Parameter” menu press:
The “Parameter” menu contains camera, software and image workflow advanced
parameters. It is structured into different tabs for better accessibility. 9 tabs are
available:
• Colour: raw conversion parameters
• Save: the output file options
• Lens: manufacturer lens list and special lenses
• Camera parameters: camera adjustment parameters
• External device: allows to connect and control external devices (GPS, Compass)
• Scheduler: programming of camera tasks
• HDR: mixing of DNG files into 32bit “.exr” files
• Custom: interface options
• Info: camera software and firmware information and a service menu
Instruction Manual Seitz 6x17 Digital - version 4.05 - May 2013- © by Seitz Phototechnik AG / Switzerland www.roundshot.ch page 15

2.2 Step 2: Get the computer ready (continued)
Press the „power on“ button on the camera to start the camera connection process.
The network connection icon shows the ongoing process. A network pop-up
confirms that the connection is established.
If the camera connection cannot be established automatically the “Camera not
connected” message appears in the lower left hand corner of the software:
The green LED (previously continuous green)
now starts to blink. The connection is confirmed
in the D3 software by the „Camera ready“
message which appears in the lower right hand
corner of the software. At the same time a small
pop-up window showing camera information as
IP address will appear in the lower right hand
corner of the software:
In the “shoot” menu click right on the camera connection icon:
The software searches in the network for
available cameras and displays them in a
list (with their IP addresses).
Click on the camera name to start the
connection.
If the camera cannot be connected it is possible to establish the connection by
clicking on
Establish the camera connection by confirming with “OK”.
Instruction Manual Seitz 6x17 Digital - version 4.05 - May 2013- © by Seitz Phototechnik AG / Switzerland www.roundshot.ch page 16
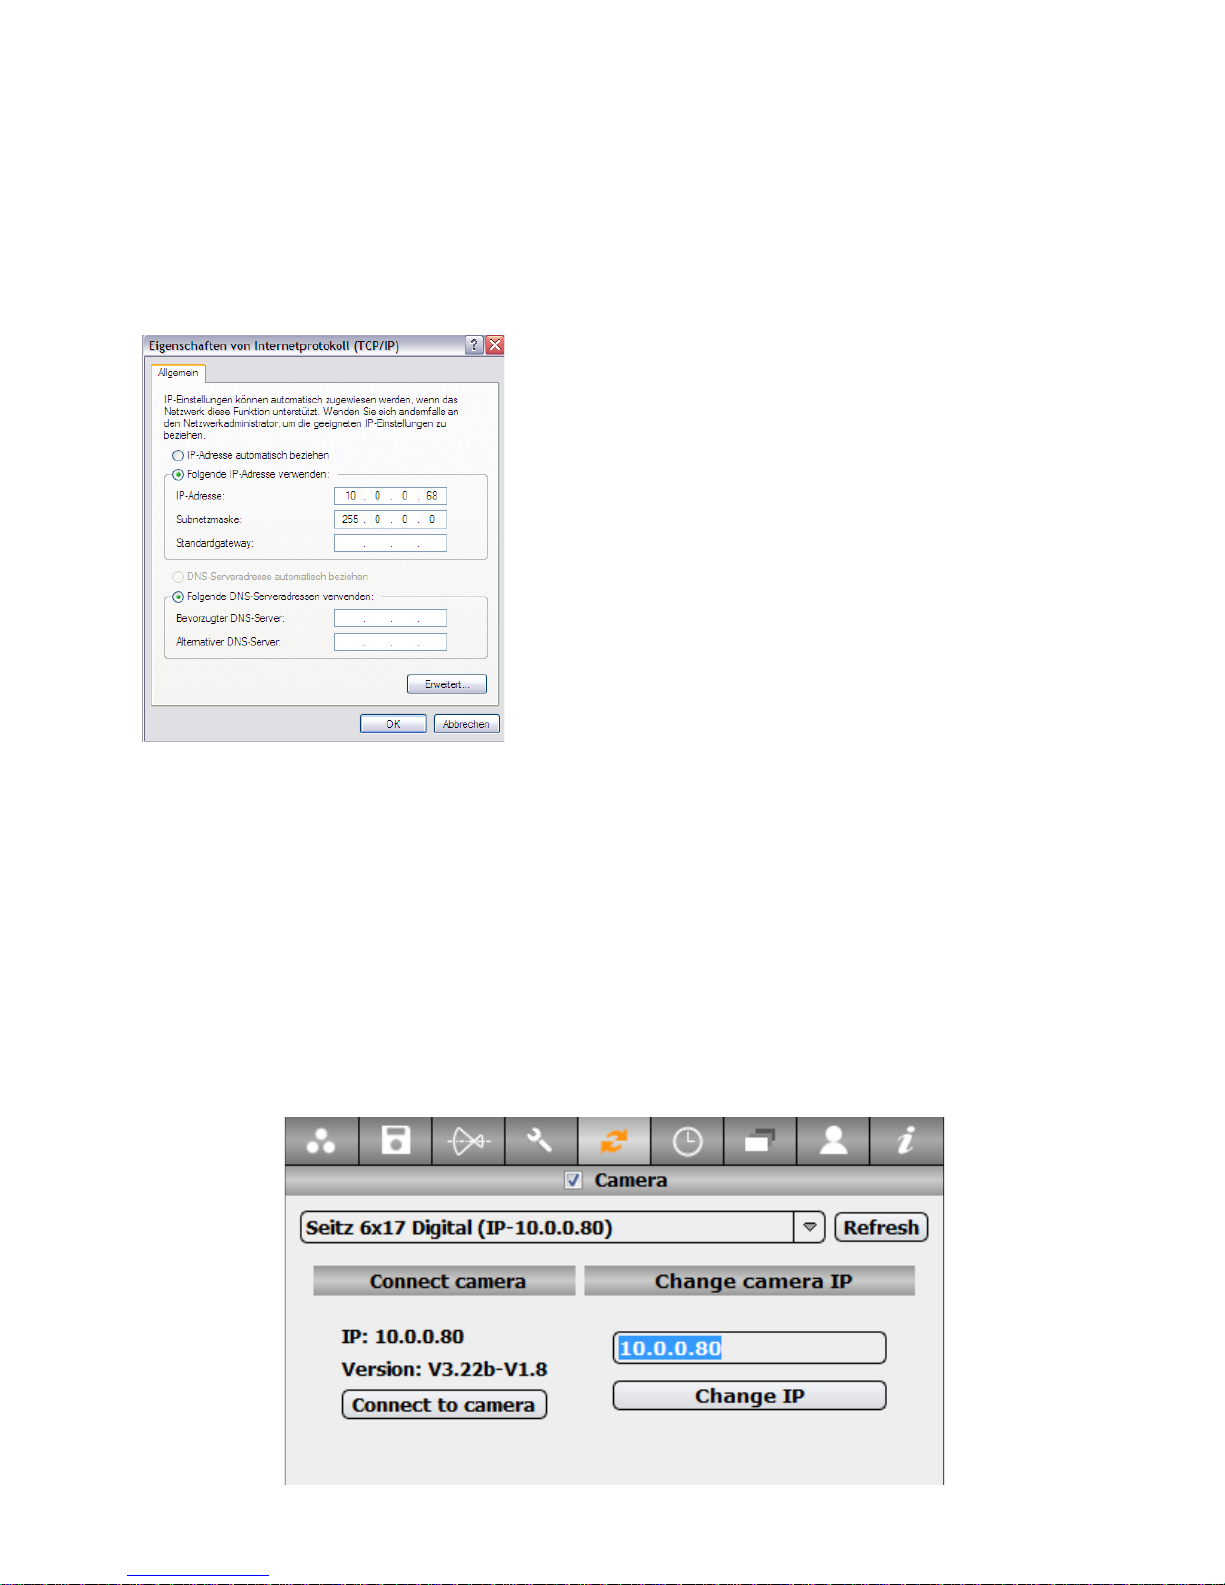
2.2 Step 2: Get the computer ready (continued)
It is also possible to change the camera IP to bring it into a desired range (for
example: 192.168.178.xx). It is important that the computer TCP/IP properties has
the same IP range than the camera (for example: 192.168.178.10). Open the external
device tab (see section 3.2.5 for more details), select the camera and change its IP
address :
If you would still like to connect to internet while working with the camera, then set
the same standard gateway network IP as your network (for example
192.168.178.xx), the same subnet (for example 255.255.255.0) and the same DNS
server (for example 192.168.178.1). Ask your system operator for assistance.
Open network connections of your
computer.
Open LAN connection.
Choose „internet protocol TCP/IP“ and
„properties“.
Choose „fixed IP“ and enter the following IP
address: 10.0.0.68
Subnet mask: 255.0.0.0
If the camera cannot be detected, open the network properties and check the settings.
It is important that the network uses an IP in the same range (but not identical) as the IP
of the camera (digital scan back) and that both are located in the same subnet:
Instruction Manual Seitz 6x17 Digital - version 4.05 - May 2013- © by Seitz Phototechnik AG / Switzerland www.roundshot.ch page 17
2.2 Step 2: Get the computer ready (continued)
The Seitz 6x17 Digital is now ready for image taking.
Instruction Manual Seitz 6x17 Digital - version 4.05 - May 2013- © by Seitz Phototechnik AG / Switzerland www.roundshot.ch page 18
2.3 Step 3: Select shoot settings
The next step consists in defining the parameters for image taking. Here is an
example of possible settings for a first image:
Select the desired shoot parameters: lens, exposure time, focusing distance,
angle, TDI stages and ISO/ASA.
If the desired lens is not in the list press the parameter button and select the
values in the “Parameter/lens” menu. For more detailed information on
image parameters and software functions please consult section 3.2
“Parameter menu”.
Press to start a scan.
Instruction Manual Seitz 6x17 Digital - version 4.05 - May 2013- © by Seitz Phototechnik AG / Switzerland www.roundshot.ch page 19
2.4 Step 4: Adjust your settings
Repeat these steps until the image is perfect.
Zoom to check the sharpness.
Focus with the focusing assistant, don‘t forget to adjust the distance
setting In the software (Optional for the 6x17 camera).
Save the image and transfer the image on your computer for postprocessing.
2.5 Step 5: Save the image
Once the image has been saved the icon turns green.
Adjust the settings. For example, change the image angle, the exposure speed or
the sensitivity of image capture (TDI Stages, ISO/ASA).
Fine control the exposure time using the exposure correction slider. It is also
possible to change the white balancing mode from automatic to presets or manual
modes .
Create another scan.
Instruction Manual Seitz 6x17 Digital - version 4.05 - May 2013- © by Seitz Phototechnik AG / Switzerland www.roundshot.ch page 20
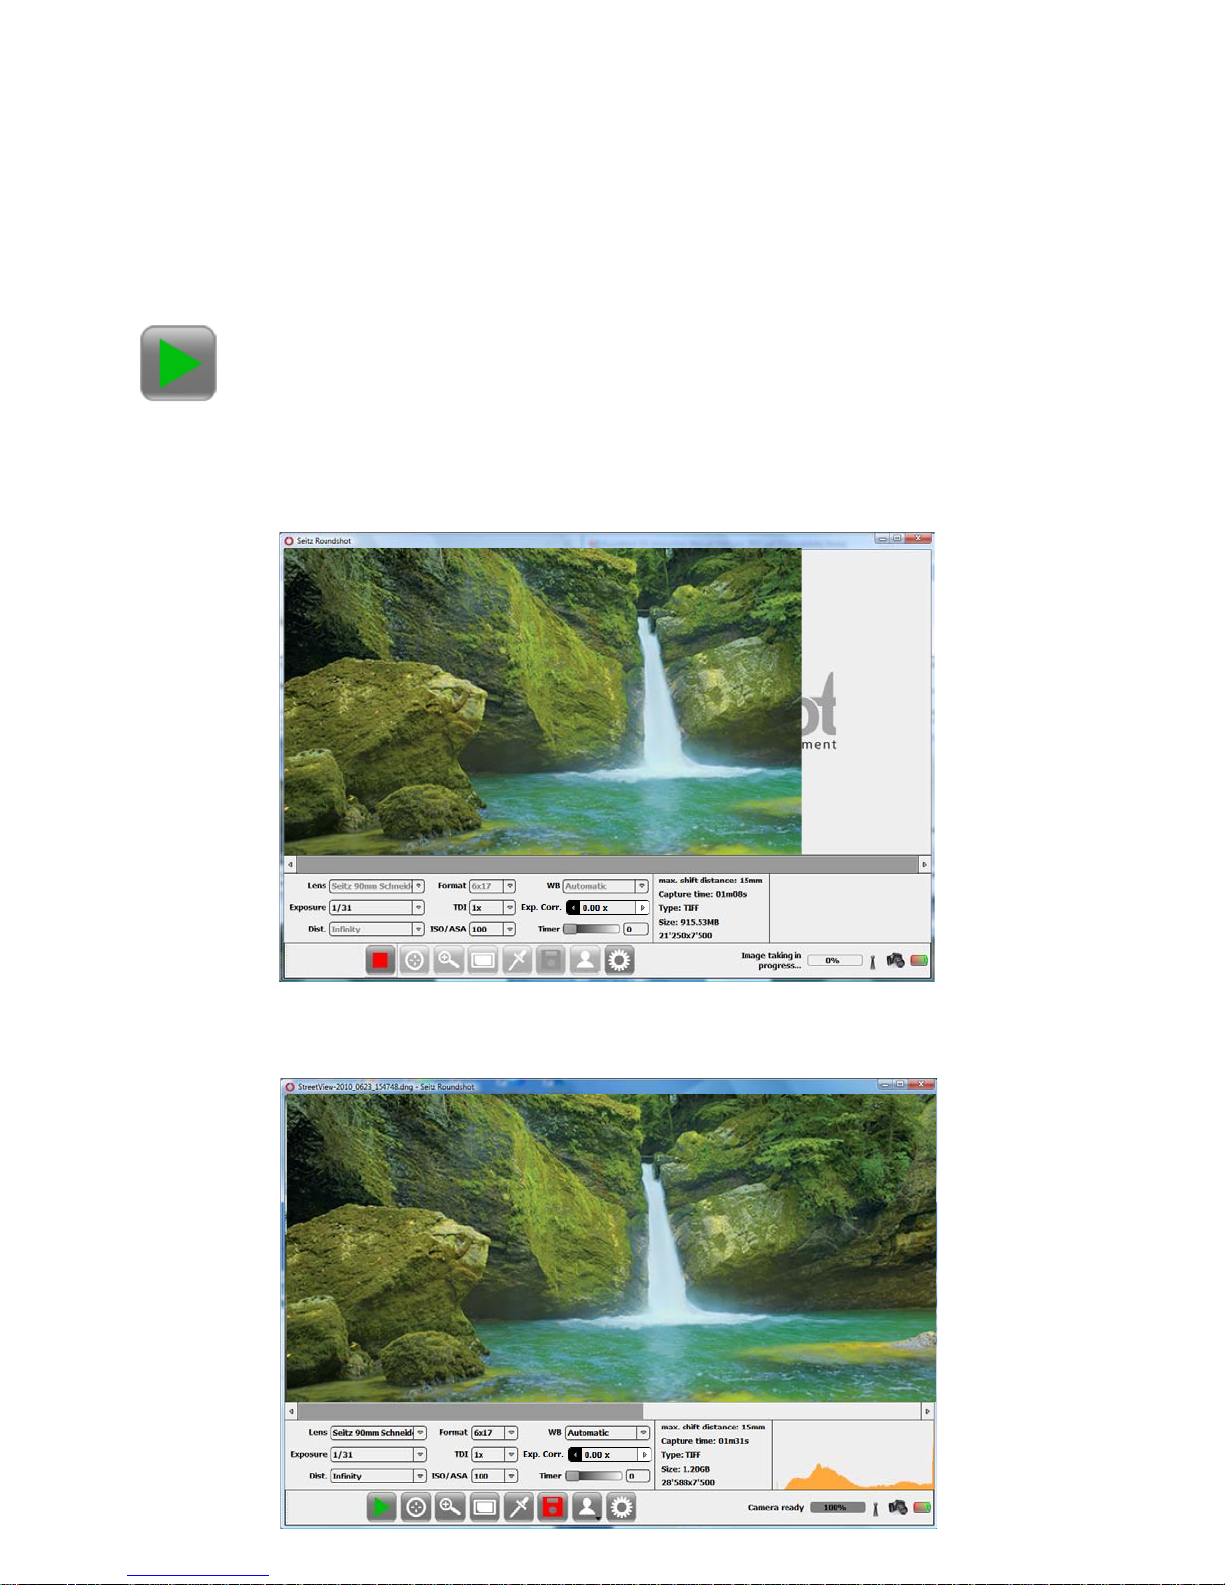
3.1 Shoot menu
The „Shoot “ menu allows to operate the camera (start and stop, focus, rescan),
zoom into the preview, apply white balancing to the image and save the panorama.
The preview shows the image as it is built up by the scan. The ongoing scan is
indicated by the message „Image taking in progress“ on the lower right hand side
of the computer screen:
Press the „Start“ button to start the image taking process:
Once the scan is fully transferred to the computer RAM, the „Camera ready“
message and the image histogram appear:
3. Seitz Roundshot D3 Software
Instruction Manual Seitz 6x17 Digital - version 4.05 - May 2013- © by Seitz Phototechnik AG / Switzerland www.roundshot.ch page 21
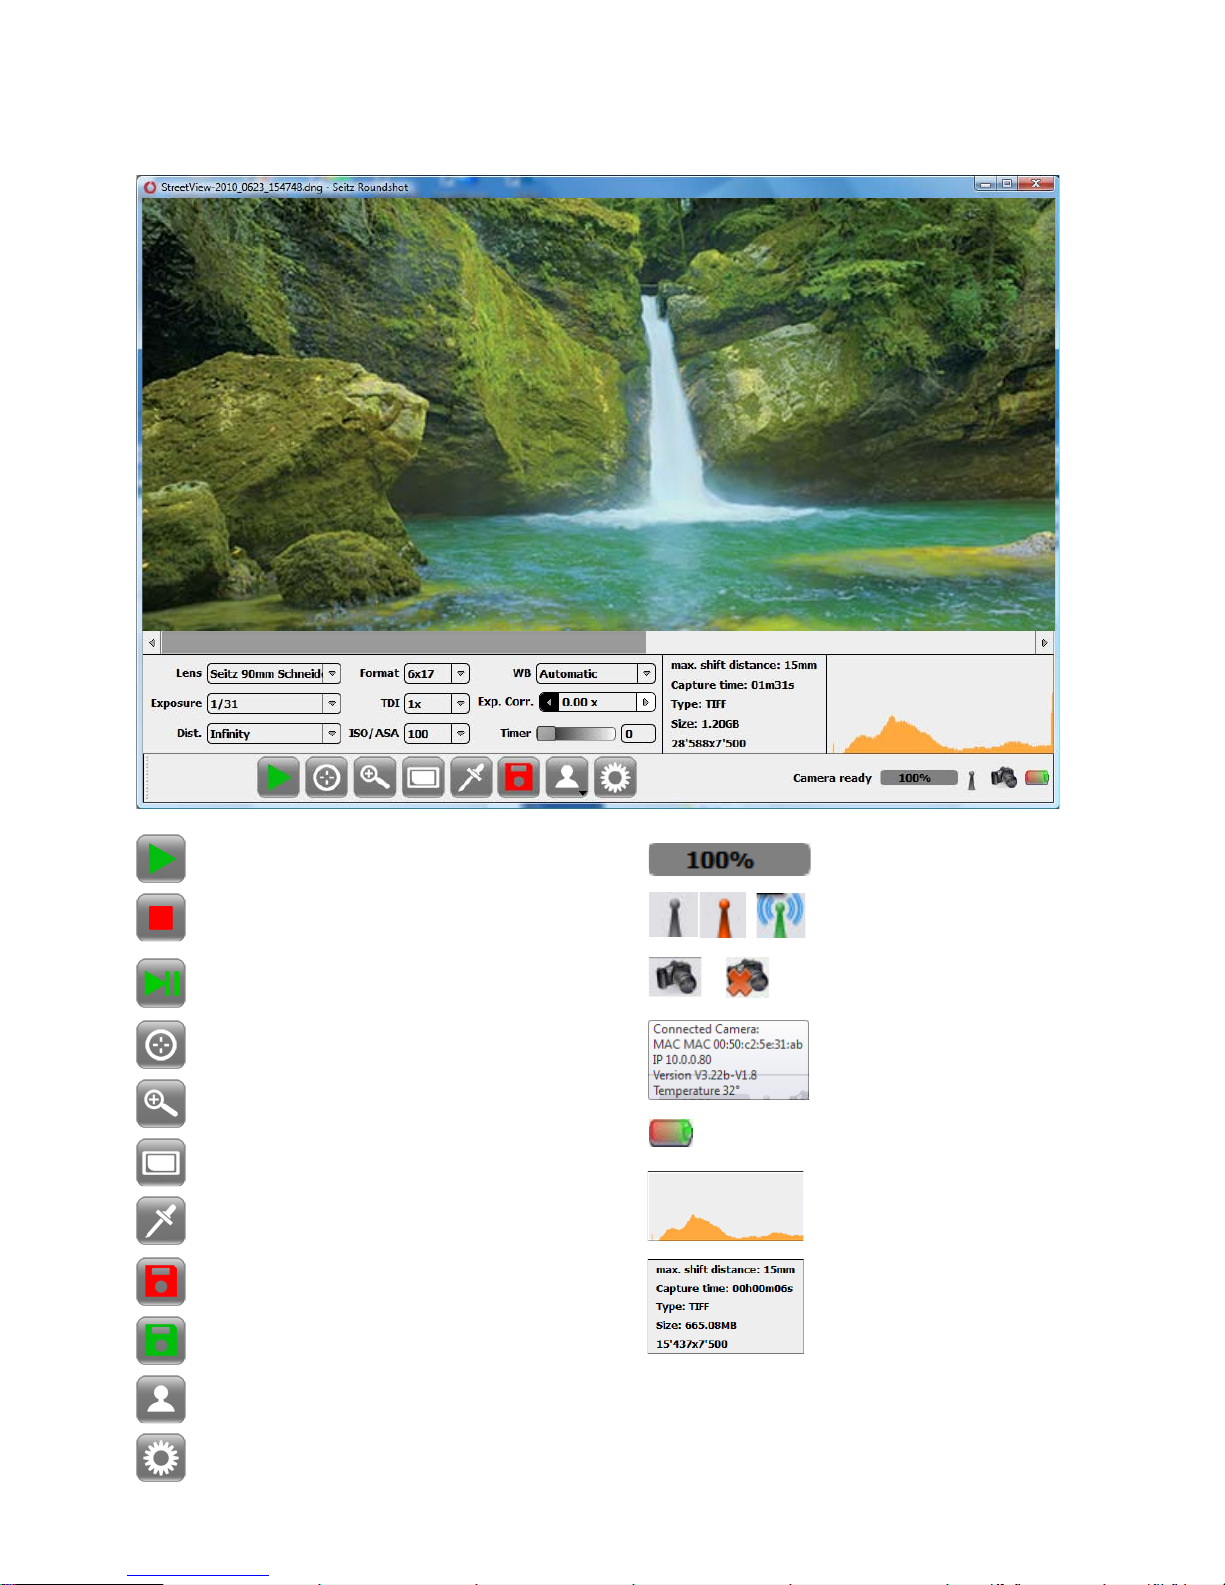
The „Shoot“ menu is controlled using the following buttons and graphical elements:
Start
Focusing Assistant
Zoom
Fit on screen
Save button (not yet saved)
Save button (already saved)
Stop
White balancing pipette
Profile Load/save
Parameter menu open/close
Scan info (max shift
distance, capture
time, file format, file
size, image pixel size)
Progress bar
GPS status symbol
Camera connection tool
Battery status
Image histogram
Camera connection
displayed on „mouse over“
Resume after pause
Instruction Manual Seitz 6x17 Digital - version 4.05 - May 2013- © by Seitz Phototechnik AG / Switzerland www.roundshot.ch page 22

Once the scan and preview are complete, additional post-processing steps can be
performed on the image such as:
• White balance (automatic, choose in picture or presets)
• Histogram stretching (if active in parameter menu)
• Black adjust (for longer exposures when a black value interpolation is required)
The ongoing rendering process is shown on the lower right corner of the window.
These post-processing steps can be launched automatically right after the scan (for
example: Automatic white balance) or some post-processing parameters can be
changed and then be applied to an existing scan (for example: „Choose in picture“
white balance, new contrast values).
These post-processing options are explained in more detail below.
For image-taking we recommend to focus on framing the image (angle),
exposure and on sharpness and saving the image as a raw file (dng). All
other adjustments such as white balance, histogram stretching, HSL etc.
can be done conveniently on a calibrated screen at home / in the studio.
Please refer to chapter 5 for detailed explanations on the ideal workflow
(post production).
Instruction Manual Seitz 6x17 Digital - version 4.05 - May 2013- © by Seitz Phototechnik AG / Switzerland www.roundshot.ch page 23
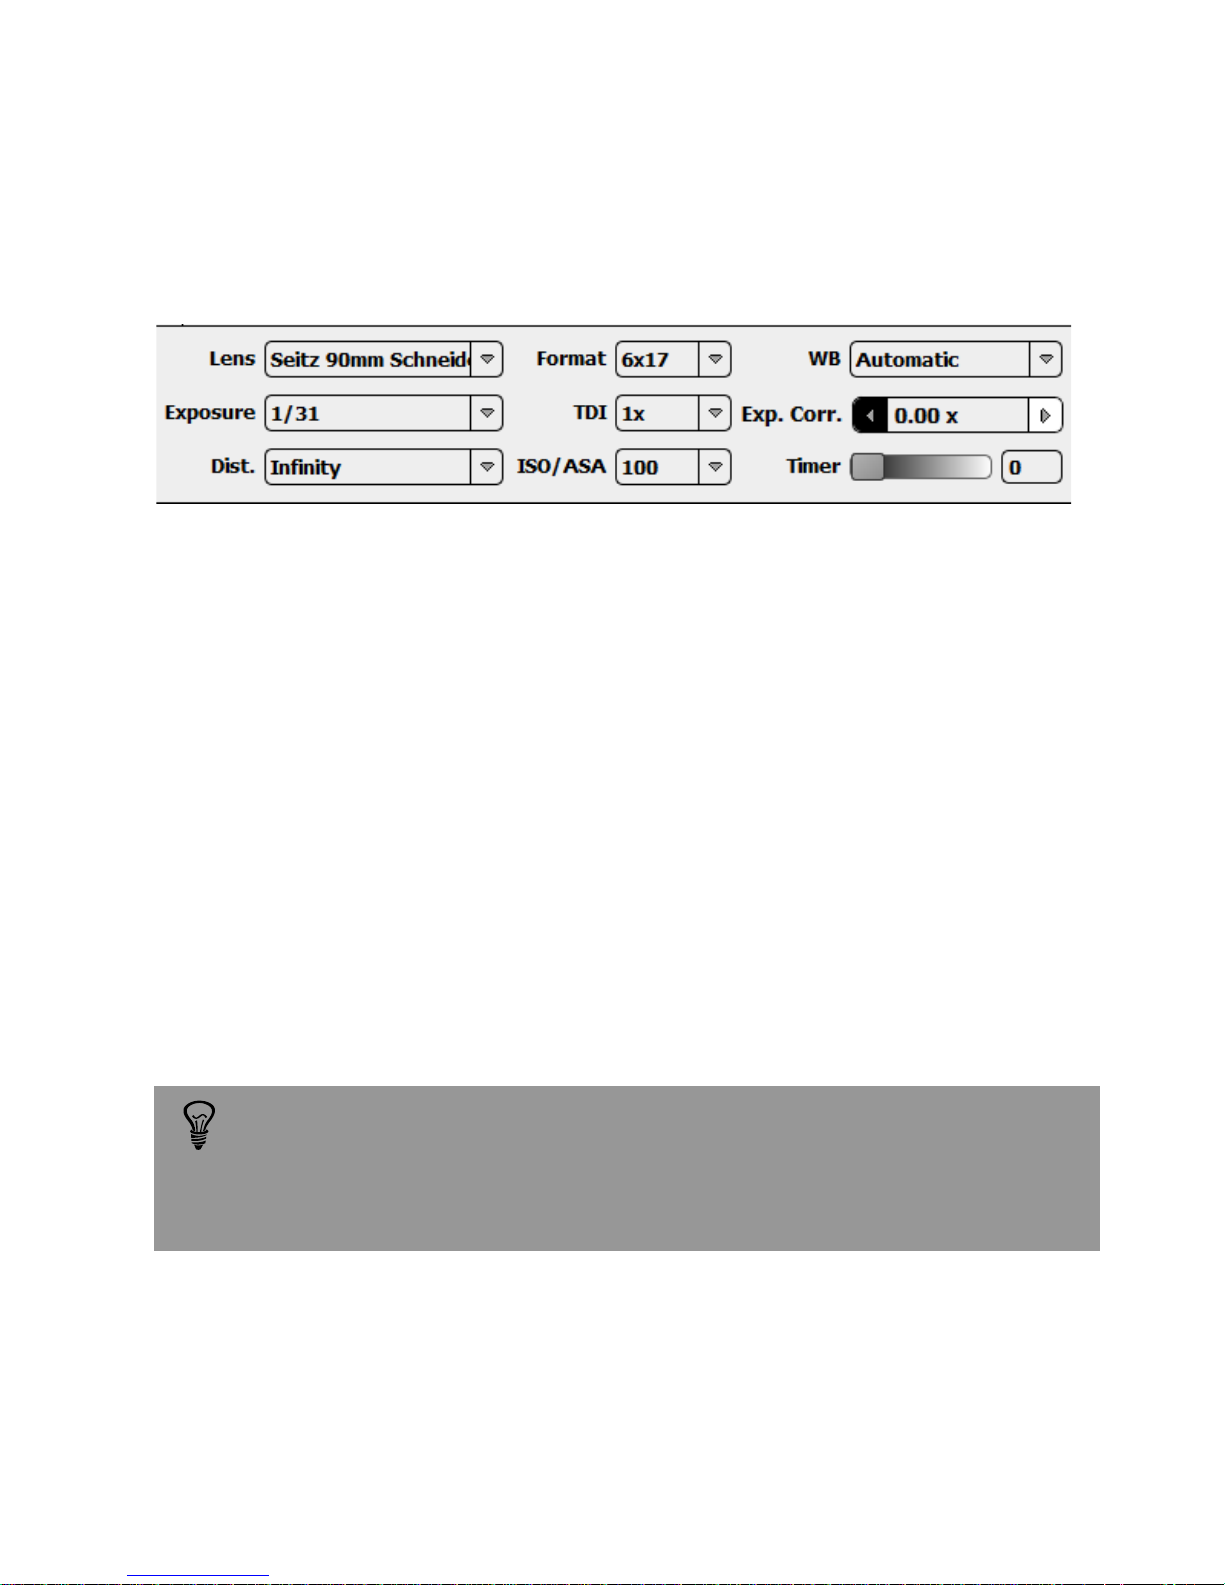
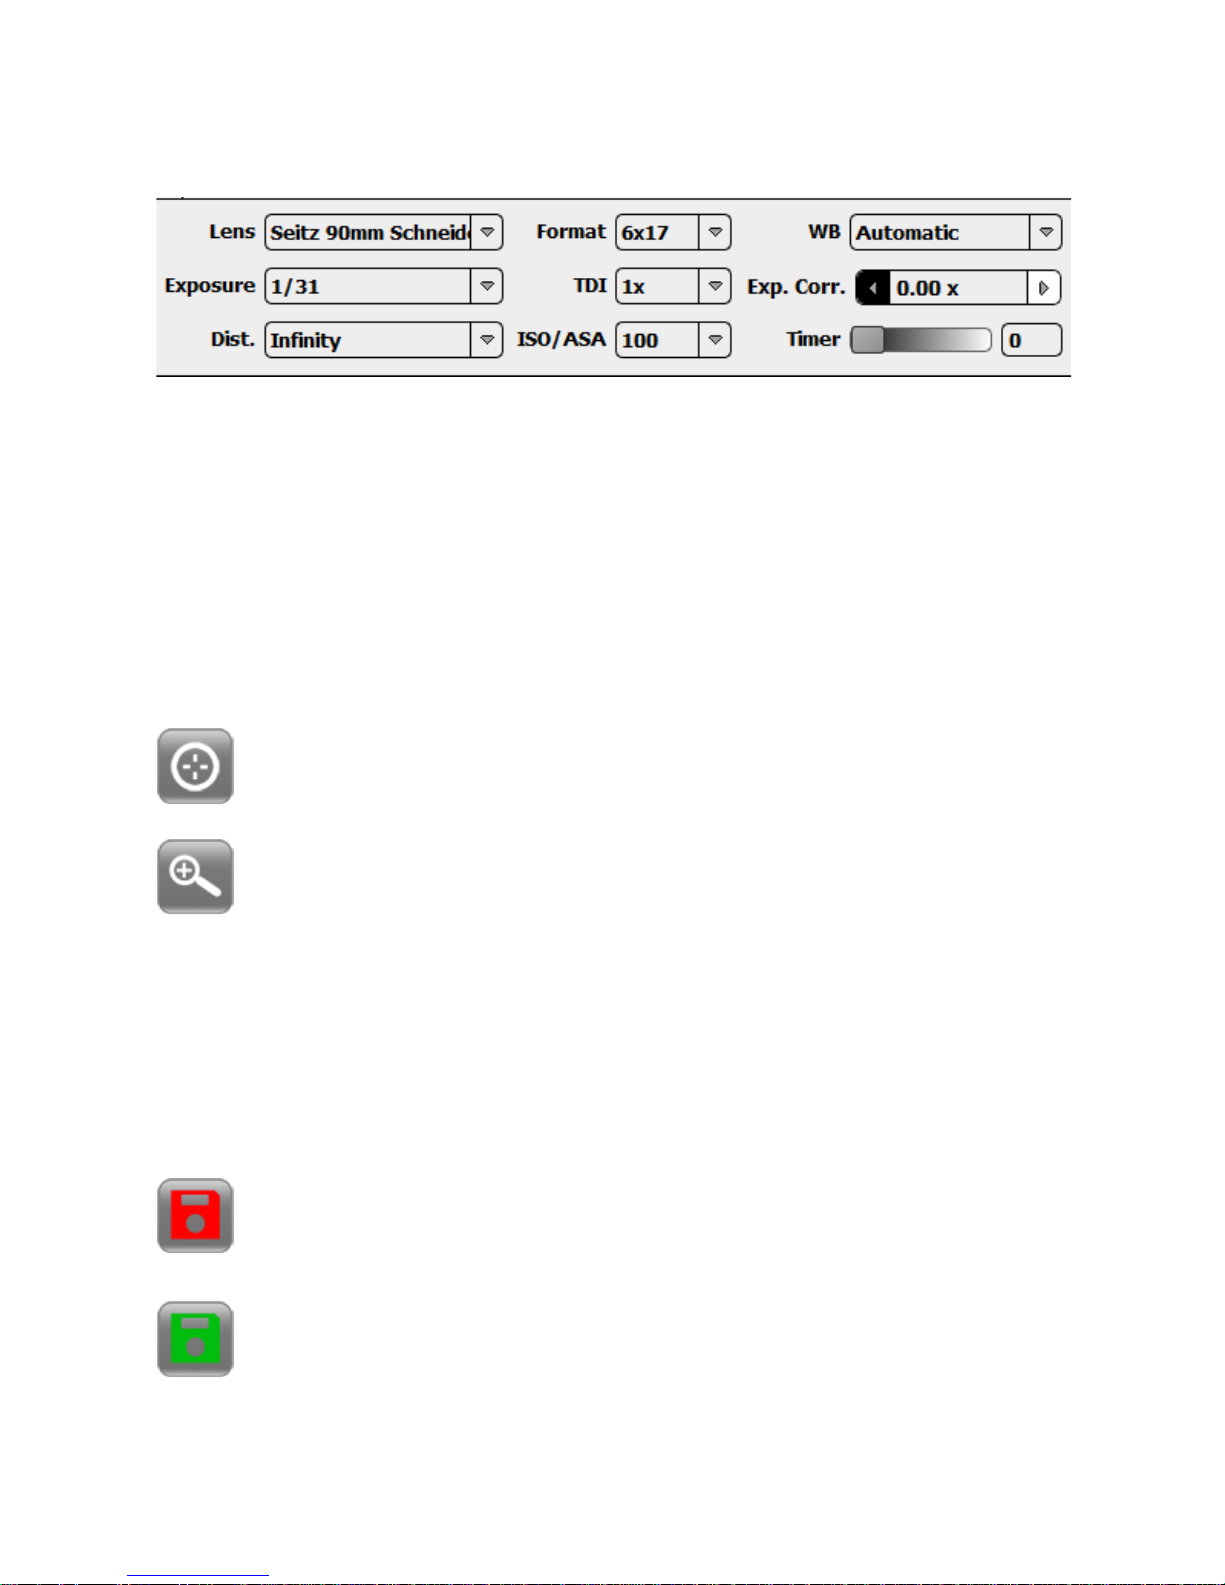
3.1.1 Shoot settings
The „Shoot Settings“ list allows to select and modify those parameters which are
most often used during image taking:
Lens: select the correct lens from the lens list. This list contains the “favourite lenses”.
If a lens is not available, open the lens tab in the parameter menu to access a full lens
list. You can also create your own lens if necessary (refer to section 3.2.3).
Format: defines the image angle. It is possible to take pictures 1x1 to 6x17.
White balance: select the white balancing mode. The “Automatic” white balancing
will apply different adjustments for every light situation. It is also possible to select a
predefined light condition as “Tungsten” or “Day light”. Finally there is the option to
choose a grey point on the image using the white balance pipette tool.
Distance: select the same focusing distance as defined on the lens. The exact
distance setting is required by the software to adjust the effective focal length.
Setting the distance correctly enhances sharpness.
„Automatic white balance“ sets the white point according to predefined
assumptions. This settings works well for most situations. In situations
with special light conditions select „choose in picture“ or one of the light
presets (tungsten, fluorescent, direct sun, cloudy).
Instruction Manual Seitz 6x17 Digital - version 4.05 - May 2013- © by Seitz Phototechnik AG / Switzerland www.roundshot.ch page 24

Technical note:
When focusing at closer distances than infinity, the effective focal length
increases, which is (after entering the correct distance) automatically
adjusted by the software. Also, the software adjusts the horizontal image
format, as with a larger effective focal length the image becomes longer
(more pixels).
3.1.1 Shoot settings (continued)
Exposure: select the image exposure mode. Several automatic modes are available
in addition to fixed exposure speeds:
• Automatic (spot): the sensor reads the light at the current position (or at a defined
measure angle). This “spot” reading is used for the entire scan.
• Automatic (prescan): the camera first completes a prescan to measure the actual
light conditions for the chosen image angle and applies the resulting average
exposure for the final (second) scan
• Automatic (variation): the camera adjust the rotation speed for every scan line.
With the parameter 1 to 100 the degree of speed adjustment can be set (1 for weak,
100 for maximum adjustment)
• Automatic (variation with prescan): the camera will create a prescan for light
measuring and then a second scan for exposure. During the second scan the
camera adjusts the rotation speed for every scan line. With the parameter 1 to 100
the degree of speed adjustment can be set (1 for weak, 100 for maximum
adjustment)
To freeze motion, use a fast exposure speed. This is achieved by using a
smaller area of the sensor, for example TDI 5x or 10x (minimum exposure
speed 1/400 and 1/200 sec). The fastest exposure speed is reached with
TDI 1x (1/2‘000 sec).
Depending on the available light, setting a higher ISO/ASA value or
opening of the aperture may be required (for example, from f=16 to f=8).
When working with automatic exposure we recommend using the
prescan option as this allows the most accurate exposure control.
Instruction Manual Seitz 6x17 Digital - version 4.05 - May 2013- © by Seitz Phototechnik AG / Switzerland www.roundshot.ch page 25

3.1.1 Shoot settings (continued)
To capture static or almost static scenes where a fast exposure speed is
not important, close the aperture (for example, from f=8 to f=16). This
will increase sharpness and depth of field.
The exposure speed is dependent on the selected sensitivity (TDI Stages).
When changing TDI Stages the exposure speeds will be changed
accordingly. For more information on exposure speeds please refer to
section 4 „How to“.
TDI: select the TDI level. A higher TDI means that a larger surface of the sensor is
used for the scan. More pixels will be exposed simultaneously with higher TDI,
making the entire scan process faster. Using higher TDI can be an advantage when
working under low-light conditions (indoor).
ISO/ASA: select the ISO/ASA level to be used. Increasing the ISO level will increase
the sensor sensitivity but also noise level. It is recommended to use the lowest ISO
level possible for better image quality
Exp. Corr.: the exposure correction is used to fine tune the exposure speed. It is
possible to select sub-f-stop adjustment for perfect image exposition
Timer: defines the delay time before starting the scan
Instruction Manual Seitz 6x17 Digital - version 4.05 - May 2013- © by Seitz Phototechnik AG / Switzerland www.roundshot.ch page 26
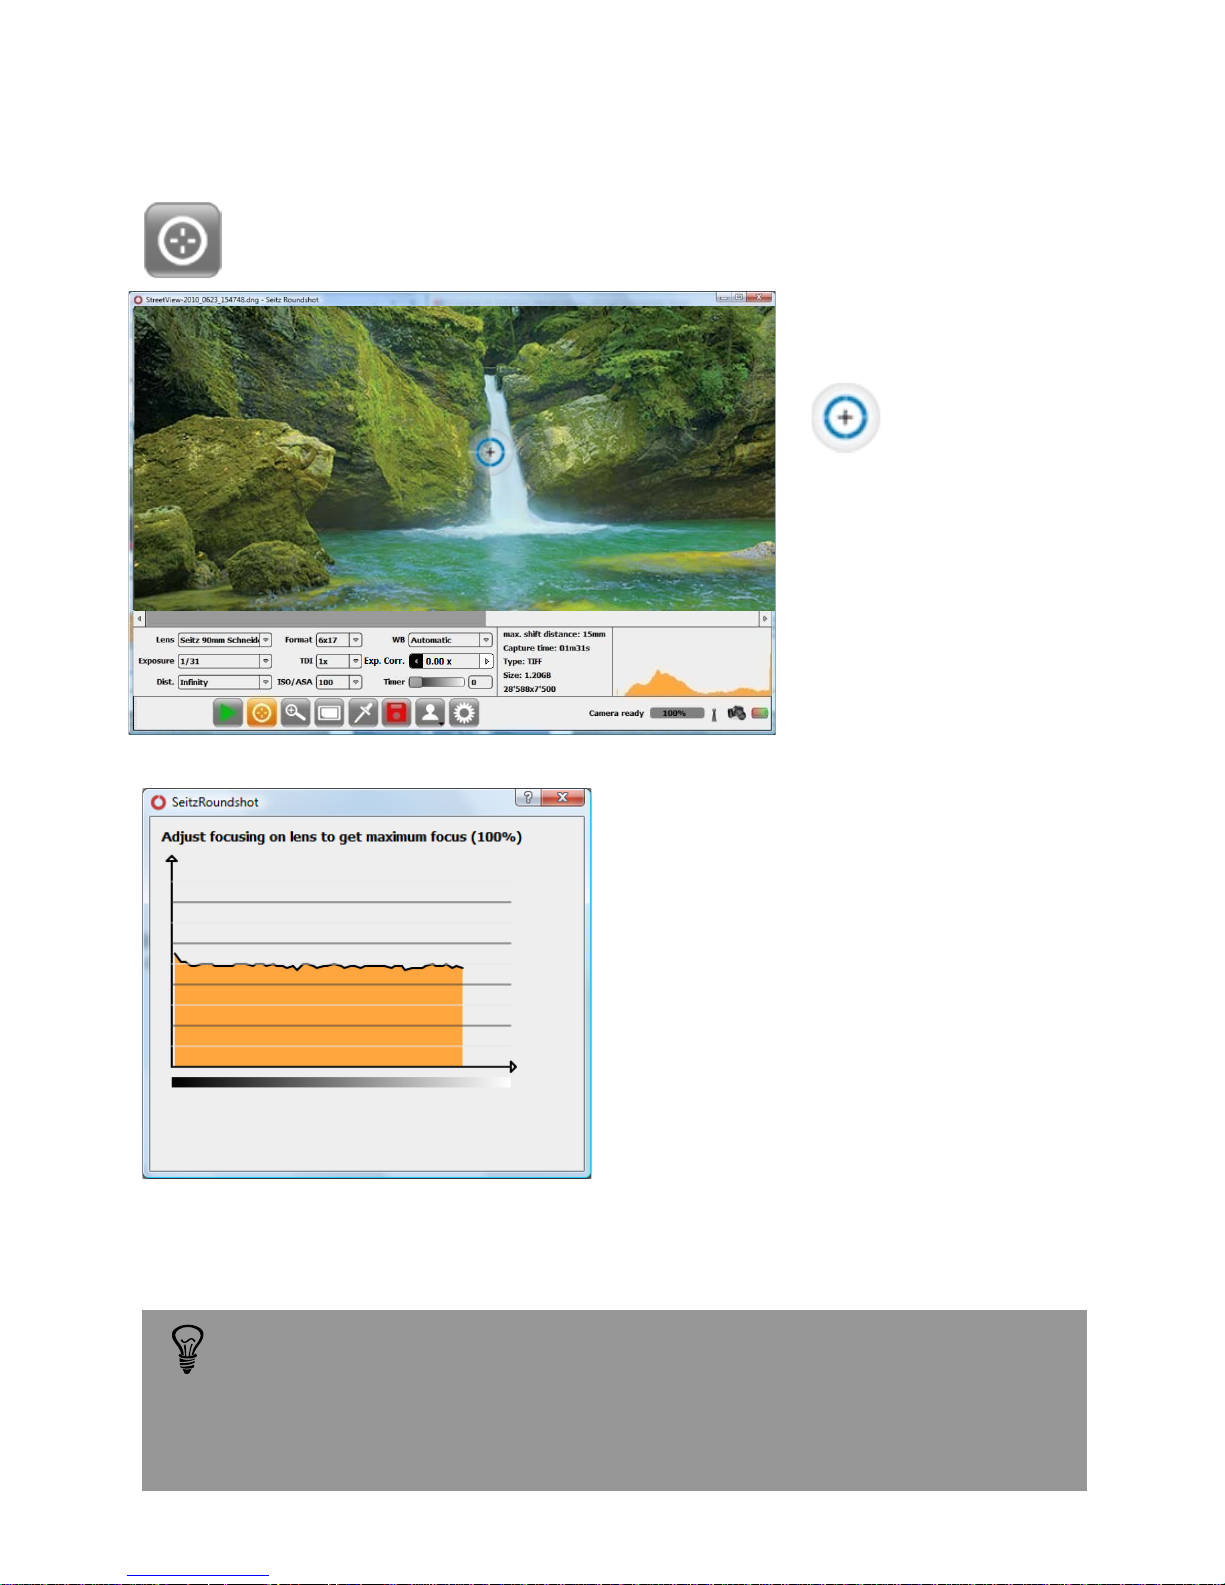
Press the button „Focusing Assistant“ and the focusing cross appears:
3.1.2 Focusing Assistant
Place the focusing cross
on the spot where the
camera should focus.
The „Focus“ window shows the
contrast metering (orange surface)
for the selected focusing spot.
Adjust the focusing on the lens
until the contrast metering shows
the highest possible value.
Close the „Focusing Assistant“ window to stop the focussing assistant tool.
The Focusing Assistant is an additional help for the photographer to
obtain the best sharpness. Set the approximate distance on the lens first
and then use the Focusing Assistant to fine-tune sharpness. Choose a
bright point in the preview image with structure and good contrast.
Avoid uniform surfaces (such as a white wall, etc.).
Instruction Manual Seitz 6x17 Digital - version 4.05 - May 2013- © by Seitz Phototechnik AG / Switzerland www.roundshot.ch page 27
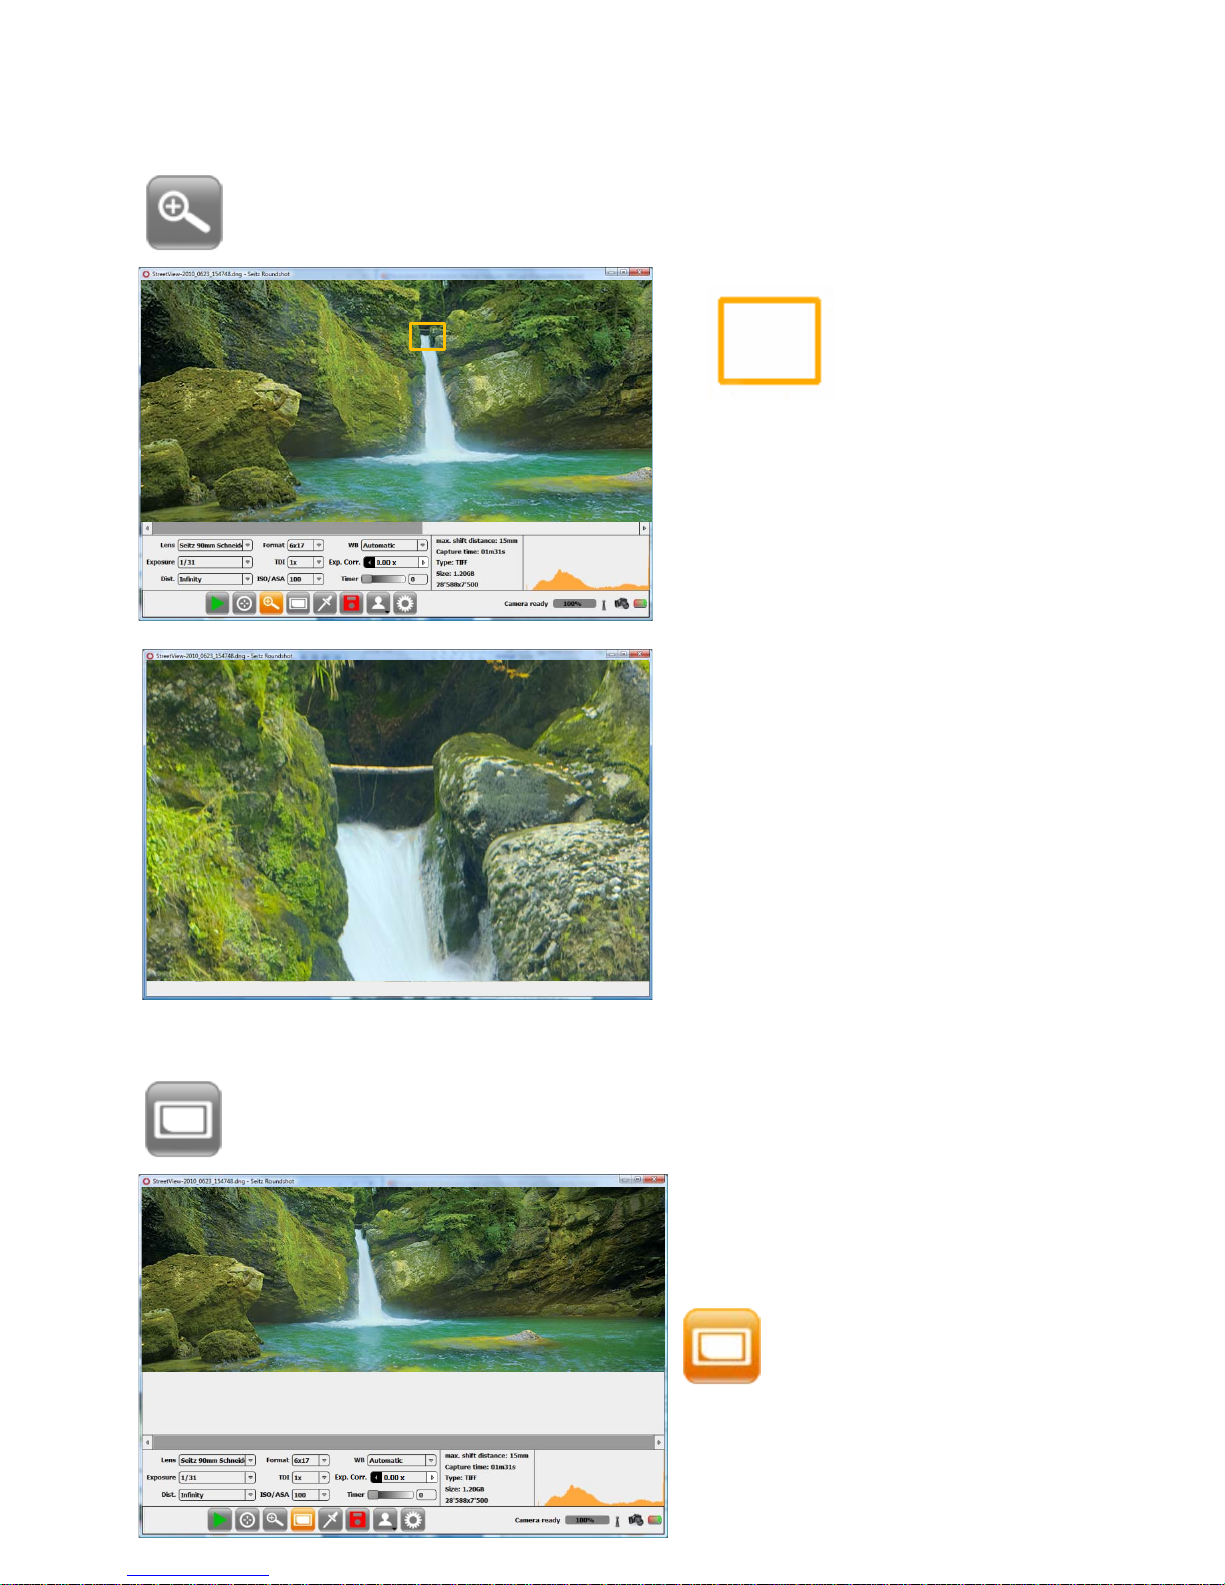
3.1.3 Zoom
Place the rectangle on the area to
magnify.
Press the button „Zoom“ and the zoom rectangle appears:
3.1.4 Fit on screen
Press the button „fit on screen“ to display the panorama in its full width:
Press again the button „fit on
screen“ to go back to original view
The zoom window opens showing
a 100% magnification* of the
selected area.
Other zoom levels can be selected
in „Parameter menu / custom tab”.
100% is the default zoom factor
Press anywhere on the image to
close the „Zoom“ window.
Instruction Manual Seitz 6x17 Digital - version 4.05 - May 2013- © by Seitz Phototechnik AG / Switzerland www.roundshot.ch page 28
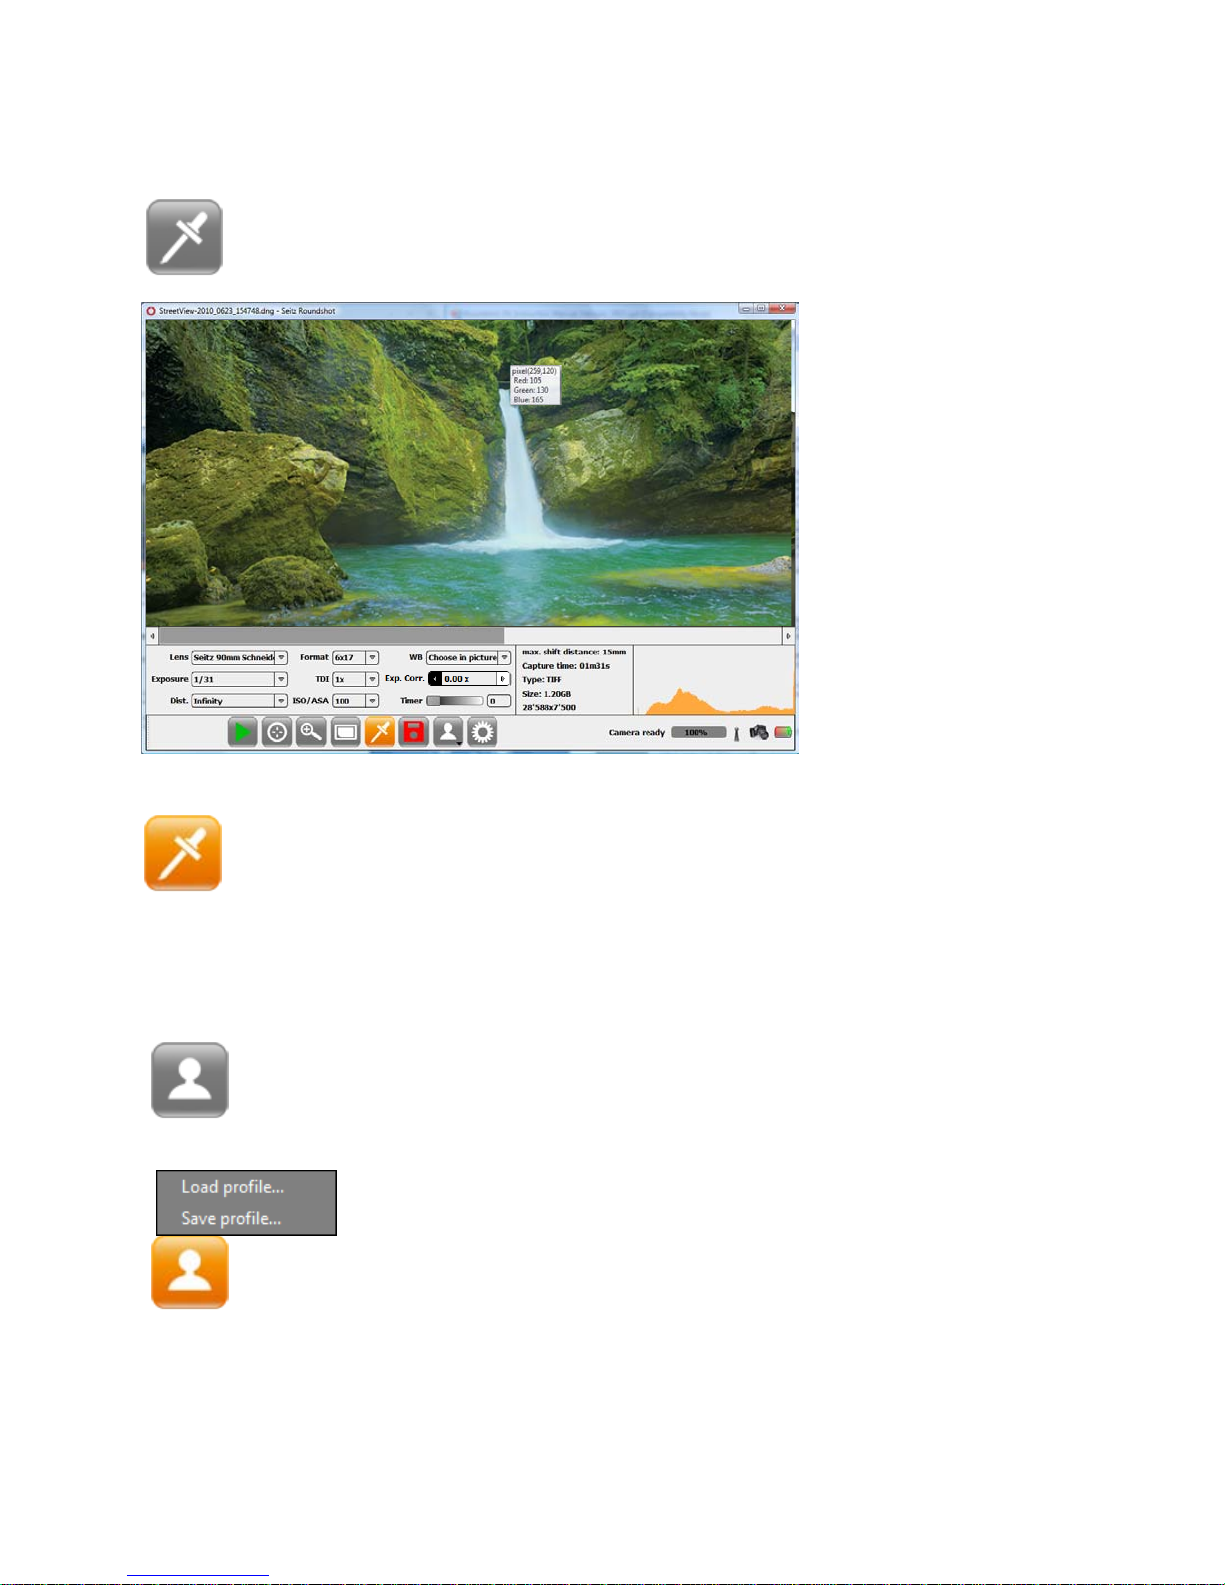
3.1.5 White balancing pipette
Press the button „White balancing pipette“ and the pipette cursor
appears on the image:
Press again the button „White balancing pipette“ to close the choose in
picture white balancing mode
3.1.6 Profile load/save
Press the button „Profile“ and the following menu appears:
Click on a neutral grey area
of the image.
Standard grey cards can be
included in the image to
select a perfect white
balance.
Please note that using the
white balancing pipette
will change the white
balancing mode. Do not
use this tool when
selecting the automatic or
preset modes.
Select “Save profile” to store a profile containing all current
shoot and image processing parameters.
Select “Load profile” to load previously saved profiles.
Instruction Manual Seitz 6x17 Digital - version 4.05 - May 2013- © by Seitz Phototechnik AG / Switzerland www.roundshot.ch page 29
 Loading...