


SeilerScope
OPERATING INSTRUCTIONS
PRECISION MICROSCOPES
A Division of Seiler Instrument Company

Seiler Instrument
Microscope Division
3433 Tree Court Ind. Blvd. • St. Louis, MO 63122
800-489-2282 • Fax: 314-968-3601
E-mail: micro@seilerinst.com • www.seilerinst.com
PRECISION MICROSCOPES

Type
Plan eyepiece
Magnification
10x
Focus (mm)
25
Field (mm)
18
Remark
The SeilerScope Biological Microscope is equipped with achromatic
objectives and wide field eyepieces with binocular head,so the observer can get
the clear image in the wide field.
I. SPECIFICATIONS
1. Eyepieces
1
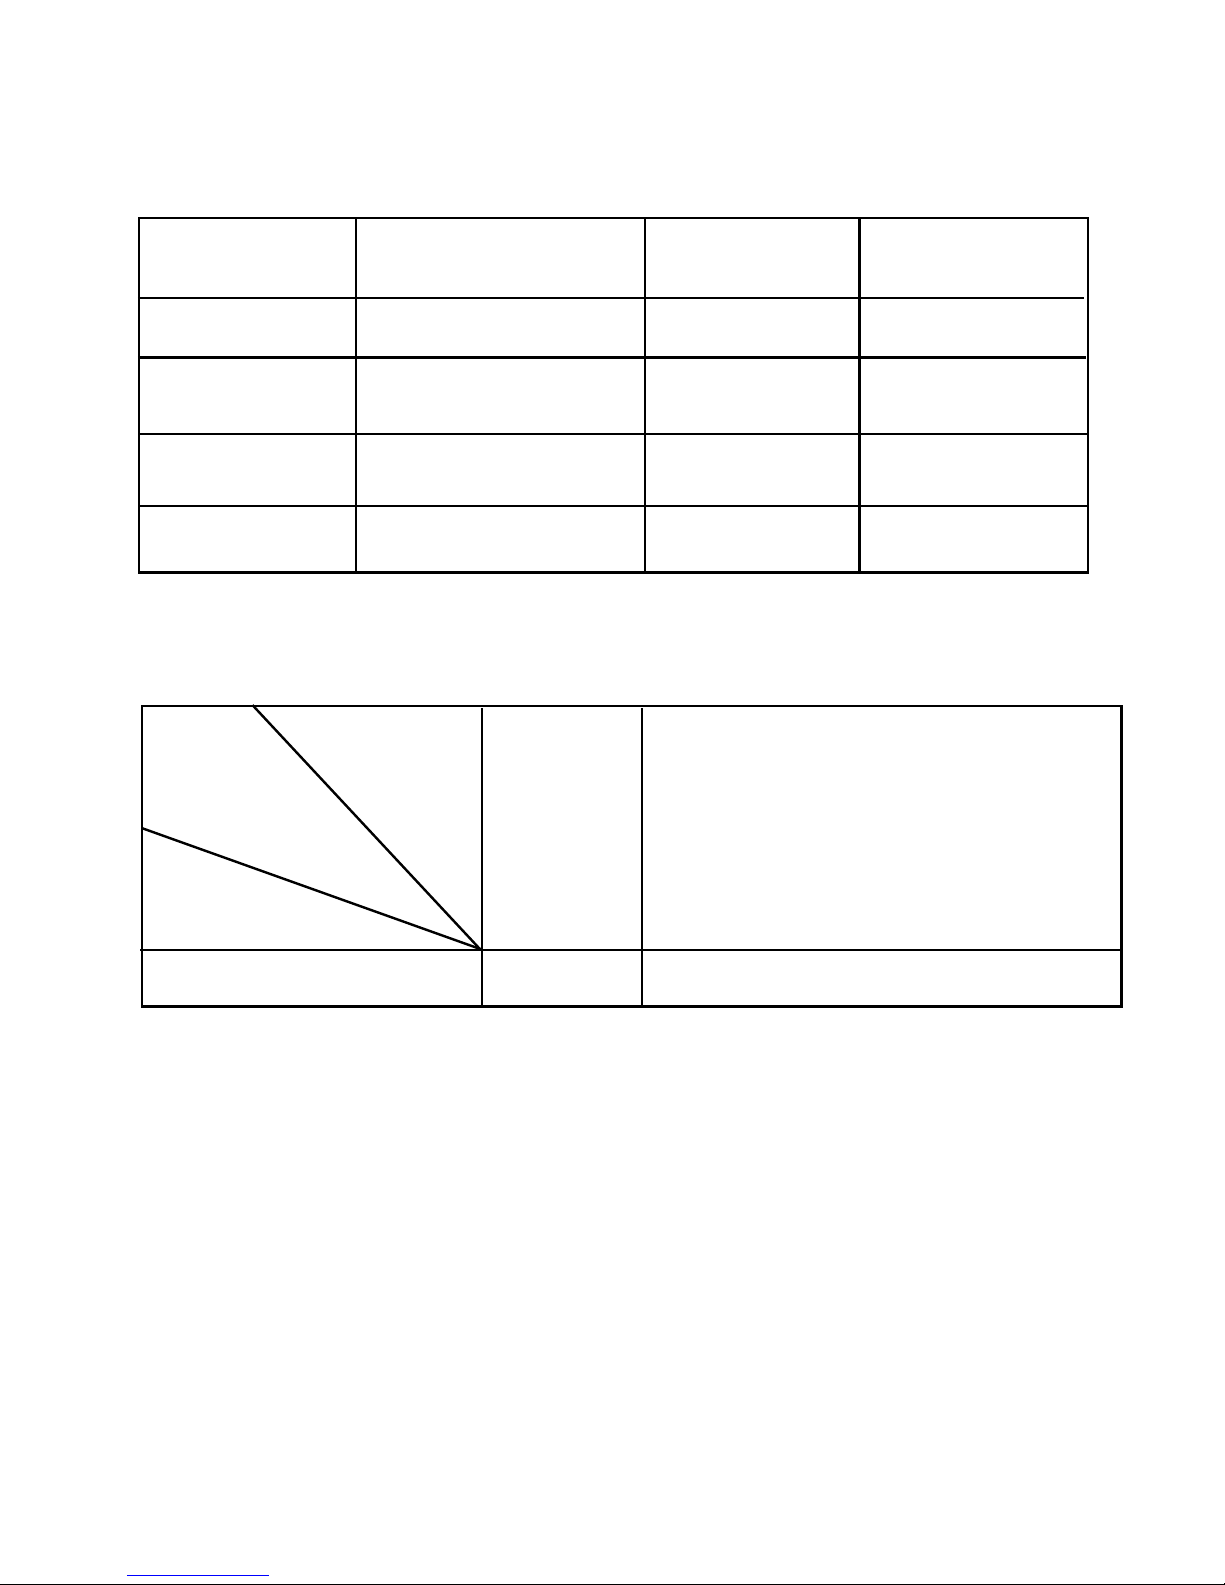
10x
Type
Achromatic
Achromatic
Achromatic
Achromatic
Magnification
4x
10x
40x
100x
N.A.
0.1
0.25
0.65
1.25 oil
W. D. (mm)
37.4
6.6
0.57
0.19
2. Objectives:
3. Total Magnification:
Objective
Total
Magnification
Eyepiece
4x 10x
40x 100x
2
4. Condenser numerical aperture: 1.25
5. Stage cross travel range: longitudinal 34mm, traverse 75mm
6. Fine focusing knob: minimum division 0.002 mm.
7. Interpupillary distances adjustment range: from 55 mm to 75 mm.
8. Light sources: using a 6V20W Halogen lamp brightness adjustable.
9. Power supply: Can be operated on AC 220V 50HZ or AC 110V 60HZ
1
2
8
9
4
3
6
5
7
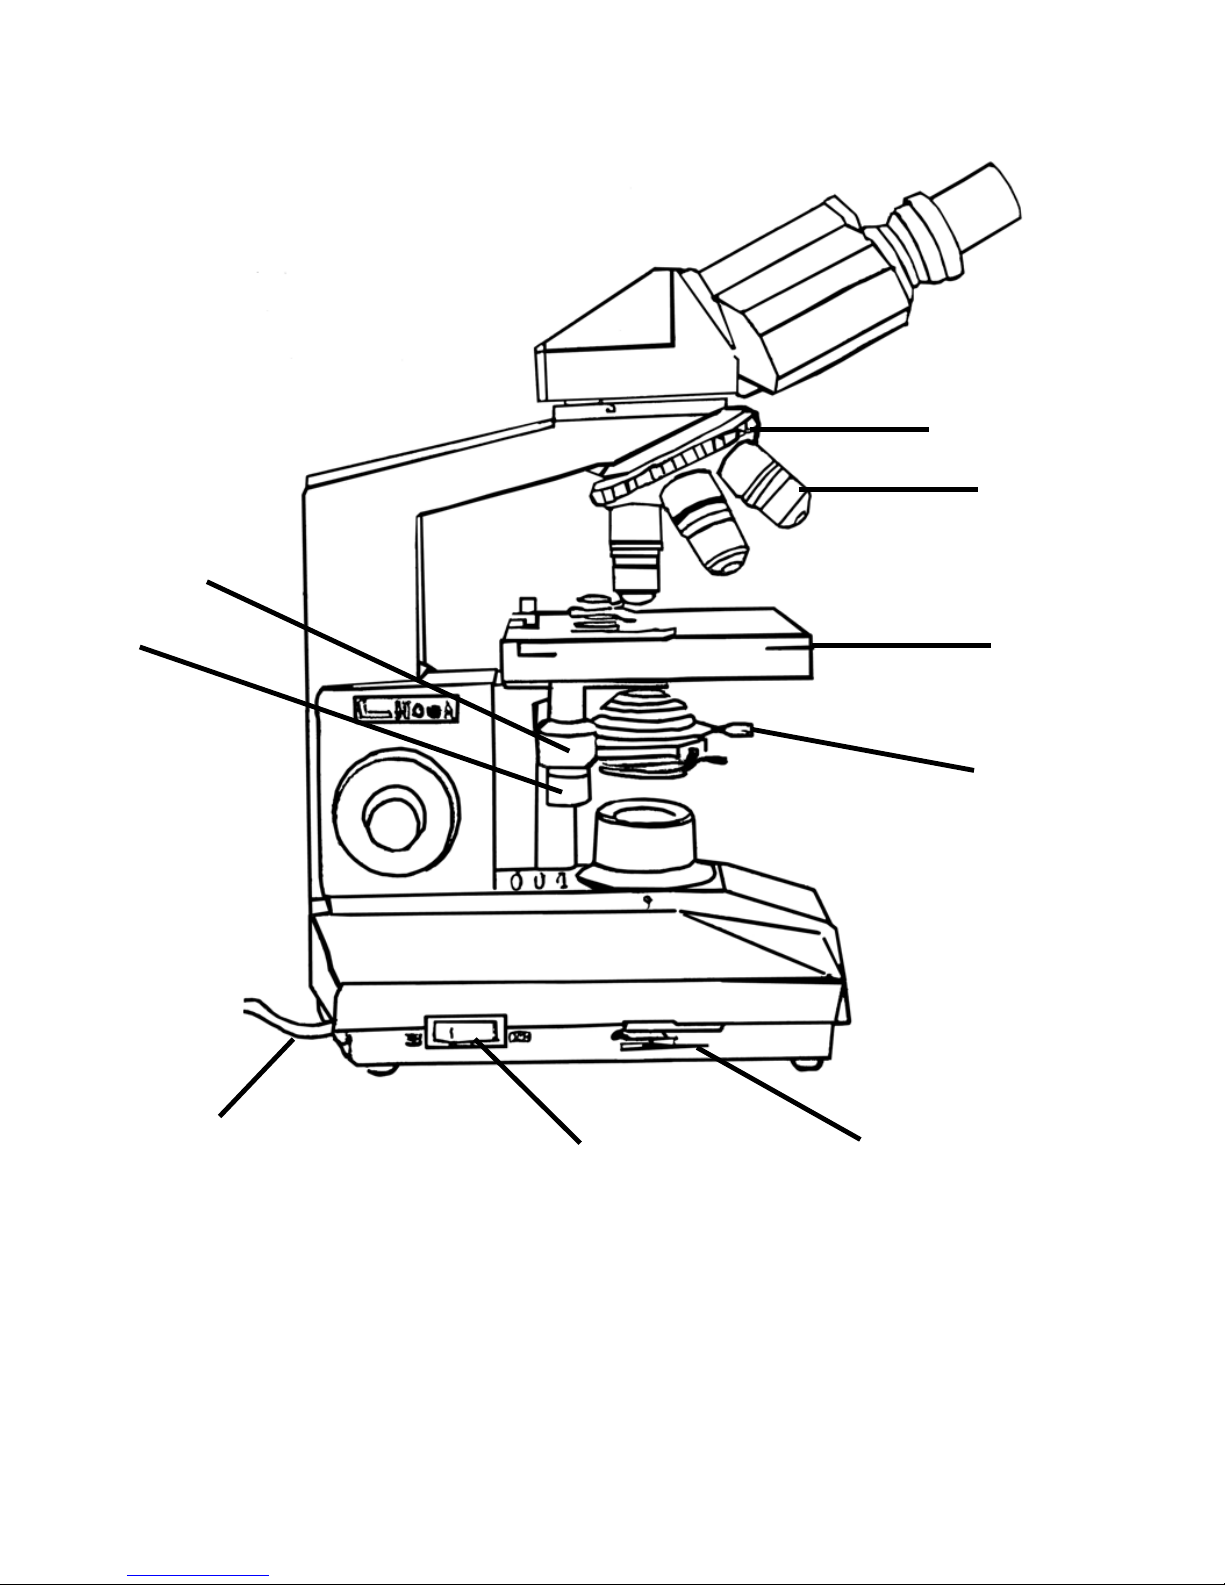
Fig. 1
1. REVOLVING NOSEPIECE 2. OBJECTIVES 3. MECHANICAL STAGE
4. CONDENSER CLIPPING SCREW 5. SHIFTING LONGITUDINAL CONTROLLER
6. TRAVERSE SHIFTING CONTROLLER 7. POWER SUPPLY CABLE
8. LIGHT SOURCE ON/OFF 9. BRIGHTNESS ADJUSTMENT CONTROL LEVER
II. COMPONENTS
3

1
2
3
4
12
11
10
9
8
7
6
5
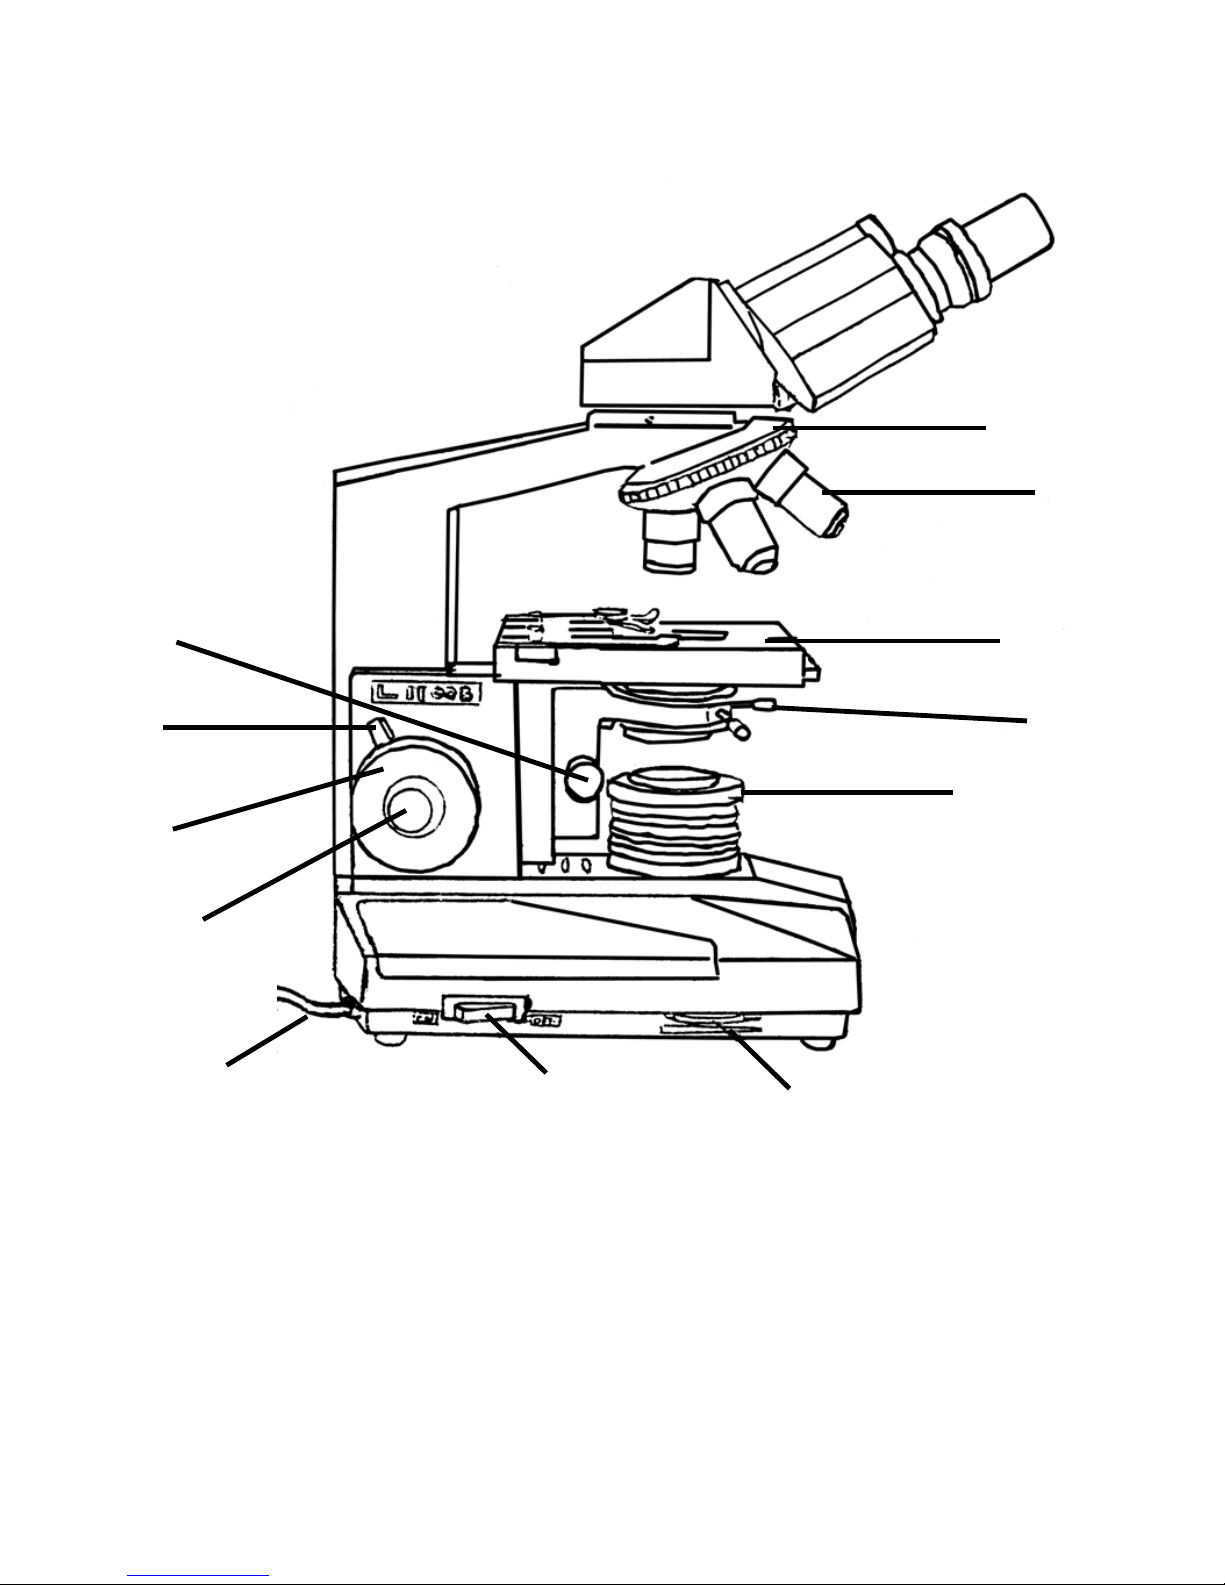
1. BINOCULAR 2. BODY 3. COARSE FOCUSING KNOB 4. FINE FOCUSING
KNOB 5. EYEPIECE 6. BINOCULAR CLIPPING SCREW 7. SPECIMEN CUP
8. CONDENSER 9. CONDENSER UP/DOWN KNOB 10. COLLECTOR
11. REFLECTOR 12. BASE
4
Fig. 2
1
10
11
12
5
4
3
2
7
6
8
9
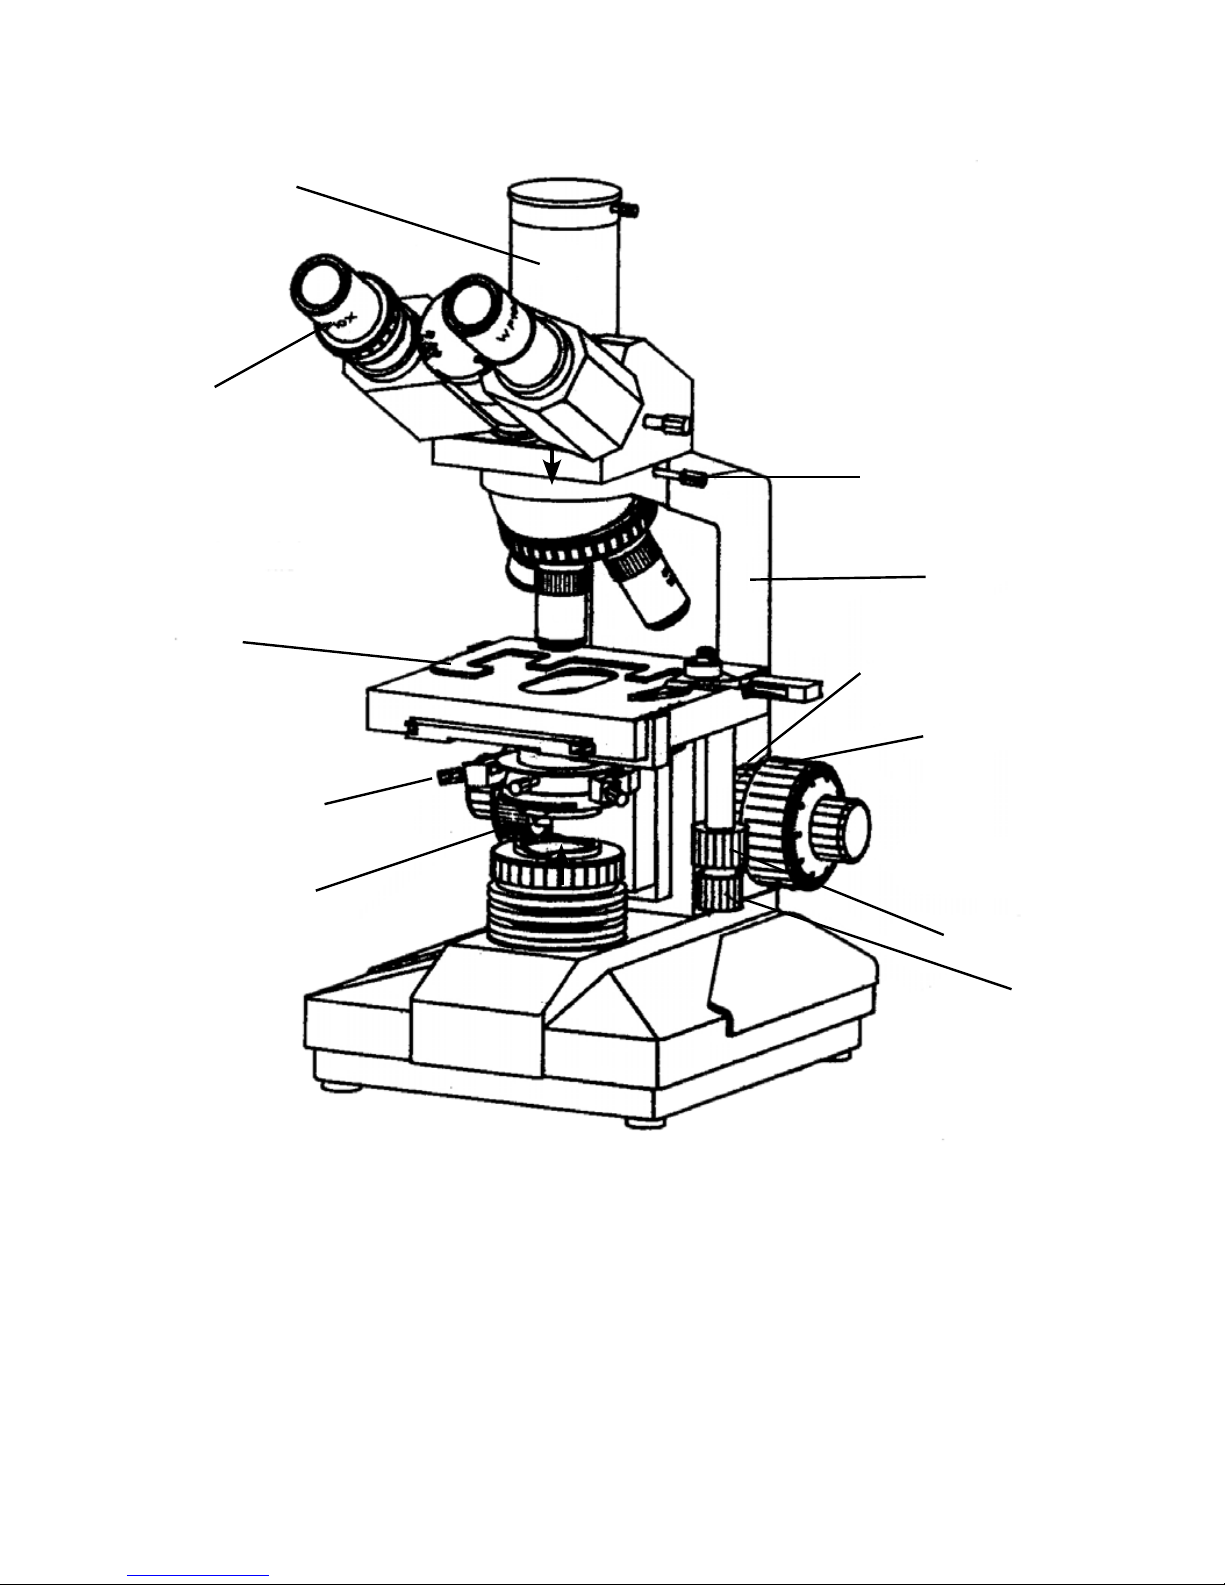
Fig. 3
1. REVOLVING NOSEPIECE 2. OBJECTIVES 3. MECHANICAL STAGE
4. CONDENSER CLIPPING SCREW 5. FIELD DIAPHRAGM (SELECT)
6.CONDENSER UP/DOWN KNOB 7. FOCUSING LIMIT KNOB
8. COARSE FOCUSING KNOB 9. FINE FOCUSING 10. POWER SUPPLY CABLE
11. LIGHT SOURCES ON/OFF 12. BRIGHTNESS ADJUSTMENT CONTROL LEVER
5
2
3
4
5
6
1
Fig. 4
1. TRINOCULAR 7. MAIN BODY
2. EYEPIECE 8. ADJUSTABLE TENSION KNOB
3. SPECIMEN HOLDER 9. COARSE FOCUSING KNOB
4. CONDENSER ADJUSTING SCREW 10. LENGTHWISE KNOB
5. CONDENSER WITH APERTURE DIAPHRAGM 11. CROSS KNOB
6. TUBE HOLDING SCREW
7
8
9
10
11

IV. OPTICAL SYSTEM
1
2
3
4
5
7
8
6
Fig. 5
1. EYEPIECE 2. OBJECTIVE 3. CONDENSER 4. APERTURE DIAPHRAGM
5. COLLECTOR LENS 6. HALOGEN LAMP 7. PRISM-MIRROR SYSTEM
7

V. OBSERVING OPERATION
1. General operation
(1) Turn on the power by pressing the ON/OFF switch.
(2) Set the 10x objective into operation position by turning the
nosepiece. Then focus the specimen which is on the stage.
(3) Adjust the interdistances of binocular to fit the eyes of
observer.
(4) For desirable illumination, up or down the condenser. Vary
the illumination controller and adjust aperture of the iris.
(5) While interchange other objective, turn the nosepiece and
refocus slightly with the fine focusing knob. When using the
100x immersion objective, be sure to put a drop of cedar wood
oil between the objective and the specimen.
2. Setting components
(1) Adjust the binocular for fitting the pupil distances.
Focus the specimen and combine the left and right view fields
into one by adjusting the interdistances of the binocular.
(shown in Fig. 6)
(2) Fit the binocular’s to observer’s sight.
Observe with right eye on 40x objective, bring the specimen
into focus by adjusting the coarse/fine focusing knob. The
machine now will fit the sight of the observer’s eyes.
(shown in Fig. 7)
Fig. 6 Fig. 7
8
(3) Coarse/fine focusing
A. For SeilerScope
Coaxial coarse and fine adjustment knobs make the focusing
smoother. To suit operator preference or a heavy or light knob
touch, a tension adjustment ring is provided. This device can
also prevent the stage slides up. In order to prevent collisions
between objective and specimen due to accidental stage
movement. The microscope has a focusing limit control knob.
Once the specimen is focused, tighten the knob to prevent the
stage from moving beyond a safe limit. (shown in Fig. 8)
FOCUSING LIMIT KNOB
TENSION ADJUSTABLE KNOB
FINE FOCUSING KNOB
TENSION ADJUSTABLE KNOB
Fig. 8
9

(4) Stage
The specimen clip which is on the stage hold the specimen very
easily. The longitudinal/traverse shifting controller is coaxial and can
be used conveniently. (shown in Fig. 9)
(5) Up/down the condenser
The condenser will move vertically when turning the condenser
up/down knob in manner. (shown in Fig. 10)
(6) Utilization of the aperture diaphragm on the condenser.
The numerical aperture of illumination system can be varied by the
aperture diaphragm and bring about the change in resolution,
contrast and focal depth. Mostly an image of fair contrast may reach,
when the diameter of the numerical aperture being 70-80% of the exit
pupil of the concerning objective. (shown in Fig. 12)
SPECIMEN CLIP
LONGITUDINAL
SHIFTING CONTROLLER
TRAVERSE SHIFTING
CONTROLLER
Fig. 9
Fig. 10
CONDENSER UP/DOWN KNOB
10

Removing the eyepieces. Adjust the aperture diaphragm properly while looking through eyepiece tube. The eyepiece tube and the image of the aperture
of the bright ring in the objective pupil. Keep in mind the handle position of the
aperture diaphragm for each objective when the best image quality is reached.
(7) Power switch and adjusting intensity
Turn on the power, adjusting the intensity knob making the eyes observe
image of specimen comfortably.
Note: Don’t put the intensity knob on the highest position longly. Avoid
deducing livelife of lamp. (shown in Fig. 12)
11
OBJECTIVE PUPIL
APERTURE DIAPHRAGM
Fig. 11
LIGHT SOURCE ON/OFF
BRIGHTNESS ADJUSTING
CONTROL LEVER
Fig. 12

(8) Adjusting of field diaphragm
Switch on the power, then turn the 10x objective into the optical axis.
Observe with 10x eyepieces. Turning the up/down condenser knob then
reach the image of field diaphragm. Then concenter field diaphragm
and optical axis with adjusting screw. Turn the ring of field diaphragm.
When the field diaphragm is more than the field of eyepiece. Using 4x
objective, then adjust method as so. (shown Fig. 13)
ADJUSTING SCREW OF
CONDENSER
CONDENSER
RING OF FIELD
DIAPHRAGM
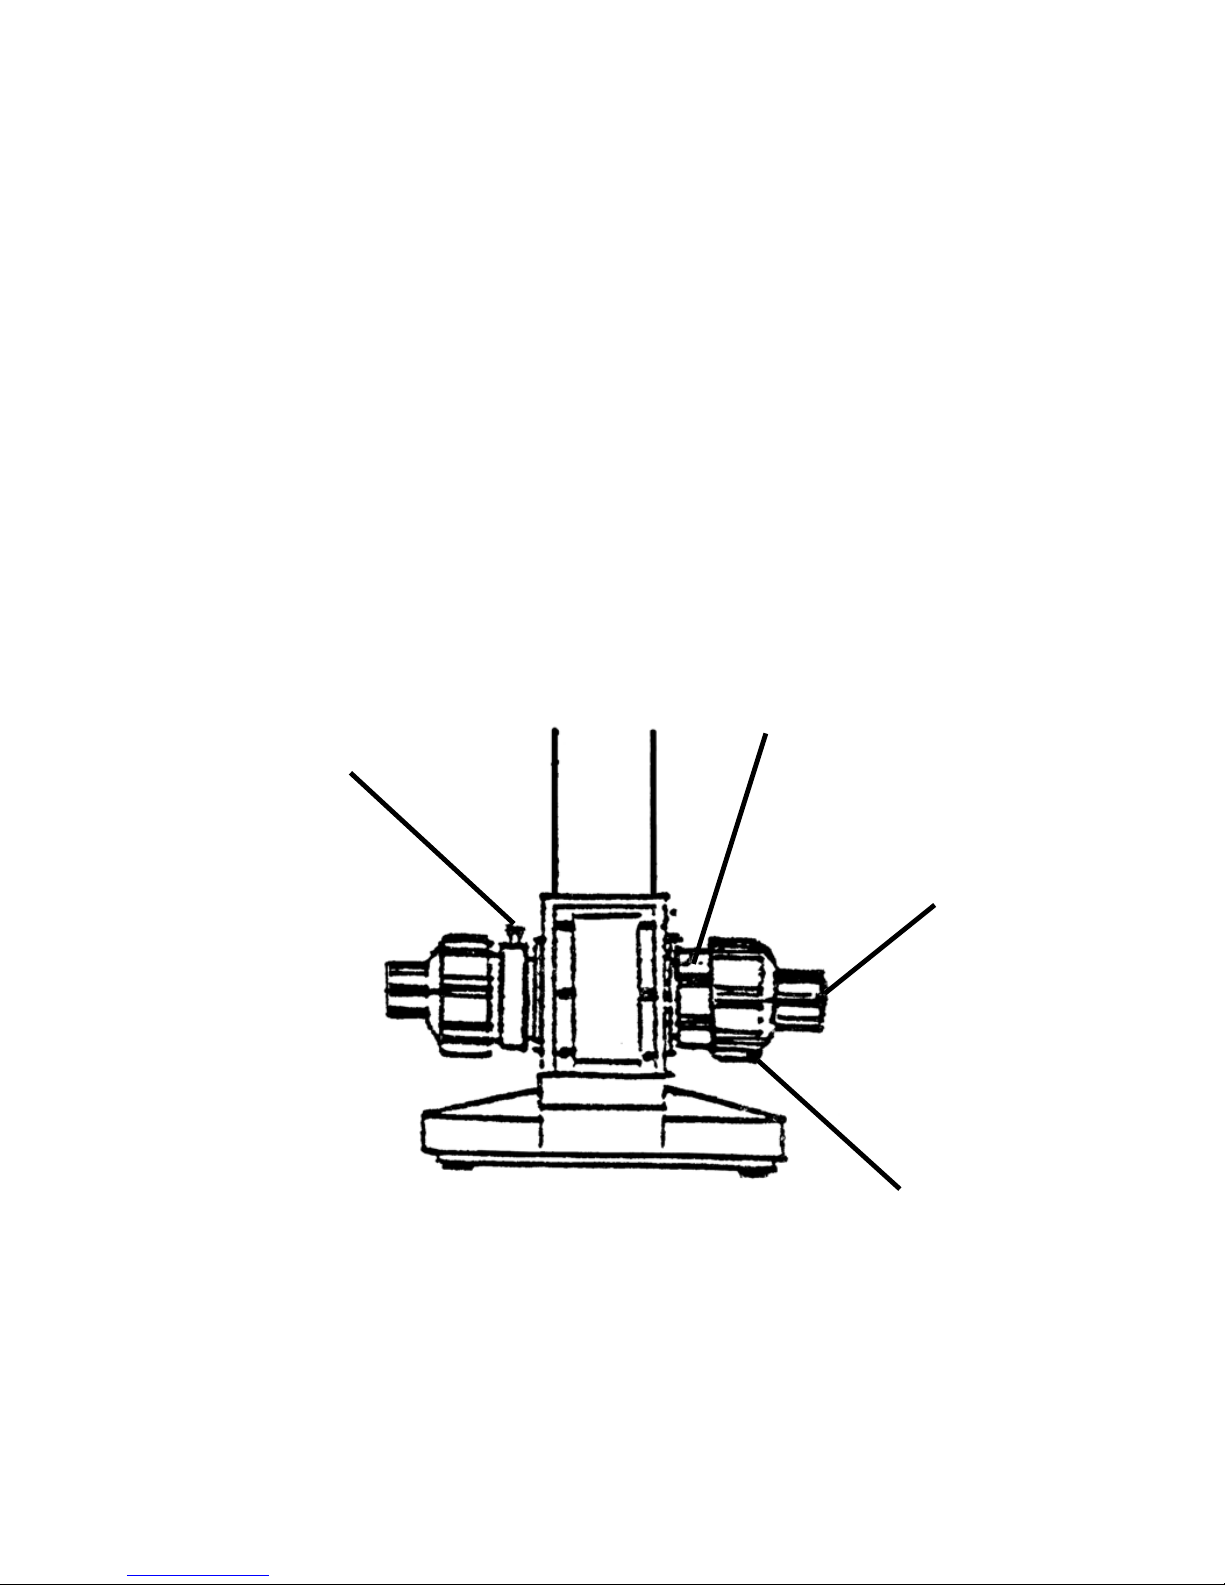
VI. EXCHANGING THE LAMP AND FUSE
(1) Pull out the plug of power electrical wire [1] and disconnect the
power supply.
(2) Incline microscope, loosen screw [2] of fixing lamp base board [3]
on middle part of bottom, and remove lamp base board from
bottom.
(3) Pull out the old lamp from lamp base [4].
(4) Insert new lamp [5] into lamp base properly, as shown in Fig. 11
direction, make it touch better.
(5) Clean the new lamp with absoluted alcohol.
(6) Refix lamp base board on bottom with screw [2].
(7) Mount the lamp well. Plug in power source. Turn 4x objective
lens into path. Adjust condenser upwards and downwards and
make light enter view of field. If light spot is offset the center of
view, loose screw [6] slightly and move lamp base [4]. Make lamp
spot into center, then tighten up the screw [6] to use immediately.
(shown in Fig. 14)
12
Fig. 13

Fig. 14
(8) Loosen the screw of fuse 7, put out the bad fuse, mount the new fuse.
Tighten the screw of fuse and use.
VII. CIRCUIT DIAGRAM
CI
0.0082-0.012 MF
FUSE
~220V
~110V
W470K
L390 MH
C2
8.LMF
110V
R4
270K
R3
1K
C3
0.068MF
R1
470K-
R2
100-150K
6
1
7
5
2
3
4
Fig. 15
13

One of the most common questions the
Seiler technicians are asked is what to do
when a 40x objective (400x magnification)
won’t focus or produces a poor image. A
poor image on an objective can be caused
from a number of problems. By following the
simple procedure below, you will be able to
troubleshoot about 90% of these problems
and get the microscope back in operation:
1. Check the slide. The first step in trouble-
shooting the 40x objective is make sure the
specimen slide is right side up. If the non-
cover glass side of the slide is up to the 40x,
there will not be enough working distance to
focus through the thick glass.
2. Check the cover glass thickness. A
cover glass number one (0.17mm thick) is
recommended or maximum performance.
3. Make sure the objective is clean.
Unscrew the 40x objective and examine it by
using a magnifying glass to look at the front
lens. To view the front lens, hold the objective in your left hand (if you are right-handed)
under good desk lamp or in a well-lit room.
Hold the objective vertical with the front lens
up (toward the ceiling). Hold the magnifier
close to your eye and focus on the very
top of the objective. Slowly tilt the tip of the
objective toward your eye and away from
your eye. At some point you should be able
to see dirt or oil on the lens.
To clean the lens, a cleaning solution of for
35mm camera lens is recommended. Apply
the solution to the dirty or oily lens area with
a cotton tipped applicator. Do not rub or
scrub the lens. Lightly rotate the applicator
between your forefinger and thumb, moving
around the lens area. Rotate about three or
four times, then discard the dirty applicator.
Repeat this at least one more time and then
re-examine with the magnifier to check for
dirt or oil. If debris is still present, repeat the
cleaning procedure.
After cleaning with the solution, breathe
warm air onto the lens and use a clean
applicator to remove any moisture from the
lens. Rotate the applicator lightly on the lens
as you did when using the solution. Repeat
this two or three times with a clean applicator
each time. Re-examine with the magnifier for
dirt or oil and repeat the cleaning procedure
if debris is still present.
A substitute cleaning solution of mild
soap mixed with a large amount of water
can be used for temporary cleaning. Make
sure the water is not too soapy. Clean cotton
gauze can be used in place of cotton tipped
applicators using 1” squares, but this generally cleans only the center of the field of view.
4. Call Seiler’s Service Department. If the
procedures described above do not improve
the image of the 40x objective, our Service
Department will be happy to provide further
assistance.
Tips & Techniques
Troubleshooting the 40x Objective
PRECISION MICROSCOPES
 Loading...