

Page 1

Information is Power
(text to come)
triax pcv10 features
• (text to come)
•
HRM Strap
Your Heart Rate Monitor [HRM] Strap
enables the Watch to display heart
rate information. The HRM Strap will
function automatically if worn
correctly and is within a few meters of
the watch. When worn directly against
the skin, two electrodes detect the
electrical impulses in your heart and
transmit that data to the Watch as
your heart rate.
ATTENTION: Anyone beginning an exercise regimen
for the first time (especially users of pacemakers
or other implanted devices) should consult their
physician or health professional before using
the heart rate monitor.
SDM Pod
Your Speed Distance Monitor [SDM]
Pod measures the acceleration and
deceleration of your foot 100 times
each second. SDM Pod calculates
your speed and distance even when
your stride length or speed changes.
Be sure to calibrate for best results.
Page 2

1
triax pcv10 introduction (Text and Content to come)
Page 3

2
Installing Drivers, Software and USB PCdock (Text and Content to come)
Page 4

3
Contents
Quick Start . . . . . . . . . . . . . . . . . . . . . . . . . . . . . . . . . . . . . . . . . . . . . . . . . . . . . . . . . . . . . . . . . . . . . . . . . . . . . . . . . . . . . 4
TIME mode
Set Time . . . . . . . . . . . . . . . . . . . . . . . . . . . . . . . . . . . . . . . . . . . . . . . . . . . . . . . . . . . . . . . . . . . . . . . . . . . . . . . . . . . . . . . . 6
Set an Alarm . . . . . . . . . . . . . . . . . . . . . . . . . . . . . . . . . . . . . . . . . . . . . . . . . . . . . . . . . . . . . . . . . . . . . . . . . . . . . . . . . . . . . 7
WORKOUT mode
Programming Workouts . . . . . . . . . . . . . . . . . . . . . . . . . . . . . . . . . . . . . . . . . . . . . . . . . . . . . . . . . . . . . . . . . . . . . . . . . . . . 8
Activate a Programmed Workout . . . . . . . . . . . . . . . . . . . . . . . . . . . . . . . . . . . . . . . . . . . . . . . . . . . . . . . . . . . . . . . . . . . . . 9
Calibrating the Speed Distance Monitor [SDM] Pod . . . . . . . . . . . . . . . . . . . . . . . . . . . . . . . . . . . . . . . . . . . . . . . . . . . . . . 10
Adjusting your Offset . . . . . . . . . . . . . . . . . . . . . . . . . . . . . . . . . . . . . . . . . . . . . . . . . . . . . . . . . . . . . . . . . . . . . . . . . . . . . . 11
CHRONOGRAPH mode
Using the Chronograph . . . . . . . . . . . . . . . . . . . . . . . . . . . . . . . . . . . . . . . . . . . . . . . . . . . . . . . . . . . . . . . . . . . . . . . . . . . . 12
Setting the Chronograph Auto-Lap . . . . . . . . . . . . . . . . . . . . . . . . . . . . . . . . . . . . . . . . . . . . . . . . . . . . . . . . . . . . . . . . . . . 14
STATS mode
Review Stored Runs/Workouts . . . . . . . . . . . . . . . . . . . . . . . . . . . . . . . . . . . . . . . . . . . . . . . . . . . . . . . . . . . . . . . . . . . . . . 15
PC mode
Linking the Watch to your Computer . . . . . . . . . . . . . . . . . . . . . . . . . . . . . . . . . . . . . . . . . . . . . . . . . . . . . . . . . . . . . . . . . . 16
Heart Rate Chart . . . . . . . . . . . . . . . . . . . . . . . . . . . . . . . . . . . . . . . . . . . . . . . . . . . . . . . . . . . . . . . . . . . . . . . . . . . . . . . . . 17
Running Pace Chart . . . . . . . . . . . . . . . . . . . . . . . . . . . . . . . . . . . . . . . . . . . . . . . . . . . . . . . . . . . . . . . . . . . . . . . . . . . . . . . 18
Troubleshooting . . . . . . . . . . . . . . . . . . . . . . . . . . . . . . . . . . . . . . . . . . . . . . . . . . . . . . . . . . . . . . . . . . . . . . . . . . . . . . . . . . 19
Water Resistance . . . . . . . . . . . . . . . . . . . . . . . . . . . . . . . . . . . . . . . . . . . . . . . . . . . . . . . . . . . . . . . . . . . . . . . . . . . . . . . . . 20
Mode Limits . . . . . . . . . . . . . . . . . . . . . . . . . . . . . . . . . . . . . . . . . . . . . . . . . . . . . . . . . . . . . . . . . . . . . . . . . . . . . . . . . . . . . 20
Material Specifications . . . . . . . . . . . . . . . . . . . . . . . . . . . . . . . . . . . . . . . . . . . . . . . . . . . . . . . . . . . . . . . . . . . . . . . . . . . . . 20
FCC Compliance . . . . . . . . . . . . . . . . . . . . . . . . . . . . . . . . . . . . . . . . . . . . . . . . . . . . . . . . . . . . . . . . . . . . . . . . . . . . . . . . . . 20
Battery . . . . . . . . . . . . . . . . . . . . . . . . . . . . . . . . . . . . . . . . . . . . . . . . . . . . . . . . . . . . . . . . . . . . . . . . . . . . . . . . . . . . . . . . . 21
Warranty . . . . . . . . . . . . . . . . . . . . . . . . . . . . . . . . . . . . . . . . . . . . . . . . . . . . . . . . . . . . . . . . . . . . . . . . . . . . . . . . . . . . . . . . 22
Service Centers . . . . . . . . . . . . . . . . . . . . . . . . . . . . . . . . . . . . . . . . . . . . . . . . . . . . . . . . . . . . . . . . . . . . . . . . . . . . . . . . . . 22
Index . . . . . . . . . . . . . . . . . . . . . . . . . . . . . . . . . . . . . . . . . . . . . . . . . . . . . . . . . . . . . . . . . . . . . . . . . . . . . . . . . . . . . . . . . . . 23
This document with updates is available online at
www.nike.com / manuals
Page 5

3
Attach other side of HRM Strap around
chest. Position on rib cage just below
the breast plate. Should be worn
directly against skin and snug enough
to not slip down while running.
1
Push tab up through slot
in HRM Strap.
Press down tab until flush
2
3
Secure the SDM Pod with black
strap. The SDM Pod should rest
just below where laces tie and
be secure enough to not move
while running.
1
Remove the SDM Pod
from holder.
2
Loosen shoe laces and slide
yellow clip up under laces.
4
Quick Start Follow steps through to position your hardware and go for a run.
Page 6

5
Generously wet both
grooved areas on the back
of HRM Strap to ensure a
good pick up between your
pulse and the strap.
4
4
Turn SDM Pod ON.
Light will begin to blink.
Press and hold power button
to turn SDM Pod off.
Start Run
Lap View
Split View
Heart Rate
View
Distance
View
Pace View
Scroll to
CHRONOGRAPH mode
Page 7

6
Press button to select
adjustable element
Scroll to
TIME mode
4
4 SEC
EXIT
Electrolight
On/Off
Set hour Set minutes Set seconds Set day Set month Set year Choose 12 or
24 hour clock
Show Day or
Month
in display
Power Save Set Contrast
Chime On/Off
Chime sounds at the
press of any button
Switch Time Zones
Press to view
Hold 2 sec to switch
2 SEC
Power Save (0-24hrs.)
After X hours with no activity,
watch goes to sleep. Push any
button to wake. Alarm will still
function.
Set Time
Follow steps through to set the time and date.
Page 8

7
Press button to select
adjustable element
Press button to
select alarm
Alarm is automatically
turn ON upon exiting
adjust mode
etc...
Scroll to
TIME mode
5
6
4
4
4 SEC
EXIT
Set hour Set minutes
Turn Alarm ON/OFF
The alarm icon will
show in the display of any
mode when an alarm is
turned ON
Set an Alarm
In TIME mode you can set up to 6 alarms. Press any button to stop the audible alarm. The alarm will automatically stop
after 20 seconds. Follow steps through to set an alarm.
Page 9

8
Programming Workouts
(Text and Content to come)
Page 10

9
Activate a Programmed Workout
In WKOUT mode you can select and activate a workout programmed into the watch using the triax pcv10 software.
Follow steps through to select and complete a desired workout.
Scroll to
WORKOUT mode
Workout 1
Workout 2
Workout 3
etc...
Segment 1
Segment 2
Segment 3
etc...
EXIT
2 sec
2 sec
2 sec
Selected workout
segments begin
to auto scroll
Begin Workout
3
Pause Workout
4
Manually END segment
Press once to pause segment.
Press twice to END segment
and pause workout at the
begining of next segment.
Begin PAUSED segment
Press to restart paused
segment or start next
segment after manually
ending a segment.
Turn segment chime ON/OFF
The segment chime will sound
between segments if segments
are not ended manually.
3
S
E
C
3
Page 11

10
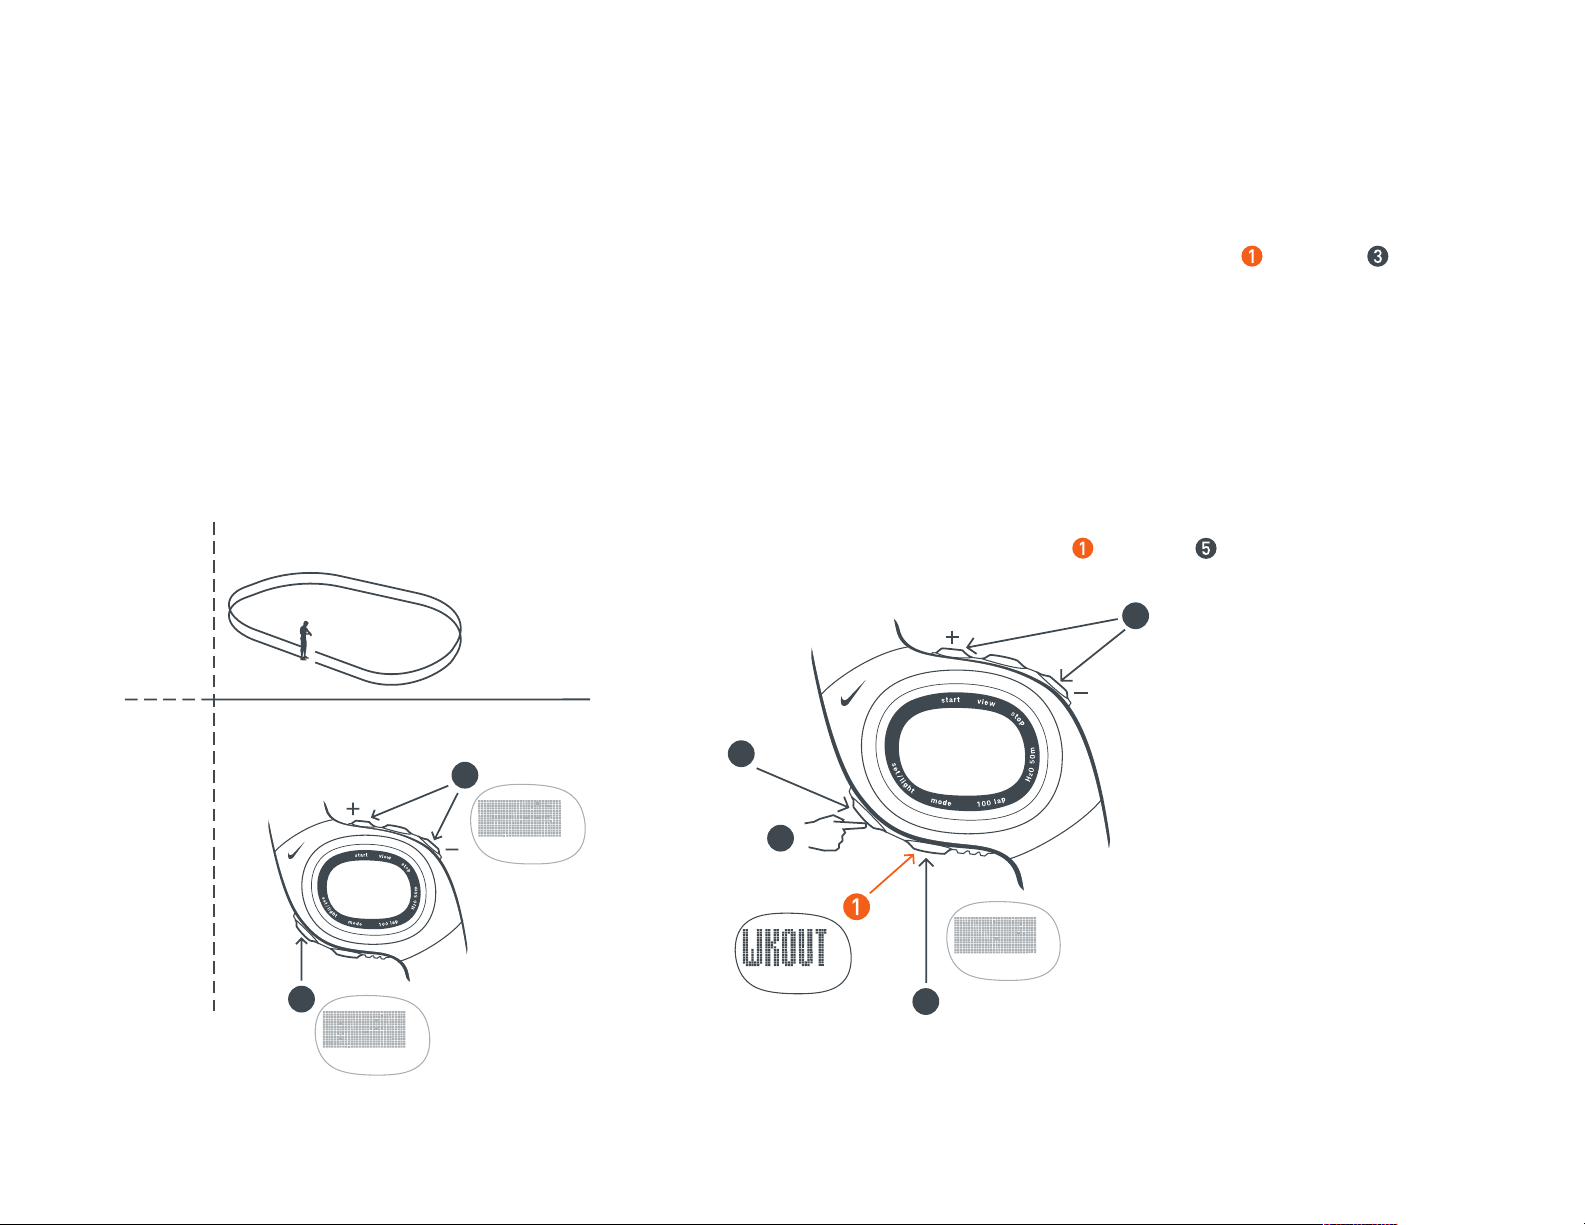
Calibrating the Speed Distance Monitor [SDM] Pod
Once calibarated, your SDM Pod is over 97% accurate. Use either WORKOUT mode or CHRONOGRAPH mode to
calibrate the SDM Pod. Calibrate your SDM Pod by running 400-800 meters on a marked track, then adjust the watch
to exact distance. You will need to calibrate the SDM Pod each time you replace the watch battery.
Follow steps through to automatically caliibrate your SDM Pod.
Scroll to
WORKOUT mode
Turn SDM
Pod ON
or
Scroll to
CHRONOGRAPH
mode
3 SEC
Press button
several times to
scroll to Calibrate
3
4
5
6
Run at your usual pace on the inside lane.
Complete 1-2 laps (400-800 meters).
Go to a 400 meter marked track.
400 meter
Page 12
11
7
8
If you ran 400 meters, adjust displayed
distance to read 400M.
After you calibrate the SDM Pod an Offset number is automatically
input to the watch. The default Offset number is 1.000. You can view
your adjusted Offset number by following steps through .
Write down and save your Offset number. Enter the number after
you change your SDM Pod battery or the watch battery to avoid
going to a track to recalibrate.
Note: Variations in pod placement and different shoe models will
affect the accuracy of your SDM Pod.
To make small adjustments to the calibration, use the manual Offset.
For example, if the SDM is slightly under measuring distance increase
the Offset number. Follow steps through to fine tune the Offset.
Adjusting your Offset
Scroll to
WORKOUT mode
(can also be accessed
in CHRONGRAPH mode)
Press button
several times to
scroll to Offset
3 SEC
2
5
3
4
EXIT
EXAMPLES
1.000 = Factory setting
0.990 = 99% of Factory calibration
1.010 = 101% of Factory calibration
You run 400m. The SDM measurement
at the end of the run was 392m (5%under).
The Offset factor would be 1.050
(5% adjustment).
Page 13

12
Using the Chronograph
In Chronograph mode, you can mark lap times and total
times during your run. Both lap times and total times
are captured simultaneously when you press the lap button.
After you stop the chronograph, your run information is
automatically saved in STATS mode. See page 15 for
STATS mode. Follow steps through to use
your chronograph.
Scroll to
CHRONOGRAPH
mode
Lap View
Split View
HR View
Distance View
Pace View
Press button at any
time during run to
switch information
in main display.
LAP 1
TOTAL 1
Mark Laps
Lap time is the time required
to go once around a track, or
complete a segment of a run.
and
Mark Totals
Total time is the time from
the beginning of the run up
to the point you mark.
Start Run
2
Mark Lap/Total
You will have
7 sec to
read your lap
and total time
Page 14

13
LAP 4
TOTAL 4
LAP 3
TOTAL 3
LAP 2
TOTAL 2
Stop Run
Run information
is automatically
entered into
STATS mode.
Mark
Lap/Total
4
Mark
Lap/Total
Reset Chronograph
and Move to Next Run
3 SEC
Reset Chronograph
The information for this
run is stored in STATS
mode and chronograph
moves on to next run
Page 15

Setting the Chronograph Auto-Lap
The Chronograph contains an Auto-Lap feature. You can set a distance at which the watch will automatically mark a lap.
You cannot manually mark laps when Auto-Lap is activated. Follow steps through to setup the Auto-Lap feature.
EXIT
4 SEC
LAP 1 LAP 2
Scroll to
CHRONOGRAPH
mode
4
Press button to select
adjustable element.
Set speed unit Set heart rate
unit
Set max
heart rate
Set Auto-Lap
Set lap distance
(Example: 1 mile)
Auto-Lap
ON/OFF
Start Run
Press start/ lap
button
Auto-Lap
distance unit
Auto-Lap
Marked
(1 mile)
SDM manual
calibration
see page 11
Adjusting your
Offset
Auto-Lap
Marked
(1 mile)
SDM auto
calibration
see page 10
Calibrating the
SDM Pod
Page 16

15
Review Stored Runs/Workouts
In STATS mode you can review stored information including total time, average heart rate, total distance, average pace
and detailed lap information. The memory can stored up to 100 laps and multiple runs or workouts.
Follow steps through to view stats stored for your runs/workouts.
Tot al Time
Scroll to
STATS mode
Odometer will
automatically appear
in display
Select a Run
Date of run
appears in
primary display.
Follow these steps
to view STATS on
most recent run.
Follow these steps
to view STATS on
all other runs.
Total Time Average HR Total Distance Average Pace
4
Lap 1 Time
Lap 1 Ave. HR
Lap 1 Distance
Lap 1 Ave. Pace
5
Lap 2 Time
Lap n Time... Lap n Ave. HR... Lap n Distance...
Total Time Average HR Total Distance Average Pace
Lap 2 Ave. HR
Lap 2 Distance
Lap 2 Ave. Pace
Lap n Ave. Pace...
4
4 SEC
Clear STATS
Hold for 4 sec to
clear ALL RUNS.
Hold for 7 sec to
clear odometer.
Page 17

16
Linking the Watch to your Computer
Use PC mode to connect the watch to your computer through the USB PCdock. Once the watch has successfully linked
with the PCdock, the blue LED light on the PCdock will begin to flash slowly. You can then proceed to upload new workouts
to the watch or download run/ workout statistics to your computer. Follow steps through to link the watch
to your computer.
Repeat this step until
you get a successful link.
Scroll to
PC mode
See page 2 Installing Drivers, Software and USB PCdock
to ensure the PCdock is properly attached to your computer.
The watch will automatically try to detect
the digital ID of the HRM chest strap and
the SDM pod. Once detected or after 2-3
minutes of inactivity, the watch will
enter TIME mode.
4
Watch will begin
to link with the PCdock.
Failed Link
Successful Link
4 SEC
Page 18

17
Heart Rate Intensity Chart
This is another way to gauge your approximate heart rate zones based on sex, age and weight. Starting with your
Max Heart Rate, use the chart to help calculate your zones depending on the intensity of your workout.
Note this formula may not work for everyone.
Determine your target heart rate zones (intensities)
Low Intensity Medium Intensity High Intensity
Max Heart Rate
50 - 65% of Max HR 65 - 80% of Max HR 80 - 100% of Max HR
205 bpm 103 - 133 bpm 133 - 164 bpm 164 - 205 bpm
200 100 - 130 130 - 160 160 - 200
195 98 - 127 127 - 156 156 - 195
190 95 - 123 123 - 152 152 - 190
185 93 - 120 120 - 148
148 - 185
180 90 - 117 117 - 144
144 - 180
175 88 - 114 114 - 140 140 - 175
170 85 - 111 111 - 136 136 - 170
165 83 - 108 108 - 132 132 - 165
160 80 - 104 104 - 128 128 - 160
155 78 - 101 101 - 124 124 - 155
150 75 - 98 98 - 120 120 - 150
Low Intensity (50-65% of Max HR)
Exercise in this zone after an
injury, or during a recovery
session. Stay in this zone when
beginning an exercise program.
Medium Intensity (65-80% of Max HR)
Exercise in this zone to increase
cardiovascular health, improve
endurance, or lose weight.
High Intensity (80-100% of Max HR)
Exercise in this zone to increase
peak performance and acclimate
your body to competition-level
activity. Stay in this level to increase
lactic-acid tolerance.
Find your Max Heart Rate
210 - .7 x age
Page 19

18
Running Pace Chart
Use this chart to determine your pace (time per distance) for common races and finishing times.
2 mi 3.2K
3 mi 4.8K
3.1 mi 5K
3.5 mi 5.6K
5 mi 8.1K
6 mi 9.7K
6.2 mi 10K
9.3 mi 15K
10 mi 16.1K
12.4 mi 20K
1/2 Marathon
13.1 mi 21.1K
15 mi 24.1K
15.53 mi 25K
18.64 mi 30K
20 mi 32.2K
Marathon*
26.2 mi 42.2K
*Example: If your goal is to finish a marathon in 3:43:00 you would need a pace
of 8:30/mi. If this is your goal, you might want to train with the pace zone at 8:40/mi
for the slow threshold and 8:20/mi for the fast threshold.
Common Races and Finishing times
12:00/mi
7:28/km
24:00
36:00
37:17
42:00
1:00:00
1:12:00
1:14:34
1:51:51
2:00:00
2:29:08
2:37:19
3:00:00
3:06:25
3:43:42
4:00:00
5:14:37
11:30
/mi
7:09/km
23:00
34:30
35:44
40:15
57:30
1:09:00
1:11:27
1:47:11
1:55:00
2:22:55
2:30:45
2:52:30
2:58:39
3:34:22
3:50:00
5:01:31
11:00
/mi
6:50/km
22:00
33:00
34:11
38:30
55:00
1:06:00
1:08:21
1:42:32
1:50:00
2:16:42
2:24:12
2:45:00
2:50:53
3:25:03
3:40:00
4:48:24
10:30
/mi
6:31/km
21:00
31:30
32:37
36:45
52:30
1:03:00
1:05:15
1:37:52
1:45:00
2:10:29
2:17:39
2:37:30
2:43:07
3:15:44
3:30:00
4:35:18
10:00
/mi
6:13/km
20:00
30:00
31:04
35:00
50:00
1:00:00
1:02:08
1:33:12
1:40:00
2:04:16
2:11:06
2:30:00
2:35:21
3:06:25
3:20:00
4:22:11
9:30
/mi
5:54/km
19:00
28:30
29:31
33:15
47:30
57:00
59:02
1:28:33
1:35:00
1:58:04
2:04:32
2:22:30
2:27:35
2:57:05
3:10:00
4:09:05
9:00
/mi
5:35/km
18:00
27:00
27:58
31:30
45:00
54:00
55:55
1:23:53
1:30:00
1:51:51
1:57:59
2:15:00
2:19:49
2:47:46
3:00:00
3:55:58
8:30
/mi*
5:17/km
17:00
25:30
26:24
29:45
42:30
51:00
52:49
1:19:13
1:25:00
1:45:38
1:51:26
2:07:30
2:12:02
2:38:27
2:50:00
3:42:52*
8:00
/mi
4:58/km
16:00
24:00
24:51
28:00
40:00
48:00
49:43
1:14:34
1:20:00
1:39:25
1:44:53
2:00:00
204:16
2:29:08
2:40:00
3:29:45
7:30
/mi
4:40/km
15:00
22:30
23:18
26:15
37:30
45:00
46:36
1:09:54
1:15:00
1:33:12
1:38:19
1:52:30
1:56:30
2:19:49
2:30:00
3:16:38
7:00
/mi
4:21/km
14:00
21:00
21:45
24:30
35:00
42:00
43:30
1:05:15
1:10:00
1:27:00
1:31:46
1:45:00
1:48:44
2:10:29
2:20:00
3:03:32
6:30
/mi
4:02/km
13:00
19:30
20:12
22:45
32:30
39:00
40:23
1:00:35
1:05:00
1:20:47
1:25:13
1:37:30
1:40:58
2:01:10
2:10:00
2:50:25
6:00
/mi
3:44/km
12:00
18:00
18:38
21:00
30:00
36:00
37:17
55:55
1:00:00
1:14:34
1:18:39
1:30:00
1:33:12
1:51:51
2:00:00
2:37:19
5:30
/mi
3:25/km
11:00
16:30
17:05
19:15
27:30
33:00
34:11
51:16
55:00
1:08:21
1:12:06
1:22:30
1:25:26
1:42:32
1:50:00
2:24:12
5:00
/mi
3:06/km
10:00
15:00
15:32
17:30
25:00
30:00
31:04
46:36
50:00
1:02:08
1:05:33
1:15:00
1:17:40
1:33:12
1:40:00
2:11:06
Pace
(minute per mile)
Pace (minute per kilometer)
Page 20

19
Troubleshooting
Watch does not “link” with the USB PCdock:
Try repositioning the USB PCdock away from your monitor or
other electronic devices. You can also try moving the watch
closer to the PCdock. Turn off any devices nearby that may be
using the same radio frequency: 916MHz (cordless phones,
baby monitors, etc.). Press the mode button several times
to re-enter PC mode and try “linking” again.
USB PC Link module blue LED is not flashing:
Make sure the PCdock is plugged into the USB port
on your computer. Make sure you have installed the software
application and drivers.
HRM chest strap does not “link” with the watch:
Make sure the chest strap is on by placing it on the body.
The unit turns on when it detects the two electrodes on
the body. It is recommended to wear the chest strap directly
against the skin.
Try to reposition the HRM chest strap slightly.
Try replacing the battery.
Moisten the electrodes with water or gel to make better
contact with the body. If you are waering the chest strap over
clothing, try getting the clothing wet also.
Re-enter CHRONO or WRKOUT mode to the watch.
SDM pod does not “link” with the watch:
Make sure the unit is on by depressing the power switch on the
top of the unit. The red LED indicator should be flashing slowly.
Try replacing the battery.
Re-enter CHRONO or WRKOUT mode on the watch.
SDM Pod Attachment to shoe:
Make sure the SDM Pod is attached to the laces securely
enough that there is no “wobble” when you are running.
The Pod should be aligned with the foot and secured well
enough that the alignment does not change during a run.
Orthotics:
People who wear orthotics or have extreme pronation or
supination in their stride may experience reduced accuracy.
Try re-calibrating for improved accuracy.
Varying Paces:
People who run at varying paces within a run may
experience reduced accuracy. Try calibrating at the
speed you usually run.
LED light on SDM Pod flashes rapidly:
This indicates low battery power. Replace the AAA
battery in the SDM Pod.
Watch beeps continuously:
If you have the pace zone alarm on and your pace does not
fall within your limits, the watch will beep to let you know
you are out of your zone. See page 8 for instructions on how
to turn off the pace zone alarm.
Crosstalk:
If you receive "crosstalk" from another electronic device,
press the button on the speed sensor. The watch and speed
sensor will begin linking on another channel.
Watch display is frozen:
The display of your watch may "freeze" due to static
electricity or recent battery replacement. If this occurs,
press and hold all four buttons at the same time.
This will erase the data in the memory and allow you
to reset the watch to the factory settings.
Press and hold all four buttons
at the same time to reset
the watch to the factory settings
Page 21

20
Water Resistance
Watch
Water Resistant up to 50 Meters:
Designed for underwater performance
to a depth of 165 feet (50 m).
ATTENTION: Water damage
will occur if watch buttons
are pressed while underwater!
HRM Strap
Water Resistant up to 30 Meters:
Wipe dry after use.
SDM Pod
Water Resistant up to 1 ATM:
Wipe dry after use.
Mode Limits
Chronograph: 23:59’59”
Timer: 23:59’59”
Heart Rate: 40 - 240 bpm
Material Specifications
Crystal:
Case:
Buckle:
Bezel:
Caseback:
Strap:
FCC Compliance
This device complies with part 15 of the FCC rules.
Operation is subject to the following two conditions:
(1) This device may not cause harmful interference.
(2) This device must accept any interference that
may cause undesired operation.
Tested to comply with FCC standards.
For home or office use.
FCC warning: Changes or modifications not
expressly approved by Nike could void your
authority to operate this device
under FCC regulations
Page 22

21
Battery
Watch
Battery Type:
Battery Life:
The battery is estimated to last 1-1.5 years depending on frequency and use
of certain features. Activating the Electrolite feature will contribute to battery drain.
Battery Replacement:
Follow steps below to replace your watch battery. For best results, you can have
Nike’s authorized service center change the watch battery.
WARNING! Keep watch batteries away from children.
If swallowed, contact a doctor immediately.
HRM Strap
Battery Type:
Battery Life:
SDM Pod
Battery Type:
Battery Life:
Battery Replacement:
Page 23

22
Two-Year Limited Warranty
Your NIKE watch is warranted to be free of defects in materials
or workmanship, under normal use, for a period of two years from
the date of delivery. This limited warranty excludes the battery, crystal,
strap, or damage resulting from improper care or handling, accidents,
modification, unauthorized repairs or normal wear.
Return the defective watch and the store receipt to the place of purchase.
If there is a covered defect, you have the option to have the defective parts
or watch repaired or replaced with the same product (if available) or
a similar product of equal price. However, NIKE reserves the right
to refuse either repair or replacement (but not both) if the cost of
doing so would be disproportionate to the defect.
This limited warranty is in place of all other express warranties,
and excludes refund of the purchase price. Any implied warranties,
including merchantability and fitness for a particular purpose, are limited
to the duration of this limited warranty. In no event shall NIKE be liable
for direct, indirect, incidental or consequential damages arising out of
the use of the watch, and any recovery is limited to the purchase price.
No other person or company is authorized to change this limited warranty,
and your dealer is solely responsible for any other warranties.
For U.S. Purchasers: Some states do not allow limitations on how long
an implied warranty lasts, or exclusions of incidental or consequential
damages, so the above limitations may not apply to you. This warranty gives
you specific legal rights, and you may also have other rights which vary
from state to state.
The foregoing is without prejudice to other legal rights that may arise
under applicable national legislation.
For non-warranty service like battery or strap replacement, contact one of
the listed service centers.
Service Centers
USA: 800-359-2508
Parsec Enterprises, Inc.
7501 N. Harker Dr.
Peoria, IL 61650
Denmark: +45 75 75 3260
France: +33 1 42 72 03 33
UK: +44 1628 41 0200
Germany: +49 2154 943 471
Netherlands: +31 104009899
Belgium: +32 2 468 13 23
Italy: +39 2 72000980
Norway: +47 33 304 5000
Sweden: +46 8 626 6500
Austria: +43 13313937
Israel: +972-3-5172540
Finland: +358 9 4780 500
Poland: +4822 637 5757
Slovenia/Croatia: +3861 3006130
Switzerland: 032 654 65 65
Turkey: +90 (212) 513 62 90
UAE: +971 4 3599905
Japan: 0120-500-719
Taiwan: 0800-009-868
Korea: 080-022-0182.
Singapore: 65-788 0990
Malaysia: 603-7722 2459
Thailand: 662-676 6100
Philippines: 632-848 9851
Australia: 1300 656 453
Page 24

23
Index
 Loading...