


GPSSportsMonitor
J-307
UserManual

J-307 User Manual
Welcome
Features
Measuring a variety of activities
Measure running, walking, bike riding, swimming and other activities, and display the
results.
❏ Measure distance, pace, routes, and other information.
U “Measurable items” on page 33
❏ Measure the time that has elapsed since each start (split time) and lap times.
U “Measuring workouts” on page 32
❏ Check the measured results/data.
U “Stopping and saving measuring” on page 38
Welcom e
is device features many other functions.
❏ Measure pulse (heart rate). (Pulse measurement function):
U “Measuring Pulse (Heart Rate) during Exercise” on page 30
❏ AT L ap:
Device records your lap times for distances you have set beforehand.
U “Recording laps automatically (AT Lap)” on page 44
❏ AT Pau se:
The device automatically stops measuring when you stand still and then restarts measuring
once you start moving again.
U “Pausing and resuming measuring automatically (AT Pause)” on page 46
❏ Training:
The device measures specic time and distance goals that you congure./
U “Measuring
❏ Notications:
The device vibrates to notify you when a lap time is recorded, when a target distance has
been reached, etc.
U “Vibration” on page 76
precongured
time and distances (Training)” on page 48
2

J-307 User Manual
Measuring activity
Changing device settings
Welcom e
Measure various daily activities such as desk work, household chores, and so on.
❏ Measure distance, number of steps, calories burnt, and other information.
U “Measuring Daily Activity (Meas. Activity)” on page 61
❏ Set a target number of steps and view your daily progress.
U “Conguring a target number of steps” on page 65
❏ View the past seven days worth of activity data.
U “Checking your activity” on page 64
Device settings can be congured to individual preferences.
❏ Contrast:
This setting is used to adjust the screen contrast.
U “Contrast” on page 76
❏ AT L ight:
This setting is used to turn on the light automatically when transitioning to dierent screens.
U “BACKLIGHT” on page 76
❏ Initialization:
This setting initializes the device memory and information.
U “Initializing the device” on page 88
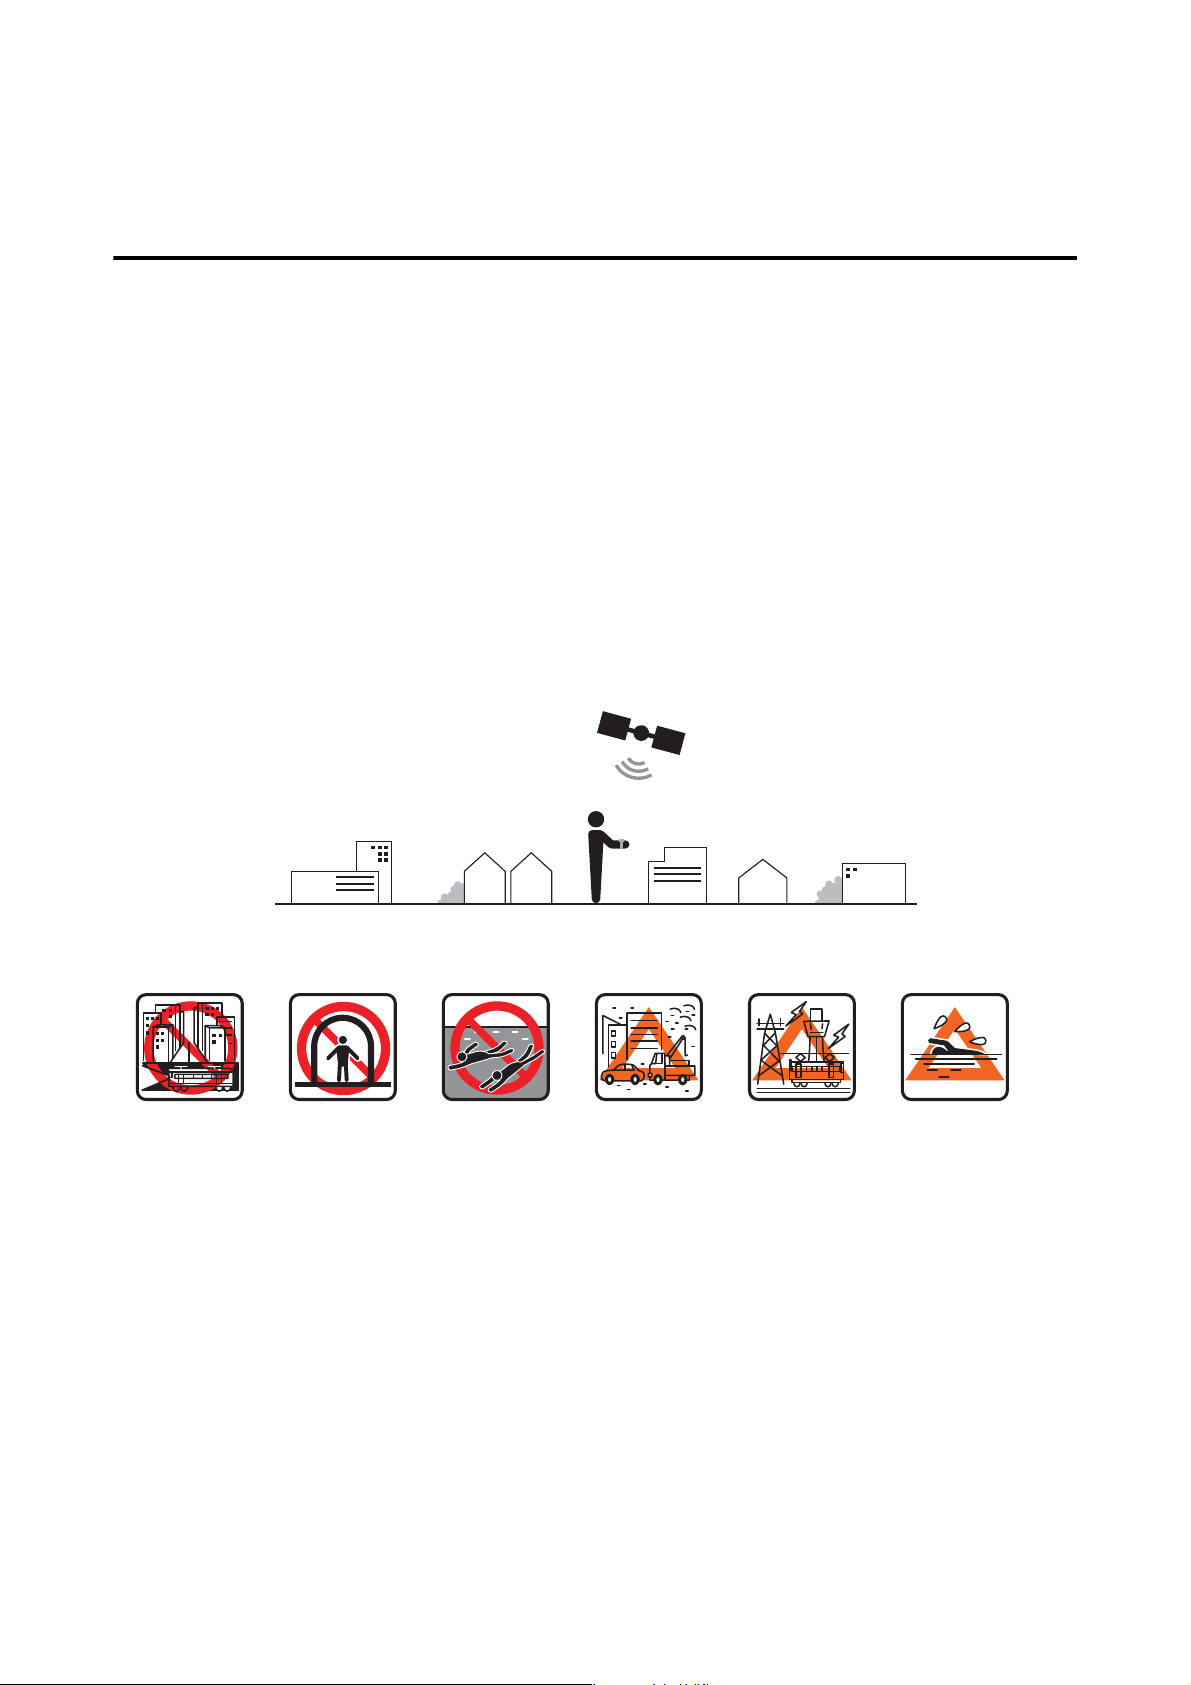
Other features
❏ This device supports the Quasi-Zenith Satellite System (QZSS).
❏ This device is equipped with a stride sensor so that your distance and pace can still be
measured when in locations with poor GPS signal reception, such as in tunnels or indoors.
U “About the stride sensor” on page 29
❏ With the Epson View companion application, you can view and manage your workout and
activity data from your PC or smartphone.
U “Managing data with the companion application” on page 59
3

J-307 User Manual
Contents
Contents
Welcome......................................................................... 2
Features.............................................................................. 2
Overview of the ProSense. . . ..................................................... 7
Brief description of the ProSense........................................................... 8
Brief description of the User's Guide and Startup Guide........................................... 9
Descriptions in the User's Guide.......................................................... 9
Conventions used in operation procedures.................................................. 9
Caution........................................................................... 10
Using this Device Safely................................................................. 11
Symbols in this Manual............................................................... 11
Product precautions.................................................................. 11
USB Charging clip precautions.......................................................... 12
Notes on electromagnetic waves......................................................... 13
Included items and optional accessories...................................................... 14
Included items...................................................................... 14
Optional accessories.................................................................. 14
Setup............................................................................ 15
Charging the device.................................................................... 16
Button functions...................................................................... 19
Conguring initial settings............................................................... 21
Conguring the device directly.......................................................... 22
Device screens........................................................................ 23
Screen display...................................................................... 23
Battery levels......................................................................... 24
Locking and unlocking the buttons......................................................... 25
Locking the buttons.................................................................. 25
Turning the device on and o............................................................. 26
Turning on the device................................................................. 26
Device sensors........................................................................ 27
GPS signal reception (GPS positioning).................................................... 27
About the stride sensor................................................................ 29
Measuring Pulse (Heart Rate) during Exercise................................................. 30
Measuring Your Workout....................................................... 31
Measuring workouts.................................................................... 32
Measurable activities................................................................. 32
Measurable items.................................................................... 33
Measurement preparation (selecting the Activity Type)........................................ 36
Starting measuring................................................................... 37
Pausing and resuming measuring........................................................ 37
Stopping and saving measuring.......................................................... 38
4

J-307 User Manual
Contents
Checking data during measuring........................................................... 39
Recording lap times during measuring...................................................... 40
Changing Measure Set (GPS measurement settings)............................................. 41
Conguring settings.................................................................. 41
List of Measure Set................................................................... 43
Recording laps automatically (AT Lap).................................................... 44
Pausing and resuming measuring automatically (AT Pause)..................................... 46
Measuring precongured time and distances (Training)........................................ 48
Setting and measuring paces (target pace).................................................. 50
Setting time/distance training sessions with high/low intensity intervals(interval training)............... 51
Using A-GPS to reduce the GPS positioning time............................................... 52
Conguring the operation of the backlight during measuring...................................... 52
Conguring workout notications......................................................... 52
Measuring time (Stopwatch).............................................................. 54
Checking Workout Measurement Data......................................... 55
Checking history data from previous measurement............................................. 56
Measurement data that can be checked in recall.............................................. 57
Deleting measurement data from the history.................................................. 58
Managing data with the companion application................................................ 59
Starting wireless communication......................................................... 60
Measuring Daily Activity (Meas. Activity). ...................................... 61
Track activity measurement function........................................................ 62
Using track activity measurement function eectively......................................... 62
Measuring activity..................................................................... 63
Checking your activity.................................................................. 64
Activity data you can check............................................................. 64
Checking current activity (Track Activity screen)............................................. 64
Checking previous activity data (Recall screen).............................................. 65
Conguring
Checking your target number of steps progress................................................ 66
Stop measuring your activity.............................................................. 67
a target number of steps........................................................ 65
Usage Examples for Some Typical Scenarios. ................................... 68
Measuring marathons and walking sessions................................................... 69
Conguring training workouts for races..................................................... 70
Conguring racing goals................................................................. 71
Checking your daily condition (Activity)..................................................... 72
Changing Device Settings....................................................... 73
Changing device settings................................................................ 74
Conguring the device from a smartphone................................................. 74
Conguring the device from a PC........................................................ 74
Conguring the device directly.......................................................... 75
5

J-307 User Manual
Contents
Settings............................................................................. 76
Bluetooth.......................................................................... 76
Activity........................................................................... 76
Vibration.......................................................................... 76
Display........................................................................... 76
System............................................................................ 77
Turn O............................................................................ 77
Certication......................................................................... 78
Regular Maintenance........................................................... 79
Cleaning the device.................................................................... 80
Main device and band................................................................ 80
Waterproof performance................................................................ 82
Batteries............................................................................ 82
Internal rechargeable device battery...................................................... 82
Disposing of the device.................................................................. 82
Problem solving....................................................................... 83
Updating the rmware.................................................................. 86
Checking the rmware version.......................................................... 86
Updating the rmware................................................................ 86
Performing system resets................................................................ 87
Initializing the device................................................................... 88
Appendix........................................................................ 89
Product specications................................................................... 90
Device specications................................................................. 90
Option specications................................................................. 91
Understanding the icons................................................................. 92
Glossary............................................................................ 93
Trademarks.......................................................................... 95
6

J-307 User Manual
Overview of the ProSense
Overview of the ProSense
U “Brief description of the ProSense” on page 8
U “Brief description of the User's Guide and Startup Guide” on page 9
U “Using this Device Safely” on page 11
U “Included items and optional accessories” on page 14
7

J-307 User Manual
Overview of the ProSense
Brief description of the ProSense
is device is a sports watch designed with GPS functionality to measure and record running and other workout
activity. is device also tracks and records other types of daily activity. With the Epson View companion
application, you can analyze, review, and manage your workout and activity data from your PC or smartphone.
You can also create and track training plans in eorts to accomplish longer term goals such as completing
marathons.
8

J-307 User Manual
Overview of the ProSense
Brief description of the User's Guide and Startup
Guide
ank you for your purchase of the GPS Sports Monitor "ProSense".
To ensure correct use of the device, make sure to read the included Startup Guide and then refer to the User's
Guide as necessary.
Keep the included Startup Guide easily available when you need help with the device.
Descriptions in the User's Guide
Warning This symbol represents precautions or instructions that must be followed. Incorrect
handling due to the disregard of this information may result in product failure or
incorrect operation.
Caution Indicates additional explanations and related information.
Menu Name Indicates menu items displayed on the screen of the device.
START/STOP button Indicates the device buttons.
U
Indicates related pages. Click the link in blue text to display the related page.
Conventions used in operation procedures
Actual procedure Procedure as described in this document
Press the ENTER button.
Press the UP or DOWN button and then select Prole.
Press the ENTER button.
Press the ENTER button > press the UP or DOWN button >
select Prole > and then press the ENTER button.
9

J-307 User Manual
Overview of the ProSense
Caution
❏ Unapproved copying of part or all of this guide is strictly forbidden.
❏ e content of this guide is subject to change without prior notice.
❏ Although every eort has been made to ensure the accuracy of this guide, contact us if you have any questions
or notice any errors in descriptions in the content of this guide.
❏ Despite the preceding clause, we cannot accept any responsibility for mishandling due to errors in this guide.
❏ We cannot accept any responsibility for malfunctions and so on that occur due to ignoring the content of this
guide, the device being handled inappropriately, repairs or modications performed by a third party that is not
our company or appointed by our company.
10
J-307 User Manual
Overview of the ProSense
Using this Device Safely
Make sure to read the included "Using this Device Safely" document before using the product to ensure safe use.
Incorrect handling may result in product failure or incorrect operation.
❏ Keep the included Startup Guide and the User's Guide (this document) easily available when you need help
resolving issues with the device.
❏ Conrm the laws and regulations of the applicable country when traveling to other countries with this
device.
❏ is product is not a medical device. Use this device as a workout aid.
Symbols in this Manual
e following symbols are used in this guide to indicate potentially dangerous operations or handling. Make sure
you understand these warnings before using the product.
Wa r n in g
is symbol indicates information that, if ignored, could possibly result in serious personal injury.
Caution
Ignoring these instructions and mishandling this device could cause injury or damage to property.
This symbol indicates an action that should be done.
This symbol indicates an action that must not be done.
Product precautions
Warnin g
Do not overexert yourself or work to exhaustion. Always seek medical attention immediately if you are feeling
unwell or for any injury.
Do not watch the device while exercising. Doing so may result in tumbling or slipping. Pay close attention to
your surroundings while using the device.
Do not use while scuba diving.
Use of this device may result in allergic reactions, itchiness of the skin, or irritation. If your skin has a reaction
to the device, rst try loosening the belt and reposition the device. If the situation does not improve,
immediately stop use of the device and seek medical attention.
11
J-307 User Manual
Do not use or store this device in the following environments. Doing so may result in electric shock, re, or
product malfunction and damage.
❏ Locations exposed to extreme temperature/humidity
❏ Near volatile substances
❏ Dusty places
❏ Near a re
❏ Near sources of magnetic energy such as TVs, speakers, and magnetic necklaces
Do not attempt to disassemble or repair this product. Doing so may cause electric shock or other accident.
Do not leave this product within reach of young children.
Use this product at your own risk. Seiko Epson shall not be liable for damages caused to the owner of the
device or any third party.
Overview of the ProSense
Warnin g
If you sweat while wearing this device, remove the device and then completely wipe sweat and any dirt o
your wrist and the device. Continuing to wear the device while wet with sweat or dirty may cause itchiness
and irritation.
This device is water resistant up to 5 bars of pressure. Do not press any buttons while the device is
underwater. This may eect the quality of the waterproong.
Do not use the device while in a bath or sauna. Steam, soap, and minerals in the water could degrade water
resistance or cause rust.
USB Charging clip precautions
Do not use a damaged USB Charging clip. Doing so may result in re or product malfunction./
Do not use the USB Charging clip if dusty or dirty. Doing so may result in re.
Do not use the USB Charging clip if you notice any smoke, odor, or abnormal noise. Doing so may result in re.
If some abnormalities occur during use, immediately disconnect the USB Charging clip cable and contact a
repair center.
Caution
Warnin g
Do not use USB Charging clip if any foreign substances or water/other liquids get inside the device. Doing so
may result in electric shock or re./ If this happens, immediately disconnect the USB Charging clip cable and
contact a repair center.
Disconnect the cable when the USB Charging clip is not in use. Metal or dust/foreign matter collecting on the
terminals may result in burns or re.
Do not use the USB Charging clip to charge other devices. This device must be charged only with the USB
Charging clip. Do not use any other charging method. Doing so may result in product malfunction, electric
shock, or
re.
12
J-307 User Manual
Overview of the ProSense
Notes on electromagnetic waves
device is equipped with Bluetooth
is
Smart technology.
®
function enables wireless communication of
is
measurement data between the device and a smartphone.
device has been
is
classied
as a low electronic data communication system based on Radio Law.
erefore,
this
device does not require a radio station license. e following acts may be punishable by law.
❏ Disassembling or remodeling the device
❏ Removing the verication or certication number for the device
Frequency
is device uses the frequency bands 2.402 to 2.480 GHz. Other wireless devices may
use the same frequency. Note the following points to avoid wireless interference with
other wireless devices.
Precautions when performing wireless communication
device operates on the 2.4 GHz band.
is
device operates in the same frequency bandwidth as industrial,
is
microwave ovens and mobile object
identication
(RF-ID) systems (licensed premises radio stations, amateur, and
scientic,
and medical devices such as
unlicensed specied low-power radio stations (hereaer "other radio stations")) used in factory production lines.
1. Before using this device, make sure there are no "other radio stations" being used in the vicinity.
2. If this device causes RF interference between the device and "other radio stations", promptly move to a dierent
location, stop using the device, and contact your local reseller to ask for advice on preventing interference (for
example setting up partitions).
3. In addition, when harmful radio wave interference occurs between the device and "other radio stations", and
refer to "Contacting us about this product" to contact our service centre.
Warnin g
If you notice any abnormalities on your skin and so on, stop using the device immediately and contact a
specialist.
In areas in which usage is restricted, such as on airplanes and in hospitals, follow the rules and regulations
provided (such as in-ight announcements).
Do not use the device if you have a surgically implanted medical device such as a cardiac pacemaker.
Do not bring the device into an operating room, intensive care unit, and so on, and do not use the device near
medical equipment. Radio waves from the device may interfere with electronic medical equipment causing
the equipment to malfunction and cause an accident.
13
J-307 User Manual
Overview of the ProSense
Included items and optional accessories
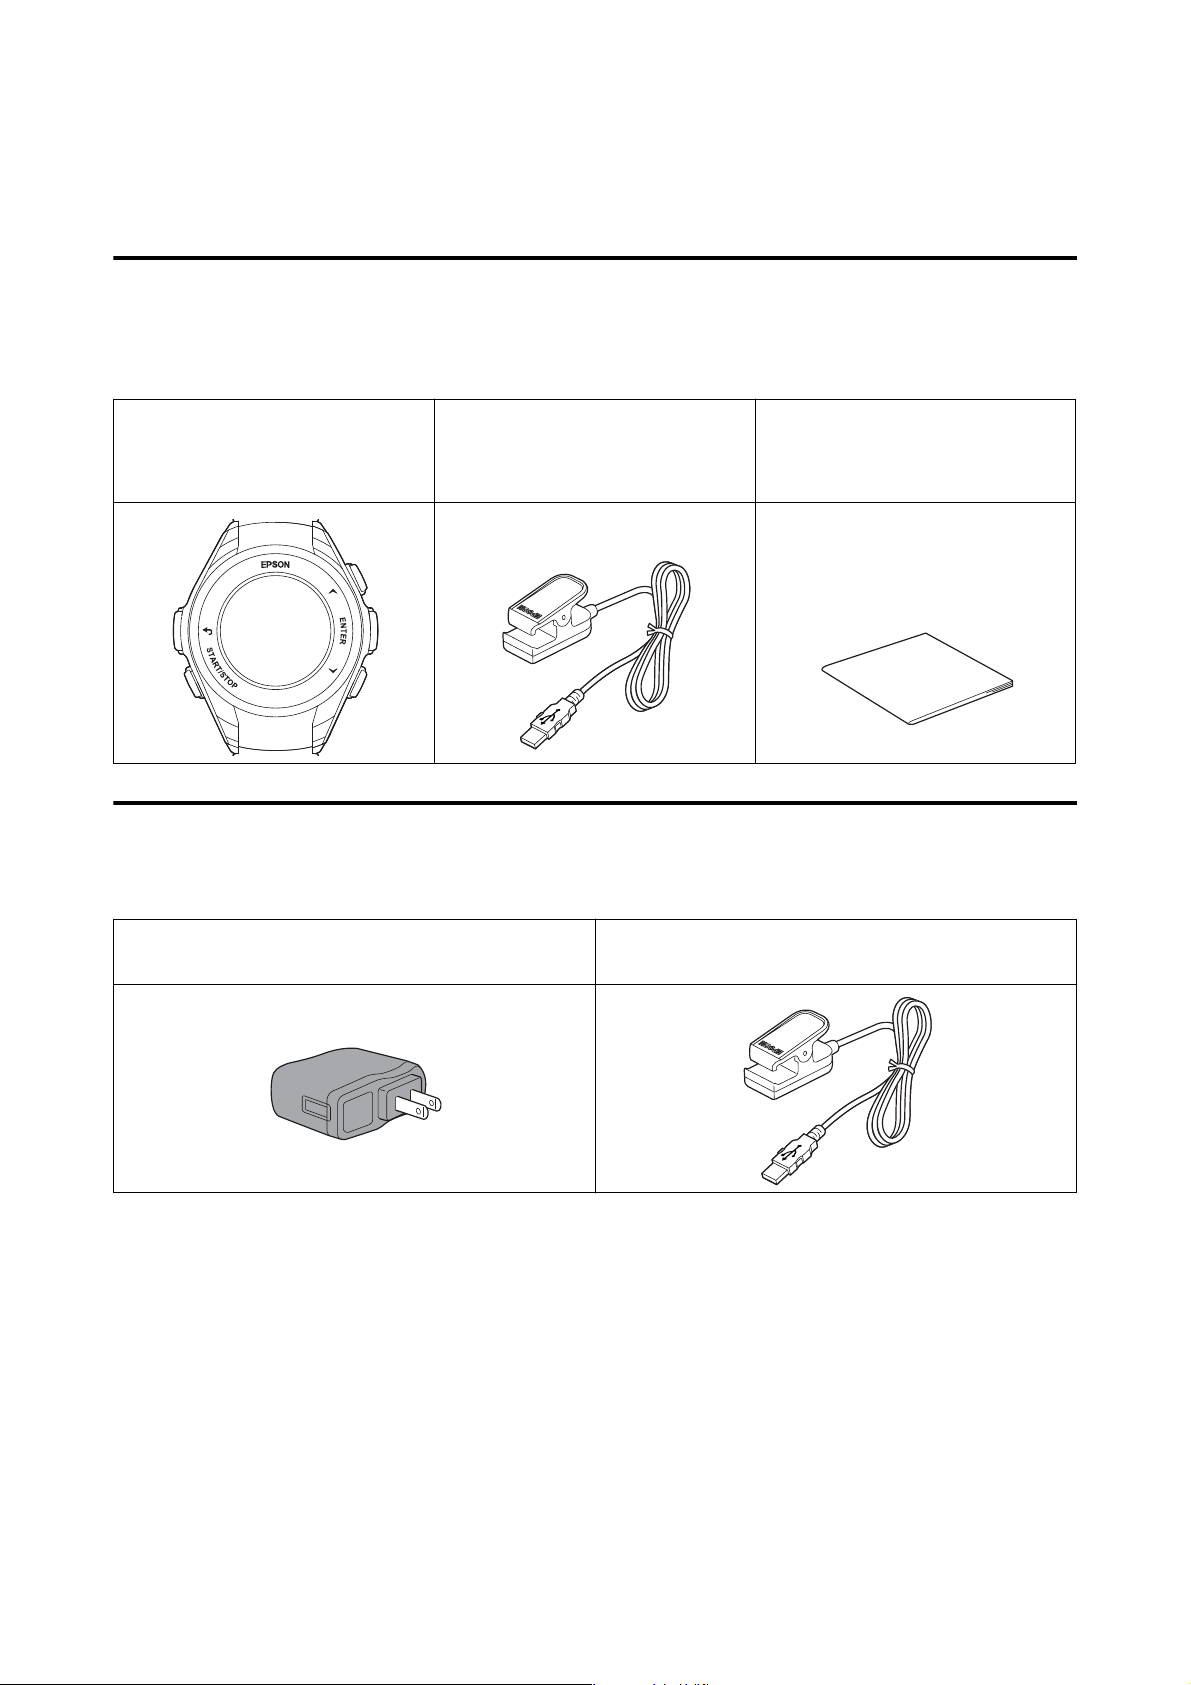
Included items
Make sure you check that all of the following items have been supplied with this product. If any of these items are
missing, contact your local reseller.
Notes on Usage
Startup Guide
Warranty
Device
USB Charging clip (charging and
communication device)
Optional accessories
You can purchase the following optional extras. Contact your local reseller for more information.
AC adapter
USB Charging clip (charging and communication
device)
14

J-307 User Manual
Setup
U “Charging the device” on page 16
U “Button functions” on page 19
U “Conguring initial settings” on page 21
U “Device screens” on page 23
U “Battery levels” on page 24
U “Locking and unlocking the buttons” on page 25
U “Turning the device on and o” on page 26
U “Device sensors” on page 27
Setup
15
J-307 User Manual
Charging the device
Important
c
❏ Charge this device before using it for the rst time.
❏ Use the specied USB Charging clip.
❏ Do not attach the USB Charging clip to a wet or dirty device.
Doing so may cause corrosion or malfunction of the device or USB Charging clip contact points, or
communication failures.
Setup
❏ Charge in environments with ambient temperatures of 5 to 35˚C. Attempting to charge the device in any other
environment causes the following charge error screen to appear and the device to stop charging. When it
returns to a suitable temperature, charging resumes.
❏ Bluetooth is enabled when the USB Charging clip is attached to the device. Disable Bluetooth when not in use.
U “ON/OFF” on page 76
Attach the USB Charging clip to the device.
A
Turn the device over so that the glass faces down. Hold the device up and then attach the USB Charging clip
so that the triangle marks on the back side of the device and the USB Charging clip are in alignment.
16
J-307 User Manual
Setup
Start charging the device.
B
Two charging methods are available.
oUsing the AC adapter to charge the device
Connect the USB plug of the USB Charging clip to the USB port in the AC adapter and then connect the AC
adapter to an electrical outlet.
We recommend using the optional AC adapter to charge the device. Using an incompatible AC adapter may
result in failure to charge or improper operation.
oUsing a PC to charge the device
Connect the USB plug of the USB Charging clip to the USB port in the PC.
is method will not necessarily be successful with all computers. Do not use a USB hub or other
intermediate device. Connect the USB Charging clip directly to the PC.
Charging will start automatically once devices are properly connected. e typical average time to fully
charge the device is 2.5 to 3.5 hours
.
can vary depending on conditions.
is
Note
You can use the Epson View companion application to congure initial settings from the PC while charging the device.
Visit the following website to download Epson View, create an account, and learn how to use the application to congure
the device and perform other operations.
U https://view.epson.com/
17
J-307 User Manual
Setup
Check that charging is complete.
C
Charging is complete once the "Remove clip to setup your watch" message appears.
Note
❏ Once the device is fully charged, the overcharge prevention feature engages. e device will not be damaged
even if you continue to charge the battery.
❏ e Time screen appears when conguring initial settings while charging the device.
the device is fully charged, disconnect the USB Charging clip from the device. Disconnect the cable
Aer
D
from the USB port in the PC or AC adapter.
18
J-307 User Manual
Button functions
Setup
3
1
2
4
5
is device is operated using the BACK button, START/STOP button, UP button, ENTER button, and DOWN
button. ese buttons have dierent functions depending on the displayed screen. e following table describes
the button functions for each screen.
Func tion
Button
Time screen/Track Activity
screen
*
Measurement screen Menu/Settings screen
Pressing the button at the Track
Activity screen displays the Time
1
2
3
4 -
screen. Pressing and holding the
button at the Track Activity
screen also displays the Time
screen.
Pressing the button displays the
Measurement screen.
Pressing and holding the button
turns on the device.
Pressing the button displays the
Track Activity screen and the
General Settings screen. Pressing
and holding the button locks and
unlocks the buttons.
Pressing and holding the button
while no measurement is in
progress displays the Time screen.
Pressing the button starts,
pauses, and resumes measuring.
Pressing the button switches
between Measurement screens.
Pressing and holding the button
locks and unlocks the buttons.
During measuring: Records a lap
time.
Not during measurement:
Pressing the button displays the
Menu screen.
Pressing the button displays the
previous screen. Pressing and
holding the button displays the
Time screen.
-
Pressing the button selects the
next option up.
This button is also used to
increase values. When entering
values, pressing and holding the
button increases values quickly.
Pressing the button selects the
highlighted option.
19

J-307 User Manual
Func tion
Setup
Measurement screen Menu/Settings screen
Pressing the button switches
between Measurement screens.
Button
5
Time screen/Track Activity
Pressing the button displays the
activity type for the next
measurement or displays the
Workout Recall screen.
screen
*
*When MEAS. ACTIVITY is set to ON.
e backlight turns on for 10 seconds whenever any button is pressed.
Pressing the button selects the
next option down.
This button is also used to
decrease values. When entering
values, pressing and holding the
button decreases values quickly.
20

J-307 User Manual
Setup
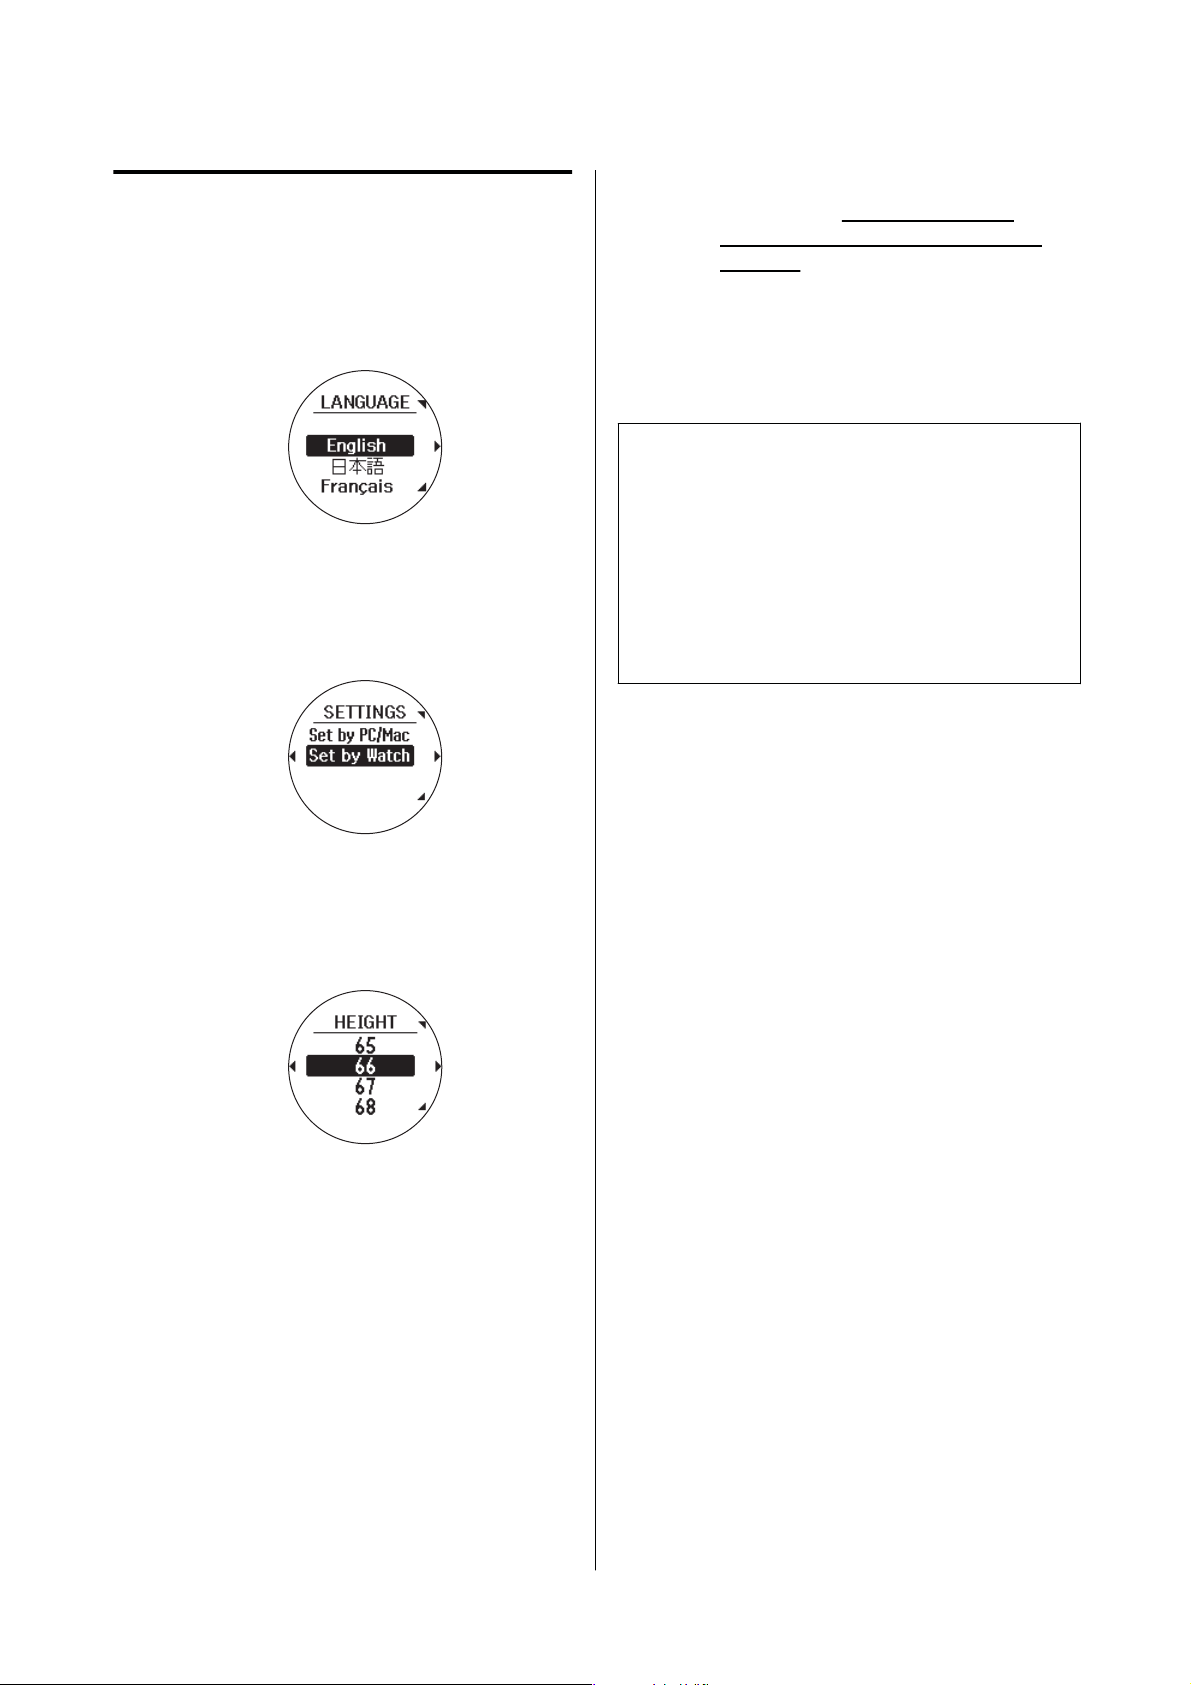
Conguring
initial
settings
Initial settings include personal details such as height
and weight. Conguring this information improves
accuracy of the recorded data. e initial settings
process starts once the USB Charging clip is removed
from the device.
21
J-307 User Manual
Setup
Conguring
Set the display language
the device directly
A
Select LANGUAGE and then press the ENTER
button.
Select the
conguration
method
B
Press the UP orDOWN button > select Set by
Wa t ch > and then press the ENTER button.
* To congure the date and time
automatically, move to an outdoor
location where there are no obstacles
overhead and select Set by GPS.
Conguration is complete aer you have
nished conguring all settings and the Time
screen appears.
Note
❏ If the device fails to acquire a GPS signal, press the
ENTER button and congure manually, or move to
another location and press the BACK button to
start acquiring a GPS signal again.
❏ To edit settings or other information, press the
BACK button to display the desired setting. e
previous conguration has already been saved if
you return to a setting.
Enter your initial settings
C
Follow the on-screen instructions and enter
your information for the initial settings.
Initial settings include the following personal
details.
❏ Height
❏ Weight
❏ Gender
❏ DOB
❏ Date and time (Year, Month, Day, AM/PM, Minutes,
Seconds)
*
22

J-307 User Manual
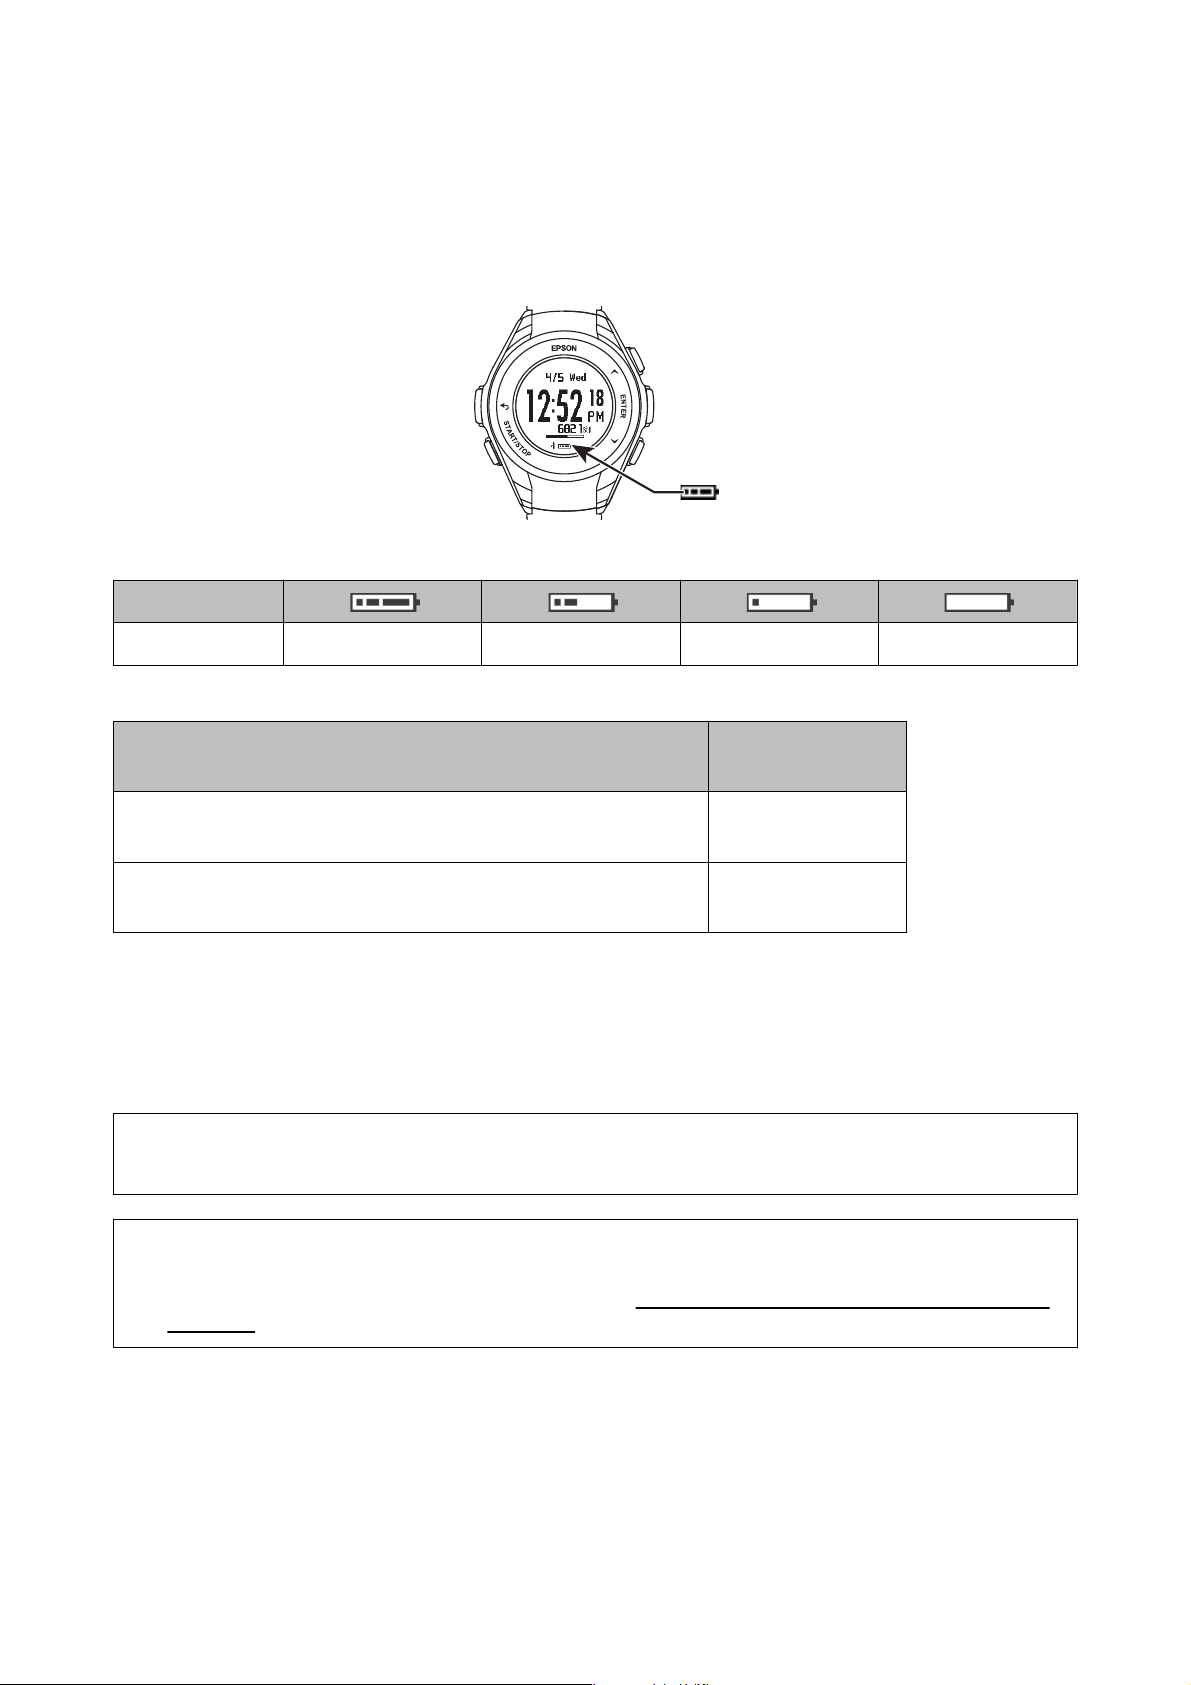
Device screens
Screen display
Time screen
1
2
3
4
1:
Current date and day
Setup
2:
Current time
3:
Total steps for the day and indicator of progress
toward your target number of steps
4:
Icons that represent the status of GPS
positioning, wireless communication, and
battery level.
* Only when MEAS. ACTIVITY is set to ON.
*
Settings screen
Measurement screen
Activity screen
23
J-307 User Manual
Setup
Battery levels
You can check how much charge remains from the battery icon below the time display.
Battery icon and standard usage times
Usage function
GPS measuring 5 to 10 hours 2 to 5 hours 1 to 2 hours 0 to 1 hour
Estimated battery life of time display operation only (no GPS measuring)
Usage function
Meas. Activity is disabled, AUTO SLEEP is enabled*1, Bluetooth is disabled,
AUTO SEARCH is disabled
Meas. Activity is enabled, AUTO SLEEP is enabled
AUTO SEARCH is disabled
*1
, Bluetooth is enabled,
Maximum operation
*2
time
30 days
7 days
*1 AUTO SLEEP is active for 14 hours per day (internal evaluation criteria).
*2 e operation time varies depending on the environment, which aects GPS reception, and device settings
such as backlight settings.
Note
Even if the battery runs out, measurement data is stored in the main memory.
Important
c
Nothing will appear in the screen when the battery level is low. If the device is le for a long time with a low battery,
the performance of the rechargeable battery will deteriorate. Make sure you charge the device at least once every
six months even when it is not being used.
24
J-307 User Manual
Setup
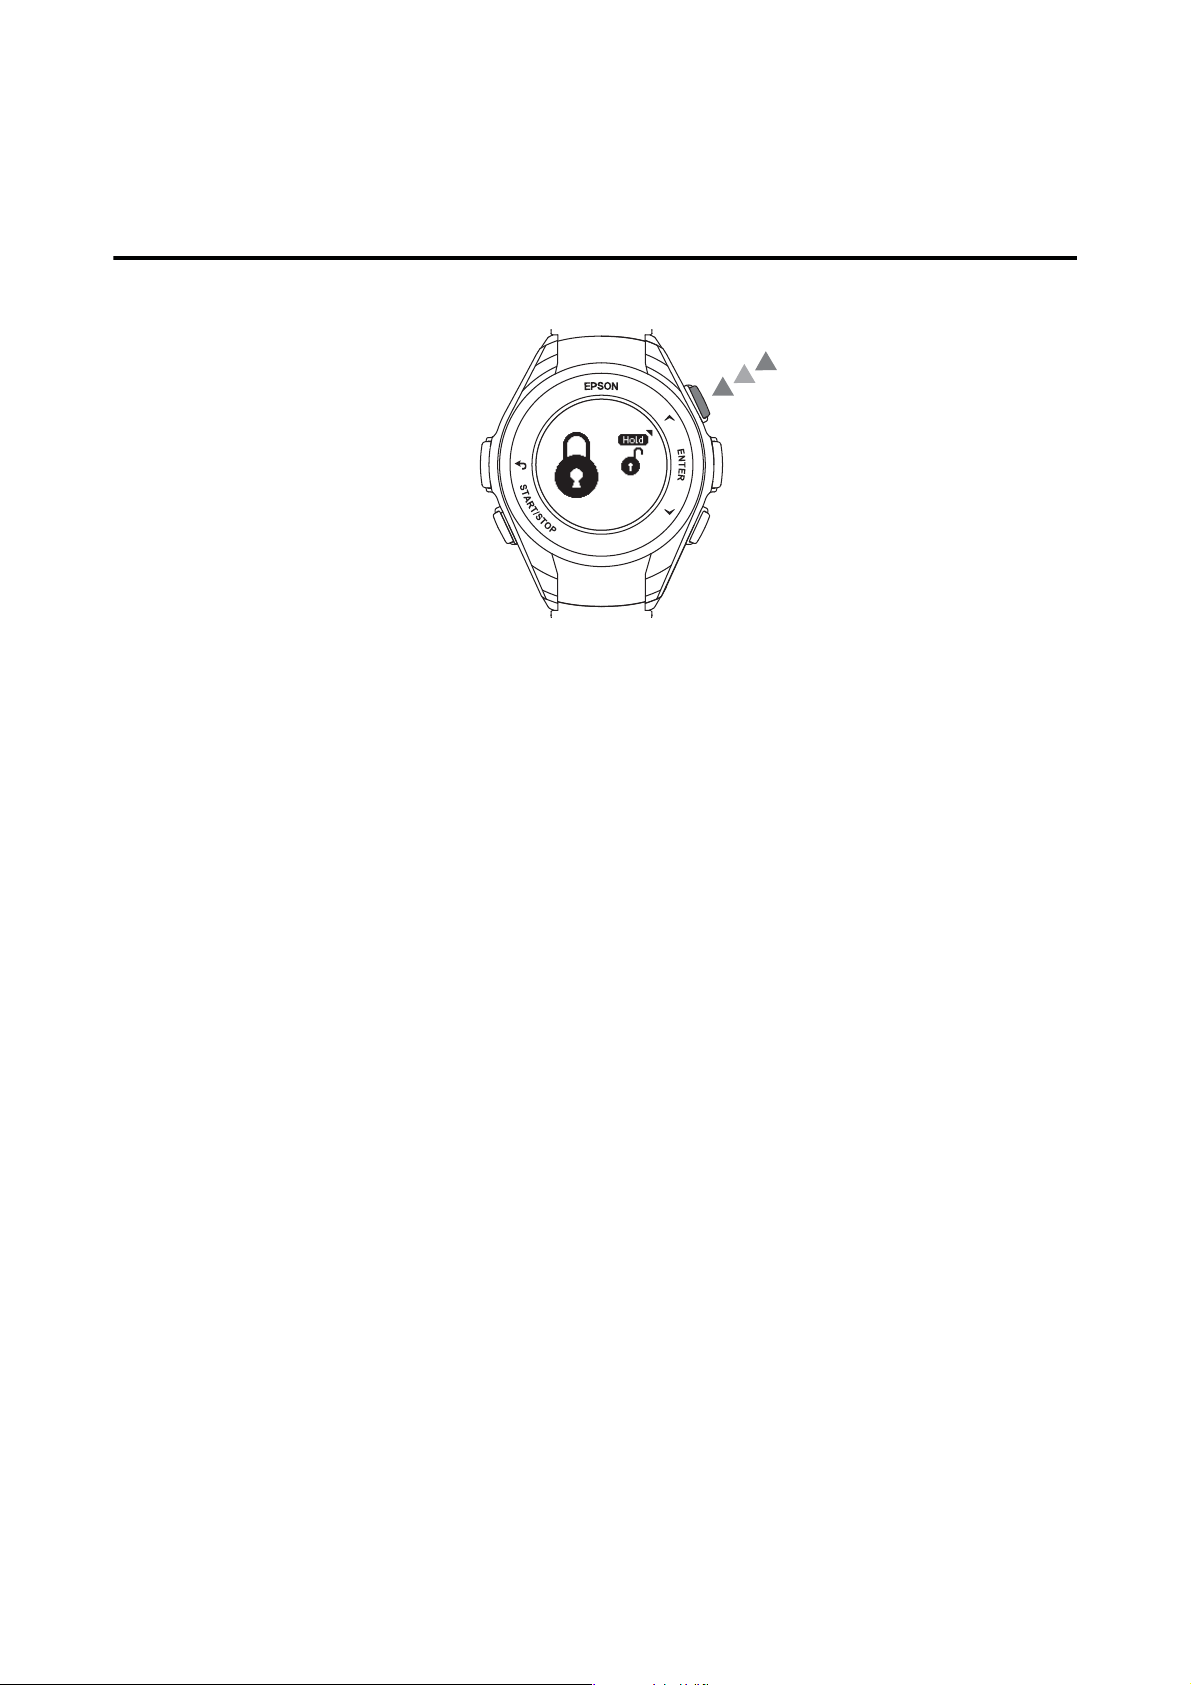
Locking and unlocking the buttons
Locking the buttons
To lock the buttons, press and hold the UP button at the following screens.
❏ Time screen
❏ Activity screen
❏ Measuring screen
Unlocking the buttons
To unlock the buttons, press and hold the UP button.
25
J-307 User Manual
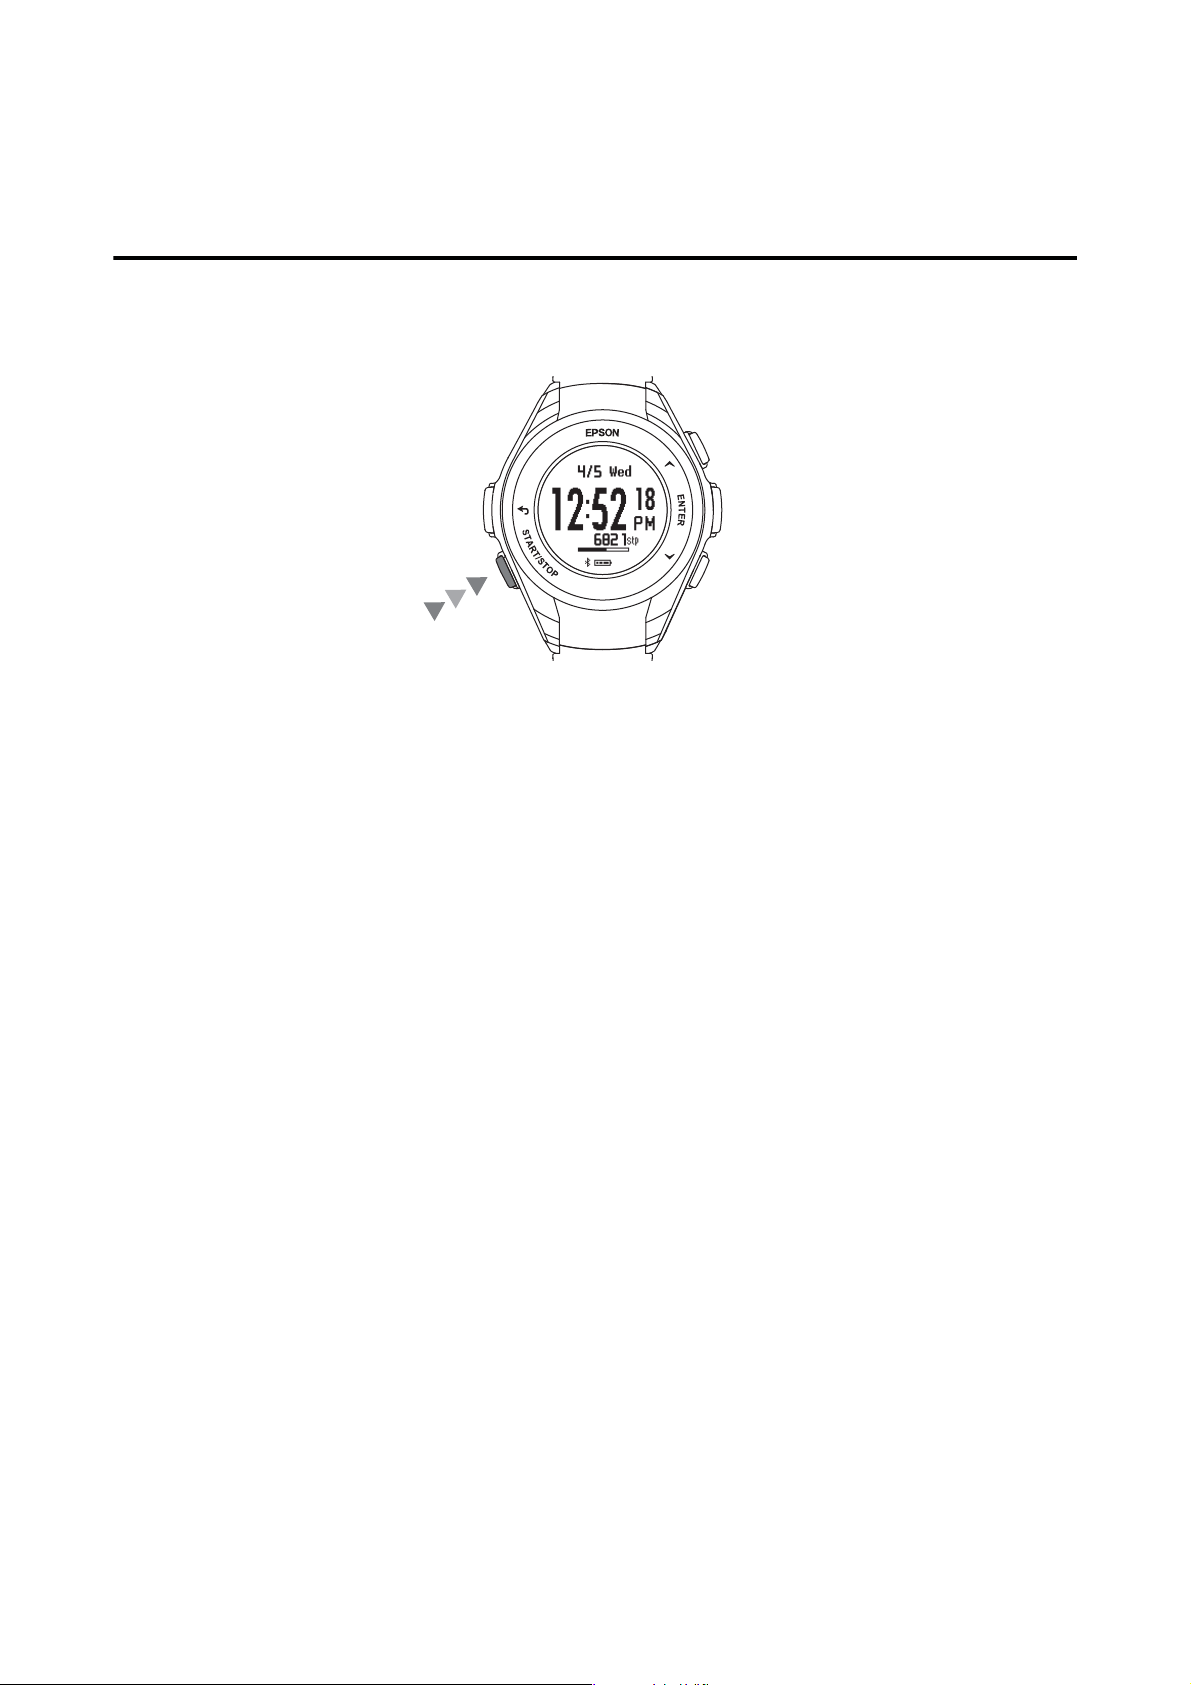
Setup
Turning the device on and
o
Turning on the device
Press and hold the START/STOP button for 2 seconds to turn on and start the device.
Turning o the device
Tu r n o the device if it will be unused for an extended period of time. To turn o the device, press the ENTER
button at the Time screen and then select MENU > Turn O > Ye s .
U “Turn O” on page 77
26
J-307 User Manual
Setup
Device sensors
GPS signal reception (GPS positioning)
GPS positioning
GPS positioning is the process by which the device receives a GPS signal and timing information to measure
routes, distance, pace, and other information.
To ensure accuracy of measurements, use the device under the following conditions in areas of good GPS signal
reception.
Scenarios in which GPS positioning is used
❏ GPS measuring (Run or Walk measurements)
❏ Time synchronization (SETTINGSSet by GPS, SystemUpdate Time)
Good signal reception conditions
Locations where you cannot receive signals Locations that are
Inside rooms or
buildings, or
underground
In tunnels Under water Locations with
electronic
interference, such
as constructions
sites and heavy
trac
dicult
Near high-voltage
wires or television
towers, overhead
electric wires for
trains, and roads
with skyscrapers
to receive signals
On water
Using the device for the
Before using the device for the rst time aer purchase, wait at least 15 minutes aer initial GPS positioning
outdoors with no obstructions overhead while the device displays the Measurement screen. is improves
measurement accuracy.
rst
time
27
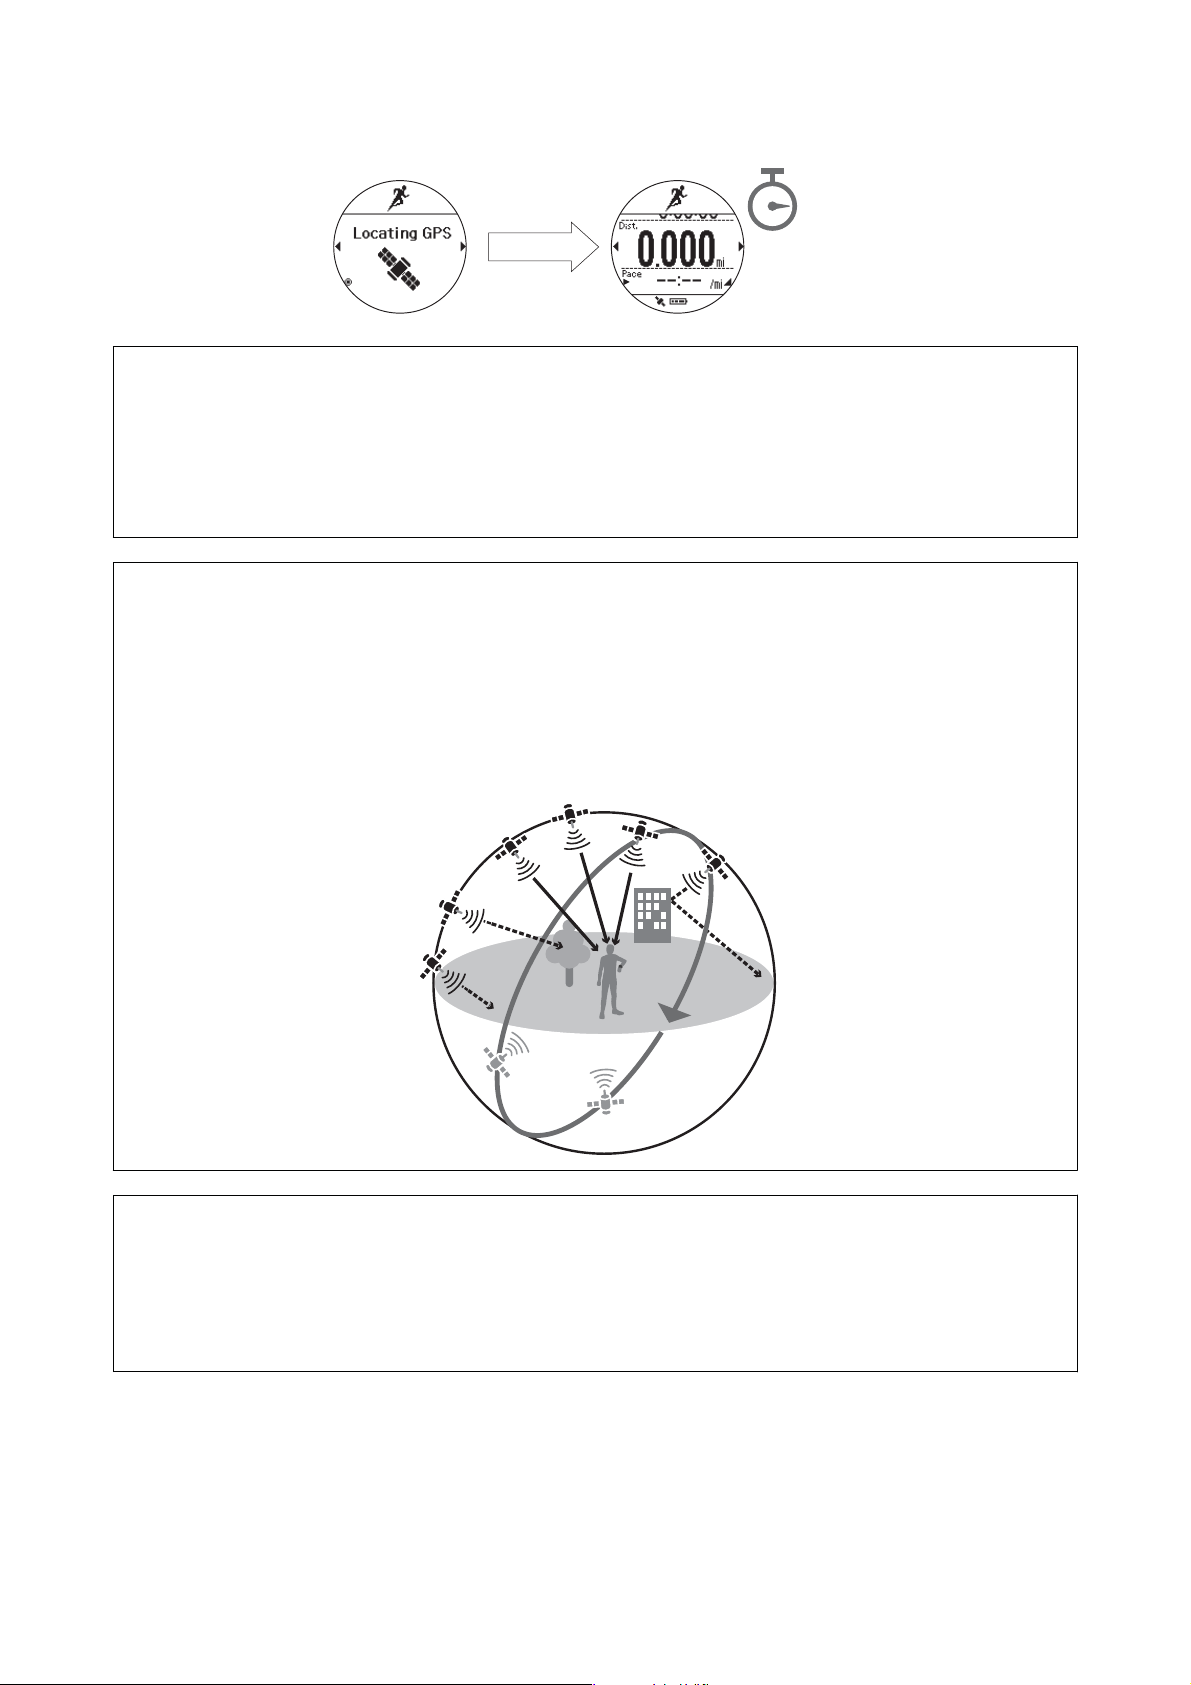
J-307 User Manual
Setup
The Measurement screen
appears after GPS locating.
Wait 15 minutes
Note
❏ Refer to the following page for more information on GPS positioning.
U “Measurement preparation (selecting the Activity Type)” on page 36
❏ is process normally only needs to be performed once.
❏ Perform this process if the device has not been used for several months.
Note
e basic conguration of the GPS system is 24 satellites orbiting the Earth at an altitude of 20,000 km with at least four
satellites traveling in six dierent orbits. e GPS receiver acquires data from four satellites and calculates the latitude,
longitude, altitude, and time. You can start measuring once the GPS positioning has been performed and this
information has been received. You can receive more detailed GPS navigation data (satellite orbital information) if you
wait 15 minutes aer initial GPS signal acquisition, which improves measuring accuracy.
However, note that GPS positioning is not 100% accurate or reliable at all times even with the more detailed GPS data
because of atmospheric conditions and the usage environment.
Note
AGPS - Reducing the GPS Positioning Time
You can reduce the GPS signal acquisition time by connecting the device with a smartphone and then retrieving GPS
satellite information from a network server. Refer to the Epson View website for more information.
https://view.epson.com/
28
J-307 User Manual
Setup
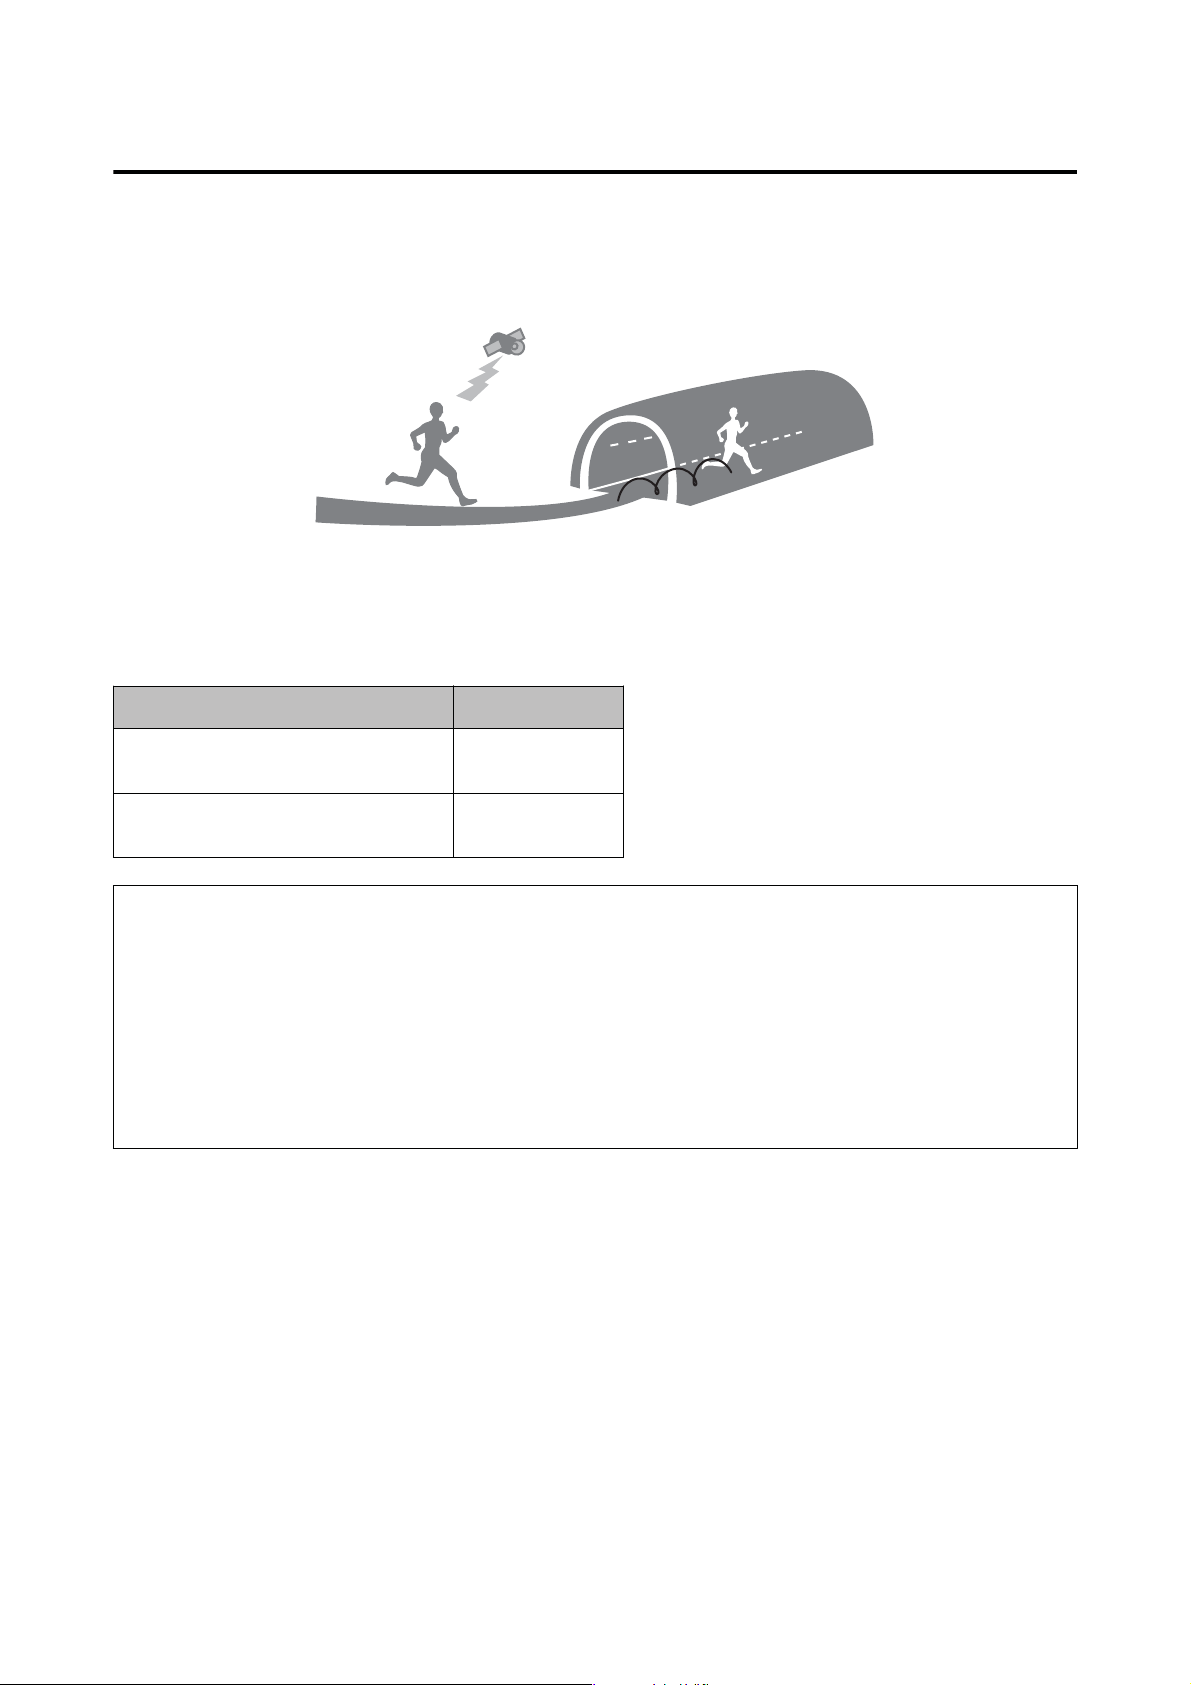
About the stride sensor
is device is equipped with a stride sensor. is sensor enables the device to continue measuring your distance
and pace in locations with poor GPS signal reception, such as in tunnels or indoors.
Using the device for the rst time
When using the device for the rst time, run or walk for the specied time depending on the location as described
in the following table to allow the device to acclimate to your stride.
Location Time
Outside with no obstructions overhead
Area with many buildings Approx. 30
Note
❏ is process normally only needs to be performed once. However, note that information on your stride is initialized if
the device is initialized. If this occurs, you need to perform the process to allow the stride sensor to acclimate to your
stride again.
❏ When you mainly use the device for walking, set the activity type to Wa l k.
U “Measurement preparation (selecting the Activity Type)” on page 36
❏ Signicant measurement errors may occur if your stride diers signicantly from that used during the stride sensor
initialization session.
Approx. 10
minutes
minutes
29

J-307 User Manual
Setup
Measuring Pulse (Heart Rate) during Exercise
Wear the device on your wrist and then press the [UP] button to see your pulse (heart rate).
You can set ve heart rate zones (within the range of the minimum and maximum heart rate) to suit the exercise
intensity in User Settings.
e value in brackets () is the default setting.
Setting items Value Explanation
HR Zone Zone1
(30 to 100 bpm)
Zone2
(101 to 130 bpm)
Zone3
(131 to 160 bpm)
Zone4
(161 to 190 bpm)
Zone5
(191 to 240 bpm)
30

J-307 User Manual
Measuring Your Workout
Measuring Your Workout
U “Measuring workouts” on page 32
U “Checking data during measuring” on page 39
U “Recording lap times during measuring” on page 40
U “Changing Measure Set (GPS measurement settings)” on page 41
U “Using A-GPS to reduce the GPS positioning time” on page 52
U “Conguring the operation of the backlight during measuring” on page 52
U “Conguring workout notications” on page 52
U “Measuring time (Stopwatch)” on page 54
31

J-307 User Manual
Measuring Your Workout
Measuring workouts
is device uses positional and time information received from GPS satellites to measure your distance, pace, and
routes.
You can also measure split times and lap times during GPS measuring sessions.
Split time
Measures the elapsed time from the start.
Press the START/STOP button to start
measuring. Press the START/STOP button
again to stop the measuring.
START/STOP START/STOP
Lap time
Records the elapsed time for each lap.
Press the ENTER button during a
measurement to record your lap time.
START/STOP ENTER START/STOPENTER ENTER
Note
When using the AT Lap function, laps are recorded automatically each time the precongured distance is reached.
U “Recording laps automatically (AT Lap)” on page 44
Measurable activities
Workout Expla nati on
Run Jogging, running, marathons, etc.
Indoor run Indoor running
Walk Walk ing
Bike Bike riding
Indoor bike Indoor bike riding training
Treadmill Using a treadmill indoors
Pool swim Swimming or activities in a pool
32

J-307 User Manual
Measuring Your Workout
Measurable items
Workout Ex plan atio n
Split Time (Time) Total time from the start of measurements
Distance (Dist.) Total distance from the start of measurements
Pace (Pace) Current pace (time per kilometer/mile)
Lap Time (LapTime) Average lap time
Lap Pace (LapPace) Average pace for each lap
Calories Burnt (Calories) Calories burnt from the start of measurements
Steps (Steps) Total number of steps since the start of measurements
Stride (Stride) Current stride
Pitch (Pitch) Current number of steps per minute
Heart rate (HR) Current heart rate per minute
Time (Time of Day) Current time
Estimated end distance
Estimated end time
*3
*2
Estimated distance completed at the end of the congured time
Estimated time at completion of the congured distance
*2 When Time is set under Tr ain ing
*3 When Dist. is set under Trai nin g
Measurement Screens
Press the UP or DOWN buttons at the Measurement screen to change through the dierent displays. Press the
ENTER button to display the Lap screen.
33

J-307 User Manual
Screen
Measuring Your Workout
Settings screen Screen 1 Screen 2 Screen 3
Run
Treadmill
Walk
This screen displays the
current settings.
❏ AT La p
❏ AT Paus e
❏ Training
* 1
❏ Time
❏ Distance
❏ LapPace
❏ Stride
❏ Calories
❏ Time of Day
❏ Steps
❏ Time of Day
❏ Pitch
❏ Time of Day
-
❏ Calories
❏ Time of Day
34

J-307 User Manual
Measuring Your Workout
Training screen
Screen
Run ❏ TA RGE T TIME
Treadmill
Walk
❏ TARGET DIST.
❏ Estimated end time
(only when a target
distance has been
set)
❏ Estimated end
distance
(only when a target
time has been set)
*2
*1 Does not appear during measuring.
Interval screen Race screen Lap screen
❏ LapTime
❏ LapPace
--
*2 Appears only when a Time or Dist. has been set.
Note
e training parameters/information that appears on screens 1 through 3 and the Lap screen can be changed.
Refer to the Epson View companion application for more information.
U https://view.epson.com/
35

J-307 User Manual
Measuring Your Workout
Measurement preparation (selecting the Activity Type)
At the Time screen, press the DOWN button to select the activity type.
e following table lists the available activities.
Activity Type Explanation
Running (Run) Jogging, running, marathons, etc.
Walking (Walk) Walk ing
Treadmill (Treadmill) Jogging or running on a treadmill
e device will begin GPS positioning once an activity is selected. e Measurement screen appears once the GPS
positioning is complete.
Note
e device will display the Measurement screen without performing GPS positioning when Tre ad mi ll is selected.
Important
c
❏ Make sure the screen is facing up and you are outside with no obstructions overhead
positioning.
U “GPS signal reception (GPS positioning)” on page 27
❏ If the device fails to acquire a GPS signal, the "Locating GPS Failed" message appears. Press the BACK button
to try and acquire the GPS signal again. To continue your measurement without using GPS positioning, press
the ENTER button.
when performing GPS
❏ To start your measurement without waiting for the device to nish GPS positioning, press the START/STOP
button at the screen that appears while the device acquires the GPS signal. e device will not be able to track
your route while the device is still performing GPS positioning. e device will begin tracking your route as
soon as it nishes GPS positioning.
U “Measurable items” on page 33
36

J-307 User Manual
Measuring Your Workout
Starting measuring
At the Measurement screen, press the START/STOP
button to start the measuring.
Important
c
❏ e oldest data will be overwritten when the
device runs out of storage space used for
measurement data. We recommend that you
use the Epson View companion application to
upload data aer each measuring.
U “Managing data with the companion
application” on page 59
Note
e device will return to the Time screen aer one hour
of no operation before measuring is started or during
paused measuring. e data for the paused measuring
up to the point of the pause will be saved.
❏ e maximum measurement time for each
split lap is 13 hours. If these times are
exceeded, measuring is stopped.
❏ e maximum number of measuring sessions
is 64.
Pausing and resuming
measuring
You can pause the measuring by pressing the START/
STOP button during the measuring. You can then
resume the measuring by pressing the START/STOP
button again.
37

J-307 User Manual
Measuring Your Workout
Stopping and saving measuring
Display the Stop menu
A
Press the ENTER button while the measuring is
paused to display the Stop menu.
Save the data
B
Press the UP orDOWN button > select Save >
and then press the ENTER button.
You can return to the Time screen by waiting 15
seconds or pressing the ENTER button.
e Measurement Results screen appears with
the following information.
❏ Activity type and date
❏ Measurement time
❏ Distance
❏ Split time
❏ Average pace
❏ Average stride
❏ Calories burnt
❏ Steps
❏ Total n umber of la ps
Use the UP and DOWN buttons to change
through the dierent displays./
Note
Select Delete if you do not want to save the data.
To resume the measuring, select Resume or press
the START/STOP button.
38

J-307 User Manual
Measuring Your Workout
Checking data during measuring
ree dierent screens are available during measuring. Press the UP and DOWN buttons to switch between these
screens.
e information that appears depends on the selected activity.
Screen 1 Screen 2 Screen 3
Screen
Run
Treadmill
Walk
❏ Time
❏ Distance
❏ LapPace
❏ Stride
❏ Calories
❏ Time of Day
❏ Steps
❏ Time of Day
❏ Pitch
❏ Time of Day
-
❏ Calories
❏ Time of Day
39

J-307 User Manual
Measuring Your Workout
Recording lap times
during measuring
Press the ENTER button during measuring to record a
lap.
e Display Lap screen appears for a few seconds
when a lap is recorded.
Note
e Display Lap screen will also appear when you have
reached the distance set for the AT Lap function.
U “Recording laps automatically (AT Lap)” on
page 44
40

J-307 User Manual
Measuring Your Workout
Changing Measure Set
(GPS measurement
settings)
Various user-congurable measurement settings are
available.
Conguring settings
Display the Workout menu
A
Press the ENTER button at the Measurement
screen.
Note
e available settings vary depending on the
activity.
U “List of Measure Set” on page 43
Note
is menu can also be displayed from the paused
measurement screen.
Press the UP or DOWN button > select Settings
> and then press the ENTER button.
Display the Settings screen
B
Press the UP orDOWN button > select the
desired setting > and then press the ENTER
button.
41

J-307 User Manual
Measuring Your Workout
Congure
settings
C
Press the UP orDOWN button > select the
desired option > and then press the ENTER
button.
Finish the conguration
D
Once you have congured all desired settings,
press the BACK button to display the
Measurement screen.
Note
❏ If you congured settings while measuring is
paused, press the BACK button twice to display the
paused measurement screen.
❏ Yo u c an also
Epson View. Refer to the following website for more
information.
U https://view.epson.com/
congure
settings from a PC using
42

J-307 User Manual
Measuring Your Workout
List of Measure Set
AT Lap
is function automatically records laps each time a precongured distance is reached.
U “Recording laps automatically (AT Lap)” on page 44
AT Pause (only for Run activity sessions)
is function automatically pauses your measuring when you stop running and resumes your measuring when you
start running again.
U “Pausing and resuming measuring automatically (AT Pause)” on page 46
Training
is function measures your performance in regards to precongured time and distance goals and also has a mode
that helps you maintain a
U “Measuring precongured time and distances (Training)” on page 48
precongured
pace.
Interval (only for Run activity sessions)
Interval training is the repetition of sprints followed by periods of rest.
You can set target times and distances to create a full workout.
device will vibrate to notify you when to switch between each sprint and rest period.
e
U “Setting time/distance training sessions with high/low intensity intervals(interval training)” on page 51
Race (only for Run activity sessions)
is feature allows you to set a target pace so that the device will vibrate to notify you when you have deviated
from the target pace.
U “Setting and measuring paces (target pace)” on page 50
43

J-307 User Manual
Measuring Your Workout
Recording laps automatically
(AT Lap)
is function automatically records laps each time a
precongured distance is reached.
Display the Workout menu
A
Press the ENTER button at the Measurement
screen.
Display the Settings screen
B
Press the UP or DOWN button > select AT L ap
> and then press the ENTER button.
Note
is menu can also be displayed from the paused
measurement screen.
Press the UP or DOWN button > select Settings
> and then press the ENTER button.
44

J-307 User Manual
Measuring Your Workout
Congure
settings
C
Press the UP or DOWN button > select Time
or Dist. > and then press the ENTER button.
Note
❏ To disable this function, select OFF.
Finish the
conguration
D
Once you have congured all desired settings,
press the BACK button to display the
Measurement screen.
Note
If you congured settings while the measurement is
paused, press the BACK button twice to display the
paused measurement screen.
45

J-307 User Manual
Measuring Your Workout
Pausing and resuming
measuring automatically (AT
Pause)
is function automatically pauses your measuring
when you stop running and resumes your measuring
when you start running again.
Display the Workout menu
A
Press the ENTER button at the Measurement
screen.
Display the Settings screen
B
Press the UP orDOWN button > select AT
Pause > and then press the ENTER button.
Note
is menu can also be displayed from the paused
measurement screen.
Press the UP or DOWN button > select Settings
> and then press the ENTER button.
46

J-307 User Manual
Measuring Your Workout
Congure
settings
C
Press the UP orDOWN button > select ON >
and then press the ENTER button.
Note
❏ To disable this function, select OFF.
Finish the
conguration
D
Once you have congured all desired settings,
press the BACK button to display the
Measurement screen.
Note
If you congured settings while the measurement is
paused, press the BACK button twice to display the
paused measurement screen.
47

J-307 User Manual
Measuring Your Workout
Measuring
precongured
time and distances (Training)
Training
is function measures your performance in regards to precongured time and distance goals and also has a mode
that helps you maintain a precongured pace.
Time training
Yo u
congure
During the session, you can check the running time and estimated end distance.
U “Measuring
Distance training
You congure a distance to create a distance training session.
a training time to create a timed training session.
Precongured
Time and Distances (Time/Dist.)” on page 49
During the session, you can check the current distance and estimated arrival times.
U “Measuring Precongured Time and Distances (Time/Dist.)” on page 49
Race training (only for Run activity sessions)
is feature allows you to set a target pace so that the device will vibrate to notify you when you have deviated
from the target pace.
U “Setting and measuring paces (target pace)” on page 50
Interval training (only for Run activity sessions)
Interval training is the repetition of sprints followed by periods of rest.
You can set target times and distances to create a full workout.
e device will vibrate to notify you when to switch between each sprint and rest period.
U “Brief description of interval training” on page 51
48

J-307 User Manual
Measuring Your Workout
Measuring Precongured Time and
Distances (Time/Dist.)
Display the Workout menu
A
Press the ENTER button at the Measurement
screen.
Note
is menu can also be displayed from the paused
measurement screen.
Press the UP or DOWN button > select Settings
> and then press the ENTER button.
Congure
settings
C
Press the UP orDOWN button > select Time or
Dist. > and then press the ENTER button.
Note
To disable this function, select OFF.
Finish the
conguration
D
Once you have congured all desired settings,
press the BACK button to display the
Measurement screen.
Display the Settings screen
B
Press the UP orDOWN button > select
Tr ai ni n g > and then press the ENTER button.
Note
If you congured settings while the measurement is
paused, press the BACK button twice to display the
paused measurement screen.
49

J-307 User Manual
Measuring Your Workout
Setting and measuring paces
(target pace)
is feature allows you to set a target pace (time per
kilometer) so that the device will vibrate to notify you
when you have deviated from the target pace.
is feature is only available for Run activity sessions.
♪
Note
e target pace can also be congured from a PC if you
use the Epson View PC application. In this scenario, you
can congure a dierent target pace for each lap/
interval. Refer to the "Application User's Guide" for
more information.
♪
♪
Conguring paces
Measuring
See the following page for information on measuring.
U “Measuring workouts” on page 32
50

J-307 User Manual
Measuring Your Workout
Setting time/distance training
sessions with high/low
intensity intervals
(interval training)
Brief description of interval training
Interval training is the repetition of sprints (high
intensity) followed by periods of rest (low intensity).
You can set target times and distances to create a full
workout.
e device will vibrate and trigger a sound to notify
you when to switch between each sprint and rest
period./
Sprint: High-intensity training periods
Rest: Low-intensity training periods
Number of intervals: Number of intervals of the sprint
and rest periods
Setting conditions in your interval
sessions
Note
Interval settings can also be congured from a PC if you
use the PC application.Epson View
You can freely congure the number of intervals when
using the PC application. Refer to the "Application
User's Guide" for more information.
Setting interval conditions
Measuring
Important
c
❏ Make sure the screen is facing up and you are
outside with no obstructions overhead when
performing GPS positioning.
U “GPS signal reception (GPS positioning)”
on page 27
❏ It usually takes less than two minutes for the
device to complete GPS positioning.
Sprint
(Sprint)
Rest
(Rest) First interval Second interval
51

J-307 User Manual
Measuring Your Workout
Using A-GPS to reduce the GPS positioning time
You can reduce the GPS positioning time before your walking or running session by updating the GPS information
in the device./
Connect the device to a PC or smartphone and start Epson View to automatically update the GPS information in
the device.
Important
c
❏ Downloading GPS information may incur separate communication charges for which the user is responsible.
❏ You do not need to be outside to update the GPS information via Epson View.
Conguring the operation of the backlight during
measuring
You can enable the backlight to remain on during the entire measurement.
is is useful when using the device at night.
U “BACKLIGHT” on page 76
Note
❏ Using the device with the backlight constantly on reduces the continuous GPS tracking time by approximately two
hours.
❏ e backlight turns o momentarily while the device vibrates as lap or other notication. e backlight turns back on
aer the device stops vibrating.
Conguring workout notications
e device can vibrate as notication such as when you complete laps or your target distance in Training mode.
e device alerts users of the following notications.
❏ Completion of laps in AT Lap mode
❏ Pausing and resuming of measuring in AT Pause mode
❏ Completion of target distance or target time in Training mode
52

J-307 User Manual
Measuring Your Workout
❏ Deviation from the target pace range in Training mode
U “Vibration” on page 76
53

J-307 User Manual
Measuring Your Workout
Measuring time
(Stopwatch)
Use this feature to measure only time without using
GPS measuring.
Note
❏ Stopwatch data is not stored in the device.
❏ is function cannot measure distance, pace, or
other GPS measuring activity.
Display the screen
A
At the Time screen, press the DOWN button
and then select Stopwatch.
Check recorded laps.
Starting measuring
B
Press the START/STOP button to start the
stopwatch.
Button functions
START/STOP button: Starts and stops the
stopwatch./
ENTER button:
Records the lap time. (During measuring)
Resets the stopwatch. (When the measuring is
paused)
UP and /DOWN buttons when the measuring
is paused:
54

J-307 User Manual
Checking Workout Measurement Data
Checking Workout Measurement Data
U “Checking history data from previous measurement” on page 56
U “Deleting measurement data from the history” on page 58
U “Managing data with the companion application” on page 59
55

J-307 User Manual
Checking Workout Measurement Data
Checking history data
from previous
measurement
You can check measured data on the recall screen.
56

J-307 User Manual
Checking Workout Measurement Data
Measurement data that can be
checked in recall
e following measurement data can be checked.
Icons
Run activity
Indoor run activity
Walk activity
Bike activity
Indoor bike activity
Treadmill activity
Pool swim activity
Measurement data parameters
- Date measured
- Start time/End time
Distance
Split time
Average pace
Average stride
HR Heart rate
Calories burnt
Steps
Total number of laps
57

J-307 User Manual
Checking Workout Measurement Data
Deleting measurement
data from the history
Two methods are available to delete measurement data
from the history.
❏ Use the following procedure to delete
measurement data from the history.
❏ To delete the entire history and all measurement
data, initialize the device. Refer to the following
page for more information.
U “Initializing the device” on page 88
58

J-307 User Manual
Checking Workout Measurement Data
Managing data with the companion application
EPSON View companion application:
With this application, you can review workout measurement data and activity data from your PC.
With this application, you can review workout measurement data and activity data from your smartphone and PC.
Visit the following website to download Epson View, create an account, and learn how to upload data and perform
other operations.
PC:
Smartphone:
https://view.epson.com/
Use the following QR code to access the web‐
site.
59

J-307 User Manual
Checking Workout Measurement Data
Starting wireless
communication
is section describes the procedure to start wireless
communication so that the device can be paired with a
smartphone.
Note
❏ To delete the smartphone pairing, display the
Settings menu, select Smartphone and then Forget
Device.
e following screen appears once the pairing has
been deleted. Select Pairing Completed to complete
the operation.
60

J-307 User Manual
Measuring Daily Activity (Meas. Activity)
Measuring Daily Activity (Meas. Activity)
U “Track activity measurement function” on page 62
U “Measuring activity” on page 63
U “Checking your activity” on page 64
U
“Conguring
U “Checking your target number of steps progress” on page 66
U “Stop measuring your activity” on page 67
a target number of steps” on page 65
61

J-307 User Manual
Measuring Daily Activity (Meas. Activity)
Track activity measurement function
is device is equipped with functionality to measure dierent activities.
e device can measure daily activity such as number of steps and calories burnt while the device is worn.
Measured data is aggregated on a per-day basis and is viewable on the device or the companion application.
Data on the number of steps derived from GPS measuring, distance, calories burnt, and sleep is included in the
activity data.
Using track activity measurement function eectively
Congure a target number of steps per data so that you can check your progress on the device.
U “Conguring a target number of steps” on page 65
U “Checking your activity” on page 64
62

J-307 User Manual
Measuring Daily Activity (Meas. Activity)
Measuring activity
Display the General Settings screen
A
At the Time screen, press the UP button >
select Settings > and then press the ENTER
button.
Display the Activity screen
B
Press the UP orDOWN button > select Activity
> and then press the ENTER button.
Finish the
conguration
E
Press the BACK button to display the Time
screen.
Note
e number of steps appears on the Time screen
when MEAS. ACTIVITY is set to ON.
Display the track activity measurement screen
C
Press the UP orDOWN button > select Meas.
Activity > and then press the ENTER button.
Congure
settings
D
Press the UP orDOWN button > select ON >
and then press the ENTER button.
63

J-307 User Manual
Measuring Daily Activity (Meas. Activity)
Checking your activity
Activity data you can check
e following two types of data can be checked.
❏ Current activity data (Track Activity screen)
❏ Past seven days worth of activity data (Recall screen)
Measurement item
Steps
-
HR Heart rate
-
Recovery time
Mind balance
Sleep measurement
Calories
Distance
Exercise
Checking current activity (Track Activity screen)
At the Time screen, press the UP button to display the Track Activity screen. Press the UP orDOWN buttons to
change through the dierent display parameters. Press the ENTER button at the Track Activity screen to display a
graph of the past seven days worth of activity data. Press the BACK button to return to the Track Activity screen.
At the Steps screen, press the DOWN button to return to the Time screen.
Note
Activity is measured on a per-day basis with a cutover time of midnight between each day.
64

J-307 User Manual
Measuring Daily Activity (Meas. Activity)
Checking previous activity data
(Recall screen)
Important
c
e device stores the past seven days worth of
activity data. Older data is overwritten by the
oldest data rst. For this reason, we recommend
that you upload data to the Epson View
companion application on a timely basis.
U “Managing data with the companion
application” on page 59
Note
Activity data cannot be deleted from the History. To
delete the activity data, initialize the device.
U “Initializing the device” on page 88
Conguring
a target
number of steps
❏ You can track your progress towards your daily
target number of steps when Meas. Activity is set
to ON.
❏ e default target number of steps is 10,000 steps/
day.
65

J-307 User Manual
Measuring Daily Activity (Meas. Activity)
Checking your target
number of steps progress
If you congure a target number of steps, the device
displays a target number of steps progress indicator on
the Time screen.
66

J-307 User Manual
Measuring Daily Activity (Meas. Activity)
Stop measuring your
activity
Note
Note: When Track Activity is set to OFF, the Track
Activity icon
Time screen (to the right of the battery icon).
device will no longer measure your number of steps,
e
calories burnt, or distance.
is removed from the bottom right of the
67

J-307 User Manual
Usage Examples for Some Typical Scenarios
Usage Examples for Some Typical Scenarios
U “Measuring marathons and walking sessions” on page 69
U “Conguring training workouts for races” on page 70
U “Conguring racing goals” on page 71
U “Checking your daily condition (Activity)” on page 72
68

J-307 User Manual
Usage Examples for Some Typical Scenarios
Measuring marathons and walking sessions
69

J-307 User Manual
Usage Examples for Some Typical Scenarios
Conguring
training workouts for races
70

J-307 User Manual
Usage Examples for Some Typical Scenarios
Conguring
racing goals
71

J-307 User Manual
Usage Examples for Some Typical Scenarios
Checking your daily condition (Activity)
72

J-307 User Manual
Changing Device Settings
Changing Device Settings
U “Changing device settings” on page 74
U “Settings” on page 76
U “Turn O” on page 77
73

J-307 User Manual
Changing Device Settings
Changing device settings
is section describes the procedures to congure the
device.
Conguring
smartphone
You can congure this device using a smartphone.
Download and refer to the Application User's Guide
for more information.
http://www.epson.jp/support/support_menu/ks/
121.htm
Note
A wireless connection must be established between the
device and a smartphone to congure the device using a
smartphone.
U “Starting wireless communication” on page 60
the device from a
Conguring
the device from a
PC
Connect the device to the PC
A
Attach the USB Charging clip to the device and
connect the USB plug into a USB port on the
PC.
Congure
settings
B
Start the Epson View companion application on
the PC and
the on-screen instructions and enter your
information.
congure
the initial settings. Follow
Synchronize the device
C
Aer entering your initial settings, click Next to
synchronize the device.
\\\e conguration is complete once the Time
screen appears on the device. Remove the USB
Charging clip from the device.
Note
Visit the following website for more information on
using Epson View.
U https://view.epson.com/
74

J-307 User Manual
Changing Device Settings
Conguring
Display the MENU
the device directly
A
At the Time screen, press the ENTER button.
Display the Settings screen
B
Press the UP orDOWN button > select Settings
> and then press the ENTER button.
Select the desired setting
C
Press the UP orDOWN button > select a setting
> and then press the ENTER button.
Finish the
conguration
E
Press and hold the BACK button.
Some settings must be
detail. In such cases, completely congure the
setting.
Select an
option/congure
congured
a value
in more
D
Press the UP orDOWN button > select a setting
> and then press the ENTER button.
Some settings must be
detail. Follow the on-screen instructions.
Note
Press and hold the UP orDOWN button when entering
values to increase values quickly.
U “Button functions” on page 19
congured
in more
75

J-307 User Manual
Changing Device Settings
Settings
Bluetooth
ON/OFF
is setting is used to enable and disable Bluetooth.
Options
Pairing
is is used to connect with a smartphone.
Select the device to be connected and then operate the
smartphone.
Forget Device
is setting is used to delete the connection
information for the smartphone. Select the desired
device and then select Forget Device.
: ON, OFF
Notications
ese settings are used to enable and disable
notications
calls and email messages when the device is paired
with a smartphone.
such as smartphone reception of phone
Non-Workout
is setting is used to enable and disable notications
at the Time screen.
Options
: ON, OFF
Workout
is setting is used to enable and disable notications
at the Measurement screen.
Options
: ON, OFF
Alert
is setting is used to enable or disable vibration of
the device as notication such as when you complete
laps or your target distance in training mode.
Activity
Step Target
is setting is used to enter a target number of steps.
Options
: 100 to 30,000 steps in 100-step increments.
Meas. Activity
is setting is used to enable and disable the track
activity measurement function.
Options
: ON, OFF
Vibration
Alarm
setting is used to enable and disable alarms, and
is
congure the alarm time.
Options
: ON, OFF
Display
Contrast
Set the contrast for the screen.
Options
BACKLIGHT
ese settings are used to congure the conditions at
which the backlight turns on.
❏ Movement of the wrist wearing the device (Wrist
❏ Pressing of any button (Button Push)
: High, Normal, Low
turn)
Options
Options
: ON, OFF
: ON, OFF
Options
: ON (00:00 to 23:59), OFF
❏ During measuring (Workout)
Options
76
: All Time, OFF

J-307 User Manual
Changing Device Settings
❏ Triggering of a notication such as completion of
a lap or target distance in Training mode
(Notications)
Options
When a specied time has passed, the light
automatically turns o. e backlight remains on until
the end of measuring when Wo rk o ut is selected for
All Time.
Note
❏ Using the device with the backlight constantly on
❏ e backlight turns o momentarily while the
: ON, OFF
reduces the continuous GPS tracking time by
approximately two hours.
device vibrates as lap or other notication. e
backlight turns back on aer the device stops
vibrating.
AUTO SLEEP
minutes elapses, we recommend that you select
Cancel, move to a
again.
❏ Manual:
Congure the time manually on the device
directly.
Options
: Year, Month, Date, Hour and Minutes
dierent
location, and try
Time Format
Set the format for the display time.
Options
: 12 Hour, 24 Hour
Display Seconds
is setting is used to enable and disable the display of
seconds.
Options
: ON, OFF
When you leave the device for a while, this function
automatically puts the device into sleep status.
Options
: ON, OFF
System
Language
Set the display language.
Options
Clock Set
UPDATE TIME
is setting is used to congure the current time.
Options
❏ Set by GPS:
: English,
: Set by GPS, Manual
Auto Search
When this setting is enabled, the device will
periodically perform GPS positioning whenever a
measurement is in progress to reduce the initial GPS
signal acquisition time before starting your next
measurement.
Options
: ON, OFF
RESET
Initializing the device resets all settings to their
defaults
deletes all measurement and activity data (History).
Options
U “Initializing the device” on page 88
(Prole/Settings),
: Yes, No
resets the stride sensor, and
VER.INFO
Displays the
rmware
version information.
e time is set in accordance with GPS
positioning.
GPS signals cannot be received while indoors.
Make sure the screen is facing up and you are
outside with no obstructions overhead
device fails to complete GPS positioning
process will take a few minutes.
is
. If the
aer
two
Turn O
is is used to turn o the device. To turn the device
on again, press and hold the START/STOP for 2
seconds.
77

J-307 User Manual
Certication
is displays the device certications.
Changing Device Settings
78

J-307 User Manual
Regular Maintenance
Regular Maintenance
U “Cleaning the device” on page 80
U “Waterproof performance” on page 82
U “Batteries” on page 82
U “Disposing of the device” on page 82
U “Problem solving” on page 83
U “Updating the rmware” on page 86
U “Performing system resets” on page 87
U “Initializing the device” on page 88
79

J-307 User Manual
Regular Maintenance
Cleaning the device
Main device and band
Periodically cleaning with water
Clean the main device with water aer each use or periodically. Wipe completely dry with a dry cloth aer
washing.
e band can be washed with a diluted mild detergent.
Important
c
❏ Do not press any buttons or scrub the glass too strongly while cleaning the device. Doing so may cause
malfunction or scratching of the glass.
❏ Do not press any buttons while the device is underwater. Doing so may result in failure.
❏ is strap is made from polyurethane and aer years of use the color may fade or it may lose its elasticity.
Cleaning contact points
If you experience problems charging the device or using the connection, use a damp cotton swab to clean the
contact points on the device and USB Charging clip.
80

J-307 User Manual
Regular Maintenance
Important
c
❏ Do not attach the USB Charging clip to the device while contact points are wet or dirty. Doing so may cause
corrosion or malfunction of the contact points, or communication failures.
❏ Do not clean using organic solvents such as benzine, thinner, alcohol, or detergent. is could cause the product
to degrade.
81

J-307 User Manual
Regular Maintenance
Waterproof performance
Batteries
Internal rechargeable device battery
You cannot replace the built-in rechargeable battery yourself. If the battery does not retain its charge for as long as
it used to due to prolonged use, the battery has likely reached the end of its service life. In this situation, contact
your local reseller or our repair center to replace the battery for a fee.
average service life of the battery is four years.
e
varies depending on usage conditions.
is
Disposing of the device
When disposing of this device, follow your local laws and regulations.
82

J-307 User Manual
Regular Maintenance
Problem solving
Check each item.
Problem Solution
Basic actions The screen is not displayed. You cannot start using the device immediately after purchase
until the device is charged. Try charging the device rst. Also,
nothing is displayed if the battery runs out. Make sure you
charge the battery before use.
U “Charging the device” on page 16
The device does not react even
after performing an operation.
The screen turns o or turns blue
during use.
The clock turns o. When you leave the device for a while, it enters sleep status and
The time is not set correctly. Set "Time Adjust" from Sys. Settings.
Is the battery running low? Charge the battery.
U “Battery levels” on page 24
If the device does not operate after charging, try resetting the
system.
U “Performing system resets” on page 87
Perform a system reset.
U “Performing system resets” on page 87
the time display turns o. This is not a malfunction as the display
is restored the next time a button is pressed or you move the
device. If the display is not restored, the battery is running low.
Charge the device.
U “Charging the device” on page 16
Note that the clock does not turn o if AUTO SLEEP is disabled.
U “AUTO SLEEP” on page 77
U “UPDATE TIME” on page 77
If the hour is dierent, check the time zone and daylight-saving
time.
U “Clock Set” on page 77
Measurement stops while
exercising.
When exercising slowly, such as when walking, we recommend
turning o the AT Pause function.
U “Pausing and resuming measuring automatically (AT Pause)”
on page 46
83

J-307 User Manual
Regular Maintenance
Problem Solution
GPS GPS signal reception is weak or
failing.
GPS signal reception is weak or
interrupted.
Charging The device does not charge after
attaching the USB Charging clip.
Perform GPS positioning again with the device outside with no
obstructions overhead for 15 minutes.
U “GPS signal reception (GPS positioning)” on page 27
Go to a location outside with no obstructions overhead. GPS
signals cannot be received while indoors. Obstacles partially
blocking the sky, such as tall buildings and mountain sides, can
also interrupt signal reception, which results in reduced distance
accuracy.
Even when a signal is being received, it may be interrupted
depending on the running environment.
Wear the device on the outside of your arm. Also, make sure the
strap is tightened.
Check the USB Charging clip connection.
Clean the contact points of the device and USB Charging clip.
U “Main device and band” on page 80
❏ The charge screen may not appear for 1 to 2 minutes after
attaching the USB Charging clip when the battery is
completely exhausted. This is not a malfunction.
❏ A malfunction may have occurred if you cannot charge the
device even after checking the points above. If this
happens, immediately stop trying to charge the device and
send the main device and USB Charging clip to our repair
center.
The charge error screen is
displayed.
The main device and USB
Charging clip become hot during
the charging process.
Water resistance Can I use the device when
swimming?
The inside of the glass becomes
cloudy.
Communication The device is not recognized by
the PC when connected.
Charge in environments with ambient temperatures of 5 to 35˚C.
There may be a malfunction. Stop charging the device
immediately and contact our repair center.
This device is water resistant up to 5 bars of pressure and can be
used while swimming. However, do not press any buttons while
the device is underwater. The device cannot receive GPS signals
while underwater.
Condensation may occur in the device due to dierences in
temperature between the device and the open air. Temporary
condensation does not have any
continue using the device in this situation. If the condensation
remains for a long time, water may have entered the device.
Send the device to our repair center.
Check the connection between the PC (USB port) and USB
Charging clip (USB plug). Clean the contact points of the device
and USB Charging clip.
U “Main device and band” on page 80
Perform a system reset.
U “Performing system resets” on page 87
on the device. You may
eect
84

J-307 User Manual
Regular Maintenance
Problem Solution
Web application An error screen appears and
communication is interrupted
during data exchanges with the
PC.
Do not move the device and USB Charging clip during
communication processes. Avoid communicating data under
environments where static electricity can be easily generated. If
an error occurs, try reconnecting the USB Charging clip and
attempting the communication again.
If you are still having communication errors aer performing this troubleshooting, contact our service center.
85

J-307 User Manual
Regular Maintenance
Updating the
You may be able to resolve problems that occur by
updating the rmware.
Download and use the latest version.
Important
c
e device and all settings/history data are
initialized when the rmware is updated. Refer to
the following page of the Epson website for more
information on updates.
http://www.epson.jp/dl_so/category/121.htm
Before updating the rmware, upload your
measurement data to the Epson View companion
application.
U “Managing data with the companion
application” on page 59
rmware
Checking the rmware version
Note
Check the following if the ProSense rmware
update tool does not start.
❏ An instance of the ProSense rmware update
tool is already started preventing the starting
of another instance.
❏ e USB Charging clip attached to the device
is correctly connected to the PC.
Refer to the download page on the Epson website
for more information on
procedures.
rmware
update
Updating the rmware
e latest rmware version is available for
A
download from the following URL.
http://www.epson.jp/dl_so/category/
121.htm
Select your device model and follow the
on-screen instructions to download the
rmware.
Attach the USB Charging clip to the device and
B
then connect the cable directly to a USB port
on the PC.
Execute the downloaded
le.
C
ProSense
e
rmware
update tool starts.
Follow the on-screen instructions to update the
rmware.
86

J-307 User Manual
Regular Maintenance
Performing system resets
Perform a system reset if operation becomes unstable.
Press the UP, ENTER, and DOWN buttons simultaneously.
screen is reset and the device restarts.
e
Note
Measurement data is not recorded if a system reset is performed while measuring.
e following shows the dierences between a system reset and initializing.
: Data and settings are retained.
-: Data and settings are not retained. (Settings must be recongured.)
Data/Settings System reset Initialize
Workout settings
Recall
Screen settings
System
Prole
Today's Activity Data - -
-
-
-
-
Target number of steps congured for
Activity
User stride data
Pairing
Time information
-
-
-
87

J-307 User Manual
Regular Maintenance
Initializing the device
If you want to delete all measurement data and clear
the device's memory, you need to initialize the device.
Display the menu
A
At the Time screen, press the ENTER button.
Select Settings
B
Press the UP orDOWN button > select Settings
> and then press the ENTER button.
Select System
C
Press the UP orDOWN button > select System
> and then press the ENTER button.
Initializing the device
E
Press the UP orDOWN button > select Ye s >
and then press the ENTER button.
Once the initialization is complete, the device will
restart and display the Initial Settings screen. Initialize
the device.
U “Conguring initial settings” on page 21
Refer to the following page for more information on
initialization.
U “Performing system resets” on page 87
Select Reset
D
Press the UP orDOWN button > select Reset >
and then press the ENTER button.
88

J-307 User Manual
Appendix
U “Product specications” on page 90
U “Understanding the icons” on page 92
U “Glossary” on page 93
U “Trademarks” on page 95
Appendix
89

J-307 User Manual
Appendix
Product
specications
Device specications
Model No. -
Size (thickness) 14.0mm
Weight Approximately 40 g
Water resistance Water resistant up to 5 bars of pressure
Operating
time
Operating temperature -5 to 50˚C
Maximum measurement time Approx. 13 hours
Maximum number of daily activity records Current day + past 6 days
Clock display (when Track Activity enabled, Auto Sleep enabled,
Bluetooth enabled, and Auto Search disabled)
Clock display (when Track Activity disabled, Auto Sleep enabled,
Bluetooth disabled, and Auto Search disabled)
GPS enabled (when Track Activity is disabled) Up to 13 hours *2
Up to 7 days *1 *2
Up to 30 days *1 *2
Maximum number of measurement records 64
Number of lap records Maximum of 200 per split
Total maximum of 512
Heart rate measurement
Pitch/Stride measurement
Display
range
Distance/Lap distance 0.000 to 999.99 km/0.000 to 999.99 mi
Pace/Lap Pace/Average Pace 0'01'' to 30'00''/km, 0'01'' to 45'00''/mi
Split/Lap time 0:00'00" to 13:00'00"
Pitch/Average Pitch 0 to 255 spm
Stride/Average stride 0 to 255 cm / 0 to 100 inches
Steps 0 to 999,999 steps
Calories burnt 0 to 9,999 kcal
Heart rate 30 to 240 bpm
Estimated end time 0:00'00" to 11:59 PM'59"
USB
Charging clip
Estimated end distance 0.000 to 999.99 km/0.000 to 999.99 mi
Operating temperature range 5 to 35˚C
90

J-307 User Manual
Appendix
*1 e device periodically receives a GPS signal to reduce the initial GPS positioning time.
Auto Sleep is active for 14 hours per day (internal evaluation criteria)
*2 Operating time varies depending on GPS signal reception quality and device settings.
e operating time is signicantly reduced when GPS signal reception is poor, such as indoors. (Some
settings that aect battery life include backlight settings.)
Option specications
You can purchase the following optional extras. Contact your local reseller for more information.
USB charging clip
Operating temperature range 5 to 35˚C
AC adapter specications
Input 100 VAC 50/60 Hz
Output 5 VDC / 1.0 A
91

J-307 User Manual
Understanding the icons
Icons Name
Run mode (measuring while running)
Walking mode (measuring while walking)
Treadmill mode (measuring treadmill workout sessions)
Device is acquiring a GPS signal (GPS On)
GPS positioning
Average pace
Lap
Appendix
Distance
Calories burnt
Stopwatch
Split time
AT Lap
Manual Lap
Steps
Average stride
Charging
USB communication in progress
Buttons are locked
Buttons are unlocked
92

J-307 User Manual
Glossary
Denition Term
Appendix
A system that is used to calculate
current positions via a GPS receiver
that receives signals from satellites
orbiting the earth. This function
allows you to accurately understand
positional and time information.
U “GPS signal reception (GPS
positioning)” on page 27
Distance from the measurement start
point to the current time.
Target ti me per km Target Pace
The device is water resistant up to 5
bars of pressure.
The display automatically turns o
after a certain time of no user
operation.
The total time from starting to
stopping the workout.
This companion application allows
you to use a smartphone or PC
browser to review session and
measurement data from your device.
GPS function
Distance
Water resistant up to 5 bars of pressure
Auto Sleep
Split time
Epson View
This function automatically pauses
your measuring when you stop
running and resumes your measuring
when you start running again.
This function automatically records
laps once a certain distance has been
reached.
This function measures various daily
activity including number of steps,
distance, and calories burnt.
This function turns on the light
automatically when transitioning to
dierent
This sensor uses stride and
acceleration data accumulated when
GPS is in use so that the device can
estimate distance traveled when you
are in locations of poor GPS signal
reception, such as tunnels.
U “About the stride sensor” on
page 29
screens.
AT Paus e
AT Lap
Track Ac tivity
AT Ligh t
Stride sensor
93

J-307 User Manual
Denition Term
Appendix
Your current pace acquired from GPS
information.
Your pace for the current lap. Lap pace
Your time for the lap. Lap time
Pace
94

J-307 User Manual
Appendix
Trademarks
❏ EPSON and EXCEED YOUR VISION are registered trademarks of the Seiko Epson Corporation.
❏ Microso and Windows are registered trademarks of the Microso Corporation in the United States of
America and other countries.
❏ OS X and macOS are registered trademarks of Apple Inc. in the United States of America and other countries.
❏ iPhone is a trademark of Apple Inc.
❏ Android and Google Play are trademarks of Google Inc.
❏
❏ QR Code is a registered trademark of DENSO WAVE INCORPORATED.
❏ Other product names are the trademarks or registered trademarks of their respective companies.
Bluetooth
e
Corporation uses these trademarks under the terms of license.
word mark and logos are registered trademarks of Bluetooth SIG, Inc. Seiko Epson
®
95

GPSSportsMonitor
J-307
http://www.epson.jp/support/supportmenu/ks/121.htm
XXXXXXXXX ©2017SeikoEpsonCorporation.Allrightsreserved.
 Loading...