

Page 1

Cal. S651
INSTRUCTIONS (P. 3)
BEDIENUNGSANLEITUNG (S. 25)
INSTRUCTIONS (P. 48)
ISTRUZIONI (P. 70)
INSTRUCCIONES (P. 94)
INSTRUÇÕES (P. 116)
用法説明 (137 頁)
Page 2

You are now the proud owner of a SEIKO Digital Quartz Watch Cal. S651. For best results, please
read the instructions in this booklet carefully before using your SEIKO Digital Quartz Watch.
Please keep this manual handy for ready reference.
Sie sind jetzt Besitzer einer SEIKO Digital-Quarzuhr Kal. S651. Bitte lesen Sie diese Bedienungsan-
English
leitung vor Verwendung der Uhr sorgfältig durch und heben Sie sie gut auf.
Vous voici l’heureux propriétaire d’une montre numérique SEIKO quartz Cal. S651. Pour obtenir
d’excellentes performances de cet article SEIKO, veuillez lire attentivement cette brochure que
vous conserverez pour toute référence ultérieure.
Siete ora in possesso di un orologio SEIKO digitale al quarzo Cal. S651. Per ottenere i migliori
possibili risultati dal Vostro orologio, leggere attentamente le istruzioni di questo manuale prima
di utilizzare il Vostro orologio SEIKO digitale al quarzo. Conservare poi il manuale stesso per ogni
qualsiasi eventuale futuro riferimento.
Enhorabuena por su adquisición de un reloj SEIKO digital de cuarzo Cal. S651. Para óptimo
resultado, lea detenidamente las instrucciones de este folleto antes de usar el reloj. Guarde este
manual para consulta posterior.
Você pode sentir-se orgulhoso de possuir um Relógio SEIKO Quartz Digital Cal. S651. Para obter
os melhores resultados, leia atentamente as instruções contidas neste opúsculo antes de usar o
seu Relógio SEIKO Quartz Digital. Queira conservar este manual para referências futuras.
2
Page 3

CONTENTS
Page
MODE CHANGE ...................................................................................................... 5
TIME/CALENDAR SETTING ..................................................................................... 6
STOPWATCH ........................................................................................................... 8
TIMER ...................................................................................................................... 10
ALARM .................................................................................................................... 12
ILLUMINATING LIGHT ............................................................................................. 14
NOTES ON USING THE WATCH ............................................................................. 15
BATTERY CHANGE .................................................................................................. 18
TO PRESERVE THE QUALITY OF YOUR WATCH................................................... 20
SPECIFICATIONS ..................................................................................................... 23
ENGLISH
English
3
Page 4

CAL. S651
English
TIME/CALENDAR
STOPWATCH
● Measures up to 10 hours in 1/100 second increments.
● Memory recall function: Up to 8 lap times can be stored in memory.
TIMER
● Preset timer function: Four different lengths of time have been preset.
● Adjustable timer function: Can be set for up to 9 hours and 59 minutes in one-minute
increments.
ALARM
AUTO ILLUMINATION FUNCTION
● The display is illuminated for 2 seconds with each press of any of the buttons.
● While the stopwatch or timer is counting, the display is illuminated for 2 seconds every
minute to signal the lapse of time.
ILLUMINATING LIGHT (ELECTROLUMINESCENT PANEL)
4
Page 5
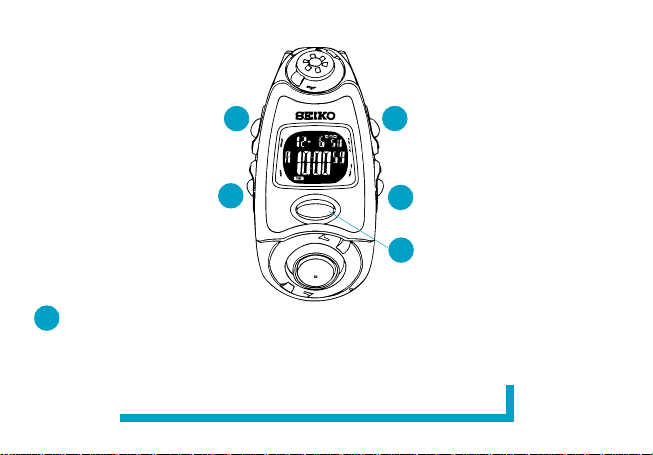
MODE CHANGE
English
B
A
With each press, the mode changes in the following order:
A
TIME/
CALENDAR
mode
➡
STOPWATCH
mode
➡
C
TIMER
mode
➡
D
E
ALARM
➡
mode
5
Page 6
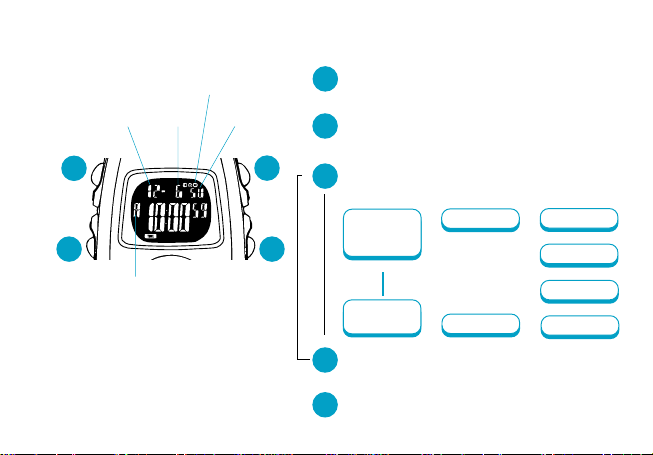
TIME/CALENDAR SETTING
English
Auto illumination mark
Month
Date
B
A
“A” (AM)/“P” (PM) mark
6
Day
Press to show TIME/CALENDAR mode.
A
▼
Press and hold for 2 to 3 seconds to show
B
TIME/CALENDAR SETTING display.
▼
C
D
Press repeatedly to select the digits (flash-
▼
C
ing) to be adjusted.
illumination
on/off
12-/24-hour
indication
▼
Press to set the flashing digits.
D
▼
Press to return to TIME/CALENDAR mode.
B
*
Auto
*See the next page.
▲
▲
▲
Seconds
Year
▲
Minutes
▲
Hour
▲
Date
▲
Month
▲
Page 7
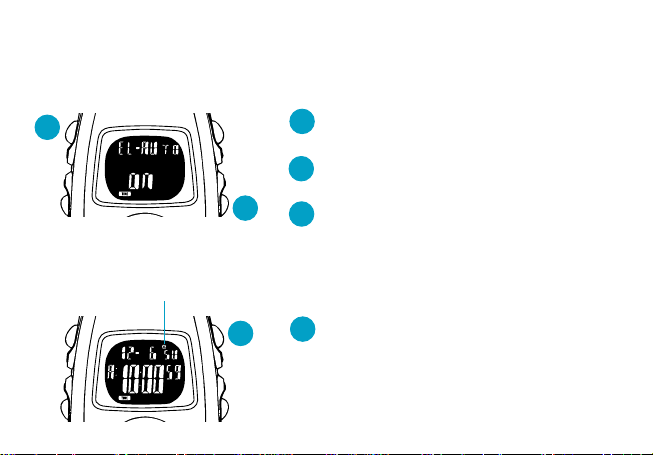
● TURNING ON/OFF OF THE AUTO ILLUMINATION
✩ The display is illuminated for 2 seconds with each press of any of the buttons.
✩ While the stopwatch or timer is counting, the display is illuminated for 2 seconds every
minute to signal the lapse of time.
Press and hold for 2 to 3 seconds in TIME/
B
● TURNING ON/OFF OF THE HOURLY TIME SIGNAL AND BUTTON OPERATION
CONFIRMATION SOUND
Hourly time signal mark
C
B
CALENDAR mode.
▼
With each press, the auto illumination is
D
alternately turned on and off.
▼
D
Press to return to TIME/CALENDAR mode.
B
With each press in TIME/CALENDAR
C
mode, the hourly time signal and button
operation confirmation sound are alternately turned on and off.
English
7
Page 8
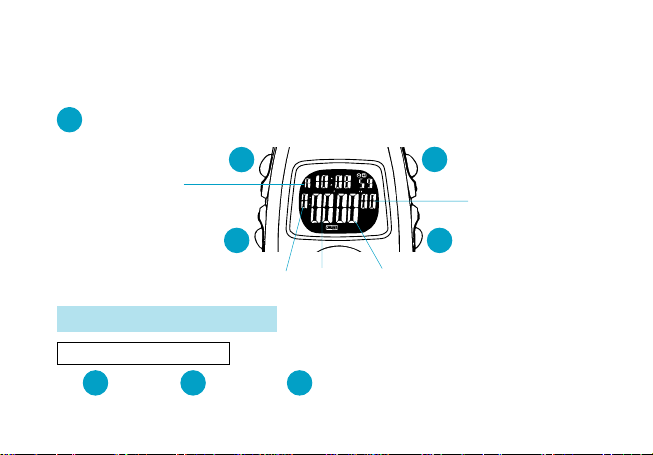
STOPWATCH
● The stopwatch measures up to 10 hours in 1/100 second increments.
● The first 8 lap times are automatically stored in memory.
English
Press to show STOPWATCH mode.
A
Current time
STOPWATCH OPERATION
Standard measurement
▼
C
START
8
B
A
Hour Seconds
C
STOP RESET
▼
D
C
1/100 seconds
D
Minutes
Page 9
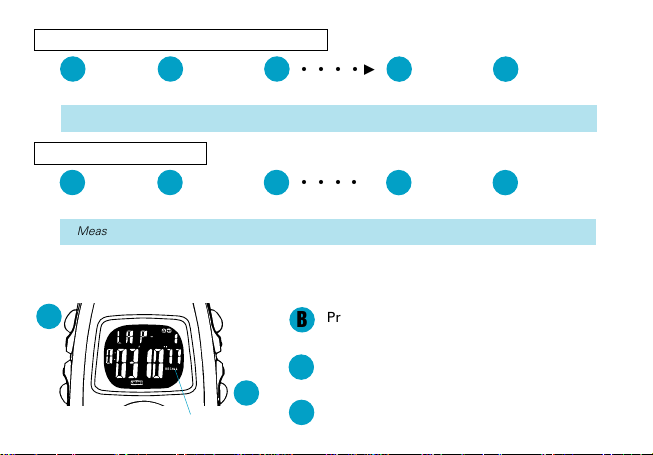
Accumulated elapsed time measurement
C
START
* Restart and stop of the stopwatch can be repeated by pressing button C.
Lap time measurement
C
START LAP 1 LAP 2
* Measurement of lap time can be repeated by pressing button D.
● MEMORY RECALL FUNCTION
The stored data can be recalled either during or after the measurement.
▼
C
STOP RESTART
▼
DD
▼
▼
B
D
Recall mark
C
○○○○
○○○○
B
▼
D
▼
B
▼
C
STOP RESET
▼
C
STOP RESET
Press to activate the memory recall function.
With each press, the stored data are recalled from the oldest to the newest.
Press to return to STOPWATCH mode.
English
▼
D
▼
D
9
Page 10
TIMER
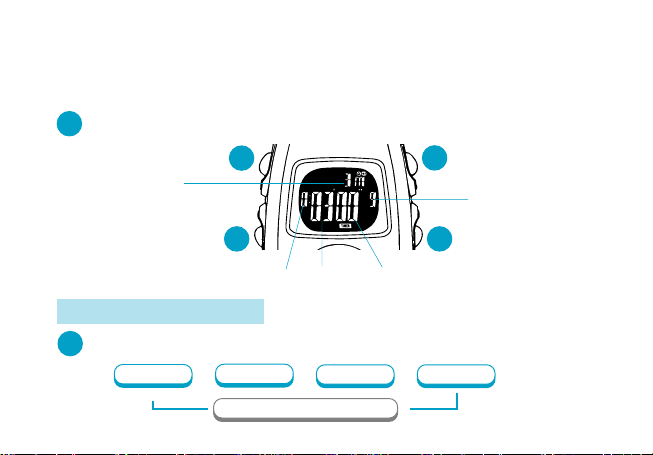
● Two types of timers are available: preset timer and adjustable timer.
● Four different lengths of time have been preset for the preset timer: 3, 5, 10 and 15 minutes.
● The adjustable timer can be set for up to 9 hours and 59 minutes in one minute increments.
English
Press to show TIMER mode.
A
Set time
PRESET TIMER SETTING
Press repeatedly to select the desired preset time.
D
3 minutes
▲
10
▲
B
A
Hour Seconds
Minutes
5 minutes
▲
10 minutes▲15 minutes
Adjustable timer
C
D
▲
Number of times
the countdown is
repeated
Page 11
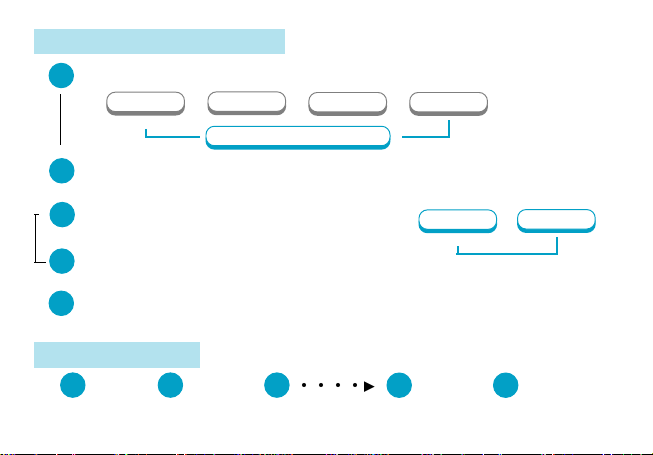
ADJUSTABLE TIMER SETTING
Press to select the adjustable timer.
D
3 minutes
▼
Press and hold for 2 to 3 seconds to show ADJUSTABLE TIMER SETTING
B
display.
▼
Press to select the digits (flashing) to be ad-
▼
C
justed.
▼
Press to set the flashing digits.
D
▼
Press to return to TIMER mode.
B
▲
5 minutes
▲
▲
10 minutes▲15 minutes
Adjustable timer
▲
Hour
▲
TIMER OPERATION
C
START
▼
C
STOP RESTART
▼
C
○○○○
▼
C
STOP RESET
▼
English
▲
Minutes
D
11
Page 12
ALARM
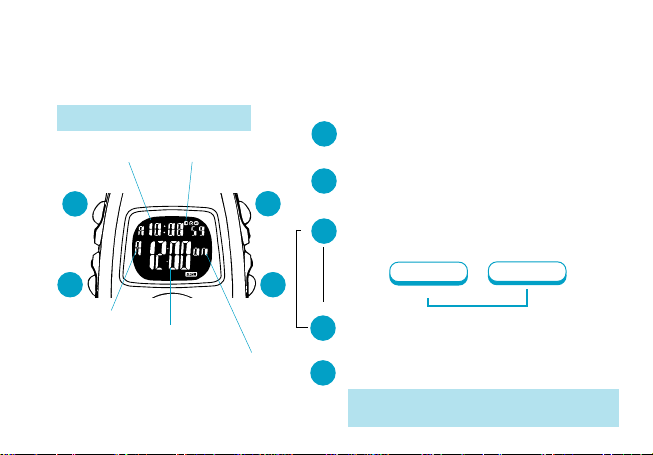
● The alarm can be set to ring on a 24-hour basis.
● At the designated time, the display is illuminated as the alarm rings.
English
ALARM TIME SETTING
Current time
B
A
“A” (AM)/
“P” (PM)
12
mark
Set alarm time
Alarm mark
C
D
“on”/“– –”
(alarm engagement/
disengagement) mark
Press to show ALARM mode.
A
▼
Press and hold for 2 to 3 seconds to show
B
ALARM SETTING display.
▼
Press to select the digits (flashing) to be
▼
C
adjusted.
Hour
▼
Press to set the flashing digits.
D
▼
Press to return to ALARM mode.
B
* The alarm and “on” marks are displayed and
the alarm is automatically engaged.
▲
Minutes
▲
Page 13
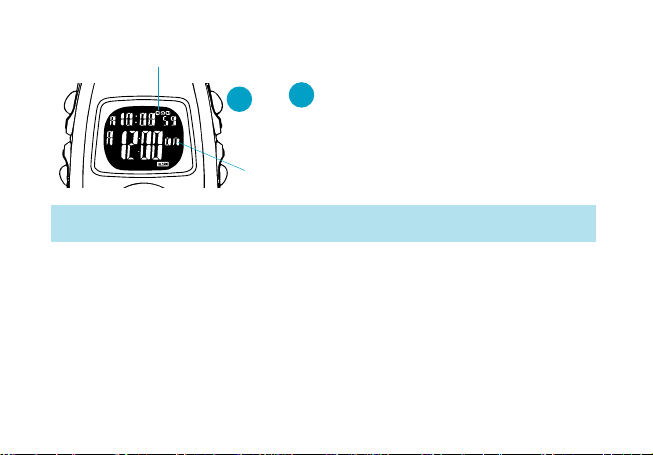
● ALARM ENGAGEMENT/DISENGAGEMENT
Alarm mark
With each press in ALARM mode, the
“on” mark
C
alarm is alternately engaged and disengaged.
C
* At the designated time the alarm rings for 20 seconds, and the display is illuminated as the alarm
rings. To stop them manually, press any of the five buttons.
English
13
Page 14
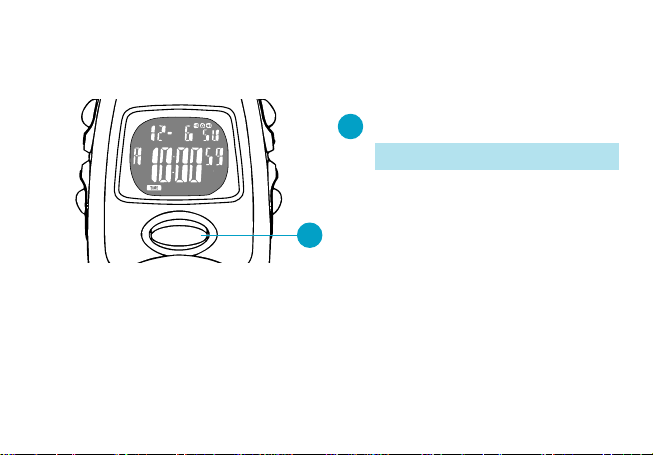
ILLUMINATING LIGHT (Electroluminescent panel)
● Certain materials emit light when voltage passes through them. This phenomenon, known
as “electroluminescence”, is used to illuminate the display.
English
Press in any mode.
E
* The display is illuminated for 3 seconds.
E
14
Page 15

NOTES ON USING THE WATCH
MODE CHANGE
● When the confirmation sound is switched on, a beep sounds with each press of button A. As a
reference aid, the pitch is different when the TIME/CALENDAR mode appears.
TIME/CALENDAR SETTING
● The calendar automatically adjusts for odd and even months including February of leap years from the
year 1995 up to the end of 2044.
● Once the year, month and date have been set, the day of the week is automatically set.
● The flashing digits except on/off of the auto illumination function, the seconds and the 12-/24-hour
indication move quickly if button D is kept pressed.
● In setting the seconds, when the seconds read any number from “30” to “59” and button D is pressed,
one minute is added and the seconds are reset to “00”.
● Changeover between 12- and 24-hour indications is made alternately with each press of button D.
● If the watch is left untouched in the TIME/CALENDAR SETTING display with the digits flashing, it will
automatically return to the TIME/CALENDAR mode in 2 to 3 minutes.
● When the hourly time signal mark is displayed, the hourly time signal rings every hour on the hour and
the confirmation sound beeps with each press of the buttons.
● When all the segments light up:
If buttons C and D are pressed at the same time in the TIME/CALENDAR
SETTING display, all the segments of the display will light up as shown
at right. This is not a malfunction.
Press any of the five buttons to return to the TIME/CALENDAR mode
and then, set the time/calendar again.
English
15
Page 16

STOPWATCH
● When button D is pressed to measure a lap time, the lap time measured and lap number remain
displayed for 10 seconds and then, the display automatically returns to the measurement in progress.
● The lap number counts up to “99”. After “99”, the number is displayed in two digits such as “00” for
English
100, “01” for 101, and so on.
● By turning on both the button operation confirmation sound and auto illumination function, a beep
sounds and the display is illuminated every minute to signal the lapse of time for the first 19 minutes.
The beep sounds every minute after the first 19 minutes.
● Even if the STOPWATCH mode is changed to another while the measurement is in progress, it
continues counting properly and the flashing STOPWATCH mode mark indicates that the stopwatch
is in use. After the stopwatch is used, however, be sure to reset it to prevent the overconsumption
of battery energy that would shorten the battery life.
● In memory recall after measurement, the oldest measurement in memory is displayed first.
In memory recall during measurement, the newest one is displayed first.
TIMER
● In the adjustable timer setting, the flashing digits move quickly if button D is kept pressed.
● If the watch is left untouched in the TIMER SETTING display with the digits flashing, it will
automatically return to the TIMER mode in 2 to 3 minutes.
● Restart and stop of the timer can be repeated by pressing button C.
● When the set time is up, a warning sound beeps for 5 seconds. To stop it manually, press any of the
five buttons.
● After the set time is up, the timer counts down the set time repeatedly. After the timer is used,
therefore, be sure to reset it.
● After the countdown is repeated 99 times, the number of times the countdown is repeated is displayed
in two digits such as “00” for 100, “01” for 101, and so on.
● By turning on the button operation confirmation sound, a beep sounds every minute to signal the lapse
of time.
16
Page 17

● By turning on the auto illumination function, the display is illuminated every minute to signal the lapse
of time for the last 19 minutes of the countdown. If the countdown is repeated more than 10 times,
however, the display will not be illuminated.
● Even if the TIMER mode is changed to another while the measurement is in progress, it continues
counting properly and the flashing TIMER mode mark indicates that the timer is in use. After the timer
is used, however, be sure to reset it to prevent the overconsumption of battery energy that would
shorten the battery life.
ALARM
● In the alarm time setting, the flashing digits move quickly if button D is kept pressed.
● When the time function is displayed in the 24-hour indication, the alarm is also displayed in the 24-hour
indication.
● When setting the hour digits in the 12-hour indication, check that AM/PM is properly set.
● If the watch is left untouched in the ALARM SETTING display with the digits flashing, it will
automatically return to the ALARM mode in 2 to 3 minutes.
● The alarm can be tested by keeping buttons C and D pressed at the same time in the TIME/CALENDAR
mode.
ILLUMINATING LIGHT (Electroluminescent panel)
● The electroluminescent panel loses its luminance as the battery voltage decreases. Also, its
luminance level decreases gradually with use. After 240 hours of use, the level decreases by about
half.
● When the illuminating light becomes dim, replace the battery with a new one. If the illuminating light
remains dim after the battery is replaced, have the electroluminescent panel replaced with a new one
by the retailer from whom the watch was purchased, or an AUTHORIZED SEIKO DEALER. It will be
replaced at cost.
● While the illuminating light is used, the watch gives out a slight noise. However, this is not a
malfunction.
English
17
Page 18

BATTERY CHANGE
2
English
Years
● Battery life indicator
When all the digits start flashing, replace the battery with a new one as soon as
possible. Otherwise, the watch will stop operating in 2 to 3 days. We suggest that
you have the battery replaced by a SEIKO DEALER.
* Even though the display is flashing, time accuracy is not affected.
● Necessary procedure after battery change
After the battery is replaced with a new one, or an abnormal display (broken digits,
etc.) appears, follow the procedure below to reset the IC.
18
The miniature battery which powers your watch should last approximately
2 years. However, because the battery is inserted at the factory to check
the function and performance of the watch, its actual life once in your
possession may be less than the specified period. When the battery expires,
be sure to replace it as soon as possible to prevent any malfunction. For
battery replacement, we recommend that you contact an AUTHORIZED
SEIKO DEALER and request SEIKO CR2025 battery.
* The battery life may be less than 2 years if:
• the stopwatch is used for more than 10 hours a day,
• the timer is used for more than 10 hours a day,
• the alarm is used more than once a day,
• the illuminating light is used more than 3 times a day,
• the auto illumination function is used more than 30 times a week, and/or
• the confirmation sound is used more than 24 times a day.
Page 19
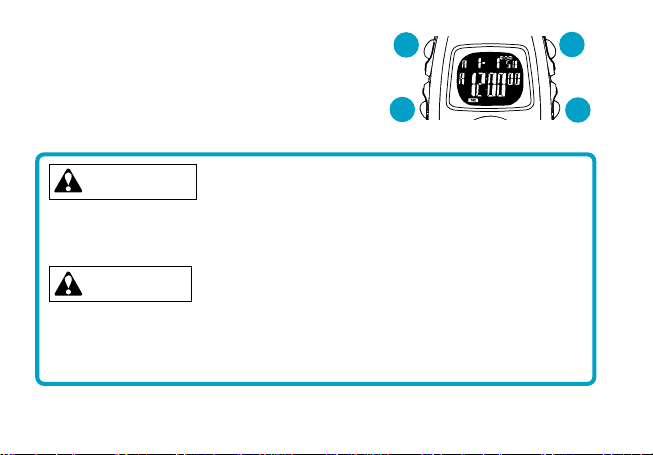
Press and hold buttons A, B, C and D at the same
time for 2 to 3 seconds.
* The display shown at right appears when the buttons are
released.
* Before using the watch, set the time/calendar and then the
alarm.
B
A
C
WARNING
● Do not remove the battery from the watch.
● If it is necessary to take out the battery, keep it out of the reach of children. If
a child swallows it, consult a doctor immediately.
CAUTION
● Never short-circuit, heat or otherwise tamper with the battery, and never
expose it to fire. The battery may burst, become very hot or catch fire.
● The battery is not rechargeable. Never attempt to recharge it, as this may cause
battery leakage or damage to the battery.
English
D
19
Page 20
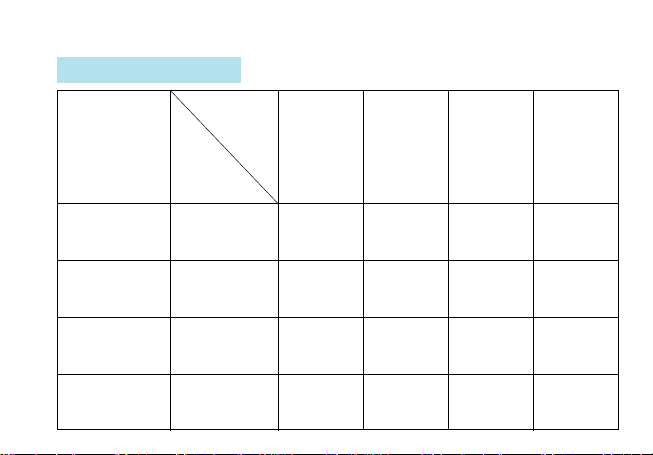
TO PRESERVE THE QUALITY OF YOUR WATCH
■ WATER RESISTANCE
English
Indication on
No indication
case back
Condition
of use
Degree
of water
resistance*
Non-water
resistant
Accidental
contact with
water such
as rain and
splashes
No No No No
Swimming,
yachting and
taking a
shower
Taking a bath
and shallow
diving
Scuba
diving**
and
saturation
diving
20
WATER
RESISTANT
WATER
RESISTANT
5 BAR
WATER
RESISTANT
10/15/20 BAR
3 bar
5 bar
10/15/20 bar
Yes No No No
Yes Yes No No
Yes Yes Yes No
Page 21
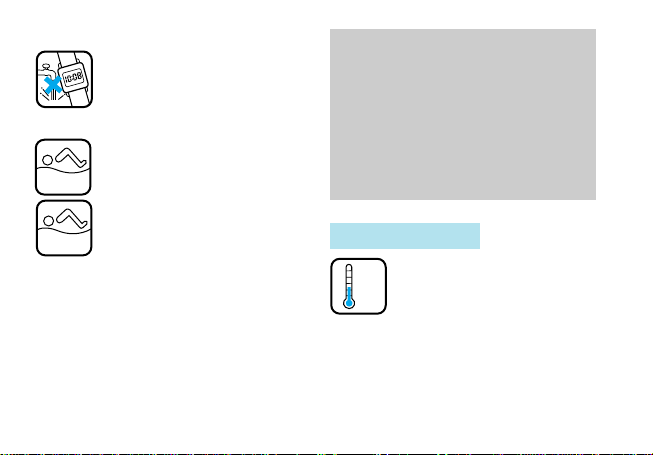
● Non-water resistant
+50°C
-10°C
• If the watch becomes wet, have it
checked by an AUTHORIZED
SEIKO DEALER or SERVICE
CENTER.
● Water resistant 5/10/15/20 bar
• Do not operate the buttons when
the watch is wet or in water.
5
bar WR
10/15/20
bar WR
or 20 bar watch, be sure to observe the
following:
* Do not operate the buttons when the watch
is wet with soapy water or shampoo.
* If the watch is left in warm water, a slight
time loss or gain may be caused. This
condition, however, will be corrected when
the watch returns to normal temperature.
If used in sea water, rinse the
watch in fresh water and dry it
completely.
• When taking a shower with a water
resistant 5 bar watch, or taking a
bath with a water resistant 10, 15
* Pressure in bar is a test pressure and
should not be considered as
corresponding to actual diving depth
since swimming movement tends to
increase the pressure at a given
depth. Care should also be taken on
diving into water.
** We recommend that you wear a
SEIKO Diver’s Watch for scuba
diving.
■ TEMPERATURES
Your watch works with stable
accuracy within a temperature
range of 5°C and 35°C (41°F
Temperatures over 50°C (122°F) or below
–10°C (+14°F) may cause a slight time loss
or gain or battery leakage or shorten the
battery life.
However, the above conditions will be
corrected when the watch returns to normal
temperature.
and 95°F).
English
21
Page 22
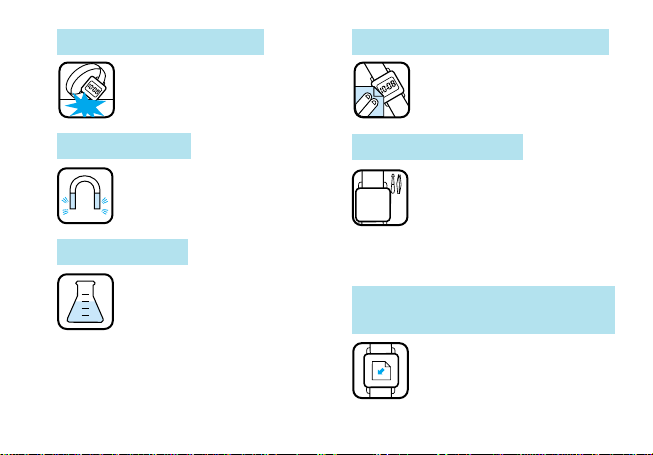
■ SHOCKS & VIBRATION
Be careful not to drop your watch
English
or hit it against hard surfaces.
■ CARE OF CASE AND BRACELET
To prevent possible rusting of
the case and bracelet, wipe them
periodically with a soft dry cloth.
■ MAGNETISM
Your watch will not be affected
by magnetism.
S
N
■ CHEMICALS
Be careful not to expose the
watch to solvents, mercury,
cosmetic spray, detergents,
the case, bracelet, etc. may become
discolored, deteriorated or damaged.
22
adhesives or paints. Otherwise,
■ PERIODIC CHECK
It is recommended that the
watch be checked once every 2
2 - 3
Years
SEIKO DEALER or SERVICE CENTER to
ensure that the case, buttons, gasket and
crystal seal remain intact.
to 3 years. Have your watch
checked by an AUTHORIZED
■ PRECAUTION REGARDING
CASE BACK PROTECTIVE FILM
If your watch has a protective
film and/or a sticker on the case
back, be sure to peel them off
before using your watch.
Page 23
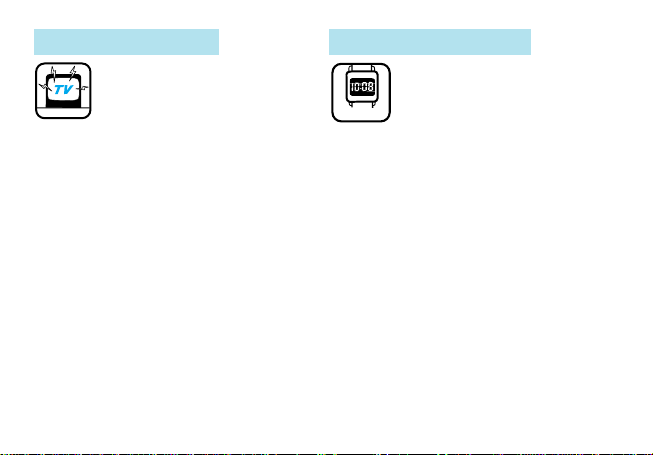
■ STATIC ELECTRICITY
The IC (Integrated Circuit) used
in your watch will be affected by
static electricity which may disturb
from close contact with objects such as TV
screens which emit strong static electricity.
the display. Keep the watch away
■ LIQUID CRYSTAL PANEL
The normal life expectancy for
a liquid crystal panel is
approximately 7 years. After
7 Years
becoming difficult to read. Please contact
your AUTHORIZED SEIKO DEALER or
SERVICE CENTER if you wish to have a
new panel fitted (guaranteed one year).
that it may decrease in contrast,
SPECIFICATIONS
1 Frequency of crystal oscillator .................. 32,768 Hz (Hz = Hertz … Cycles per second)
2 Loss/gain (monthly rate) ............................ Less than 20 seconds at normal temperature range (5° C ~
3 Operational temperature range ................. –10° C ~ +50° C (14° F ~ 122° F)
Desirable temperature range of use ......... –10° C ~ +50° C (14° F ~ 122° F)
4 Display system
TIME/CALENDAR mode ...................... Year (only in the TIME/CALENDAR SETTING display), month,
35° C) (41° F ~ 95° F)
date, day of the week, hour, minutes and seconds
“A” (AM)/“P” (PM) mark in the 12-hour indication
TIME/CALENDAR mode mark
(Alarm mark, hourly time signal mark and auto illumination
mark)
English
23
Page 24

STOPWATCH mode ............................. Measures up to 10 hours.
English
TIMER mode ........................................ Up to 9 hours and 59 minutes can be set in minute
ALARM mode ...................................... Alarm time (hour and minutes) and current time
5 Display medium ........................................ Nematic Liquid Crystal, FEM (Field Effect Mode)
6 Battery ...................................................... SEIKO CR2025, 1 piece
7 Battery life indicator .................................. All the digits in the display start flashing when the battery
8 IC (Integrated Circuit) ................................ C-MOS-LSI, 1 piece
* The specifications are subject to change without prior notice for product improvement.
24
Hour, minutes, seconds and 1/100 seconds
Current time and “A” (AM)/“P” (PM) mark in the 12-hour
indication
STOPWATCH mode mark, lap No., “LAP” mark, and
“RECALL” mark in the MEMORY RECALL display
(Alarm mark, hourly time signal mark and auto illumination
mark)
increments for the adjustable timer.
Hour, minutes, seconds and the number of times the
countdown is repeated
TIMER mode mark
(Alarm mark, hourly time signal mark and auto illumination
mark)
“A” (AM)/“P” (PM) mark in the 12-hour indication
ALARM mode mark and “on”/“– –” mark
(Alarm mark, hourly time signal mark and auto illumination
mark)
life nears its end.
Bipolar IC, 1 piece
 Loading...