

Page 1
セイコーストップウオッチ
サウンドプロデューサー
取扱説明書取扱説明書
INSTRUCTION
このたびはセイコーストップウオッチサウンドプロデュこのたびはセイコーストップウオッチサウンドプロデュ
ーサーをお買い上げいただきありがとうございました。ーサーをお買い上げいただきありがとうございました。
ご使用の前にこの取扱説明書をよくお読みのうえ正しご使用の前にこの取扱説明書をよくお読みのうえ正し
くご愛用くださいますようお願い申し上げます。なおこのくご愛用くださいますようお願い申し上げます。なおこの
取扱説明書はお手もとに保存し、必要に応じてご覧く
ださい。
S351
Page 2
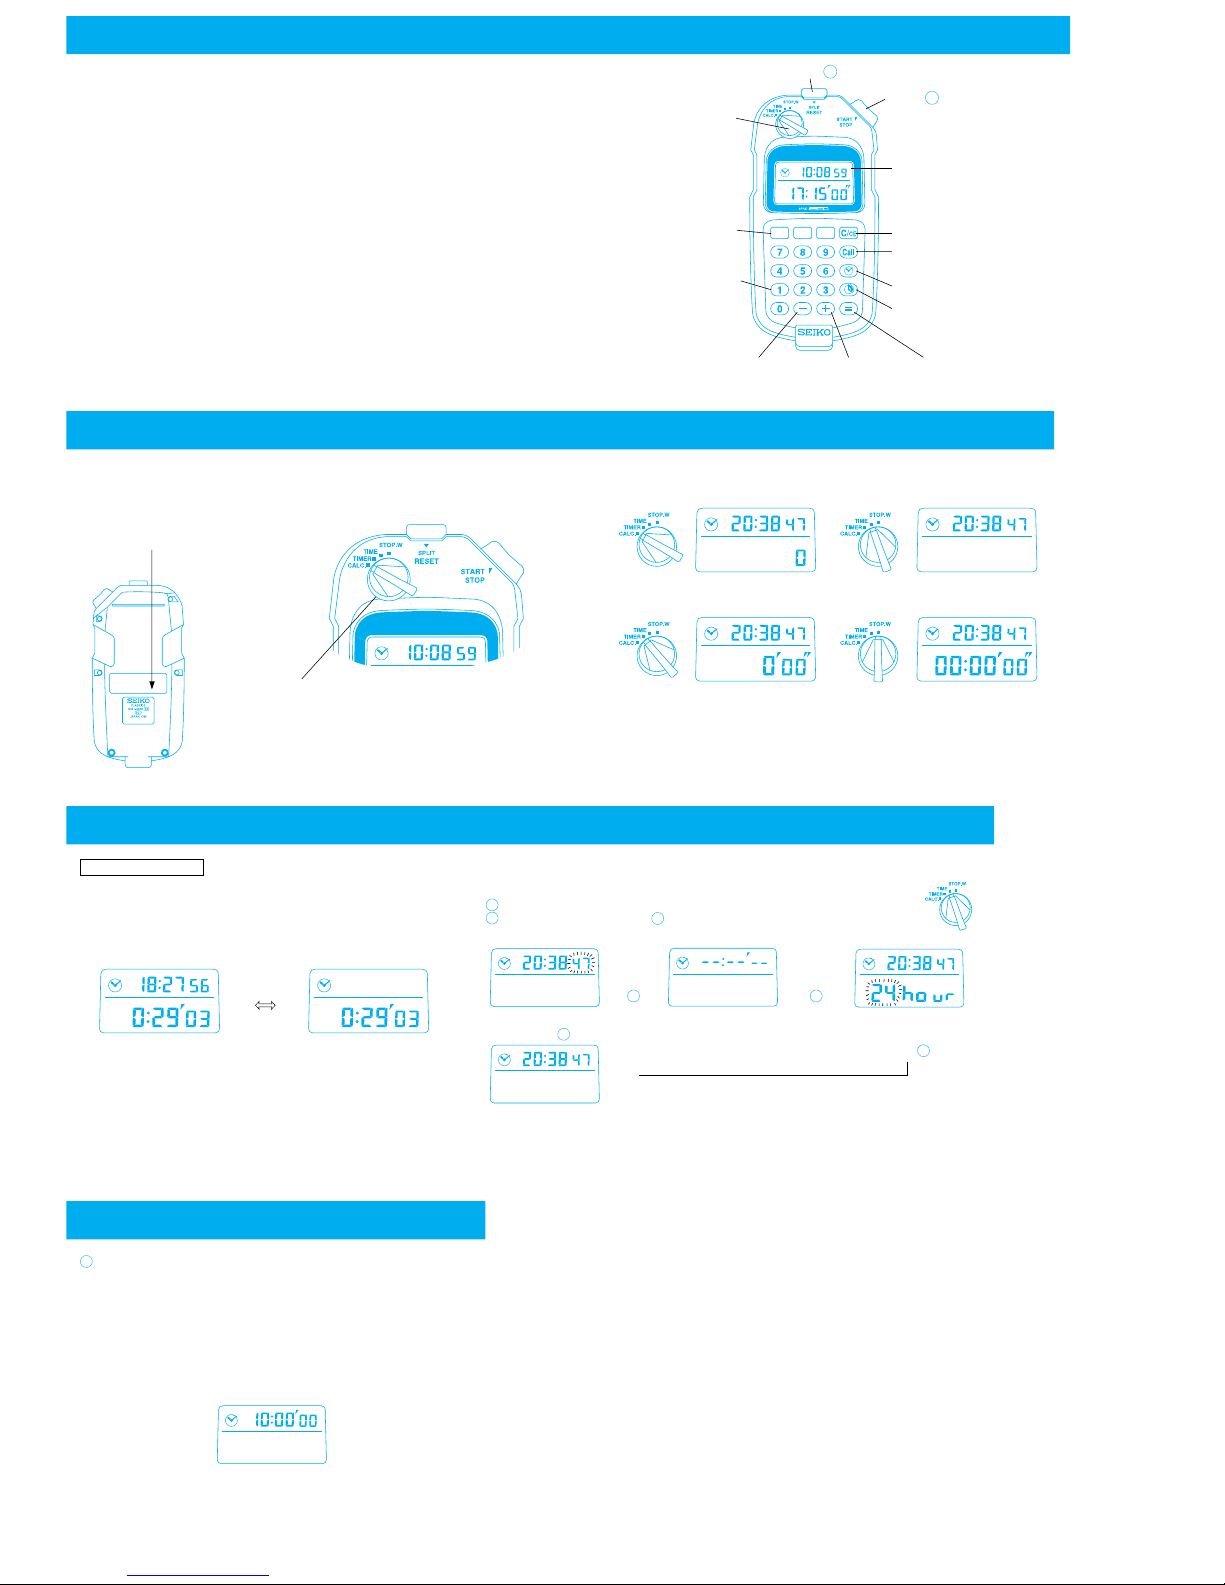
■FEATURES
分時 秒
Button A
Mode selector
Hour, minute and
second keys
Number entry keys
(for numerals
from 0 to 9)
Subtraction key
Addition key Equal key
Recall key [Call]
Time display key
Display:
Upper row : Time display
Lower row : Measurement/
calculation data display
Button B
・The SEIKO Cal. S351 features timer and stopwatch functions designed for
broadcasting use.
It is also equipped with a convenient function to calculate times entered in the
sexagesimal form.
1. Addition and subtraction of times can be made simply by entering the hour, minute
and second digits with the number entry and time (hour, minute and second)
keys.
can be used as the starting time in the timer and stopwatch functions.
2. The timer can be set for up to 99 hours, 59 minutes and 59 seconds in one second
increments.
Show the time elapsed from the end of the countdown with “−” sign.
While the timer is counting down, the time elapsed from the start of the countdown can also be displayed.
3. The stopwatch can measure up to 100 hours in one second increments.
After 100 hours, it will start counting again from “0” repeatedly.
Split time measurement is also possible.
4. Changeover between 12- and 24-hour indications is possible.
5. The watch will not give out any beeping sound such as sound for button operation
confirmation, as it will disturb the broadcast.
Clear/clear entry key
Elapsed time display key
*
■CHANGEOVER OF MODES
・The watch is provided with 4 modes.
・The mode can be changed by turning the mode selector.
Mode selector
Positions of the mode marks for the mode selector
Time calculation mode: [CALC.] Time mode: [TIME]
Stopwatch mode: [STOP-W.]
The timer and stopwatch continue counting even if the mode is changed
to another.
Timer mode: [TIMER]
*The rear center of the
watch is dented so that
a name sticker or the
like can be attached.
■HOW TO SET THE TIME 「TIME」
Current time display
・In the time calculation, timer and stopwatch modes, the
current time can be shown in the upper row of the display as
required. With each press of the time display key, the current
time appears and disappears alternately.
Notes:
・The current time can be displayed in any modes other than
the time.
・Once the current time is displayed in one mode, it will also
be displayed in the other modes.
・In the time mode, the current time is always displayed and
will not disappear even if the time display key is pressed.
〈Current time displayed〉 〈Current time not displayed〉
Ex.)
・Use the number entry and time keys to set the desired time.
・The time you wish to set should be entered in the 24-hour indication.
The entered time, however, can be displayed in the 12-hour indication.
Turn the mode selector to set the knob to “TIME”.
With each press of button , the display changes as follows:
Even while the display changes, the watch continues operating normally.
→
→
〈Second setting display〉*〈Time setting display〉*〈Changeover between 12-
and 24-hour indications〉
→
〈Time display〉
Note: If the watch is left untouched with the second digits flashing or with “--:-- --” or
“24 hour” displayed, the display will automatically return to the TIME in 1 to 2
minutes.
Time display
key
↑
↓
A
1
2
A
A
A
A
3
In the time setting display, set the desired time using the
number entry and time keys.
Ex.) To set 10:00 a.m.:
[1] [0] [時 (HOUR)] [0] [分 (MINUTE)] [0] [秒 (SECOND)]
Or
[1] [0] [0] [0] [0] [0]
*In the first method, entering the minute and second digits is not
necessary if they are “0”.
Page 3

Notes:
・The time can be entered either by using the number entry and time keys or by using
the number entry keys alone according to the time you wish to set. (For details, see
“Entry of times” in “■ HOW TO USE THE TIME CALCULATION MODE”.)
・If a wrong number has been entered, press the clear/clear entry key and enter the
correct one.
・The hour should be entered in the 24-hour indication. (If it is 2:00 p.m., for example,
enter “14” instead of “2”.)
・Any digits left unentered will be regarded as “0”. (See “■ HOW TO USE THE TIME
CALCULATION MODE”.)
4
B
Press button in accordance with a time signal. The display will return to the TIME
and the seconds will start immediately from the set time.
Notes:
・If the entered time exceeds “23:59 59”, the display will return to the time setting
display.
・If digits greater than “60” are entered for the minutes or seconds and button is
pressed, one hour or minute will be added, respectively.
・If the watch is set to show the time in the 12-hour indication, the set time will be display-
ed in the 12-hour indication, though it should be entered in the 24-hour indication.
・When the time is not newly set and button is pressed, the display will show the
time set previously.
B
B
→
(Time set previously)
Second setting (Second setting can be made easily if the time displayed is less
than 30 seconds ahead of or behind the correct time.)
・Follow the procedure below to reset the second digits to “00”.
In the time mode, press button to show the second
setting display.
→
Press button in accordance with a time signal.
The second digits are reset to “00”.
Notes:
・ When the second digits read any number from “30”to
“59” and button is pressed, one minute is added and
the seconds are reset to “00”.
・ If the time is more than 30 seconds ahead of or behind
the correct time, show the time setting display to set the
correct time.
・ When button is pressed, the watch will return to the
time mode.
A
B
B
1
2
B
A
B
B
B
Changeover between 12-and 24-hour indications
・As the 24-hour indication system is commonly used in the broadcasting
stations, the watch is so designed that the time should be entered only in
the 24-hour indication.
・It is also possible, however, to show the time in the 12-hour indication.
In the time mode, press button three times to show the display for
changeover between 12-and 24-hour indications.
With each press of button , the display changes over between the 12-
and 24-hour indications alternately.
〈24-hour indication〉 〈12-hour indication〉
Notes:
・Once the desired time indication has been selected in the time mode, the
current time will be displayed in the selected indication in all modes.
・When the 12-hour indication is selected, there is no mark displayed to
distinguish between “AM” and “PM”.
A
B
1
2
B
■HOW TO USE THE TIME CALCULATION MODE 「CALC.」
・The addition and subtraction of times can be made simply by
entering the hour, minute and second digits.
・Up to ±99 hours 59 minutes and 59 seconds can be entered
for calculation.
・The time can be entered either by using the number entry and
time keys or by using the number entry keys only.
・The calculation result can be stored and recalled for use in the
timer and stopwatch modes as the starting time.
Entry of times
To enter the time digits, use the number entry and time keys
as described below.
●Follow either of the two methods below.
〈Entry with the number entry keys only〉
・Use the number entry keys from [0] to [9] to enter the desired
time.
・This method is useful for entering time with a few digits.
〈Entry with the number entry and time keys〉
・Use the time keys ([時 (HOUR)], [分 (MINUTE)] and [秒
(SECOND)]) together with the number entry keys to enter
the desired time.
・This method is useful for entering time having blank digits,
for instance, “2 hours”.
Notes:
・Before entering time, press the clear
/clear entry key to reset the digits to “0”.
・The two methods above cannot be
used in combination to enter the time.
See the following cases as examples.
〈Case 1〉To enter “2 hours and 15
minutes”: Once you have
entered [2] and [時 (HOUR)]
for the hour digits, you should
not enter [1], [5], [0] and [0]
but should enter [1], [5] and
[分 (MINUTE)].
〈Case 2〉To enter “2 hours and 15
minutes”: Once you have
entered [2], [1], [5], you
should not enter [分
(MINUTE)] but should enter
[0] and [0].
・To set the starting time in the timer and
stopwatch modes, also use either of the
two methods above.
分時 秒
Notes:
・If a wrong number has been entered, press the
clear/clear entry key and enter the correct one.
・If a number greater than 60 is entered for the
minute or second digits, one hour or minute is
added when [+], [−] or [=] is entered. (In this
case,“″” mark will be displayed.)
・When a calculation result exceeds 99 hours 59
minutes and 59 seconds, the error mark “Error”
is displayed, To clear the error mark, press the
clear/clear entry key. The digits are reset to “0”.
・Enter from the upper digits in order.
・Start entering from the digits having
numbers. It is not necessary to
enter [0] and [0] for the hour digits.
・Enter [0] for the blank digits.
●Detailed explanation of entry methods
Turn the mode selector to set the knob to “CALC.”.
Entry with the number entry keys only
・Use the number entry keys to enter numbers in the order of hour,
minute and second digits, entering [0] for the blank digits.
Ex. 1) 2 hours 15 minutes 10
seconds
[2] [1] [5] [1] [0]
Ex. 2) 15 minutes 2 seconds
[1] [5] [0] [2]
Ex. 3) 10 hours 8 seconds
[1] [0] [0] [0] [0] [8]
1
[C/CE]
→
Page 4
→In this case, the entry can be made more easily
with the previous method using the number entry
keys only.
(When [秒 (SECOND)] is entered, “ ″” will be displayed.)
Notes:
・If a wrong number has been entered, press the clear/clear entry key and enter the correct one.
・If more than three numbers are entered in succession without pressing the time keys, the time keys will not work,
and the entry of the remaining digits should be made according to the method using the number entry keys only.
・If a number greater than 60 is entered for the minute or second digits, one hour or minute is added when [+], [−]
or [=] is entered. (In this case, “ ″” mark will be displayed.)
・When a calculation result exceeds 99 hours 59 minutes and 59 seconds, the error mark “Error” is displayed.
To clear the error mark, press the clear/clear entry key. The digits are reset to “0”.
2
Entry with the number entry and time keys
・After entering numbers, enter the time digit ([時(HOUR)],[分 (MINUTE)] or [秒 (SECOND)]).
This method is useful for entering time having blank digits.
Ex. 1) 2 hours 15 minutes and 10 seconds
[2] [時 (HOUR)] [1] [5] [分 (MINUTE)] [1] [0] [秒 (SECOND)]
Ex. 2) 15 minutes and 2 seconds
[1] [5] [分 (MINUTE)] [2] [秒 (SECOND)]→Start entering from the digits having numbers.
↑
Entry of [秒 (SECOND)] can be eliminated.
Ex. 3) 10 hours and 8 seconds
[1] [0] [時 (HOUR)] [0] [8] [秒 (SECOND)]→It is not necessary to enter [分 (MINUTE)].
↑
Entry of [秒 (SECOND)] can be eliminated.
↑
Entry of [秒 (SECOND)] can be eliminated.
Addition
Standard calculation
・Enter a time, [+], another time and [=].
Ex.) (3 minutes and 25 seconds)+(2 minutes and 1 second)=:
[3] [2] [5] [+] [2] [0] [1] [=]
Successive addition
Ex.) (1 minute and 15 seconds)+(34 seconds)+··+(15 minutes and 3 seconds)=:
[1] [1] [5] [+] [3] [4] [+]., [+][1] [5] [3] [=]
Subtraction
Standard calculation
Ex.) (4 minutes and 18 seconds)−(1 minute and 54 seconds) =:
[4] [1] [8] [−] [1] [5] [4] [=]
Successive subtraction
Ex.) (2 hours)−(1 hour and 36 minutes)−··−(8 seconds)=:
[2] [時 (HOUR)] [−] [1] [時 (HOUR)] [3] [6] [分 (MINUTE)] [−] ·· [−] [8] [=]
Combined calculation of addition and subtraction
・ The addition and subtraction procedures described above can be carried out successively.
Ex.) (1 hour and 4 minutes)+(25 seconds)−(7 minutes and 37 seconds) ··+(9 minute) =
[1] [時 (HOUR)] [4] [分 (MINUTE)] [+] [2] [5] [−] [7] [3] [7] ·· [+] [9] [分 (MINUTE)] [−]
1
2
1
2
Correction of wrong entries
When a wrong number has been entered but [+] [−] or [=] key is not pressed:
Press the clear/clear entry key and enter the correct one.
Ex.) (3 minutes and 25 seconds)+(2 minutes and 1 second):
[3] [2] [5] [+] [3] [0] [1]
To correct “3” to “2” :
[C/CE] [2] [0] [1] [=]
Note:
If no arithmetic operation key is pressed after a wrong number has been entered,
it can be corrected easily using the clear/clear entry key. If an arithmetic operation
key is pressed after a wrong entry, however, the entry cannot be undone. In that
case, press the clear/clear entry key to cancel the calculation, and then, reenter
the times from the beginning. In the case of the example above, enter the times
from “3 minutes and 25 seconds” again.
If a wrong arithmetic operation key is pressed:
Press the correct one immediately after the wrong key is pressed.
Ex.) (3 minutes and 25 seconds)+(2 minutes and 1 second):
[3] [2] [5] [−]
If you noticed the mistake at this point, press the proper key immediately
after the wrong one.
[+] [2] [0] [=]
1
2
How to use the calculation result in other modes (Timer and stopwatch modes)
・The calculation result obtained in the time calculation mode is automatically stored in memory and
can be recalled and used as the strarting time in the timer and stopwatch functions.
After a calculation is completed, change the mode to the timer or stopwatch before a new calcula-
tion is made.
(Turn the mode selector to change the mode.)
If the timer or stopwatch is counting, press the buttons to stop and reset it.
Then, press the recall key. The calculation result will be recalled and displayed.
Press button to start the timer or stopwatch.
(For details, refer to “■ HOW TO USE THE TIMER” and “■ HOW TO USE THE STOPWATCH”.)
Notes:
・If the calculation by pressing arithmetic operation keys, the time entered in the time calculation
mode cannot be stored and recalled in the timer or stopwatch modes. In that case, the calculation
result obtained previously will be displayed by pressing the recall key. Check the displayed time
before starting the timer or stopwatch.
・When calculations are made successively, the calculation result stored in memory is renewed
each time a calculation is made.
・If the error mark “Error” is displayed after a calculation, the memory is cleared completely, and
the previous calculation result will also be erased from memory. Therefore, “0” will be displayed
when the recall key is pressed.
B
1
3
2
Remarks on the calculation
・If the calculation result is more than 99 hours 59 minutes and 59 seconds or less than-99
hours 59 minutes and 59 seconds, the error mark “Error” will be displayed and no digits will
be shown if the number entry key are pressed. In that case, press the clear/clear entry key to
reset the digits to “0”.
・If the error mark is displayed, the calculation result retained in memory will be erased and “0”
will be displayed by pressing the recall key in the timer or stopwatch mode.
・If the mode selector is turned to change the mode from the time calculation mode to another
during or after a calculation, entered time or calculation result shown on the display will be
erased and “0” will be displayed when the mode is returned to the time calculation.
・The calculation result stored in memory will be retained unless a new calculation is made or
unless the error mark is displayed after a calculation.
・The calculation result in memory cannot be displayed in the time calculation mode.
・The calculation result in memory cannot be erased by pressing the clear/clear entry key.
Page 5
■HOW TO USE THE TIMER 「TIMER」
分時 秒
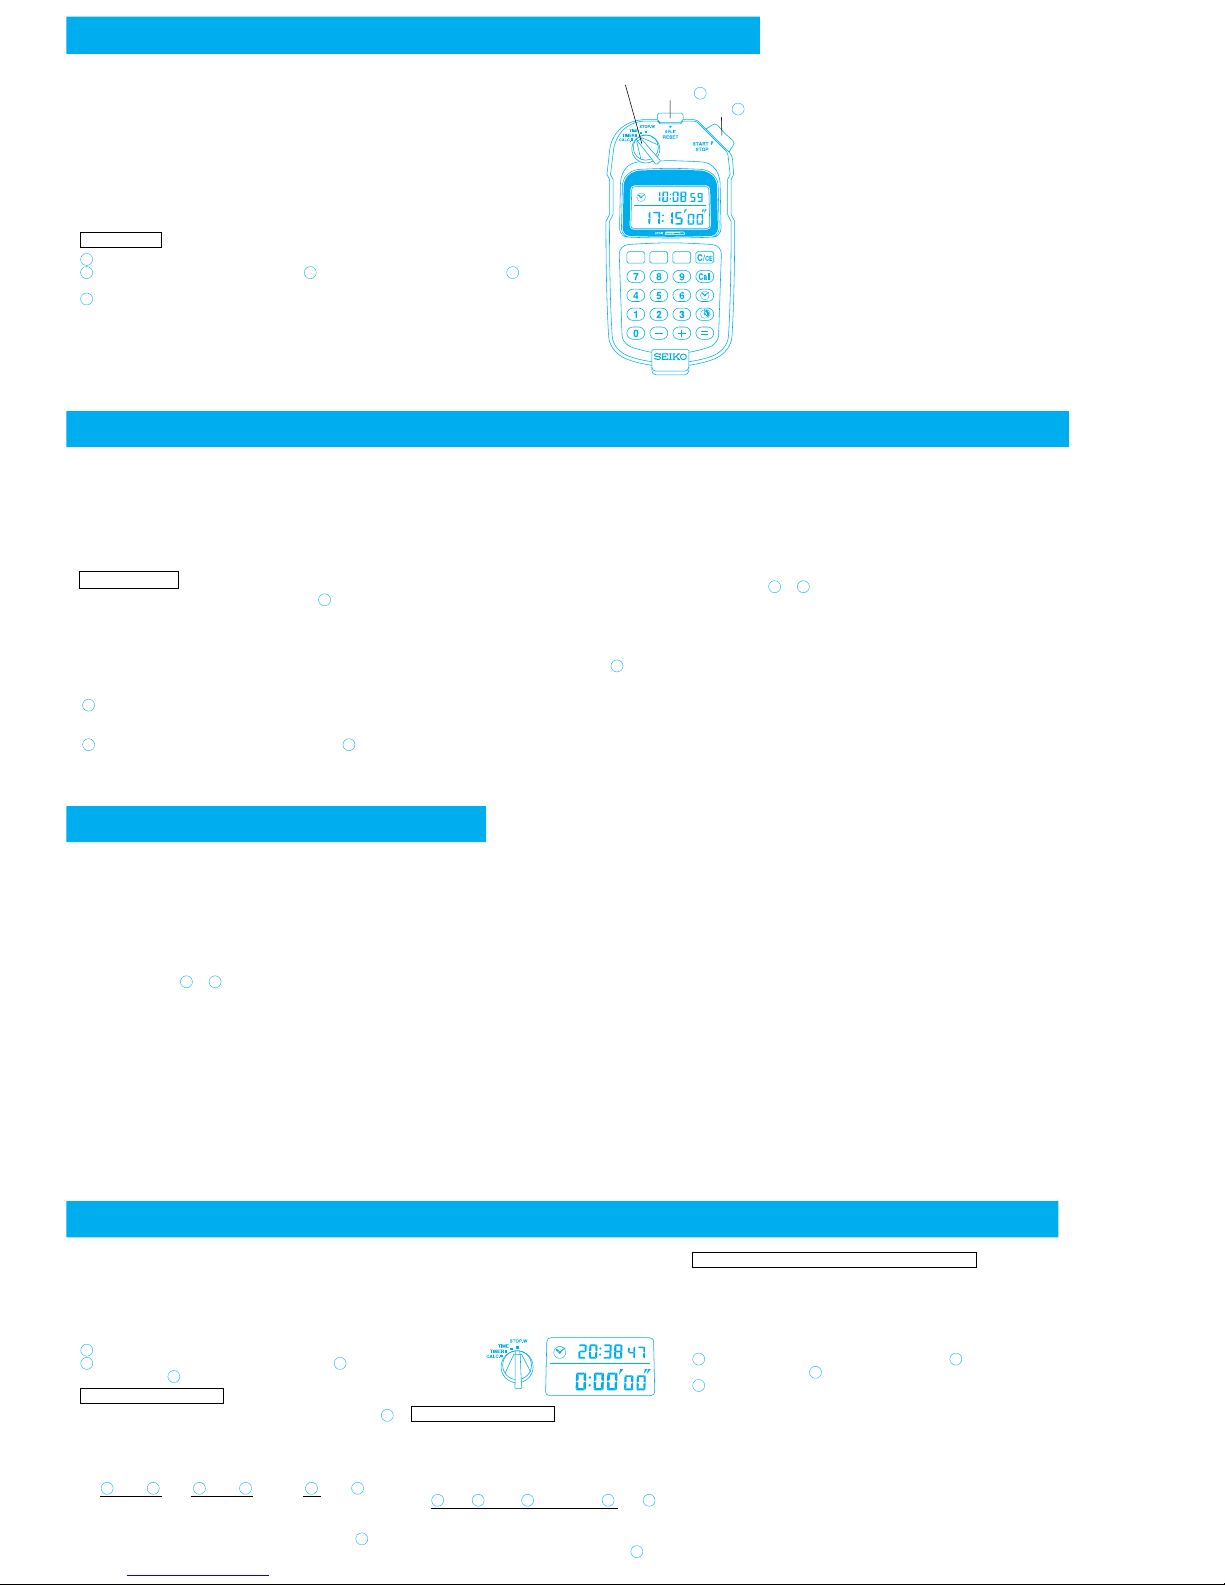
Mode selector
Button
Button
・The timer can be set for up to 99 hours, 59 minutes and 59 seconds in one second
increments.
・Once the timer is set, the set time is stored in memory and can be used repeatedly
unless it is canceled.
・The timer can be set either by entering a time with keys or by recalling the
calculation result obtained in the time calculation mode.
・The remaining time is displayed in one second increments, and the time elapsed
from the start of the countdown can also be displayed while the elapsed time
display key is kept pressed.
・After the set time is up, the timer continues counting to show the time elapsed from
the end of the countdown, with “−” sign attached before the digits, for example, “0”,
“−1”, “−2”, and so on.
Turn the mode selector to set the knob to “TIMER”.
If the timer is counting, press button to stop the timer and then press to reset it.
(The time set previously will be displayed.)
Press the clear/clear entry key, and then, use the number entry and time keys to
enter the desired time. The timer can also be set by pressing the recall key to recall
the calculation result obtained in the time calculation mode.
Ex. 1) To set 3 minutes and 15 seconds:
[C/CE] [3] [1] [5]Or [C/CE] [3] [分 (MINUTE)] [1] [5]
(For details, refer to “■ HOW TO USE THE TIME CALCULATION MODE”.)
Timer setting
1
3
2
A
B
A
B
3
Notes:
・ By pressing the clear/clear entry key after the timer is reset, the
set time stored in memory is canceled and the digits are reset
to “0′00″”.
・ The timer counts down up to 100 hours in total from the start of
the countdown and stops. If the timer is set to count down 5
minutes and continues counting down after the set time is up,
for example, it will automatically stop when “-99:55′00″” is
displayed.
Press button or to reset the timer. The time previously set,
“5′00″” will be shown.
〈To check the time elapsed from the start of the countdown〉
While the elapsed time display key is kept pressed, the time
elapsed from the start of the countdown is displayed.
・ When the elapsed time key is released, the remaining time is
displayed again.
・ While the elapsed time display key is kept pressed, the time
shown on the display increases in one second increment.
・ While the timer is stopped, the time elapsed from the start of the
countdown is displayed while the elapsed time display key is
kept pressed.
Timer operation
Ex. 2) To recall the calculation result:
[C/CE] [Call]
The calculation result obtained in the time calculation mode will be displayed.
Notes:
・Even if the clear/clear entry key is not pressed, the time can be entered and set for the timer.
・A negative calculation result obtained in the time calculation mode can be displayed for the
timer by pressing the recall key. The timer, however, will not count down the time.
・The arithmetic operation keys ([+], [−] and [=]) does not work in the timer mode.
To start or stop the timer, press button . Restart and stop of the timer can be repeated by
pressing the button. The timer restarts counting down from the time shown on the display.
Notes:
・When the timer is stopped, “STOP” and “ ″” marks are displayed.
・While the timer is counting down, “ ″” mark is not displayed.
・When a negative time (a time having a minus sign) is set for the timer and button is
pressed to start the timer, the error mark “Error” is displayed. In that case, press the
clear/clear entry key to reset the digits to “0′00″” and enter a proper time.
After the set time is up, the timer continues counting down to show the time elapsed from the
end of the countdown, with “−” sign attached before the digits, for example, “0”, “–1”, “–2”, and
so on.
When the timer is stopped and button is pressed, the timer is reset and the time
previously set is displayed. The set time can be used repeatedly unless it is canceled.
B
B
2
A
A
B
Notes:
・ By pressing the clear/clear entry key after the timer is reset, the
set time stored in memory is canceled and the digits are reset
to “0′00″”.
・ The timer counts down up to 100 hours in total from the start of
the countdown and stops. If the timer is set to count down 5
minutes and continues counting down after the set time is up,
for example, it will automatically stop when “-99:55′00″” is
displayed.
Press button or to reset the timer. The time previously set,
“5′00″” will be shown.
〈To check the time elapsed from the start of the countdown〉
While the elapsed time display key is kept pressed, the time
elapsed from the start of the countdown is displayed.
・ When the elapsed time key is released, the remaining time is
displayed again.
・ While the elapsed time display key is kept pressed, the time
shown on the display increases in one second increment.
・ While the timer is stopped, the time elapsed from the start of the
countdown is displayed while the elapsed time display key is
kept pressed.
A
B
■HOW TO USE THE STOPWATCH 「STOP-W.」
・The stopwatch can measure up to 99 hours 59 minutes and 59 seconds in one second increments.
After 100 hours, it will start counting again from “0” and continues counting.
・Split measurement is possible.
・The stopwatch can be set to count from a desired time up to 99 hours 59 minutes and 59 seconds
in one second increment.
・The starting time can be set by entering a time with the number entry and time keys or by recalling
the calculation result obtained in the time calculation mode.
Turn the mode selector to set the knob to “STOP-W.”.
If the stopwatch is counting, press button to stop it and then
press button to reset it.
・To start and stop the measurement, press button .
Restart and stop of the stopwatch can be repeated
by pressing the button. The accumulated elapsed
time measurement is possible.
Start
↑
Restart and stop of the stopwatch can
be repeated by pressing button .
To start the measurement from the desired time
・ By entering a desired time, the stopwatch can count from
the set time instead of “0”, for example, 3 minutes and 15
seconds. In that case, the stopwatch displays the elapsed
time added by the set time.
・ The starting time can also be set by recalling the calcula-
tion result obtained in the time calculation mode.
If the stopwatch is counting, press button to stop it and
then press button to reset it.
Press the number entry and time keys to enter the
desired time, or press the recall key to recall the calcula-
tion result obtained in the time calculation mode.
Ex. 1) To set 3 minute and 15 seconds:
[C/CE] [3] [1] [5]
or
[C/CE] [3] [分 (MINUTE)] [1] [5]
(For details, refer to “■ HOW TO USE THE TIME CAL-
CULATION MODE”.)
Ex. 2) To recall the calculation result:
[C/CE] [Call]
The calculation result will be displayed.
A
B
1
2
Standard measurement
Stop
A
B B
Restart Stop
B
StopBReset
B
· · · ·
A
B
・The split time measurement function is
convenient in checking the elapsed time
while the measurement is in progress.
Start
↑
Measurement and release of the split time
can be repeated by pressing button .
Split time measurement
Split
AAA
A
B
Split
release
Stop
B
Reset· · · ·
A
1
2
B
Page 6
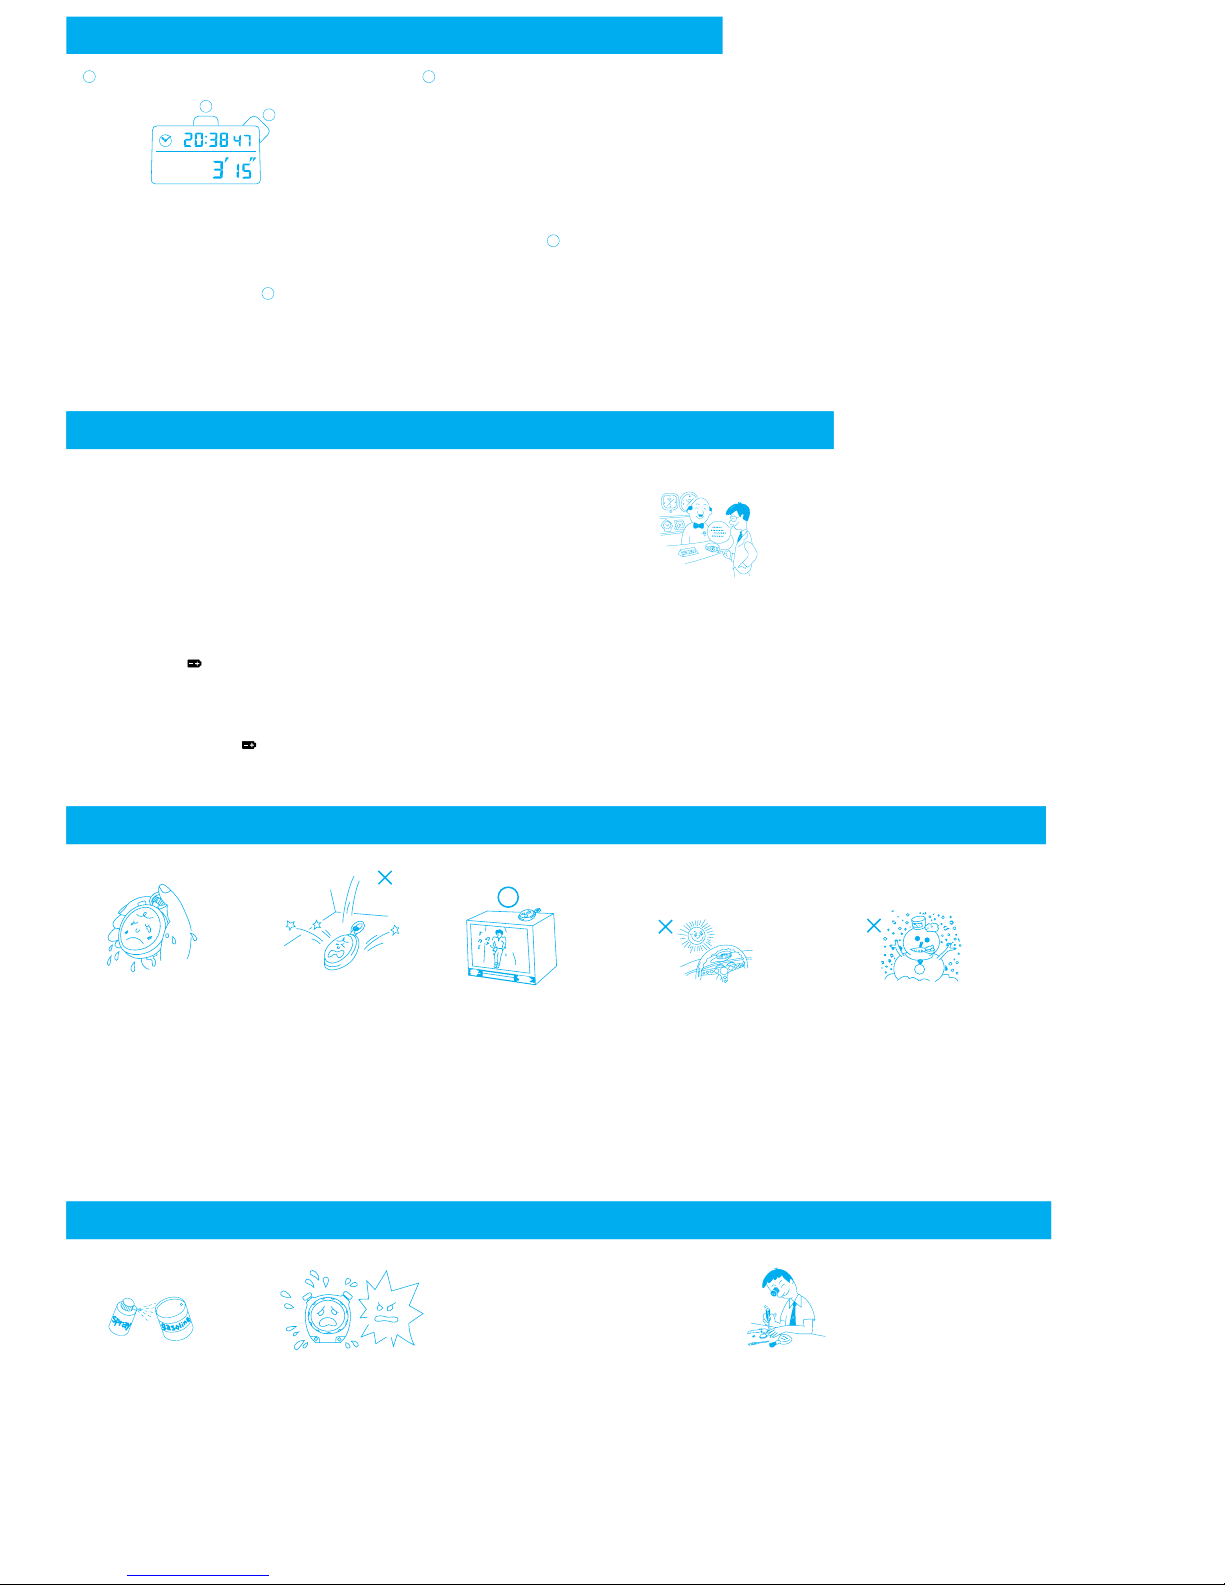
After the starting time setting is completed, press button to start the stopwatch. For the stopwatch
operation, refer to the stopwatch operation explained above.
Notes:
・When the stopwatch is stopped, “STOP” and “ ″” marks are displayed.
・While the stopwatch is counting, “ ″” is not displayed.
・While the split time is measured, “SPLIT” and “ ″” are displayed. If button is pressed while the
split time is measured, the measurement is stopped and the total elapsed time is displayed in place
of the split time.
・A negative calculation result obtained in the time calculation mode can be set as the starting time
with the recall key. If button is pressed to start the stopwatch, however, the error mark “Error” is
displayed and the stopwatch will not start counting. Press the clear/clear entry key to reset the digits
to “0:00′00″” and then enter a proper starting time.
・The set staring time is not stored in memoty, and it will be canceled once the stopwatch is started.
・The arithmetic operation keys [+] [−] and [=] do not work in the stopwatch mode.
A
B
3
B
B
B
■NOTES ON THE BATTERIES
When flashing “ ” mark appears in the upper left of the display,
replace the battery with a new one as soon as possible. Otherwise,
the watch may stop operating in 2 to 3 days. We suggest that you
have the battery replaced by a retailer from whom your watch was
purchased or a SEIKO dealer.
*Even though the flashing “ ” mark is displayed, time accuracy is not
affected.
川
BATTERY LIFE INDICATOR
BATTERY LIFE
[Battery for the stopwatch]
A new normal battery will last approximately three years.
*If the timer is used more than 10 times a day, the battery life may be less than
the specified period.
*The battery in your watch may run down in less than the specified period
after the date ofpurchase, as it is a monitor battery inserted at the factory
to check the functions and performance of the watch.
*The battery in your watch will therefore be replaced with a new one only at
cost even if it runs down within the guarantee period.
When replacing the battery, be sure to take your watch
to the retailer from whom your watch was purchased
or an AUTHORIZED SEIKO DEALER , and specify the
" SEIKO genuine SB battery ".
If an old battery is kept inside the watch for a long time,
electrolyte leakage may occur and a malfunction may be
caused. Be sure to replace the battery as soon as it runs
down to prevent any possible malfunction.
*When a battery is taken out of a watch, it must be kept at a
place beyond the reach of an infant. In case it is swallowed
by an infant, consult a doctor immediately.
BATTERY CHANGE
■CARE OF YOUR STOPWATCH
Being equipped with the
number entry and other
keys as used in calculators,
your watch is not water
resistant according to the
water resistance standard
for watches. It can withstand, however, the
accidental contact with
splashes of water or rain. If
the watch is wet, wipe it
thoroughly dry with a soft
dry cloth or the like.
WATER RESISTANT
ANTI-SHOCK
Light activities will not
affect yourwatch, but
be careful not to drop
your watch or hit it
against hard surfaces,
as this way cause
damage.
TEMPERATURE
Your watch is designed to work with stable accuracy
between normal temperature range of 5°C and 35°C .
Do not leave your watch in
direct sunlight or very high
temperatures for a long time.
• The display may become
black, but this condition will
be corrected when the
watch returns to normal
temperature .
Do not leave the watch in a very low
temperature, as this may cause :
1) A slight time loss or gain.
2) The change of digits to become
slow
(with accuracy remaining normal.)
The adove conditions will be corrected when the watch returns to normal
temperature.
If the watch is left in temperatures over 60 or below-10 for a long time,the
watch maystop operating, battery leakage may be occurred, or the battery
life may be shortened.
*
℃ ℃
ANTI-MAGNETIC
Magnetism will not affect
the watch
As a small amount of moisture is included inside the
stopwatch , the inner surface of the glass may be
temporarily blurred if the atmospheric temperature is
long time, we suggest that you have the stopwatch checked
by the retailer from whom it was purchased.
lower than that inside the stopwatch . This does not
adversely affect it . However , if the blur persists for a
*
■
TOPRESERVETHEQUALITYOFYOURSTOPWATCH
■
LIQUIDCRYSTALPANEL
*
*
CHECK
Be sure to have the gasket and push-pin replaced with
Specify “SEIKO GENUINE PARTS”
After checking the watch, adjustment or repair may be
required.
new ones by a SEIKO DEALER after the watch is
adjusted or repaired.
when replacing the parts.
It is recommended that the stopwatch be checked every
time the battery for the stopwatch is replaced with a
new one or once every 2 to 3 years . We suggest that
you have your watch checked by a SEIKO DEALER
when the battery is replaced, for oil condition, battery
electrolyte leakage or damage due to water or sweat.
STATIC ELECTRICITY
CHEMICALS
The IC (Integrated Circuit)
used in your watch will be
affected by static electricity,
which may disturb the display.
Keep your watch away from
close contact with suchobjects
as TV screens which emit strong
static electricity.
As plastic materials are
used for the watch case,
be careful not to expose
the watch to solvents
( such as alcohol and
gasoline), cosmetic
spray, detergent, adhesives or paints, as the
case, bracelet, etc. will
be discolored, deteriorate or deform through
the chemical action.
After about 7 years of use digital display
panel will decrease in contrast, becoming
difficult to read. Have the panel replaced
with a new one by the retailer from whom
your watch was purchased or an
AUTHORIZED SEIKO DEALER. The
panel will be replaced at cost.
Page 7

■SPECIFICATIONS
1. Frequency of crystal oscillator·················32,768 Hz (Hz=Cycles per second)
2. Loss/gain (monthly rate)··························Less than 0. 0006% or 15 seconds at normal tem perature range (5°C〜 35°C)
3. Operational temperature range···············−10°C 〜 +60°C (For the display···0°C〜+50°C)
4. Display medium·······································Nematic Liquid Crystal, FEM (Field Effect Mode)
5. Battery·····················································Miniature lithium battery SB-T751, 1 piece
6. Battery life indicator·································Flashing “ ” mark is shown on the display.
7. IC (Integrated Circuit)······························C-MOS-LSI, 1 piece
8. Display system
Time calculation mode·······························Current time (hour, minutes and seconds),
calculation data (hour, minutes and seconds) and
“Error” mark
Timer mode················································Current time (hour, minutes and seconds),
remaining time (hour, minutes and seconds), “STOP”
and “Error” marks
Time mode·················································Current time (hour, minutes and seconds) and “Error”
mark
Stopwatch mode········································Current time (hour, minutes and seconds), measured
time (hour, minutes and seconds), “SPLIT”, “STOP”
and “Error” marks
*The specifications above are subject to change without prior notice, for product improvement.
 Loading...