

Page 1
SEIKO DIGITAL STOPWATCH Cal. S141
You are now the proud owner of a SEIKO Digital Stopwatch Cal. S141. For best results, please read the instructions
in this booklet carefully before using your SEIKO Digital Stopwatch. Please keep this manual handy for ready reference.
WARNING
NOTES ON THE BATTERY FOR THE STOPWATCH
Do not remove the battery from the watch.
If it is necessary to take out the battery, keep it out of the reach of children. If a child swallows it, consult a doctor
immediately.
Never short-circuit, heat or otherwise tamper with the battery, and never expose it to fire. The battery may burst,
become very hot or catch fire.
The battery is not rechargeable. Never attempt to recharge it, as this may cause battery leakage or damage to the
battery.
NOTES ON THE STRAP
The stopwatch has a strap for wearing it around your neck. Take good care lest it should be caught by something
near you or wind around your neck.
Please also note that the strap may damage your clothes, or injure your hands, neck or other parts of your body.
TO PRESERVE THE QUALITY OF YOUR STOPWATCH
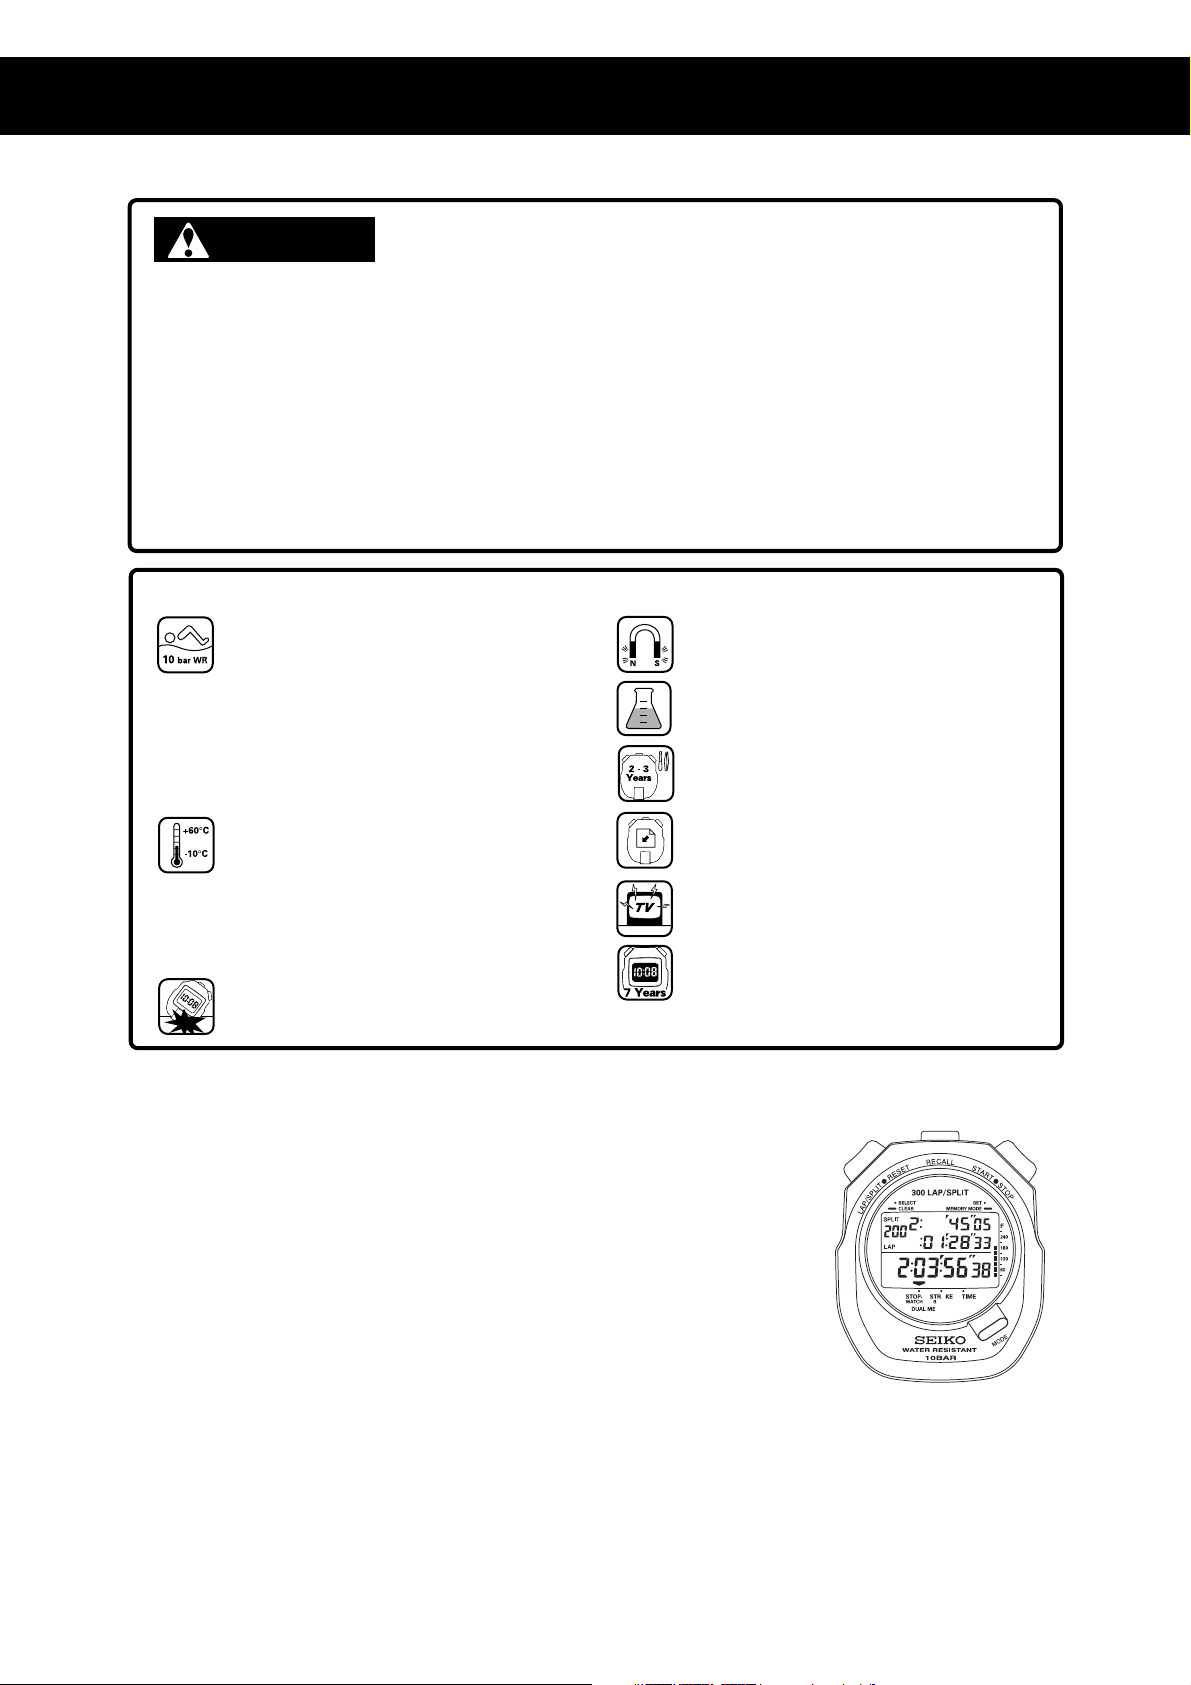
WATER RESISTANCE (10 bar)
Yo ur sto pw at ch is des igne d a nd man uf ac tu re d t o
withst and up t o 10 bar, a nd i s su itable for tak ing baths
and shallow diving, but not for scuba diving.
Do not operate the buttons when the stopwatch is wet or
in wat er. If used in sea w ater, rinse the stopwat ch in
fresh water and dry it completely.
When bathin g wi th y our stopwatch, be su re t o ob serve
the following:
* Do not op erate the buttons when the stopwatch is wet
with soapy water or shampoo.
* If the stopwatch is left in warm water, a slight time loss
or ga in may be caused. T his condition, howe ver, w ill
be corrected whe n the stopwa tch return s to normal
temperature.
TEMPERATURES
If the stopwa tch is left in dir ect sun light f or a long t ime,
the displ ay may become blac k, but this condition will be
co rr ec ted w hen th e s to pw atch r et ur ns to nor ma l
temperatur e. Do not leave your stopwatch in very low
temperatures below –10 C (+14 F) for a long time since
the cold may cause:
a. a slight time loss or gain.
b. the change of digits to become slow.
c. the display light to dim.
However , the above condition s will be corre cted when
the stopwatch returns to normal temperature.
SHOCKS
Do not subject it to violent shocks.
o o
MAGNETISM
Your stopwatch will not be affected by magnetism.
CHEMICALS
Be car ef ul not to expos e the stopw at ch to sol ven ts ,
mercury, cosmetic spray, detergents, adhesives or paints.
Ot he rw is e, th e ca se , e tc . m ay bec ome d is co lo re d,
deteriorated or damaged.
PERIODIC CHECK
It is re commended that the stop watc h be checked once
every 2 to 3 year s. H ave your st opwat ch check ed by an
AUTHORIZED SEIKO DEALER or SERVICE CENTER to ensure
that the case, buttons, gasket and crystal seal remain intact.
PRECAUTION REGARDING CASE BACK PROTECTIVE FILM
If your stopwatch has a protective film and/or a sticker on
the case back, be sure to peel them off before using it.
STATIC ELECTRICITY
The IC (Integrated Circuit) used in your stopw atch will be
affected by static electricity which may disturb the display.
Keep your stopwatch away from close contact with objects
such as TV screens which emit strong static electricity.
LIQUID CRYSTAL PANEL
The normal life e xpectancy for a liquid crystal panel is
approxi mat ely 7 years. Aft er that it may decrease in
contrast, becomin g diffi cult to read. Please conta ct your
AUTHORIZED SEIKO DEALER or SERVI CE CENTE R if you
wish to have a new panel fitted (guaranteed one year).
1
Page 2

TIME/CALENDAR SETTING
Before setting the time/calendar or ID No., be sure to reset the stopwatch to “00.” The time/calendar and ID No. can be set only when the stopwatch is reset.
B
Month Year
A
ID No.
Hour
Minutes
Date
Seconds
TIME/CALENDAR display indicator
D
1. Press “D” to show the TIME/CALENDAR display, and then press “B.” SECOND digits flash. Press “A” to reset the SECOND to “00.”
2. Press “B” repeatedly to select the digits (flashing) to be adjusted in the following order.
TIME/CALENDAR display
SECOND
MINUTE HOUR YEAR
MONTH
DATE
ID NO.
MEMORY MODE
Setting mode
3. Press “A” to set the digits. The digits move quickly if the button is kept pressed.
4. Press “B” to return to the TIME/CALENDAR display.
Notes:
1. The calendar automatically adjusts for odd and even months including February of leap years from 2006 to 2055.
2. When the SECOND reads any number from “30” to “59” and “A” is pressed, one minute is added.
3. The time is displayed in the 24-hour indication.
4. The ID No. can be set in two digits from “01” to “99”. When “OFF” is displayed, it indicates that no ID No. is set.
5. To change the memory mode, press and hold "A" for 1.5 seconds.
When "OFF" is displayed above "BLOCK," the stopwatch is in the single memory mode, which is the default setting.
When "ON" is display ed above "BLOCK" and the BLOCK mark appears at the bottom r ight, the stopwatch is in the block memo ry mode, which is d esigned for
professional level use.
Refer to MEMORY RECALL FUNCTION---BLOCK MEMORY MODE on page 3.
BLOCK mark
CAUTION
Change of memory mode will delete all the
previously stored data.
Block memory mode Single memory mode
ADJUSTING THE CONTRAST ON THE DISPLAY
The contrast of the liquid crystal display can be adjusted in 10 steps from level “1” to “10.”
1. Press “C” in the TIME/CALENDAR display to show the CONTRAST ADJUSTMENT display.
2. Press “A” or “B” repeatedly to adjust the contrast. The display becomes darker by pressing “A”
and lighter by pressing “B.”
3. Press “C” or “D” to return to the TIME/CALENDAR display.
B
C
A
Contrast
level
D
STOPWATCH
• Up to 300 lap/split time data can be stored in memory and recalled during or after measurement.
• The stopwatch can measure and display the lap/split time that exceeds its limit of 300, but it cannot store the data in memory for the 301st measurement
data and afterward.
* When a new measurement is commenced while the stopwatch is in the single memory mode, the lap/split time data obtained from the previous measurement will be automatically deleted.
• For professional level use, the default single memory mode can be changed to the block memory mode, in which commencement of a new measurement
will not erase the previous measurement data. The block memory mode is useful for saving records or comparing data.
Refer to MEMORY RECALL FUNCTION---BLOCK MEMORY MODE on page 3.
Before using the stopwatch, be sure to reset the digits to “00.”
When the stopwatch is stopped, press “B.”
When the stopwatch is counting, press “A” and then press “B.”
1. STANDARD MEASUREMENT
Press “D” to show the STOPWATCH 1 (Accumulated elapsed time) display.
START
A BA
STOP RESET
Block No.
B
C
A
Split time
Lap time
2. ACCUMULATED ELAPSED TIME MEASUREMENT
Press “D” to show the STOPWATCH 1 (Accumulated elapsed time) display.
A AA
START
* Restarting and stopping the stopwatch can be repeated by pressing “A.”
STOP RESTART
A
STOP
B
RESET
2
STOPWATCH display indicator
D
Accumulated elapsed time /
lap time in progress
Page 3

3. SPLIT/LAP TIME MEASUREMENT
Press “D” to show the STOPWATCH 1 (Accumulated elapsed time) display or STOPWATCH 2 (Lap
time in progress) display.
B BA
START
* The split/lap time can be measured repeatedly by pressing “B.”
SPLIT/LAP 1 SPLIT/LAP 2
A
STOP
B
RESET
Lap time
Start
Split time
“Split time” r efers to an elapsed time re quired to
cover a distance from the start to a given point.
“Lap time” ref ers to a n elapsed time requ ired to
cover a given section of the whole distance.
Split/lap No.
Accumulated elapsed
time display
Accumulated elapsed time
Notes:
1. When the digits are reset to “00” by pressing “B,” a new block number for the next measurement is displayed.
2. In the lap time in progress display, when the lap time measurement in progress exceeds 1 hour, the hour digit appears in place of the mark for lap time in progress display.
Split time
Lap time
Lap time in progress
display mark
Lap time in progress
Lap time in progress
display
MEMORY RECALL FUNCTION ------- SINGLE MEMORY MODE
• Up to 300 lap/split time data of one measurement can be stored in memory and recalled on display.
• With each press of “C,” the stored data is recalled.
• The stored data can be recalled even during measurement (while the stopwatch is measuring).
• Memory recall sequence
When the stopwatch is stopped, with each press of “C,” the stored data will be recalled from the first (oldest) to the last (newest) data.
When the stopwatch is measuring, with each press of “C,” the stored data will be recalled from the last (newest) to the first (oldest).
MEMORY RECALL WHEN THE STOPWATCH IS STOPPED OR RESET
With each press of “C,” the data is recalled chronologically (starting from the first/oldest data).
Ex.: When the stopwatch is reset to “00” after the measurement
Reset First lap time Split & lap times Stop time
C
The data can be recalled successively one after another by keeping “C” pressed.
Split time
Lap/Split
number
Lap time
• Wh en a new mea surem en t is
commenced, the lap/split time data
ob tai n ed fr om t he pr evi o us
measurement will be automatically
deleted.
RECALL mark appears while the stored data is being recalled on display.
The mark shows the memory recall sequence (descending/ascending).
* The data can be recalled successively by keeping “C” pressed.
* To stop the recall of the data when the stopwatch is stopped, press “A”, “B” or “D.”
To stop the recall of the data when the stopwatch is reset, press “A” or “D.”
MEMORY RECALL FUNCTION ------- BLOCK MEMORY MODE
The Cal. 141 features a dual memory mode:
Single memory mode ..... The single memory mode is the default-set mode. The lap/split time data of one measurement from start to stop can be stored.
Block memory mode ...... The block memory mode is an advanced mode designed for professional level use. A sequence of measurement data obtained
<How to change the memory mode>
1. While in the TIME/CALENDAR display, press “B” 8 times until “BLOCK” appears on the display, above which either “ON” or “OFF” is flashing.
2. Press “A” for 1.5 seconds until the memory mode changes with a long beep.
When the stopwatch is reset, and a new measurement is commenced, the lap/split time data of the previous measurement will
be automatically deleted.
from start to stop (or reset) is recorded as a “block.” Up to 100 blocks of data can be stored in memory without deleting the
previous data.
A A
Block mark*
Single memory mode
Block memory mode
* When the block memo ry mode is selected, the BLOCK
mark appears at the bottom right on the display regardless
of the display mode.
Benefits of block memory mode
Easy data management ............ The block number as well as starting time and date of measurement are automatically recorded and stored.
Handy data storage ................ Creation of a new block of data will not erase the previous data in memory. While in the single memory mode,
a new measurement will delete the latest measurement data.
3
Page 4

When the stopwatch is reset while the block memory mode is selected, a new “block number” is assigned to the next sequence of data.
Block number
A block of data with a block number is automatically accompanied by the starting time and date of measurement, which is convenient for easy data
management.
* A block of data contains at least three data components; block number, measured lap/split time(s), starting time and date. If more than one block of data is stored in memory, the memory may
reach a capacity limit even before the total number of lap/split time measurement totals to 300.
1. MEMORY RECALL WHEN THE STOPWATCH IS STOPPED OR RESET
With each press of “C,” the data is recalled chronologically (starting from the first/oldest data in block “1”).
Ex.: When the stopwatch is reset to “00” in block 4
Reset Start time & date
C
(block 1)
Block number
Fastest lap time
(block 1)
Date
Fastest lap number Lap/Split number Split time
Split & lap times
(block 1)
Stop time
(block 1)
Data of
block 2
Data of
block 3
Starting time
* The data can be recalled successively by keeping “C” pressed.
* To stop the recall of the data when the stopwatch is stopped, press “A”, “B” or “D.” To stop the recall of the data when the stopwatch is reset, press “A” or “D.”
Fastest lap time
2. MEMORY RECALL WHEN THE STOPWATCH IS MEASURING
With each press of “C,” the data is recalled starting from the last (newest) data.
Ex.: When the measurement of the third split/lap time in block “4” has been completed
Fastest lap time
Fastest lap number
Split/lap 3
(block 4)
(block 4)
Split/lap 3
(block 4)
Split/lap 2
(block 4)
Split/lap 1
(block 4)
Data of
block 3
Data of
block 2
Accumulated elapsed time
* The data can be recalled successively by keeping “C” pressed.
* To measure the lap time and split time while the stored data are recalled, operate the buttons as follows.
Press “B” to measure new lap time and split time.
Press “A” to stop the measurement.
Press “D” to return to the measurement mode.
3. MEMORY CAPACITY INDICATOR
The number of da ta stored in memory is displayed graphically by the
memory capacity indicator.
Each segment of the bar corresponds to 30 data.
* When no segment is displayed, the stored data is less than 30.
When the memory reaches its full capacity, all the segments of the bar are
displayed.
* The 301st data and those measured thereafter will be displayed but will not be stored in
memory for later recall.
While the data is recalled, a segment of the bar flashes to indicate the
measurement order of the data being recalled.
A block of data contains at least three data components; block number,
measured lap/split time, starting time and date. If more than one block of data
is stored in memory, the memory may reach a capacity limit even before the
total number of lap/split time measurement totals to 300.
[ Number of data in memory ]
F
291~300
270~290
240~269
E
210~239
180~209
150~179
120~149
90~119
60~ 89
30~ 59
Data of
block 1
When the numbe r of
stored measurements
exceeds 290, the letter
"F" starts flashing.
When the memory is at
its ful l cap ac ity , the
letter "F" stops flashing
and remains displayed.
4. HOW TO CLEAR THE STORED DATA
Once the following steps are taken, all the stored data are erased from memory. The stored data cannot
be erased one by one or block by block.
Before clearing the data, check that the stopwatch is reset to “00.”
1. Press “C” to show the MEMORY RECALL display.
2. Keep “B” pressed for more than 1.5 seconds.
* While the button is kept pressed, the display shown at right appears with warning beeps.
* After 1.5 seconds, all the stored data is erased from memory with a long beep. Then, the initial measurement display is shown.
* Unless “B” is kept pressed for more than 1.5 seconds, the stored data will not be erased from memory.
4
B
C
Page 5

STROKE/FREQUENCY MEASUREMENT
The stroke/frequency of an activity per minute is automatically calculated by measuring the time required to make three strokes.
Measurable number of strokes per minute is between 10 and 180.
Up to 9 data can be stored in memory.
1. HOW TO USE THE STROKE/FREQUENCY MEASURING FUNCTION
1. Press “D” to show the STROKE/FREQUENCY MEASURING display.
2. Press “A” to start the measurement.
3. Press “A” to stop the measurement after the third stroke was made.
measurement
Start of
A
Measuring
D
Notes:
1. During the first se cond a fter the meas urement has b een started b y pressing “A ”, fla shing “180-0” is
displayed. If the measurement is stopped by pressing “A” during the period, “Error” will appear. If the
measurem ent is not stopped by pressing “A” after more than 18 seconds have elapsed, “Error” will
automatically appear.
2. If “B” is pressed while the measurement is stopped or “Error” is shown, the digits will be reset to “0-0”.
Even if the digits are not reset to “0-0” with the measurement stopped or “Error” shown on the display, the
measurement can be started by pressing “A.”
3. When the digits are reset to “0-0” or a new measurement is started, the data measured last will be stored
in Memory-1. When the new measurement is made, it will be stored in Memory 1 as the data in Memory1 is transferred to Memory-2.
4. When more than 9 measurements are made, the oldest data will be erased from memory.
measurement
Stop of
Number of strokes
per minute
2. RECALL OF THE STORED DATA
With each press of “C”, the data is recalled starting from Memory-1.
* The data cannot be recalled while the measurement is being made.
3. HOW TO CLEAR THE STORED DATA
Once the following steps are taken, all the stored data are erased from memory. The stored
data cannot be erased one by one.
1. Press “C” to show the MEMORY RECALL display.
2. Keep “B” pressed for more than 1.5 seconds.
* While the button is kept pressed, the display shown at right appears with warning beeps.
* After 1.5 seconds, all the stored data is erased from memory with a long beep. Then, the initial measurement
display is shown.
* Unless “B” is kept pressed for more than 1.5 seconds, the stored data will not be erased from memory.
Reset
A
Memory No.
“Error” mark
B
C
BATTERY CHANGE
The lithium battery which powers your watch should last approximately 3 years. However, because the battery is inserted at the fac tory to check the function and
performance of the watch, its actual life once in your possession may be less than the specified period. When the battery expires, be sure to replace it as soon as possible
to prevent any malfunction. For battery replacement, we recommend that you contact an AUTHORIZED SEIKO DEALER and request SEIKO SB-T74 battery.
* If the stopwatch is used for more than 3 hours a day, the battery life may be less than the specified period.
Battery life indicator
When the battery nears its end, a flashing battery mark “BATT” is displayed. In that case, have the battery replaced with a new one as soon as possible by the retailer
from whom the stopwatch was purchased or an AUTHORIZED SEIKO DEALER.
* When the battery is replaced with a new one, all the stored data will be erased from memory.
SPECIFICATIONS
1. Frequency of crystal oscillator .............. 32,768 Hz (Hz = Hertz … Cycles per second)
2. Accuracy ................................................. 0.0006% at normal temperature range (5 ºC - 35ºC) (41ºF - 95ºF)
3. Operational temperature range ............ –10ºC - +60ºC (14ºF - 140ºF)
4. Desirable temperature range of use ..... 0ºC - +50ºC (32ºF - 122ºF)
5. Display system
Time/calendar display ..................... Hour (24-hour indication), minute, second, year (from 2006 to 2055), month, date, ID No. (OFF / 01 - 99)
Stopwatch display ........................... Hour, minute, second, 1/100 second
Stroke/frequency
measuring display ........................... Number of strokes (10 - 180 per minute, measurement time 1 to 18 seconds), Number of measurement (1- 9)
6. Display medium ..................................... Nematic Liquid Crystal, FEM (Field Effect Mode)
7. Battery ..................................................... Lithium battery SB-T74, 1 piece
8. Battery life ............................................... Approximately 3 years (If the stopwatch is used for more than 3 hours a day, the battery life may be less than the specified period.)
9. IC (Integrated Circuit) ............................. C-MOS-LSI, 1 piece
10. Battery life indicator is available.
* The specifications are subject to change without prior notice, for product improvements.
Less than 15 seconds per month
CONTRAST ADJUSTMENT (1 -10)
Three-row display of split time, lap time, total elapsed time or lap time in progress
Number of blocks (1 - 999), Number of lap/split times (0 - 999), Memory capacity indicator (bar indicator)
5
 Loading...