

Page 1
紙
Thank you for purchasing SEIKO SHOOTING TIMER KT-401.
Before using your SEIKO SHOOTING TIMER, please read this
manual carefully for its proper use and care.
Keep this manual handy for ready reference.
Page 2
r
CAUTION
(1) This manual may not be copied or reproduced in any form, in whole or in part, without the express
written consent of SEIKO.
(2) This manual may be subject to change without notice.
(3) This manual has been prepared carefully to provide you with complete information for the operation
of this product. For the purpose of constant improvement in this manual, your suggestions and
comments on the descriptions included in it are highly appreciated.
(4) SEIKO shall not be liable for any failure of this product or direct or indirect damages resulting from
such failure if such failure is caused due to abuse, misuse, failure to observe instructions in this
manual and neglect of other reasonable care, and servicing, changes, modifications or alterations
performed by other than SEIKO or a servicing contractor authorized by SEIKO.
SAFETY ALERT SYMBOLS
The symbols and terms used in this manual have the meaning as explained below:
WARNING is used to indicate a potentially hazardous situation
WARNING
which is likely to cause death or severe personal injury if the
instructions under this heading are not followed correctly.
CAUTION is used to indicate a potentially hazardous situation
CAUTION
The following pictorial symbols indicate what must NOT be done.
Gene
The following pictorial symbols indicate what must be done.
prohibition
al
which is likely to cause personal injury or property loss if the
instructions under this heading are not followed correctly.
Prohibition
against
disassembly/
tampering
Prohibition
against
use near
water
Prohibition
against
handling with
wet hands
Prohibition
against
exposure to
water
General
instructions
Extraction of
power plug
Page 3

Table of Contents
1. SAFETY PRECAUTIONS......................................................................................................................... 1
2. OVERVIEW ............................................................................................................................................... 3
3. FEATURES................................................................................................................................................ 3
4. NEMES AND FUNCTIONS OF PARTS ................................................ ………………………………3
5. BEFORE USING YOUR SHOOTING TIMER ...................................................................................... 5
6. METHOD OF OPERATION.................................................................................................................... 6
7. PRODUCT COMPOSITION AND SPECIFICATIONS......................................................................... 8
Page 4
1. SAFETY PRECAUTIONS
The following precautions must be strictly observed for the safety of yourself and your fellow
workers and for the protection of property from loss and damages.
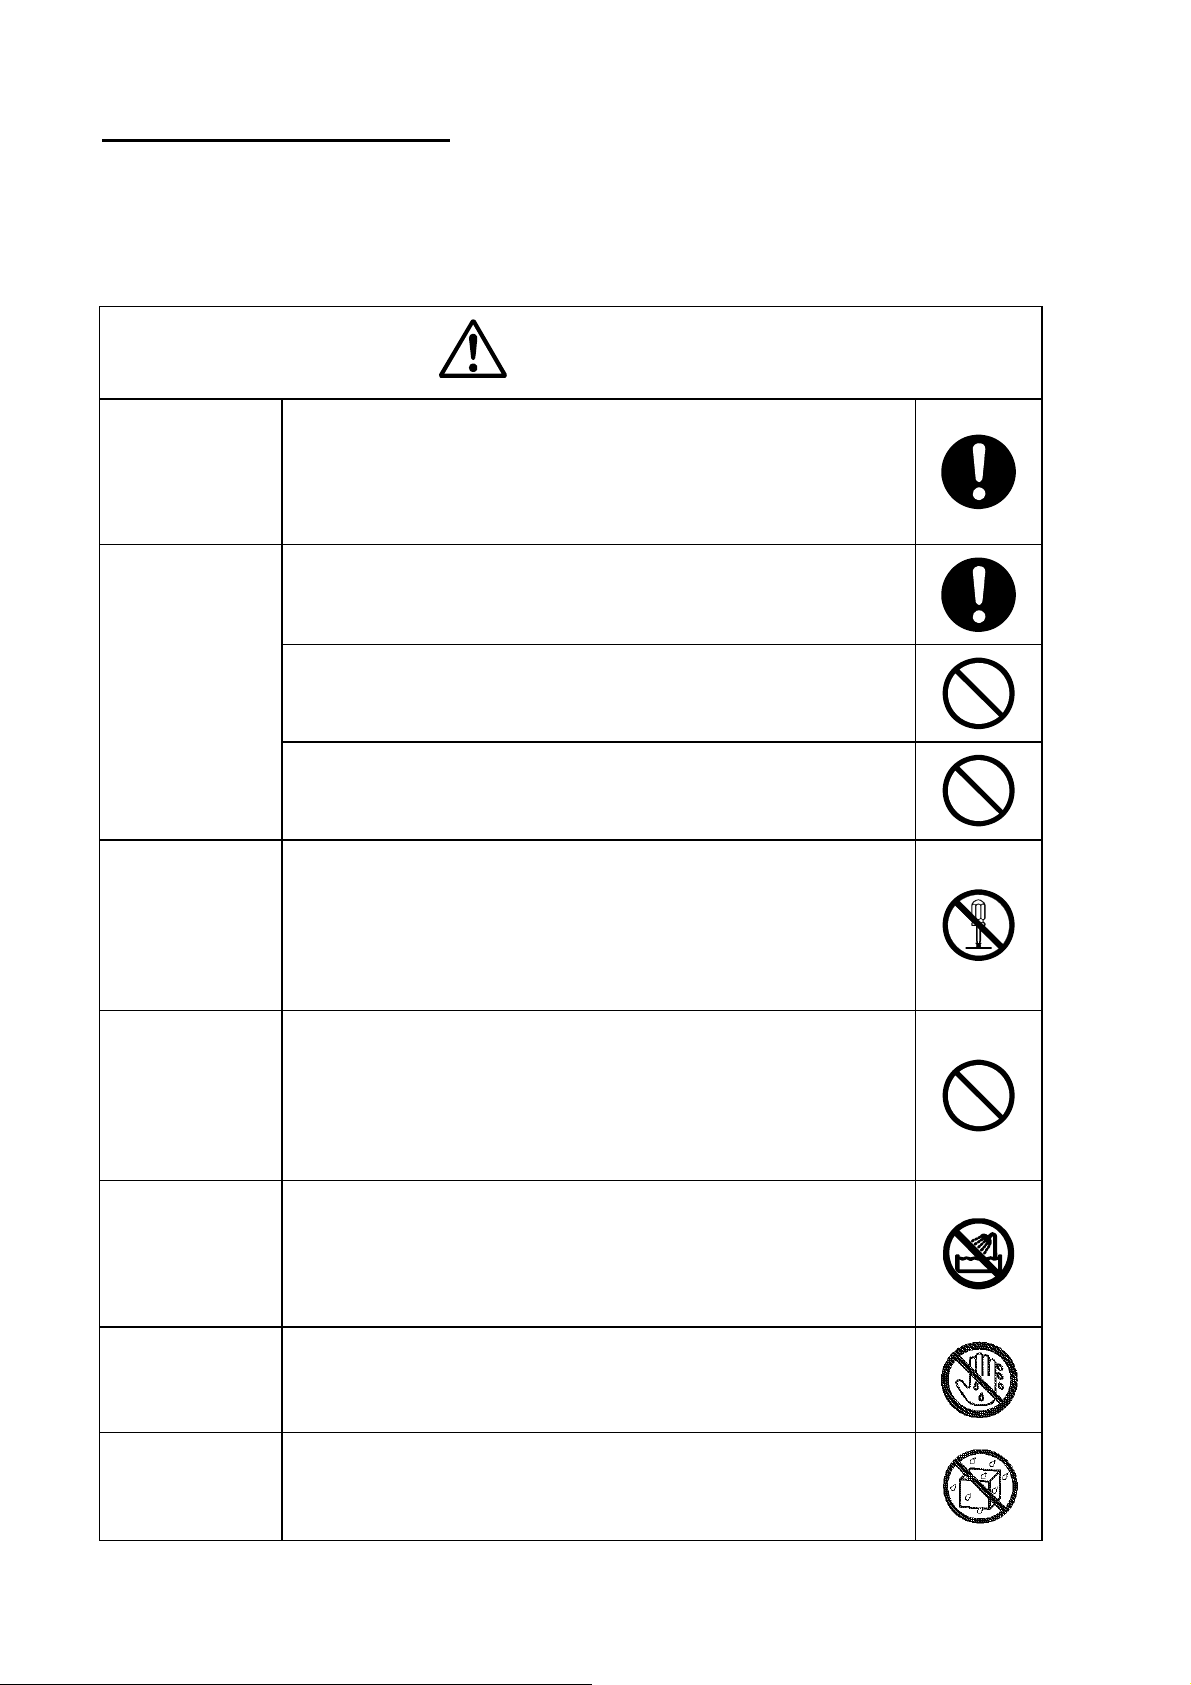
WARNING
If the Product is giving out smoke or burnt smell, or showing other
Actions to be
taken in case of
troubles
abnormal symptoms, turn off the power switch and cut the power
supply immediately. Then, call your nearby SEIKO dealer or
agent for repair serve. If the Product is used again without being
reconditioned, an electric shock or fire may be caused.
When unplugging the power cord from the outlet, do not pull the
cord, but hold the plug. An electric shock, a malfunction or fire
may be caused.
Caution on cable
connection
Prohibition
against
unauthorized
disassembly,
repair or
modification
No foreign matter
Prohibition
against use near
water
Never use any damaged power cord or plug, or loose socket. An
electric shock, short circuit or fire may result.
Do not use the Product at humid or dusty places, or places
where the temperature changes abruptly. A short circuit or
electric shock may result.
Unless you are a qualified electrician, never try to disassemble,
repair or modify the Product.
For repair serve, contact your nearby SEIKO dealer or agent.
Unauthorized disassembly, repair or modification may cause an
electric shock or fire.
Do not let any foreign matter such as pin and a piece of metal
enter into the inside of the Product. In case this has occurred,
turn off the power switch immediately, and call your nearby
SEIKO dealer or agent for inspection. If the Product is used
again without being reconditioned, an electric shock or fire may
result.
The Product is designed for indoor use only, and its case is not
water resistant. Never expose the Product to water. Do not
use it outdoors or near a swimming pool, where it may be
exposed to rain or splashes of water. A short circuit or electric
shock may result.
Prohibition against
handling with wet
hands
Prohibition
against exposure
to water
Never operate the Product with wet hands. An electric shock or
malfunction may result.
Do not get the power and other connectors wet. A burn or a
malfunction may be caused.
1
Page 5
CAUTION
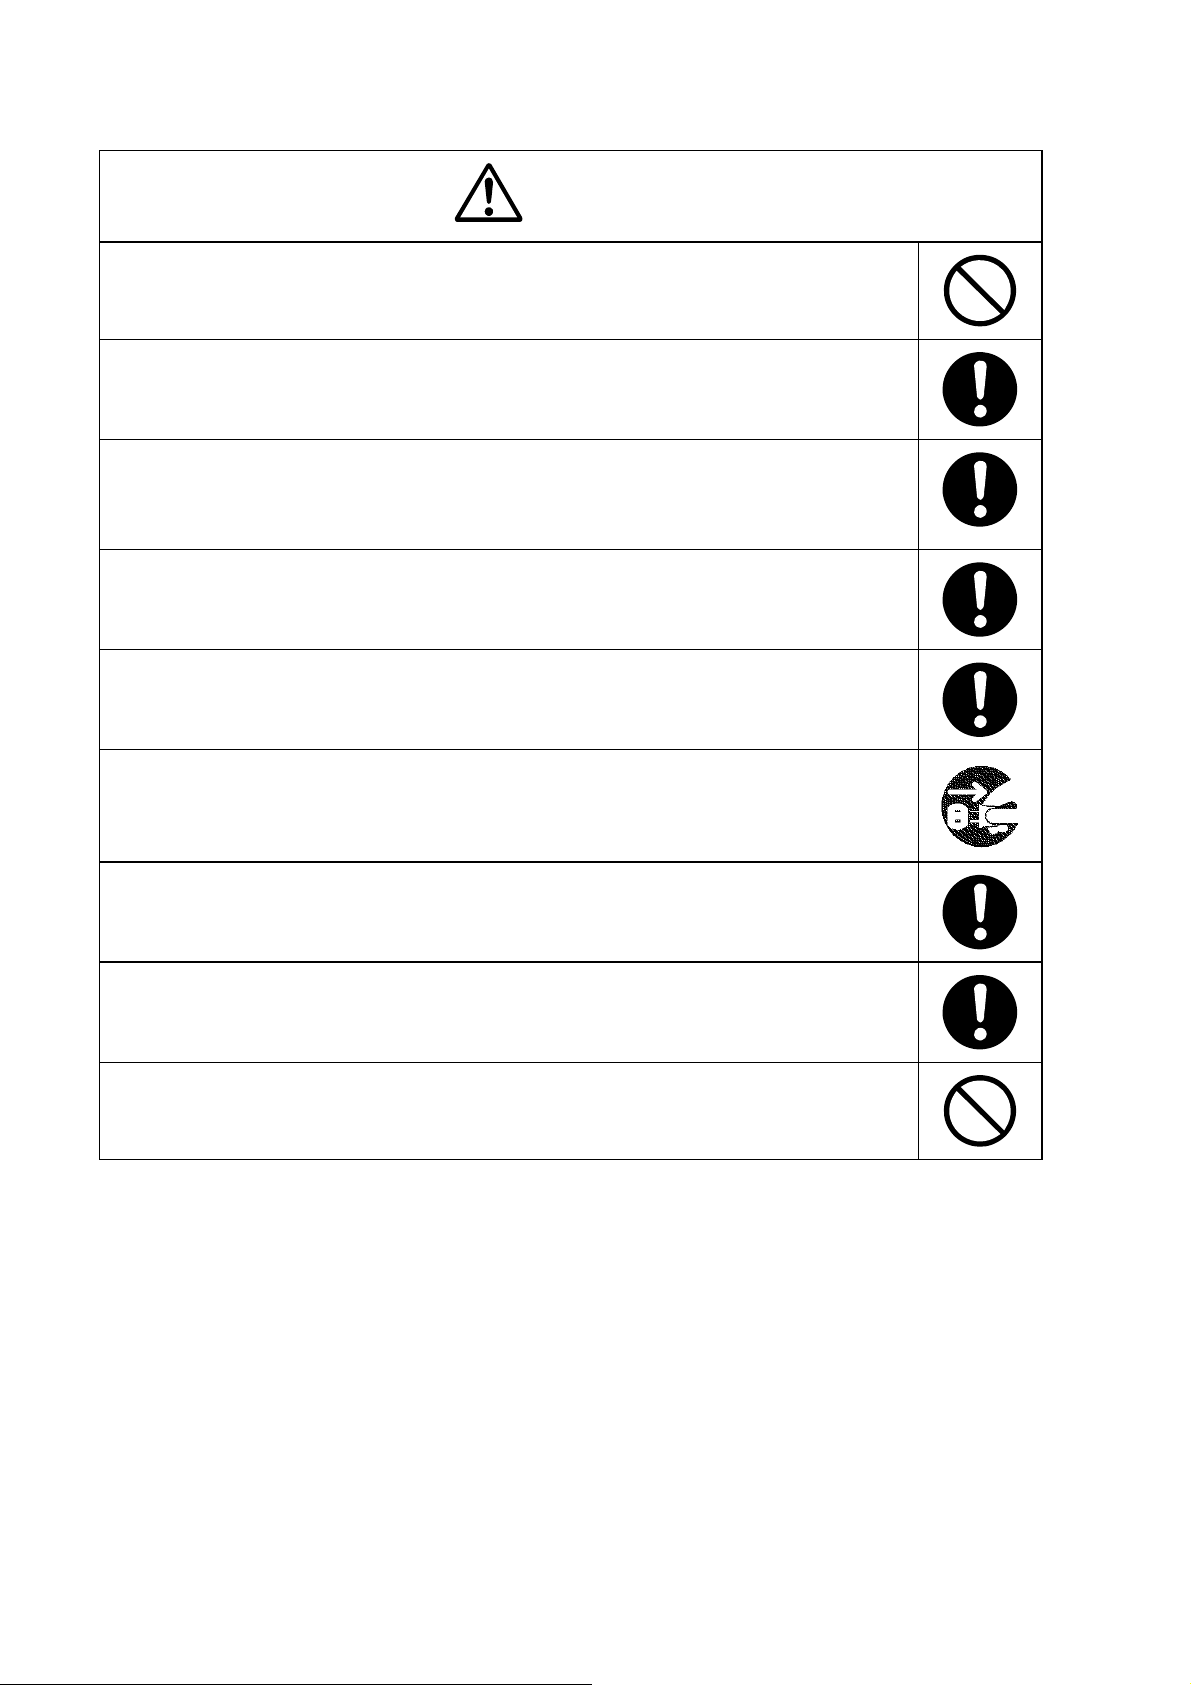
Do not leave the Product under direct sunlight for a long time. The temperature
inside it may rise excessively to damage the circuit and other parts.
Before connecting the power cord and other cables to the Product, be sure to check
that the power switch is turned off. Do not use any power cord or cable other than
specified. Otherwise, an electric shock or malfunction may be caused.
This Product is equipped with precision electronic circuits. Misuse or abuse, or
rough handling of the Product may adversely affect the performance of such
electronic circuits, causing a malfunction and reducing the serveable life of the
Product.
When the power switch is turned on and off or vice versa in succession, an interval
of at least 5 seconds should be provided between the switch operations.
Before moving the Product, be sure to turn off the power switch. An electric shock
or malfunction may result.
While the Product is not in use, be sure to keep the power plug disconnected from
the outlet. Otherwise, the insulation will be deteriorated to cause an electric shock,
leakage of electricity, or fire.
If any abnormal operation occurs due to an abnormal signal transmitted from outside
or other causes, turn off the power switch, and then turn it on again after at least 5
seconds.
When connecting the cables, insert the plugs properly. Otherwise, a malfunction or
abnormal operation may be caused.
Do not expose the case of the Product to solvents such as alcohol and gasoline,
spray of cosmetics or the like, cleaners, adhesives, or paints. They may discolor,
deteriorate or damage the case due to chemical change.
2
Page 6
2. OVERVIEW
SEIKO SHOOTING TIMER KT-401 is a display device that is preadjusted to count and show the lapse of
time required by the 24- and 14-second rules in basketball.
It also supports the 30-second rule in mini-basketball.
In addition to those preset times, the timer can be set for any desired amount of time up to 99 seconds in
one second increments, making itself suitable for a wide variety of training programs.
3. FEATURES
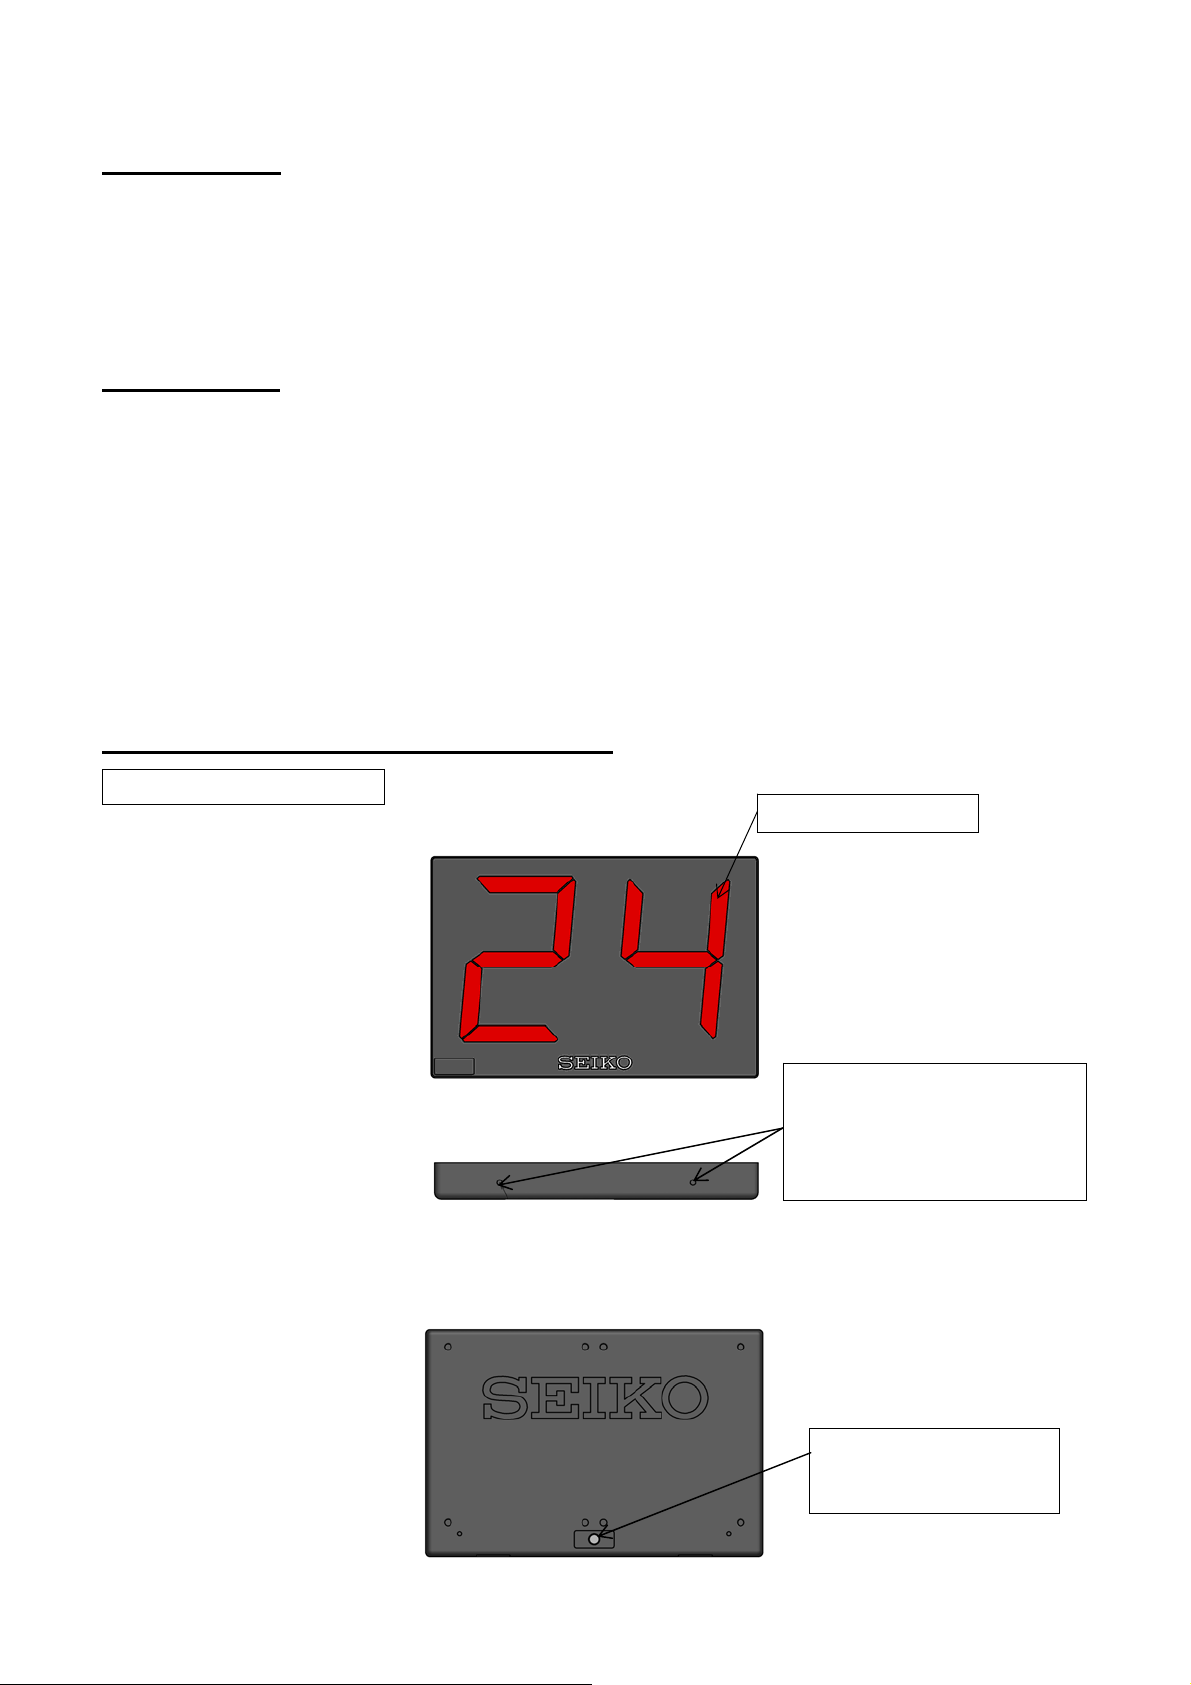
・The characters displayed are clear and highly visible with their height of 250 mm and the use of
high-intensity LED.
・“Start/Stop”, “Reset & Start” and “14 sec. Reset & Start” buttons on the operation panel to control the
timer are illuminated from within to show the operation status of the respective buttons.
These buttons are distinguishable from others by being larger in size or different in shape, increasing
the user-friendliness of the operation panel.
・The preset 24 and 14 seconds can be adjusted as desired, and the time you have set can be retained in
memory.
・KT-401 is a product recommended by the Japan Basketball Association (JBA) for the use in the games of
basketball.
4. NAMES AND FUNCTIONS OF PARTS
DISPLAY BOARD
<Front>
<Bottom>
<Rear>
High-intensity red LED
(for mounting KT-401 on a stand)
* KT-401 can be mounted on Stand
KT-011 and Desktop Stand
KT-022 (both sold separately).
2-M6 nut
Connector
(for connecting signal cable)
3
Page 7
play
r
play
r
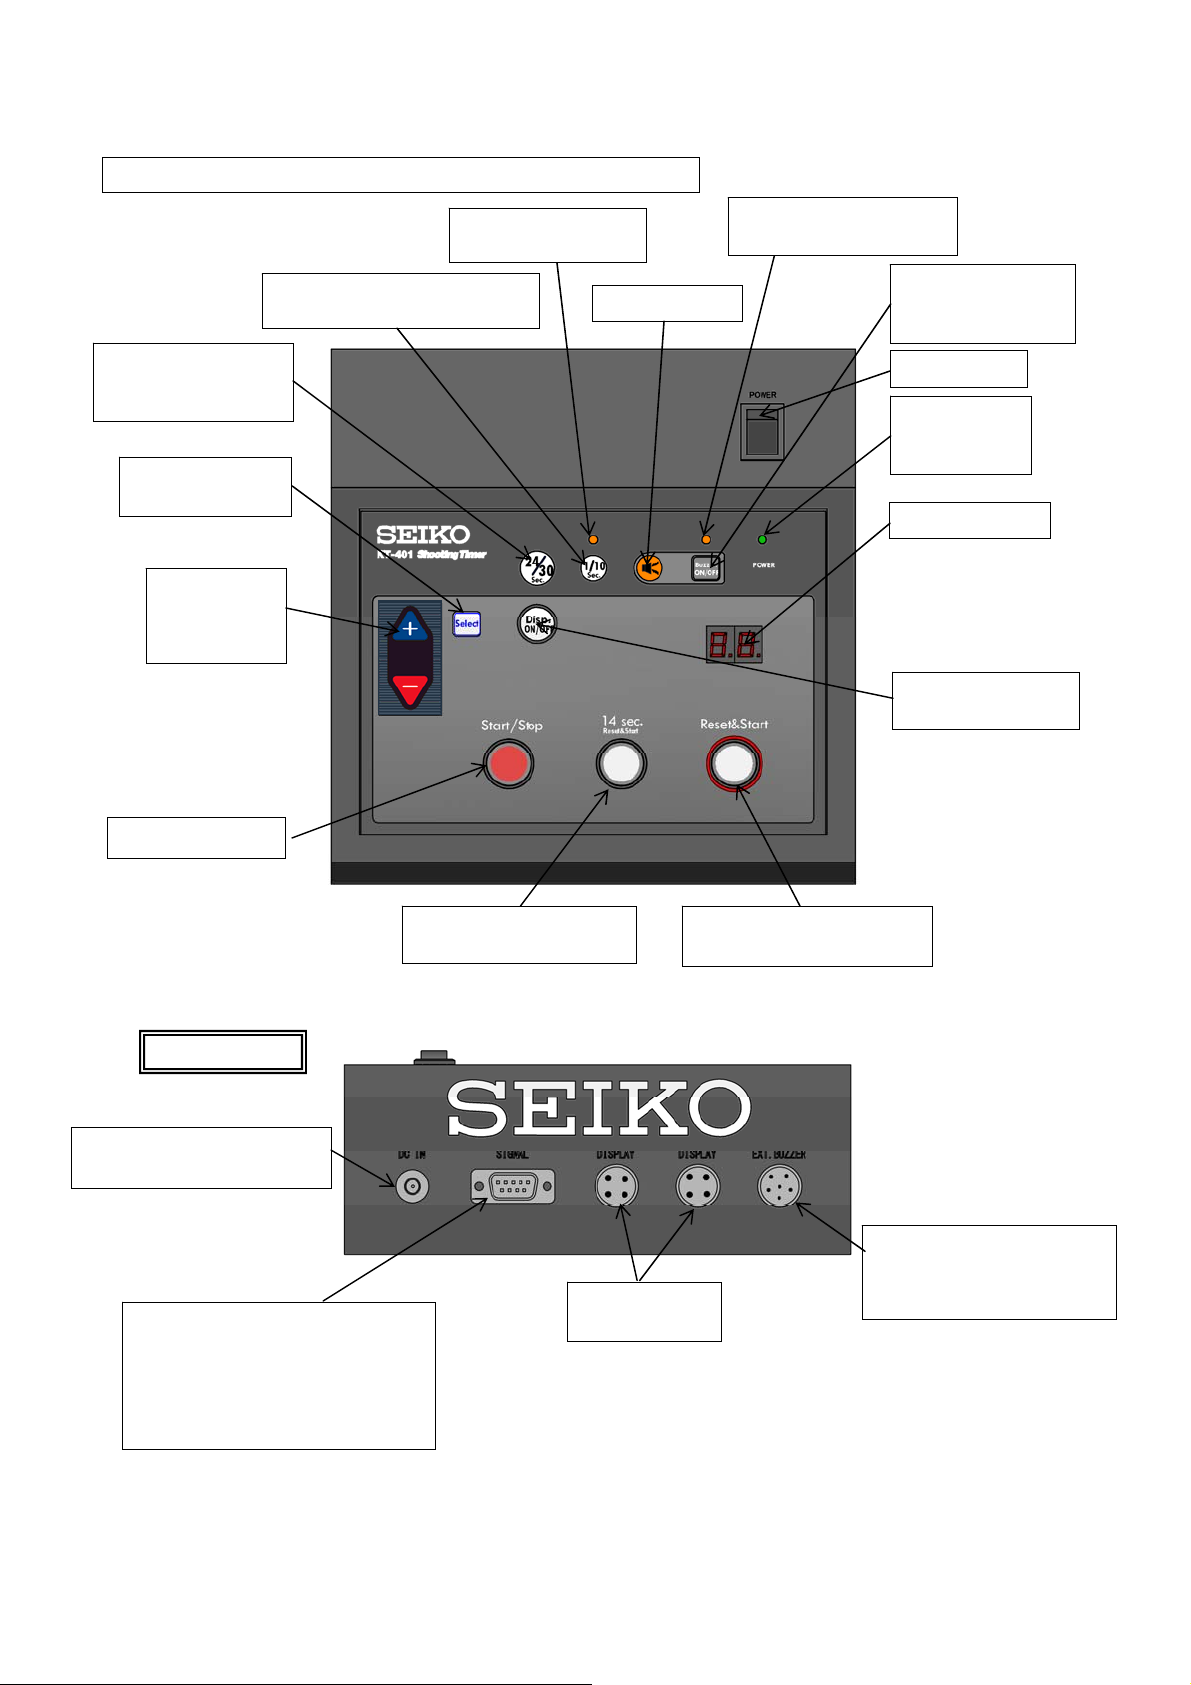
OPERATION BOARD/OPERATION PANEL
<Top>
Button to change
over between 24 and
30 sec. rule displays
Button to register
settings
Button to
adjust
countdown
time of time
LED lamp to light up
in 1/10 sec. dis
Button to change over between
1 and 1/10 sec. dis
s
Buzzer button
LED lamp to light up
when buzzer is engaged
Button to
engage/disengage
buzzer
Power switch
LED lamp to
light up when
power is on
Display monito
Button to turn
on/off display board
Start/Stop button
<Rear>
Connector for adaptor with
Connectors
power cable
Connector for transmitting display
* Not used in normal system
configuration.
* To be used when system is
extended.
data signal
Reset & Start button for
14 sec. countdown
Connector for
display board
Reset & Start button for
24/30 sec. countdown
Connector for external
buzzer
* BZ-050 can be connected.
4
Page 8
(
5. BEFORE USING YOUR SHOOTING TIMER
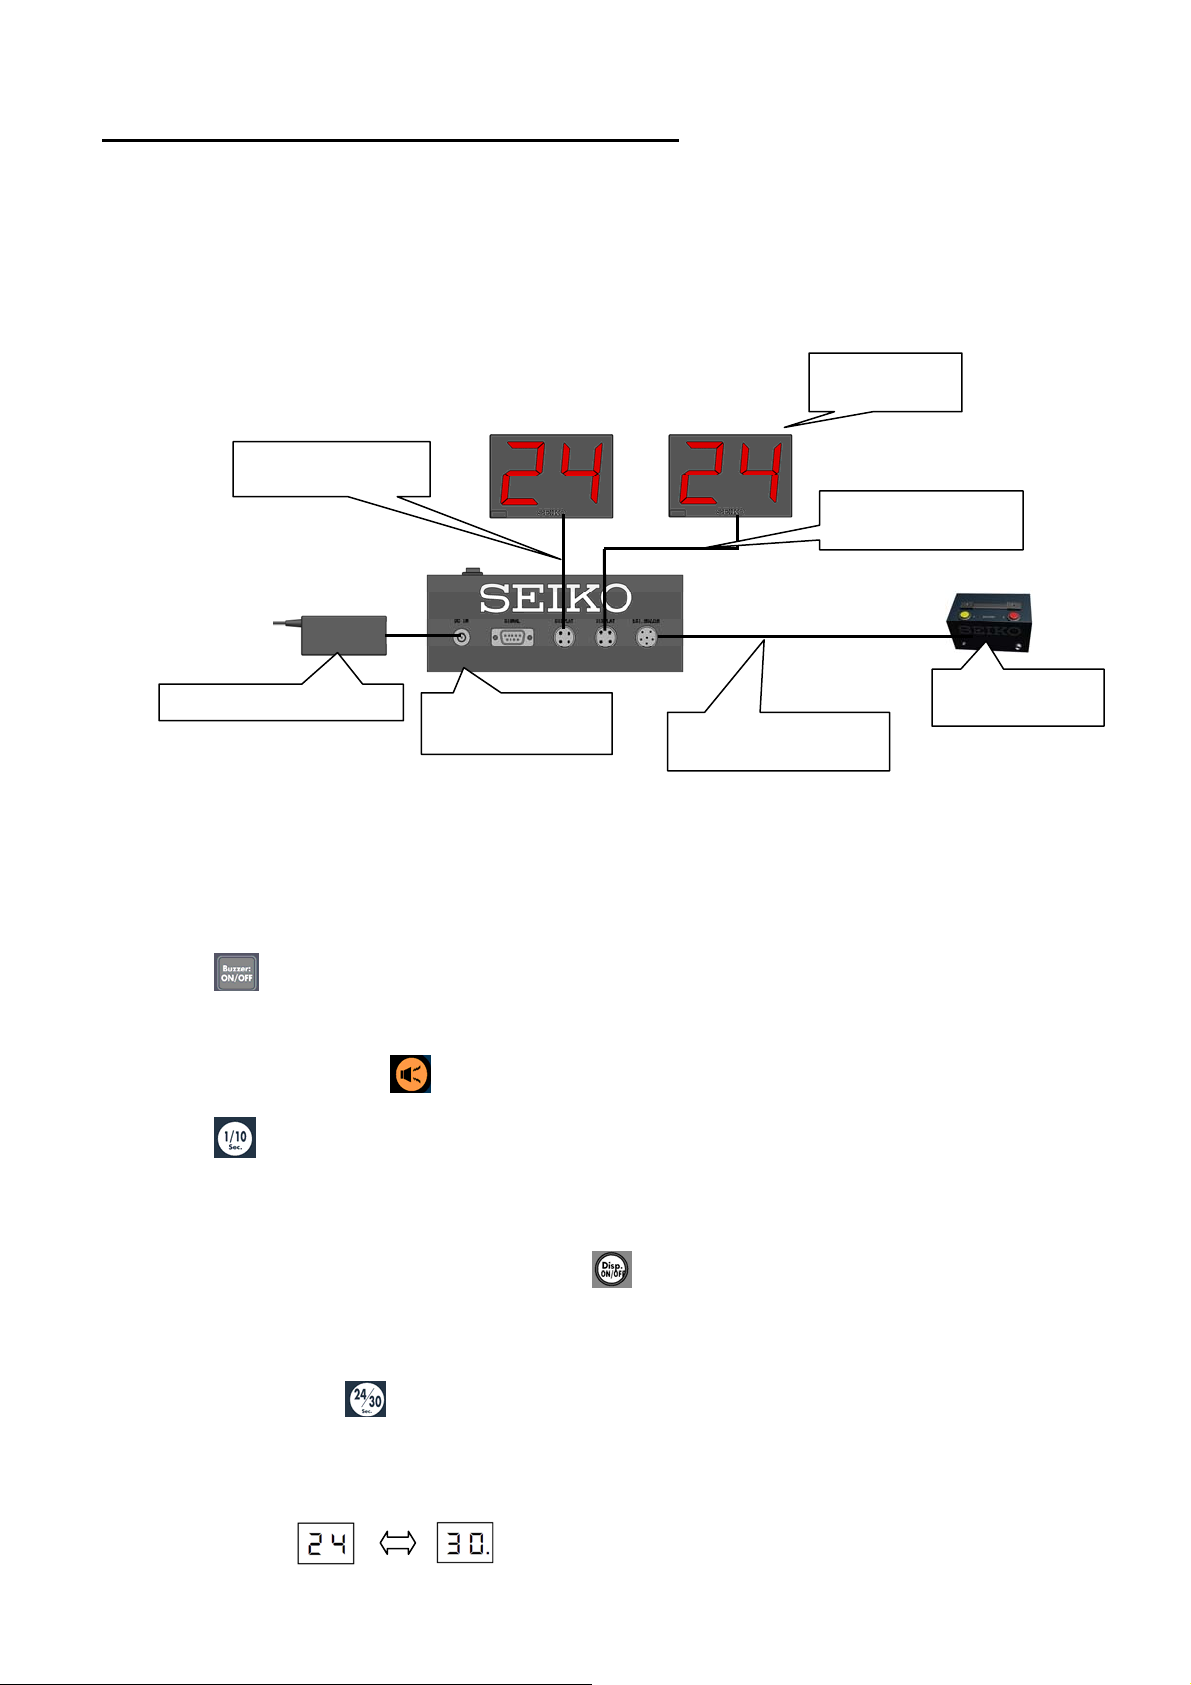
1. Securely connect the adaptor with power cable included with KT-401 to the power connector of the
operation board, and insert the power plug of the power cable properly into the outlet.
2. Securely insert the plugs of the dedicated cables into the connectors on the rears of the display board
and operation board, and tighten the connector nuts.
<Connection diagram for connectors
on the rear of operation board>
Adaptor with power cable
* 30 m and 50 m signal cables can be connected interchangeably to either of the connectors of the
display board.
3. Turn on the power switch. The corresponding LED lamp lights up while the power is on.
4. Press button to engage/disengage the time-up warning buzzer. The corresponding LED lamp
lights up while the buzzer is engaged.
5. The buzzer sounds while button is kept pressed.
6. Press button to select 1 or 1/10 second increment display to be shown after the countdown time
has reached less than 10 seconds. The corresponding LED lamp lights up while 1/10 second
increment display is selected.
7. If the display board is turned off by pressing button, the buzzer is automatically disengaged.
When the display board is turned on again, the buzzer is engaged or disengaged according to the
previous setting.
8. With each press of button, the countdown time is changed over between 24 and 30 seconds.
When 30 seconds is selected for the countdown time, “.” is shown after “30” on the display monitor of
the display board.
<Display monitor>
KT-401CA30
30 m signal cable)
KT-401OP
(Operation board)
Dedicated 5 m cable
(Included with BZ-050)
5
KT-401DP
(Display board)
KT-401CA50
(50 m signal cable)
BZ-050
(Sold separately)
Page 9
6 METHOD OF OPERATION
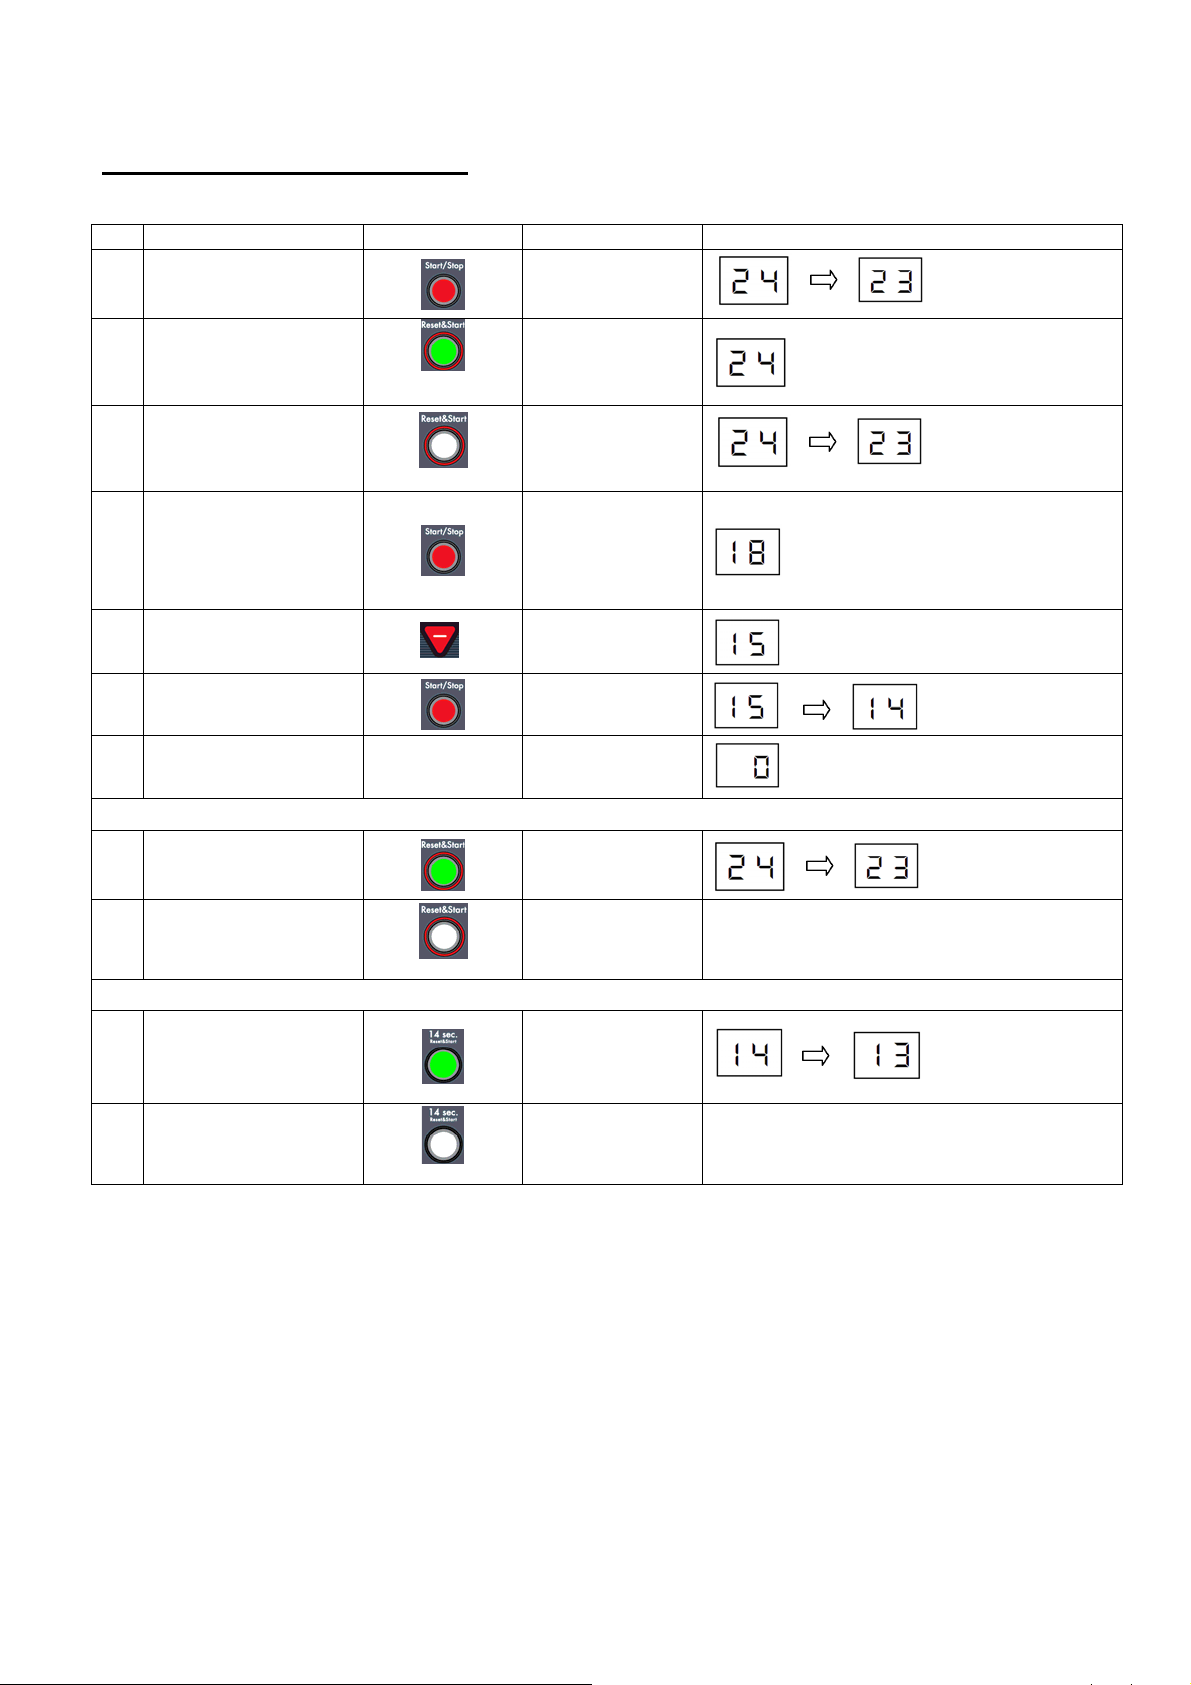
● Operation Procedure: Normal Use
Operation
To start game
Timer starts counting
1
down set time.
A shot was made.
2
Ball was rebounded.
3
When ball goes out of
bounds, and play is
stopped:
4
* If throw-in is awarded to
the other team, reset
timer.
To adjust countdown
5
time
Game is restarted.
6
24 seconds have
elapsed, and play is
7
stopped.
● To start countdown from 24 seconds
To reset timer
8-1
Button operation
Keep button
pressed.
Release button.
Action/Remarks Display monitor
Countdown is started.
* Start/Stop button
flashes in red.
Timer is stopped.
* Reset &Start button
lights up in green.
Countdown is started.
* Start/Stop button
flashes in red.
Timer is stopped.
* Start/Stop button
lights up in red.
Ex.) To change from
“18” to “15”
seconds:
* Start/Stop button
flashes in red.
Timer stops
automatically with
buzzer sound.
Keep button pressed.
* Reset &Start button
lights up in green.
(Buzzer)
To start countdown
8-2
Release button
●To start countdown from 14 seconds
To reset timer
9-1
To start countdown
9-2
Release button
* Start/Stop button
flashes in red.
Keep button pressed.
* 14 sec.
Reset &Start
button lights up in
green.
* Start/Stop button
flashes in red.
6
Page 10
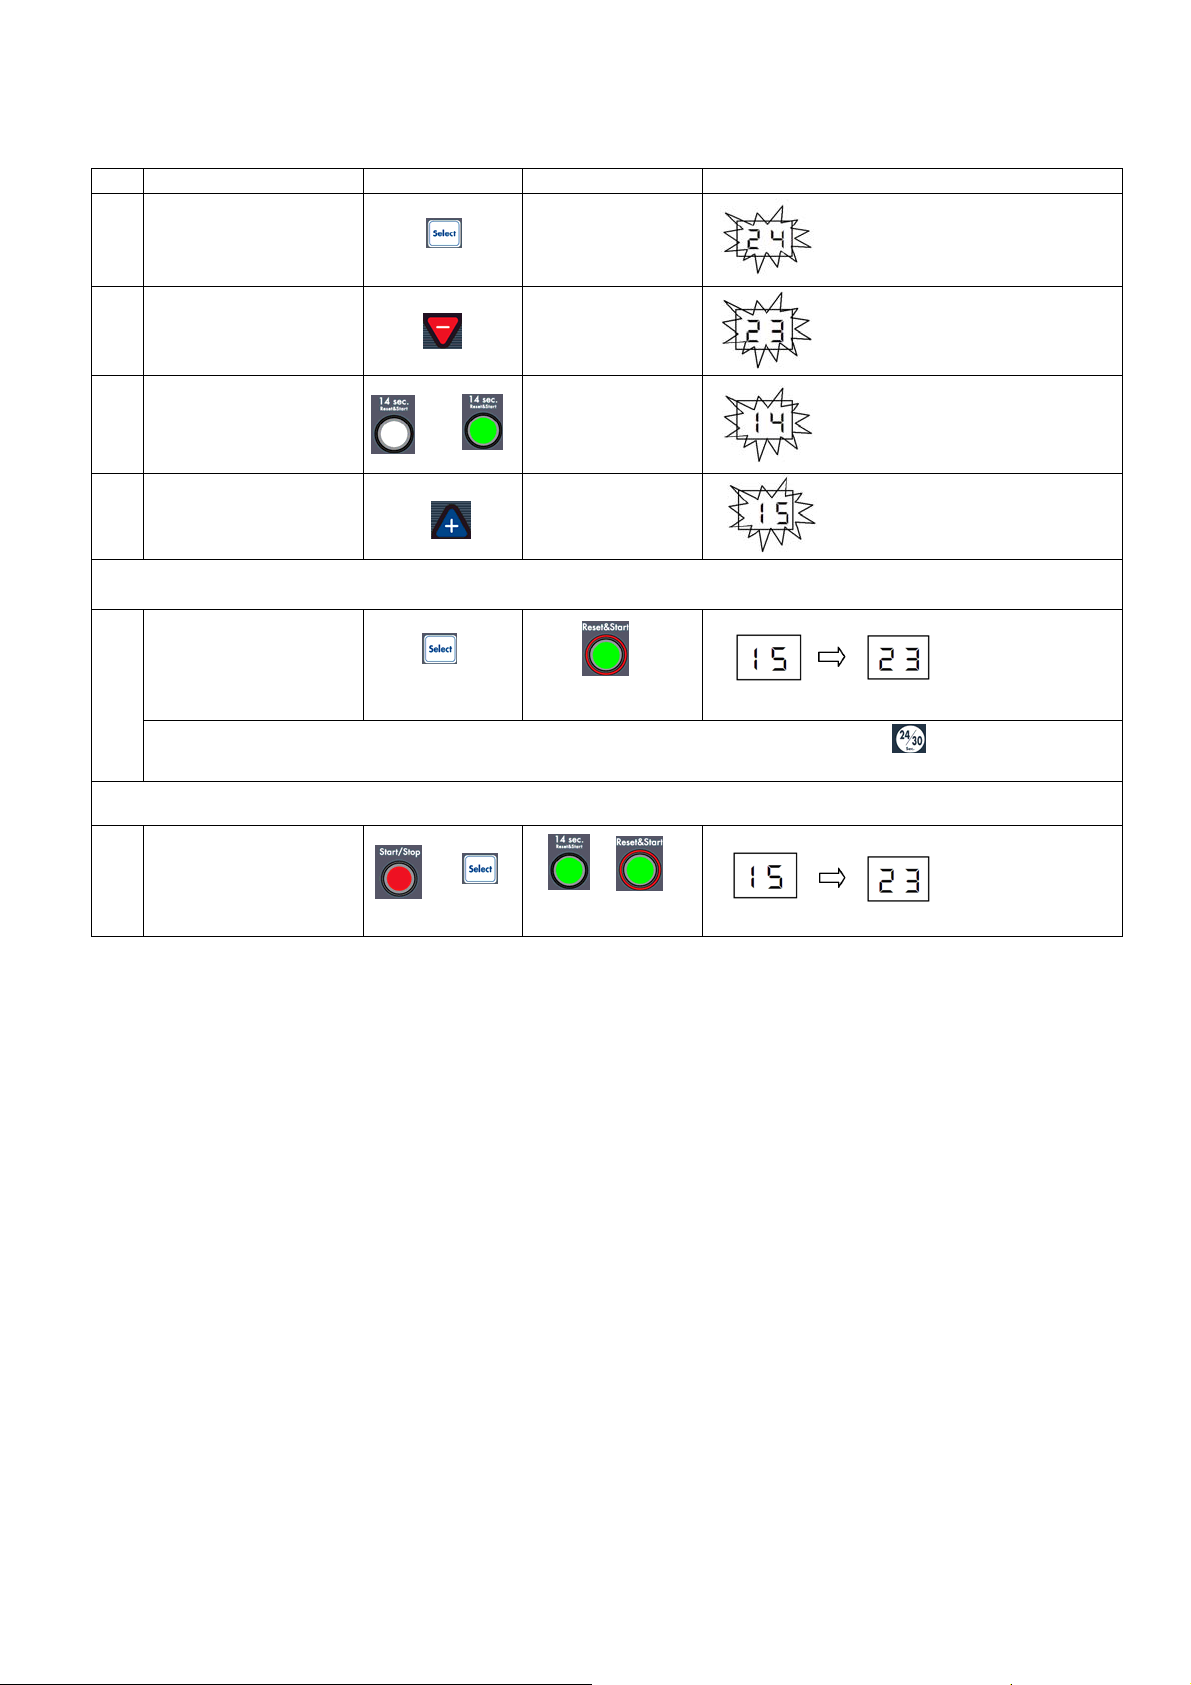
■ To change countdown time to other than 24 or 14 seconds
Operation
While timer is stopped
1
To change countdown
time from 24 to 23
2
seconds
To change countdown
time from 14 to other
3
setting
To change countdown
time from 14 to 15
4
seconds
Button operation
→
Action/Remarks Display monitor
* Start/Stop button
lights up in red.
* Reset &Start button
lights up in green.
Ex.) To change from
“24” to “23”
seconds:
* Start/Stop button
lights up in red.
* 14 sec.
Reset &Start button
lights up in green.
Ex.) To change from
“14” to “15”
seconds:
■ To cancel set countdown time when power switch is turned off (when playing a game under a special rule
applied only to the game):
To register setting
5-1
Button flashes in
green three times.
* To return to the preset countdown time selected before the change, keep button pressed for
more than 2 secods, or turn off and on the power switch.
■ To retain set count down time when power switch is turned off (when current rules are changed)
To register setting
5-2
+
Buttons flash in green
three times.
* Note that the countdown time of 30 seconds cannot be changed to any other setting.
7
Page 11

7. PRODUCT COMPOSITION AND SPECIFICATIONS
1. Product Composition
① 24-sec. Display Board KT-401DP (attached with JBA recommendation sticker)...........2 units
② 24-sec. Display Operation Board KT-401OP
(attached with JBA recommendation sticker) ............................................................1 unit
③ Adaptor with Power Cable (5 m) KT-ADP01 ................................................................1 piece
④ 50 m Signal Cable KT-401CA50 ..................................................................................1 piece
⑤ 30 m Signal Cable KT-401CA30 ..................................................................................1 piece
2. Specifications
・Dimensions ...................... Display board: Approx. 500 (W) x 338 (H) x 55 (D) mm
Operation board: Approx. 186 (W) x 73 (H) x 182 (D) mm
・Character height...............Display board: 250 mm
・Display .............................Display board: High-intensity red LED
・Weight..............................Display board: Approx. 2.6 kg
Operation board: Approx. 1.1 kg/ Adaptor with power cable0.7 kg
30 m cable: Approx. 1.4 kg
50 m cable: Approx. 2.1 kg
・Power supply ...................AC 100 ~ 240 V, 50/60 Hz
・Case material................... Display board: ABS resin
Operation board: Steel plate with baked finish
Note: The above specifications are subject to change without prior notice for product improvement.
8
Page 12
I
-
URL http://www.seiko-sts.co.jp
- - - - - - - - - - - - - - - - - - - - - - - - - - - - - - - - - - - - - - - - - - - - - - - - - - - - - - - - - - - - - - - - - - - - - - - - - - - - - - - -
GUARANTEE
Thank you very much for purchasing SEIKO SHOOTING TIMER KT-401.
We certify that the Product is guaranteed against defects in material and workmanship according to the
guarantee conditions specified herein.
If the Product malfunctions under normal use as described in this Operating Manual within one year from
the date of purchase, it will be repaired without charge.
To qualify for the services under the guarantee, you must present your SEIKO SHOOTING TIMER KT-401
to the retailer from whom it was purchased, or a service facility designated by us. Packaging and
transportation charges are to be paid by the owner of the Product.
Even within the guarantee period, repair services will be provided at cost in the following cases:
(1) Failure or damage caused by misuse or carelessness;
(2) Failure or damage caused by improper repair or modification;
(3) Failure or damage caused by improper handling such as dropping of the Product during
transportation after purchase;
(4) Failure or damage caused by natural disasters such as fire, flood, earthquake and lightning, and
other factors beyond the control of us such as smoke and other air pollution and extraordinary
atmospheric pressure;
(5) Scratches, cracks or other damage on the case caused by use over time;
(6) If the name of the retailer and the purchase date are not indicated in the space below, or if such information
has been rewritten; and
(7) If this Guarantee is not submitted together with the Product.
Date of purchase:
Retailer:
Please note that this Guarantee is valid only if the name of the retailer and the date of purchase are
properly entered by the retailer from whom your SEIKO SHOOTING TIMER KT-401 was purchased.
9
6503E
 Loading...