

Page 1

Read this User’s Guide carefully before use of this printer and
handle it properly.
After reading, keep it for later use.
E n h a n c e m e n t G u i d e
3
D oc u m e n t n u m b e r
Wide Format Solvent Inkjet Printer
IP-7900/7700
U00121262500
Page 2

IP-7900/7700 Wide Format Solvent Inkjet Printer Enhancement Guide
Documents Number U00121262500, First Edition, July 2010
Copyright © 2010 by Seiko I Infotech Inc.
All rights reserved
Seiko I Infotech Inc. reserves the right to make changes without notice to the specications and materials contained herein and shall not be
responsible for any damages (including consequential) caused by reliance on the materials presented, including but not limited to
typographical, arithmetic, or listing errors.
Please address any questions, comments, and suggestions to :
Seiko Instruments GmbH, French branch
20 rue Jean Rostand, 91400 Orsay France
Tel: +33-1-60-19-35-41
Fax: +33-1-60-19-35-17
Seiko Instruments USA Inc., Infotech Division
2060 Wineridge Place, Suite A, Escondido,
CA 92029, USA
Tel : +1-760-781-5200
Fax : +1-760-745-1195
Seiko I Infotech Inc.
8 Nakase 1-chome, Mihama-ku, Chiba-shi, Chiba 261-8507, Japan
Phone : +81 43 211 1363
Fax : +81 43 211 8709
This guide acknowledges the following trademarks :
is a trademark of Seiko Instruments Inc.
All other trademarks are the properties of their respective companies.
This equipment has been tested and found to comply with the limits for a Class A digital device, pursuant to Part 15 of the FCC Rules. These
limits are designed to provide reasonable protection against harmful interference when the equipment is operated in a commercial
environment.
This equipment generates, uses, and can radiate radio frequency energy and, if not installed and used in accordance with the instruction
manual, may cause harmful interference to radio communications. Operation of this equipment in a residential area is likely to cause harmful
interference in which case the user will be required to correct the interference at his own expense.
The CE mark, that shows that the products sold in the EU are conformed to the requirements of EC directive, is statutorily obliged to be
axed to the products.
In each directive, the scope of directive to be applied to equipment is explicitly dened. Our company’s product IP-7900 conforms the EMC
directive (2004/108/EC)) and low voltage directive (2006/95/EC).
Inquiry of CE mark:
Seiko Instruments Europe S.A.
European Head Oce
20 rue Jean Rostand, 91400 Orsay France
Tel: +33-1-60-19-35-41
Fax: +33-1-60-19-35-17
Seiko Instruments USA Inc., Infotech Division
2060 Wineridge Place, Suite A, Escondido,
CA 92029, USA
Tel : +1-760-781-5200
Fax : +1-760-745-1195
Seiko I Infotech Inc.
8 Nakase 1-chome, Mihama-ku, Chiba-shi, Chiba 261-8507, Japan
Phone : +81 43 211 1363
Fax : +81 43 211 8709
Page 3

Introduction
IP-7900/7700 Wide Format Solvent Inkjet Printer (hereafter simply called the Printer.) is equipped with built-in
USB interface that adopts solvent ink and supports media of up to 104-inch width (IP-7700: 74-inch width).
IP-7900/7700 Wide Format Solvent Inkjet Printer “Enhancement Guide” explains the additional improvement and
information to the documents below. So read the “Enhancement Guide” referring to them.
- IP-7900-00/7700-00 Wide Format Solvent Inkjet Printer Basic Operation Guide (U00117679401, May 2010)
- IP-7900/7700 Wide Format Solvent Inkjet Printer Advanced Operation Guide (U00117680501, May 2010)
- IP-7900-02/7700-02 Wide Format Solvent Inkjet Printer Basic Operation Guide (U00120248800, May 2010)
-
IP-7900-02/-03/7700-02/-03 Wide Format Solvent Inkjet Printer Advanced Operation Guide
The Basic Operation Guide describes:
- The Printer’s features and main components
- Information required for the operation
- Basic operations to turn the Printer on and o and to handle the media and ink system
(U00120250100, May 2010)
To operate the Printer safely and properly, before starting the operation be sure to read the following.
- Safety precautions
- Delivery products
- Manual legend (notation rules)
Keep this guide near the Printer so that you can quickly access it at any time.
3
Page 4

4
Manual legend (Notational rules)
The notational rules such as marks, keys, LCD, and LEDs used for explanation in this guide are as follows:
Marks
WARNING
- Boxes marked with a "WARNING" describe points of caution for avoiding serious personal injury.
CAUTION
- Boxes marked with a "CAUTION" describe points of caution for avoiding injury to yourself or damage
to the Printer.
TIP:
- This mark o ers you the information to facilitate
the Printer operation.
Reference mark
This mark is followed by a reference section or page number.
Marginal indication for source document
The marginal indications guide you the document as the information source. Note that the description on the
Enhancement Guide:
- replaces the source document’s description; or
- explains additionally on the source document’s description.
Table of contents
The table of contents contains two types of numbers: ones
parenthesized, and others with a star.
The parenthesized numbers indicate the page numbers to
be referred on the source document, while the starred ones
indicate the page numbers of the
“Enhancement Guide.”
Page 5

IP-7900-00/7700-00 Basic Operation Guide
TABLE OF CONTENTS
Introduction (3)
Safety precautions (7)
General warning and cautions (7)
Handling precautions (9)
Components delivered with this product (12)
Manual legend (Notational rules) (14)
Operating conditions (17)
Introduction (18)
Appearance / Main components and their
functions (18)
Printer rear (supply side) (19)
Printer interior (20)
Operation panel (21)
Maintenance (64)
Daily maintenance (64)
Check the wiper blade for contamination and replenish
wiper cleaning liquid (66)
Clean the capping unit (67)
Replenish spittoon absorber liquid (69)
Check the waste ink bottle (70)
Clean the carriage (70)
Cleaning the madia edge guard (73)
Performing normal cleaning (74)
Print the nozzle print pattern (75)
Cleaning (76)
Clean the exterior (76)
Clean the front cover and front paper guide (76)
Carriage cleaning (76)
After today’s operation (77)
Printer heater unit (21)
Online and o ine (22)
Online (22)
Offline (22)
Supported media (23)
Vinyl (23)
Banner (23)
Mesh banner (23)
Backlit banner (FF) (23)
Solvent printing coated paper (23)
For your basic operation (24)
Precautions to prevent media jams (24)
Basic operation for printing (26)
Printing workflow overview (26)
Procedure to remove media roll from the Printer (
Media at take-up side (44)
Media at supply side (46)
Procedure to remove scroller (scroller flange) from media roll
To print on other media (50)
To print on Vinyl, Mesh banner, Backlit banner (FF), or
Solvent printing coated paper (50)
44)
(48)
When encountering a problem (82)
Check your problem (82)
How to clear media jams (85)
When an error message is displayed (86)
Out of ink while printing (90)
The media was skewed. (91)
Warning messages 9
Move the Printer (93)
Replace a waste ink bottle (94)
Install and replace an ink pack (96)
Replace a spittoon case (98)
Replace a wiper blade (100)
Appendix (102)
Basic speci cations (102)
Consumables (103)
Options (105)
Index (108)
To take up media in LOOSE winding mode (52)
To perform double-sided printing (59)
5
Page 6
6
IP-7900-02/7700-02 Basic Operation Guide
TABLE OF CONTENTS
Introduction (3)
Safety precautions (7)
General warning and cautions (7)
Handling precautions (8)
Components delivered with this product (12)
Manual legend (Notational rules) (14)
Operating conditions (17)
Introduction (18)
Appearance / Main components and their
functions (18)
Printer rear (supply side) (18)
Printer interior (20)
Operation panel (21)
Maintenance (64)
Daily maintenance (64)
Check the wiper blade for contamination and replenish
wiper cleaning liquid (66)
Clean the capping unit (67)
Replenish spittoon absorber liquid (69)
Check the waste ink bottle (70)
Clean the carriage (70)
Cleaning the madia edge guard (73)
Performing normal cleaning (74)
Print the nozzle print pattern (75)
Cleaning (76)
Clean the exterior (76)
Clean the front cover and front paper guide (76)
Carriage cleaning (76)
After today’s operation (77)
Printer heater unit (21)
Online and o ine (22)
Online (22)
Offline (22)
Supported media (23)
Vinyl (23)
Banner (23)
Mesh banner (23)
Backlit banner (FF) (23)
Solvent printing coated paper (23)
For your basic operation (24)
Precautions to prevent media jams (25)
Basic operation for printing (26)
Printing workflow overview (26)
Procedure to remove media roll from the Printer
Media at take-up side (45)
Media at supply side (48)
Procedure to remove scroller flange from media roll (50)
To print on other media (53)
To print on Vinyl, Mesh banner, Backlit banner (FF), or
Solvent printing coated paper (53)
(45)
When encountering a problem (82)
Check your problem (82)
How to clear media jams (85)
When an error message is displayed (86)
Out of ink while printing (90)
The media was skewed. (91)
Warning messages 10
Move the Printer (93)
Replace a waste ink bottle (94)
Install and replace an ink pack (96)
Replace a spittoon case (98)
Replace a wiper blade (100)
Appendix (102)
Basic speci cations (102)
Consumables (103)
Options (105)
Index (108)
To take up media in LOOSE winding mode (54)
To perform double-sided printing (60)
Page 7

IP-7900/7700 Advanced Operation Guide
TABLE OF CONTENTS
The media is curled or wrinkled. (47)
White stripes appear on the print. (48)
Edges of objects are blurred. (53)
Introduction (3)
Manual legend (Notational rules) (7)
To assist your Printer in operating effectively
(8)
Turn the Printer o (8)
Service cleaning (9)
Head wash (14)
Charging the ink system after head wash (19)
Check the Printer status (22)
Check the remaining ink level (22)
Check remaining media length (23)
Print reports on the Printer status. (23)
Check the USB connection status (24)
Check the firmware version on your Printer (25)
Check the total print distance (25)
A vertical barding appears at the print's edge. (54)
Different bandings appear on the print’s right and left. (55)
Clear missing dots (nozzle clogging) (56)
Strong cleaning (56)
Fill the cap with ink (57)
Fill the cap with wiper cleaning liquid (58)
Switch between 4-color mode and 8-color mode
Adjust the heaters’ temperature (68)
Procedure to set the heater temperature (68)
Display the heater control menu. (69)
Key operation in the heater control menu (69)
Finish displaying the heater control menu (69)
Set the heater preset temperature (70)
Select the standby time (71)
Smart pass technology 14
(60)
Handle the media (26)
Create a new media preset (26)
Select a preset media (28)
Minimize the right and left margins (28)
Solve media sticking problem (30)
Solve media lifting up problem (30)
Print on a thick media (31)
Change the automatic cleaning timing 11
Copy a preset media type to create a new one (33)
Feed or rewind media (34)
Move a print start position (nest function) (36)
Print on a cut-sheet media (37)
Solve skew in LOOSE winding mode 13
To change the Printer’s basic settings (40)
Turn the audio warning beep off (40)
Update the system firmware (41)
Cleaning options (42)
Perform cleaning only for the specified print head (42)
Adjust and calibrate the Printer (74)
Before adjustment and calibration (74)
Procedure to set the smart pass technology [#IMAGE
IMPROVE.] to off (74)
Procedures (75)
Adjusting media advance compensation 16
Adjust print head position (78)
Adjust the nozzle positions at print head’s right and left (80)
Adjust bidirectional print positions (82)
Asjust the edge sensor position (87)
Adjust the print linkage after the automatic cleaning (Adjust
the media back feed) (89)
Menu tree 22
Index (98)
Manage the media advance compensation (44)
Change media advance compensation (44)
Manage print modes (45)
Troubleshoot print quality issues (46)
The print is light. (46)
Missing dots are found at the beginning of printing. (46)
7
Page 8

8
IP-7900-02/7700-02 Advanced Operation Guide
TABLE OF CONTENTS
The media is curled or wrinkled. (47)
White stripes appear on the print. (48)
Edges of objects are blurred. (53)
Introduction (3)
Manual legend (Notational rules) (7)
To assist your Printer in operating effectively
(8)
Turn the Printer o (8)
Service cleaning (9)
Head wash (14)
Charging the ink system after head wash (19)
Check the Printer status (22)
Check the remaining ink level (22)
Check remaining media length (23)
Print reports on the Printer status. (23)
Check the USB connection status (24)
Check the firmware version on your Printer (25)
Check the total print distance (25)
Handle the media (26)
Create a new media preset (26)
Select a preset media (28)
A vertical barding appears at the print's edge. (54)
Different bandings appear on the print’s right and left. (55)
Clear missing dots (nozzle clogging) (56)
Strong cleaning (56)
Fill the cap with ink (57)
Fill the cap with wiper cleaning liquid (58)
Switch between 4-color mode and 8-color
mode (60)
Adjust the heaters’ temperature (68)
Procedure to set the heater temperature (68)
Display the heater control menu. (69)
Key operation in the heater control menu (69)
Finish displaying the heater control menu (69)
Set the heater preset temperature (70)
Select the standby time (71)
Smart pass technology 14
Adjust and calibrate the Printer (74)
Minimize the right and left margins (28)
Solve media sticking problem (30)
Solve media lifting up problem (30)
Print on a thick media (31)
Change the automatic cleaning timing 11
Copy a preset media type to create a new one (33)
Feed or rewind media (34)
Move a print start position (nest function) (36)
Print on a cut-sheet media (37)
Solve skew in LOOSE winding mode 13
To change the Printer’s basic settings (40)
Turn the audio warning beep off (40)
Update the system firmware (41)
Cleaning options (42)
Perform cleaning only for the specified print head (42)
Manage the media advance compensation (44)
Change media advance compensation (44)
Before adjustment and calibration (74)
Procedure to set the smart pass technology [#IMAGE
IMPROVE.] to off (74)
Procedures (75)
Adjusting media advance compensation 16
Adjust print head position (78)
Adjust the nozzle positions at print head’s right and left (80)
Adjust bidirectional print positions (82)
Asjust the edge sensor position (87)
Adjust the print linkage after the automatic cleaning (Adjust
the media back feed) (89)
Menu tree 22
Index (98)
Manage print modes (45)
Troubleshoot print quality issues (46)
The print is light. (46)
Missing dots are found at the beginning of printing. (46)
Page 9

IP-7900-00/7700-00 Basic Operation Guide
Replaces the source document’s description
Warning messages
After the online printing, occasionally you may see one of the following messages appear on the operation panel
display with the ERROR LED ashing , which are warning messages. If so, follow the advice in the
Recommendation column.
P E R F O R M DA I L Y
M A I N T E NA NC E N O W
S E R V I C E NE E D E D
C A L L S ER VI C E
L O A D I NK P A C K
C H A R G E I NK
P E R F O R M
P H R E C OV ER Y N O W
Indication The daily maintenance (cap cleaning) is not performed.
Recommendation You are recommended to perform the daily maintenance. See
“ Daily maintenance ” on the page 64 .
Indication The supply tube pump assembly needs to be replaced.
Recommendation You are recommended to ask your service representative to
replace it.
Indication After the subcartridge’s initial ink charge to the ink system, the ink
tray has not yet started the ink supply to the ink system.
Recommendation Set the ink packs to the ink box’s slots, and perform
[#INK SUPPLY].
Indication Automatic cleaning is set to OFF, and the cleaning has not been
performed for a prescribed period.
Recommendation You are recommended to perform the print head cleaning. See
“ Performing normal cleaning ” on the page 76 .
The Ink LED blinks:
Indication Ink is running out.
Recommendation Prepare a new ink pack. See “ Install and replace an ink pack ” on
the page 96 .
9
Page 10
10
IP-7900-02/7700-02 Basic Operation Guide
Replaces the source document’s description
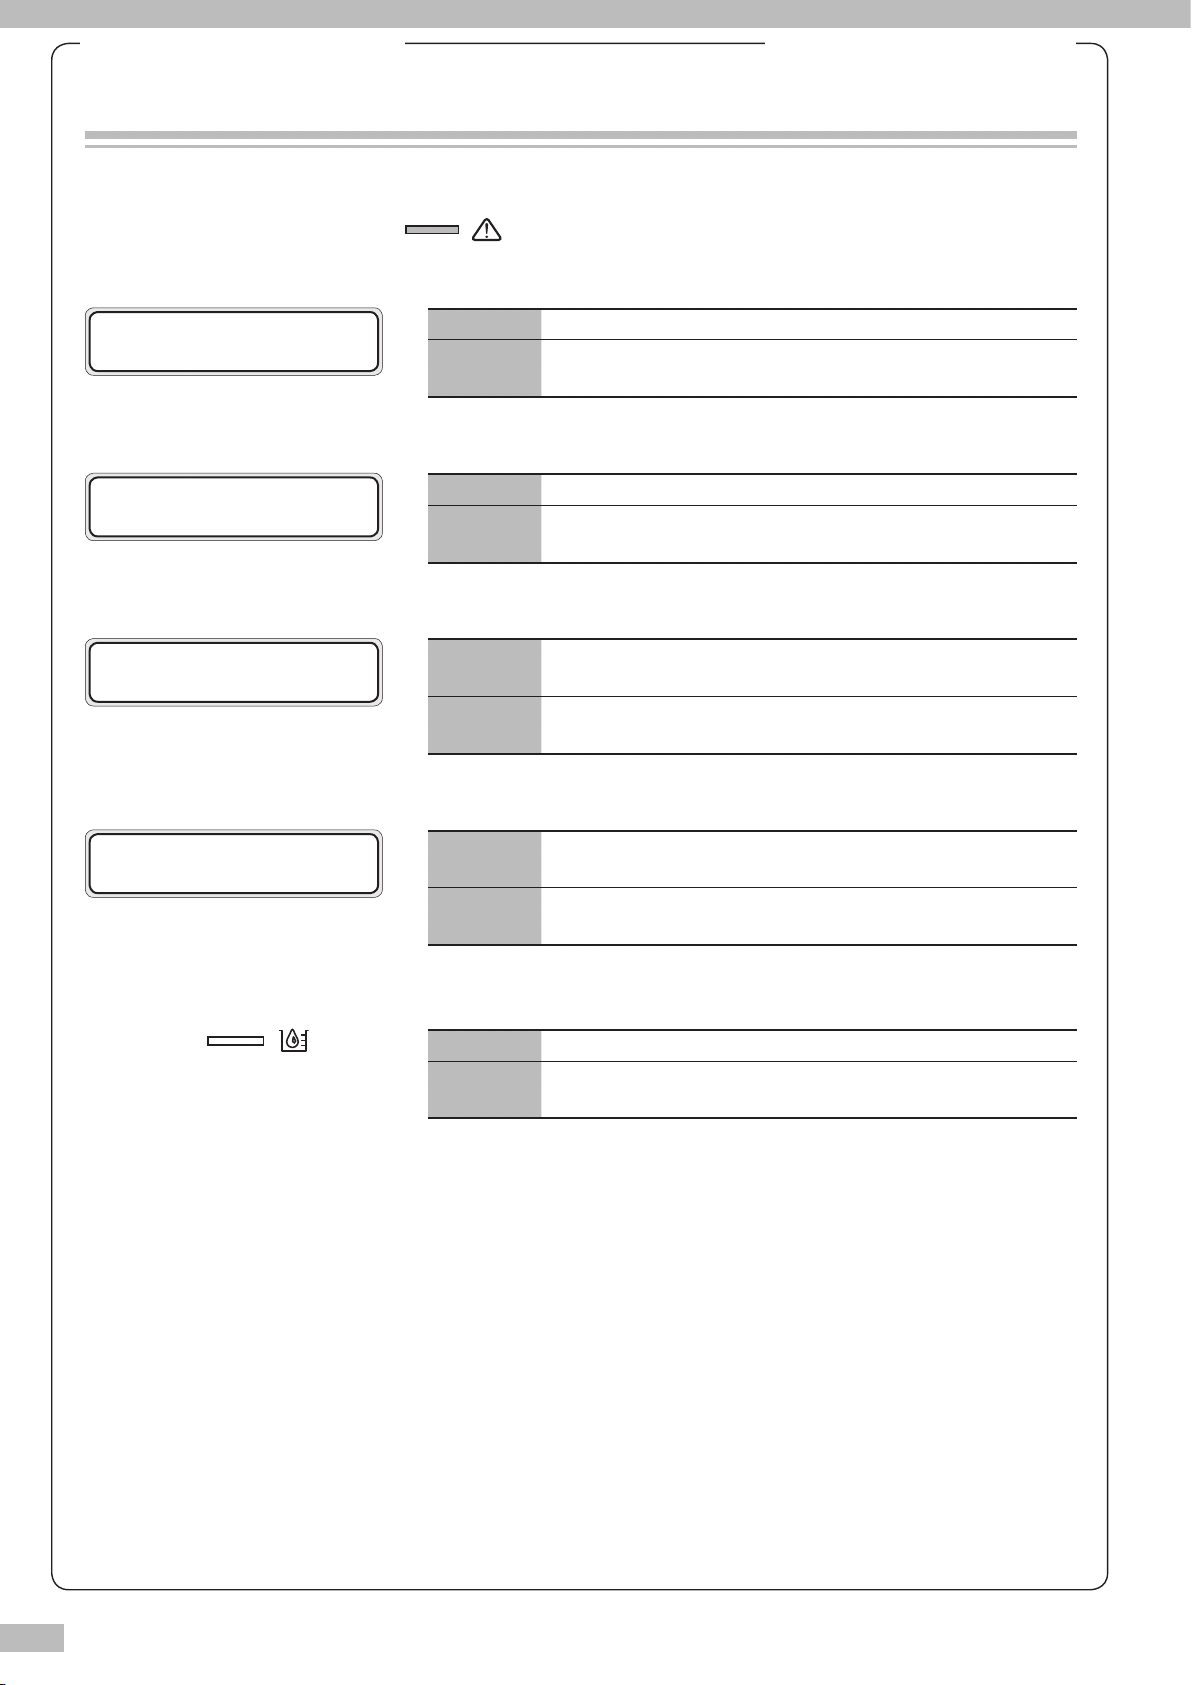
Warning messages
After the online printing, occasionally you may see one of the following messages appear on the operation panel
display with the ERROR LED ashing , which are warning messages. If so, follow the advice in the
Recommendation column.
P E R F O R M DA I L Y
M A I N T E NA NC E N O W
S E R V I C E NE E D E D
C A L L S ER VI C E
L O A D I NK P A C K
C H A R G E I NK
P E R F O R M
P H R E C OV ER Y N O W
Indication The daily maintenance (cap cleaning) is not performed.
Recommendation You are recommended to perform the daily maintenance. See
“ Daily maintenance ” on the page 64 .
Indication The supply tube pump assembly needs to be replaced.
Recommendation You are recommended to ask your service representative to
replace it.
Indication After the subcartridge’s initial ink charge to the ink system, the ink
tray has not yet started the ink supply to the ink system.
Recommendation Set the ink packs to the ink box’s slots, and perform
[#INK SUPPLY].
Indication Automatic cleaning is set to OFF, and the cleaning has not been
performed for a prescribed period.
Recommendation You are recommended to perform the print head cleaning. See
“ Performing normal cleaning ” on the page 74 .
The Ink LED blinks:
Indication Ink is running out.
Recommendation Prepare a new ink pack. See “ Install and replace an ink pack ” on
the page 96 .
Page 11
IP-7900/7700 or IP-7900-02/7700-02 Advanced Operation Guide
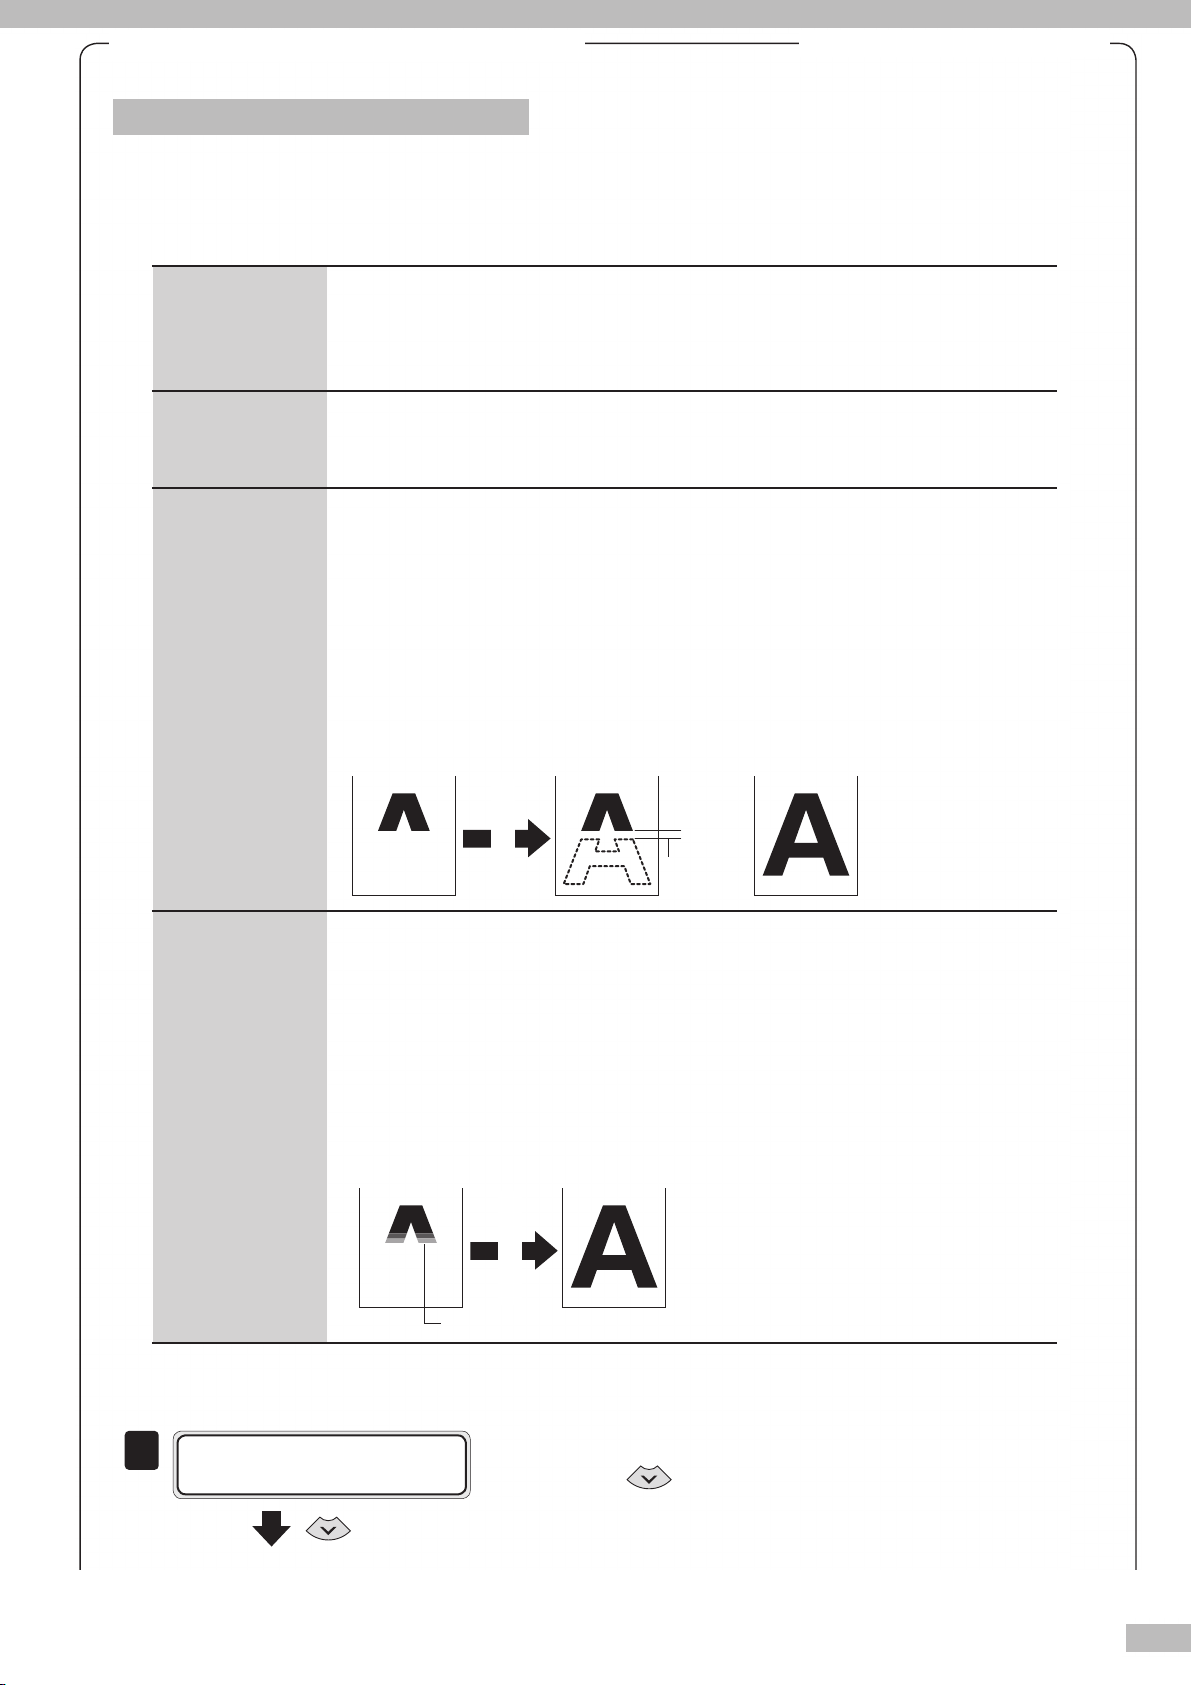
Based on the past print operation history, the Printer performs the automatic cleaning:
- On starting and completing the print operation; and
- During the print operation
When the Printer performs the cleaning during the print operation, the cleaning is started only
after completing the current band’ s print.
This mode is recommended when printing on the media subject to the heater temperature, for
example, on Vinyl.
After the cleaning, the Printer starts the rest of the interrupted print job.
Some media shows misalignment at the linkage of the prints before and after the cleaning. In such
a case, START & END or DURING PRINT2 is recommended.
Based on the past print operation history, the Printer performs the automatic cleaning on starting
and completing the print operation.
Note that the automatic cleaning is not performed during the print operation.
Based on the past print operation history, the Printer performs the automatic cleaning:
- On starting and completing the print operation; and
- During the print operation
When the Printer performs the cleaning during the print operation, the cleaning is started by
suspending the current band’ s print.
This mode is recommended when printing on the media less subjected to the heater temperature,
for example, on Banner.
After the cleaning, the Printer starts the rest of the interrupted print job.
This mode shows less misalignment at the linkage than the DURING PRINT. However, the hue after
the cleaning may be dierent from the one before the cleaning.
START & END
DURING PRINT
DURING PRINT2
Current print band
On starting and completing the printer operation, the Printer does not perform the automatic
cleaning, but only after filling the cap with ink (fillcap) the Printer performs it.
Note that the Printer never performs the automatic cleaning for ensuring the print heads’ good
condition. So, at a nozzle clogging, manually perform the normal cleaning.
OFF
Correct with
the BACK
ADJUST VAL.
Cleaning
Cleaning
1
Replaces the source document’s description
Change the automatic cleaning timing
To ensure the print heads’ proper condition, the Printer performs the automatic cleaning. The cleaning mode
can be speci ed depending on the preset media. Select the DURING PRINT or DURING PRINT2 depending on the
media characteristics.
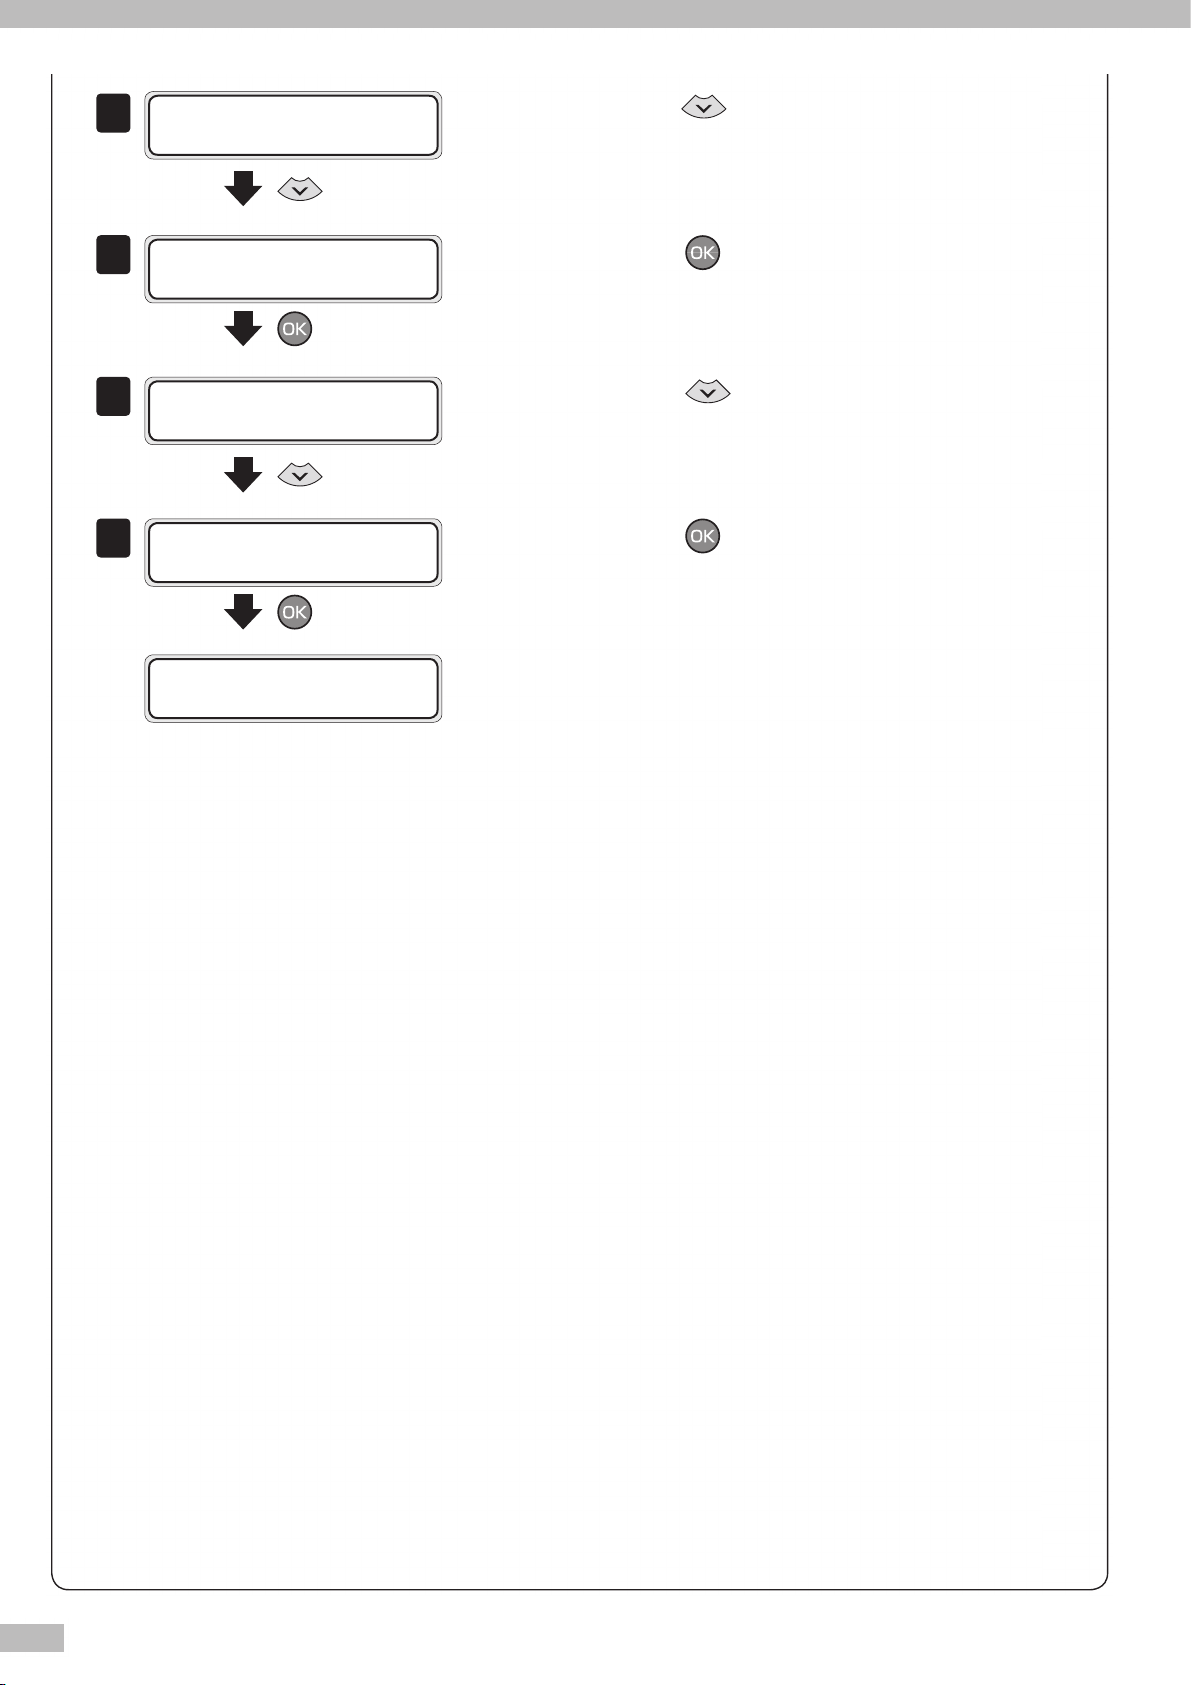
The procedure to change the automatic cleaning timing is explained as follows, taking the procedure to select
the automatic cleaning DURING PRINT for the preset media 1 as example.
I N K M E D I A RE G
M E D I A M .A D V
Set the Printer to o ine state and press the
key.
11
Page 12
12
2
# S E L E C T ME D I A
3
4
5
> 0 1 : P A PE R
With the key, scroll to [#PH CLEANING].
✻
• • •
# P H C L EA NI N G
> 0 1 : S T AR T& E N D
# P H C L EA NI N G
0 1 : S T A RT &E N D
✻
# P H C L EA NI N G
0 1 : D U R IN G P R I N T
✻
# P H C L EA NI N G
> 0 1 : D U RI NG P R I N T
Press the key.
Press the key.
Press the key.
Page 13
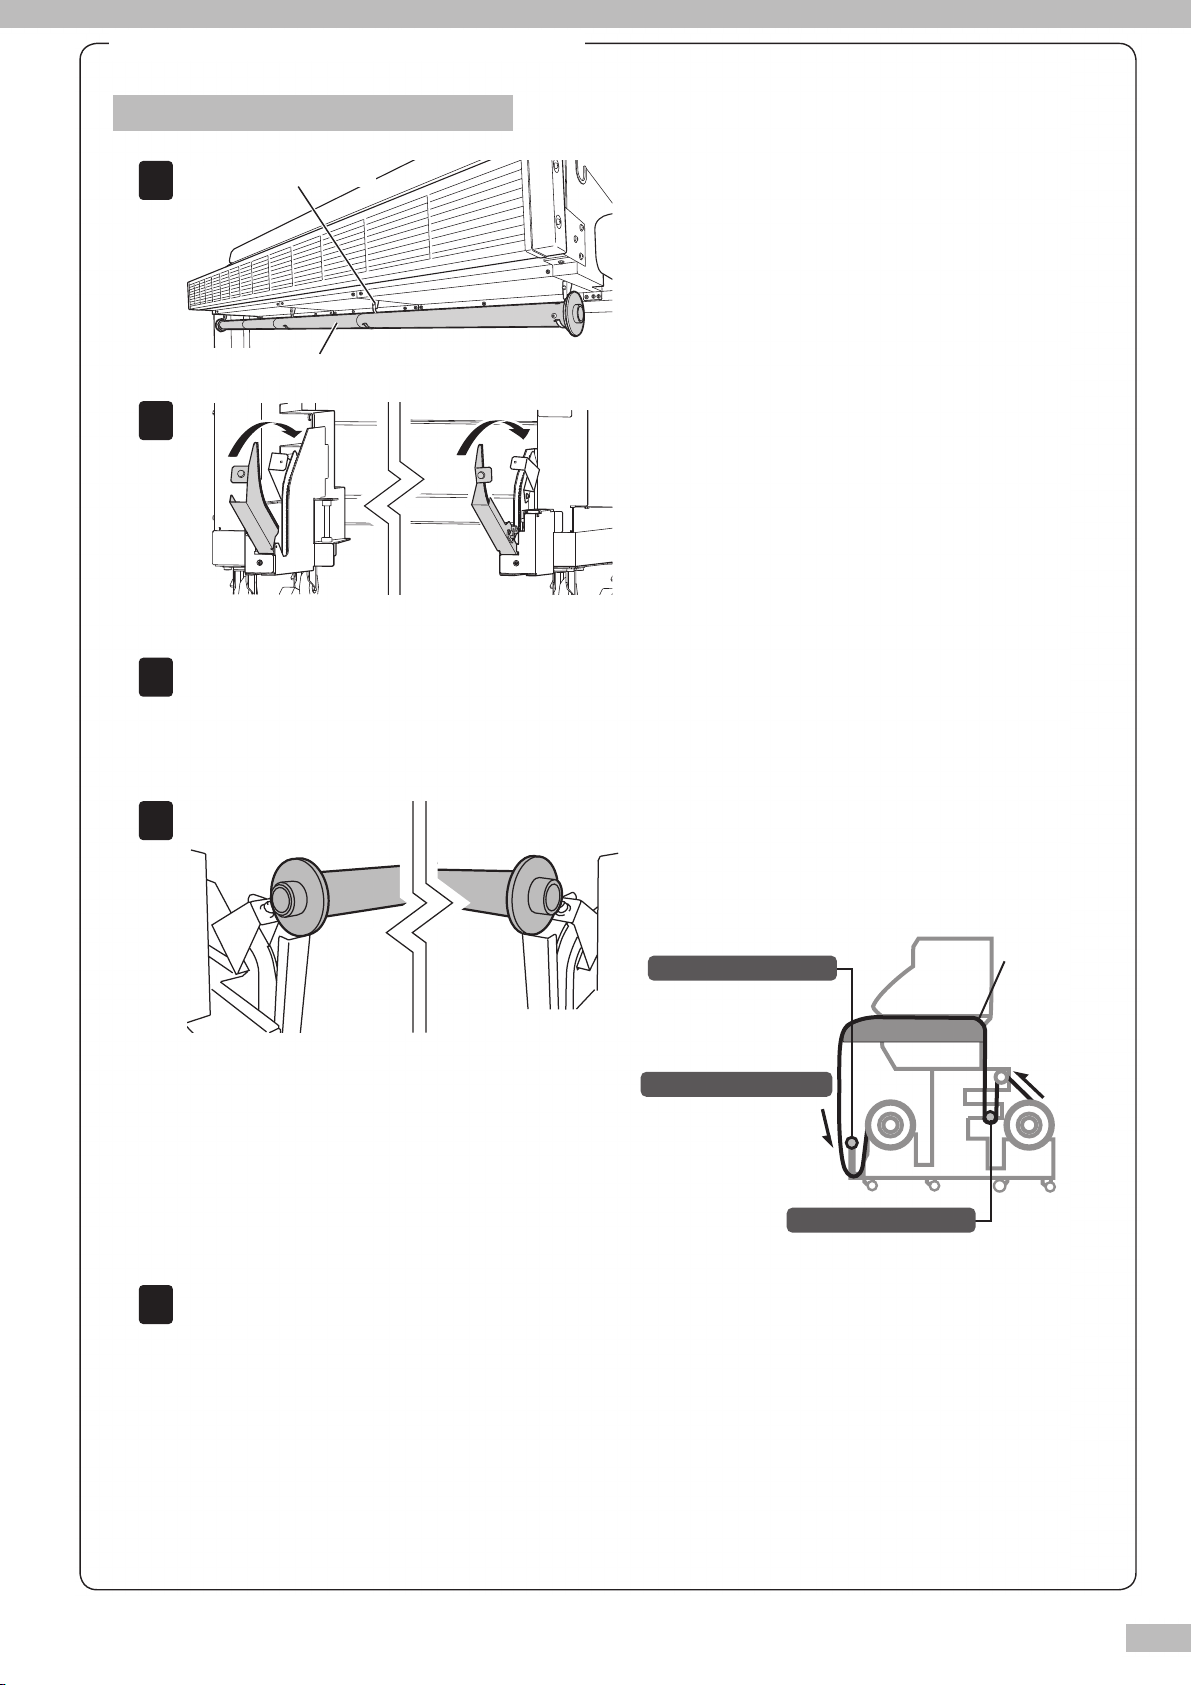
IP-7900/7700 or IP-7900-02/7700-02 Advanced Operation Guide
1
2
3
4
LOOSE winding mode
Supply-side tension bar
Tension bar with gear
Media
5
Solve skew in LOOSE winding mode
Tension bar hook
Hook the tension bar to the tension bar hook
beforehand.
Tension bar
Close the tension bar guide’s cover.
Close the cover, and x the cover by fastening the knob
screw.
Load the media on the Printer.
For the procedure, see the Basic Operation Guide "To take up media in LOOSE winding mode ."
Input the data in the software RIP.
Place the tension bar with gear on the closed
tension bar guide.
Place the tension bar carefully to prevent the tension
bar with gear from being dropped.
13
Page 14
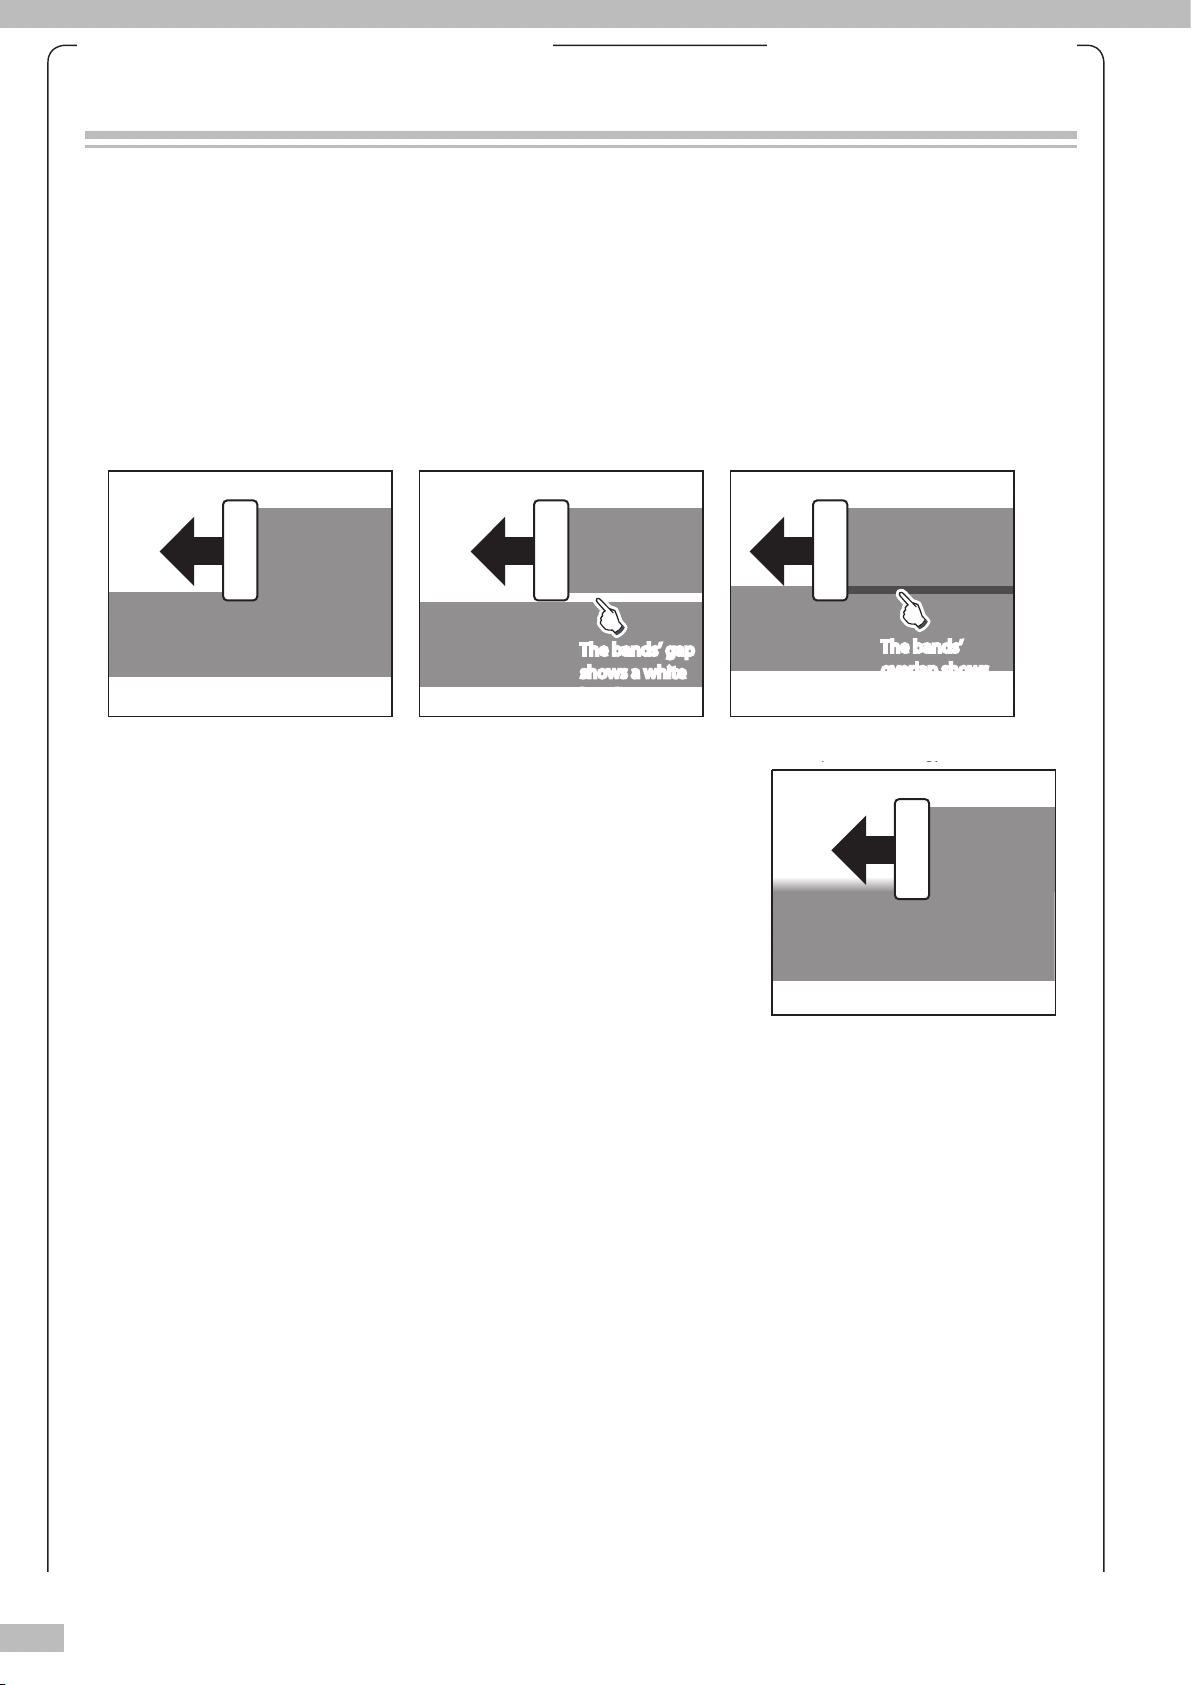
14
IP-7900/7700 or IP-7900-02/7700-02 Advanced Operation Guide
A band of print
A band of print
A band of print
A band of print
Print head Print head
A band of print
A band of print
Print head
Correct media advance
White banding at incorrect media advance
The bands’ gap
shows a white
banding.
The bands’ gap
shows a white
banding.
The bands’
overlap shows
a black banding.
The bands’
overlap shows
a black banding.
Black banding at incorrect media advance
A band of print
Print head
Smart pass technology: ON
Replaces the source document’s description
Smart pass technology
With inkjet printers, a horizontal banding may appear between the bands, which are the areas printed by one
scan. This symptom is called as banding.
The banding is caused mainly by setting the media advance compensation improperly. With the proper
compensation, the bands are linked without gap. However, with the larger compensation the bands are linked
with gaps, showing white lines, while with the smaller one the bands overlap, showing black lines.
The banding is also caused in the following cases.
- The ink dries so slowly.
- The media advance changes considerably depending on the print head scan.
The Smart Pass Technology is the function to reduce this banding problem.
With the Printer’s operation menu, this function is available by selecting
the LOW, MEDIUM, HIGH, FINE GRAIN, or HIGH, LESS SPRAY at "#IMAGE
IMPROVE" of MEDIA REG MENU.
With Smart Pass Technology, the bands are printed with overlapping
even when the media advance compensation is proper. In the LOW, the
overlapping part is processed with the SIIT’s unique algorithm so that the
part is not notable where the di erence between the overlapping part and
the rest are minimized.
The modes MEDIUM, HIGH, FINE GRAIN, and HIGH, LESS SPRAY enlarged
the overlapping parts and added the function to reduce the color density irregularities and white lines. This
function allows the print performance with higher quality and more stabilization than the previous ones.
NOTE
(1) In the LOW, with some print data, the overlapping part is light or blurred. Select the MEDIUM, HIGH, FINE GRAIN, or HIGH, LESS
SPRAY to reduce this symptom.
(2) In the HIGH, LESS SPRAY, the carriage speed is low.
Page 15
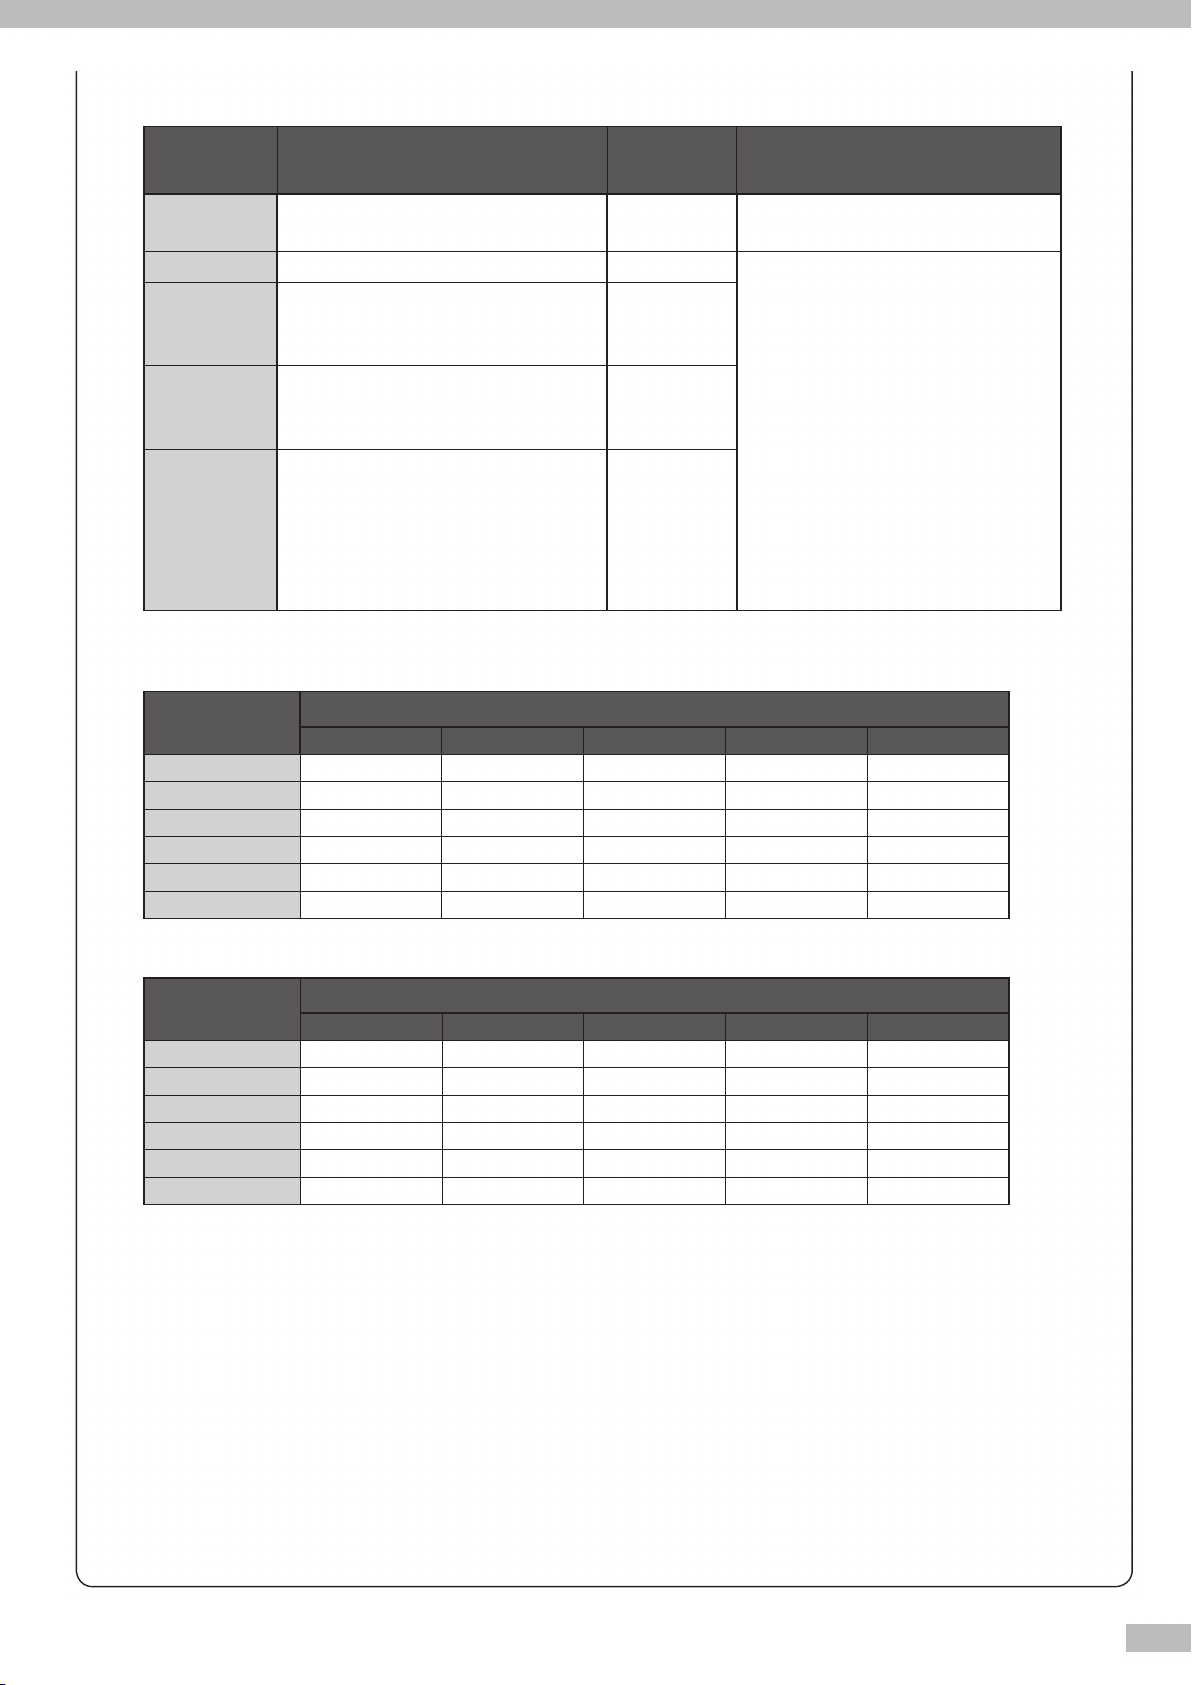
IMAGE IMPROVE Description
OFF
LOW
MEDIUM
Banding is not reduced. None* Even with the accurate media advance,
Banding is reduced. Small Even if the media advance is not
Banding is reduced. Select this mode if
the image quality is not improved with
LOW
HIGH, FINE GRAIN
the
Banding is reduced. Select this mode if
.
the image quality is not improved with
LOW
HIGH, LESS SPRAY
the
Banding is reduced. Select this mode to
and
improve the problems below:
- Bleeding is found; or
- The image edge is not sharpened. As a
result, the image is soft-focused.
* Set the value accurately.
IP-7900
Print mode
DRAFT1 50m2/h (100m2/h) 46m2/h (93m2/h) 39m2/h (78m2/h) 28m2/h (56m2/h) *3 (*3)
FINE DRAFT1 39m2/h (78m2/h) 36m2/h (72m2/h) 24m2/h (56m2/h) 18m2/h (36m2/h) *3 (*3)
NORMAL1 30m2/h (60m2/h) 27m2/h (55m2/h) 19m2/h (38m2/h) 13m2/h (26m2/h) 13m2/h (26m2/h)
NORMAL2 20m2/h (40m2/h) 19m2/h (37m2/h) 13m2/h (30m2/h) 10m2/h (20m2/h) 10m2/h (20m2/h)
QUALITY 13m2/h (26m2/h) 12m2/h (24m2/h) 8m2/h (16m2/h) 7m2/h (14m2/h) 7m2/h (14m2/h)
DENSITY2 13m2/h (26m2/h) 12m2/h (24m2/h) 8m2/h (16m2/h) 7m2/h (14m2/h) 7m2/h (14m2/h)
OFF LOW MEDIUM HIGH, FINE GRAIN HIGH, LESS SPRAY
MEDIUM
Tolerance for
media advance
misalignment
Remark
the slippery media may show banding.
Medium
accurately correct, the modes LOW,
MEDIUM, HIGH, FINE GRAIN, and HIGH,
LESS SPRAY show the banding-free
Large
.
Small
printout. The modes also reduce the
slight variation even with the slippery
media.
However, note that the printout
is defective if the media advance
misalignment exceeds the tolerance.
So, to some extent, adjust the media
advance compensation.
IMAGE IMPROVE
*1
IP-7700
Print mode
DRAFT1 50m2/h (100m2/h) 46m2/h (93m2/h) 34m2/h (68m2/h) 25m2/h (50m2/h) *3 (*3)
FINE DRAFT1 36m2/h (72m2/h) 33m2/h (67m2/h) 22m2/h (50m2/h) 16m2/h (32m2/h) *3 (*3)
NORMAL1 27m2/h (54m2/h) 25m2/h (50m2/h) 16m2/h (32m2/h) 12m2/h (24m2/h) 12m2/h (24m2/h)
NORMAL2 18m2/h (36m2/h) 16m2/h (33m2/h) 12m2/h (26m2/h) 8m2/h (16m2/h) 8m2/h (16m2/h)
QUALITY 12m2/h (24m2/h) 11m2/h (22m2/h) 7m2/h (14m2/h) 5m2/h (10m2/h) 5m2/h (10m2/h)
DENSITY2 12m2/h (24m2/h) 11m2/h (22m2/h) 7m2/h (14m2/h) 5m2/h (10m2/h) 5m2/h (10m2/h)
*1
The print speeds above are listed on the condition below:
- The Printer prints on the 2642mm (104 inches) roll media from its leftmost position to the rightmost position at 8-color print mode.
- The print speeds in brackets were measured on the same condition with 8-color print mode switched to 4-color print mode.
Currently, the 4-color print speeds with the modes MEDIUM, and HIGH, FINE GRAIN are under development.
*2
The print speeds above are listed on the condition below:
- The Printer prints on the 1900mm (74 inches) roll media from its leftmost position to the rightmost position at 8-color print mode.
- The print speeds in brackets were measured on the same condition with 8-color print mode switched to 4-color print mode.
Currently, the 4-color print speeds with the modes MEDIUM, and HIGH, FINE GRAIN are under development.
*3
With DRAFT1 or FINE DRAFT1 selected, the HIGH, LESS SPRAY is not supported .
When the HIGH, LESS SPRAY is selected, the Printer identi es it as the HIGH, FINE GRAIN.
OFF LOW MEDIUM HIGH, FINE GRAIN HIGH, LESS SPRAY
IMAGE IMPROVE
*2
15
Page 16
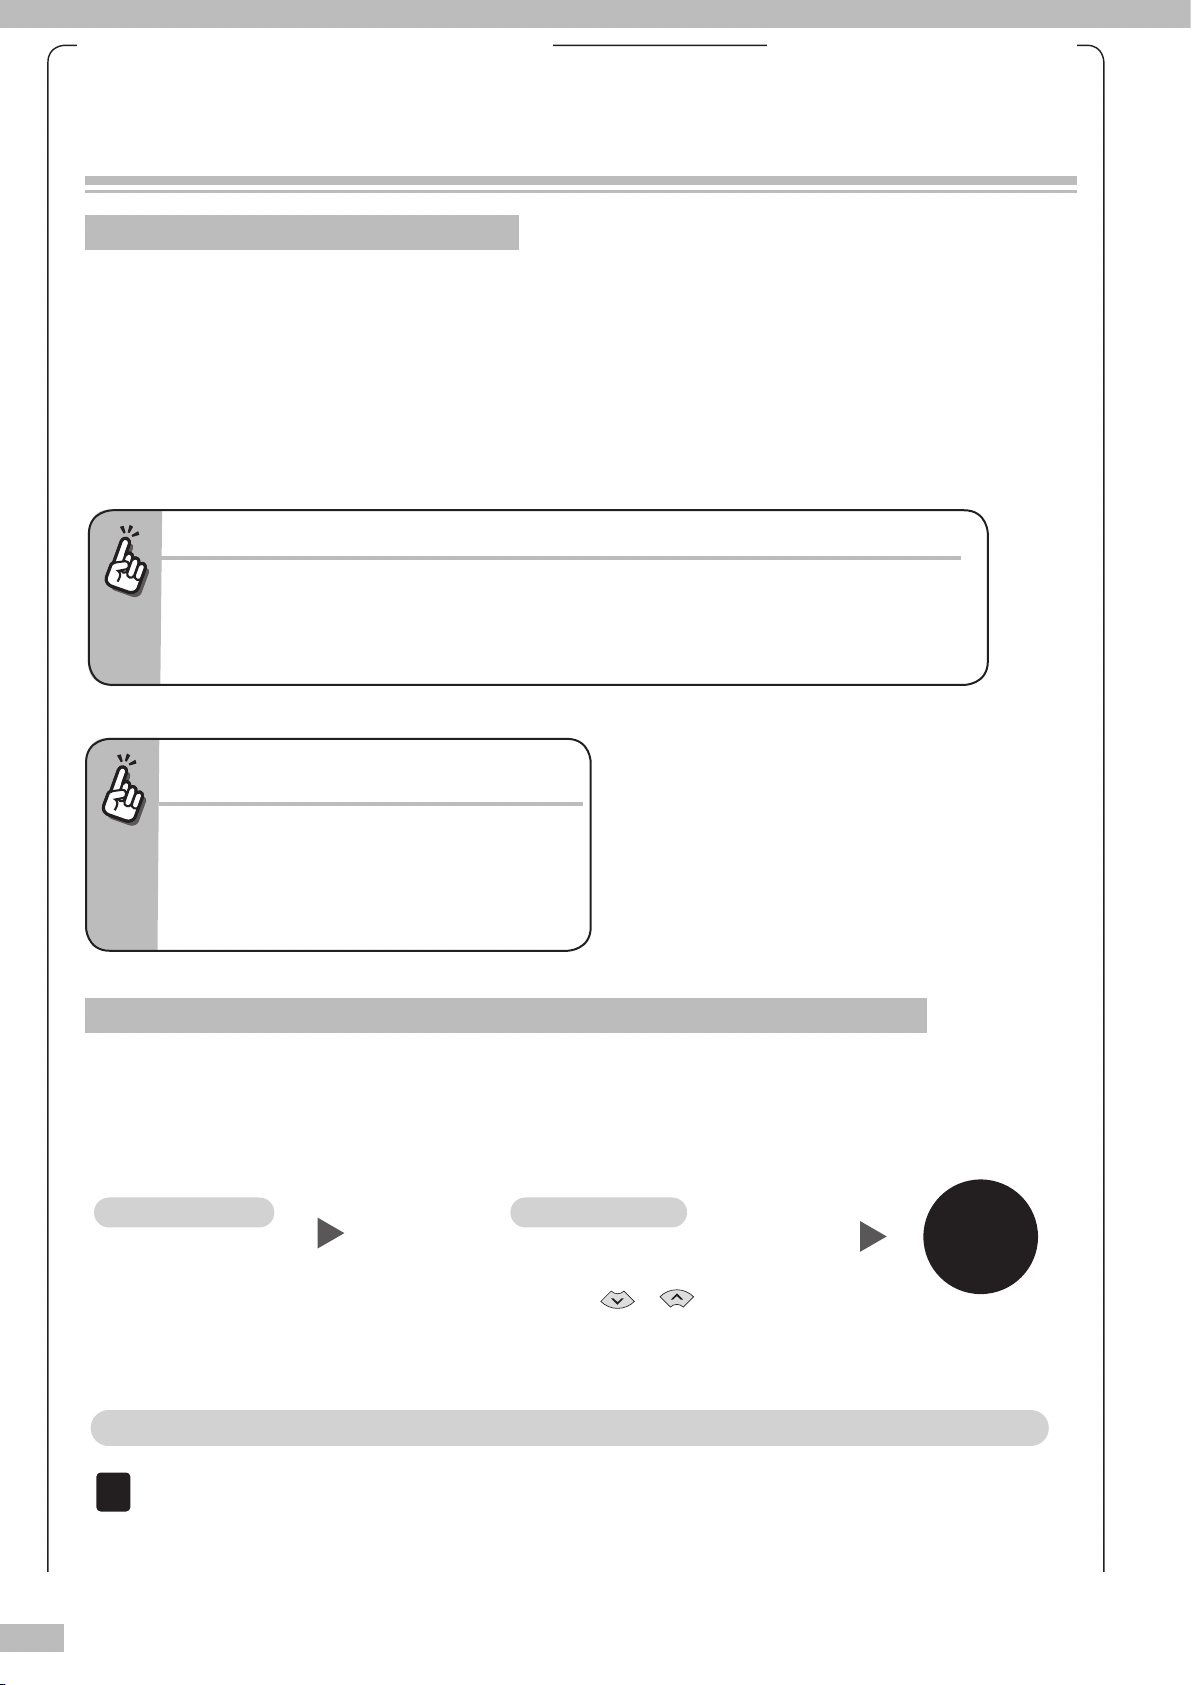
16
IP-7900/7700 or IP-7900-02/7700-02 Advanced Operation Guide
Step1 Step2
Print [SIMPLE]
adjustment pattern.
While the Printer prints the media advance adjustment
pattern, adjust the media advance adjustment value
by pressing the or key.
Completed
1
Replaces the source document’s description
Procedures
Adjusting media advance compensation
Compensate the media advance adjustment value with:
- [SIMPLE] media advance adjustment pattern; or
- [ROUGH] and [DETAIL] media advance adjustment pattern
The [SIMPLE] media advance adjustment pattern relatively reduces the media amount required to print the
adjustment pattern, while [ROUGH] and [DETAIL] media advance adjustment patterns assist you to compensate
the media advance adjustment value more accurately.
If you intend to change the media advance compensation during the print, see the procedure on the page
With the Smart Pass Technology…
- Select [SIMPLE] so that you can change the media advance compensationwhile the Printer prints the
media advance adjustment pattern in the mode set at "#IMAGE IMPROVE" of MEDIA REG MENU.
With [ROUGH] and [DETAIL] media advance adjustment pattern, the Printer always prints the media
advance adjustment pattern in the OFF mode of "#IMAGE IMPROVE."
44
.
The factors that change the media advance
compensations are as follows.
- Change the print mode
- Change the pressure with the pressure control know.
- Print with/without the take-up reel unit
- Change the media type
- Change the media advance path
Compensate the media advance with SIMPLE media advance adjustment pattern
To compensate the media advance, determine the adjustment value with the SIMPLE media advance adjustment
pattern. The length of one SIMPLE media advance adjustment pattern is 2-5mm depending on the print mode.
■ Work ow
■ Procedure
STEP 1 Print [SIMPLE] adjustment pattern
Set media longer than 4 m.
Load the media on the same condition as for the
actual printing
Page 17
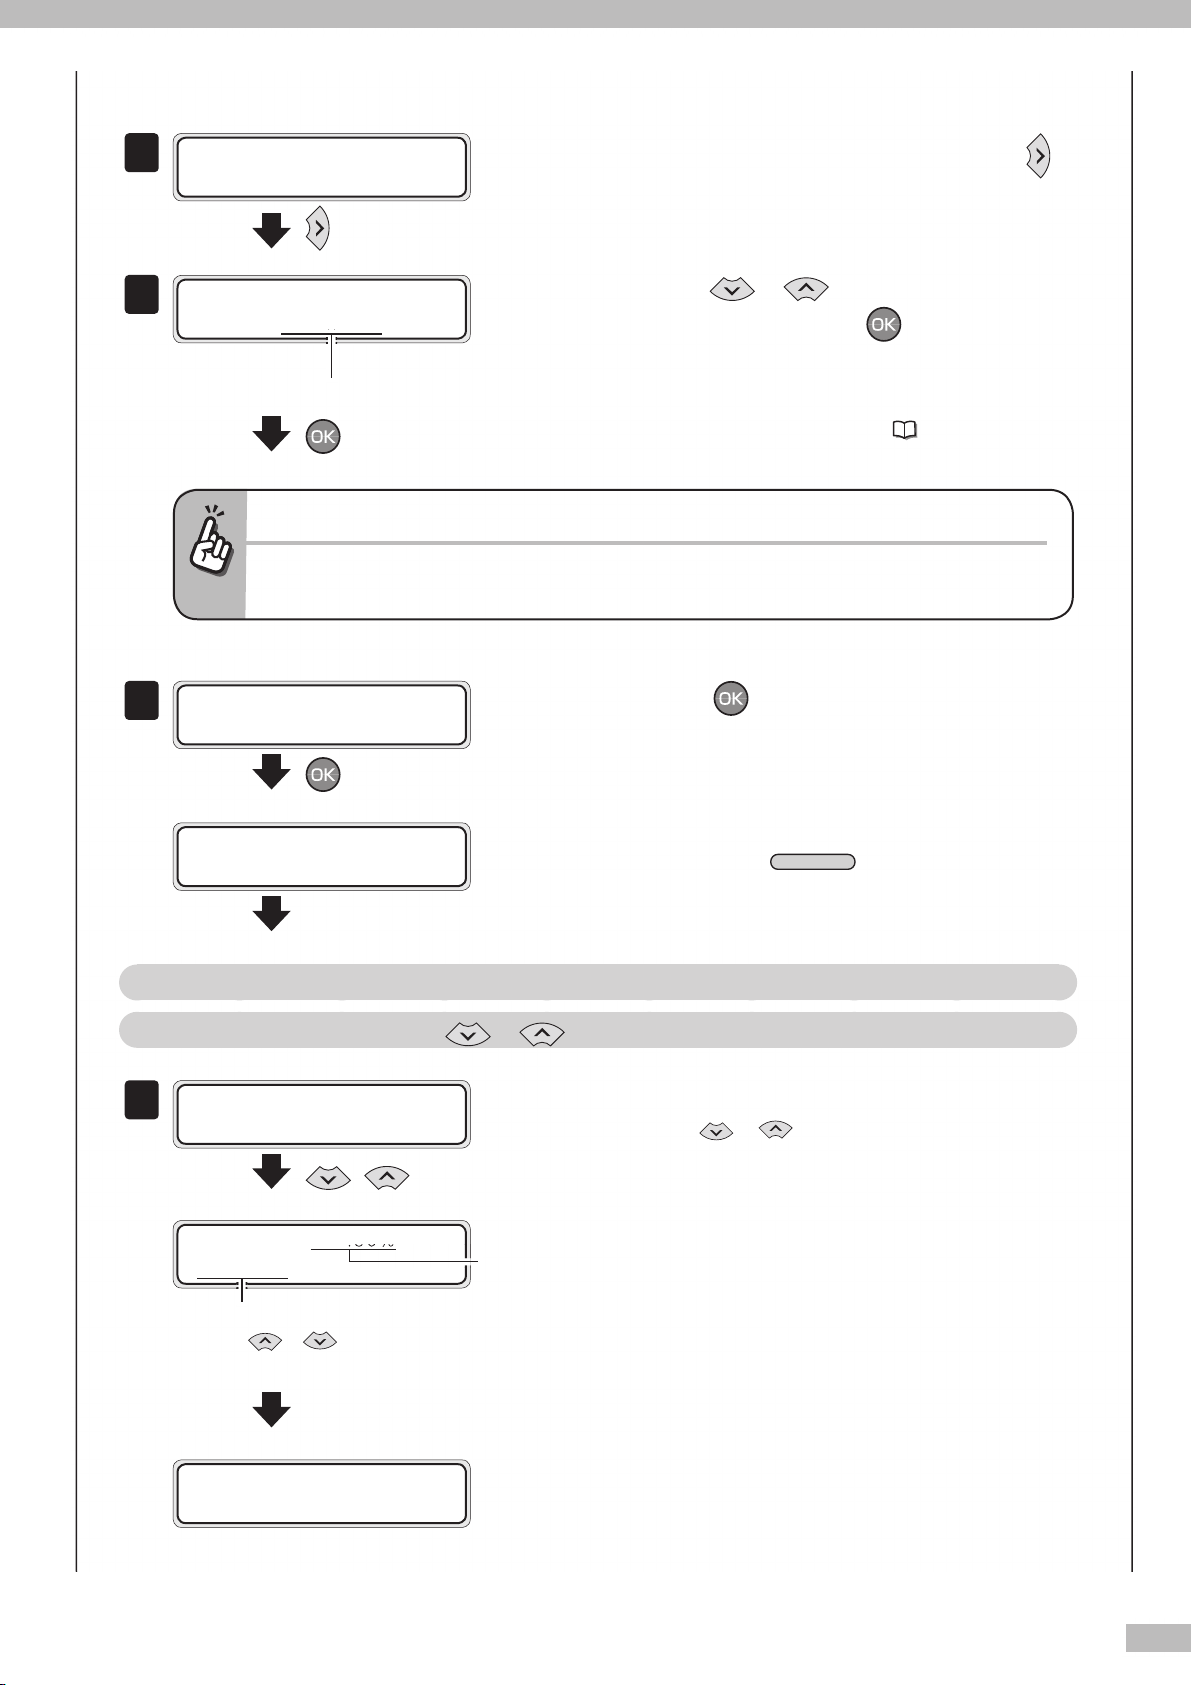
2
I N K M E D I A RE G
3
4
CA N CE L
1
M E D I A M .A D V
Set the Printer to o ine state and press the
key.
# M E D IA A DV P R IN T
> S I M P L E( NO R M A L 1 )
Print mode
If the print mode, [DENSITY2] is selected...
- To obtain the media advance compensation in DENSITY2 mode, apply the media advance adjustment
patterns, SIMPLE(QUALITY).
# M E D I A A DV P R I N T
O K ?
✻
# M E D I A A DV P R I N T
E X E C U T IN G
✻
With the or key, select [SIMPLE]
print mode, and press the key.
Select the print mode to be used normally for the
media to set the media advance compensation.
For details of print mode, refer to
Press the key.
Then the media advance adjustment pattern [SIMPLE]
is printed in the selected print mode.
To cancel printing of media advance adjustment
pattern, press the
key.
P. 45 .
STEP 2 While the Printer prints the media advance adjustment pattern, adjust the media advance
adjustment value by pressing the or key.
# M E D I A A DV P R I N T
E X E C U T IN G
✻
,
Adjusting media advance compensation
With the or key, change the media advance
compensation.
M E D I A AD V: 0 9 9 . 8 0%
0 9 9 . 8 0 %
✻
The value is incremented or decremented by 0.01%
with the or key.
The value at
the start of
printing
# M E D I A A DV P R I N T
E X E C U T IN G
✻
When no key is operated for three seconds, the display
returns to the original one.
17
Page 18
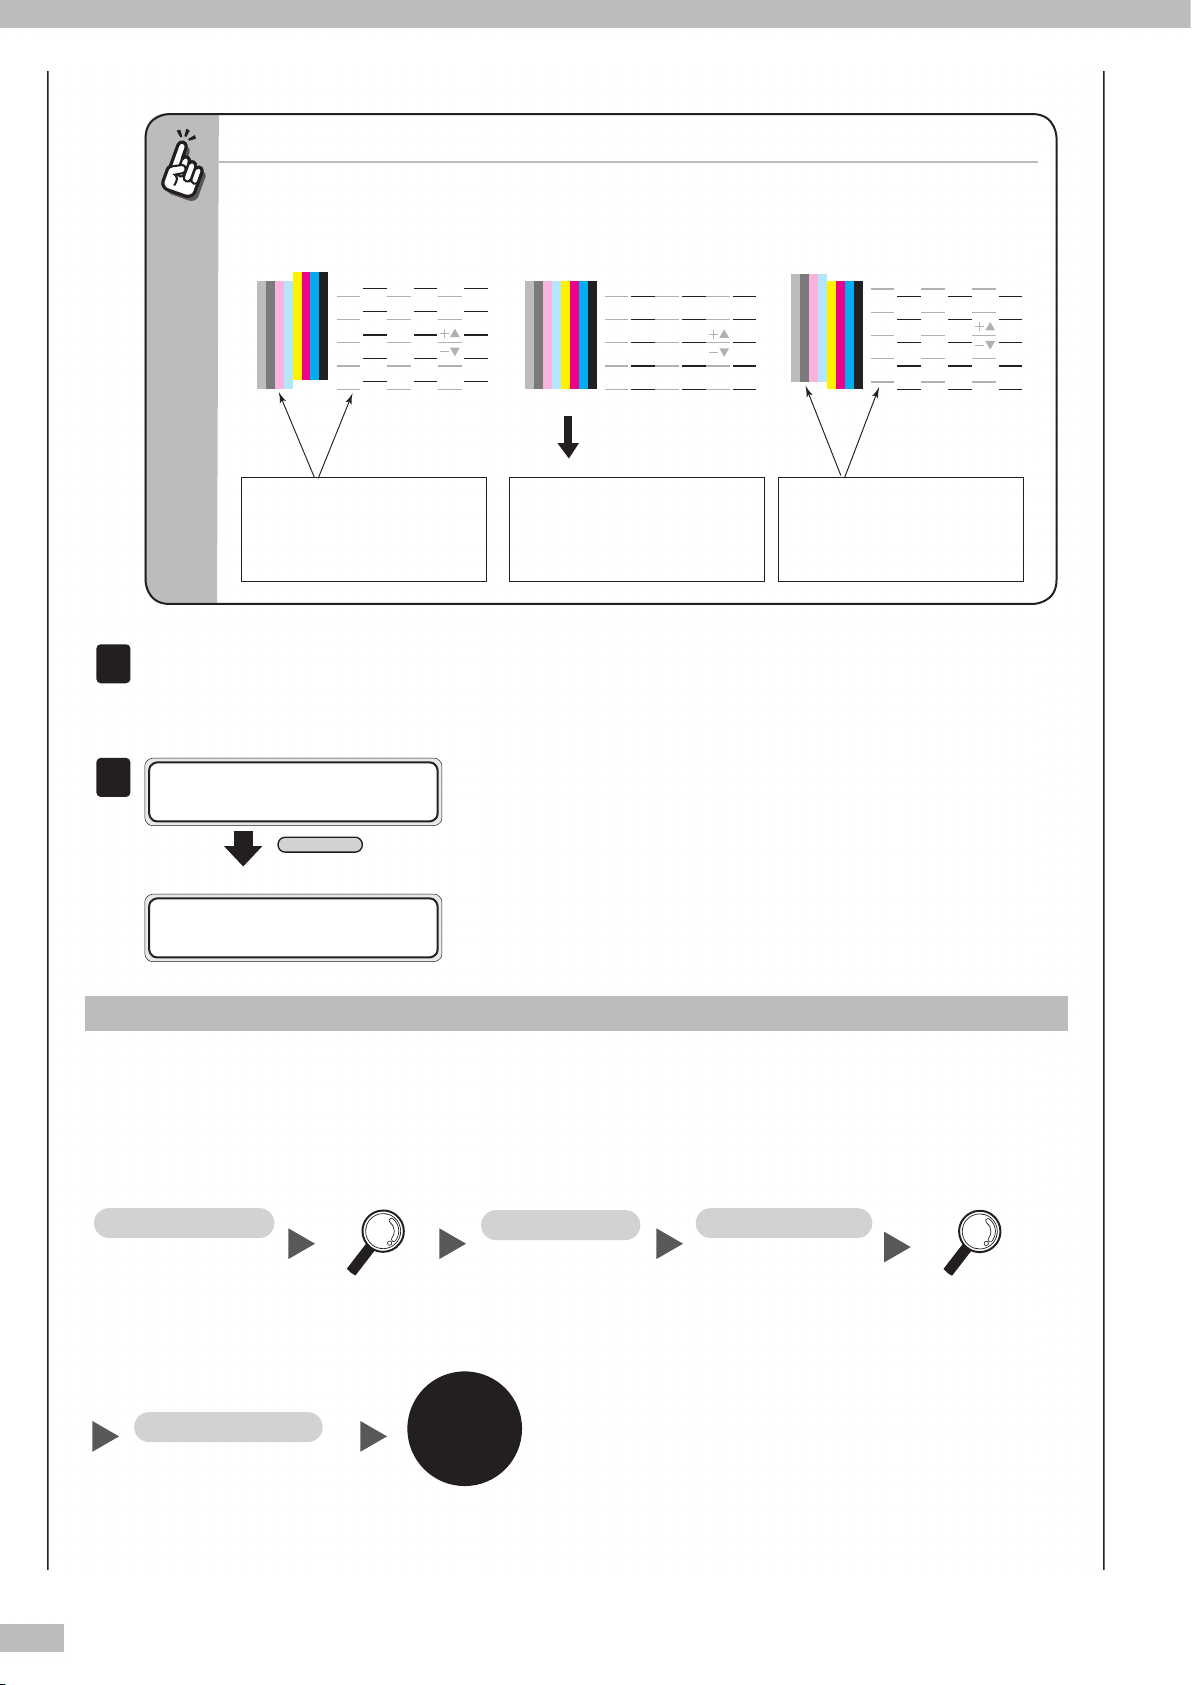
18
How to analyze the media advance adjustment pattern [SIMPLE]
Analyzing the SIMPLE media advance adjustment pattern is explained using an example of 8-color mode
printout.
In case of small media advance
compensation
In case of appropriate media
advance compensation
In case of large media advance
compensation
In Lc, Lm, Gy, and Lg, the horizontal
lines and the stripe bar’s bottom
are misaligned downward, because
the adjustment value is smaller.
All horizontal lines are aligned in one
line, and the color stripe bar’s
bottom is also aligned in one line
when the adjustment value is proper.
In Lc, Lm, Gy, and Lg, the horizontal
lines and the stripe bar’s bottom
are misaligned upward, because
the adjustment value is larger.
Media advance direction
2
Repeat the procedure from STEP 1-3 to STEP 2-1 to obtain an appropriatemedia advance
3
CA N CE L
Step1 Step3
Step2
Step4
Select a rough
media advance
compensation from
the print result.
Review the pattern to
determine the nal
compesnsation
Print [ROUGH]
adjustment pattern.
Enter the media
advance
compensation.
Enter the media advance
compensation.
Print [DETAIL]
adjustment pattern.
Completed
compensation.
# M E D IA A DV P R IN T
> S I M P L E( NO R M A L 1 )
I N K M E D I A RE G
M E D I A M .A D V
Compensate the media advance with [ROUGH] and [DETAIL] media advance adjustment pattern
Obtain your initial media advance compensation with [ROUGH] media advance adjustment pattern, and then
determine the nal media advance compensation with [DETAIL] media advance adjustment pattern. Each of
[ROUGH] and [DETAIL] prints approx. 90 cm media advance adjustment pattern.
■ Work ow
Page 19
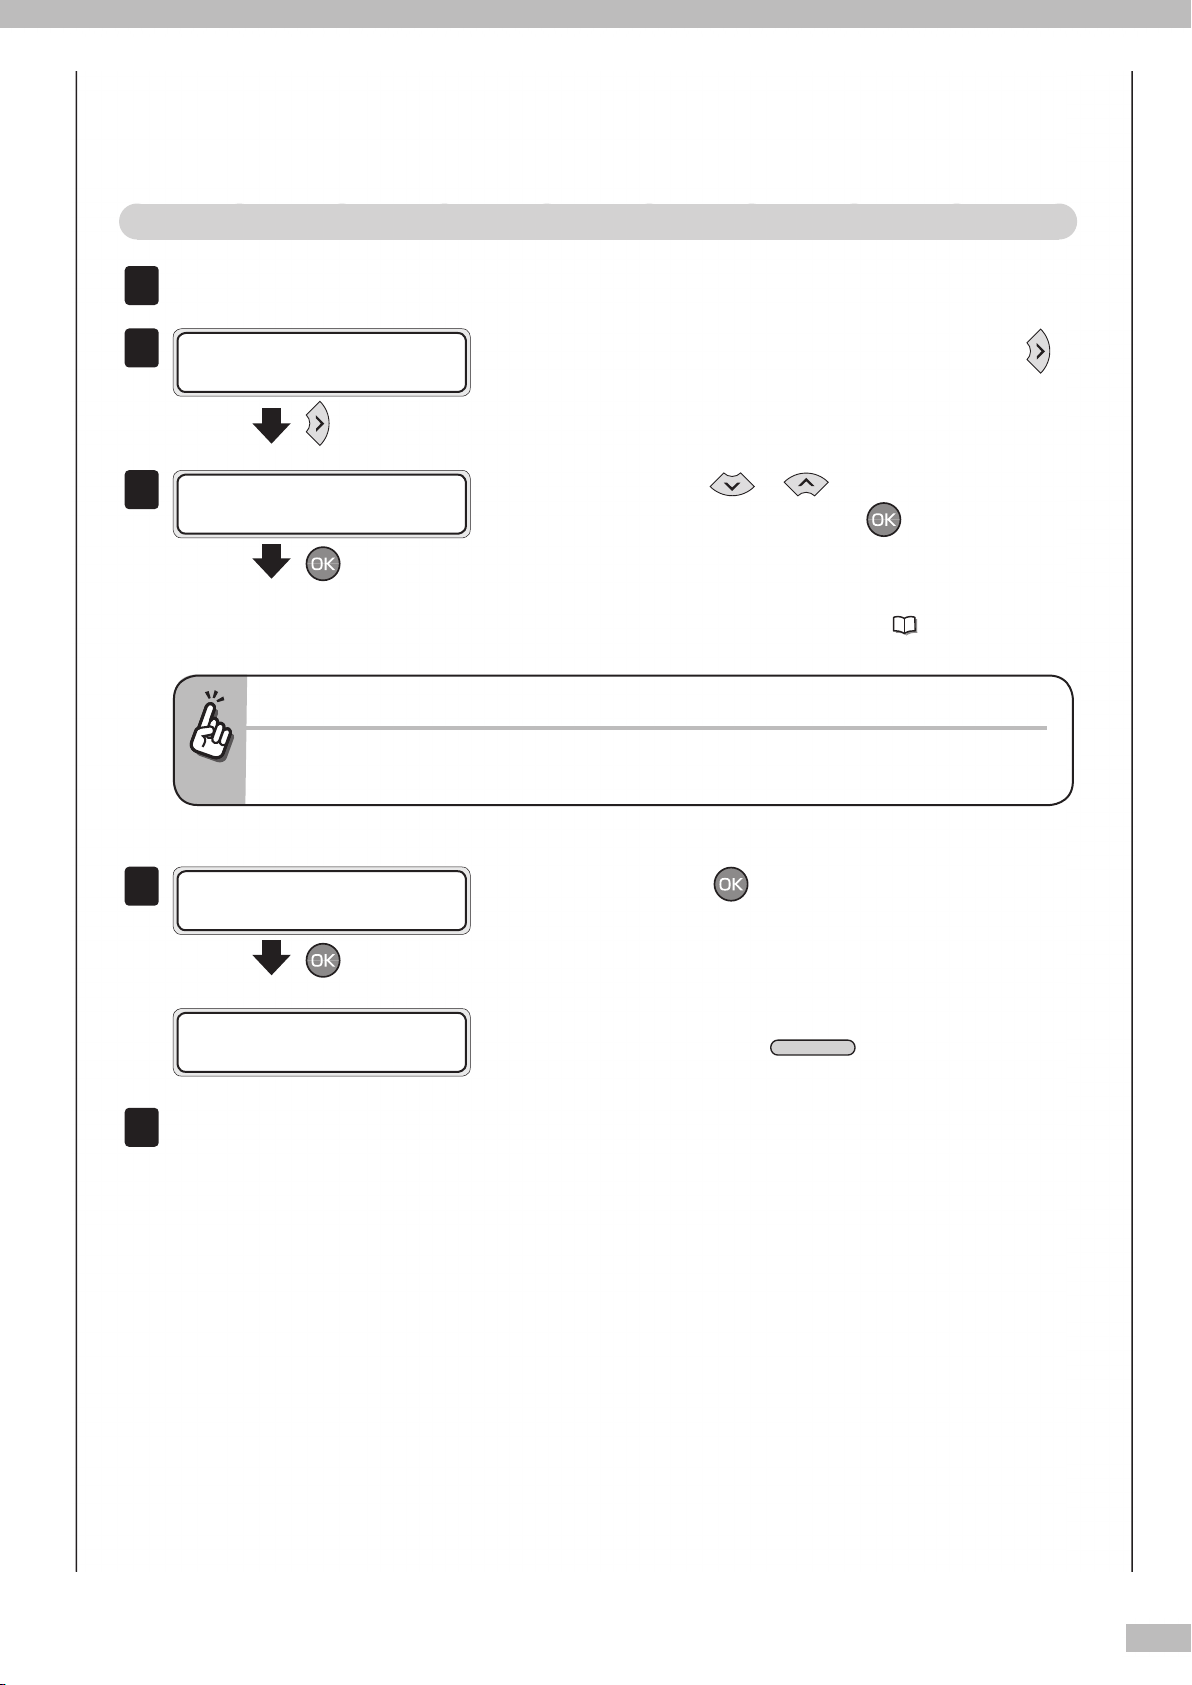
■
1
2
3
4
CA N CE L
5
Procedure
STEP 1 Print [ROUGH] adjustment pattern
Set media longer than 4 m.
I N K M E D I A RE G
M E D I A M .A D V
# M E D IA A DV P R IN T
> R O U G H (N OR M A L 1 )
If the print mode, [DENSITY2] is selected...
- To obtain the media advance compensation in DENSITY2 mode, apply the media advance adjustment
patterns, ROUGH(QUALITY) or DETAIL(QUALITY).
Load the media on the same condition as for the
actual printing
Set the Printer to o ine state and press the
key.
With the or key, select [ROUGH]
print mode, and press the key.
Select the print mode to be used normally for the
media to set the media advance compensation.
For details of print mode, refer to
P. 45 .
# M E D I A A DV P R I N T
O K ?
✻
Press the key.
Then the media advance adjustment pattern [ROUGH]
is printed in the selected print mode.
# M E D I A A DV P R I N T
E X E C U T IN G
✻
Select a rough media advance compensation from the print result.
Five patterns are printed with 0.5% increments within a range of 99.00% to 101.00%. Select a rough media
advance compensation from them.
To cancel printing of media advance adjustment
pattern, press the
key.
19
Page 20
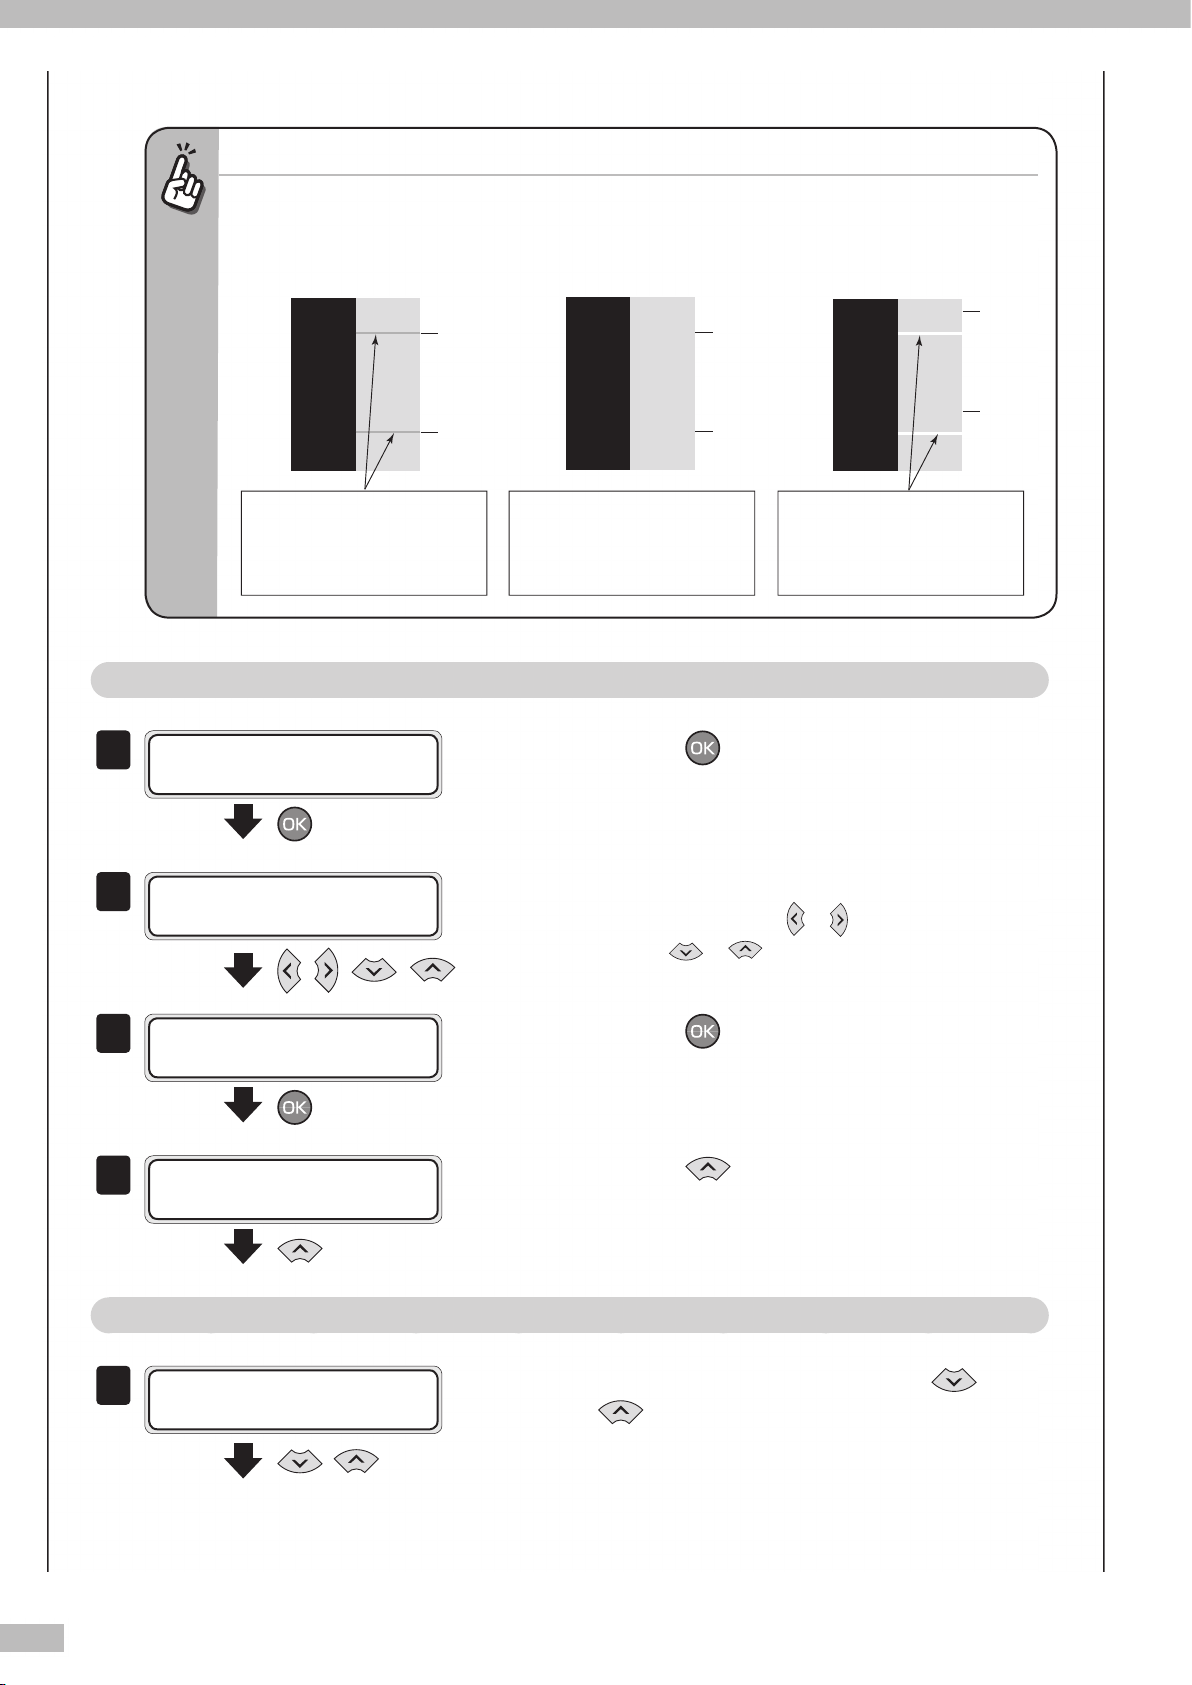
20
How to analyze the media advance adjustment pattern
Analyzing the media advance adjustment pattern is explained using an example of black (K) color.
In case of small media advance
compensation
In case of appropriate media
advance compensation
In case of large media advance
compensation
When observing the horizontal
lines, if the splices of paths are
overlapped (dense), the media
advance compensation is small.
When the splices of paths are not
overlapped and even, the media
advance compensation is
appropriate.
When the splices of paths are
separated (light), the media
advance compensation is large.
99.00%
100.25%
101.00%
STEP 2 Enter the media advance compensation.
1
2
3
4
1
# M E D I A A DV V A L U E
# B a n n e r > 1 0 0 . 00 %
Press the key.
# M E D I A A DV V A L U E
# B a n n e r ✻1 0 0 . 0 0 %
, , ,
Enter the media advance compensation.
Align the digit with the or key and set the value
with the or key
# M E D I A A DV V A L U E
# B a n n e r ✻1 0 0 . 5 0 %
Press the key.
# M E D I A A DV V A L U E
# B a n n e r > 1 0 0 . 50 %
STEP 3 Print [DETAIL] adjustment pattern
# M E D I A A DV P R I N T
> R O U G H (N OR M A L 1 )
,
Press the key.
Select the detail print mode with the or
key.
Select the same print mode as for [ROUGH].
.
Page 21
2
# M E D I A A DV P R I N T
3
4
5
1
2
3
4
5
CA N CE L
> D E T A I L( NO R M A L 1 )
Press the key.
# M E D I A A DV P R I N T
O K ?
✻
Press the key.
Then the media advance adjustment pattern [DETAIL]
is printed in the selected print mode.
# M E D I A A DV P R I N T
E X E C U T IN G
✻
Select the detail media advance compensation from the print result.
Five patterns are printed for the entered rough media advance compensation with 0.06% increments within a
range of -0.12% to +0.12%. Select an appropriate media advance compensation from them.
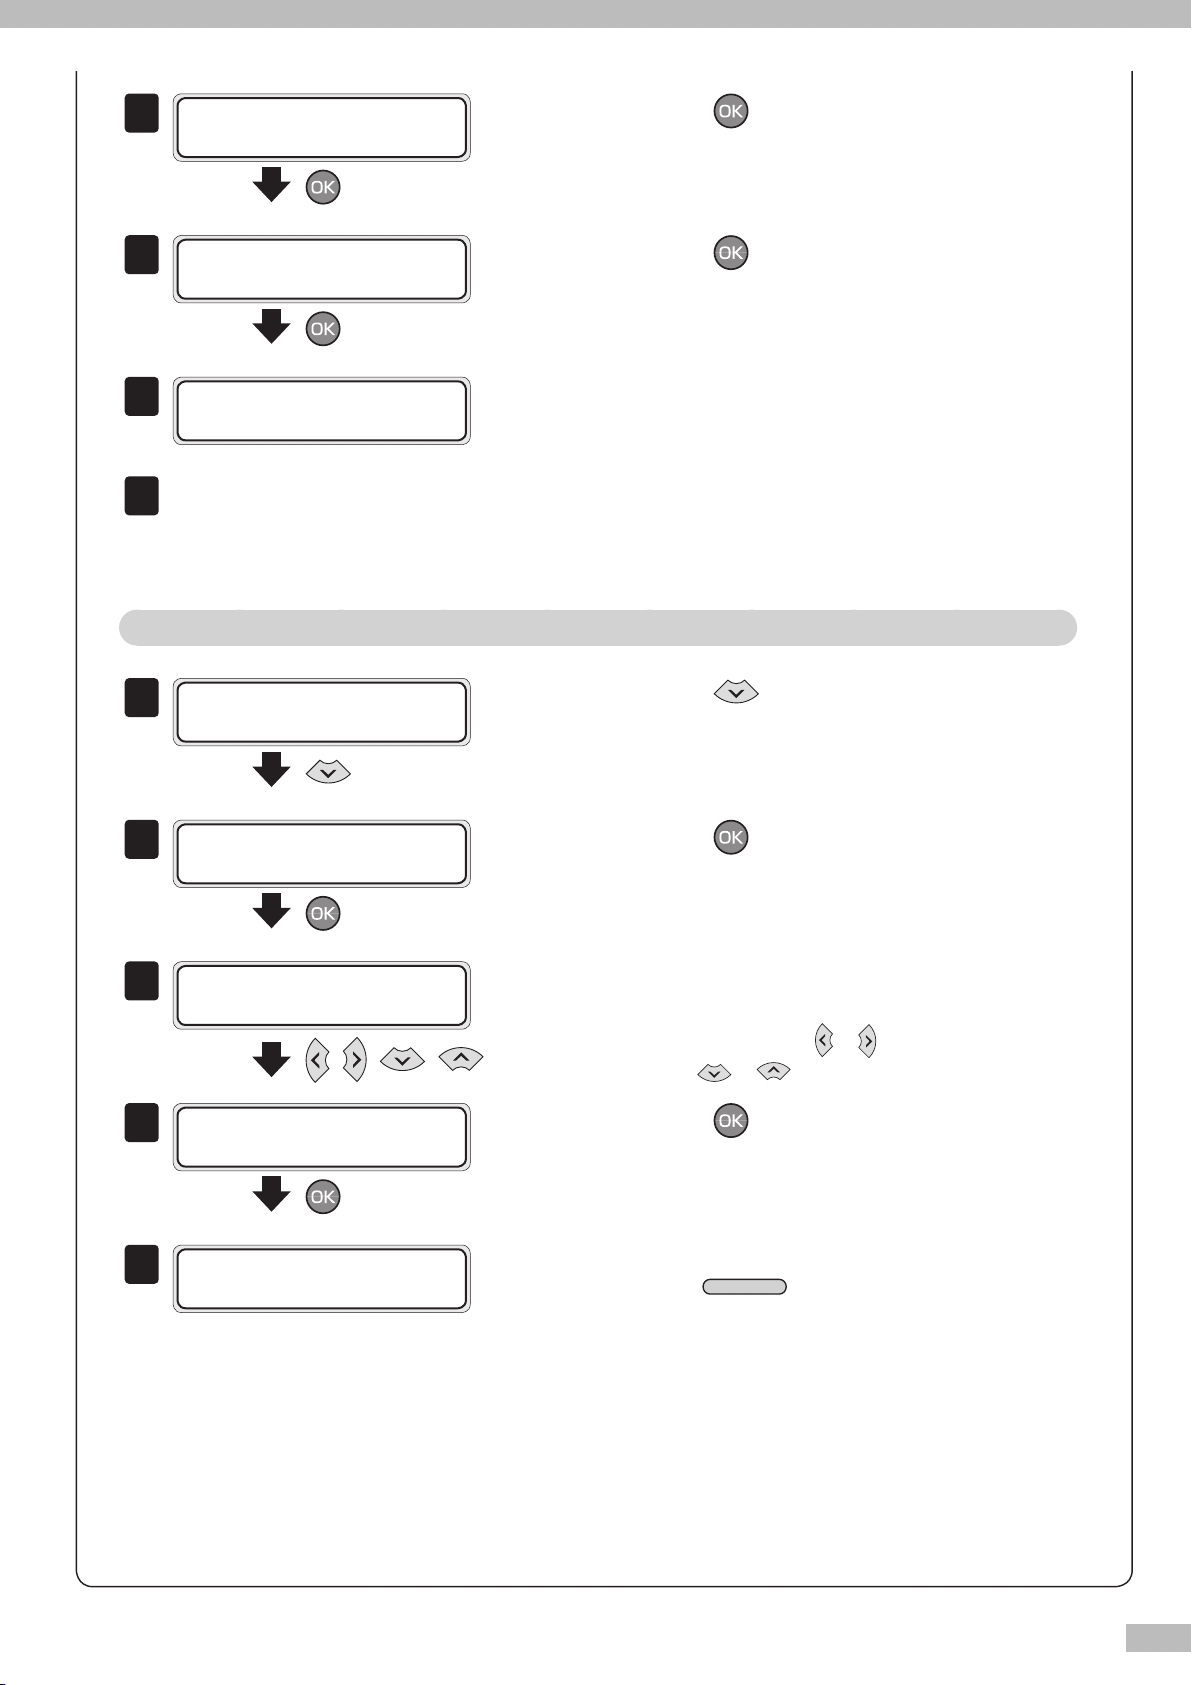
STEP 4 Enter the media advance compensation.
# M E D I A A DV P R I N T
> R O U G H (N OR M A L 1 )
Press the key.
# M E D I A A DV V A L U E
# B a n n e r > 1 0 0 . 50 %
# M E D I A A DV V A L U E
# B a n n e r ✻1 0 0 . 5 0 %
, , ,
# M E D I A A DV V A L U E
# B a n n e r ✻1 0 0 . 5 6 %
# M E D I A A DV V A L U E
# B a n n e r > 1 0 0 . 56 %
Press the key.
Enter the determined media advance
compensation.
Align the digit with the or key and set the value
with the or key
Press the key.
The operation is completed.
Press the
.
key to return to the o ine state.
21
Page 22
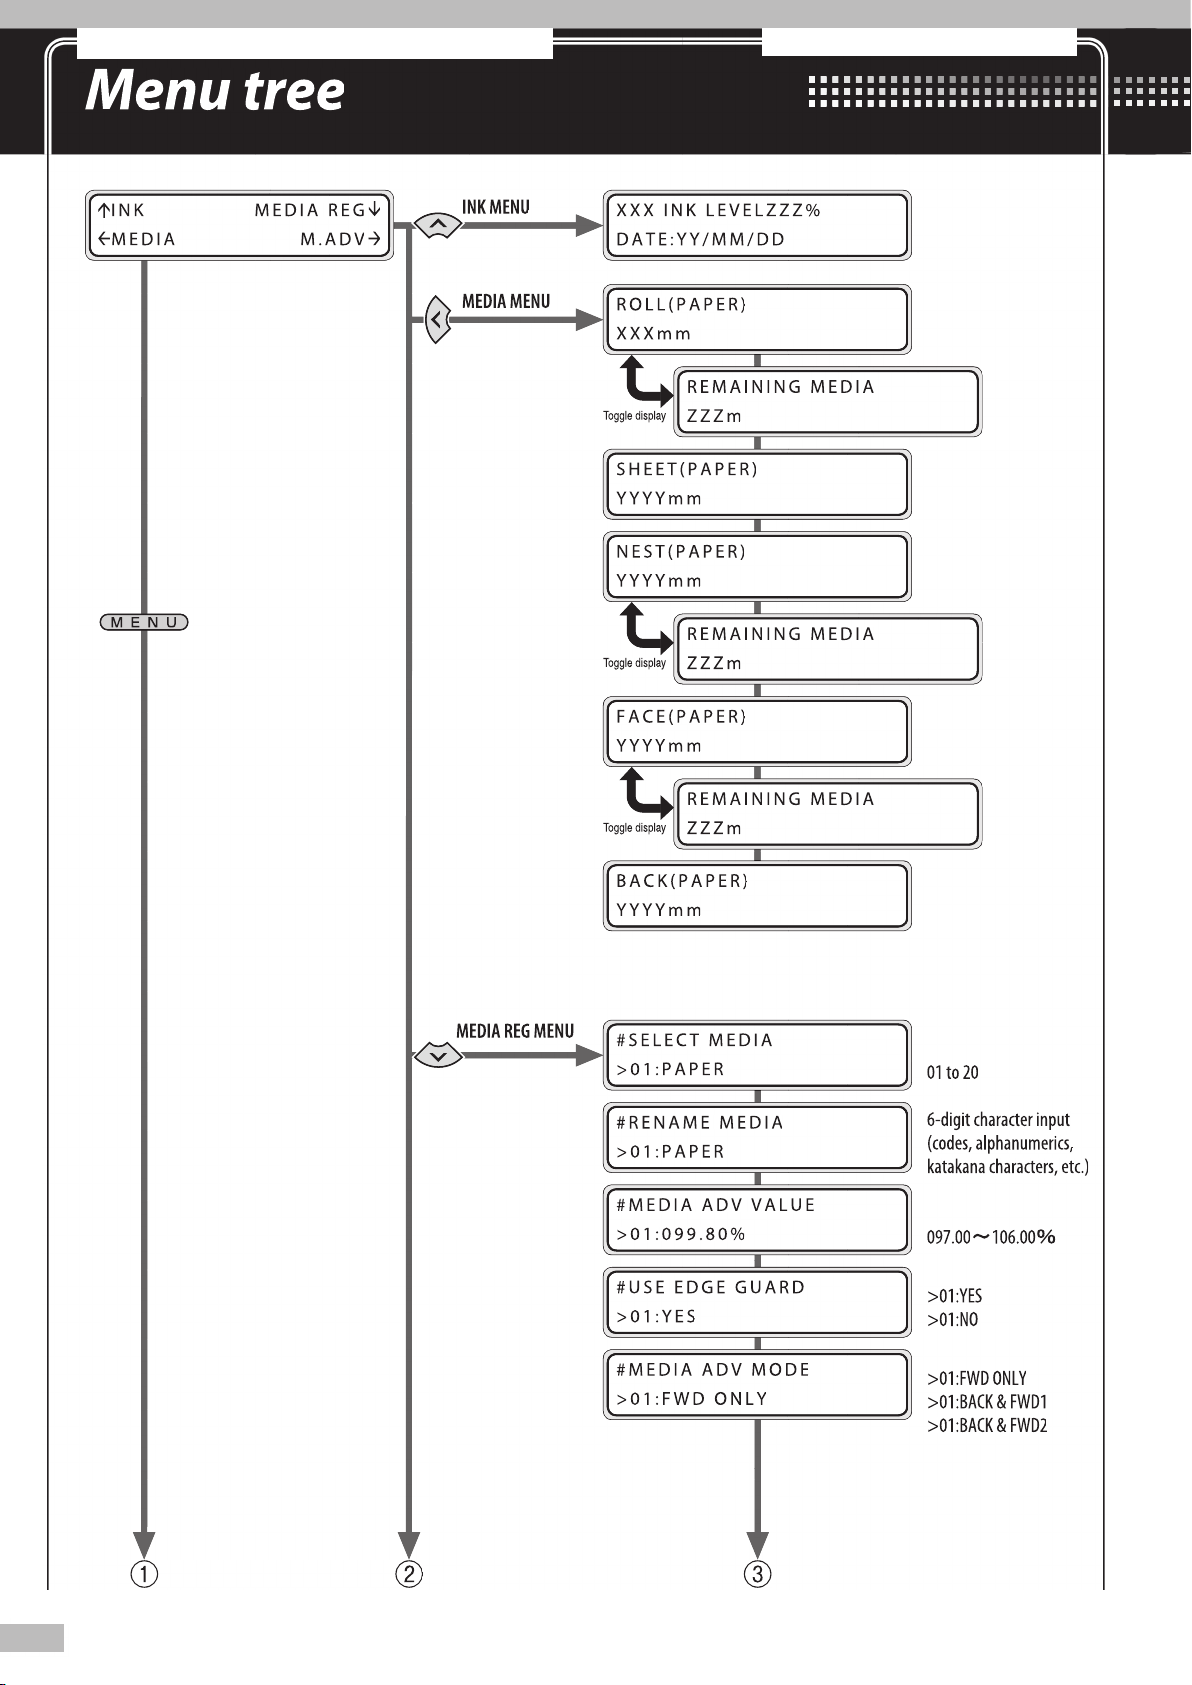
22
01 to 20
6-digit character input
(codes, alphanumerics,
katakana characters, etc.)
097.00㨪106.00㧑
>01:YES
>01:NO
>01:FWD ONLY
>01:BACK & FWD1
>01:BACK & FWD2
① ② ③
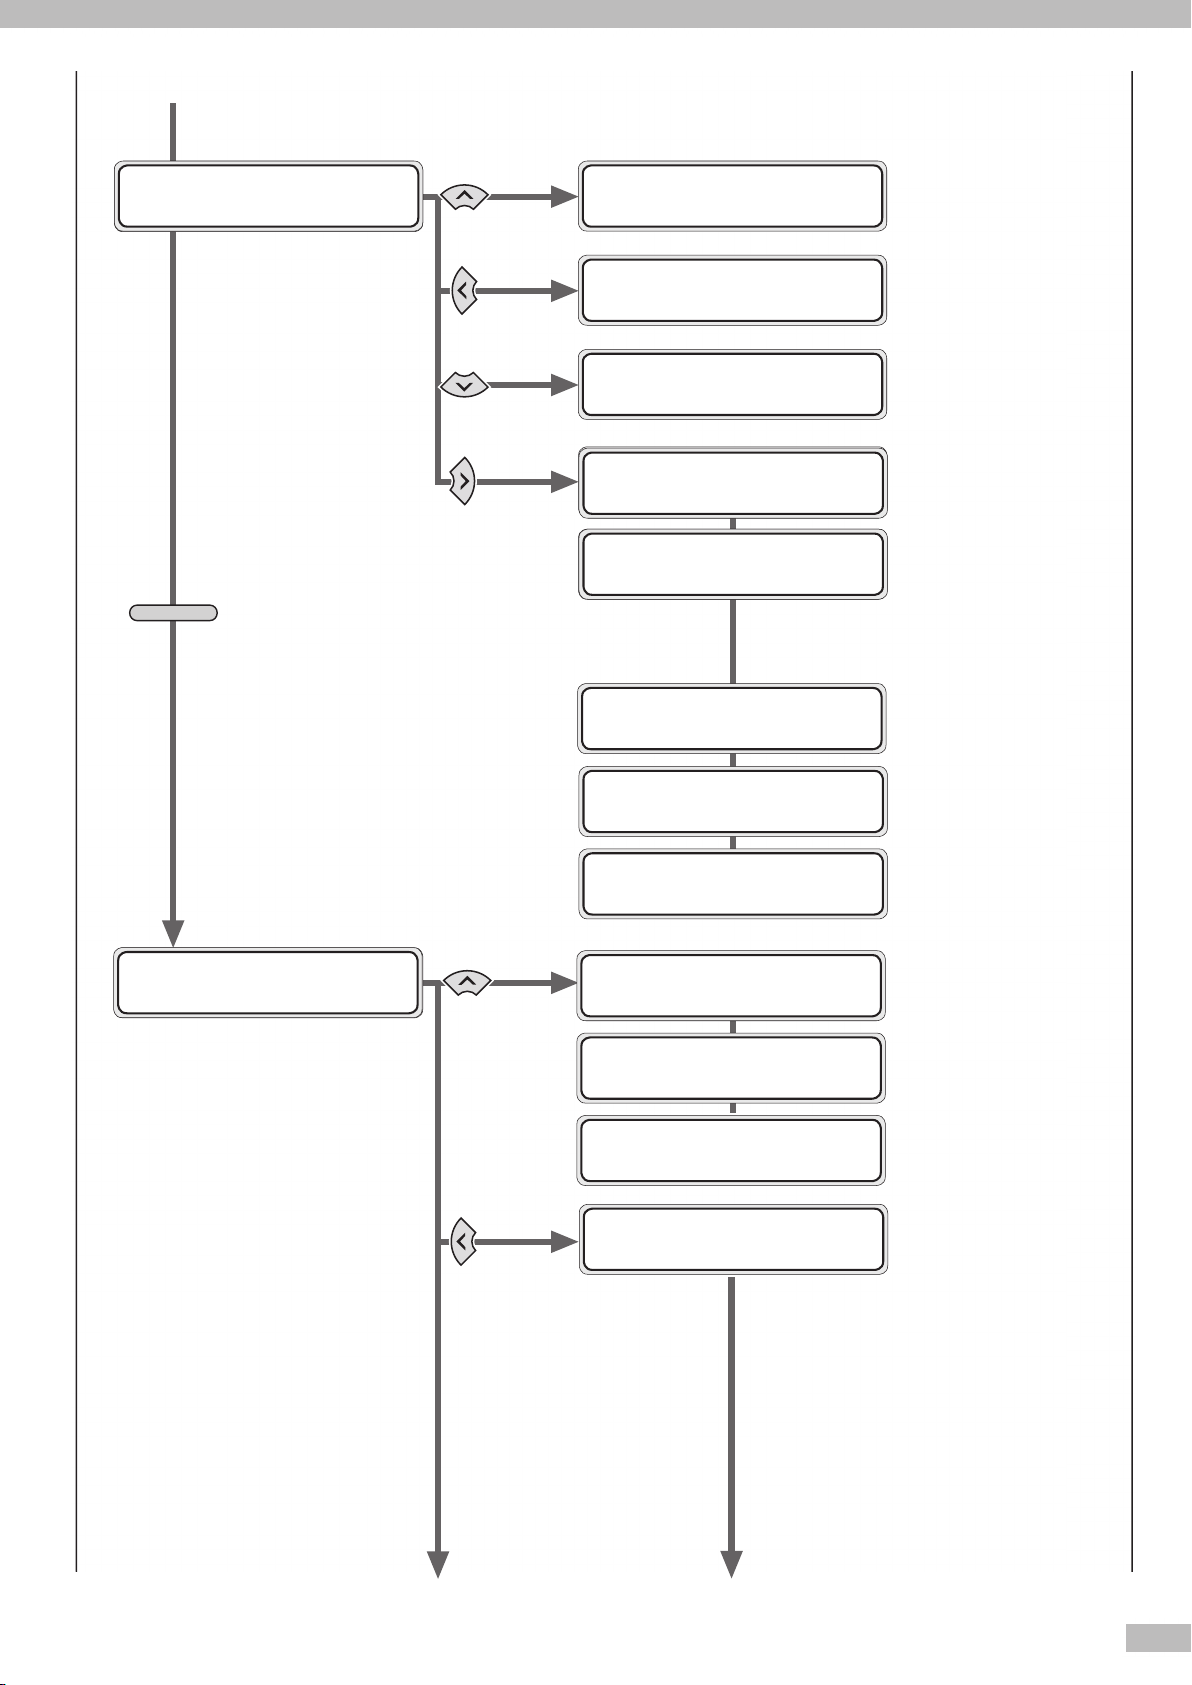
M E N U
I NK ME DI A R E G
M ED I A M . AD V
INK MENU
MEDIA MENU
MEDIA REG MENU
X XX I N K LE VE L ZZ Z%
D AT E : Y Y/ MM /D D
R OL L ( P AP ER )
X XX m m
R EM A I N IN G ME D IA
Z ZZ m
S HE E T ( PA PE R)
Y YY Y m m
N ES T ( P AP ER )
Y YY Y m m
Toggle display
Toggle display
Toggle display
R EM A I N IN G ME D IA
Z ZZ m
F AC E ( P AP ER )
Y YY Y m m
B AC K ( P AP ER )
Y YY Y m m
R EM A I N IN G ME D IA
Z ZZ m
# SE L E C T ME DI A
> 01 : P A PE R
# RE N A M E ME DI A
> 01 : P A PE R
# ME D I A A DV V A LU E
> 01 : 0 9 9. 80 %
# ME D I A A DV M O DE
> 01 : F W D ON LY
# US E E DG E GU A RD
> 01 : Y E S
Menu tree
01 to 20
6-digit character input
(codes, alphanumerics,
katakana characters, etc.)
097.000
O
2
X XX I N K LE VE L ZZ Z%
Z ZZ m
T
oggle displa
y
T
oggle displa
y
oggle displa
y
Z ZZ m
Y YY Y m m
Z ZZ m
# SE L E C T ME DI A
# RE N A M E ME DI A
# ME D I A A DV V A LU E
# ME D I A A DV M O DE
# US E E DG E GU A RD
IP-7900/7700 or IP-7900-02/7700-02 Advanced Operation Guide
Menu tree
Replaces the source document’s description
Page 23
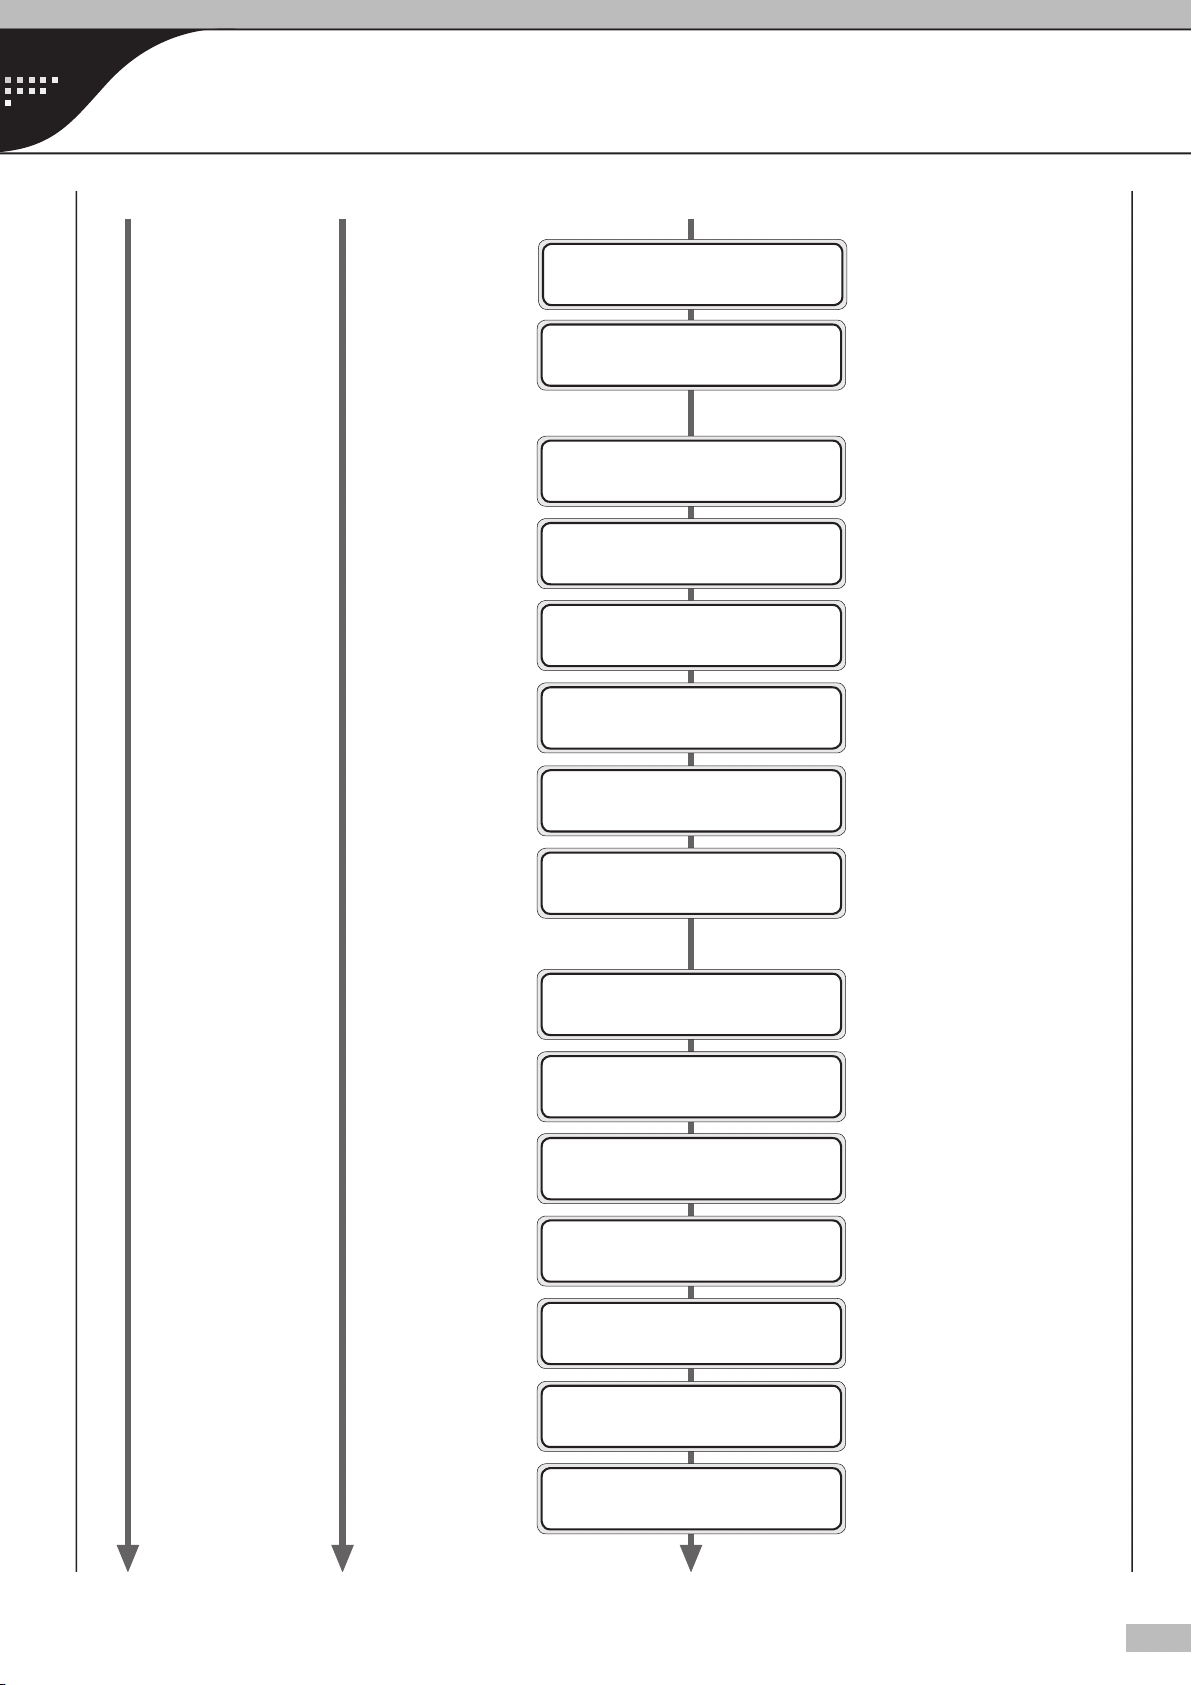
① ②
③
④
15°C to 70°C
59°F to 158°F
15°C to 55°C
59°F to 131°F
15°C to 55°C
59°F to 131°F
>01:ON
>01:OFF
>01:LOW
>01:MEDIUM
>01:HIGH, FINE GRAIN
>01:HIGH, LESS SPRAY
>01:OFF
>01:START & END
>01:DURING PRINT
>01:DURING PRINT2
>01:OFF
±2000 pulses
(Unit: Approx. 2.5 μm)
0000 to 9999
1 to 99
±, -32 to +31
±, -32 to +31
±, -32 to +31
-0.3 to +1.0
(Unit: 0.1 mm)
# ME D I A B AC K M OD E
> 01 : B A CK & F W D
# PR E H E AT ER T
> 01 : � � ° C
# CO L O R S TR IP E
> 01 : O N
# BI D I R A DJ 2 L P AP ER
> 01 : + 0 0
# IM A G E I MP RO V E.
> 01 : O N
# PH C L EA NI NG
> 01 : S T AR T & E ND
# BA C K AD JU ST VA L
> 01 : + 0 00 0P UL S E
# PH H E IG HT V A L
> 01 : + 0 .0 mm
# PH R E ST P ER I OD
> 01 : 0 0 00 CY CL E S
# PH R E ST T IM E
> 01 : 1 0 se c
# AF T E R HE AT ER T
> 01 : � � ° C
# PR I N T HE AT ER T
> 01 : � � ° C
# BI D I R A DJ 2 R P AP ER
> 01 : + 0 0
# BI D I R A DJ 3 L P AP ER
> 01 : + 0 0
# SU C T I ON F AN LE VE L
> 01 : N O RM AL
>01:BACK & FWD
>01:FWD ONLY
>01:HIGH
>01:NORMAL
>01:LOW
>01:OFF
23
Page 24
24
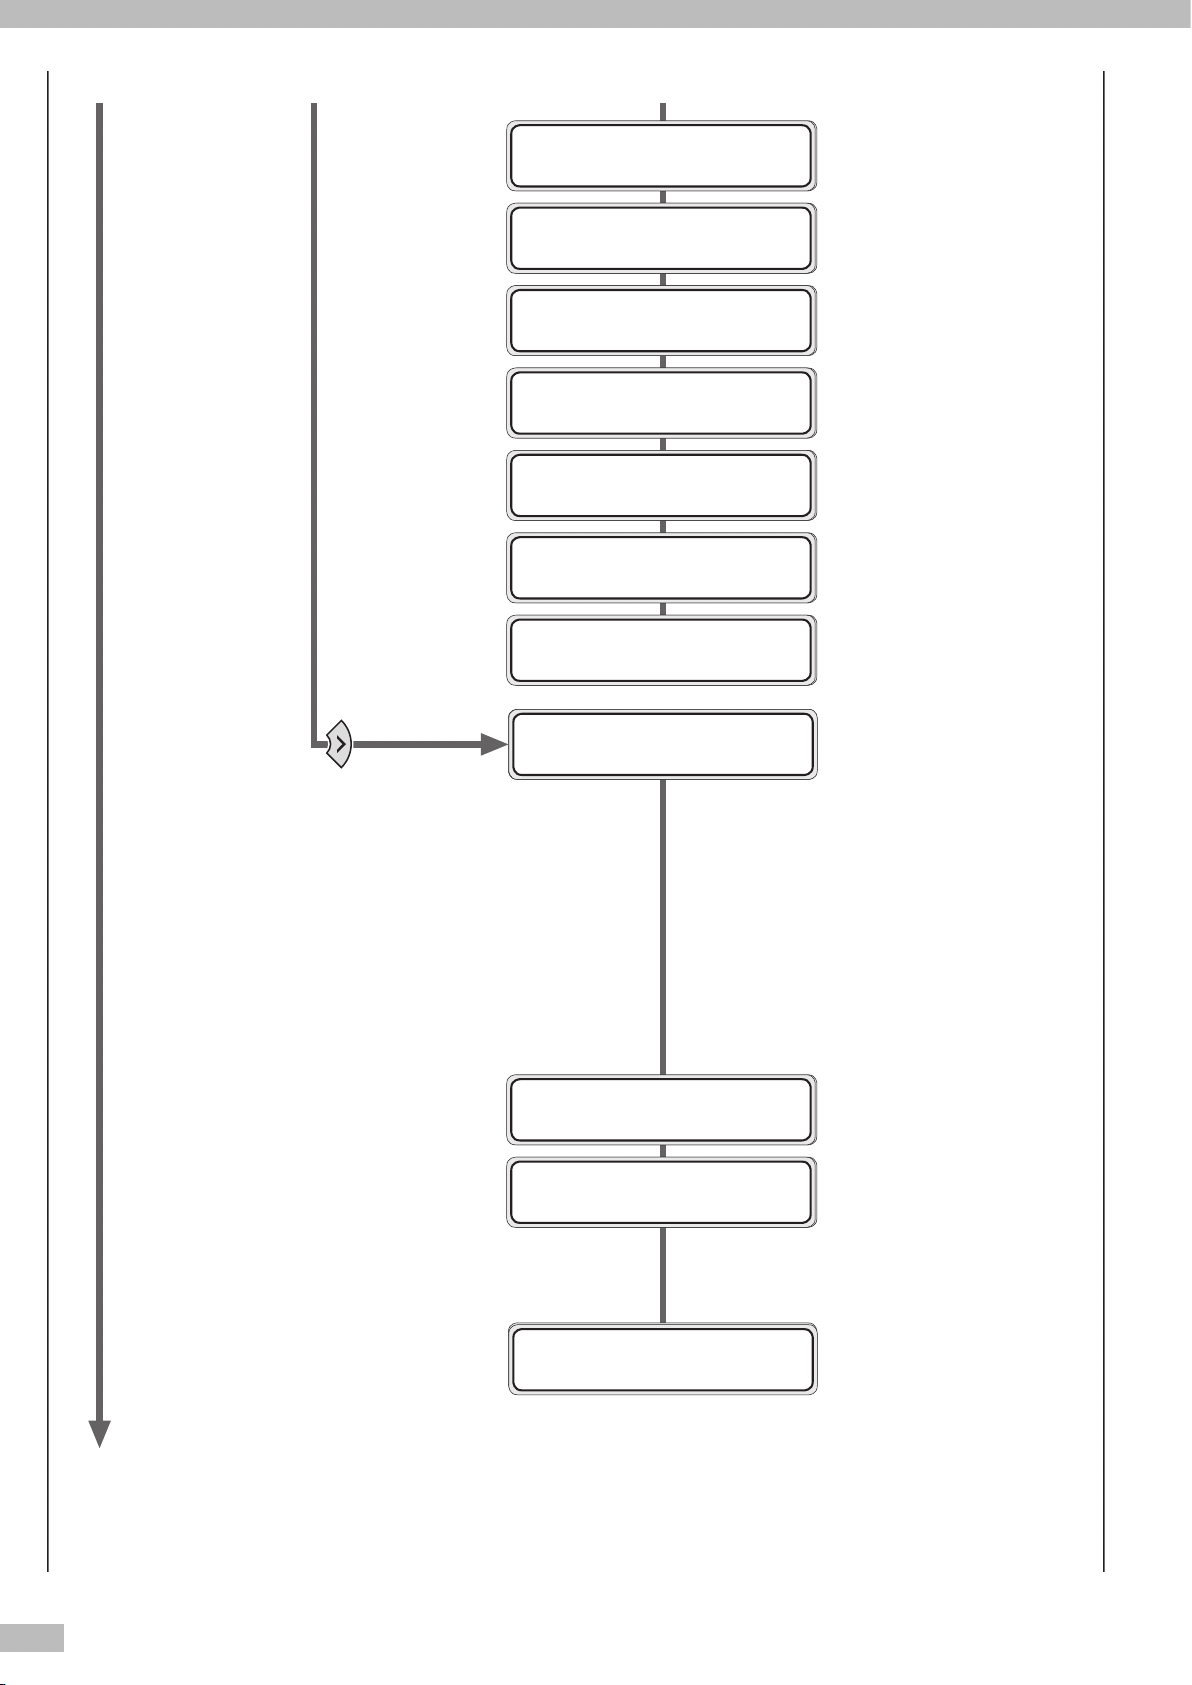
① ②
④
#メテ゛ィアサ゛ンリョウ
>01:YYYm
#メテ゛ィアサクシ゛ョ
>02:TYPE02 OK?
#ハ゜ラメータ コヒ゜ーモト
>01
#ハ゜ラメータ コヒ゜ーサキ
>01→02*
#オクリチョウセイハ゜ターン
>ラフ(ヒョウシ゛ュン)
#オクリホセイチ
#PAPER >100.00%
#モト゛シチョウセイハ゜ターン
>ヒョウシ゛ュン
#モト゛シホセイチ
#PAPER >+0000ハ゜ルス
#オウフクホセイチ4 R PAPER
>01:+00
#オウフクホセイチ3 R PAPER
>01:+00
#オウフクホセイチ4 L PAPER
>01:+00
±, -32 to +31
±, -32 to +31
±, -32 to +31
0 to 999m
0 to 3278ft
01 to 20
01 to 20
97.00 to 106.00%
>NORMAL1
>QUALITY
>DRAFT1
>FINE DRAFT
>NORMAL2
±2000 pulses (Unit:
Approx. 2.5 μm)
>SIMPLE(DRAFT1)
>SIMPLE(FINE DRAFT)
>SIMPLE(NORMAL1)
>SIMPLE(NORMAL2)
>SIMPLE(QUALITY)
>ROUGH(DRAFT1)
>ROUGH(FINE DRAFT)
>ROUGH(NORMAL1)
>ROUGH(NORMAL2)
>ROUGH(QUALITY)
>DETAIL(DRAFT1)
>DETAIL(FINE DRAFT)
>DETAIL(NORMAL1)
>DETAIL(NORMAL2)
>DETAIL(QUALITY)
# RE M A I NI NG M E DI A
> 01 : Y Y Ym
# DE L E T E ME DI A
> 02 : T Y PE 02 O K ?
# CO P Y ME DI A
> 01
# PA S T E M ED IA
> 01�0 2 *
# ME D I A A DV P R IN T
> SI M P L E( DR AF T 1)
# ME D I A A DV V A LU E
# PA P E R > 09 9 .8 1%
# BA C K AD J PR I NT
> NO R M A L1
# BA C K AD JU ST VA L
# PA P E R > +0 0 00 P
# BI D I R A DJ 4 R P AP ER
> 01 : + 0 0
# BI D I R A DJ 3 R P AP ER
> 01 : + 0 0
# BI D I R A DJ 4 L P AP ER
> 01 : + 0 0
M.ADV MENU
Page 25
①
⑦
⑧
#キャッフ°クリーニンク゛
>
#サーヒ゛ス
>サーヒ゛スクリーン
ファンクション システム
メカチョウセイ ヒータ
>NOZZLE PRINT
>ADJUSTMENT & CHECK
>ADJUST PH POS
>ADJUST PH R/L
>BIDIRECTION1
>BIDIRECTION2
>BIDIRECTION3
>BIDIRECTION4
>CHECK EDGE SENSOR
>CHECK NOZZLE
>CHECK BIDIR1
>CHECK BIDIR2
>CHECK BIDIR3
>CHECK BIDIR4
ハ゛ックフーィト゛ フィート゛
クリーニンク゛ サーヒ゛ス
M E N U
>NORMAL
>STRONG
>STORE INK SYS
>CLEAN INK SYS
>INITIAL CHARGE
>CHARGE(INKPACK)
>CHARGE CAP CL
>PH CLEANING
R EW I N D IN G ME D IA
# PH R E CO VE RY
> NO R M A L
F EE D I N G ME DI A
REWIND MENU
PH.REC MENU
FORM FEED MENU
PH.MAIN MENU
R EW I N D F OR M FE E D
P H. R E C PH .M AI N
P RI N T E R SE TU P
A DJ U S T HE AT E R
# CA P C LE AN IN G
>
# IN K S YS TE M O PT
> ST O R E I NK S Y S
# CO L O R C HA NG E ( 8- >4 )
>
# RE S E A T PR IN T HE AD
>
# WA S H PR IN TH E AD S
>
PRINTER MENU
ADJUST MENU
# ER R O R L OG P R IN T
>
# CO N F I G PR IN T
>
# HI S T O RY P RI N T
>
# TE S T PR IN TS
> NO Z Z L E PR IN T
25
Page 26
26
⑦
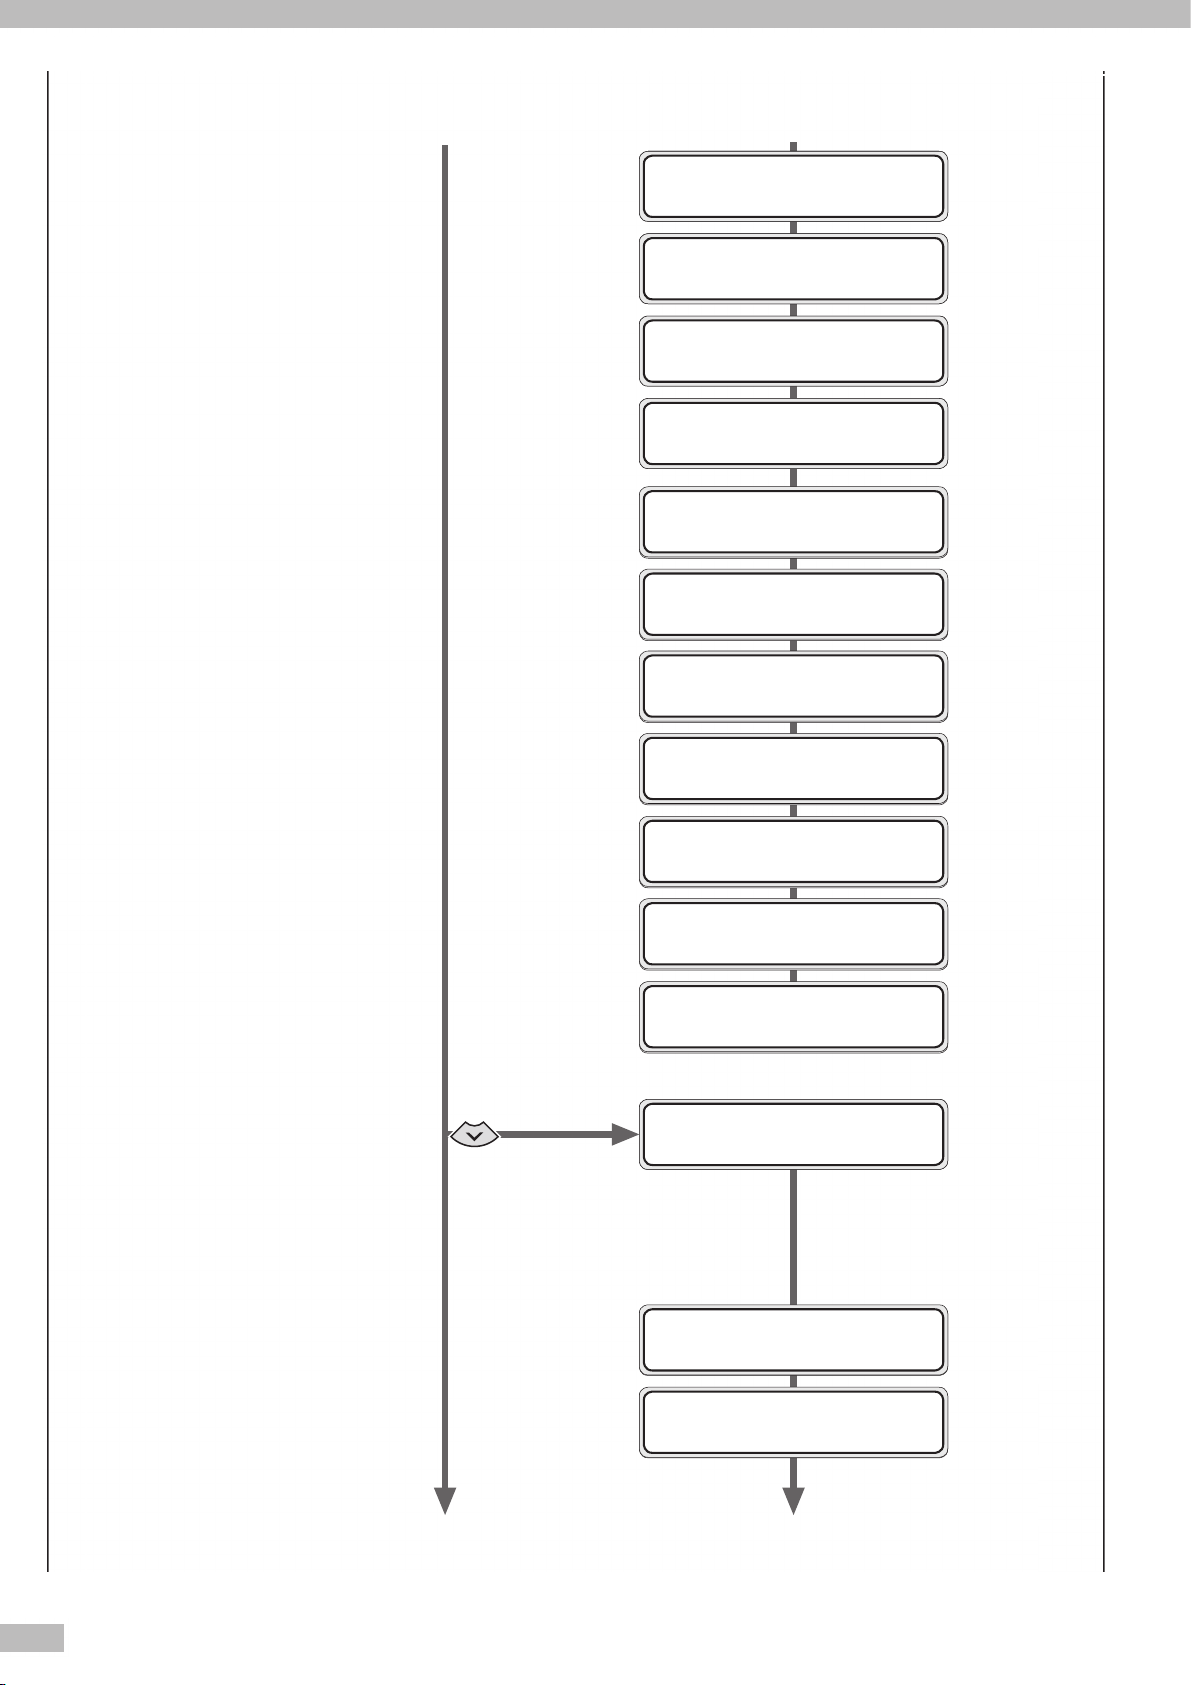
#タイムソ゛ーン(YY/MM/DD)
*yy/mm/dd hh:mi +xx
#LANGUAGE
>JAPANESE
#ナカ゛サタンイ
>ミリ
⑨
⑧
#オウフクホセイチ3 L PAPER
#Y1 >+00
#オウフクホセイチ3 R PAPER
#Y1 >+00
#オウフクホセイチ4 L PAPER
#Y1 >+00
#オウフクホセイチ4 R PAPER
#Y1 >+00
#エッシ゛センサイチホセイチ
>+0.0mm
#オウフクホセイチ2 R PAPER
#Y1 >+00
#オウフクホセイチ2 L PAPER
#Y1 >+00
±, -32 to +31
±, -32 to +31
±, -32 to +31
±, -32 to +31
±, -32 to +31
±, -32 to +31
±, -32 to +31
±, -32 to +31
±, -32 to +31
±, -32 to +31
-5.0 to +5.0 mm
>ENGLISH
>FRENCH
>ITALIAN
>GERMAN
>SPANISH
>PORTUGUESE
>JAPANESE
-12 to +12
>MILLIMETER
>INCH
#ヘット゛イチホセイチ
#Y1 >+00
#オウフクホセイチ1 L PAPER
#Y1 >+00
#ヘット゛サユウホセイチ
#Y1 >+00
#オウフクホセイチ1 R PAPER
#Y1 >+00
# PH T O P H VA L
# Y1 >+ 0 0
# BI D I R A DJ 1 L P AP ER
# Y1 >+ 0 0
# PH R / L AD J V AL
# Y1 >+ 0 0
# BI D I R A DJ 1 R P AP ER
# Y1 >+ 0 0
# TI M E ZO NE ( G MT +)
> YY / M M /D D HH : MM + 00
# LA N G U AG E
> EN G L I SH
# LE N G T H UN IT S
> MI L L I ME TE R
# BI D I R A DJ 3 L P AP ER
# YY >+ 0 0
# BI D I R A DJ 3 R P AP ER
# YY >+ 0 0
# BI D I R A DJ 4 L P AP ER
# YY Y > +0 0
# BI D I R A DJ 4 R P AP ER
# YY Y > +0 0
# ED G E SE NS OR AD J VA L
> +0 . 0 m m
# BI D I R A DJ 2 R P AP ER
# YY >+ 0 0
# BI D I R A DJ 2 L P AP ER
# YY >+ 0 0
SETUP MENU
Page 27
⑦ ⑨
#USB スピート゛
*HIGH−SPEED
#USBアト゛レス
*000
#ショキセッテイ
>
#アップテ゛ート
>
#タ゛ウンロート゛
>
#シ゛ャムケンシュツカント゛
>キョウ(テ゛フォルト)
#スタンハ゛イシ゛カン
>30フン
#HCBハ゛ーシ゛ョン
*XX_YYZ
#BTCハ゛ーシ゛ョン
*XXX
#F/Wハ゛ーシ゛ョン
*X.XX_YY
#IPBハ゛ーシ゛ョン
*XX_YYZ
#ACTハ゛ーシ゛ョン
*XX_YYZ
HIGH-SPEED
FULL-SPEED
>HIGH(DEFAULT
>LOW
>NONE
>30min
>60min
>120min
>CONTINUOUS
#オント゛タンイ
>セッシ
#ケイコクオン(キャッフ゜オーフ゜ン)
>オン
#ケイコクオン(TURタイムアウト)
>オン
#ケイコクオン(インクエラー)
>オン
#BOOTハ゛ーシ゛ョン
*X.XX
>CENTIGRADE
>FAHRENHEIT
>ON
>OFF
>ON
>OFF
>ON
>OFF
000 to 255
# TE M P E RA TU RE UN IT S
> CE N T I GR AD E
# BE E P ( UN CA P C AR RI )
> ON
# BE E P ( TU R TI M EO UT )
> ON
# BE E P ( IN K ER R OR )
> ON
# BO O T VE RS IO N
* X. X X
# US B S PE ED
* HI G H - SP EE D
# US B A DD RE SS
* XX X
# FA C T O RY D EF A UL T
>
# PR I N T ER F W U PG RA DE
>
# DO W N L OA D
>
# JA M S EN SI TI V IT Y
> HI G H ( DE FA UL T )
# HE A T E R ST AN D BY T IM E
> 30 m i n
# CA R R I AG E PC A V ER
* XX X X X
# BT C V ER
* XX X
# PR I N T ER F W V ER
* X. X X _ YY
# MA I N PC A VE R
* XX X X X
# AC T P CA V ER
* X. X X
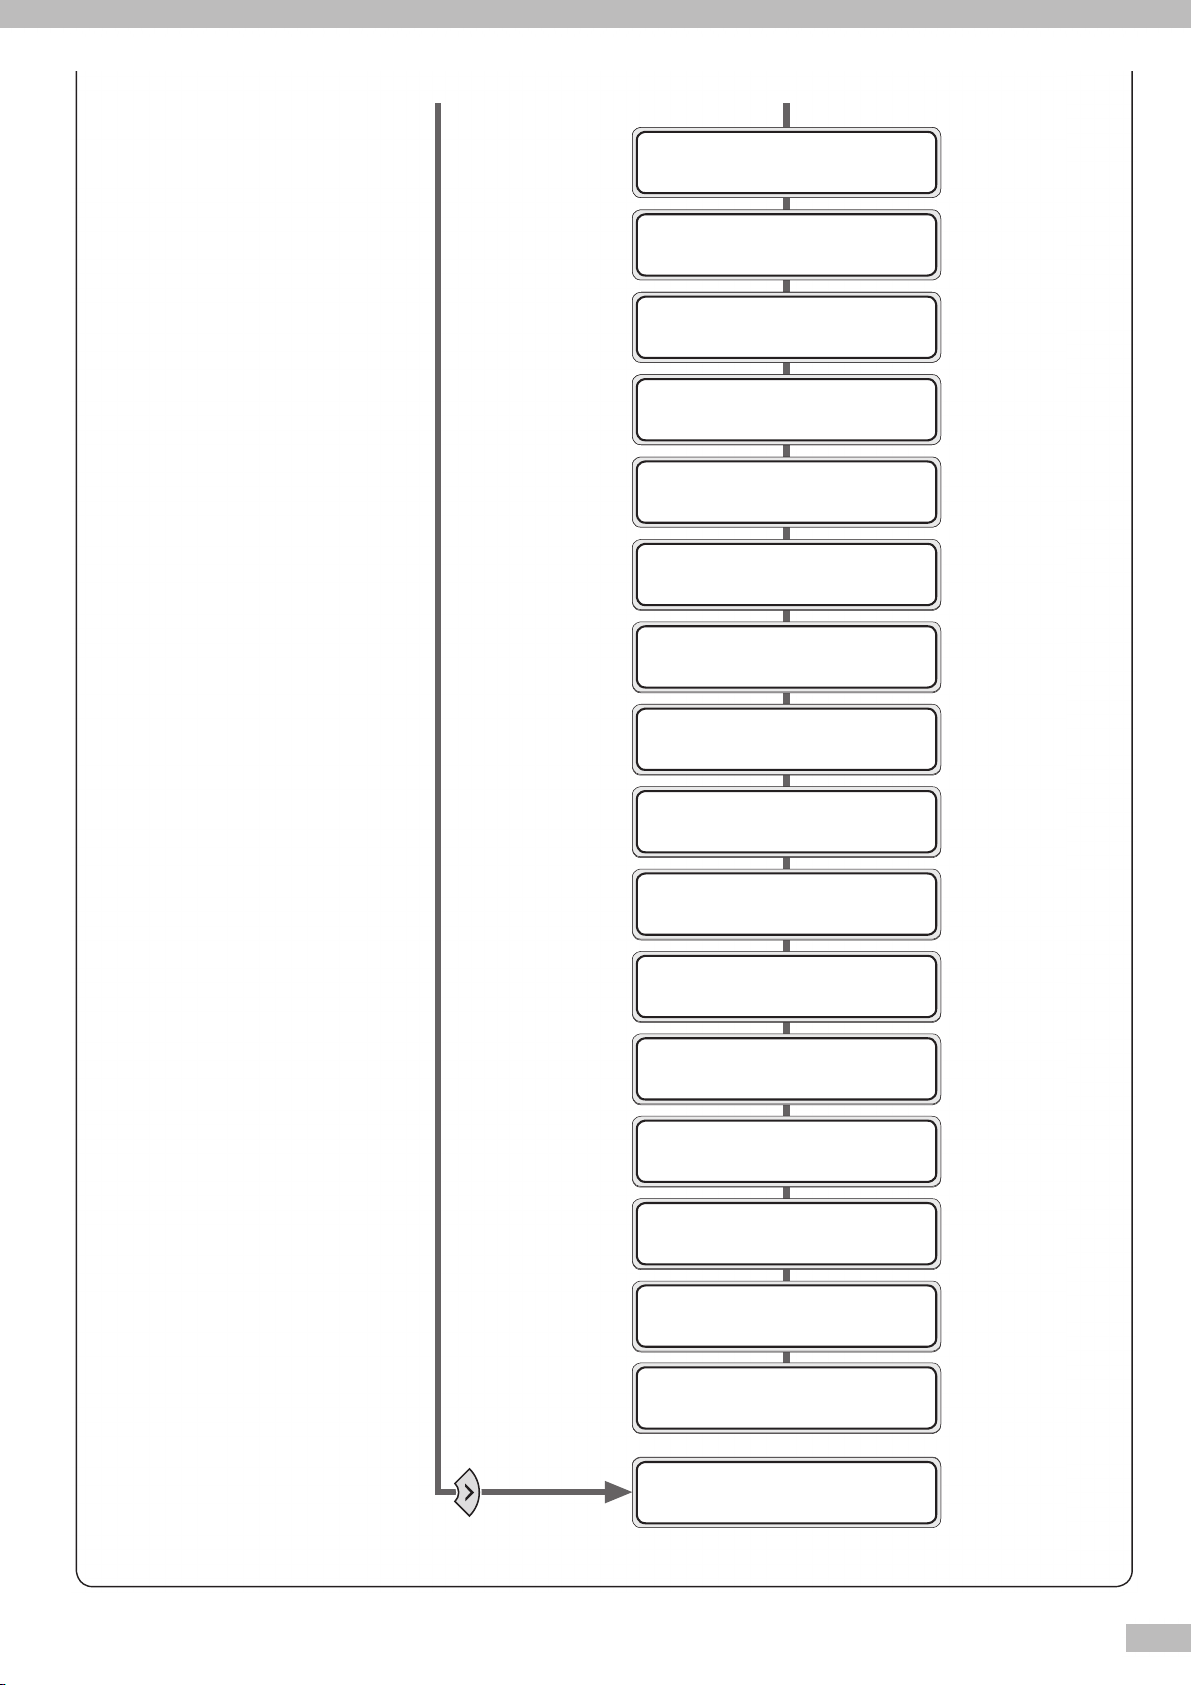
HEATER MENU
27
Page 28

 Loading...