

Page 1

H851 NSYH851D1-A1906
T-7
空気潜水用防水ダイバーズウオッチ
DIVER’S WATCH FOR AIR DIVING
H851
取扱説明書
INSTRUCTIONS
日本語
..................................................
English ................................................
そのほかの言語の取扱説明書は、パソコンや
スマートフォンから当社ホームページ内の
「カスタマーサービス」>「取扱説明書ダウンロード」
にアクセスいただき、ご覧ください。
Deutsch / Français / Italiano / Español /
Pусский язык / / Português /
䬁Ổ
ᶮ㔈
/
䷂橕ᶮ㔈
/
https://www.seikowatches.com/
JA
1
EN
1
Please refer to the Instruction Manuals
of other languages by accessing
"Customer Service"→ "Instruction"
on our Website from PC or Smartphone.
/
㭛⧄
Page 2
Thank you very much for choosing a SEIKO watch.
WARNING
Make sure to read the following instructions before use and strictly observe them.
CAUTION
Make sure to read the following instructions before use and strictly observe them.
For proper and safe use of your SEIKO watch,
please read carefully the instructions in this
booklet before using it.
Keep this manual handy for easy reference.
* Length adjustment service for metallic bands is available at the retailer from
whom the watch was purchased. If you cannot have your watch repaired by
the retailer from whom the watch was purchased because you received the
watch as a gift, or you moved to a distant place, please contact SEIKO
CUSTOMER SERVICE CENTER. The service may also be available on a
chargeable basis at other retailers, however, some retailers may not undertake
the service.
* If your watch has a protective film for preventing scratches, make sure to peel
it off before using the watch. If the watch is used with the film on it, dirt, sweat,
dust, or moisture may be attached to the film and may cause rust.
EN
1
b
b WARNING
When diving, never carry out operations other than those specified in this instruction manual. Mishandling
of the product and misunderstanding of the displayed content may lead to a fatal or serious accident.
b
WARNING
The diver’s watch is an auxiliary instrument which mainly displays the passage of time and does not ensure
the safety of a user. Use this watch while using the equipment (residual pressure gauge, water depth meter,
etc.) required for safe diving.
b
WARNING
Never use this watch for “saturation diving” using helium gas.
b
WARNING
Do not dive using this product unless you have been properly trained in scuba diving, acquired the requisite
experience and techniques for safe diving, thoroughly familiarized yourself with the operation and handling
of this product, and inspect all functions of this product prior to each dive.
EN
2
b
b CAUTION
Inspect the following items before diving (excluding saturation diving):
• The watch is normally operating.
• The remaining battery level is sufficient and the mainspring is sufficiently wound.
• The rotating bezel turns smoothly. (The bezel rotation must not be too loose or too tight.)
• Screws of the crown and other parts are reliably tightened.
• No abnormalities such as flaws or cracks exist on the band or glass.
• The band is reliably fixed (with spring bar, buckle or other parts.)
* If any abnormality is observed in the above items, do not use this watch for diving.
b CAUTION
Do not operate the crown or buttons underwater.
b
CAUTION
As the use environment of the diver’s watch may affect not only the case or band but also the internal
mechanism of the watch, we recommend that you periodically request an overhaul for inspection and
adjustment approximately once every three to four years.
EN
3
Page 3
CONTENTS
1 HOW TO USE
Handling cautions ............................................ 6
Precautions for diving (Please make sure to
observe the following.) .................................. 10
Before diving .............................................. 10
While diving ............................................... 12
After diving ................................................. 13
Structure of the case .................................. 14
Characteristics .............................................. 15
Names of the parts and their functions .......... 17
Screw down crown ........................................ 18
Screw lock type button .................................. 19
Switching modes ........................................... 20
How to use the rotating bezel ........................ 21
2 How to Set the Time and Date
How to set the time and date ......................... 23
How to set the standard hand position ....... 26
Listening to the Alarm Tone and Setting the
Time Signal Service/Operation Confirmation
Sound ........................................................ 29
How to set local time ..................................... 30
3 How to Use the Stopwatch
How to use the stopwatch ............................. 32
4 How to Use the Alarm
How to use the alarm ..................................... 34
5 Solar Charging Function
Charging the battery ...................................... 37
How to charge the battery .......................... 37
Guide to charging times ............................. 38
Battery level ............................................... 39
Power saving/sleep function ...................... 41
6 TO PRESERVE THE QUALITY OF YOUR
WATCH
Daily care ...................................................... 42
Performance and type ................................... 43
Lumibrite ....................................................... 44
Power Source ................................................ 45
Magnetic resistant performance .................... 47
Band .............................................................. 49
How to use the diver adjuster ........................ 51
How to use the diver extender ....................... 53
After sales service ......................................... 55
7 TROUBLESHOOTING
Troubleshooting ............................................ 58
How to reset the system ................................ 61
8 SPECIFICATIONS
Specifications ................................................ 62
EN
1
HOW TO USE
EN
4
Handling cautions
b WARNING
Please note that there is a risk of serious consequences such as severe injury if the following
safety regulations are not strictly observed.
Immediately stop wearing the watch in following cases:
○ If the watch body or band becomes edged by corrosion etc.
○ If the pins protrude from the band.
* Immediately consult the retailer from whom the watch was purchased or SEIKO CUSTOMER SERVICE
CENTER.
Keep the watch and accessories out of the reach of babies and children.
Care should be taken to prevent a baby or a child accidentally swallowing the accessories.
If a baby or child swallows the battery or accessories, immediately consult a doctor, as it will be
harmful to the health of the baby or child.
Do not remove the secondary battery from the watch.
* About the secondary battery → Power Source → P. 45
Replacement of the secondary battery requires professional knowledge and skill. Please ask the retailer
from whom the watch was purchased for replacement of the secondary battery.
Installation of an ordinary silver oxide battery can generate heat that can cause bursting and ignition.
6
Please note that there is a risk of minor injury or material damage if the following safety
b CAUTION
regulations are not strictly observed.
Avoid the following places for wearing or keeping the watch:
○ Places where volatile agents (cosmetics such as polish remover, bug repellent, thinners etc.) are
vaporizing
○ Places where the temperature drops below
5°C or rises above 35°C for a long time
○ Places affected by strong magnetism or static
electricity
If you observe any allergic symptoms or skin irritation
Stop wearing the watch immediately and consult a specialist such as a dermatologist or an allergist.
Other cautions
○ For adjusting the length of the metallic band, specialized knowledge and expertise are necessary.
Therefore, in such a case, contact the retailer from whom the watch was purchased. If you attempt
to adjust the metallic band, injury may occur to your hand or fingers, or parts of the band may be
lost.
○ Do not disassemble or tamper with the watch.
○ Keep the watch out of the reach of babies and children. Extra care should be taken to avoid risks
of any injury or allergic rash or itching that may be caused when they touch the watch.
○ If your watch is of the fob or pendant type, the strap or chain attached to the watch may damage
your clothes, or injure the hand, neck, or other parts of your body.
○ Places affected by strong vibrations
○ Places of high humidity
○ Dusty places
EN
EN
5
1
HOW TO USE
7
Page 4
1
Precautions for diving (Please make sure to observe the following.)
HOW TO USE
b WARNING
Never use the watch, in saturation diving using helium gas.
b WARNING
While diving, never operate the watch in any other manner than set forth in the instruction
manual.
b WARNING
Before using the diver’s watch, you have to be properly trained in various types of diving and
possess the requisite experience and skill to dive safely. When diving, strictly abide by the
rules of diving.
b CAUTION
Please note that there is a risk of minor injury or material damage if the following safety
regulations are not strictly observed.
Do not turn or pull out the crown when the watch is wet.
Water may get inside of the watch.
* If the inner surface of the glass is clouded with condensation or water droplets appear
inside of the watch for a long time, the water resistant performance of the watch is
deteriorated. Immediately consult the retailer from whom the watch was purchased or
SEIKO CUSTOMER SERVICE CENTER.
Do not leave moisture, sweat and dirt on the watch for a long time.
Be aware of a risk that a water resistant watch may lessen its water resistant
performance because of deterioration of the adhesive on the glass or gasket.
Do not wear the watch while taking a bath or a sauna.
Steam, soap or some components of a hot spring may accelerate the deterioration
of water resistant performance of the watch.
1
HOW TO USE
EN
8
1
HOW TO USE
4
■ Before diving
Before diving, check the following:
* “Names of the parts and their functions” → P. 17
The time is correctly set.
1
The seconds hand is moving at
2
one-second intervals.
If the hand is moving at twosecond intervals or it is
stopped, place the dial under
light to charge the battery.
* “Charging the battery” → P. 37
The rotating bezel turns
3
smoothly.
(The bezel rotation must not be
too loose or too tight.)
* “How to use the rotating bezel” → P. 21
EN
10
1
2
3
5
6
The crown and button screws
are firmly tightened.
* “Screw down crown” → P. 18
* “Screw lock type button” → P. 19
There are no visible cracks or
scratches on the crystal or
watch band.
The band is firmly attached to
the watch (with spring bars,
clamp or other parts.)
4
4
5
6
b
CAUTION
If there are any malfunctions, contact the retailer from whom the watch was purchased
or SEIKO CUSTOMER SERVICE CENTER.
EN
EN
9
1
HOW TO USE
11
Page 5
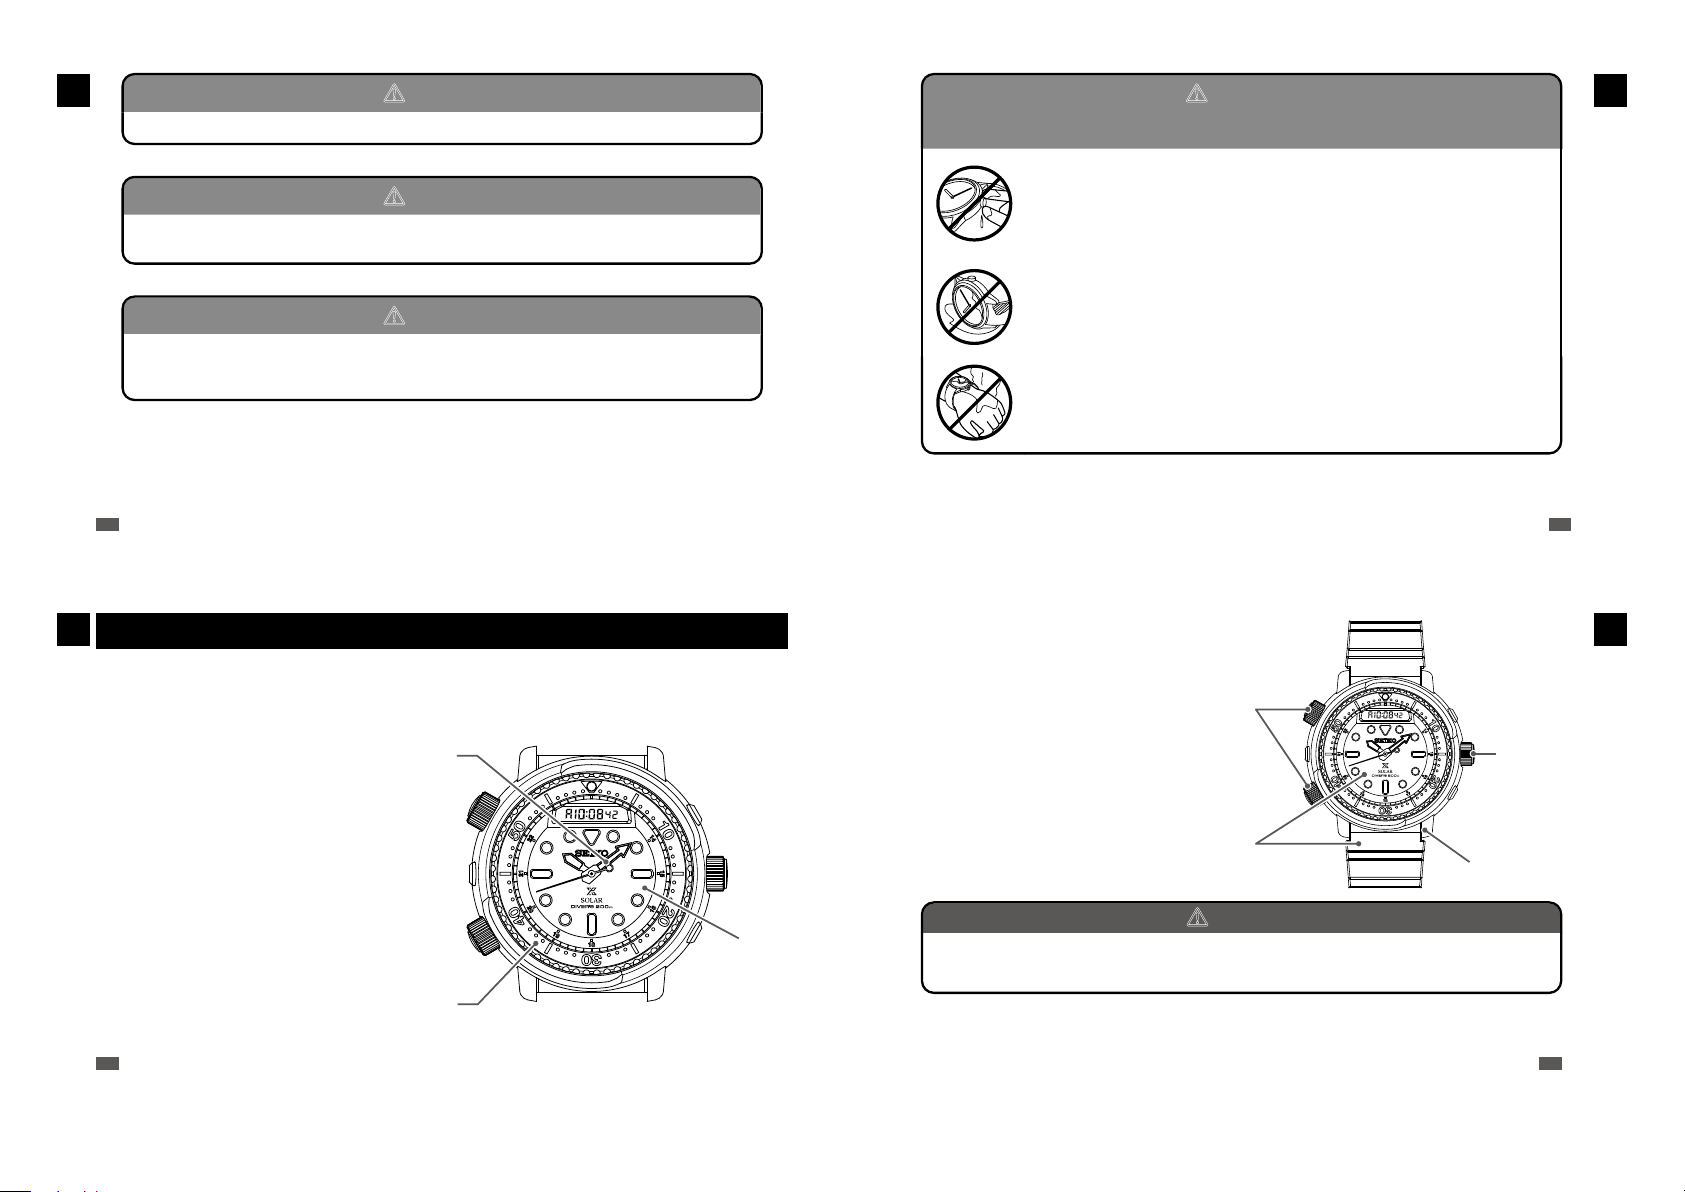
■ While diving
1
HOW TO USE
Please observe the following cautions for use.
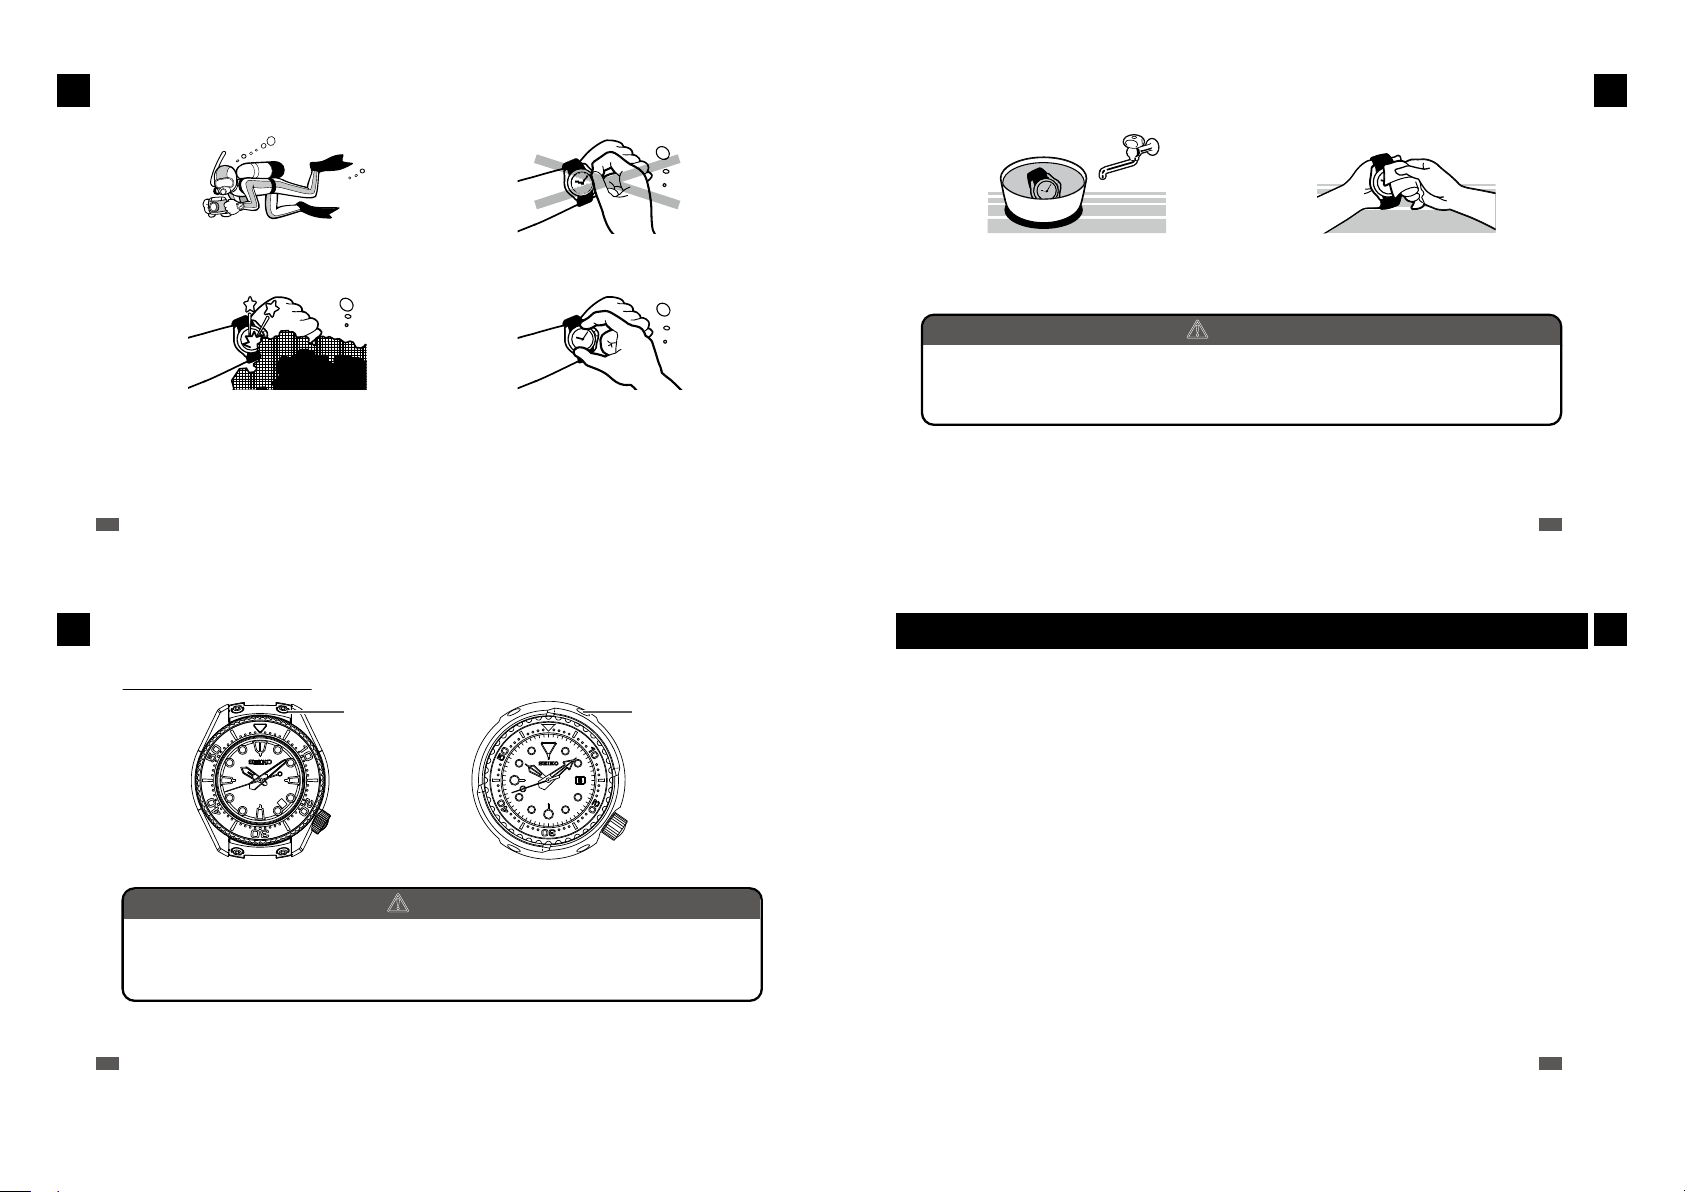
■ After diving
Please follow the care instructions below after diving.
1
HOW TO USE
The watch can be used for air diving within the water
resistant range displayed on the dial.
Take care not to bump the watch against hard
objects such as rocks.
EN
12
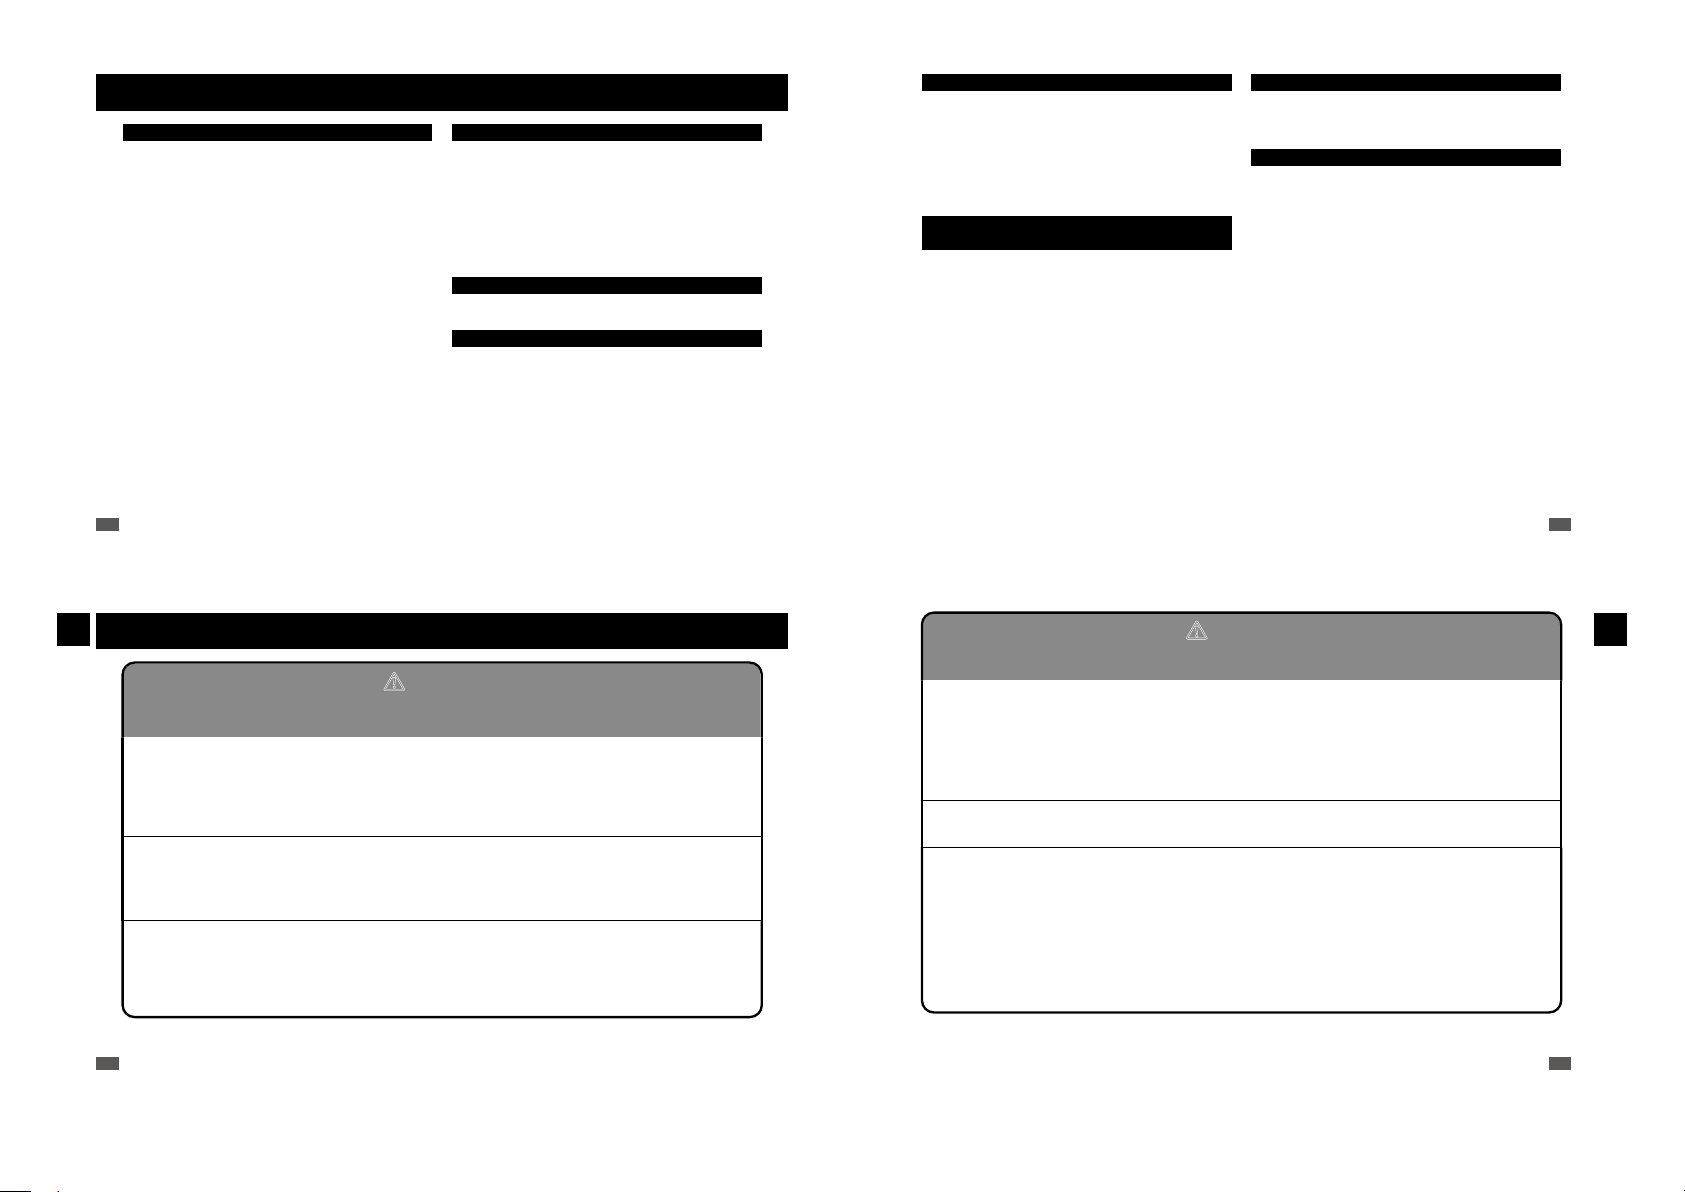
■ Structure of the case
1
HOW TO USE
In the following types of models, take care of the following issues in usage.
The bezel or protective outer case is securely fastened to the watch with setscrews.
Never loosen the setscrews.
Do not operate the crown or buttons underwater.
Bezel rotation may become slightly harder in the
water but this is not a malfunction.
setscrew setscrew
* The above illustration is provided as an example, therefore it may not be exactly the same as your watch.
b
CAUTION
Never loosen the setscrews used to fix the bezel or protective outer case.
Doing so may cause damage or result in further loosening.
* If you find that the setscrews have become loose or are functioning abnormally, consult the retailer from whom
the watch was purchased or SEIKO CUSTOMER SERVICE CENTER.
EN
14
Rinse the watch in fresh water to wash out all seawater and wipe it thoroughly dry to prevent rust.
Avoid pouring running water onto the watch directly from a faucet. Put some water into a bowl first, and
then soak the watch in the water to wash it.
b
CAUTION
Depending on the environment where a diver’s watch is used, its inner parts or movement
as well as its case or band may be affected. We recommend that you have your watch
overhauled regularly once every 3 or 4 years.
Characteristics
■ Water resistant
performance for air diving...
■ Time and calendar function.....
→ P. 23
■ Local time display function.....
→ P. 30
■ Stopwatch function..................
→ P. 32
■ Alarm function..........................
→ P. 34
■ Solar charging function...........
→ P. 37
■ Power save/sleep function......
→ P. 41
This watch is equipped with water resistant performance to be used
in water for a long period of time with scuba diving tanks. (It cannot
be used for saturation diving that uses helium gas.)
The calendar is a fully automatic calendar with dates from 2001 to
2100. The day and date are displayed on the digital display screen.
You can display your home time on the analog display and the local
time on the digital display.
The stopwatch can count up to a maximum of 100 hours.
The watch is equipped with a daily alarm function that sounds every
day at the set time (hour/minute).
The watch charges by converting light that shines on the solar panel
on the dial into electrical energy. After the battery is fully charged,
the watch will operate for about six months even if the dial is not
exposed to light.
If the dial is not exposed to light and the crown and buttons are not
operated for a certain period of time, the power save function
activates to limit the consumption of unnecessary energy.
EN
EN
13
1
HOW TO USE
15
Page 6
1
■ Battery level indication
HOW TO USE
function.....................................
→ P. 39
The current battery level is displayed in 10 levels. It gives you an
indication of how much battery charge is remaining.
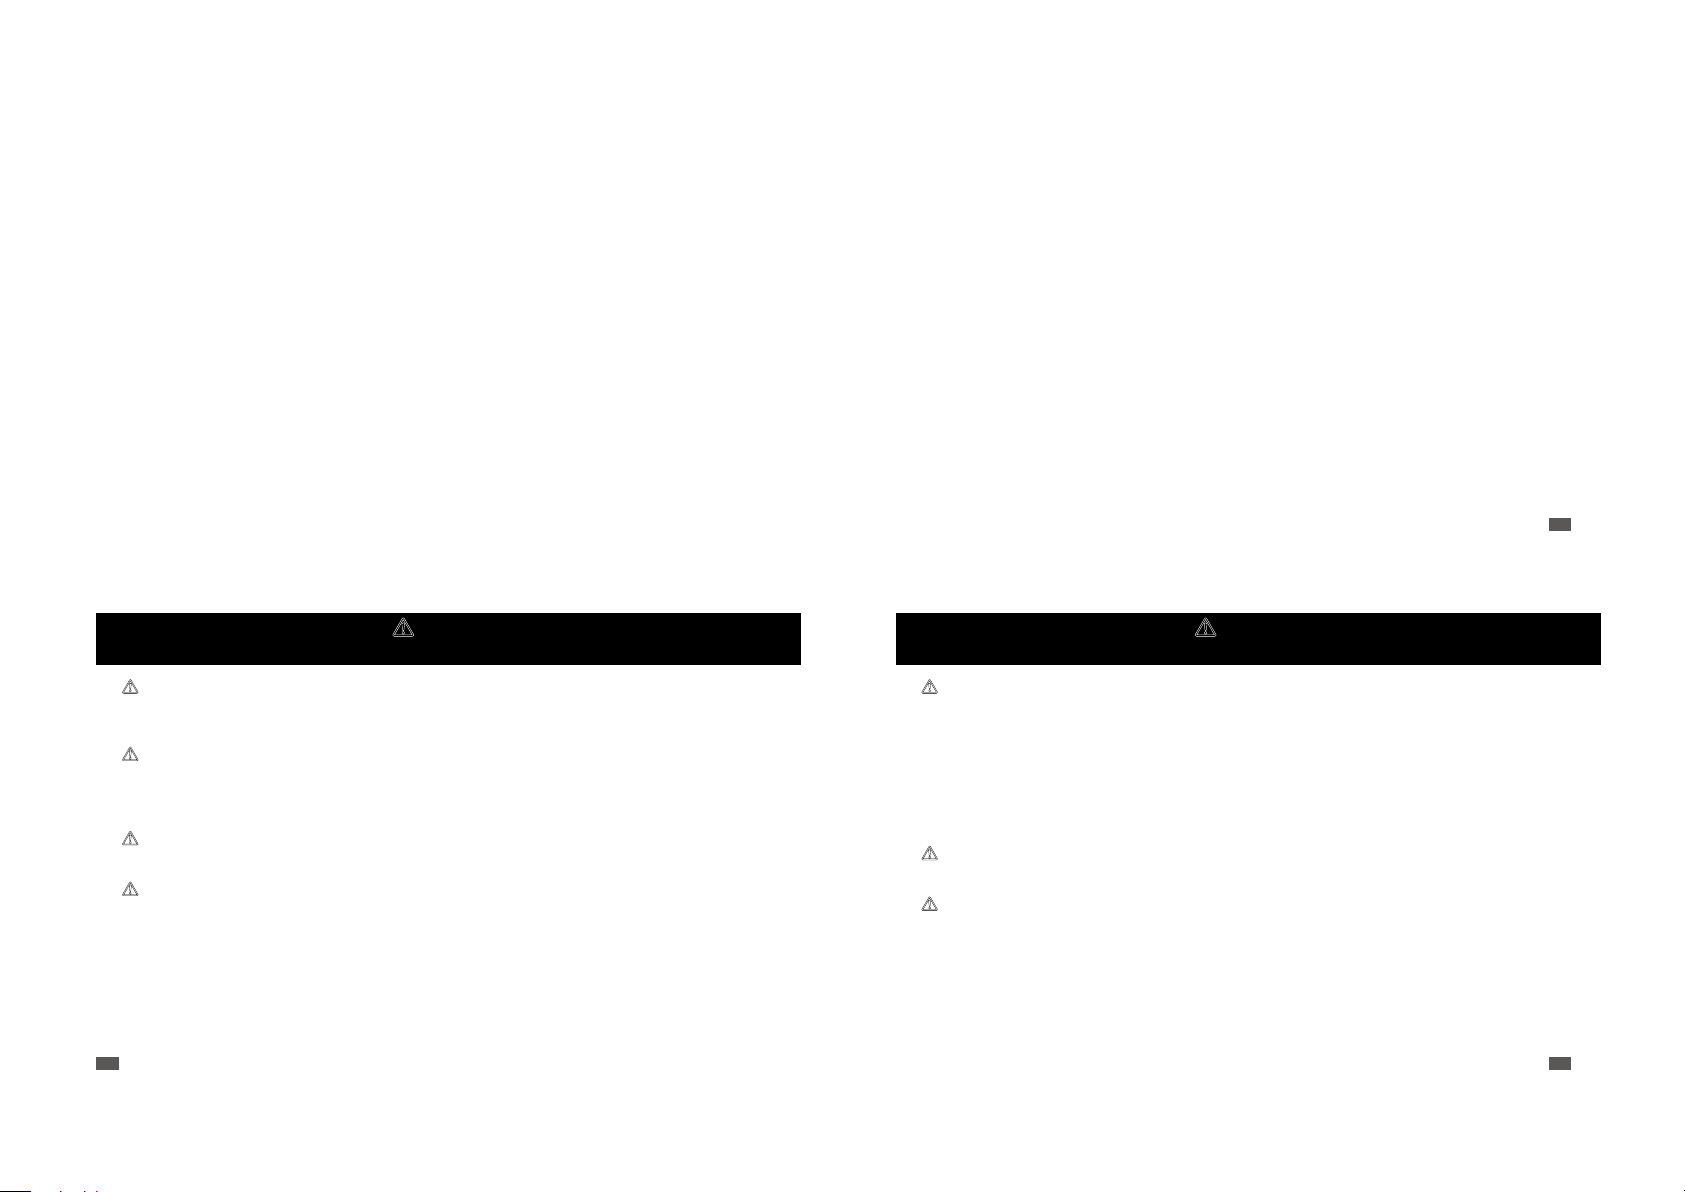
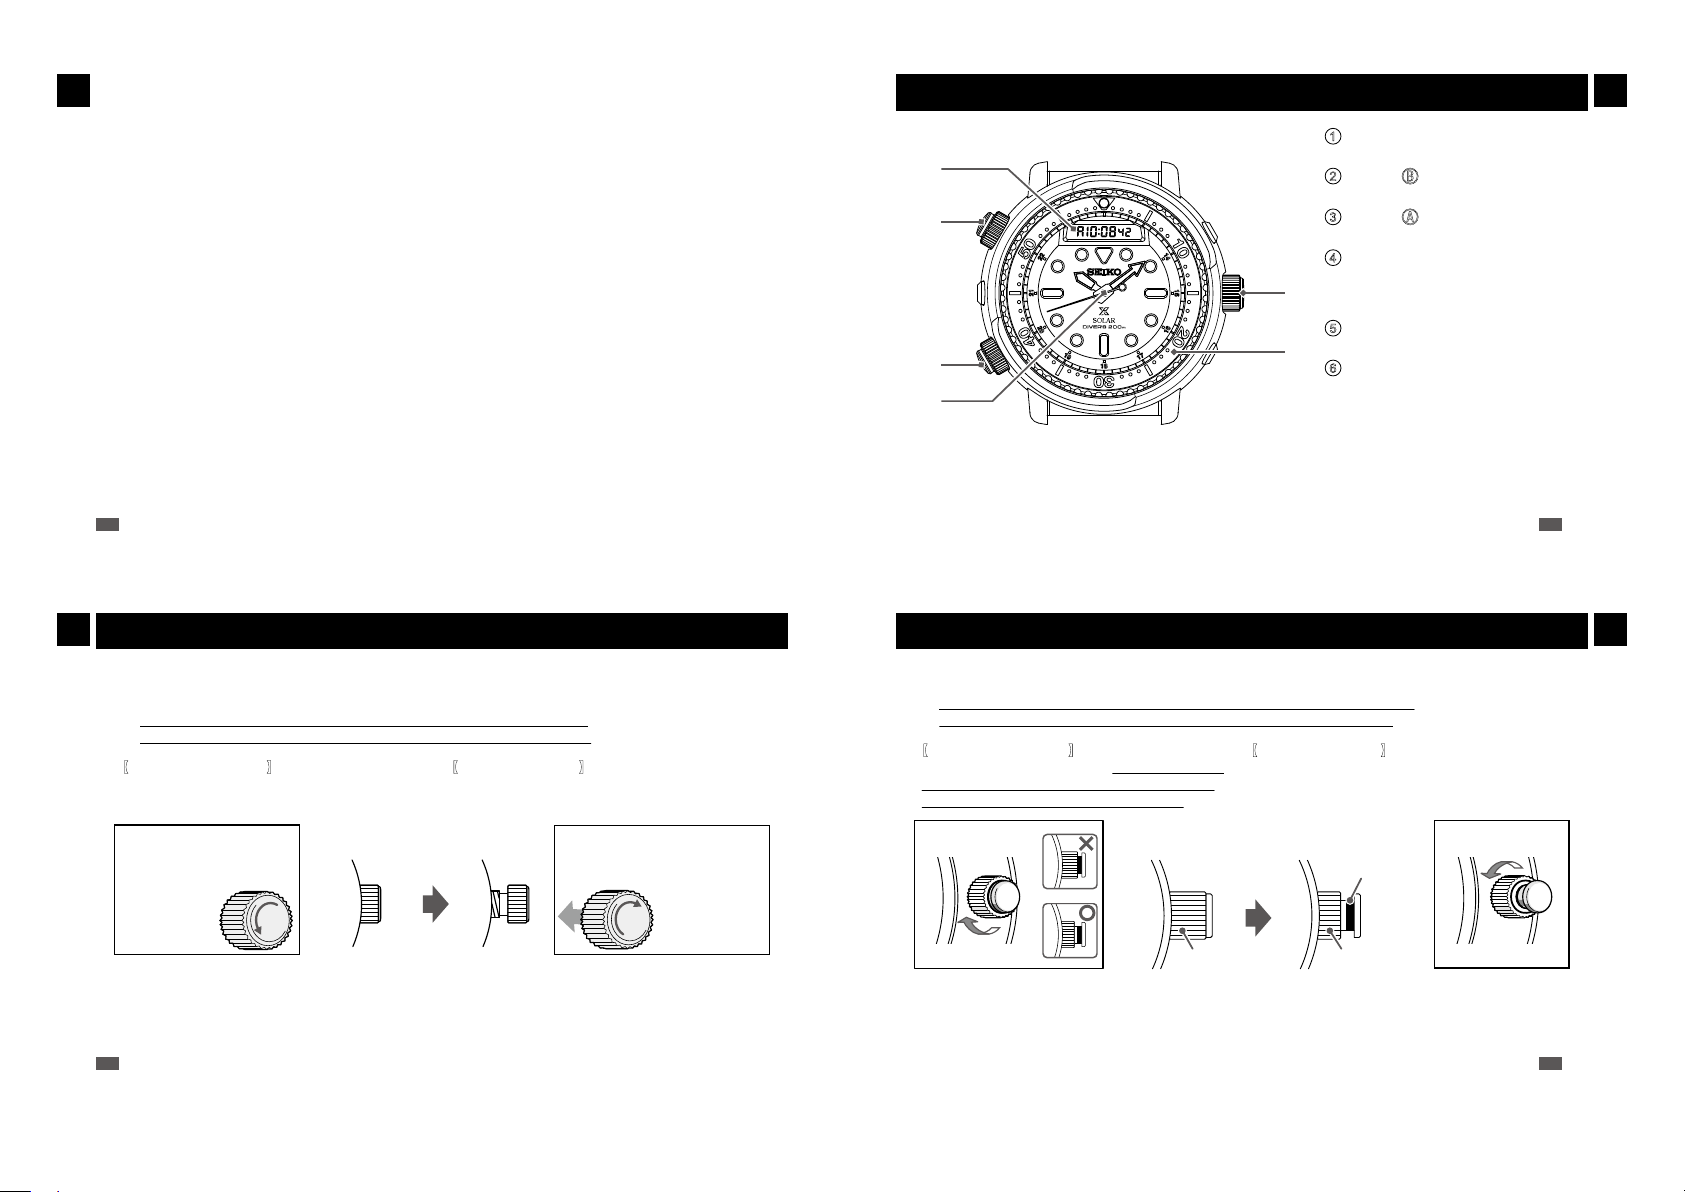
Names of the parts and their functions
Digital display
1
“Switching modes” → P. 20
1
2
3
4
5
6
Button B
2
“Screw lock type button” → P. 19
Button A
3
“Screw lock type button” → P. 19
Analog display
4
• Hour hand
• Minute hand
• Seconds hand
Crown
5
“Screw down crown” → P. 18
Rotating bezel
6
“How to use the rotating bezel”
→ P. 21
1
HOW TO USE
EN
16
1
HOW TO USE
The screw down crown features a mechanism that can securely lock the crown when it is not
being operated in order to prevent any operational errors and to improve its water resistant
performance.
It is necessary to unlock the screw down crown before operating it.
•
Once you have finished operating the crown, make sure to relock it.
•
To unlock the crown】
【
Turn the crown counterclockwise to unscrew it.
Now the crown can be operated.
Unlock the crown before
operating it.
Unscrew
* When locking the crown, turn it slowly with care, ensuring that the screw is properly engaged. Be careful not to
push it in forcefully, as doing so may damage the screw hole in the case.
EN
18
Screw down crown
【
To lock the crown】
Turn the crown clockwise while gently pressing it in
toward the watch body until it stops.
Crown locked
Crown unlocked
After operating the crown,
lock it.
Rotate while
pressing
the crown in.
Screw lock type button
The screw lock type button features a mechanism that can securely lock the button when it is not
being operated in order to prevent any operational errors and to improve its water performance.
It is necessary to unlock the screw lock type button before operating it.
•
Once you have finished operating the button, make sure to relock it.
•
To unlock the button】
【
Turn the button ring clockwise.
ring until you can see the entire check line and it
stops will enable you to operate the button.
Turn until it stops
Unscrew
* If the screw or button get dirty, they may not operate properly. “Daily care” → P. 42
* Note that if you turn the button ring more than you need to, the screw lock button may be difficult to return to its
original position.
* Before you go diving, check that both buttons are properly locked.
* Do not use the buttons when the watch is wet or when you are underwater.
Turning the button
Button locked
Button ring
【
To lock the button】
Turn the button counterclockwise until it stops.
Button unlocked
Check line
Button ring
Turn until it stops
Screw
EN
EN
17
1
HOW TO USE
19
Page 7

1
By setting the rotating bezel beforehand, the elapsed time since the start of an event can be measured.
* The above illustration is provided as an example, therefore it may not be exactly the same as your watch.
1
At the start of the event, for which
you want to measure the elapsed
time (for example, when you start
diving), rotate the bezel so that
the
mark on the bezel is
aligned with the minute hand.
The rotating bezel is designed to rotate only
counterclockwise.
Do not forcibly rotate it clockwise.
“[One-Way rotating bezel]” → P. 22
2
Read the graduation on the
rotating bezel to which the
minute hand is pointing.
The graduation on the rotating bezel to
which the minute hand is pointing indicates
the elapsed time.
[One-Way rotating bezel]
As the evaluation of the remaining air in your cylinder is based on the information of the elapsed time of the dive,
the rotating bezel for a diver’s watch is designed to rotate only counterclockwise, so that the watch is prevented
from displaying the elapsed time shorter than it actually is.
Make sure that you check the correct remaining amount of air in your cylinder before diving.
Use the display of the elapsed time by the rotating bezel only as a guide during diving.
HOW TO USE
When you press Button A, the digital display changes.
B
Switching modes
Time display
Calendar display Local time display
→ P. 30
How to use the rotating bezel
Example: When you start diving at 10:10 am.
Align the
with the minute hand
*
Rotating direction of
the bezel
mark
1
HOW TO USE
A
* If you hold down Button A, the display will change to the time regardless of what is being displayed.
* If the operation confirmation sound is set, a sound will play every time you change the display.
(For details on the operation confirmation sound, see P. 29.)
* You can check the battery level by holding down Button B unless the digital display is showing the stopwatch.
→ P. 39
EN
20
1
HOW TO USE
b
EN
22
CAUTION
Alarm display
→ P. 34
Stopwatch display
→ P. 32
Example: After 20 minutes has elapsed
Elapsed time
EN
How to set the time and date
The times on the digital and analog displays are linked.
You can set the analog display time by setting the digital display time.
* If the digital display time and the analog display time are out of sync, the standard hand position is misaligned. Set
the standard hand position. → P. 26
Unlock the crown and button.
1
* “Screw down crown” → P. 18
* “Screw lock type button” → P. 19
Press Button A to show the time on the digital
2
display.
Pull out the crown.
3
* The hands on the analog display will stop and “seconds” on
the digital display will start flashing.
A
EN
21
2
How to Set the Time and Date
23
Page 8

Turn the crown to set the time
The hand to be aligned to the standard position moves slightly
to indicate that it is ready to be aligned.
AAA
4
and calendar.
2
How to Set the Time and Date
A
* When you press Button A, the flashing item that can be set changes.
Second Minute Hour
* When setting the seconds, select “Seconds” and turn the crown to set the seconds in accordance with the time
signal service.
* If you turn the crown while 30 to 59 seconds are shown on the seconds display, one minute is added to the time
and the second digits are immediately reset to “00”.
* The telephone time signal service is helpful for setting the seconds hand exactly.
* Setting the date automatically sets “Day”.
EN
24
Turn clockwise:
Time/date moves
forwards
Turn counterclockwise:
Time/date moves
backwards
■ How to set the standard hand position
If the standard hand position on the analog display is misaligned, you will need to correct it.
2
How to Set the Time and Date
Unlock the crown and button.
1
* “Screw down crown” → P. 18
* “Screw lock type button” → P. 19
Push the crown back in to the normal position.
5
* The hands on the analog display move to the set time and the
watch starts to function.
2
How to Set the Time and Date
Lock the crown and button.
6
* “Screw down crown” → P. 18
* “Screw lock type button” → P. 19
* This watch is equipped with a fully automatic calendar function. As the day of the week, day, month, and year from
2001 to 2100 have been programmed in the automatic calendar, you do not need to manually adjust odd and even
months and leap years during this period.
DayMonthYear12/24H
EN
25
Check that the standard hand position is not misaligned.
5
* If the hand is misaligned, turn the crown to align the hand to the 12 o’clock position.
* If you are aligning the seconds hand to the standard position, it will not move if you turn the crown
counterclockwise.
* Pressing Button A enables you to switch to the hand that is to be aligned to the standard position.
2
How to Set the Time and Date
Press Button A to show the time on the digital
2
display.
Pull out the crown.
3
Hold down Button B.
4
* All hands will move to the 12 o’clock position and “S SET” will
start flashing on the digital display.
*
EN
26
A
B
Aligning the seconds
hand
Aligning the minute
hand
Aligning the hour hand
EN
27
Page 9

Push the crown back in to the normal position.
The alarm symbol will start flashing
6
* The hands on the analog display move to the current time and
2
How to Set the Time and Date
the watch starts to function.
Lock the crown and button.
7
* “Screw down crown” → P. 18
* “Screw lock type button” → P. 19
■ Listening to the Alarm Tone and Setting the Time Signal
Service/Operation Confirmation Sound
●
Listening to the alarm tone
When the digital display is showing the time, holding
down Button A and Button B at the same time
enables you to listen to the alarm tone.
●
Setting the time signal service/
operation confirmation sound
When the digital display is showing the time,
pressing Button A and Button B at the same time
enables you to set and turn off the time signal
service/operation confirmation sound.
Time signal service symbol
2
How to Set the Time and Date
EN
28
How to set local time
In addition to the time shown on the time display, you can set another time as the local time. This
2
is useful for when you travel overseas.
How to Set the Time and Date
Unlock the crown and button.
1
* “Screw down crown” → P. 18
* “Screw lock type button” → P. 19
Press Button A to show the local time on the
2
digital display.
Pull out the crown.
3
* “Hour” on the digital display will start flashing.
A
B
A
Turn the crown to set the time.
4
* When you press Button A, the flashing
item that can be set changes.
Push the crown back in to the
5
normal position.
Lock the crown and button.
6
* “Screw down crown” → P. 18
* “Screw lock type button” → P. 19
B
A
* The alarm tone will sound at this time, but this is not an
error.
Turn clockwise:
Time moves forwards
A
Turn counterclockwise:
Time moves backwards
EN
29
2
How to Set the Time and Date
EN
30
EN
31
Page 10

How to use the stopwatch
The stopwatch can count up to a maximum of 99 hours, 59 minutes, 59 seconds in increments of
1/100 seconds.
The stopwatch can count in increments of seconds after 60 minutes has passed.
* The light will not turn on when the watch is in stopwatch display.
3
How to Use the Stopwatch
Unlock the button.
1
* “Screw lock type button” → P. 19
Press Button A to show the stopwatch on the digital display.
2
A
Press Button B to start the stopwatch.
3
* The stopwatch starts or stops when you press Button B.
* Hold down Button B to reset the stopwatch time.
* If you press Button A to change the digital display while the stopwatch is functioning, it will continue to
function.
* If the stopwatch exceeds the maximum count time, it will automatically stop and be reset.
B
* Lock the button once you have finished using the stopwatch.
“Screw lock type button” → P. 19
Up to 60 minutes
1/100 of a second
Seconds
Minutes
Over 60 minutes
Seconds
Minutes
Hours
3
How to Use the Stopwatch
EN
32
How to use the alarm
You can set the alarm to sound every day at a set time.
Unlock the crown and button.
1
* “Screw down crown” → P. 18
* “Screw lock type button” → P. 19
4
How to Use the Alarm
Press Button A to show the alarm on the
2
digital display.
Pull out the crown.
3
* “Hour” on the digital display will start flashing.
EN
34
A
Turn the crown to set the time.
4
* When you press Button A, the flashing
item that can be set changes.
Push the crown back in to the
5
normal position.
* The alarm will automatically be turned on.
Lock the crown and button.
6
* “Screw down crown” → P. 18
* “Screw lock type button” → P. 19
A
Turn clockwise:
Time moves forwards
Turn counterclockwise:
Time moves backwards
EN
EN
33
35
4
How to Use the Alarm
Page 11

■ When you want to turn the alarm on or off
The watch is used or stored under conditions where
it cannot be exposed to light for a long time.
When the digital display is showing the alarm, pressing Button A and Button B at the same time enables
you to turn the alarm tone on or off.
Alarm symbol
B
4
How to Use the Alarm
A
Charging the battery
■ How to charge the battery
Expose the dial to light to charge the watch.
5
Solar Charging Function
■ Stopping an activated alarm
The alarm will sound for 10 seconds at the set time.
To stop the activated alarm, press any button on the watch.
EN
36
■ Guide to charging times
Charge the watch using the times below as a guide.
Battery level
indication
Outside on a
sunny day
5
Window sill on a
Solar Charging Function
sunny day
Window sill on a
cloudy day
Inside under a
fluorescent light
BATT 0
(All off)
Approx. 2 hours
Approx. 15 hours
Approx. 50 hours
Approx. 220 hours
BATT 1
Approx. 4 hours
Approx. 40 hours
Approx. 135 hours
BATT 2 -
BATT 3
Approx. 10 hours
Approx. 8 hours
Approx. 95 hours
Approx. 80 hours
Approx. 310 hours
Approx. 255 hours
BATT 4 -
BATT 6
BATT 7 BATT 10
Charge
time for one
day’s use
Approx.
2 minutes
Approx.
20 minutes
Approx.
60 minutes
Approx.
4 hours
To ensure optimal performance of the watch, make
sure that the watch is kept sufficiently charged at all
times.
* Be careful to make sure that the watch does not get hot when it is charging. (The operating temperature range is
0 °C to +50 °C.)
* When you first start using the watch or starting it after it stopped due to a lack of charge, charge the watch sufficiently
using the table on P. 38 as a guide.
Under the following situations, the energy of the
watch is likely to be depleted, resulting in stoppage
of the watch:
• The watch is concealed under a sleeve.
•
EN
■ Battery level
●
Two-second hand movement
When the battery level is low, the seconds hand will move every two seconds, which is called
“two-second hand movement”.
If the battery charge is completely depleted after that, the watch stops.
If “two-second hand movement” occurs, sufficiently charge the battery. → P. 37
* During two-second hand movement, the light will not function and the alarm tone/operation confirmation sound
will stop.
●
Battery level
You can check the battery level by holding down Button B unless the digital display is showing
the stopwatch.
B
37
5
Solar Charging Function
EN
38
EN
39
Page 12

If the battery level falls to “BATT 6” or below, try to charge the battery.
Battery level
indication
BATT 10 -
1
BATT 7
BATT 6 -
2
BATT 4
BATT 3 -
3
BATT 2
BATT 1
5
4
Solar Charging Function
BATT 0
5
EN
40
(All off)
Restrictions on operations and
None.
The light will not turn on.
The alarm tone/operation confirmation
sound will stop.
Sufficiently charge the battery until it reaches 1. → P. 37
* If irregular movement occurs, reset the system. → P. 61
* All function settings will be reset and the standard hand position data will also be lost.
After restoring the watch from BATT 0, follow the procedures in “How to set the time and
date” → (P. 23) and “How to set the standard hand position” → (P. 26).
functions
What should you do?
Use the watch normally.
Try to charge the battery. → P. 37
Sufficiently charge the battery until it
reaches 1. → P. 37
After charging the battery, use the watch
normally.
■ Power saving/sleep function
If the dial is not exposed to light and the buttons are not operated for a certain period of time, the
power save function activates.
●
Power save mode
If the dial is not exposed to light and the buttons are
not operated for more than two hours, power save
mode will be enabled.
When the watch is in power save mode, the “PS”
symbol will flash.
●
Turning off the power save/sleep function
Performing one of the following operations will turn off the power save/sleep function:
• Expose the watch to light
• Operate any button
• Pull out or push in the crown
●
Sleep mode
If the dial is not exposed to light and the buttons are
not operated for about three days, sleep mode will
be enabled.
When the watch is in sleep mode, the “SL” symbol
will flash.
* During sleep mode, the stopwatch count will be reset
and the alarm tone will be turned off.
EN
5
Solar Charging Function
41
TO PRESERVE THE QUALITY OF YOUR
Daily care
●
The watch requires good daily care
• Do not wash the watch when its crown is in the extended position.
• Wipe away moisture, sweat or dirt with a soft cloth.
• After soaking the watch in seawater, be sure to wash the watch in clean pure water and wipe it dry
carefully.
WATCH
6
Do not pour running water directly from a faucet onto the watch. Put some water into a bowl first, and
then soak the watch in the water to wash it.
* If your watch is rated as “Non-water resistant” or “water resistant for everyday life”, do not wash the watch.
“Performance and type” → P. 43
●
Turn the crown from time to time
• In order to prevent corrosion of the crown, turn the crown from time to time.
• The same practice should be applied to a screw down crown.
“Screw down crown” → P. 18
EN
42
Performance and type
The case back shows the caliber and performance of your watch
Water resistant performance
performance
•
Water resistant performance
•
Case Number
The number to identify the type of your watch.
* The above illustration is provided as an example, therefore it may not be exactly the same as your watch.
Magnetic resistant performance
•
Refer to pages P. 47 and P. 48.
Case NumberMagnetic resistant
EN
TO PRESERVE THE QUALITY OF YOUR
WATCH
6
43
Page 13

TO PRESERVE THE QUALITY OF YOUR
Lumibrite
Power Source
TO PRESERVE THE QUALITY OF YOUR
If your watch has Lumibrite
Lumibrite is a luminous paint that absorbs the light energy of sunlight and lighting apparatuses in a short
time and stores it to emit light in the dark. For example, if exposed to a light of more than 500 lux for
approximately 10 minutes, Lumibrite can emit light for 3 to 5 hours. Please note, however, that, as Lumibrite
emits the light it stores, the luminance level of the light decreases gradually over time. The duration of the
emitted light may also differ slightly depending on such factors as the brightness of the place where the
watch is exposed to light and the distance from the light source to the watch.
WATCH
* In general, when coming from a place that is bright to a place that is dark, it takes human eyes some time to adapt
to the darkness making it difficult to see objects initially. (Dark adaptation)
* Lumibrite is luminous paint that stores and emits light, which is harmless to human beings and the environment,
containing no toxic materials such as radioactive substances.
<Brightness levels>
6
Sunlight
Indoor (Window-side during
daytime)
Lighting apparatus (40-watt daylight
fluorescent light)
EN
44
TO PRESERVE THE QUALITY OF YOUR
* Overcharge prevention function
When the secondary battery is fully charged, the overcharge prevention function is automatically
activated to avoid further charging.
There is no need to worry about damage caused by overcharging no matter how much the
secondary battery is charged in excess of the “time required for fully charging the watch.”
* For the required time to fully charge the battery, see “Guide to charging times” → P. 38.
WATCH
■ Notes on charging the watch
Condition Illumination
Fine weather 100,000 lux
Cloudy weather 10,000 lux
Fine weather more than 3,000 lux
Cloudy weather 1,000 to 3,000 lux
Rainy weather less than 1,000 lux
Distance to the watch: 1 m 1,000 lux
Distance to the watch: 3 m 500 lux (average room luminance)
Distance to the watch: 4 m 250 lux
b
WARNING
• When charging the watch, do not place the watch in close proximity to an intense light
source such as lighting equipment for photography, spotlights or incandescent lights,
6
as the watch may be excessively heated resulting in damage to its internal parts.
• When charging the watch by exposure to direct sunlight, avoid places that easily reach
high temperatures, such as a car dashboard.
• Always keep the watch temperature under 60°C.
The battery used in this watch is a special secondary battery, which is different from ordinary
batteries.
Unlike an ordinary silver oxide battery, the secondary battery does not require periodic
replacement.
The capacity or charging efficiency may gradually lower due to long-term use or operating
environment.
In addition, long-term use may shorten the charge duration due to wear, contamination, lubricant
deterioration of mechanical parts, etc. Request repair when the performance lowers.
b
WARNING
■ Notes on replacing the secondary battery
• Do not remove the secondary battery from the watch.
Replacement of the secondary battery requires professional knowledge and skill.
Please ask the retailer from whom the watch was purchased for replacement of the
secondary battery.
• Installation of an ordinary silver oxide battery can generate heat that can cause
bursting and ignition.
EN
Magnetic resistant performance
a watch may temporarily gain or lose time or stop operating.
Diver’s watches feature magnetic resistant performance which is equivalent to or above JIS Class 1.
Indication on the case back Condition of use
No indication
If the watch becomes magnetized and its accuracy deteriorates to an extent exceeding the specified rate
under normal use, the watch needs to be demagnetized. In this case, you will be charged for
demagnetization and accuracy readjustment even if it happens within the guarantee period.
The reason why a watch is affected by magnetism
The built-in motor is provided with a magnet, which may be influenced by a strong external magnetic field.
Affected by nearby magnetism,
b DANGER
Keep the watch more than 5 cm away from magnetic products.
(JIS level-1 standard)
Keep the watch more than 1 cm away from magnetic products.
(JIS level-2 standard)
WATCH
6
45
TO PRESERVE THE QUALITY OF YOUR
WATCH
6
EN
46
EN
47
Page 14

TO PRESERVE THE QUALITY OF YOUR
Examples of common magnetic products that may affect watches
WATCH
Smartphone, cellular phone,
tablet terminal (speaker)
6
AC adapter Bag
(with magnet
buckle)
Band
The band touches the skin directly and becomes dirty with sweat or dust. Therefore, lack of care
may accelerate deterioration of the band or cause skin irritation or stain on the sleeve edge.
The watch requires a lot of attention for long usage.
●
Metallic band
• Moisture, sweat or soil will cause rust even on a stainless steel band if they are left for a long time.
Lack of care may result in a rash or cause a yellowish or gold stain on the lower sleeve edge of shirts.
•
• Wipe off moisture, sweat or soil with a soft cloth as soon as possible.
• To clean the soil around the joint gaps of the band, wipe it out in water and then brush it off with a soft
toothbrush.
(Protect the watch body from water splashes by wrapping it up in plastic wrap etc.)
Clean it off with a soft cloth.
• Because some titan bands use pins made of stainless steel, which has outstanding strength, rust may
form in the stainless steel parts.
• If rust advances, pins may poke out or drop out, and the watch case may fall off the band, or the clasp
may not open.
• If a pin is poking out, personal injury may result. In such a case, refrain from using the watch and request
repair.
TO PRESERVE THE QUALITY OF YOUR
WATCH
6
AC-powered
shaver
EN
48
TO PRESERVE THE QUALITY OF YOUR
●
Polyurethane band
• A polyurethane band is susceptible to discoloration from light, and may be deteriorated by solvent or
atmospheric humidity.
Especially a translucent, white, or pale colored band easily adsorbs other colors, resulting in color smears
•
or discoloration.
• Wash out dirt in water and clean it off with a dry cloth.
(Protect the watch body from water splashes by wrapping it up in plastic wrap etc.)
• When the band becomes less flexible, have the band replaced with a new one. If you continue to use
the band as it is, the band may develop cracks or become brittle over time.
●
WATCH
6
Silicone band
• As for material characteristics, the band is easily dirtied, and may be stained and discolored.
Wipe off dirt with a wet cloth or cleaning tissue.
• Unlike bands of other materials, cracks may result in the band being cut. Take care not to damage the
band with an edged tool.
Notes on skin
irritation and
allergy
Notes on the
length of the band
Magnetic cooking
device
Skin irritation caused by a band may result from various factors such as allergy to
metals or leathers, or skin reactions against friction on dust or the band itself.
Adjust the band to allow a little clearance with your wrist to ensure proper
airflow.
When wearing the watch, leave enough room to insert a finger between
the band and your wrist.
Portable radio
(speaker)
Magnetic
necklace
Magnetic health
pillow
EN
How to use the diver adjuster
If your watch’s metallic band has the Diver Adjuster function, the length of the band can be easily
adjusted.
It is very useful when you wear the watch over a wet suit or winter clothing.
Lift up the flap approximately
1
90°until it stands upright, and
then press the flap down
further approximately 20°and
lightly hold it.
• When doing so, take care not to push
the flap forcibly. Although you may feel
slight resistance, doing this requires
only a light force.
Lightly pull the band on the 6
2
o’clock side of the watch along
the curved line of the band to
pull out the slider.
• Doing this requires only a light force.
Take care not to pull the band forcibly.
• The slider can be pulled out
approximately 30 mm. Take care not
to pull it out more than this limit.
Band on the 6
o’clock side of
the watch
Flap
20° 90°
49
TO PRESERVE THE QUALITY OF YOUR
WATCH
6
EN
50
EN
51
Page 15

TO PRESERVE THE QUALITY OF YOUR
WATCH
While pressing the push
3
button, lift up the clasp to
release the buckle, and place
the watch on your wrist.
Close the clasp (4-1) first and
4
then, the flap (4-2).
Flap
(4-2)
Clasp
Push button
Clasp
(4-1)
How to use the diver extender
If your watch’s metallic band has the Diver Extender function, the length of the band can be easily
adjusted.
It is very useful when you wear the watch over a wet suit or winter clothing.
Lift up the flap.
1
Flap
TO PRESERVE THE QUALITY OF YOUR
WATCH
6
Hold both sides of the band to
5
adjust the length of the slider
until it fits snugly around your
wrist.
EN
52
TO PRESERVE THE QUALITY OF YOUR
WATCH
6
Open the two-piece foldover
3
portion of the Diver Extender in
the direction of the arrow.
• Some force is required to open the
foldover portion, and it will click when
it is opened.
Slide the upper cover of the
4
Diver Extender in the direction
of the arrow, and then, pull it up
to extend the two-piece
foldover portion to the full
extent.
Two-piece foldover portion of
the Diver Extender
Upper cover of the Diver Extender
While pressing the push
2
button, open the clasp.
• After opening the clasp, push the flap
back to the normal position for safety’s
sake.
Clasp
Push button
After sales service
●
Notes on guarantee and repair
• Contact the retailer from whom the watch was purchased or SEIKO CUSTOMER SERVICE CENTER
for repair or overhaul.
• Within the guarantee period, present the certificate of guarantee to receive repair services.
• Guarantee coverage is provided in the certificate of guarantee.
Read carefully and retain it.
• For repair services after the guarantee period has expired, if the functions of the watch can be restored
by repair work, we will undertake repair services upon request and payment.
●
Replacement with functional parts
• Please keep in mind that if original parts are not available, they may be replaced with substitutes whose
outward appearance may differ from the originals.
EN
6
53
TO PRESERVE THE QUALITY OF YOUR
WATCH
6
Place the watch on your wrist,
5
and close the clasp (5-1) first
and then, the flap (5-2).
* To fold up the Diver Extender, reverse the
procedure above. When the two-piece
folder portion of the Diver Extender is
folded up completely, it also clicks in the
same manner as when it is opened.
EN
54
Flap
(5-2)
Clasp
(5-1)
EN
55
Page 16

TO PRESERVE THE QUALITY OF YOUR
●
Inspection and adjustment by disassembly and cleaning (overhaul)
• Periodic inspection and adjustment by disassembly and cleaning (overhaul) is recommended
approximately once every 3 to 4 years in order to maintain optimal performance of the watch for a long
time. According to use conditions, the oil retaining condition of your watch mechanical parts may
deteriorate, abrasion of the parts may occur due to contamination of oil, which may ultimately lead the
watch itself to stop. Furthermore, the digital display may go out due to liquid leaking.
• The power transmission gear of the movement of this watch constantly receives force. To ensure that
this mechanism works properly all the time, washing parts, changing oil, adjusting accuracy, checking
functions and replacing consumable parts on a regular basis are important. The first overhaul after the
purchase of your watch is particularly important for preserving long-time use of your watch. According
WATCH
6
to use conditions, the oil retaining condition of your watch mechanical parts may deteriorate, abrasion
of the parts may occur due to contamination of oil, which may ultimately lead the watch itself to stop. As
the parts such as gasket may deteriorate, water resistant performance may be impaired due to intrusion
of perspiration and moisture.
Please contact the retailer from whom the watch was purchased for inspection and adjustment by
disassembly and cleaning (overhaul). For replacement of parts, please specify “SEIKO GENUINE
PARTS.” When asking for inspection and adjustment by disassembly and cleaning (overhaul), make
sure that the gasket and push pin are also replaced with new ones.
• When your watch is inspected and adjusted by disassembly and cleaning (overhauled), the movement
of your watch may be replaced.
b
CAUTION
Depending on the environment where a diver’s watch is used, its inner parts or movement
as well as its case or band may be affected. We recommend that you have your watch
overhauled regularly once every 3 or 4 years.
●
Internal watch light (LED)
The watch uses a technique to uniformly diffuse light from a light emitting diode (LED) with a light guide
plate.
* If the battery is nearing the end of life and voltage decreases, illumination (brightness) will decrease.
●
Liquid crystal panel
After the liquid crystal panel in this watch has been used for seven years, the contrast will decrease and
the numbers will be hard to read. Please get it replaced at the retailer from whom the watch was purchased.
They will replace it for a fee.
TO PRESERVE THE QUALITY OF YOUR
WATCH
6
EN
56
Troubles Possible causes Solutions
The watch stops
operating.
TROUBLESHOOTING
The seconds hand
is moving at twosecond intervals.
Even if the watch
is charged until
“BATT 10” after it
stops, the
7
seconds hand
does not move in
one-second
intervals.
Or it does not
work.
EN
58
Troubleshooting
The power is completely depleted or
low.
If you wear the watch every day and
this occurs, the most likely cause is
the watch is hidden by your sleeves
or other clothing when you wear it
and it is not sufficiently exposed to
light.
The internal watch system is
unstable.
Sufficiently charge the battery until
the seconds hand moves every
second.
When you wear the watch, try to
make sure that the watch is not
hidden by your sleeves or other
clothing. Additionally, when you take
the watch off, try to place it in a bright
place.
See “How to reset the system”
→ (P. 61) and follow the procedure.
Referen
ce
P. 37
P. 61
Troubles Possible causes Solutions
If the watch returns to room
temperature, the accuracy will return
to its original state.
If it does not return to its original
state, contact the retailer from whom
the watch was purchased.
Correct this condition by moving and
keeping the watch away from the
magnetic source, and reset the time.
If this action does not correct the
condition, contact the retailer from
whom the watch was purchased.
Sufficiently charge the battery until
the seconds hand moves every
second.
The watch
temporarily gains/
loses time.
The buttons do
not work
(Nothing happens
when they are
pressed)
The watch has been left in extremely
high or low temperatures for a long
time.
The watch has been left close to an
object with a strong magnetic field.
The power is low.
Referen
ce
-
-
P. 37
EN
EN
57
59
TROUBLESHOOTING
7
Page 17

Troubles Possible causes Solutions
Cal. H851
1.Features Three-hand (hour, minute, and seconds) analog display and digital display
2. Frequency of crystal
oscillator
32,768 Hz (Hz = Vibrations per second)
3. Loss/gain (daily rate)
Monthly average loss/gain ± 15 seconds
Only if worn on the wrist in a temperature range of 5°C to 35°C.
4. Operational
temperature range
−10°C to +60°C (the display function is 0°C to +50°C)
5. Driving system
(analog)
Three step motors
6. Display (digital) FE (field effect) nematic liquid crystals
7. Power source Rechargeable battery: 1
8. Duration
Approx. six months (if the watch is not exposed to light after a full charge, the
stopwatch is used an hour a day, the light is used once a day (two seconds), the
alarm is used once a day (10 seconds), and power save mode is engaged for six
hours a day)
9. Light (digital) Internal light: LED
10. Electronic circuits Oscillation, division, drive: C-MOS LSI (1), LED circuit: C-MOS IC (1)
The digital display
time and the
analog display
time are out of
sync.
The date changes
TROUBLESHOOTING
at 12 o’clock noon.
Blur in the display
persists.
* For a solution to a problem other than listed above, contact the retailer from whom the watch was purchased.
The watch has been left close to an
object with a strong magnetic field or
it received a strong shock or
vibrations.
AM/PM is not properly set. Set “Hour” for the time correctly. P. 23
Small amount of water has got inside
the watch due to deterioration of the
gasket, etc.
Set the standard hand position on
the analog display again.
Consult the retailer from whom the
watch was purchased.
7
EN
60
Specifications
Referen
ce
P. 26
-
How to reset the system
If the watch does not work, the seconds hand does not return to one-second movement even if the battery
is sufficiently charged, or the watch operates irregularly, performing a system reset will return the watch to
normal.
Unlock the crown.
1
* “Screw down crown” → P. 18
Pull out the crown.
2
Hold down Button A and Button B at the same
3
time for more than 10 seconds
• All hands will move to the 12 o’clock position, the digital
display will turn off, and the system will reset. When you let go
of the buttons, time and date setup will appear on the digital
display.
• The time and date will be shown as 1/1/2019, Tuesday,
12:00:00 am.
Set the standard hand position and time/date.
4
• “How to set the time and date” → P. 23
• “How to set the standard hand position” → P. 26
B
A
EN
TROUBLESHOOTING
7
61
8
SPECIFICATIONS
* The specifications are subject to change without prior notice due to product improvements.
EN
62
Product : Combination Quartz Solar watch
Model : H851
This product is in compliance with the essential
requirements and other relevant provisions of
the RoHS Directive (2011/65/EU).
EN
63
 Loading...