

Seiko H-2BL-AE Instruction Manual
g-s
HI—
I
ML.
M M
INSTRUCTION
MANUAL
I
SEIKO
SEWING
MACHINE
CO.,
LTD.
Thank
you
very
much
for
buyingaSEIKO
instructions belowand the explanations given in the instruction manual.
With
industrial
as
the
needle
parts.
Follow
atingthe
sewing
and
the
machine
machines,itis
thread
take-up
instructions
so that you
normaltocarry
lever,
from
training'peVspnnel
will
knovv
sewing
and
consequently
howto use it
machine.
out
work
Before
while
positioned
using
thereisalwaysadangerofinjury
and
instructors
correctly.
regarding
your
new
directly-in
safe
machine,
frontofmoving
that
and
correct
please
read
the
parts
safety
such
canbecausedbythese
operation
before
oper
Q]
Safety indications
This
instruction
ensure
The
safe
operation
meanings
ofthese
Indications
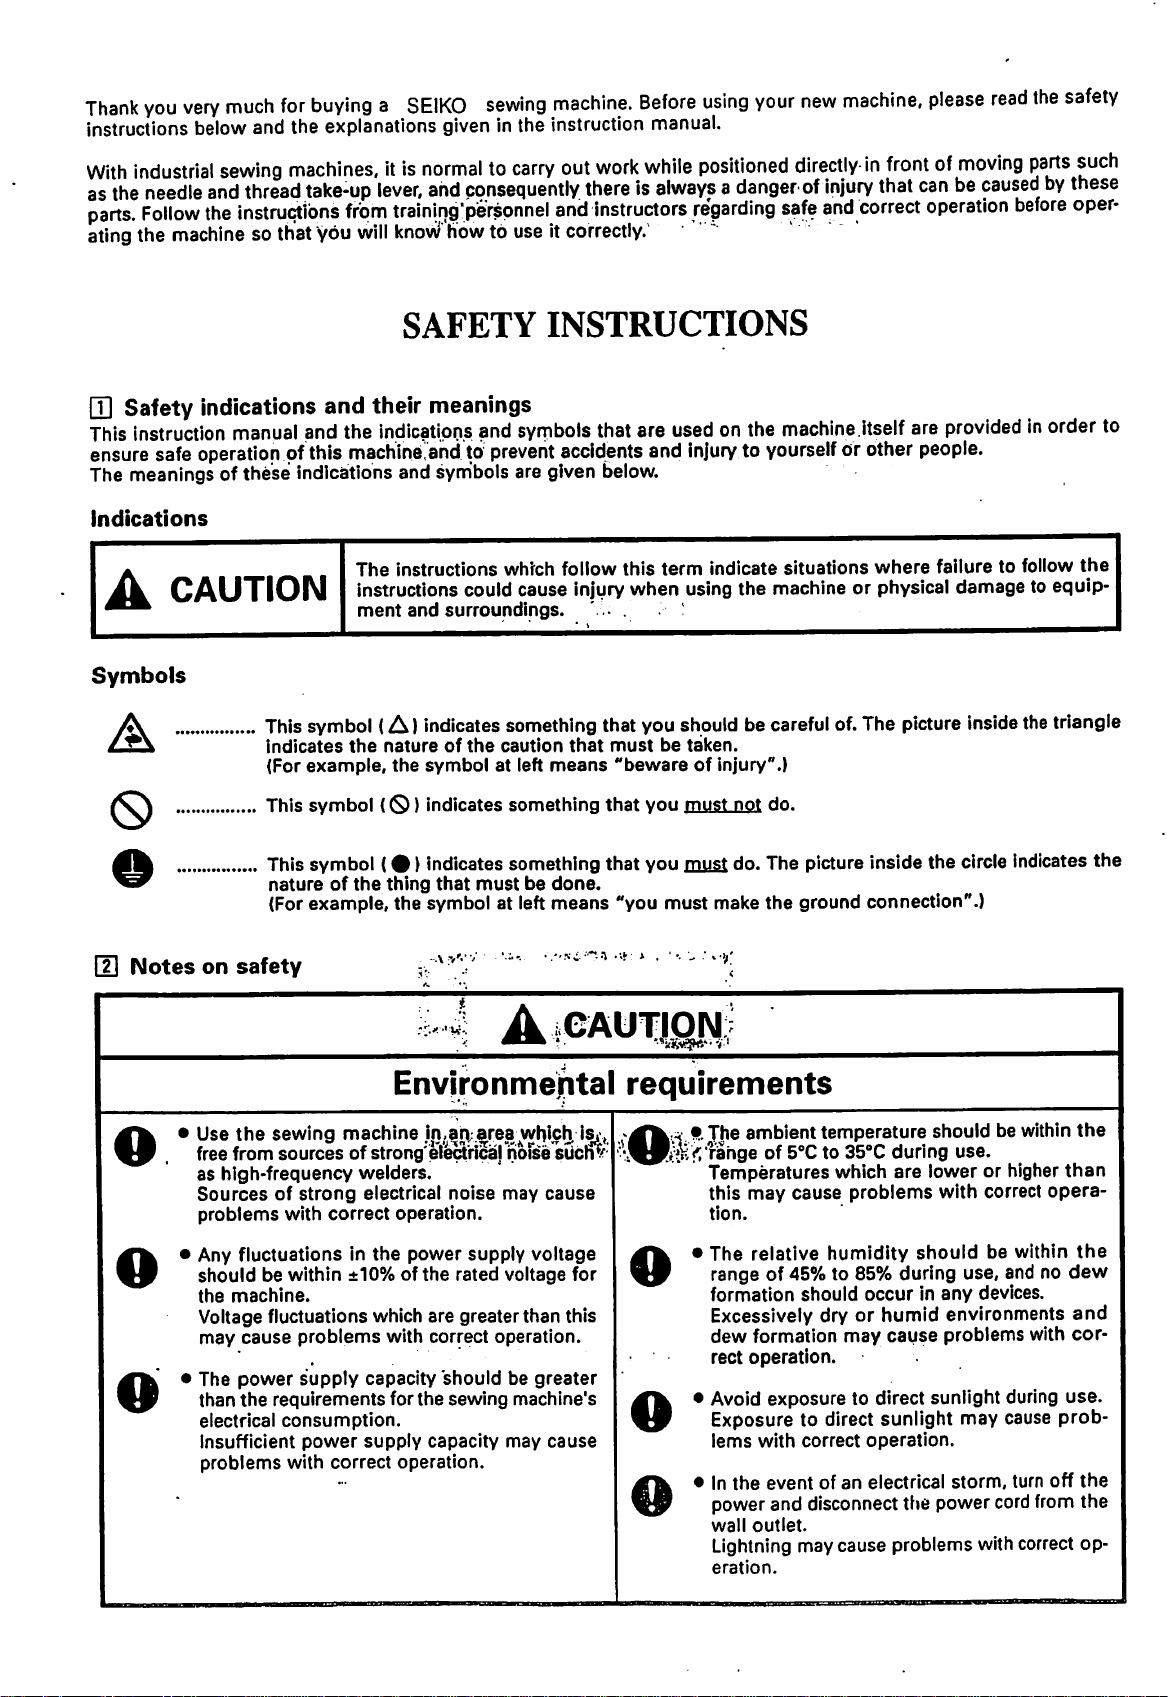
A
Q/I^UTION
Symbols
0
SAFETY
and
their meanings
manual
...
andthe
ofthis
indications
Thissymbol
indicates
(For
example,
This
symbol
This symbol
natureofthe
(For example, the symbol at left
indications
machineiandtoprevent
and
symbols
The
instructions
instructions
ment
and
surroundings.
(A)
indicatessomething that you should be careful of.The pictureinsidethe triangle
the
natureofthe
the
symbol
((S))
indicates
(#)
indicates something that you must do. The picture inside the circle Indicates the
thing
that
INSTRUCTIONS
and
syrnbols
are
given
which
could
cause
caution
at left
means
something
mustbedone.
means
thatare
accidents
follow
injury
that
and
Below.
this
term
when
must
be
"bewareofinjury".)
that
you
"you
must
used
on the
injurytoyourself
indicate
using
taken.
must
make the ground connection".)
machine.itself
or other
situations
the
machineorphysical
not
do.
where
are
providedInorder to
people.
failuretofollow
the
damagetoequip
Notes
a
on
safety
AeAUTJON
Environmental
•
Use
the
sewing
free
from
sourcesof
as
high-frequency
Sourcesofstrong
problems
• Any
fluctuationsinthe
shouldbewithin
the
machine.
Voltage fluctuations which are greater than this
may
cause
• The
power
than
the
requirements
electrical
Insufficient
problems with correct operation.
consumption.
with
correct
problems
supply
power
machine
welders.
electrical
±10% of
supply
ii},^ari;.area
strong'ele^'riSal
operation.
power
the
with
correct
capacity
for
the
capacity
whic^
nofse
noise
may
supply
rated
shouldbegreater
sewing
voltage
voltage
operation.
machine's
may
.*'Ni
siicfr'r'
cause
for
cause
:y.>f'
requirements
f.The
HJfSVlfahgeof5®Cto35°C
ambient
Temperatures which
this
may
tion.
•
The
relative
o
o
0
range of 45% to 85% during use, and no
formation
Excessively dry or humid environments
dew
formation
rect operation.
• Avoid exposure to direct sunlight during
Exposure to direct sunlight may cause
lems
with
• In
the
power and disconnect the power cordfrom the
wall
outlet.
Lightning may cause problems with correct op
eration.
temperature
cause
humidity
should
may
correct
eventofan
problems
occurinany
operation.
electrical
should be within
during
are
cause
use.
lower or higher
with
should
problems
storm,
correct
be within
devices.
with
turn
the
than
opera
the
dew
and
cor
use.
prob
off
the
0
o
A
CAUTION
Installation
•
Machine
by a qualified technician.
• Contact your
trician for any electrical work that may need to
be
•
The
The
or
• Do not connectthe power cord untilinstallation
is
complete,
ateifthe
could
• Be
connection
receiving a serious electric shock, and problems
with
installation
done.
SEIKO
should
only be carried
dealer or a qualified elec
sewing machine weighs more than 35 kg.
installation
more
people.
shouldbecarried
otherwise
the
machine
outbytwo
may
oper
treadle is pressed by mistake, which
resultininjury.
sure
to connect
is not secure, you run a high risk of
correct
operation
the
ground. If
may
also
the
occur.
ground
out
o
0
o
o
0
• All
cords
should
away from any moving parts. Furthermore, do
not
excessiveiy
too
firmly with
danger
•
Install
motor.
the
that
belt
be
bend
the
staples,
secured
at
least
cordsorsecure
otherwise
thereisthe
25
mm
them
fire or electric shocks could occur.
coverstothe
machine
head
and
• If using a work table which has casters, the
casters
they
• Be
when handling
gets into your eyes or onto your skin, othenvise
inflammation
Furthermore;donot
cumstances,
arrhoea.
Keep
shouldbesecuredinsuchawaysothat
cannot
suretowear
move.
protective
the
lubricating oil,sothat
can
result.
asitcan
^
the
oil outofthe reach of children.
drink
cause
goggles
the
oil
vomiting
and
under
gloves
no oil
any
cir
and
di
0
0
A
A
Sewing
• This'sewihg machine'shbuld only be used by"
operators
traininginsafe
•
The
any
e
Turn
times,
the
treadleIspressed
result
•
When
• -When replacing
•
When
ing
•
When
keep
switched
tia.
starting
•
Attach
ing
these
who
sewing
applications
off
machine
the
otherwise
in injury.
threading
power
not using
the
machine
using a
turning
offasa
Wait
until
work.
all safety
machine. If
devices
have
received
use
beforehand.
should
other
than
switchatthe
the
machine
by mistake, which
the
needle
the
needle
the
machine and when leav
unattended
clutch
motor,
even
resultofthe
the
motor
devices
the
machine is used without
attached,
injury
the
not be
sewing.
may
and
after
the
stops
before using
may
necessary,
•
following
operate
bobbin
the
motor
power
motor's
fully
result.
used
before
the
for
if
could
will
is
iner
sew
Cleaning
A
.lii
r %
'Z.i
T ..1>trV
If
casters
they
• Do
usihg*^a
not
work'table which
shouldbesecuredinsuchawaysothat
cannot
touch
move.
anyofthe
•
has
moving
casters, the
partsorpress
any objects against the machine whiie sewing,
as this
to
e
For
not
may
• Ifanerror
noisesorsmejls
off
est
• If
your nearest
the
machines
touch
result.
the
SEIKO
the
nician.
may
result in personal injuryordamage
machine. ;
with
automatic
the
solenoid
occurs
power
machine
switch. Then
dealerora qualified technician.
SEIKO
section,
in machine,..pir if
are
noticed, immediately turn
developsaproblem,
dealer or a qualified tech
presser
otherwise
contact
lifter,
abnormal
your
contact
do
burns
near
• Be
sure
to wear protective goggles and gloves
can
the oil out of the reach of children.
A
•
Turn
off
the
power
cleaning,
if
the
result
otherwise
treadle is pressed by mistake, which could
in injury.
switch before carrying
the
machine may
operate
• When using a clutch motor, the motor will
keep
switched
tia.
Wait
starting
turning
work.
offasa
until
even
resultofthe
the
motor
after
stops
the
motor's
fully
power
before
out
iner
0
when handling the lubricatingoil,so that nooil
gets into youreyes or ontoyourskin,otherwise
inflammation
Furthermore, do
is
circumstances,asit
diarrhoea.
Keep
result.
not
can
drink
the
cause
oil
under
vomiting
any
and

A
CAUTION
•
Maintenance
chine
(S)
• Ask
o
• Turn off
A
should
technician.
your
cian to
tionofthe
power cord from the wall outlet at the follow
ing times, otheryrise
carry
the
ifthetreadle is pressed by
result
in injury.
•
When
and
•
When
the
•
When
keep
switched
tia.
starting
carrying
maintenance
replacing
rotary
usingaclutch
turning
Wait
Q] Warning labels
and
inspection of
only be carried
SEIKO
electrical
work.
dealer or a qualified electri
out
any
power
switch
out
consumable
hook
even
offasa
until
the
Maintenance
the
sewing
out
by a qualified
maintenance
system.
and
the
machine
mistake,
inspection,
..
motor,
after
resultofthe
motor
disconnect
may
parts
the
the
motor's
stops
and
which
adjustment
motor
power
fully
ma
inspec
the
operate
cbutd
such
as
will
iner
before
is
and
A
O
O
•A,-
Inspection
• If
the
power
carrying
careful to
• Use only the proper replacement parts as speci
fied by SEIKO.
any
• If
absolutely
nal
positions
rectly
• Any
problemsinmachine
sult
from
•machine will
switch
out
some
observe
safety
before
devices
suretoreinstall
and
using
unauthorized
notbecoveredbythe
needstobe
adjustment, be extremely
all
safety
have
check
that
the
machine.
modifications
left on
precautions.
been
removed,
themtotheirpagi
they
operate
operation
which re
warranty.
when
cor
to
the
be
* The following warning labels appear on the seWlhg machine.
Please follow the instructions on the labels at all times when using the machine. Ifthe labels have been re
movedorare
1
A
Safety
difficult to read, please contact your nearest
A
CAUTION
Moving
parts
maycause
Operate
Tum
threading,
andneede,
devices
Injury.
with
safety
changing
cleaning
dewces.
bobbin
etc.
offmain switch before
SEIKO
i
dealer.
•
Directionofoperation
• Be
sure
the
run
to connect
ground
the
shock.
riskofreceiving a serious
If
you
electric
the
connectionisnot
ground.
O Finger guard
O Thread take-up cover
O Belt cover, etc.
secure,

1.
NAMES
2.
MACHINE
3.
WORK
3-1.
3r2.
4.
INSTALLATION
4-1.
4-2.
4-3.
4-4.
OF
MAJOR
SPECIFICATIONS
TABLE
Work
Table
Motor
Installing
Installing
installing
Adjusting
4-5. Installing the bejt
4-6.•Installing
4-7.
Installing
4-8.
Installing
4-9.
Ground
4-10.
Lubrication
4-11.
Checking
rotating
4-12.
Test
5.
PREPARATION
5-1.
Removing
Winding
5-2.
5-3.
Threading
5-4. Installing
5-5.
Threading
5-6.
Adjusting
wire
direction
operation
AND
the
the
the
the
the
the
the
cotton
connections
the
BEFORE
the
the
lower
the
the
needle
the
the
PARTS
MOTOR
oil
pan
machine
knee
knee
bobbin
belt
machine
bobbin
lower
upper
stitch
head
lifter
assembly.....
lifter 5
winder
cover
stand
pulley
SEWING
case
thread
thread
thread
length
7^.^^
CONTENTS
1
7. THREAD
1
2
8. STANDARD
2
2
3
3
4
5
5
6
6
8
9
9
9
10
11
11
11
12
12
13
13
9.
10.TROUBLESHOOTIN
TENSION
7-1. Adjusting
7-2. Adjusting
8-1. Adjusting
8-2. Adjusting
and
angle
8-3. Adjusting
8-4.
Adjusting
feed
mechanism
8-5.
Adjustirig
rotary
hook
8-6. Adjusting
8-7.
Adjusting
8-8.
Adjusting
the
forward
lengths
8-9.
Adjusting
8-10.
Adjusting
arid
presser
8-11.
Adjusting
lubrication
8-12.-
Adjusting
CLEANING
the
the
thread
presser
tension
foot
ADJUSTMENTS
the
the
the
the
presser
feed
needle
needle
foot height 16
dog
bar
and
timing
the needle and
timing
the
arm
the
and
the
the
foot21
the
amount..
the
..................... 19
thread
difference
tension
walking
rotary
oil
tension
thread
guide
backtack
release.......
foot
hook
pump
G 25
pressure..
.; 16
height
height^... 18
spring..
R 20
between
stitch
15
15
15
17
16
19
20
20
22
22
23
6.
SEWING
14
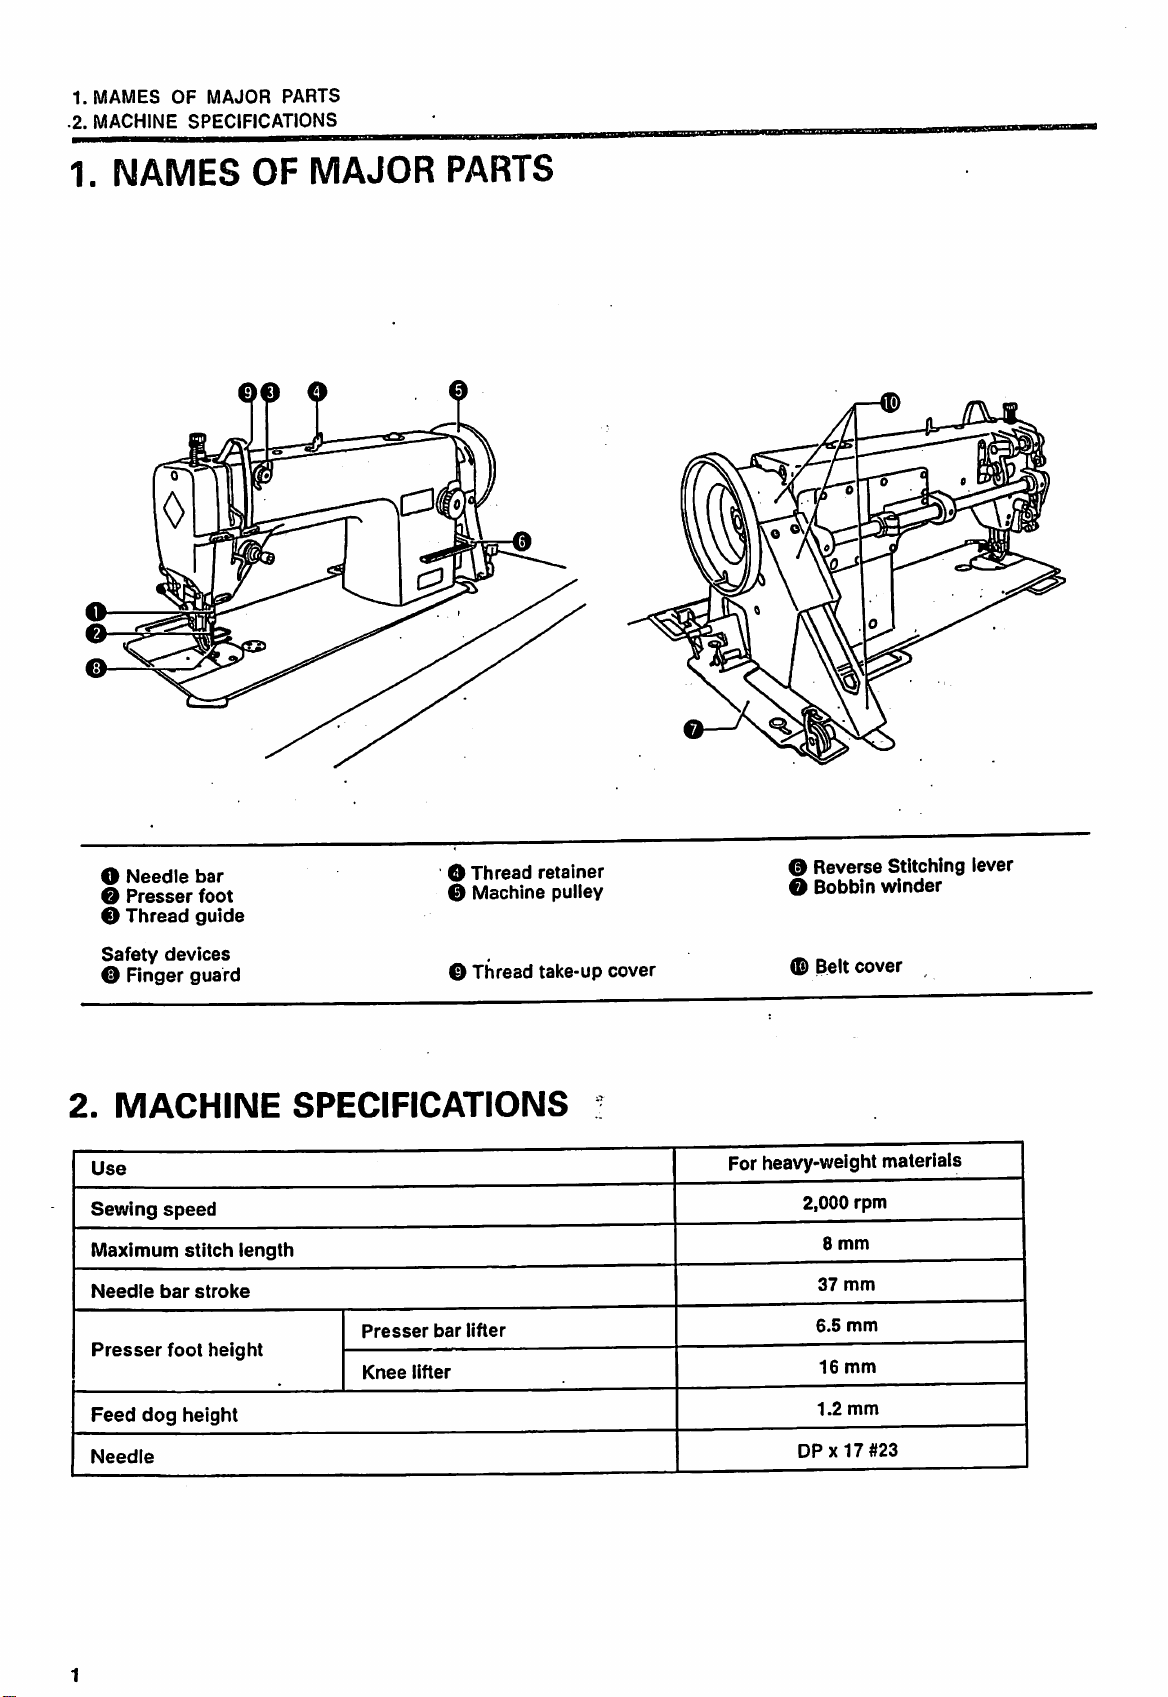
1.MAMES
.2.
MACHINE
1.
NAMES
OF
MAJOR
SPECIFICATIONS
PARTS
OF
MAJOR
PARTS
O
Needle
O
Presser
O
Thread
Safety
O Finger
2.
MACHINE
Use
Sewing
Maximum
Needle
Presser
Feed
dog
Needle
bar
guide
devices
guard
speed
stitch
bar
stroke
foot
height
foot
height
SPECIFICATIONS
length
Presser
Knee
lifter
O
0
0
bar
Thread
Machine
Thread
lifter
retainer
pulley
take-up
cover
0
Reverse
O
Bobbin
0
Belt
Stitching
winder
cover
For heavy-weight materials
2,000
rpm
8
mm
37
mm
6.5
mm
16
mm
1.2
mm
DPX17
#23
lever
3.
WORK
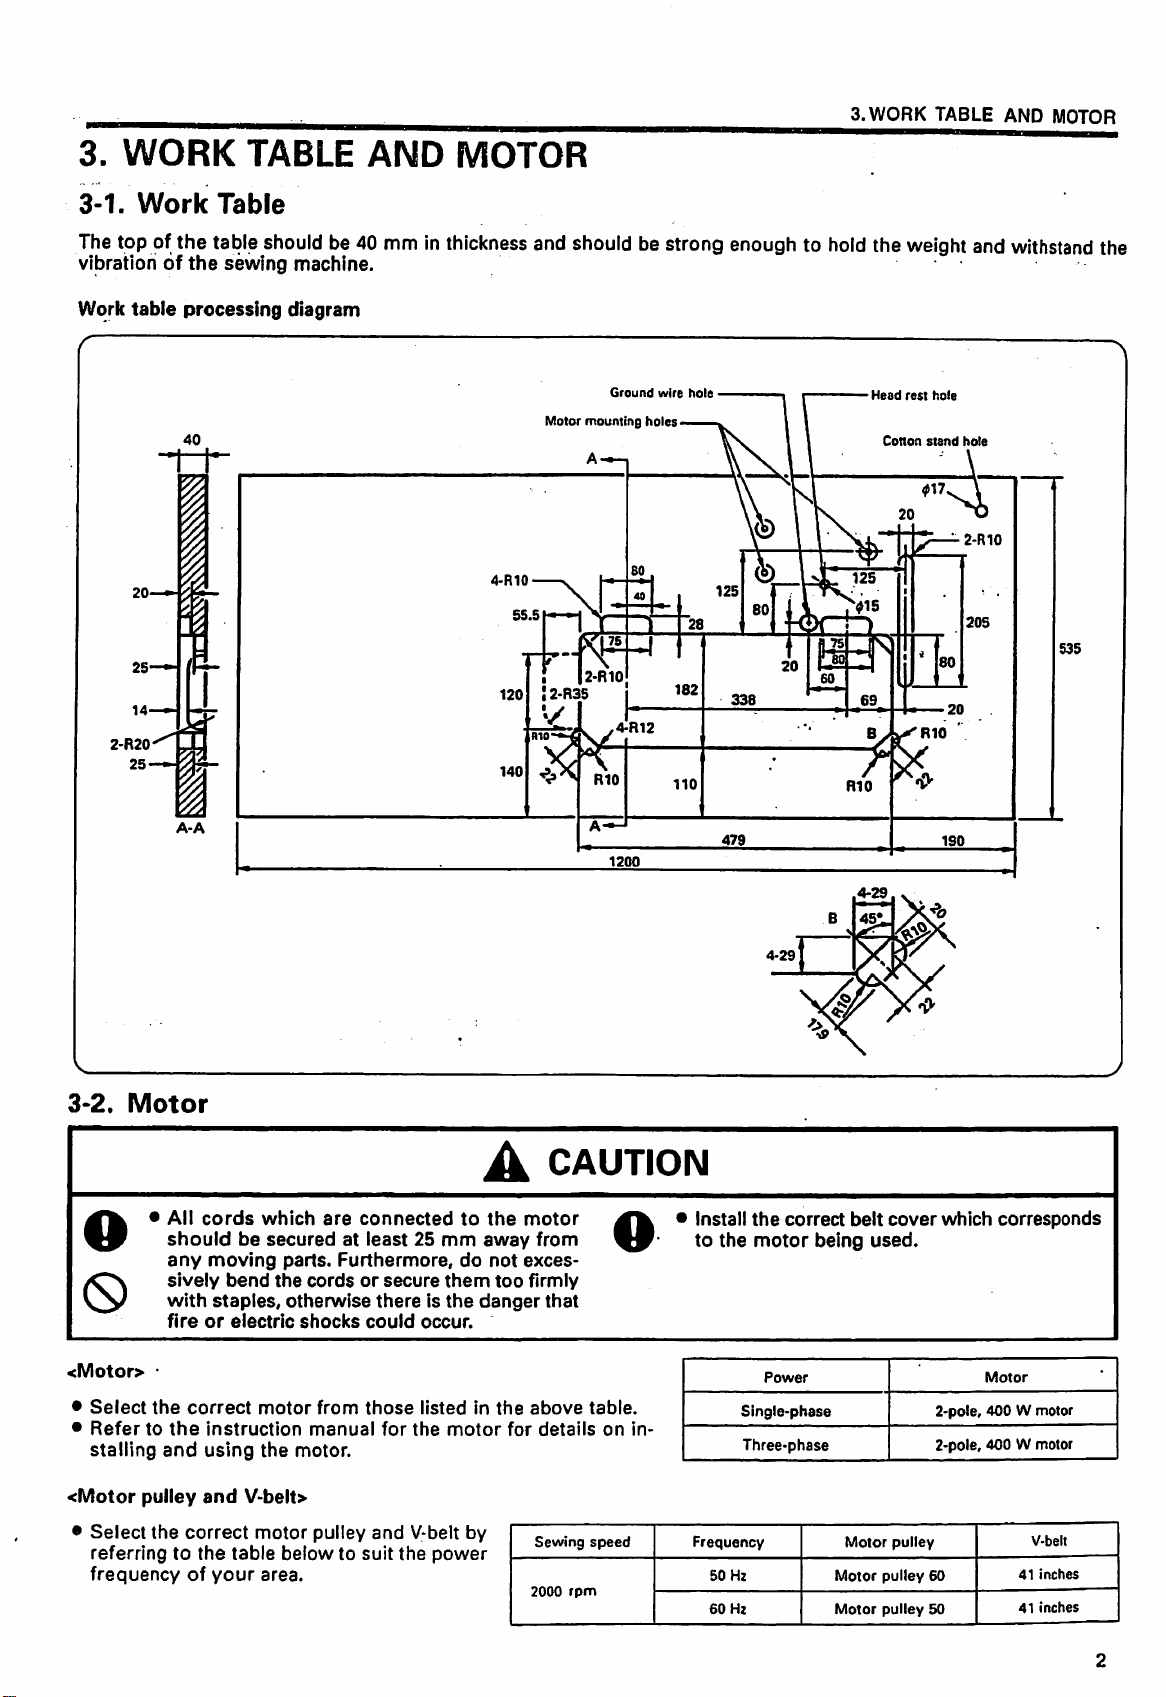
3-1.
Work
The
top of the table should be 40 mmin
vibrationofthe
Work
table
processing
TABLE
Table
sewing
machine.
diagram
AND
MOTOR
thickness
and should be strong enoughto
Motor
Ground
mounting
wire
holes.
hole
3. WORK TABLE AND MOTOR
hold
the
Head
weight
rest
Cotton
hole
stand
and
hole
withstand
the
3*2.
2-R20
Motor
4-R10
2-R3S
2-R10
4-R12
4-29
vvi
B
45*^
X
2-R10
•
All
O
should
any
sively
0
<Motor>
•
Select
•
Refer
stalling
<Motor
•
Select
with
fireorelectric
•
the
to
the
and
pulley
the
correct
referringtothe
frequencyofyour
cords
moving
bend
staples,
correct
instruction
using
and
which
are
connected
be
securedatleast25mm
parts.
Furthermore,
the
cordsorsecure
otherwise
motor
the
motor.
shocks
manual
from
thereisthe
could
those
for
V-belt>
motor
pulley
and
table
belowtosuit
area.
them
occur.
listedinthe
the
motor
V-belt by
the
power
A
to
away
do
danger
CAUTION
the
motor
from
not
exces
too
firmly
that
above
for
details
Sewing
2000
table.
speed
rpm
on
o
Install
the
correct
to
the
motor
in
Single-phase
Three-phase
Frequency
50
Hz
60
Hz
being
Power
belt
Motor
Motor
Motor
cover
used.
pulley
pulley
pulley
which
corresponds
Motor
2-poie,
400
W motor
2-pole, 400 W motor
V-belt
41
60
50
inches
41
inches

4.
INSTALLATION
4.
INSTALLATION
4-1.
r
A
by a qualified technician.
•
Ask
your
SEIKO
cian for any electrical workthat may need to
be
done.
• The sewing machine weights more than 35
The
Installation
or
more
people.
Installing
{
^
-
---V-
VI
the
dealer or a
shouldbecarried
oil
pan
qualified
-
outbytwo
CAUTION
(S)
electri
o
kg.
o
\
1. Insert
of
the
2. Insert
of
the
•
Do
not
connect
tioniscomplete,
operateifthe
which
could result in injury.
•
Be
sure to connectthe ground. Ifthe ground
the
power
otherwise
cord
the
until
installa
machine
treadleispressedbymistake,
connection is not secure, serious electric
shocks
• Install the belt cover to the machine head.
the
oil
the
oil
will
result.
two
head cushions F O into
pan
O.
two
head
pan
cushions
O.
B 0 into
the
the
front
back
will
corners
corners
V
(
nlL-—
V
J
3. Place the oil pan O into the groove in the worktable so
that
4. Insert
work
corners
table.
the
two
are
rubber
.
aligned.
cushions
O into
the
notches in
the
V
J

4-2.
Installing
the
machine
head
4.
INSTALLATION
1. insert
2.
insert
bed.
3.
Clamp
work
head
ners.
4.
Tap
NOTE:
the
knee lifter complying
the
two
hingesOinto
the
hingesOonto
table,
and
then
cushionsOwhich
the
pillowOinto
Tap
the
pillow
If
the
pillowisnot
the
machine
whenitis
tilted
the
the
rubber
place
the
areontopofthe
the
table
securely
pushedinas
head
will
notbesufficiently
back.
bar
O.
holesInthe
cushions
machine
hole.
into
the
machine
0 in
head
onto
oil
pan
table
hole.
farasit will
stable
the
the
cor
go,
4.
INSTALLATION
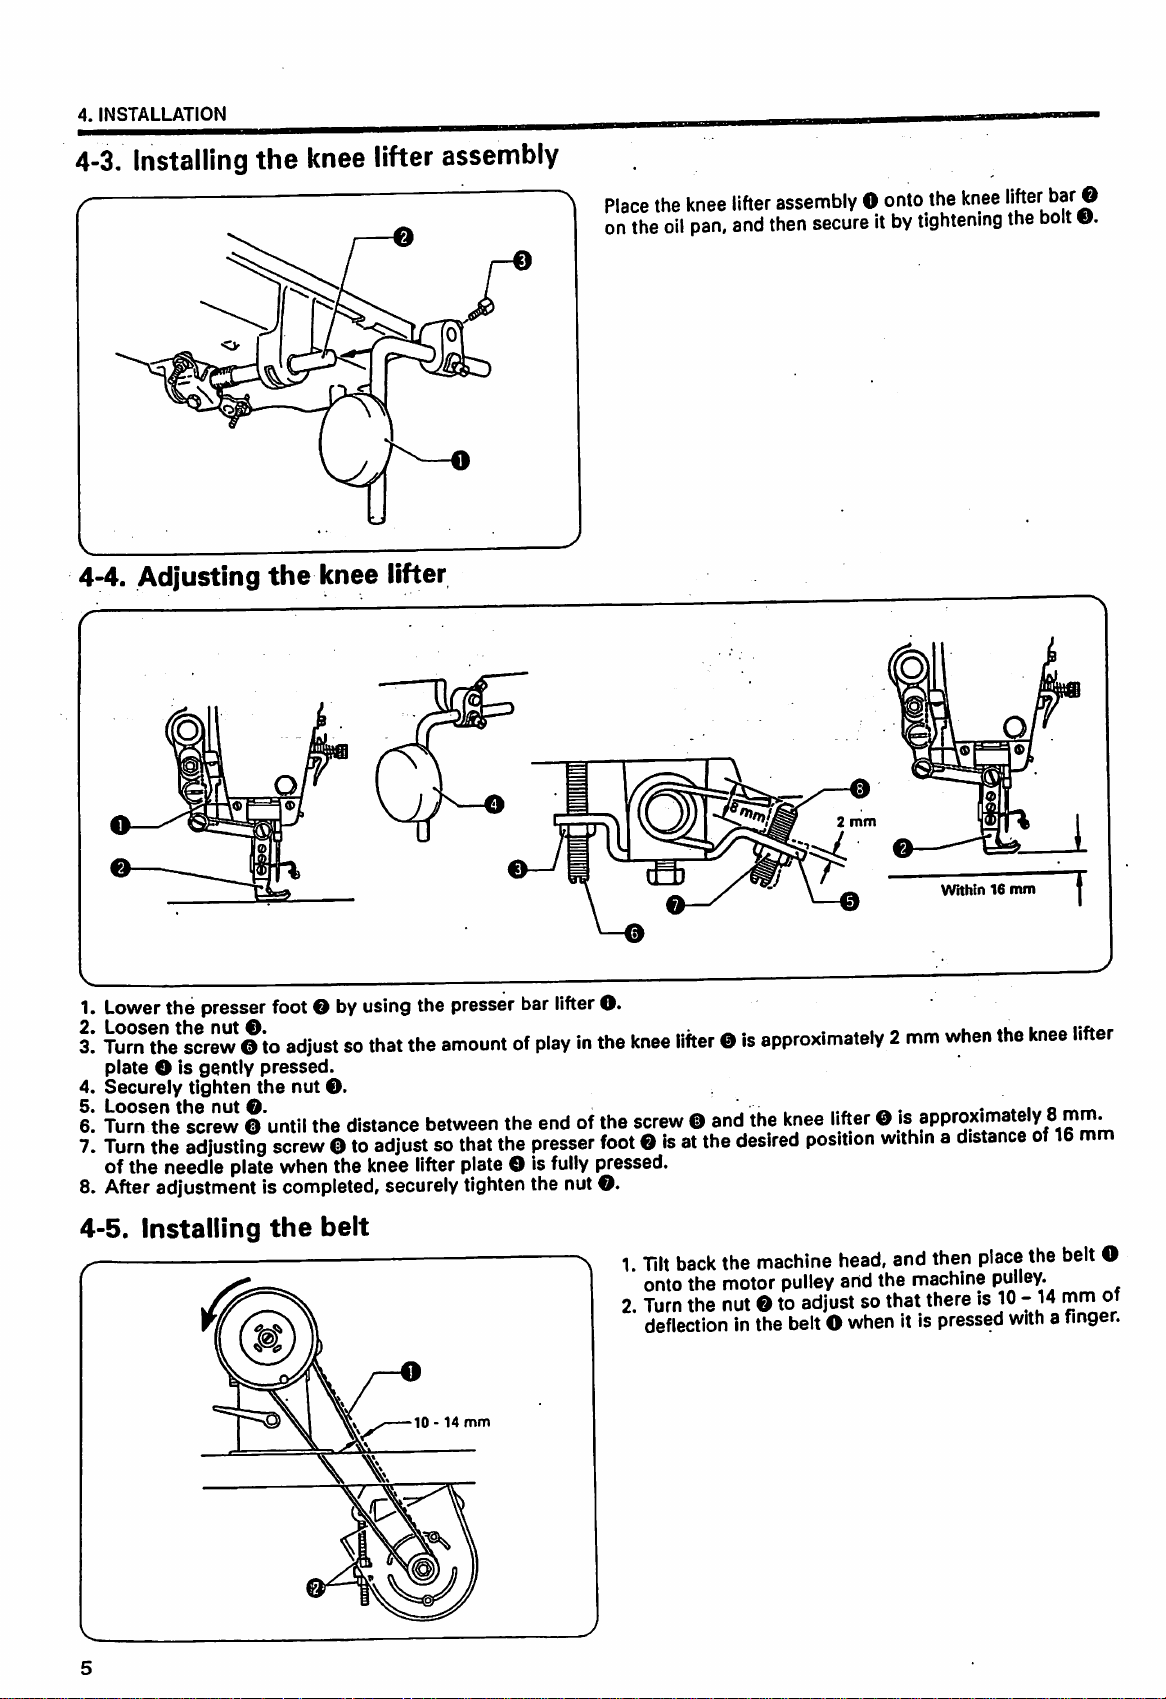
4-3.
Installing the
V.
4-4. Adjusting
knee
the
knee lifter
lifter assembly
Place
on
the
the
oil
knee
pan,
lifter
assembly0onto
and
then
secureItby
the
knee
tightening
'ijter
the
bar
bolt
©
O.
1.
Lower
3.
Turn
plate
4.
Securely
6.
Turn
7.
Turn
of the needle platewhen the knee
8. Afteradjustment is completed, securelytightenthe nut©.
4-5.
the presser footO byusing the presser bar
the^screw©to
O is
gently
tighten
the
screw©until
the
adjusting
Installing
adjustsothat
pressed.
the
nut
©.
the
screw©to
the
belt
the
distance
between
adjustsothat
lifter
amountofplayInthe
plate
the
the
O is
presser
lifter
O.
endofthe
foot©isatthe
fully
pressed.
knee
lifter©Is
screw©and
1.
Tilt
back
onto
the
2.
Turn
the
deflection
2
mm
Within16mm
approximately
the
knee
lifter
desired
the
motor
nut
inthe beltO whenit is pressed
position
machine
pulley
©to
adjustsothat
2
mm
when
© f
withinadistanceof16
head,
and
then
andthe
machine
there
the
knee
place
the
belt
pulley.
10-14mmof
withafinger.
lifter
m
O
14
mm
 Loading...