

Page 1

Cal. V198
INSTRUCTIONS (P. 3)
BEDIENUNGSANLEITUNG (S. 50)
INSTRUCTIONS (P. 99)
ISTRUZIONI (P. 147)
INSTRUCCIONES (P. 194)
INSTRUÇÕES (P. 241)
ИНСТРУКЦИИ
(C.
288
)
(
337
)
Page 2

English
English
2 3
You are now th e proud owner o f a SEIKO Analogu e Quartz Solar Cal. V198 . For the best r esults,
pleas e read the in struct ions in this b ooklet ca refully b efore usin g the watch . Please ke ep this manua l
handy for ready reference.
Wir gra tulieren Ihn en zum Kauf der S EIKO Analog- Quarzuhr mi t Solarzelle Kal. V198. Le sen Sie
diese Bedienungsanleitung vor der Verwen dung aufmer ksam durch, um ihre optima le Nutzung zu
gewäh rleis ten. H eben Si e diese B edie nungs anleit ung gut a uf, um jed erze it wie der nac hles en zu könne n.
Vous ête s maintenan t l’heureux p ropriétai re d’une montr e à quartz so laire et analo gique SEIKO Ca l.
V198. Pour en obtenir de s perform ances opti males, veuill ez lire atte ntivement c ette brochure avant
d'utiliser la montr e. Conser vez ce manuel p our vous y réfé rer en cas de b esoin.
Grazie d i aver acquis tato ques to orologio S EIKO Analogic o al Quarzo, Solar Cal. V198. Pe r poter
utiliz zare l’orolo gio al massim o delle sue pre stazioni l eggere at tentamen te questo ma nuale di
istruzioni prima di p assare all ’uso dell’orolo gio stess o, e conserv arlo poi per qu alsiasi eventuale
futura consultazione.
Uste d es ahora un orgulloso propietario de un S EIKO Cuarzo Analógico Sol ar Cal. V198. Pa ra los
mejores resulta dos, por favo r, lea cui dadosamente las instr uccione s de este panfl eto antes ut ilizar
su Reloj S EIKO. Por favor, guar de este manual en un lugar conveniente par a su futura re ferencia .
Agora p ode sentir- se orgulhos o de possuir um Seiko Solar Quartz Anal ógico Cal. V19 8. Para obter
os melhores resul tados, leia a tentamen te as instru ções cont idas neste opúsculo an tes de usá- lo.
Conserve este m anual para consultas fu turas.
Теперь вы являетесь обладателем ана логовых кварцевых часов Сейко Соляр
(Seiko Solar) Ка либра V198. Перед испо льзование м их, для достиже ния лучших
результатов, пожалуйста, внимательно ознакомьтесь с данной инструкцией и
обязат ельно сохран ите ее.
歡迎購買 V198 機型精工石英指針式太陽能錶。為能更有效地利用本錶,使用本錶前,請
仔細閱讀本手冊內的各項使用說明,並妥善保管本手冊,以便今後參考。
BEFORE USE
It may be n ecessa ry to perf orm the initia l setting s such as hand p osition adj ustment an d
time /calend ar settin g. Set the watc h accordi ng to the proce dure “TIME S ETTING A ND
HAND P OSITION AD JUSTMENT” o n page 11 before u se.
Page 3

English
5
ENGLISH
4
CONTENTS
Page
FEATURES ....................................................................................................................... 5
DISPL AY & BUT TONS ..................................................................................................... 7
SCRE W LOCK TYPE C ROWN ......................................................................................... 9
HOW TO CH ANGE THE DI SPLAY MODE ...................................................................... 10
TIME S ETTING A ND HAND POS ITION ADJ USTMENT ................................................ 11
PERPETUAL CALENDAR ................................................................................................ 18
HOW TO US E THE STOPWATCH ................................................................................... 24
HOW TO US E THE ALAR M ............................................................................................ 27
HOW TO CH ARGE AND STA RT THE WATCH ............................................................... 31
OVERCHARGING PREVENTION FUNCTION................................................................. 32
POWE R RESERVE IND ICATOR ...................................................................................... 33
GUIDELINE OF CHARGING TIME/ACCURACY ............................................................. 35
ENERGY D EPLETION F OREWARN ING FUNCT ION ..................................................... 36
NOTE ON P OWER SUPPLY ............................................................................................ 37
IMPROPER FUNCTION ................................................................................................... 38
ROTAT ING BE ZEL ............................................................................................................ 39
TACH YMET ER ................................................................................................................. 40
TELEMETER .................................................................................................................... 42
TROUBLESHOOTING ...................................................................................................... 44
SPECIFICATIONS ............................................................................................................ 48
I
For the care of your watch, see “TO PRESERVE THE QUALITY OF YOUR
WATCH” in the attached Worldwide G uarantee and Instruction Booklet.
n
TIME
• Hour, minute and small sec ond hands.
n
STOPWAT CH
• 24-hour stopwatch in 1/5-second increments.
• Spli t time measurement on dem and.
• When the mea surement reaches 24 hours, the stop watch automatically
stop s and is reset .
n
SINGLE-TIME ALARM
• The ala rm can be set to s ound only once at a design ated time within 24
hours.
• Sound demon stration f unction is available.
n
PERPETUAL CALENDAR
• Date is indic ated by the ce nter hand in th e CALENDAR /ALARM mode.
• Day of the week i s indicate d by the day hand at the 12 o’clock pos ition.
• Ther e is no need to adjust the date a t the end of the month up to
February 28, 2100.
• Month and year can be chec ked on demand .
n
POWERED BY LIGHT ENERGY
FEATUR ES
Page 4

English
English
6 7
DISPLAY & BUTTONS
Hour hand
Small second hand
Alarm sub di al
(Stopwatc h hour and minute
hands)
Minute hand
a. Normal position
b. First click position:
alarm setting
c. Second click position:
time setting, calendar
setting, hand position
adjustment
Power reserve ind icator/Day han d/Mode
indicator (month/year/alarm)
Calendar hand
(Stopwatc h second hand)
a b c
B
A
n
NO BATTERY CHANGE REQUIRED (Please refer to page 37 "NOTE ON POWER
SU PPLY ")
n
LASTS FOR 6 MONTHS AFTER FULL CHARGE
n
POWER RESERVE INDICATOR
n
ENERGY DEPLETION FOREWARNING FUNCTION
n
OVERCHARGING PREVENTION FUNCTION
CROWN
Page 5

English
English
8 9
◆
The center hand has dual functions:
SCREW LOCK TYPE CROWN
◆
Some models may have a screw-lock mechanism that can se curely loc k
the crown by screw when not in use.
◆
Lo cking the crown will help to prevent any operational errors and enhan ce
the water resistant quality of the watch.
◆
It is necessar y to unlock the s crew lock t ype crown b efore using it. Once
you have finished using the crown, make sure to relock i t.
l
How to use the screw lock type crown
Keep the crown securely locked unless you need to use it.
- In the CA LENDAR/ ALARM mode, it indic ates the date, month an d year.
-
In the STO PWATCH mode, it indicates the sec ond
.
• Some mode ls may have a screw lock type crown. If your w atch has a screw lock type
crown, refer to “SCREW LOCK TYPE CROWN.”
•
Simplifie d illustrations may be used in the foll owing sections of this manual.
[How to unlock the screw lock ty pe crown]
Turn the crown counterclockwis e.
The crown is unlocke d and can be use d.
[How to l ock the screw lock typ e crown]
Once you have finishe d using the crown, turn it
clockwise whil e gently pressing it in toward the watch
body un til it stops .
• When locking the c rown, turn it slowly with care, ensuring that the s crew is properly engaged .
• Be careful not to forcibly push it in, as doing so may dama ge the screw hole in the case.
Page 6

English
English
10 11
◆
This watch is design ed so that the following adju stments are made with th e
crown a t the second click position.
1) Time settings for main dial and alarm sub dial.
2) Calendar setting
3) Hand position adjustment for alarm hour and minute hands, day hand and
calendar hand.
Second click
▲
▲
B
B
B
◆
With each press of b utton B, the display mode changes bet ween the
C ALENDAR/ALARM mode and the STOPWATCH mod e alternate ly.
HOW TO CHANGE THE DISPLAY MODE
Calendar hand
Day hand
CALENDAR/ALARM
MODE
STOPWATCH MODE
• When the displ ay mode is switched, the function of th e hands will change ac cordingly.
• Before switching the dis play mode from the STOPWATCH mode to the CA LENDAR/ ALARM
mode, make sure that the sto pwatch has been reset.
• While the stopwatch i s counting, button B is use d for ”SPLIT,” “SPLIT RELEASE,” or ”RESET”
functions.
Alarm sub di al
Power reserve ind icator
Stopwatch hour a nd
minute hands
Small
second
hand
Stopwatch
second hand
B
Minute hand
Alarm sub di al
(Alarm ho ur and mminute
hands)
Main dial
Day hand
Calendar hand
TIME SETTING AND HAND POSITION
ADJUSTMENT
When any hand requires a
position
adjustment, complete
the hand position adjustment
procedure first, and then move
on to the time setting procedure.
Page 7

English
English
12 13
●
How to check the position of the hands
◆
Check that the sec ond hand moves a t normal one -second i ntervals w hen the crown
is at the n ormal posit ion. When the w atch is stop ped or the second hand is mov ing
at 2-s econd intervals, charge the watch b y exposing it t o light. See “H OW TO
CHARGE AND START THE WATCH.”
Pull out to second click.
t
CROWN
A
Press for 2 second s or longer.
The stopwatch hour a nd
minute hands, the stopwatch
second hand, and the p ower
reserve indica tor move to the
preliminary position. The
watch i s now in hand posi tion
adjustment mode.
Name of hand Preliminary position
Stopwatch hour and mi nute hands
(Alarm hour and minute hands)
0:00
Stopwatch second hand
(Calendar hand)
0 second position
Power re serve ind icator
(Day hand/ Mode indicator)
Low leve l
Check that the posi tion of each hand is
at the pr eliminary p osition by re ferring
to the table below.
t
•
If the crown is pulled out while the stopwatch is counting, the stopwatch will be automatically
reset.
• If the crown is pulled out while the alarm is set, the alarm will be automatically canceled.
• This operation can be performed both in the CALENDAR/ALARM mode and STOPWATCH
mode.
◆
If any hand is not correctly positioned, adjust it by carrying out the procedure on the
following page.
◆
When all hands are correctly positioned, move on to the procedure for “Time
settings for main dial and alarm sub dial.”
▲
Second
click
Stopwatch
second hand
Power reserve
indicator
Stopwatch
hour and
minute hands
Page 8
English
English
14 15
Stopwatch seco nd hand
A
B
B
Press to set the stopwatch hour an d minute
hands to the 0:0 0 position.
Second click
B
A
Stopwatch hour a nd minute hands
When adjusting the position of the hand,
the hands can only be advanced in the
clockwise direction.
A
Press once. The stopwatch se cond hand
turns a full circle.
B
Press to set the stopwatch sec ond hand to
the 0 pos ition.
Second click
The hand s move quickly if but ton B is continuously
pressed.
The hand m oves quickly if but ton B is continuously
pressed.
t
Press once. The po wer reser ve indicato r
turns a full circle.
Press to set the
power reserve indicator
pointing at the low leve l.
After the positi ons of the hand s are adjuste d, make sure that the main dial time and the
alarm sub-dial ti me are both re set.
The hand moves quickly if
button B is continuously
pressed.
power reserve indicator
B
A
A
B
▲
▲
CROWN
After all the adjus tments are c omplete, push in to normal p osition.
STOPWATCH
hour and minute hands
The position of eac h hand can be re adjusted in t he followin g order by pres sing
button A.
STOPWATCH
second hand
Power reserve indicator
▲
[ IMPORTANT ]
t
●
How to adjust the position of the hands
Page 9

English
English
16 17
●
Time settings for main dial and alarm sub dial
Turn to set the m ain dial time.
Pull out to second click when the
small second hand is at the 12 o’clock
position.
The small second hand will stop
immediately.
Small sec ond hand
• If the crown is pulled out while the
stopwatch is counting, the stopwatch will
be automatica lly reset.
• If the crown is pu lled out while the alarm
is s et, the al arm will b e automat ically
canceled.
•
This operation can be performed both
in the CALENDAR
/ALAR M mode and
STOPWATCH mode.
Second click
Second click
It is recommended that the hands be
set to a ti me a few minu tes ahead o f the
curre nt time, tak ing into cons ideratio n
the time required to c omplete the time
set ting for alarm sub dial, after which
the cro wn is to be push ed in.
t
B
Press to set the alarm s ub-dial time to
the current time in the 24 -hour format.
◆
The main dial time should be set in the 12-hour format, regardless of whether it is
AM or PM.
◆
When setting the minute hand, first advance it 4 to 5 minutes ahead of the desired
time, and then turn it back to the exact time.
After time sett ings for main dial
and alarm sub dial are complete,
push in to n ormal position.
CROWN
B
Main dial
Alarm sub di al
Second click
• With each press of button B, the alarm
sub-dial time is advanced by one minute.
• The hands move quickly if button B is
continuously pressed.
• Make sure that the alarm sub-dial time is
set to exactly the same time as the main
dial time, which has been previously set,
in the 24-hour format.
At the moment when the alarm
sub- dial time ind icates 12 o’clo ck
midnig ht, the date changes.
t
CROWN
CROWN
CROWN
Page 10

English
English
18 19
PERPETUAL CALENDAR
◆
T he date is indicated by the calendar hand.
◆
T he day of the week is indicated by the day han d.
◆
T he calenda r hand can also b e used to che ck the year and m onth.
◆
There i s no need to adjust the date a t the end of the mo nth up to Febru ary 28,
2100.
●
How to read the calendar
In the CA LENDAR/ALARM mode, the day hand indicates th e day of the week and
the calendar mode (month/year), and the c alendar hand indicates t he date, month,
and year.
Date (from 1 to 31)
Month (from 1 to 12)
Year (The number of elapsed
years since the last leap year)
Calendar hand
Day hand
A
●
How to check the year and month
In the CALENDAR/ALARM mod e, with each press of but ton A, the cal endar
hand turns to indicat e the date, month and year successivel y.
▲
Day of the week
▲
M
L
●
How to adjust the calendar
It is es sential tha t all the hands a re correc tly
positioned, otherwise th e watch may not
show th e calendar correctly.
CROWN
Pull out to second click.
Second click
[ IMPORTANT ]
▲
Power reserve
amount
▲
Date
▲
Month
Year
▲
A
A
Calendar
hand
Day hand
Day of the week
A
A
▲
Date
Page 11

English
English
20 21
• If the crown is pulled out while the stopwatch is counting, the stopwatch will be automatically
reset.
•
If the crown is pulled out while the alarm is set, the alarm will be automatically canceled.
• This operation can be performed both in the CALENDAR/ALARM mode and STOPWATCH
mode.
A
Press once.
The day ha nd turns a full circle.
B
Press to set the day of the week.
• The day of the week can be set to any day
of the week from Sunday to Saturday.
• If button B is pressed after the day hand
points to Saturday, the day hand swings
back and stops pointing to Sunday.
t
B
Press to set the mont h.
• The month can be set to any month from January (1 ) to December (12).
• If button B is pressed after the calen dar hand points to 12, the calendar h and swings back and
stops pointing to 1.
A
Press again.
The day han d indicates “M” (M onth), and the c alendar hand moves for ward and
stops pointing to the month.
A
Press once.
The calendar hand turns a full circle.
Press to set the date .
• The date can be set to any numeral
between 1 and 31.
• If button B is p ressed after the c alendar
hand points to “3 1,” the calendar hand
moves forward and stop s pointing to “1”.
t
B
t
Day hand
Day of the week
B
A
A
B
Calendar hand
Date (from 1 to 31)
Month (from 1 to 12)
Second click
Day hand
Page 12

English
English
22 23
A
Press again.
B
Press to set the year.
The day han d indicates “L” (Leap year),
and the calendar hand moves forward
and stops, pointing to the year.
1
2
3
2012
2016
.
.
.
.
.
2096
2013
2017
.
.
.
.
.
2097
2014
2018
.
.
.
.
.
2098
2015
2019
.
.
.
.
.
2099
Year Indication
Year
One year
Two years
Three years
Leap
year
The number of elapsed years
since the last leap year
t
Calendar hand
A
B
Year (The number of el apsed
years since the la st leap year)
If button A is pressed again, the watch returns to the for the time setting mode
for the alarm sub-dial.
▲
▲
Alarm sub-dial
▲
Day of the
week
Month
▲
Year
CROWN
After all the adjus tments
are complete, push in to
normal p osition.
When the date is set to a nonexistent day
such as February 30 or November 31 etc.,
the date will automatically advance to the
first date of the following month.
A
Press again.
With each press of button A, the calendar can be readjusted in the following order.
t
Date
▲
Page 13

English
English
24 25
HOW TO USE THE STOPWATCH
◆
T he measure d time can be re ad up to 24 hours in 1 /5- se cond incre ments.
◆
Whe n the measur ement reac hes 24 hours, the stopwat ch automat ically sto ps
count ing and is reset.
◆
Split time measurement function is available.
• If the stopwatch minute and h our hands do not re turn to the “0” positi on when
the stopwatch is reset to “0,” it will be necess ary to adjust the positions of the
stopwatch hands.
• Refer to " TIME SETTING AND HAND POSITION A DJUSTM ENT."
B
Press to enter the STO PWATCH
mode.
•
Refer to HOW TO C HANG E THE DI SPLAY
MODE.
• While the stopwatch is counting,
pressing button B will not change
the display mode.
• While the stopwatch is counting, if
the crown is pulled out to the first or
second click position, the stopwatch
will be automatically cancelled.
Stopwatch
second hand
Power reserve
indicator
Stopwatch
hour and
minute
hands
B
<STANDARD MEASUREMENT>
<ACCUMULATED ELAPSED TIME MEASUREMENT>
<SPLIT TIME MEASUREMENT>
<MEASUREMENT OF TWO COMPETITORS>
STOP
RESET
START
START
START
START
STOP
RESTART
STOP
RESET
SPLIT
SPLIT
RELEASE
STOP
RESET
FINISH TIME
OF 1ST
COMPETITOR
2ND
COMPETITOR
FINISHES
FINISH TIME
OF 2ND
COMPETITOR
RESET
▼
▼
▼
▼
▼
▼
▼
▼
▼
▼
▼
▼
▼
▼
A
B
AA
A
B
A
A
B
B
B
BBB
A
A
A
A
Restart and stop
of the stopwatch
can be repeated by pressing button A.
• Measurement and release of split time can be repeated by pressing button B.
• If the time measured reaches 24 hours while the split time is being displayed, the stopwatch
automatically stops counting and releases the split time display, showing “00" 00.”
STOPWATCH OPERATION
Page 14

English
English
26 27
While the STOPWATCH hands are stopped
[When the stopwat ch is stopped]
1. Pre ss Button B to reset the stopwatch.
[When the split time measurement is displayed
while the stopwatch is measuring.]
1. Press But ton B to release the split tim e
display and return to the normal display.
2. Pre ss Button A to stop the stopwatch.
3. Pre ss Button B to reset the stopwatch.
[When the split time measurement is displayed
and the s topwatch is stopped]
1. Press But ton B to release the split tim e
dis play.
2. Pre ss Button B to reset the stopwatch.
●
How to reset the stopwatch
While the STOPWATCH hands are moving
1. Pres s Button A to s top the stopwatch.
2. Pres s Button B to r eset the stopwatch.
Stopwatch hour
and minute hands
Stopwatch
second hand
A
B
HOW TO USE THE ALARM
◆
The alarm sounds only once at the de signated alarm time and it is
automatically disengaged.
◆
The alarm time can be s et within 24 hours from the current time in
1-minute increment s.
◆
The alarm sound can be previewed.
●
How to set the alarm time
CROWN
Pull out to first click in the
CALENDAR/ALARM mode
.
• Refer to HO W TO CHANGE THE
DISPLAY MODE.
First click
• Upon doing this, the day hand
points to “AL.”
•
If the crown is pulled out while
the alarm is set,
the alarm will be
automatically canceled.
• If the watch is in the STOPWATCH mode, press the button
B to change to the CALENDAR/
ALARM mode.
B
Alarm sub di al
A
Day hand
Page 15

English
English
28 29
●
How to manually silence the alarm
CROWN
After alarm time se tting is complete, push
in to normal position.
B
Press to set the alarm time.
• W ith each press of button A, the ala rm sub-dial
time advance s by one minute.
• With e ach press of button B, the alarm sub -dial
time moves bac k by one minute.
• The hands move qu ickly if button A or B is
continuously pressed.
• The al arm hands stop when they indic ate the
curre nt time.
• If the alarm time is set to the c urrent time, the
alarm cannot b e set.
◆
The alarm sounds for 20 seconds at the designated
time.
◆
To silence the alarm, press either button A or B.
• The alarm will be automatically canceled once it sounds
at the designated time.
A
B
t
OR
A
●
How to change the alarm time, once it has already been set
CROWN
Pull out to first click in the
CALENDAR/ALARM mode.
Upon doin g this, the set alarm time
is automatically canceled, and the
alarm sub- dial time change s to
indicate the current time.
Press to set a new alarm time.
•
With ea ch press of button A, the
alarm sub-dial time advance s by
one minute.
• With eac h press of button B, the
alarm sub -dial time mo ves back by
one minute.
• The hands move qu ickly if button
A or B is continuously pressed.
CROWN
After alarm time se tting is
complete, push in to no rmal
position.
First click
B
Alarm sub di al
t
t
B
OR
A
A
Alarm sub di al
Page 16

English
English
30 31
●
How to cancel the alarm time
CROWN
Pull out to first clic k in the
CALENDAR/ALARM mode.
Upon doing this, the set alarm
time is automatically canceled, and
the alarm sub-dial time changes to
indicate the current time.
CROWN
Push ba ck in to normal position.
●
Sound demonstration function
B
Press for 3 second s in the CALENDA R
/ALARM mode.
The alarm sound can be heard while
button B is continuously pressed.
CROWN
First click
B
t
HOW TO CHARGE AND START THE WATCH
u
When you start the watch or whe n the energy in t he rechargeable battery
is redu ced to an extremely low level, charge it sufficien tly by exposing the
watch to light.
1 Ex pose the wat ch to sunlight or s trong
artificial light.
When the watch has stopped operating, the second
hand will start moving at 2-second intervals.
If the watch is charged by exposing it to strong light
such as sunlight, the power reserve indicator may
not show the remaining power reserve amount
properly. Make sure to charge the watch sufficiently
by referring to “GUIDELINE OF CHARGING TIME/
ACCURACY.”
2 Keep the watch exposed to the light until
the second hand move s at 1-second
intervals.
3 Wh en the watch is charged af ter it has
completely stopped, set the date and
time be fore wearing the watch.
Page 17

English
English
32 33
Caution for charging
●
Whe n char gin g the wa tch, do not p lac e it too c los e to a pho tof lash
light, spotlight, incandescent light or other li ght sources as the watch
temperature will become extremely high, c ausing damage to the part s
inside the watch.
●
When exposing the watch to sunlight to charge it, do not leave it on the
dashb oard of a car, etc., for a long time, as the watch temperature will
become extremely high.
●
While charging the watch, make sure the watch temperature does not
exceed 60 °C.
CAUTION
OVERCHARGING PREVENTION FUNCTION
No mat ter how long the secondar y batter y is charged, the performance of the
watch w ill not be degr aded. When the seconda ry battery becomes fully char ged,
the over charging prevention function will be automatically activa ted to prevent it
from being charged further.
POWER RESERVE INDICATOR
The pow er reserve indicator c an be used to check the power reserve amount
(continuous operating time).
●
How to check the power reserve amount
In the STO PWATCH mode, the sub-dial hand at the 12 o’clock position
indicates the powe r reserve a mount.
In the CA LENDAR/ALARM mod e, it indicates the day of the w eek, M (Month),
L (Lea p year), and then the power reserve amount. Press bu tton A until the
hand indicates pow er reserve amount.
▲
▲
Day of the week
▲
M
L
A A
▲
Power reserve
amount
A
Sub-dial
hand
A
Page 18

English
English
34 35
Level of power reserve
amount Low Middle High
The approximate time
until the watc h stops
operating
0 to 2 days 2 to 100 days 100 days or longer
• The power reserve ind icator provides only a general g uideline of the duration within whi ch
the watch keeps operating without needing to be charged.
• When the powe r reserve ind icator indicates Low level, the sec ond hand moves at twosecond inter vals, and will stop within 48 hou rs.
• If the watch is ch arged by exposing it to strong light suc h as sunlight, the power reserve
indicator m ay not show the remaining powe r reserve amount properly. Make sure to cha rge
the watch sufficie ntly by referring to “GUIDELINE O F CHARGING TIME/ ACCURACY.”
v
Th e above table provi des only a general g uideline.
GUIDELINE OF CHARGING TIME/ACCURACY
A: Tim e to charge 1 day of power
B: Tim e required for steady o peration
C: Ti me required for full ch arge
u The watch operates while
charging electricity by
converting light received on
the dial to electrical energy.
It cannot properly operate
unless the remaining energy
is sufficient. Place or store
the watch in a location
receiving light etc., to
sufficiently charge electricity.
• When the watch is
stopped or the second
hand starts moving
at 2-second intervals,
charge the watch by
exposing it to light.
• The time required for
charging the watch
varies depending on
the calibres. Check the
calibre of your watch
engraved on the back
cover.
• It is recommended that
the watch be charged for
as long as the charging
time "B" to assure the
stable movement of the
watch.
Environment/Lightsource (lux)
V198
A
(minutes)
B
(hours)C (hours)
General offices/ Fluorescent light (700 )
150 60 -
30W20cm / Fluorescent light (30 00) 33 13 110
Cloudy weather/Sunlight (10000) 9 3.5 30
Fair weather/Sunlight (100000) 2 0.6 5
Expe cted life p er charge from full
charge to stoppage
6 months
Loss/gain (monthly rate)
Less than 15 seconds when the watch
is worn on you r wrist at a normal
temperature range (5 ºC to 35 ºC)
Operational temperature range -10 ºC to 60 º C
Page 19

English
English
36 37
ENERGY DEPLETION FOREWARNING FUNCTION
l
Whe n the energy s tored in the re chargeable batter y is reduce d to an extremely
low level, the second h and starts moving at 2-second intervals ins tead of the
normal 1-second in tervals. The watch remains accurate even while the second
hand is moving at 2-se cond inter vals.
l When thi s occurs, re charge the wa tch as soon as p ossible by exp osing it to ligh t.
Otherwise, the watch will stop operating within 48 hours. (For re charging the
watch, see “HOW TO CHA RGE AND START THE WATCH”)
•
While the second hand is moving at 2-second intervals, the stopwatch cannot be activated.
This is not a malfunction.
•
If the second hand starts to move at 2-second intervals while the stopwatch is operating,
the stopwatch will be automatically stopped and the stopwatch hands will return to the “0”
position.
•
While the second hand is moving at 2-second intervals, the alarm time cannot be set.
•
If the time reaches the alarm time while the second hand is moving at 2-second intervals, the
alarm will not sound, and the alarm will be automatically cancelled.
v TO PREVENT THE ENERGY DEPLETION
•
When wear ing the watch, make sure that the watch is not c overed by
clothing.
•
Whe n the wa tch i s not in use, l eave it in a br ight plac e as lo ng as
possible.
NOTE ON POWER SUPPLY
●
The batter y used in this watch is a rechargeable batter y, which is di fferent
from ordinary silver oxide bat teries. Unlike other disp osable bat teries su ch as
dry- cell bat teries or button cells , this rechar geable bat tery can b e used over
and over again by repeating the cycles of dischar ging and recharging.
●
Th e ca pacit y or r ec har ging ef fi ci ency of t he r ech ar gea bl e batte ry m ay
gra dually det erior ate fo r vari ous reason s such a s long -ter m use or u sage
con ditio ns. Wor n or contaminated me chani cal pa rts or d egraded oil s may
also shorten rechargin g cycles . If the efficiency of the rechargeable b atter y
decreases, it will be neces sary to have the watch repaired.
l
Do not r emove the rech argea ble ba tter y yourself. Re plac ement o f the
rechargeable batte ry requires prof essional knowle dge and sk ill. Please
ask a watch retaile r for replacement of the re chargeable batter y.
l
Installation of an ordinary silver oxide bat tery can generate hea t that can
cause bursting and ignition.
CAUTION
Page 20

English
English
38 39
IMPROPER FUNCTION
When an abnormal display appear s, follow the pr ocedures below to rese t the
built-in IC. The watch will resume its normal op eration.
<HOW TO RESET THE IC>
1. Pull out the crow n to the se cond
click .
2. Keep pressing down But ton A and
B for 3 seconds or longer.
3. P us h th e crown b ac k in to t he
nor mal po siti on and c heck i f the
sm al l se co nd ha nd m ov es a s
normal.
B
A
CROWN
Resetting the IC will initialize the watch. Before starting to use the watch, it
will be necessary to set the time and adjust the STOPWATCH hands to the “0”
position. Refer to “TIME SETTING AND HAND POSITION ADJUSTMENT” section
of this manual.
ROTATING BEZEL
(for models with rotating bezel)
●
The r otating bezel can show up to 6 0 minutes of elapsed time.
1 Turn the rotating be zel to align its "
"
mark wi th the minute hand.
Note: For some models, the rotating bezel rotates only counterclockwise.
Start
Elapsed time
2 Re ad th e numb er on t he ro tating be zel
that the minute hand points to.
30 minutes hav e
elapsed.
Page 21

English
English
40 41
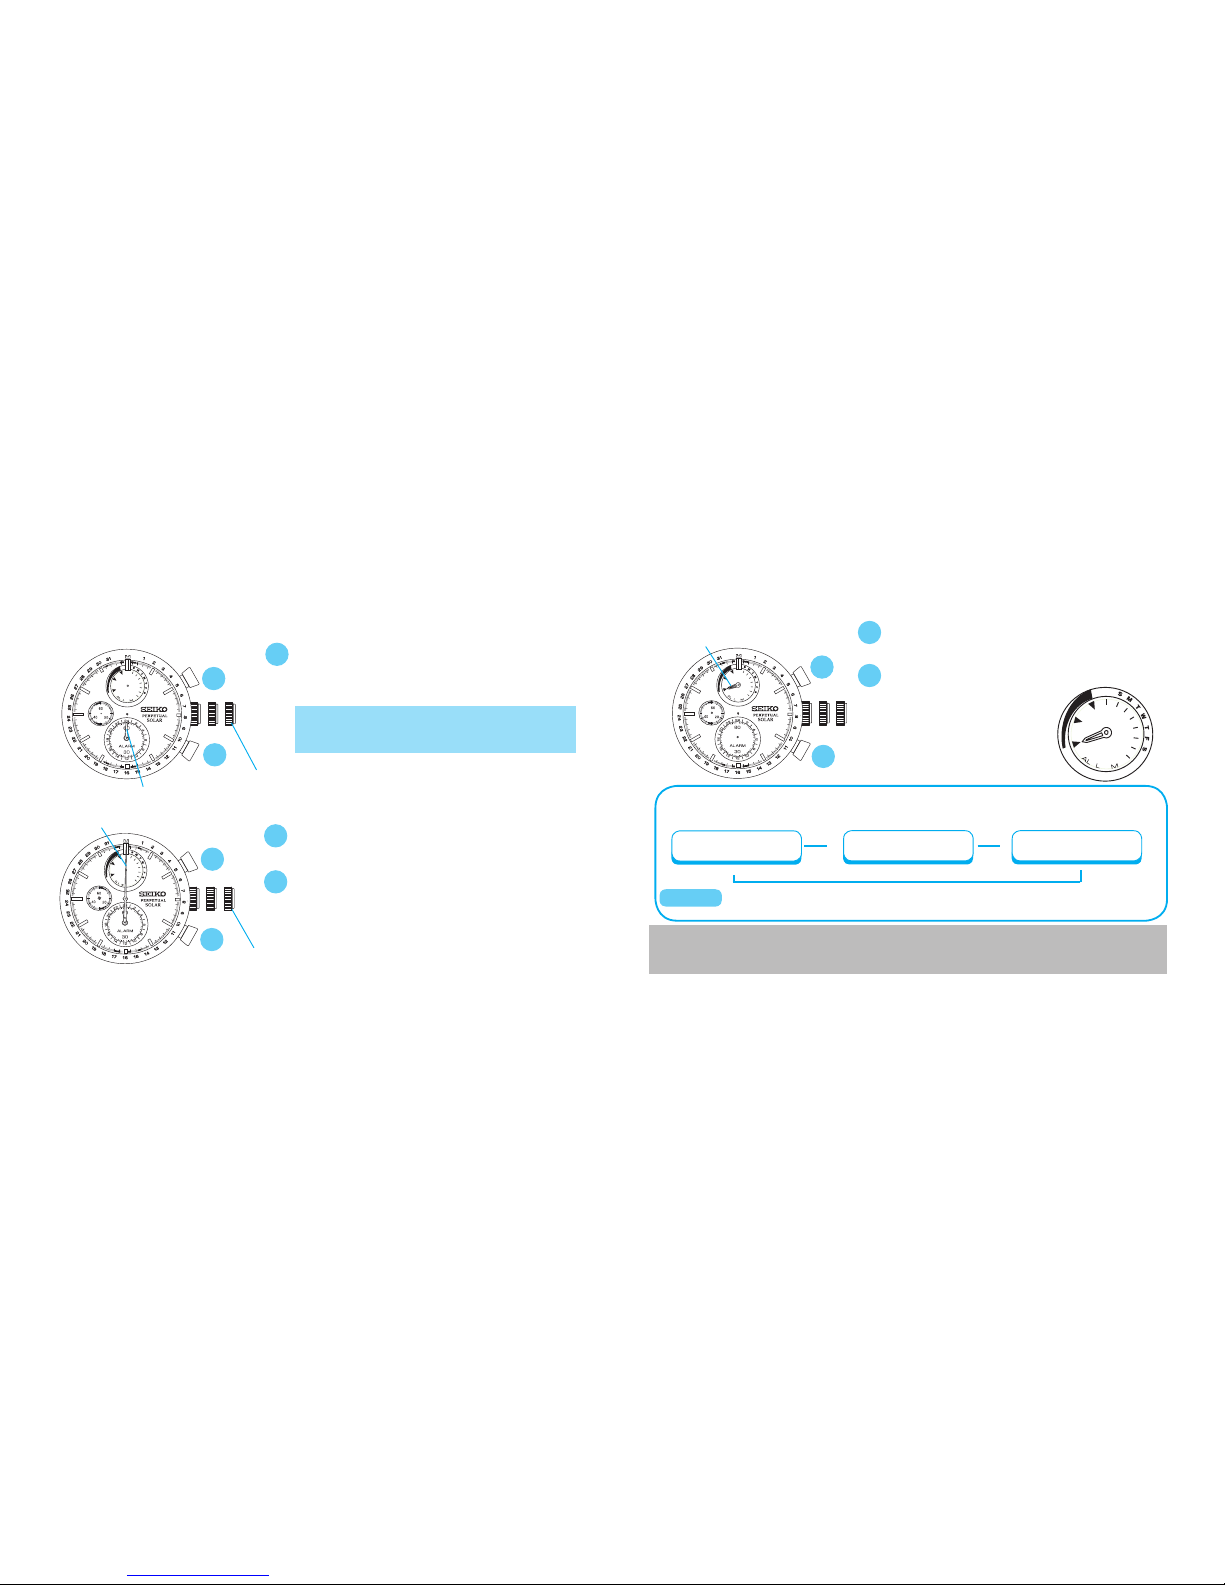
TACHYMETER
(for models with tachymeter scale on the dial)
l
Tachyme ter scale ca n be used only w hen the time re quired is le ss than 60 se conds.
To measure the hourly average speed of a vehicle
Use the s topwatch to
determine how many seconds
it take s to go 1 km or 1 mile.
Tachymeter scale indi cated by
the STOP WATCH 1/ 5-sec ond
hand gives the average speed
per hour.
Ex. 1
STOPWATCH 1/5-
second hand:
40 seconds
Tachymeter scale:
"90"
“90” (tachymeter scale figure) x 1 (km or mile)
= 90 km/h or mph
Ex. 2: If the measuring distance is extended to 2 km or miles or shortened to 0.5 km or
miles and the STOPWATCH 1/5-second hand indicates “90” on tachymeter scale:
"90" (tachymeter scale figure) x 2 (km or mile) = 180 km/h or mph
"90" (tachymeter scale figure) x 0.5 (km or mile) = 45 km/h or mph
1
2
To measure the hourly rate of operation
Use the s topwatch to measure
the time r equired to complete 1
job.
1
Tachymeter scale indi cated by
the STOP WATCH 1/ 5-sec ond
hand gives the average number
of jobs a ccomplished per hour.
2
Ex. 1
STOPWATCH 1/5second hand:
20 seconds
Tachymeter scale : "180"
“180” (tachymeter scale figure) x 1 job
= 180 jobs/hour
Ex. 2: If 15 jobs are completed in 20 seconds:
"180" (tachymeter scale figure) x 15 jobs = 2700 jobs/hour
Page 22

English
English
42 43
TELEMETER
(for models with telemeter scale on the dial)
l
The telemeter can pr ovide a rough indication of the distanc e to the source o f
light and sound.
l
The telemeter indicates the distance from your location to an objec t that emits
both lig ht and sound. For example, it ca n indicate th e distance to the place
where lightning str uck by measuring the time elapsed after you see a flas h of
lightning until you hear the sound.
l
A flash of lightning rea ches you almost immediately while the sound travels to
you at a sp eed of 0.33 k m/se cond. The distance to th e source of the light and
sound c an be calculated on the bas is of this dif ference.
l
The telemeter sca le is graduated so that the so und travels at a speed of 1 km in
3 seconds.*
*Under the condition of temperature of 20° C(68° F)
The telemeter provides only a rough indication of the distance to the
place where lightning struck , and theref ore, the indic ation cannot be used
as the guideline to avoid th e danger of ligh tning. It should also be note d
that the speed of the sound differs depending on the temperature of the
atmosphere where it travels.
CAUTION
HOW TO USE THE TELEMETER
Befor e beginning, c heck that th e stopwatc h has been reset.
START
(Flash of light)
STOP
(Crash of thunder)
Press Button A to start the
stopw atch as soon a s you
see light.
When you hear the sound,
press Button A to stop the
stopwatch.
Read the telemeter scale
that the STOPWATCH 1/5 second hand points to.
Approx. 3 k m
Please note that the STOPWATCH 1/5-second hand moves in 1/5-second increments and does not
always point exactly to the graduations of the telemeter scale. The telemeter scale can be used
only when the measured time is less than 60 seconds.
3
2
1
Page 23

English
English
44 45
TROUBLESHOOTING
Tro ubl es Possible causes
The wat ch stops operating. The ene rgy has been depleted.
The small second han d moves at
two-se cond intervals.
The ene rgy is running short.
The stopped watch has been
charged for longer than the time
requir ed for full charge, but the
second hand does no t resume
one-second interval movement.
The ligh t the watch has been exposed to was
too weak.
The buil t-in IC has fallen into an unstable
condition.
The wat ch temporar ily gains or
loses time.
The wat ch has been le ft or worn in ex tremely
high or low temperatures.
The wat ch has been le ft close to an object
with a s trong magne tic field.
You have dropped the watch, hit it agains t a hard
surf ace or worn it w hile playing active spor ts.
The wat ch was exposed to strong vibrations .
Solutions
If you of ten encoun ter this problem even though you wear the watch everyday, the
watch m ay not be expos ed to sufficient light while you wear it. For example, the
watch m ay be covered by the cuff of clothing. Re
charge the watch suf ficientl y by
exposing it to light.
The time required for c harging will vary depending on the intensity of light.
Recharge the watch referring to "GUIDELINE OF CHARGING TI ME/ACCUR ACY."
Reset the watch by following the instructio ns in “IMPROPER FUNCTION."
Return the watch to a normal temperature so that it works accurately as usual, and
then re set the time. The watch has b een adjust ed so that it works accura tely when
it is worn on your wrist under a normal temperature r ange between 5 ºC and 35 ºC.
Corre ct this condition by moving and keeping th e watch away fr om the
magne tic source. If this actio n does not cor rect the condition, con tact the
retailer from whom t he watch was purchased.
Reset the time. If the w atch does no t return to it s normal accuracy aft er
rese tting the time, contac t the retailer from whom the watch was purchased.
Page 24

English
English
46 47
Tro ubl es Possible causes
The STOPWATCH hands do not
return to the "0" position when the
stopw atch is reset.
Affected by ex ternal sources, or bec ause the
internal IC had been r eset, the s topwatch hand
positions have moved out of correct alignments.
Although the alarm time has not
been set, the time on the alarm
sub dial and the time on the main
dial are not the same.
The wat ch has been le ft close to an object
with a s trong magne tic field. The watch has
been ex posed to strong vibrations.
The inner surface of the glass is
clouded.
Moisture has enter ed the watch b ecause the
gasket has deteriorated.
The dat e changes during the day.
The time is set 12 hours ahe ad of or behind
the correct time.
Solutions
Adjust the STOPWATCH hand s to the "0" position by follo wing the instructions in
“
TIME SETTING AN D HAND POSITION ADJUST MENT
”
Reset the time for main dial and alarm sub dial.
Contact the retailer from whom the watch was purchased.
Reset the time correctly, refer ring to “TIME SETTING A ND HAND POSI TION
ADJUSTMENT”
• In the event of any other problem, please contact the retailer from whom the watch was purchased.
Page 25

English
English
48 49
SPECIFICATIONS
1 Frequency of cryst al oscillator .......... 32,768 Hz (Hz = Hertz … Cycles per second )
2 L oss/gain (monthly rate) ................... ±15 seconds at nor mal temperature rang e
( 5 °C to 35 °C/ 41 °F to 95 ° F)
3 Operational temperature range .......... –10 °C to 60 °C /14 °F to 140 °F
4 D riving system .................................... Step motor 4 pieces
5 D isplay system
Time ................................................ Hour, minute and small second h ands in
1-second increments
Stopwatch ......................................
Stopwatch second hand in 1/5 -second in crements (60 seconds/360 degrees)
Stopwatch minute hand in 1-minute increment s
(60 minutes/360 degrees)
Stopwatch hour hand synchronizes w ith the
minute hand ( 24 hours/360 degrees)
Alarm ..............................................
Alarm minute hand in 1-minute increment s (60
minutes/360 degrees)
Al arm hour hand synchronizes with the minute
hand (24hours/360 degrees)
Calendar .......................................... Date indication by the calend ar hand (month &
year can be checked on demand)
Day indication by the day hand
6 Power supply...........................................
Manganese titanium-lithium rechargeable batter y
7
Continuo us operating time from full charge
......... A pproximately 6 mont hs i
f the stopwatch is used
for shorter than 1 hour per day an d the alarm
sounds for s horter than 20 sec onds per day
8 Additional function .................................. Energ y depletion forewarn ing function,
overc harging prevention function
9 IC (Integ rated Circuit) ............................. C-M OS-IC , 1 piece
• The spec ifications are subject to change without prior notice due to product
imp rovements.
 Loading...