

Page 1

.,lyEsd
+oll
c31
louod
uols!^elel
99807-fl
afl
S]IU]S
Page 2

Page 3
Jo
flavl
s-l.Nf-LNoc
Z
n
e
NI
V
I
L
NNoc
lo
NOIUVS fHI
)CV8/INOUJ
sNolrcf
Ar oc-l
nv
reMod
euuoluv
xvoc
ly\oH
ecl^les
eloulou
eloueU
dnlas
lceles
clseS
punos
dnlos
eJnlcld
proc
(ca)vetn
uod
pJezrM
lndul
nuar{ eJnls!d
nue!\l
lauueqc
leluered
nuay\l
nuanl Jaqlo
nuoy\
uollcauuoc
uorlceuuoS
uorlcauuoc
(lueuodtuoc)t6q61
uorlceuuoc
uollceuuoc
uollcouuoc
uollcunl
loJluoc
lorluoc
dnles
ecJnos
uoueJodo
nue[/l
loJluoS
uorlcauuoC
nf
ul suollcnJlsul
epou,
v
L
8
I
6
6
OI
01,
ll
il
zt
tt
,t
9t,
9t.
91.
6l
ZZ
NZ
LZ
6Z
0t
ds
sNolrv9lllcf
vt
cc
Page 4
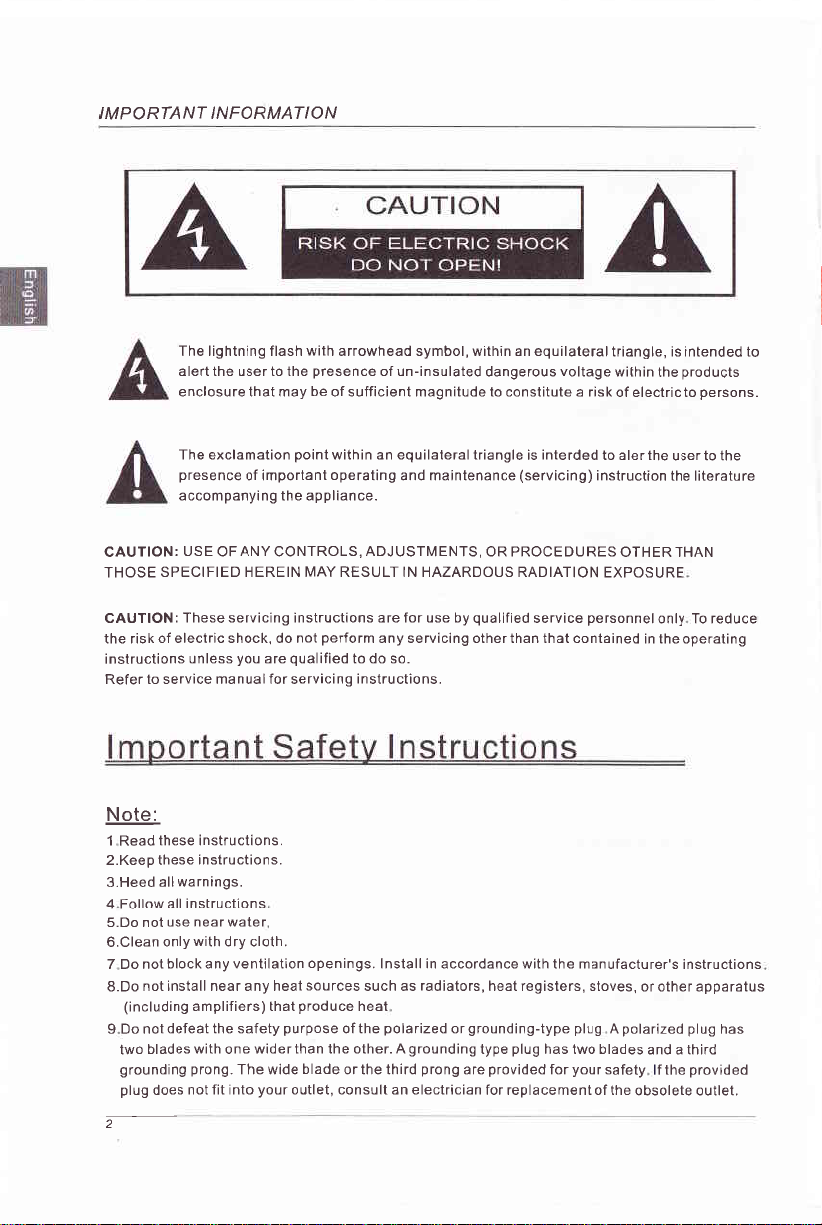
IMPORTANT INFORMATION
AA
The lightning flash
alert the user to the
enclosure that may
The exclamation
presence
accompanying the appliance.
CAUTION:
THOSE
CAUTION:
the risk
instructions
Refer to service manual for servicing
USE
SPECIFIED HEREIN MAY RESULT IN HAZARDOUS RADIATION
These servicing instructions are for use by
of electric shock, do not
OF
unless
of important
ANY
you
with
presence
be
point
CONTROLS,
perform
qualified
are
arrowhead symbol, within an equilateraltriangle,
of un-insulated
of sufficient magnitude to constitute a risk
within an equilateral triangle
operating
and maintenance
ADJUSTMENTS,
any servicing other than that contained
to do so.
instructions.
dangerous
OR PROCEDURES
qualified
voltage
interded
is
(servicing)
service
within
of electric to
to aler the
instruction
OTHER THAN
EXPOSURE
personnel
is intended to
products
the
persons.
user to the
the literature
only To reduce
in the operating
Note:
these instructions.
1 Read
2.Keep these
3.Heed
4 Follow
5.Do not
6.Clean
7 Do not
8.Do
(including amplifiers) that
9Donotdefeatthesafetypurposeofthepolarizedorgrounding-typeplug Apolarizedplughas
two
groundingprong.Thewidebladeorthethirdprongareprovidedforyoursafety
plug
2
instructions.
allwarnings.
instructions
all
use near water
with
only
not install near any heat
blades
does
dry cloth.
block any ventilation
with
not fit i nto
wider than the other. A
one
your
openings.
sources
produce
outlet, consult an electrician
lnstall in accordance with the manufacturer's
radiators,
such as
heat
grounding
heat registers, stoves,
plug
type
has two blades
for replacement of the
instructions
or other apparatus
and a third
lftheprovided
obsolete outlet.
Page 5
tNVlAOdWl
NOUVWAOJNT
llxo
I !
Iaql oiol.la
asn Iluo
z I
,(luo asn
e usqM
€ I
lle
tl
Jalel
'Iea
q.ns
!
I
snlereddv
paceld
NEVM I L
uec
stql 6nldun
q}lm
sl
se
oql uo
aql
snleJedde aLll
lleqs
/
s)u0uqcelle
'uec
'posn
snlelEdde
ol 6ulcl^los
lou
aq
aonpal 01:0Nl
/!
eql uoll
'puels
6ulJn
p
paullenb
Ilddns-laMod
uaaq sEq
snleredde
lslJ
aql
snteJedde
sollossecce
'podu}
uol]nec asn
6ululq6ll
ecr^Jas
lo
pJoc
pasodxo
posodxa
lo
Jo ollJ
pelilcads
ro
'lalcEJq
aql
6ut^ou ueqm
lauuosrad
ro 6utddlrp ol
aql Iq
olqP}
'eJnlsrou ro ursJ ol
/
uec
uoqm Jo sulols
ptnbtl 'po6euep st 6nld
soop
6utqselds
op 'lcol.ls 9lJlcolo
pallrcods
pasnun
sr 6urcr^rgs
seq
lou
puE
lou
,{q
teql
J0Jnlce]nueu
snleJedde
6uot JoJ
perlnbar
uaaq
polllds
slcotqo ou
s!Lll asodxa
spollad
ueqa
ro
'raJnlcP]nu eu oql
ol uot]eutquoc
lo
ar.ll
Jo
'Illeulou sleJado
ol snleJedde
plos
pto^e
JeAO-dI
uoJ] IJn[ut
snleJedde
aql
tllla
io
aurl
pa6euep
.sase^
Iue u!
,snleledde
lleqs
aq
uaaq
seq snleJedde
oql olu!
uelteJ o^eq
sl.olqo
ueaq seq
psddolp
qlta pallrl
seqcns
,sp!nbtl
aJnlsrou
Jo uleJ
alqeredolllpearoqlleqs'ocl^aplcouuocslpaqlsepasnslreldnocacuBllddelo6nldsuleUl
uorlcauuocOulqueoa^llcaloJdeqllmlallnola)icosSNlVlleolpolcouuocoqlleLlssnleleddeaqls!
lutodoqlpue,salceldoceJecuotua^uoc,sonldlellJelnctuedpoqcutdJouopo)ileM6ulaquoJrpJo9laModoqllcoloJd0L
Page 6

lueqf
lceluoc
no^
erns ole1i\
lCVJlAd
cvlfud'z
nf
eql
tno[
'teleap
Arf
lvs't
ud
w
f
se/'/\
sttll 6ur^nq Jol
lnd
1ou
aql
inf
1eq11caq3
n
f
aseeld
peal
ut
peDeuep
a^eq nor(
lenueur
sr.ll
lsuerl
lle
eql
plnoqS
nl
sNolrnvcfud
ecelrns elqEls e uo
eroloq Ilrl6noJoq]
op'paOeurep aq
or.ll ol 6utp.tocce souossacge oql
6urleredo
aqi
lou
'lepou
'711
llelsur
lr
pue
oo
oo
lou
lou
,(ue aceld
n I
eq] ssn
pelse66ns
leualBtu
qlrM
nI
aql uo
esoql ueql Joqlo saJnlxu
rornlcelnueu eql Iq
:o
papr,rord
w
i(peels
n I
nf
aq) uo sburuado uorlelrluol aq] Jeloc Jo
lua^ard
ol
ol
palcalord pue polnor
'lleJ
oO
11
lleM
e ereq nor(
'lunou.r
lcoqc
]r leql
sr
lcolq
lou
ffi
lsnur
aq
JaMod
u.tor1 e;doed
n
salqec
pue pJoc
uaq] uo 6urddols
pue
A1:edord
oql 6ursnec
Page 7
ad A.IlJVs
sNo/lnvcf
ul
oqt
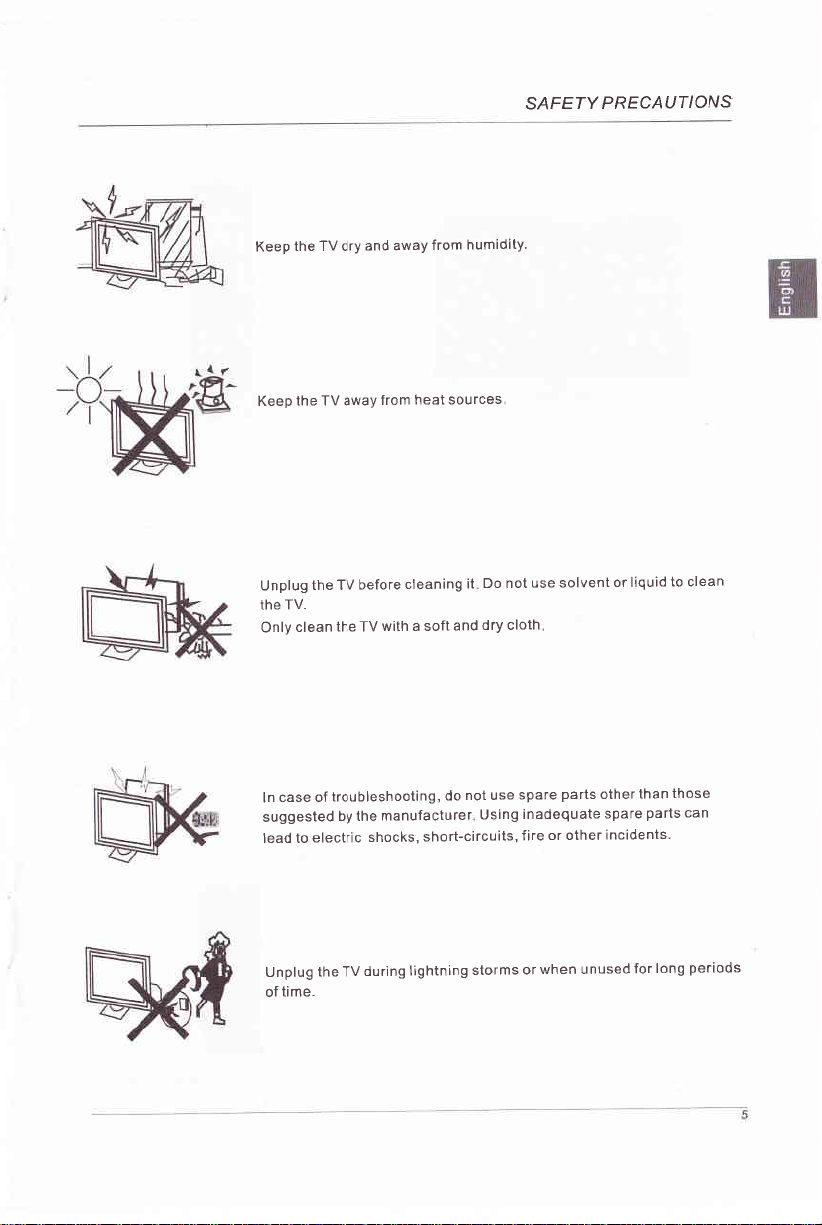
deey
-L
'n
(1ug
pEol
eq]
aq1 deay
aql
6nldun
ueelc
asPc
jo
palso66ns
ol
n1
11
r(lp
^e/'^e
nf
nf
aq]
oq]
Aq
clJlcala
pue
eloJaq
uol;
e
qU/!\
[er*e
uto.tl
leaq
6utueelc
llos
op
'6utlooqselqno:l
'^lrprunLl
secJnos
lou
1t
oC
pue
]ou
6ulsn
JaJnlcejnueul
luen;os
osn
Lllolc IJp
eJeds osn
leqlo sued
eleds olenbopeul
Jeqlo
lo eJu'sllncJlc-uotls'slcoLls
ol
prnbt;.to
esoq]
ueql
uBc
sUed
'sluaplcul
uealc
nI
oql
6nldun
Jo
'aulll
6uunp
6ululll6ll
lo strlrols
ueq^
rol
pasnun
sporJad
6uol
Page 8
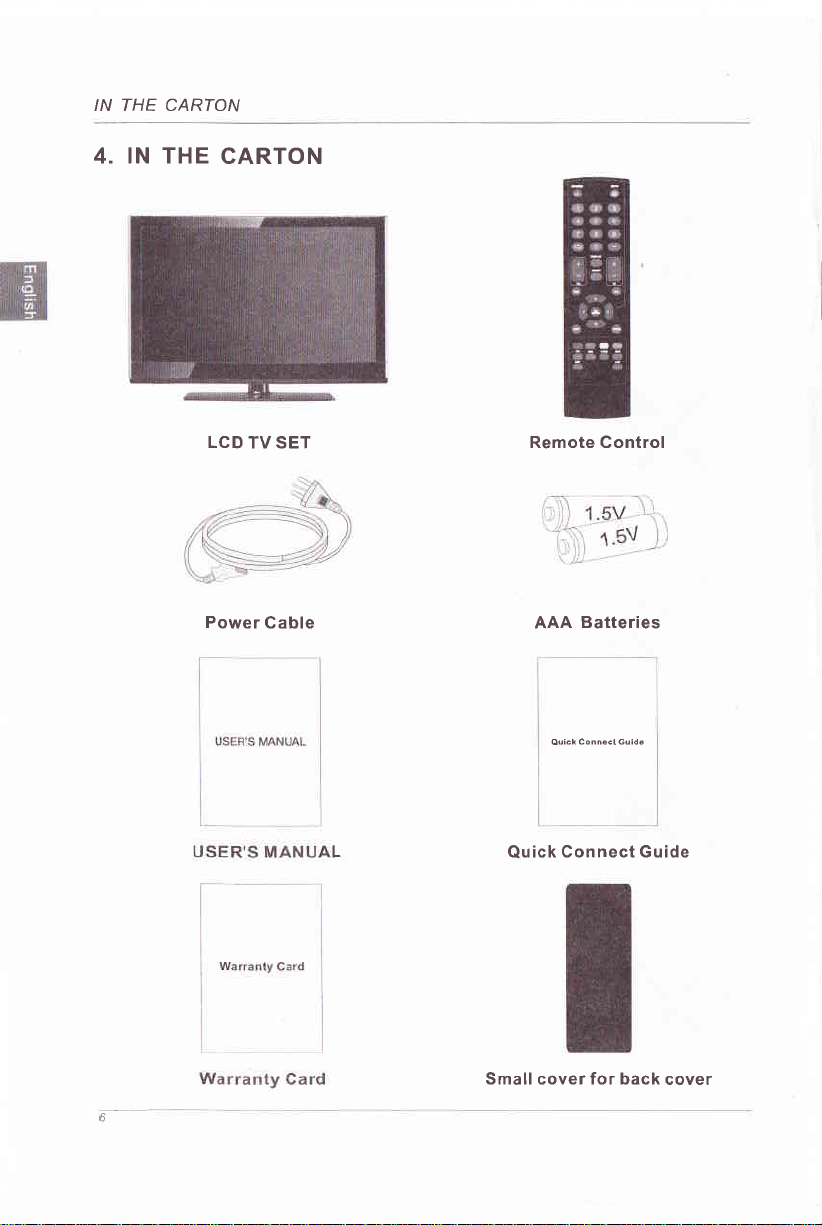
IN THE CARTON
4. !N THE
CARTON
LCD
TV SET
Power
Cable
Remote Con
AAA Batteries
trol
OuickConnoctGuids
L
Small cover for back cover
6
Connect Guide
Quick
Page 9

vcvauNoaJ
At
oc1
Jo sNoI-tcfNNoc
'9
luorJ
IcEE
,re!A
/$o!A
vcv8/rNoul
pue
lo.lluoc
I
0
aql
n
eql
z
L
t
suo!l3auuo0
CV
:Nl
'f
t I
y{OH'Z
lcet
Cd
'e
VCn
?
!u/l-A
I
:O:lOlA
'L
'8
6
I
lol
:u/l
OIOnV
lu'0 I
:Nl
lL
xvoc
'z
lo sNolrcSNNoc
sseld
ssaJd'Z
sseJd
ssaJd,
sseJd'9
sMoqs
(Cd)
:fNOHd
.,1'1113yt1,,
'ueercs
Jo,.+HC,,
..+-lOA,,
'oulnloA
U:lMOd'9
pel
s f 1or13u
alouJel
'lorluoc
lerttod uteYl
li\lOH/
y!OH/Zl
On O Jo
:OlOnV
:
lcouuoC
:Adqd,AJtrdqdl'9
rol :zu/l-A'
eq]]cauuoC
of
olA
:InO
lceuuoc
eql
J-UOd
:lClAUfS
:lno
Ar oc'l
o1
.,-HC,,
,,--lon,,
Jo
uaqi
ueeJ6Jo
:uosNf
lndur
I
:e
]ceuuoC
eql
rdqd^
oaprn
'orpne
lceuuoC
o]
aqllcauuoC
'euuolue
ESn
:
-lNO
lcauuoc
eql
eqllceles ol,,fCUnOS,,
aql dn 6ut:q
uecsol
ol
s/r^oqs :UOIVCIONI
pel
AIJnoA
parerlul
lcauuo3
aqt
otpnv eql
:6q61 eqllceuuoC
'orpne
lce[1ndut
otpne oql
'euoqdpeaq
xvoc
eqlulnloluollnq,.L8oNVIS,,
ureur
ur
s!
rosues
y16
g
)ce[]ndlno
lnd1no 8CU-Cd
On
to
O
'lJorouonf
'ecrnoslndut
uo nuel.u
^qpuels
'epour
poqclr/rr\s
'uo
eqt JoJ
1nd1no I
lo
'Cd
1o
lcet
'36
OnO
lo XJellndlno
ro
Jo
'UCA
'slauueqcq6noJql
eseelcepJoeseeJcu!
'UCn
lueudtnbe
es6
i(ro1ce3
rotUod
'.le^!ecor
'i(1u6
I
Page 10
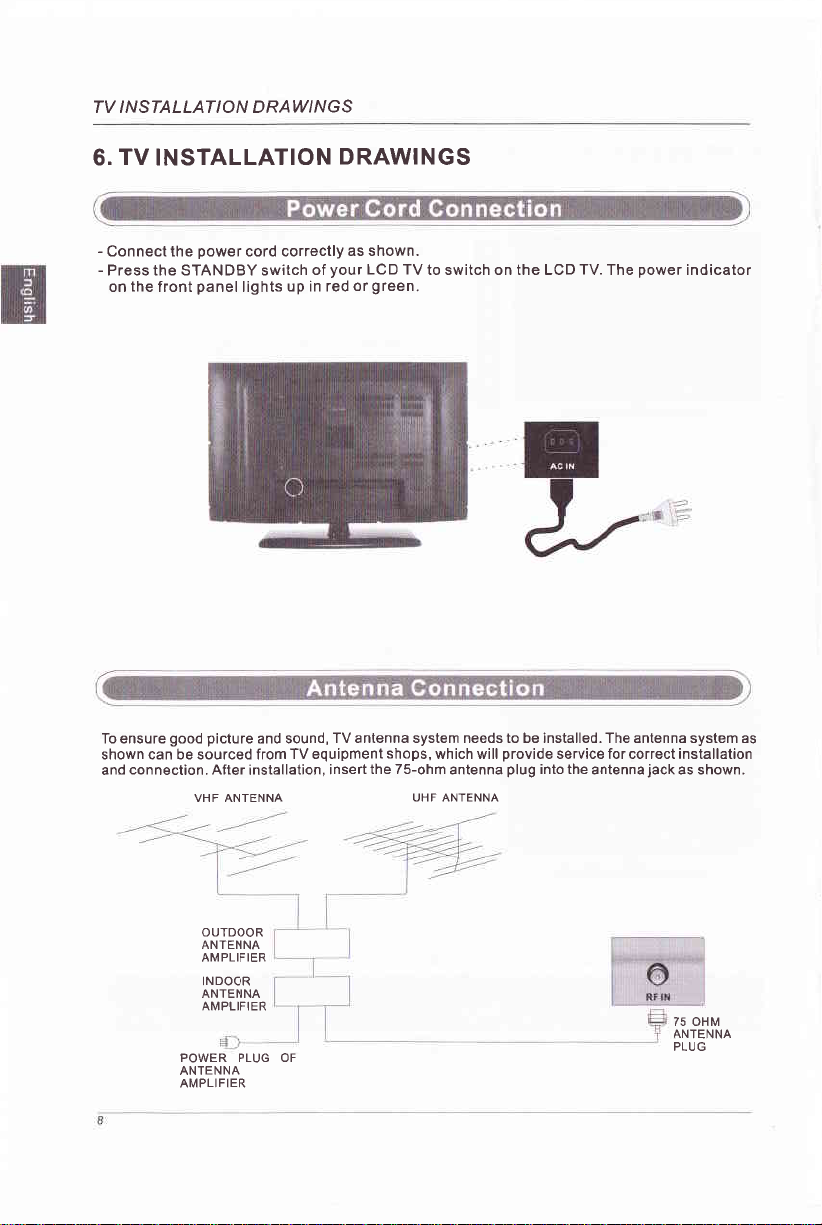
TV I N STALLAT I O N D RAWI N G S
TV
6.
INSTALLATION
-
Connect the
-
Press the STANDBY switch
the
on
To ensure
shown can be sourced from
connection. After
and
power
panel
front
good picture
VHF ANTENNA
cord correctly
lights
and sound,
installation,
DRAWINGS
as shown.
your
LCD TV
of
up in red
TV equipment
or
TV antenna system needs to be installed. The antenna system as
insert
to switch on the LCD
green.
shops,
the 7s-ohm
which will
UHF ANTENNA
antenna
provide
service for correct installation
plug
into the
TV.
The
antenna
power
jack
indicator
as shown.
OUTDOOR
ANTENNA
AMPLIFIER
INDOOR
ANTENNA
AMPLIFIER
POWER PLUG OF
ANTENNA
AMPLIFIER
75 OHM
ANTENNA
PLUG
Page 11
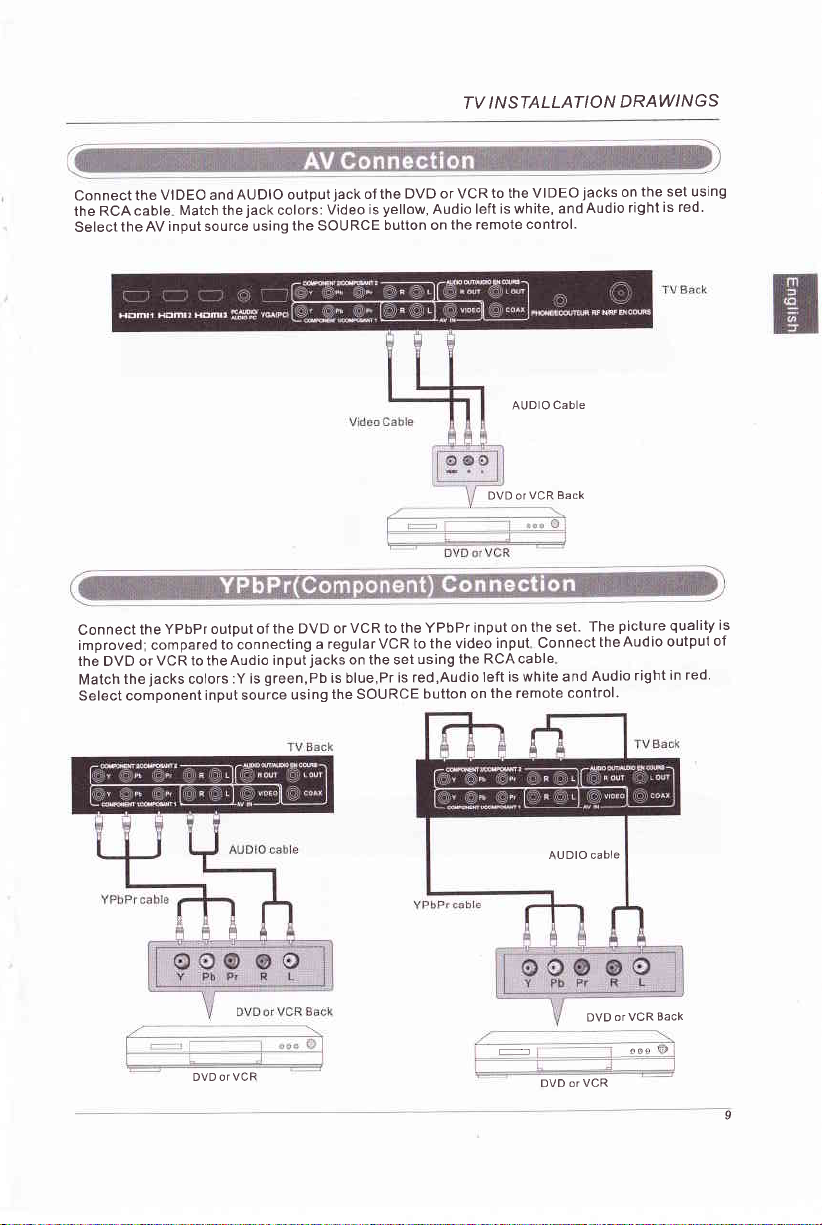
Al
s 9
O
N O I
tVllVlS N I
N I/AVA
aql
]cauuoC
]celes
on
o
qcleu\l
lcalas
eq]
elqecVCUoql
nV
aq]
:pa^oJdull
ucn
ro
slceI aq]
Of O ln
pue
lndut
ol
paJeduloc
eq] ol
l:
sloloc
lndulluauoduoc
orpnv
sl
OIOnV
oq]
6ulsn ac:nos
]ndul
lndlno
fSUnOS
roon6eqlJolndlnordqdAeqllcauuoC
Jeln6ar
e 6ullcauuoc
qd'ueeJ6
6ulsn oclnos
eq] uo slcef
rd'enlq sl
orll
oql
ucn
tos
sl
f cunos
lo
uo uollnq
ol
o]
aq]
on o
oept^ aql
v3u
eql 6ursn
ljel
olpnv'pel
aql
uo uounq
oql
alolual
ro
lndut
sl
UCn
On C
ro lcel
C In
otonv
alqec
ellq/!1
alouel
Of
'loJluoc
etqec
tceE Ecn
Jceuuoc
pue
slceI
eql
orpnv
'lorluoc
las
aql uo
6ursn
'pa:srlq6uorpnVpue'aUqMsll1ololpnV'Aollolsloapln:sloloclcelaqlqcleyl
s1i(1;lenbernlcideql'leseqtuolndurrdqd1aqlolUcn
Io
]ndlno
otpnv
lq6u
ur
'poJ
oAC
olcnv
etqec
o^o
lcee u3A
ro
:
ucA
ro
ucn
on
o
ro
6
Page 12
s 9
N
t At
N I/AVA O N O ltvllvts
eq] uo
lcauuoC
eJoluaJ
'loJluoc
re4tldulv otpnv o]
lesaqluolcelOlOnVCdaq]o]Cdeqf
eql ol oct^ap
yyg3
gCUeqllceles
]nd1no
nI
aql uo >ice[
lesaq1uoycet(36)Veneqto]CdoqllolndlnoECUaqllceuuo3
]o]ndlnoOIOnVoqllcauuoC
uo)]nqjCUnOS6ursnqlrrrrrecrnoslndur
nI
)iceE
o
rorlrldue orpnV
)iceq
Jarrrldue
Page 13

N I Al
llvllvls
s 9 N
I lAVA
O N O
lt/!OH
sleubls
6nld
:Uod oct^les
Llclqiv\
qOnolq}
alqec auo
j_.,
I
H
lt/!CH
oq] soceldal
,{1uo
3 I,OH
ffi*ffiffiee!*{'l
Hs.:.{iffi}q',H
Fln#-;i!trffi,k;ffi
k
rceS
Iluo sesn i(rolceJ:ol)
(
uorlceuuoc
ele
sleu6ts eseql
s/$ollE
llE lo
rolsueJl
ur
paJlolsueJ]
lorluoc/oapr^/orpne
'lelrbrp
tceS n1
gsn
rceS n-t
otqec
LL
Page 14

REMOTE CONTROL
7. REMOTE CONTROL
STANDBY
Turn the LCD TV ON or OFF.
....
MUTE
Press to mule the
un-mute the TV.
NUMBER BUTTONS
0-9 to directly change the TV
Press
SOURCE
PTeSSSOURCE todisplaytheOSD
press
A Vto select an input source, and then
OK to confirm
sound
Press again
press
or
channel
input source,
V+
press
to
Press this button
multiple
O
Return to the
DISPLAY
Press to display the
MENU
Brings up the main TV menu to the
EXIT
Exit the main
to enter a
program
channel
previous
TV menu to lhe screen.
program
such
channel viewed.
source and channel's information
ASPECT
Press to select
THUMBSTTCK(
Allows
system settings to
VOL+/VOL.
Press to
cH+/cH-
Press to scan through
cc
Press
EPG
Presstodisplay
Aspect Ratio
v/<
you
A/
to navigate the on-screen
your preference
increase
/
/ >/OK
decrease the
channels
to display the closed caption
EPG menu
v-cHtP
Press to enlerthe
LIST
Press to display
FAV
Press to display
MTS
Press to
select
V-CHIP menu
the
the
program's
a
program
TV
favorite
second audio
number for
as 2-1
,etc
screen
)
menus and adjust the
level
sound
list.
list in TV mode
channel
(if
available)
Page 15

'l
. Open the cover.
2. Uses threeAsize batteries.
marks
3. Replace the battery cover
the batteries line up correctly with compartment markings.
on
When inserting the
batteries,
REMOTE CONTROL
make sure correct
polarities
"+'and
"-"
prevent
To
1. lnstall
2. Do not mix batteries:(OLD and NEW or CARBON and ALKALINE,
Remove batteries
WARNING! DO
AS THEY
battery leakage
all batteries
NOT LEAVE BATTERIES IN THE REMOTE CONTROL
LEAK OR CORRODE CAUSING DAMAGE TO THE
CAN
which
correctly, and as marked on the remote control
may result in bodily
when the remote is not used for a long
injury or damage to the remote:
period
REMOTE CONTROL. CHECK
THEM PERIODICALLY AND REPLACE THEM AS REQUIRED.
WARNING! DO NOT MIX
BATTERIES AT THE SAME
WARNING! EXHAUSTED
ACCORDING TO ANY SAFETY OR
NEVER DISPOSE OF BATTERIES
WARNINGI
FIRE OR THE LIKE.
NEVER EXPOSE BATTERIES TO EXCESSIVE HEAT
BATTERY TYPES WHEN INSERTING BATTERIES,
TIME. DO
BATTERIES MUST BE TREATED WITH CARE
NOT MIX OLD AND
RECYCLING REGULATIONS IN FORCE
INTO
GENEML WASTE,
NEW BATTERIES.
OR FIRE.
SUCH AS SUNSHINE,
etc)
of time.
FOR EXTENDED PERIODS
REPLACE ALL
AND DISPOSED OF
IN YOUR LOCAL
AREA,
Page 16

nNSrU
NOUVAIdO
nuow'8
uolleredo
esooq3
leqar
edAl
1o
ot ocrlep
les
'dn
Page 17

NOttvaSdo nNSw
sseJd
sseJd
sseJd
yo
v/a
f cunos
oi uollnq
ol uoltnq
lceles
eql
eql Jelua ol uol]nq
^eldsrp
aql
lndul
pelcalas
lndur
ocJnos
no^ acrnos
'ecJnos
'lsrl
luEM
l.lclEM ol
Page 18

OPERATION
MENU
MENU
Press
Press</>button
OK button
Press
a
a
Press
you
l.Press
following.
as
Press
2
3.Press
4.When
V/ button
can
ENTER
V/A to select
{/} to
you
button to
to select
to enter
press
MENU
when the Picture
the desired
changed
have
display
to select
button
the desired
MAIN
the
MENU
the
menu.
sub
the
option
the
go
back
to
Settings
menu
level
the settings,
OSD MENU
you
want.
press</>to
then
and
to the upper menu
item is highlighted.
item. Press ENTER
you
can exitfrom
adjust
or ExlT
Then
proceed
to
the menu
value in the
the
button
you
will
if necessary.
pressing
by
to close
go
to
MENU'
sub menu
oSD.
the
the sub-menu
Picture
V/A
Press
the detail
lJ ser.
Mode
button to select
as
options
Picture
following can
Mode,
adjusted.
be
then
press
</>
Available
button
picture
adjust. Only
to
mode:
Dynamic,
in the User mode,
Standard,Movie
Page 19

nNlW
NOllvaldo
ssald
ueql
sseld
ueql
sseulq6lrg
V/
</>
sseld
lse.lluoc
v/a
</>
sseJd
uollnq
ol
ol uollnq
l3eles
ol
uopnq
o]
uopnq
]colas
ssaulq6ttg
'lsnlpe
'lserluoc
]snlpe
Joloc
v/l
ssord
ueql
ssald
ueql
lu !r
sseld
se
e
'
sseld
sseudreqS
V/
ssald
v/a
sserd uaq]
]Nf
sseid'l
ol ssald'z
</>
ssard
no^ ueqM
</>
uollnq
</>
</>
Uf
'6utwro11o1
]celas
ol
e^eq
ol uollnq
ol
ol uotlnq
aql
o1 uollnq
ol
uollnq
ol uo]lnq
ueLUt^
]sntpe
]cotas
lcslas
lcalos
eql
peJlsap
aql
pe6ueqc
'roloc
lsnlpe
lsntpe
'lull
lsnlpe
ueelcs
ol uell
eq]
'ssaudleqg
[rla]!
nuau
eq]
's6ullles
s6utlleg
ssa'ld
pellsap
uBc
no^
'le^al
llxe
ufl-Nf
uoJJ
palqDrlqOrq st uelt
oql
ueql
ll
paacoJd ol
nuou
^q
no[
11rr'r
aq1
o1 o6
v/aAJessacau
nNSt/\
6ulsseld
nueur-qns
ueoJJs
ssard
v/a
ezls
ol uollnq
lcelas
uaolcs
uaql'ezls
llnJ'euiaulc'sseleJaleM'leruroN
ssold
</>
ol uollnq
:azrs
ueeJcs
olqelle^v']snlpe
Page 20

MENU OPERATION
Auto Wide
Press v/ button
picture
to
Temperature
Color
Press
ENTER when the
Available color temperature:
to select
fit the
screen automatically.
color Temperature
the item Auto
Cool, Normal, Warm.
Wide, then
When the Auto
item is
press
ENTER button
Wide is
highlighted
press
to adjust.
</> button
selected, the symbol
rhen
lt can
will
set the
show as:
to adjust
Dynamic Contrast
PressV/ button
It can
adjust
signal in order to
Available Mode:
Film Mode
Press V/A
press
{/} button
and2:22ull down Available
Noise Reduction
Press V/A button
press
then
Reduction: Off,
18
to select
the
contrast
improve
On/Off.
button to
to adjust
to select
</>
button to
Low, Medium,
corresponding
select
the </>
picture
the
the item Film
lt
handles
Film
Mode:
the item
adjust
Available Noise
High
button to adjust.
to the input
quality
displayed.
Mode, then
pull
3:2
down
On/Off
Noise Reduction,
W
W
W
Page 21

NOUVAIdO nNSW
ofdII
sserd
sseid'Z
sseJd'e
v/a
</>
sserd ueqt
^q
saJnlc!d eqlJo
:uorlcnpau esroN
U3lNfsseJd'!
'6urmo11o1
V/A
ol
</>
eireq no[ ueq1y1'p
eql ol
uollcnpeu esloN
ol uollnq
lceles
eql
'lsn[pe
eq] 6ulcnpeJ
perlsep
eq1
paDueqc
urelr aqllcales ol uounq
ll
lcolq
'uinrpan '/{ro'l 'lJO
parlsap
'la^al
cadyl
'q6rH
nuouJ
'ural!
's6ur11es
noI
elqElre^V'esrou
sse:d
llxo
ueo
'uorlcnpeu asroN
I}lenb eq1 anordur uec
efdyl
U
jtN3
senuauJ-qnseqloto6llrttano[uaql'pe1q6llq6!qs!uralts6ut11egpunoseqlueqr
ol
;r
peeco.rd
6urssoJd i(q nueur aql utoJJ
'fuesseceu
'nNJII
Jesn
punos
apofl
aql
'opou
'lJos'pJepuels
ol uollnqv/a sserd
llelep
]celes
</>
urell eql
punos
eq uec 6u!r{rollo] sesuolldo
sssrd ueqt'apoyl
'pelsn[pe
ol uo]lnq
elqelre^v
punos
'lsn[pP
:apoyI
^luo
'rasn
aql ur
'ctuleu^o
Page 22

nNtW
sseg
sseJd
alqorl
sseJd
ssald
NOLVAfdO
V/
V/
a3u eleS
V/
uo]lnq
ol uoUnq
o] uollnq
ol
looles
lcales
lcelas
ueql
ssord
ssetd
sse-rd
</>
</>
</>
o1 uollnq
o1 uollnq
og uollnq
'lsnlpe
'lsnlpe
lsnlpe
uralr aql
u-rolr eql
urelr aql
uoLll'sseg
ueq1,elqet1
'acueleg
<:-
V/
ssold
ssaJd
ssaJd
OZ
:6utr,rro;;o;
60leuv
v/a
1e1;6;g
v/a
'qsruedg
1r1
01 e.rnlcrd eql
punos
orpne:elard eq1
punog
orpne:e1ald aq1
eql
ol uo]]nq
o] uollnq
uaqivr
ol uounq
uaqrvr
lcolos
ueoJcs
lcelos
lcalas
uelt eql
uelt aql
uleil eql
e o1 6urqclrns
punoJlns
ueq1tr'rllecrleuolne
0oleuy
paJJalaJd
leuueqc
60;eue ue o1 6urqclrivrs
lelt6to
poJJajeld
ley6rp
uaql,opof\l
sserd
olnv eq1
yO
sl aptM
,puno5
alqelrenv
uaql
punos
,
alqelreAV'lauueqc
sseJd uaql
60;euy
ssetd
lelrDro
uo11nq
o1
eql 'polcelas
</>
</>
:punos
:punos
ll lsnlpe
uec
Joqu:r(s
11rr'r
ol uollnq
roerals
o] uoilnq
'qsr16u3
los
se l oqs
)calas
dvs'ouoy\l
lcales
'qcuerl
Page 23

lAV
sserd
v/a
eurnlon
leAel
uec
ol uol)nq
les
lceles
nNlW
No
'lnv
uelr eql
aurnlo^ aql
^llecrleuroJnP
sserd ueqt
lsnlpe
</>
ol uollnq
lcolas
aql ol 6urpuodseJJoc
ro
lndur
'llo
orpne
NOUVAIdO
olnv
raleads
ro
ol uollnq
ll
'llo
lceles
eql
las
releads eq]
orpne
ol uollnq
llr/$
lndlno
ol uollnq
lcelas
aq
lcales
]nd]no
'olnu
eq]
uail aqt
uall
olqelre^v
'releeds
lelroro
lE]r6rp
orpnv
sserd ueql
']ndlno
:lndlno orpne
</>
sserd ueql
^qloo
v/a
sserd
'Jro
ol
lelr6!O
olpnv
v/a
ssord
lElrorp
porlsop
ol uounq
</>
lceles
'llo 'leuoro
'y{cd
No
epoII Jaz!lenb3
sseJd
v/a
ol uoltnq
lcelas
ueqt
'zzvl'dod ')cou
sseJd
'resn
'epoN
:apolll razrlenbf alqelre^v'opour
.rezrlenbf ueu aql
'llo
</>
ol uollnq
lcelas
eql
peJrsep
Page 24

NOUVASdO nNlW
sserd
]celes
eql
V/
lndu!
aql
uaqrn
umoqs
[1uo s!
nuoul slql: oloN
lauueqC
o] uollnq
u;,, uotldo
lceles
lauuPqg
,,ls!-l
'lsll
oq] 'uO
ueql
ssa:d
lauueqc
s!
ecJnos
)O
11rr,r leqel
'Al
ol uollnq
uecs
ut r(eldsrp
aq]
eql
'lsrl
louueqC
'lsrl
ll
no^
ssaJd
V/A
ol uounq
lceles
ollJo^ei
lauueqC
)O
sseid
uaql ']sl-l
o]
uoUnq
eil.lo^el
eql uecs
lsr-l
Page 25

nNlW
NOUVAIdO
qns
ssard
leu6!S
ssard
elaql
ssald
v/a
'nueuJ
adru
v/a
v/a
leuueqc v
ol uollnq
o] uollnq
ol uounq
qcJees
]calos
lcalos
:suollceles oMl aJe
lcelas
nueu\l
Jrv
lll^
lenueul
leu6!s
pue
olnv
'alqec
se
leedde
lauueqc
uaq] 'ad^I
leuuEl.lc
'Moleq
'6uruas
ssaJd
uoql
'LlclPes
ueql
</>
ssold
sseJd
ol uollnq
)o
yo
ol
uollnq
lcelos
ol uollnq
los
ed^l erll
qcreas
aql
no^
eql ul anleA
lueM
ol
'leuueqc
'les
Page 26

nNSvU
NOUVAIdO
lceles
Sn lcoles
,il
llnplop'Jelua
ssed
pro,r
)|O
sserd ueql'dlHC-n
ssard uaq] 'dlHC-A
'.,0000,,s|
yO
ol uollnq
ol uollnq
V
lsnlpe
V
'lsnlpe
qns
qns
nuau
nueu
llrrvr
1;rrvr
reedde
reedde
lndul
ssoJd
SE
'MOtAq
sseJd
,u\Oleq Se
ssed
V/
V/
ol
proi
uollnq
ol uollnq
ol
Page 27

nNlW
NOUVASdO
sseJd
sseld
sseJd
V/
iv\olaq se
V/
V/
Molaq se
ol uollnq
o] uoltnq
o] uollnq
lcalss
1cales
lceles
nI
'6ut1ey
ueql
sserd uaql'6ut1eg
sseld
ssetd ueql'6ut1eg al^ou\
)6
yO
yO
uollnq
ol uoilnq
uounq
lsnlpe
ol
qns y
tcol
V
lsnlpe
ol
oluollnqyOsserdueql'6urleulcelesoluollnq</>/V/ASseJd
qns
lcol
nuau
nue[IJ
1;rrrrr
lltrvr
teedde
reedde
sseJd
oleq se
V/A
ol
uo]]nq
Sn
]celes
'dlHC-n
)O
sseld ueq]
o]
uo]lnq
V
'lsnfpe
qns
nueur
llr/r^
reedde
Page 28

MENU
OPERATION
The operation
UnRated
Block
press
Downloadable
Press
lf the
Clear
press
Note:
The operations
CHANGE
Press
A Sub
be changed
Note:
button
{/}
V
A
/
program
DTV
Downloadable
V
/
above
The
PASSWORD
V
/
Will
Menu
at
you
forget
lf
CANADA V-CHIP
of
Show
to
Rating
button to
doesn't
select Block
select Downloadable
UnRated
have this
Date
button to select Clear
two operation only
the same as US
are
button to select Change
appear as below.
the same time.
password, you
your
is the same
as the operation of US
Show, then
Rating,
rating information,
Downloadable
when
valid
V-CHlP.
Password,
password
lf the
"1470"
can use
press
then
this option will
Data, then
playing
the downloadable
press
then
changed, all of
is
to enter any menu
OK
press
OK butlon
press
OK button
V-CHlP.
button to setthe
to set the rating.
gray.
be in
OK button to set
data stream.
to adjust the value.
passwords
the
locked.
rating locked.
the rating
in the menu
will
Page 29

nNlN
NOUVASdO
sseJd
ss3.td
uec no1
l
V/A
V/A
uollnq
ol
ol uollnq
eql Jelue
lcalas
lcales
pslcol
ocJnos
'sJJnoS
lt
acrnos
noi(
'Icol
les
ueql
sseJd ueql
sserd
yO
ecJnos eql
y6
uollnq
ol
'lcol
tas
eql
eql ralue ol uollnq
qns
acrnos
lco'I
'
'nuaur
sseld
v/a
ol uounq
lcales
</>
ula]l 3ql
pasolc
sserd uaql 'uo!]dB3
o] uollnq
'lsnlpe
Page 30

MENU OPERATION
Caption
Press V/A button to select
Display
Analog Caption Type
V/ button to
Press
Available
type: CCI,
select
CC2,
Digital Caption Type
V/A button to
Press
Available
type: Servicel
select
-6
Digital CC Preset
V/ button to
Press
CC Style
Digital
This menu
is
select
only shown
when
Caption Display, then
Analog
CC3,
CC4,
Digital Caption Type,
Digital
CC
the Digital CC Preset
Caption
TEXT1,
Preset, then
Type,
press
{/} button
press
then
TEXT2, TEXT3,
press
then
press
{/}
is selected
to select
{/}
button to select the type.
TEXT4.
{/} button
button
Custom
to select the type
to select Default
ON or OFF
or Custom
CC Size
Press V/
Standard, Large.
Font
CC
V/l
Press
Opacity
CC
V/A
Press
Available Opacity: Default,
Color
Text
V/A
Press
Available Color: Default,
CC Background
Press V/A button to
Available
Background Color
CC
Press v/A button to select
Available
2B
to
button
select
button to select
button to select
button to select
Opacity
Opacity: Default,
Color: Default,
select
CC
Size, then
then
,
CC Opacity, then
Solid, Flashing, Translucent,
Text
Black,
CC Background
Solid,
press
</>
press
{/} button to select
press
Color, then
White, Red, Green,
Flashing, Translucent,
press
Opacity, then
button
cc Background color,
Black,
White, Red,
Green, Blue,
to set Available
the Font
</> button
Transparent.
{/} button
Blue,
Yellow,
press
Transparent
press
then
yellow,
Size: Default,
Available
to select
to select
type: Default,
the Opacity.
the color
Magenta, Cyan.
</> button to
</>
button to select the
Magenta, Cyan.
Small,
Style0-7.
select the Opacity
color
Page 31

nNlW
NOUVAJdO
Y/A
V/
ouoz euflI
V/A
Icolc
V/
eurl dnlas
v/a
e6enEuel
uollnq
ol
:a6en6ue1 elqepBAV
o] uollnq
ol uo]lnq
ol uollnq
eturl aq11sn[pe
o] uo]lnq
uollnq
leel lo
]calas
lcales
]celes
'elsPlv'culced'ulelunor{
]calas
lceles
eql ol 06 o]
^eO
eql s^eldslp uolldo sll'll
lxeu
'lcolC olnv
n lO
aq1 6urpuodset:oc
'uorldo
leeM lO
</>
</>
</>
sserd uaql
'llpa
o] uollnq
I;;ecrleuolne
dnles aql
'e6en6ue1 nuey! ulaU oq]
'qsrueds'qcua.r3'qsr16u3
)O
o]
sserd ueql-'lcolC eql
sseld
ueql 'auoZ Ja[ul]
sseJd uoql
eu!l
sseJd
ueql 'eul1 dnlas
ol 6ulpuodsaJJoc
ol uollnq
o] uollnq
</>
'les
o1 uounq
elqelle^V
'lsnlpe
'leJluaC :azrS
'uJelsPS'crluellv'puelpuno]/v\eN'eoues'llEMeH
les
)r
uO
ro
lsn[pE
eql
11
'96
ou!]
noi(
pue
lr les
'uO
eql esn
'aurl
nueyl
sseJd
sserd
ssald
olnv
sseJd
lltrr
1t
sseld
uf lNf
,teo
Ice€
enl8
v/a
sseld
ou
'.leu6ls
ol uollnq
las
loqleq^
lcelas
eql
enl8
punoJ6lceq
yo
uounq
sseJd uoql'punor6lce€
lou
Jo enlq ur
lcolas
ol
sr
eraq] ueqM
Page 32

MENU OPERATION
No Signal Power
PressV/A
When set it On and there
turns amber.
No Operation Power
Off
button to select No
is no signal
Off
Press V/ button to select
When set it On and there
light turns red
is
no
All Reset
Press V/ button
All Reset item, a dialogue box
to
select
AV/YPbPrl
Power
Signal
input
No Operation
operation
then
Reset,
All
appear
will
PbPr2lHDM
lY
Off, then
by 10 minutes,
Power Off
press
then
,
input by 3 hours,
press
OK button
as following:
button
OK
itwill turns
press
OK button
itwillturns off
to execute
l1
DMl2/H
/H
to select it On or
panel
off the
to select
panel
the
When
reset
DM l3
Off.
and the LED
it On or Off
the LED
and
you
select
lighl
Page 33

nNlW
NOilVAIdO
;1;rtr
USINf
ol
ol
e^eq
epoH ornl3!d
</>
</>
ueqM
lceles
lsnlpe
ol
uollnq
elnlcld
ol
uollnq
o] uounq
ssald'l
'6urr*o11o1
V/
ssald'Z
t
sserd
ss€rd
sseJd
sseJd
</>
no^ ueqM't
v/l
elqelleAV
ssoulq6!rE
v/a
ssoJd ueql
lsEJluoc
v/a
sserd ueql
eql
paouEqc
lcales
:epoul
lceles
ol uollnq
]coles
ol uollnq
eJn]ctd eql
p€Jlsap
eql ol ulau oql
eJnlcld
Isnlpe
lsnlpP
nueul
's6ullles eql
'lseJluoc
st uelt soutyeg
l.ueu
perlsep
uec no^
ueql'epou\
'sseulq6u8
'pe1q611qbrq
Uf lNf
sseJd
'le^el
]lxe
ol
uJoJJ
'resn'el^oy\'plepuels'cltllPu^o
no[ ueql
ll
paacoJd
f
nueLU aql
q
lsntpe
ol
uollnq</>ssaJd
eqt ol oo
'i(resseceu
n
6ulsseld
nNf
sE
nueuj-qns
m
m
JoloS
sseld
ssaJd
lu!I
v/a
</>
ssord uaql
sseudleqs
v/a
uollnq
</>
ssord uoql
uec
uol]do slql
]ou
ol uounq
ol
eq
ol uollnq
ol uounq
lcolas
lceles
'uoloc
]snlpe
.
']sntpe
'polsnlpe
'sseudreqs
m
m
Page 34

nNSW
NOUVAIdO
U
N
sserd'!
jf
j
'6urano;1o1
V/AsseJd'Z
</>
ssard'e
,
noi( ueq6
ol
ol
eneq
lcslas
eql
lsnlpe
eq1
pebueqc
poJlsep
aq] ol uralr eql
nueuJ
's6urpas
sr urelr s6url1eg ueeJcs eql ueqm
'uelr
la^el
pa.lrsep
uec noi(
sseJd
lrxa
'pelq6rlr.16rq
USLNf
ot
llrair
noi( uetll
1r
peecold
Dursserd Iq nuetu oq] uroJJ
sB nueuJ-qns eql ol o6
'rfuessaceu
'1-1p3y1
ezts ueoJcs
sseJd
'19n3
1o6
V/
16
'1o6
ol uoUnq
lcalas
</>
ssejd ueql 'ezrs ueeJcs
o1 uollnq
'lsnfpe
azrs uaeJcs elqelreAV
aPlM olnv
cd
eq1
acrnos
paJrsap
eqlol uJelr eq11snfpe o1
tuelrs6urpegCdeq]ueqt
nueuJ
'tlalr
parsep
's6urpes
uec noi(
pa]q6rlqOrqsr
ssard
'lo^al
lrxe
uoJJ
ulIN3
ol
no^ueql
1r
paaeord
nueur aq]
6utsse:d [q
senuelrJ-qnsaqloOllrl
Aressacau
'
'1'1113y1
'6urivro;;o1
prleAUr
lcalas
eql
ur
pe6ueqc
sr uel! aprM olnv
sserd
sserd'z
sser6'g
noi( ueqM',
USINf
olv/a
1/p
aneq
!
Page 35

olnv
sseld
lsntpv
V/A
ol uollnq
lcales
olnV
'lsnlpy
NOLVASdO nNlW
Uels
sserd ueql
yg
ol uo]lnq
olne
6urlsnlpe
yo
ssald
ssard
uaql
rcolS
ssaJd
</>
sseJd
</>
sseJd
lec!l.roA
aseqd
losau
lEluoz!.roH
v/a
</>
ssard ueql
uolt!sod
v/a
</>
sserd
v/a
ol uo]lnq
v/a
uollnq
ol uollnq
y/a
laseJ
ol uollnq
uorl!sod
lcelas
ol uollnq
o] uo]lnq
ol uoltnq
uollnq
]calas
ol uollnq
tsnlpe
lceles
ol
]snlpe
lcalas
ol uollnq
'lsnlpe
'tsntpeol
suorldo eql
leluozrJoH
lecruan lcalos
'e^oqe
'uorilsod
'uorlrsod
sseJd ueql'Icolc
ssaJd uaql'eseqd
sseJd ueql'leseu
w
ry
elouoJ
uolleJodo oql :eloN
'lolluoc
puE
lo
aql
uolldUcsap
loq
^aI
s!
olqEurueJ6oJd
,rno^ uo
Page 36

TROUBLESHOOTING
TROUBLESHOOTING
9.
you
Please
check if
can
solve
problems
by troubleshooting
yourself
display
remote
does
TV cover
multiple
image
control
not work
Double or
Snow on the screen
The
"Zip" made noise
Please check
that all cables
are
correctly
plugged
Adjust the contrast, the color and the brightness.
be the result from a lighting signal from car, motor, neon light
May
other electrical devices or appliances.
and
May be the resu lt of an electrical wave disturb from
Computer and Game machine or Radio.
The cables
Please
the remote control is not hidden by
of
Even if the display image is correct, the noise may come from an
on
unsteady
Make sure that
or of the remote control.
ofthe
the batteries
check
fixation of the
you
antenna are not correctly
order and alignment. Check that the lR
panel.
have not
press
plugged
something.
the MUTE
in
other
in.
button ofthe
TV,
panel
34
Page 37

sNo/lvclJ/cfds
t
'0
ds
,r"r3ff$ii
azrs uaeJSs
^etdsrO
edII
(laxrd)uortnlosaU
lcadsy
orleg
Je^ od
IlddnS
nI
uelsls
oeprl
]ndlno
orpnV
a
l
(L
(L
o
x.
F
od
NI-NV
Jdqd^
-
Nt
t1,10H
-
-
(cd)vc^
J.UVCS
-
I-UVCS
.
3NOHdUV:l
-
o3or^-s
-
tvtxvoc
-
Noyr1,10c
ssn
sNorrvcHrcf
^ue
'ecuaJeJar rnor{.ro1 [1uo .,
uorldunsuo3:ervroS
1euro3 lndul
JeA
VNN3INV
Nl
Nr
Nr
oronv(cd)ve^
-
Nr
INO
l-nO
Nr
l.no
fcvlusl_Nr
-l
uOrsep eq] ol a6ueqc
puE
0,
Llcul
oc-r
rll-
080tx0z6r
6:
9L
A0rz-0tlcv
M16t
3St_N/-lVd
MSXZ U /
s3A
s3
s3A
s3A
sfA
s3
s3
S=l
1.ro6
ecrAJeS
zH09/09
SSrN/3SlV
i(;ug
lpM
lou
uorlecUrcads
aq
oodt
oAo
lq6!eM
OnO
cul
cxf
csr6
oep!A
puets
ren
ssoJe
qecrsAq6
gx1y1x1) puels
(s6y)
(sOX)
leur:o3
leruJol lndlno
(uruHx6rl)
(ruru
|,x186
LI
|'9x80
I
LZ
wwzLgxt6zxL86
ruurz
Page 38

@
c.
-
I
o-=f.
@
a
2
o
!
=.
a
o
c
='
=.
-
 Loading...