

Page 1
INSTA-BERM
(Frame)
OPERATIONS
MANUAL
2018 VERSION D
Page 2

INSTA-BERM (FRAME) OPERATIONS MANUAL - Version D
Issue Date: September 2018
PLEASE READ BEFORE USING.
SEI INDUSTRIES LTD.
7400 Wilson Avenue
Delta, B.C. Canada
V4G 1H3
Phone: (604) 946-3131
Fax: (604) 940-9566
E-Mail: [email protected]
Website: www.sei-ind.com
COPYRIGHT © 2018 SEI INDUSTRIES LTD. ALL RIGHTS RESERVED
We Engineer Solutions
PRINTED IN CANADA
2018 Insta-Berm (Frame) Operations Manual (Version D)
Page 3

Table of Contents
Section 1: Introduction 1
Overview of the Insta-Berm (Frame) ............................................................................1
Section 2: Description 2
Description of the Insta-Berm (Frame) System ............................................................2
Fabric Information ...........................................................................................2
Chemically Resistant Insta-Berm System .......................................................3
Fabric Chemical Resistance ...........................................................................4
Standard Equipment .....................................................................................................5
Optional Equipment ......................................................................................................5
RainDrain Description .....................................................................................5
RainDrain Performance ..................................................................................6
RainDrain Installation .....................................................................................7
RainDrain Specifications ................................................................................8
Section 3: Safety 9
Safety Precautions .......................................................................................................9
Handling Chemicals and Fluids ......................................................................9
Handling of Petroleum Fuels ..........................................................................9
Personnel Safety ............................................................................................9
Section 4: Installation 10
Installation Procedures ...............................................................................................10
Selecting a Site .............................................................................................10
Preparing the Site .........................................................................................10
Assembling the Berm ...................................................................................11
High Wind Precautions .................................................................................22
Section 5: Maintenance 23
Maintenance and Repairs ...........................................................................................23
Spill Clean-Up ...............................................................................................23
Removing Water and Foreign Materials .......................................................23
Extending the Service Life of the Insta-Berm System ..................................24
Repairs .......................................................................................................................26
Using Glue ....................................................................................................26
Repairing in High Humidity ...........................................................................27
Applying the Glue .........................................................................................27
Gluing with Patches ......................................................................................29
Cutting the Patch ..........................................................................................30
Applying the Patch ........................................................................................31
Using Other Glues ........................................................................................32
We Engineer Solutions
2018 Insta-Berm (Frame) Operations Manual (Version D)
Page 4

Section 6: Packing and Storage 33
Repacking, Shipping and Storage ..............................................................................33
Repacking the Insta-Berm System ...............................................................33
Shipping Instructions ....................................................................................36
Storing the Insta-Berm System .....................................................................36
Section 7: Specifications and Parts 37
Specifications .............................................................................................................37
Terra Tank to Frame Insta-Berm Cross Reference Chart ............................39
Repair Kits .................................................................................................................40
Mini Repair Pocket Kit REPKM002 ..............................................................40
Mini Repair Pocket Kit REPKM002NG (no glue) ..........................................40
Parts List .....................................................................................................................41
20" High Berms .............................................................................................41
32" High Berms .............................................................................................42
Section 8: Warranty 43
We Engineer Solutions
2018 Insta-Berm (Frame) Operations Manual (Version D)
Page 5
Section 1: Introduction
Overview of the Insta-Berm (Frame) System
Section 1: Introduction
Overview of the Insta-Berm (Frame) System
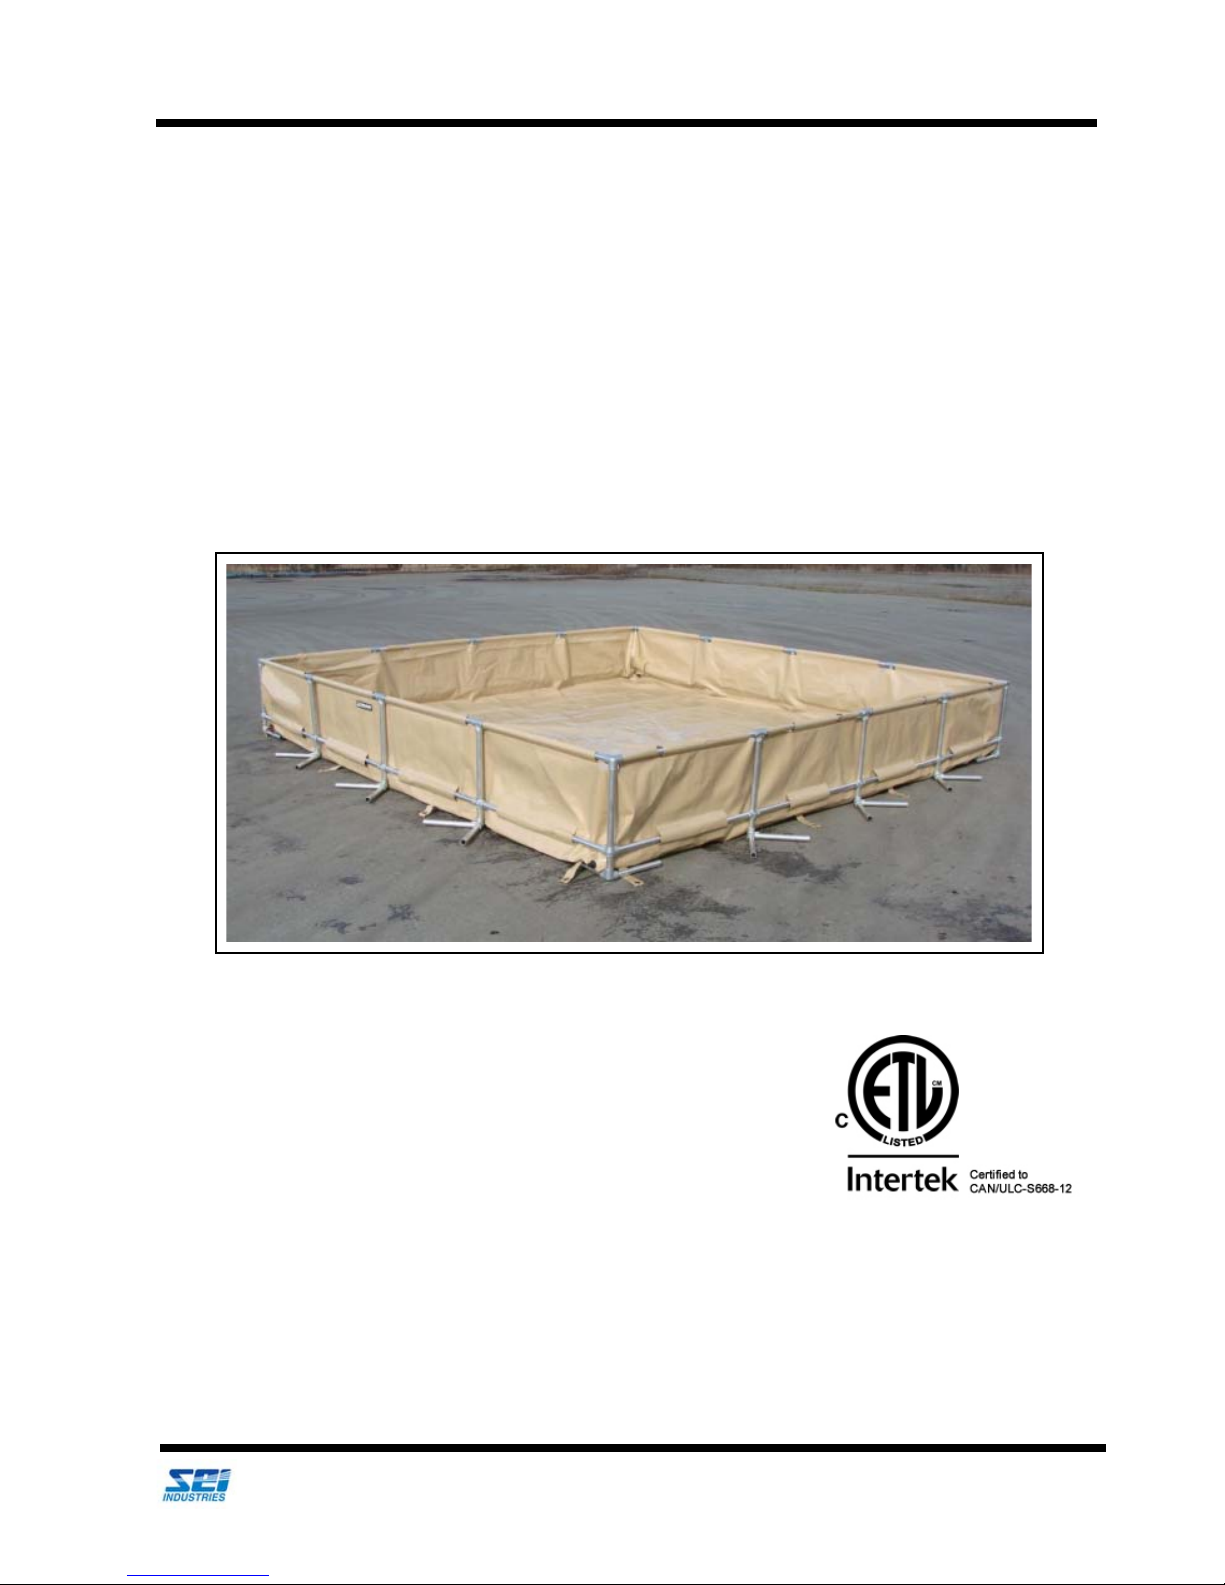
This manual provides the necessary information and instructions for the installation, operation,
maintenance, shipping and safe use of SEI Industries’ Insta-Berm (Frame)
containment berm liner system. Additional copies of this manual are available from SEI Industries Ltd.
– a portable secondary
A fully collapsible berm, the Insta-Berm (Frame) is easy to use and meets
EPA regulation 40CFR112.7. It comes in two fabric choices; ChemShield and Arctic-Shield fabric, which is fully certified by Intertek to meet
the CAN/ULC-S668-12 Class IP and Class IIP standard and is suitable for
secondary containment of flammable liquids and combustible liquids in
both above ground (exposed) and (buried) non-exposed secondary
containment applications.
This standard is listed in the Storage Tank Systems for Petroleum Products
and Allied Petroleum Products Regulations (SOR/2008-197), under the Canadian Environmental Protection
Act, 1999.
We Engineer Solutions
2018 Insta-Berm (Frame) Operations Manual (Version D) 1
Page 6
Section 2: Description
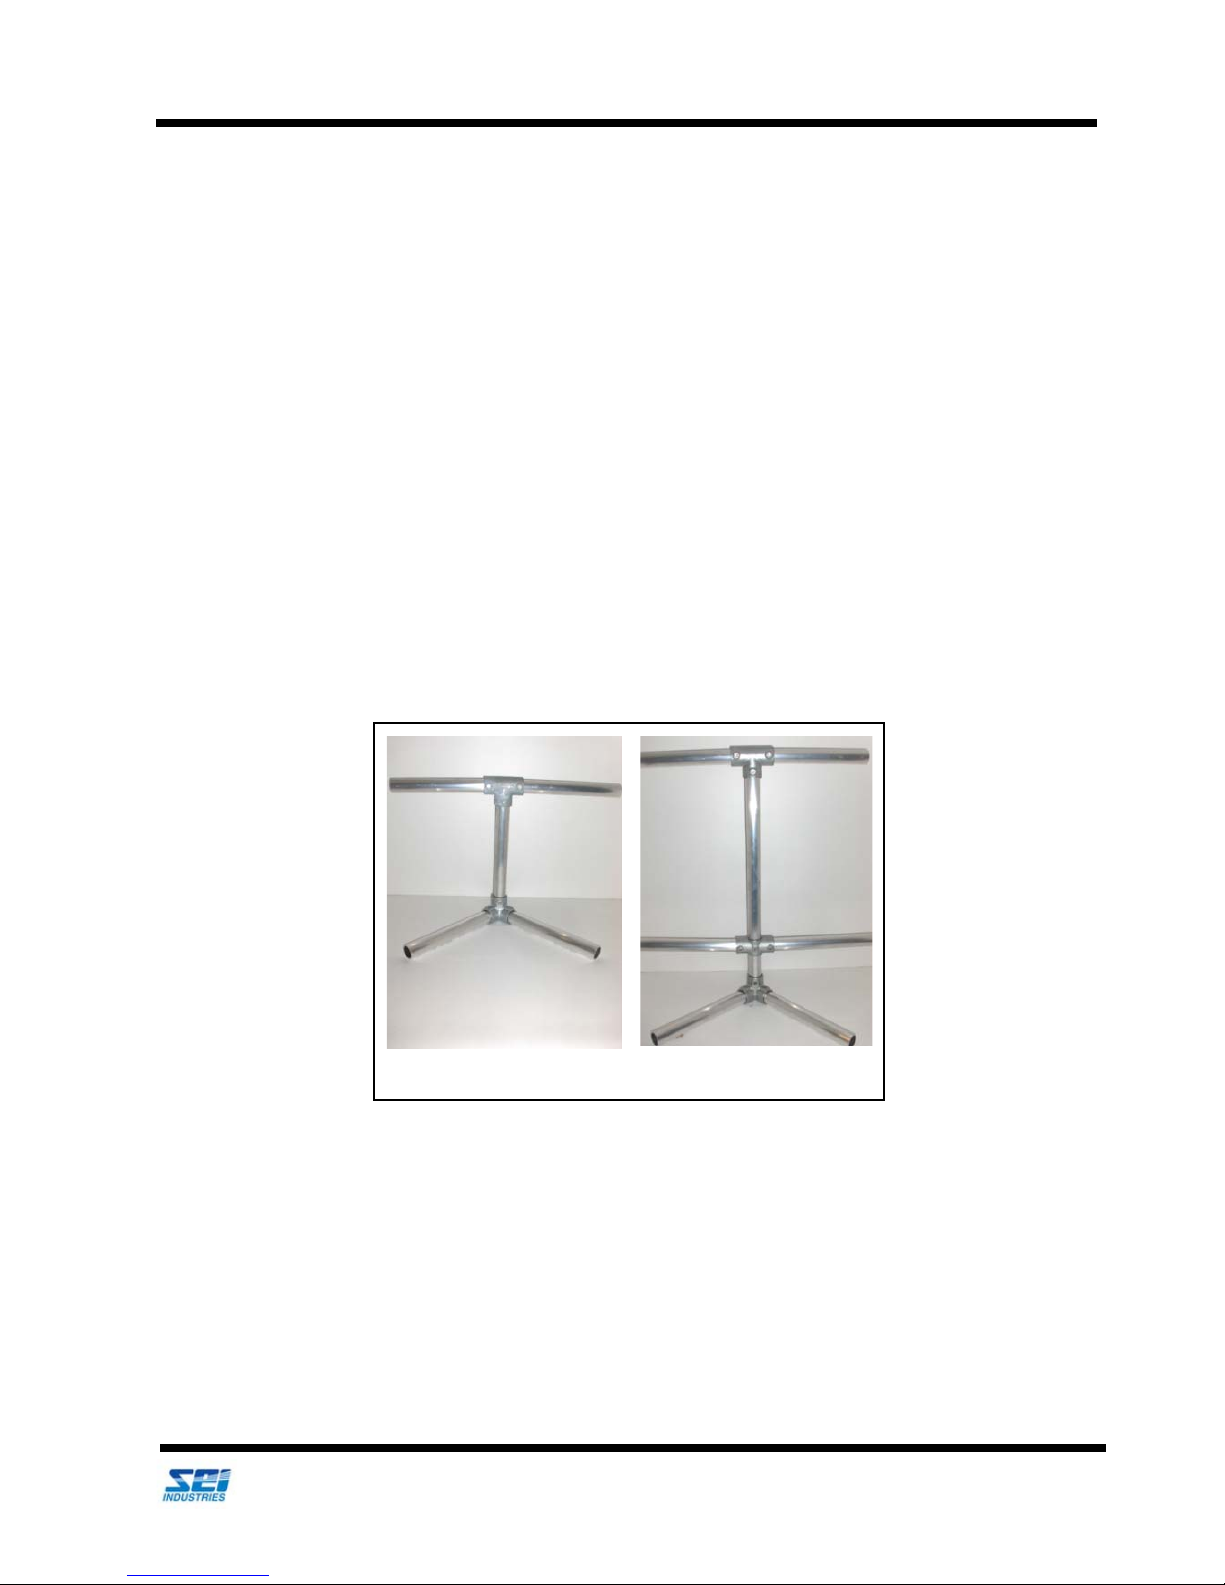
20" high frame shown.
32" high frame shown.
Description of the Insta-Berm (Frame) System
Section 2: Description
Description of the Insta-Berm (Frame) System
The frame-supported Insta-Berm system is a portable secondary containment berm liner, intended to prevent
the spill of liquids and hazardous materials. The liner is constructed of polymer-coated nylon or polyester
fabric. Some models may be constructed of urethane-coated nylon. This type of berm system is used for
larger applications that require superior environmental protection.
The prefabricated support frame is constructed of corrosion resistant aluminium pipe and galvanized
malleable iron fittings.
There are two Insta-Berm frame models available (20" high and 32" high frames). The 32" model has a
second set of rails to support the bottom of the liner.
Fabric Information
There are two types of fabric available with the frame-supported Insta-Berm systems:
• 30oz Chem-Shield fabric
• Arctic-Shield fabric is certified to ETL W/N 1746, chemical and fire-resistant fabric for
temperatures to -50 degrees Fahrenheit / -46 degrees Celsius (Arctic-Shield fabric is not
suitable for acids)
We Engineer Solutions
2018 Insta-Berm (Frame) Operations Manual (Version D) 2
Page 7
Section 2: Description
Important Note
Please contact an SEI representative for information on which fluids are acceptable for
containment in a chemical resistant Insta-Berm system. The user is responsible for ensuring the
berm is suitable for each application.
Description of the Insta-Berm (Frame) System
Chem-Shield (30 oz., black/black color)
Chem-Shield liners are constructed with interpolymer alloy coating that combines excellent durability with
resistance to many chemicals. This fabric is suitable for containment of oily water, sludge, transformer
mineral oil, sulphuric acid, PCB transformer oils, 30% chlorine, ammonium hydroxide, ethanol and
fertilizer. This liner is designed to contain most chemicals suitable to -20 F. Call SEI to confirm usage of a
specific chemical. Using optional corrosion proof fittings, phosphoric acid (10%) and sodium hydroxide
(60%) is also permissible. An alternative glue for repairs would be Loctite 495, which should be available
locally.
Arctic-Shield (tan/green color, used in Arctic berms)
Arctic-Shield liners are constructed from urethane-coated nylon that meets U.S. military specification MILT-52983G for fuel tanks. The following fluids are acceptable for containment: Jet A, Jet B, JP-1, JP-4, JP8, kerosene, avgas, diesel fuels with less than 40% aromatic content and isopropyl alcohol suitable to -50 F.
Arctic-Shield fabric is not suitable for use with gasoline (contact SEI for information on the Desert King).
Arctic-Shield fabric meets U.S. military specification MI-T-52983G and ATPD-2266. An alternat ive glue
for repairs would be 3M(DP420), which should be available locally.
Arctic-Shield fabric will provide longer service life due to a higher resistance to abrasion. It can also be
used in warmer climates.
Chemically Resistant Insta-Berm System
Chemically resistant Insta-Berm systems are made from polymer coated polyester or nylon fabric. This
fabric combines excellent durability with resistance to many chemicals.
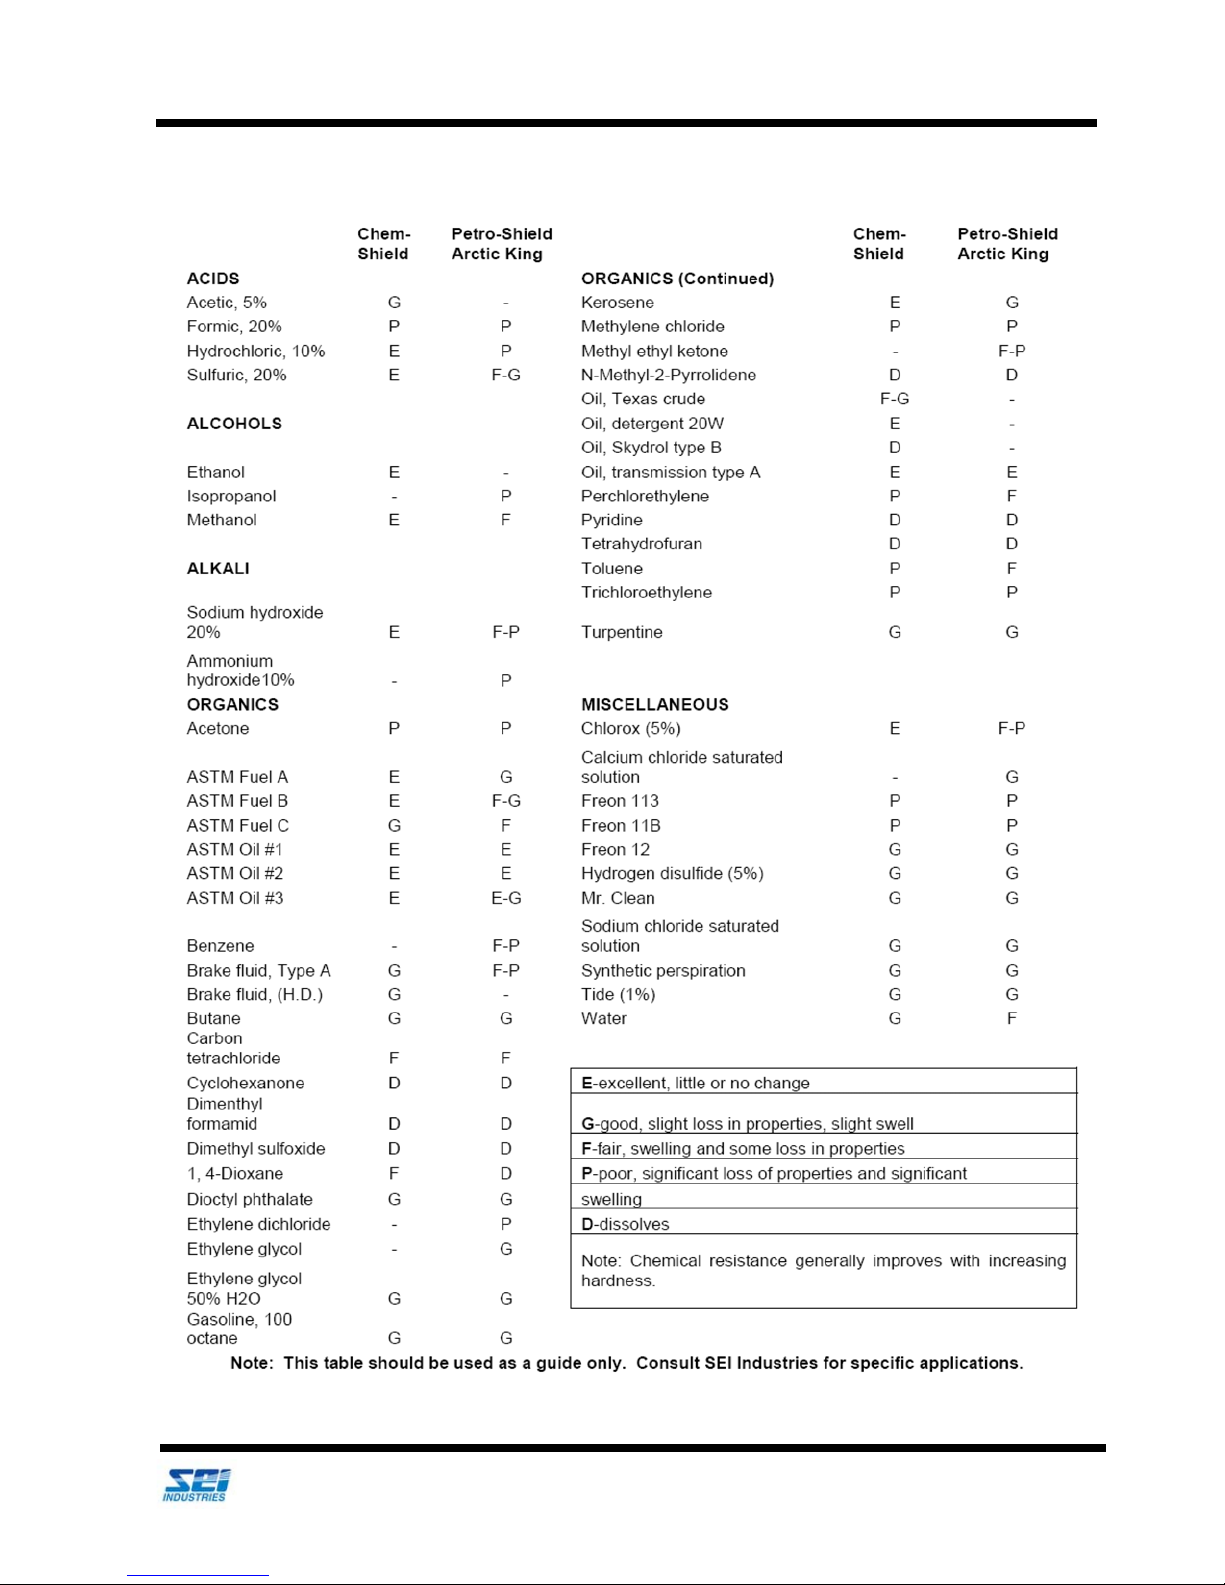
The data shown in the chart on the following page is the result of laboratory tests and is intended to serve
only as a guide. No performance warranty is intended or implied. The degree of chemical attack on any
material is governed by the length of time, temperature and size of the area exposed.
When considering chemically resistant Insta-Berm system for specific applications, a fabric sample should
be tested in as close to actual service conditions as possible.
We Engineer Solutions
2018 Insta-Berm (Frame) Operations Manual (Version D) 3
Page 8
Section 2: Description
Fabric Chemical Resistance
Description of the Insta-Berm (Frame) System
We Engineer Solutions
2018 Insta-Berm (Frame) Operations Manual (Version D) 4
Page 9
Section 2: Description
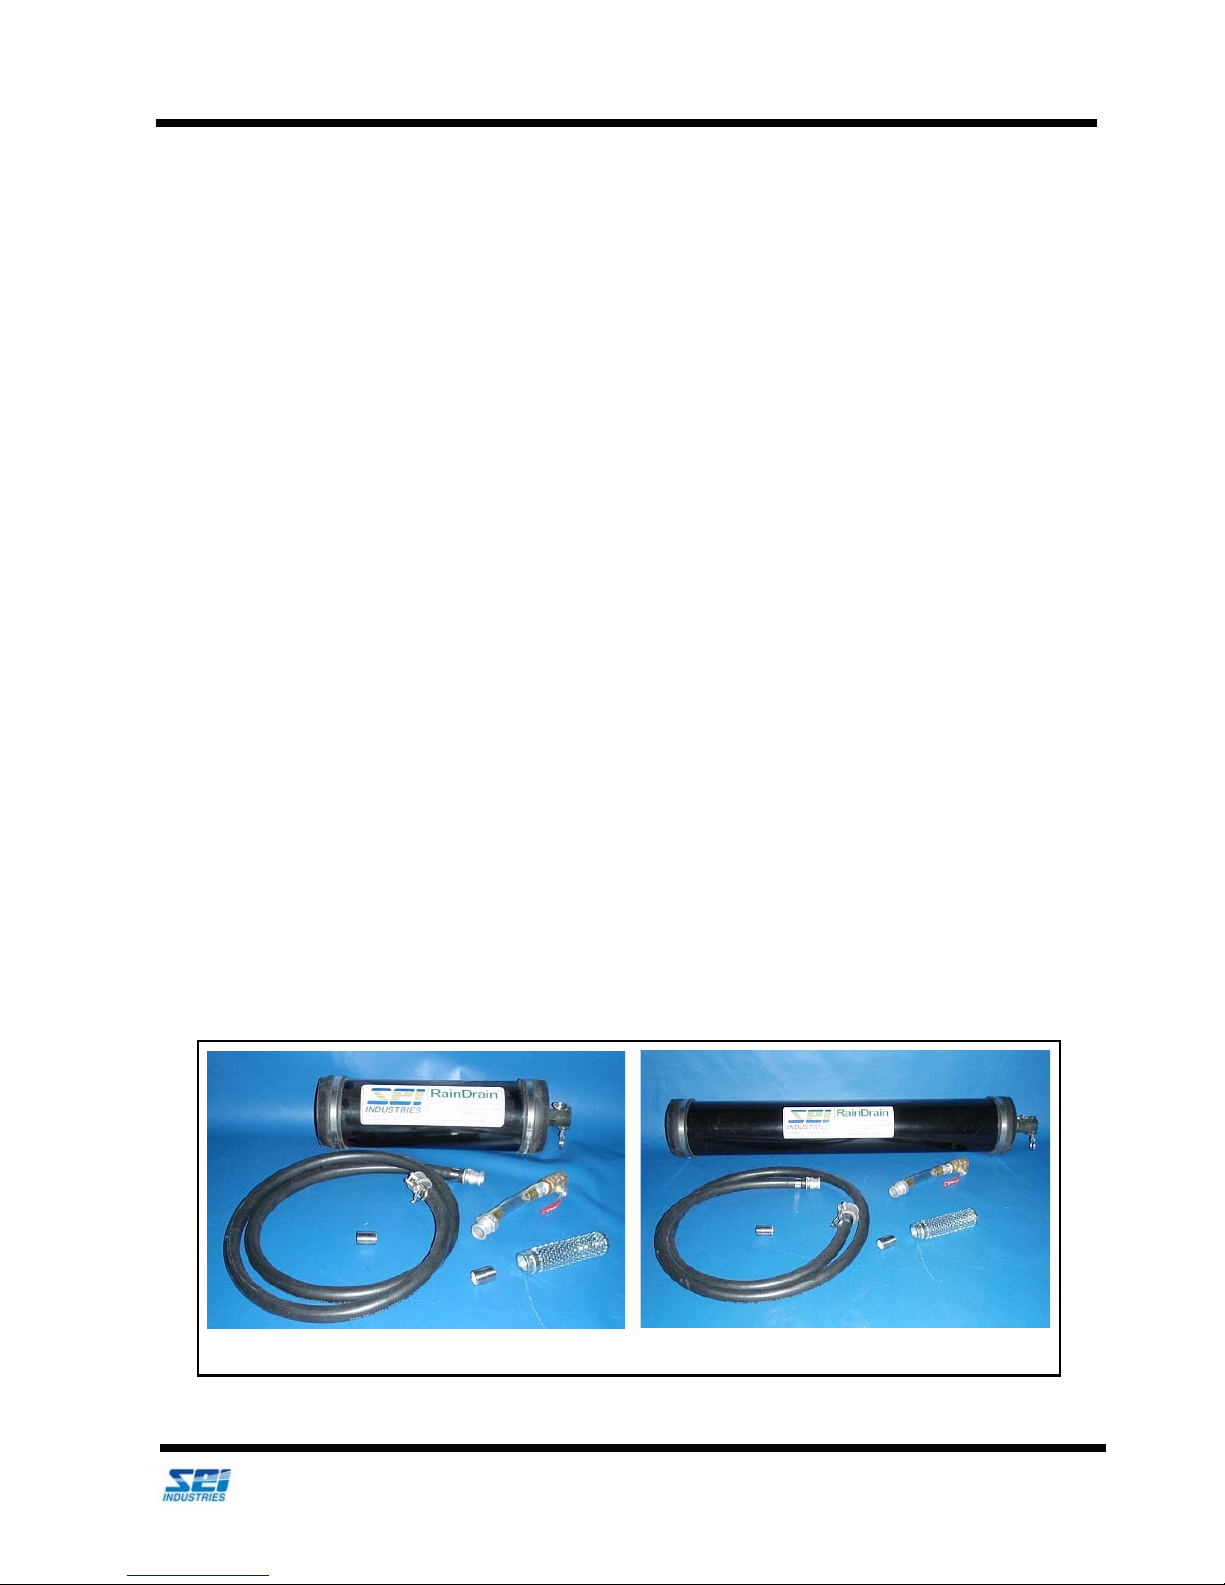
18" Filter Assembly
36" Filter Assembly
Standard Equipment
Standard Equipment
The frame-supported Insta-Berm system comes complete with a berm liner, prefabricated support frame
(20" or 32" high), pre-installed stake down tabs and bulkhead fittings for the optional RainDrain system. A
crate for shipping and a repair pouch are also included. All repair instructions are found in this manual.
Optional Equipment
Also available from SEI Industries:
• RainDrain system
• High wind stakes (available only on Arctic-Shield berms)
• Groundsheet to protect the bottom of the Insta-Berm
• Track belting to protect the inside of the Insta-Berm from tires
• Carrying bag
RainDrain Description
The RainDrain system allows operators to continuously gravity-drain rain water from secondary
containment berms without having to monitor the discharge. The RainDrain is designed as a go-no-go
filtration system that will automatically stop the flow of discharge water when it is full or when there is a
large amount of hydrocarbons present in the water being discharged.
We Engineer Solutions
2018 Insta-Berm (Frame) Operations Manual (Version D) 5
Page 10
Section 2: Description
Important Note
The amount of hydrocarbons present in the secondary containment system will determine the
frequency in which to replace the filter cartridge.
Warning
In the event of a catastrophic failure of a primary containment tank (that is secured within a
secondary containment berm and protected by the RainDrain), the subsequent spill of a significant
amount of fuel will cause the filter to shut down automatically. It is still possible that a small
amount of fuel will escape through the RainDrain because of the higher fuel to water discharge
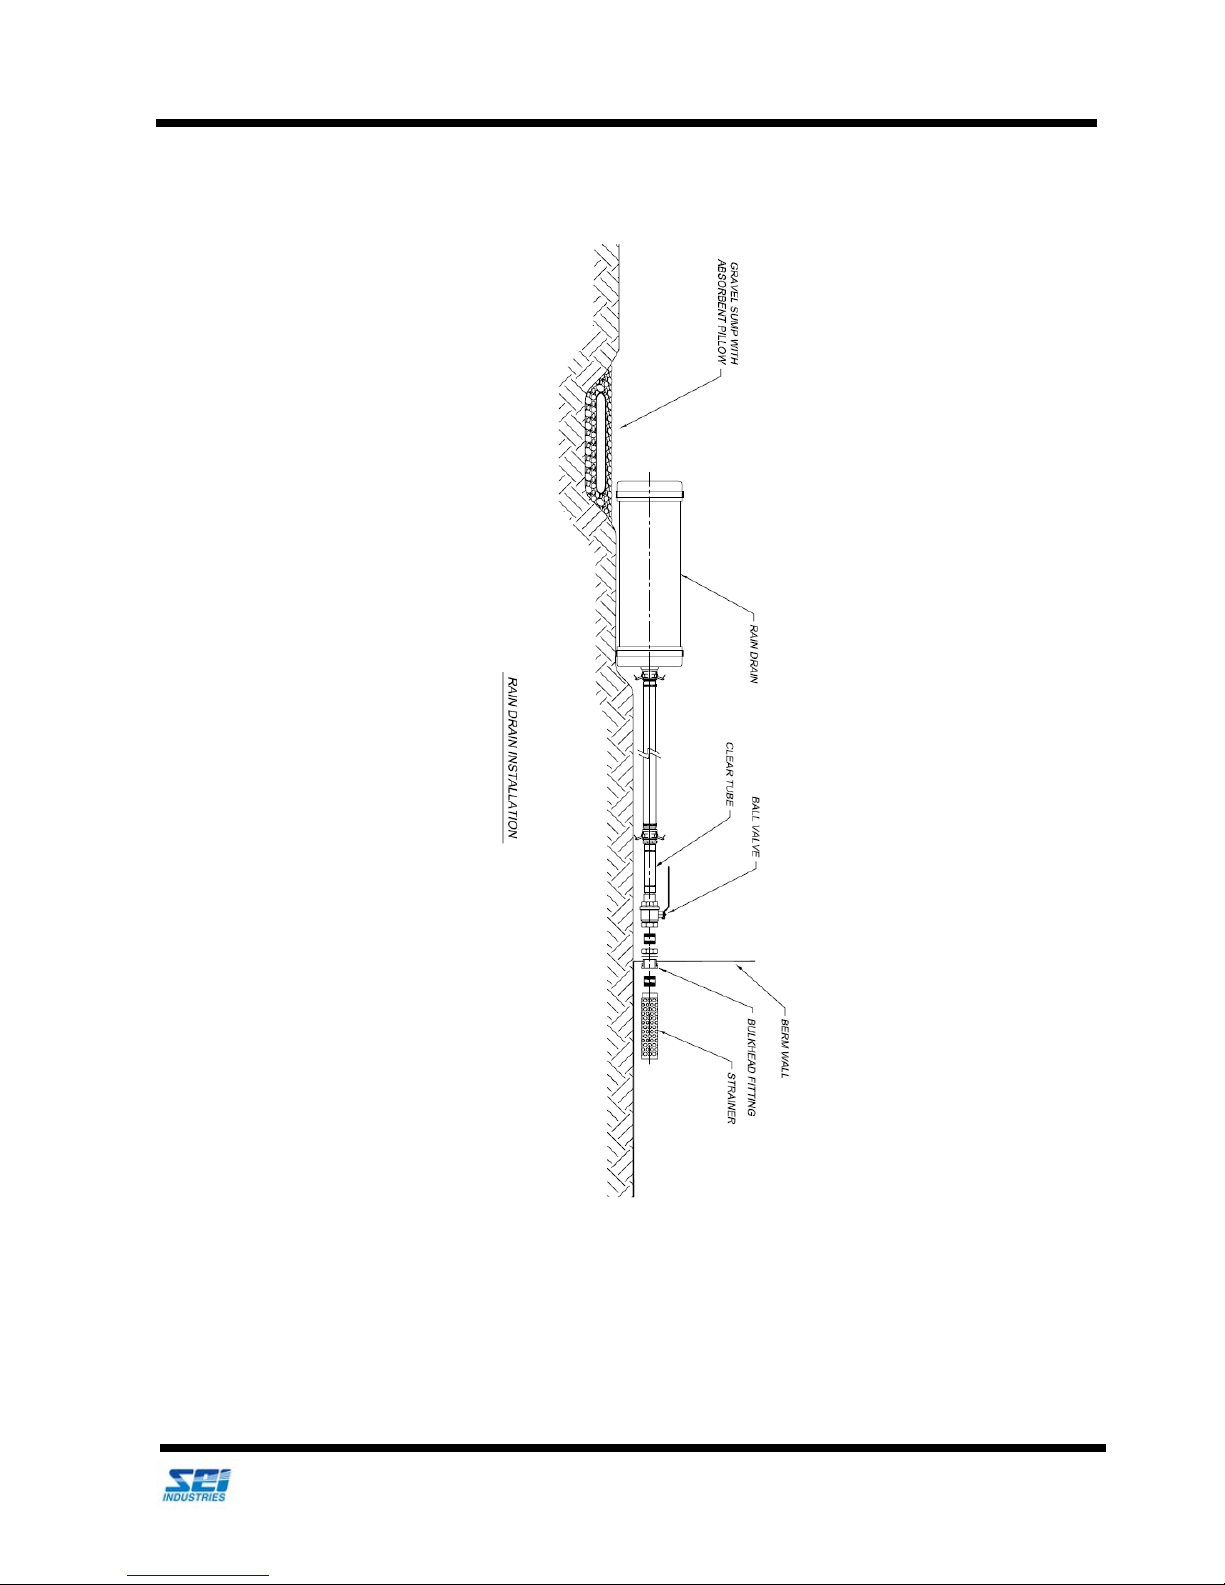
ratio. This discharge can be trapped in a small discharge pit filled with hydrocarbon absorbent
pads.
Optional Equipment
RainDrain Performance
The RainDrain system allows rainfall and water from other sources to be discharged from the berm. The
filtration unit stops all target contaminates, acting as a hydrocarbon selection unit and reducing the
discharged water below 10 ppm hydrocarbon content.
When the filtration unit reaches containment capacity, it will automatically cease to discharge all fluids.
When this occurs the filter cartridge will have to be replaced. Once that is completed, the system is ready
for normal operation.
We Engineer Solutions
2018 Insta-Berm (Frame) Operations Manual (Version D) 6
Page 11
Section 2: Description
RainDrain Installation
Optional Equipment
We Engineer Solutions
2018 Insta-Berm (Frame) Operations Manual (Version D) 7
Page 12
Section 2: Description
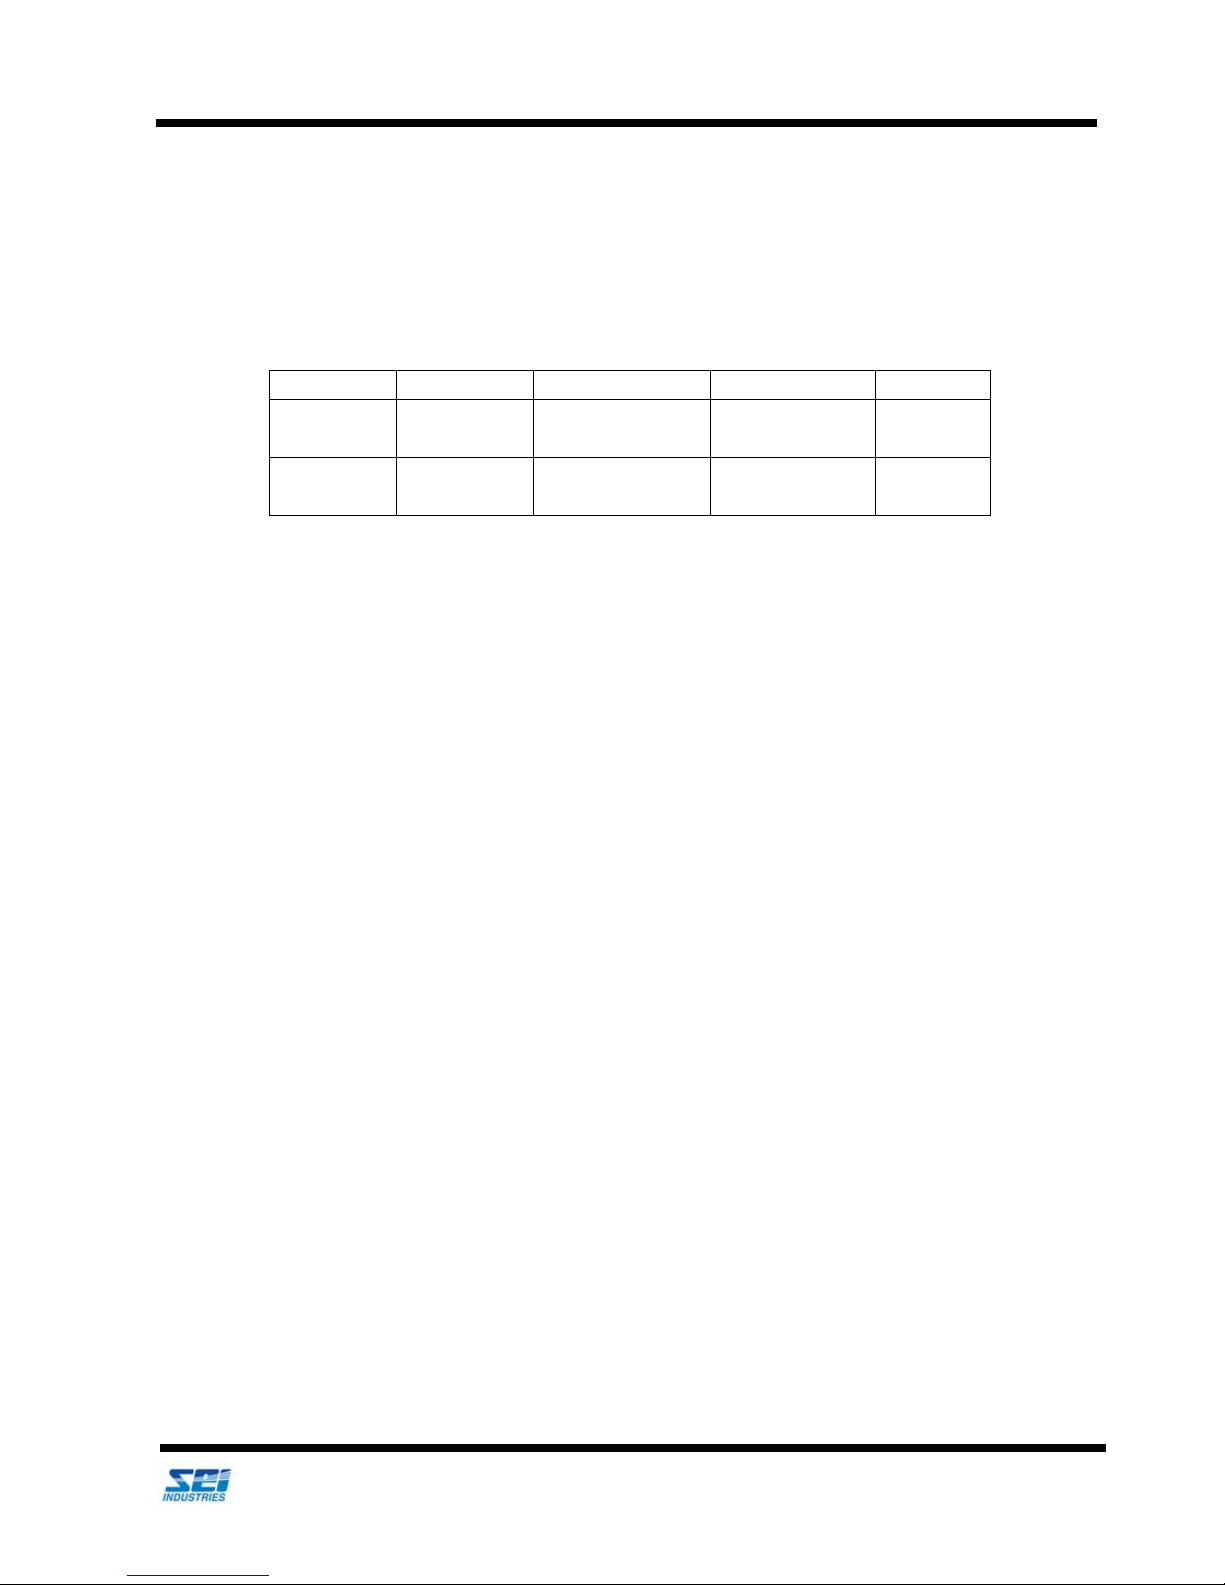
Model # Oil Capacity Water Flow Rate Dimensions Weight
IBMKF0618 .5 USG
1.9 Liters
.32 USGPM
1.2 L/Min
6” Dia. X 18” L
(15 cm x 45 cm)
13 lbs.
(5.89 Kg)
IBMKF0636 2 USG
7.6 Liters
.32 USGPM
1.2 L/Min
6” Dia. X 36” L
(15 cm x 91 cm)
26 lbs.
(11.79 Kg)
RainDrain Specifications
Models
Optional Equipment
The RainDrain meets or exceeds the design requirements as well as free oil and grease water discharge
levels for the following regulations:
• Environmental Protection Agency (EPA) 40 CFR Part 112.7
• Canadian Council of Ministers of the Environment (CCME) Code of Practice for above
ground and underground storage tank systems containing petroleum and allied petroleum
products. Section 3.10.3(1)(b)(i)
• British Columbia Waste Management Act, BC Regulation 168/94
• Alaska State AAC-75.075
The RainDrain is designed to produce a discharge of water that does not contain more then 10mg/L of free
oil and grease as measured by the partition-gravimetric method. Independent testing has proven the
RainDrain exceeds this performance requirement and those results are available upon request.
Based upon data available to SEI Industries Ltd. components in this product are not hazardous under the
OSHA Hazard Communication (29 CFR 1910.1200).
We Engineer Solutions
2018 Insta-Berm (Frame) Operations Manual (Version D) 8
Page 13

Section 3: Safety
Section 3: Safety
Safety Precautions
Handling Chemicals and Fluids
When handling chemicals and fluids, the following rules should be observed:
• Use approved skin and eye protection, as required.
• Use suggested safety procedures; contact the chemical manufacturer for the specific
material safety data sheets.
Handling of Petroleum Fuels
Safety Precautions
Handling of petroleum fuels is always a potentially dangerous operation. The following rules should be
observed:
• Keep the fueling site free of debris and flammable materials such as dry grass, etc.
• Observe all normal safety practices; e.g. a strict no smoking rule.
• Collect all intentional spillage in a container and discard safely.
• Keep all unnecessary personnel off site.
• Use grounding devices, where applicable.
• Have fire extinguishers manned during refuelling.
• Do not pack and ship containers with fuel residue inside.
Personnel Safety
The berm liner can become slippery when snow or water has accumulated inside. Track belting and proper
footwear is recommend when walking inside the berm liner.
We Engineer Solutions
2018 Insta-Berm (Frame) Operations Manual (Version D) 9
Page 14
Section 4: Installation
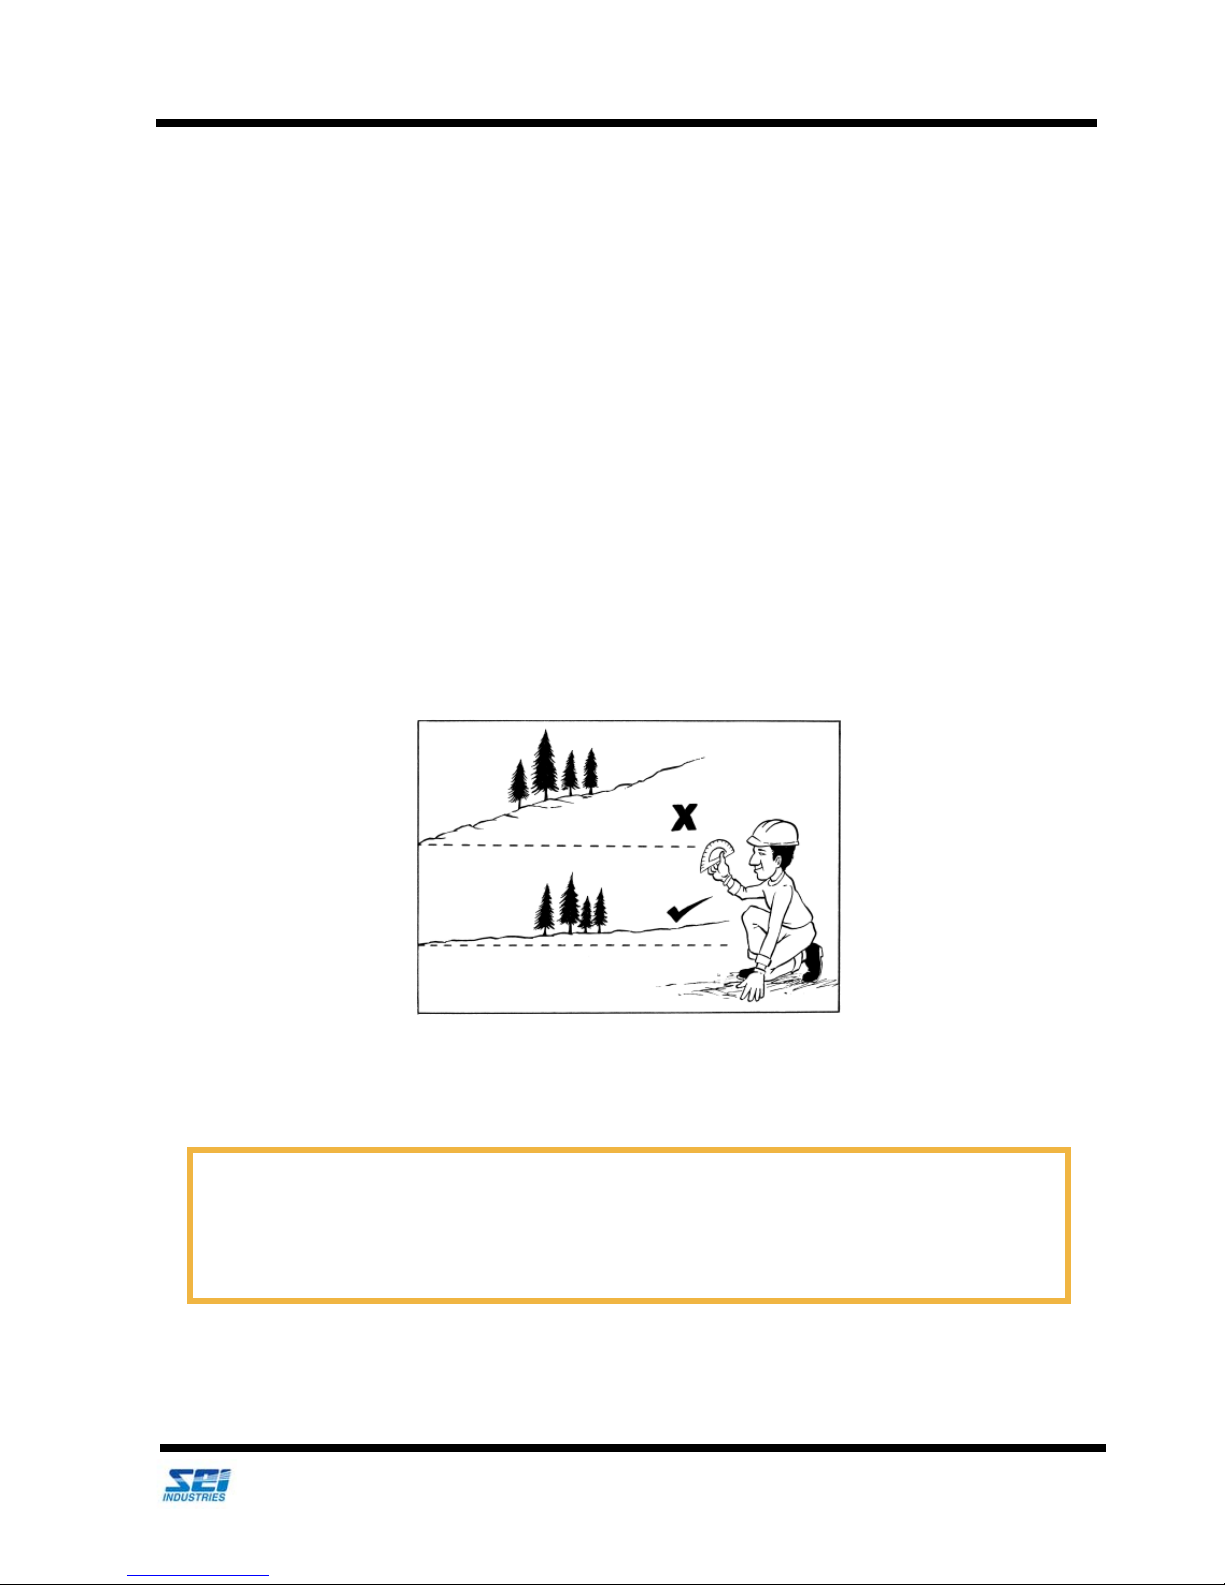
Select a site (maximum slope one degree).
1.0
Important Note
SEI recommends consulting a soils engineer to determine soil composition. A soils engineer can
also determine if the soil is stable enough to support the weight of the berm and any objects inside
the berm.
Installation Procedures
Section 4: Installation
Installation Procedures
Selecting a Site
The frame-supported Insta-Berm system may be installed on asphalt, concrete, sand or soil if the surface is
well groomed and level. The site selected must be free of rocks, sticks and other debris that may damage
the floor of the berm.
Select a site approximately 6’ (1.8m) larger in each direction then the overall berm size (see Section 7:
Specifications and Parts for overall dimensions). For best operating conditions, the slope of the site selected
should not exceed one degree in any direction. Any slope will reduce the capacity of the berm. However,
if the site has a slope in only one direction, it can result in better draining of the berm.
Preparing the Site
The surface of the ground should be smooth and firm. If the berm is to be installed on a paved surface, the
surface should be swept clean before installation. Sharp gravel on top of a hard surface may puncture the
berm.
We Engineer Solutions
2018 Insta-Berm (Frame) Operations Manual (Version D) 10
Page 15
Section 4: Installation
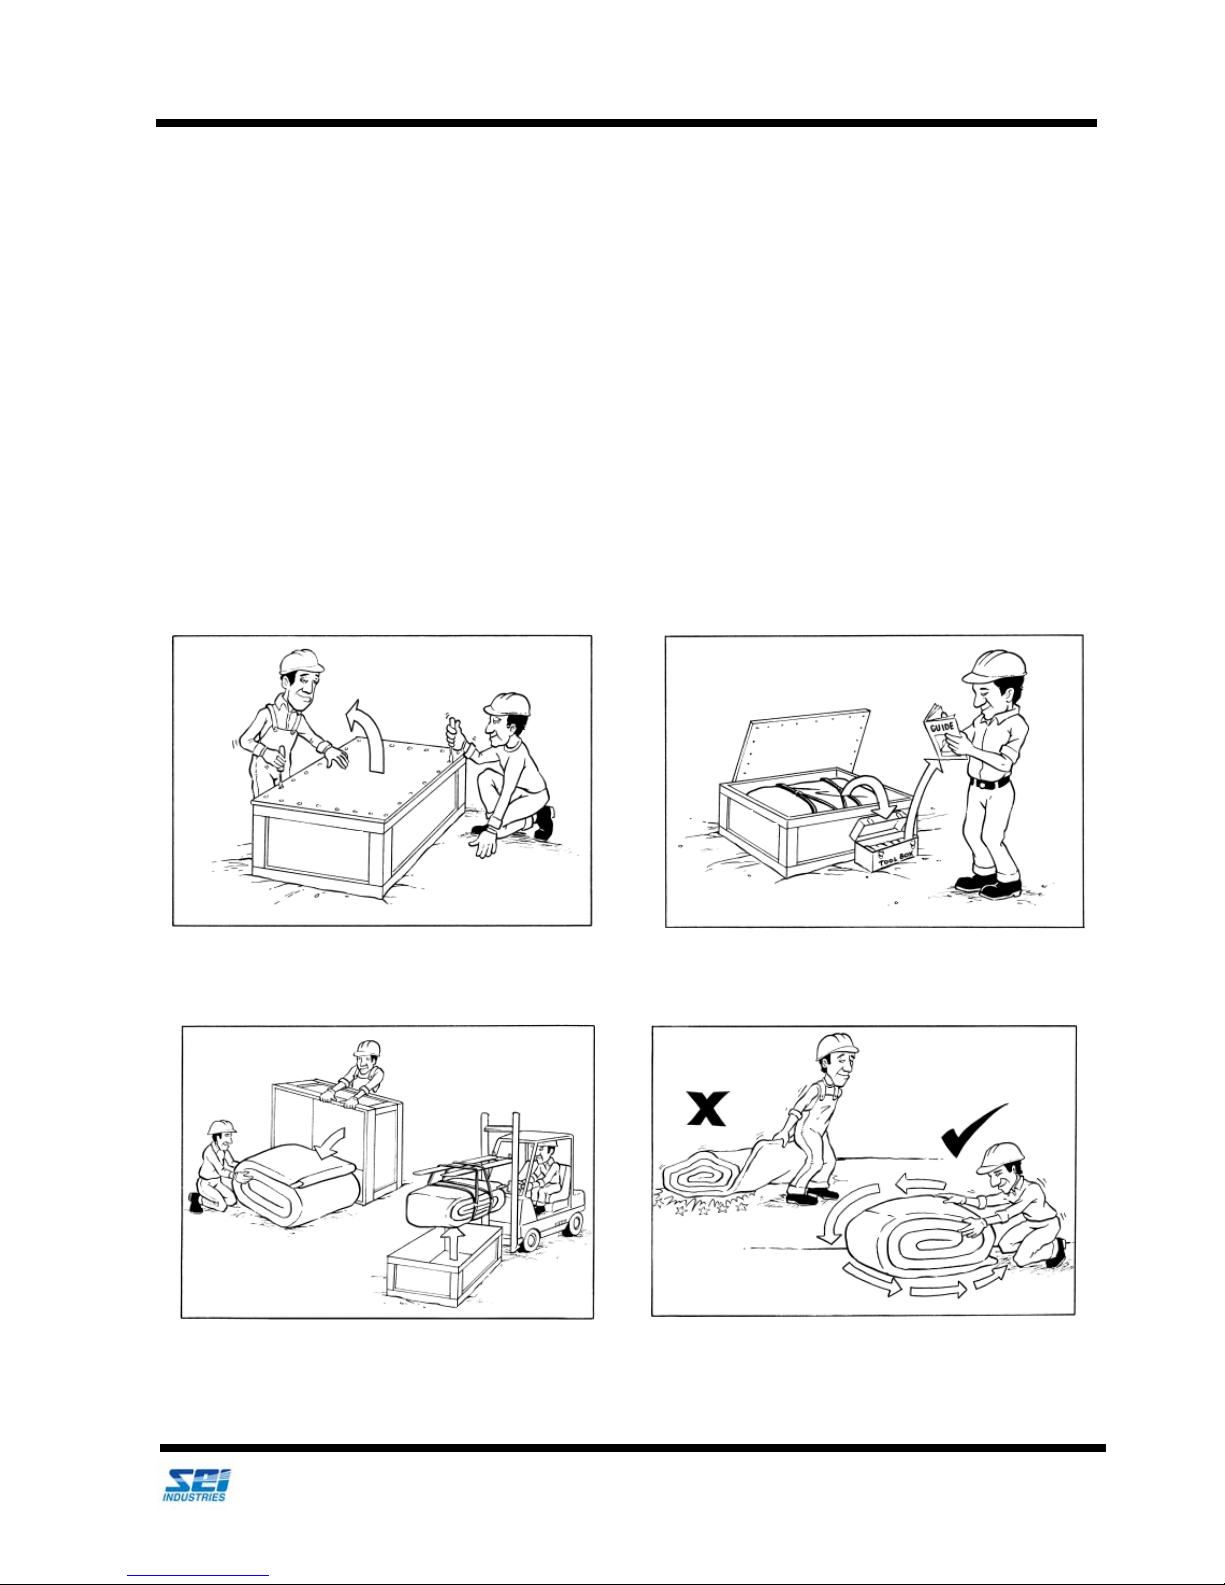
1. Open the crate.
2. Read the operator’s manual.
3. Tip the crate and roll the liner and berm out
OR lift the liner out with straps.
4. Roll the liner and berm to move it. Do not
drag.
Installation Procedures
If the ground surface is too rough or irregular, it must be prepared by placing 1-2" (25-50 mm) of pea gravel
covered by 1-2" (25-50 mm) of sand or soil. This also provides some drainage and helps keep water away
from the liner.
The ground supporting the Insta-Berm system must be firm enough to prevent the berm from settling after
filling, otherwise the berm liner may stretch and rupture. The ground must also be firm enough to prevent
the frame support legs from sinking, should the berm fill with liquid.
A groundsheet is recommended to protect the bottom surface of the berm from sharp objects (available from
SEI Industries). An inside chafing liner is also available.
Assembling the Berm
Move the crate to the assembly site and follow the procedures below:
We Engineer Solutions
2018 Insta-Berm (Frame) Operations Manual (Version D) 11
Page 16
Section 4: Installation
Important Note
If the berm is equipped with an optional groundsheet, the groundsheet will be the smaller of the
two.
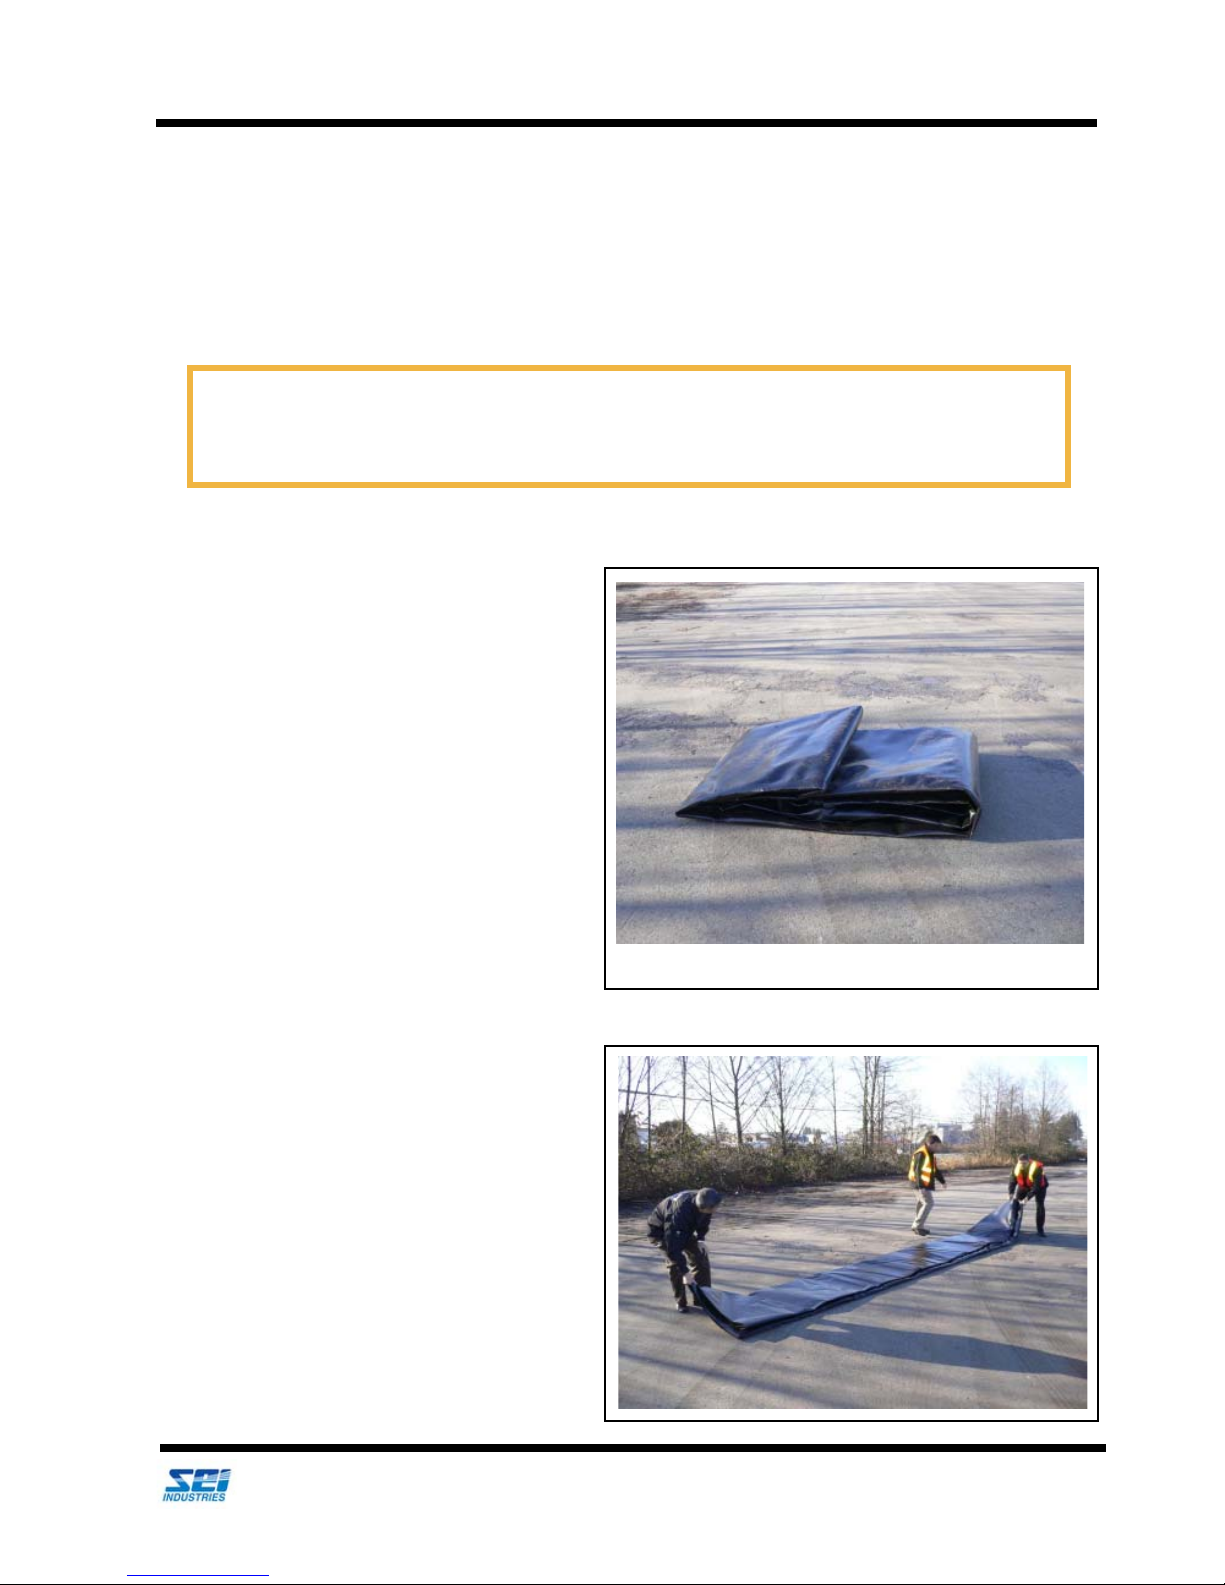
Groundsheet.
Installation Procedures
5. The shipping container should be retained for storage or for shipping the berm to a new location.
Note how the liner is folded for easy return to the container.
6. If the berm is to be equipped with a groundsheet, spread the groundsheet out first. The groundsheet must be at least 2-3’ larger then the berm itself.
7. Place the groundsheet at one corner of
the site.
8. Unfold the groundsheet and centre it
along one edge of the site.
We Engineer Solutions
2018 Insta-Berm (Frame) Operations Manual (Version D) 12
Page 17
Section 4: Installation
Warning
Do not drag the berm without a barrier to protect the fabric from the ground.
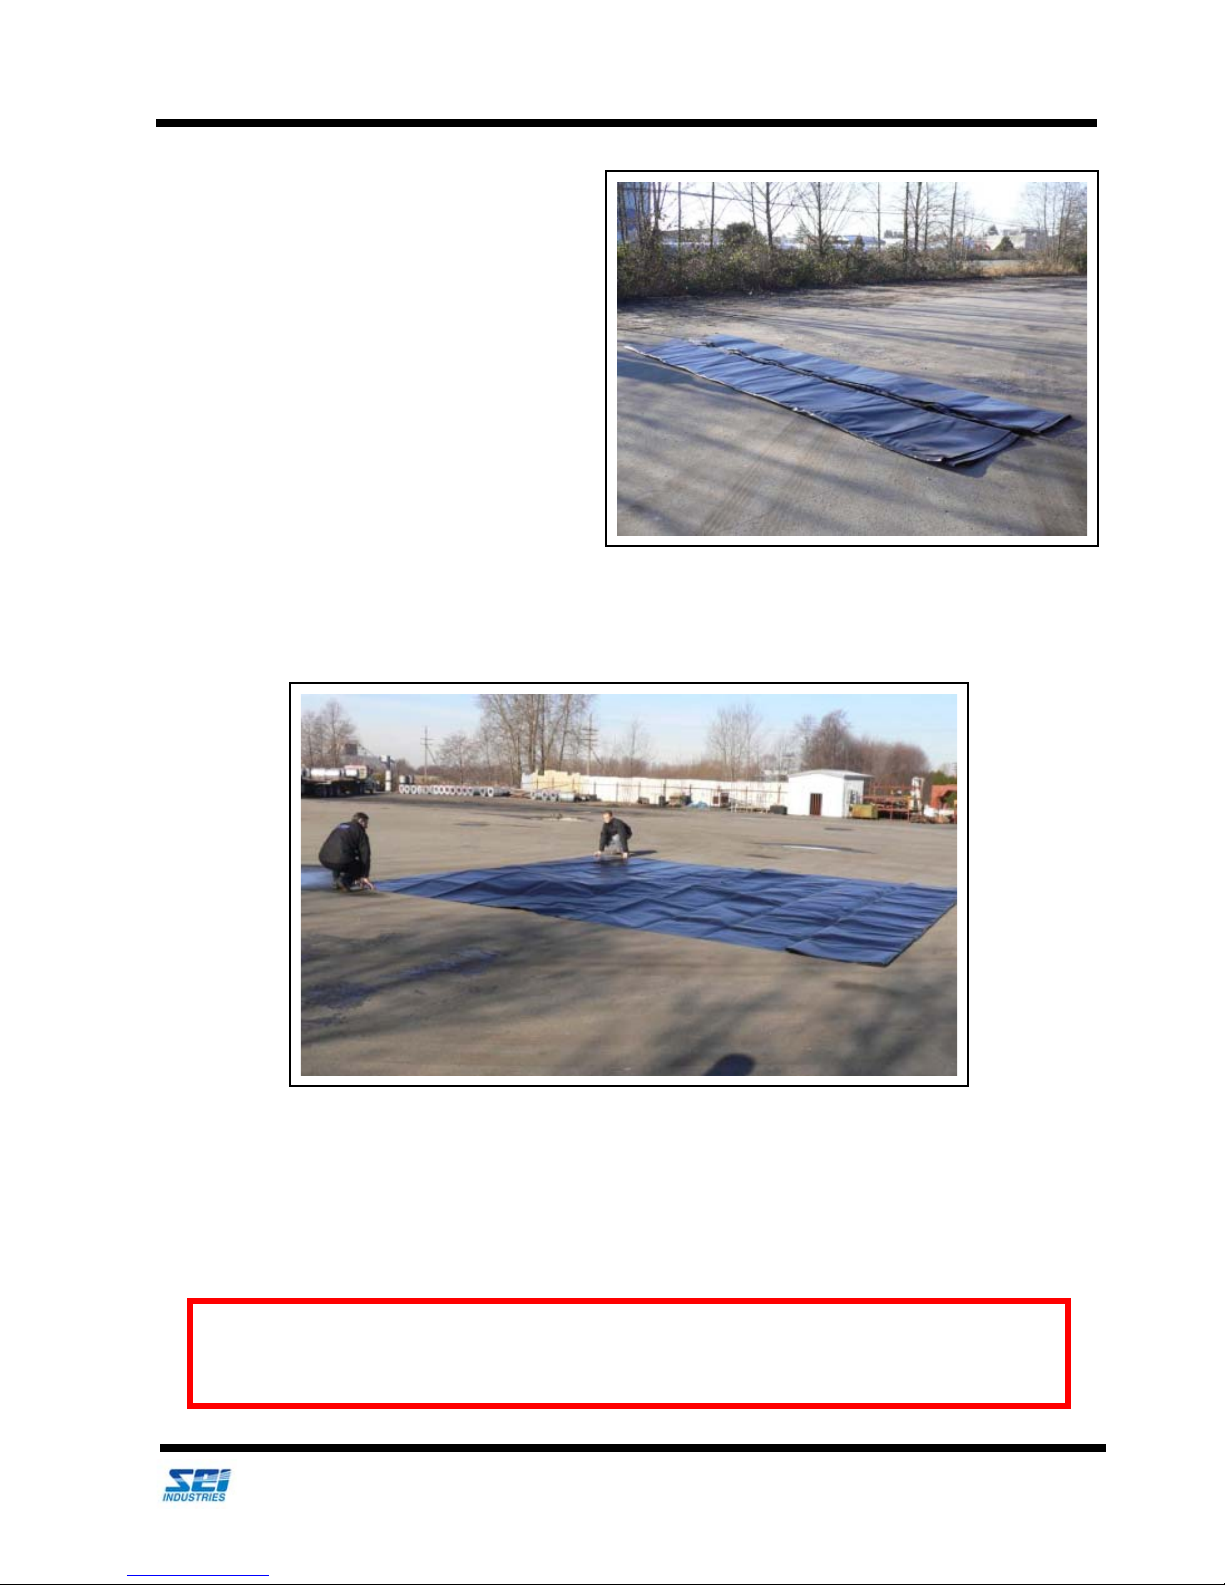
9. Unroll the groundsheet across the site.
10. The groundsheet should now look like this.
Installation Procedures
11. Pull the edges of the groundsheet to remove any wrinkles. Flapping the edge to release trapped air
will make it easier to pull flat.
We Engineer Solutions
2018 Insta-Berm (Frame) Operations Manual (Version D) 13
Page 18
Section 4: Installation
Important Note
The berm liner can be moved by having personnel at opposite sides of the liner, lifting the edges.
By flapping the edges, air is caught under the berm, allowing the berm to be moved without
possible damage.
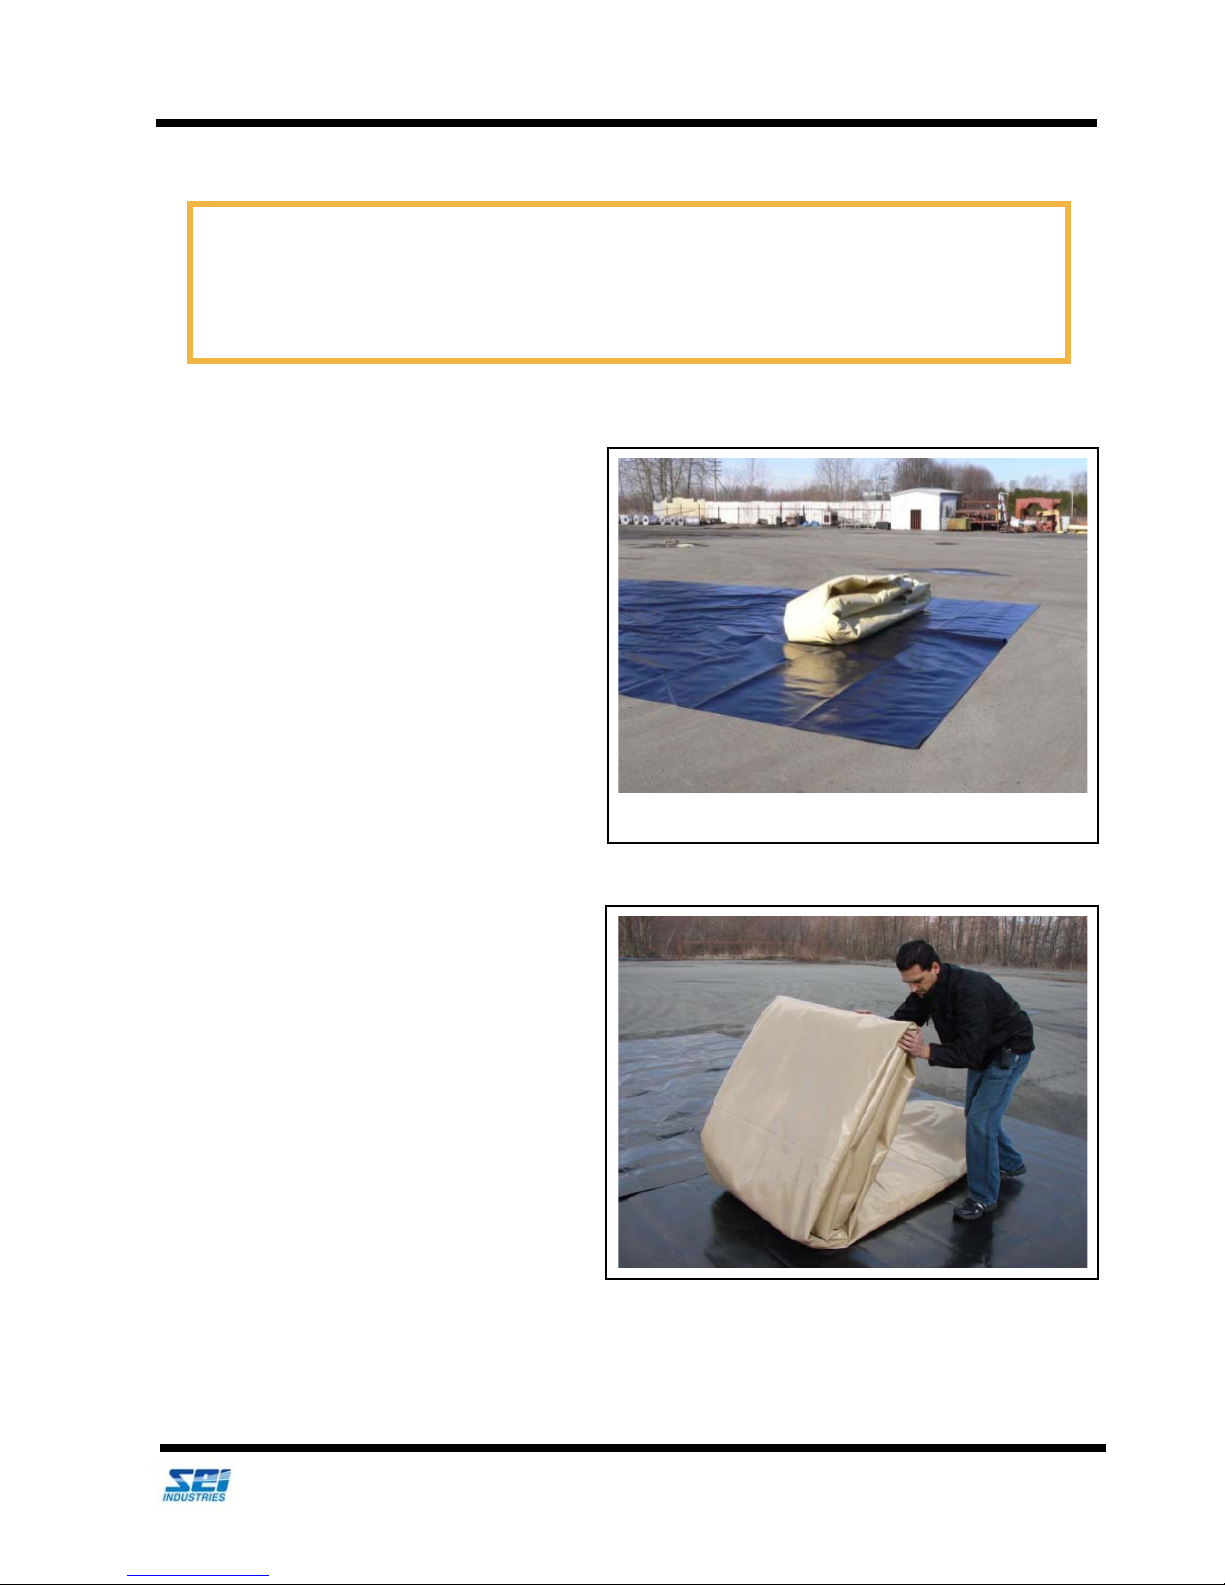
Folded berm liner.
12. Using the crate liner fabric, carefully
drag or roll the berm onto the groundsheet.
Installation Procedures
13. The size of your berm will determine
how it should be placed on the groundsheet. As you begin to unroll the berm,
you may need to adjust its position to
align the long and short sides.
14. To adjust the alignment of the berm, lift the berm by pulling on each end and move it into the correct position. For larger berms, re-roll the berm and place the crate liner material under the berm
to slide it to the correct position.
We Engineer Solutions
2018 Insta-Berm (Frame) Operations Manual (Version D) 14
Page 19
Section 4: Installation
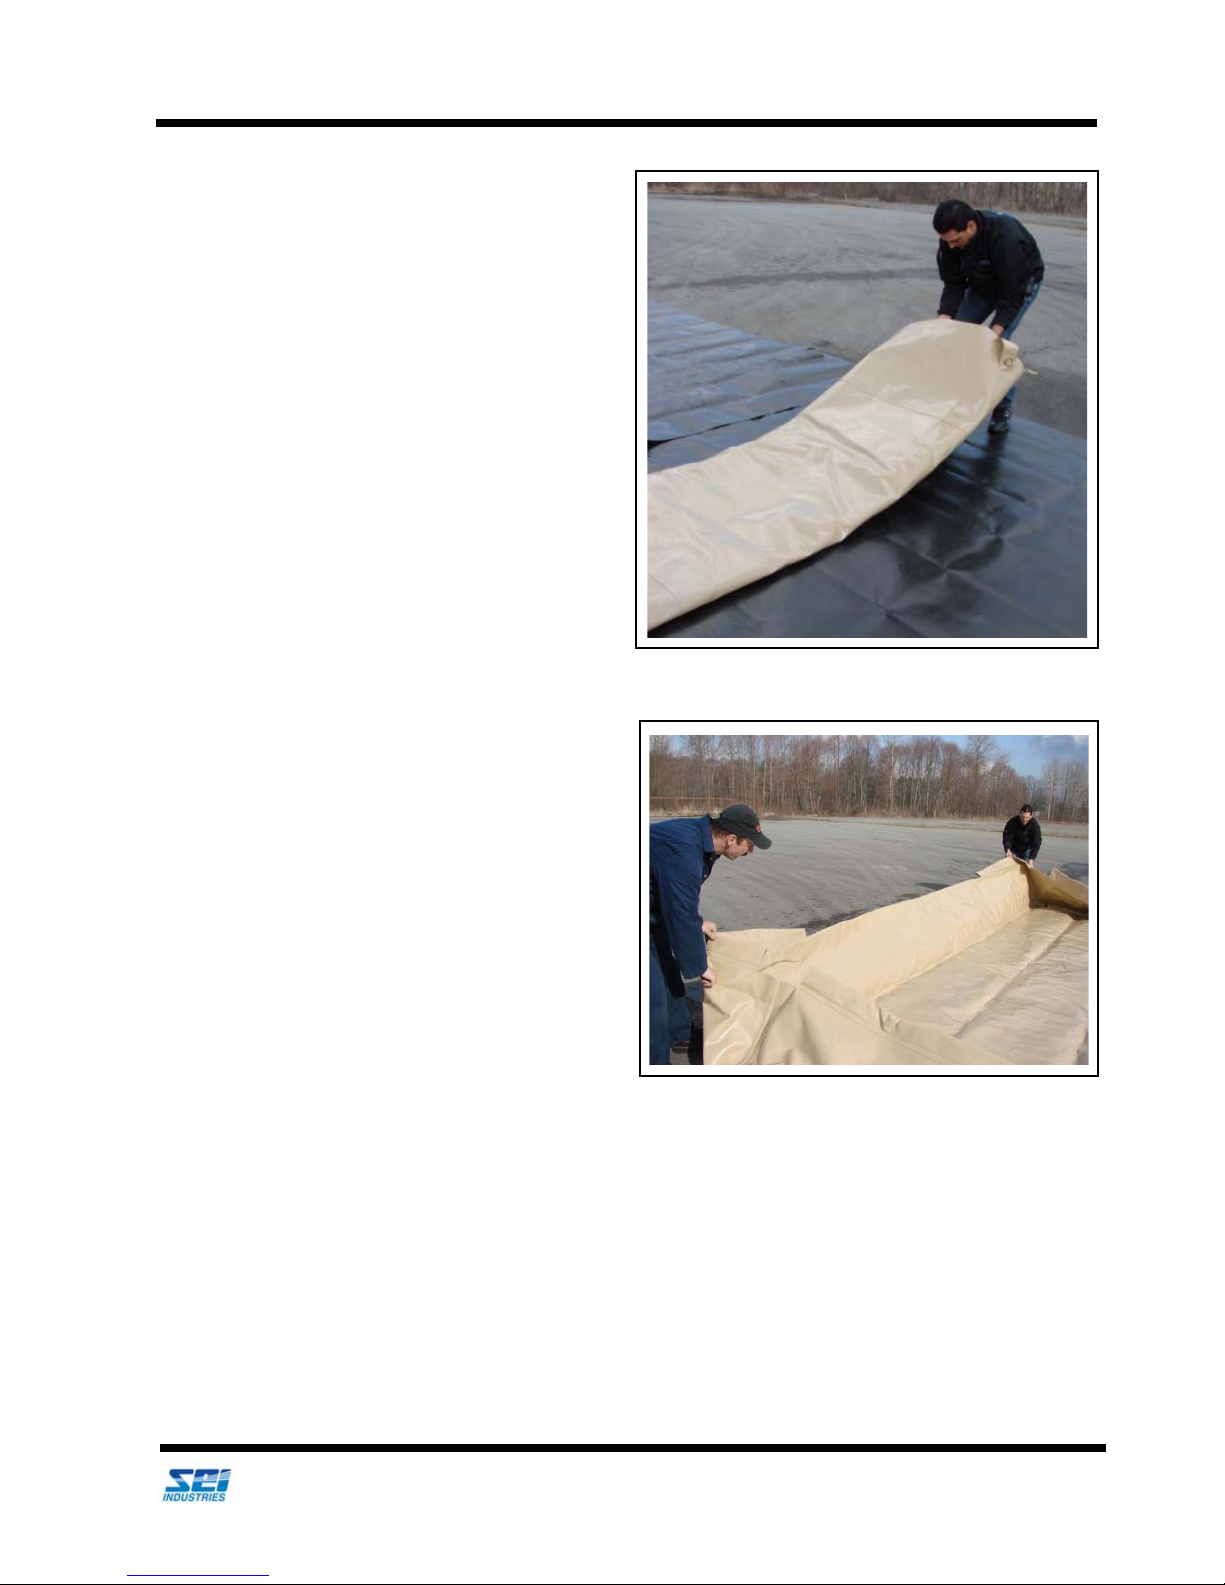
15. Unfold the berm liner (ensuring the alignment is correct) as shown and pull the berm
liner flat to ensure there are no wrinkles.
Installation Procedures
16. Unroll the berm liner across the site.
We Engineer Solutions
2018 Insta-Berm (Frame) Operations Manual (Version D) 15
Page 20
Section 4: Installation
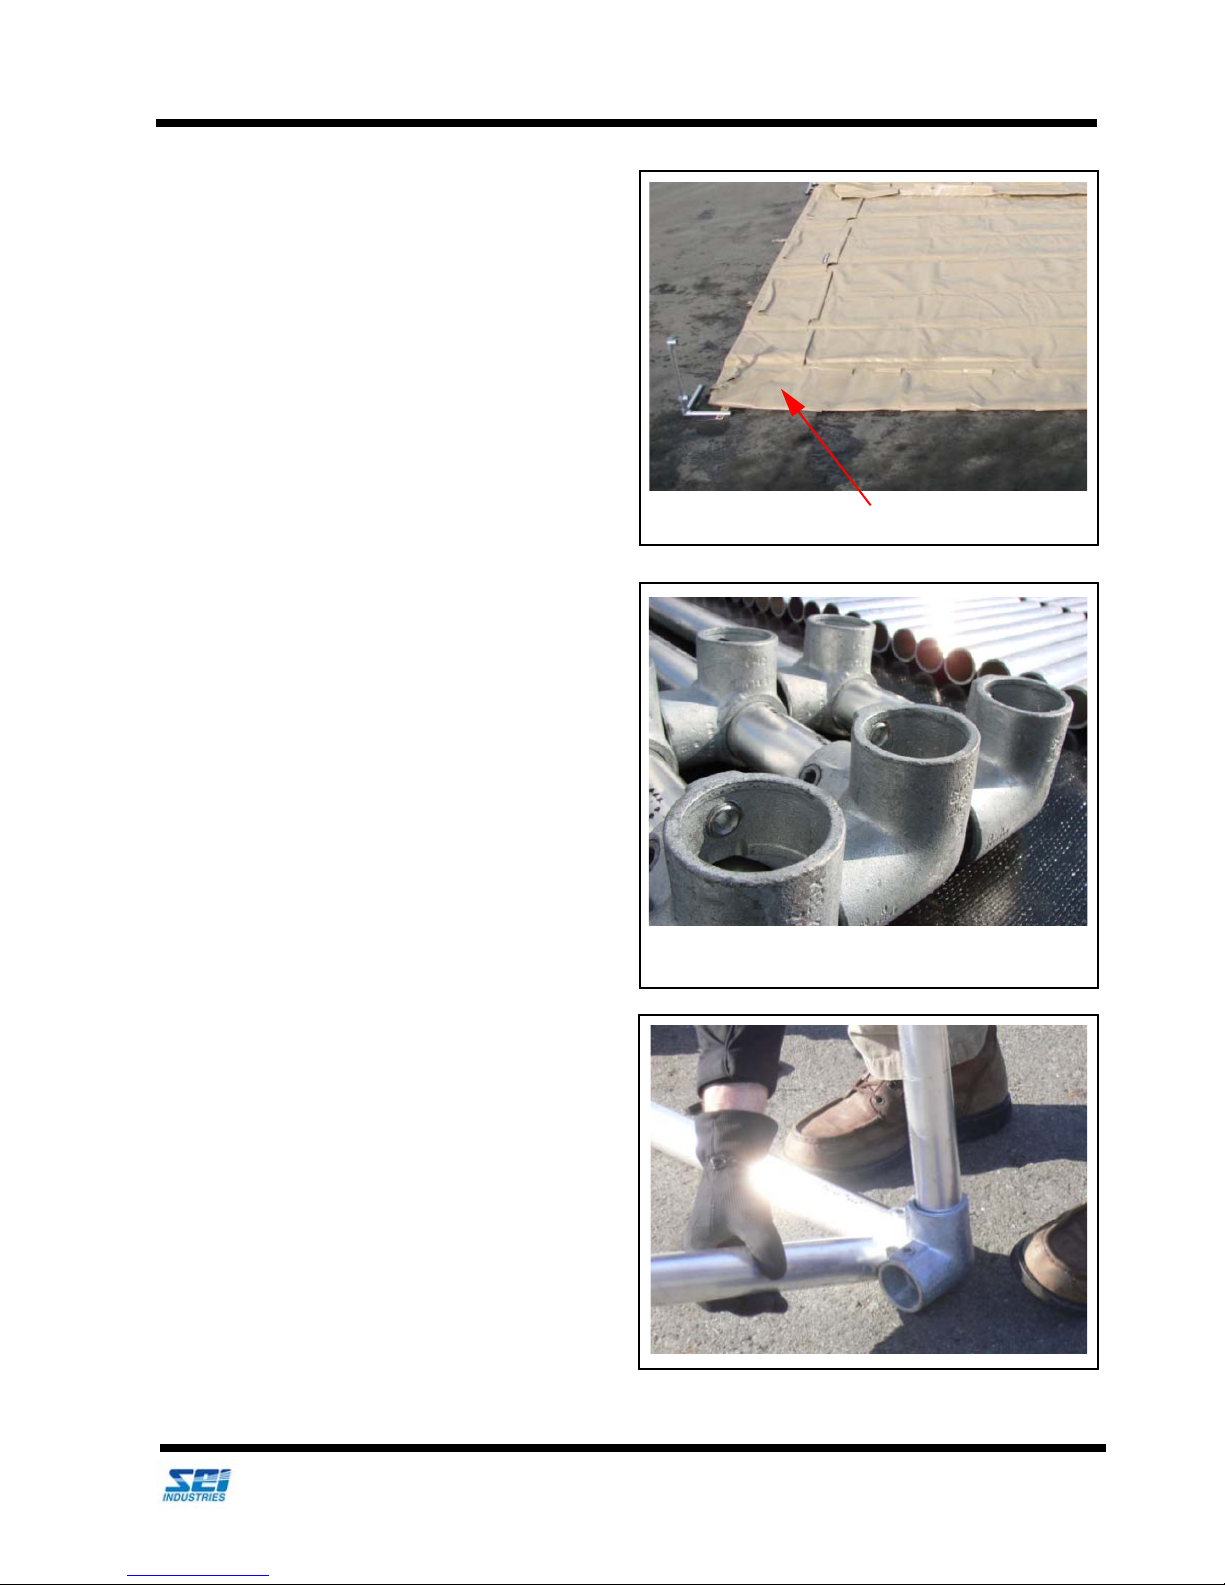
Forming a natural corner.
Corner posts.
17. Fold back each side and end until a natural
corner is formed. This creates space to
assemble the frame.
18. Locate the four corner posts with fittings
attached.
Installation Procedures
19. Attach the 16" (long) legs to the corner post.
We Engineer Solutions
2018 Insta-Berm (Frame) Operations Manual (Version D) 16
Page 21
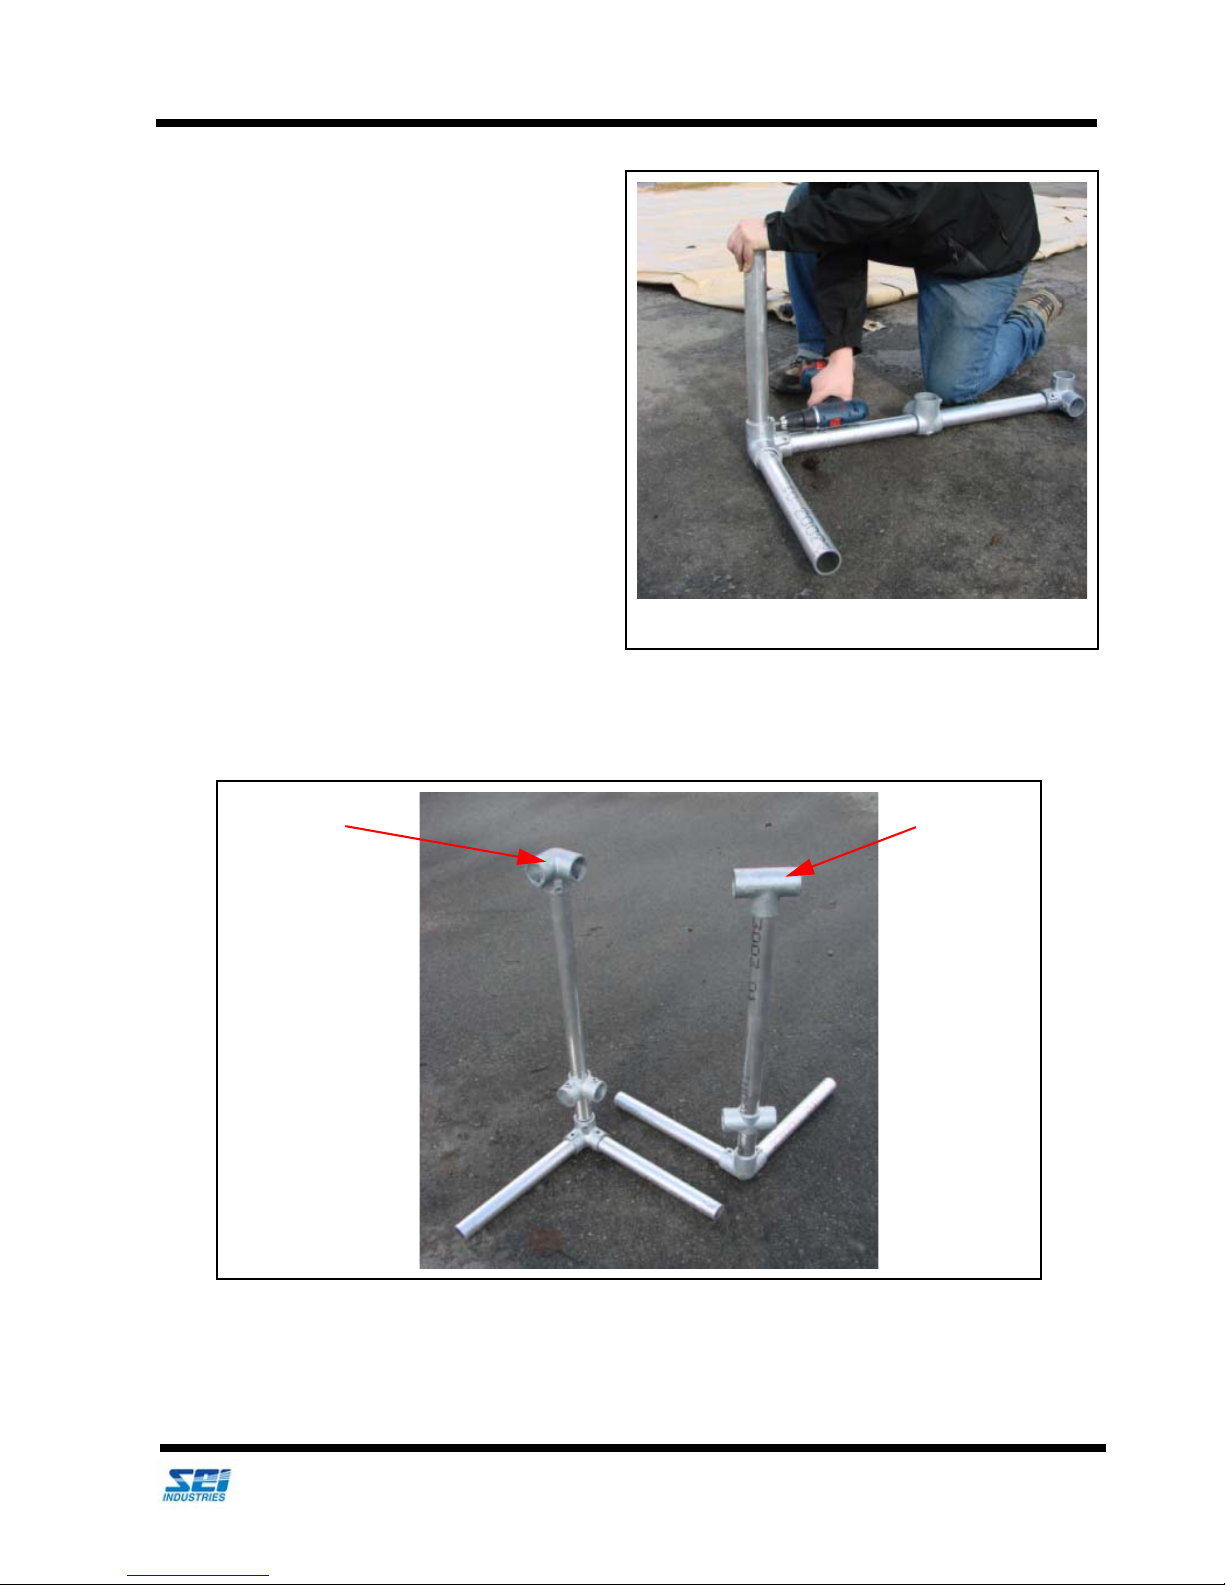
Section 4: Installation
Tightening the leg set screws.
Corner posts.
Side posts.
20. Tighten the leg set screws with the
supplied Allan wrench to 29 ft-lb. (39
Nm).
Installation Procedures
21. Locate the side posts and attach legs in the same manner as the corner posts.
We Engineer Solutions
2018 Insta-Berm (Frame) Operations Manual (Version D) 17
Page 22
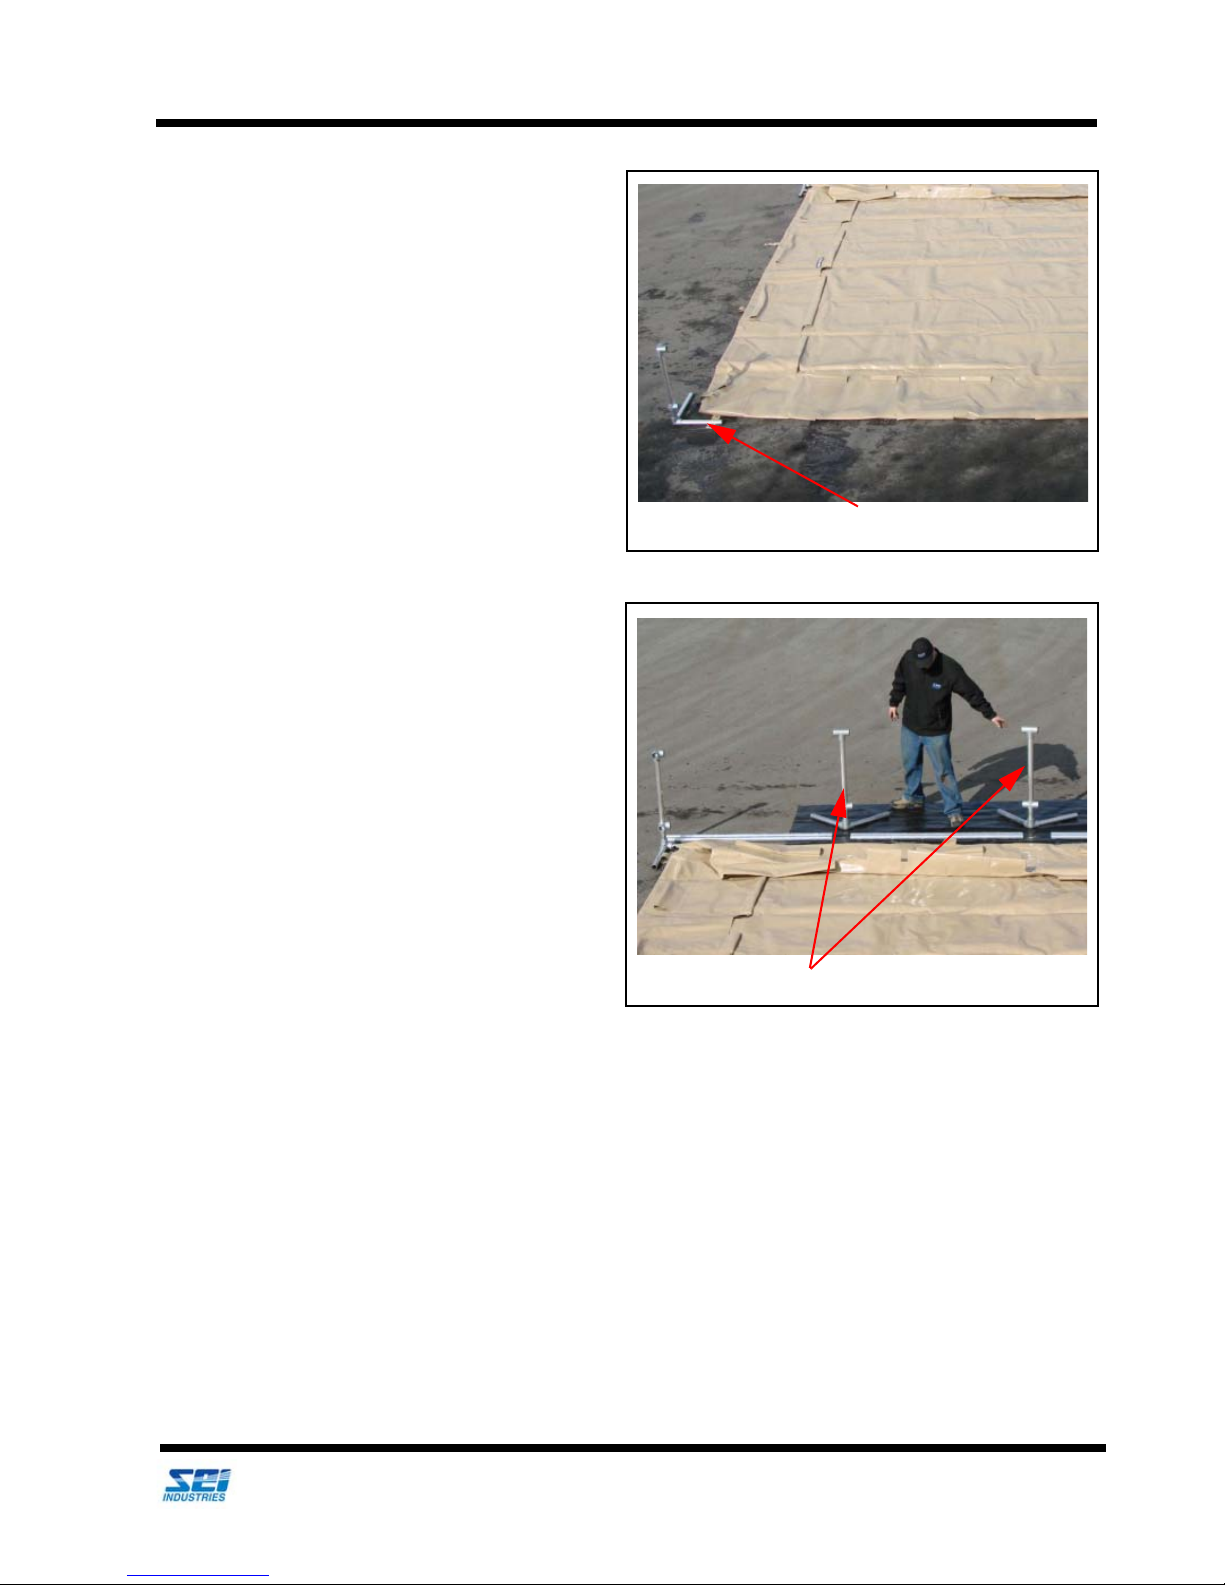
Section 4: Installation
Corner post in position.
Side posts in position.
22. Place the completed corner posts at each
corner.
23. Place side posts approximately 5’ apart
along each side.
Installation Procedures
We Engineer Solutions
2018 Insta-Berm (Frame) Operations Manual (Version D) 18
Page 23
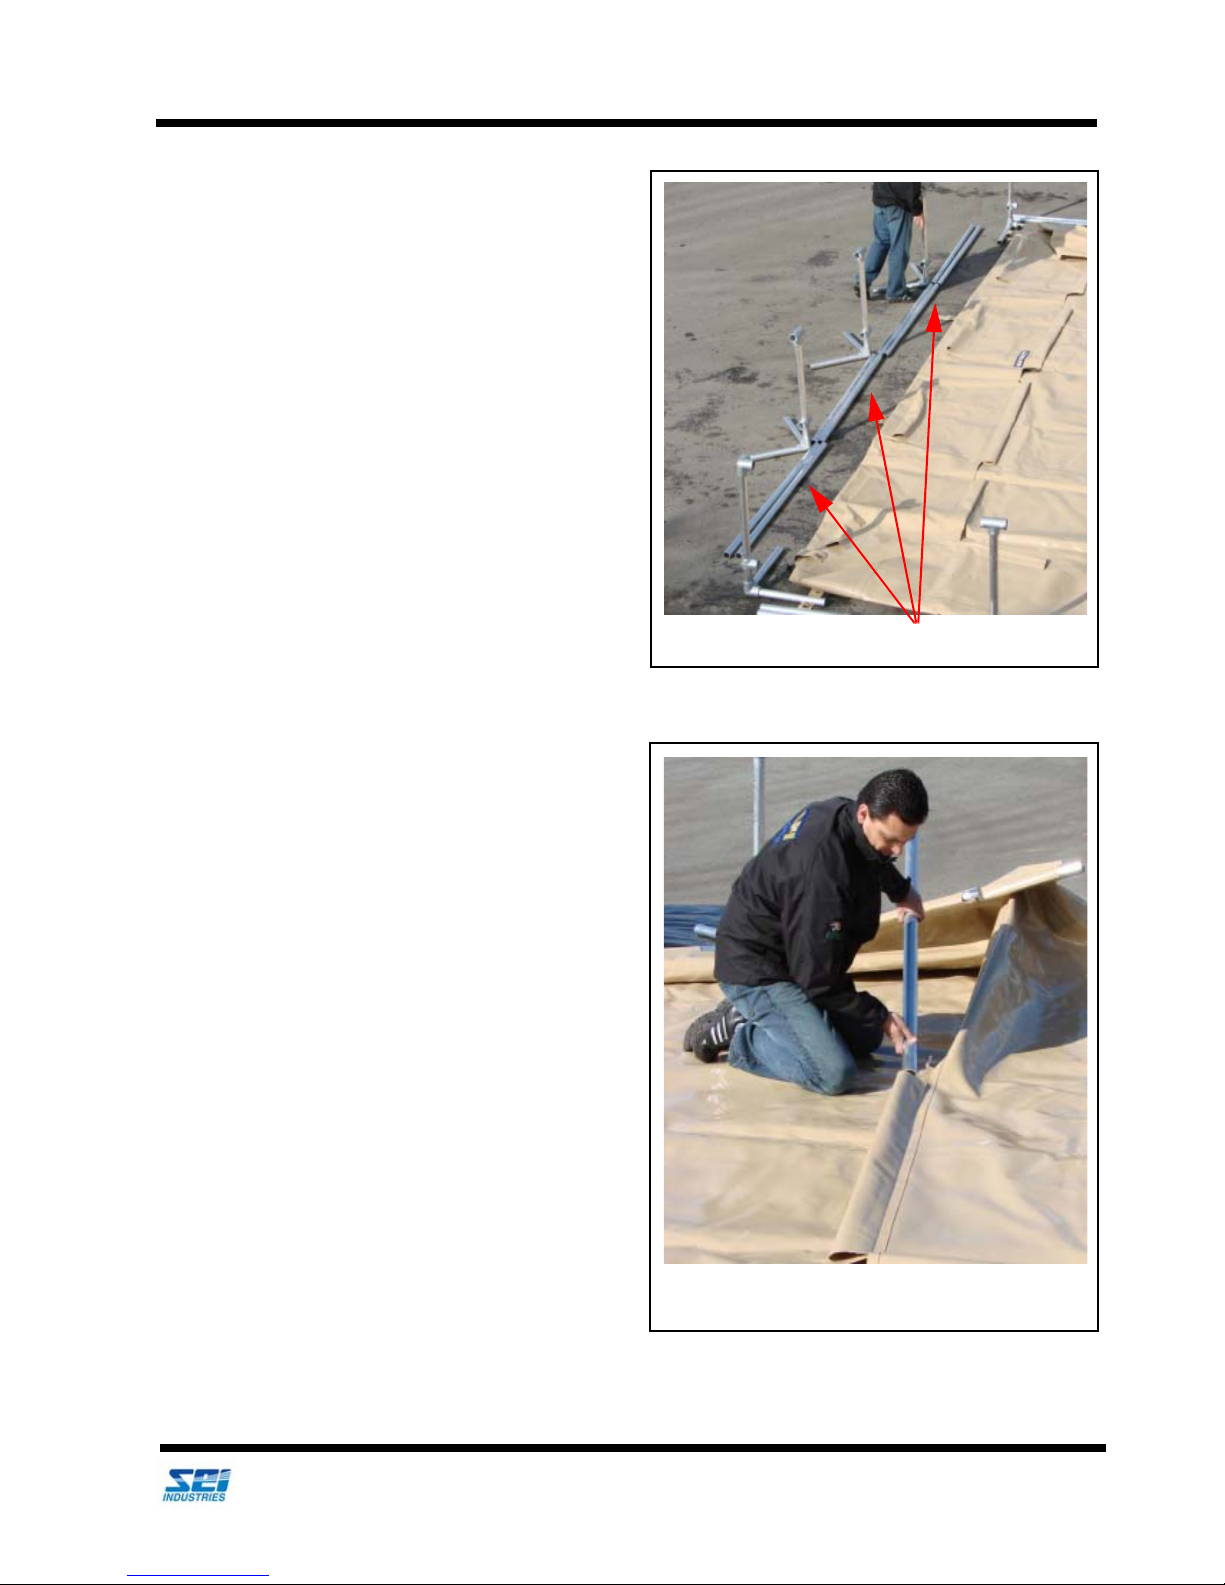
Section 4: Installation
Rails laid along the side of the berm.
Sliding rails on a 20" high berm.
24. Place the 5’ (1500 mm) rails in between the
posts on each end and both sides. One rail
for each section of 20" high berms and two
rails for each section of 32" berms.
Installation Procedures
25. For a 20" high berm, slide the rails into each
pocket around the berm.
We Engineer Solutions
2018 Insta-Berm (Frame) Operations Manual (Version D) 19
Page 24
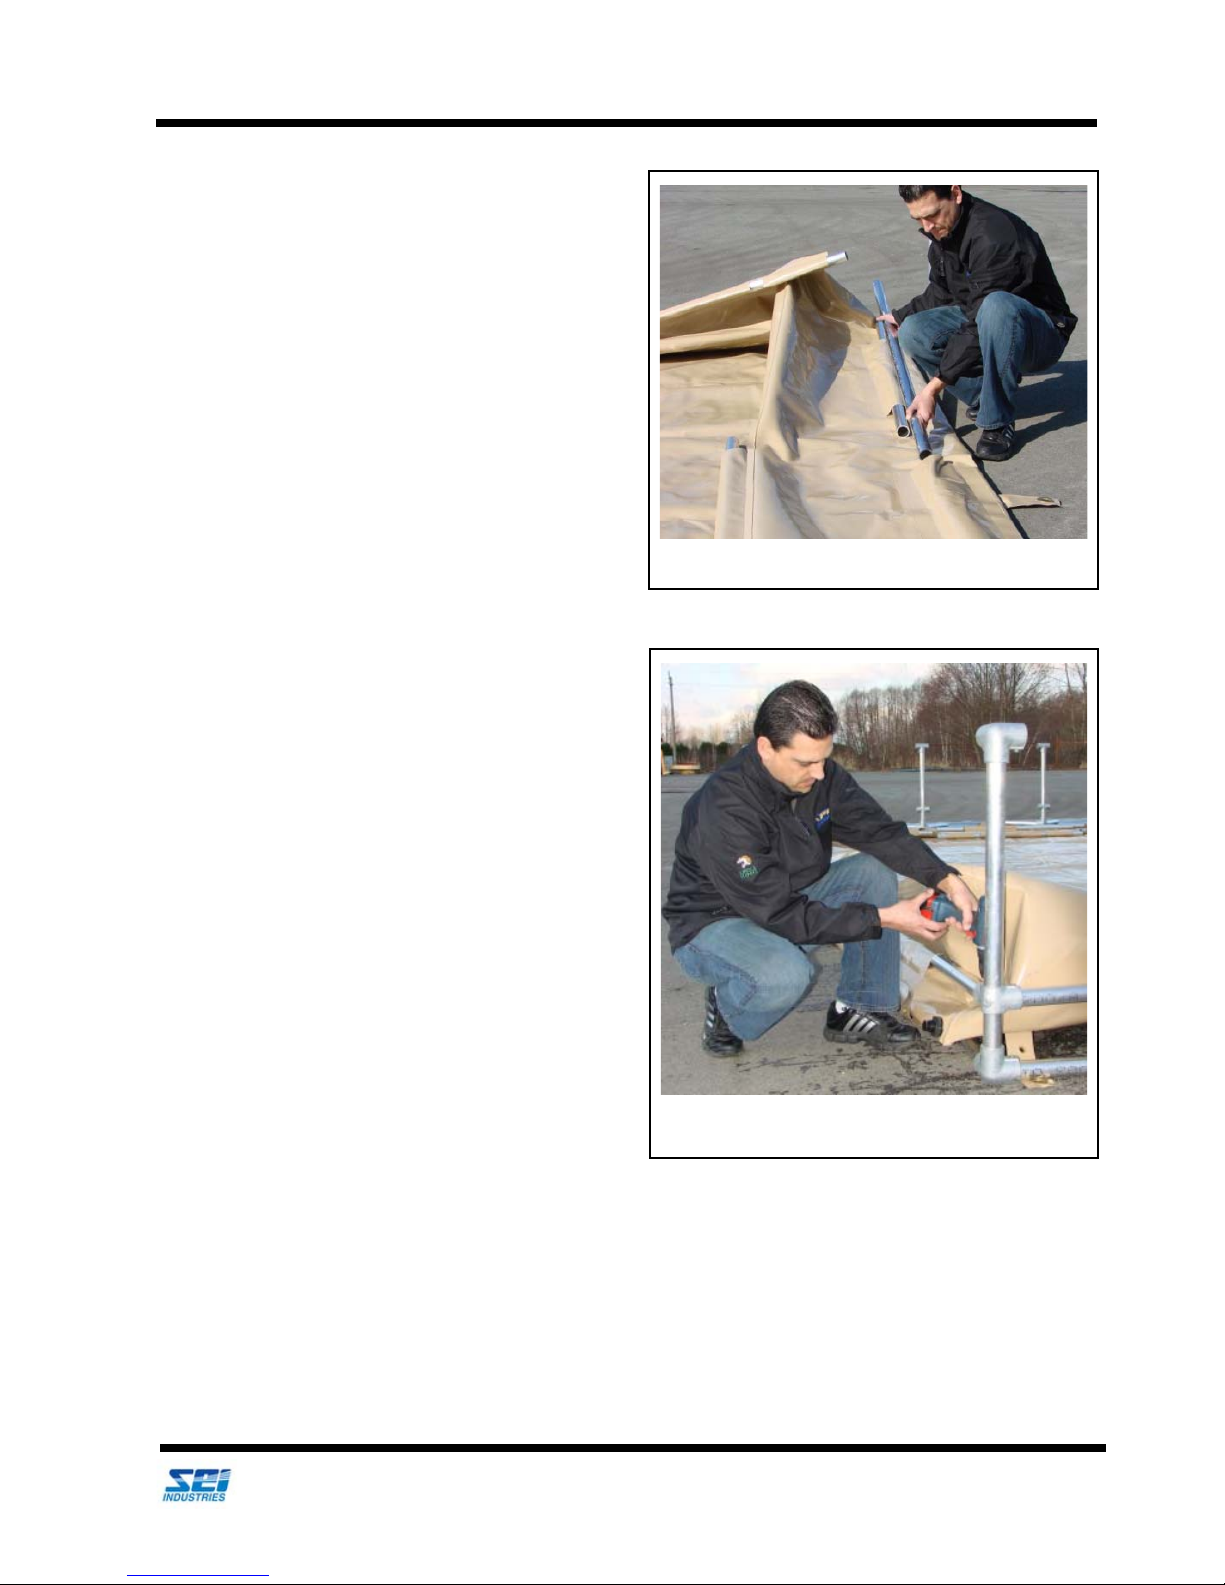
Section 4: Installation
Slide top and bottom rails into pockets.
Lower rails in place and tighten set screw.
26. For a 32" high berm, slide the rails into both
the top and bottom pockets around the berm.
27. Starting with one corner, insert the lower
rails. Tighten the set screw on the corner
post to 29 ft-lb. (39 Nm).
Installation Procedures
We Engineer Solutions
2018 Insta-Berm (Frame) Operations Manual (Version D) 20
Page 25
Section 4: Installation
Tightening the top rail.
Attaching the top rail to the side post.
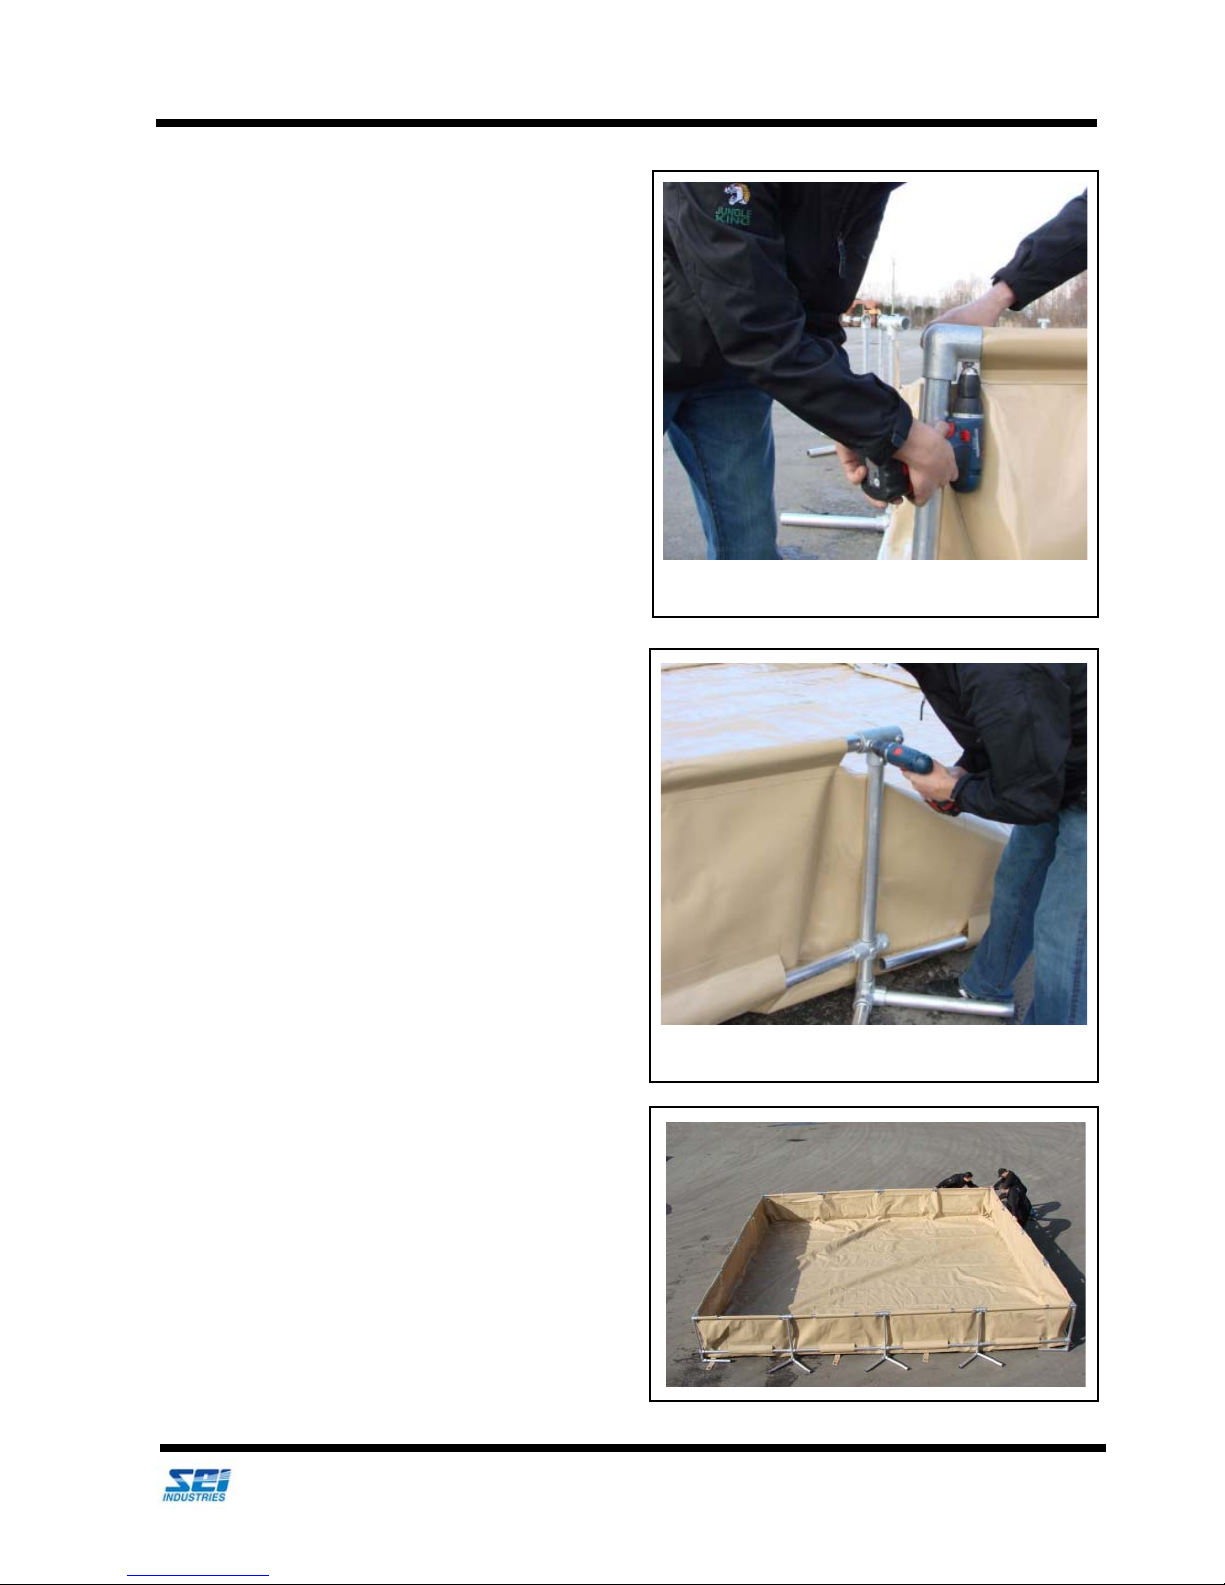
28. Attach the top rails to the starting corner post
and tighten the set screw to 29 ft-lb. (39 nm).
29. Move to the closest side post to the starting
corner and attach the other end of the top rail
onto the side post. Tighten the set screw.
Installation Procedures
30. Continue attaching the rails around the entire
berm until you return to your starting point.
If sufficient personnel are available, two
teams can work in opposite directions from
the starting corner.
31. The completed berm should now look like
this.
We Engineer Solutions
2018 Insta-Berm (Frame) Operations Manual (Version D) 21
Page 26
Section 4: Installation
Warning
When using the Insta-Berm system near a helicopter or in high wind areas, it must be secured with
tie-downs or sandbags to prevent the helicopter downwash or wind from lifting the liner.
Helicopters can create enough downwash to lift an unsecured, empty berm liner completely off the
ground. This could cause a rotor-strike.
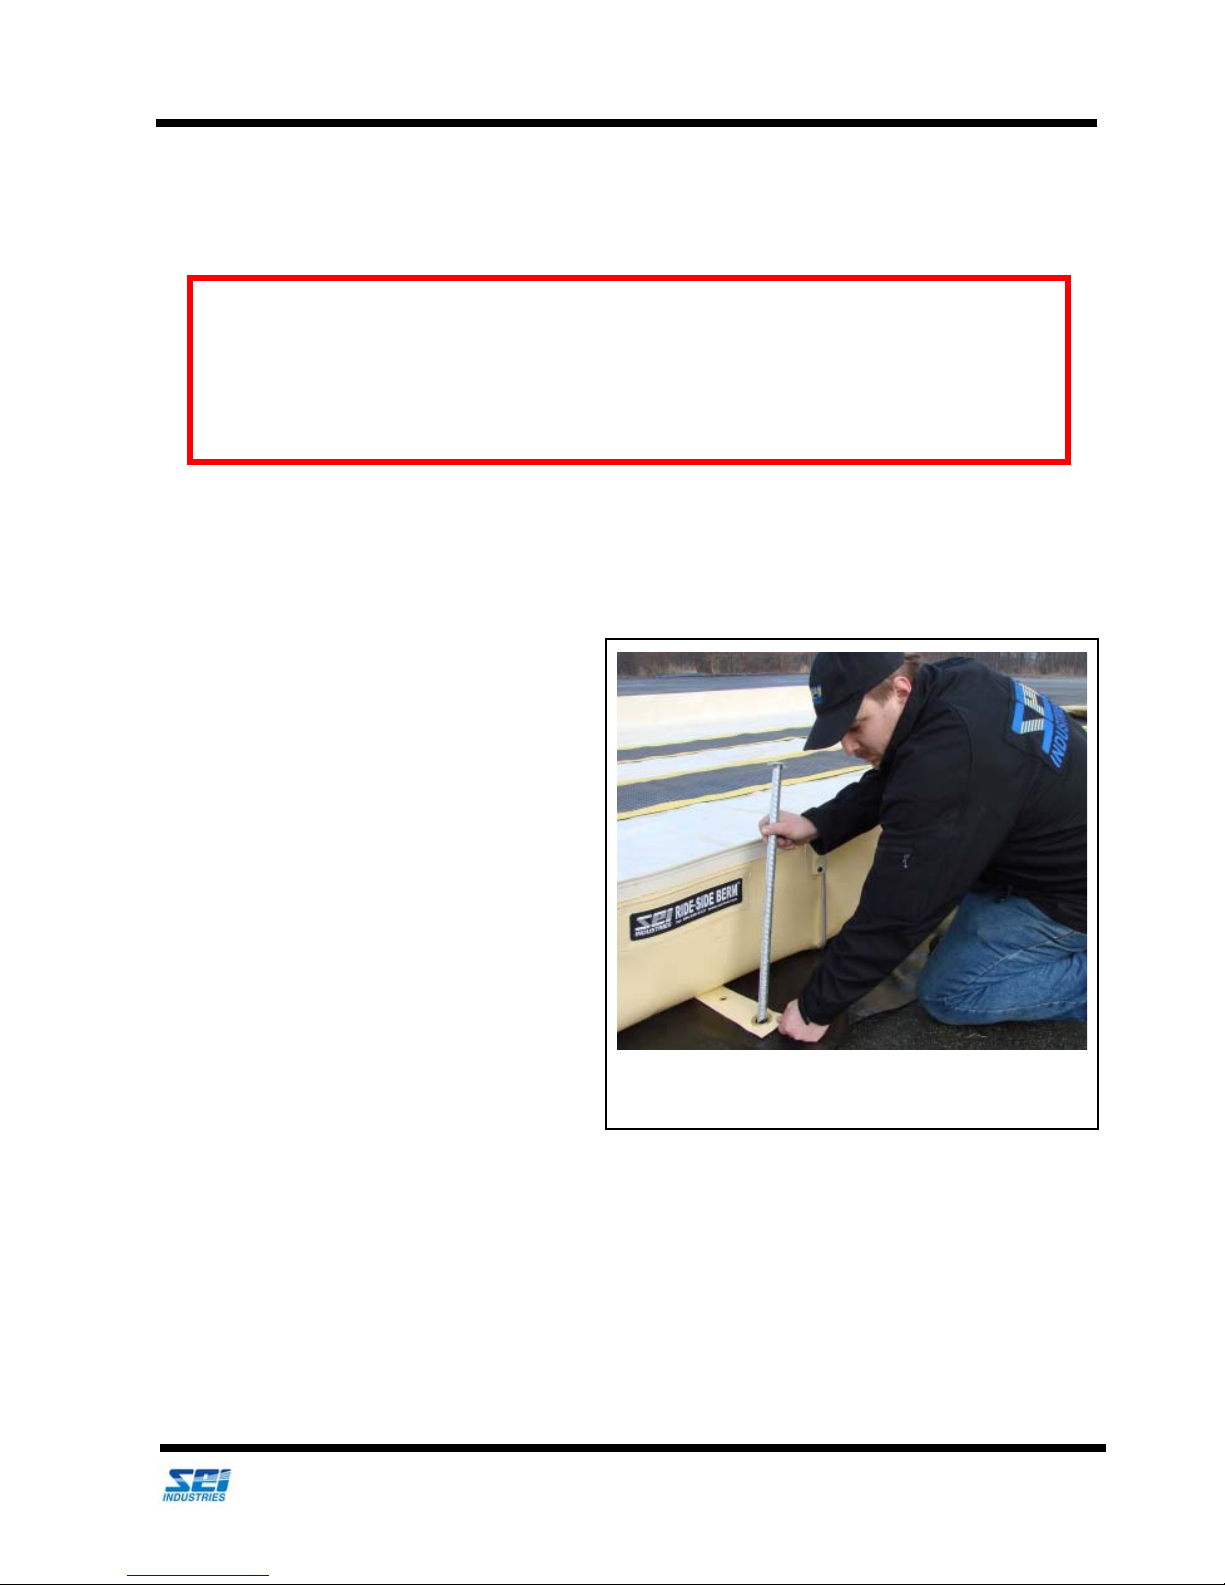
High wind stake (available on Arctic-Shield berms
only).
High Wind Precautions
Installing high wind stakes will lock the berm in place.
1. To secure the Insta-Berm system in high
wind areas, place sandbags inside the
liner near the edges. If the berm is
empty, sandbags should also be placed
on the corners of the liner.
Installation Procedures
2. High wind stakes should also be
installed (available only on ArcticShield berms).
We Engineer Solutions
2018 Insta-Berm (Frame) Operations Manual (Version D) 22
Page 27
Section 5: Maintenance
Caution
The Insta-Berm system is for temporary secondary containment. Neutralize or transfer spills
collected within the liner to permanent holding containers promptly.
Caution
SEI Industries will not be liable for any loss of stored liquids or related damage. To maximize spill
retention, inspect the Insta-Berm frequently and remove rain water, snow or dirt promptly from
the liner.
Section 5: Maintenance
Maintenance and Repairs
Spill Clean-Up
Maintenance and Repairs
Chemical resistance data is based on an exposure limit of 28 days duration at room temperature. The liner
may be over-lined with disposable thin polyethylene sheeting for rapid clean up of spills.
Removing Water and Foreign Materials
If the water has any chemicals floating on the surface or suspended in the water, a filter system should be
used to eliminate these chemicals before allowing the water to return to the environment. SEI Industries
recommends using SEI’s RainDrain system for removing hydro-carbons. For non hydro-carbon chemicals,
contact the local authorities to determine how to safely dispose of the chemicals.
To facilitate the pumping of water from inside the berm, each berm should be equipped with a manually
operated pump. The pump should be located at the lowest point in the berm. An automatic pump should
not be used as it would pump out any spillage in the berm.
If the Insta-Berm is installed on a grade, the liner can be un-hooked from the top pipe on the downhill side
to allow the water to drain. Re-install the liner on the top pipe after draining the water. Do not leave the
berm unattended while one side is lowered to facilitate draining. SEI Industries can automate this process
with the RainDrain system. See this manual for more information.
We Engineer Solutions
2018 Insta-Berm (Frame) Operations Manual (Version D) 23
Page 28
Section 5: Maintenance
Important Note
Check the setscrews annually for tightness. Tighten to 29 ft-lb. (39 Nm).
Maintenance and Repairs
Extending the Service Life of the Insta-Berm System
As with any equipment, the service life of the Insta-Berm system can be extended with proper care. Various
factors affect portable berms:
• Ultra-violet radiation
• Folding
•Abrasion
•Moisture
• Temperature
• Type of liquid stored
An Insta-Berm system used in shady, dry, cool conditions and not moved frequently will provide longer
service life.
The following suggestions will help extend berm service life:
• When moving the liner it should not be dragged or abraded. The folds should be made at
different places each time the liner is moved. Be particularly careful with fork-lifts as the
liner should be rolled onto the forks rather than sliding the forks under the tank.
• Spilled fluids should be removed promptly from the liner or tubes.
• The site should be arranged so the liner or tubes will not be sitting in water. A ditch
around the berm will allow water to collect below the berm pad.
• Fabric berms are affected more by some liquids than by others. Contact SEI Industries
for information on the liquid you intend to store.
We Engineer Solutions
2018 Insta-Berm (Frame) Operations Manual (Version D) 24
Page 29
Section 5: Maintenance
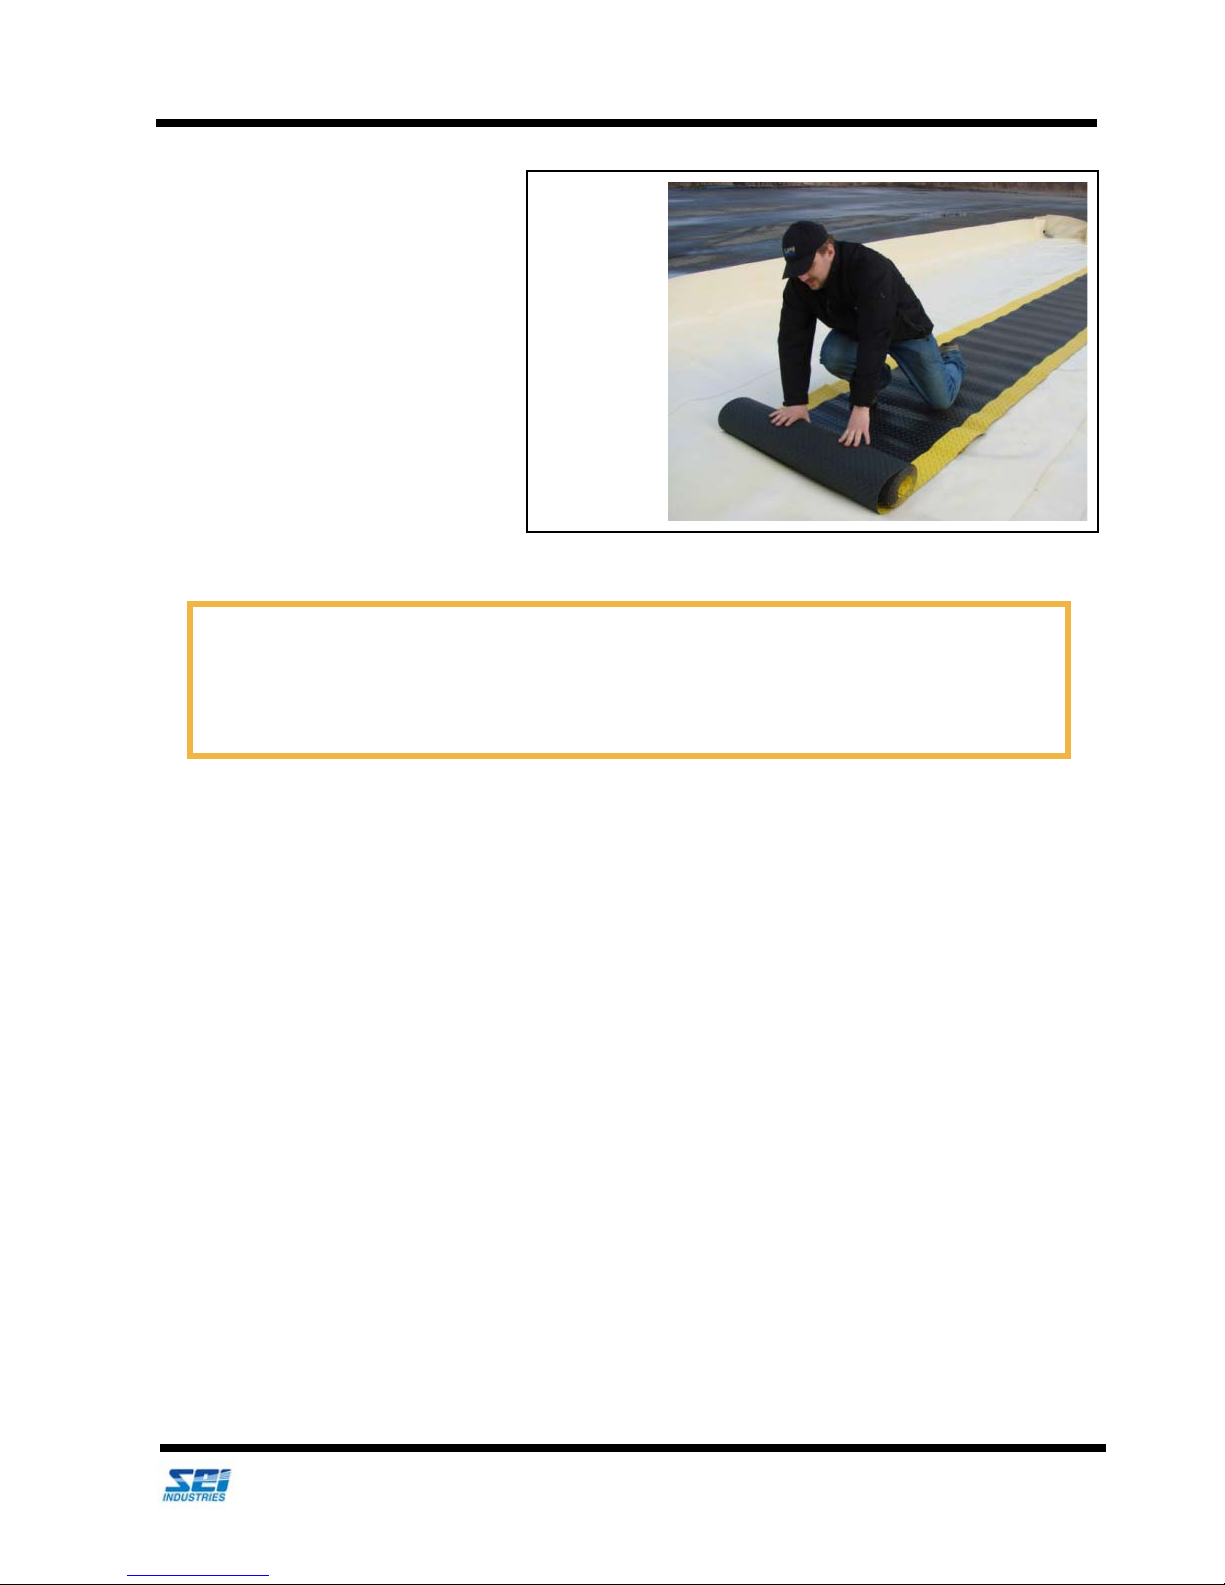
Track belting.
Important Note
If the berm is equipped with the optional track belting, it should now be spread out evenly inside
the berm. If sharp or abrasive equipment is to be placed inside the berm, plywood panels can be
laid down to protect the fabric.
• If vehicles are intended to
enter/exit the berm, track belting is recommended.
Maintenance and Repairs
We Engineer Solutions
2018 Insta-Berm (Frame) Operations Manual (Version D) 25
Page 30
Section 5: Maintenance
Important Note
Try a test repair before attempting to repair the item. It is much harder to fix a repair once a failed
attempt has been made as the hardened glue is difficult to remove.
Important Note
Dura-Seal glue has been designed specifically for the SEI family of fabrics. The shelf life of this
adhesive is about one year. Fresh adhesive can be obtained directly from SEI Industries Ltd.
Repairs
Using Glue
Tools and Materials Required
• Roller
•Scissors
• Patch material
•Glue
• Solvent (isopropyl rubbing alcohol is recommended)
• Abrasive pad
Repairs
Before commencing repairs using glue, the following should be noted:
• The weather should be warm (above 60 deg. F or 15 deg. C) and dry.
• If the glue and patch are not properly placed, air bubbles will be created between the
glue and patch.
• The patch should be weighted down for 8-12 hours.
• The repaired item should not be used before the glue has set.
We Engineer Solutions
2018 Insta-Berm (Frame) Operations Manual (Version D) 26
Page 31
Section 5: Maintenance
Warning
Glue vapours are highly explosive. Explosive vapours may occur causing fire and/or injury. Keep
away from all sparks, flame, lighters or cigarettes.
Solvent and glue are both extremely hazardous. Use solvent and glue under well ventilated
conditions only.
When using a warm air fan, either use one which is rated EXPLOSION PROOF or make sure that
there is a steady flow of air past the work area to remove fumes as they are generated.
Repairing in High Humidity
Repairs
In conditions of high humidity, a proper technique is essential for securing the bond strength desired as the
presence of surface moisture can destroy the effectiveness of the cemented bond.
The evaporation of solvent from the adhesive may reduce the surface temperature below the dew point
resulting in condensation of water vapour on the surface of the adhesive. This is often visible as fogging or
a milky white appearance on the surface.
The use of a solvent to clean the surface prior to cementing can also reduce temperatures below the dew
point.
To overcome the high humidity problem, raise the temperature of the patch area. This can be accomplished
with a warm air fan.
Applying the Glue
Small scrapes, damaged fabric coating or pinholes, which are not leaking, can be repaired with glue only.
They do not require a patch. (A small scrape is defined as damage to the outer fabric coating only. A pinhole
is defined as a small puncture that is not leaking.) However, damage to the base fabric must be repaired with
a patch.
We Engineer Solutions
2018 Insta-Berm (Frame) Operations Manual (Version D) 27
Page 32
Section 5: Maintenance
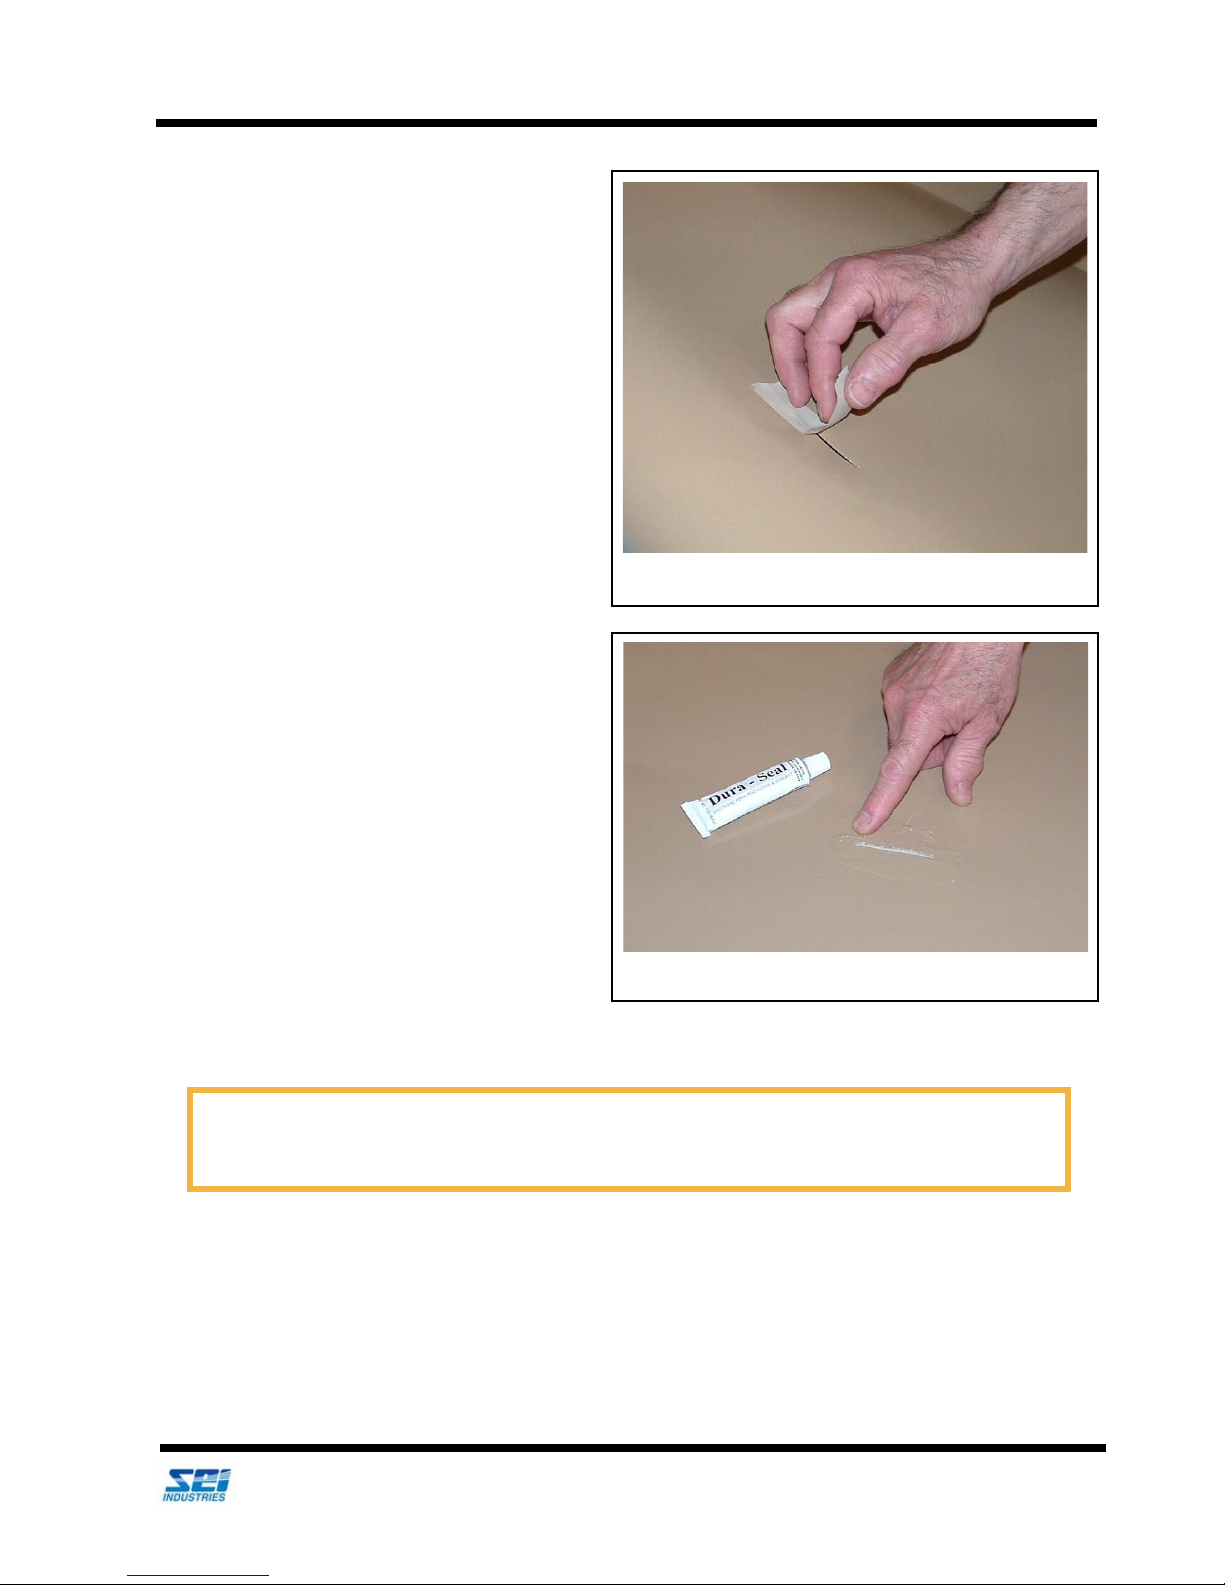
Apply masking tape on the backside of tear.
Squeeze glue around tear and spread with fingers.
Important Note
Allow repair to harden for 24 hours at room temperature before using the item.
1. Fill the weight bag with water prior to
beginning repairs.
2. Clean the area to be repaired with an
abrasive pad dampened with solvent.
Remove all traces of masking tape, if
previously used. If possible, place a
piece of masking tape on the back side of
the item being repaired.
3. Paint the damaged area with glue. Use a
thick coat of glue, overlapping the edges
of the repair by 1" (25 mm). Be sure that
the edges are well coated. A damaged
coating should be given two coats of
glue. Apply the second coat within four
hours of the first coat.
Repairs
We Engineer Solutions
2018 Insta-Berm (Frame) Operations Manual (Version D) 28
Page 33
Section 5: Maintenance
The damaged
area should
be supported
on a flat, solid
platform.
Repairs
Gluing with Patches
If liquid is escaping or there is dampness around the damaged area, the item must be drained. If the damaged
area is still dry, it will be possible to obtain a good bond without draining the item.
Any loose coating should be cut back with scissors. Trim to a point where there is a solid bond between the
reinforcing fabric or scrim and the coating.
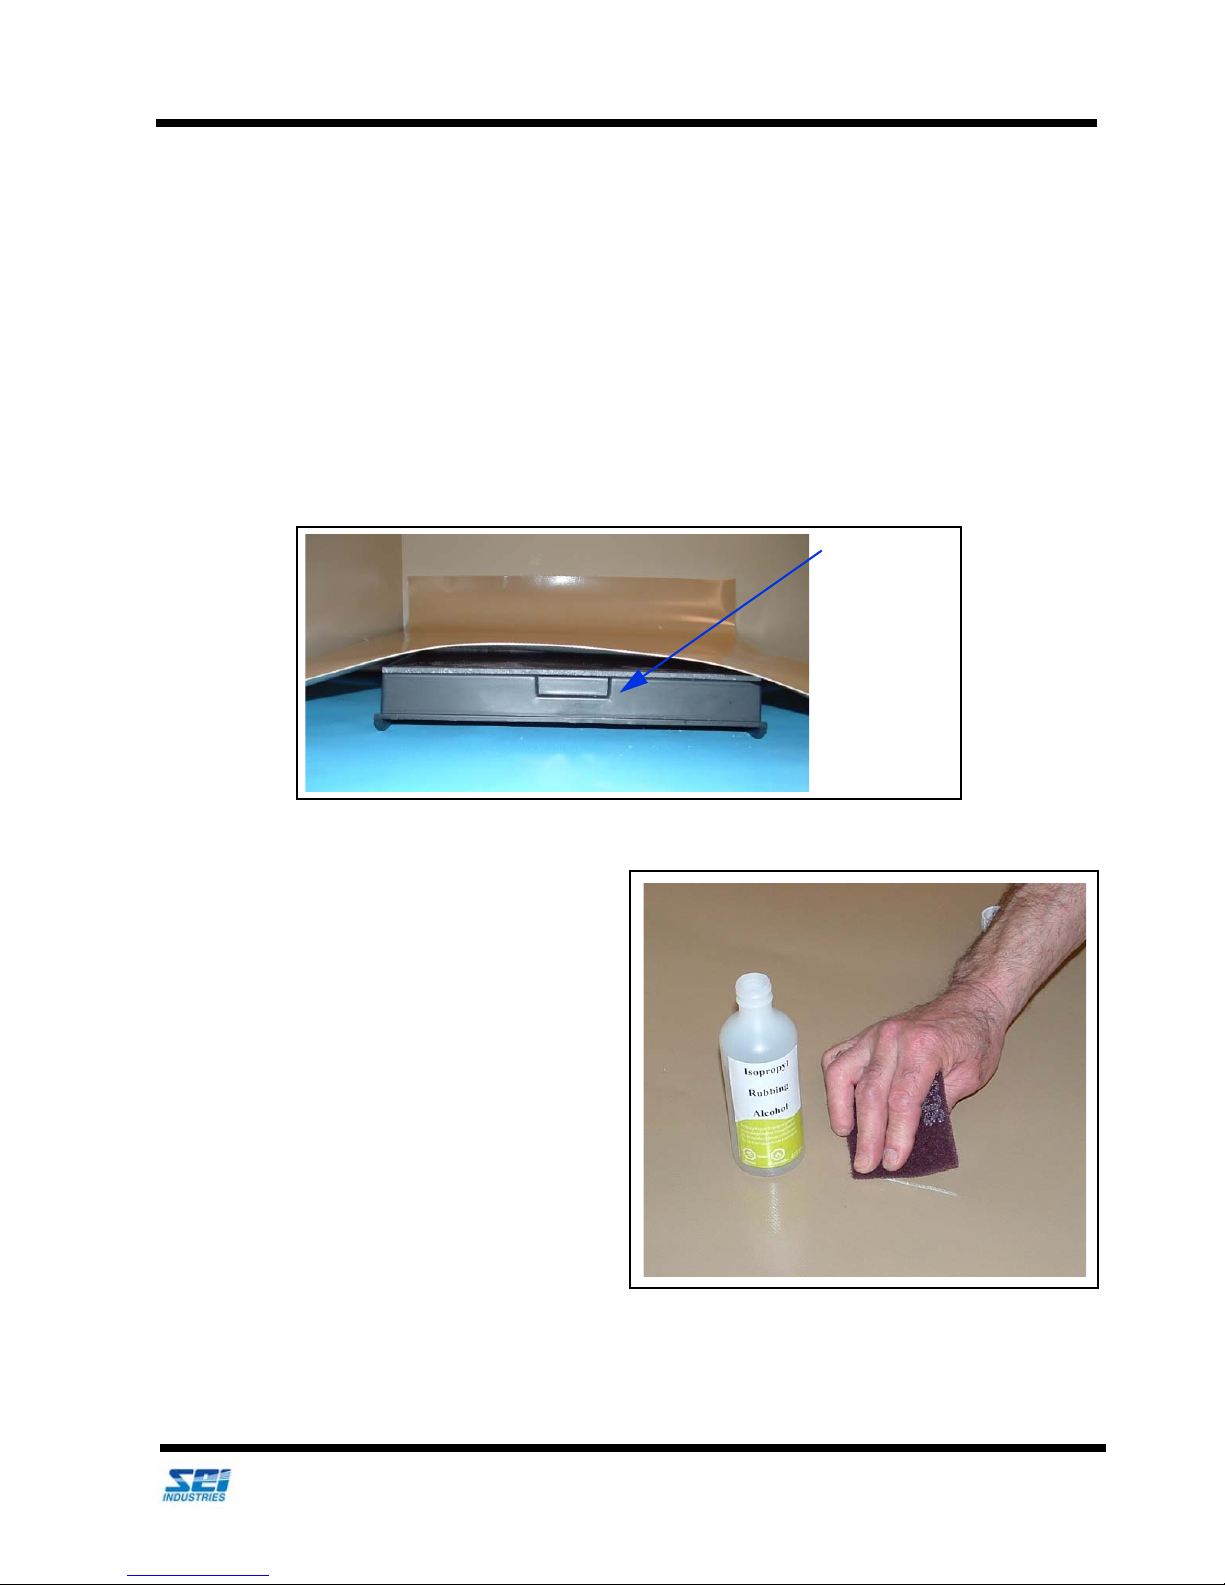
1. Support the damaged area on a flat, solid platform. If the item is drained, the damaged area should
be supported above the rest of the item. This allows residual liquid to drain away from the damaged area. This platform should be strong enough to support the fabric (flat) and allow the patch
to be rolled once it is in place.
2. Scrub the damaged area with an abrasive
pad dampened with solvent (isopropyl rubbing alcohol is recommended). Scrub vigorously to remove the cured surface. The
area should be clean and dry with a dull
matte finish.
We Engineer Solutions
2018 Insta-Berm (Frame) Operations Manual (Version D) 29
Page 34
Section 5: Maintenance
Caution
Solvent will damage the fabric if too much is used or if the fabric is left exposed to solvent residue.
The color of patch will vary, depending on the
product repair kit.
Repairs
3. Wipe with a rag, dampened with solvent, to remove any residue from cleaning. Check to see if the
area is totally clean and all coated surfaces and edges are dull. If not, repeat the cleaning. This is
critical for a good glue bond.
Cutting the Patch
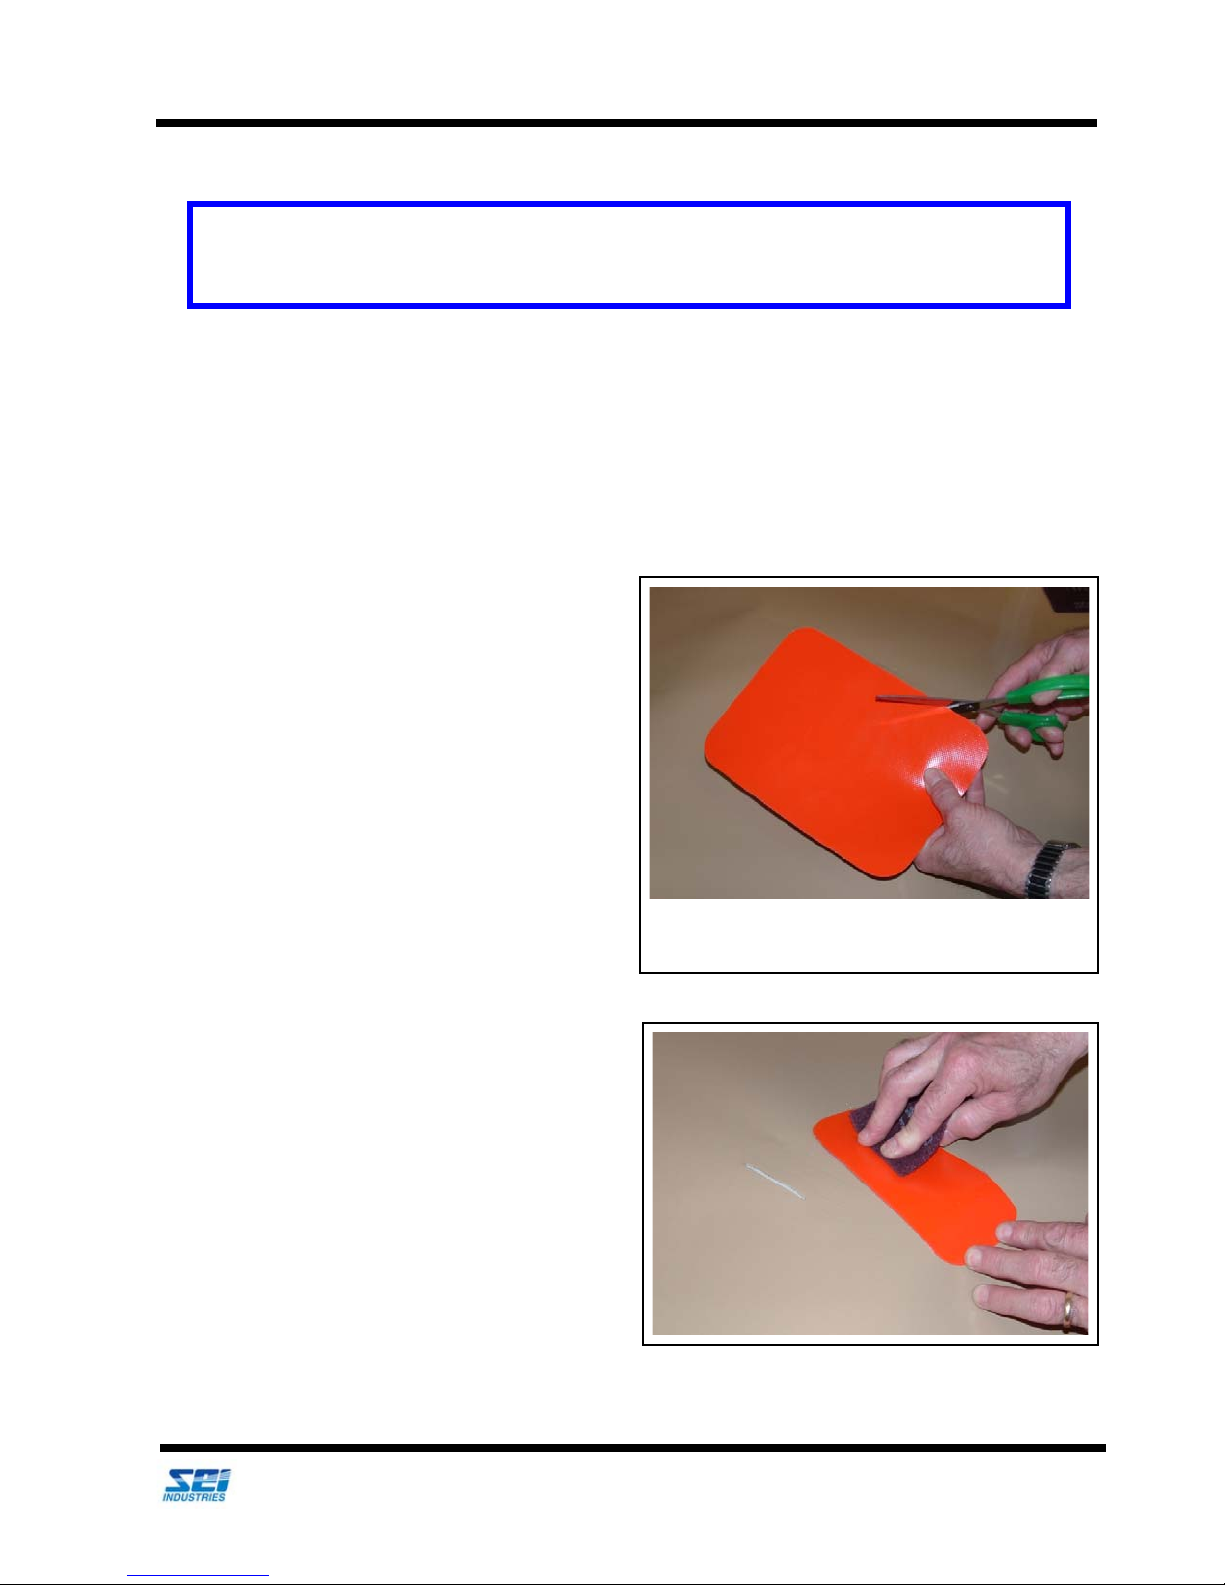
1. Cut a patch. The patch should be at least 2"
(50 mm) larger in every direction from the
damaged area. A round patch is recommended but, if a rectangular patch covers
the damage better, then round all corners.
2. Clean the patch by scrubbing with a pad
dampened with solvent. Rub vigorously to
remove the gloss from the fabric. Clean
both sides of the patch, as it is easy to get the
patch turned over during installation. The
patch should also be cleaned on the outside
since it will be painted with glue later.
We Engineer Solutions
2018 Insta-Berm (Frame) Operations Manual (Version D) 30
Page 35
Section 5: Maintenance
Repairs
Applying the Patch
1. Apply the Dura-Seal glue to the patch and damaged area. Wait 30 minutes (at 75 deg. F or 22 deg.
C) for some of the solvent to evaporate from the glue. The glue should become thicker but still be
quite wet. If it has been allowed to dry too long, give both sides another thin coat. If the glue has
dried too long, it will be difficult to avoid entrapping air bubbles in the bonded joint.
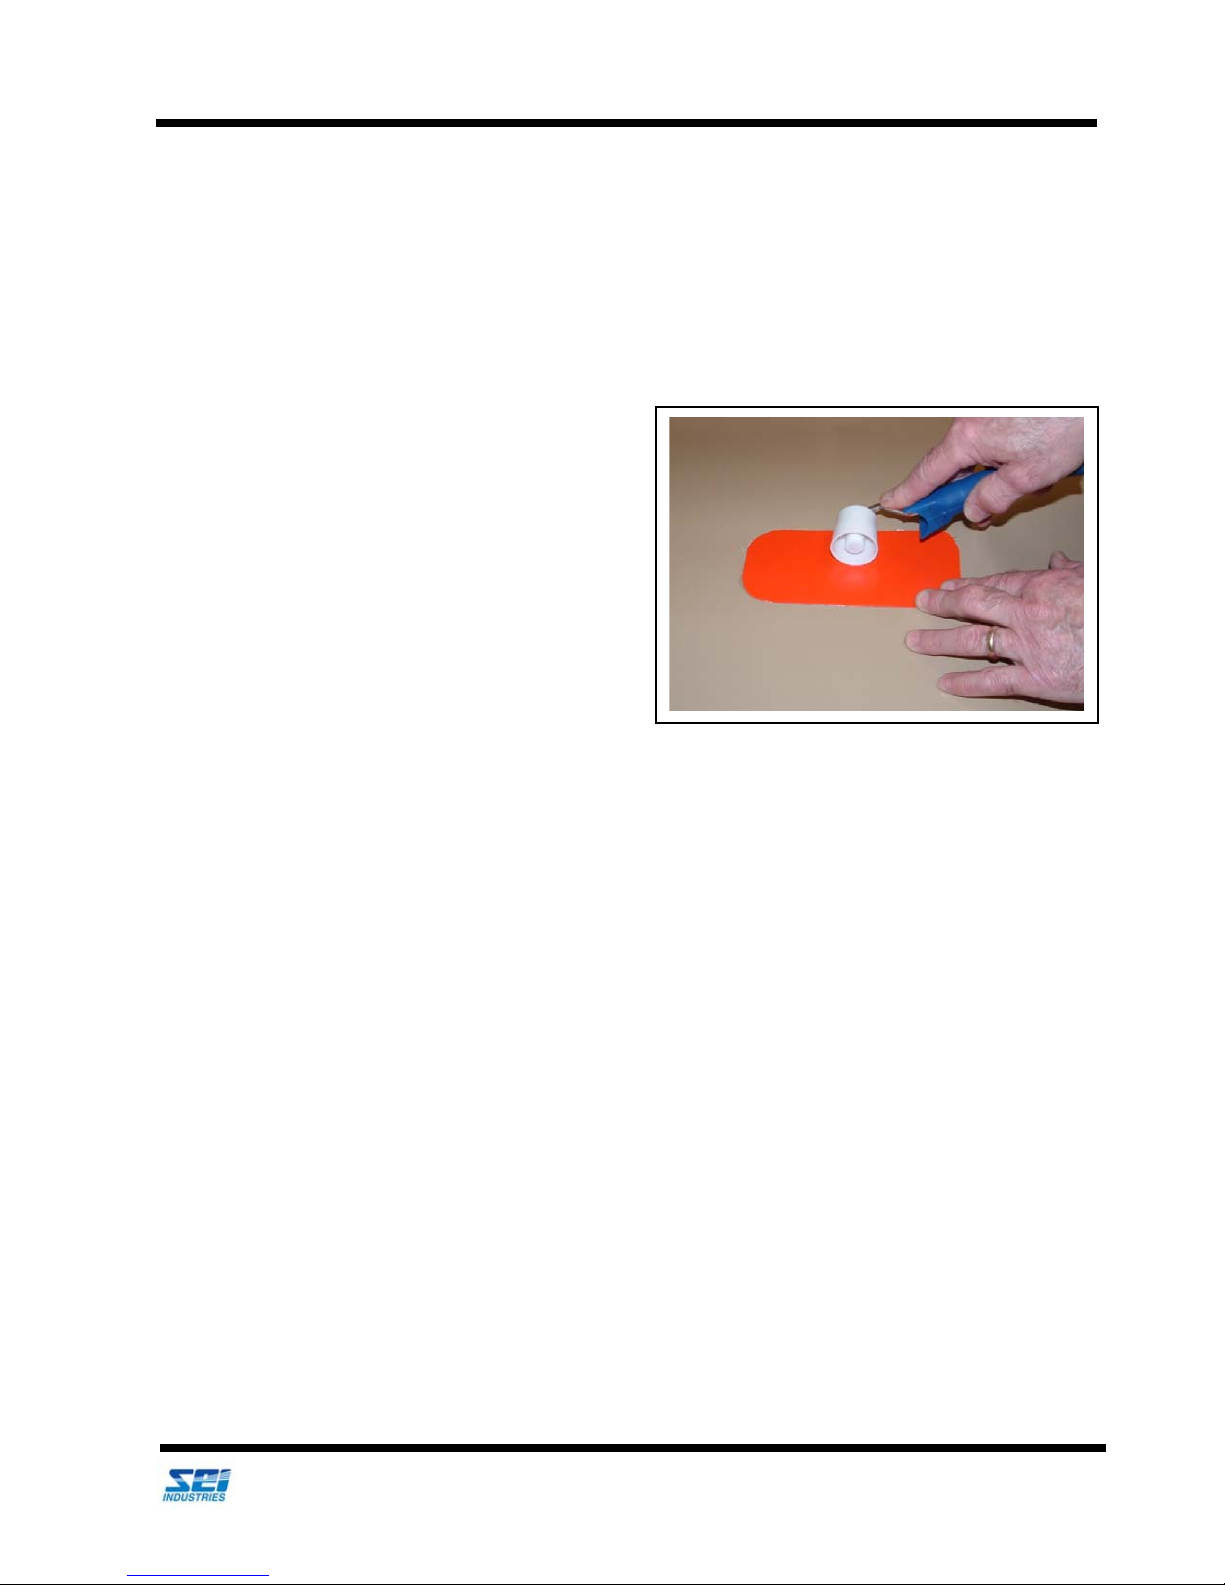
2. Place the patch and roll it down with the
roller. Place the centre of the patch down
first, then roll it out towards the edges with
the roller. This expels trapped air. Once the
patch is rolled down, do not let it lift up. This
will prevent air from getting under the patch
which causes a weak bond.
3. If the item is sloped during the repair, tape the patch in place while holding it down. This stops the
patch from sliding away from the damaged area.
4. Weight the patch down. Place a plastic cover sheet over the patch followed by a weight bag for 12
hours at room temperature. The item can then be moved but should not be filled until the glue has
cured for 24 hours. The weight should hold the patch tight against the item while the glue sets.
The plastic cover sheet will prevent the glue from sticking to the weight bag.
5. If the patch will be subjected to abrasion after 24 hours, paint over the patch with glue. Painting
the patch also provides protection from ultra violet light and weather. Allow the bond to harden
for 24 hours at room temperature before using the item.
We Engineer Solutions
2018 Insta-Berm (Frame) Operations Manual (Version D) 31
Page 36
Section 5: Maintenance
Warning
Loctite 495 carries the following warning: Irritating by inhalation. Eye irritant. Combustible
liquid. Contains cyanoacrilate ester which may cause allergic skin reactions. Skin contact through
clothing may cause burns. Use adequate ventilation in case of eye or body contact. Flush with
water. Get medical attention for eye or internal contact.
Repairs
Using Other Glues
If you do not have any Dura-Seal available, there are two other glues that can be used and are typically easy
to purchase locally.
1. Loctite 495 can be used on Chem-Shield fabric to provide a quick patch repair but it will make a
long term repair difficult at a later date as all 495 glue must be removed before applying DuraSeal.
2. The other glue option is 3M’s 420 glue which has the advantage of creating a more permanent
repair. If using this glue, follow the same instructions in this manual as for Dura-Seal adhesive.
We Engineer Solutions
2018 Insta-Berm (Frame) Operations Manual (Version D) 32
Page 37
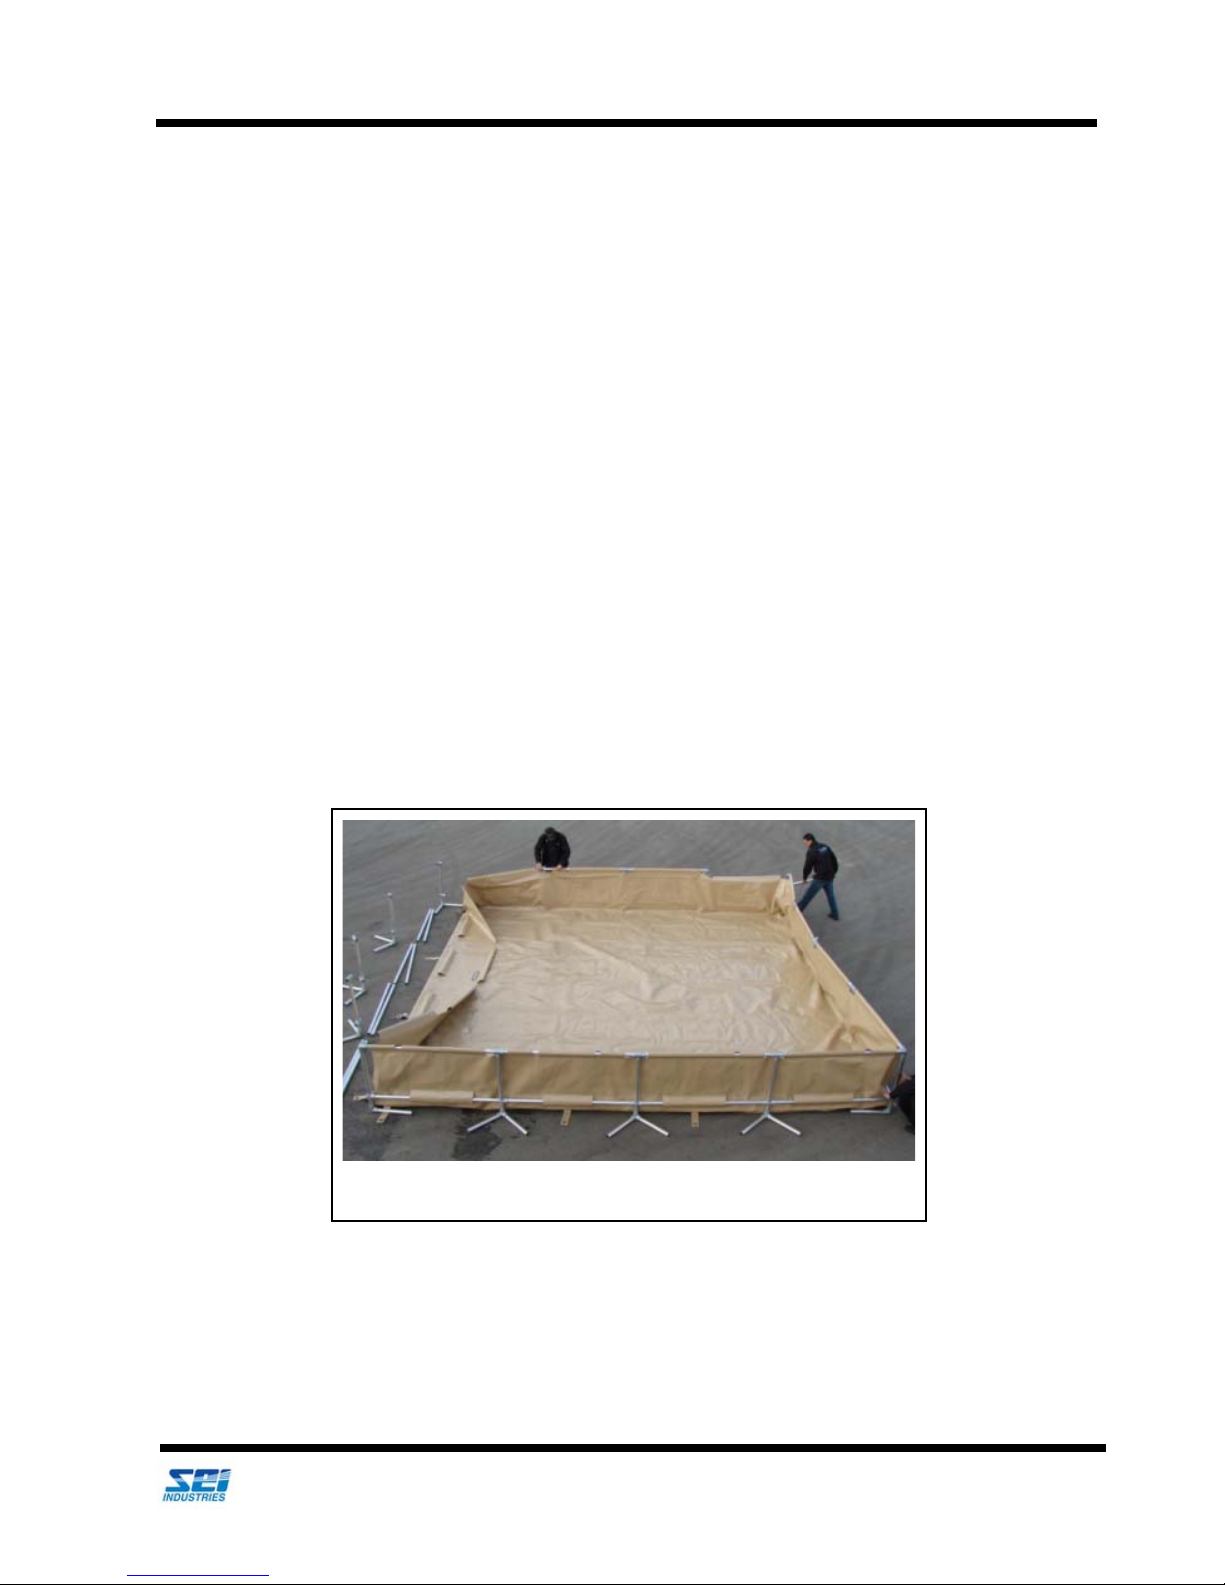
Section 6: Packing and Storage
Removing rails from posts.
Repacking, Shipping and Storage
Section 6: Packing and Storage
Repacking, Shipping and Storage
Repacking the Insta-Berm System
The following procedure is recommend for folding a liner:
1. Empty all liquids from the liner.
2. Clean the berm liner with a pressure washer using a mild soap and water solution through the
RainDrain system. Allow the berm liner to dry completely.
3. Remove all rails from the posts and the liner pockets.
We Engineer Solutions
2018 Insta-Berm (Frame) Operations Manual (Version D) 33
Page 38
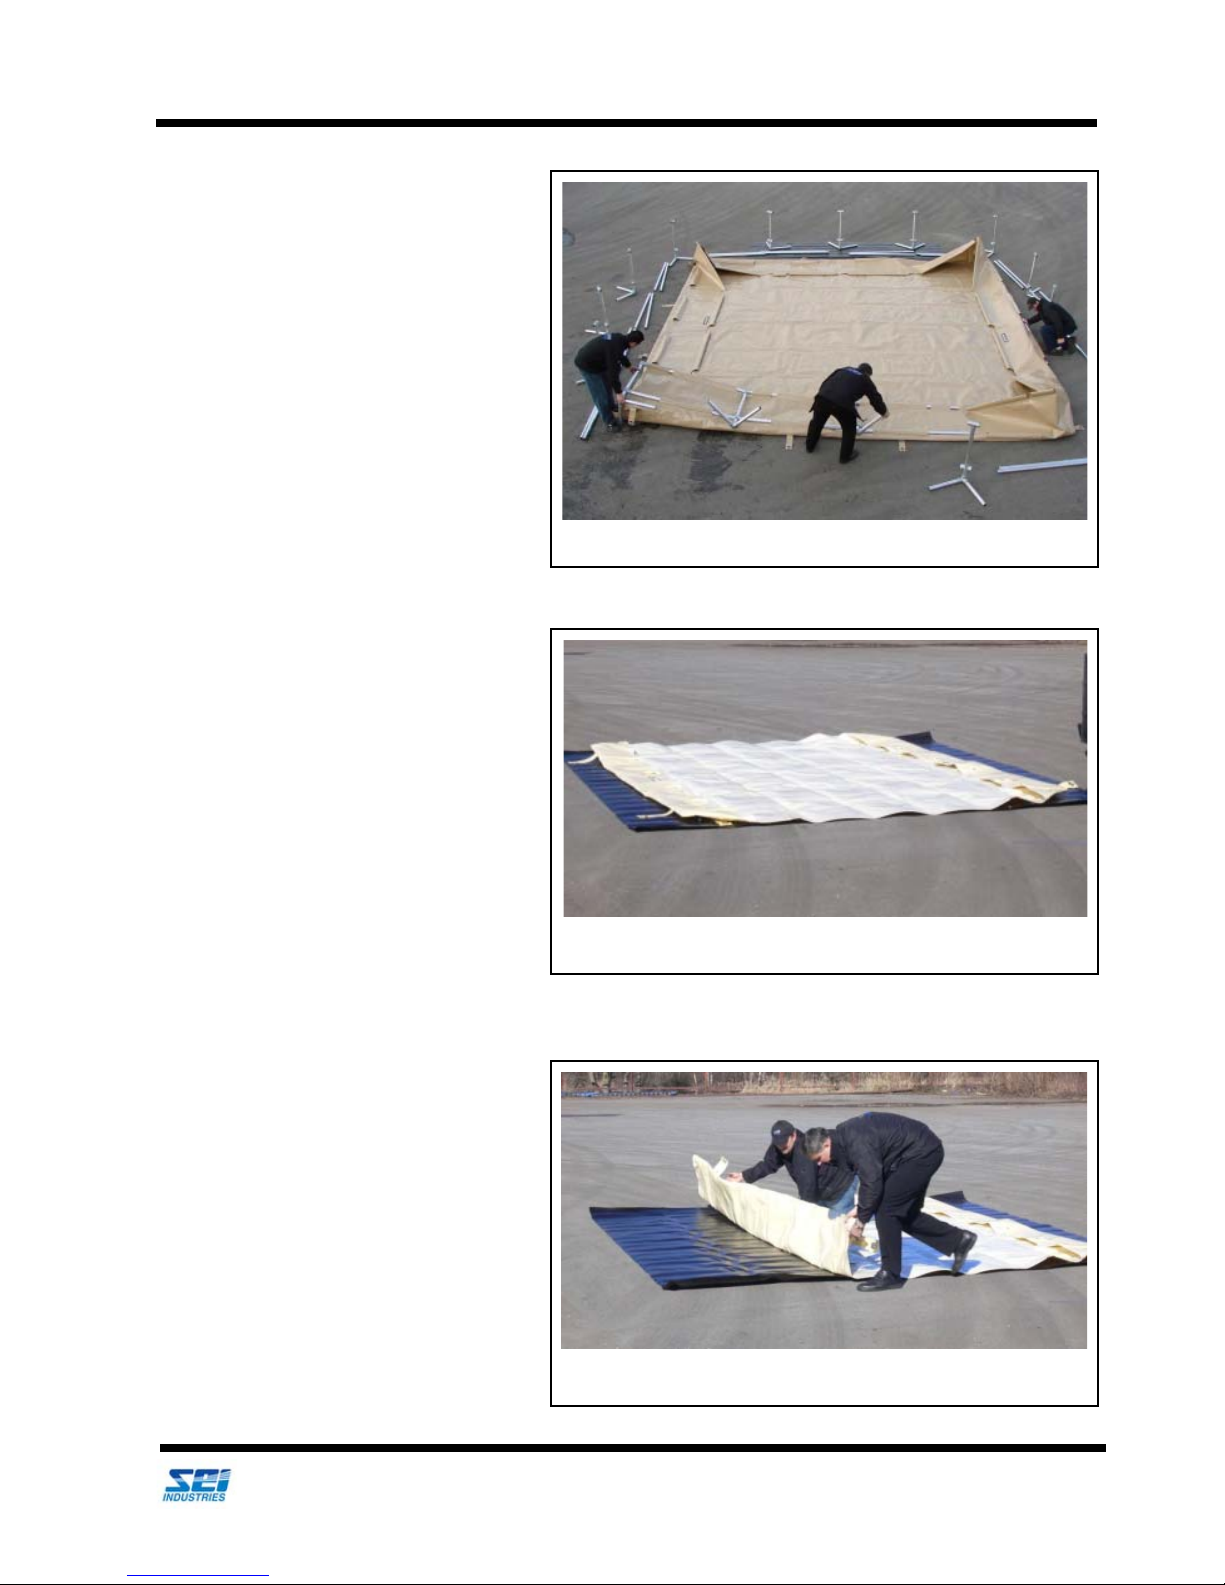
Section 6: Packing and Storage
Sides collapsed towards the centre.
Berm liner laid flat.
Folding the berm liner.
4. Collapse the sides towards the
centre. Remove all rails and
posts from the area.
5. Ensure the berm liner is completely flat.
Repacking, Shipping and Storage
6. Begin folding the berm liner as
shown.
We Engineer Solutions
2018 Insta-Berm (Frame) Operations Manual (Version D) 34
Page 39
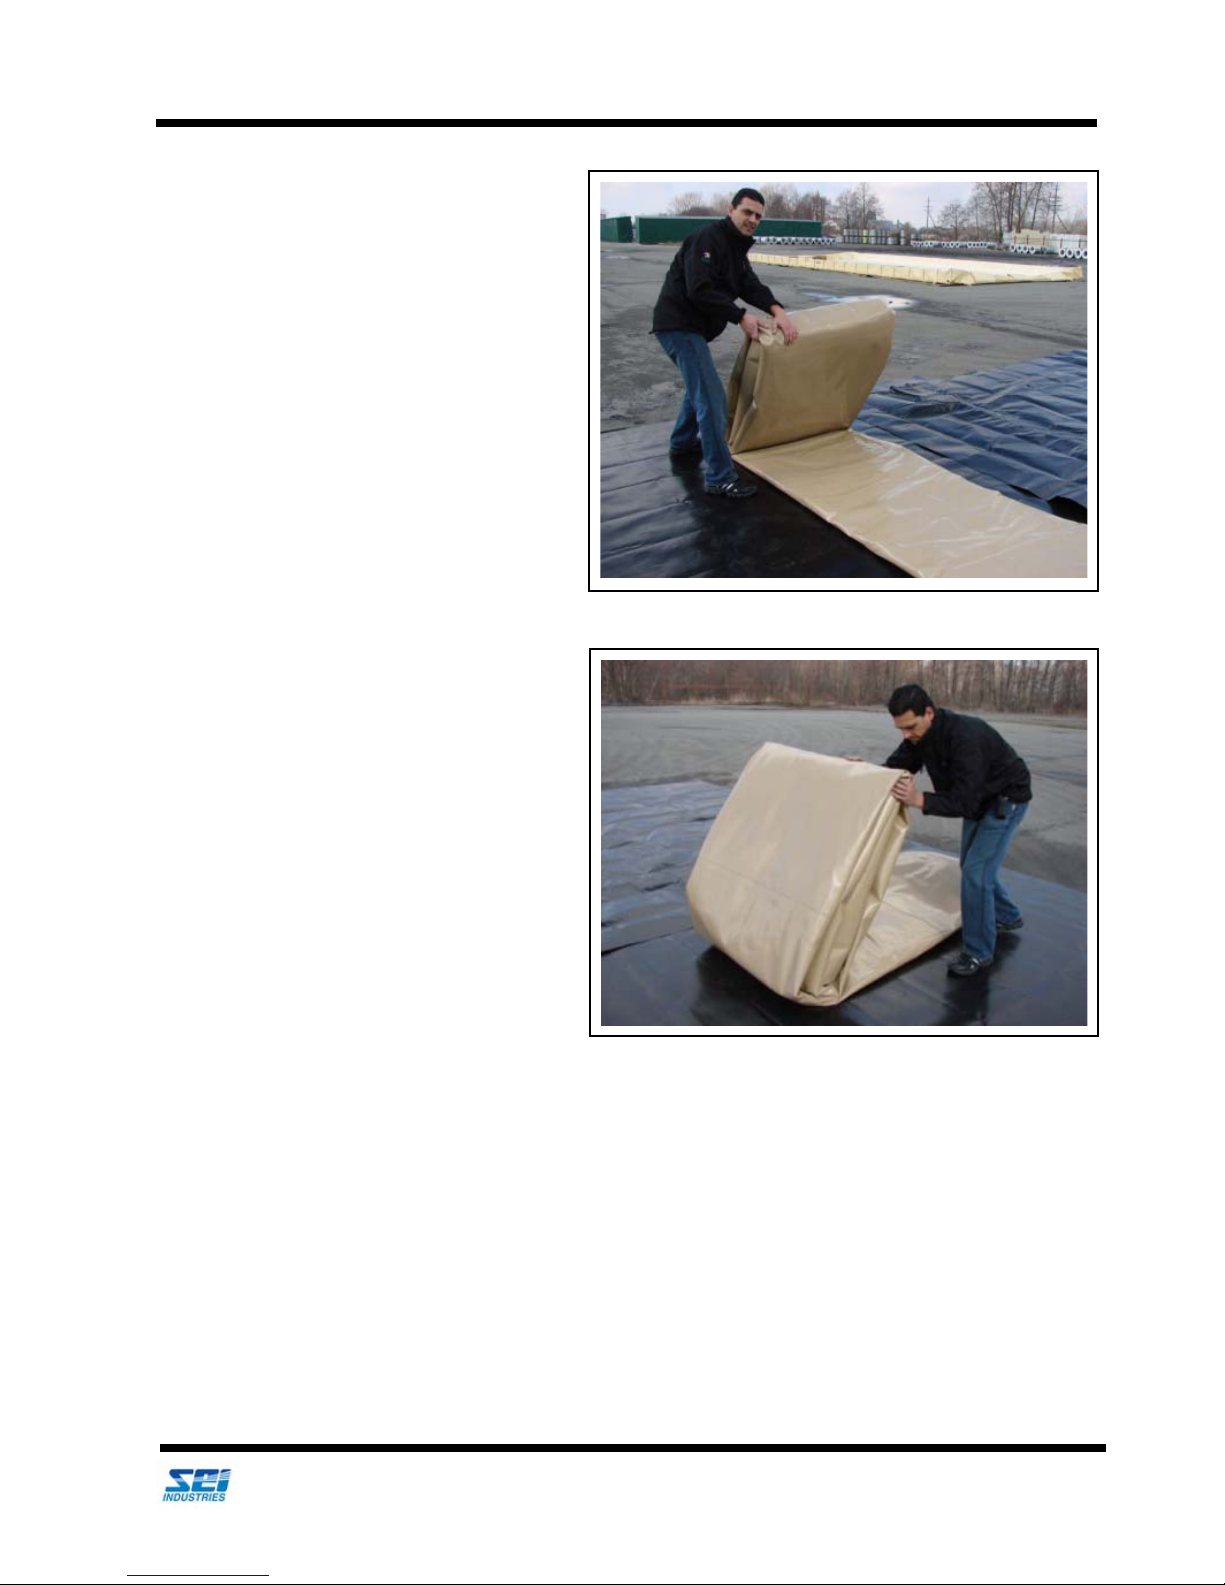
Section 6: Packing and Storage
7. Continue folding the berm liner as
shown.
8. Finished folding procedure.
Repacking, Shipping and Storage
We Engineer Solutions
2018 Insta-Berm (Frame) Operations Manual (Version D) 35
Page 40
Section 6: Packing and Storage
Warning
Do not pack and ship containers with fuel residue inside.
Important Note
If hazardous chemicals were stored, there may be restrictions on the method in which the berm can
be transported. Please contact your local carriers to determine how to transport your liner safely.
Shipping Instructions
Repacking, Shipping and Storage
To minimize the risk of damage, the Insta-Berm system should be shipped in its original crate or in an
equivalent sturdy, well padded crate.
Storing the Insta-Berm System
For the best storage life, the system should be stored inside the carrying bag or shipping crate in a cool, dry
location that is out of direct sunlight.
We Engineer Solutions
2018 Insta-Berm (Frame) Operations Manual (Version D) 36
Page 41
Section 7: Specifications and Parts
Section 7: Specifications and Parts
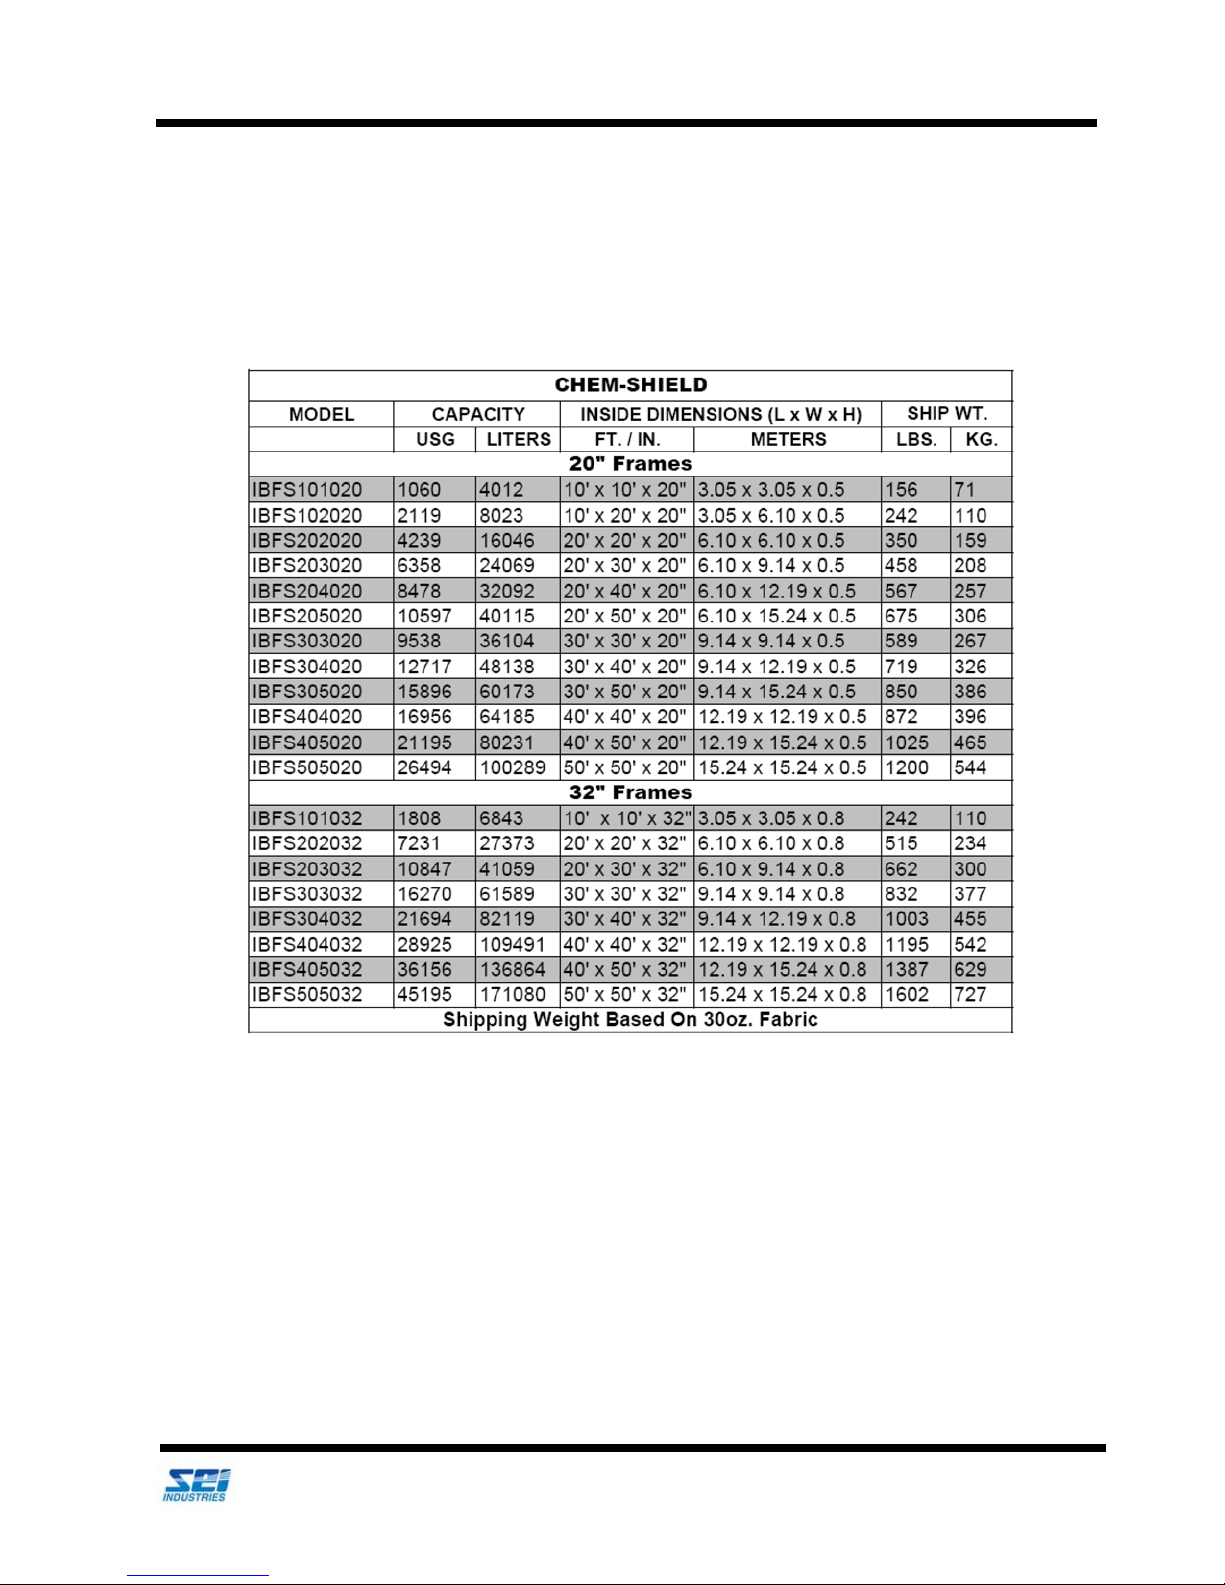
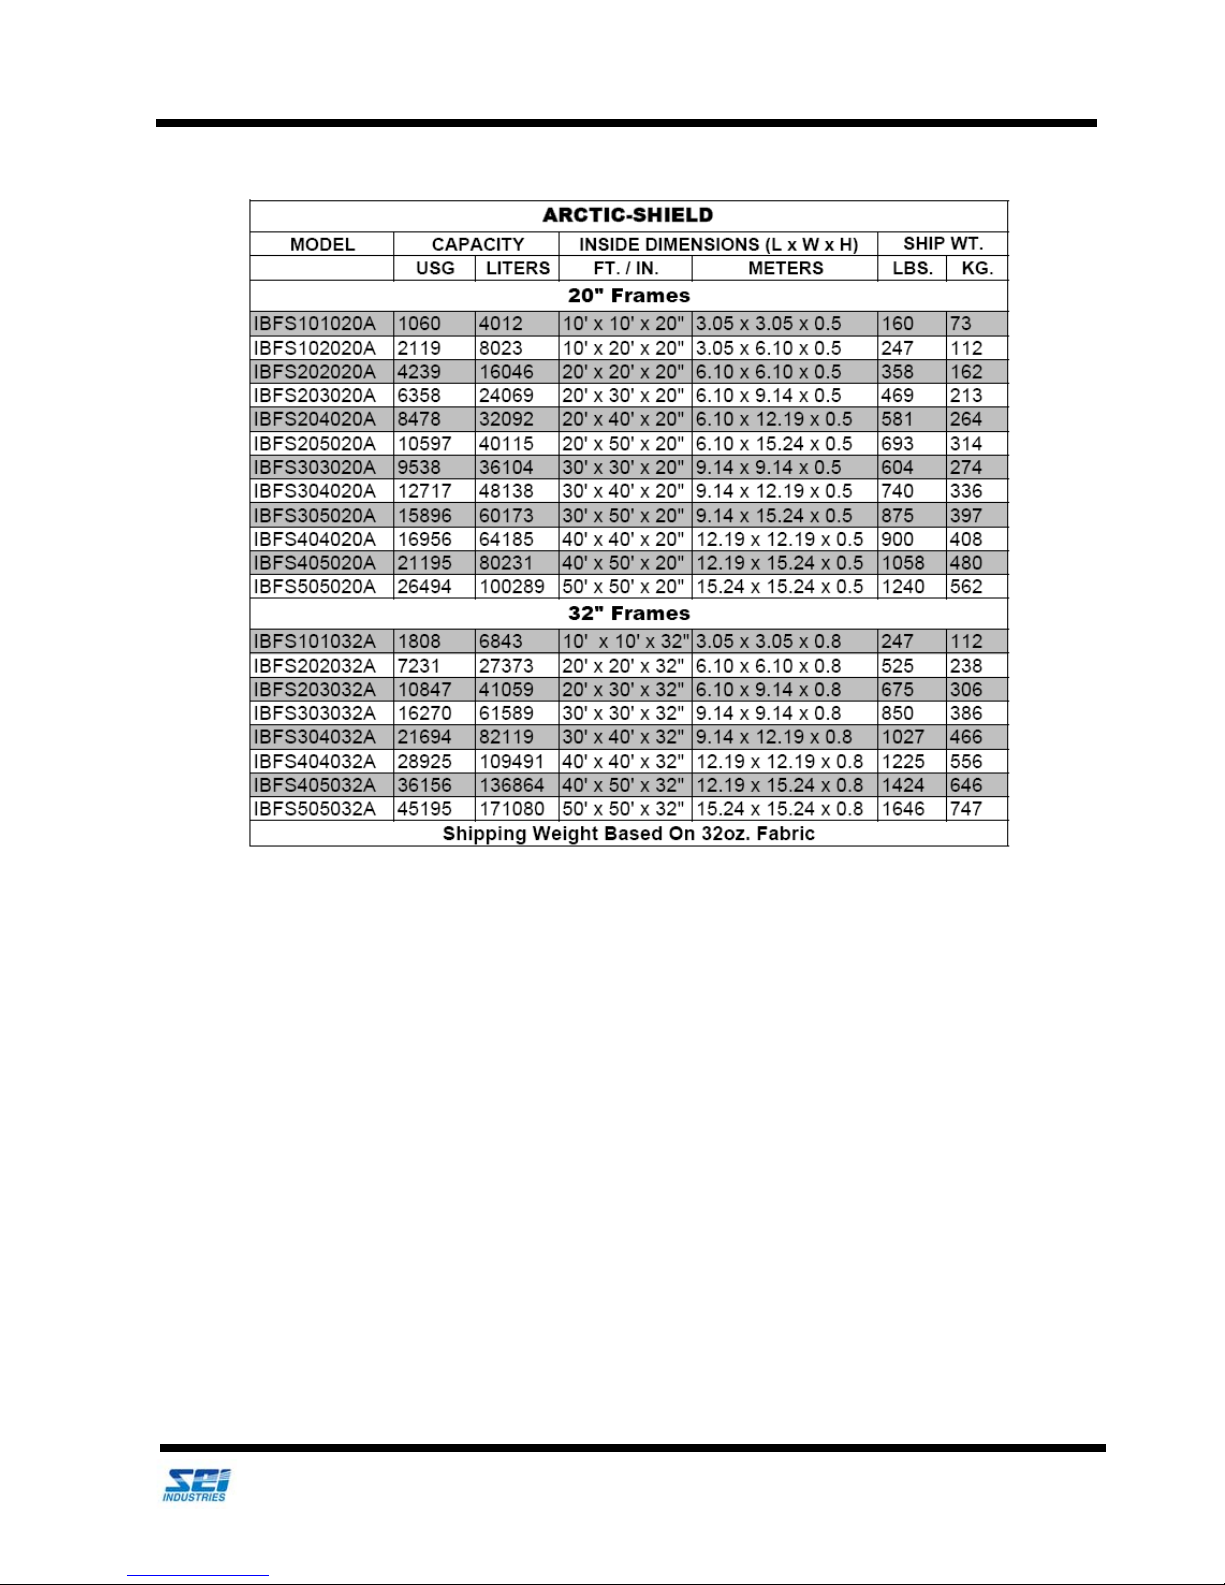
Specifications
Specifications
We Engineer Solutions
2018 Insta-Berm (Frame) Operations Manual (Version D) 37
Page 42
Section 7: Specifications and Parts
Specifications
We Engineer Solutions
2018 Insta-Berm (Frame) Operations Manual (Version D) 38
Page 43
Section 7: Specifications and Parts
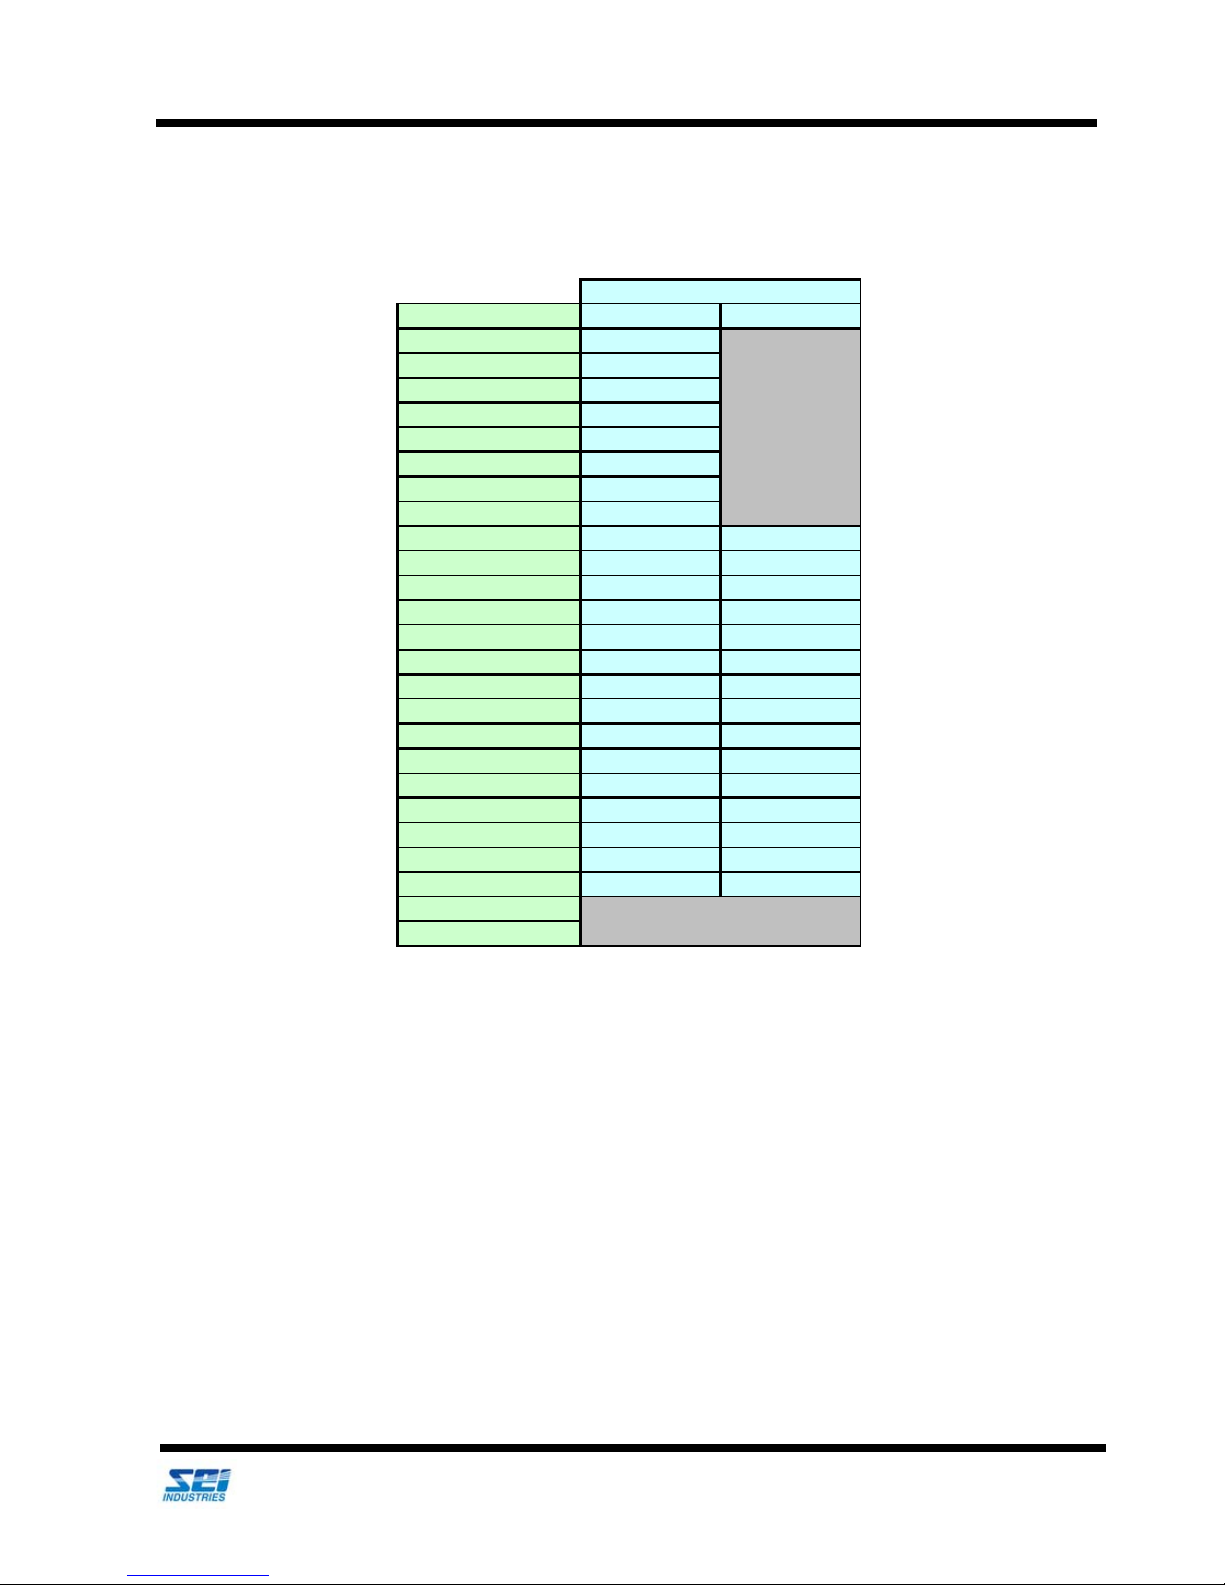
1000 USG IBFS202020
1200 USG IBFS202020
1500 USG IBFS202020
1800 USG IBFS202020
2000 USG IBFS202020
2400 USG IBFS202020
2500 USG IBFS202020
3000 USG IBFS202020
3600 USG IBFS202020 IBFS202032
4000 USG IBFS203020 IBFS202032
4800 USG IBFS203020 IBFS203032
5000 USG IBFS203020 IBFS203032
6000 USG IBFS303020 IBFS203032
7500 USG IBFS303020 IBFS303032
9000 USG IBFS304020 IBFS303032
10000 USG IBFS304020 IBFS303032
12000 USG IBFS404020 IBFS303032
15000 USG IBFS404020 IBFS304032
18000 USG IBFS405020 IBFS304032
20000 USG IBFS505020 IBFS404032
24000 USG IBFS505020 IBFS404032
25000 USG IBFS606020 IBFS404032
30000 USG IBFS606020 IBFS405032
48000 USG
50000 USG
FRAME BERM
Terra Tank to Frame Insta-Berm Cross Reference Chart
TANK CAPACITY 20" 32"
Specifications
We Engineer Solutions
2018 Insta-Berm (Frame) Operations Manual (Version D) 39
Page 44
Section 7: Specifications and Parts
Important Note
It is the responsibility of the dealer and end user to ensure that the importation of glue is allowed
in the country of use.
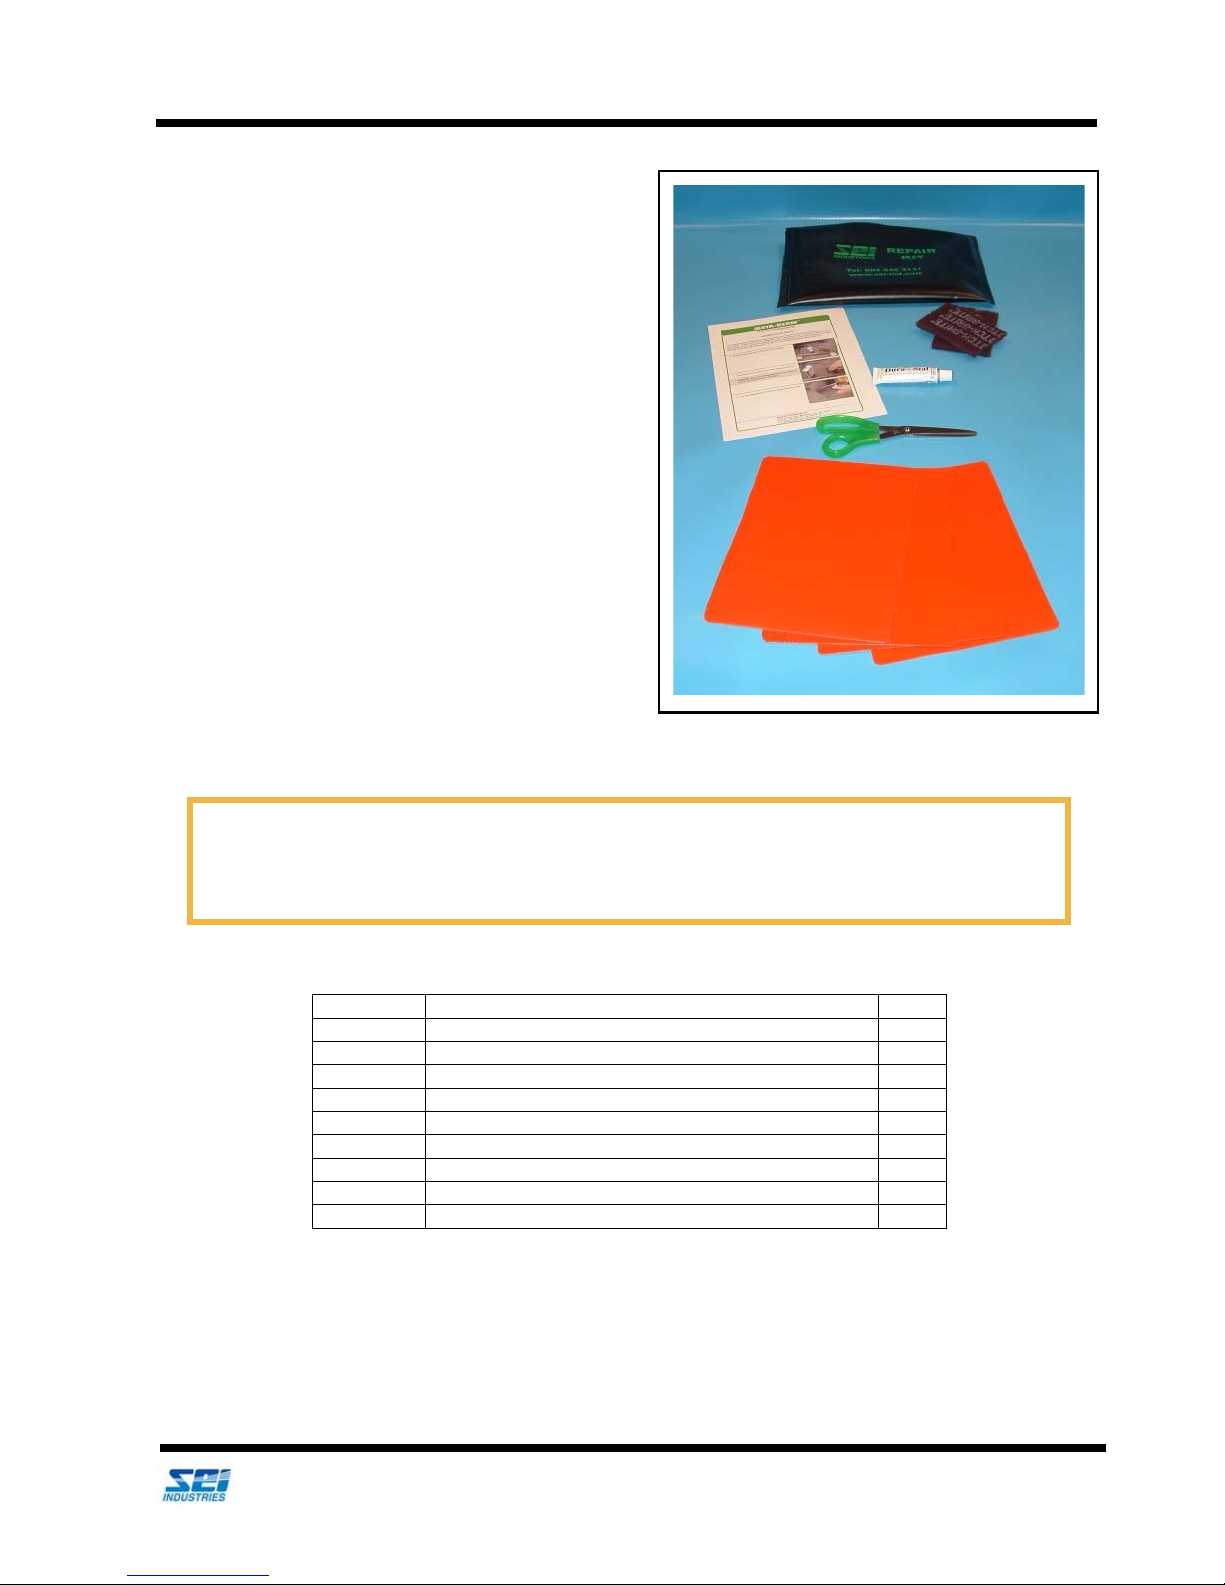
PART # DESCRIPTION QTY.
REPM102 FABRIC REPAIR FLYER 1
REPP001 POUCH FOR REPAIR POCKET 1
PP504 ABRASIVE PAD 2
PP525 ADHESIVE, DURA-SEAL 1 oz. (see note above) 1
PP513 SCISSORS 1
REPP140 REPAIR PATCH FOR CHEM GUARD 24 OZ 3
REPP120 REPAIR PATCH FOR CHEM GUARD 30 OZ 3
REPP142 REPAIR PATCH FOR PETROSHIELD 3
REPP150 REPAIR PATCH FOR TEMPSHEILD 3
Repair Kits
Mini Repair Pocket Kit REPKM002
Mini Repair Pocket Kit REPKM002NG (no glue)
Repair Kits
We Engineer Solutions
2018 Insta-Berm (Frame) Operations Manual (Version D) 40
Page 45
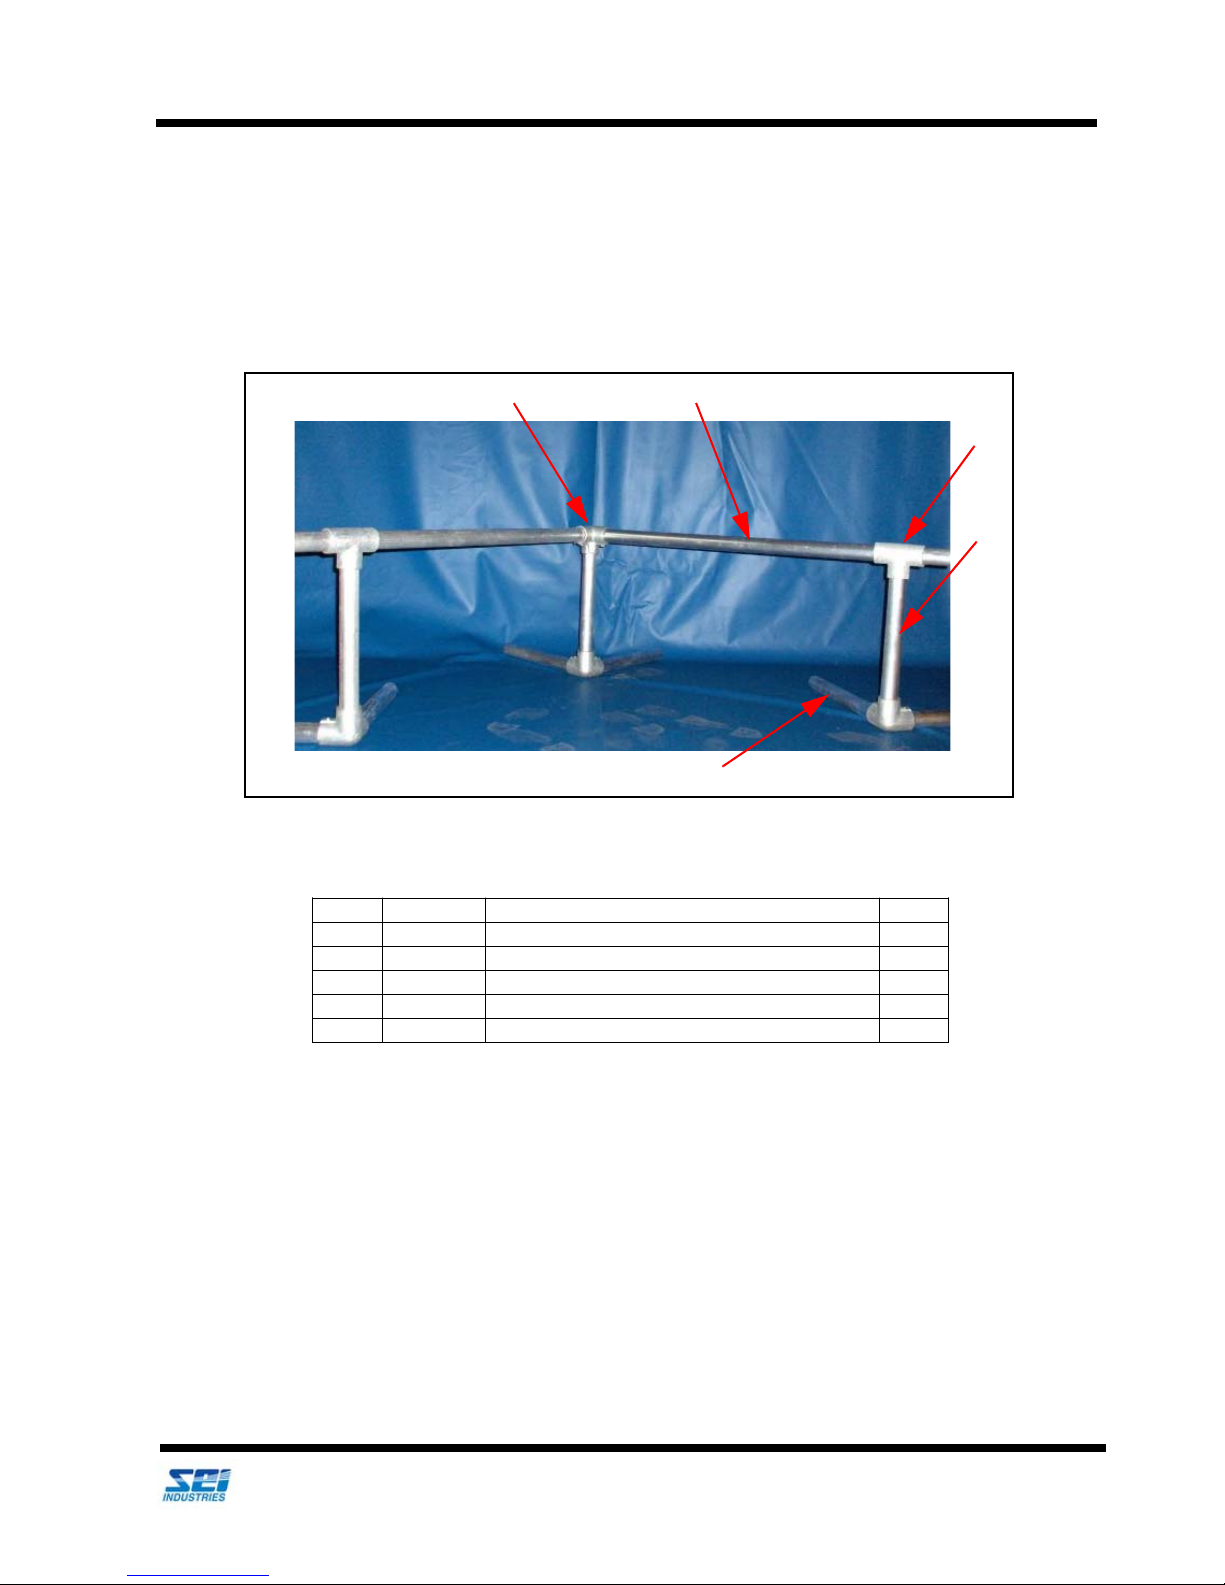
Section 7: Specifications and Parts
1
2
3
4
5
ITEM PART # DESCRIPTION QTY.
1 IBMF001 Fitting elbow 3 way 90 degrees Galv. 1 ½” 1
2 IBMF044 Rail section 1 ½” x 58” Alum. 1
3 IBMF002 Fitting long tee Galv. 1 ½” 1
4 IBMF033 Corner or side post 1 ½” x 18 ¾” Alum. 1
5 IBMF032 Foot tube 1 ½” X 15 7/8” 1
Parts List
20" High Berms
Parts List
We Engineer Solutions
2018 Insta-Berm (Frame) Operations Manual (Version D) 41
Page 46
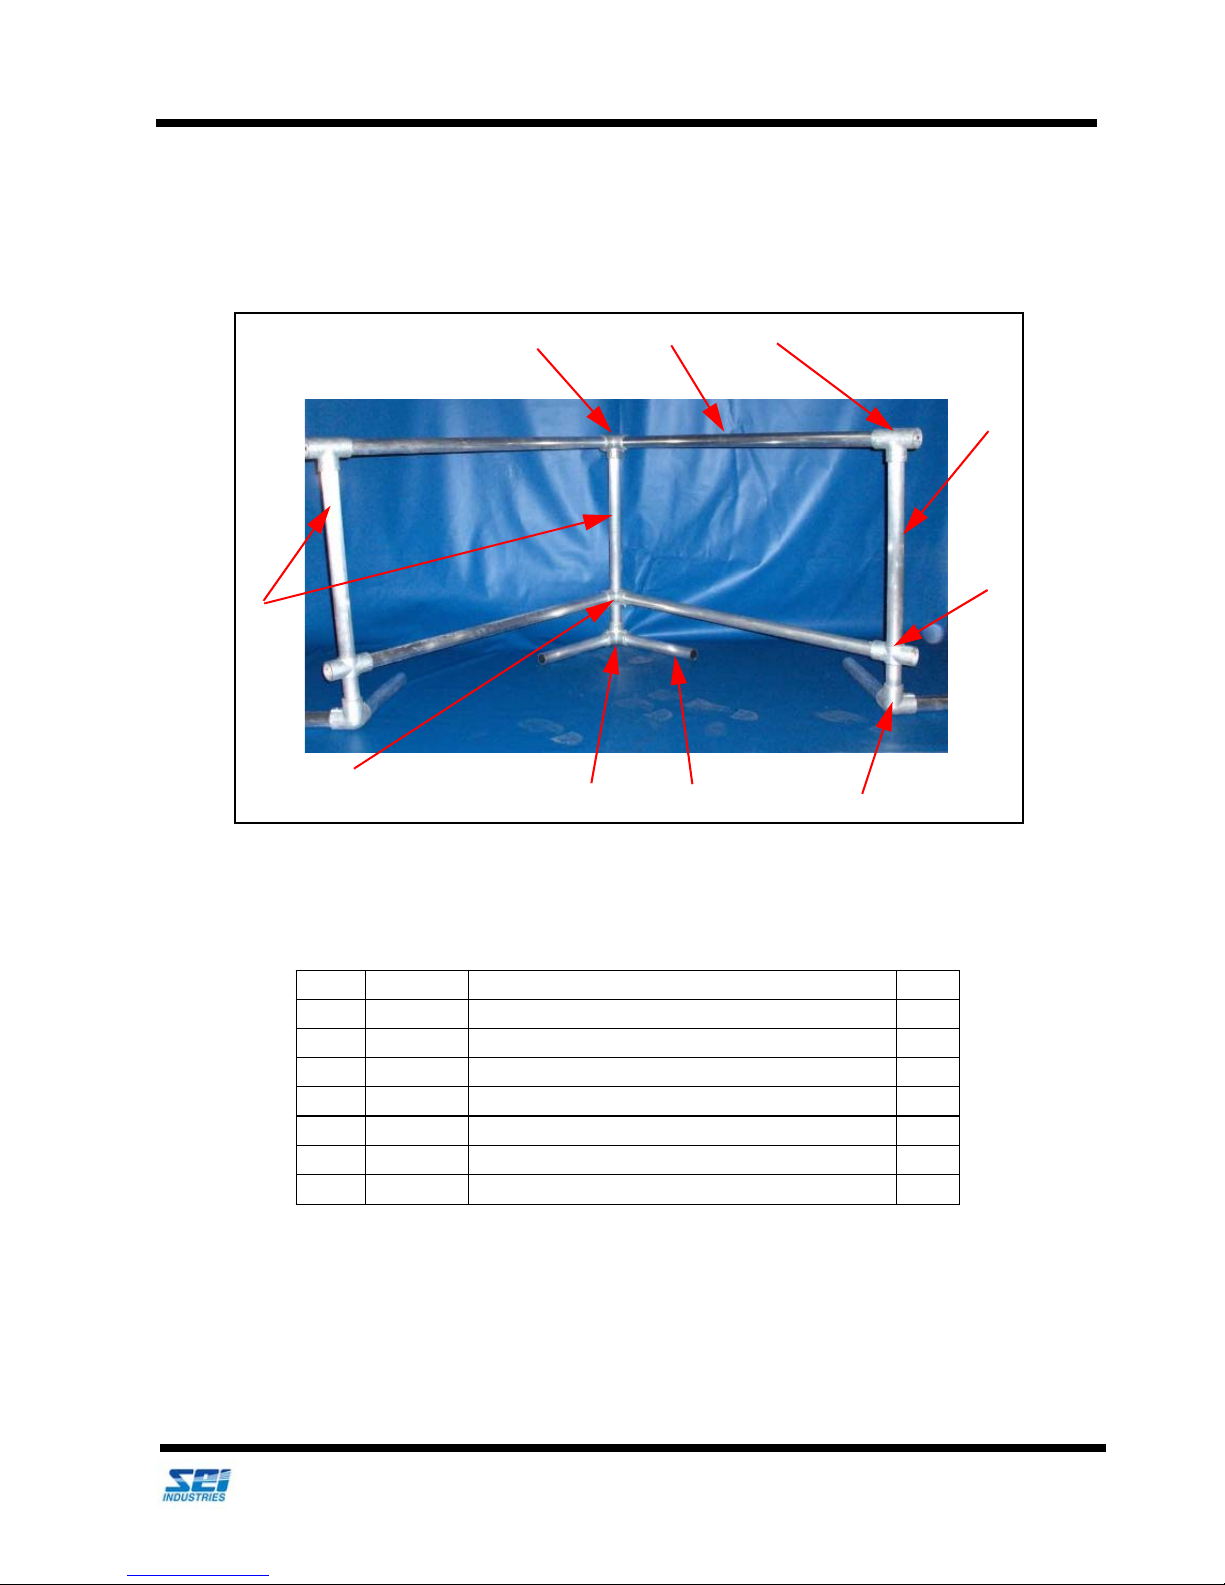
Section 7: Specifications and Parts
1
2
3
4
5
1
6
1
7
4
ITEM PART # DESCRIPTION QTY
1 IBMF001 Fitting elbow 3 way 90 degrees Galv.1 ½” 1
2 IBMF044 Rail section 1 ½” X 58” Alum. 1
3 IBMF002 Fitting long tee Galv. 1 ½” 1
4 IBMF040 Corner or side post 1 ½” X 33 ½” Alum 1
5 IBMF011 Fitting cross straight 4 way Galv. 1 ½ 1
6 IBMF032 Foot tube 1 ½” x 15 7/8” Alum 1
7 IBMF010 Fitting side outlet 90 degrees 4 way Galv 1 ½” 1
32" High Berms
Parts List
We Engineer Solutions
2018 Insta-Berm (Frame) Operations Manual (Version D) 42
Page 47

Section 8: Warranty
Section 8: Warranty
a) Warranty is limited to repairing or replacing, at the company’s sole discretion, any product approved to
be defective.
b) The company’s products are not guaranteed for any specific length of time or measure of service, but are
warranted only to be free from defects in workmanship and material for a period of one year to the original
purchaser.
c) To the extent allowable under applicable law, the company’s liability for consequential, incidental and
environmental damages is expressly disclaimed. The company’s liability in all events is limited to and
shall not exceed, the purchase price paid.
d) This warranty is granted to the original purchaser and does not extend to a subsequent purchaser or
assignee.
e) The company must receive notification in writing of any claims of warranty from the original purchaser
which must give details of the claimed defect in the product.
f) Where the original purchaser is claiming under warranty, the product must be returned to the company for
inspection with all transportation and duty charges prepaid.
g) The warranty does not extend to any product that has been accidentally damaged, abraded, altered,
punctured, abused, misused or used for a purpose which has not been approved by the company.
h) This warranty does not apply to any accessories used with the product such as pumps, filters, hoses, etc.,
that are not supplied by the company, and any warranty on such accessories must be requested from the
manufacturer or dealer of the accessories.
i) In the event the original purchaser does not give notice of a warranty claim within one year of the original
purchase of the product, it is understood that the purchaser has waived the claim for warranty and the
purchaser and/or any subsequent purchaser must accept the condition of the product as it may be, without
warranty.
j) Any technical information supplied by the company regarding the product is not a condition of warranty
but rather is information provided by the company to the best of its knowledge.
k) There are no implied warranties nor is there any warranty that can be assumed from any representation
of any person, except the company itself.
Exclusions
This warranty is void if the product is not assembled, used and/or maintained in accordance with the
operator’s manual supplied by SEI.
We Engineer Solutions
2018 Insta-Berm (Frame) Operations Manual (Version D) 43
 Loading...