

Page 1

Table of Contents
Segway ES Series - 1!
Mi Electric Scooter - 15
Page 2

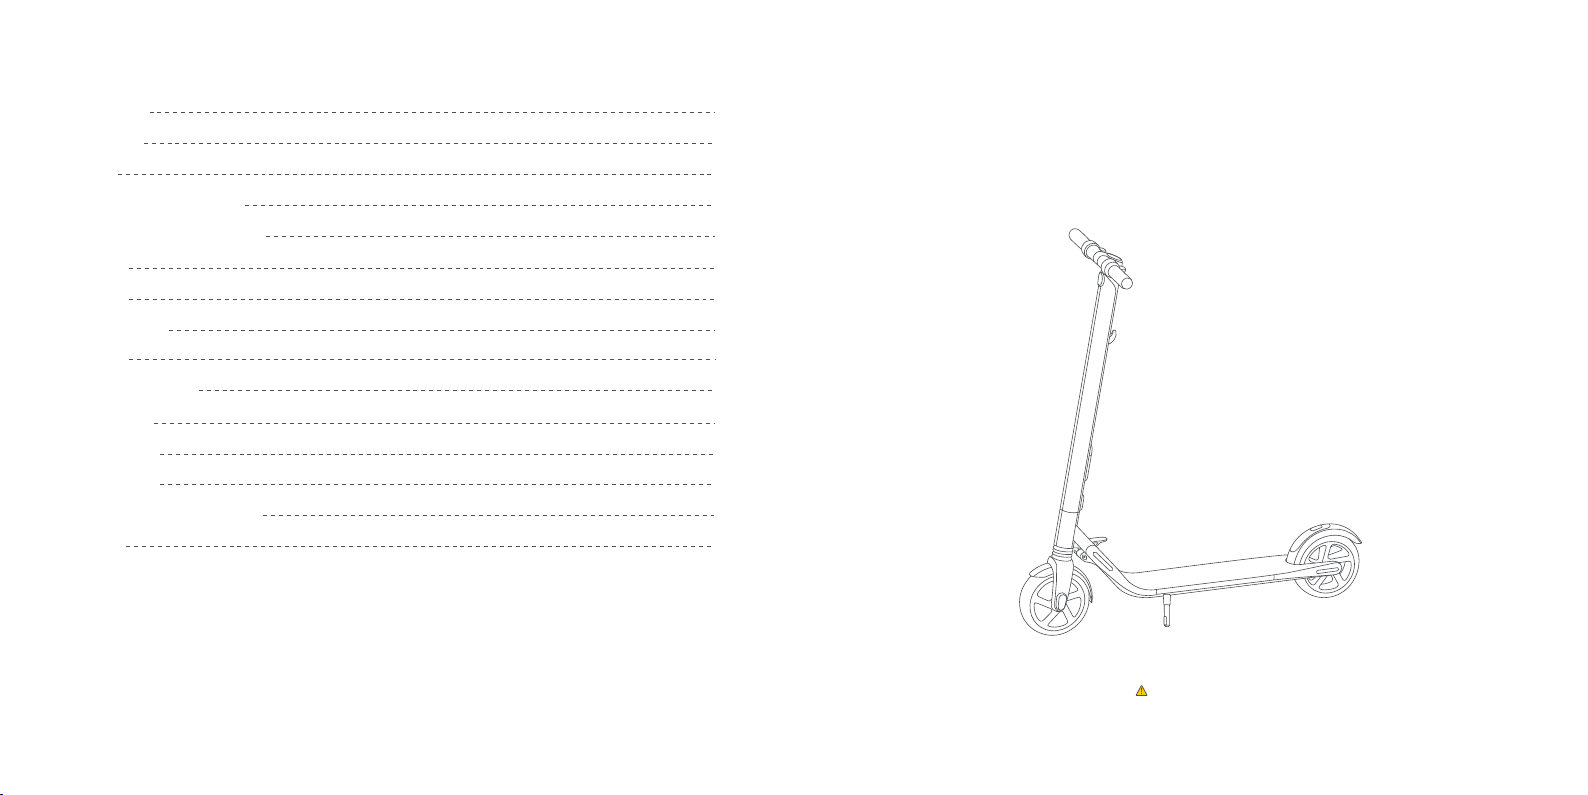
User Manual
ES series
The manufacturer reserves the right to make changes to the product, release firmware updates, and update this
manual at any time. Visit www.segway.com or check the App to download the latest user materials. You must install the
App, activate your KickScooter, and obtain the latest updates and safety instructions.
www.segway.com
25612-00001 aa
ANSI/CAN/UL-2272 certified; ANSI/UL 2271 certified
Visite www.segway.com para baixar o manual do usuário.
Original Instructions
Page 3
Contents Thanks for choosing the Ninebot KickScooter ES series!
1 Riding Safety
2 Packing List
3 Diagram
4 Assembling Your KickScooter
5 Installing a Second Battery Pack
6 First Ride
7 Charging
8 Learning to Ride
9 Warnings
10 Folding and Carrying
11 Maintenance
12 Specifications
13 Certifications
14 Tradem ark a nd Lega l Sta tement
15 Contact
02
04
05
06
07
08
09
09
11
15
16
17
18
20
21
Thanks for choosing the Ninebot KickScooter (hereinafter referred to as KickScooter)!
Yo u r K i c k S c o o t e r i s a f a s h i o n a b l e t r a n s p o r t a t i o n d e v i c e w i t h m o b i l e a p p , a l l o w i n g y o u t o c o n n e c t w i t h o t h e r r i d e r s .
Enjoy your ride and connect with riders world wide!
WARN ING !
Always use both electric brake and foot brake for emergency stopping. Otherwise you risk falls and/or
collisions from not achieving the max. braking capability.
01
Page 4

1 Riding Safety
1. The KickScooter is a recreational transporter. Before mastering riding skills, you need to practice. Neither Ninebot Inc. (means
Ninebot (Beijing) Tech Co., Ltd.and its subsidiaries and affiliates) nor Segway Inc. is responsible for any injuries or damage caused
by a ri der's inexpe rience or fa ilure to foll ow the instr uctions in this docum ent.
2. Please understand that you can reduce the risk by following all the instructions and warnings in this manual, but you cannot
elimi nate all the ris ks. Rememb er that whenever you ride the Kick Scooter you risk injury f rom loss of control , collisi ons, and falls.
When entering into public spaces always comply with the local laws and regulations. As with other vehicles, faster speeds require
longer braking distance. Sudden braking o n low tra ction su rfaces co uld lead to whee l slip, or falls. Be cautiou s and al ways keep a
safe distance between you a nd other people or vehicles wh en riding. Be alert and slow down when entering unfamiliar areas.
3. Al ways wear a helmet when ri ding. Use an approve d bicycle or skat eboard he lmet tha t fits p roperly w ith the chin stra p in pl ace, and
provide s protect ion for t he back of your h ead.
4. Do no t attempt your first ride in any area w here you might encounter c hildren, pedestr ians, pets, vehic les, bicycles, or other
obstac les and potentia l hazards.
5. Res pect ped estrians by always yieldin g the ri ght of w ay. Pass on t he left w henever p ossible. Wh en approa ching a pedestria n from
the f ront, stay to the r ight and slow dow n. Avoid star tling p edestrian s. When ap proaching from beh ind, anno unce your self and slow
down to walking speed when passing. Please obey local traffic laws and regulations if situation is different.
6. In places w ithout laws com ply with the sa fety guid elines o utlined in thi s manual . Neithe r Ninebo t Inc. no r Segway Inc. is responsib le
for any p roperty damage, pe rsonal injury/death, a ccidents, or le gal disputes ca used by viola tions of the safety instruc tions.
7. D o n o t a l l o w a n y o n e t o r i d e yo u r K i c k S c o o te r o n h i s / h e r ow n u n l e s s t h ey h a v e c a r e f u l l y r e a d t h i s m a n u a l a n d f o l l o w e d t h e N e w
Rider Tutor ial in the App. The safety of new rid ers is you r respons ibility. Assi st new ri ders unt il they are comfor table wi th the b asic
operat ion of t he Kick Scooter. Make sure each new rid er wears a helmet and oth er protec tive gear.
8. Before eac h ride check fo r loose fasteners and damaged com ponents. If the K ickScooter makes abnormal sound s or signals an
alarm, immediately stop riding. Diagnose your KickScooter via the Ninebot by Segway App and call your dealer/distributor for
service.
speed . Under n o circums tance sh ould you ride on roads wit h motor vehicles. Th e manufa cturer rec ommends riders b e 14+ years
old. Always follow these safety instructions:
A. People who should not ride the KickScooter include:
i. Anyone under the influence of alcohol or drugs.
ii. Anyon e who su ffers from disease that pu ts them at risk if they engage in strenuous physical activi ty.
iii. Anyone wh o has p roblems w ith bala nce or w ith moto r skills that wo uld inte rfere with their a bility t o mainta in balan ce.
iv. Anyone whose weight is outside the stated limits (see Specifications).
v. P regn ant wom en.
B. Riders under the a ge of 18 years old should ri de under adult superv ision.
C. Comply wi th local laws and regulatio ns when ridi ng this produ ct. Do not rid e where prohibi ted by local l aws.
D. To ride saf ely, you mus t be abl e to clea rly see what is in front of you a nd you mu st be cl early vi sible to others.
E. Do not rid e in the snow, in t he rain, o r on road s which are wet, m uddy, icy, or t hat are s lippery for any reason. Do not ride over
obstacles (sand, loose gravel, or sticks). Doing so could result in a loss of balance or traction and could cause a fall.
11. Do not attempt to charge your KickScooter if it, the charger, or the power outlet is wet.
12. As wi th any e lectronic device, us e a surge protector when c harging t o help p rotect you r KickSco oter from damage due to p ower
surges and volta ge spikes. Only use the Seg way suppl ied cha rger. Do not u se a cha rger from any othe r differen t product models.
13. Use on ly Nineb ot or Se gway app roved parts and acce ssories. Do not mo dify your KickSco oter. Modific ations to your Ki ckScoote r
could interfere with the operation of the KickScooter, could result in serious injur y and/or dama ge, and coul d void the Limited
Warr anty.
9. Be alert! S can both far ahe ad and i n front o f your Ki ckScooter — your eyes are you r best to ol for s afely avoi ding obst acles and low
tracti on surfa ces (inc luding, b ut not l imited to, wet groun d, loose s and, loose gravel, a nd ice).
10. To reduce risk of injury, you must read and follow all “CAUTION” and “WARNING” notices in this docu ment. Do not ride at an u nsafe
02 03
Page 5
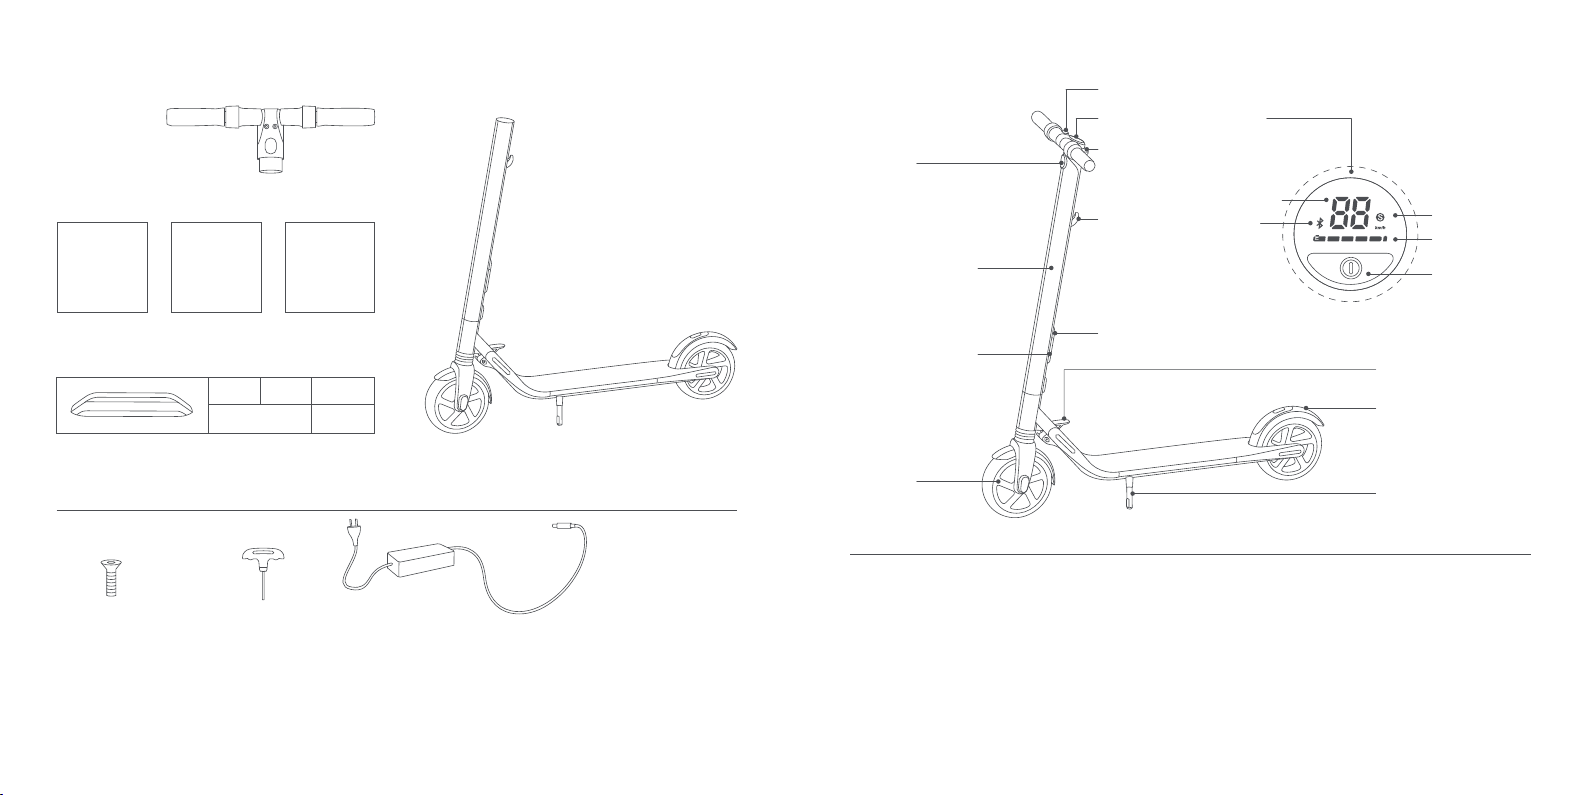
2 Packing List
Handle Mainframe
User Materials
QUICK STARTUSER MANUAL
LIMITED WARRANTY
3 Diagram
Headlight
Stem (battery cabin)
Elec tronic th rottle
Dashboard & Power button
Elec tronic bra ke
Speedometer
Fol di ng la tch
Bluetooth
Power mod e
Power leve l
Power but ton
(multi-functional)
Second Battery Pack
Second battery port
Charge port
Fol di ng pe dal
ES1 ES2 ES4
Sold separately Included
Hub motor
Accessories
(one e xtra)
When unboxing your KickScooter, please verify that the above items are included in the package. If you are missing any components,
please contact your dealer/distributor or nearest service center (see contacts in the user manual). After verifying that all components are
present and in good condition, you can assemble your new KickScooter.
Please retain the box and packaging materials in case you need to ship your KickScooter in the future.
Rememb er to power off your KickScoot er and u nplug the charge ca ble before assemblin g, mountin g accessor ies, or cle aning the
mainframe.
04 05
M4 Hex Wrench
Battery ChargerM4 Flathead Screw x 5
Dashboard & Power Button
Speedometer: Indicates the current speed. Also displays error codes when faults are detected.
Power leve l: In dicat es t he rem aini ng ba ttery leve l wi th 5 bars. Each bar equat es to app roxima tely 20% power level .
Power mod e (dou ble click the powe r but ton to sw itch the m ode):
—Red "S" icon: Sport mode (maximum power/speed and reduced range).
—White "S" ico n: Stand ard mode (moderat e power/speed a nd range).
—No "S" icon: Speed limit mode (minimum power/speed and increased range).
Bluetooth: A blinking Bluetooth icon indicates that the vehicle is ready to connect. A solid Bluetooth icon indicates that the vehicle is
connected to a mobil e device.
Power butt on: Short pres s to power on. Long p ress to po wer o ff. Whe n pow ered on, si ngle clic k to turn on/of f the head ligh t. Do uble- clic k
to change power m ode.
Rear fe nder/foot brake
Kickstand
Page 6
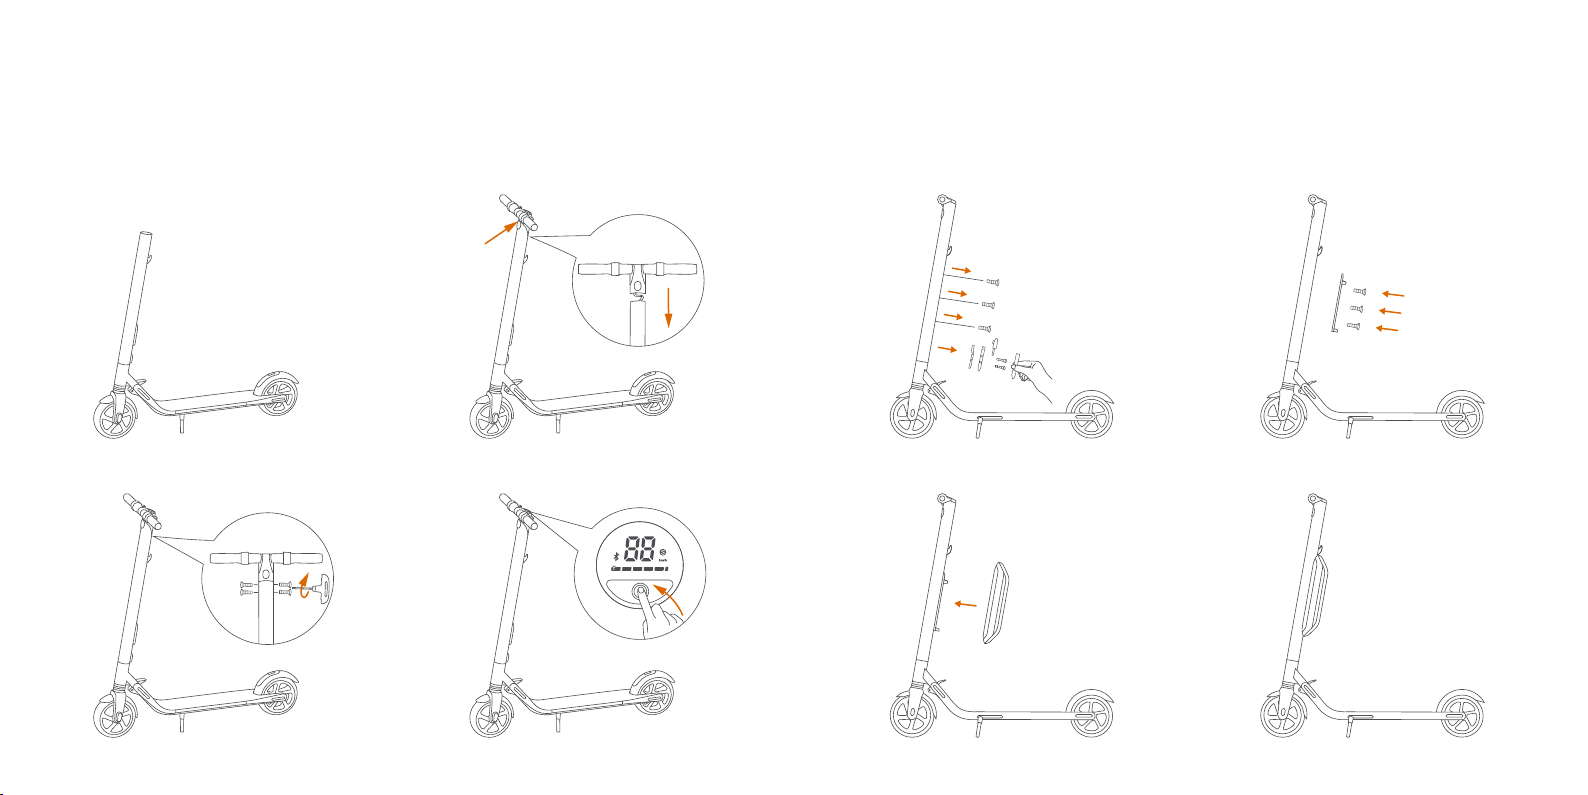
4 Assembling Your KickScooter
5 Installing a Second Battery Pack
1. Unfold the stem and push it until you hear a
click. Then unfold the kickstand to support
the scooter.
3. Inst all four screws (two on each s ide) wit h
the included hex wrench.
2. Firmly connect the wires inside the handle and
the stem. Slide the handle onto the stem. Be
aware of the correct orientation.
Head Light
toward front
4. Verify that your KickScoo ter powers on and off.
Fol low t hes e ste ps wh en in st all in g a s ec ond b att ery p ac k:
1. Remove the three screws on the stem, as
shown. Then remove the cover near the
charge port.
3. Inst all the battery pack ont o the s upport b racket
and tighten the screws securely.
2. Install the support bracket and fasten securely
with three screws, as shown.
4. Verify that your KickScoo ter powers on and off.
06 07
Page 7
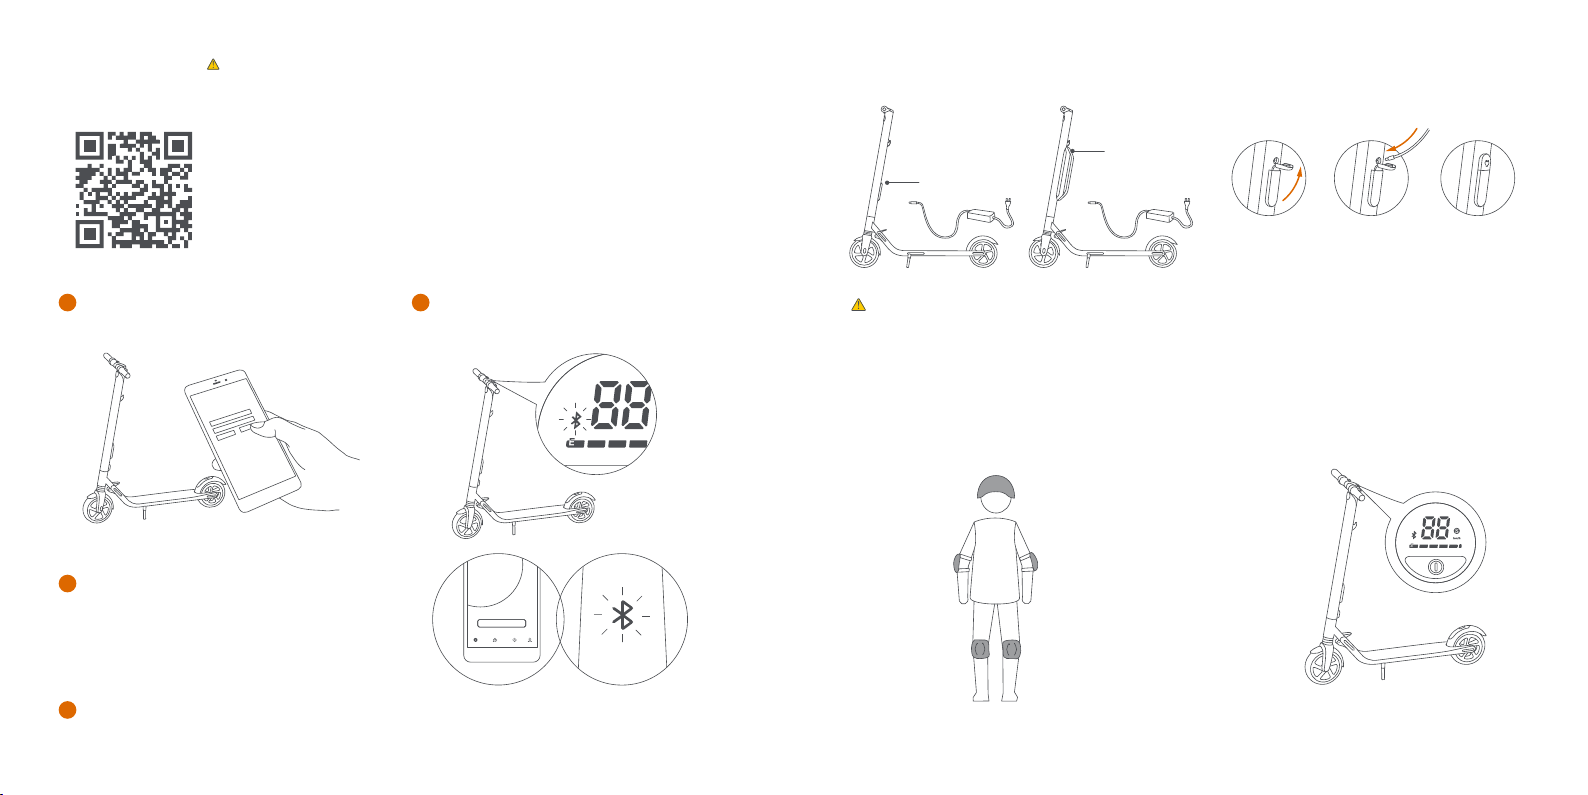
6 First Ride
Vehicle N Fans Club Me
Discover
There are safety risks when learning to ride the KickScooter. You must read the Safety
Instructions via the App before your first ride.
For yo ur sa fe ty, you r new K ick Sc oot er is n ot ac ti vat ed an d w il l bee p occ as ion al ly af te r P owe r
ON.
Until activated, the KickScooter maintains a very low riding speed, and can not be ridden
with full function. Install the App on your mobile device (with Bluetooth 4.0 or above),
connect to the KickScooter with Bluetooth, and follow the App instructions to activate your
KickScooter and enjoy the full performance.
Scan the QR c ode to d ownload t he App (i OS 8.0 or above, Androi d™ 4.3 or above).
7 Charging
ES1/ES2
Charge port
ES4
Charge port
Charging step tips
Open the charge
port cover.
Insert the
charge plug.
Close the charge
port cover when
finished.
Install the App and register/login. Power on the K ickS coote r. A blin king Blue toot h
1
2
icon indicates the KickScooter is waiting for a
connection.
WA RNIN G
Do not connect the charger if the charge port or charge cable is wet.
Your Kick Scooter is fu lly cha rged when the LED on the charger c hanges fro m red (cha rging) to green (t rickle charge).
Close the charge port cover when not charging.
8 Learning to Ride
Click “Vehicle”→“Search device” to connect to your
3
KickScooter.
The KickScooter will beep when the connection is
successful. The Bluetooth icon will stop blinking and
remai n illumi nated.
4
Fol low t he Ap p i ns tru ct ion s to ac ti ve th e K ic kSc oo ter a nd le arn h ow to ri de sa fe ly.
Yo u c a n n o w s t a r t t o u s e y o u r K i c k S c o o t e r, c h e c k t h e s t a t u s w i t h A p p , a n d i n t e r a c t w i t h o t h e r u s e r s . H a v e f u n !
08 09
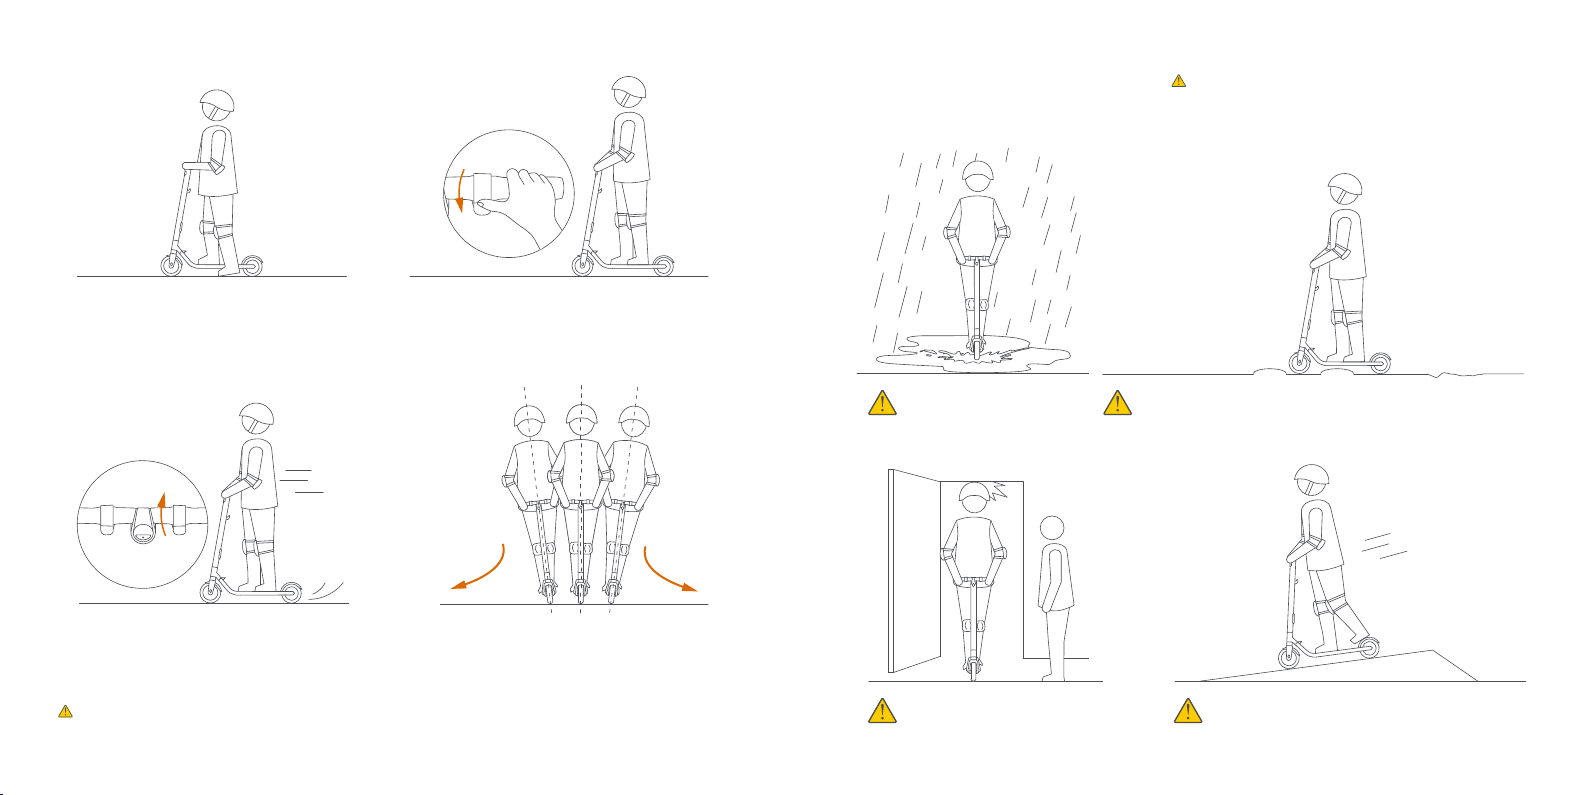
Wear an approved helme t and o ther prot ective gea r
to mi nimize any po ssible i njury.
1. Power on the scooter and check the
indicator lamp power level. Charge the
scooter if the battery level is low.
Page 8
9 Warnings
WA RNIN G
Fai lu re to f ol lo w th ese i ns tr uc ti on s co uld l ea d to s er io us i nju ry .
2. Stand on the footrest with one foot and
push off with your foot to start gliding.
4. Slow down by releasing the throttle ;stir the
brake handle thumb shifter quickly and
stamp the fender with foot at the same time
to tr igger me chanical braking in order to
make a sharp brake.
WA RNIN G
When braking rapidly you risk serious injury due to loss of traction and falls. Maintain a moderate speed and look out
for p otential hazards.
10 11
3. Put your oth er foot on the f ootrest to keep bo th feet
stabl e. Press the throttle on righ t hand t o speed up
when you are balanced.
Note, For your safety, the motor will not engage
until the scooter reachs 1.8 mph
(3 km/h).
5. To turn, shif t your body wei ght and turn the
handle slightly.
DO NOT ride the
scooter in the rain.
Watc h yo ur head wh en p ass ing
through doorways.
DO NOT ride over speed bumps, thresholds, or other bumps at
HIGH SPEED.
Watc h yo ur spe ed w hen tra veli ng d ownh ill . Us e bo th
brakes together when traveling at high speed.
Page 9
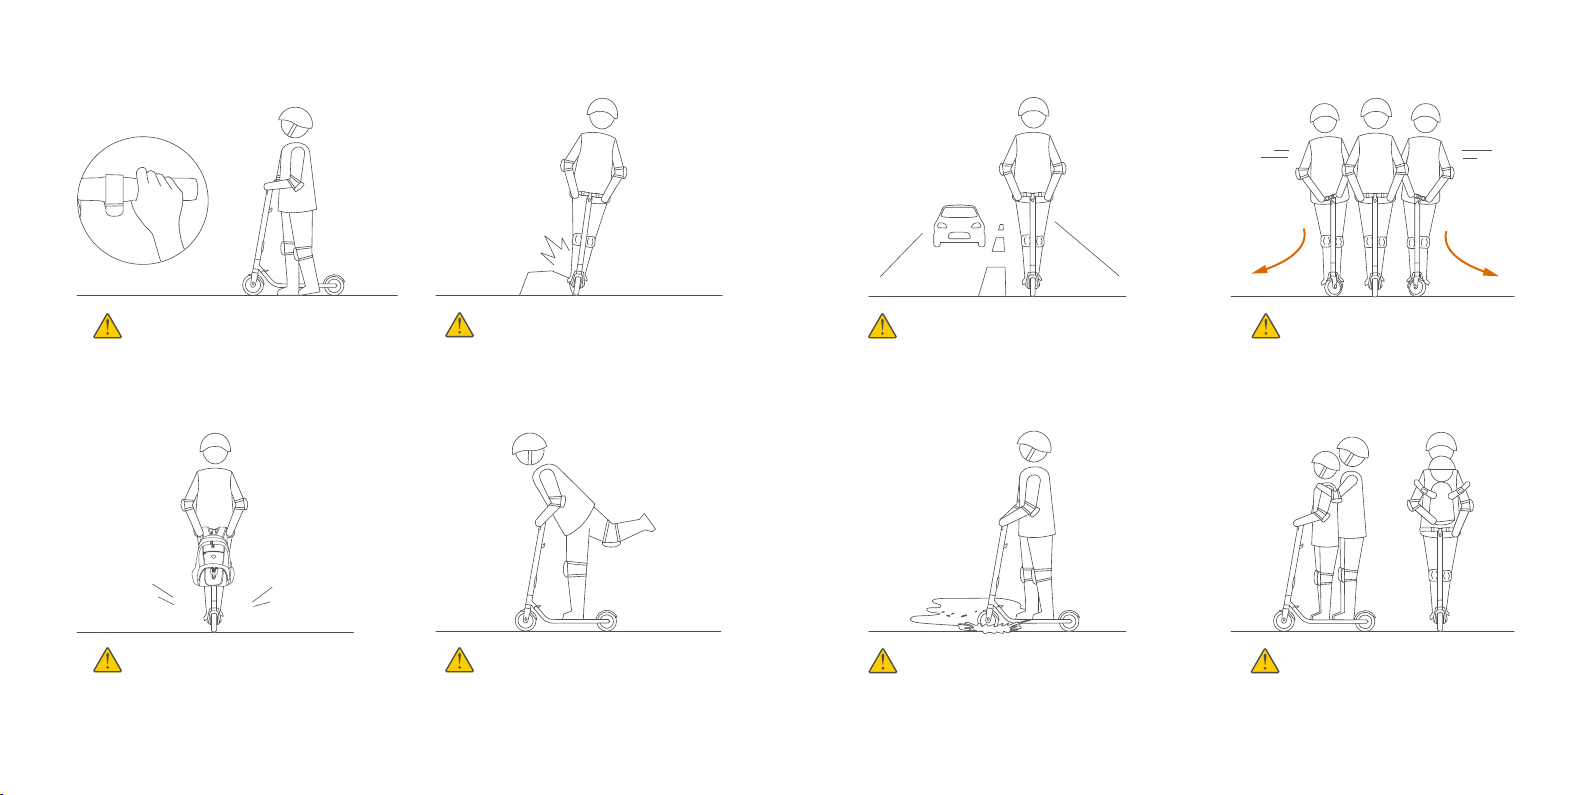
DO N OT p ress the throttle when walk ing
with the scooter.
Avoid conta cting obstac les wi th th e
tire/wheel.
DO N OT r ide on p ublic roa ds,
motorways, or highways.
DO N OT ro tate the handle violentl y while
driving at high speed.
DO NOT carry heavy objects on the
handlebar.
12 13
DO NOT ride the scooter with
only one foot.
DO NOT ride through puddles or.
other bodies of water deeper than 1
inch (2 cm).
The KickScooter is for one rider only.
Do not ride double or carry any
passengers. Do not carry a child.
Page 10
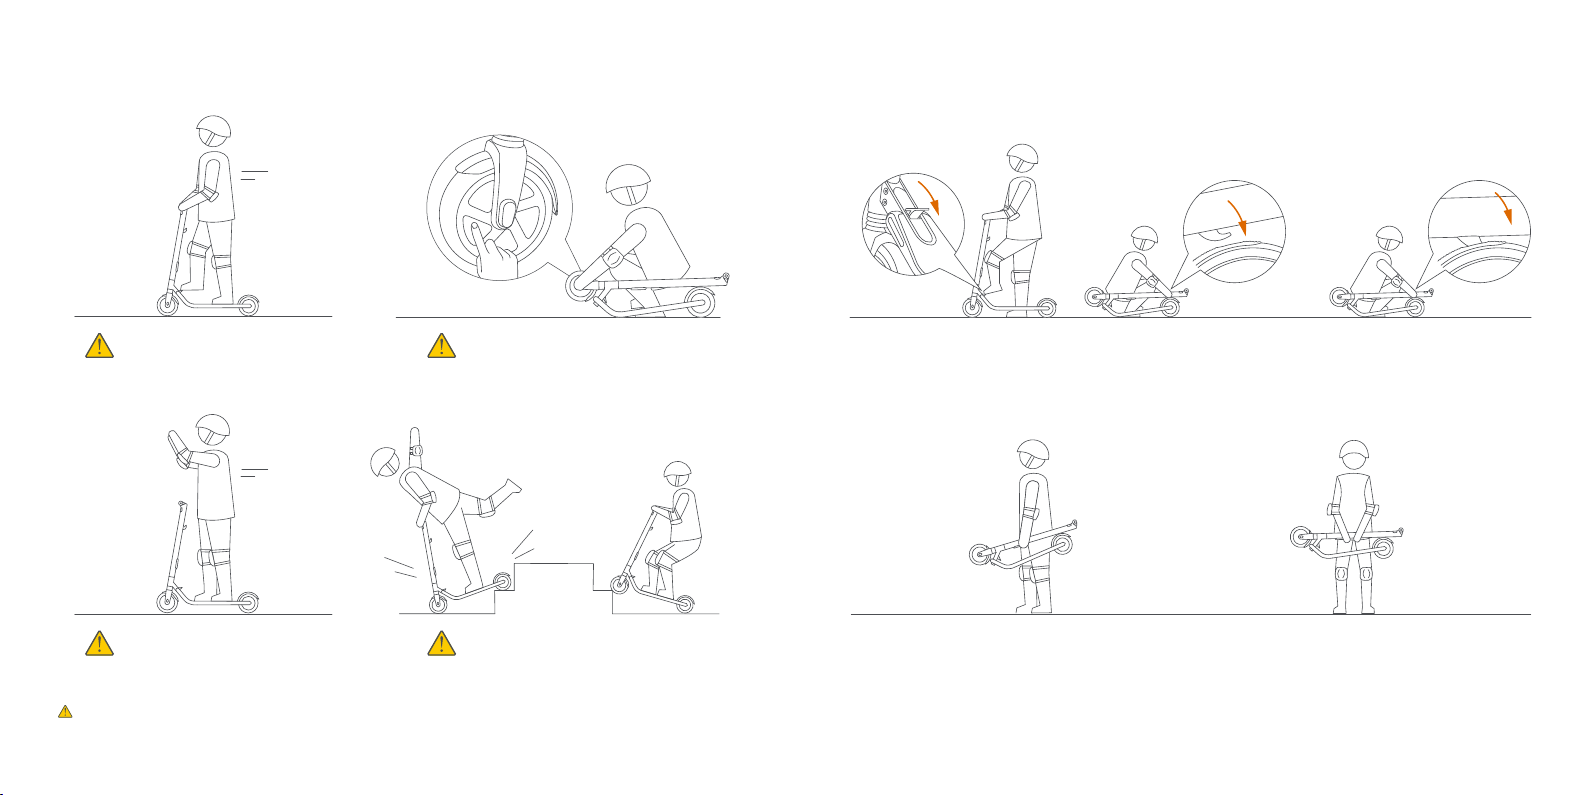
10 Folding and Carrying
Fol di ng
DO NOT step on the folding
pedal while riding.
DO NOT take your hands off the
handlebar while riding. Do not ride with
one hand only.
WA RNIN G
Always keep both hands on the handlebar or you risk serious injury due to loss of balance and falls.
14 15
DO NOT touch the hub motor after riding
because it can get hot.
DO NOT ride up and down stairs or jump
over ob stacles.
Step on the folding pedal while pushing the handlebar forward slightly. Then fold the handlebar down until it locks into
the rear fender.
Carrying
When your Kic kScooter is folde d up, simp ly lift it by th e stem to carry.
Page 11

11 Maintenance
12 Specifications
Cleaning and Storage
Use a soft, wet cloth to wipe th e mainf rame clea n. Hard to remove dir t can be scrubbe d with a toothbr ush and toothpas te, then c leaned
with a soft, wet cloth. Scratches on plastic parts can be polished with fine grit abrasive paper.
NOTE
Do no t wash you r KickSc ooter wi th alcoh ol, gasoli ne, acetone , or othe r corrosiv e/volatile s olvents. The se substa nces may damage t he
Dimensions
Wei ght
Rider
appearance and internal structure of your KickScooter. Do not wash your KickScooter with a power washer or hose.
WARNI NG
Make sure the KickScooter is powered OFF, the charging cable is unplugged, and the rubber cap on the charge port is tightly sealed before
cleaning; otherwise you may damage the electronic components.
Machine
Parame ters
Store your KickScooter in a cool, dry place. Do not store it outdoors for extended periods of time. Exposure to sunlight and temperature
extreme s (both hot and cold) wi ll accel erate the aging process of the pla stic comp onents a nd may re duce batt ery life.
Battery Pack Maintenance
Do not store or charge the batter y at temperatures outside the stated limits (see S pecifications). Do not puncture the battery. Refer to
your l ocal laws and regu lations re garding ba ttery recyc ling and/or disposal.
Battery
A well maint ained battery can pe rform w ell even after many m iles of ridin g. Charge the b attery after e ach ri de and avoid d raining the
batter y comple tely. When u sed at ro om temper ature (70° F [22°C]) the bat tery range and per formance is at i ts best; whereas u sing it at
temperatures below 32°F (0°C) can decrease range and performance. Typical ly, at -4°F (- 20°C) range can be half tha t of the same battery
at 70° F (22°C). Battery r ange will recover w hen tempe rature ri ses. More d etails a re availab le in t he App.
Motor
NOTE
Typ i c a l ly , a f ul l y c ha r g ed b a tt e r y sh o u l d r e t ai n c h ar g e f o r 12 0 - 18 0 d ay s i n S t a n db y M od e . A lo w - po w e r b a t te r y s ho u l d re t a i n c h a rg e fo r
30-60 days in Standby Mode. Remember to charge the battery after each use. Completely draining the battery may cause permanent
Charger
damage to the battery. Ele ctronics inside the batte ry record the charge -dischar ge condit ion of t he batter y; damag e caused by
over-disc harge or un der-discharg e will no t be covered by the Li mited Warranty.
WARNING
Do not attempt to disa ssemble the battery. Risk of fire. No user serviceable parts.
Fea tur es
WARNING
Do not ride when the ambient temperature is outside the m achine operation temperature (see Specificati ons) because low/high
tempe rature wil l limit the max imum powe r/torque. Doin g so cou ld cause personal injury or proper ty damage due to slips or falls.
16 17
[1] Typical Range: tested while riding under full power, 165 lbs (75 kg) load, 77°F (25°C), 60% of max. speed on average on pavement.
[2] All KickScooter models could install the second battery. Some of the parameters would change in this case.
Item
Unfold: Length x Width x Height
Fol d: Len gt h x W idt h x H ei gh t
Net
Payloa d
Recomme nded Age
Require d Height
Max. Speed
Typ i c a l R a n ge
[1]
Max. Slope
Tra v e r s a b l e Te r r a i n
Operating Temperature
Storage Temperature
IP Rating
Nominal Voltage
Max. Charging Voltage
Charging Temperature 32–104°F (0-40°C)
Nominal Capacity
Battery Management System
Number Of Batteries
[2]
Nominal Power
Max. Power
Output Power
Input Voltage
Output Voltage
Output Current
Duration of Charging
Shock Absorber front front & rear
Brake Light
Atmosph ere Light N/A Customizable colour
Riding Modes Speed limit m ode, Stand ard mode and Spo rt mode
ES1 ES2 ES4
40x17x45 in (102×43×113 cm)
45x17x16 in (113×43×40 cm)
24.9 lbs (11.3 kg)
27.6 lbs (12.5 kg)
30.9 lbs (14.0 kg)
55–220 lbs (25–100 kg)
14+ y ears
3’ 11”–6’ 6” (120–200 cm)
12.4 mph (20 km/h)
15.5 miles (25 km)
10%
15.5 mph (25 km/h)
15.5 miles (25 km)
10%
18.6 mph (30 km/h)
28.0 miles (45 km )
15%
asphalt/flat pavement; obstacles < 0.4 in (1 cm); gaps < 1.2 in (3 cm)
14–10 4°F (-10 –40°C)
-4–122°F (-20–50°C)
IP54
36 VDC
42 VDC
187 Wh
187 Wh
374 Wh
Over-heating, short circuit, over-current and over-charge protect ion
1
250 W
500 W
1
300 W
700 W
2
300 W
800 W
71 W
100-240 VAC
42 VDC
1.7 A
3.5 h
3.5 h
7 h
reflec tor LED rear light
Page 12

13 Certifications
This product has been tested to and passed ANSI/CAN/UL-2272.
The battery complies with UN/DOT 38.3.
The second battery pack complies with ANSI/UL 2271 and UN/DOT 38.3.
Fed eral Com mun icat ion s C ommi ssi on ( FCC) Co mpli anc e St ate ment fo r US A
This device complies with part 15 of the FCC rules. Operation is subject to the following two conditions: (1) This device may not cause
harmful interference, and (2) this device must accept any interference received, including interference that may cause undesired
operation.
NOTE
This equipment has been tested and found to comply with the limits for a Class B digital device, pursuant to part 15 of the FCC Rules.
These limits a re design ed to prov ide reaso nable pro tection against h armful i nterferenc e in a re sidentia l instal lation. Th is equip ment
generates, u ses and can rad iate radio freq uency energy and, if not in stalled and used in accorda nce with the instructions , may cause
harmful interference to radio communications. However, there is no guarantee that interference will not occur in a particular installation. If
this equipment does cause harmful interference to radio or television reception, which can be determined by turning the equipment off
and on, the user is encouraged to try to correct the interference by one or more of the following measures:
—Reorient or relocate the receiving antenna.
—Increase the separation between the equipment and receiver.
—Connect the equipment into an outlet on a circuit different from that to which the receiver is connected.
—Consult the dealer or an experienced radio/TV technician for help.
This equipmen t compli es with FCC radiat ion expos ure limi ts set fo rth for a n uncont rolled en vironment .
Industry Canada (IC) Compliance Statement for Canada
This device co mplies w ith Indu stry Can ada lice nse-exempt RSS stan dard (s). Op eration is subje ct to th e followi ng two co nditions : (1) th is
device may not cause interference, and (2) this device must accept any interference, including interference that may cause undesired
operation of the device.
CAN IC ES-3 (B)/N MB-3(B)
Neither Segway Inc. nor Ninebot is responsible for any changes or modifications not expressly approved by Segway Inc. or Ninebot. Such
modifications could void the user's authority to operate the equipment.
For mo de l: ES 1/E S2 /ES 4
FCC ID : 2ALS 8-NT952 7
IC: 22636-NT9527
18 19
European Union Compliance Statement
Battery recycling information for the European Union
Batter ies or p ackaging for batte ries are labeled in accord ance wit h Europea n Directi ve 2006/6 6/EC conc erning b atteries and
accumulators and waste batteries and accumulators. The Directive determines the framework for the return and recycling of used
batteries and a ccumulators as applicable throughout the European Un ion. This label is applied to various batteries to indi cate that the
battery is not to be thrown away, but rather reclaimed u pon end of life per thi s Directive.
In accordance with the European Directive 2006/66/EC, batteries and accumulators are labeled to indicate that they are to be collected
separately and recycled at end of life. The lab el on the battery may also include a chemical symbol for the metal concerne d in the battery
(Pb for lead, Hg for mercury, and Cd for cadmium). Users of batteries and accumulators must not dispose of batteries and accumulators
as unsorted municipal waste, but use the collection framework available to customers for the return, recycling, and treatment of batteries
and accumulators. Customer participation is important to minimize any potential effects of batteries and accumulators on the
enviro nment an d human health d ue to th e potent ial prese nce of ha zardous s ubstances .
Restric tion of Ha zardous Substances Directive (RoHS)
Nineb ot produc ts sold in the E uropean U nion, on or after 3 Januar y 2013 m eet the requiremen ts of Di rective 20 11/65/EU on the
restric tion of the use of certa in hazard ous subst ances in electri cal and electroni c equipm ent
(“RoHS recast” or “RoHS 2”).
Radio and Telecommunications Terminal Equipment Directive
Segway Europe B.V.
EU Contact Address for regulatory topics o nly: Hogehilweg 8, 1101CC Amsterdam, The Netherlands.
Hereby, Ninebot (Changzhou) Tech Co., Ltd, declares that the wireless equipment listed in this section are in compliance with the essential
require ments an d other relevant provision s of Di rective 20 14/53/EU.
Page 13

14 Trademark and Legal Statement
15 Contact
Ninebot and the shape icon are trademarks of Ninebot (Tianjin) Tech. Co., Ltd; Segway is the registered trademark of Segway Inc.; Ninebot
by Segway is a tradem ark of Segwa y Inc.; Androi d, Google Pla y are tradema rks of Googl e Inc. App Store is a servi ce mark of Ap ple Inc. The
respec tive owne rs reserve the rig hts of t heir tra demarks referred t o in thi s manua l.
The KickScooter is covered by relevant patents. For patent information go to http://www.segway.com.
We have a ttem pte d to inc lud e d esc ri pti ons an d i nst ru cti ons fo r a ll th e f unc tio ns of th e K ick Sco ote r at the ti me of pr int ing . H owev er, y our
KickScooter may differ slightly from the one shown in this document. Visit the Apple App Store (iOS) or the Google Play Store (Android) to
download and install the App.
Please note that there are multiple Segway and Ninebot by Segway models with different functions, and some of the functions mentioned
herein may not be applicable to your unit. The manufacturer reserves the right to change the design and functionality of the KickScooter
produc t and do cumentat ion wit hout pri or notic e.
© 2017 Ninebot (Beijing) Tech Co. Ltd. All rights reserved.
Conta ct us if you exper ience is sues rela ting to riding, m aintenan ce and sa fety, or erro rs/faults with your KickSco oter.
Americas:
Segway Inc.
14 Techno logy Drive, Bedford , NH 0 3110, USA
Tel : 1 - 6 0 3 - 2 2 2 - 6 0 0 0
Fax : 1-6 03 -2 22 -6 00 1
Tol l F r e e : 1 - 8 6 6 - 4 7 3 - 4 9 2 9
E-mail Sales: custome roperatio n@segway.co m
E-mail Servic e: techn icalsup port@se gway.com
Webs it e: www. seg way .com
Europe, Middle East and Africa:
Segway Europe B.V.
Hogehi lweg 8, 11 01CC Amste rdam, The N etherlan ds
Email service: servi ce@segway.eu.com
Webs it e: www. seg way .com
Have your KickScooter serial number on hand when contacting Segway.
Yo u c a n f i n d y o u r s e r i a l n u m b e r o n t h e u n d e r s i d e o f y o u r K i c k S c o o t e r
or in the App under More Settings –> Basic Information.
20 21
Page 14

WARNING!
Whenever you ride your vehicle you risk injury or death from loss of control, collisions,
and falls. Be sure to read the User Manual and watch the Safety Video before riding.
QUICK START
The manufacturer reserves the right to make changes to the vehicle, release firmware updates, and
update this manual at any time. Visit www.segway.com to download the latest user materials. You must
install the App to follow the New Rider Tutorial, activate your vehicle, and obtain the latest updates and
safety instructions.
25620-00001 aa
Scan to download the App
Alternatively, go to the Google Play Store (Android) or the Apple App Store (iOS) and search for
"Segway" or "Ninebot" to download and install the App. Be advised there is a minimum
Android/iOS/Bluetooth version required. See User Manual for additional details.
Page 15

First Ride
Vehicle N Fans Club Me
Discover
There are safety risks when learning to ride the KickScooter. You must read the Safety
Instructions via the App before your first ride.
For yo ur sa fet y, y our ne w Kic kSc oo ter i s n ot ac tiv ate d and w ill be ep oc ca sio nal ly af te r
Power ON.
Until activated, the KickScooter maintains a very low riding speed, and can not be ridden
with full function. Install the App on your mobile device (with Bluetooth 4.0 or above),
connect to the KickScooter with Bluetooth, and follow the App instructions to activate
your KickScooter and enj oy the full performance.
Scan the QR code to download the App (iOS 8.0 or above, Android™ 4.3 or above).
Learning to Ride
Install the App and register/login. Power on the K ickS coote r. A blin king Blue toot h
1
2
icon indicates the KickScooter is waiting for a
connection.
Click “Vehicle” → “S earc h devi ce ” to co nne ct to you r
3
KickScooter.
The KickScooter will beep when the connection is
successful. The Bluetooth icon will stop blinking and
remai n illumi nated.
4
Fol low t he Ap p i ns tru ct ion s to ac ti ve th e K ic kSc oo ter a nd le arn h ow to ri de sa fe ly.
Yo u c a n n o w s t a r t t o u s e y o u r K i c k S c o o t e r, c h e c k t h e s t a t u s w i t h A p p , a n d i n t e r a c t w i t h o t h e r u s e r s . H a v e f u n !
Wear an approved helmet and other
protective gear to minimize any
possible injury.
1. Power on the scooter and
check the indicator lamp
power level. Charge the
2. Stand on the footrest with one
foot and push off wi th your foot
to start gliding.
scooter if the battery level is
low.
3. Put your oth er foot on the f ootrest to
keep b oth feet st able. Press the
thrott le on r ight han d to spe ed up
when you are balanced.
Note, For your safety, the motor will
not engage until the scooter reachs 1.8
mph (3 km/h).
WARNING
4. Slow down by releasing the
throttle; stir the brake handle
thumb shifter quickly and stamp
the fender with foot at the same
time to trigger mechanical
braking in order to make a sharp
brake.
5. To turn, shif t your body wei ght
and turn the handle slightly.
When braking rapidly you risk serious injury due to loss of traction and falls. Maintain a moderate speed and look out
for p otential hazards.
Page 16

Page 17

Page 18

Page 19

Page 20

Page 21

Page 22

Page 23

Page 24

Page 25

Page 26

Page 27

Page 28

Page 29

Page 30

Page 31

Page 32

Page 33

 Loading...