

Page 1
The manufacturer reserves the right to make changes to the product, release firmware updates, and update this manual at any
EN
time. Visit www.segway.com or check the Segway-Ninebot app to download the latest user materials. You must install the app,
activate your KickScooter, and obtain the latest updates and safety instructions.
Le fabricant se réserve le droit d'apporter des modifications au produit, de publier des mises à jour du microprogramme et de
FR
réviser ce manuel à tout moment. Visitez www.segway.com ou consultez l'application Segway-Ninebot pour télécharger les
derniers contenus utilisateur. Vous devez installer l'application, activer votre trottinette et obtenir les dernières mises à jour et
consignes de sécurité.
Der Hersteller behält sich jederzeit das Recht von Produktänderungen, der Herausgabe von Firmware-Updates und der
DE
Aktualisierung dieses Handbuches vor. Besuchen Sie www.segway.com oder schauen Sie auf der Segway-Ninebot App nach, um
sich die neuesten Benutzermaterialien herunterzuladen. Sie müssen die Segway-Ninebot App installieren und Ihren KickScooter
aktivieren, um die neuesten Updates und Sicherheitshinweise zu erhalten.
Il produttore si riserva il diritto di apportare modifiche al prodotto, aggiornare gli aggiornamenti del firmware e aggiornare questo
IT
manuale in qualsiasi momento. Visitare www.segway.com o controllare l'app Segway-Ninebot per scaricare l'ultimo manuale
utente e materiali. È necessario installare l'App, attivare il proprio KickScooter e ottenere gli ultimi aggiornamenti e le istruzioni di
sicurezza.
El fabricante se reserva el derecho a realizar cambios en el producto, actualizaciones del firmware y modificaciones de este
ES
manual en cualquier momento. Visita www.segway.com o revisa la app para descargar los materiales de usuario más recientes.
Debes instalar la aplicación Segway-Ninebot, activar tu KickScooter y obtener las actualizaciones e instrucciones de seguridad
más recientes.
Producent zastrzega sobie prawo do wprowadzania zmian w produkcie, aktualizacji oprogramowania i aktualizacji tej instrukcji
PL
obsługi w dowolnym momencie. Odwied stron www.segway.com lub sprawd aplikacj Segway-Ninebot, aby pobra najnowsze
materiały uytkownika. Musisz zainstalowa aplikacj, aktywowa swojego KickScootera i uzyska najnowsze aktualizacje i zasady
bezpieczestwa.
De fabrikant reserves de Rechtsaf tot maken veranderingen tot de Product, laat los firmware updates, en update deze handleiding
NL
Bij elk tijd. Op bezoek komen www.segway.com of controleren de Segway-Ninebot app tot downloaden de laatste gebruiker
materialen. Jij moeten installeren de app, activeren uw KickScooter, en verwerven de laatste updates en veiligheid instructies.
O fabricante reserva-se o direito de fazer alterações no produto, lançar atualizações de firmware e atualizar este manual a
PT
qualquer momento. Visite www.segway.com ou verifique a aplicação Segway-Ninebot para descarregar os materiais de utilizador
mais recentes. Deve instalar a aplicação, ativar a sua KickScooter e obter as últimas atualizações e instruções de segurança.
EN The pictures shown are for illustration purposes only. The actual product may vary.
FR La photo est pour référence seulement. Veuillez vous référer au produit réel pour plus de détails.
DE Das Bild dient nur als Referenz. Das tatsächliche Produkt kann abweichen. Bitte beziehen Sie sich auf das aktuelle Produkt für
weitere Details.
I T La figura è da considerarsi solo come riferimento. Si prega di far riferimento al prodotto attuale per maggiori dettagli.
ES La imagen es solo de referencia. Remítase al producto en sí para ver más detalles.
PL Rysunek jest tylko poglądowy. Szczegóły znajdują się w faktycznym produkcie.
NL De afbeeldingen getoond zijn voor illustratie doeleinden enkel en alleen. De feitelijk Product kunnen variëren.
PT As imagens apresentadas são apenas para fins ilustrativos. O produto real pode variar.
Ninebot KickScooter
EN
Product Manual
FR
Manuel du Produit
DE
Produkt-Handbuch
IT
Manuale del prodotto
ES
Manual del producto
PL
Instrukcja produktu
NL
Product Handleiding
PT
Manual do produto
www.segway.com
CE.04.00.0799.05-A
XX
Page 2
1
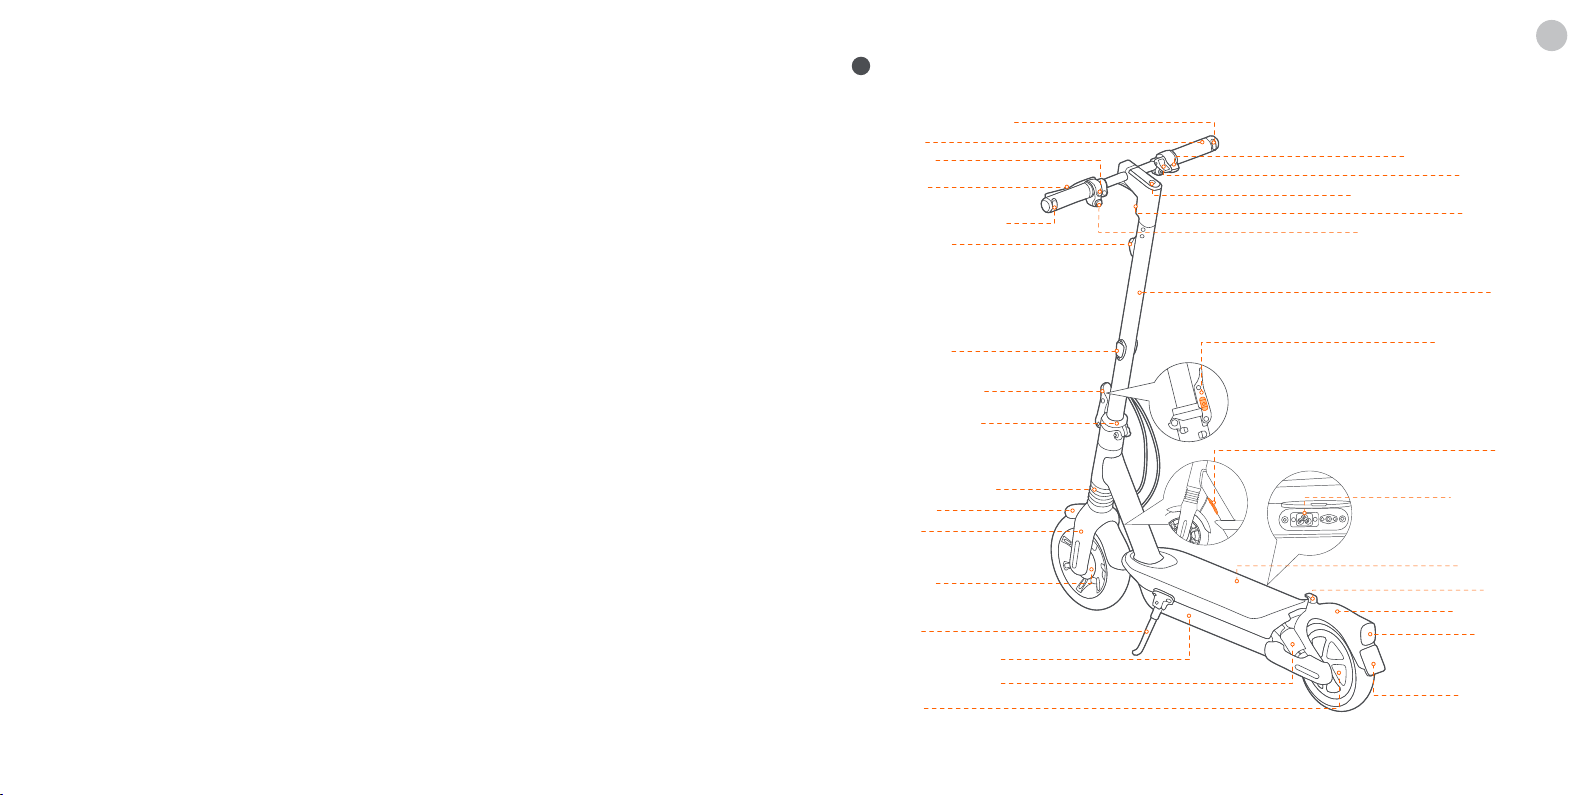
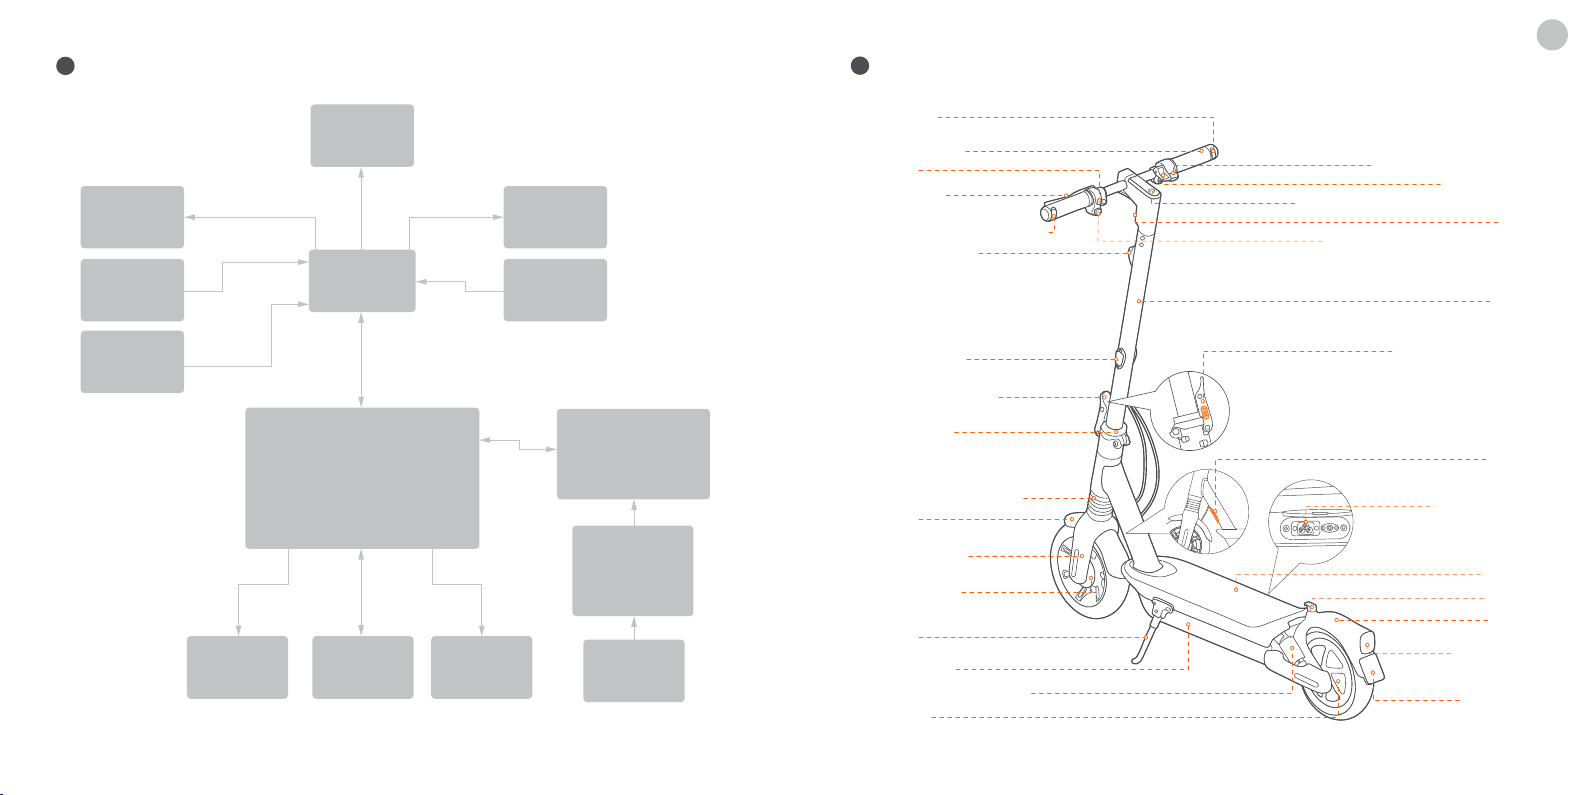
Diagram
Right Direction Indicator
Handlebar
Horn Button
Brake Lever
Left Direction Indicator
Front Reflector
EN
Electronic Throttle
Snap Hook
Dashboard & Power Button
Headlight
Direction Indicator Switch
Stem
Side Reflector
Quick-release Lever
Folding Mechanism
Front Shock Absorber
Front Fender
Front Fork
Drum Brake
Kickstand
Battery Compartment
Rear Shock Absorber
Hub Motor
Safety Button
Horn
Charge Port
Footboard
Buckle
Rear Fender
Tail light
& Brake Light
& Reflector
Insurance
Plate Area
01 02 03 04 05 06 07 08 09 10 11 12 13
Page 3
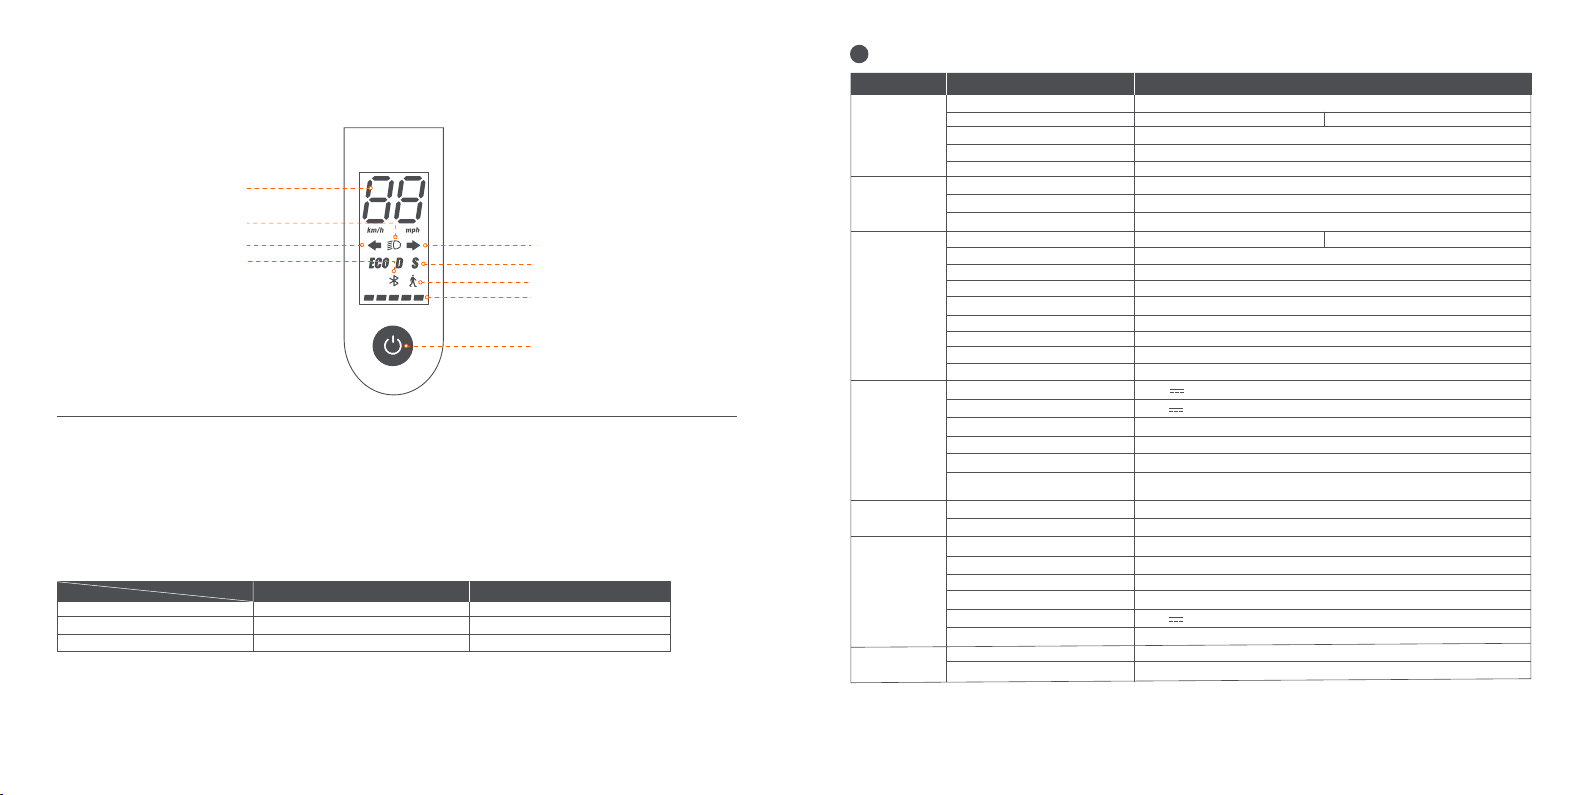
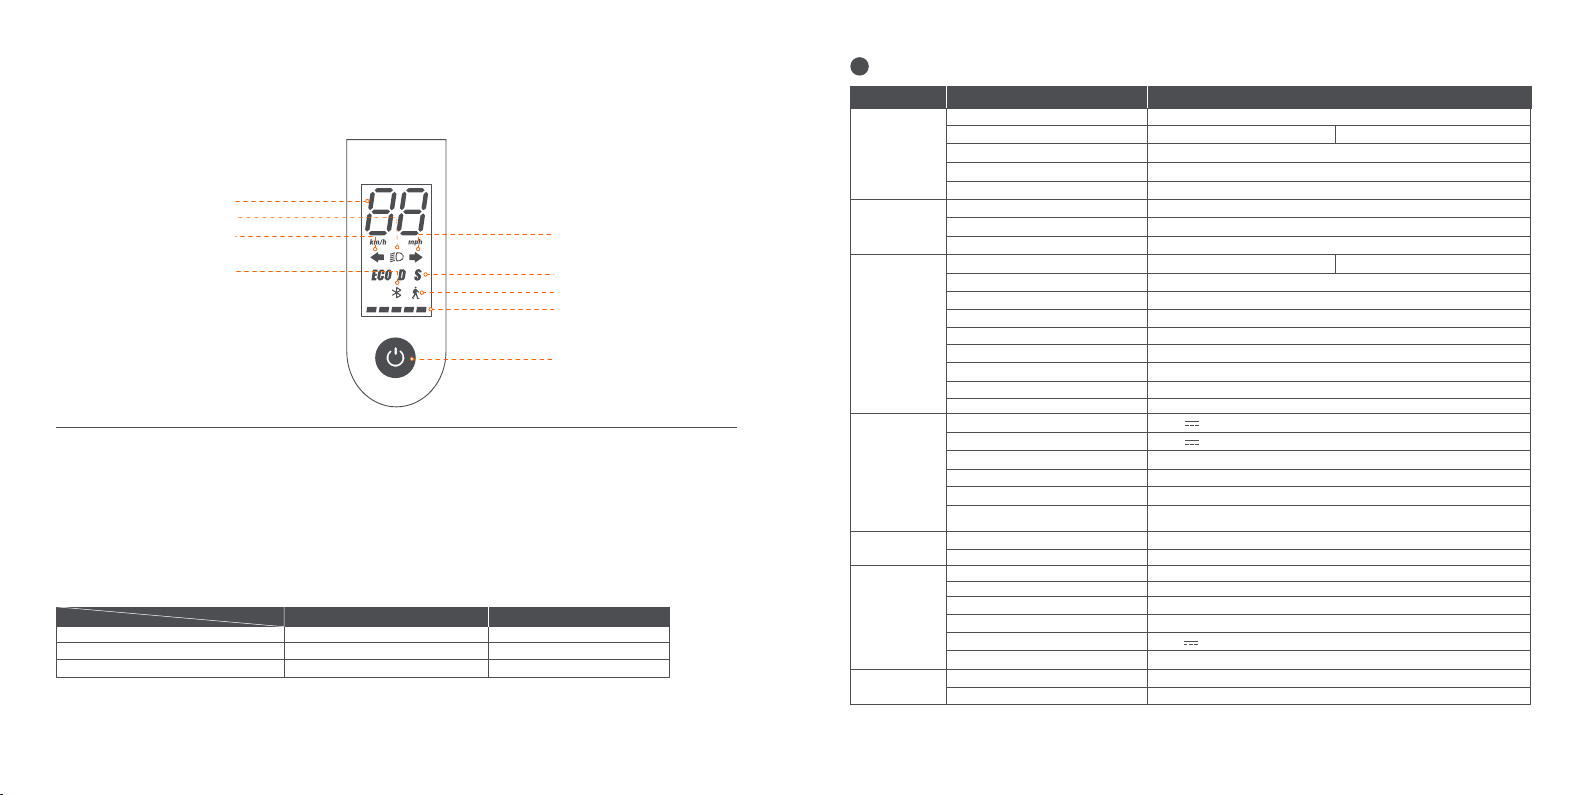
Dashboard & Power Button
Speedometer
Left Direction Indicator Icon
Power Button: Press the button to power on; press and hold the button for 3 seconds to power off. When the KickScooter is on, press the
button to turn on/off the headlight and the tail light; and press twice to switch between the speed modes.
Speedometer: It displays the current speed of the scooter, as well as error codes.
Direction Indicator: When turning left or right, press the “←” (left) or “→” (right) switch on the direction indicator switch. Then the
direction indicator will flash regularly which can be turned off by pressing the corresponding switch again.
Walk Mode: Max. speed is 5 km/h (3.1 mph).
The headlight and tail light are always on and can't be turned off.
* How to enable in the Segway-Ninebot app: Settings > Walk Mode.
Speed Mode: There are three modes available. The top speed is as follows:
Mode
ECO (Energy-saving mode)
D (Standard mode)
S (Sport mode)
Bluetooth: It indicates that the scooter has been successfully connected to the mobile device.
Battery Level: The total battery level equals 5 bars.
* The battery power is very low when the first battery bar is red. Please charge your KickScooter immediately.
Headlight
Bluetooth
Model
15 km/h (9.3 mph)
20 km/h (12.4 mph)
25 km/h (15.5 mph)
Right Direction Indicator Icon
Speed Mode
Walk Mode
Battery Level
Power Button
Max G2 DMax G2 E
15 km/h (9.3 mph)
20 km/h (12.4 mph)
20 km/h (12.4 mph)
2
Specications
Item Parameter
Name
Product
Rider
Machine
Battery
Motor
Charger
Tire
[1] Theoretical Range: Tested while riding with a full battery, 75 kg (165 lbs) load, 25°C (77°F), at the speed of 16 km/h (9.9 mph) on average on pavement.
[2] Typical Range: Tested while riding with a full battery, 75 kg (165 lbs) load, 25°C (77°F), at the max.speed on pavement.
* Some of the factors that affect range include speed, load, number of starts and stops, ambient temperature, etc.
Model
Length × Width × Height
Folded: Length × Width × Height
Net Weight
Max. Payload
Recommended Age
Required Height
Max. Speed
Theoretical Range
Typical Range
Max. Slope
Traversable Terrain
Operating Temperature
Storage Temperature
IP Rating
Duration of Charging
Nominal Voltage
Max. Charging Voltage
Charging Ambient Temperature
Nominal Capacity
Nominal Energy
Battery Management System
Nominal Power
Max. Power
Model
Type Built-in
Output Power
Input Voltage
Max. Output Voltage
Output Current
Tire Pressure
Tires
[1]
[2]
Ninebot KickScooter Max G2
051501E
Approx. 1210 × 570 × 1264 mm (47.6 × 22.4 × 49.8 in)
Approx. 1210 × 570 × 605 mm (47.6 × 22.4 × 23.8 in)
Approx. 24.25 kg (53.5 lbs)
120 kg (265 lbs)
16–55 years old
120-200 cm (3'11"–6'6")
Approx. 25 km/h (15.5 mph)
Approx. 70 km (43.5 miles)
Approx. 50 km (31.1 miles)
Approx. 22%
Most of the flat road conditions and typical Belgian roads.
-10–40°C (14–104°F)
-10–50°C (14–122°F); recommended 10~30°C (50–86°F)
IPX5
Approx. 6 h
36 V
42 V
0–40°C (32–104°F)
15.3 Ah
551 Wh
Over-heating, short circuit, over-current, over-discharge and
over-charge protection
0.45 kW, 450 W
0.9 kW, 900 W
NB-42D0-02D9
0.1218 kW, 121.8 W
100–240 V ~ 50–60 Hz, 2.0 A MAX.
42 V
2.9 A
42—48 psi
10-inch Tubeless Self-sealing Tire
051501D
Approx. 20 km/h (12.4 mph)
Page 4
3
Certications
The battery complies with UN 38.3.
European Union Compliance Statement
Important WEEE information
This symbol on the product or on its packaging indicates that used electrical and electronic products should not be
mixed with unsorted municipal waste. For proper treatment, it is your responsibility to dispose of your waste
equipment by arranging to return it to designated collection points.
Disposing of this product correctly will help save valuable resources and prevent any potential negative eects on
human health and the environment, which could otherwise arise from inappropriate waste handling.
Penalties may be applicable for incorrect disposal of this waste, in accordance with your national legislation.
Please contact your local authority for further details of your nearest designated collection point.
Battery recycling information for Users
This symbol means that batteries and accumulators, at their end-of-life, should not be mixed with unsorted municipal
waste. Your participation is an important part of the eort to minimize the impact of batteries and accumulators on
the environment and on human health. For proper recycling you can return this product or the batteries or
accumulators it contains to your supplier or to a designated collection point.
Disposing of this product correctly will help save valuable resources and prevent any potential negative eects on
human health and the environment, which could otherwise arise from inappropriate waste handling.
Penalties may be applicable for incorrect disposal of this waste, in accordance with your national legislation.
there are separate collection systems for used batteries and accumulators.
Please, dispose of batteries and accumulators correctly at your local community waste collection/recycling
center.
Radio Equipment Directive
Ninebot (Changzhou) Tech Co., Ltd. hereby declares that the product listed in this section comply with the essential
requirements and other relevant provisions of the Radio Equipment Directive 2014/53/EU.
Restriction of the use of certain hazardous substances (RoHS) Directive
Ninebot (Changzhou) Tech Co., Ltd. hereby declares the whole product including parts (cables, cords, and so on)
meets the requirements of RoHS Directive 2011/65/EU and amendment Commission Delegated Directive (EU)
2015/863 on the restriction of the use of certain hazardous substances in electrical and electronic equipment
("RoHS recast" or "RoHS 2.0").
Machinery Directive
Ninebot (Changzhou) Tech Co., Ltd. hereby declares that the product listed in this section comply with the essential
requirements and other relevant provisions of the Machinery Directive 2006/42/EC.
EU Authorised Representative:
Segway-Ninebot Europe
Dynamostraat 7, 1014 BN Amsterdam, The Netherlands.
Ninebot (Changzhou) Tech Co., Ltd. hereby declares that the product model: 051501E, 051501D comply with the
essential requirements and other relevant provisions of the Radio Equipment Directive 2014/53/EU,the machinery
directive 2006/42/EC, and the RoHS Directive 2011/65/EU and amendment Commission Delegated Directive (EU)
2015/863.
The declaration of conformity can be viewed at the following address: https://eu-en.segway.com/instruction-manuals
UK Compliance Statement
Radio Equipment Regulations 2017
Ninebot (Changzhou) Tech Co., Ltd. hereby declares that the product listed in this section comply with the essential
requirements and other relevant provisions of Radio Equipment Regulations 2017.
The Restriction of the Use of Certain Hazardous Substances in Electrical and Electronic Equipment Regulations
2012
Ninebot (Changzhou) Tech Co., Ltd. hereby declares the whole product including parts (cables, cords, and so on)
meets the requirements of The Restriction of the Use of Certain Hazardous Substances in Electrical and Electronic
Equipment Regulations 2012.
Page 5
Supply of Machinery (Safety) Regulations 2008
Ninebot (Changzhou) Tech Co., Ltd. hereby declares that the product listed in this section comply with the essential
requirements and other relevant provisions of The Safety of Supply of Machinery (Safety) Regulations 2008.
UK Authorised Representative:
UKCA Experts Ltd.
Dept 302, 43 Owston Road Carcroft, Doncaster, DN6 8DA, United Kingdom
Ninebot (Changzhou) Tech Co., Ltd. hereby declares that the product model: 051501E complies with the essential
requirements and other relevant provisions of the Radio Equipment Regulations 2017,Supply of Machinery (Safety)
Regulations 2008 and the Restriction of the Use of Certain Hazardous Substances in Electrical and Electronic
Equipment Regulations 2012.
The declaration of conformity can be viewed at the following address: www.segway.com
Bluetooth
Frequency Band(s)
Max. RF Power
2.4000-2.4835GHz
20mW
Use of the Works with Apple badge means that a product has been designed to work specifically with the technology
identified in the badge and has been certified by the product manufacturer to meet Apple Find My network product
specifications and requirements. Apple is not responsible for the operation of this device or use of this product or its
compliance with safety and regulatory standards.
4
Recommended Maintenance Schedule
To ensure safe riding, day to day care and regular maintenance are essential. You, the owner, have control and knowledge of
how often you use your scooter, how hard you use it and where you use it. It is the owner's responsibility to perform regular
checks and bring your scooter to authorized service center for inspection and service. Please refer to the maintenance
schedule below.
Note: This maintenance schedule charges a service fee.
Every 6
Item Component
Mainframe parts
Tire pressure
Tire wear
Mainframe
maintenance
Screws on the
stem top
Screws on the
folding
mechanism
Maintenance Method
Use a soft, wet cloth to wipe the
mainframe clean.
Inflate tires to 42-48 psi
Check if the tires are cracked,
deformed, or significantly worn.
Tighten the screws fixed with the
handlebar and the stem. The suggested
torque is 5.5±0.5 N·m.
Tighten the screw on the throttle. The
suggested torque is 0.9±0.06 N·m.
Tighten the screws on the brake lever. The
suggested torque is 6±1 N·m.
Tighten the screws on the stem top. The
suggested torque is 8.5±0.5 N·m.
Tighten the fixing screws of the folding
handle and the front fork,
Two lateral screws at the side, the
recommended torque is 15 ± 1N · m
Fold and unfold, the upper vertical screw,
the recommended torque is 15 ± 1N · m
Fold the connecting rod, and fasten the
connecting rod screws when rocking on
the bike. The folding is smooth without
shaking.
Every 3
months
√
months or
every 500
km (310
miles)
Every 1 year or
every 1000
km (621
miles)
Every 3 years
or
every 10,000
km (6,214
miles)
√ √√√
√ √√√
√ √√
√
√
√
√√
√√
√√
Page 6

Item Component
Hub motor
Front wheel
maintenance
Brake
adjustment
Drum brake
Function
inspection
Taillight
Headlight
Direction
indicators
Dashboard
Horn
Throttle
Maintenance Method
To accelerate and decelerate, check if
the hub motor is stalled or has
abnormal sounds.
Check if the front wheel is stalled or gets
shaky, or the axis shaft is unbalanced.
If the brake is too tight/loose, use the 4
mm Allen key to loosen the screw on the
caliper. Then slightly adjust the brake
line (decrease/increase the exposed
length), and tighten the screw again.
Test standard: the riding speed is 20
km/h (12.4 mph), and the braking
distance is within 6m
Front wheel can rotate normally without
abnormal sound. Front wheel can be
braked after squeezing the brake lever.
Squeeze the brake lever, the tail light
works normally.
Check the headlight and see if it lights
brightly.
Toggle the direction indicator button to
the left/right respectively, check if the
direction indicators on the left/right
side flash normally.
Power on the scooter, the dashboard
works properly.
Press the horn button and the sound is
loud.
Press and hold the throttle then release
it, checking for acceleration and
deceleration.
Note: Release it, check if the throttle will
back to the position.
Every 3
months
Every 6
months or
every 500
km (310
miles)
Every 1 year or
every 1000
km (621
miles)
√ √
√ √
√ √√
√ √√
√ √√
√ √√
√ √√
√ √√
√ √√
√ √√
Every 3 years
or
every 10,000
km (6,214
miles)
Item Component
Fault
detection
Function
inspection
Important
parts
Functional
parts
Charging
Control
buttons
Turning
Battery
assembly
Controller
Hub motor
Rear wheel
assembly
Throttle &
Brake lever
Front fork
assembly
Folding
mechanism
Drumbrake
Dashboard
Cover
Maintenance Method
After connecting with the Segway-Ninebot
app:
1) Update the firmware to the latest
version.
2) Check if the notification of the
corresponding error code and
possible causes will prompt when the
scooter detects an error
Charge the scooter:
1) Check if the current battery power
displays on the dashboard.
2) Check the LED indicator on the battery
charger.
Charging: red, Fully charged: green.
Press or toggle the button 3 times without
failure.
Test with left turns and right turns (the
steering angle is 60). No resistance or lag
when turning.
The battery need to be replaced when it is
charged and discharged for 500 times or
the total mileage is more than 10,000 km
(6,213 miles).
Note: It is recommended to charge once
every 60 days for long-term storage.
After 3 years' or 10,000 km's (6,214
miles') riding, the abnormal parts of the
kickscooter have to be repleced
immediately.
Every 3
months
Every 6
months or
every 500
km (310
miles)
Every 1 year or
every 1000
km (621
miles)
√√ √
√√ √
√√ √
√ √
Every 3 years
or
every 10,000
km (6,214
miles)
√
Page 7

5
Trademark
6
Common Failures
Ninebot is the trademark of Ninebot (Beijing) Tech Co., Ltd; Segway and the Rider Design are the registered trademarks of
Segway Inc., App Store, Apple Logo, Apple, Apple Find My, Apple Watch, Find My, iPhone, iPad, iPadOS, Mac, macOS and
watchOS are trademarks of Apple Inc. IOS is a trademark of Cisco and is used under license. Android, Google Play and the
Google Play logo are trademarks of Google LLC. The Bluetooth® word mark and logos are registered trademarks owned by
Bluetooth SIG, Inc. and any use of such marks by Segway-Ninebot is under license. Other trademarks and trade names are
those of their respective owners.
The KickScooter is covered by relevant patents. For patent information, go to http://www.segway.com
We have attempted to include descriptions and instructions for all the functions of the KickScooter at the time of printing.
However, due to constant improvement of product features and changes of design, your KickScooter may difer slightly
from the one shown in this document. Scan the QR code or visit the Apple App Store (iOS) or the Google Play Store
(Android) to download and install the App.
Please note that there are multiple Segway and Ninebot models with dierent functions, and some of the functions
mentioned herein may not be applicable to your unit. The manufacturer reserves the right to change the design and
functionality of the KickScooter product and documentation without prior notice.
© 2023 Ninebot (Beijing) Tech Co. Ltd. All rights reserved.
(※The Segway-Ninebot App can support KickScooter with built-in Bluetooth)
Possible causesError code Solution
10 Bluetooth communication failure
11
12
13
14 Abnormal throttle hall sampling
15 Abnormal brake hall sampling
18 Abnormal motor hall signal
21 Battery communication failure
23 Default battery SN Please contact after-sales service or an authorized dealer.
24 Abnormal default voltage
26 Abnormal data writing/reading Please contact after-sales service or an authorized dealer.
31 Incorrect FLASH operation Please contact after-sales service or an authorized dealer.
35 Default KickScootery SN Check whether KickScooter still keeps default SN.
39 Abnormal battery temperature
40 Abnormal controller NTC
41 Abnormal motor NTC Please contact after-sales service or an authorized dealer.
45
Abnormal 1A phase current
sampling of motor
Abnormal 1B phase current
sampling of motor
Abnormal 1C phase current
sampling of motor
Abnormal mother wire current
sampling
Check the connection of dashboard communication wire and
control cable, or contact after-sales service or an authorized dealer.
Please contact after-sales service or an authorized dealer.
Please contact after-sales service or an authorized dealer.
Please contact after-sales service or an authorized dealer.
Check whether the throttle is pressed when powered on, or
contact after-sales service or an authorized dealer.
Check whether the brake lever is squeezed when powered on,
or contact after-sales service or an authorized dealer.
Check whether the hall socket is loose, or contact after-sales
service or an authorized dealer.
Check whether the wire connected with the battery communication
wire and controller is loose, or contact after-sales service or
an authorized dealer.
Check whether the connection wire of battery to controller is loose,
or contact after-sales service or an authorized dealer.
Check the working environment of battery, or contact after-sales
service or an authorized dealer.
Overheated controller, or contact after-sales service or an
authorized dealer.
Please contact after-sales service or an authorized dealer.
Page 8
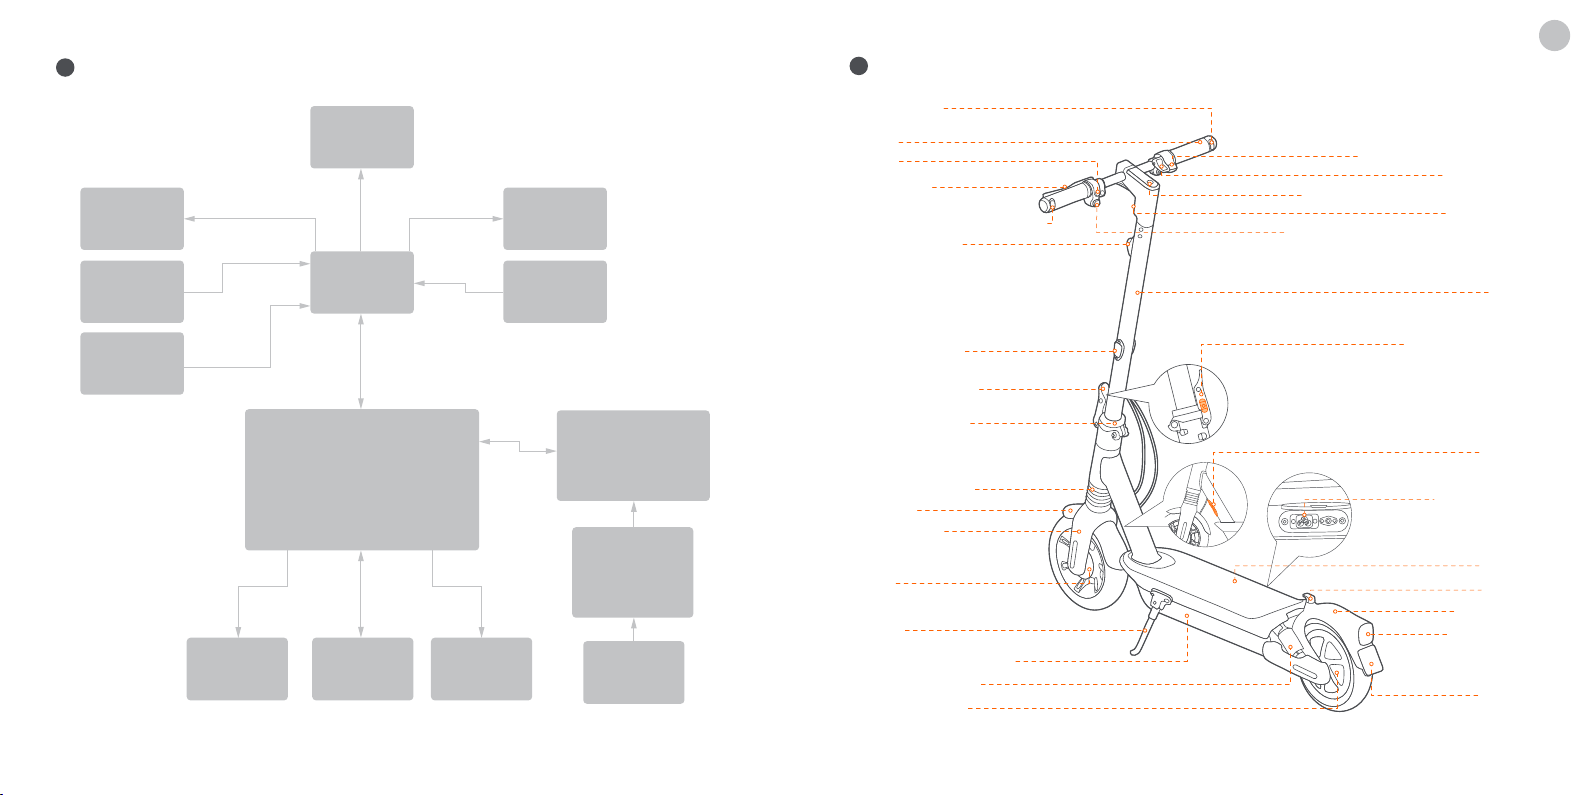
7
Wiring Diagram
Left Direction
Indicator
Headlight
Right Direction
Indicator
1
Diagramme
Indicateur de
direction droit
Guidon
Cloche
Frein à main
Indicateur de direction gauche
Réflecteur avant
FR
Accélérateur électronique
Mousqueton
Tableau de bord et Bouton marche
Phare avant
Commutateur indicateur de direction
Brake
Direction
Indicator
Switch + Horn
Dashboard
Controller
Motor Rear LightHorn
Throttle
Battery
Built-in Charger
AC Charge
Port
Réflecteur latéral
Levier de libération
rapide
Mécanisme pliant
Amortisseur avant
Aile avant
Fourche avant
Frein à
tambour
Béquille
Réceptacle de la batterie
Amortisseur arrière
Moteur du moyeu
Tronc
Bouton de sécurité
Klaxon
Port de charge
Plinthe
Boucle
Aile arrière
Feu arrière &
Luz LED trasera &
Réflecteur
d'immatriculation
Plaque
Page 9
Tableau de bord et Bouton marche
Compteur de vitesse
Phare avant
Icône d'indicateur de
direction gauche
Bluetooth
Bouton marche : Appuyez brièvement pour allumer. Appuyez sur le bouton pendant 3 secondes pour éteindre la trottinette. Lorsque
l'appareil est allumé, cliquez une fois pour allumer / éteindre le phare avant & feu arrière, double-cliquez pour modifier le mode de vitesse.
Compteur de vitesse : Indique la vitesse actuelle. Affiche également les codes d'erreur lorsque des problèmes sont détectés.
Icône d'indicateur de direction: Lorsque vous tournez à gauche ou à droite, appuyez sur le commutateur « ← » (gauche) ou « → » (droite) sur
le commutateur d’ indicateur de direction. Ensuite, l'indicateur de direction clignotera régulièrement, ce qui peut être désactivé en appuyant à
nouveau sur l'interrupteur correspondant.
Mode marche : La vitesse maximale est de 5 km/h (3.1 mph).
Le phare avant et le feu arrière sont toujours allumés et ne peuvent pas être éteints.
* Comment activer dans l'application: Paramètres > Mode marche.
Mode de vitesse : trois modes sont disponibles. La vitesse maximale est la suivante:
Modes
ECO (mode économie d'énergie)
D (mode Standard)
S (mode Sport)
Bluetooth : L'icône indique que la trottinette a été connectée avec succès à l'appareil mobile.
Niveau de la batterie : Le niveau total de la batterie équivaut à 5 barres.
* La puissance de la batterie est très faible lorsque la première barre de batterie est rouge. Veuillez recharger votre trottinette
immédiatement.
14 15 16 17 18 19 20 21 22 23 24 25 26 27 28 29
Modèle
Max G2 E Max G2 D
15 km/h (9.3 mph)
20 km/h (12.4 mph)
25 km/h (15.5 mph)
Icône d'indicateur de
direction droit
Mode de vitesse
Mode marche
Niveau de la batterie
Bouton marche
15 km/h (9.3 mph)
20 km/h (12.4 mph)
20 km/h (12.4 mph)
2
Spécications
Article Paramètre
Nom
Produit
Utilisateur
Paramètre s
de l'appareil
Batterie
Moteur
Chargeur
Pneu
[1] Champ d'application théorique: Testé en roulant avec une batterie pleine, une charge de 75 kg (165 lbs), 25°C (77°F), à la vitesse moyenne de
16 km/h (9,9 mph) en moyenne sur la chaussée.
[2] Autonomie typique: Testé en roulant avec une batterie pleine, une charge de 75 kg (165 lbs), 25°C (77°F), roulez à la vitesse maximale sur le trottoir.
* Certains facteurs peuvent affecter l'autonomie comme: la vitesse, le nombre de démarrages et d'arrêts, charge, la température ambiante, etc.
Modèle
Longueur × Largeur × Hauteur
Replié : Longueur × Largeur × Hauteur
Poids net
Charge utile max.
Âge recommandé
Taille requise
Vitesse maximale
Champ d'application théorique
Autonomie typique
Inclinaison max.
Terrain praticable
Température d'opération
Température d'entreposage
Indice IP
Durée de chargement
Tension nominale
Max. Tension de charge
Température de charge
Capacité nominale
Énergie nominale
Système de gestion de la batterie
Puissance nominale
Puissance max.
Modèle
Type
Puissance de sortie
Tension d'entrée
Tension de sortie max.
Sortie nominale
Pression des pneus
Les pneus
[2]
Ninebot KickScooter Max G2
051501E
Env. 1210 × 570 × 1264 mm (47,6 × 22,4 × 49,8 in)
Env. 1210 × 570 × 605 mm (47,6 × 22,4 × 23,8 in)
Env. 24,25 kg (53,5 lbs)
120 kg (265 lbs)
16–55 ans
120–200 cm (3’11”–6’6”)
Env. 25 km/h (15,5 mph)
[1]
Env. 70 km (43,5 miles)
Env. 50 km (31,1 miles)
Env. 22%
Plupart des routes plates et des routes belges typiques.
-10–40°C (14–104°F)
-10–50°C (14–122°F); recommandation: 10~30°C (50–86°F)
IPX5
Env. 6 h
36 V
42 V
0–40°C (32–104°F)
15,3 Ah
551 Wh
Surchauffe, court-circuit, décharge excessive, surintensité et
protection de surintensité
0,45 kW, 450 W
0,9 kW, 900 W
NB-42D0-02D9
Intégré
0,1218 kW, 121,8 W
100–240 V ~ 50–60 Hz, 2,0 A MAX.
42 V
2,9 A
42-48 psi
Pneus tubeless auto-obturants de 10 pouces
051501D
Env. 20 km/h (12.4 mph)
Page 10
3
Certications
La batterie est conformes à la norme UN 38.3.
Déclaration de conformité à l'Union européenne
Informations sur l'élimination pour les utilisateurs des déchets d'équipements électriques et électroniques
Ce symbole sur le produit ou sur son emballage indique que les produits électriques et électroniques usagés ne
doivent pas être mélangés avec les déchets municipaux non triés. Pour un traitement approprié, il est de votre
responsabilité d'éliminer vos déchets d'équipements en faisant en sorte de les rapporter aux points de collecte
désignés.L'élimination correcte de ce produit permet d'économiser des ressources précieuses et d'éviter tout eet
négatif potentiel sur la santé humaine et l'environnement, qui pourrait autrement résulter d'une manipulation
inappropriée des déchets.Des sanctions peuvent être applicables en cas d'élimination incorrecte de ces déchets,
conformément à votre législation nationale.
Veuillez contacter votre autorité locale pour plus de détails sur le point de collecte désigné le plus proche.
Informations sur le recyclage de la batterie pour les utilisateurs
Ce symbole signifie que les piles et accumulateurs, à leur fin de vie, ne doivent pas être mélangés avec les déchets
municipaux non triés. Votre participation est une partie importante de l'eort visant à minimiser l'impact des piles et
accumulateurs sur l'environnement et sur la santé humaine Pour un recyclage approprié, vous pouvez retourner ce
produit ou les piles ou accumulateurs qu'il contient à votre fournisseur ou à un point de collecte désigné.
L'élimination correcte de ce produit permet d'économiser des ressources précieuses et d'éviter tout eet négatif
potentiel sur la santé humaine et l'environnement, qui pourrait autrement résulter d'une manipulation inappropriée
des déchets.Des sanctions peuvent être applicables en cas d'élimination incorrecte de ces déchets, conformément à
votre législation nationale.
il existe des systèmes de collecte séparés pour les piles et accumulateurs usagés.
Veuillez jeter les piles et les accumulateurs correctement à la collecte/recyclage des déchets de votre communauté
locale centre.
Directive sur les équipements radio
Ninebot (Changzhou) Tech Co., Ltd. déclare par la présente que le produit répertorié dans cette section est conforme
16 17 18 19 20 21 22 23 24 25 26 27 28 29
aux exigences essentielles et aux autres dispositions pertinentes de la directive sur les équipements radio
2014/53/UE.
Directive sur la limitation de l'utilisation de certaines substances dangereuses (RoHS)
Ninebot (Changzhou) Tech Co., Ltd. déclare par la présente que l'ensemble du produit, y compris les pièces (câbles,
cordons, etc.) est conforme aux exigences de la directive RoHS 2011/65/UE et de la modification de la directive
déléguée (UE) 2015/863 sur le restriction de l'utilisation de certaines substances dangereuses dans les équipements électriques et électroniques (""RoHS recast"" ou ""RoHS 2.0"").
Directive Machines
Ninebot (Changzhou) Tech Co., Ltd. déclare par la présente que le produit répertorié dans cette section est conforme
aux exigences essentielles et aux autres dispositions pertinentes de la directive Machines 2006/42/CE.
Représentant autorisé:
Segway-Ninebot Europe, Dynamostraat 7, 1014 BN
Amsterdam, The Netherlands
Ninebot (Changzhou) Tech Co., Ltd. déclare par la présente que le modèle de produit : 051501E, 051501D est
conforme aux exigences essentielles et aux autres dispositions pertinentes de la directive sur les équipements radio
2014/53/UE et de la directive Machines 2006/42/CE et de la directive RoHS 2011/65/UE et modification de la
directive déléguée (UE) 2015/863 de la Commission.
La déclaration de conformité peut être consultée à l'adresse suivante : http://eu-en.segway.com/support-instructions
Bluetooth
Utilisation Works with Apple Badge signifie que le produit a été conçu pour utiliser exclusivement la technologie
identifiée dans le badge et a été certifié conforme par le fabricant du produit Apple Find My network Spécifications et
exigences du produit. Apple n'est pas responsable du fonctionnement de cet appareil ou de l'utilisation de ce produit
ou de sa conformité aux normes de sécurité et de réglementation.
Bandes de fréquence (s)
Max. Puissance RF
2.4000-2.4835GHz
20mW
Page 11

4
Calendrier d'entretien recommandé
Tous les
3 mois
Pour assurer une conduite en toute sécurité, un soin quotidien et un entretien régulier sont essentiels. En tant que propriétaire,
Élément Composant Méthode d'entretien
vous avez le contrôle et la connaissance de la fréquence à laquelle vous utilisez votre scooter, de l' intensité avec laquelle vous
l'utilisez et de l'endroit où vous l'utilisez. Il est de la responsabilité du propriétaire propriétaire d'effectuerectuer des contrôles
réguliers et d'apporter votre scooter à un centre de service agréé pour inspection et entretien. Veuillez vous référer au
Moyeu moteur
calendrier d'entretien ci-dessous.
Remarque: ce programme de maintenance facture des frais de service.
Tous les 6
Élément Composant
Pièces du cadre
Pression des
pneus
Usure des pneus
Maintenance
du cadre
18 19 20 21 22 23 24 25 26 27 28 29
Vis sur le dessus
de la tige
Vis sur le
mécanisme de
pliage
Méthode d'entretien
Utilisez un chiffon doux et humide pour
essuyer le châssis principal pour le
nettoyer.
Gonflez les pneus à 42-48 psi
Vérifiez si les pneus sont fissurés,
déformés ou très usés.
Serrez les vis fixées au guidon et à la tige.
Le couple suggéré est de 5,5±0,5 N·m.
Serrez la vis sur l’accélérateur
électronique. Le couple suggéré est de
0,9±0,06 N·m.
Serrez les vis sur les leviers de frein. Le
couple suggéré est de 6±1 N·m.
Serrez les vis sur le dessus de la tige. Le
couple suggéré est de 8,5±0,5 N·m.
Serrer les vis de fixation de la poignée
pliante et de la fourche avant,
Deux vis transversales latérales avec un
couple recommandé de 15 ± 1n·m
Pliez et Dépliez la vis verticale supérieure
avec un couple recommandé de
15 ± 1n·m
Pliez la tige de raccordement, serrez les
vis de la tige de raccordement lorsque
vous roulez, pliez en douceur sans
secousses.
Tous les
3 mois
√
(310 miles)
mois ou
tous les
500km
Tous les 1 an ou
tous les 1,000
km (621 miles)
√ √√√
√ √√√
√ √√
√
√
√
Tous les 3 ans
ou tous les
10,000km
(6,214 miles)
√√
√√
√√
Contrôle des
fonctions
Entretien des
roues avant
Réglage du
frein à disque
Frein à tambour
Feu arrière
Feu de route
Indicateurs de
direction
Tableau de
bord
Klaxon
Accélérateur
électronique
Pour accélérer et décélérer, vérifiez si le
moyeu moteur est bloqué ou émet des
sons anormaux.
Vérifiez si la roue avant est bloquée ou
tremblante, ou si l'arbre de l'axe est
déséquilibré.
Si le frein est trop serré/lâche, utilisez la
clé Allen de 4mm pour desserrer la vis
de l’étrier. Ajustez ensuite légèrement la
ligne de frein (diminuez / augmentez la
durée d'exposition), puis serrez les vis.
Norme d'essai: vitesse de conduite 20
km/h (12.4 mph), distance de freinage
inférieure à 6 m
La roue avant tourne normalement sans
bruit anormal. Les roues avant peuvent
être freinées lorsque le levier de frein
est pressé.
Serrez les leviers de frein, le feu arrière
fonctionne normalement.
Vérifiez le feu de route et voyez s'il
s'allume bien.
Basculez le bouton des indicateurs de
direction vers la gauche/droite
respectivement, vérifiez si les
indicateurs de direction du côté
gauche/droit clignotent normalement.
Allumez le scooter, le tableau de bord
fonctionne correctement.
Appuyez sur le bouton klaxon et le son
est fort.
Appuyez sur l’accélérateur électronique
et maintenez-le enfoncé, puis
relâchez-le, en vérifiant l’accélération et
la décélération.Remarque : relâchez-le,
vérifiez si l’accélérateur électronique
revient à la position.
Tous les 6
mois ou
tous les
500km
(310 miles)
Tous les 1 an ou
tous les 1,000
km (621 miles)
√ √
√ √
√ √√
√ √√
√ √√
√ √√
√ √√
√ √√
√ √√
√ √√
Tous les 3 ans
ou tous les
10,000km
(6,214 miles)
Page 12

5
Tous les 6
mois ou
Élément Composant Méthode d'entretien
Après connexion avec l'application
Segway-Ninebot :
Détection de
panne
Contrôle des
fonctions
Pièces
importantes
Pièces
fonctionnelles
20 21 22 23 24 25 26 27 28 29
Chargement
Boutons de
contrôle
Tourner
Ensemble de
batterie
Manette
Moyeu moteur
Montage de la
roue arrière
Leviers
d'accélérateur et
de frein
Ensemble de
fourche avant
Mécanisme de
pliage
Frein à tambour
Couvercle du
tableau de bord
1) Mettez à jour le firmware vers la
dernière version.
2) Vérifiez si la notification du code
d'erreur correspondant et des causes
possibles s'affiche lorsque le scooter
détecte une erreur.
Chargez le scooter :
1) Vérifiez si la puissance actuelle de la
batterie s’affiche sur le tableau de bord.
2) Vérifiez l'indicateur LED sur le chargeur
de batterie.
Charge : rouge, complètement chargé :
vert.
Appuyez ou basculez le bouton 3 fois sans
échec.
Testez avec des virages à gauche et des
virages à droite (l'angle de braquage est
de 60).Pas de résistance ni de décalage
lors des virages.
Lorsque la batterie est chargée 500 fois
ou que le kilométrage total dépasse
10,000 km (6,213 milles), la batterie doit
être remplacée.
Note: il est recommandé de charger tous
les 60 jours pour un stockage à long
terme.
Après 3 ans ou 10,000 km (6,214 miles)
de conduite, les pièces anormales du
KickScooter doivent être remplacées
immédiatement.
Tous les
3 mois
(310 miles)
tous les
500km
Tous les 1 an ou
tous les 1,000
km (621 miles)
Tous les 3 ans
ou tous les
10,000km
(6,214 miles)
√√ √
√√ √
√√ √
√ √
√
Marque déposée
Ninebot est la marque commerciale de Ninebot (Beijing) Tech Co., Ltd. ; Segway et le Rider Design sont des marques
déposées de Segway Inc., App Store, Apple logo, Apple, Apple find my, Apple Watch, find my, iPhone, iPad, iPad os, Mac,
MacOs et Watch os sont des marques déposées d'Apple GmbH. IOS est une marque déposée de Cisco et est sous licence.
Android, Google Play et le logo Google Play sont des marques commerciales de Google LLC. La marque et les logos
Bluetooth® sont des marques déposées appartenant à Bluetooth SIG, Inc. et toute utilisation de ces marques par
Segway-Ninebot est sous licence. Les autres marques et noms commerciaux appartiennent à leurs propriétaires respectifs.
Le KickScooter est couvert par les brevets pertinents. Pour obtenir des renseignements sur les brevets, rendez-vous sur
http://www.segway.com.
Nous nous sommes eorcés d'inclure des descriptions et des instructions pour toutes les fonctions du KickScooter au
moment de l'impression. Cependant, en raison de l'amélioration constante des fonctionnalités de l'appareil et des
modifications de conception, votre KickScooter peut diérer légèrement de celui présenté dans ce document. Scannez le
QR code ou visitez l'Apple App Store (iOS) ou le Google Play Store (Android) pour télécharger et installer l'application.
Veuillez noter qu'il existe plusieurs modèles Segway et Ninebot ayant diérentes fonctions et certaines des fonctions
mentionnées ici peuvent ne pas concerner votre appareil. Le fabricant se réserve le droit de modifier la conception et les
fonctionnalités du produit et de la documentation KickScooter sans préavis.
© 2023 Ninebot (Beijing) Tech Co., Ltd. Tous droits réservés.
(※L'application Segway-Ninebot peut prendre en charge le KickScooter avec Bluetooth intégré)
Page 13
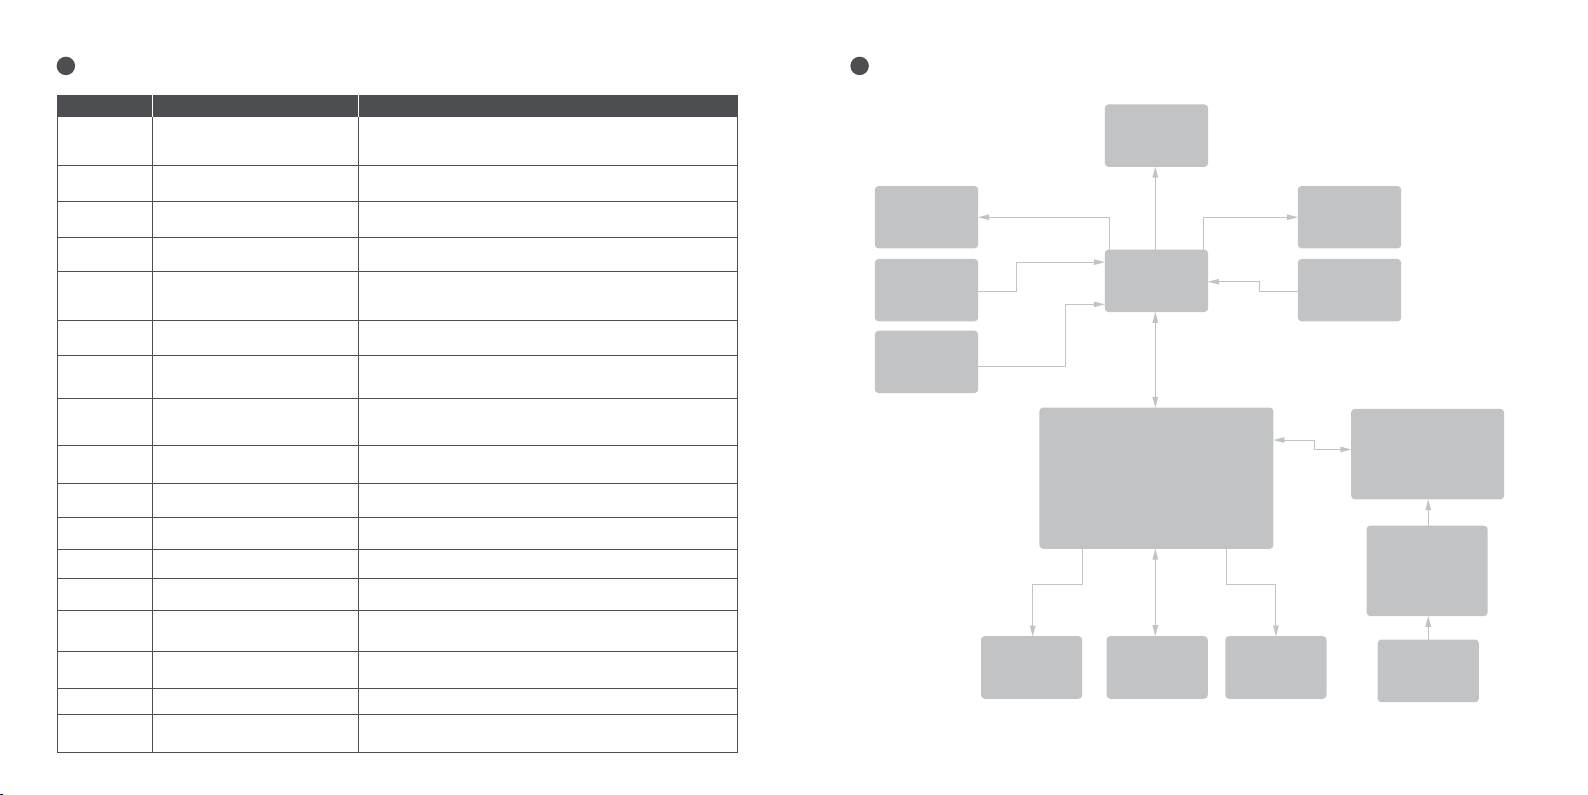
6
Défaillances courantes
Causes possiblesCode d'erreur Solution
10
11
12
13
14
15
18 Signal Hall du moteur anormal
21
23 SN de la batterie par défaut Veuillez contacter le service après-vente ou un revendeur agréé.
24 Tension par défaut anormale
26
31
35 SN KickScooter par défaut Vérifiez que le KickScooter conserve toujours le SN par défaut.
39 Température de batterie anormale
40 NTC contrôleur anormal
41 NTC moteur anormal Veuillez contacter le service après-vente ou un revendeur agréé.
45
22 23 24 25 26 27 28 29
Échec de la communication
Bluetooth
Échantillonnage anormal du
courant de phase 1A du moteur
Échantillonnage anormal du
courant de phase 1B du moteur
Échantillonnage anormal du
courant de phase 1C du moteur
Échantillonnage anormal du capteur
Hall de l’accélérateur électronique
Échantillonnage anormal du capteur
Hall de freinage
Échec de la communication de
la batterie
Écriture/lecture de données
anormale
Opération FLASH incorrecte
Échantillonnage de courant
de fil mère anormal
Vérifiez la connexion du câble de communication du tableau de
bord et du câble de commande, ou contactez le service
après-vente ou un revendeur agréé.
Veuillez contacter le service après-vente ou un revendeur agréé.
Veuillez contacter le service après-vente ou un revendeur agréé.
Veuillez contacter le service après-vente ou un revendeur agréé.
Vérifiez si l'accélérateur électronique est enfoncé lors de la mise
sous tension ou contactez le service après-vente ou un
revendeur agréé.
Vérifiez si le levier de frein est serré lors de la mise sous tension ou
contactez le service après-vente ou un revendeur agréé.
Vérifiez si la prise Hall est desserrée ou contactez le service
après-vente ou un revendeur agréé.
Vérifiez si le câble connecté au câble de communication de la
batterie et au contrôleur est desserré, ou contactez le service
après-vente ou un revendeur agréé.
Vérifiez si le câble de connexion de la batterie au contrôleur est
desserré ou contactez le service après-vente ou un revendeur agréé.
Veuillez contacter le service après-vente ou un revendeur agréé.
Veuillez contacter le service après-vente ou un revendeur agréé.
Vérifiez l'environnement de fonctionnement de la batterie ou
contactez le service après-vente ou un revendeur agréé.
Surchauffe du contrôleur, ou veuillez contacter le service
après-vente ou un revendeur agréé.
Veuillez contacter le service après-vente ou un revendeur agréé.
7
Schéma de câblage
Feu de virage
à gauche
Frein
Indicateur de
direction
+ Bouton
klaxon
Phare avant
Tableau
de bord
Contrôleur
Moteur Feu arrièreKlaxon
Feu de virage
à gauche
Accélérateur
électronique
Intégré Chargeur
Batterie
AC Port
de charge
Page 14
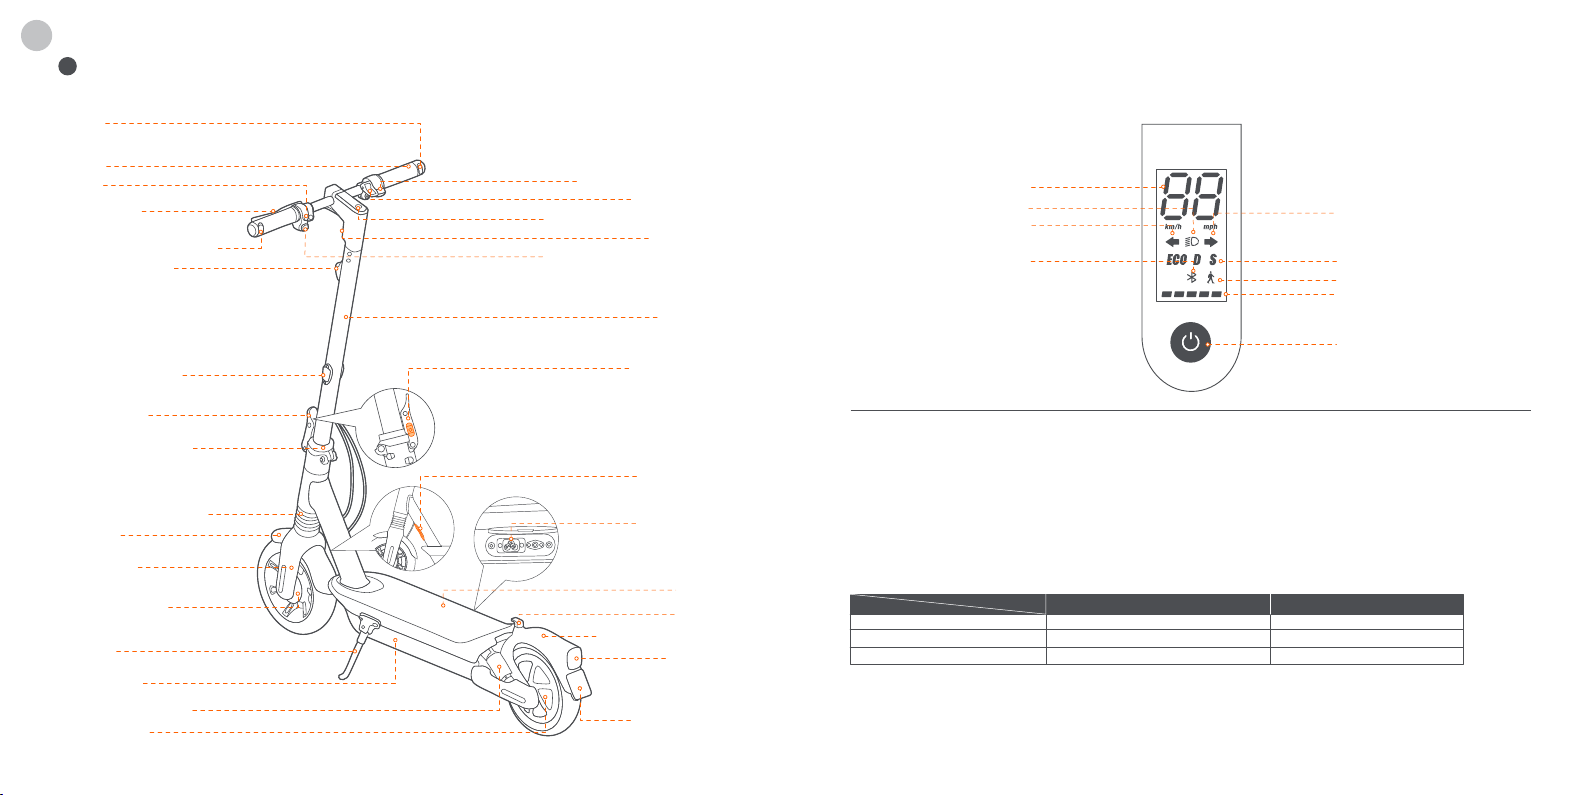
DE
1
Diagramm
Rechts
Fahrtrichtungsanzeiger
Lenker
Klingel
Bremshebel
Links Richtungsanzeiger
Frontrückstrahler
Seitenrückstrahler
Elektronischer Gashebel
Karabinerhaken
Armaturenbrett & Startknopf
Scheinwerfer
Fahrtrichtungsanzeiger-Taste
Lenkstange
Sicherheitstaste
Armaturenbrett & Startknopf
Tachoanzeige
Scheinwerfer
Links
Fahrtrichtungsanzeiger
Bluetooth
Rechts
Fahrtrichtungsanzeiger
Geschwindigkeitsmodus
Gehmodus
Akkustand
Startknopf
Auslösehebel
Klappmechanismus
Klingeln Sie an
Vorderer Stoßdämpfer
Vorderes
Ladeanschluss
Schutzblech
Vordergabel
Trittbrett
Trommelbremse
Ständer
Hinteres Schutzblech
Batteriefach
Stoßdämpfer hinten
Narbenmotor
24 25 26 27 28 29
Schnalle
Rücklicht &
Bremsleuchte &
Reflektor
Nummernschild
Startknopf: Zum Einschalten den Startknopf kurz drücken. Die Taste 3 Sekunden lang gedrückt halten, um den Roller auszuschalten.
Wenn der KickScooter eingeschaltet ist, drücken Sie die Starttaste, um den Scheinwerfer und das Rücklicht zum ein-/auszuschalten und
drücken Sie doppelt, um zwischen den Geschwindigkeitsmodi zu wechseln.
Tacho: Zeigt die aktuelle Geschwindigkeit an. Hier werden auch Fehlercodes bei Erkennen von Fehlern angezeigt.
Fahrtrichtungsanzeiger: Drücken Sie beim Abbiegen nach links oder rechts den Schalter „←“ (links) oder „→“ (rechts) am
Blinkerschalter. Dann blinkt die Fahrtrichtungsanzeige regelmäßig, was durch erneutes Drücken des entsprechenden Schalters
ausgeschaltet werden kann.
Gehmodus: Max. Geschwindigkeit 5 km/h (3,1 mph).
Der Scheinwerfer und das Rücklicht sind dauerhaft eingeschaltet und können nicht ausgeschaltet werden.
* So aktivieren Sie in der App: Einstellungen > Gehmodus.
Geschwindigkeitsmodus: Es sind drei verschiedene Modi verfügbar. Die Höchstgeschwindigkeit ist wie folgt:
Modes
ECO (Energiesparmodus)
D (Standardmodus)
S (Sportmodus)
Bluetooth: Das Symbol zeigt an, dass der Roller erfolgreich an das mobile Gerät gekoppelt wurde.
Akkustand: Die Batteriegesamtladung wird mit 5 Balken angezeigt.
* Der Akkustand ist sehr gering, wenn der erste Batteriebalken rot leuchtet. Bitte laden Sie Ihren KickScooter sofort auf.
Modell
Max G2 E Max G2 D
15 km/h (9.3 mph)
20 km/h (12.4 mph)
25 km/h (15.5 mph)
15 km/h (9.3 mph)
20 km/h (12.4 mph)
20 km/h (12.4 mph)
Page 15
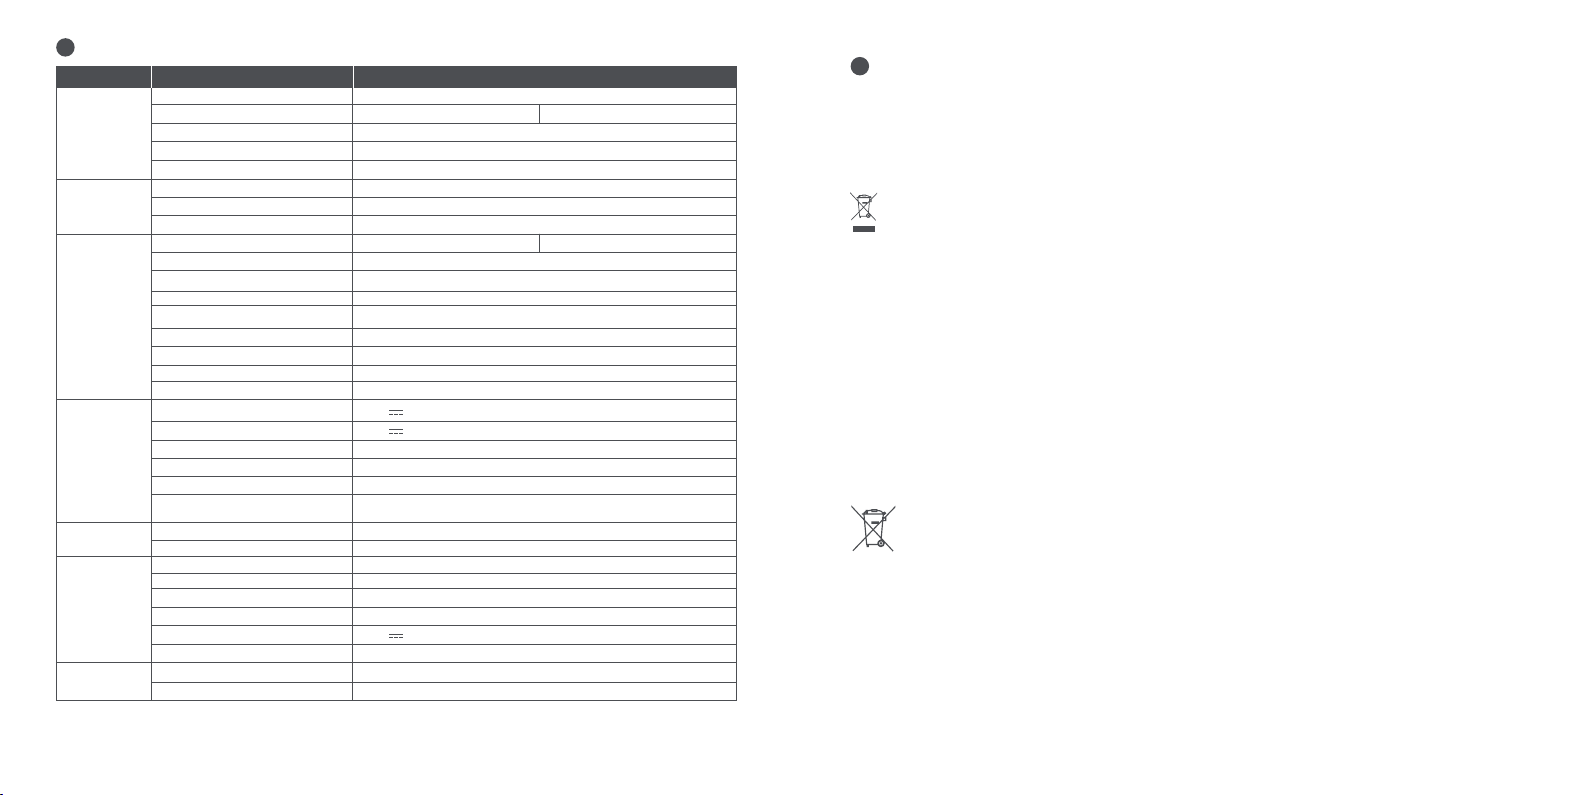
2
Technische Daten
Artikel Parameter
Name
Modell
Produkt
Länge × Breite × Höhe
Zusammengeklappt: Länge × Breite × Höhe
Nettogewicht
Nutzlast
Fahrer
Altersempfehlung
Erforderliche Höhe
Maschinenparameter
Höchst geschwindigkeit
Theoretischer Bereich
Normale Reichweite
Höchst steigung
[1]
[2]
Befahrbares Gelände
Betriebstemperatur
Lagertemperatur
IP-Klassifizierung
Ladedauer
Nennspannung
Max. Ladespannung
Batterie
Ladetemperatur
Nennleistung
Nominale Energie
Batteriemanagementsystem
Motor
Ladegerät
Nennleistung
Max. Leistung
Modell
Typ
Nennausgangsleistung
Eingangsspannung
Max. Ausgangsspannung
Ausgang nominal
Reifen
[1] Theoretischer Bereich: Getestet beim Fahren mit vollem akku, 75 kg (165 lbs) traglast, 25°C (77°F), und einer durchschnittsgeschwindigkeit von
16 km/h (9,9 mph) auf Bürgersteigen.
[2] Normale Reichweite: Getestet beim fahren mit vollem akku, 75 kg (165 lbs) traglast, 25°C (77°F), höchstgeschwindigkeit auf durchschnittlichem
Straßenbelag durchgeführt.
26 27 28 29
* Einige der Faktoren, die die Reichweite beeinflussen sind, Geschwindigkeit, last, Anzahl der Starts und Stopps, Temperatur, usw.
Reifendruck
Reifen
Ninebot KickScooter Max G2
051501E
051501D
Ca. 1210 × 570 × 1264 mm (47,6 × 22,4 × 49,8 in)
Ca. 1210 × 570 × 605 mm (47,6 × 22,4 × 23,8 in)
Ca. 24,25 kg (53,5 lbs)
120 kg (265 lbs)
16–55 Jahre
130–200 cm (4’3”–6’6”)
Ca. 25 km/h (15,5 mph)
Ca. 20 km/h (12,4 mph)
Ca. 70 km (43,5 miles)
Ca. 50 km (31,1 miles)
Ca. 22%
Meisten ebenen Straßenverhältnisse und typisch belgische Straßen
-10–40°C (14–104°F)
-10–50°C (14–122°F); empfohlene: 10~30°C: (50–86°F)
IPX5
Ca. 6 h
36 V
42 V
0–40°C (32–104°F)
15,3 Ah
561 Wh
Überhitzungs-, Kurzschluss-, Überentladung-, Überstrom- und
Überladeschutz
0,45 kW, 450 W
0,9 kW, 900 W
NB-42D0-02D9
Integriert
0,1218 kW, 121,8 W
100–240 V ~ 50–60 Hz, 2,0 A MAX.
42 V
2,9 A
42–48 psi
10-Zoll-selbstdichtende schlauchlose Reifen
3
Zertizierungen
Der Batterie entspricht den UN 38.3-Vorschriften.
Konformitätserklärung der Europäischen Union
Informationen zur Entsorgung für Benutzer von Elektro- und Elektronik-Altgeräten
Dieses Symbol auf dem Produkt oder seiner Verpackung weist darauf hin, dass gebrauchte Elektro- und Elektronikprodukte nicht mit unsortiertem Siedlungsabfall gemischt werden sollten. Für eine ordnungsgemäße Behandlung
sind Sie dafür verantwortlich, Ihre Altgeräte zu entsorgen, indem Sie dafür sorgen, dass sie an ausgewiesenen
Sammelstellen abgegeben werden.
Die ordnungsgemäße Entsorgung dieses Produkts trägt dazu bei, wertvolle Ressourcen zu sparen und mögliche
negative Auswirkungen auf die menschliche Gesundheit und die Umwelt zu vermeiden, die andernfalls durch
unsachgemäße Abfallbehandlung entstehen könnten.
Für die unsachgemäße Entsorgung dieses Abfalls können gemäß Ihrer nationalen Gesetzgebung Strafen verhängt
werden.
Bitte wenden Sie sich an Ihre örtliche Behörde, um weitere Informationen zur nächstgelegenen ausgewiesenen
Sammelstelle zu erhalten.
Informationen zum Batterierecycling für Benutzer
Dieses Symbol bedeutet, dass Batterien und Akkumulatoren am Ende ihrer Lebensdauer nicht mit unsortiertem
Siedlungsabfall vermischt werden sollten. Ihre Teilnahme ist ein wichtiger Teil der Bemühungen, die Auswirkungen
von Batterien und Akkumulatoren auf die Umwelt und die menschliche Gesundheit zu minimieren Zum ordnungsgemäßen Recycling können Sie dieses Produkt oder die darin enthaltenen Batterien oder Akkus bei Ihrem
Lieferanten oder einer dafür vorgesehenen Sammelstelle abgeben.
Die ordnungsgemäße Entsorgung dieses Produkts trägt dazu bei, wertvolle Ressourcen zu sparen und mögliche
negative Auswirkungen auf die menschliche Gesundheit und die Umwelt zu vermeiden, die andernfalls durch
unsachgemäße Abfallbehandlung entstehen könnten.
Für die unsachgemäße Entsorgung dieses Abfalls können gemäß Ihrer nationalen Gesetzgebung Strafen verhängt
werden.
Page 16
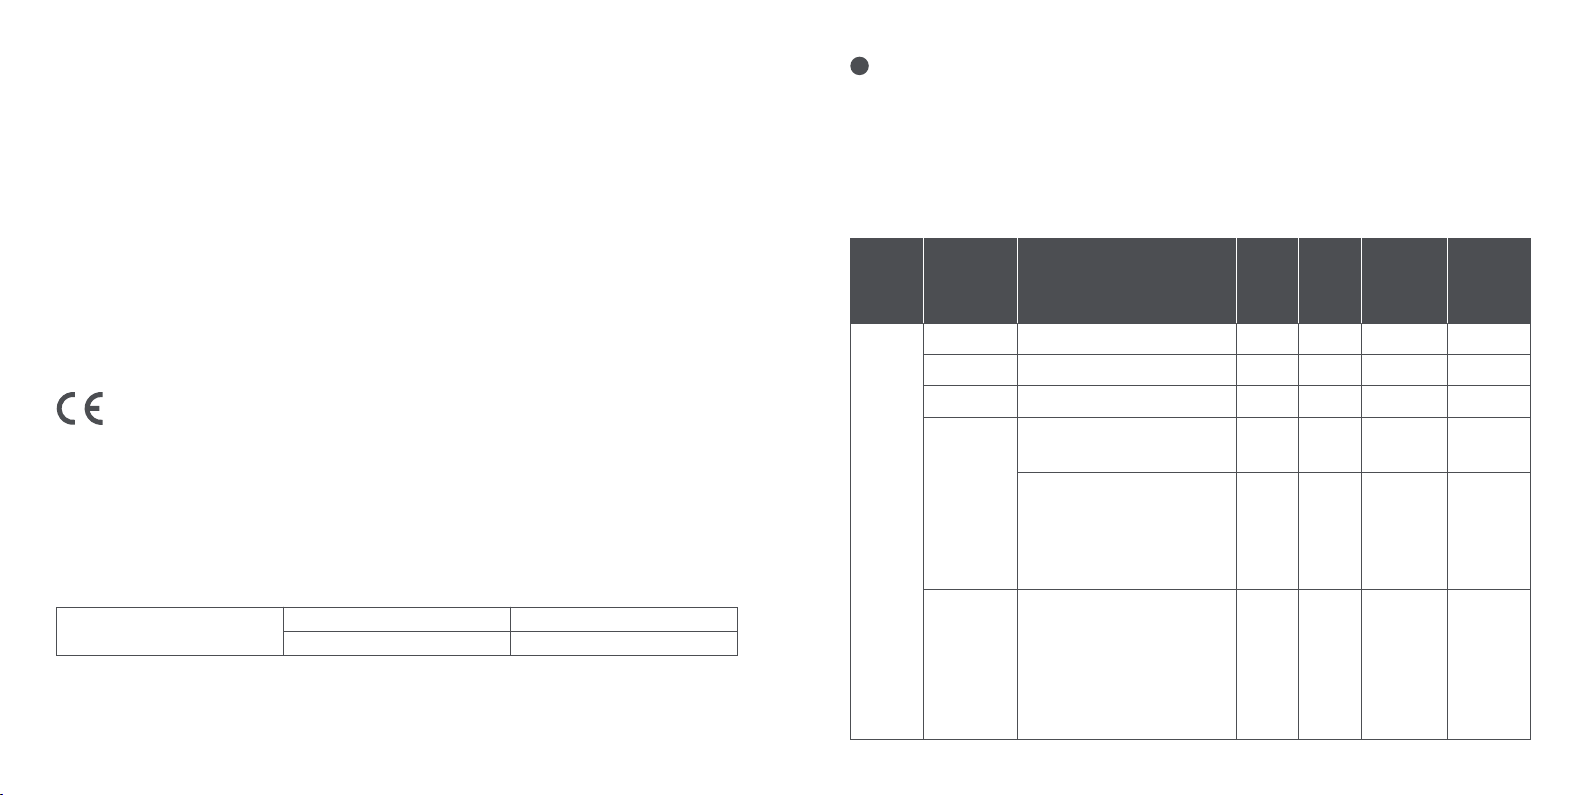
Für gebrauchte Batterien und Akkus gibt es getrennte Sammelsysteme.
Bitte entsorgen Sie Batterien und Akkus fachgerecht bei Ihrer kommunalen Sammelstelle/Recycling Center.
Richtlinie über Funkanlagen
Ninebot (Changzhou) Tech Co., Ltd. erklärt hiermit, dass das in diesem Abschnitt aufgeführte Produkt den
grundlegenden Anforderungen und anderen relevanten Bestimmungen der Richtlinie 2014/53/EU über Funkanlagen
entspricht.
Beschränkung der Verwendung bestimmter gefährlicher Stoe (RoHS)-Richtlinie
Ninebot (Changzhou) Tech Co., Ltd. erklärt hiermit, dass das gesamte Produkt einschließlich Teilen (Kabel, Schnüre
usw.) die Anforderungen der RoHS-Richtlinie 2011/65/EU und der Änderung der Delegierten Richtlinie (EU)
2015/863 der Kommission über die erfüllt Beschränkung der Verwendung bestimmter gefährlicher Stoe in Elektround Elektronikgeräten („RoHS recast“ oder „RoHS 2.0“).
Maschinenrichtlinie
Ninebot (Changzhou) Tech Co., Ltd. erklärt hiermit, dass das in diesem Abschnitt aufgeführte Produkt den
grundlegenden Anforderungen und anderen relevanten Bestimmungen der Maschinenrichtlinie 2006/42/EG
entspricht.
Autorisierter Vertreter:
Segway-Ninebot Europe, Dynamostraat 7, 1014 BN
Amsterdam, The Netherlands
Ninebot (Changzhou) Tech Co., Ltd. erklärt hiermit, dass das Produktmodell: 051501E, 051501D den grundlegenden
Anforderungen und anderen relevanten Bestimmungen der Richtlinie 2014/53/EU über Funkanlagen entspricht und
der Maschinenrichtlinie 2006/42/EG entspricht und der RoHS-Richtlinie 2011/65/EU entspricht und Änderung
Delegierte Richtlinie (EU) 2015/863 der Kommission.
Die Konformitätserklärung kann unter folgender Adresse eingesehen werden: http://eu-en.segway.com/support-instructions
Bluetooth
Frequenzband (-bänder)
Max. Hochfrequenzleistung
2.4000-2.4835GHz
20mW
Nutzung der Works with Apple Badge bedeutet, dass ein Produkt speziell für die im Badge identifizierte Technologie
entwickelt wurde und vom Produkthersteller zertifiziert wurde, um Apple Find My network Produktspezifikationen
und -anforderungen. Apple ist nicht verantwortlich für den Betrieb dieses Geräts oder die Verwendung dieses
Produkts oder seine Einhaltung von Sicherheits- und Regulierungsstandards.
28 29
4
Empfohlener Wartungsplan
Um ein sicheres Fahren zu gewährleisten, sind tägliche undege und regelmäßige Wartung unerlässlich. Sie, der Besitzer,
haben die Kontrolle und das Wissen darüber, wie oft Sie Ihren Roller benutzen, wie intensiv Sie ihn benutzen und wo Sie ihn
benutzen. Er gehört dem Besitzer Es liegt in Ihrer Verantwortung, regelmäßige Überprüfungendurchzuführen und Ihren
Scooter zur Inspektion und Wartung zu einem autorisierten Servicecenter zu bringen. Für Ihre Sicherheit und ein besseres
Fahrerlebnis führen Sie bitte eine regelmäßige Wartung des KickScooters durch. Bitte beachten Sie den Wartungsplan unten.
Hinweis: Für diesen Wartungsplan wird eine Servicegebühr erhoben.
Alle 6
Monate
Artikel Komponente
Mainframe-Teile
Reifendruck
Reifenverschleiß
Mainframe
Wartung
Schrauben auf
der Schaftspitze
Schrauben am
Klappmechanis
mus
Wartungsmethode
Wischen Sie den Mainframe mit einem
weichen,feuchten Tuch sauber.
Reifen auf 42-48 psi aufpumpen.
Überprüfen Sie, ob die Reifen gerissen,
verformt oder stark abgenutzt sind.
Ziehen Sie die Schrauben fest, die mit
dem Lenker und dem Vorbau verbunden
sind. Das empfohlene Drehmoment
beträgt 5,5±0,5 N·m.
Ziehen Sie die Schraube an der
Drosselklappe fest. Das empfohlene
Drehmoment beträgt 0,9±0,06 N·m.
Ziehen Sie die Schrauben an den
Bremshebeln fest. Das empfohlene
Drehmoment beträgt 6±1 N·m.
Ziehen Sie die Schrauben am
Vorbauoberteil fest. Das empfohlene
Drehmoment beträgt 8,5±0,5 N·m.
Ziehen Sie die Befestigungsschrauben
des Klappgriffs und der Vordergabel fest,
Zwei seitliche Schrauben an der Seite,
das empfohlene Drehmoment beträgt
15 ± 1N · m
Falten und entfalten, die obere vertikale
Schraube, das empfohlene Drehmoment
ist 15 ± 1N · m
Falten Sie die Pleuelstange und
befestigen Sie die
Pleuelstangenschrauben, wenn Sie auf
dem Fahrrad schaukeln.
Alle 3
Monate
Alle 1 Jahr oder
oder alle
500 km
Meilen)
√
(310
alle 1,000 km
(621 Meilen)
√ √√√
√ √√√
√ √√
√
√
√
Alle 3 Jahr oder
alle 10,000 km
(6,214 Meilen)
√√
√√
√√
Page 17

Alle 6
Monate
Alle 6
Monate
Alle 1 Jahr oder
Artikel Komponente Wartungsmethode
Überprüfen Sie zum Beschleunigen und
Nabenmotor
Vorderrad
Wartung
Bremseinste
llung
Trommelbremse
Funktionsprü
fung
Rücklicht
Scheinwerfer
Fahrtrichtung
sanzeiger
Armaturenbrett
Klingeln Sie an
Gaspedal
30 31 32 33 34 35 36 37 38 39 40 41 42 43 44 45
Abbremsen, ob der Nabenmotor
abgewürgt ist oder ungewöhnliche
Geräusche macht.
Überprüfen Sie, ob das Vorderrad
blockiert ist oder wackelt, oder die
Achswelleist unausgeglichen.
Wenn die Bremse zu fest / locker ist,
lösen Sie die Schraube am Bremssattel
mit dem 4-mm-Inbusschlüssel. Stellen
Sie dann die Bremsleitung leicht ein
(verringern / erhöhen Sie die
freiliegende Länge) und ziehen Sie die
Schraube wieder an.
Teststandard: die Fahrgeschwindigkeit
ist 20 km/h (12.4 mph), und der
Bremsweg ist innerhalb 6m
La roue avant tourne normalement sans
bruit anormal. Les roues avant peuvent
être freinées lorsque le levier de frein
est pressé.
Drücken Sie die Bremshebel, die
Rücklichter funktionieren normal.
Überprüfen Sie den Scheinwerfer und
sehen Sie, ob er hell leuchtet.
Drücken Sie die
Fahrtrichtungsanzeiger-Taste jeweils
nach links/rechts. Prüfen Sie, ob die
Fahrtrichtungsanzeiger auf der
linken/rechten Seite normal blinken.
Schalten Sie den Roller ein, das
Armaturenbrett funktioniert
ordnungsgemäß.
Drücken Sie die Hupentaste und das
Geräusch ist laut.
Halten Sie den Gashebel gedrückt und
lassen Sie ihn dann los, um
Beschleunigung und Verzögerung zu
prüfen.
Hinweis: Lassen Sie den Gashebel los und
prüfen Sie, ob der Gashebel in die Position
zurückkehrt.
Alle 3
Monate
oder alle
500 km
(310
Meilen)
alle 1,000 km
(621 Meilen)
Alle 3 Jahr oder
alle 10,000 km
(6,214 Meilen)
√ √
√ √
√ √√
√ √√
√ √√
√ √√
√ √√
√ √√
√ √√
√ √√
Artikel Komponente Wartungsmethode
Nach dem Verbinden mit der
Segway-Ninebot-App:
1) Aktualisieren Sie die Firmware auf die
neueste Version.
2) Prüfen Sie, ob die Benachrichtigung
über den entsprechenden
Fehlercode und mögliche Ursachen
erfolgt, wenn der Scooter einen Fehler
erkennt.
Roller aufladen:
1) Überprüfen Sie, ob die aktuelle
Batterieleistung auf dem Dashboard
angezeigt wird.
2) Überprüfen Sie die LED-Anzeige am
Batterieladegerät. Laden: rot. Voll
aufgeladen: grün.
Drücken oder schalten Sie die Taste 3 Mal
ohne Fehler um.
Test mit Linkskurven und Rechtskurven
(der Lenkwinkel beträgt 60). Kein
Widerstand oder Verzögerung beim
Wenden
Die Batterie muss ausgetauscht werden,
wenn sie 500 Mal geladen und entladen
wurde oder die Gesamtlaufleistung mehr
als 10,000 km (6,213 Meilen) beträgt.
Hinweis: Bei längerer Lagerung wird
empfohlen, alle 60 Tage einmal
aufzuladen.
Nach 3 Jahren oder 10,000 km (6,214
Meilen) Fahrt müssen die abnormalen
Teile des Tretrollers sofort ersetzt werden.
Funktionsprü
fung
Wichtige
Teile
Funktionst
eile
Erkennung
Laden
Steuerschalter
Drehen
Batteriemo
ntage
Regler
Nabenmotor
Hinterradbaugru
ppe
Gas- und
Bremshebel
Montage der
Vorderradgabel
Klappmecha
nismus
Trommelbremse
Dashboard-Abde
ckung
Alle 3
Monate
oder alle
500 km
(310
Meilen)
Alle 1 Jahr oder
alle 1,000 km
(621 Meilen)
Alle 3 Jahr oder
alle 10,000 km
(6,214 Meilen)
√√ √
√√ √
√√ √
√ √
√
Page 18

5
Warenzeichen
6
Häuge Fehler
Ninebot ist das Warenzeichen von Ninebot (Beijing) Tech Co., Ltd; Segway und das Rider Design sind eingetragene
Warenzeichen von Segway Inc., App Store, Apple Logo, Apple, Apple Find My, Apple Watch, Find My, iPhone, iPad, iPadOS,
Mac, macOS und watchOS sind Marken von Apple Inc. IOS ist eine Marke von Cisco und wird unter Lizenz verwendet.
Android, Google Play und das Google Play-Logo sind Warenzeichen von Google LLC. Die Bluetooth®-Wortmarke und die
Logos sind eingetragene Warenzeichen im Besitz der Bluetooth SIG, Inc. und werden von Segway-Ninebot unter Lizenz
verwendet. Andere Marken oder Warenzeichen und Handelsnamen sind das Eigentum ihrer jeweiligen Eigentümer.
Der KickScooter unterliegt dem Schutz entsprechender Patente. Patentinformationen finden Sie unter
http://www.segway.com.
Wir haben versucht, Beschreibungen und Anweisungen für alle Funktionen des KickScooter zum Zeitpunkt des Drucks
aufzunehmen. Aufgrund der ständigen Verbesserung der Produkteigenschaften und Designänderungen kann Ihr
KickScooter jedoch leicht von dem in diesem Dokument beschriebenen abweichen. Besuchen Sie den Apple App Store
(iOS) oder den Google Play Store (Android), um die App herunterzuladen und zu installieren. Bitte beachten Sie, dass es
zahlreiche Segway und Ninebot Modelle mit unterschiedlichen Funktionen gibt und dass einige der hier genannten
Funktionen für Ihr Modell nicht zutreend sind. Der Hersteller behält sich das Recht vor, Design und Funktionalität des
KickScooter-Produktes sowie die Dokumentation ohne vorherige Mitteilung zu ändern.
© 2023 Ninebot (Beijing) Tech Co. Ltd. Alle Rechte vorbehalten.
(※Die App ist geeignet für den KickScooter, die „Bluetooth“ unterstützt)
32 33 34 35 36 37 38 39 40 41 42 43 44 45
10
11
12
13
14
15
18
21
23 Standard-Seriennummer des Akkus
24 Anormale Standardspannung
26
31 Falscher FLASH-Betrieb
35
39 Anormale Akkutemperatur
40 Anormaler Controller-NTC
41 Anormaler Motor-NTC
45
Mögliche UrsachenFehlercode Lösung
Bluetooth-Kommunikationsfehler
Anormale 1A-PhasenstromAbtastung des Motors
Anormale 1B-Phasenstrom-Abtastung des Motors
Anormale 1C-Phasenstrom-Abtastung des Motors
Anormale Abtastung des
Gasgriff-Halls
Anormale Abtastung des
Brems-Halls
Anormales Motor-Hall-Signal
Ausfall der Akkukommunikation
Anormales
Schreiben/Lesen von Daten
Standard-Seriennummer des
KickScooter
Anormale Abtastung des
BUS-Stroms
Überprüfen Sie den Anschluss des Kommunikations- und
Steuerkabels der Anzeigetafel, oder wenden Sie sich an den
Kundendienst oder einen autorisierten Händler.
Bitte wenden Sie sich an den Kundendienst oder einen autorisierten
Händler.
Bitte wenden Sie sich an den Kundendienst oder einen autorisierten
Händler.
Bitte wenden Sie sich an den Kundendienst oder einen
autorisierten Händler.
Prüfen Sie, ob der Gasgriff beim Einschalten gedrückt ist, oder
wenden Sie sich an den Kundendienst oder einen autorisierten
Händler.
Prüfen Sie, ob der Bremshebel beim Einschalten betätigt wird, oder
wenden Sie sich an den Kundendienst oder einen autorisierten
Händler.
Prüfen Sie, ob die Steckbuchse des Hall-Sensors locker ist, oder
wenden Sie sich an den Kundendienst oder einen autorisierten
Händler.
Prüfen Sie, ob das Kabel, das mit dem Kommunikationskabel des
Akkus und dem Controller verbunden ist, locker ist, oder wenden Sie
sich an den Kundendienst oder einen autorisierten Händler.
Bitte wenden Sie sich an den Kundendienst oder einen autorisierten
Händler.
Prüfen Sie, ob das Verbindungskabel zwischen Akku und Controller
locker ist, oder wenden Sie sich an den Kundendienst oder einen
autorisierten Händler.
Bitte wenden Sie sich an den Kundendienst oder einen
autorisierten Händler.
Bitte wenden Sie sich an den Kundendienst oder einen autorisierten
Händler.
Prüfen Sie, ob KickScooter noch die Standard-Seriennummer
aufweist.
Prüfen Sie die Arbeitsumgebung des Akkus, oder wenden Sie sich
an den Kundendienst oder einen autorisierten Händler.
Überhitzter regler, oder bitte wenden Sie sich an den
Kundendienst oder einen autorisierten Händler.
Bitte wenden Sie sich an den Kundendienst oder einen
autorisierten Händler.
Bitte wenden Sie sich an den Kundendienst oder einen
autorisierten Händler.
Page 19
7
Schaltplan
Linke
Fahrtrichtung
sanzeiger
Bremshebel
Scheinwerfer
Armaturenbrett
Rechts
Fahrtrichtung
sanzeiger
Elektronischer
Gashebel
1
Diagramma
Indicatore di
direzione destro
Barra del manico
Campana
Leva del freno
Indicatore di direzione sinistro
Riflettore anteriore
IT
Acceleratore elettronico
Moschettone
Cruscotto e Pulsante Alimentazione
Faro
Pulsante indicatore di direzione
Stelo
Fahrtrichtung
sanzeiger-Taste
+ Klingelknopf
Batterie
Controller
Integriert
Ladegerät
Narbenmotor RücklichtKlingeln Sie an
34 35 36 37 38 39 40 41 42 43 44 45
AC
Ladeanschluss
Riflettore laterale
Leva di sgancio rapido
Meccanismo di
chiusura pieghevole
Ammortizzatore anteriore
Parafango
anteriore
Forcella anteriore
Freno a tamburo
Cavalletto
Cabina batteria
Ammortizzatore posteriore
Motore hub
Pulsante di sicurezza
Corno
Porta di carica
Pedana
Fibbia
Retro
Parafango
Luce retro &
Luce Freno &
Riflettore
Area targa
Page 20
Cruscotto e Pulsante Alimentazione
Tachimetro
Icona dell'indicatore
Faro
di direzione sinistro
Bluetooth
Pulsante di alimentazione: Premere brevemente per accendere. Premere e tenere premuto il pulsante per 3 secondi per spegnere il
monopattino. Quando acceso, fare un clic per accendere/spegnere il faro & luce retro e fare doppio clic per cambiare la modalità di guida.
Tachimetro: Indica la velocità attuale. Visualizza anche i codici di errore quando vengono rilevati guasti.
Indicador de dirección: Quando si gira a sinistra o a destra, premere l'interruttore “←” (sinistra) o “→” (destra) sull'interruttore
dell'indicatore di direzione. Quindi l'indicatore di direzione lampeggerà regolarmente, e potrà essere spento premendo nuovamente
l'interruttore corrispondente.
Modalità passeggiata: La velocità massima è di 5 km/h (3.1 mph).
il faro e la luce posteriore sono sempre accesi e non possono essere spenti.
* Come abilitare in App: Impostazioni > Modalità passeggiata.
Modalità di guida: sono disponibili tre differenti modalità. La velocità massima è la seguente:
Mode
ECO (modalità di risparmio energetico)
D (modalità standard)
S (modalità Sport)
Bluetooth: l'icona indica che il monopattino è stato collegato correttamente al dispositivo mobile.
Livello alimentazione: Il livello totale della batteria è pari a 5 barre.
* Quando il colore della prima barra di carica della batteria diventa di colore rosso, la carica della batteria è molto bassa. Si prega di
mettere immediatamente in carica KickScooter.
36 37 38 39 40 41 42 43 44 45
Modello
15 km/h (9.3 mph)
20 km/h (12.4 mph)
25 km/h (15.5 mph)
Icona dell'indicatore
di direzione destro
Modalità
Modalità Walk
Livello alimentazione
Pulsante di alimentazione
Max G2 DMax G2 E
15 km/h (9.3 mph)
20 km/h (12.4 mph)
20 km/h (12.4 mph)
2
Dati tecnici
Articolo Parametro
Nome
Prodotto
Utente
Parametri
macchina
Batteria
Motore
Caricatore
Pneumatici
[1] Intervallo teorico : Testato durante la guida con una batteria piena, carico 75 kg (165 lbs), 25°C (77°F), alla velocità media di 16 km/h (9,9 mph) sull'asfalto.
[2] Gamma Tipica: Testato durante la guida con una batteria piena, carico 75 kg (165 lbs), 25°C (77°F), alla velocità massima sul marciapiede.
* Alcuni fattori che potrebbero influire sull’ autonomia sono: velocità, carico, frequenza di arresti e ripartenze, temperatura climatica, etc.
Modello
Lunghezza × Larghezza × Altezza
Piegato: Lunghezza × Larghezza × Altezza
Peso netto
Carico utile
Età consigliata
Altezza Richiesta
Velocità massima
Intervallo teorico
Gamma Tipica
Inclinazione Massima
Terreno attraversabile
Temperatura di funzionamento
Temperatura di immagazzinamento
Classe IP
Durata della Ricarica
Tensione nominale
Tensione di ricarica massima
Temperatura di ricarica
Capacità nominale
Energia nominale
Sistema di gestione batteria
Potenza nominale
Potenza massima
Modello
Tipo
Potenza di Uscita
Tensione di ingresso
Tensione in uscita max.
Uscita nominale
Pressione dei pneumatici
Pneumatici
[1]
[2]
Ninebot KickScooter Max G2
051501E
Circa 1210 × 570 × 1264 mm (47,6 × 22,4 × 49,8 in)
Circa 1210 × 570 × 605 mm (47,6 × 22,4 × 23,8 in)
Circa 24,25 kg (53,5 lbs)
120 kg (265 lbs)
16–55 anni
120–200 cm (3’11”–6’6”)
Circa 25 km/h (15,5 mph)
Circa 70 km (43,5 miles)
Circa 50 km (31,1 miles)
Circa 22%
Maggior parte delle condizioni stradali pianeggianti e tipiche strade belghe.
-10–40°C (14–104°F)
-10–50°C (14–122°F); Consigliato: 10~30°C (50–86°F)
IPX5
Circa 6 h
36 V
42 V
0–40°C (32–104°F)
15,3 Ah
551 Wh
Protezione da sovrariscaldamento, scarico, cortocircuito,
sovracorrente e sovraccarica
0,45 kW, 450 W
0,9 kW, 900 W
NB-42D0-02D9
Incorporato
0,1218 kW, 121,8 W
100–240 V ~ 50–60 Hz, 2,0 A MAX.
42 V
2,9 A
42-48 psi
Pneumatici tubeless autosigillanti da 10 pollici
051501D
Circa 20 km/h (12,4 mph)
Page 21
3
Certicazioni
La batteria è conforme a UN 38.3.
Dichiarazione di conformità dell'Unione Europea
Informazioni sullo smaltimento per gli utenti dei riuti di apparecchiature elettriche ed elettroniche
Questo simbolo sul prodotto o sulla sua confezione indica che i prodotti elettrici ed elettronici usati non devono
essere mischiati con i rifiuti urbani indierenziati. Per un corretto trattamento, è tua responsabilità smaltire le
apparecchiature di scarto provvedendo a restituirle ai punti di raccolta designati.
Il corretto smaltimento di questo prodotto consentirà di risparmiare risorse preziose e di prevenire potenziali eetti
negativi sulla salute umana e sull'ambiente, che potrebbero derivare da una gestione inappropriata dei rifiuti.
Potrebbero essere applicate sanzioni per lo smaltimento non corretto di questi rifiuti, in conformità con la
legislazione nazionale.
Si prega di contattare l'autorità locale per ulteriori dettagli sul punto di raccolta designato più vicino.
Informazioni sul riciclaggio della batteria per gli utenti
Questo simbolo significa che batterie e accumulatori, alla fine del loro ciclo di vita, non devono essere mischiati con i
rifiuti urbani indierenziati. La tua partecipazione è una parte importante dello sforzo per ridurre al minimo l'impatto
di batterie e accumulatori sull'ambiente e sulla salute umana Per un corretto riciclaggio è possibile restituire questo
prodotto o le batterie o gli accumulatori in esso contenuti al proprio fornitore o in un punto di raccolta designato.
Il corretto smaltimento di questo prodotto consentirà di risparmiare risorse preziose e di prevenire potenziali eetti
negativi sulla salute umana e sull'ambiente, che potrebbero derivare da una gestione inappropriata dei rifiuti.
Potrebbero essere applicate sanzioni per lo smaltimento non corretto di questi rifiuti, in conformità con la
legislazione nazionale.
esistono sistemi di raccolta dierenziata per batterie e accumulatori usati.
Per favore, smaltisci correttamente le batterie e gli accumulatori presso la tua comunità locale di raccolta/riciclaggio
dei rifiuti centro.
Direttiva sulle apparecchiature radio
Ninebot (Changzhou) Tech Co., Ltd. dichiara che il prodotto elencato in questa sezione è conforme ai requisiti
essenziali e ad altre disposizioni pertinenti della Direttiva sulle apparecchiature radio 2014/53/UE.
Direttiva sulla restrizione dell'uso di determinate sostanze pericolose (RoHS).
Ninebot (Changzhou) Tech Co., Ltd. dichiara che l'intero prodotto comprese le parti (cavi, cavi e così via) soddisfa i
requisiti della Direttiva RoHS 2011/65/UE e modifica della Direttiva delegata (UE) 2015/863 della Commissione sulla
limitazione dell'uso di determinate sostanze pericolose nelle apparecchiature elettriche ed elettroniche (""RoHS
recast"" o ""RoHS 2.0"").
Direttiva macchine
Ninebot (Changzhou) Tech Co., Ltd. dichiara che il prodotto elencato in questa sezione è conforme ai requisiti
essenziali e ad altre disposizioni pertinenti della Direttiva Macchine 2006/42/CE.
Rappresentante autorizzato:
Segway-Ninebot Europe, Dynamostraat 7, 1014
BN Amsterdam, The Netherlands
Ninebot (Changzhou) Tech Co., Ltd. dichiara che il modello del prodotto: 051501E, 051501D è conforme ai requisiti
essenziali e ad altre disposizioni pertinenti della Direttiva sulle apparecchiature radio 2014/53/UE e della Direttiva
Macchine 2006/42/CE e della Direttiva RoHS 2011/65/UE e modifica Direttiva delegata (UE) 2015/863 della
Commissione.
La dichiarazione di conformità può essere visionata al seguente indirizzo: http://eu-en.segway.com/support-instructions
Bluetooth
Uso del Works with Apple badge significa che un prodotto è stato progettato per funzionare specificamente con la
tecnologia identificata nel badge ed è stato certificato dal produttore del prodotto per soddisfare Apple Find My
network specifiche e requisiti del prodotto. Apple non è responsabile del funzionamento di questo dispositivo o
dell'uso di questo prodotto o della sua conformità agli standard di sicurezza e normativi.
Banda/e di frequenza
Max. Potenza RF
2.4000-2.4835GHz
20mW
38 39 40 41 42 43 44 45
Page 22

4
Programma di manutenzione consigliato
Per garantire una guida sicura, l'assistenza quotidiana e la manutenzione regolare sono essenziali. Tu, il proprietario, hai il
controllo e la conoscenza di quanto spesso usi il tuo scooter, quanto duramente lo usi e dove lo usi. È compito del proprietario
responsabilità di eseguire controlli regolari e portare lo scooter presso un centro di assistenza autorizzato per l'ispezione e
l'assistenza. Per la tua sicurezza e una migliore esperienza di guida, eseguire una manutenzione regolare del KickScooter. Fare
riferimento al programma di manutenzione di seguito.
Nota: questo programma di manutenzione addebita una tari_x005fa di servizio.
Ogni 6
Articolo Componente
Parti
delmainframe
Pressione dei
pneumatici
Usura dei
pneumatici
Manutenzion
e del
mainframe
Viti sulla parte
superiore dello
stelo
Viti sul
meccanismo
pieghevole
Metodo di manutenzione
Utilizzare un panno morbido e umido
per pulire il mainframe.
Gonfia le gomme a 42-48 psi.
Controllare se i pneumatici sono
incrinati, deformati o notevolmente
usurati.
Serrare le viti fissate con il manubrio e
l'attacco. La coppia suggerita è di
5,5±0,5 N·m.
Serrare la vite sull'acceleratore. La coppia
consigliata è di 0,9±0,06 N·m.
Stringere le viti sulle leve dei freni. La
coppia consigliata è di 6±1 N·m.
Stringere le viti sulla parte superiore dello
stelo. La coppia suggerita è di
8,5±0,5 N·m.
Stringi le viti di fissaggio della maniglia
pieghevole e della forcella anteriore,
Due viti laterali laterali, la coppia
raccomandata è 15 ± 1 N · m
Piegare e dispiegare, la vite verticale
superiore, la coppia raccomandata è
15 ± 1 N · m
Piegare la biella e fissare le viti della biella
quando si dondola sulla bici. La piega è
liscia senza scuotere.
Ogni 3
mesi
√
mesi o ogni
310 miglia
(500 km)
Ogni 1 anno o
ogni 1,000 km
(621 miglia)
√ √√√
√ √√√
√ √√
√
√
√
Ogni 3 anni o
ogni 10,000 km
(6,214 miglia)
√√
√√
√√
Articolo Componente Metodo di manutenzione
Per accelerare e decelerare, controllare
se il motore del mozzo è in stallo o
emette suoni anomali.
Controlla se la ruota anteriore è stabile
o traballa, o l'albero dell'asse è
sbilanciato.
Se il freno è troppo stretto / allentato,
utilizzare la chiave a brugola da 4 mm
per allentare la vite sul calibro. Quindi
regolare leggermente la linea del freno
(ridurre / aumentare la lunghezza
esposta) e serrare nuovamente la vite.
Standard della prova: la velocità di guida
è 20 km/h (12.4 mph) e la distanza di
frenata è entro 6m
La ruota anteriore può ruotare
normalmente senza suono anormale.
La ruota anteriore può essere frenata
dopo aver premuto la leva del freno.
Premi le leve dei freni, le luci posteriori
funzionano normalmente.
Controllare il faro e vedere se si
accende intensamente.
Spostare il pulsante dell'indicatore di
direzione rispettivamente verso
sinistra/destra, controllare se gli indicatori
di direzione sul lato sinistro/destro
lampeggiano normalmente.
Accendere/spegnere il monopattino, il
suono del cicalino è normale.
Premi il pulsante del clacson e il suono è
forte.
Tenere premuto l'acceleratore, quindi
rilasciarlo, controllando l'accelerazione
e la decelerazione.
Nota: rilasciarlo, controllare se
l'acceleratore torna in posizione.
Ispezione
funzionale
Motore a mozzo
Manutenzione
della ruota
anteriore
Regolazione del
freno
Trommelbremse
Fanale
posteriore
Faro
Indicatori di
direzione
Cruscotto
Corno
Acceleratore
Ogni 3
mesi
Ogni 6
mesi o ogni
310 miglia
(500 km)
Ogni 1 anno o
ogni 1,000 km
(621 miglia)
√ √
√ √
√ √√
√ √√
√ √√
√ √√
√ √√
√ √√
√ √√
√ √√
Ogni 3 anni o
ogni 10,000 km
(6,214 miglia)
40 41 42 43 44 45
Page 23

Ogni 6
mesi o ogni
Ogni 3
Articolo Componente Metodo di manutenzione
Dopo la connessione con l'app
Segway-Ninebot:
Rilevamento
dell'app
Ispezione
funzionale
Parti
importanti
Parti
funzionali
42 43 44 45
Ricarica
Interruttore
di controllo
Girando
Assemblaggi
o batteria
Controllore
Motore a mozzo
Gruppo ruota
posteriore
Leve
acceleratore e
freno
Gruppo forcella
anteriore
Meccanismo
pieghevole
Freno a tamburo
Copertura del
cruscotto
1) Aggiorna il firmware all'ultima versione.
2) Verificare se la notifica del codice di
errore corrispondente edelle possibili
cause verrà visualizzata quando lo scooter
rilevaun errore.
Ricaricare lo scooter:
1) Verificare se sul cruscotto viene
visualizzata la carica attuale della batteria.
2) Controllare l'indicatore LED sul
caricabatteria.
Ricarica: rossa. Completamente carico:
verde.
Premere o attivare il pulsante 3 volte
senza errori.
Prova con curve a sinistra e curve a destra
(l'angolo di sterzata è 60).
Nessuna resistenza o ritardo in curva.
La batteria deve essere sostituita quando
viene caricata e scaricata per 500 volte o il
chilometraggio totale è superiore a 10,000
km (6,213 miglia).
Nota: Si consiglia di caricare una volta
ogni 60 giorni per la conservazione a
lungo termine.
Dopo 3 anni o 10,000 km (6,214 miglia) di
percorrenza, le parti anomale del
monopattino devono essere sostituite
immediatamente.
mesi
310 miglia
(500 km)
Ogni 1 anno o
ogni 1,000 km
(621 miglia)
Ogni 3 anni o
ogni 10,000 km
(6,214 miglia)
√√ √
√√ √
√√ √
√ √
√
5
TMarchio commerciale
Ninebot è un marchio registrato di Ninebot (Beijing) Tech. Co., Ltd; Segway e Rider Design sono marchi registrati di Segway
Inc.; App Store, logo Apple, Apple, Apple Trova il mio, Apple Watch, Trova il mio, iPhone, iPad, iPadOS, Mac, macOS e
watchOS sono marchi di Apple Inc. IOS è un marchio di Cisco ed è utilizzato sotto licenza. Android, Google Play e il logo
Google Play sono marchi di Google LLC. Il marchio e i loghi Bluetooth® sono marchi registrati di proprietà di Bluetooth SIG,
Inc. e qualsiasi uso di tali marchi da parte di Segway-Ninebot è sotto licenza. Altri marchi e nomi commerciali sono quelli
dei rispettivi proprietari.
KickScooter è coperto dai relativi brevetti. Per informazioni sui brevetti andare su http://www.segway.com.
Al momento della stampa, abbiamo tentato di includere descrizioni e istruzioni per tutte le funzionalità di KickScooter.
Tuttavia, a causa del costante miglioramento delle caratteristiche del prodotto e dei cambiamenti di progettazione, il tuo
KickScooter potrebbe dierire leggermente da quello descritto in questo documento. Visitez l’ App Store d’ Apple (IOS) ou
le Google Play Store (Android) pour télécharger et installer l’appli.
Si prega di notare che esistono diversi modelli Segway e Ninebot con diverse funzioni e alcune delle funzioni menzionate in
questo documento potrebbero non essere applicabili all'unità. Il produttore si riserva il diritto di modificare la progettazione
e la funzionalità del prodotto e della documentazione KickScooter senza preavviso.
© 2023 Ninebot (Beijing) Tech Co. Ltd. Tutti i diritti riservati.
(※L'app è adatta per KickScooter che supporta "Bluetooth")
Page 24
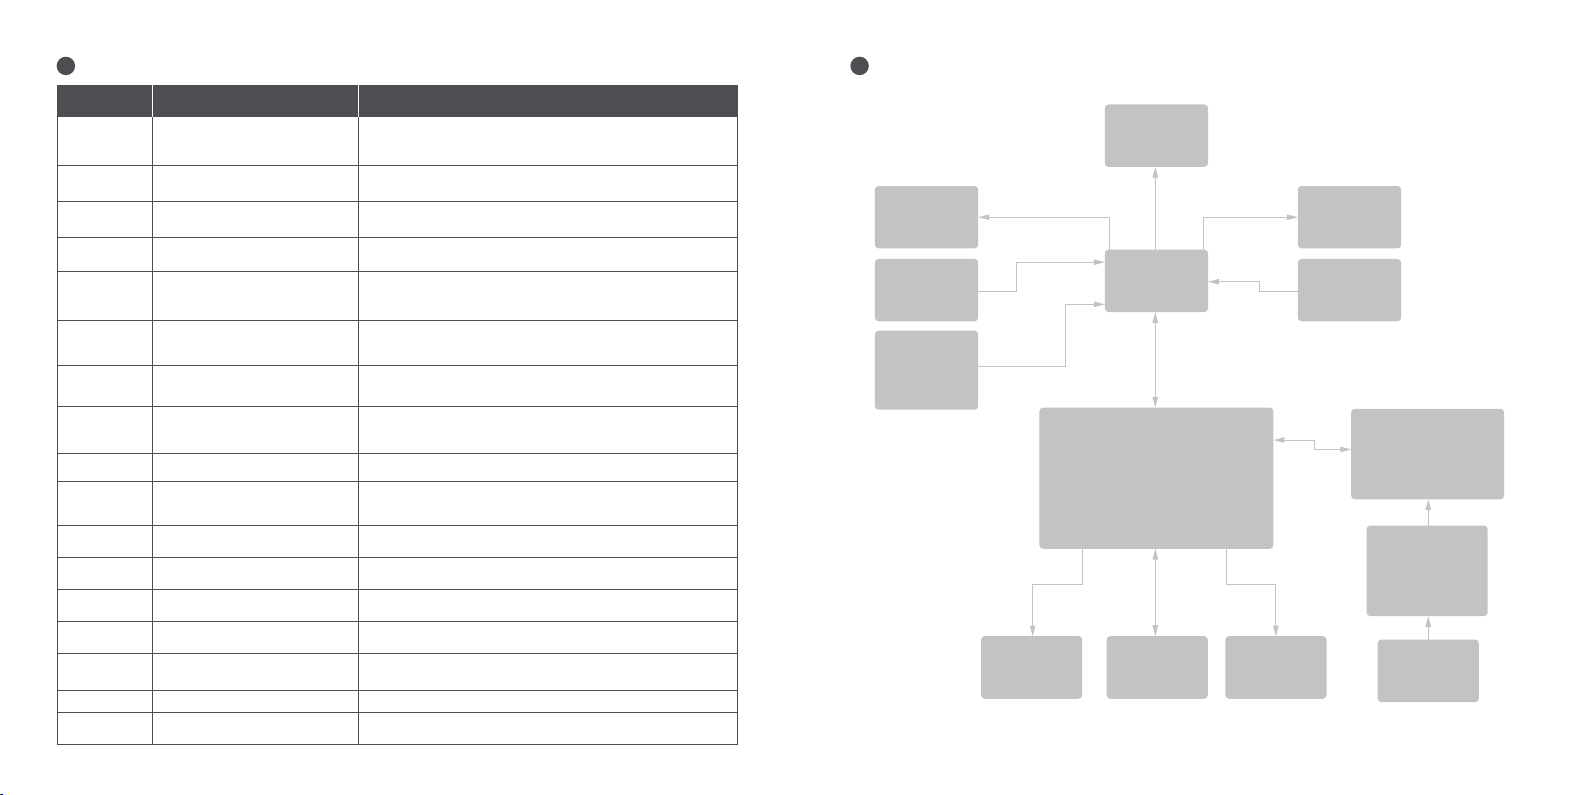
6
Errori comuni
Codice di
errore
10
11
12
13
14
15
18
21
23 SN predefinito della batteria
24 Tensione predefinita anomala
26
31 Funzionamento non corretto FLASH
35
39
40 NTC del controller anomalo
41 NTC del motore anomalo
45
44 45
Possibili cause
Errore di comunicazione
Bluetooth
Campionamento anomalo corrente
di fase 1A del motore
Campionamento anomalo
corrente di fase 1B del motore
Campionamento anomalo
corrente di fase 1C del motore
Campionamento anomalo sensore
di Hall acceleratore
Campionamento anomalo sensore
di Hall freni
Segnale anomalo sensore di Hall
motore
Errore di comunicazione batteria
Scrittura/lettura anomala
dei dati
SN predefinito del KickScooter
Temperatura anomala della
batteria
Campionamento anomalo corrente
sbarre
Soluzione
Controllare il collegamento del filo di comunicazione del
cruscotto e del cavo di controllo, oppure contattare il
servizio post-vendita o un rivenditore autorizzato.
Contattare il servizio post-vendita o un rivenditore autorizzato.
Contattare il servizio post-vendita o un rivenditore autorizzato.
Contattare il servizio post-vendita o un rivenditore autorizzato.
Verificare che l'acceleratore sia premuto quando il veicolo è
acceso, oppure contattare il servizio post-vendita o un
rivenditore autorizzato.
Verificare che la leva del freno sia premuta quando il veicolo è
acceso, oppure contattare il servizio post-vendita o un rivenditore
autorizzato.
Controllare se la presa del sensore di Hall è allentata, oppure
contattare il servizio post-vendita o un rivenditore autorizzato.
Controllare se il filo collegato al filo di comunicazione della batteria e
al controller è allentato, oppure contattare il servizio post-vendita o
un rivenditore autorizzato.
Contattare il servizio post-vendita o un rivenditore autorizzato.
Controllare se il filo che collega la batteria al controller è allentato,
oppure contattare il servizio post-vendita o un rivenditore
autorizzato.
Contattare il servizio post-vendita o un rivenditore autorizzato.
Contattare il servizio post-vendita o un rivenditore autorizzato.
Controllare se il KickScooter ha ancora il proprio SN
predefinito.
Controllare l'ambiente operativo della batteria, oppure contattare il
servizio post-vendita o un rivenditore autorizzato.
Regolatore surriscaldato, o contattare il servizio
post-vendita o un rivenditore autorizzato.
Contattare il servizio post-vendita o un rivenditore autorizzato.
Contattare il servizio post-vendita o un rivenditore autorizzato.
7
Schema di cablaggio
Indicatore di
direzione
sinistro
Freno
Pulsante
indicatore
di direzione
+ Pulsante
corno
Faro
Cruscotto
Controllore
Motore hub Luce retroCorno
Indicatore
di direzione
destro
Acceleratore
elettronico
Batteria
Incorporato
Caricatore
AC Porta
di carica
Page 25
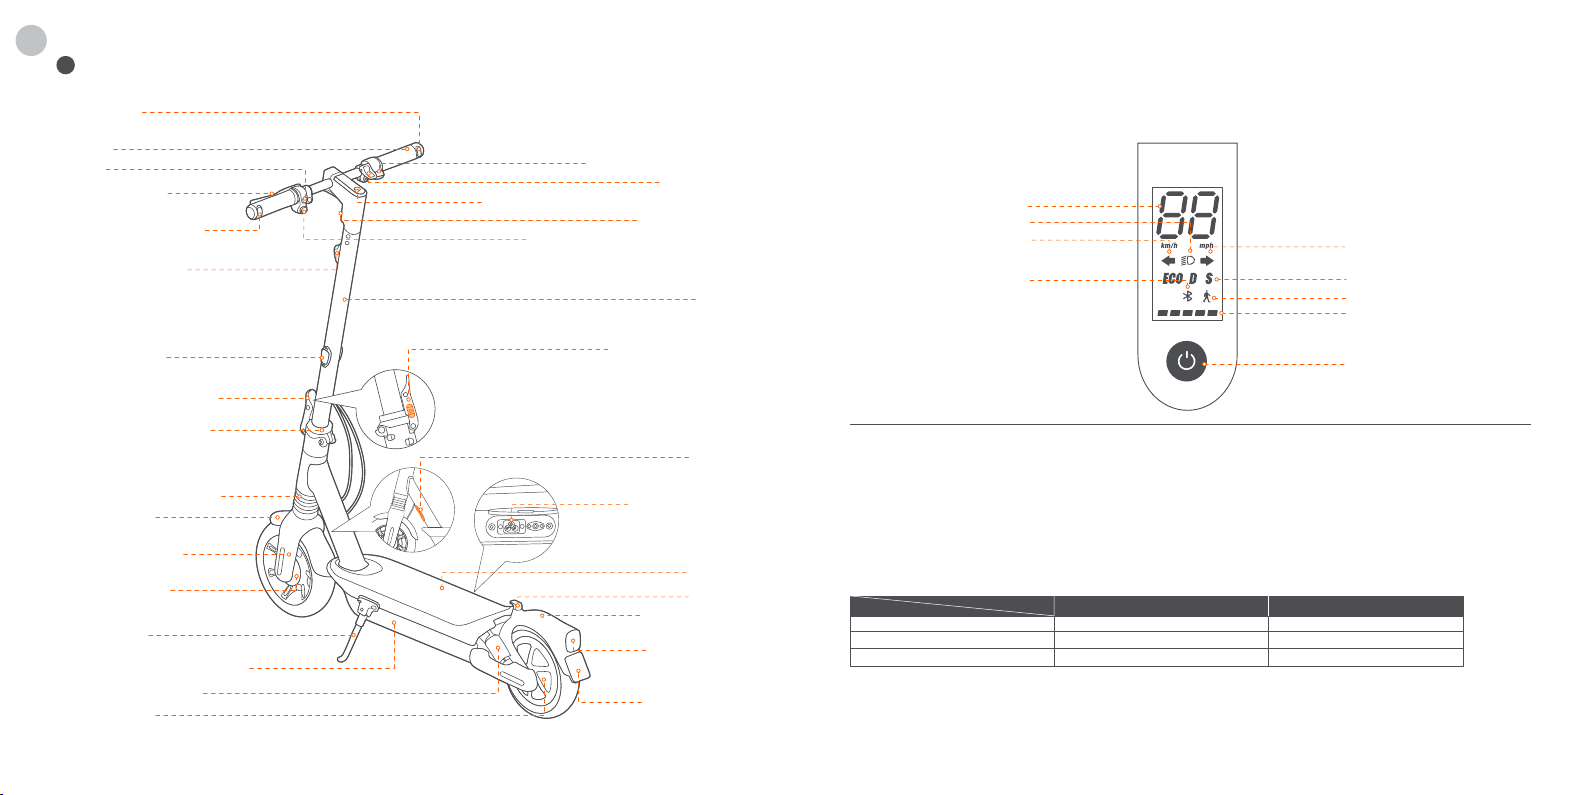
ES
1
Diagrama
Indicador de
dirección derecho
Manillar
Timbre
Palanca de freno
Indicador de dirección
izquierdo
Reflector delantero
Acelerador electrónico
Mosquetón
Panel de control y botón de encendido
Faro delantero
Indicador Cambiar de dirección
Barra
Panel de control y botón de encendido
Velocímetro
Faro delantero
Icono del indicador de
dirección izquierdo
Bluetooth
Icono del indicador
de dirección derecho
Modos
Modo caminar
Nivel de energía
Reflector lateral
Botón de seguridad
Botón de encendido
Palanca de cierre rápido
Mecanismo de plegado
Bocina
Amortiguador delantero
Guardabarros
Puerto de carga
delantero
Horquilla delantera
Zócalo
Freno de tambor
Hebilla
Guardabarros
Pata de cabra
trasero
Luz trasera &
Compartimento de la batería
Amortiguador trasero
Motor del buje
46 47 48 49 50 51 52 53 54 55 56 57 58 59 60 61
Luz de freno &
Reflectante
Area de placa
de seguro
Botón de encendido: Pulsación breve para encender. Mantenga presionado el botón 3 segundos para apagar el patinete. Cuando el patinete
está encendido, una pulsación para encender / apagar el faro delantero y luz trasera, dos pulsaciones para cambiar el modo de velocidad.
Velocímetro: Indica la velocidad actual. También muestra códigos de error si se detectan averías.
Icono del indicador de dirección: Cuando gire a la izquierda o a la derecha, presione el interruptor “←” (izquierda) o “→” (derecha) en el
botón del indicador de dirección. A continuación, el indicador de dirección parpadeará de forma periódica. Para apagarlo, se debe
presionar nuevamente el botón correspondiente.
Modo caminar: La velocidad máxima es de 5 km/h (3,1 mph).
El faro y la luz trasera están siempre encendidos y no se pueden apagar.
* Cómo habilitar en la aplicación: Conguración > Modo caminar.
Modo de velocidad: Hay tres modos disponibles. La velocidad máxima es:
Modes
ECO (modo de ahorro energético)
D (modo estándar)
S (modo deportivo)
Bluetooth: El icono indica que el patinete se ha conectado al dispositivo móvil correctamente.
Nivel de energía: El nivel total de la batería es igual a 5 barras.
* La energía de la batería es muy baja cuando la primera barra de la batería es roja. Cargue su KickScooter inmediatamente.
Modelo
Max G2 E Max G2 D
15 km/h (9.3 mph)
20 km/h (12.4 mph)
25 km/h (15.5 mph)
15 km/h (9.3 mph)
20 km/h (12.4 mph)
20 km/h (12.4 mph)
Page 26
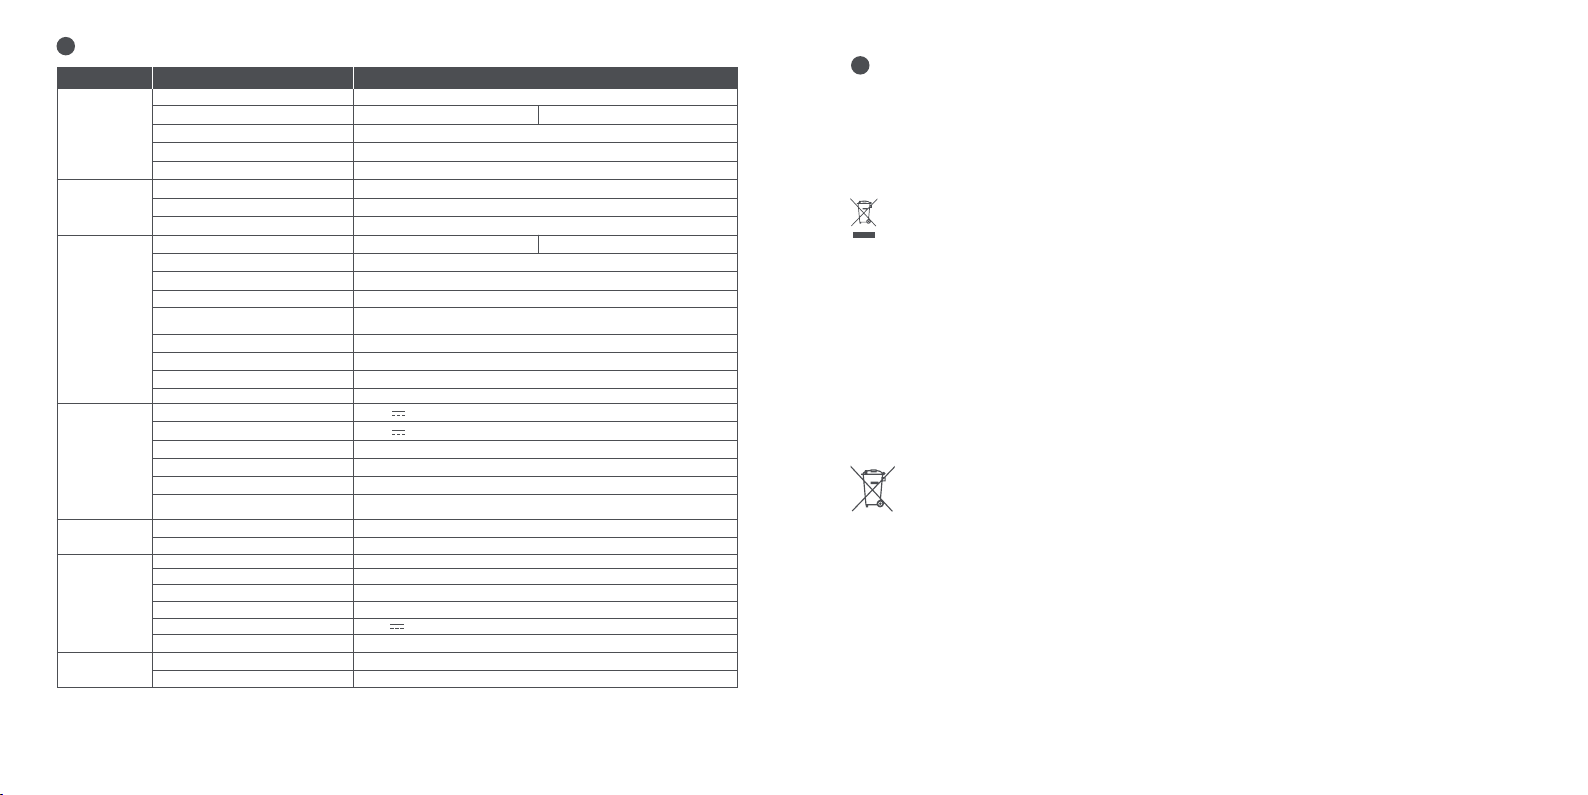
2
Especicaciones
Articulo Parámetro
Nombre
Modelo
Producto
Largo × Ancho × Alto
Plegado: Largo × Ancho × Alto
Peso neto
Carga útil máxima
Usuario
Edad recomendada
Altura necesaria
Parámetros
de
la máquina
Velocidad máxima
Alcance teórico
Rango típico
Pendiente máxima
Terreno apropiado
Temperatura de operación
[1]
[2]
Temperatura de almacenamiento
Índice IP
Duración de la carga
Voltaje nominal
Voltaje de carga máximo
Batería
Temperatura de carga
Capacidad nominal
Energía nominal
Sistema de gestión de la batería
Motor
Cargador
Potencia nominal
Máx. potencia
Modelo
Tipo Integrado
Potencia de salida
Voltaje de entrada
Tensión de salida máxima
Salida nominal
Rueda
[1] Alcance teórico: Probado mientras se conduce con la batería totalmente cargada, 75 kg (165 lbs) de carga, 25 °C (77 °F), a unavelocidad de
16 km/h (9,9 mph) de promedio sobre pavimento.
[2] Rango típico: Probado mientras se conduce con la batería totalmente cargada, 75 kg (165 lbs) de carga, 25 °C (77 °F), Conduce a la velocidad más alta
en la acera.
* Algunos de los factores que afectan el rango incluyen: velocidad, carca, número de arranques y paradas, temperatura ambiente, etc.
48 49 50 51 52 53 54 55 56 57 58 59 60 61
Presión de los neumáticos
Llantas
Ninebot KickScooter Max G2
051501E
051501D
Aprox. 1210 × 570 × 1264 mm (47,6 × 22,4 × 49,8 in)
Aprox. 1210 × 570 × 605 mm (47,6 × 22,4 × 23,8 in)
Aprox. 24,25 kg (53,5 lbs)
120 kg (265 lbs)
16–55 años
120–200 cm (3’11”–6’6”)
Aprox. 25 km/h (15,5 mph)
Aprox. 20 km/h (12,4 mph)
Aprox. 70 km (43,5 miles)
Aprox. 50 km (31,1 miles)
Aprox. 22%
Mayoría de las condiciones de carreteras llanas y las carreteras
típicas belgas.
-10–40°C (14–104°F)
-10–50°C (14–122°F); Recomendación: 10~30°C (50–86°F)
IPX5
Aprox. 6 h
36 V
42 V
0–40°C (32–104°F)
15,3 Ah
551 Wh
Protección contra sobrecalentamiento, sobredescarga,
cortocircuito, sobrecorriente y sobrecarga
0,45 kW, 450 W
0,9 kW, 900 W
NB-42D0-02D9
0,1218 kW, 121,8 W
100–240 V ~ 50–60 Hz, 2,0 A MAX.
42 V
2.9 At
42-48 psi
Neumáticos sin cámara autosellantes de 10 pulgadas
3
Homologaciones
El batería cumple con la normativa UN 38.3.
Declaración de cumplimiento de la Unión Europea
Información sobre la eliminación para usuarios de equipos eléctricos y electrónicos de desecho
Este símbolo en el producto o en su embalaje indica que los productos eléctricos y electrónicos usados no deben
mezclarse con residuos municipales sin clasificar. Para un tratamiento adecuado, es su responsabilidad deshacerse
de su equipo de desecho devolviéndolo a los puntos de recogida designados.
La eliminación correcta de este producto ayudará a ahorrar recursos valiosos y evitará cualquier posible efecto
negativo en la salud humana y el medio ambiente, que de otro modo podría derivarse de un manejo inadecuado de
los desechos.
Pueden aplicarse sanciones por la eliminación incorrecta de estos residuos, de acuerdo con su legislación nacional.
Comuníquese con su autoridad local para obtener más detalles sobre el punto de recolección designado más
cercano.
Información de reciclaje de baterías para usuarios
Este símbolo significa que las pilas y acumuladores, al final de su vida útil, no deben mezclarse con residuos
municipales sin clasificar. Su participación es una parte importante del esfuerzo para minimizar el impacto de las
pilas y acumuladores en el medio ambiente y en la salud humana. Para un reciclaje adecuado puede devolver este
producto o las pilas o acumuladores que contiene a su proveedor o a un punto de recogida designado.
La eliminación correcta de este producto ayudará a ahorrar recursos valiosos y evitará cualquier posible efecto
negativo en la salud humana y el medio ambiente, que de otro modo podría derivarse de un manejo inadecuado de
los desechos.
Pueden aplicarse sanciones por la eliminación incorrecta de estos residuos, de acuerdo con su legislación nacional.
existen sistemas de recogida selectiva de pilas y acumuladores usados.
Por favor, deshágase de las baterías y acumuladores correctamente en el centro de recolección/reciclaje de residuos
de su comunidad local centrar.
Page 27
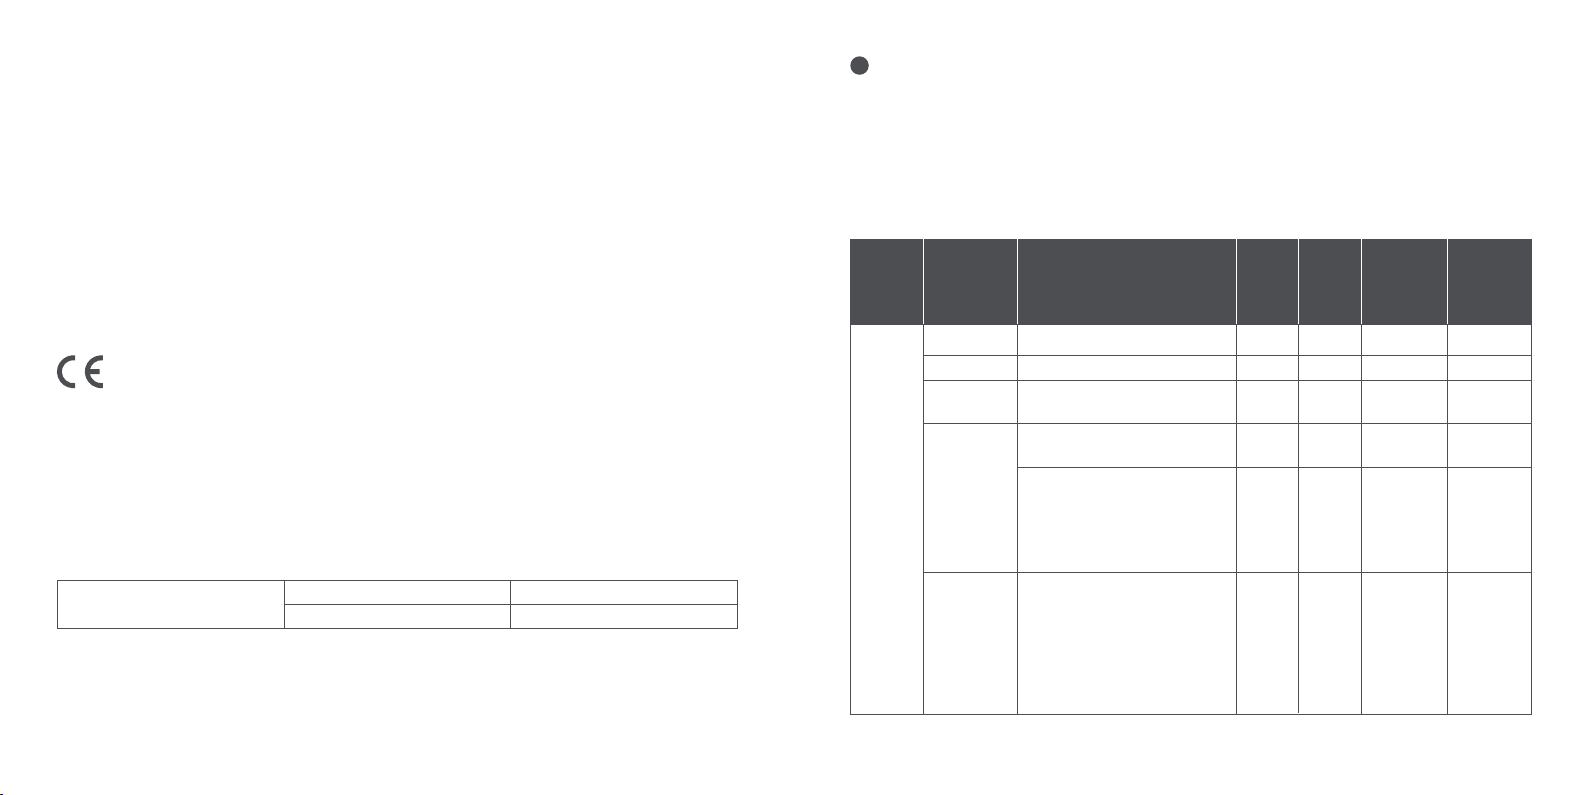
4
Directiva de equipos de radio
Ninebot (Changzhou) Tech Co., Ltd. declara por la presente que el producto enumerado en esta sección cumple con
los requisitos esenciales y otras disposiciones relevantes de la Directiva de equipos de radio 2014/53/UE.
Restricción del uso de ciertas sustancias peligrosas (RoHS) Directiva
Ninebot (Changzhou) Tech Co., Ltd. declara por la presente que todo el producto, incluidas las piezas (cables,
cordones, etc.), cumple con los requisitos de la Directiva RoHS 2011/65/UE y la enmienda de la Directiva Delegada
Recommended Maintenance Schedule
Para garantizar una conducción segura, el cuidado diario y el mantenimiento regular son esenciales. Usted, el propietario,
debe conocer y controlar la frecuencia con la que usa su patinete, la intensidad con la que lo usa y dónde lo usa. Es
responsabilidad del propietario efectuar revisiones periódicas, y llevar su patinete a un taller autorizado para su inspección y
servicio. Consulte el programa de mantenimiento a continuación.
Nota: El programa de mantenimiento precisa el pago de la tarifa de servicio.
(UE) 2015/863 de la Comisión sobre la restricción del uso de ciertas sustancias peligrosas en equipos eléctricos y
electrónicos (""RoHS refundido"" o ""RoHS 2.0"").
Directiva de maquinaria
Ninebot (Changzhou) Tech Co., Ltd. declara por la presente que el producto enumerado en esta sección cumple con
los requisitos esenciales y otras disposiciones relevantes de la Directiva de Maquinaria 2006/42/EC.
Representantes autorizados de la ue:
Segway ninebot Europa
Dinamostrat 7, Ámsterdam, países bajos, Código postal: 1014 lote.
Ninebot (changzhou) Technology co., Ltd. declara aquí que el modelo de producto: 051501E , 051501D cumple con
los requisitos básicos y otras regulaciones pertinentes de la Directiva de equipos de radio 2014 / 53 / ue, la Directiva
de maquinaria 2006 / 42 / ce, la directiva RoHS 2011 / 65 / UE y la Directiva de autorización de la Comisión de
revisión (ue) 2015 / 863.
La Declaración de conformidad se puede ver en la siguiente dirección: http://eu-en.segway.com/support-instructions
Bluetooth
Bandas de frecuencia
Potencia de RF máxima
2.4000-2.4835GHz
20mW
Uso Works with Apple La insignia significa que el producto ha sido diseñado para usar específicamente la tecnología
identificada en la insignia y ha sido certificado por el fabricante del producto como conforme. Apple Find My network
Especificaciones y requisitos del producto. Apple no es responsable del funcionamiento de este dispositivo o del uso
Elemento Componente Método de mantenimiento
Mantenimien
to del cuadro
Piezas del
cuadro
Presión de los
neumáticos
Desgaste de los
neumáticos
Tornillos en la
parte superior
del mástil
Tornillos en el
mecanismo de
plegado
Use un paño suave y húmedo para
limpiar el cuadro.
Infle los neumáticos a 42-48 psi.
Compruebe si los neumáticos están
agrietados, deformados o muy
gastados.
Apriete los tornillos fijados al manillar y al
mástil. El par de torsión sugerido es de
5,5±0,5 N.m.
Apriete el tornillo del acelerador. El par
sugerido es de 0,9±0,06 N·m.
Apriete los tornillos de las palancas de
freno. El par sugerido es de 6±1 N·m.
Apriete los tornillos en la parte superior
del mástil. El par sugerido es de
8,5±0,5 N·m.
Apriete los tornillos de fijación del mango
plegable y la horquilla delantera,
Dos tornillos laterales, el par
recomendado es de 15 ± 1 n·m
Plegado y desenrollado, tornillo vertical
superior, par recomendado de 15 ± 1 n·m
Barra de conexión plegable, se requiere
apretar el tornillo de la barra de conexión
cuando se monta y se balancea, el pliegue
es suave y no se balancea.
Cada 3
meses
Cada 6
meses o
cada 500
km (310
√
millas)
Cada 1 año o
cada 1,000 km
(621 millas)
√ √√√
√ √√√
√ √√
√
√
√
Cada 3 años o
cada 10,000
km (6,214
millas)
√√
√√
√√
de este producto o si cumple con las normas de Seguridad y supervisión.
50 51 52 53 54 55 56 57 58 59 60 61
Page 28

Cada 6
Elemento Componente Método de mantenimiento
Motor de rueda
Mantenimiento
de la rueda
delantera
Ajuste del freno
de disco
Freno de tambor
Inspección
de funciones
Luz trasera
Faro
Indicadores de
dirección
Tablero de
instrumentos
Bocina
Acelerador
52 53 54 55 56 57 58 59 60 61
Para acelerar y desacelerar, verifique si el
motor derueda está atascado o tiene
sonidos anormales.
Compruebe si la rueda delantera está
atascada o tiembla, o si el eje está
desequilibrado.
Si el freno está demasiado apretado /
flojo, utilice la llave Allen de 4 mm para
aflojar el tornillo del calibrador. A
continuación, ajusteligeramente el
cable del freno (disminuir / aumentar la
duración de la exposición) y vuelva a
apretar el tornillo.
Normas de ensayo: velocidad de
conducción 20 km / h (12.4 mph),
distancia de frenado inferior a 6 m
La ruota anteriore può ruotare
normalmente senza suono anormale.
La ruota anteriore può essere frenata dopo
aver premuto la leva del freno.
Apriete las palancas de freno, el faro
trasero funciona con normalidad.
Revise el faro y vea si se enciende con
fuerza.
Mueva el botón del indicador de dirección
hacia la izquierda/derecha
respectivamente, compruebe si los
indicadores de dirección del lado
izquierdo/derecho parpadean
normalmente.
Encienda el scooter y el panel de
instrumentos funciona correctamente.
Presiona el botón de la bocina.
Presione y sostenga el acelerador y luego
suéltelo, verificando laaceleración y
desaceleración.
Nota: Suelte el acelerador y compruebe
que vuelve a su posición.
Cada 3
meses
meses o
cada 500
km (310
millas)
Cada 1 año o
cada 1,000 km
(621 millas)
Cada 3 años o
cada 10,000
km (6,214
millas)
√ √
√ √
√ √√
√ √√
√ √√
√ √√
√ √√
√ √√
√ √√
√ √√
Elemento Componente Método de mantenimiento
Después de conectarse con la aplicación
Segway-Ninebot:
1) Actualice el firmware a la última versión.
2) Compruebe si la notificación del código
de error
correspondiente y las posibles causas
aparecen cuando elpatinete detecta un
error.
Cargue el patinete:
1) Verifique si la energía actual de la batería
se muestra en el panel de control.
2) Revise el indicador LED en el cargador
de la batería.
Cargando: rojo, Completamente cargado:
verde.
Presione o mueva el botón 3 veces sin
fallar.
Pruebe con giros a la izquierda y giros a la
derecha (el ángulo de dirección es 60).
Sin resistencia ni retraso al girar.
La batería debe reemplazarse cuando se
cargue y descargue 500 veces o cuando
el kilometraje total sea superior a 10,000
km (6,213 millas).
Nota: Se recomienda cargar una vez cada
60 días en caso de almacenamiento a
largo plazo.
Después de 3 a ños o 10,000 km (6,214
millas) de conducción, las partes
anormales de la scooter deben reponerse
inmediatamente.
Inspección
de funciones
Piezas
importantes
Piezas
funcionales
Detección de
fallos
Carga
Interruptores
de control
Giro
Batería
Controlador
Motor de rueda
Montaje de la
rueda trasera
Palancas de
acelerador y
freno
Horquilla
delantera
Mecanismo
de plegado
Freno de tambor
Cubierta del
salpicadero
Cada 3
meses
Cada 6
meses o
cada 500
km (310
millas)
Cada 1 año o
cada 1,000 km
(621 millas)
√√ √
√√ √
√√ √
√ √
Cada 3 años o
cada 10,000
km (6,214
millas)
√
Page 29

5
Marca comercial
Ninebot es la marca comercial de Ninebot (Beijing) Tech Co., Ltd.; Segway y Rider Design son marcas registradas de
Segway Inc., APP store, Apple logo, apple, Apple find my, Apple watch, find my, iphone, ipad, ipados, mac, MacOS y watchos
son marcas comerciales de Apple AG. Ios es una marca registrada de Cisco y se utiliza con licencia. Android, Google Play y
el logotipo de Google Play son marcas comerciales de Google LLC. La marca denominativa y los logotipos de Bluetooth son
marcas registradas propiedad de Bluetooth® SIG, Inc., y cualquier uso de dichas marcas por parte de Segway-Ninebot se
realiza bajo licencia. Otras marcas y nombres comerciales pertenecen a sus respectivos propietarios.
El KickScooter está cubierto por las patentes correspondientes. Para obtener información sobre patentes, visite
http://www.segway.com
Hemos intentado incluir descripciones e instrucciones de todas las funciones del KickScooter en el momento de la
impresión. Sin embargo, debido a la mejora constante de las funciones del producto y a los cambios en el diseño, es posible
que su KickScooter presente ligeras diferencias respecto al que se muestra en este documento. Escanee el código QR o
visite Apple App Store (iOS) o Google Play Store (Android) para descargar e instalar la aplicación.
Tenga en cuenta que disponemos de varios modelos de Segway y Ninebot con diferentes funciones, y algunas de las
funciones mencionadas en este documento puede no tenerlas su unidad. El fabricante se reserva el derecho a modificar el
diseño y las funciones del producto KickScooter y la documentación sin previo aviso.
© 2023 Ninebot (Beijing) Tech Co., Ltd. Todos los derechos reservados.
(※La aplicación Segway-Ninebot es compatible con KickScooter con Bluetooth integrado)
54 55 56 57 58 59 60 61
6
Fallos comunes
Código de
error
10
11
12
13
14
15
18
21
23
24 Tensión anormal por defecto
26
31
35
39
40 NTC anormal del controlador
41 NTC anormal del motor
45
Posibles causas
Fallo de comunicación Bluetooth
Muestreo anormal de la corriente
de fase 1A del motor
Muestreo anormal de la
corriente de fase 1B del motor
Muestreo anormal de la
corriente de fase 1C del motor
Muestreo anormal del sensor hall
del acelerador
Muestreo anormal del sensor hall
del freno
Señal anormal del sensor hall del
motor
Fallo de comunicación de la batería
Número de referencia de la batería
por defecto
Escritura/lectura anormal
de datos
Funcionamiento incorrecto de
FLASH
Número de referencia del
KickScooter por defecto
Temperatura anormal de la
batería
Muestreo anormal de la corriente
del cable madre
Solución
Compruebe la conexión del cable de comunicación del panel de
control y del cable de control, o póngase en contacto con el servicio
postventa o con un distribuidor autorizado.
Póngase en contacto con el servicio postventa o un distribuidor
autorizado.
Póngase en contacto con el servicio postventa o un distribuidor
autorizado.
Póngase en contacto con el servicio postventa o un distribuidor
autorizado.
Compruebe si el acelerador está presionado cuando se
enciende, o póngase en contacto con el servicio postventa o con
un distribuidor autorizado.
Compruebe si la palanca de freno está apretada cuando se enciende,
o póngase en contacto con el servicio postventa o con un
distribuidor autorizado.
Compruebe si la toma de corriente del sensor hall está suelta, o
póngase en contacto con el servicio postventa o con un distribuidor
autorizado.
Compruebe si el cable conectado con el cable de comunicación de la
batería y el controlador está suelto, o póngase en contacto con el
servicio postventa o con un distribuidor autorizado.
Póngase en contacto con el servicio postventa o un distribuidor
autorizado.
Compruebe si el cable de conexión de la batería al controlador está
suelto, o póngase en contacto con el servicio postventa o con un
distribuidor autorizado.
Póngase en contacto con el servicio postventa o un distribuidor
autorizado.
Póngase en contacto con el servicio postventa o un distribuidor
autorizado.
Compruebe si KickScooter sigue manteniendo el número de
referencia por defecto.
Compruebe el entorno de trabajo de la batería, o póngase en
contacto con el servicio postventa o con un distribuidor autorizado.
Sobrecalentamiento del controlador, o póngase en contacto con el
servicio postventa o un distribuidor autorizado.
Póngase en contacto con el servicio postventa o un distribuidor
autorizado.
Póngase en contacto con el servicio postventa o un distribuidor
autorizado.
Page 30
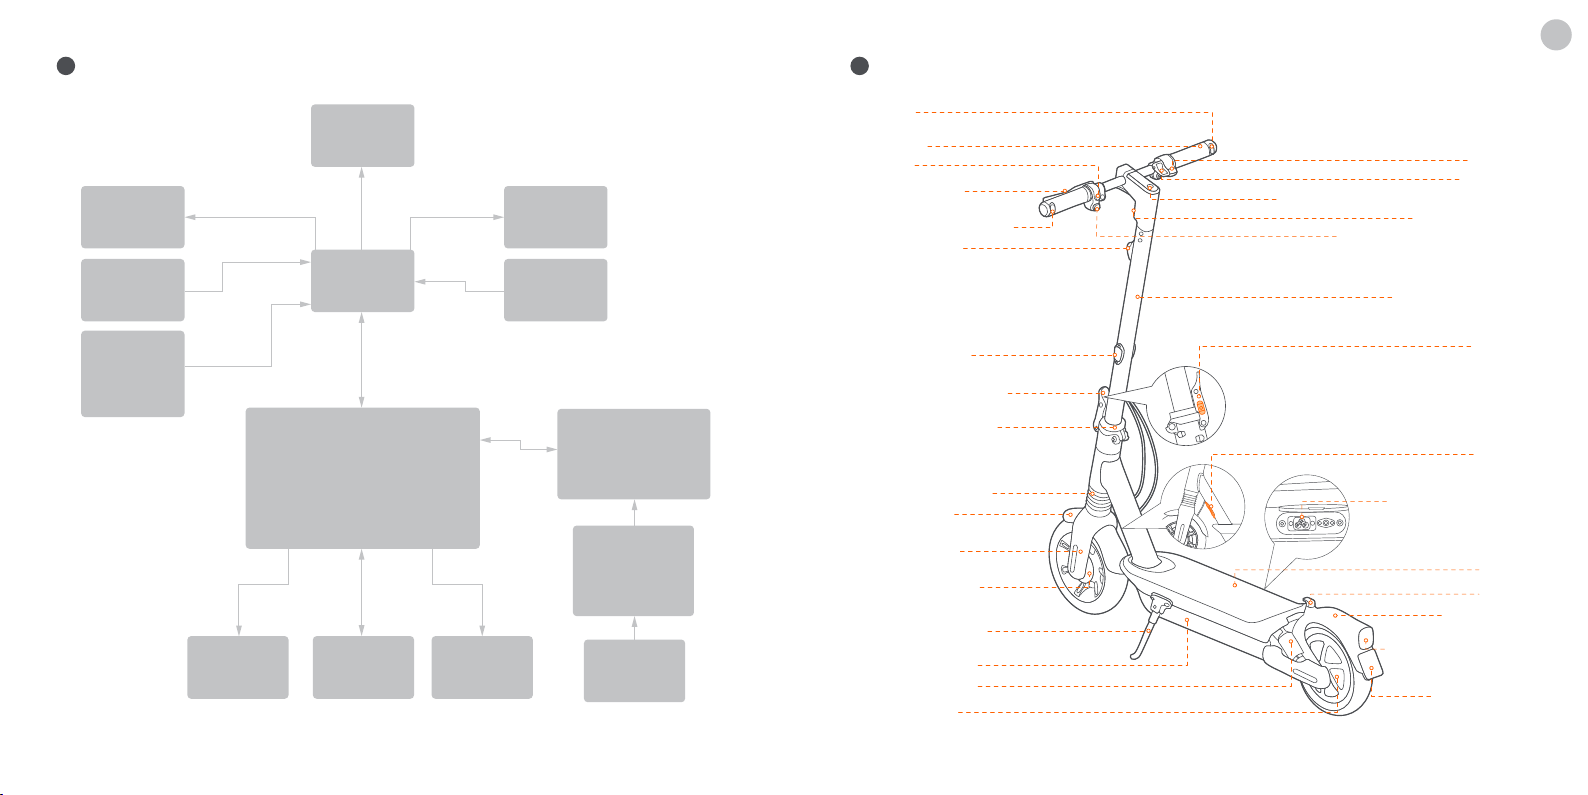
7
Diagrama de cableado
Indicador de
dirección
izquierdo
Freno
Faro
delantero
Panel de
control
Indicador de
dirección
derecho
Acelerador
electrónico
1
Schemat
Wskaźnik
kierunku w prawo
Kierownica
Dzwonek
Uchwyt hamulca
Lewy wskaźnik kierunku
Przedni reflektor
PL
Manetka
Karabinek
Deska rozdzielcza i przycisk zasilania
Reflektor przedni
Przycisk wskaźnika kierunku
Kolumna kierownicy
Indicador
Cambiar
de dirección
+ Botón
de bocina
Batería
Controlador
Integrado
Cargador
Motor Luz traseraBocina
56 57 58 59 60 61
AC Puerto
de carga
Odbłyśnik boczny
Dźwignia do szybkiego
zwalniania/składania
Mechanizm składania
Amortyzator przedni
Przedni błotnik
Przedni widelec
Hamulec bębnowy
Podnóżek hulajnogi
Komora na baterię
Tylny amortyzator
Koło napedowe
Gniazdko ładowania
Tylne światło & Światło
Przycisk
bezpieczenstwa
Przycisk
Podest
Klamra
Tylny błotnik
Parafango
hamowania &
Reflektor
Obszar tablicy
Page 31
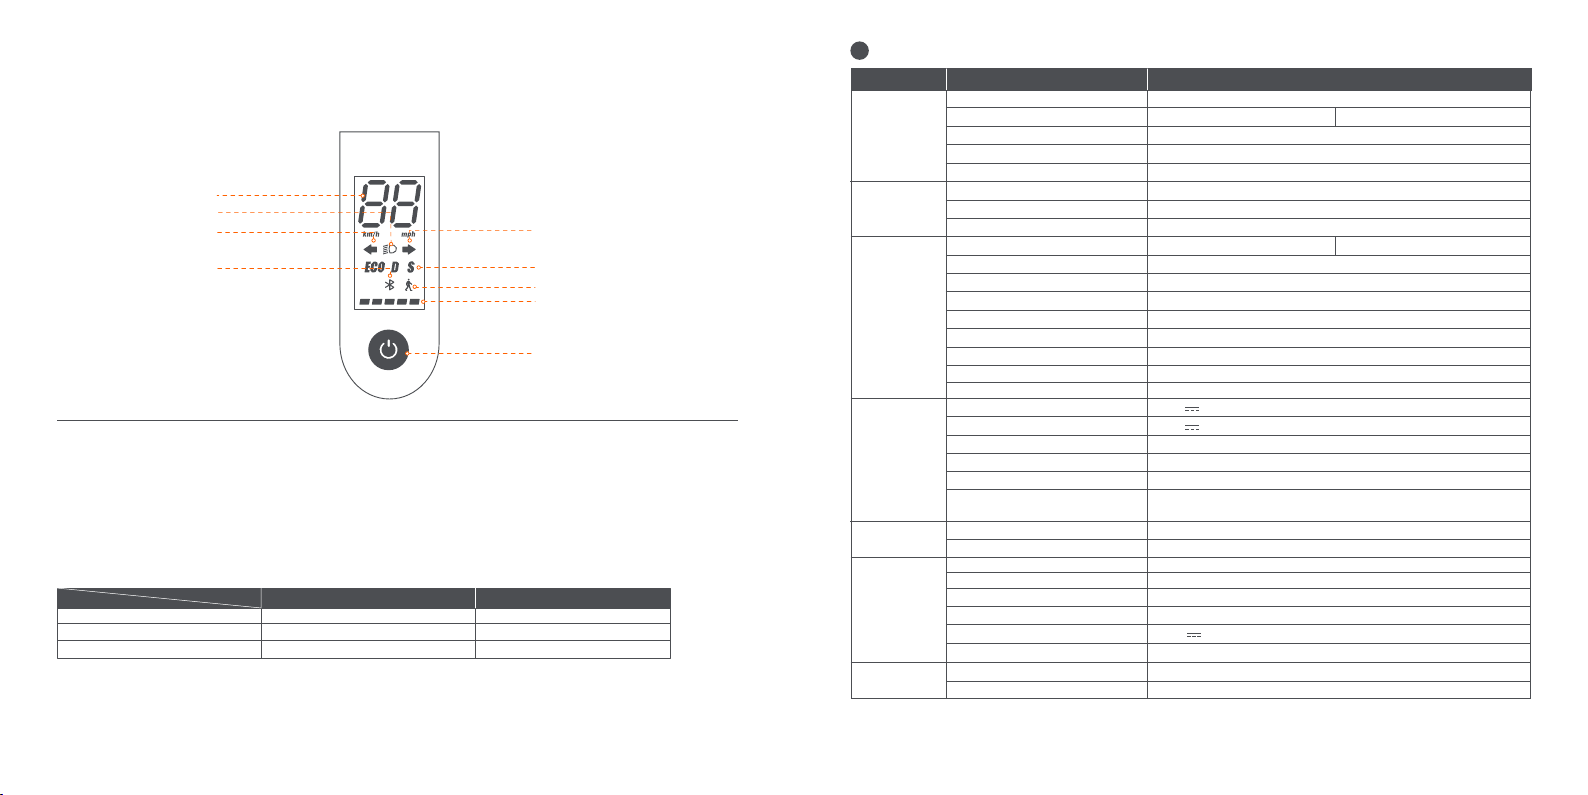
2
Deska rozdzielcza i przycisk zasilania
Predkosciomierz
Reflektor przedni
Ikona kierunkowskazu
prawego
Bluetooth
Przycisk Start: Krótko naciśnij przycisk Start, aby włączyć. Naciśnij i przytrzymaj przycisk przez 3 sekundy, aby wyłączyć skuter. Przy włączonej
hulajnodze KickScooter naciśnij przycisk Start, aby włączyć / wyłączyć światło przednie i tylne, a następnie naciśnij dwukrotnie, aby przełączać
między trybami prędkości.
Prędkościomierz: wskazuje aktualną prędkość hulajnogi. Wyświetla również kody błędów.
Wskaźnika kierunku: Skręcając w lewo lub w prawo, naciśnij przełącznik „←” (w lewo) lub „→” (w prawo) na przełączniku kierunkowskazów.
Następnie kierunkowskaz będzie migał regularnie, co można wyłączyć, ponownie naciskając odpowiedni przełącznik.
Tryb spacerowy: Maksymalna prędkość wynosi 5 km/h (3.1 mph).
Reflektor przedni i tylne światło są zawsze włączone i nie można ich wyłączyć.
* Jak włączyć w aplikacji: Ustawienia > Tryb spacerowy.
Tryb prędkości: są dostępne 3 tryby. Maksymalna prędkość wynosi:
Modes
ECO (tryb oszczędzania energii)
D (tryb standardowy)
S (modo deportivo)
Bluetooth: ikona wskazuje, że hulajnoga została pomyślnie połączona z urządzeniem mobilnym.
Poziom naładowania baterii: Całkowity poziom naładowania baterii odpowiada pięciu paskom.
* Poziom naładowania baterii jest bardzo niski, gdy pierwszy pasek wskaźnika baterii jest czerwony. Należy natychmiast
naładować baterię hulajnogi kickscooter.
58 59 60 61
Model
Max G2 E Max G2 D
15 km/h (9.3 mph)
20 km/h (12.4 mph)
25 km/h (15.5 mph)
Ikona lewego
kierunkowskazu
Tryb prędkości
Tryb spaceru
Poziom naładowania baterii
Przycisk zasilania
15 km/h (9.3 mph)
20 km/h (12.4 mph)
20 km/h (12.4 mph)
Charakterystyka
Poz Parametr
Imię
Produkt
Użytkownik
Parametry
urządzenia
Akumulator
Silnik
Ładowarka
Opona
[1] Zakres teoretyczny: Testowany podczas jazdy z pełnym akumulatorem, obciążenie 75 kg (165 lbs), 25°C (77°F), przy średniej prędkości
16 km/h (9,9 mph) na chodniku.
[2] Typowy zasięg: Testowany podczas jazdy z pełnym akumulatorem, obciążenie 75 kg (165 lbs), 25°C (77°F), z maksymalną prędkością na chodniku.
* Niektóre czynniki, wpływające na zasięg to: prędkość, obciążenie, liczba uruchomień i zatrzymań urządzenia, temperatura otoczenia itp.
Model
dł. x szer. x wys.
Złożony: dł. x szer. x wys.
Masa netto
Ładowność
Zalecany wiek
Wymagany wzrost
Prędkość max.
Zakres teoretyczny
Typowy zasięg
Max. nachylenie
Możliwość jazdy po
Temperatura robocza
Temperatura przechowywania
Klasa ochrony
Czas ładowania
Napięcie znamionowe
Max. napięcie ładowania
Temperatura ładowania
Pojemność znamionowa
Energia nominalna
System zarządzania baterią
Moc znamionowa
Maks. Moc
Model
Escribe Incorporado - Integrado
Napięcie wejściowe
Wejście nominalna
Maks. napięcie wyjściowe
Wyjście znamionowe
Ciśnienie w oponach
Opony
[1]
[2]
Ninebot KickScooter Max G2
051501E
Około 1210 × 570 × 1264 mm (47,6 × 22,4 × 49,8 in)
Około 1210 × 570 × 605 mm (47,6 × 22,4 × 23,8 in)
Około 24,25 kg (53,5 lbs)
120 kg (265 lbs)
16–55 lat
120–200 cm (3’11”–6’6”)
Około 25 km/h (15,5 mph)
Około 70 km (43,5 miles)
Około 50 km (31,1 miles)
Około 22%
Większość płaskich dróg i typowych belgijskich dróg.
-10 do 40°C (14–104°F)
-10–50°C (14–122°F); Zalecane: 10~30°C (50–86°F)
IPX5
Około 6 h
36 V
42 V
0–40°C (32–104°F)
15,3 Ah
551 Wh
Ochrona przed przegrzaniem, zwarciem, przeciążeniem,
nadmiernym rozładowaniem i przeładowaniem
0,45 kW, 450 W
0,9 kW, 900 W
NB-42D0-02D9
0,1218 kW, 121,8 W
100–240 V ~ 50–60 Hz, 2,0 A MAX.
42 V
2,9 A
42-48 psi
10-calowe samouszczelniające opony bezdętkowe
051501D
Około 20 km/h (12,4 mph)
Page 32
3
Atesty
Bateria jest zgodna z UN 38.3.
Oświadczenie o zgodności z przepisami Unii Europejskiej
Informacje o usuwaniu dla użytkowników zużytego sprzętu elektrycznego i elektronicznego
podstawowymi wymaganiami i innymi stosownymi postanowieniami dyrektywy w sprawie urządzeń radiowych
2014/53/UE.
Dyrektywa w sprawie ograniczeń w stosowaniu niektórych substancji niebezpiecznych (RoHS)
Ninebot (Changzhou) Tech Co., Ltd. niniejszym oświadcza, że cały produkt, w tym części (kable, przewody itp.) spełnia
wymagania dyrektywy RoHS 2011/65/UE i zmiany dyrektywy delegowanej Komisji (UE) 2015/863 w sprawie ograniczenie stosowania niektórych niebezpiecznych substancji w sprzęcie elektrycznym i elektronicznym („RoHS przekształcenie”
lub „RoHS 2.0””).
Ten symbol na produkcie lub jego opakowaniu oznacza, że zużytych produktów elektrycznych i elektronicznych nie
należy mieszać z niesortowanymi odpadami komunalnymi. Aby zapewnić prawidłowe przetwarzanie, użytkownik jest
odpowiedzialny za pozbycie się zużytego sprzętu poprzez zorganizowanie jego zwrotu do wyznaczonych punktów
zbiórki.
Właściwa utylizacja tego produktu pomoże zaoszczędzić cenne zasoby i zapobiec wszelkim potencjalnym negatywnym
skutkom dla zdrowia ludzkiego i środowiska, które w przeciwnym razie mogłyby wyniknąć z niewłaściwego
postępowania z odpadami.
Za nieprawidłową utylizację tych odpadów mogą zostać nałożone kary, zgodnie z krajowymi przepisami.
Prosimy o kontakt z lokalnymi władzami w celu uzyskania dalszych informacji o najbliższym wyznaczonym punkcie
zbiórki.
Informacje dotyczące recyklingu baterii dla użytkowników
Ten symbol oznacza, że baterie i akumulatory po zużyciu nie powinny być mieszane z niesortowanymi odpadami
komunalnymi. Twój udział jest ważną częścią wysiłków na rzecz zminimalizowania wpływu baterii i akumulatorów na
środowisko i zdrowie ludzi W celu prawidłowego recyklingu możesz zwrócić ten produkt lub baterie lub akumulatory,
które zawiera, do dostawcy lub do wyznaczonego punktu zbiórki.
Właściwa utylizacja tego produktu pomoże zaoszczędzić cenne zasoby i zapobiec wszelkim potencjalnym negatywnym
skutkom dla zdrowia ludzkiego i środowiska, które w przeciwnym razie mogłyby wyniknąć z niewłaściwego
postępowania z odpadami.
Za nieprawidłową utylizację tych odpadów mogą zostać nałożone kary, zgodnie z krajowymi przepisami.
istnieją oddzielne systemy zbiórki zużytych baterii i akumulatorów.
Prosimy o prawidłową utylizację baterii i akumulatorów w lokalnej zbiórce/recyklingu odpadów środek.
Dyrektywa w sprawie urządzeń radiowych
Ninebot (Changzhou) Tech Co., Ltd. niniejszym oświadcza, że produkt wymieniony w tej sekcji jest zgodny z
60 61
Dyrektywa maszynowa
Ninebot (Changzhou) Tech Co., Ltd. niniejszym oświadcza, że produkt wymieniony w tej sekcji jest zgodny z zasadniczymi wymaganiami i innymi stosownymi postanowieniami dyrektywy maszynowej 2006/42/WE.
Upoważniony przedstawiciel:
Segway-Ninebot Europe, Dynamostraat 7, 1014 BN
Amsterdam, The Netherlands
Ninebot (Changzhou) Tech Co., Ltd. niniejszym oświadcza, że model produktu: 051501E, 051501D jest zgodny z
zasadniczymi wymaganiami i innymi stosownymi postanowieniami dyrektywy w sprawie urządzeń radiowych
2014/53/UE, oraz dyrektywy RoHS 2011/65/UE i zmiana Dyrektywa delegowana Komisji (UE) 2015/863.
Deklarację zgodności można zobaczyć pod następującym adresem: http://eu-en.segway.com/support-instructions
Bluetooth
Wykorzystanie Works with Apple oznacza, że produkt został zaprojektowany tak, aby współpracował specjalnie z
technologią zidentyfikowaną na plakecie i został certyfikowany przez producenta produktu w celu spełnienia Apple Find
My network specyfikacje i wymagania produktu. Apple nie ponosi odpowiedzialności za działanie tego urządzenia lub
korzystanie z tego produktu lub jego zgodność z normami bezpieczeństwa i regulacyjnymi.
Pasmo częstotliwości
Moc emisji RF
2.4000-2.4835GHz
20mW
Page 33

4
Zalecany harmonogram konserwacji
Aby zapewnić bezpieczną jazdę, niezbędna jest codzienna pielęgnacja i regularna konserwacja. Ty, właściciel, masz
Przedmiot komponent Metoda konserwacji
Każde 3
miesiące
kontrolę i wiedzę o tym, jak często korzystasz ze skutera, jak ciężko go używasz i gdzie go używasz. obowiązek
przeprowadzania regularnych kontroli i dostarczania skutera do autoryzowanego centrum serwisowego w celu
przeprowadzenia kontroli i serwisu. Dla własnego bezpieczeństwa i lepszych wrażeń z jazdy należy przeprowadzać
regularną konserwację KickScootera. Zapoznaj się z poniższym harmonogramem konserwacji.
Uwaga: ten harmonogram konserwacji nalicza opłatę serwisową.
Co 6
miesięcy
Każde 3
Przedmiot komponent Metoda konserwacji
Części
mainframe
Ciśnienie w
oponach
Zużycie opony
Konserwacja
komputerów
mainframe
62 63 64 65 66 67
Śruby na górze
trzpienia
Śruby na
mechanizmie
składania
Użyj miękkiej, wilgotnej szmatki, aby
wytrzeć ramę główną do czysta.
Napompuj opony do 42-48 psi.
Sprawdź, czy opony nie są popękane,
zdeformowane lub znacznie zużyte.
Dokręć śrub przymocowanych do
kierownicy i mostka. Sugerowany
moment obrotowy to 5,5 ± 0,5 Nm.
Dokręć śrubę przepustnicy.
Sugerowany moment obrotowy to
0,9 ± 0,06 N·m.
Dokręć śruby na dźwigniach hamulców.
Sugerowany moment obrotowy to 6 ± 1
N·m.Dokręć śruby na szczycie mostka.
Sugerowany moment obrotowy to
8,5 ± 0,5 N·m.
Dokręcić śruby mocujące składanego
uchwytu i widelca przedniego,
Dwa śruby boczne z boku, zalecany
moment obrotowy wynosi 15 ± 1N · m
Składaj i rozwijaj, górna pionowa
śruba, zalecany moment obrotowy
wynosi 15 ± 1N · m
Złóż pręt łączący i zamocuj śruby
łączące podczas kołysania na
rowerze.Składanie jest gładkie bez
trzęsienia
miesiące
lub co 500
√
km (310
mil)
Co 1 rok lub co
1,000 km (621
mil)
√ √√√
√ √√√
√ √√
√
√
√
Co 3 rok lub co
10,000 km
(6,214 mil)
√√
√√
√√
Kontrola
funkcji
Silnik piasty
Konserwacja
przedniego koła
Regulacja
hamulca
Hamulec
bębnowy
Światła tylne
światło głowy
Kierunkowskazy
Deska
rozdzielcza
Przycisk
Przepustnica
Aby przyspieszyć i zwolnić, sprawdź,
czy silnik piasty nie utknął lub nie
wydaje nienormalnych dźwięków.
Sprawdź, czy przednie koło nie jest
zablokowane, czy się trzęsie, lub czy
wałek osi
Jeżeli hamulec jest zbyt mocno /
luźny, należyodkręcić śrubę na
zacisku za pomocą klucza
imbusowego 4 mm. Następnie
ostrożnie wyregulować przewód
hamulcowy (zmniejsz / zwiększ
długość ekspozycji) i ponownie
dokręcić śrubę.
Standard testowy: prędkość jazdy
wynosi 20 km/h (12.4 mph), a droga
hamowania jest w ciągu 6m
Przednie koło może obracać się
normalnie bez nieprawidłowego
dźwięku.Przednie koło można hamować
po naciśnięciu dźwigni hamulca.
Ściśnij dźwignie hamulca, tylne
światła działają normalnie.
Sprawdź reflektor i zobacz, czy świeci
jasno.
Przełącz przycisk kierunkowskazów
odpowiednio w lewo/prawo, sprawdź,
czy kierunkowskazy po lewej/prawej
stronie migają normalnie.
Włącz skuter, deska rozdzielcza
działa prawidłowo.
Naciśnij przycisk klaksonu, a dźwięk
jest głośny.
Naciśnij i przytrzymaj przepustnicę, a
następnie zwolnij ją,sprawdzając
przyspieszenie i opóźnienie.
Uwaga: Puść go, sprawdź, czy
przepustnica wróci do pozycji.
Co 6
miesięcy
lub co 500
km (310
mil)
Co 1 rok lub co
1,000 km (621
mil)
√ √
√ √
√ √√
√ √√
√ √√
√ √√
√ √√
√ √√
√ √√
√ √√
Co 3 rok lub co
10,000 km
(6,214 mil)
Page 34

Co 6
miesięcy
Każde 3
Przedmiot komponent Metoda konserwacji
Po połączeniu z aplikacją
Segway-Ninebot:
wykrywanie
aplikacji
Kontrola
funkcji
Ważne
części
Części
funkcjonaln
e
64 65
Ładowanie
przełącznik
sterowania
Obrócenie
Zespół baterii
Kontroler
Silnik piasty
Zespół tylnych
koła
Dźwignie
przepustnicy i
hamulca
Montaż
przedniego
widelca
Mechanizm
składania
Hamulec
bębnowy
Osłona deski
rozdzielczej
1) Zaktualizuj oprogramowanie do
najnowszej wersji.
2) Sprawdź, czy powiadomienie o
odpowiednim kodzie błędu i możliwych
przyczynach pojawi się, gdy hulajnoga
wykryje błąd.
Ładowanie skutera:
1) Sprawdź, czy na desce rozdzielczej
wyświetla sięaktualna moc baterii.
2) Sprawdź wskaźnik LED na ładowarce.
Ładowanie:czerwony. W pełni
naładowany: zielony.
Naciśnij lub przełącz przycisk 3 razy bez
awarii.
Test z skrętami w lewo i w prawo (kąt
skrętu wynosi 60).Brak oporu i opóźnień
podczas skręcania.
Akumulator należy wymienić, gdy jest
ładowany i rozładowany przez
500-krotnie lub całkowity przebieg
wynosi ponad 10,000 km (6,213 mil).
Uwaga: Zaleca się ładowanie raz na
60-dni za długoterminowe
przechowywanie.
Po 3 latach lub 10,000 km (6,214 mil)
jazdy nieprawidłowe części hulajnogi
muszą zostać natychmiast uzupełnione.
miesiące
lub co 500
km (310
mil)
Co 1 rok lub co
1,000 km (621
Co 3 rok lub co
10,000 km
mil)
(6,214 mil)
√√ √
√√ √
√√ √
√ √
√
5
Znak towarowy
Ninebot jest znakiem towarowym firmy Ninebot (Beijing) Tech Co., Ltd; Segway i Rider Design są zastrzeżonymi
znakami towarowymi firmySegway Inc., App Store, logo Apple, Apple, Apple Find My, Apple Watch, Find My, iPhone,
iPad, iPadOS, Mac, macOS i watchOS są znakami towarowymi Apple Inc. IOS jest znakiem towarowym firmy Cisco i jest
używany na podstawie licencji. Android, Google Play i logo Google Play są znakami towarowymi firmy Google LLC.
Znak słowny i logo Bluetooth® są zastrzeżonymi znakami towarowymi firmy Bluetooth SIG, Inc. takie znaki
Segway-Ninebot są objęte licencją. Inne znaki towarowe i nazwy handlowe należą do ich odpowiednich właścicieli.
Hulajnoga jest objęta odpowiednimi patentami. Informacje dotyczące patentów można znaleźć na stronie
http://www.segway.com.
Podjęliśmy próbę dołączenia opisów i instrukcji, dotyczących wszystkich funkcji hulajnogi w momencie drukowania.
Jednak dzięki ciągłemu ulepszaniu produktu i zmianach w projekcie, zakupiony przedmiot może nieznacznie różnić się
od wersji pokazanej w tym dokumencie. Aby pobrać i zainstalować aplikację, prosimy odwiedzić Apple App Store (iOS)
lub Google Play (Android).Należy pamiętać, że istnieje wiele modeli pojazdów Segway i Ninebot by Segway z różnymi
funkcjami także niektóre zwymienionych w tej instrukcji funkcji mogą nie mieć zastosowania w danym urządzeniu.
Producent zastrzega sobie prawo do zmiany konstrukcji i funkcjonalności wyrobu oraz jego dokumentacji, bez
wcześniejszego powiadomienia.
© 2023 Ninebot (Beijing) Tech Co. Ltd. Wszelkie prawa zastrzeżone.
(※Aplikacja KickScooter działa na Bluetooth)
Page 35
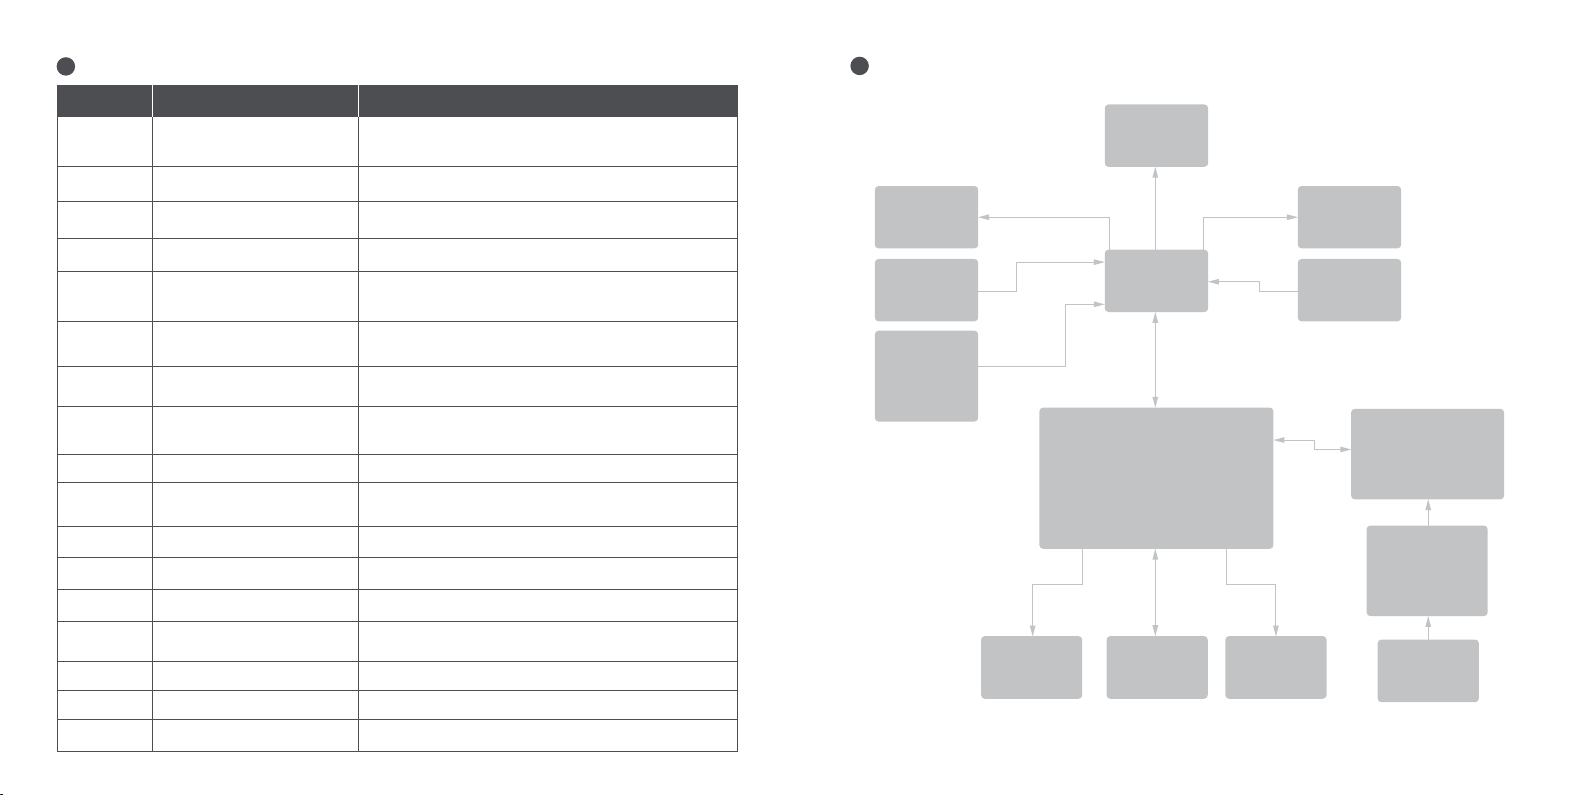
6
Typowe awarie
Kod błędu
10
11
12
13
14
15
18
21
23
24
26
31
35
39
40
41
45
66 67
Możliwe przyczyny
Błąd komunikacji Bluetooth
Nieprawidłowe próbkowanie
prądu fazy 1A silnika
Nieprawidłowe próbkowanie
prądu fazy 1B silnika
Nieprawidłowe próbkowanie
prądu fazy 1C silnika
Nieprawidłowe próbkowanie
elementu hallotronowego
przepustnicy
Nieprawidłowe próbkowanie
elementu hallotronowego
hamulca
Nieprawidłowy sygnał z elementu
hallotronowego silnika
Błąd komunikacji z akumulatorem
Domyślny numer seryjny
akumulatora
Nieprawidłowe napięcie
domyślne
Nieprawidłowy
zapis/odczyt danych
Nieprawidłowe działanie FLASH
Domyślny numer seryjny
KickScootera
Nieprawidłowa temperatura
akumulatora
Nieprawidłowy termistor NTC
sterownika
Nieprawidłowy termistor NTC
silnika
Nieprawidłowe próbkowanie
prądu przewodu głównego
Rozwiązanie
Sprawdź połączenie przewodu komunikacyjnego deski
rozdzielczej i przewodu sterującego lub skontaktuj się z działem
obsługi posprzedażnej albo autoryzowanym sprzedawcą.
Skontaktuj się z działem obsługi posprzedażnej lub autoryzowanym sprzedawcą.
Skontaktuj się z działem obsługi posprzedażnej lub autoryzowanym sprzedawcą.
Skontaktuj się z działem obsługi posprzedażnej lub
autoryzowanym sprzedawcą.
Sprawdź, czy w momencie włączania zasilania przepustnica
jest wciśnięta lub skontaktuj się z działem obsługi
posprzedażnej albo autoryzowanym sprzedawcą.
Sprawdź, czy w momencie włączania zasilania dźwignia
hamulca jest naciśnięta lub skontaktuj się z działem obsługi
posprzedażnej albo autoryzowanym sprzedawcą.
Sprawdź, czy gniazdo hallotronowe jest luźne lub skontaktuj się
z działem obsługi posprzedażnej albo autoryzowanym
sprzedawcą.
Sprawdź czy przewód połączony z przewodem komunikacyjnym
akumulatora i sterownika jest luźny lub skontaktuj się z działem
obsługi posprzedażnej albo autoryzowanym sprzedawcą.
Skontaktuj się z działem obsługi posprzedażnej lub autoryzowanym sprzedawcą.
Sprawdź, czy przewód łączący akumulator ze sterownikiem jest
luźny lub skontaktuj się z działem obsługi posprzedażnej albo
autoryzowanym sprzedawcą.
Skontaktuj się z działem obsługi posprzedażnej lub
autoryzowanym sprzedawcą.
Skontaktuj się z działem obsługi posprzedażnej lub autoryzowanym sprzedawcą.
Sprawdź, czy KickScooter nadal utrzymuje domyślny numer
seryjny.
Sprawdź otoczenie robocze akumulatora lub skontaktuj się z
działem obsługi posprzedażnej albo autoryzowanym
sprzedawcą.
Regulator przegrzany, lub skontaktuj się z działem obsługi
posprzedażnej lub autoryzowanym sprzedawcą.
Skontaktuj się z działem obsługi posprzedażnej lub autoryzowanym sprzedawcą.
Skontaktuj się z działem obsługi posprzedażnej lub
autoryzowanym sprzedawcą.
7
Schemat okablowania
Wskaźnik
kierunku
lewego
Hamulec
Przycisk
wskaźnika
kierunku +
Przycisk
dzwonka
Reflektor
przedni
Deska
rozdzielcza
Kontroler
Silnik kołowy Tylne światłoPrzycisk
Wskaźnik
kierunku
prawego
Manetka
Baterię
Wbudowana
ładowarka
AC Gniazdko
ładowania
Page 36
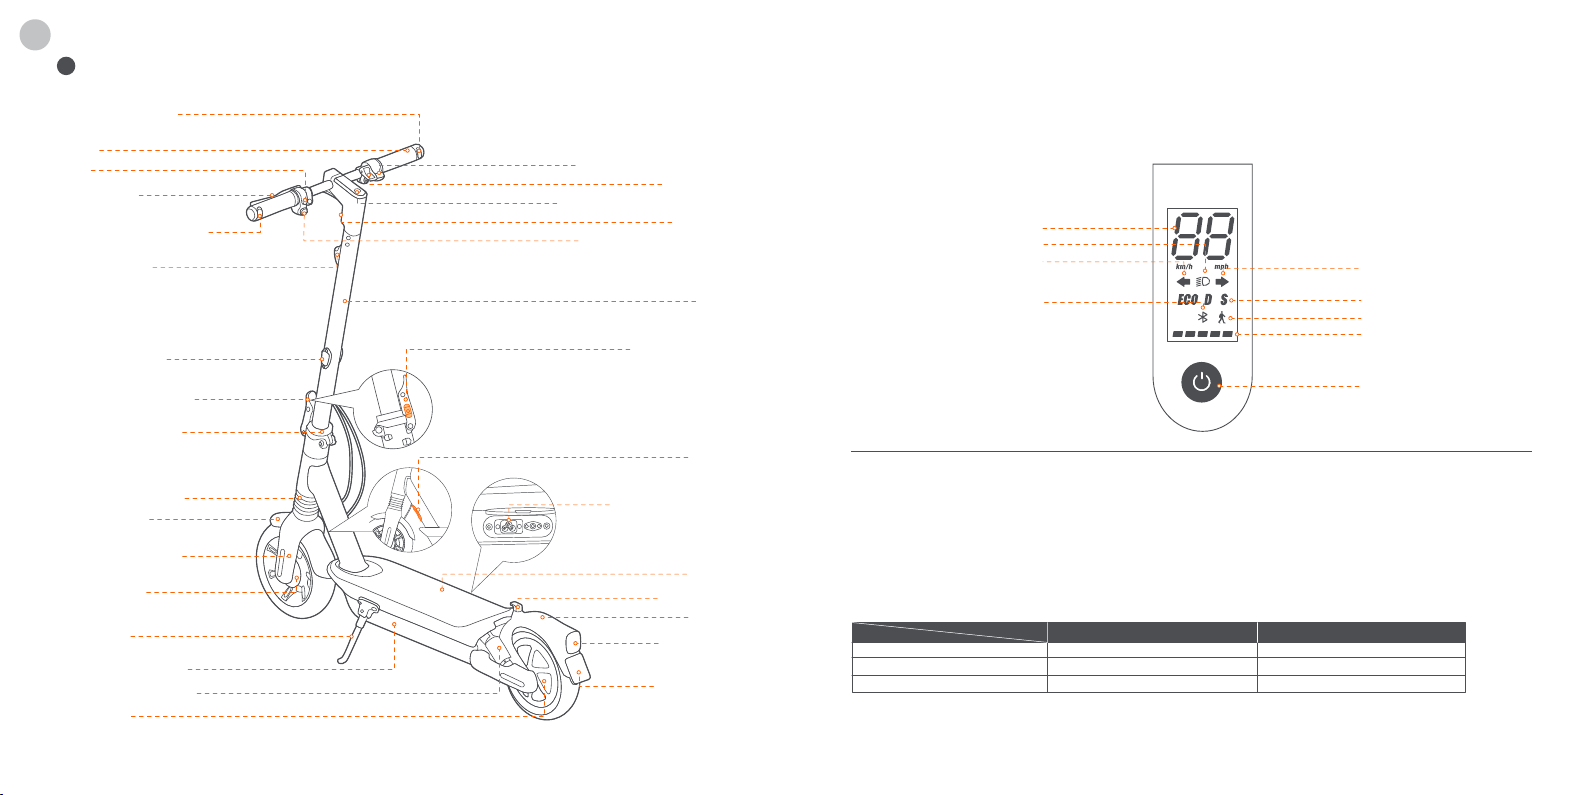
NL
1
Diagram
Richtingaanwijzer
rechts
Stuur
Klok
Rem hendel
Richtingaanwijzer links
Reflector voor
Reflector zijkant
Quick-releasehendel
Vouwmechanisme
Schokdemper voor
Voorspatbord
Voorvork Voorkant
Trommelrem
Standaard
Accucompartiment
Schokdemper achter
Naafmotor
68
Elektronische gashendel
Snap Haak
Dashboard & Stroom Knop
Koplamp
Richting Indicator Knop
Barra
Veiligheidsknop
Claxon
Voetenplank Schijf
Zócalo
Achterkant
Fender
Achterlicht
& Reflector
Verzekering
Bord
Dashboard & Stroom Knop
Snelheidsmeter
Koplamp
richtingaanwijzericon
Linker
Bluetooth
Startknop: druk op de knop tot draai Aan; druk op en uitstel de knop voor 3 seconden tot draai uit. Wanneer de KickScooter is Aan, druk
op de knop tot draai aan uit de koplamp en de achterkant licht, en druk op tweemaal tot schakelaar tussen de snelheid modi.
Snelheidsmeter: Het toont de huidig snelheid van de scooter, net zo goed net zo fout codes.
Richtingaanwijzer: Wanneer u naar links of rechts draait, drukt u op de schakelaar "←" (links) of "→" (rechts) op de
richtingaanwijzerschakelaar. Daarna knippert de richtingaanwijzer regelmatig, die kan worden uitgeschakeld door nogmaals op de
bijbehorende schakelaar te drukken.
Walk Modus: Max. snelheid is 5 km/u (3.1 mph).
De koplamp en het achterlicht zijn altijd aan en kunnen niet worden uitgeschakeld.
Hoe in staat te stellen in de Segway-Ninebot app: Instellingen >Walk Modus.
* Snelheid Modus: Daar zijn drie modi beschikbaar. De bovenkant snelheid is net zo volgt:
Modus
ECO (Energiebesparend modus)
D (Standaard modus)
S (Sport modus)
Bluetooth: Het duidt op Dat de scooter heeft geweest met succes verbonden tot de mobiel apparaat.
Accu Niveau: De totaal accu niveau gelijk aan 5 bars.
* De batterij macht is heel laag wanneer de eerste batterij bar is rood. Alstublieft laad je op KickScooter onmiddellijk.
Model
15 km/h (9.3 mph)
20 km/h (12.4 mph)
25 km/h (15.5 mph)
20 km/h (12.4 mph)
20 km/h (12.4 mph)
Rechts
richtingaanwijzericon
Snelheidsmodus
Walk Modus
Foutmelding Accu
Niveau
Startknop
Max G2 DMax G2 E
15 km/h (9.3 mph)
69
Page 37

2
Specicaties:
Item Parameter
Naam
Producto
Usuario
Parámetros
de
la máquina
Batería
Motor
Cargador
Rueda
[1] Theoretisch bereik: Getest rijdend met volle accu, 75 kg (165 lbs) belasting, 25°C (77°F), op een gemiddelde snelheid van 16 km/u (9,9 mph) op bestrating.
[2] Typisch actieradius: Getest rijdend met volle accu, 75 kg (165 lbs) belasting, 25°C (77°F), op de maximale snelheid op stoep.
* Sommige van de factoren die van invloed zijn op bereik omvat snelheid, belasting, aantal starts en stopt, ambient temperatuur, enz.
70
Model
Lengte × Breedte × Hoogte
Opgevouwen: Lengte × Breedte × Hoogte
Netto Gewicht
Max. belasting
Aanbevolen leeftijd
Vereiste lengte
Max. Snelheid
Theoretisch bereik
Typisch actieradius
Max. helling
Geschikt terrein
Bedrijfstemperatuur
Opslagtemperatuur
IP waarde
Duur opladen (enkel)
Nominale spanning
Max. oplaadspanning
Opladen omgevingstemperatuur
Nominale capaciteit
Nominale energie
Accubeheersysteem
Nominaal vermogen
Maximaal vermogen
Model
Type Integrado
Afgegeven vermogen
Ingangsspanning
Max. uitgangsspanning
Nominaal uitgangsvermogen
Bandenspanning
Type
[1]
[2]
Ninebot KickScooter Max G2
051501E
Ong. 1210 × 570 × 1264 mm (47,6 × 22,4 × 49,8 in)
Ong. 1210 × 570 × 605 mm (47,6 × 22,4 × 23,8 in)
Ong. 24,25 kg (53,5 lbs)
120 kg (265 lbs)
16–55 jaar oud
120–200 cm (3’11”–6’6”)
Ong. 25 km/h (15,5 mph)
Ong. 70 km (43,5 mijl)
Ong. 50 km (31,1 mijl)
Ong. 22%
Meeste vlakke wegdekken en typische Belgische wegen.
-10–40°C (14–104°F)
-10–50°C (14–122°F); Aanbevolen: 10~30°C (50–86°F)
IPX5
Ong. 6 h
36 V
42 V
0–40°C (32–104°F)
15,3 Ah
551 Wh
Protección contra sobrecalentamiento, sobredescarga,
cortocircuito, sobrecorriente y sobrecarga
0,45 kW, 450 W
0,9 kW, 900 W
NB-42D0-02D9
0,1218 kW, 121,8 W
100–240 V ~ 50–60 Hz, 2,0 A MAX.
42 V
2,9 A
42-48 psi
10 inch zelfafdichtende tubeless-banden
051501D
Ong. 20 km/h (12,4 mph)
3
Certiceringen
De accu voldoet aan UN/DOT 38.3.
EU-conformiteitsverklaring
Informatie over verwijderen voor gebruikers van afgedankte elektrische en elektronische apparaten
Dit symbool op het product of op de verpakking betekent dat gebruikte elektrische en elektronische producten niet
bij het ongescheiden gemeentelijk afval horen. Voor de juiste behandeling is het uw verantwoordelijkheid om uw
afgedankte apparaten te verwijderen door deze in te leveren bij de daarvoor bedoelde inzamelpunten.
Het correct verwijderen van dit product helpt met het terugwinnen van waardevolle stoen en voorkomt mogelijke
negatieve eecten voor de menselijke gezondheid en het milieu, die zouden kunnen voortkomen uit het incorrect
omgaan met afval.
Er kunnen boetes worden gegeven voor het niet correct verwijderen van dit afval, in overeenstemming met uw
nationale wetgeving.
Neem contact op met uw lokale overheid voor verdere details over het dichtstbijzijnde inzamelpunt.
Accu-recyclinginformatie voor de Europese Unie
Dit symbool betekent dat accu's en accumulatoren aan het einde van hun levensduur niet bij het ongescheiden
gemeentelijk afval horen. Uw medewerking is een belangrijk onderdeel van de inspanningen om de gevolgen van
accu's en accumulatoren op het milieu en de volksgezondheid te beperken. Voor correcte recycling kunt u dit product
of de accu's of accumulatoren die erin zitten inleveren bij uw leverancier of het daarvoor bedoelde inzamelpunt.
Het correct verwijderen van dit product helpt met het terugwinnen van waardevolle stoen en voorkomt mogelijke
negatieve eecten voor de menselijke gezondheid en het milieu, die zouden kunnen voortkomen uit het incorrect
omgaan met afval.
Er kunnen boetes worden gegeven voor het niet correct verwijderen van dit afval, volgens uw nationale wetgeving. Er
worden verschillende inzamelingssystemen gebruikt voor accu's en accumulatoren.
Verwijder accu's en accumulatoren correct bij uw lokale afvalinzamelings-/recyclingcentrum.
71
Page 38
Richtlijn radioapparatuur
Ninebot (Changzhou) Tech Co., Ltd. verklaart hierbij dat het product dat staat vermeld in deze sectie voldoet aan de
essentiële eisen en overige relevante bepalingen van de Richtlijn radioapparatuur 2014/53/EU.
Richtlijn betreende beperking van het gebruik van bepaalde gevaarlijke stoen
Ninebot (Changzhou) Tech Co., Ltd. verklaart hierbij dat het gehele product, inclusief onderdelen (kabels, snoeren en
dergelijke) voldoen aan de eisen van de Richtlijn Gebruik bepaalde gevaarlijke stoen 2011/65/EU en het amendment Gedelegeerde Richtlijn (EU) 2015/863 van de Commissie betreende beperking van het gebruik van bepaalde
gevaarlijke stoen ("RoHS recast" of "RoHS 2.0").
Richtlijn betreende machines
Ninebot (Changzhou) Tech Co., Ltd. verklaart hierbij dat het product dat staat vermeld in deze sectie voldoet aan de
essentiële eisen en overige relevante bepalingen van de Richtlijn betreende machines 2006/42/EC.
Geautoriseerde vertegenwoordiger EU:
Segway-Ninebot Europe
Dynamostraat 7, 1014 BN Amsterdam, Nederland.
Ninebot (Changzhou) Tech Co., Ltd. verklaart hierbij dat het productmodel: 051501E, 051501D voldoet aan de
essentiële eisen en overige relevante bepalingen van de Richtlijn betreende radioapparatuur 2014/53/EU, de
Richtlijn betreende machines 2006/42/EC en de Richtlijn RoHS 2011/65/EU en de Gedelegeerde Richtlijn (EU)
2015/863 van de Commissie.
De conformiteitsverklaring kan worden ingezien op het volgende adres: http://eu-en.segway.com/support-instructions
Conformiteitsverklaring VK
Radio Equipment Regulations 2017
Ninebot (Changzhou) Tech Co., Ltd. verklaart hierbij dat het product dat staat vermeld in deze sectie voldoet aan de
essentiële eisen en overige relevante bepalingen van de Radio Equipment Regulations 2017.
De Restriction of the Use of Certain Hazardous Substances in Electrical and Electronic Equipment Regulations 2012
Ninebot (Changzhou) Tech Co., Ltd. verklaart hierbij dat het gehele product, inclusief onderdelen (kabels, snoeren en
dergelijke) voldoen aan de eisen van de Restriction of the Use of Certain Hazardous Substances in Electrical and
Electronic Equipment Regulations 2012.
Supply of Machinery (Safety) Regulations 2008
Ninebot (Changzhou) Tech Co., Ltd. verklaart hierbij dat het product dat staat vermeld in deze sectie voldoet aan de
essentiële eisen en overige relevante bepalingen van de Safety of Supply of Machinery (Safety) Regulations 2008.
Bluetooth
Frequentieband(s)
Max. RF-vermogen
2.4000-2.4835 GHz
20 mW
Gebruik van de Works with Apple badge betekent dat een product is ontworpen om specifiek te werken met de
technologie die in de badge wordt geïdentificeerd en door de productfabrikant is gecertificeerd om te voldoen aan
Apple Find My network productspecificaties en -eisen. Apple is niet verantwoordelijk voor de werking van dit
apparaat of het gebruik van dit product of de conformiteit ervan met veiligheids- en regelgevingsnormen.
72
73
Page 39

4
Aanbevolen onderhoudsschema
Voor veilig rijden zijn dagelijkse zorg voor uw apparaat en regelmatig onderhoud noodzakelijk. U als eigenaar, hebt de controle
Item Onderdeel Onderhoudsmethode
Elke 3
maanden
over en de kennis van hoe vaak u uw step gebruikt, hoe intensief u er gebruik van maakt en waar u ermee rijdt. Het is de
verantwoordelijkheid als eigenaar om regelmatige controles uit te voeren en uw step bij een geautoriseerd servicecentrum aan
te bieden voor inspecties en onderhoud. Houd het onderstaande onderhoudsschema aan.
Opmerking: dit onderhoudsschema brengt kosten in rekening.
Elke 6
maanden
Elke 3
√
of elke 500
kilometer
(320 mijl)
Item Onderdeel Onderhoudsmethode
Onderdelen
frame
Bandendruk
Bandenslijtage
Onderhoud
frame
74 75
Schroevens op
bovenkant van
de stuurstang
Schroeven op
het
vouwmechani
sme
Gebruik een zachte, vochtige doek om
het frame schoon te vegen.
Pomp de banden op tot 42–48 psi
Controleer of de banden gescheurd,
vervormd of aanzienlijk versleten zijn.
Draai de schroeven aan die het stuur aan
de stuurstang bevestigen. Het
aanbevolen aandraaimoment is
5,5 ± 0,5 Nm.
Draai de schroef op de gashendel aan. Het
aanbevolen aandraaimoment is
0,9 ± 0,06 N·m.
Draai de schroeven op de remhendel aan.
Het aanbevolen aandraaimoment is
6 ± 1 N·m.
Draai de schroeven bovenop de stuurstang
aan. Het aanbevolen aandraaimoment is
8,5 ± 0,5 N·m.
Draai de bevestigingsschroeven van het
vouwhandvat en de voorvork vast,
Twee zijschroeven aan de zijkant, het
aanbevolen koppel is 15 ± 1N · m
Vouw en vouw, de bovenste verticale
schroef, het aanbevolen koppel is
15 ± 1N · m
Vouw de drijfstang, en bevestig de
drijfstang schroeven wanneer u op de
fiets schommelt.
maanden
Elke 1 jaar of
elke 1,000
kilometer (621
mijl)
Elke 3 jaar of
elke 10,000
kilometer
(6,214 mijl)
√ √√√
√ √√√
√ √√
√
√
√
√√
√√
√√
Inspectie
werking
Naafmotor
Onderhoud
voorwiel
Rem afstellen
Trommelrem
Achterlicht
Koplamp
Richtingaanwij
zer
Dashboard
hoorn
Gashendel
Voor accelereren of afremmen,
controleer of de naafmotor is gestopt of
abnormale geluiden produceert.
Controleer of het voorwiel is
vastgelopen of wankel wordt, of de as
van de asonevenwichtig is.
Als de rem te strak/los is, gebruik dan een
4 mm inbussleutel om de schroef op de
klauw lost te draaien. Pas vervolgens de
remlijn aan (verminder/vergroot de
blootliggende lengte) en draai de schroef
weer aan.
Testnorm: de rijsnelheid is 20 km/h (12.4
mph), en de remafstand is binnen 6m
Voorwiel kan normaal draaien zonder
abnormaal geluid. Voorwiel kan worden
geremd na het indrukken van de
remhendel.
Knijp in de remhendel en controleer of het
achterlicht normaal functioneert.
Controleer de koplamp en of deze
helder brandt.
Draai de richtingaanwijzerknop
respectievelijk naar links/rechts,
controleer of de richtingaanwijzers aan
de linker-/rechterkant normaal
knipperen.
Schakel de step in en controleer of het
dashboard normaal functioneert.
Druk op de toeterknop en het geluid is
luid.
Druk de gashendel in en laat deze
vervolgens los, controleer de
acceleratie en het afremmen.
Opmerking: laat los, controleer of de
gashendel terugveert.
Elke 6
maanden
of elke 500
kilometer
(320 mijl)
Elke 1 jaar of
elke 1,000
kilometer (621
mijl)
√ √
√ √
√ √√
√ √√
√ √√
√ √√
√ √√
√ √√
√ √√
√ √√
Elke 3 jaar of
elke 10,000
kilometer
(6,214 mijl)
Page 40

Elke 6
maanden
Elke 3
Item Onderdeel Onderhoudsmethode
Na verbinden met de
Segway-Ninebot-app:
Foutdetectie
Inspectie
werking
Belangrijke
onderdelen
Functionele
onderdelen
76 77
Opladen
Bedienings-knop
pen
Sturen
Accugedeelte
Besturing
Naafmotor
Achterwielmonta
ge
Gas- en
remhendel
Voorvorkged
eelte
Vouwmechan
isme
Trommelrem
Dashboardkap
1) Update de firmware naar de nieuwste
versie.
2) Controleer of de melding van de
bijbehorende foutcode enmogelijke
oorzaken zullen aangeven wanneer de
scooter een fout detecteert.
De step opladen:
1) Controleer of de huidige accustatus
wordt weergegeven op het dashboard.
2) Controleer de LED-indicator op de
batterijlader.
Opladen: rood, Volledig opgeladen: groen.
Druk of wissel de knop 3 keer zonder te
falen.
Test met links en rechts sturen (de
stuurhoek is 60). Geen weerstand of
vertraging bij het sturen.
De accu dient vervangen te worden
wanneer deze 500 keer is opgeladen en
ontladen of wanneer de totale
kilometerstand meer dan 10,000 km
(6,213 mijl) is.
Opmerking: in geval van langdurige opslag
is het aanbevolen om eens per 60 dagen
de accu op te laden.
Na 3 jaar of 10,000 km (6,214 mijl) rijden
moeten de abnormale onderdelen van de
kickscooter onmiddellijk worden
vervangen.
maanden
of elke 500
kilometer
(320 mijl)
Elke 1 jaar of
elke 1,000
kilometer (621
mijl)
Elke 3 jaar of
elke 10,000
kilometer
(6,214 mijl)
√√ √
√√ √
√√ √
√ √
√
5
Handelsmerk
Ninebot is het handelsmerk van Ninebot (Beijing) Tech Co., Ltd; Segway en het Rider Design zijn de geregistreerde
handelsmerken vanSegway Inc., Apple Store, Apple Logo, Apple, Apple Find My, Apple Watch, Find My, iPhone, iPad, iPadOS,
Mac, macOS en watchOS zijn handelsmerken van Apple Inc. IOS is een handelsmerk van Cisco en wordt onder licentie
gebruikt. Android, Google Play en het Google Play-logo zijn handelsmerken van Google LLC. Het Bluetooth®-woordmerk en
de logo's zijn geregistreerde handelsmerken die eigendom zijn van Bluetooth SIG, Inc. en elk gebruik van dergelijke merken
van Segway-Ninebot zijn onder licentie.
Andere handelsmerken en handelsnamen zijn die van hun respectievelijke eigenaren.De KickScooter is gedekt door
relevante patenten. Ga voor patentinformatie naar http:/www.segway.com
Wij hebben geprobeerd ten tijde van de druk omschrijvingen en instructies voor alle functies van de KickScooter te
vermelden. Echter, vanwege constante verbeteringen van productfuncties en ontwerpveranderingen kan uw KickScooter
mogelijk licht afwijken van dat wat wordt getoond in dit document. Bezoek de Apple App Store (iOS) of de Google PlayStore
(Android) om de Segway-Ninebot-app te downloaden en te installeren. Houd er rekening mee dat er meerdere Segway en
Ninebot modellen zijn met verschillende functies en sommige functies die hier worden genoemd zijn mogelijk niet van
toepassing op uw product. De fabrikant behoudt het recht om het ontwerp en de functionaliteit van het
KickScooter-product en documentatie zonder voorafgaande kennisgeving te wijzigen.
© 2023 Ninebot (Beijing) Tech Co. Ltd. Alle rechten voorbehouden.
(※De Segway-Ninebot-app ondersteunt de KickScooter met ingebouwde Bluetooth)
Page 41
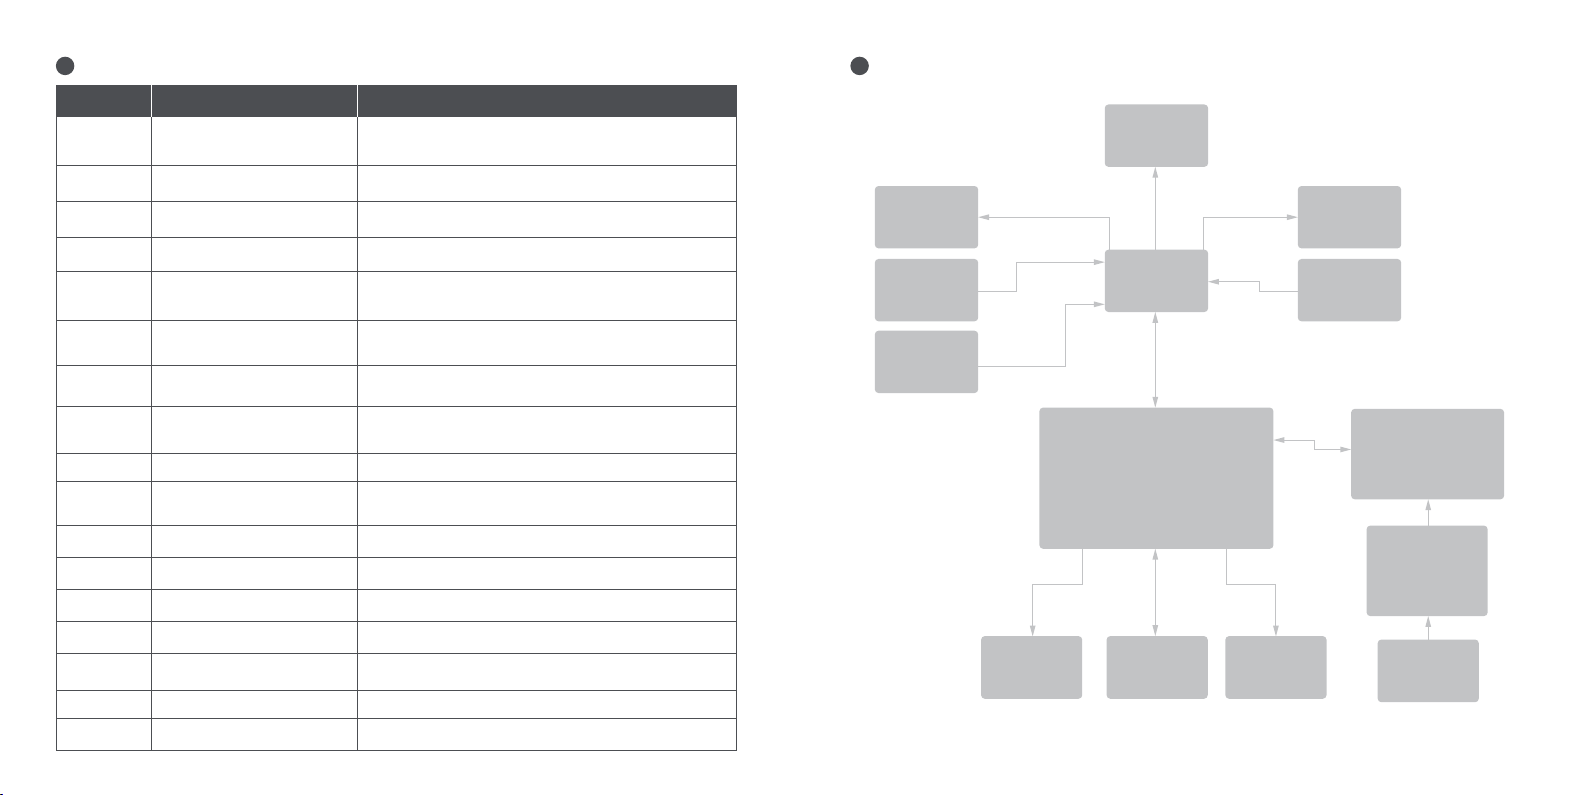
6
Algemene storingen
Mogelijke oorzakenFoutcode Oplossing
10
11
12
13
14
15
18
21
23
24 Abnormale standaardspanning
26
31
35
39
40 Abnormale NTC regelaar
41 Abnormale NTC motor
45
78 79 80 81 82 83 84 85 86 87 88 89 90 91
Bluetooth-communicatiestoring
Abnormale bemonstering
1A-fasestroom van de motor
Abnormale bemonstering
1B-fasestroom van de motor
Abnormale bemonstering 1C
fasestroom van de motor
Abnormale bemonstering
hall-sensor gashendel
Abnormale bemonstering
hall-sensor rem
Abnormaal signaal hall-sensor
motor
Storing accucommunicatie
Serienummer standaard accu
Abnormaal schrijven/lezen
van gegevens
Onjuiste werking FLASH
Serienummer standaard
KickScooter
Abnormale accutemperatuur
Abnormale bemonstering
busstroom
Controleer de aansluiting van de communicatiedraad van het
dashboard en de besturingskabel of neem contact op met de dienst
na verkoop of een erkende dealer.
Neem contact op met de dienst na verkoop of een erkende dealer.
Neem contact op met de dienst na verkoop of een erkende dealer.
Neem contact op met de dienst na verkoop of een erkende
dealer.
Controleer of de gashendel in is geknepen bij het inschakelen, of
neem contact op met de dienst na verkoop of een erkende
dealer.
Controleer of de remhendel in is geknepen bij het inschakelen, of
neem contact op met de dienst na verkoop of een erkende dealer.
Controleer of de aansluiting van de hall-sensor los zit of neem
contact op met de dienst na verkoop of een erkende dealer.
Controleer of de draad die verbonden is met de communicatiedraad
van de batterij en de controller los zit, of neem contact op met de
dienst na verkoop of een erkende dealer.
Neem contact op met de dienst na verkoop of een erkende dealer.
Controleer of de verbindingsdraad van de accu naar de regelaar los
zit of neem contact op met de dienst na verkoop of een erkende
dealer.
Neem contact op met de dienst na verkoop of een erkende
dealer.
Neem contact op met de dienst na verkoop of een erkende dealer.
Controleer of KickScooter nog steeds de standaard SN
behoudt.
Controleer de werkomgeving van de accu of neem contact op met
de dienst na verkoop of een erkende dealer.
Oververwarmde regelaar, of neem contact op met de dienst na
verkoop of een erkende dealer.
Neem contact op met de dienst na verkoop of een erkende dealer.
Neem contact op met de dienst na verkoop of een erkende
dealer.
7
Bedradingsdiagram
Richtingaanwi
jzer links
Rem
Richting
Indicator
Knop +
Claxonknop
Koplamp
Dashboard
Controller
Naafmotor AchterlichtClaxon
Rechter
richtingaanwi
jzer
Elektronische
gashendel
Accu
Integrado
Cargador
AC Laadpoort
Page 42
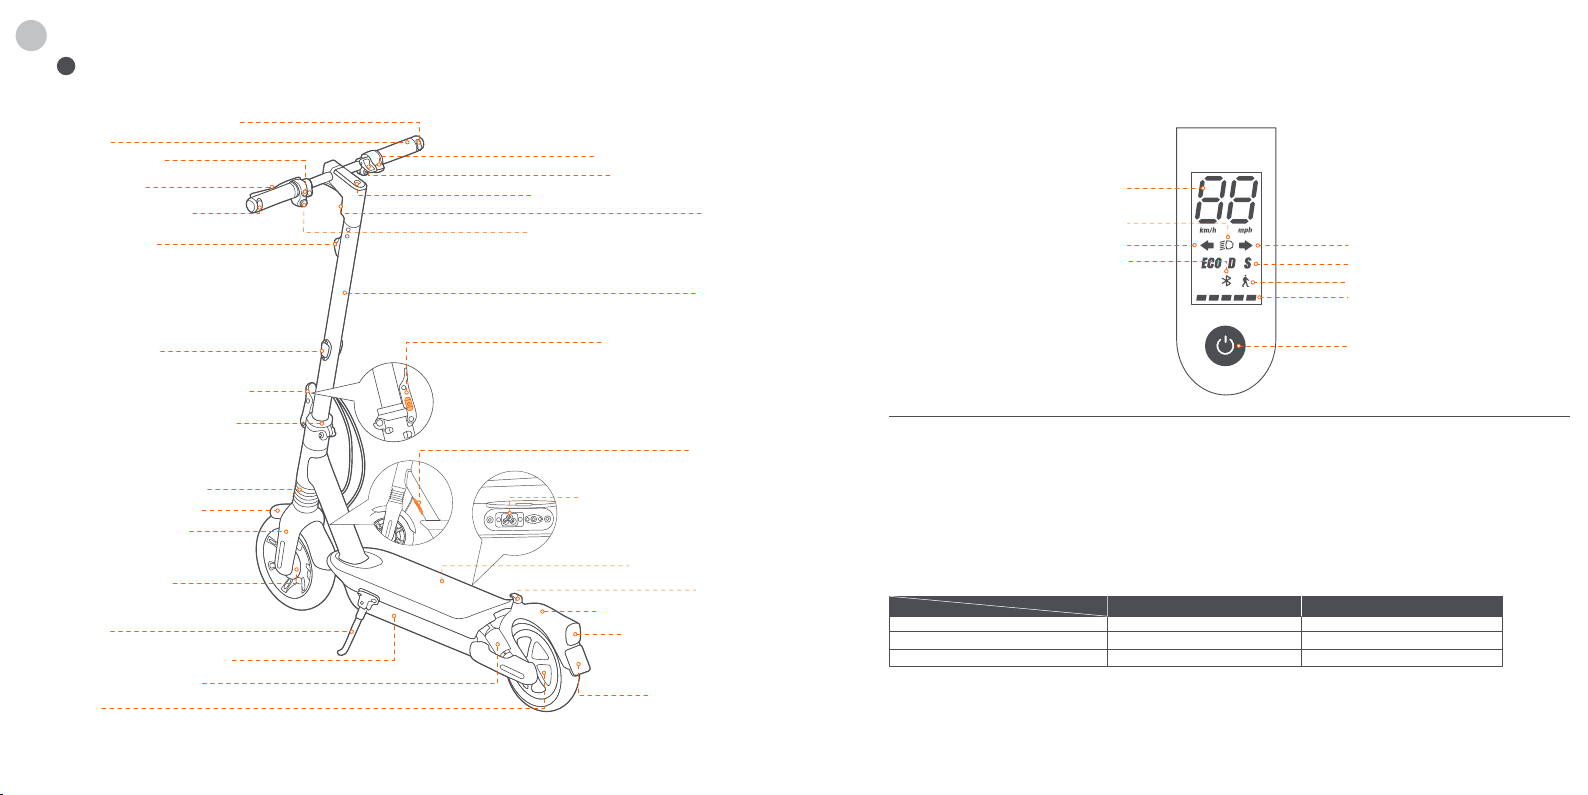
PT
1
Diagrama
Indicador de Direção Direito
Guiador
Botão da buzina
Alavanca deo
Indicador de Direção
Esquerdo
Refletor frontal
Acelerador Eletrónico
Gancho de Pressão
Tablier e botão de ligar/desligar
Farol
Interruptor indicador de direção
Haste
Tablier e botão de ligar/desligar
Velocímetro
Farol
Ícone Indicador de Direção Esquerda
Bluetooth
Ícone Indicador de Direção Direita
Modo velocidade
Modo de caminhada
Nível de bateria
Refletor Lateral
Botão de Segurança
Botão de energia
Alavanca de libertação rápida
Mecanismo de dobramento
Buzina
Amortecedor Dianteiro
Para-choque dianteiro
Porta de Carregamento
Tipo Garfo dianteiro
Tabuleiro de pés
Travão de tambor
Fivela
Para-choque Traseiro
Suporte
Compartimento da bateria
Amortecedor Traseiro
Motor
80 81 82 83 84 85 86 87 88 89 90 91
Luz traseira e luz
de travagem e
refletor
Área da Placa
de Seguro
Botão de Ligar/Desligar: Prima o botão para ligar; prima e segure o botão por 3 segundos para desligar. Quando a KickScooter estiver
ligada, pressione o botão para ligar/desligar o farol e a luz traseira; e pressione duas vezes para alternar entre os modos de velocidade.
Velocímetro: Mostra a velocidade actual da scooter, bem como os códigos de erro.
Indicador de direção: Ao virar à esquerda ou à direita, pressione o botão “←” (esquerda) ou “→” (direita) no interruptor de indicador de
direção. Em seguida, o indicador de direção piscará regularmente, o que pode ser desligado premindo o botão correspondente
novamente.
Modo de caminhada: máx. velocidade é de 5 km/h (3,1 mph).
O farol e a luz traseira estão sempre ligados e não podem ser desligados.
* Como ativar na aplicação Segway-Ninebot: Congurações > Modo de caminhada.
Modo de velocidade: Existem três modos disponíveis. A velocidade máxima é a seguinte:
Modo
ECO (modo de poupança de energia)
D (modo padrão)
S (modo desportivo)
Bluetooth: Indica que a scooter foi ligada com sucesso ao dispositivo móvel.
Nível de bateria: O nível total da bateria é igual a 5 barras.
* A carga da bateria está muito baixa quando a primeira barra da bateria está vermelha. Por favor, carregue a sua KickScooter
imediatamente.
Modelo
15 km/h (9,3 mph)
20 km/h (12,4 mph)
25 km/h (15,5 mph)
Max G2 DMax G2 E
15 km/h (9,3 mph)
20 km/h (12,4 mph)
20 km/h (12,4 mph)
Page 43
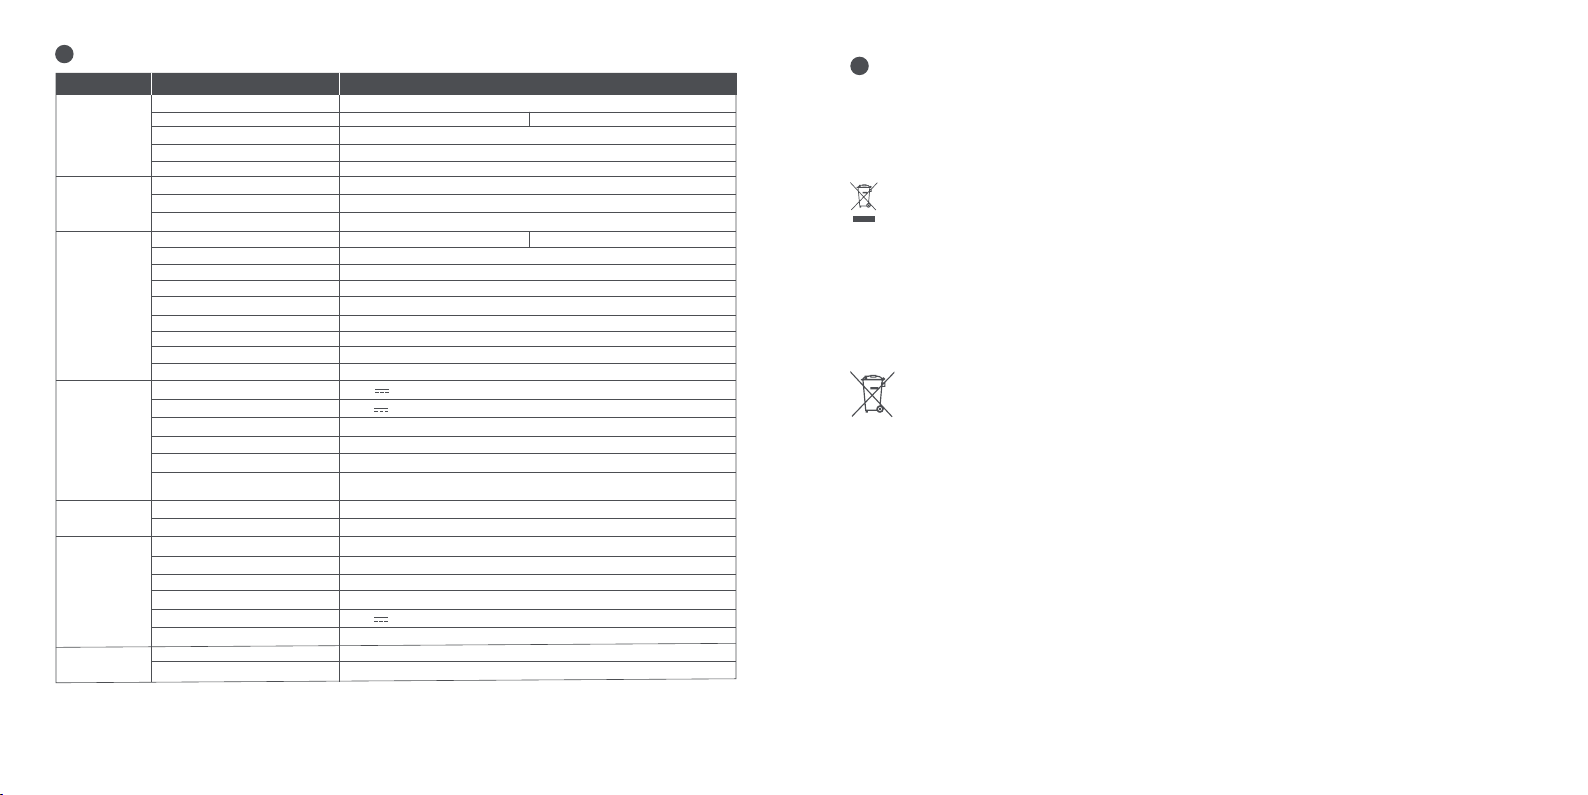
2
Especicações
Item Parâmetro
Nome
Produto
Modelo
Comprimento × Largura × Altura
Dobrada: Comprimento × Largura × Altura
Peso líquido
Máx. Carga útil
Condutor
Idade recomendada
Altura Necessária
Máquina
Máx. Velocidade
Alcance Teórico
Alcance Típico
Inclinação Máxima
Terreno Atravessável
[1]
[2]
Temperatura de operação
Temperatura de armazenamento
Classificação IP
Duração do carregamento
Voltagem nominal
Máx. Tensão de carregamento
Bateria
Temperatura ambiente de carregamento
Capacidade nominal
Energia Nominal
Sistema de gestão de bateria
Motor
Potência Nominal
Potência Máxima
Modelo
Tipo Embutido
Carregador
Potência de saída
Tensão de entrada
Máx. Tensão de saída
Corrente de saída
Pneu
[1] Alcance Teórico: Testado durante a condução com uma bateria cheia, 75 kg (165 lbs) de carga, 25°C (77°F), 70% do máx. velocidade média no
asfalto.
[2] Faixa Típica: Testado durante a condução com a bateria carregada, 75 kg (165 lbs) de carga, 25°C (77°F), à velocidade máxima no asfalto.
* Alguns dos fatores que afetam a gama incluem velocidade, carga, número de arranques e paragens, temperatura ambiente, etc.
82 83 84 85 86 87 88 89 90 91
Pressão do pneu
Pneus
Ninebot KickScooter Max G2
051501E
Aproximadamente. 1210 × 570 × 1264 mm (47,6 × 22,4 × 49,8 pol.)
Aprox. 1210 × 570 × 605 mm (47,6 × 22,4 × 23,8 pol.)
051501D
Aproximadamente. 24,25 kg (53,5 libras)
120 kg (265 lbs)
16–55 anos
120-200 cm (3'11"–6'6")
Aproximadamente. 25 km/h (15,5 mph)
Aproximadamente. 20 km/h (12,4 mph)
Aproximadamente. 70 km (43,5 milhas)
Aproximadamente. 50 km (31,1 milhas)
Aproximadamente. 22%
A maioria das condições de estrada plana e estradas belgas típicas.
-10–40°C (14–104°F)
-10–50°C (14–122°F); recomendado 10~30°C (50–86°F)
IPX5
Aproximadamente. 5h
36 V
42 V
0–40°C (32–104°F)
15.3 Ah
551 Wh
Proteção contra sobreaquecimento, curto-circuito, sobrecorrente,
sobre-descarga e sobrecarga
0,45 kW, 450 W
0,9 kW, 900 W
NB-42D0-02D9
0,1218 kW, 121,8 W
100–240 V ~ 50–60 Hz, 2,0 A MÁX.
42 V
2,9A
2,89 a 3,31 bar (42 a 48 psi)
Pneu auto-vedante sem câmara de ar de 10 polegadas
3
Certicações
A bateria está em conformidade com UN 38.3.
Declaração de Conformidade da União Europeia
Informações importantes sobre REEE
Este símbolo no produto ou na sua embalagem indica que produtos elétricos e eletrónicos usados não devem ser
misturados com lixo municipal não classificado. Para o tratamento adequado, é sua responsabilidade eliminar o
equipamento usado, devolvendo-o aos pontos de recolha designados.
A eliminação correta deste produto ajudará a poupar recursos valiosos e a prevenir quaisquer potenciais efeitos negativos
na saúde humana e no ambiente, que de outra forma poderiam surgir de um manuseamento inadequado dos resíduos.
Podem ser aplicadas sanções por eliminação incorreta destes resíduos, de acordo com a sua legislação nacional.
Por favor contacte a sua autoridade local para mais detalhes sobre o seu ponto de recolha designado mais próximo.
Informação sobre reciclagem de baterias para utilizadores
Este símbolo significa que as pilhas e acumuladores, no seu fim de vida útil, não devem ser misturados com resíduos
municipais não triados. A sua participação é uma parte importante do esforço para minimizar o impacto das pilhas e
acumuladores no ambiente e na saúde humana. Para uma reciclagem adequada, pode devolver este produto ou as pilhas
ou acumuladores que contém ao seu fornecedor ou a um ponto de recolha designado.
A eliminação correta deste produto ajudará a poupar recursos valiosos e a prevenir quaisquer potenciais efeitos negativos
na saúde humana e no ambiente, que de outra forma poderiam surgir de um manuseamento inadequado dos resíduos.
Podem ser aplicadas sanções por eliminação incorreta destes resíduos, de acordo com a sua legislação nacional.
existem sistemas de recolha separados para pilhas e acumuladores usados.
Por favor, elimine as pilhas e acumuladores corretamente no seu centro comunitário local de recolha/reciclagem de
resíduos.
Page 44
Diretiva de Equipamentos de Rádio
Ninebot (Changzhou) Tech Co., Ltd. declara que o produto listado nesta secção está em conformidade com os
requisitos essenciais e outras disposições relevantes da Diretiva de Equipamentos de Rádio 2014/53/UE.
Diretiva de restrição do uso de certas substâncias perigosas (RoHS)
Ninebot (Changzhou) Tech Co., Ltd. declara por meio deste que todo o produto, incluindo peças (cabos, cabos e
assim por diante) atende aos requisitos da Diretiva RoHS 2011/65/EU e emenda à Diretiva Delegada da Comissão
(UE) 2015/863 sobre o restrição do uso de certas substâncias perigosas em equipamentos elétricos e eletrónicos
("RoHS reformulado" ou "RoHS 2.0").
Diretiva de Máquinas
Ninebot (Changzhou) Tech Co., Ltd. declara que o produto listado nesta secção está em conformidade com os
requisitos essenciais e outras provisões relevantes da Diretiva de Máquinas 2006/42/EC.
Representante autorizado da UE:
Segway-Ninebot Europe
Dynamostraat 7, 1014 BN Amesterdão, Países Baixos.
Ninebot (Changzhou) Tech Co., Ltd. declara que o modelo do produto: 051501E, 051501D cumprem os requisitos
essenciais e outras disposições relevantes da Diretiva de Equipamentos de Rádio 2014/53/UE, a diretiva de
máquinas 2006/42/CE e a diretiva RoHS 2011/65/EU e emenda à diretiva delegada da Comissão (UE) 2015/863.
A declaração de conformidade pode ser consultada no seguinte endereço:
https://eu-en.segway.com/instruction-manuals
Declaração de Conformidade do Reino Unido
Regulamentos de equipamentos de rádio 2017
Ninebot (Changzhou) Tech Co., Ltd. declara que o produto listado nesta secção está em conformidade com os
requisitos essenciais e outras disposições relevantes dos Regulamentos de Equipamentos de Rádio 2017.
Regulamentos de Fornecimento de Máquinas (Segurança) 2008
Ninebot (Changzhou) Tech Co., Ltd. declara que o produto listado nesta secção está em conformidade com os
requisitos essenciais e outras disposições relevantes dos Regulamentos de Segurança de Fornecimento de Máquinas
(Segurança) de 2008.
Representante autorizado do Reino Unido:
UKCA Experts Ltd.
Dept 302, 43 Owston Road Carcroft, Doncaster, DN6 8DA, Reino Unido
Ninebot (Changzhou) Tech Co., Ltd. declara que o modelo do produto: 051501E está em conformidade com os
requisitos essenciais e outras disposições relevantes dos Regulamentos de Equipamentos de Rádio 2017,
Regulamentos de Fornecimento de Máquinas (Segurança) de 2008 e Regulamentos de Restrição do Uso de Certas
Substâncias Perigosas em Equipamentos Elétricos e Eletrónicos de 2012.
A declaração de conformidade pode ser consultada no seguinte endereço: www.segway.com
Bluetooth
Banda(s) de frequência
Potência RF Máxima
2,4000-2,4835 GHz
20mW
O uso do selo Works with Apple significa que um produto foi projetado para funcionar especificamente com a tecnologia
identificada no selo e foi certificado pelo fabricante do produto para atender às especificações e requisitos do produto da
rede Apple Find My. A Apple não é responsável pela operação deste dispositivo ou pelo uso deste produto ou por sua
conformidade com os padrões regulatórios e de segurança.
A Restrição do Uso de Certas Substâncias Perigosas em Regulamentos de Equipamentos Elétricos e Eletrónicos
2012
Ninebot (Changzhou) Tech Co., Ltd. aqui declara que todo o produto, incluindo peças (cabos, cabos e assim por
diante) atende aos requisitos da Restrição do uso de certas substâncias perigosas em regulamentos de
equipamentos elétricos e eletrónicos de 2012.
84 85 86 87 88 89 90 91
Page 45
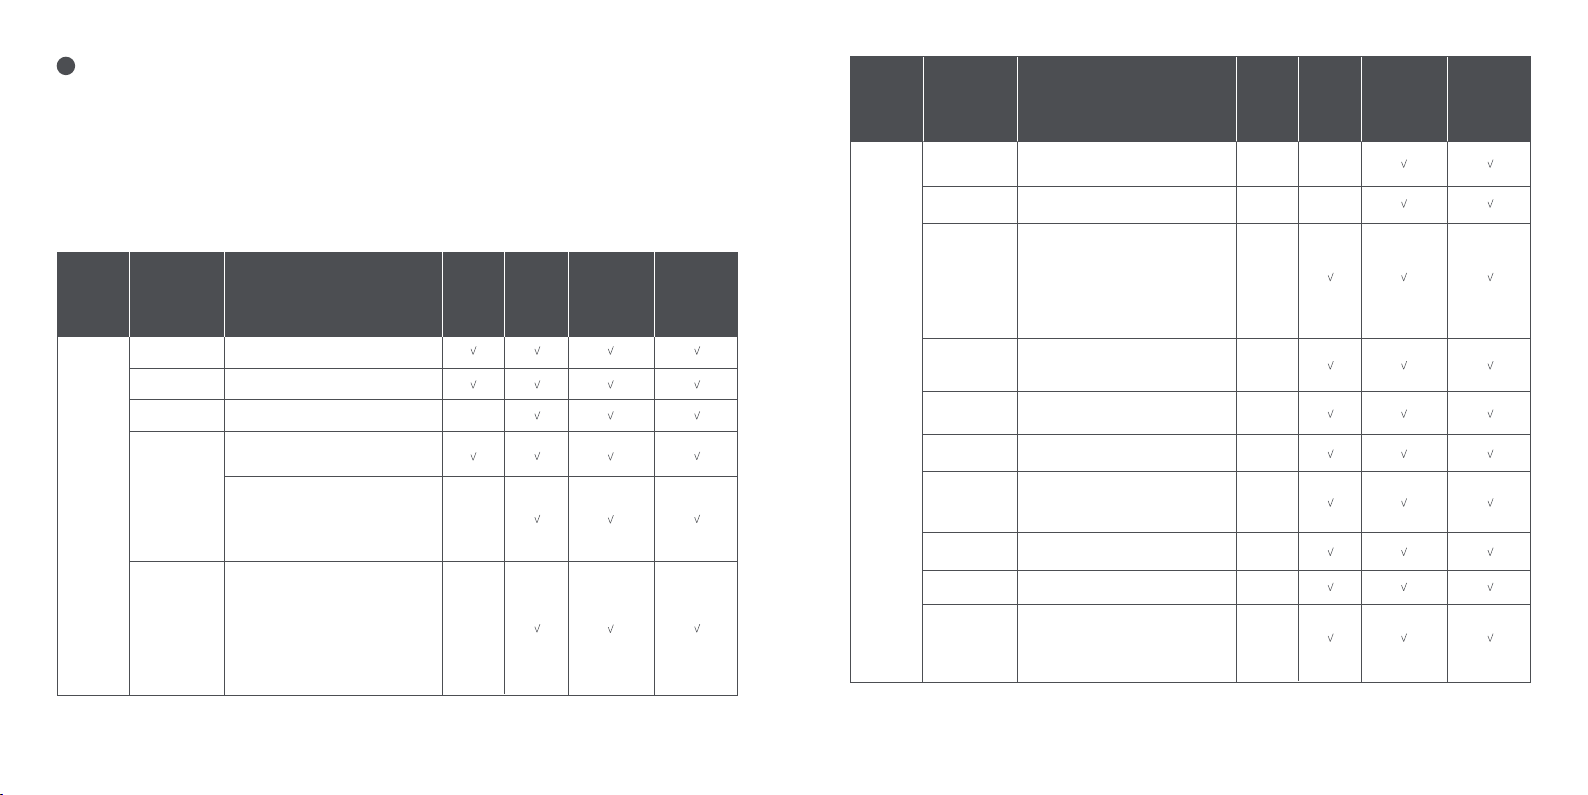
4
Cronograma de manutenção recomendado
Para garantir uma condução segura, os cuidados diários e a manutenção regular são essenciais. Você, o proprietário, tem
controlo e conhecimento da frequência com que usa a sua scooter, o quão difícil a usa e onde a usa. É da responsabilidade do
proprietário realizar verificações regulares e levar a sua scooter ao centro de serviço autorizado para inspeção e serviço.
Consulte o cronograma de manutenção abaixo.
Observação: Este cronograma de manutenção cobra uma taxa de serviço.
Item Componente
Partes da estrutura
principal
Pressão do pneu
Desgaste do pneu
Manutenção
da estrutura
principal
Parafusos na
parte superior
da haste
Parafusos no
mecanismo de
dobragem
Método de manutenção
Use um pano macio e húmido para
limpar a estrutura principal.
Encha os pneus a 2,89 a 3,31
bar (42 a 48 psi)
Verifique se os pneus estão rachados,
deformados ou significativamente gastos.
Aperte os parafusos fixados com o
guiador e a haste. O binário sugerido é
de 5,5±0,5 N·m.
Aperte o parafuso no acelerador. O binário
sugerido é de 0,9±0,06 N·m.
Aperte os parafusos na alavanca do travão.
O binário sugerido é de 6±1 N·m.
Aperte os parafusos na parte superior da
haste. O binário sugerido é de 8,5±0,5 N·m.
Aperte os parafusos de fixação da alça
dobrável e do tipo garfo dianteira,
Dois parafusos laterais na lateral, o
binário recomendado é 15 ± 1N · m
Dobre e desdobre, o parafuso vertical
superior, o binário recomendado é
15 ± 1N · m
Dobre a biela, e aperte os parafusos da
biela quando balançar na bicicleta. A
dobra é suave sem tremer.
A cada 3
meses
A cada 6
meses ou a
cada 500
km (310
milhas)
A cada 1 ano ou
a cada 1000 km
(621 milhas)
A cada 3 anos
ou a cada
10.000 km
(6.214 milhas)
Item Componente
Motor
Manutenção da
roda dianteira
Ajuste do travão
Travão de
inspeção de
função
tambor
Luz traseira
Farol
Indicadores de
direção
Tablier
Buzina
Acelerador
A cada 3
Método de manutenção
Para acelerar e desacelerar, verifique
se o motor está parado ou apresenta
ruídos anormais.
Verifique se a roda dianteira está
paralisada ou se fica instável, ou se o eixo
do eixo está desequilibrado.
Se o travão estiver demasiado
apertado/apertado, use a chave Allen de 4 mm
para desapertar o parafuso na pinça. Depois
ajuste ligeiramente a linha de travagem
(diminua/aumentar o comprimento exposto),
e aperte novamente o parafuso. Padrão de
teste: a velocidade de condução é de 20 km/h
(12.4 mph), e a distância de travagem é de 6m
A roda dianteira pode girar
normalmente sem som anormal. A roda
dianteira pode ser travada depois de
apertar a alavanca do travão.
Aperte a alavanca do travão, a luz
traseira funciona normalmente.
Verifique o farol e veja se este brilha
forte.
Alterne o botão indicador de direção para a
esquerda/direita respetivamente, verifique
se os indicadores de direção do lado
esquerdo/direito piscam normalmente.
Ligue a scooter, o tablier funciona
corretamente.
Pressione o botão da buzina e o som é
alto.
Pressione e segure o acelerador e
solte-o, verificando a aceleração e
desaceleração.
Observação: Solte-o, verifique se o
acelerador volta para a posição.
meses
A cada 6
meses ou a
cada 500
km (310
milhas)
A cada 1 ano ou
a cada 1000
km (621
milhas)
A cada 3 anos
ou a cada
10.000 km
(6.214 milhas)
86 87 88 89 90 91
Page 46

Item Componente
Deteção de falha
inspeção de
função
Partes
importantes
Partes
funcionais
A Carregar
Botões de
controlo
Virar
Montagem da
bateria
Controlador
Motor
Montagem da
roda traseira
Alavanca do
acelerador e travão
Montagem do tipo
garfo dianteira
Mecanismo de
dobramento
Travão de tambor
Capa do Tablier
Método de manutenção
Depois de conectar com a aplicação
Segway-Ninebot:
1) Atualize o firmware para a versão mais
recente.
2) Verifique se a notificação do código de
erro correspondente e
possíveis causas serão apresentadas
quando a scooter detetar um erro
Carregue a scooter:
1) Verifique se a carga atual da bateria é
apresentada no tablier.
2) Verifique o indicador LED no carregador
de bateria.
A Carregar: vermelho, Totalmente
carregado: verde.
Pressione ou alterne o botão 3 vezes
sem falha.
Teste com curvas à esquerda e à direita
(o ângulo de direção é 60). Sem
resistência ou atraso ao virar.
A bateria precisa ser substituída quando for
carregada e descarregada 500 vezes ou quando
a quilometragem total for superior a 10.000 km
(6.213 milhas).
Observação: Recomenda-se carregar uma vez a
cada 60 dias para armazenamento de longo prazo.
Depois de 3 anos ou 10.000 km
(6 214 milhas) de pedalada, as partes
anormais da kickscooter têm de ser
substituídas imediatamente.
A cada 3
meses
A cada 6
meses ou a
cada 500
km (310
milhas)
A cada 1 ano ou
a cada 1000
km (621
milhas)
A cada 3 anos
ou a cada
10.000 km
(6.214 milhas)
5
Marca Registada
Ninebot é marca comercial da Ninebot (Pequim) Tech Co., Ltd; Segway e Rider Design são marcas registadas da Segway
Inc., App Store, logótipo da Apple, Apple, Apple Find My, Apple Watch, Find My, iPhone, iPad, iPadOS, Mac, macOS e
watchOS são marcas comerciais da Apple Inc. IOS é uma marca registada da Cisco e é usada sob licença. Android, Google
Play e o logótipo do Google Play são marcas comerciais da Google LLC. A palavra e os logotipos Bluetooth® são marcas
registadas de propriedade da Bluetooth SIG, Inc. e qualquer uso de tais marcas pela Segway-Ninebot está sob licença.
Outras marcas comerciais e nomes comerciais são dos seus respetivos proprietários.
A KickScooter é coberta por patentes relevantes. Para obter informações sobre patentes, visite http://www.segway.com
Tentamos incluir descrições e instruções para todas as funções da KickScooter no momento da impressão. No entanto,
devido à constante melhoria das características do produto e mudanças do design, a sua KickScooter pode diferir
ligeiramente daquela mostrada neste documento. Leia o código QR ou visite a Apple App Store (iOS) ou a Google Play
Store (Android) para descarregar e instalar a aplicação.
Note que existem vários modelos Segway e Ninebot com funções diferentes, e algumas das funções aqui mencionadas
podem não ser aplicáveis à sua unidade. O fabricante reserva-se o direito de alterar o design e a funcionalidade do produto
e documentação KickScooter sem aviso prévio.
© 2023 Ninebot (Beijing) Tech Co. Ltd. Todos os direitos reservados.
(※A aplicação Segway-Ninebot pode suportar KickScooter com Bluetooth integrado)
88 89 90 91
Page 47
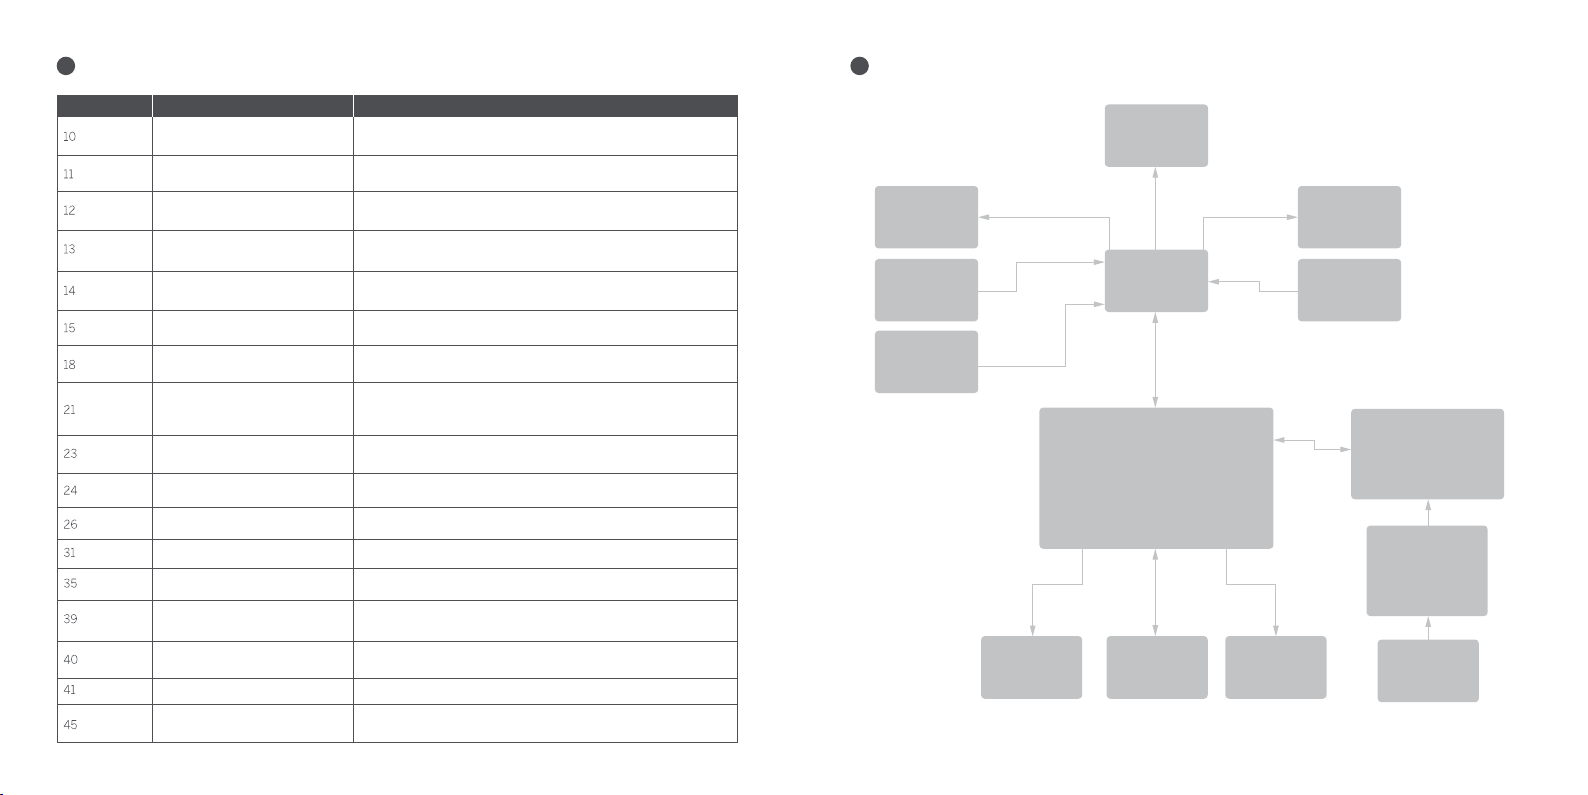
6
Falhas Comuns
7
Diagrama Elétrico
Causas PossíveisCódigo de erro Solução
Falha de comunicação Bluetooth
Amostragem de corrente de
fase 1A anormal do motor
Amostragem de corrente anormal
de fase 1B do motor
Amostragem de corrente anormal
de fase 1C do motor
Amostragem anormal do hall
do acelerador
Amostragem anormal do hall
do travão
Sinal anormal do hall do motor
Falha de comunicação da bateria
Número de série padrão da bateria
Tensão padrão anormal
Escrita/leitura anormal de dados
Operação FLASH incorreta
Número de Série Padrão
KickScootery
Temperatura anormal da bateria
Controlador anormal NTC
Motor anormal NTC
Amostragem de corrente anormal
90 91
do fio mãe
Verifique a ligação do fio de comunicação do painel de
instrumentos e do cabo de controlo, ou contacte o serviço
pós-venda ou um concessionário autorizado.
Entre em contacto com o serviço pós-venda ou com um
revendedor autorizado.
Entre em contacto com o serviço pós-venda ou com um
revendedor autorizado.
Entre em contacto com o serviço pós-venda ou com um
revendedor autorizado.
Verifique se o acelerador é pressionado quando ligado, ou
contacte o serviço pós-venda ou um concessionário autorizado.
Verifique se a alavanca do travão é apertada quando ligada, ou
contacte o serviço pós-venda ou um concessionário autorizado.
Verifique se a tomada do hall está solta, ou contacte o serviço
pós-venda ou um revendedor autorizado.
Verifique se o fio ligado com o fio de comunicação da bateria
e o controlador está solto, ou contacte o serviço pós-venda
ou um revendedor autorizado.
Entre em contacto com o serviço pós-venda ou com um
revendedor autorizado.
Verifique se o fio de ligação da bateria ao controlador está solto
ou contacte o serviço pós-venda ou um revendedor autorizado.
Entre em contacto com o serviço pós-venda ou com um
revendedor autorizado.
Entre em contacto com o serviço pós-venda ou com um
revendedor autorizado.
Verifique se a KickScooter ainda mantém o número de série
padrão.
Verifique o ambiente de trabalho da bateria, ou contacte o serviço
pós-venda ou um revendedor autorizado.
Controlador sobreaquecido, ou contacte o serviço
pós-venda ou um concessionário autorizado.
Entre em contacto com o serviço pós-venda ou com um
revendedor autorizado.
Entre em contacto com o serviço pós-venda ou com um
revendedor autorizado.
Indicador de
Direção
Esquerdo
Travão
Interruptor
indicador de
direção +
buzina
Farol
Tablier
Controlador
Motor Luz traseiraBuzina
Indicador de
Direção Direito
Acelerador
Bateria
Carregador
Embutido
Porta de
carregamento
CA
Page 48

 Loading...