


2W901R-SS
(USER’S GUIDES)
Remote FCC ID Number
IC ID Number
2W901R-SS VA5JR901-2WSS 7087A-R901WSS
Statement :The term IC before the radio certification number only signifies that Industry Canada technical specifications were met.
CAUTION
This device complies with Part 15 /RSS-GEN of the FCC/IC rules.
(1) This device may not cause harmful interference.
(2) This device may accept any interference received, including interference that may cause undesired operation.
CAUTION
operate this device.
This device can’t be co-located with other transmitter as the RF exposure state ments.
:The User that modifications to the unit may void the users authority to operate the unit
: Changes or modifications not expressly approved by the party responsible for compliance could void the users authority to
Operation is subject to the following conditions;
I. Button Functions
If you install Starter only or Alarm only, your functionality will be limited accordingly. Alarm/Starter Combo units will have all of the functions listed
hereunder
.
Extended button function
Normal buttonButton
0.5 second Arm AUX #1 Drive Lock On/Off
4 seconds Panic
Double tap button
Press once then Press twice then Press three times then
0.5 second AUX #2 Turbo Timer On/Off
2 seconds AUX #5
0.5 second Turn On Backlight AUX #3 2nd Car On/Off Valet On/Off
2 seconds Trunk AUX #6
0.5 second Car Check Run time extender AUX #4 Timer Start On/Off
2 seconds Start On/Off Aux #7
0.5 second Function
5 seconds Button Lock On/Off
10 secconds Power On/Off
0.5 second Siren On/Off
2 seconds Shock On/Off
0.5 second
2 seconds Option #1
0.5 second
2 seconds Option #2
0.5 second Passive Arming On/Off
2 seconds Remote Menu
Disarm
Some of the above button functions require additional programming by the installer. Here is a list of options that you may want to review before installation. These
are features that
may not be normally set up at the time of installation. Therefore, there may be extra charge for these programming. Please notify your installer if you would like some
of these features. Some of these features require extra installation. You can match the function from the above menu with the option of the below menu by finding
the corresponding starred numbers. Example: Valet Mode Function (*2) matches Option 3-10 (*2).
2

Option
Number
1-3 Driver's priority unlock Off On V V V
1-6
1-7 (*7)
1-8
1-9 (*3)
1-10
2-2 (*5) Turbo mode. Off 2 Min 1Min 4 Min V V
2-5 (*4)
2-6 (*4)
2-7 Remote Start Runtime 15 Min 25 Min 45 Min 3 Min V V
2-8 (*4)
2-9 (*4)
2-11 (*6)
3-1
3-4 Starter-Kill relay. Anti-Grind Anti-Grind + Starter Kill
3-5 (*8) Anti-Jacking Starter-kill
3-6 Factory Alarm Option Off On (4200DX Only) V
3-7
3-8 Horn Output On Double Lock Only On Lock and Unlock
3-10 (*2) Valet
4-5 (*1)
Cold Start with Thermister
Runtime Extension w/ #1
Feature
Reservation Lock
(Manual transmission)
Unlock / Disarm With
Trunk Release
Locking while in Passive
Arming
Ignition controlled door
locks
Auto Relock (If a door is
not opened within this
amount of time.)
Assembly
Timer Start, or, Minimum
Interval Between Cold
Starts
Temperature of Cold
Starting
Temperature of Hot
Starting
Turbo, Remote Start
for 2 seconds
Parking lights While
Remote Started
Siren Duration
(Upon Alarm Trigger)
Secure Aux Output
(1 and 2 Only)
Default(I) Optional(II) Optional(III) Optional(IV) Alarm/Starter Starter Alarm
Locks When Reservation
Mode is Set
Unlock, Factory Disarm,
and Trunk Release
Passive locking w/ Passive
Arming
Off On
Off 30 sec 60 sec 5 min V V V
Off On V V
3 Hour (4 minute runtime,
double for Diesel)
Off -10° C / 14° F -5° C / 23° F 0° C / 32° F
Off 30° C / 86° F 35° C / 95° F 40° C / 104° F V V
No Yes V V
Constant Output Flashing Output Off
30 sec 60 sec 120 Sec
Key 5 times, or Remote
(I+III) while Ignition is On
On Off
Does Not Lock When
Reservation is Set
Factory Disarm, Trunk
Release Only
No Passive Locking w/
Passive Arming
1.5 Hour
(4 minute runtime, double
for Diesel)
Ignition-Kill
(no Anti-Grind)
Key 5 times or Remote
(I+III)
Setting Applicable To
Reservation Sets 10
Seconds After the Last
Door is Closed
Trunk Release Only
RPM Locks (Tach
Sensing Mode Only)
Reservation
(Runtime 2-7)
Anti-Grind +
Passive Starter Kill
Auto kill (Auto-door
locks Off) Canadian
Remotes w/ AUTO
Function Only
On Lock, Unlock, and
Start
Secure Valet
(Default code 3,3)
24 Hour Repeat with
Cold Starting of 2-8
Auto kill (Auto-door
locks On) Canadian
Remotes w/ AUTO
On Double Lock and
V V
V V V
V V V
V V V
V V
(Runtime 2-7)
V V
V V
Function Only
Chirps for 20
seconds
Start
V V
V V
V V
V
V V V
V V V
3

1. I for 0.5 Seconds – Lo ck/Unlock – Tapping this button for a split second will lock/arm and unlock/disarm your CompuStar system.
2. I for 2.5 Seconds – Auto Mode is activated (Auto Icon shows up) or Remote Start Run Time is reset during remote start.
1) Auto Mode: There are 3 different Auto Modes.
A. Auto Mode 1 – Low Power, Auto Icon On. When holding button I for 2.5 seconds, Auto Mode engages on the low power setting. Once you go out of range of
your vehicle the
system will automatically lock and arm. Once you come back into range, your system will automatically unlock and disarm your CompuStar.
B.. Auto Mode 2 – High Power, Auto Icon flash. This will increase the range of auto arms and disarms.
C. Auto Mode 3 – High Power, Auto icon flash rapidly. Same as 2, except:
If you remain on the border of range between your remote and vehicle and your CompuStar automatically locks and unlocks, a failsafe will engage. Once your
system Auto locks and unlocks twice in a 2 minute period then Auto Mode will cancel. You will have to tap button I to unlock your CompuStar and turn Auto
Mode back on.
When you hold button I for a fourth time the Auto icon will turn off and Auto Mode is disabled.
2) If your vehicle is running with remote start, you can Reset Remote Start Run time by pressing button I for 2.5 seconds.
3. Tapping button II or III will activate Aux 1 or Aux 2, which can be used to activate side doors, window modules, etc.
By default, these buttons can only be activated as Secure Aux to prevent accident activation. Click IV before you activate II or III. This can be changed – ask your
installer. You may want to remove Secure Aux if you connect Aux to open side doors.
4. Button IV (0.5 seconds) has 3 functions:
1) Car Check - Has three stages. Press button IV for 0.5 sec again to advance to the next stage. (1)Vehicle Temperature, (2)Vehicle Battery Voltage, (3)Remote
Battery Voltage.
2) Secure Aux – Secure Aux protects you from accidentally activating Aux 1 or Aux 2. It is designed so you do not accidentally roll down your windows or pop
your doors.
3) Memory for remote settings and time clock – Tap IV before you remove the battery. When you insert a battery back, the remote settings and time clock will be
restored
5. Button IV (2.5 Seconds) – Button Lock – Holding down button IV for 2.5 seconds will activate the button locking feature on your remote. This is designed so you
do not
accidentally hit any buttons while the remote is in your pocket.
6. Button IV (4 Seconds) – Panic Mode – Holding down button IV for 4 seconds will panic the siren. You can turn panic mode off by tapping button I. This Panic
mode will also activate the Anti-Jack mode. The Anti-Jack mode will require additional installation.
7. Button I+II – Siren On/Off – Tapping these two buttons at the same time will mute the siren chirps during arm/lock and disarm/unlock. This feature will also mute
the siren
when the siren is set to 20 chirp silent siren
8. There are three different ways to enter Valet mode.
1) I+III together for a half second while Ignition is on. Your installer can change the setting so that you do not have to turn ignition on.
2) Ignition On and Off for 5 times with key
3) Secure Valet – Consult your installer for this feature. If your installer turns on Secure Valet option, you can put the system into Valet mode with the valet/LED
button by
following steps 3-5 below. You can change the valet code numbers as follows:
A. Your installer must program Option 3-10 to setting 3.
B. Turn key to the ignition on position.
4

C. Hold down valet switch for 1.5 seconds. The LED on the switch will begin to flash rapidly.
D. Tap the button on the switch to enter first number of 2-digit code. LED will flash the first number slowly.
E. Once the LED begins flashing rapidly tap the button on the switch to enter the second number.
F. Turn ignition off and Valet Switch is now programmed.
G. To enter valet mode follow steps 3 to 5
H. If the RPS unlock code (explained later in this manual) is already set and you set the Valet Switch then it overwrites the first two digits of the RPS code
9. Button I+III (2.5 Seconds) – When you hold these two buttons together for 2.5 seconds you can disable your shock sensor. This also disables any other added
sensors such as radar, proximity or tilt sensors.
10. Button I+IV – Drive Lock On/Off – Tapping buttons I+IV at the same time turns on the “Drive Lock” feature on your system. Your CompuStar dealer must also
set this option in the option menu. This feature locks your vehicle when you turn the ignition on and press the foot brake or accelerate. The CompuStar will unlock
your vehicle when you turn the key off or set the emergency brake. (manual transmissions only)
11. Button II+III – Passive Arming On/Off – Tapping buttons II+III at the same time turns Passive mode on. With passive mode on, your vehicle will lock and arm
30 seconds after the door is opened and closed. The parking lights will flash and/or siren will chirp every 10 seconds up to 30.
12. Remote Options Programming
Button II+III (2.5 Seconds) – Holding buttons II and III for 2.5 seconds will put the remote into and take out of the Remote Option Menu. There are 7 different
options in the Remote Option Menu that can be set. To toggle through the menu just tap button IV to move down each option. Tap button III to move up each
option in the menu.
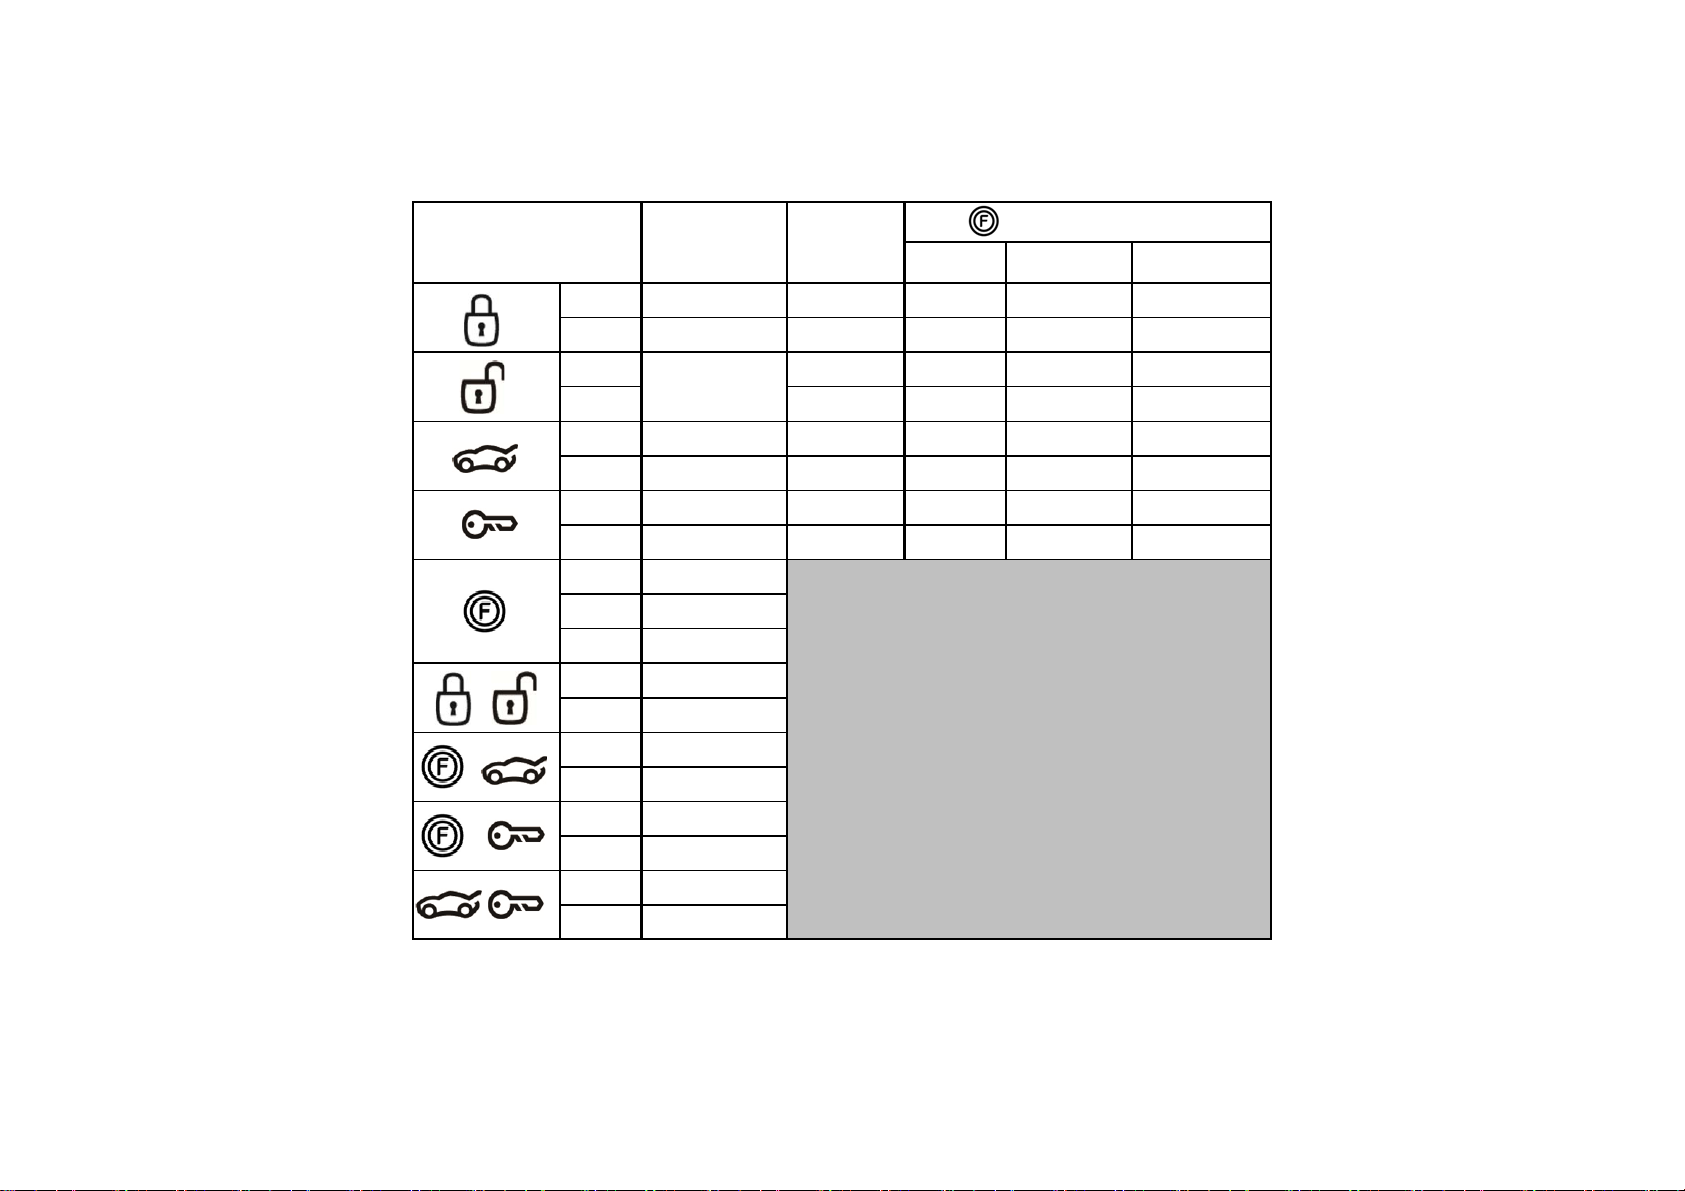
(Note: The Remote Option Menu will flash certain icons to show which section of the menu you are in. Please refer to the table below.)
Setting Remote Options
Button Duration Effect
II+III 2.5 sec Enters/exits Remote Programming mode.
IV 0.5 sec Moves forward through the options.
III 0.5 sec Moves backward through the options.
I 0.5 sec
II 0.5 sec Adjusts minutes on time based options.
Adjusts hour on time based options or turns options
on/off.
Flashing Icon Setting Being Adjusted
Clock Time
Clock/Timer/Exhaust Automatic Start Time
Clock/Timer/Alarm
Clock
Alarm Clock Alarm Clock On/Off
Car Call Car Call using RPS On/Off
Vibration Vibration mode On/Off
°F or °C Temperature displayed in Fahrenheit or Celsius
Alarm Clock Time
5
 Loading...