

Page 1
User Guide
DR-X1 / DR-X1MAX / DR-X1R
Your Car, Connected.
Page 1 of 20 Confidential
Page 2
User Guide
1. Package & Accessory
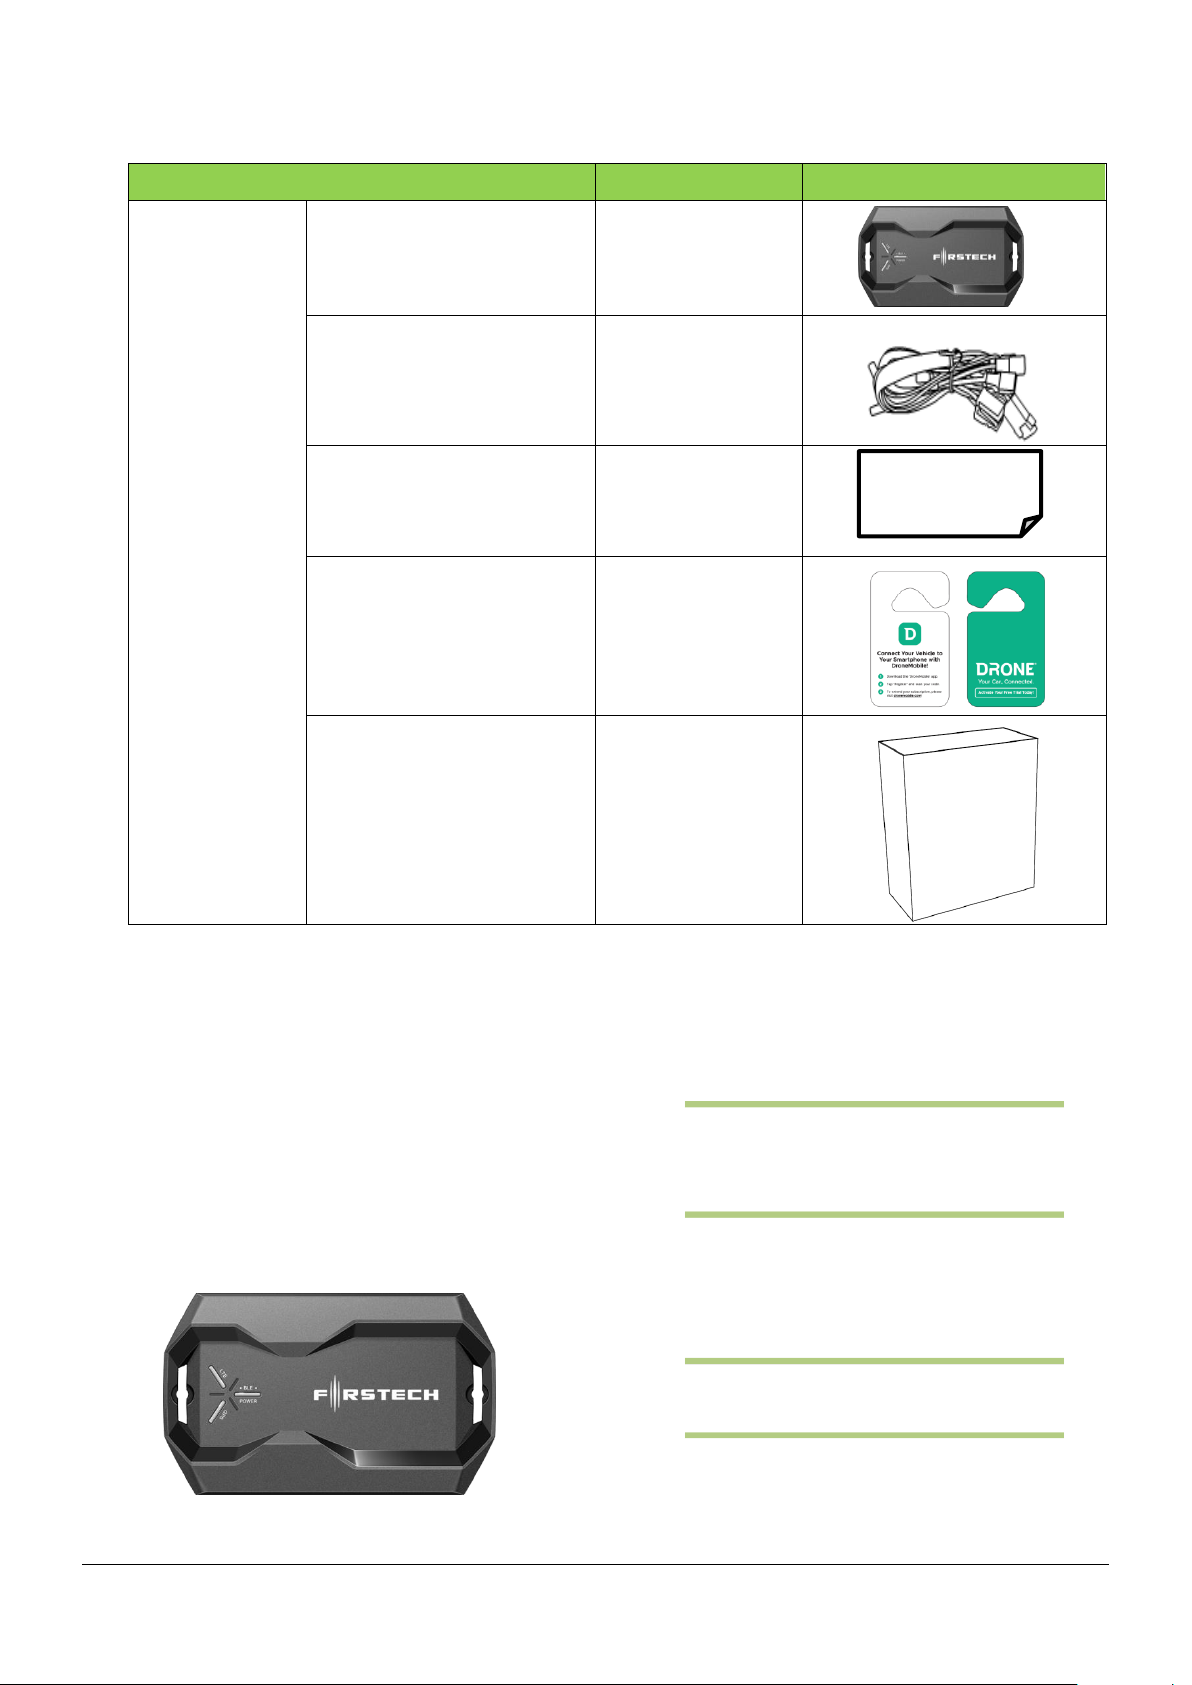
Item
Description
Remark
Default
DR-X1
( DR-X1MAX / R-X1R)
1EA
Harness Cable
SEGI OEM
User Manual
Soft cover
Sticker
1page
Gift Box
1box
LED : Pair with the mobile phone then blink
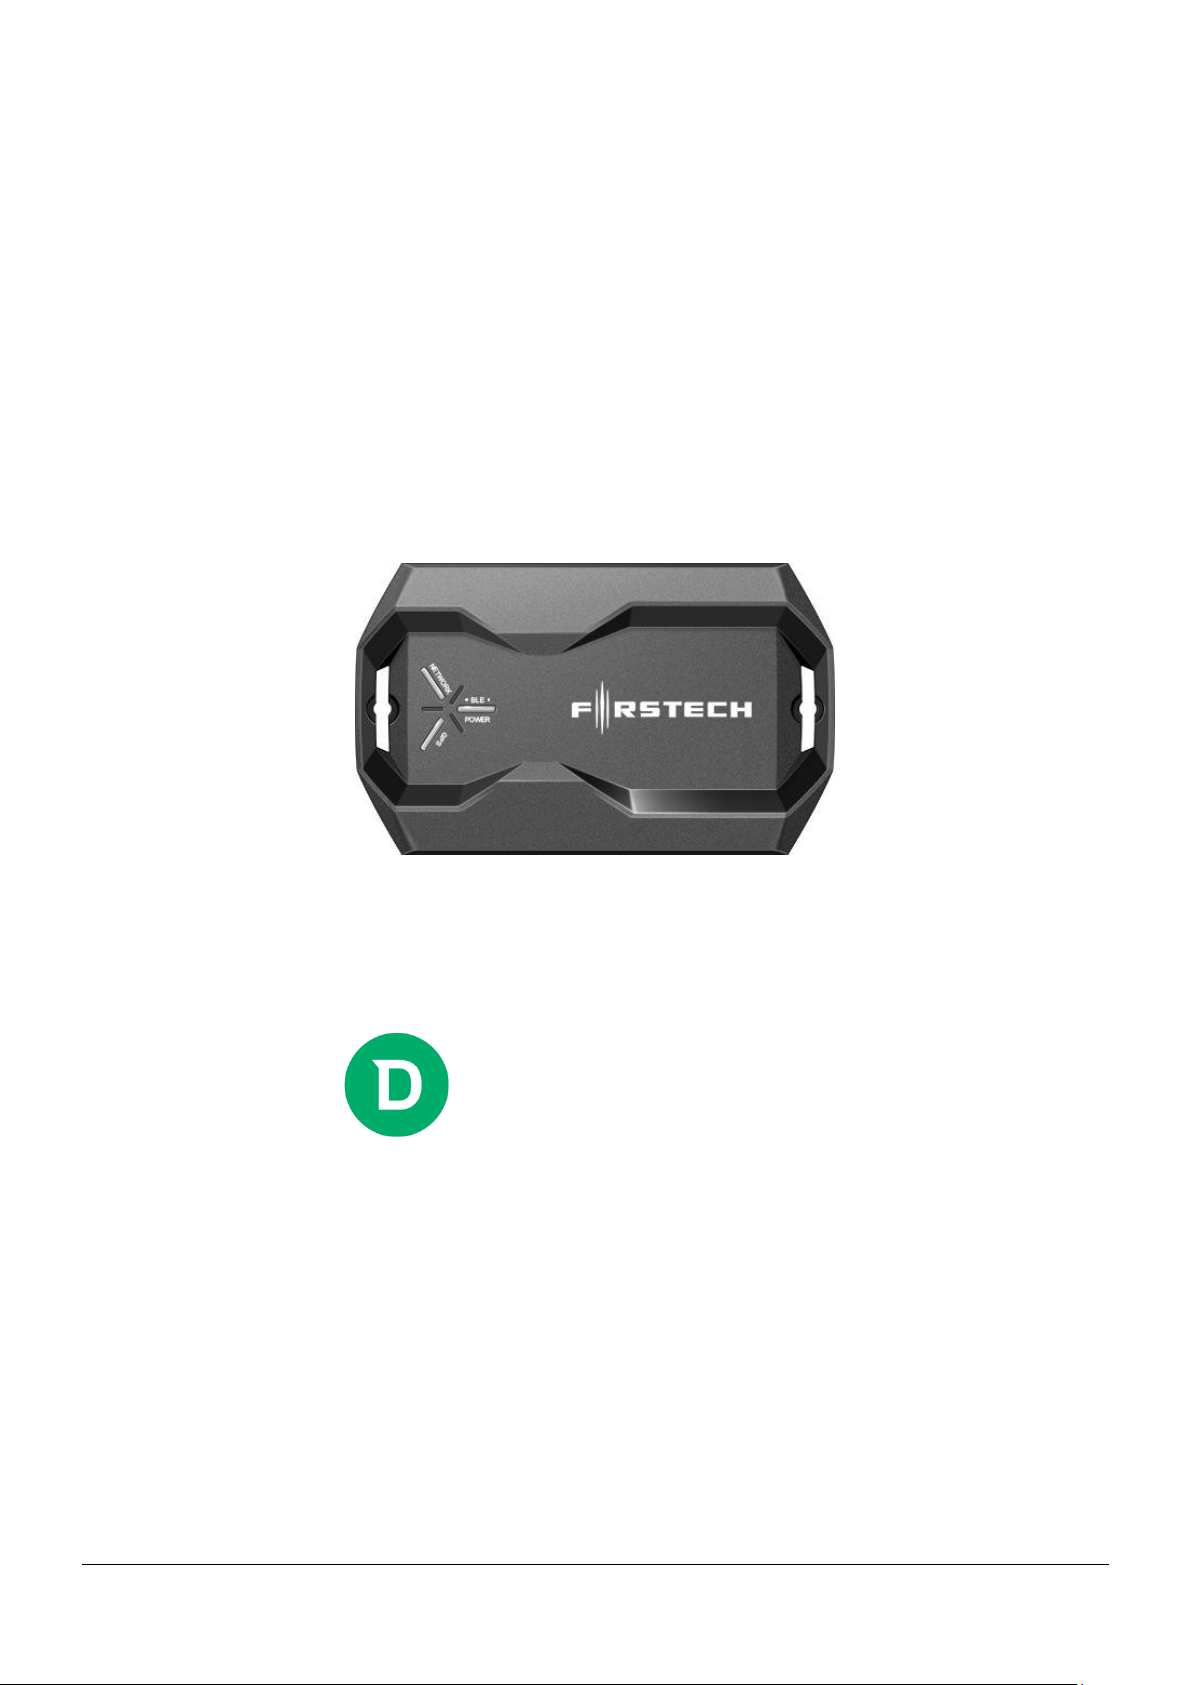
2. Product Overview
DR-X1 series are a LTE technology Terminal designed
to provide wireless connectivity between Car-Alarm
system and LTE network. Global Navigation Satellite
System (GNSS) feature provides Tracking service with
accurately determining the location of Car.
Green LED : LTE Connected to base station then
blinking one time every 2 sec.
Red LED : Power ON and Idle stat then solid light
on and sleep state then blinking one time
every 10 Sec.
Blue
Amber LED : GPS fixed then blink but GPS
Page 2 of 20 Confidential
Page 3
Pin No
1 2 3
4
Pin contents
12V
GND
TXD(5V)
RXD(5V)
10 Pin Black : STAND ALONE.
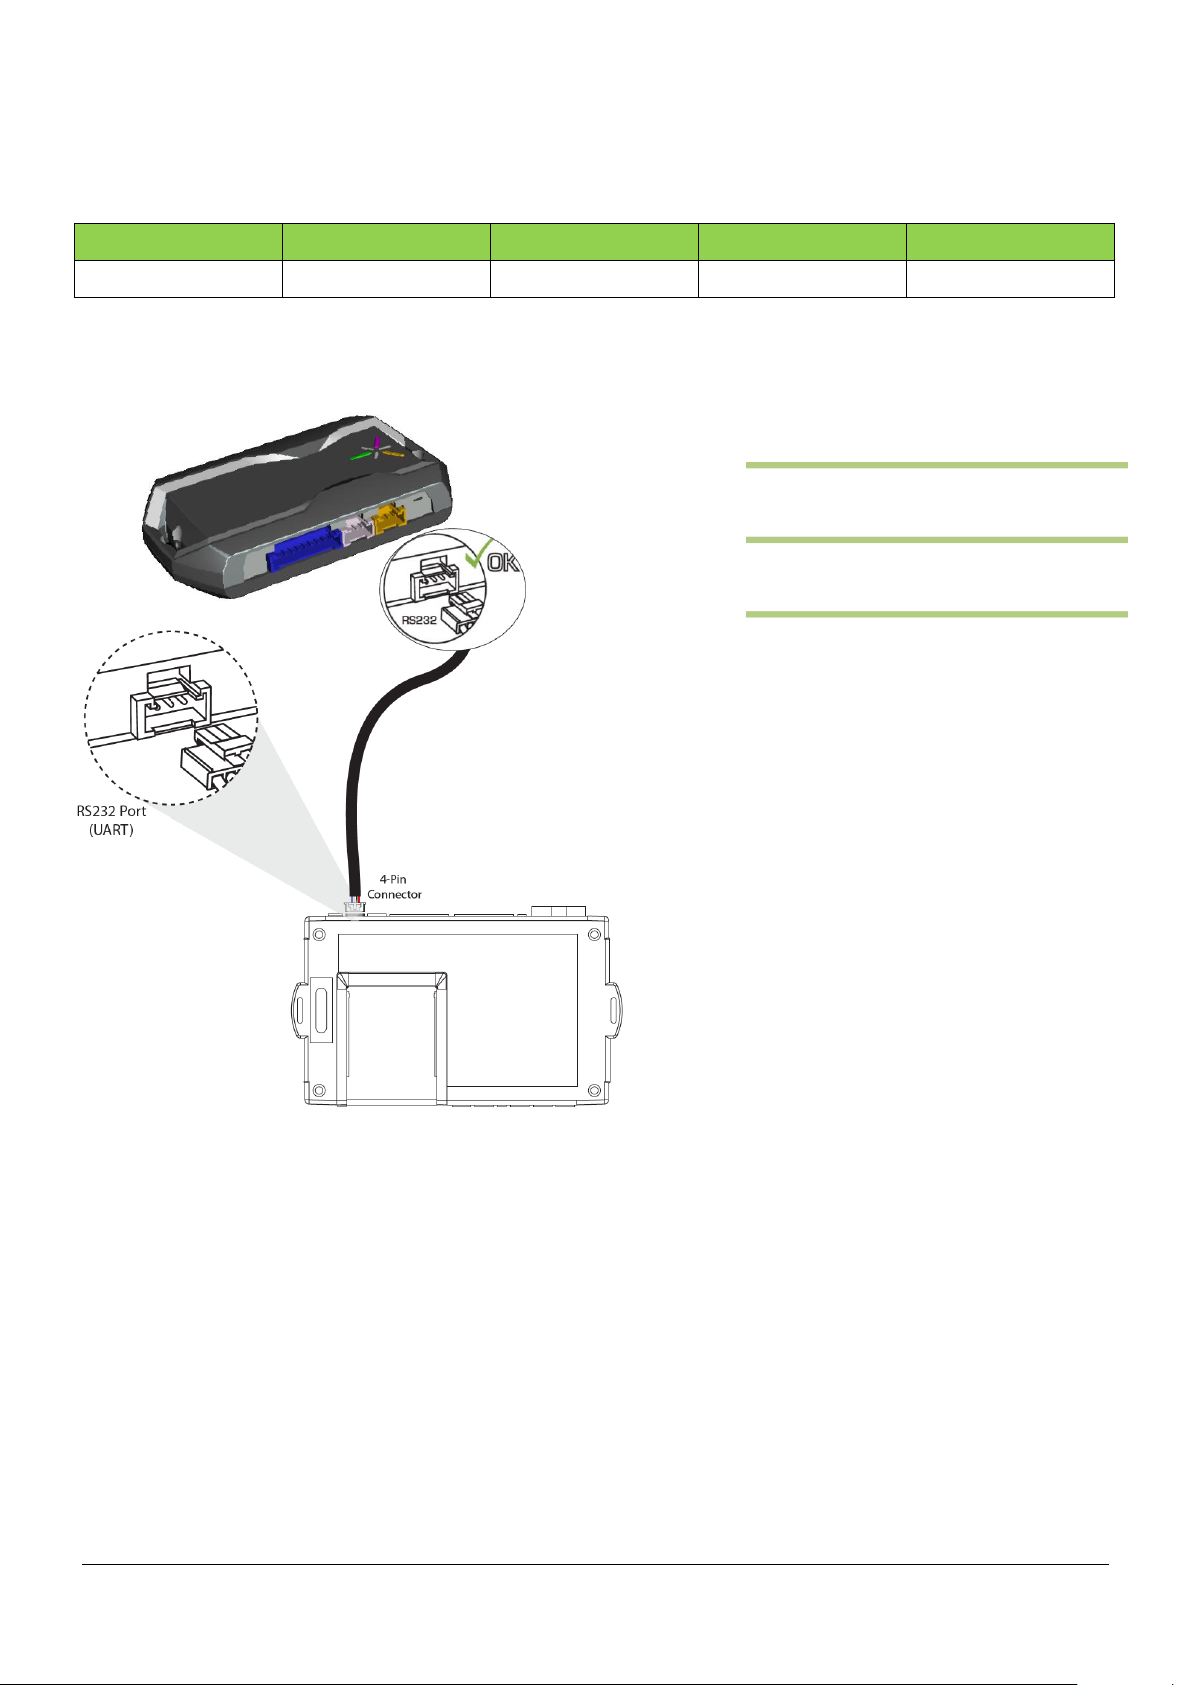
2.1 How to connect with Harness.
2.1.1 Standard Harness(UART 1 / UART 2)
4 Pin Black port :External Device .
4 Pin Gray port :TELMATICS
Page 3 of 20 Confidential
Page 4
1 2 3 4 5 6 7 8 9
10
12V
GND
GPS(3.3V)
POC 1
PIOC 2
PIOC 3
PIC 1
IG1
CAN H
CAN L
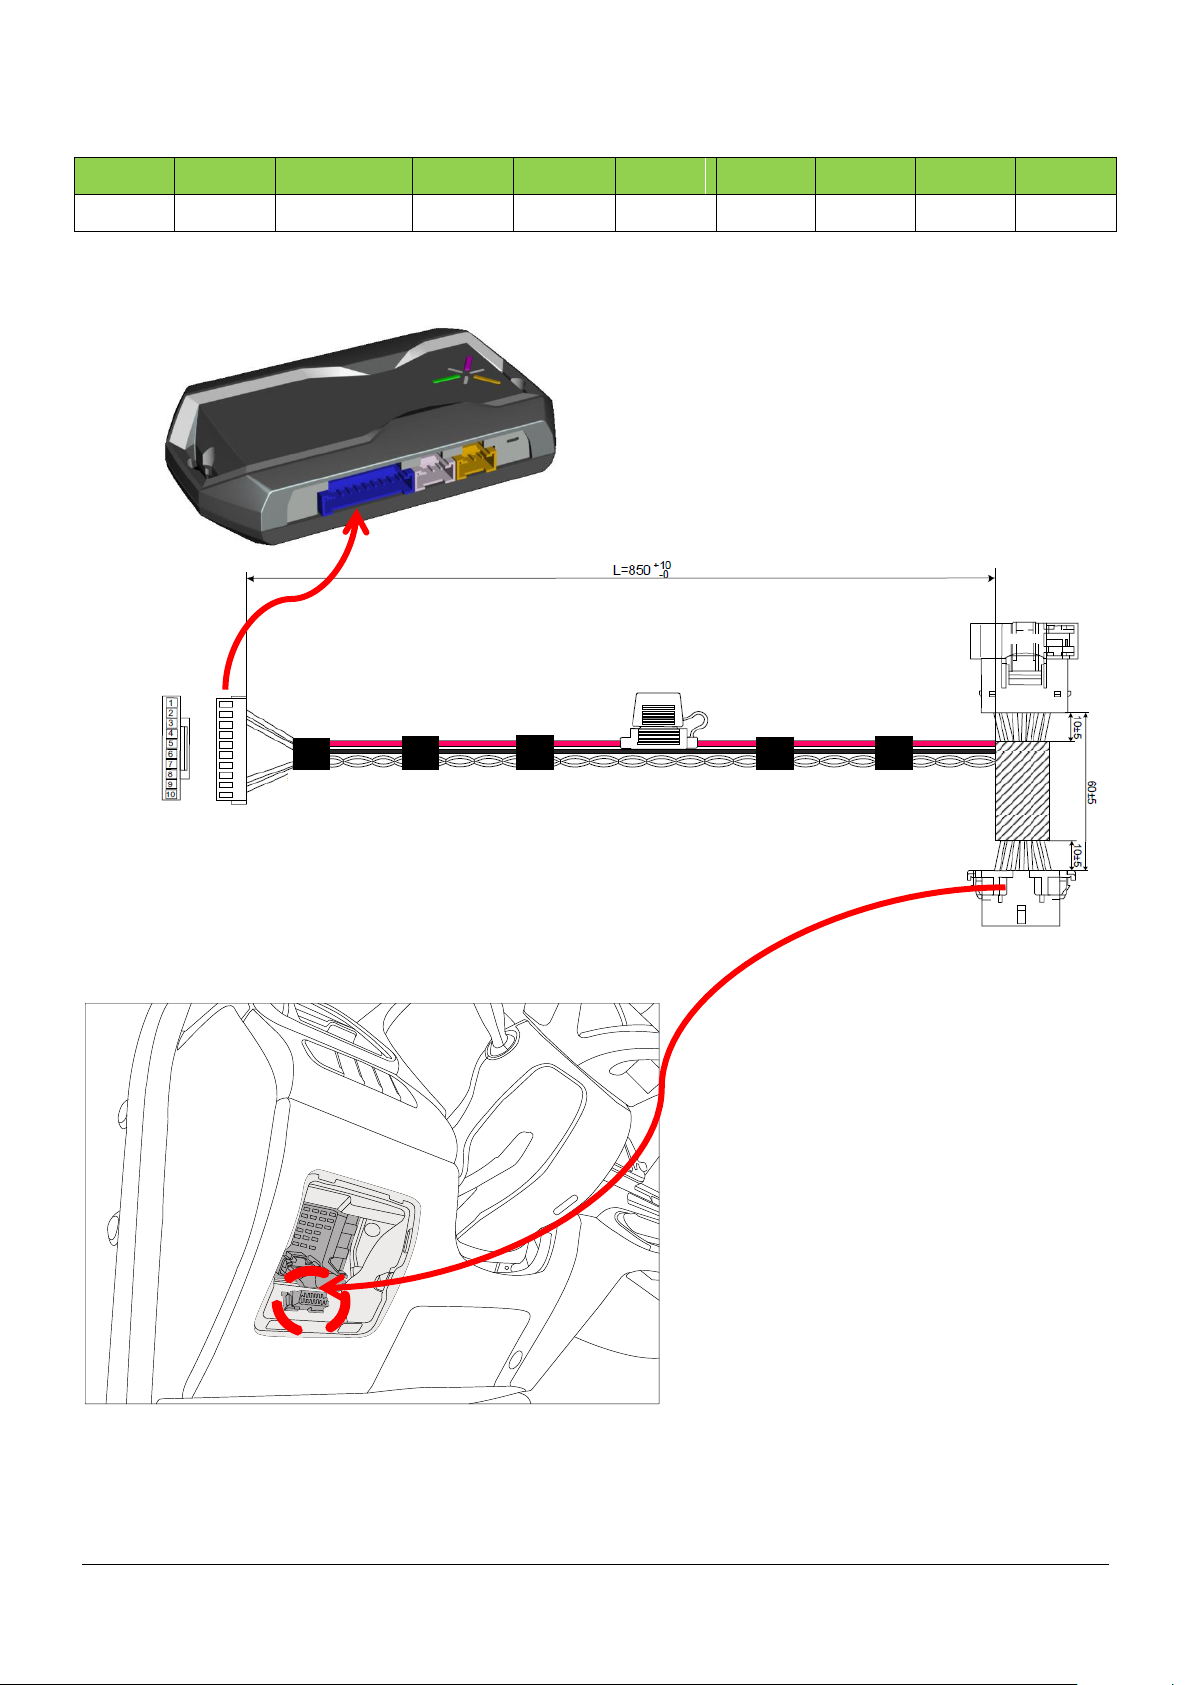
2.1.2 Stand-Alone Harness(10Pin)
Page 4 of 20 Confidential
Page 5

2.2 How to add DroneMobile to your vehicle
DroneMobile is a connected car solution that allows you to control and track your vehicle from
your smartphone or connected home device. In order to do this, you will need the following:
Aftermarket remote start or security system
o Compustar
o Arctic Start
o iDatalink
o iDataStart
o FTX
o NuStart
o Midcity Engineering
DroneMobile module
o DR-X1 module
o DR-X1MAX module
o DR-X1R module
DroneMobile subscription plan
Authorized DroneMobile retailer
o Visit www.dronemobile.com to find an Authorized retailer near you.
Upon registration, you will be given a 30-day free trial of DroneMobile basic services – meaning
that once your DroneMobile system has been installed, you can immediately start controlling
your vehicle with the DroneMobile app.
Page 5 of 20 Confidential
Page 6

3. Setup and Get Started.
3.1 App download
Downloading the DroneMobile app is a similar process on both Android and iPhone
smartphones.
To download the DroneMobile app, please follow these instructions:
Click either of the buttons above, or search "DroneMobile" in your app store.
Press "Download" or "Get" to download the DroneMobile app onto your smartphone.
If downloading the app does not work or is slow, your smartphone’s internet connection may
be weak. If this is the case, please relocate to an area with better cellular coverage OR connect
to a nearby Wi-Fi network and try again
Page 6 of 20 Confidential
Page 7

3.2 How to register for DronMobile app
After you have installed a DroneMobile system into your vehicle, you can now register for a
DroneMobile account. In order to register for a DroneMobile account, you will need your
DroneMobile system’s serial number, which should be provided to you by your authorized
retailer.
Your DroneMobile system’s serial number should be printed on a sticker that is included with
your DroneMobile module. If you cannot find this sticker, please contact your original place of
installation.
Registering in the DroneMobile App
1. Download the DroneMobile app from the App Store or Google Play store.
2. Press the “Register” link in the bottom corner.
3. Enter your DroneMobile system’s serial number and name your vehicle.
4. Create your DroneMobile username and profile.
Page 7 of 20 Confidential
Page 8

5. Done!
Registering on the DroneMobile Website
1. Go to https://accounts.dronemobile.com/userlogin.
2. Click the “Register” link.
3. Enter your DroneMobile system’s serial number and name your vehicle.
4. Create your DroneMobile username and profile.
5. Done!
Page 8 of 20 Confidential
Page 9

3.3 “Home” Screen
The new DroneMobile home screen allows you to check your vehicle’s status right when you
open the app. The home screen is divided into sections, or “widgets”, which show different
aspects of your vehicle’s status.
Page 9 of 20 Confidential
Page 10

3.4 “Control” Screen
The DroneMobile 4.0 app now features a simplified, easy to use interface for starting, lock, and
controlling your vehicle.
To open the “Control” screen, press the green control icon in the middle of the footer menu. The
“Control” screen is accessible from nearly anywhere within the DroneMobile app, making it easy
to navigate to and from the “Control” screen.
The “Control” screen has the following items:
“Ready to Start” – For manual transmission vehicles, this will indicate whether
reservation mode is set and the vehicle is ready to be remote started.
“Switch Vehicles” – For switching vehicles to control. NOTE: switching vehicles on the
“Control” screen will also switch vehicles on other screens.
Vehicle Profile Picture + Vehicle Name – Both can be updated in the “Vehicle Info” page.
Last Command – This will show the last command or notification to/from your vehicle.
Swipe left/right to show secondary commands, such as Trunk/Panic/Aux1/Aux2.
To close the “Control” screen, press the “X” icon at the bottom of the screen or swipe down
anywhere on the screen
Page 10 of 20 Confidential
Page 11

To lock your doors, tap the “Lock” or “Unlock” buttons. While the command is being sent, the
button you pressed will pulse until the command is confirmed. If the command is successful, a
green check mark will appear. If the command is unsuccessful, a red X icon will appear.
If you experience and unsuccessful command, please go through our “Troubleshooting” steps.
Page 11 of 20 Confidential
Page 12
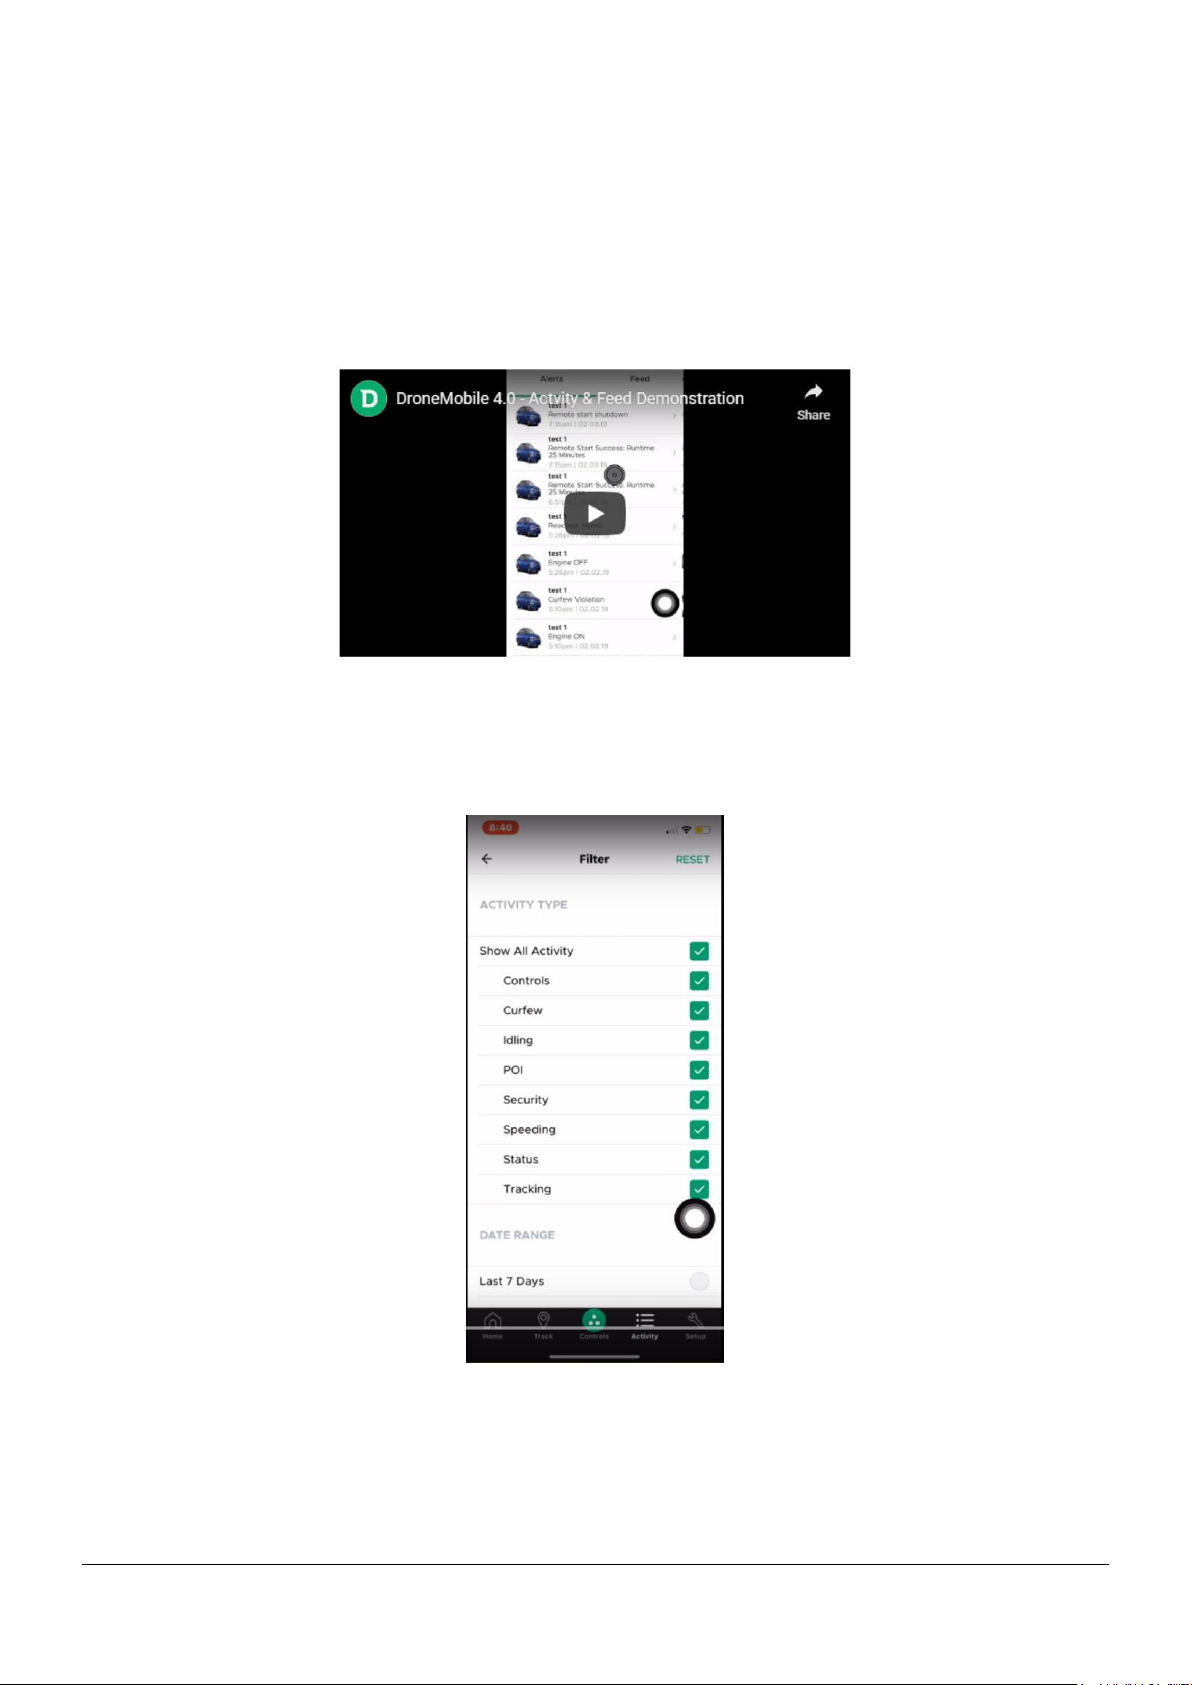
3.5 “Activity “ Screen
DroneMobile 4.0 allows you to customize all the activity you would like to see on your app.
After selecting your Drone Settings and Alerts, you'll receive the information right on your
screen.
Here's a video illustration:
You can further customize it, by only selecting the feedback you are really looking for. See
below:
NOTE: Some of the options shown on this video, are available on Premium and Business
subscription only.
Page 12 of 20 Confidential
Page 13
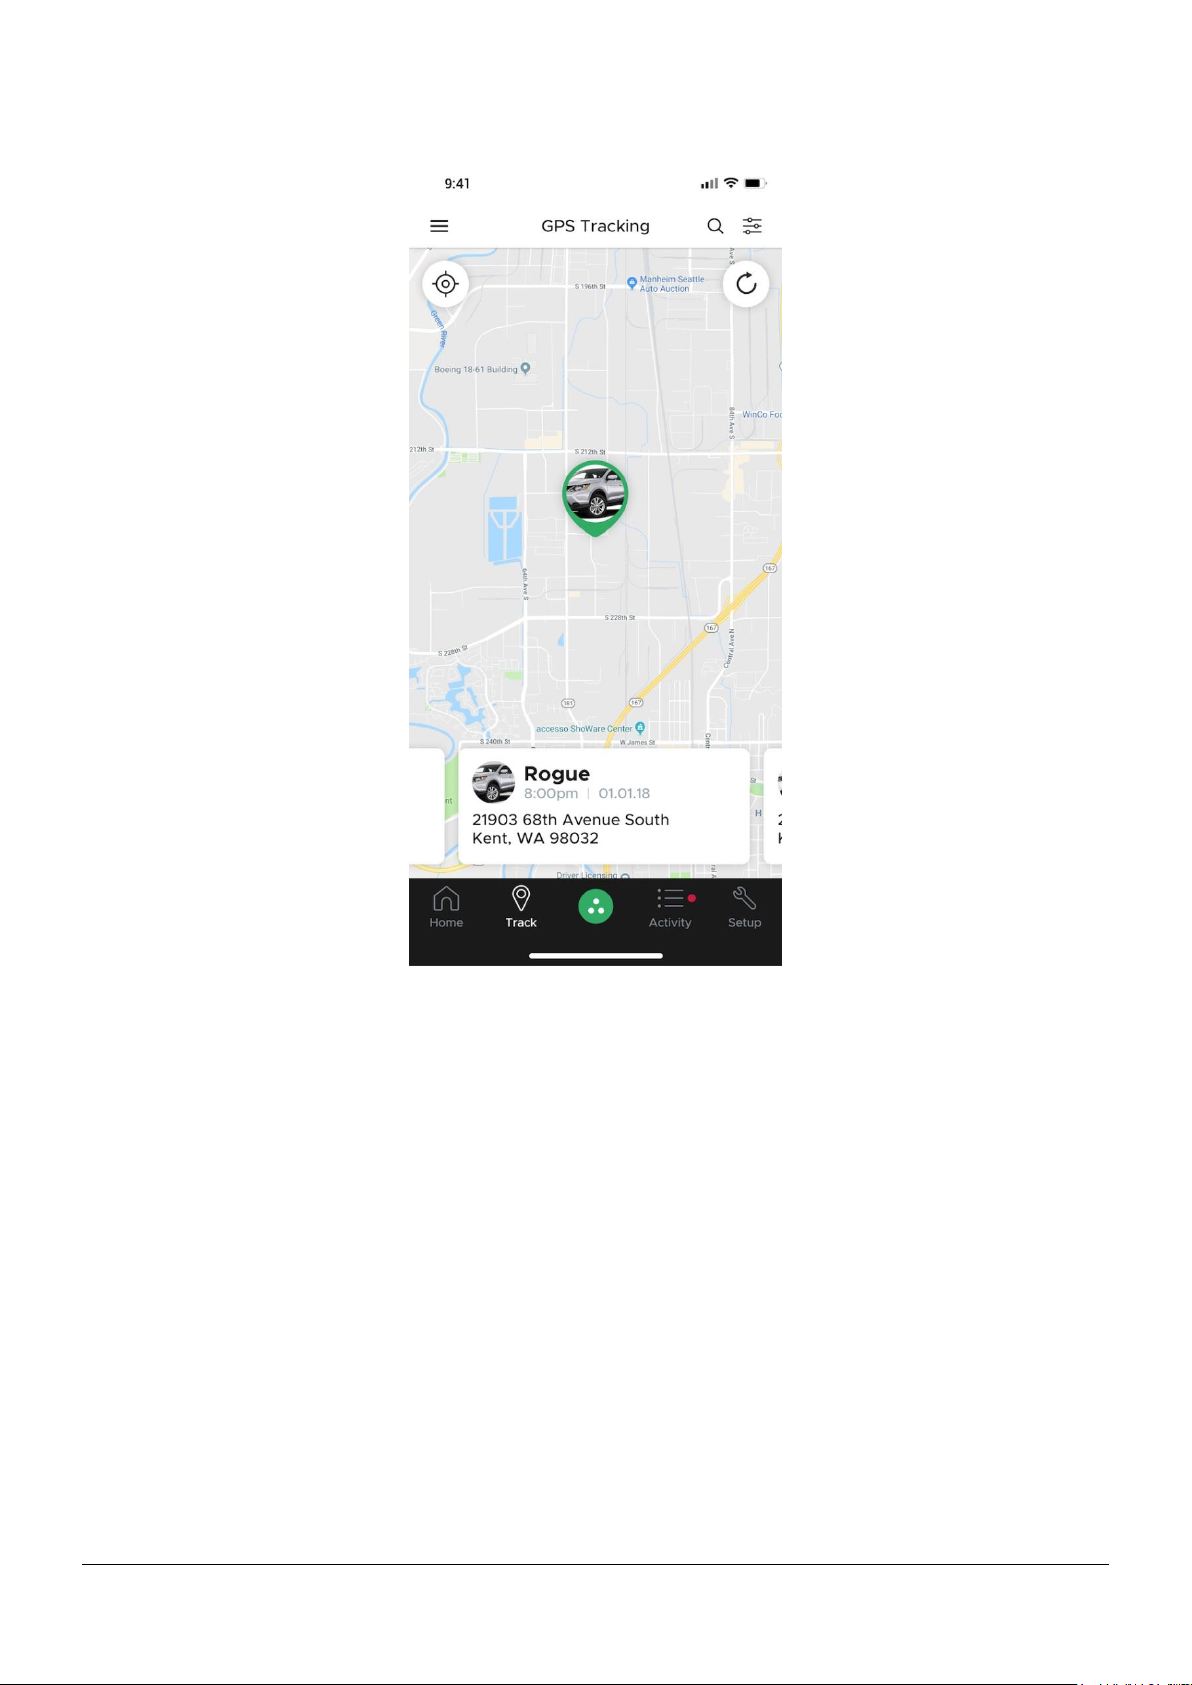
3.6 “Track” Screen
One of the main benefits of DroneMobile is the ability to locate your vehicle from the app. So
whether you forgot where you parked or you’re keeping tabs on a young driver in your family,
DroneMobile can locate your vehicle in seconds.
IMPORTANT
DroneMobile Tracking features can only be accessed with a Premium, Business, or Business
Plus subscription. If your DroneMobile system is subscribed to a Basic plan, you will not see
your vehicle’s location on the “Tracking” page.
How to Access the Tracking Page
In order to access the tracking page, press the “Track” button on the footer menu at the bottom
of the screen. This button is the second from the left and is marked with a map “pin” icon
Page 13 of 20 Confidential
Page 14

3.7 Family Sharing
DroneMobile 4 now features the ability to share access to your
vehicles with family members. Upon launch, family sharing will
simply create additional logins for family members to access the
vehicles on your account
3.8 “Setup” Screen : Setting Up Your DronMobile System
To adjust the settings, or to customize your DroneMobile system, navigate to the “Setup” page
in the DroneMobile app. To go to this page, press the right-most menu option in the footer bar.
There is a wrench icon next to the Setup link.
Once you find your way to the Setup page, you will see the following items:
Your vehicle name and vehicle profile picture – if you want to change the settings on
another vehicle, go to the vehicle menu by pressing the two-arrow icon in the top right
corner of the page.
Vehicle Info - Edit your vehicle’s profile and picture.
Subscription – Check your DroneMobile system’s subscription status.
Drone Settings – Configure your DroneMobile system’s settings.
System Settings – Configure your remote start or alarm.
Alerts – Customize which push notifications you receive from your DroneMobile system.
3.9 Application Settings
Drone 4.0 allows you to further customize your experience. From the app setting screen, you
are able to complete the following:
- Change Password
- Face/Touch ID permission *iOS only
- Passcode Lock *Android only
- Command Confirmation - Avoid pressing the wrong button by confirming every command sent
- Audible Confirmation - Get audible feedback whenever a command i ssuccessful
Page 14 of 20 Confidential
Page 15

- Vibration Confirmation - Get haptic feedback whenever a command is succesful
- Auto-Refresh: Update your vehicle's status whenever your open up the app.
*This will work the very first time you are opening Drone. If the app is running in the
background, please complete a manual refresh.
- Show Commands - Launch the command screen whenever you open the Drone app
*It will make your interaction a lot faster with your vehicle.
- Units - Change from Metric to Imperial
4. Troubleshooting
4.1 Command Error (301)
What is this error?
The symptoms of this error is that when sending LOCK or ENGINE START commands, you
receive messages that “Doors didn’t lock” or “Remote start error”.
Why am I receiving this error?
Your smartphone IS successfully communicating with the DroneMobile system inside your
vehicle. However, the DroneMobile module is unable to communicate with your remote
start/security system.
How can I resolve this issue?
This error is most often caused by the DroneMobile module being plugged into the incorrect
data port on your aftermarket security or remote start system. To correct this issue, you will
need to visit your local authorized retailer/installer.
This error may be caused incorrect firmware installed onto either your DroneMobile module OR
your remote start/security system. In order to troubleshoot this issue, you will need to visit your
local authorized retailer/installer. We recommend visiting your original place of installation, but
all DroneMobile service centers will be able to troubleshoot this issue.
Page 15 of 20 Confidential
Page 16

4.2 (Something Went Wrong) Vehicle Not Responding
Why am I receiving this error?
You are receiving this error because the DroneMobile device in your vehicle is unable to receive
and/or confirm commands sent from the DroneMobile app.
How can I resolve this issue?
Please try any of the following to troubleshoot your issue.
1. Make sure your vehicle has network coverage – If your vehicle is parked in a non-
residential parking structure or in the middle of the wilderness, you may not be able to
connect to your vehicle.
2. Try resending your command – Occasionally, initial commands sent from the
DroneMobile app may time out. Try sending the same command to your vehicle and see
if you are able to connect to your vehicle.
3. Wait 2-3 hours – Networks refresh ever 2-3 hours and connections may resolve
themselves after waiting for a short period of time.
4. Make sure you have the most current version of the DroneMobile smartphone
app. – Visit your smartphone’s app store to see if any updates for your DroneMobile app
are available.
5. Log out and log back into the DroneMobile app. – If you do have the most current
version of the DroneMobile app, try logging out and logging back into the app. You can
log out by pressing “Settings” in the menu, and then “Profile” to see the Log Out button.
Log back and try re-sending your command.
If you still are unable to connect to your vehicle after trying these 5 steps, please visit
the DroneMobile blog to see if there are any known network issues that might be affecting your
vehicle.
OR
Visit your local authorized DroneMobile dealer. We recommend visiting your original place of
installation, but all DroneMobile dealers are trained to support our customers.
Please have your DroneMobile dealer perform the following procedures:
1. Power-cycle the DroneMobile module – Disconnect the main harness from the module,
wait 10 seconds, and reconnect. Wait to see that both the blue and green LEDs are
flashing.
2. Secure the DroneMobile module mounting position – Make sure the DroneMobile
module is mounted label-side DOWN and as far up in the dashboard as possible.
Page 16 of 20 Confidential
Page 17

3. If the module is still not communicating, replace the module as it may be defective.
4.3 Error - The Internet connection appears to be offline.
Why am I receiving this error?
You are receiving this error because your smartphone is unable to connect to the internet
and/or send commands via the DroneMobile app.
How can I resolve this issue?
Please make sure you have a solid internet connection on your smartphone. You can test your
smartphone’s internet connection simply by visiting any website using your web browser.
Please follow these steps:
Check your internet connection. Make sure you have a solid Wi-Fi or cellular connection
by visiting any website using your web browser (try dronemobile.com or google.com).
Once your internet connection has been re-established, log out from the DroneMobile
app by selecting “Settings” from the menu. Then select “Profile” and then “Log Out”.
Press the “Log In” button and re-enter your credentials.
If you are able to login, try re-sending a LOCK command to your vehicle.
If you are NOT able to login, try switching to a different internet connection.
If you are able to login, but still receive the same error, please delete and reinstall the
DroneMobile app from your smartphone.
How do I delete and reinstall the DroneMobile app?
1. Press and hold the DroneMobile application icon.
2. The “UNINSTALL” option should appear at the top of your screen.
3. Drag the DroneMobile icon onto the “UNINSTALL” option.
You can also delete the DroneMobile application from the Google Play store.
If you are trying to re-install the most current version of the DroneMobile app, please try the
following:
1. Open the “Google Play Store” application.
2. Search for “DroneMobile”.
3. Press “INSTALL”.
Page 17 of 20 Confidential
Page 18

5. Safety, handling, and support
Important safety information
WARNING: Failure to follow these safety instructions could result in fire, electric shock, injury, or
damage to X1 or other property. Read all the safety information below before using DR-X1
Series.
Handling Handle X1 with care. It is made of metal, and plastic and has sensitive
electronic components inside. X1 or its battery can be damaged if dropped, burned,
punctured, or crushed, or if it comes in contact with liquid. If you suspect damage to X1
or the battery, discontinue use of X1 , as it may cause overheating or injury.
Repairing Donʼt open X1 and donʼt attempt to repair X1 yourself. Disassembling X1
may damage it, result in loss of splash and water resistance (supported models), or
cause injury to you. For example, X1, X1 MAX, or later, contains one or more lasers that
could be damaged during repair or disassembly, which could result in hazardous
exposure to infrared laser emissions that are not visible. If DR-X1 is damaged or
malfunctions, contact Compustar or an Authorized DroneMobile retailer. Repairs by
service providers other than Compustar or an Authorized DroneMobile retailer may not
involve the use of Compustar genuine parts and may affect the safety and functionality of
the device
Battery Donʼt attempt to replace the X1 battery yourself. The lithium-ion battery in X1
should be replaced by Compustar or an authorized service provider. Improper
replacement or repair could damage the battery, cause overheating, or result in injury.
The battery must be recycled or disposed of separately from household waste. Donʼt
incinerate the battery.
Page 18 of 20 Confidential
Page 19

6. FCC compliance statement
NOTE: This equipment has been tested and found to comply with the limits for a Class B
digital device, pursuant to part 15 of the FCC Rules. These limits are designed to pro-vide
reasonable protection against harmful interference in a residential installation.
This equipment generates, uses and can radiate radio frequency energy and, if not installed and used in accordance with the instructions, may cause harmful interference to
radio communications. However, there is no guarantee that interference will not occur in a
particular installation. If this equipment does cause harmful interference to radio or
television reception, which can be determined by turning the equipment off and on, the
user is encouraged to try to correct the interference by one or more of the following
measures:
-Reorient or relocate the receiving antenna.
-Increase the separation between the equipment and receiver.
-Connect the equipment into an outlet on a circuit different from that to which the receiver
is connected.
-Consult the dealer or an experienced radio/TV technician for help.
CAUTION : Changes or modifications not expressly approved by the manufacturer
responsible for compliance could void the user’s authority to operate the equipment
This device complies with part 15 of the FCC Rules.
Operation is subject to the following two conditions:
• (1) This device may not cause harmful interference, and
• (2) this device must accept any interference received, including interference that may cause
undesired operation.
cause undesired operation.
This device should be installed and operated with minimum 20 cm between the radiator and your body.
7. Canadian regulatory statement
This device complies with Industry Canada license-exempt RSS standard(s).
Operation is subject to the following two conditions:
(1) this device may not cause interference, and
Page 19 of 20 Confidential
Page 20

(2) this device must accept any interference, including interference that may cause undesired operation of
the device.
Le present appareil est conforme aux CNR d'Industrie Canada applicables aux appareils radio exempts
de licence. L'exploitation est autorisee aux deux conditions suivantes :
(1) l'appareil ne doit pas produire de brouillage, et.
(2) l'utilisateur de l'appareil doit accepter tout brouillage radio electrique subi, meme si le brouillage est
susceptible d'en compromettre le fonctionnement.
This equipment should be installed and operated with minimum 20 cm between the radiator
and your body.
Cet appareil doit être installé et utilisé avec un minimum de 20 cm entre le radiateur et votre
corps.
Model : DR-X1MAX
FCC ID : VA5CMT248-X1MAX
IC : 7087A-CMT248X1M
Contains FCC ID: XMR201707BG96
Contains IC: 10224A-201709BG96
Model : DR-X1
Contains FCC ID: XMR201707BG96
Contains IC: 10224A-201709BG96
Page 20 of 20 Confidential
 Loading...