

Page 1
embOS
Real-Time Operating System
CPU & Compiler specifics
for ARM Cortex-M using
IAR Embedded Workbench
Document: UM01014
Software Version: 5.10.1.0
Revision: 1
Date: March 1, 2021
A product of SEGGER Microcontroller GmbH
www.segger.com
Page 2

2
Disclaimer
Specifications written in this document are believed to be accurate, but are not guaranteed to
be entirely free of error. The information in this manual is subject to change for functional or
performance improvements without notice. Please make sure your manual is the latest edition.
While the information herein is assumed to be accurate, SEGGER Microcontroller GmbH (SEGGER) assumes no responsibility for any errors or omissions. SEGGER makes and you receive no
warranties or conditions, express, implied, statutory or in any communication with you. SEGGER
specifically disclaims any implied warranty of merchantability or fitness for a particular purpose.
Copyright notice
You may not extract portions of this manual or modify the PDF file in any way without the prior
written permission of SEGGER. The software described in this document is furnished under a
license and may only be used or copied in accordance with the terms of such a license.
© 2010-2020 SEGGER Microcontroller GmbH, Monheim am Rhein / Germany
Trademarks
Names mentioned in this manual may be trademarks of their respective companies.
Brand and product names are trademarks or registered trademarks of their respective holders.
Contact address
SEGGER Microcontroller GmbH
Ecolab-Allee 5
D-40789 Monheim am Rhein
Germany
Tel. +49 2173-99312-0
Fax. +49 2173-99312-28
E-mail:
Internet: www.segger.com
support@segger.com
*
*
By sending us an email your (personal) data will automatically be processed. For further information please refer to our
privacy policy which is available at https://www.segger.com/legal/privacy-policy/.
embOS for Cortex-M and IAR © 2010-2020 SEGGER Microcontroller GmbH
Page 3

3
Manual versions
This manual describes the current software version. If you find an error in the manual or a
problem in the software, please inform us and we will try to assist you as soon as possible.
Contact us for further information on topics or functions that are not yet documented.
Print date: March 1, 2021
Software Revision Date By Description
5.10.0.0 1 210301 MM
5.10.0.0 0 200617 TS/MM
5.06 1 190930 MC
5.06 0 190514 MM
5.02a 0 180727 MM
5.00 0 180522 MM
4.40 0 180104 MC
4.38 0 170928 MC
4.36 0 170721 MC
4.34 0 170327 TS
4.30 0 161213 MC
4.26 0 161027 RH
4.22 0 160531 MC
4.16 0 160122 MC
4.14 0 151222 MC
4.12a 0 150917 TS
4.10 0 150505 TS
4.06b 0 150330 TS
4.06a 0 150317 TS
4.04a 0 150109 SC
4.02a 0 140918 TS
4.02 0 140819 TS
4.00 0 140606 TS
3.90 0 140228 AW
3.88g 0 131104 TS
3.88c 0 130813 TS
3.88b 0 130528 AW/TS
3.86n 0 121210 AW
3.86l 0 121126 TS
3.86g 0 120806 AW
3.86f 0 120726 AW
Added missing chapter “CPU and compiler specifics”.
Chapter “Libraries” updated.
Chapter “CPU and compiler specifics -> IAR C-Spy stack check warning”
added.
Chapter “Libraries” updated.
New software version.
New software version.
New software version.
New software version.
New software version.
New software version.
Chapter “Compiler specifics” updated.
New software version.
Chapters “Using embOS” and “embOS C-Spy Plugin” updated.
Chapters “VFP support”, “CPU and compiler specifics”, and “embOS CSpy Plugin” updated.
New software version.
New software version.
New software version.
Chapter “Compiler specifics” updated.
New software version.
Typos corrected.
New software version.
New generic embOS sources V4.04a.
New generic embOS sources V4.02a.
New generic embOS sources V4.02.
New generic embOS sources V4.00.
New generic embOS sources V3.90.
Updated start project for EWARM V7.10.
New generic embOS sources V3.88g.
New generic embOS sources V3.88c.
New generic embOS sources V3.88b.
Chapter 4, “Thread safe system libraries with IAR compiler V6.4 or newer” corrected. One required linker parameter was missing in previous description.
New generic embOS sources V3.86n.
Chapter 4, “Thread safe system libraries with IAR compiler V6.4 or newer” added to describe the procedure to activate thread safe library support with newer IAR compiler.
Software: New embOS sources V3.86i.
Software: New embOS sources V3.86g.
Software: New embOS sources V3.86f.
Task events are 32bits wide for Cortex-M.
embOS for Cortex-M and IAR © 2010-2020 SEGGER Microcontroller GmbH
Page 4

4
Software Revision Date By Description
3.86e 0 120708 AW
3.86d 0 120510 AW
3.84c1 0 120203 AW
3.84c 1 120117 TS
3.84.1 0 111103 AW
3.84 0 111027 AW
3.82u 0 110701 AW
3.82s 0 110323 TS
3.82m 0 101117 AW
3.82l 0 101027 AW
3.82h 0 100722 TS
3.82a 1 100701 AW
3.82a 0 091026 TS
Software: New embOS sources V3.86e.
Modified hard fault handler added to RTOSInit.
Software: New embOS sources V3.86d.
OS_ExtendTaskContext_TLS_VFP() corrected.
Software: Scheduler for Cortex-M4 with VFP corrected.
Chapter 4: New functions to save and restore VFP context of Cortex-M4
in ISR handler:
OS_VFP_Save()
OS_VFP_Restore()
Software version updated.
Software: New scheduler uses main stack for OS_Idle().
Chapter 5: Stacks, system stack descripton updated.
New Chapter 6.8.4 and 6.8.5: Interrupt peripheral identifier and priority
values used with embOS described more in detail.
Chapter 7: Interrupt controller setup using CMSIS described more in detail. New chapter 7.7.1 describes differences between embOS functions
and CMSIS functions.
Chapter 3.2.1: New libraries with VFPv4 support added.
Chapter 4.3, 4.4: Support for VFPv4 added:
OS_ExtendTaskContext_TLS()
OS_ExtendTaskContext_TLS_VFP()
OS_ExtendTaskContext_VFP()
Chapter CMSIS with IAR EWARM V6 added.
New library mode DPL added.
Thread local storage for new IAR workbench V6.
Library names updated for new IAR workbench V6.
Thread safe library support modified for IAR workbench V6.
embOS CM3 and embOS CM0 manual merged.
Chapter Stacks: Task stack size corrected.
First version.
embOS for Cortex-M and IAR © 2010-2020 SEGGER Microcontroller GmbH
Page 5

5
About this document
Assumptions
This document assumes that you already have a solid knowledge of the following:
• The software tools used for building your application (assembler, linker, C compiler).
• The C programming language.
• The target processor.
• DOS command line.
If you feel that your knowledge of C is not sufficient, we recommend The C Programming Lan-
guage by Kernighan and Richie (ISBN 0--13--1103628), which describes the standard in C programming and, in newer editions, also covers the ANSI C standard.
How to use this manual
This manual explains all the functions and macros that the product offers. It assumes you have
a working knowledge of the C language. Knowledge of assembly programming is not required.
Typographic conventions for syntax
This manual uses the following typographic conventions:
Style Used for
Body Body text.
Keyword
Parameter Parameters in API functions.
Sample Sample code in program examples.
Sample comment Comments in program examples.
Reference
GUIElement Buttons, dialog boxes, menu names, menu commands.
Emphasis Very important sections.
Text that you enter at the command prompt or that appears on
the display (that is system functions, file- or pathnames).
Reference to chapters, sections, tables and figures or other documents.
embOS for Cortex-M and IAR © 2010-2020 SEGGER Microcontroller GmbH
Page 6

6
embOS for Cortex-M and IAR © 2010-2020 SEGGER Microcontroller GmbH
Page 7

7
Table of contents
1 Using embOS ................................................................................................................9
1.1 Installation .................................................................................................. 10
1.2 First Steps .................................................................................................. 11
1.3 The example application OS_StartLEDBlink.c ................................................... 12
1.4 Stepping through the sample application .........................................................13
2 Build your own application ..........................................................................................17
2.1 Introduction .................................................................................................18
2.2 Required files for an embOS ..........................................................................18
2.3 Change library mode .................................................................................... 18
2.4 Select another CPU ...................................................................................... 18
3 Libraries .......................................................................................................................19
3.1 Naming conventions for prebuilt libraries ........................................................ 20
4 CPU and compiler specifics ........................................................................................21
4.1 Standard system libraries ..............................................................................22
4.2 Thread-safe system libraries ..........................................................................22
4.3 Thread-Local Storage TLS ............................................................................. 23
4.4 IAR C-Spy stack check warning ..................................................................... 25
4.5 ARM erratum 837070 ................................................................................... 26
4.6 ARM TrustZone support .................................................................................27
5 Stacks ......................................................................................................................... 28
5.1 Task stack for Cortex-M ................................................................................ 29
5.2 System stack for Cortex-M ............................................................................ 29
5.3 Interrupt stack for Cortex-M ..........................................................................29
6 Interrupts .....................................................................................................................30
6.1 What happens when an interrupt occurs? ........................................................ 31
6.2 Defining interrupt handlers in C .....................................................................31
6.3 Interrupt vector table ................................................................................... 31
6.4 Interrupt-stack switching .............................................................................. 32
6.5 Zero latency interrupts ................................................................................. 32
6.6 Interrupt priorities ........................................................................................32
6.7 Interrupt nesting ..........................................................................................33
6.8 Interrupt handling API .................................................................................. 35
embOS for Cortex-M and IAR © 2010-2020 SEGGER Microcontroller GmbH
Page 8

8
7 CMSIS .........................................................................................................................40
7.1 The generic CMSIS start project .................................................................... 41
7.2 Device specific files needed for embOS with CMSIS .......................................... 41
7.3 Device specific functions/variables needed for embOS with CMSIS ...................... 41
7.4 CMSIS generic functions needed for embOS with CMSIS ................................... 42
7.5 Customizing the embOS CMSIS generic start project ........................................ 42
7.6 Adding CMSIS to other embOS start projects .................................................. 42
7.7 Interrupt and exception handling with CMSIS .................................................. 44
7.7.1 Enable and disable interrupts ............................................................. 44
7.7.2 Setting the Interrupt priority .............................................................. 44
8 VFP support ................................................................................................................45
8.1 Vector Floating Point support .........................................................................46
9 RTT and SystemView .................................................................................................47
9.1 SEGGER Real Time Transfer .......................................................................... 48
9.2 SEGGER SystemView ....................................................................................49
10 Technical data ...........................................................................................................50
10.1 Memory requirements ................................................................................. 51
embOS for Cortex-M and IAR © 2010-2020 SEGGER Microcontroller GmbH
Page 9

Chapter 1
Using embOS
This chapter describes how to start with and use embOS. You should follow these steps to
become familiar with embOS.
embOS for Cortex-M and IAR © 2010-2020 SEGGER Microcontroller GmbH
Page 10

10 CHAPTER 1 Installation
1.1 Installation
embOS is shipped as a zip-file in electronic form.
To install it, proceed as follows:
Extract the zip-file to any folder of your choice, preserving the directory structure of this
file. Keep all files in their respective sub directories. Make sure the files are not read only
after copying.
Assuming that you are using an IDE to develop your application, no further installation
steps are required. You will find many prepared sample start projects, which you should
use and modify to write your application. So follow the instructions of section First Steps
on page 11.
You should do this even if you do not intend to use the IDE for your application development
to become familiar with embOS.
If you do not or do not want to work with the IDE, you should: Copy either all or only the
library-file that you need to your work-directory. The advantage is that when switching to
an updated version of embOS later in a project, you do not affect older projects that use
embOS, too. embOS does in no way rely on an IDE, it may be used without the IDE using
batch files or a make utility without any problem.
embOS for Cortex-M and IAR © 2010-2020 SEGGER Microcontroller GmbH
Page 11
11 CHAPTER 1 First Steps
1.2 First Steps
After installation of embOS you can create your first multitasking application. You have
received several ready to go sample start workspaces and projects and every other files
needed in the subfolder Start. It is a good idea to use one of them as a starting point for
all of your applications. The subfolder BoardSupport contains the workspaces and projects
which are located in manufacturer- and CPU-specific subfolders.
To start with, you may use any project from BoardSupport subfolder.
To get your new application running, you should proceed as follows:
• Create a work directory for your application, for example c:\work.
• Copy the whole folder Start which is part of your embOS distribution into your work
directory.
• Clear the read-only attribute of all files in the new Start folder.
• Open one sample workspace/project in
Start\BoardSupport\<DeviceManufacturer>\<CPU> with your IDE (for example, by
double clicking it).
• Build the project. It should be built without any error or warning messages.
After generating the project of your choice, the screen should look like this:
For additional information you should open the ReadMe.txt file which is part of every specific
project. The ReadMe file describes the different configurations of the project and gives
additional information about specific hardware settings of the supported eval boards, if
required.
embOS for Cortex-M and IAR © 2010-2020 SEGGER Microcontroller GmbH
Page 12

12 CHAPTER 1 The example application OS_StartLEDBlink.c
1.3 The example application OS_StartLEDBlink.c
The following is a printout of the example application OS_StartLEDBlink.c. It is a good
starting point for your application. (Note that the file actually shipped with your port of
embOS may look slightly different from this one.)
What happens is easy to see:
After initialization of embOS; two tasks are created and started. The two tasks are activated
and execute until they run into the delay, then suspend for the specified time and continue
execution.
/*********************************************************************
* SEGGER Microcontroller GmbH *
* The Embedded Experts *
**********************************************************************
-------------------------- END-OF-HEADER ----------------------------File : OS_StartLEDBlink.c
Purpose : embOS sample program running two simple tasks, each toggling
a LED of the target hardware (as configured in BSP.c).
*/
#include "RTOS.h"
#include "BSP.h"
static OS_STACKPTR int StackHP[128], StackLP[128]; // Task stacks
static OS_TASK TCBHP, TCBLP; // Task control blocks
static void HPTask(void) {
while (1) {
BSP_ToggleLED(0);
OS_TASK_Delay(50);
}
}
static void LPTask(void) {
while (1) {
BSP_ToggleLED(1);
OS_TASK_Delay(200);
}
}
/*********************************************************************
*
* main()
*/
int main(void) {
OS_Init(); // Initialize embOS
OS_InitHW(); // Initialize required hardware
BSP_Init(); // Initialize LED ports
OS_TASK_CREATE(&TCBHP, "HP Task", 100, HPTask, StackHP);
OS_TASK_CREATE(&TCBLP, "LP Task", 50, LPTask, StackLP);
OS_Start(); // Start embOS
return 0;
}
/*************************** End of file ****************************/
embOS for Cortex-M and IAR © 2010-2020 SEGGER Microcontroller GmbH
Page 13
13 CHAPTER 1 Stepping through the sample application
1.4 Stepping through the sample application
When starting the debugger, you will see the main() function (see example screen shot
below). The main() function appears as long as project option Run to main is selected,
which it is enabled by default. Now you can step through the program.
OS_Init() is part of the embOS library and written in assembler; you can there fore only
step into it in disassembly mode. It initializes the relevant OS variables.
OS_InitHW() is part of RTOSInit.c and therefore part of your application. Its primary
purpose is to initialize the hardware required to generate the system tick interrupt for
embOS. Step through it to see what is done.
OS_Start() should be the last line in main(), because it starts multitasking and does not
return.
embOS for Cortex-M and IAR © 2010-2020 SEGGER Microcontroller GmbH
Page 14
14 CHAPTER 1 Stepping through the sample application
Before you step into OS_Start(), you should set two breakpoints in the two tasks as shown
below.
As OS_Start() is part of the embOS library, you can step through it in disassembly mode
only.
Click GO, step over OS_Start(), or step into OS_Start() in disassembly mode until you
reach the highest priority task.
embOS for Cortex-M and IAR © 2010-2020 SEGGER Microcontroller GmbH
Page 15
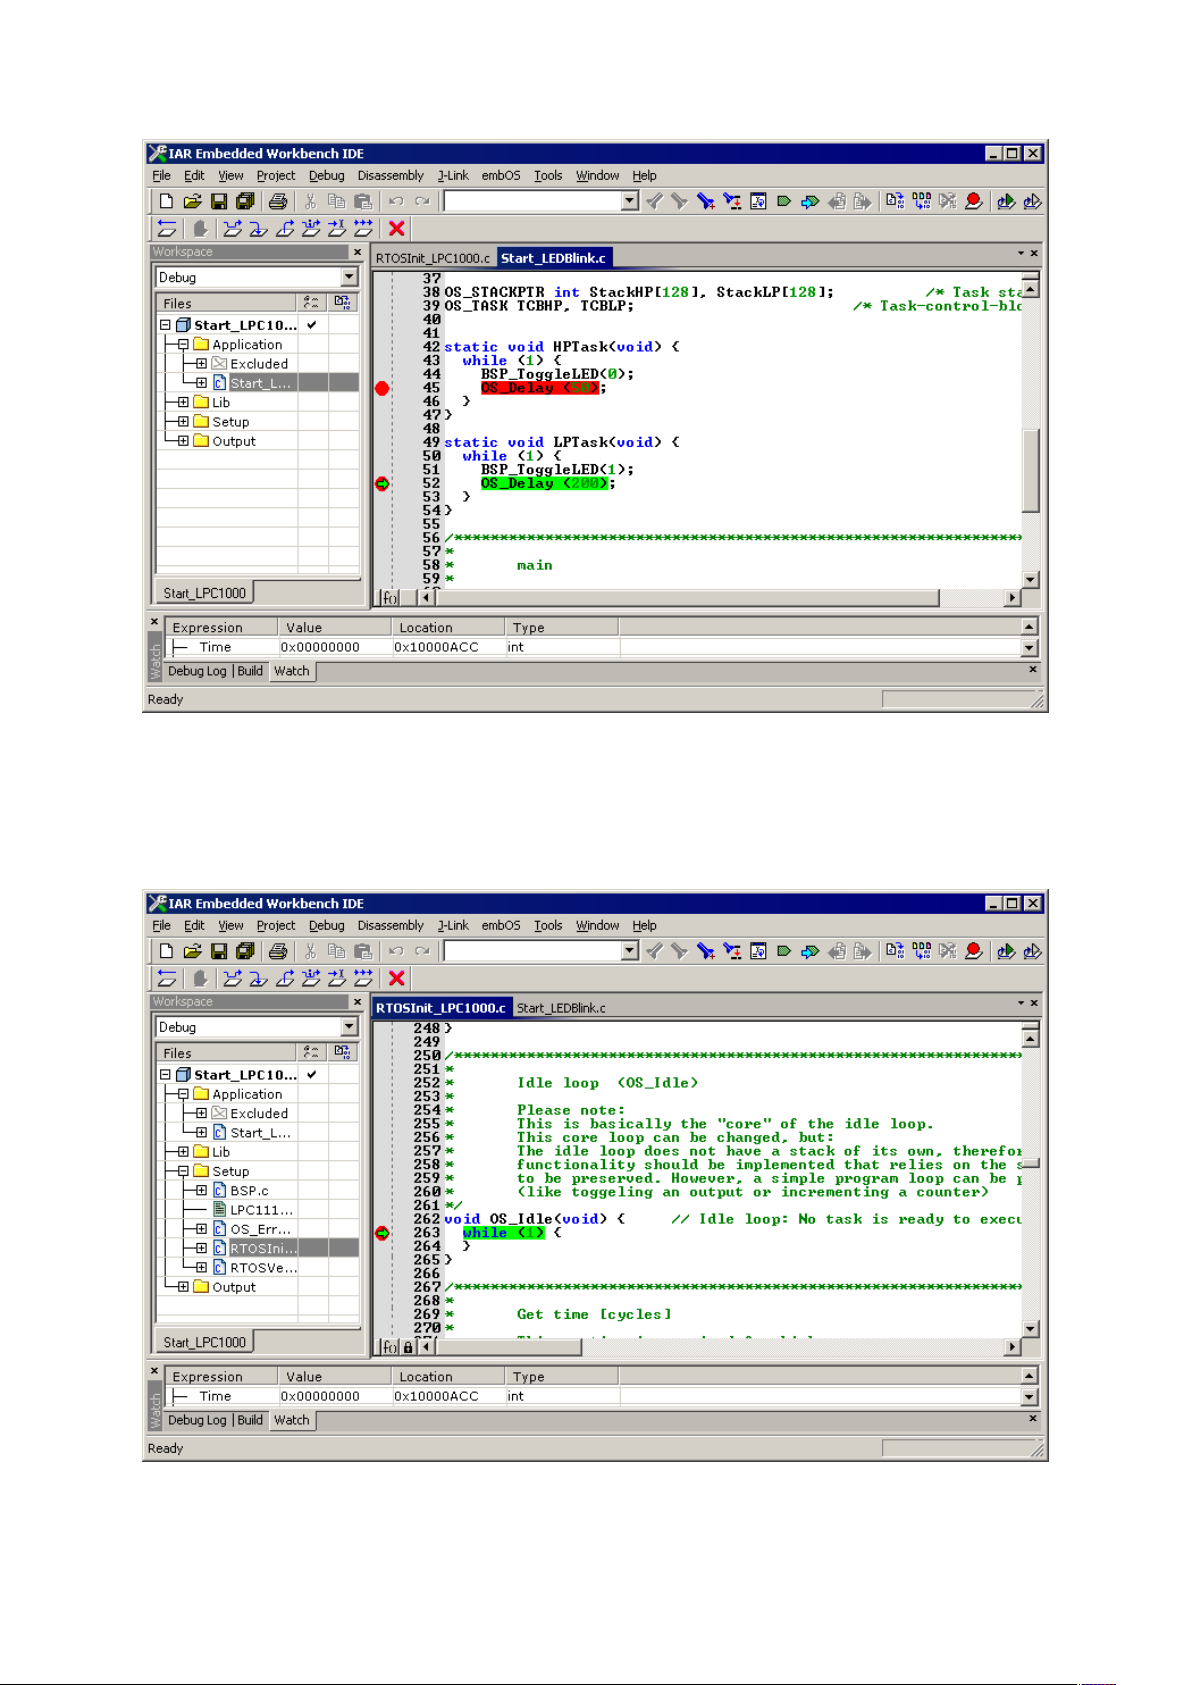
15 CHAPTER 1 Stepping through the sample application
If you continue stepping, you will arrive at the task that has lower priority:
Continue to step through the program, there is no other task ready for execution. embOS
will therefore start the idle-loop, which is an endless loop always executed if there is nothing
else to do (no task is ready, no interrupt routine or timer executing).
You will arrive there when you step into the OS_TASK_Delay() function in disassembly
mode. OS_Idle() is part of RTOSInit.c. You may also set a breakpoint there before stepping over the delay in LPTask().
embOS for Cortex-M and IAR © 2010-2020 SEGGER Microcontroller GmbH
Page 16
16 CHAPTER 1 Stepping through the sample application
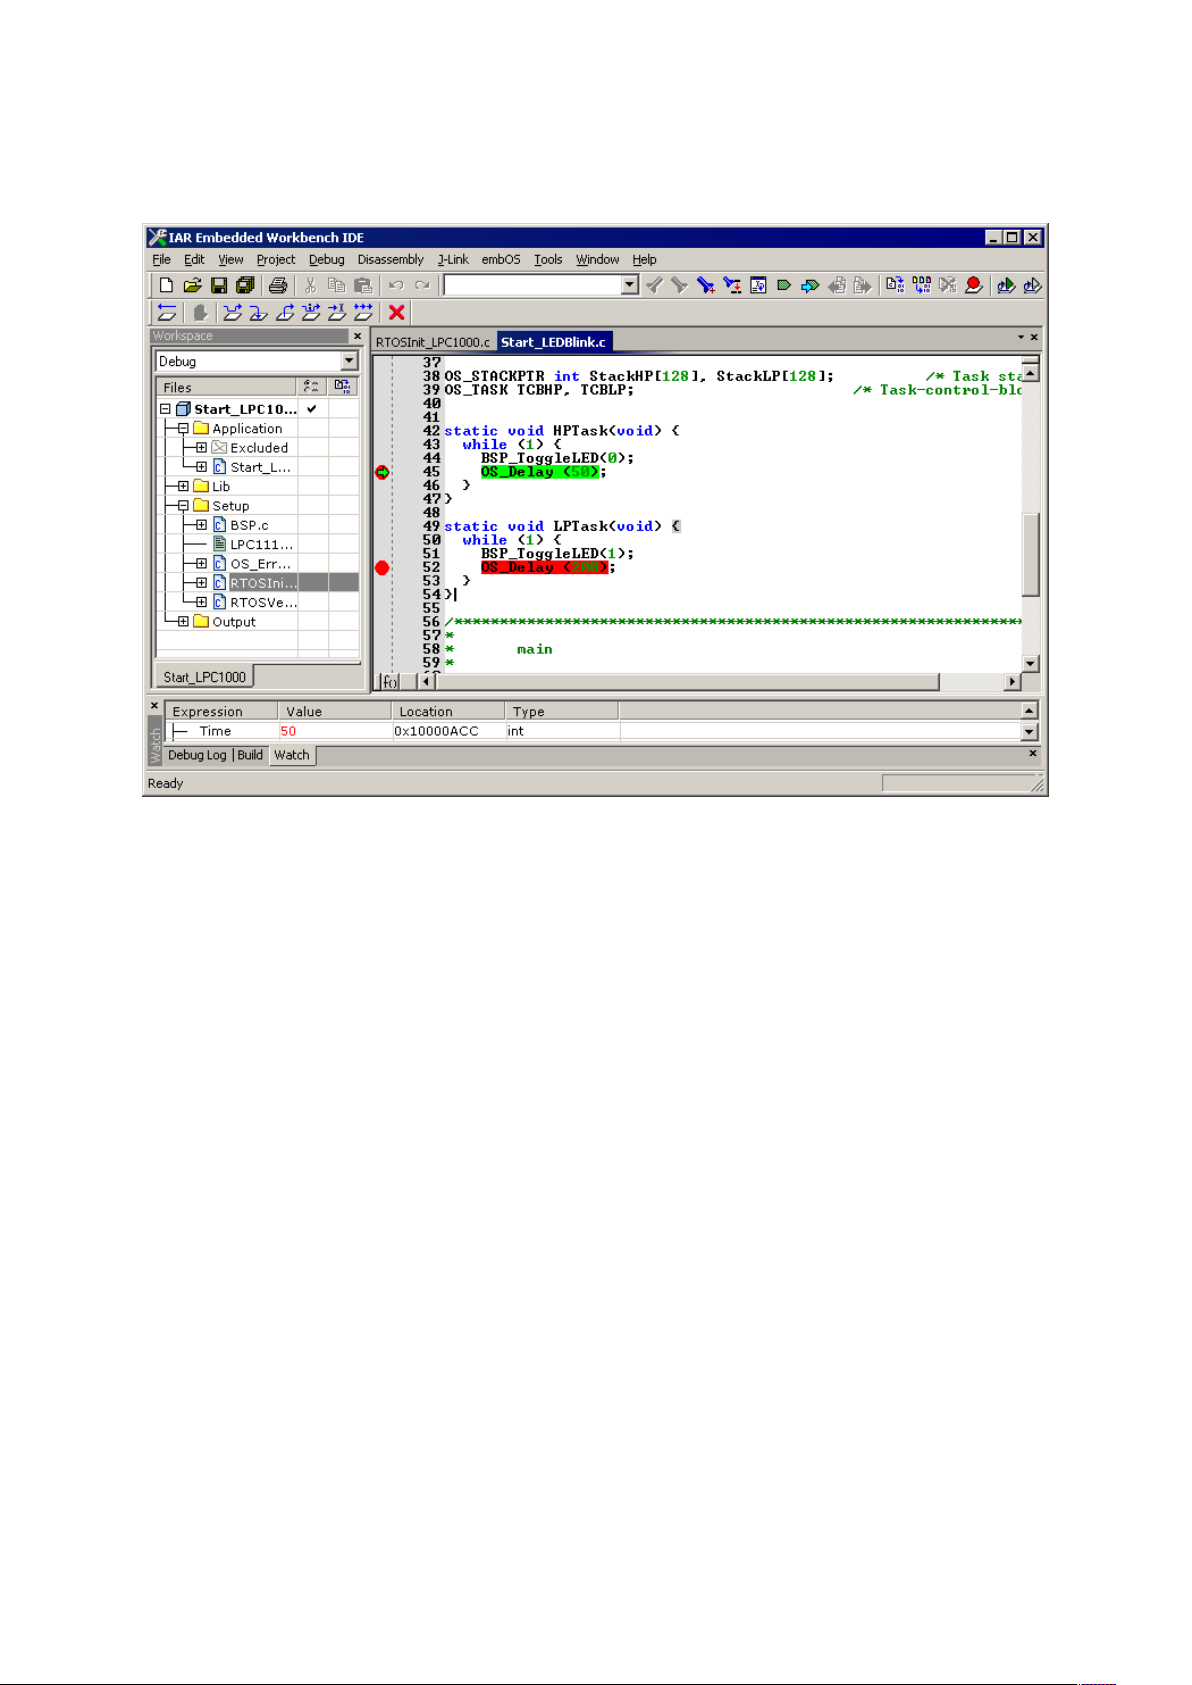
If you set a breakpoint in one or both of our tasks, you will see that they continue execution
after the given delay.
As can be seen by the value of embOS timer variable OS_Global.Time, shown in the Watch
window, HPTask() continues operation after expiration of the 50 system tick delay.
embOS for Cortex-M and IAR © 2010-2020 SEGGER Microcontroller GmbH
Page 17

Chapter 2
Build your own application
This chapter provides all information to set up your own embOS project.
embOS for Cortex-M and IAR © 2010-2020 SEGGER Microcontroller GmbH
Page 18

18 CHAPTER 2 Introduction
2.1 Introduction
To build your own application, you should always start with one of the supplied sample
workspaces and projects. Therefore, select an embOS workspace as described in chapter
First Steps on page 11 and modify the project to fit your needs. Using an embOS start
project as starting point has the advantage that all necessary files are included and all
settings for the project are already done.
2.2 Required files for an embOS
To build an application using embOS, the following files from your embOS distribution are
required and have to be included in your project:
• RTOS.h from subfolder Inc\.
This header file declares all embOS API functions and data types and has to be included
in any source file using embOS functions.
• RTOSInit*.c from one target specific BoardSupport\<Manufacturer>\<MCU>
subfolder. It contains hardware-dependent initialization code for embOS. It initializes
the system timer interrupt and optional communication for embOSView via UART or
JTAG.
• OS_Error.c from one target specific subfolder BoardSupport\<Manufacturer>\<MCU>.
The error handler is used if any debug library is used in your project.
• One embOS library from the subfolder Lib\.
• Additional CPU and compiler specific files may be required according to CPU.
When you decide to write your own startup code or use a low level init() function, ensure
that non-initialized variables are initialized with zero, according to C standard. This is required for some embOS internal variables. Your main() function has to initialize embOS by
calling OS_Init() and OS_InitHW() prior to any other embOS functions that are called.
2.3 Change library mode
For your application you might want to choose another library. For debugging and program
development you should use an embOS debug library. For your final application you may
wish to use an embOS release library or a stack check library.
Therefore you have to select or replace the embOS library in your project or target:
• If your selected library is already available in your project, just select the appropriate
configuration.
• To add a library, you may add the library to the existing Lib group. Exclude all other
libraries from your build, delete unused libraries or remove them from the configuration.
• Check and set the appropriate OS_LIBMODE_* define as preprocessor option and/ or
modify the OS_Config.h file accordingly.
2.4 Select another CPU
embOS contains CPU-specific code for various CPUs. Manufacturer- and CPU-specific sample
start workspaces and projects are located in the subfolders of the BoardSupport\ folder.
To select a CPU which is already supported, just select the appropriate workspace from a
CPU-specific folder.
If your CPU is currently not supported, examine all RTOSInit.c files in the CPU-specific
subfolders and select one which almost fits your CPU. You may have to modify OS_InitH-
W(), OS_COM_Init(), the interrupt service routines for embOS system timer tick and communication to embOSView and the low level initialization.
embOS for Cortex-M and IAR © 2010-2020 SEGGER Microcontroller GmbH
Page 19

Chapter 3
Libraries
This chapter includes CPU-specific information such as CPU-modes and available libraries.
embOS for Cortex-M and IAR © 2010-2020 SEGGER Microcontroller GmbH
Page 20

20 CHAPTER 3 Naming conventions for prebuilt libraries
3.1 Naming conventions for prebuilt libraries
embOS is shipped with different pre-built libraries with different combinations of features.
The libraries are named as follows:
os<Architecture>_t<Endianness><VFP_support>_<LibMode><Errata><TrustZone>.a
Parameter Meaning Values
6m : Cortex-M0/M0+/M1
7m : Cortex-M3/M4/M7/M33
Architecture Specifies the ARM architecture
8mbl : Cortex-M23 (IAR V8.x only)
8mml: Cortex-M33 with TrustZone
support (IAR V8.x only)
Endianness Byte order
VFP_support Floating point support
LibMode Specifies the library mode
Specifies whether a
Errata
TrustZone
workaround for ARM errata
was applied.
Specifies whether ARM TrustZone support is included.
Example
b : Big endian
l : Little endian
_ : No hardware VFP support
v : VFPv4 (Cortex-M4/M7/M33 only)
xr : Extreme Release
r : Release
s : Stack check
sp : Stack check + profiling
d : Debug
dp : Debug + profiling + Stack check
dt : Debug + profiling + Stack check
+ trace
dpl : Debug + profiling + Stack check
built with low optimization level
_837070: Erratum 837070 applied.
: No workaround applied.
_tz : ARM TrustZone support applied.
: No ARM TrustZone support.
os7m_tl__dp.a is the library for a project using Cortex-M3 core, thumb mode, little endian
mode with debug and profiling support.
Note
With earlier versions of embOS for Cortex-M the workaround for ARM erratum 837070
was applied by default for ARMv7-M devices. If libraries including the workaround are
desired, a suitable set of libraries is provided, but projects would need to be updated
accordingly. Please have a look in the chapter ARM erratum 837070 for more details.
embOS for Cortex-M and IAR © 2010-2020 SEGGER Microcontroller GmbH
Page 21

Chapter 4
CPU and compiler specifics
embOS for Cortex-M and IAR © 2010-2020 SEGGER Microcontroller GmbH
Page 22

22 CHAPTER 4 Standard system libraries
4.1 Standard system libraries
embOS for Cortex-M and IAR may be used with IAR standard libraries.
If non thread-safe functions are used from different tasks, embOS functions may be used
to encapsulate these functions and guarantee mutual exclusion.
The system libraries from the IAR Embedded Workbench come with built-in hook functions,
which enable thread-safe calls of all system functions automatically when supported by the
operating system.
embOS compiled for IAR Embedded Workbench is prepared to use these hook functions.
Adding source code modules, which are delivered with embOS, activate the automatic
thread locking functionality of the new IAR DLib.
4.2 Thread-safe system libraries
Using embOS with C++ projects and file operations or just normal call of heap management
functions may require thread-safe system libraries if these functions are called from different tasks. Thread-safe system libraries require some locking mechanism which is RTOS
specific.
To activate thread-safe system library functionality, special source modules delivered with
embOS have to be included in the project. How to use these locking mechanisms depends
on the IAR compiler version.
4.2.1 IAR compiler V6.10 to V7.80
To enable the automatic thread-safe locking functions, the source module xmtx.c which
is included in every CPU specific Setup folder of the embOS shipment has to be included
in the project.
To support thread-safe file i/o functionality, the source module xmtx2.c has to be added.
The embOS libraries compiled for and with the IAR compiler / workbench V6 come with
all code required to automatically handle the thread-safe system libraries when the source
module xmtx.c and xmtx2.c from the embOS shipment are included in the project.
Note that thread-safe system library and file i/o support is required only, when non threadsafe functions are called from multiple tasks, or thread-local storage is used in multiple
tasks.
With IAR compiler version V6.40 to V7.80, the thread-safe system library hook functions
delivered with embOS are not automatically linked in, even if they are included in the
project.
To enable the automatic thread-safe locking functions, the project options for the linker
have to be setup to replace the default locking functions from the system libraries by the
functions delivered with embOS.
Activate the checkbox “Use command line options” in the dialog Project -> Options
-> Linker -> Extra options then, in the “Command line options:” field, add the
following lines:
--redirect __iar_Locksyslock=__iar_Locksyslock_mtx
--redirect __iar_Unlocksyslock=__iar_Unlocksyslock_mtx
--redirect __iar_Lockfilelock=__iar_Lockfilelock_mtx
--redirect __iar_Unlockfilelock=__iar_Unlockfilelock_mtx
--keep __iar_Locksyslock_mtx
embOS for Cortex-M and IAR © 2010-2020 SEGGER Microcontroller GmbH
Page 23

23 CHAPTER 4 Thread-Local Storage TLS
4.2.2 IAR compiler V8.10 and newer
To enable the automatic thread-safe locking functions, the source module xmtx.c which is
included in every CPU specific Setup folder of the embOS shipment has to be included in
the project and the function OS_INIT_SYS_LOCKS() must be called. Additionally the option
“Enable thread support in library” must be set in project settings->Library
configuration.
To support thread-safe file i/o functionality, the source module xmtx2.c has to be added.
To support C++ dynamic lock functionality, the source module xmtx3.c has to be added.
The embOS libraries compiled for and with the IAR compiler / workbench V8 come with
all code required to automatically handle the thread-safe system libraries when the source
module xmtx.c, xmtx2.c and xmtx3.c from the embOS shipment are included in the
project.
Note that thread-safe system library, file i/o and C++ dynamic lock support is required
only when non-thread-safe functions are called from multiple tasks, or thread-local storage
is used in multiple tasks.
4.3 Thread-Local Storage TLS
The DLib of Cortex-M supports usage of thread-local storage. Several library objects and
functions need local variables which have to be unique to a thread. Thread-local storage
will be required when these functions are called from multiple threads.
embOS for Cortex-M is prepared to support the tread-local storage, but does not use it per
default. This has the advantage of no additional overhead as long as thread-local storage is
not needed by the application. The embOS implementation of thread-local storage allows
activation of TLS separately for every task.
Only tasks that call functions using TLS need to activate the TLS by calling an initialization
function when the task is started.
The IAR runtime environment allocates the TLS memory on the heap. Using TLS with multiple tasks shall therefore use thread-safe system library functionality which is automatically
enabled when the xmtx.c module from the embOS distribution is added to the project.
Library objects that need thread-local storage when used in multiple tasks are:
• error functions -- errno, strerror.
• locale functions -- localeconv, setlocale.
• time functions -- asctime, localtime, gmtime, mktime.
• multibyte functions -- mbrlen, mbrtowc, mbsrtowc, mbtowc, wcrtomb, wcsrtomb,
wctomb.
• rand functions -- rand, srand.
• etc functions -- atexit, strtok.
• C++ exception engine.
embOS for Cortex-M and IAR © 2010-2020 SEGGER Microcontroller GmbH
Page 24

24 CHAPTER 4 Thread-Local Storage TLS
4.3.1 OS_TASK_SetContextExtensionTLS()
Description
OS_TASK_SetContextExtensionTLS() may be called from a task to initialize and use thread-local storage.
This API is not available in embOS library mode OS_LIBMODE_SAFE.
Prototype
void OS_TASK_SetContextExtensionTLS(void);
Additional information
OS_TASK_SetContextExtensionTLS() shall be the first function called from a task when
TLS should be used in the specific task. The function must not be called multiple times
from one task. The thread-local storage is allocated on the heap. To ensure thread-safe
heap management, the thread-safe system library functionality shall also be enabled when
using TLS.
Thread-safe system library calls are automatically enabled when the source module xmtx.c
which is delivered with embOS in the BSP Setup folders is included in the project.
Example
The following printout demonstrates the usage of task specific TLS in an application.
#include "RTOS.h"
static OS_STACKPTR int StackHP[128], StackLP[128]; // Task stacks
static OS_TASK TCBHP, TCBLP; // Task control blocks
static void HPTask(void) {
OS_TASK_SetContextExtensionTLS();
while (1) {
errno = 42; // errno specific to HPTask
OS_TASK_Delay(50);
}
}
static void LPTask(void) {
OS_TASK_SetContextExtensionTLS();
while (1) {
errno = 1; // errno specific to LPTask
OS_TASK_Delay(200);
}
}
int main(void) {
errno = 0; // errno not specific to any task
OS_Init(); // Initialize embOS
OS_InitHW(); // Initialize required hardware
OS_TASK_CREATE(&TCBHP, "HP Task", 100, HPTask, StackHP);
OS_TASK_CREATE(&TCBLP, "LP Task", 50, LPTask, StackLP);
OS_Start(); // Start embOS
return 0;
}
embOS for Cortex-M and IAR © 2010-2020 SEGGER Microcontroller GmbH
Page 25

25 CHAPTER 4 IAR C-Spy stack check warning
4.4 IAR C-Spy stack check warning
IAR’s C-Spy debugger provides a stack check feature which throws a warning when the
stack pointer does not point to memory within the CSTACK scope anymore. This renders
the C-Spy stack check useless, as C-Spy is not aware of any task stacks the application is
using. Depending on the IAR version used, this warning can be disabled by removing the
check mark for Tools > Options… > Stack > ’Warn when stack pointer is out of
bounds’ or Project > Options > Debugger > Plugins > Stack.
embOS for Cortex-M and IAR © 2010-2020 SEGGER Microcontroller GmbH
Page 26

26 CHAPTER 4 ARM erratum 837070
4.5 ARM erratum 837070
With earlier versions of embOS for Cortex-M the workaround for ARM erratum 837070 was
applied by default for ARMv7-M devices. If libraries including the workaround are desired,
a suitable set of libraries is provided, but projects would need to be updated accordingly. Please add the define USE_ERRATUM_837070 set to 1 to your preprocessor settings or
OS_Config.h.
If you are working with the embOS source code instead of the library please add the define
USE_ERRATUM_837070 set to 1 to the C and assembler preprocessor settings.
This workaround sets PRIMASK before writing to BASEPRI and unconditionally clears it afterwards. If the previous value of PRIMASK shall be retained after modification of BASEPRI,
the OS_PRESERVE_PRIMASK definition may be set to 1 in the C and assembler preprocessor
settings.
Devices with the ARM core r0p0 or r0p1 are affected only. When an embOS library without
this workaround is used with a device which is affected by this erratum, a debug build of
embOS calls OS_Error() with the error code OS_ERR_HW_NOT_AVAILABLE.
embOS for Cortex-M and IAR © 2010-2020 SEGGER Microcontroller GmbH
Page 27

27 CHAPTER 4 ARM TrustZone support
4.6 ARM TrustZone support
embOS Cortex-M comes with libraries for ARM TrustZone support. With it embOS runs
completely in the non-secure world but tasks can call functions from the secure world.
4.6.1 OS_TASK_SetContextExtensionARMTrustZone()
Description
OS_TASK_SetContextExtensionARMTrustZone() has to be called as first function in a task, when the the task calls functions from the secure world.
Prototype
void OS_TASK_SetContextExtensionARMTrustZone(void* pStack,
unsigned long StackSize);
Additional information
OS_TASK_SetContextExtensionARMTrustZone() extends the task context to save and restore the secure process stack pointer, secure process stack limit register and the control
register during context switches. The parameter pStack must point to a stack which is
located in the secure memory. This stack is used whenever the task calls a function in the
secure world.
Example:
//
// Locate secure task stack in secure memory
//
static __no_init OS_STACKPTR int StackHP_s[256] @ "RAM_S";
static void Task(void) {
//
// Extend the task context for the secure world.
//
OS_TASK_SetContextExtensionARMTrustZone(StackHP_s, sizeof(StackHP_s));
while (1) {
IncrementCounter_s(); // Call secure function and increment secure counter
OS_TASK_Delay(10);
}
}
embOS for Cortex-M and IAR © 2010-2020 SEGGER Microcontroller GmbH
Page 28

Chapter 5
Stacks
This chapter describes how embOS uses the different stacks of the Cortex-M CPU.
embOS for Cortex-M and IAR © 2010-2020 SEGGER Microcontroller GmbH
Page 29

29 CHAPTER 5 Task stack for Cortex-M
5.1 Task stack for Cortex-M
Each task uses its individual stack. The stack pointer is initialized and set every time a task
is activated by the scheduler. The stack-size required for a task is the sum of the stacksize of all routines, plus a basic stack size, plus size used by exceptions.
The basic stack size is the size of memory required to store the registers of the CPU plus
the stack size required by calling embOS-routines.
For Cortex-M CPUs, this minimum basic task stack size is about 112 bytes. Because any
function call uses some amount of stack and every exception also pushes at least 32 bytes
onto the current stack, the task stack size has to be large enough to handle one exception
too. For privileged tasks, we recommend at least 512 bytes stack as a start. Unprivileged
tasks will require an additional 128 bytes of task stack.
5.2 System stack for Cortex-M
The embOS system executes in thread mode, the scheduler executes in handler mode.
The minimum system stack size required by embOS is about 160 bytes (stack check &
profiling build). However, since the system stack is also used by the application before
the start of multitasking (the call to OS_Start()), and because softwaretimers and C-level
interrupt handlers also use the system-stack, the actual stack requirements depend on the
application.
The size of the system stack can be changed by modifying the project settings. We recommend a minimum stack size of 256 bytes for the CSTACK.
5.3 Interrupt stack for Cortex-M
If a normal hardware exception occurs, the Cortex-M core switches to handler mode which
uses the main stack pointer. With embOS, the main stack pointer is initialized to use the
CSTACK which is defined in the linker command file. The main stack is also used as stack by
the embOS scheduler and during idle times, when no task is ready to run and OS_Idle()
is executed.
Note
When using an embOS Safe build, please note that the stack-check-limit is configurable through OS_STACK_SetCheckLimit() and by default is configured at 70 percent
of the total stack size. This will impact the minimum size requirement for both task
stacks and the CSTACK.
embOS for Cortex-M and IAR © 2010-2020 SEGGER Microcontroller GmbH
Page 30

Chapter 6
Interrupts
The Cortex-M core comes with a built-in vectored interrupt controller which supports up
to 240 external interrupt sources. The real number of interrupt sources depends on the
specific target CPU.
embOS for Cortex-M and IAR © 2010-2020 SEGGER Microcontroller GmbH
Page 31

31 CHAPTER 6 What happens when an interrupt occurs?
6.1 What happens when an interrupt occurs?
• The CPU-core receives an interrupt request from the interrupt controller.
• As soon as the interrupts are enabled, the interrupt is accepted and executed.
• The CPU pushes temporary registers and the return address onto the current stack.
• The CPU switches to handler mode and main stack.
• The CPU saves an exception return code and current flags onto the main stack.
• The CPU jumps to the vector address delivered by the NVIC.
• The interrupt handler is processed.
• The interrupt handler ends with a return from interrupt by reading the exception return
code.
• The CPU switches back to the mode and stack which was active before the exception
was called.
• The CPU restores the temporary registers and return address from the stack and
continues the interrupted function.
6.2 Defining interrupt handlers in C
Interrupt handlers for Cortex-M cores are written as normal C-functions which do not take
parameters and do not return any value. Interrupt handlers which call an embOS function
need a prologue and an epilogue function as described in the generic manual and in the
examples below.
Example
Simple interrupt routine:
static void _Systick(void) {
OS_INT_EnterNestable(); // Inform embOS that interrupt code is running
OS_TICK_Handle(); // May be interrupted
OS_INT_LeaveNestable(); // Inform embOS that interrupt handler is left
}
6.3 Interrupt vector table
After reset, ARM Cortex-M CPUs use an initial interrupt vector table located in ROM at
address 0x00. It contains the initial stack pointer as well as the addresses of all exception
handlers, which are defined in a C source or assembly file in the CPU specific subdirectory.
All interrupt handler function addresses have to be present in that file at compile time as
long as the table is kept in ROM.
If the vector table is copied to RAM, however, interrupt handlers can be installed dynamically
at runtime. To do so, the vector table base register inside the NVIC controller has to be
initialized to point to the vector table base address in RAM.
6.3.1 Required embOS system interrupt handler
embOS for Cortex-M core needs two exception handlers which belong to the system itself,
PendSV_Handler() and SysTick_Handler(). Both are delivered with embOS. When using
your own interrupt vector table, ensure that they are referenced in the vector table.
Note
Some older BSPs used to name the PendSV ISR OS_Exception() and thus need to
rename it to PendSV_Handler().
embOS for Cortex-M and IAR © 2010-2020 SEGGER Microcontroller GmbH
Page 32

32 CHAPTER 6 Interrupt-stack switching
6.4 Interrupt-stack switching
Since Cortex-M core based controllers have two separate stack pointers and embOS utilizes
the process stack pointer to execute tasks, there is no need to explicitly switch stacks inside
interrupt routines, which utilize the main stack pointer. The routines OS_INT_EnterIntS-
tack() and OS_INT_LeaveIntStack() are supplied for source code compatibility to other
processors only and have no functionality.
6.5 Zero latency interrupts
Instead of disabling interrupts when embOS does atomic operations, the interrupt level
of the CPU is set to 128. Therefore, all interrupt priorities higher than 128 can still be
processed (please note that lower priority numbers define a higher priority). Interrupts with
priority level from 0 to 127 are never disabled. These interrupts are named zero latency
interrupts. You must not execute any embOS function from within a zero latency interrupt.
Note
Please be aware with ARM Erratum 837070 embOS sets the PRIMASK before writing to
BASEPRI and unconditionally clears it afterwards. Therefore, zero lateny interrupts are
disabled for a few cycles when embOS disables or enables embOS interrupts. Please
have a look in the chapter ARM erratum 837070 for more details.
6.6 Interrupt priorities
This chapter describes interrupt priorities supported by the Cortex-M core. The priority is
any number between 0 and 255 as seen by the CPU core. With embOS and its own setup
functions for the interrupt controller and priorities, there is no difference in the priority
values regardless of the different preemption level of specific devices. Using the CMSIS
functions to set up interrupt priorities requires different values for the priorities. These
values depend on the number of preemption levels of the specific chip. A description is
found in the chapter CMSIS.
6.6.1 Interrupt priorities with Cortex-M cores
The Cortex-M supports up to 256 levels of programmable priority with a maximum of 128
levels of preemption. Most Cortex-M chips have fewer supported levels, for example 8, 16,
32, and so on. The chip designer can customize the chip to obtain the levels required. There
is a minimum of 8 preemption levels. Every interrupt with a higher preemption level may
preempt any other interrupt handler running on a lower preemption level. Interrupts with
equal preemption level may not preempt each other.
With introduction of zero latency interrupts, interrupt priorities usable for interrupts using
embOS API functions are limited.
• Any interrupt handler using embOS API functions has to run with interrupt
priorities from 128 to 255. These embOS interrupt handlers have to start with
OS_INT_Enter() or OS_INT_EnterNestable() and have to end with OS_INT_Leave()
or OS_INT_LeaveNestable().
• Any zero latency interrupt (running at priorities from 0 to 127) must not call any embOS
API function. Even OS_INT_Enter() and OS_INT_Leave() must not be called.
• Interrupt handlers running at low priorities (from 128 to 255) not calling any embOS
API function are allowed, but must not re-enable interrupts! The priority limit between
embOS interrupts and zero latency interrupts is fixed to 128 and can only be changed
by recompiling embOS libraries! This is done for efficiency reasons. Basically the define
OS_IPL_DI_DEFAULT in RTOS.h and the RTOS.s file must be modified. There might be
other modifications necessary. Please contact the embOS support if you like to change
this threshold.
embOS for Cortex-M and IAR © 2010-2020 SEGGER Microcontroller GmbH
Page 33

33 CHAPTER 6 Interrupt nesting
6.6.2 Priority of the embOS scheduler
The embOS scheduler runs in the PendSV handler and on the lowest interrupt priority. The
scheduler may be preempted by any other interrupt with higher preemption priority level.
The application interrupts shall run on higher preemption levels to ensure short reaction
time.
During initialization, the priority of the embOS scheduler is set to 0x03 for ARMv6-M and
to 0xFF for ARMv7-M, which is the lowest preemption priority regardless of the number of
preemption levels.
6.6.3 Priority of the embOS system timer
The embOS system timer runs on the second lowest preemption level. Thus, the embOS
timer may preempt the scheduler. Application interrupts which require fast reaction should
run on a higher preemption priority level.
6.6.4 Priority of embOS software timers
The embOS software timer callback functions are called from the scheduler and run on the
schedulers preemption priority level which is the lowest interrupt priority level. To ensure
short reaction time of other interrupts, other interrupts should run on a higher preemption
priority level and the software timer callback functions should be as short as possible.
6.6.5 Priority of application interrupts for Cortex-M cores
Application interrupts using embOS functions may run on any priority level between 255
to 128. However, interrupts which require fast reaction should run on higher priority levels
than the embOS scheduler and the embOS system timer to allow preemption of theses
interrupt handlers. Interrupt handlers which require fast reaction may run on higher priorities than 128, but must not call any embOS function (zero latency interrupts). We recommend that application interrupts should run on a higher preemption level than the embOS
scheduler, at least at the second lowest preemption priority level.
As the number of preemption levels is chip specific, the second lowest preemption priority
varies depending on the chip. If the number of preemption levels is not documented, the
second lowest preemption priority can be set as follows, using embOS functions:
unsigned char Priority;
OS_ARM_ISRSetPrio(OS_ISR_ID_TICK, 0xFF);
// Set to lowest level, ALL BITS set
Priority = OS_ARM_ISRSetPrio(OS_ISR_ID_TICK, 0xFF); // Read priority back
Priority -= 1; // Lower preemption level
OS_ARM_ISRSetPrio(OS_ISR_ID_TICK, Priority);
6.7 Interrupt nesting
The Cortex-M CPU uses a priority controlled interrupt scheduling which allows nesting of
interrupts per default. Any interrupt or exception with a higher preemption priority may
interrupt an interrupt handler running on a lower preemption priority. An interrupt handler
calling embOS functions has to start with an embOS prologue function; it informs embOS
that an interrupt handler is running. For any interrupt handler, the user may decide individually whether this interrupt handler may be preempted or not by choosing the prologue
function.
6.7.1 OS_INT_Enter()
Description
Disables nesting.
embOS for Cortex-M and IAR © 2010-2020 SEGGER Microcontroller GmbH
Page 34

34 CHAPTER 6 Interrupt nesting
Prototype
void OS_INT_Enter (void);
Additional information
OS_INT_Enter() has to be used as prologue function, when the interrupt handler should
not be preempted by any other interrupt handler that runs on a priority below the zero
latency interrupt priority. An interrupt handler that starts with OS_INT_Enter() has to end
with the epilogue function OS_INT_Leave().
Example
Interrupt-routine that can not be preempted by other interrupts.
static void _Systick(void) {
OS_INT_Enter(); // Inform embOS that interrupt code is running
OS_HandleTick(); // Can not be interrupted by higher priority interrupts
OS_INT_Leave(); // Inform embOS that interrupt handler is left
}
6.7.2 OS_INT_EnterNestable()
Description
Enables nesting.
Prototype
void OS_INT_EnterNestable (void);
Additional information
OS_INT_EnterNestable(), allow nesting. OS_INT_EnterNestable() may be used as prologue function, when the interrupt handler may be preempted by any other interrupt handler that runs on a higher interrupt priority. An interrupt handler that starts with OS_IN- T_EnterNestable() has to end with the epilogue function OS_INT_LeaveNestable().
Example
Interrupt-routine that can be preempted by other interrupts.
static void _Systick(void) {
OS_INT_EnterNestable(); // Inform embOS that interrupt code is running
OS_HandleTick(); // Can be interrupted by higher priority interrupts
OS_INT_LeaveNestable(); // Inform embOS that interrupt handler is left
}
embOS for Cortex-M and IAR © 2010-2020 SEGGER Microcontroller GmbH
Page 35

35 CHAPTER 6 Interrupt handling API
6.8 Interrupt handling API
For the Cortex-M core, which has a built-in vectored interrupt controller, embOS delivers
additional functions to install and setup interrupt handler functions.
This API is not available in embOS library mode OS_LIBMODE_SAFE.
To handle interrupts with the vectored interrupt controller, embOS offers the following
functions:
6.8.1 OS_ARM_ISRInit()
Description
Used to initialize the interrupt handling.
Prototype
void OS_ARM_ISRInit(OS_U32 IsVectorTableInRAM,
OS_U32 NumInterrupts,
OS_ISR_HANDLER* VectorTableBaseAddr[],
OS_ISR_HANDLER* RAMVectorTableBaseAddr[]);
Parameters
Parameter Description
Defines whether a RAM vector table is used.
IsVectorTableInRAM
NumInterrupts Number of implemented interrupts.
VectorTableBaseAddr Flash vector table address.
RAMVectorTableBaseAddr RAM vector table address.
0: Vector table in Flash.
1: Vector table in RAM.
Additional information
This function must be called before OS_ARM_EnableISR(), OS_ARM_InstallISRHandler(),
OS_ARM_DisableISR(), OS_ARM_ISRSetPrio() can be called.
Example
void OS_InitHW(void) {
OS_ARM_ISRInit(1u, 82, (OS_ISR_HANDLER**)__Vectors, (OS_ISR_HANDLER**)pRAMVectTable);
OS_ARM_InstallISRHandler(OS_ISR_ID_TICK, OS_Systick);
OS_ARM_ISRSetPrio(OS_ISR_ID_TICK, 0xE0u);
OS_ARM_EnableISR(OS_ISR_ID_TICK);
}
embOS for Cortex-M and IAR © 2010-2020 SEGGER Microcontroller GmbH
Page 36

36 CHAPTER 6 Interrupt handling API
6.8.2 OS_ARM_InstallISRHandler()
Description
Installs an interrupt handler.
Prototype
void OS_ARM_InstallISRHandler(int ISRIndex,
OS_ISR_HANDLER* pISRHandler);
Parameters
Parameter Description
Index of the interrupt source which should be installed.
ISRIndex
pISRHandler Address of the interrupt handler.
Additional information
Sets an interrupt handler in the RAM vector table. Does nothing when the vector table is in Flash. OS_ARM_InstallISRHandler() copies the vector table from Flash to RAM when it is called for the first time and RAM vector table is enabled.
Note that the index counts from 0 for the first entry in
the vector table.
Example
void OS_InitHW(void) {
OS_ARM_ISRInit(1u, 82, (OS_ISR_HANDLER**)__Vectors, (OS_ISR_HANDLER**)pRAMVectTable);
OS_ARM_InstallISRHandler(OS_ISR_ID_TICK, OS_Systick);
OS_ARM_ISRSetPrio(OS_ISR_ID_TICK, 0xE0u);
OS_ARM_EnableISR(OS_ISR_ID_TICK);
}
embOS for Cortex-M and IAR © 2010-2020 SEGGER Microcontroller GmbH
Page 37

37 CHAPTER 6 Interrupt handling API
6.8.3 OS_ARM_EnableISR()
Description
Used to enable interrupt acceptance of a specific interrupt source in a vectored interrupt
controller.
Prototype
void OS_ARM_EnableISR (int ISRIndex);
Parameters
Parameter Description
ISRIndex
Additional information
This function just enables the interrupt inside the interrupt controller. It does not enable
the interrupt of any peripherals. This has to be done elsewhere. Note that the ISRIndex
counts from 0 for the first entry in the vector table. The first peripheral index therefore
has the ISRIndex 16, because the first peripheral interrupt vector is located after the 16
generic vectors in the vector table. This differs from index values used with CMSIS.
Index of the interrupt source which should be enabled. Note that the
index counts from 0 for the first entry in the vector table.
embOS for Cortex-M and IAR © 2010-2020 SEGGER Microcontroller GmbH
Page 38

38 CHAPTER 6 Interrupt handling API
6.8.4 OS_ARM_DisableISR()
Description
Used to disable interrupt acceptance of a specific interrupt source in a vectored interrupt
controller which is not of the VIC type.
Prototype
void OS_ARM_DisableISR (int ISRIndex);
Parameters
Parameter Description
ISRIndex
Additional information
This function just disables the interrupt in the interrupt controller. It does not disable the
interrupt of any peripherals. This has to be done elsewhere. Note that the ISRIndex counts
from 0 for the first entry in the vector table. The first peripheral index therefore has the
ISRIndex 16, because the first peripheral interrupt vector is located after the 16 generic
vectors in the vector table. This differs from index values used with CMSIS.
Index of the interrupt source which should be disabled. Note that the
index counts from 0 for the first entry in the vector table.
embOS for Cortex-M and IAR © 2010-2020 SEGGER Microcontroller GmbH
Page 39

39 CHAPTER 6 Interrupt handling API
6.8.5 OS_ARM_ISRSetPrio()
Description
Used to set or modify the priority of a specific interrupt source by programming the interrupt
controller.
Prototype
int OS_ARM_ISRSetPrio (int ISRIndex,
int Prio);
Parameters
Parameter Description
ISRIndex
Prio
Additional information
Index of the interrupt source which should be modified. Note that the
index counts from 0 for the first entry in the vector table.
The priority which should be set for the specific interrupt. Prio ranges
from 0 (highest priority) to 255 (lowest priority).
This function sets the priority of an interrupt channel by programming the interrupt controller. Please refer to CPU-specific manuals about allowed priority levels. Note that the
ISRIndex counts from 0 for the first entry in the vector table. The first peripheral index
therefore has the ISRIndex 16, because the first peripheral interrupt vector is located after
the 16 generic vectors in the vector table. This differs from index values used with CMSIS.
The priority value is independent of the chip-specific preemption levels. Any value between
0 and 255 can be used, were 255 always is the lowest priority and 0 is the highest priority.
The function can be called to set the priority for all interrupt sources, regardless of whether
embOS is used or not in the specified interrupt handler. Note that interrupt handlers running on priorities from 127 or higher must not call any embOS function.
embOS for Cortex-M and IAR © 2010-2020 SEGGER Microcontroller GmbH
Page 40

Chapter 7
CMSIS
ARM introduced the Cortex Microcontroller Software Interface Standard (CMSIS) as a vendor independent hardware abstraction layer for simplifying software re-use. The standard
enables consistent and simple software interfaces to the processor, for peripherals, for real
time operating systems as embOS and other middleware. As SEGGER is one of the CMSIS
partners, embOS for Cortex-M is fully CMSIS compliant. embOS comes with a generic CMSIS
start project which should run on any Cortex-M3 CPU. All other start projects, even those
not based on CMSIS, are also fully CMSIS compliant and can be used as starting points
for CPU specific CMSIS projects. How to use the generic project and adding vendor specific
files to this or other projects is explained in the following chapters.
embOS for Cortex-M and IAR © 2010-2020 SEGGER Microcontroller GmbH
Page 41

41 CHAPTER 7 The generic CMSIS start project
7.1 The generic CMSIS start project
The folder Start\BoardSupport\CMSIS contains a generic CMSIS start project that should
run on any ARMv7-M core. The subfolder DeviceSupport\ contains the device specific
source and header files which have to be replaced by the device specific files of the vendor
to make the CMSIS sample start project device specific.
7.2 Device specific files needed for embOS with
CMSIS
• Device.h: Contains the device specific exception and interrupt numbers and
names. embOS needs the Cortex-M generic exception numbers PendSV_IRQn and
SysTick_IRQn, as well as the exception names PendSV_Handler and SysTick_Handler,
which are vendor independent and common for all devices. The sample file delivered
with embOS does not contain any peripheral interrupt vector numbers and names as
those are not needed by embOS. To make the embOS CMSIS sample device specific
and allow usage of peripheral interrupts, this file has to be replaced by the one which
is delivered from the CPU vendor.
• System_Device.h: Declares at least the two required system timer functions which are
used to initialize the CPU clock system and one variable which allows the application
software to retrieve information about the current CPU clock speed. The names of the
clock controlling functions and variables are defined by the CMSIS standard and are
therefore identical in all vendor specific implementations.
• System_Device.c: Implements the core specific functions to initialize the CPU, at least
to initialize the core clock. The sample file delivered with embOS contains empty
dummy functions and has to be replaced by the vendor specific file which contains the
initialization functions for the core.
• Startup_Device.s: The startup file which contains the initial reset sequence and
contains exception handler and peripheral interrupt handler for all interrupts. The
handler functions are declared weak, so they can be overwritten by the application which
implements the application specific handler functionality. The sample which comes with
embOS only contains the generic exception vectors and handler and has to be replaced
by the vendor specific startup file.
Startup code requirements:
The reset handler must call the SystemInit() function which is delivered with the core
specific system functions. When using an ARMv7 CPU which may have a VFP floating point
unit equipped, please ensure that the reset handler activates the VFP and VFP support
is selected in the project options. When VFP support is not selected, the VFP should not
be switched on. Otherwise, the SystemInit() function delivered from the device vendor
should also honor the project settings and enable the VFP or keep it disabled according the
project settings. Using CMSIS compliant startup code from the chip vendors may require
modification if it enables the VFP unconditionally.
7.3 Device specific functions/variables needed for
embOS with CMSIS
The embOS system timer is triggered by the Cortex-M generic system timer. The correct
core clock and pll system is device specific and has to be initialized by a low level init function
called from the startup code. embOS calls the CMSIS function SysTick_Config() to set up
the system timer. The function relies on the correct core clock initialization performed by
the low level initialization function SystemInit() and the value of the core clock frequency
which has to be written into the SystemCoreClock variable during initialization or after
calling SystemCoreClockUpdate().
• SystemInit(): The system init function is delivered by the vendor specific CMSIS library
and is normally called from the reset handler in the startup code. The system init
embOS for Cortex-M and IAR © 2010-2020 SEGGER Microcontroller GmbH
Page 42

42 CHAPTER 7 CMSIS generic functions needed for embOS with
CMSIS
function has to initialize the core clock and has to write the CPU frequency into the
global variable SystemCoreClock.
• SystemCoreClock: Contains the current system core clock frequency and is initialized
by the low level initialization function SystemInit() during startup. embOS for CMSIS
relies on the value in this variable to adjust its own timer and all time related functions.
Any other files or functions delivered with the vendor specific CMSIS library may be
used by the application, but are not required for embOS.
7.4 CMSIS generic functions needed for embOS with
CMSIS
The embOS system timer is triggered by the Cortex-M generic system timer which has
to be initialized to generate periodic interrupts in a specified interval. The configuration
function SysTick_Config() for the system timer relies on correct initialization of the core
clock system which is performed during startup.
• SystemCoreClockUpdate(): This CMSIS function has to update the SystemCoreClock
variable according the current system timer initialization. The function is device specific
and may be called before the SystemCoreClock variable is accessed or any function
which relies on the correct setting of the system core clock variable is called. embOS
calls this function during the hardware initialization function OS_InitHW() before the
system timer is initialized.
• SysTick_Config(): This CMSIS generic function is declared an implemented in the
core_cm*.h file. It initializes and starts the SysTick counter and enables the SysTick
interrupt. For embOS it is recommended to run the SysTick interrupt at the second
lowest preemption priority. Therefore, after calling the SysTick_Config() function
from OS_InitHW(), the priority is set to the second lowest preemption priority ba a
call of NVIC_SetPriority(). The embOS function OS_InitHW() has to be called after
initialization of embOS during main and is implemented in the RTOSInit*.c file.
• SysTick_Handler(): The embOS timer interrupt handler, called periodically by the
interrupt generated from the SysTick timer. The SysTick_Handler is declared weak
in the CMSIS startup code and is replaced by the embOS Systick_Handler function
implemented in RTOSInit*.c which comes with the embOS start project.
• PendSV_Handler(): The embOS scheduler entry function. It is declared weak in the
CMSIS startup code and is replaced by the embOS internal function contained in
the embOS library. The embOS initialization code enables the PendSV exception and
initializes the priority. The application MUST NOT change the PendSV priority.
7.5 Customizing the embOS CMSIS generic start
project
The embOS CMSIS generic start project should run on every ARMv7-M CPU. As the generic
device specific functions delivered with embOS do not initialize the core clock system and
the PLL, the timing is not correct, a real CPU will run very slow. To run the sample project
on a specific CPU, replace all files in the DeviceSupport\ folder by the versions delivered
by the CPU vendor. The vendor and CPU specific files should be found in the CMSIS release
package, or are available from the core vendor. No other changes are necessary on the
start project or any other files.
To run the generic CMSIS start project on an ARMv6-M, you have to replace the embOS
libraries with libraries for ARMv6-M and have to add the specific vendor files.
7.6 Adding CMSIS to other embOS start projects
All CPU specific start projects are fully CMSIS compatible. If required or wanted in the
application, the CMSIS files for the specific CPU may be added to the project without any
modification on existing files. Note that the OS_InitHW() function in the RTOSInit file ini-
embOS for Cortex-M and IAR © 2010-2020 SEGGER Microcontroller GmbH
Page 43

43 CHAPTER 7 Adding CMSIS to other embOS start projects
tialize the core clock system and pll of the specific CPU. The system clock frequency and
core clock frequency are defined in the RTOSInit file. If the application needs access to
the SystemCoreClock, the core specific CMSIS startup code and core specific initialization
function SystemInit has to be included in the project. In this case, OS_InitHW() function
in RTOSInit may be replaced, or the CMSIS generic RTOSInit_CMSIS.c file may be used
in the project.
7.6.1 Differences between embOS projects and CMSIS
Several embOS start projects are not based on CMSIS but are fully CMSIS compliant and can
be mixed with CMSIS libraries from the device vendors. Switching from embOS to CMSIS,
or mixing embOS with CMSIS functions is possible without problems, but may require some
modification when the interrupt controller setup functions from CMSIS shall be used instead
of the embOS functions.
7.6.1.1 Different peripheral ID numbers
Using CMSIS, the peripheral IDs to setup the interrupt controller start from 0 for the first
peripheral interrupt. With embOS, the first peripheral is addressed with ID number 16.
embOS counts the first entry in the interrupt vector table from 0, so, the first peripheral
interrupt following the 16 Cortex system interrupt entries, is 16. When the embOS functions
should be replaced by the CMSIS functions, this correction has to be taken into account, or
if available, the symbolic peripheral id numbers from the CPU specific CMSIS device header
file may be used with CMSIS. Note that using these IDs with the embOS functions will work
only, when 16 is added to the IDs from the CMSIS device header files.
7.6.1.2 Different interrupt priority values
Using embOS functions, the interrupt priority value ranges from 0 to 255 and is written
into the NVIC control registers as is, regardless of the number of implemented priority bits.
255 is the lowest priority, 0 is the highest priority. Using CMSIS, the range of interrupt
priority levels used to setup the interrupt controller depends on the number of priority bits
implemented in the specific CPU. The number of priority bits for the specific device shall be
defined in the device specific CMSIS header file as __NVIC_PRIO_BITS. If it is not defined
in the device specific header files, a default of 4 is set in the generic CMSIS core header
file. A CPU with 4 priority bits supports up to 16 preemption levels. With CMSIS, the range
of interrupt priorities for this CPU would be 0 to 15, where 0 is the highest priority and
15 is the lowest. To convert an embOS priority value into a value for the CMSIS functions,
the value has to be shifted to the right by (8 - __NVIC_PRIO_BITS). To convert an CMSIS
value for the interrupt priority into the value used with the embOS functions, the value has
to be shifted to the left by (8 - __NVIC_PRIO_BITS). In any case, half of the priorities
with lower values (from zero) are high priorities which must not be used with any interrupt
handler using embOS functions.
embOS for Cortex-M and IAR © 2010-2020 SEGGER Microcontroller GmbH
Page 44

44 CHAPTER 7 Interrupt and exception handling with CMSIS
7.7 Interrupt and exception handling with CMSIS
The embOS CPU specific projects come with CPU specific vector tables and empty exception
and interrupt handlers for the specific CPU. All handlers are named according the names
of the CMSIS device specific handlers and are declared weak and can be replaced by an
implementation in the application source files. The CPU specific vector table and interrupt
handler functions in the embOS start projects can be replaced by the CPU specific CMSIS
startup file of the CPU vendor without any modification on other files in the project. embOS
uses the two Cortex-M generic exceptions PendSV and SysTick and delivers its own handler
functions to handle these exceptions. All peripheral interrupts are device specific and are
not used with embOS except for profiling support and system analysis with embOSView
using a UART.
7.7.1 Enable and disable interrupts
The generic CMSIS functions NVIC_EnableIRQ() and NVIC_DisableIRQ() can be used instead of the embOS functions OS_ARM_EnableISR() and OS_ARM_DisableISR() functions.
Note that the CMSIS functions use different peripheral ID indices to address the specific
interrupt number. embOS counts from 0 for the first entry in the interrupt vector table,
CMSIS counts from 0 for the first peripheral interrupt vector, which is ID number 16 for
the embOS functions. About these differences, please refer to Different peripheral ID num-
bers on page 43. To enable and disable interrupts in general, the embOS functions OS_IN-
T_IncDI() and OS_INT_DecRI() or other embOS functions described in the generic embOS
manual should be used instead of the intrinsic functions from the CMSIS library.
7.7.2 Setting the Interrupt priority
With CMSIS, the CMSIS generic function NVIC_SetPriority() can be used instead of the
OS_ARM_ISRSetPrio() function. Note that with the CMSIS function, the range of valid in-
terrupt priority values depends on the number of priority bits defined and implemented
for the specific device. The number of priority bits for the specific device shall be defined
in the device specific CMSIS header file as __NVIC_PRIO_BITS. If it is not defined in the
device specific header files, a default of 4 is set in the generic CMSIS core header file. A
CPU with 4 priority bits supports up to 16 preemption levels. With CMSIS, the range of
interrupt priorities for this CPU would be 0 to 15, where 0 is the highest priority and 15 is
the lowest. About interrupt priorities in an embOS project, please refer to Interrupt priori-
ties on page 32 and Interrupt nesting on page 33, about the differences between interrupt
priority and ID values used to setup the NVIC controller, please refer to Different interrupt
priority values on page 43.
embOS for Cortex-M and IAR © 2010-2020 SEGGER Microcontroller GmbH
Page 45

Chapter 8
VFP support
embOS for Cortex-M and IAR © 2010-2020 SEGGER Microcontroller GmbH
Page 46

46 CHAPTER 8 Vector Floating Point support
8.1 Vector Floating Point support
Some Cortex-M4, Cortex-M7 and Cortex-M33 MCUs come with an integrated vectored floating point unit.
When selecting the CPU and activating the VFP support in the project options, the compiler
and linker will add efficient code which uses the VFP when floating point operations are used
in the application. With embOS, the VFP registers are automatically saved and restored
when preemptive or cooperative task switches are performed. For efficiency reasons, embOS does not save and restore the VFP registers for tasks which do not use the VFP unit.
8.1.1 Using embOS libraries with VFP support
When VFP support is selected as project option, one of the embOS libraries with VFP support
have to be used in the project. The embOS libraries for VFP support require that the VFP
is switched on during startup and remains switched on during program execution. Using
your own startup code, ensure that the VFP is switched on during startup. When the VFP
unit is not switched on, the embOS scheduler will fail. The debug version of embOS checks
whether the VFP is switched on when embOS is initialized by calling OS_Init(). When the
VFP unit is not detected or not switched on, the embOS error handler OS_Error() is called
with error code OS_ERR_CPU_STATE_ILLEGAL.
8.1.2 Using the VFP in interrupt service routines
Using the VFP in interrupt service routines does not require any additional functions to save
and restore the VFP registers. The VFP registers are automatically saved and restored by
the hardware.
embOS for Cortex-M and IAR © 2010-2020 SEGGER Microcontroller GmbH
Page 47

Chapter 9
RTT and SystemView
This chapter contains information about SEGGER Real Time Transfer and SEGGER SystemView.
embOS for Cortex-M and IAR © 2010-2020 SEGGER Microcontroller GmbH
Page 48

48 CHAPTER 9 SEGGER Real Time Transfer
9.1 SEGGER Real Time Transfer
SEGGER’s Real Time Transfer (RTT) is the new technology for interactive user I/O in embedded applications. RTT can be used with any J-Link model and any supported target
processor which allows background memory access.
RTT is included with many embOS start projects. These projects are by default configured
to use RTT for debug output. Some IDEs, such as SEGGER Embedded Studio, support RTT
and display RTT output directly within the IDE. In case the used IDE does not support RTT,
SEGGER’s J-Link RTT Viewer, J-Link RTT Client, and J-Link RTT Logger may be used instead
to visualize your application?s debug output.
For more information on SEGGER Real Time Transfer, refer to segger.com/jlink-rtt.
9.1.1 Shipped files related to SEGGER RTT
All files related to SEGGER RTT are shipped inside the respective start project’s Setup folder:
File Description
SEGGER_RTT.c Generic implementation of SEGGER RTT.
SEGGER_RTT.html Generic implementation header file.
SEGGER_RTT_Conf.h Generic RTT configuration file.
SEGGER_RTT_printf.c
SEGGER_RTT_Syscalls_*.c
Generic printf() replacement to write formatted data via
RTT.
Compiler-specific low-level functions for using printf() via
RTT. If this file is included in a project, RTT is used for
debug output. To use the standard out of your IDE, exclude this file from build.
embOS for Cortex-M and IAR © 2010-2020 SEGGER Microcontroller GmbH
Page 49

49 CHAPTER 9 SEGGER SystemView
9.2 SEGGER SystemView
SEGGER SystemView is a real-time recording and visualization tool to gain a deep understanding of the runtime behavior of an application, going far beyond what debuggers are
offering. The SystemView module collects and formats the monitor data and passes it to
RTT.
SystemView is included with many embOS start projects. These projects are by default
configured to use SystemView in debug builds. The associated PC visualization application,
SystemViewer, is not shipped with embOS. Instead, the most recent version of that application is available for download from our website.
For more information on SEGGER SystemView, including the SystemViewer download, refer
to segger.com/systemview.
9.2.1 Shipped files related to SEGGER SystemView
All files related to SEGGER SystemView are shipped inside the respective start project’s
Setup folder:
File Description
Global.h
SEGGER.h Generic types and utility function header.
SEGGER_SYSVIEW.c Generic implementation of SEGGER RTT.
SEGGER_SYSVIEW.h Generic implementation include file.
SEGGER_SYSVIEW_Conf.h Generic configuration file.
SEGGER_SYSVIEW_ConfDefaults.h Generic default configuration file.
SEGGER_SYSVIEW_Config_embOS.c
SEGGER_SYSVIEW_embOS.c
SEGGER_SYSVIEW_embOS.h
SEGGER_SYSVIEW_Int.h Generic internal header file.
Global type definitios required by SEGGER SystemView.
Target-specific configuration of SystemView
with embOS.
Generic interface implementation for SystemView with embOS.
Generic interface implementation header file
for SystemView with embOS.
embOS for Cortex-M and IAR © 2010-2020 SEGGER Microcontroller GmbH
Page 50

Chapter 10
Technical data
This chapter lists technical data of embOS used with Cortex-M CPUs.
embOS for Cortex-M and IAR © 2010-2020 SEGGER Microcontroller GmbH
Page 51

51 CHAPTER 10 Memory requirements
10.1 Memory requirements
These values are neither precise nor guaranteed, but they give you a good idea of the
memory requirements. They vary depending on the current version of embOS. The minimum ROM requirement for the kernel itself is about 1.700 bytes.
In the table below, which is for X-Release build, you can find minimum RAM size requirements for embOS resources. Note that the sizes depend on selected embOS library mode.
embOS resource RAM [bytes]
Task control block 36
Software timer 20
Mutex 16
Semaphore 8
Mailbox 24
Queue 32
Task event 0
Event object 12
embOS for Cortex-M and IAR © 2010-2020 SEGGER Microcontroller GmbH
 Loading...