

Page 1
CONTENTS
STO RY - - - - - - - - - - - - - - - - - - 2
STA RT I NG A GA M E - - - - - - 3
BASIC CO N T RO LS - - - - - - - 4
GAME DISPLAY - - - - - - - - - - 7
GAME MODES - - - - - - - - - - - 9
A RCADE MODE - - - - - - - 9
VS MODE - - - - - - - - - - - 10
N E TWORK BAT T L E - - 12
MISSION MODE - - - - - 15
CH A R ACTER EDIT - - - - - - 16
O P T I O N S - - - - - - - - - - - - - - - 17
I T E M S - - - - - - - - - - - - - - - -- 20
CH A R AC T E R S - - - - - - - - - - 21
TACTICAL ADV I C E - - - - - - 2 5
Thank you for purchasing Outtrigger. Please note that this software
is designed only for use with the Dreamcast console. Be sure to read
this instruction manual thoroughly before you begin playing.
Outtrigger requires the use of a memory card to save/load
game data. For details on saving and loading, see p 18.
While saving or loading, never turn the Dreamcast power
OFF, attempt to remove the memory card or disconnect the
controller containing the memory card.
Game
File
8 Blocks
Required
sega-Outrigger-tx 7/18/01 3:00 PM Page 1
Page 2

32
STORY
In response to a series of high casualty terroist attacks to its military
research facilities, Visitaria, a multinational corporation involved with
military and space industries, established training facilities to prepare
members for entry into an elite unit known as the International Counterterrorism Special Force. Handpicked from various special forces g roups
from around the world, the first squad of highly trained, male and female
soldiers are set to begin a harsh and violent program designed to
transform them into the world’s ultimate counter-terrorism weapon.
As a member of this squad, your goal is to vie for supremacy among your
fellow trainees. Utilize the various weapons at your disposal while learning
to capitalize on your strengths and minimize your weaknesses in the various
missions available. Get to know your opponents and master the techniques
required to dispose of them quickly and effectively in the versus mode. Then
go online and use every ounce of your cunning and tactical experience to
exert your dominance on the Outtrigger network.
STARTING A GAME
MAIN MENU
A RCADE MODE - - - - - - - - - - - -9
VS MODE - - - - - - - - - - - - - - - - 10
N E TWORK BAT T L E - - - - - - -12
MISSION MODE - - - - - - - - - -15
CH A R ACTER EDIT - - - - - - - - 16
O P T I O N S - - - - - - - - - - - - - - - -17
Load the Outtrigger game disc into your Dreamcast and turn the
power ON. If you haven’t already inserted a memory card into an
expansion socket of any controller(s) connected to Control Ports
A, B, C or D, you will be requested to do so.
If more than one memory card, or previously created Outtrigger
game file is available, use * @ $ ^ to designate which game file
to load. Once the selected memory card and/or file is verified,
the game will load. Press the Start Button to proceed to the title
screen.
From the title screen, press the
Start Button to display the
mode selection screen. Use *
@ to select a game mode and
press A to enter. For details on
the modes available, refer to
the corresponding page
numbers listed here.
E a ch Outtri g ger game file re qu i res 8 free memory blocks to save .
In ge n e ral, saving and loading of game data will occur auto m a t i c a l ly
to the file designated at the sta rt of ga m e p l ay. For details on sav i n g
or loading data manually, see p. 18 .
CAUTION
Never touch the controller Analog Thumb Pad or the Triggers L/R while turning the Dreamcast
power ON. Doing so may disrupt the controller initialization procedure and result in malfunction.
SAVING & LOADING
sega-Outrigger-tx 7/18/01 3:00 PM Page 2
Page 3
4
5
Using
the Jump Pack™
To use the Jump Pack (sold separately)
when playing, always be sure to insert the
Jump Pack into Expansion Socket 2 of the
Dreamcast controller. Note that the Jump
Pack can not be used with the keyboard.
Start Button
D-Pad
^
D-Pad
*
D-Pad
@
D-Pad
$
Analog Thumb Pad
*
Analog Thumb Pad
^
Analog Thumb Pad
@
Analog Thumb Pad
$
Trigger
L
Trigger
R
B
Button
Y
Button
A
Button
X
Button
Pause - Break
Arrow Key^/Number Pad 6
Arrow Key*/Number Pad 8
Arrow Key@/Number Pad 2
Arrow Key$/Number Pad 4
E
F
D
S
S
F
Z/Delete
Tab/Insert
Space/Pagedown
C/End
Display the Pause Menu
Move Right
Move Forward
Move Backward
Move Left
Rotate View Upward
Rotate View Right
Rotate View Down
Rotate View Left
Rotate View Left
Rotate View Right
Jump
Toggle View
Fire Weapon
Toggle Weapon
CONTROLLER
KEYBOARD
Select
Cancel
Enter
D-Pad
B
Button
A
Button
Arrow Keys
Escape Key
Enter Key
DURING MENU SELECTION
CONTROLLER
KEYBOARD
DURING GAME PLAY
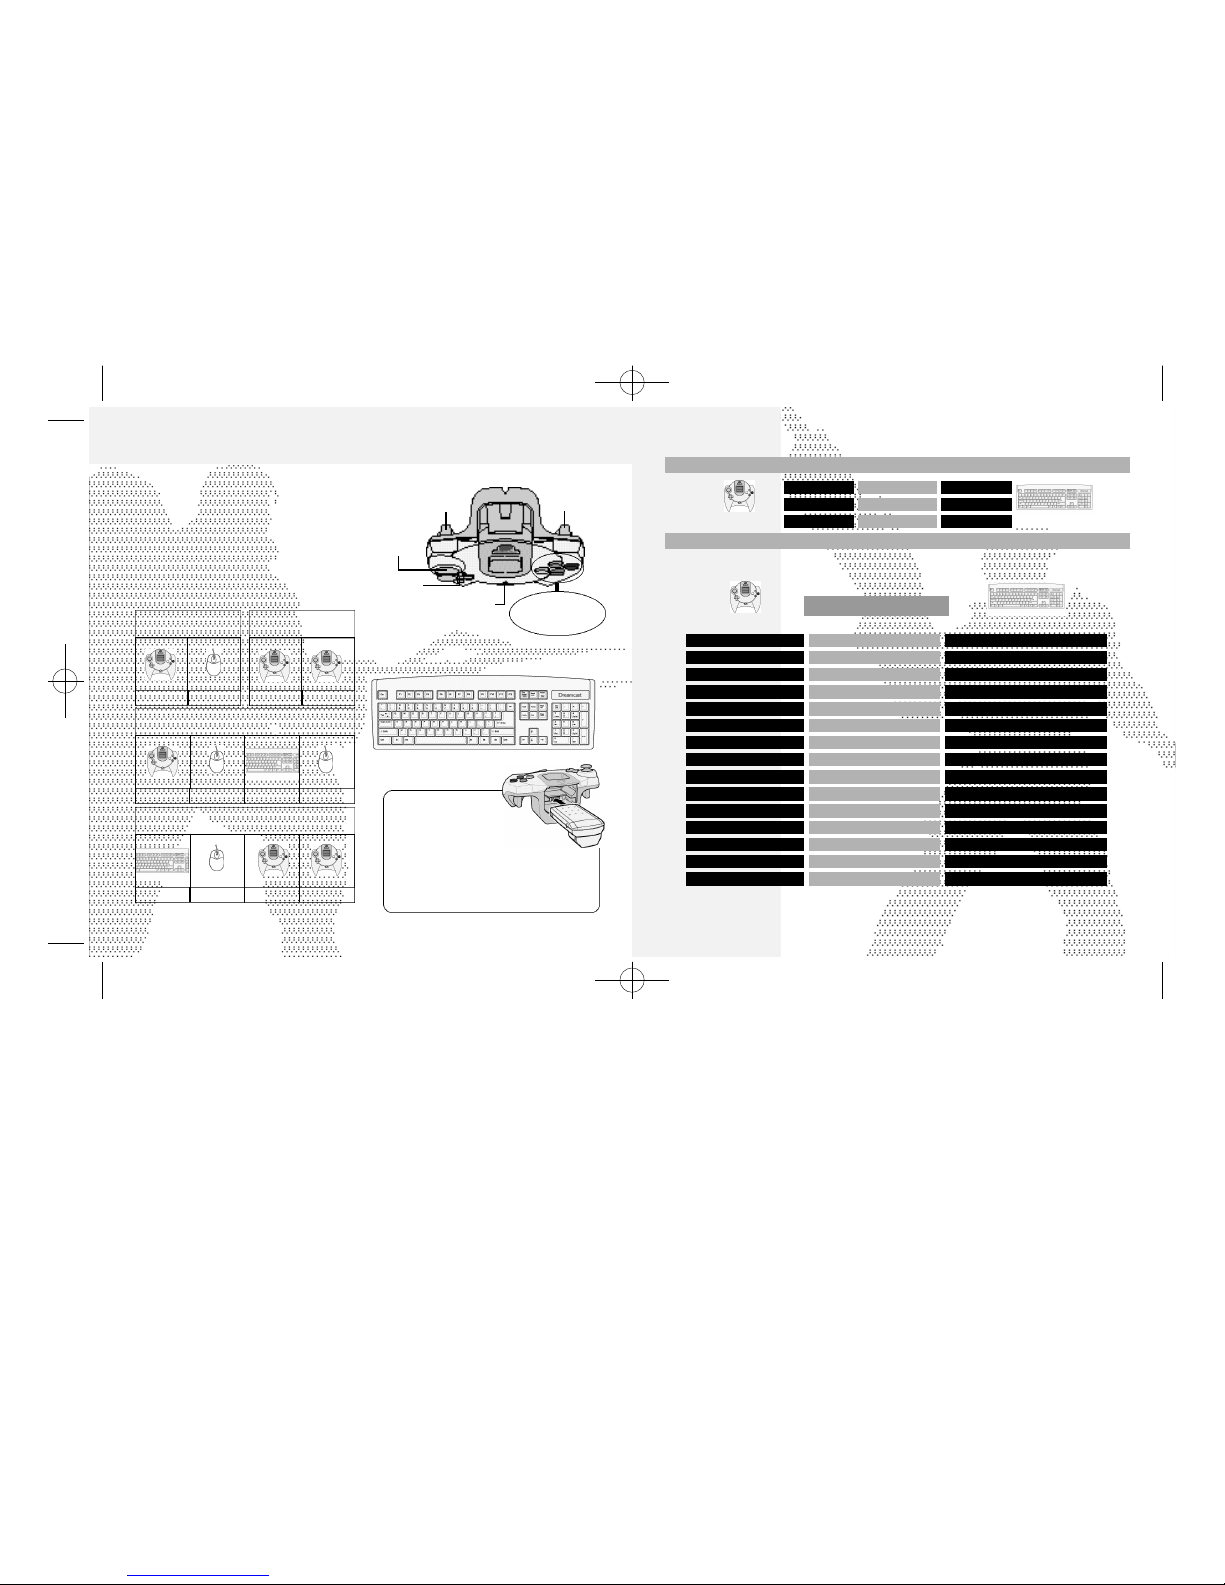
DEFAULT CONTROLS
Re fer to the fo l l o wing ch a rt for a summary of the commands assigned as the default control set t i n g s
( C o n t rol Method A) for the fo l l owing main devices. For details on alte rn a t i ve settings, see p. 6.
BASIC CONTROLS
To soft-reset the Dreamcast and return to the title screen during game play, simultaneously press
and hold the
A, B, X, Y
and Start Buttons (Keyboard: Control, Alt & Delete).
Outtrigger is a one to four player game
OFFLINE (and 1-6 players ONLINE) that can be
played using either the Dreamcast Controller
or Keyboard as a main device. Connect the
device to be used by each player to a
corresponding Control Port A, B, C or D.
A sub-device (such as the Dreamcast Mouse,
etc.) can also be used to play, however doing
so reqires the use of two ports for each
player (one port for the main device and one
for the sub). See the following diagrams for
examples on device setup:
Trigger
L
Analog
Thumb Pad
Directional
Pad (D-Pad)
Port A
Trigger R
BASIC CONTROLS
DREAMCAST CONTROLLER
DREAMCAST KEYBOARD
1 player using both
main & sub--device
Port B Port A
2 playe rs each using
one main device
Port B
Port A
2 players each using
both a main & sub--device.
Port B Port C Port D
Port A
3 players: P1 using both a main & sub-device,
P2 and P3 each using a main device only
Port B Port C Port D
and so on...
Start Button
Y Button
X
ButtonBButton
A Button
sega-Outrigger-tx 7/18/01 3:00 PM Page 4
Page 4
76
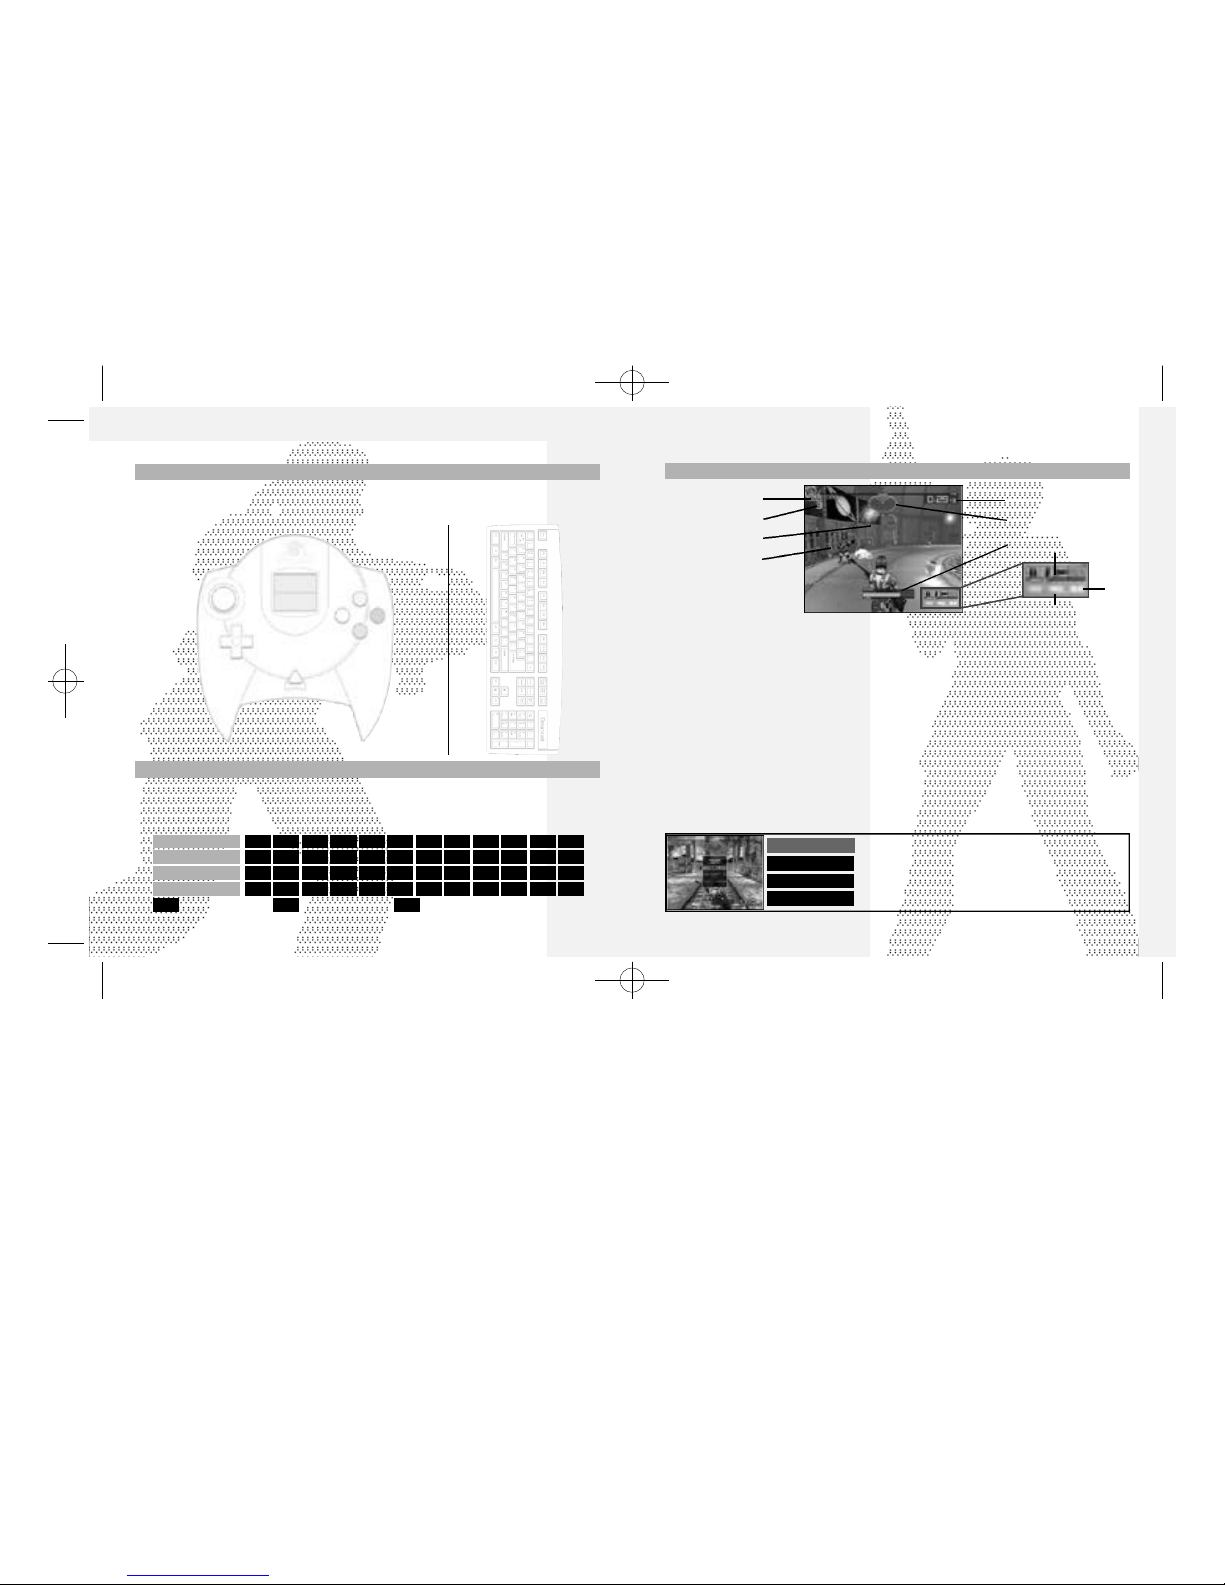
GAME DISPLAY
1 PLAYER MODE
PAUSE MENU
After pausing, select and enter one of the following items:
EXIT MENU
Close the pause menu and continue playing.
KEYCONFIG Make various device setups.
QUIT GAME End the current game and return to the title screen.
1
POINTS
The current number of points earned.
2
REMAINING OPPONENTS
Indicates the number of opponents you
must
eliminate in order to complete
the mission.
(Arcade Mode and Mission Mode only)
3
SIGHT
Use to aim. The shape will vary according to the
weapon used.
4
OPPONENT CURSOR
Appears on an opponent when in range. Color
indicates when the opponent will attack
(red = imminent). In “Highest Point Total” missions,
the opponent’s cursor is always red.
5
TIME
The allotted time remaining. A session will end when
this reaches zero if the mission objectives are not
completed.
6
RADAR MAP
Shows the position of your opponents (red) relative
to your position (green).
(Arcade and Mission Modes only).
7
STRENGTH GAUGE
Indicates your physical strength. This gauge will
decrease when damage is inflicted by an opponent.
If it reaches zero, your character will go down and
you will restart.
8
WEAPON & AMMO
Indicates the weapon currently in use and amount
of ammo remaining.
9
TOTAL ELAPSED TIME
0
COMBO GAUGE
When an enemy is shot, this gauge turns to green.
Shoot the next enemy before this gauge turns to
earn combo points.
5
1
3
2
4
6
7
8
9
0
SPACE
Z
C
TAB
---
---
*
^
@
$
E
D
S
F
KEYBOARD
A C F IB E H KD G J LTYPE
Fire Weapon
Jump
Toggle Weapon
Toggle View
---
---
Look Up
Look Right
Look Down
Look Left
Move Forward
Move Backward
Move Left
Move Right
B
The following diagrams show the main alternative command methods available. Note that each main
method (A, B, etc.) has and additional three types of configuration (e.g., method A1, A2 and A3)
available. Experiment to determine the control device and configuration setting that is right for you.
ALTERNATIVE COMMAND SETTINGS
SUB-DEVICE
BASIC CONTROLS
The following chart lists the command settings available when using a sub-device, such as the
Dreamcast Mouse, to supplement a main device for gameplay.
L R S ---L S L RR L R --R L R LS L --- ---S R L R
S S L RR R R LL --- --- L
--- --- --- S--- --- S S--- S S S
Fire Weapon
Toggle Weapon
Toggle View
Jump
L = Left Click S = Side Click R = Right Click
Analog
Thumb
Pad
TRIGGER R
TRIGGER L
A BUTTON
B BUTTON
X BUTTON
Y BUTTON
UP
RIGHT
DOWN
LEFT
D-Pad
*
^
@
$
Move Right
Move Left
Fire Weapon
Jump
Toggle Weapon
Toggle View
Look Up
Look Right
Look Down
Look Left
Move Forward
----
Move Backward
---Move Forward
Move Backward
Fire Weapon
Jump
Toggle Weapon
Toggle View
Look Up
Look Right
Look Down
Look Left
----
Move Right
----
Move Left
Fire Weapon
Jump
Move Backward
Move Right
Move Left
Move Forward
Look Up
Look Right
Look Down
Look Left
Toggle Weapon
----
Toggle View
----
CONTROLLER
B C D
sega-Outrigger-tx 7/18/01 3:00 PM Page 6
Page 5
8 9
GAME MODES
ARCADE MODE
Select this one-player mode to participate in a series of four training courses (Preparatory,
Novice, Intermediate and Advanced) ported from the arcade version of Outtrigger. Use this
mode to hone your battle technique and build your weapon skills.
Once the above settings are complete, select and enter OK.
Next, use $^ to select the course of training you wish to undergo and then
enter your selection. Once the game loads, the first mission will begin. Read
the instructions and complete the mission objectiv e
successfully to continue on to the next mission and so
on until you have completed the entire course.
SETTINGS
Next, use $^ to select a character and enter
your selection. Then, use $^ to select and
enter three alphanumeric characters to identify
your character.
Select to change the identifying color or
weapon settings of your character.
Press the enter key of the main device you will use. To use a sub-device in
conjunction with a main device, only press the enter key of the sub-device.
Even if you fail to complete a mission, you will have a chance to continue play.
To continue, press the Start Button before the countdown reaches zero to
restart from the last attempted mission.
COLOR
Use $^ to select a color.
WEAPON 1, 2 AND 3
Use *@ to select a weapon and
$^ to select a weapon type.
CONTROL ASSIST
Use $^ to toggle ON or OFF. If ON, set
the SENSITIVITY to the desired setting.
CO N T ROL TY P E
Use $^ to select control method.
VIEW
Use $^ to select NORMAL or REVERSE.
PLAYER SETUP
Select to change the control settings of
the designated devices.
DEVICE SETUP
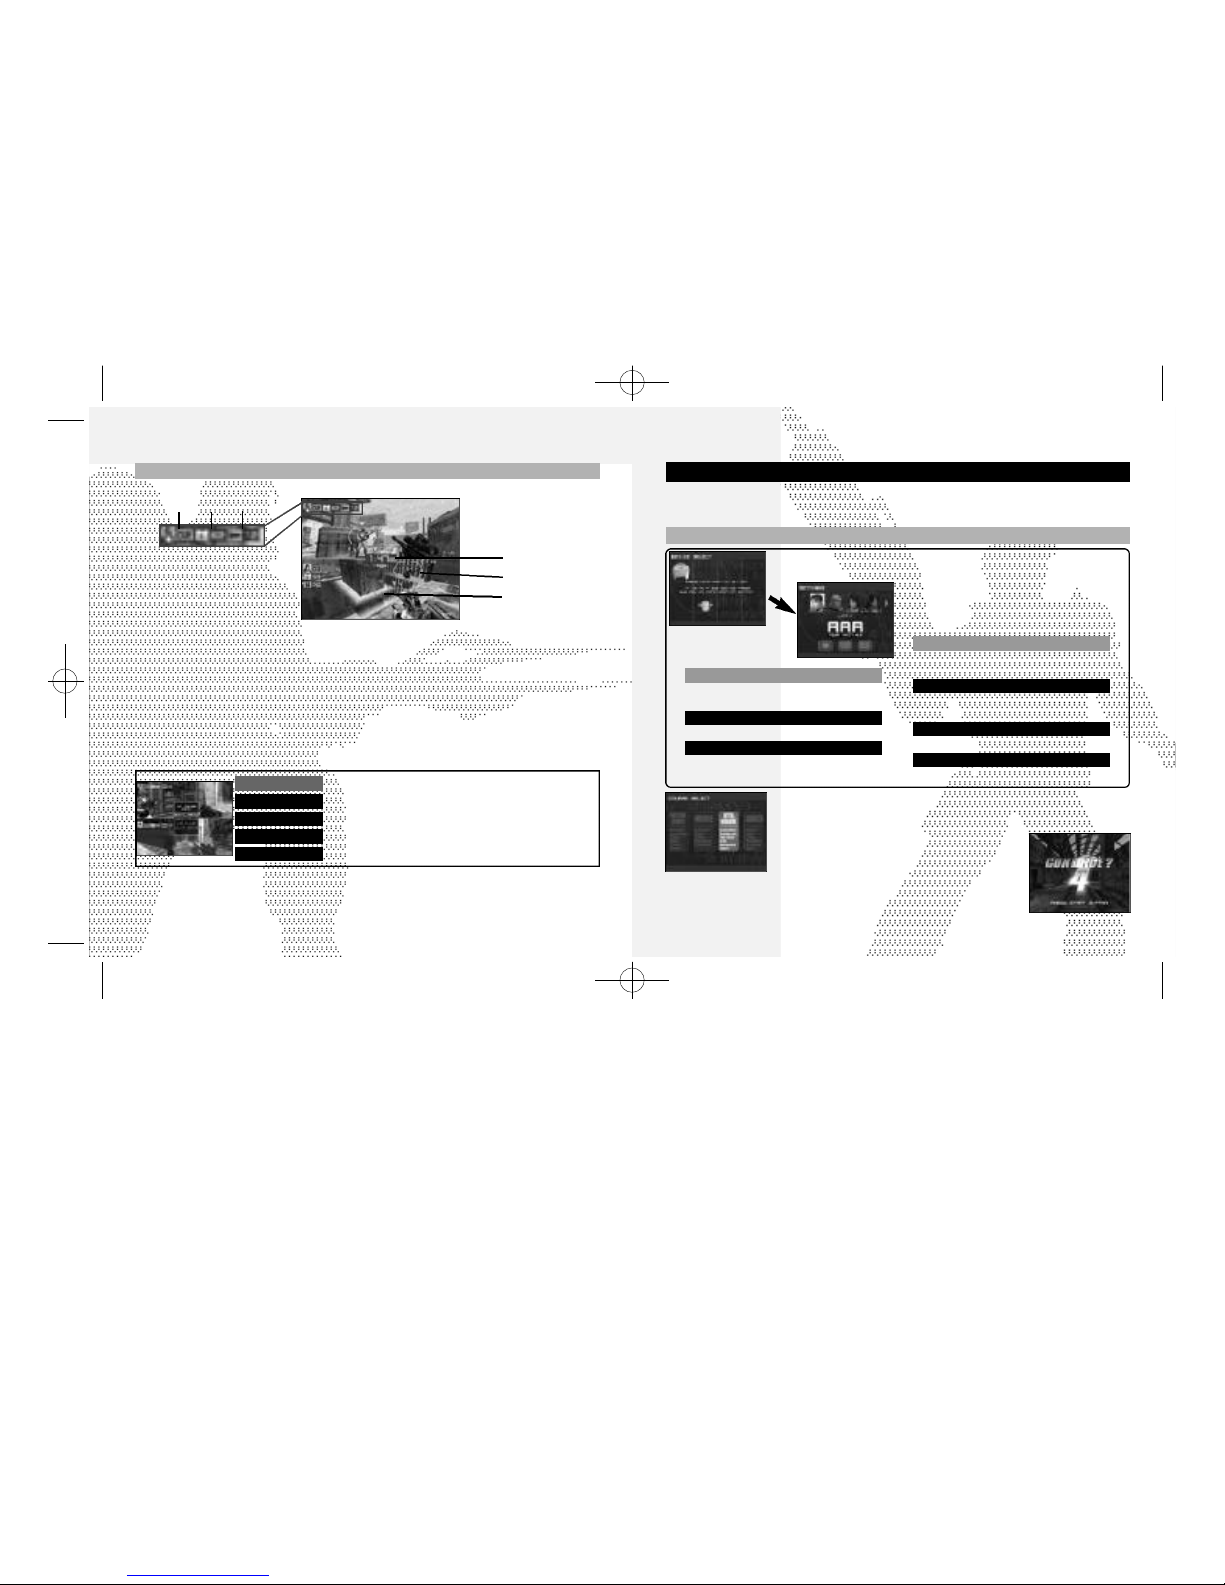
VS MODE
GAME DISPLAY
EXIT MENU
Close the pause menu and continue playing.
KEYCONFIG Change device setup.
VS RULE
Exit the current game and return to the RULES menu.
QUIT GAME End the current battle and return to the title screen.
PAUSE MENU
After pausing, select and enter one of the following items:
1 POINTS
The current number of points earned.
2 STRENGTH
Indicates your physical strength. This value will
decrease when damage is inflicted by an opponent.
If it reaches zero, your character will go down and
you will restart.
3 WEAPON & AMMO
Indicates the weapon currently in use and amount
of ammo remaining.
4 TIME
The allotted time remaining. A match will end when
this reaches zero.
5 OPPONENT CURSOR
Appears on an opponent when in range.
6 SIGHT
Use to aim. The shape will vary according to the
weapon used.
4
5
6
1 2 3
The appearances can
be changed by pressing
the Y Button.
sega-Outrigger-tx 7/18/01 3:00 PM Page 8
Page 6

10 11
ONE PLAYER TWO PLAYERS THREE TO FOUR PLAY E R S
Once the battle is over, the ranking of each participant will appear
followed by the results screen.
RETRY
Retry using the exact same settings (no load time).
CHANGE STAGE Opt to reselect the stage only.
CHANGE RULES
Opt to modify the battle rules.
EXIT Exit the versus mode and return to the title screen.
GAME MODES
Select and enter an item from the displayed menu to either continue
versus mode play or exit to the title screen.
VS MODE
Select this one to four-player mode to participate in battles where it’s every player for
themselves or divided into opposing teams. In the one player mode, you’ll battle against CPU
opponents on a full screen. When playing with 2 or more human opponents, you’ll battle on a
half or quarter split-screen.
Use *@ to select an item and $^ to adjust each setting as required. Press START to advance.
Each player must complete the device and character settings as described in the SETTINGS
section on p. 9 (see the outlined box at the center of the page). Once these settings are complete,
select OK.
GAME TYPE
Set to TIME LIMIT or POINT LIMIT.
MATCHPOINT Set the total number of points required to win (1 - 50).
TIME LIMIT
Set the time at which the battle will end (2’00 - 20’00).
MATCH COUNT
Set the number of sets required to win the match (1 - 5).
HANDICAP
ON: When the current leader is defeated they will drop a Gold Medal worth 2 points.
OFF: When the current leader is defeated they will drop a Silver Medal worth 1 point.
TEAM BATTLE
Set whether to enable or disable team play.
RULE SELECT
SETTINGS
Use $^ to select and enter the stage on which the battle will take
place. Once the game loads, the battle will begin.
Next, each player uses $^ to select a group (Team) and enter your
selection. This item is only available when the TEAM BATTLE feature is
enabled.
GAME MODES
Note: MATCH POINT is disabled, if TIME LIMIT is selected as GAME TYPE.
When you play the VS MODE by yourself, the three latest actions that has happened in the game
will be displayed at the top right side of the screen.
sega-Outrigger-tx 7/18/01 3:00 PM Page 10
Page 7

12 13
GAME MODES
NETWORK BATTLE MODE
Select this 1-6 player mode to connect online to battle against other players over the Internet.
If you have not already configured ISP settings to your Dreamcast, use your
Dreamcast browser disc to do so. Refer to the Dreamcast Browser instruction
manual for details. To request a Dreamcast browser disc call 1-800-500-8946.
GAME MODES
Follow the direction shown on the screen to connect to the network server.
Once connected, LOGIN GAME SERVER menu will be displayed. Enter your
name to be used inside the server (player name), and select Login OKto
enter the server.
CONNECTING ONLINE
Complete the device and character settings as described in the SETTINGS section on p. 9 (see
the outlined box at the center of the page). Once these settings are complete, select OK.
Note: If you are using the Dreamcast Keyboard for chatting, you must have it connected before
you proceed any further. Once the setting is made, it will not be recognized until you exit the mode.
SETTINGS
ENTERING A LOBBY
Once you are in the server, a SERVER MENU window will be displayed. Use
*@ to select the menu item, and press A to enter. When you select Join
a lobby, a list of available lobbies will be displayed. Use *@ to select the
lobby to enter, and press A to enter.
The LOCATION window, displayed at the bottom of the screen, indicates
your current location in the server.
INSIDE THE LOBBY
Inside the lobby, two windows will be displayed: LOBBY MENU window and OPERATION LOG window.
On the LOBBY MENU window, a list of menu items (commands you can perform in the lobby) will be
displayed. On the OPERATION LOG window, the actions that has taken place inside the server
(players’ entrance to/exit from the lobby/room, chat messages, etc.) will be displayed. Press B to
switch the window to be active.
Join a room
Select this to display the list of currently available rooms. Use *@ to
select the room, and press A to enter. If a password is needed to enter
the room, you will be prompted to do so.
Create a room
Create a room to have battle. See p. 14 for details.
Show Lobby members
Display the list of players in the cur rent lobby. The list will be displayed on
the OPERATION LOG window.
Leave this Lobby
Leave the current lobby.
Lobby chat
Use the on-screen software keyboard or the Dreamcast Keyboard to
chat with other players in the lobby. The message will be displayed on the
OPERATION LOG window.
Logout
Disconnect from the network (server) and return to the mode selection
menu.
LOBBY MENU
OPERATION LOG
CAUTION
Although there is an option to change game server name, there exists only one server. As this
option is strictly for possible future enhancement, please leave this parameter as is, without
changing.
Note: The server name and lobby name appearing in the screenshots here are temporary.
The actual server/lobby names may be different.
sega-Outrigger-tx 7/18/01 3:00 PM Page 12
Page 8
14 15
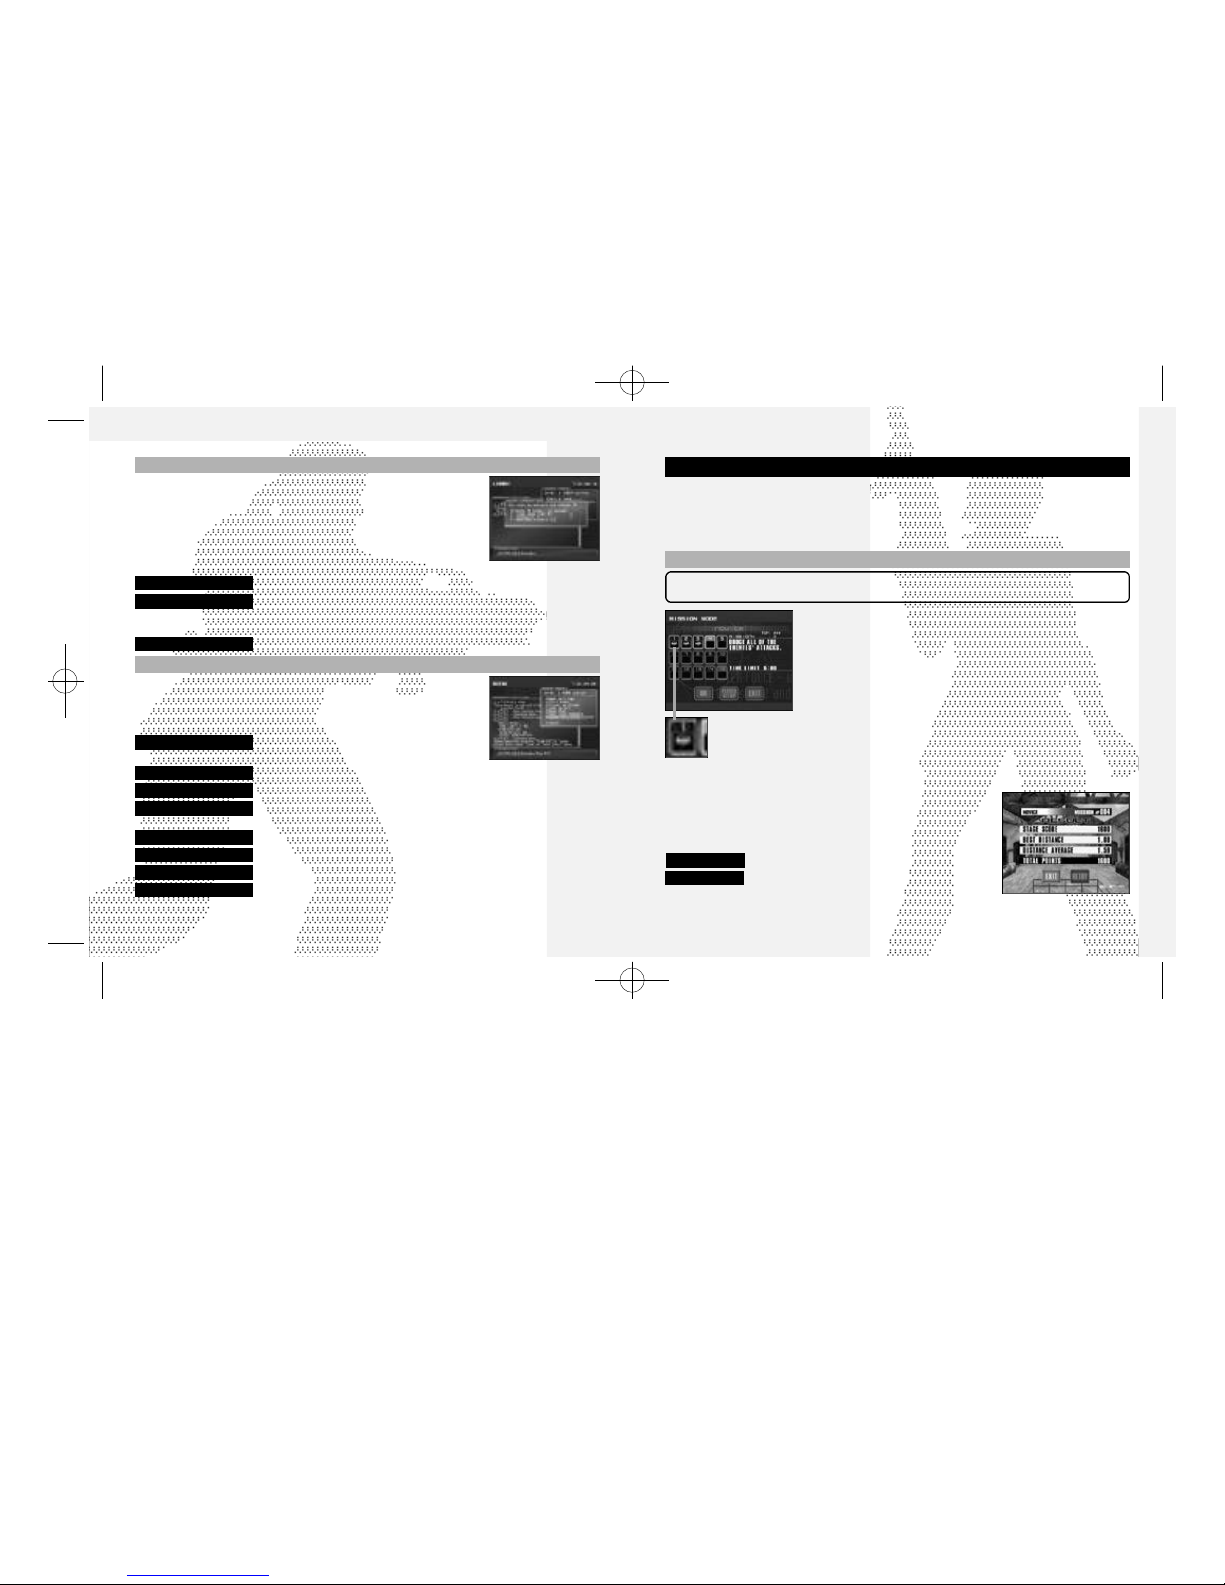
MISSION MODE
Select this one-player mode to participate in a series of missions divided into three levels of
15 missions each. Initially only the first five missions of the Novice level will be available for
selection. You will need to clear these missions in order to unlock the next cluster of five
missions and then clear those to unlock the last cluster of four missions. The 15th and final
mission of a level can only be unlocked if you clear all the previous 14 missions.
Complete the device and character settings as described in the SETTINGS section on p. 9 (see
the outlined box at the center of the page). Once these settings are complete, select OK.
SETTINGS
GAME MODES
Use $^ to select a level (Novice, Intermediate or Advanced) and
then press enter. Next, use *@$^ to select a mission from the
available options and then press enter. If you wish to modify your
player settings, select PLAYERSETUP. Otherwise, after you have read
the mission objective, select OK to begin. Select EXIT to return to the
mode selection screen.
Once the game loads, your mission will begin. Read the instructions
and complete the mission successfully to continue on to the next
mission, and so on until you have completed the entire level.
Whenever you successfully complete a mission, an emblem will appear
under that mission’s number on the mission selection screen.
Regardless of whether you successfully complete or fail a mission, you
can retry for a better scor e
. Use $^ to select either EXIT or RETRY.
EXIT
Exit and return to mission mode selection screen.
RETRY
Restart from the last attempted mission
This emblem indicates that
a mission is complete.
CREATING A ROOM
The network battle takes place inside a room in the lobby. You can enter
any currently available room, or create one. If you create a room, you
become the owner of the room, and the room will exist until all room
members leave the room. If the current owner leaves first, then another
room member becomes the new owner. To create a room, select Create a
room from the LOBBY MENU. A ROOM CREATIONmenu will be displayed.
Set the following parameters, and select Create OK to create a room.
Press B to return to the LOBBY MENU without creating a room (cancel).
room name
Enter the name for the room to create.
password
If you wish to create a room for selected participants, enter a password
to enter the room you create. You may leave this a blank, if you wish to
have the room open to everyone in the lobby.
maximum players
Establish the maximum number of participants in the room (1-6 players).
INSIDE THE ROOM
Inside the room, you can start the network battle. The game can be played
the same way as the VS MODE. Utilize the chat to agree, with one another,
on the rule to be played.
Once inside the room, a ROOM MENU will be displayed.
Game Settings You can change the rule of the game. Only the
owner of the room can select this menu item.
Start game Start the battle. Only the owner of the room can select this menu item.
Player Settings You can change the character to be used.
Team Select Select the team. This menu item is available only when the TEAM BATTLE
feature is enabled by the room owner.
Room chat
As in Lobby chat, use to communicate with others in the room.
Show room members Displays a list of members in the room in the OPERATION LOG window.
Leave this room Leave from the room to the lobby.
GAME MODES
Logout
Disconnect from the network (server) and return to the mode selection
menu.
sega-Outrigger-tx 7/18/01 3:00 PM Page 14
Page 9
16 17
CONTINUE
Set to enable or disable the continue feature.
INITIAL VIEW
Set the default view setting to either CHARACTER or WEAPON.
ARCADE GAME LEVEL
Set the arcade difficulty to EASY, NORMAL, HARD or VERY HARD.
EXIT
Select to save the options settings and return to the mode selection menu.
INITIAL SETTINGS
Select and enter this to return the options settings to the default settings.
VIBRATION
Select to enable or disable Jump Pack function, See p.19 for details.
BBA ISP SETTINGS
Select and enter this to change ISP settings if using a Broadband
Adapter. See p.19 for details.
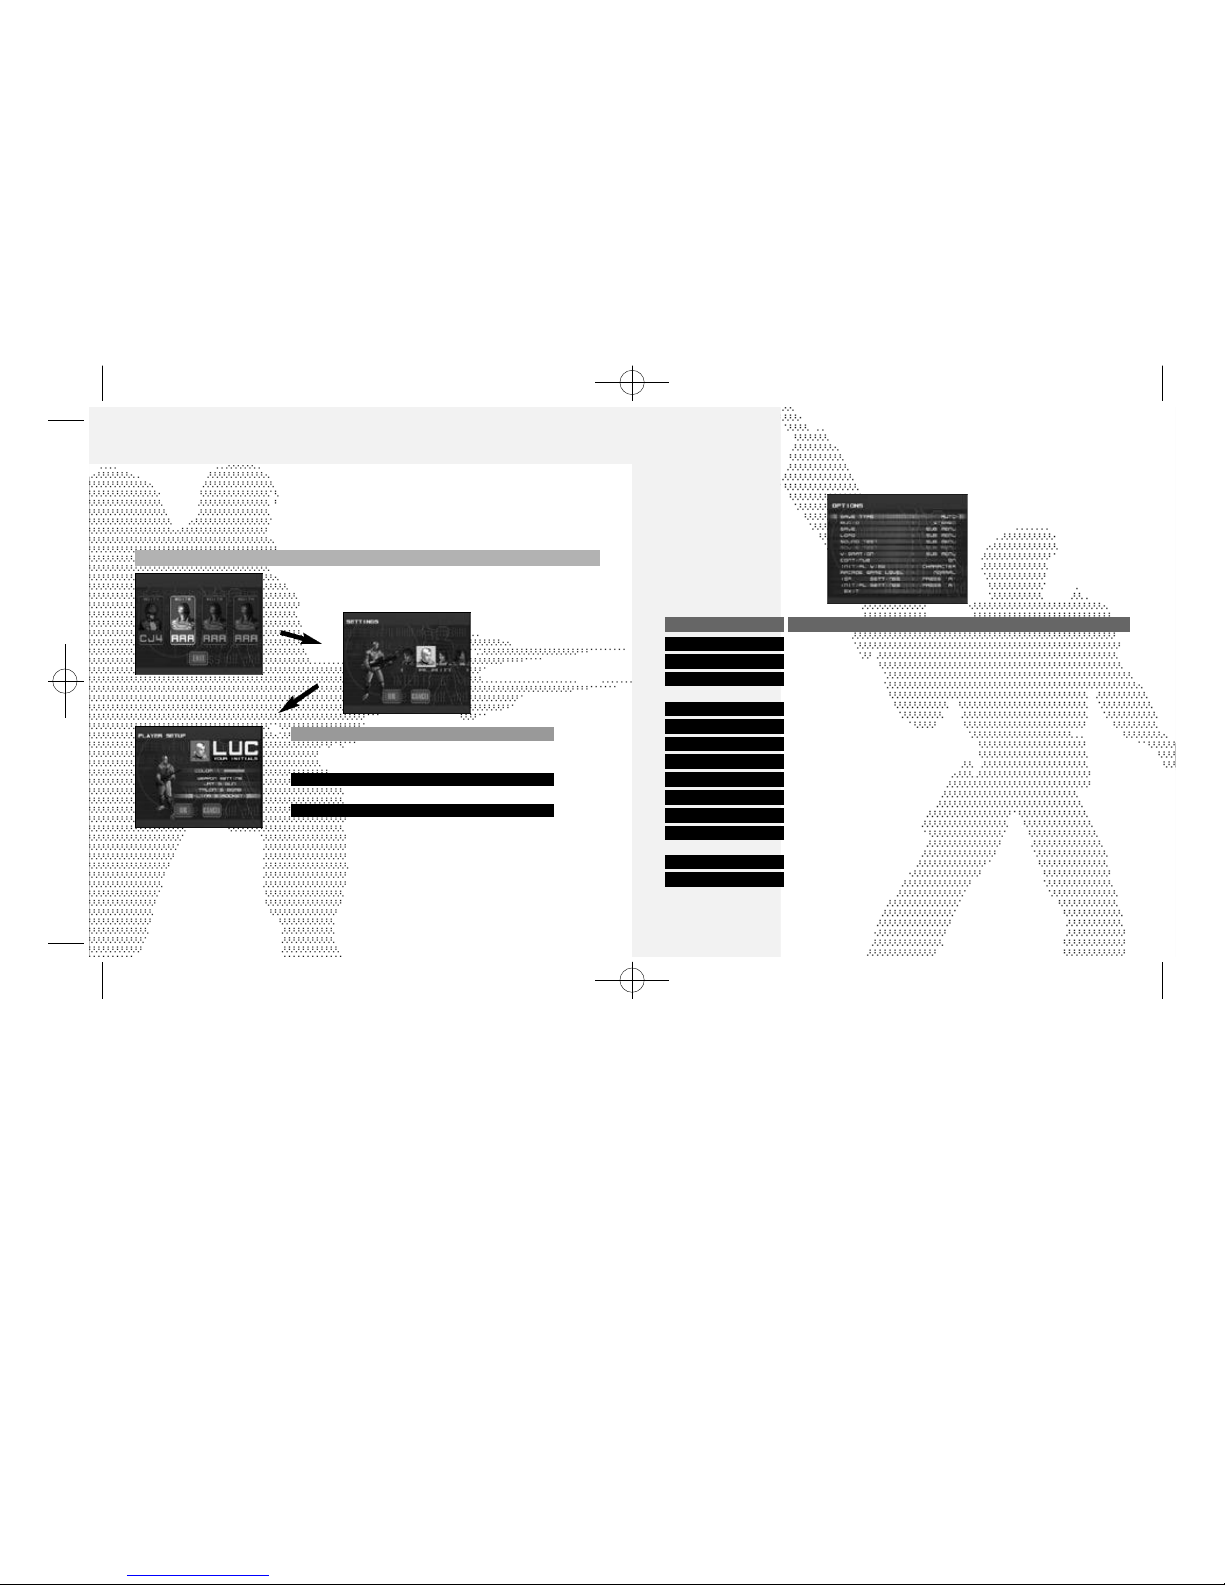
Select this mode to modify the color and weapons settings to create your own original
character that you can use to battle against other players in the versus or network versus
battle modes. Weapons that are normally not available to a particular character can be
selected as well as weapons that usually must be found on the battle field such as the
Photon Torpedo or Flame Thrower. Meeting certain requirements in arcade or mission mode
play will unlock new character types and weapons for use here.
CHARACTER EDIT
CHARACTER SELECTION SCREEN
Use $ ^ to select one of the four character
files available for editing and then press enter.
Once the settings are complete, use @ to select OK and press enter to save these settings. Select
CANCEL to exit without saving.
Next, use $^ to select a
character type from the
available options and then
press enter.
COLOR
Use $^ to select a color. Then press @.
WEAPON SETTING
Use *@ to select a weapon catagory (1 ,2 and 3)
and then use $^ to select a weapon type.
Use $^ to select three alphanumeric characters to
identify your character.
PLAYERSETUP
SAVE TYPE
Set the data save method to AUTO or MANUAL.
AUDIO
Set the sound output toSTEREO or MONO.
SAVE
Select to manually save the current game data or settings. See p.18 for
details.
LOAD Select to manually load game data or settings. See p.18 for details.
SOUND TEST
Select to display the sound test menu. See p.18 for details.
ITEM EXPLANATION
Select this mode to modify various game settings, save/load game data or conduct sound
tests.
OPTIONS
MOVIE TEST View movie. (Not available until certain requirements are met)
sega-Outrigger-tx 7/18/01 3:00 PM Page 16
Page 10

18 19
You can enable and disable Jump Pack setting for each Port separately.
Use *@ to select a port and $^ to toggle each setting t o ON or OFF.
VIBRATION
If you are connecting to the internet with the Broadband Adapter (sold
separately), you can configure the network settings here. For proper
values for each parameter (IP Address, Subnet Mask, etc.), refer to the
instruction booklet of the ISP you are contracted with.
Note: If you are connecting with the 56K modem, configure the network
setting with the Dreamcast browser disc.
Entering the Value
First, use *@ to select the parameter to change and press A. You will
then enter the value for the parameter. You can use either the Dreamcast
Controller or the Dreamcast Keyboard to enter values. If you are using the
Dreamcast Controller, use $^ to select the numeral, and press X to
enter. To backspace (erase the previous letter), press B. When you are
done, press A to complete.
If all parameters are completed, select SAVE TO FLASH to save them to
the onboard memory.
ISP SETTING
SAVE/LOAD
When you either save or load a game file, a Memory Card Select screen
will be displayed, with each icon representing the Controller
Port/Expansion Socket location. Memory card icons connected with a
game file will be displayed brightly; memory card icons without game files
will be displayed dark. Only a silhouette will be displayed with the locations
without memory cards. Use *@$^ to select the memory card. and
press A to enter. Press B to return to the Options Menu screen.
Memory Card with Game File
If saving, the game file will be overwritten. You will be confirmed of your
action. Press A to overwrite, and B to cancel. If loading, the game will
load the file and returns to the Options Menu screen.
Memory Card without Game File
Saving or loading, you will be asked whether to create a new file or not.
Press A to create a new file; press B to cancel.
When the Sound Test Menu screen is displayed, use *@ to select
menu item, and $^ to change the value.
SOUND TEST
BGM TEST
L i sten to the background music.
SE PACK
Select the pack number of the sound effe c t s .
SE TEST
L i sten to the sound effects of the selected pack.
SE VOLUME
Ad j u st the volume setting for the sound effe c t s .
BGM VO LU M E
Ad j u st the volume setting for the background music.
For BGM TEST and SE TEST, press A to play the selected music or
the sound effect.
To return to the Options Menu screen, press B.
OPTIONS OPTIONS
sega-Outrigger-tx 7/18/01 3:00 PM Page 18
Page 11

20 21
ITEMS
A number of the items and weapons available in Outtri g ger are as fo l l ows:
FLAME THROWER
This quick acting and
powerful weapon can
only be used at
close-range.
SNIPER’S RIFLE
Can dispose of an
enemy in one shot.
Press fire to activate
the zoom sight and
again to fire.
PHOTON TORPEDO
Bullets fired by this
weapon will bounce off
of objects such as
walls before striking.
GUIDED MISSILE
Missiles fired by this
weapon will
automatically home in
on their target.
AMMO
Grab this item to
increase your ammo
by 5 rounds.
LIFE UP
This will replenish your
strength
gauge by a set
amount.
ARMOR
This will absorb damage
inflicted until the armor
gauge (appears above
the strength gauge)
runs out.
TIME +5
Grab this to increase
your time limit by five
seconds (only available
in the 1P modes).
POWER UP
This item will enhance
your aim, attack power
and speed for a set
amount of time.
NOCTOVISION
These goggles enable
you to see at night as
if it were day.
THERMOGRAPHY
These goggles enable
you to see through
objects, such as walls,
for a set amount of
time.
Note: Thermography appears with green lenses; Noctovision with blue.
JAY ARAGAKI
SUBMACHINE GUN
Fires four shots at once.
Although it does not have
strong fire power, you can shoot
rapidly and accurately because
it is easy to aim.
From speed of movement to
weapon efficiency, JAY offers the
most balanced range of skills.
GRENADE
High on firepower, but harder to
aim.
Bombs will be effective on
enemies
hiding behind wall or
where you can’t
shoot in a
straight line.
ROCKET LAUNCHER
Has very high fire power, as you
can defeat the enemy with two
shots. You can also use the
explosion to cause damage.
WEAPONS
Gender: Male
Nationality: British
Height: 5’9”
Weight: 165 lbs.
Date of Birth:
Apr. 13, 1972
CHARACTERS
sega-Outrigger-tx 7/18/01 3:00 PM Page 20
Page 12

2322
ALAIN CIEL
Gender: Male
Nationality: French
Height: 5’11”
Weight: 171lbs.
Date of Birth: Oct. 4, 1971
ALAIN offers exactly the same
skill level as JAY.
CHARACTERS
SUBMACHINE GUN
Fires four shots at once.
Although it does not have
strong fire power, you can shoot
rapidly and accurately because
it is easy to aim.
GRENADE
High on firepower, but harder to
aim.
Bombs will be effective on
enemies
hiding behind wall or
where you can’t
shoot in a
straight line.
ROCKET LAUNCHER
Has very high fire power, as you
can defeat the enemy with two
shots. You can also use the
explosion to cause damage.
WEAPONS
LINA MIYAGI
SUBMACHINE GUN
Fires five shots in one burst. A
weapon that is easy to handle.
What LINA lacks in power she
more than makes up for with
her quicker speed and superior
agility. She appeals to players
who are more interested in
evasive power than attacking.
MOTION SENSOR BOMB
Sticks to the walls and ceiling
for a given time, and explodes
when someone approaches.
55mm RIFLE
This weapon lacks the explosive
power of Rocket Launcher, but
makes up for it with rapid fire
ability.
WEAPONS
Gender: Female
Nationality: Japanese
Height: 5’5”
Weight: 145 lbs.
Date of Birth:
Apr. 12, 1975
CHARACTERS
sega-Outrigger-tx 7/18/01 3:00 PM Page 22
Page 13

2524
TACTICAL ADVICE
Strafing
It is a good idea to practice strafing so that you can become accustomed to dodging opponent fire.
Rocket Lanucher Jump
With the rocket launcher equipped, press the jump and fire buttons simultaneously to per form this
huge jump. Perfect for reaching high places or evading enemy fire.
Combos
When you defeat an enemy, a small gauge under the elapsed time turns green. As you defeat the
next enemies before the gauge turns red, you will be awarded double, triple, and quadruple the
amount of normal points as combo. Aim for the combo to get a high score.
Tip on Moving
You can move and look around separately. Use this technique to move strategically and smoothly.
Tip on Dodging
To dodge enemy attacks, use sidesteps.
Damage from Blast
Blast damage can be inflicted from the explosion of the Rocket Launcher or Grenades. If you aim at an
enemy that is very close, you will risk taking damage yourself. Use the Submachine Gun for close combat.
Aiming a Little Further
It is a good idea to read the enemy movement and aim at where he is headed.
Use Items Effectively
Locations where items appear are fixed. Memorize the locations, and use the battlefield to your advantage.
Avoiding Rockets
You can shoot down rockets fired at you with your machine gun.
TALON GRANT
3 WAY LASER GUN
Bursts from this gun do more
damage than the Submachine
Gun,
but it doesn’t fire as rapidly.
You can
also deflect shots
against the walls.
HEAVY GRENADE
Upon impact these grenades will
slow down enemy movement,
which allows you to attack while
the enemy is neutralized.
RAILGUN
These Rockets fly faster and hit
harder than any other, but the
rate of fire is below normal.
WEAPONS
Gender: Male
Nationality: American
Height: 6’4”
Weight: 210 lbs.
Date of Birth: July 7, 1969
TALON is a power-oriented
character. While he may not be
quick on his feet, he does have
the strongest attacks with any
weapon.
CHARACTERS
sega-Outrigger-tx 7/18/01 3:00 PM Page 24
Page 14

2726
CREDITS
The fo l l owing credits list the sta ff responsible for the localization, marketing and manual
d evelopment for the U.S. ve rsion of Outtri g ge r . Credits for the original development sta ff of th e
game are listed in the credits of the game itself.
Product Development
Localization Producer
Klayton Vorlick
Localization Manager
Osamu Shibamiya
Vice President of PD
Jin Shimazaki
Lead Testers
Tom Fong
Demetrius Griffin
Jordan Romaidis
Testers
Jason Jensen
Curtis Chiu
Nestor Protacio
Alex Vaughan
Francisco Rivera
Brian Ivanhoe
Ray Murakawa
Jason Mercer
Daniel Armanto
Andrew Parker
Amy-Geene Williamson
Hex Jao
Chester Lee
Marcelo Aranda
Seth Benton
Daniel Airey
Test Manager
John Amirkhan
Marketing
Director of Product Marketing
John Golden
Product Manager
Rich Briggs
Associate Product Managers
Cord Smith
Noah Musler
Public Relations
Gwen Marker
Teri Higgins
Creative Services
Director of Creative Services
Robert Schonfisch
Project Manager
Angela Santos
Project Coodinator
Arianne Pitts
Manual Production (Sega of Japan)
Writer/DTP Operator
Monika Hudgins
Design/Additional Texts/DTP
Makoto Nishino
Supervisor
Yoshihiro Sakuta
Sega.com
SegaNet Producer
Art Datangel
Lead Network Analyst
Darren Nagtalon
DC Server Operations
Douglas Land
Eric Fehr
QA Manager
Lance Nelson
QA Analysts
Nic Azizian
Jason Nolen
Cliff Wilhelm
Leland Ware
Director of Engineering
Britt Morris
Network Dev Team
Gary Crumback
Sami Tabikh
Scott Foe
Kevin Kwan
Liaison Network Engineer
Takashi Kosaka
Director of Games
Jerry Markota
Business Development
Keitaro Shigemasa
Rie Wani
Marketing
Bee Yinn Low
Special Thanks
Peter Moore
Mike Rhinehart
Sandy Castagnola
Rick Ribble Jr.
Robert Reich
Hitoshi Okuno
Ryoichi Shiratsuchi
Eugene Archibald
Von Ryan Kockensparger
CREDITS
sega-Outrigger-tx 7/18/01 3:00 PM Page 26
Page 15

28
NOTES
sega-Outrigger-tx 7/18/01 3:00 PM Page 28
 Loading...