

Seeley MagIQtouch, MagIQcool Service Manual

SERVICE GUIDE
MagIQtouch & MagIQcool Controller compatible
Breezair, Braemar & Coolair models 2015/2016
®
®
Original English Instructions

TABLE OF CONTENTS
MAGIQTOUCH/MAGIQCOOL COMPATIBLE EVAPORATIVE COOLERS 5
COMMUNICATION CABLE 5
COMMISSIONING 5
FAULT MANAGEMENT 5
USER OPERATION 5
MAGIQTOUCH CONTROLLER 6
MOUNTING LOCATION 6
CABLE LENGTHS 6
MAGIQTOUCH AIR SENSOR 7
MOUNTING LOCATION 7
MOUNTING OPTIONS 7
MAGIQTOUCH LINK MODULE 8
MOUNTING A LINK MODULE IN ENCLOSURE 8
CONNECTING CABLES 9
SETTING DIPSWITCH 9
UNDERSTANDING THE MAGIQTOUCH SYSTEM 10
COMPONENT ADDRESSES 10
BEFORE POWER-UP 10
SYSTEM DIAGRAMS 11
SINGLE EVAPORATIVE COOLER 11
GAS DUCTED HEATER (+ OPTIONAL ADD-ON COOLER) 11
MULTIPLE EVAPORATIVE COOLERS 12
INSTALLATION OPTIONS 14
DEFAULT SINGLE COMPONENT 14
MULTIPLE COMPONENTS 14
INSTALLATION WIZARD 14
PHASE 1 - SYSTEM DEFINITION 14
PHASE 2 - INSTALLATION 14
CONTROLLER OR SYSTEM RESET 15
SETTINGS MENU 16
GENERAL MENU 16
COOLER MENU 17
SERVICE MENU 17
MANAGING FAULTS 17
FAULT CATEGORIES 18
SERVICE MENU 18
SERVICE OPERATING SCREEN 19
COOLER ELECTRONICS BOX 19

TABLE OF CONTENTS cont
MANAGING COMPONENTS 19
ADDING COMPONENTS 19
REPLACING COMPONENTS 20
REMOVING COMPONENTS 20
MAGIQCOOL CONTROLLER - ENTERING PARAMETER MODE 21
MANAGING THE MAGIQTOUCH CONTROLLER 22
PRE-USED CONTROLLER 22
NEW CONTROLLER TO AN EXISTING SYSTEM 22
MAGIQTOUCH TO MAGIQCOOL CONTROLLER 22
MAGIQCOOL TO MAGIQTOUCH CONTROLLER 22
BREEZAIR EXQ / EZQ / EXS EVAPORATIVE COOLER 23
QUICK REFERENCE GUIDE 23
COOLER ELECTRONICS 24
CONFIGURATION OF DRAIN VALVE WITH SHORTING PLUG 24
DIAGNOSTIC FAULT CODES 25
LED#1 HALL EFFECT SENSORS 25
LED#2 MOTOR THERMAL OVERLOAD 25
LED#3 FAN SPEED 26
LED#4 MAINS POWER 26
DIAGNOSTIC LED 27
SALINITY LED 27
FAN MOTOR TESTING 28
FAN MOTOR REMOVAL 28
FOR EXQ130 & EXS140 COOLERS ONLY 29
REFITTING THE PAD FRAMES EXQ/EXS/EZQ 32
BRAEMAR LCQ / LCS / BMQ & COOLAIR CPQ EVAPORATIVE COOLER 33
QUICK REFERENCE GUIDE 33
DIAGNOSTICS FAULT CODES 35
FAULT CODE 01 35
FAULT CODE 02 35
FAULT CODE 04 35
FAULT CODE 07 36
FAULT CODE 08 36
REFITTING THE PAD FRAMES LCQ/LCS 36
PREWET FUNCTION 37
WATER COMPONENT TESTING 38
WATER SALINITY PROBE TESTING 38
SETTING THE WATER LEVEL 39

TABLE OF CONTENTS cont
SEASONAL MAINTENANCE PROCEDURES AND CHECKS 40
TECHNICAL BULLETINS 42
A01/12 SEELEY SERVICE MEMO 43
A05/15 IMPORTANT INFORMATION FOR INSTALLERS 44
A17/14 MAGIQTOUCH CONTROLLER INSTALLATION TIPS 45
A12/14 BREEZAIR EXS PAD CONFIGURATION 46
ICON CONTROL BOX FAN SPEED LED BEHAVIOUR 47
A02/09 CIRCUIT PROTECTION FOR ICON 48
A13/08 ICON ELECTRICAL SUPPLY REQUIREMENTS 49
A16/08 WATER DISTRIBUTION HOSE CONNECTIONS 50
A06/07 FEAC WATER SUPPLY REQUIREMENTS 51
NOTES 52
MAGIQTOUCH SYSTEM TROUBLESHOOTING GUIDE 53
FREQUENTLY ASKED QUESTIONS 55
MAGIQTOUCH CONTROLLER 55
EVAPORATIVE COOLER 57
SEELEY INTERNATIONAL
- SERVICE GUIDE | 5
MAGIQTOUCH/MAGIQCOOL
COMPATIBLE EVAPORATIVE
COOLERS
The previous Breezair and Braemar range
has been replaced with MagIQtouch and
MagIQcool compatible models.
Introduction of the MagIQtouch controller
brings the following changes:
COMMUNICATION CABLE
• Cable type
26AWG 7/0.16, 6 core at communication cable
with 6P/6C RJ12 plug connections (not backwards
compatible with previous models)
• Cable lengths
Maximum recommended cable lengths changed
due to increased power requirements of the
MagIQtouch controller. Maximum cable length from
controller to rst cooler is 25m. (Each cooler is
supplied with a 20m cable ex factory).
COMMISSIONING
• Installation Wizard
The introduction of a step by step Installation
Wizard displayed on the MagIQtouch controller
to assist with commissioning. (NOTE: Installation
Wizard is only available with MagIQtouch
controllers).
FAULT MANAGEMENT
• Fault display
Displayed with full explanation and service contact
details.
• Fault resolution
Service menu assists with diagnosing faults,
troubleshooting instructions, and retrieving
component information.
• Component testing
Service Operating Screen provides full control of
all water management components on a single
screen, making testing easier.
• Removing/Replacing MagIQtouch products
Automatic detection & step by step on screen
instructions.
USER OPERATION
• Clearer, more intuitive touch screen interface for
easy operation
• New operation features (e.g. 7 day program)
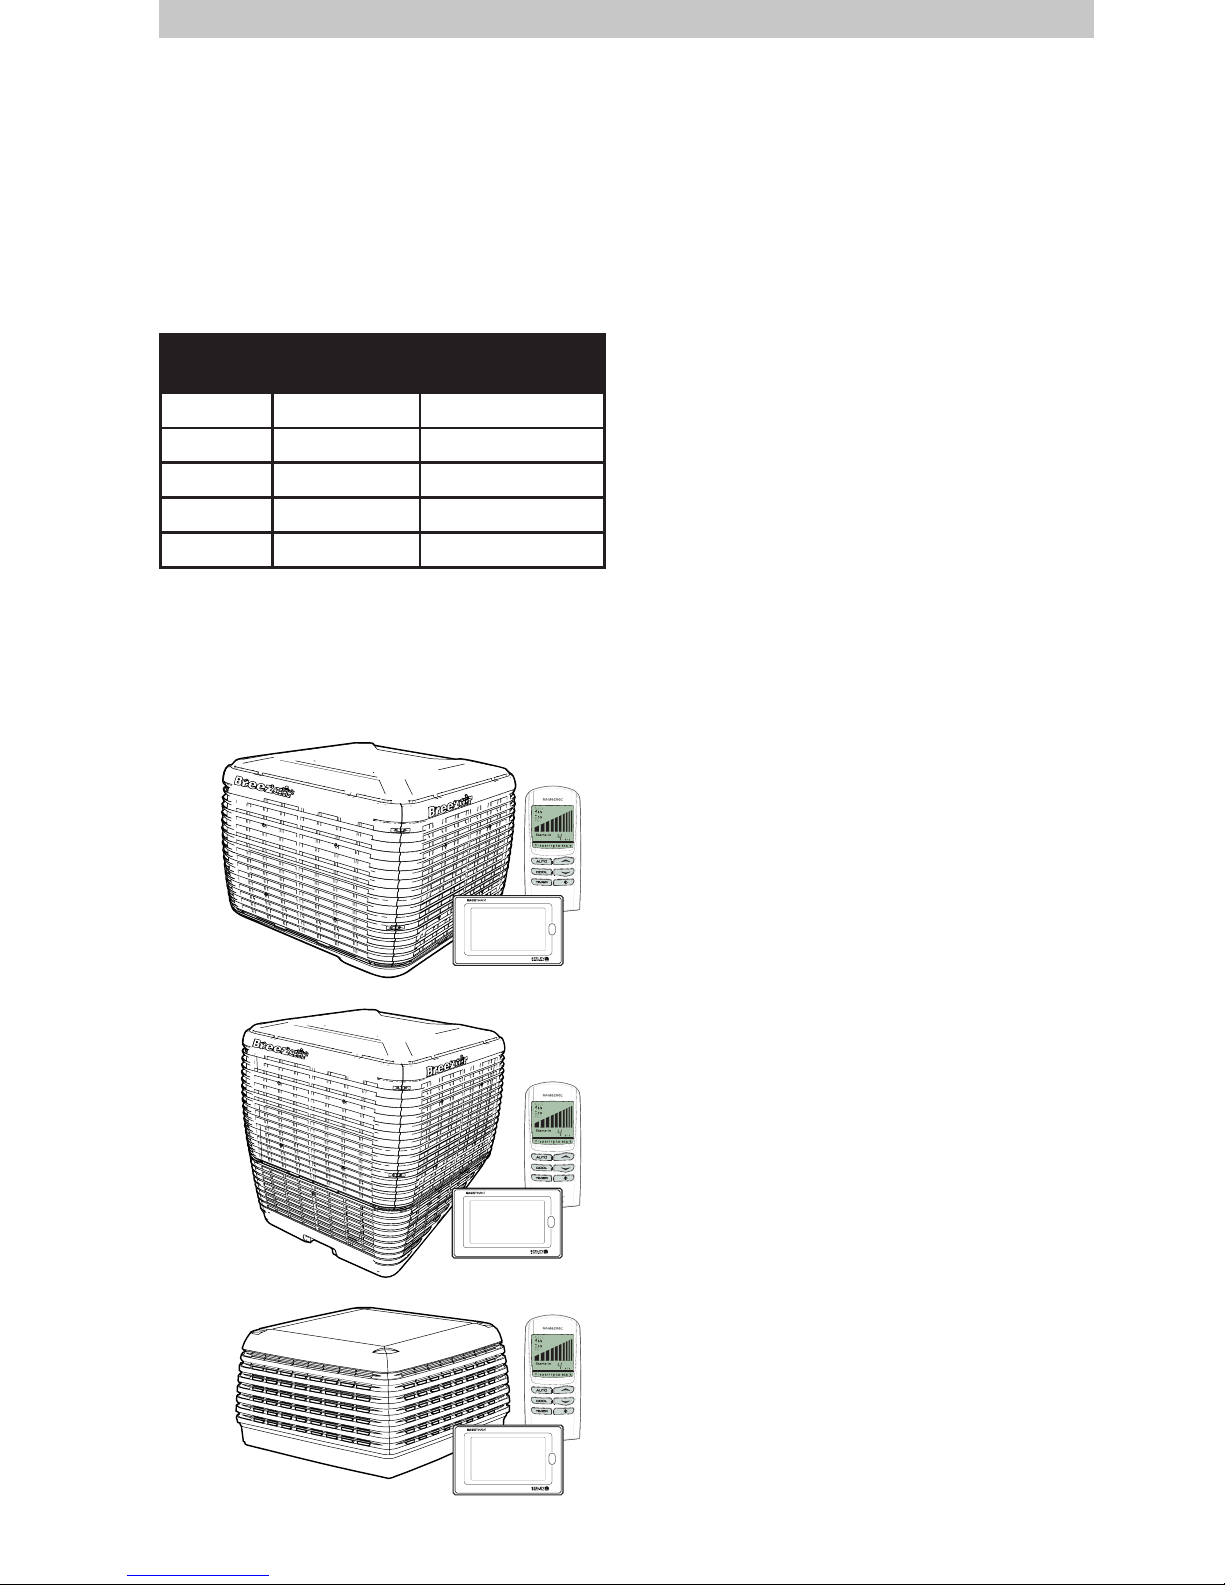
ILL1672-A ILL1674-B
ILL1674-B
ILL1674-BILL1673-A
ILL1456-B
Previous
Model
New Model Default Wall
Control
EXH EXQ, EXS MagIQtouch
EZH EZQ MagIQtouch
LCB LCQ, LCS MagIQtouch
CPL CPQ MagIQcool
BM BMQ MagIQcool
ILL1674-B
The MagIQcool controller has all the features
of older wall controls, but can connect to
RJ12 controls used in MagIQtouch coolers.
It is offered as an entry level controller for
evaporative cooler installations.
ILL1456-B

6 | MAGIQTOUCH & MAGIQCOOL MODELS
MAGIQTOUCH CONTROLLER
With a touch screen user interface and inbuilt
temperature sensor, the MagIQtouch controller
will operate Seeley International’s new range
of Breezair and Braemar models, including
EXQ, EZQ, EXS, LCQ and LCS models. BMQ
and CPQ coolers can be upgraded to the fully
featured MagIQtouch controller.
The MagIQtouch controller can be used on its
own to operate an evaporative cooler.
ILL1521-B
ILL1828-A
ILL1831-A
A single MagIQtouch controller can also be
used with a MagIQtouch Air Sensor, which
provides more exibility with the mounting
location of the controller.
MOUNTING LOCATION
The MagIQtouch controller, with in-built
temperature sensor, should be placed
approximately 1.5m above the oor, in the
most used room of the home.
Placement is critical for correct functioning of
the temperature sensing thermostat inside the
controller.
The following points must be taken into
consideration:
• Avoid direct sunlight exposure.
• Avoid mounting on external walls.
• Avoid mounting the wall control near heat sources
such as stoves and televisions.
• Do not locate in the direct airow of the duct
outlets.
• Do not locate in strong drafts or in dead spots such
as cupboards/drawers.
• Always seal the cable entry hole. Hot or cold air
coming through the wall may interfere with the
temperature measurement.
If a MagIQtouch Air Sensor is to be installed
with a single controller, the above location
instructions should be applied to the Air
Sensor. In this case, the controller location is
not important.
CAUTION! Always make sure there are no
electrical cables, gas or water pipes, or the
like, behind where you intend to drill.
CABLE LENGTHS
The maximum recommended cable length is
25m from MagIQtouch controller to rst cooler.
This is to ensure adequate power is delivered
to the controller for correct operation.
ILL1759-C
SEELEY INTERNATIONAL
- SERVICE GUIDE | 7
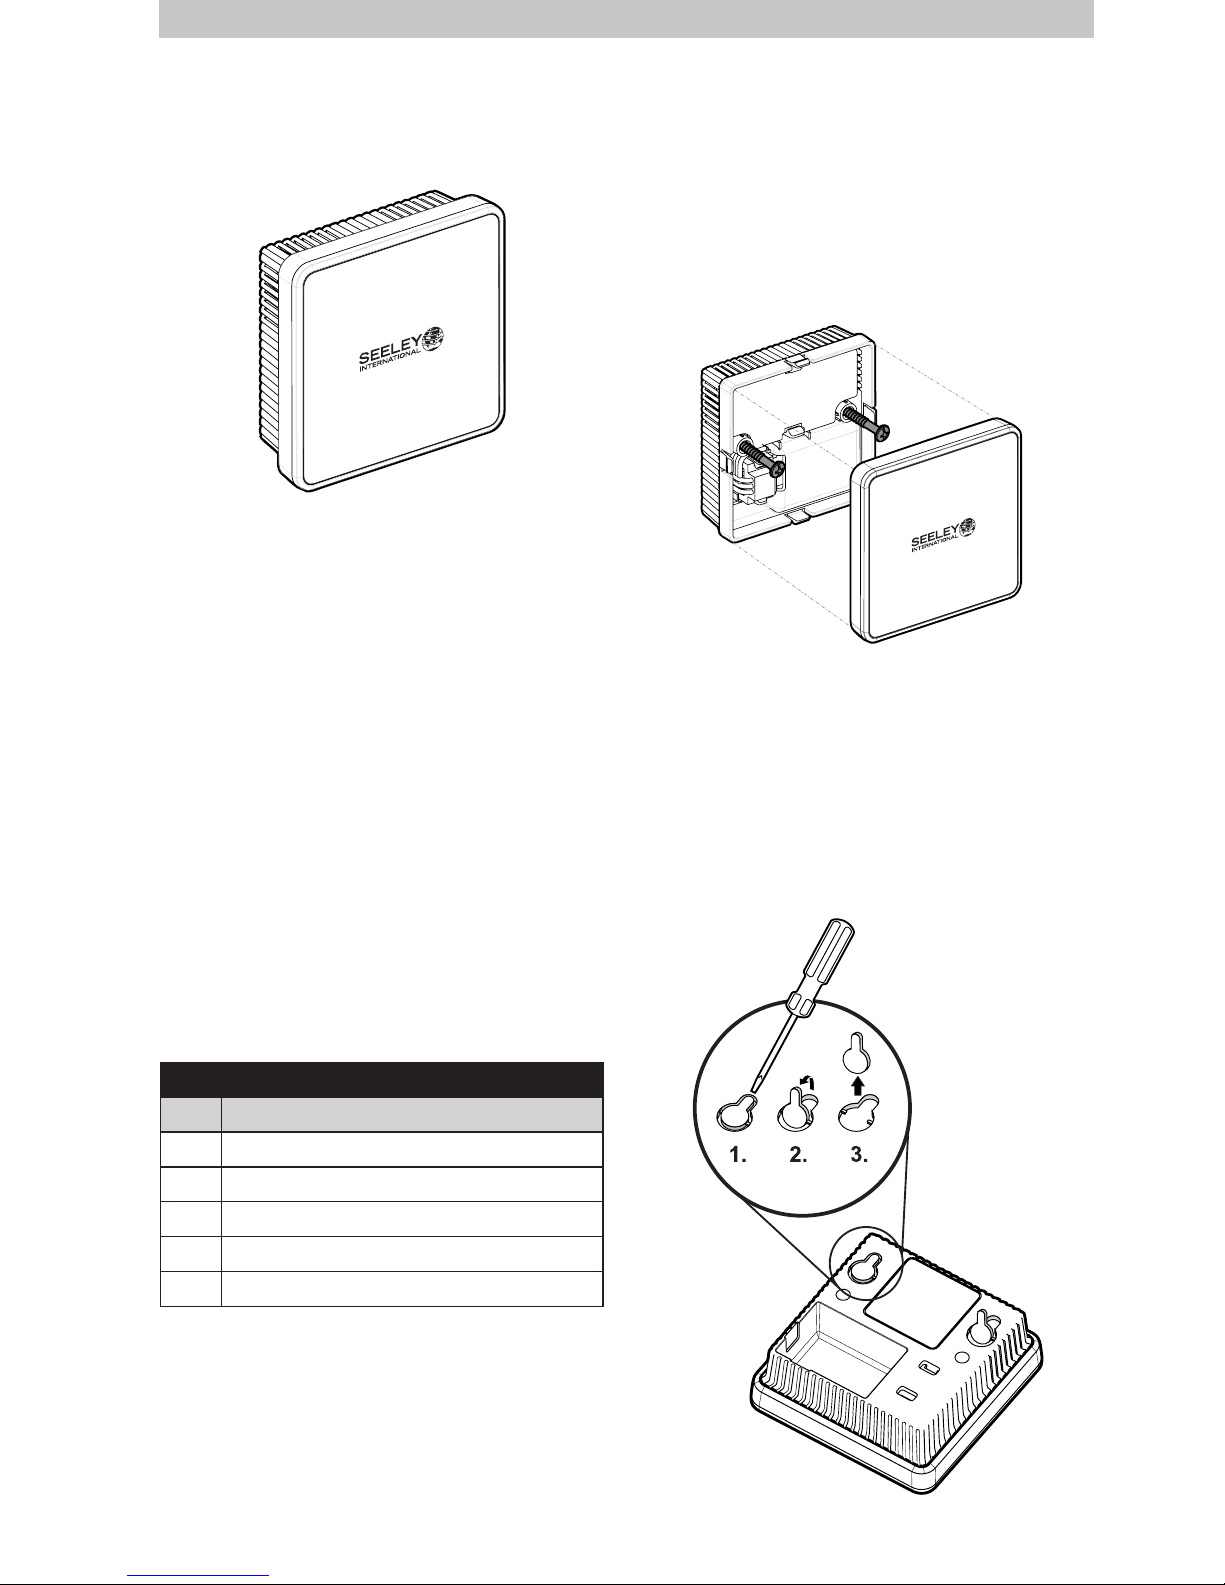
Contents
Qty Description
1 MaglQtouch Air Sensor
1 Communication Cable (20m)
2 Long Screws
2 Short Screws
2 Wall plugs
ILL1804-A
MAGIQTOUCH AIR SENSOR
The MagIQtouch Air Sensor is an optional
extra product which allows more exibility with
where the MagIQtouch controller is mounted.
Each controller has a temperature & humidity
sensor mounted inside it which dictates how
the cooler operates. In the past, this has
restricted the locations where the controller
could be mounted for successful operation of
the cooler.
This optional Air Sensor allows the controller
to be mounted in a location not ideal for
temperature sensing (e.g. cupboard, hallway,
etc.). The installer can set up the MagIQtouch
controller to take temperature and humidity
readings from this external sensor and run the
cooler accordingly.
Details of the MagIQtouch Air Sensor kit are as
follows:
094328
MagIQtouch Air Sensor
MOUNTING LOCATION
The Air Sensor will be used instead of the
MagIQtouch controller for temperature sensing.
Follow the mounting location instructions in the
MagIQtouch controller section.
MOUNTING OPTIONS
Screw Boss Mounting
If permanently xing the sensor, pull off the
front panel to expose the 2 screw bosses
inside.
Keyhole Mounting
If using the keyhole mounting method, rst
remove the break-out pieces using a small
screw driver to lever upwards. The piece can
then be pulled out.
Important! Be careful not damage the
electronics board inside the sensor when
removing the break-outs. Do not punch
inwards, but twist and pull out!
ILL1810-A
ILL1811-A
 Loading...