

Seek Thermal Reveal FirePRO User Manual
Reveal FirePRO Manual
A comprehensive guide to understanding and operating your
Thermal Imaging Camera (TIC)
Find Quality Products Online at: sales@GlobalTestSupply.com
www.GlobalTestSupply.com

Table of Contents
1 Product Registration
2 Quick Start
2.1 Charging the Battery
2.2 Setting up your Device
2.3 Home Screen
2.4 Temperature color bar
3 Reveal FirePRO schematic
4 Modes
4.1 Fire
4.2 Survey
4.3 Auto
5 Menu
5.1 Gallery
5.2 Temperature
5.3 Device
5.3.1 Date & Time
5.3.2 Language
5.3.3 Power
5.3.4 Flashlight
5.3.5 Watermark
5.3.6 Restore
5.4 About
6 Capturing a Photo
7 Downloading Images
8 Cleaning the Lens
9 Help and Customer Support
10 Troubleshooting
11 About Seek Thermal
12 Legal Disclaimer
Find Quality Products Online at: sales@GlobalTestSupply.com
www.GlobalTestSupply.com

1 Registering your product
• By sharing your name, email, and serial number, you enable us to send you product updates
and tips and techniques. We can also expedite your warranty inquiries by knowing when
and where you purchased.
• NOTE: We do not – and will not- sell any consent or contact or personal data to any
third-party!
Find Quality Products Online at: sales@GlobalTestSupply.com
www.GlobalTestSupply.com
2 Quick Start
Custom designed for enabling speed and efficiency during disasters, the Reveal
FirePRO has a unique interface all its own. Here is a list of steps to get you started:
2.1 Charging your Battery
1 For the best results, charge your Reveal FirePRO using the included USB cable.
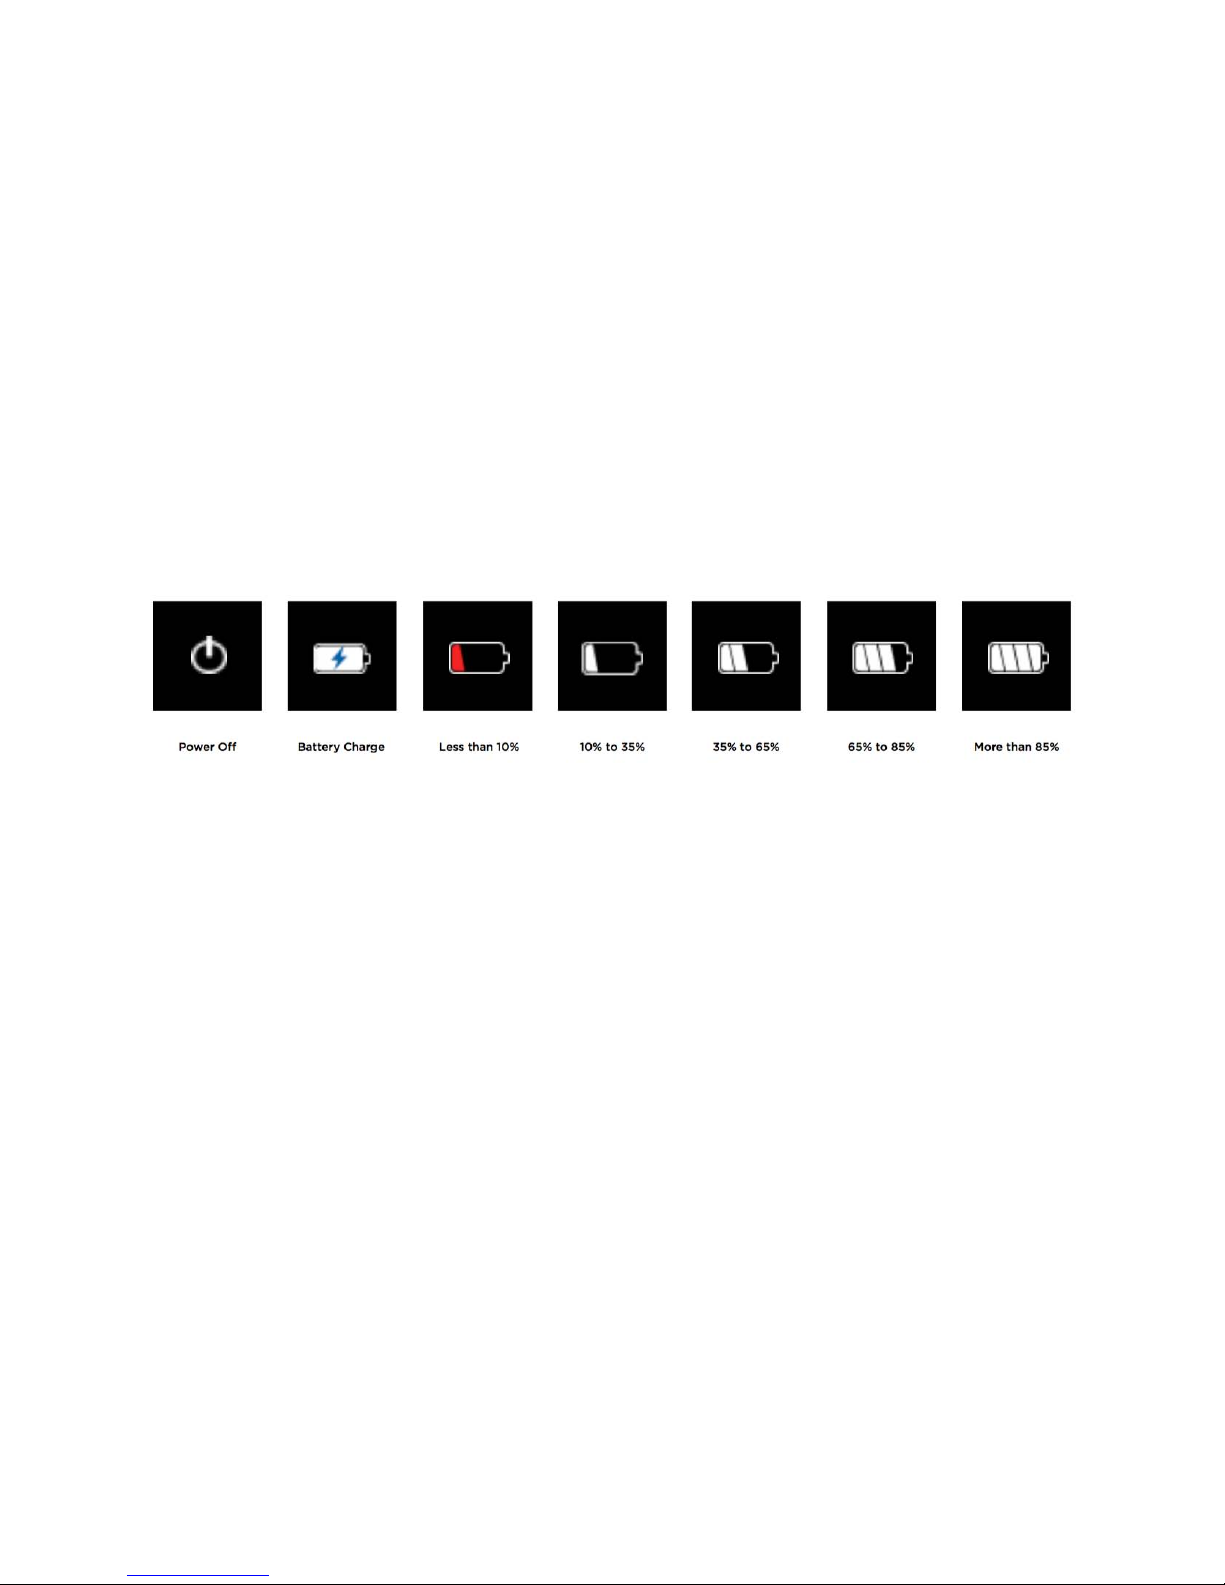
When the thermal camera is ‘off’, the Battery Charging screen will appear. The battery
charge level will only appear when plugged in and the LEFT or RIGHT buttons are
pressed.
NOTE: Reveal FirePRO will provide up to 4 hours of scanning time with a full charge.
2.2 Setting up your Device
1 To turn on your device, press the CENTER button and hold until the screen lights up.
The button-function ribbon at the top of the screen defines the meaning of the three
buttons above it. For each of the setup screens, use the LEFT and RIGHT buttons to
navigate, and the CENTER button as the selector. For numerical fields, the LEFT button
subtracts from the displayed value, while the RIGHT button adds to it, as the buttonfunction ribbon indicates. To switch the device off, press and hold down the CENTER
button for 2 seconds until screen goes dark.
2 You will be directed to a screen that asks you to set up some basic information,
including language, and date & time formats. Using the RIGHT and LEFT buttons, scroll
down and select the appropriate fields, using the CENTER button to select and
continue, concluding with the ‘setup complete’ screen.
NOTE: If you need to change any of the information input in the initial setup, or settings
afterwards, you can always restore your device back to its factory settings by selecting
“Restore” in the ‘about’ tab of your menu options. This option will reboot your device and
ask you to input the same information as when it’s first turned on. To conduct a hard
Find Quality Products Online at: sales@GlobalTestSupply.com
www.GlobalTestSupply.com

reset, press and hold the CENTER button for 30 seconds until the screen flashes on
and off. This option can be useful for recalibrating the battery power settings if the
device will not turn on.
2.3 Home Screen
Once you have completed the initial setup, you will be directed to the following screen:
2.4 Temperature Color Bar
1 If you are at all familiar with any of the other Reveal models, you will immediately
notice some differences. Unlike the other Reveal devices, pressing the CENTER button
does not take you to the menu. Instead, it turns ‘on’ or ‘off’ special footers which frame
the image while you scan.
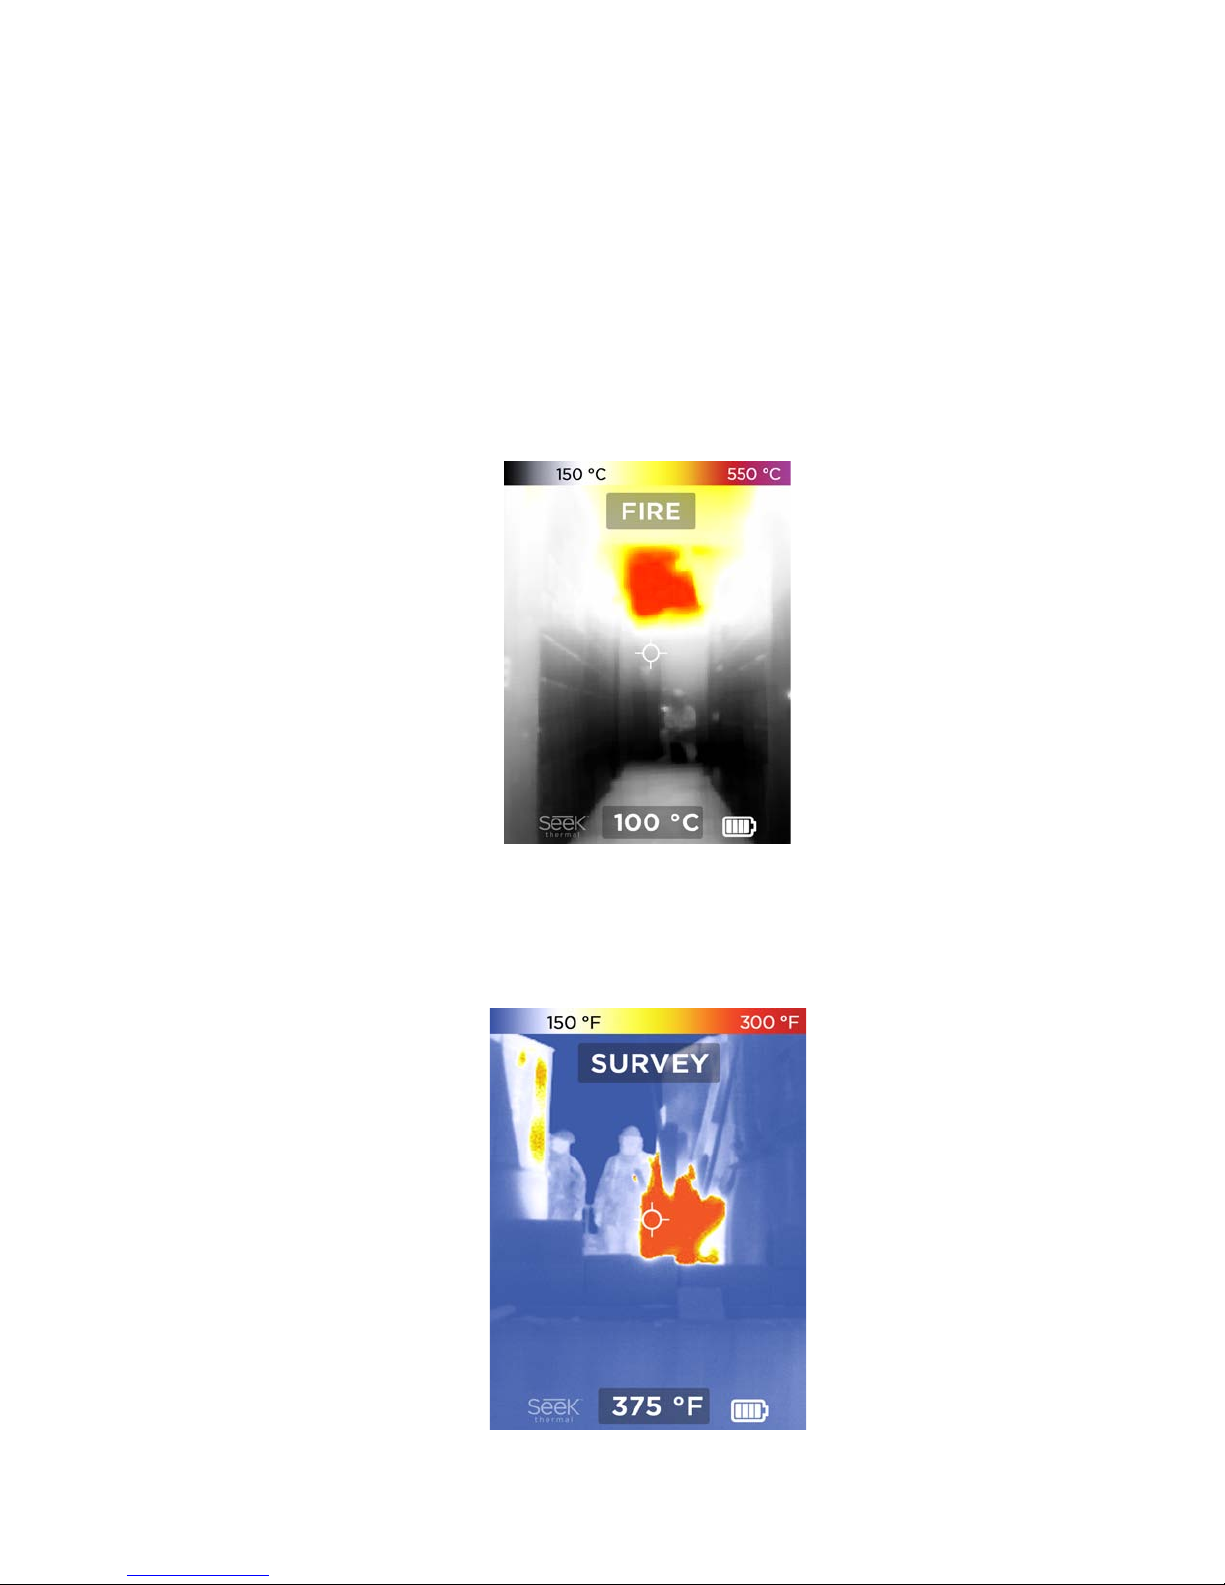
2 The temperature color bar visually displays a temperature range up to 1022°F
(550°C). The lower number in the temperature bar tells you at what temperature the
image begins to be colorized. Anything below the bottom temperature will appear black
and white, with high dynamic range, and anything above it will begin to be colorized. It
also tells you which mode you are viewing the image through, and the numerical
temperature located at the focal point of the reticle. The Seek Thermal watermark is
located at the left-hand corner of the screen, and the battery life at the bottom righthand corner of the screen.
Find Quality Products Online at: sales@GlobalTestSupply.com
www.GlobalTestSupply.com
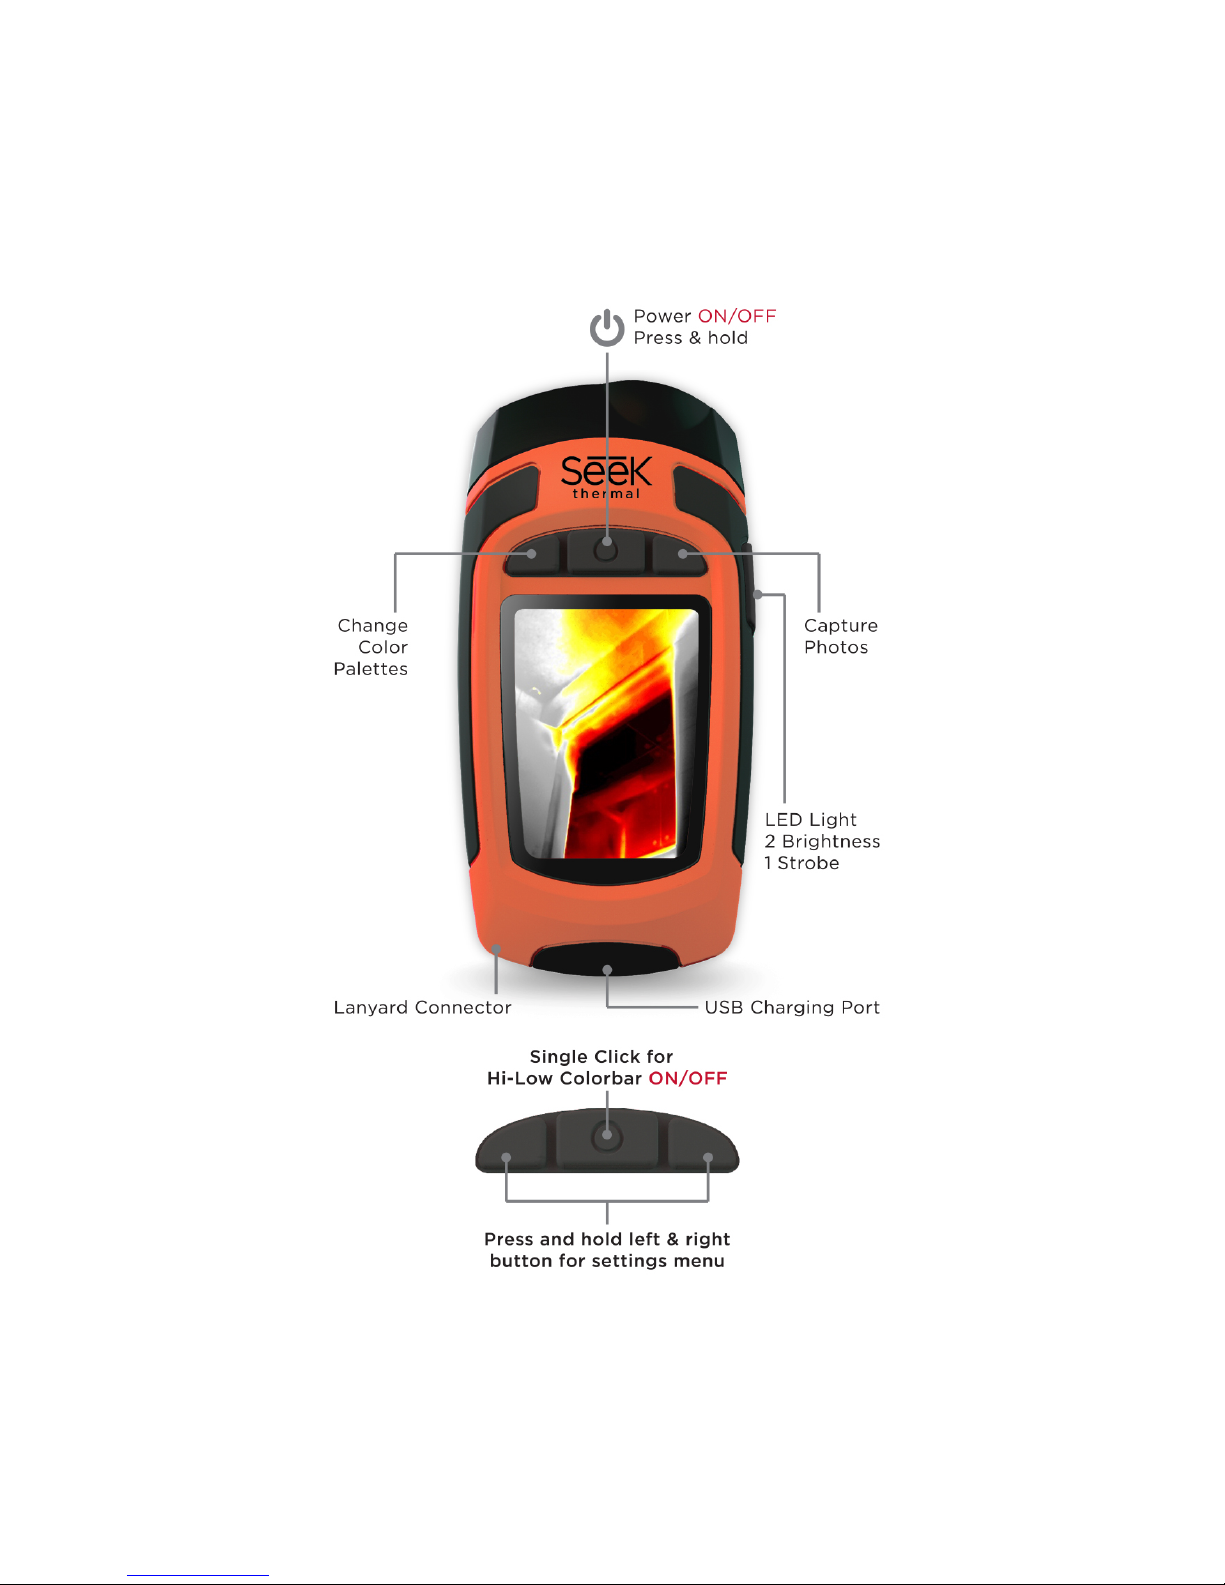
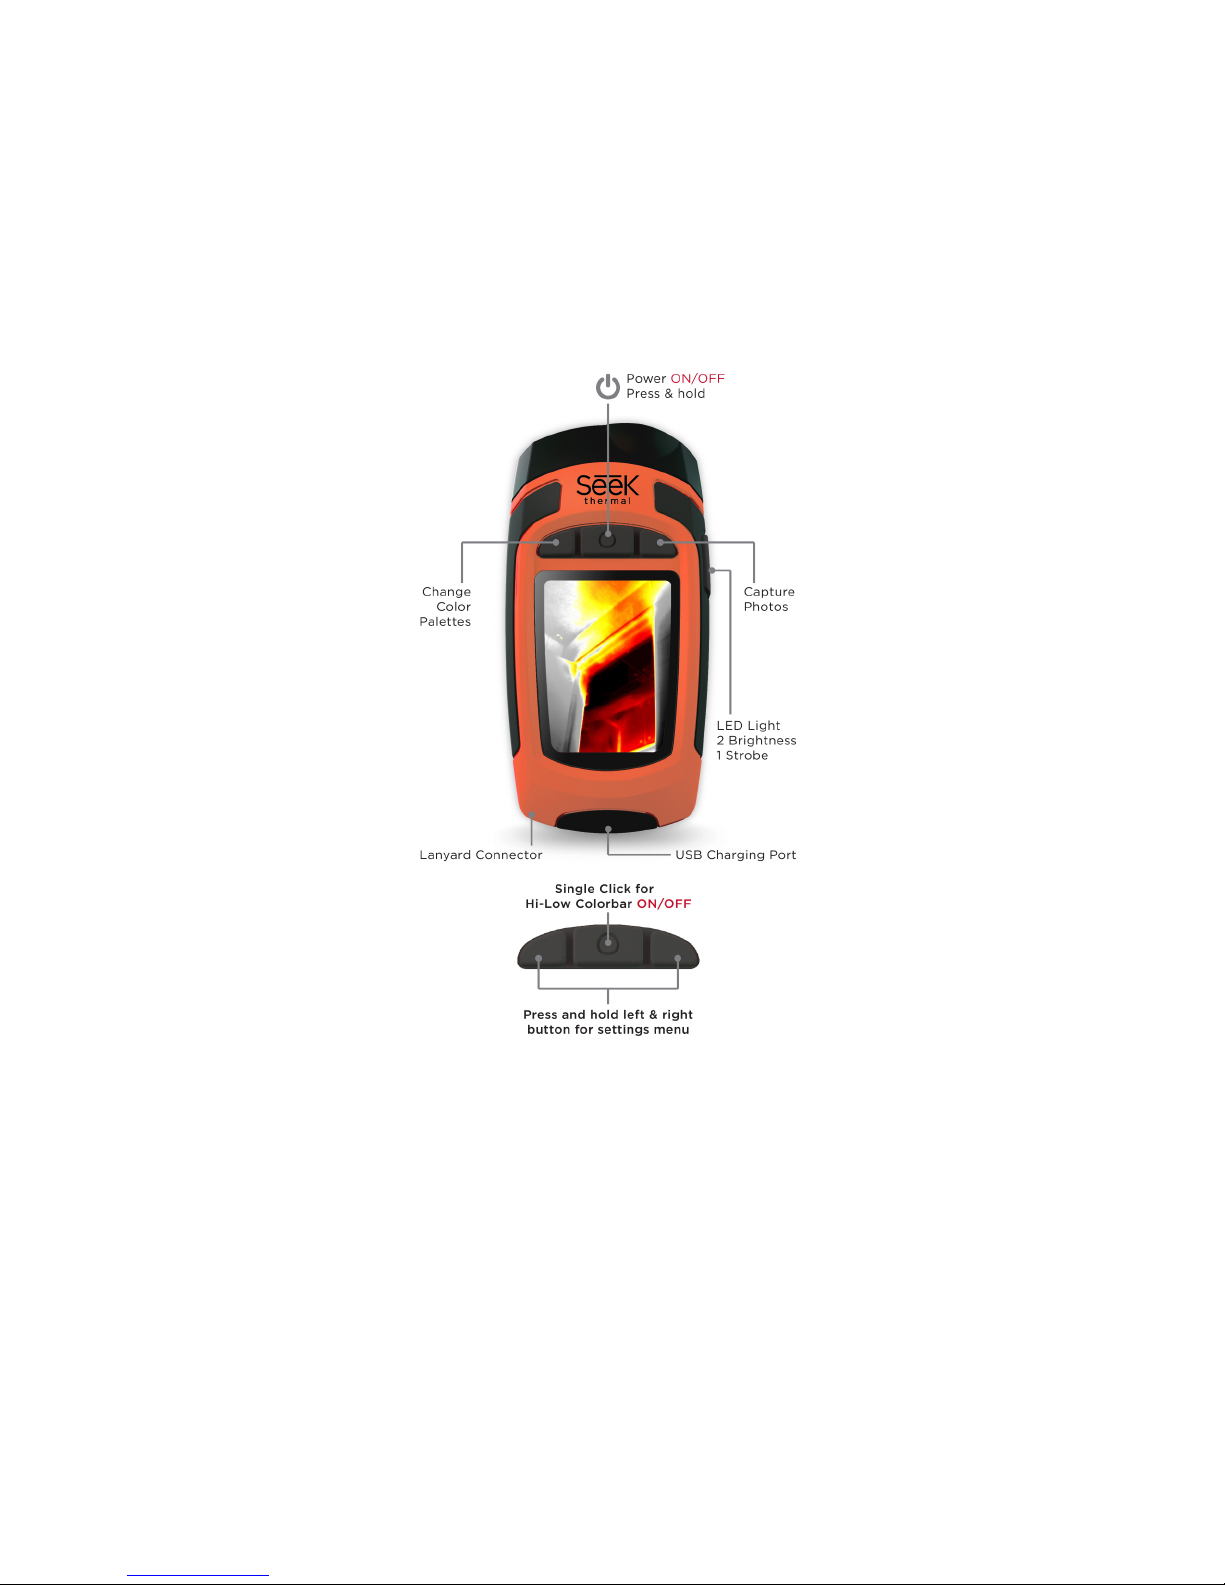
3 Reveal FirePRO Schematic
Find Quality Products Online at: sales@GlobalTestSupply.com
www.GlobalTestSupply.com
4 Modes
The Reveal FirePRO has three different modes which have been optimized for First
Responders. The following modes are as follows:
4.1 Fire- Displays an image in shades of black and grey which turn bright orange/red
when areas of extreme heat are present. This mode is specifically designed for locating
hotspots in fire during 360 size-ups and Overhaul.
4.2 Survey- Similar to Hi, a monochromatic filter of different shades of blue which turn
white around warmer areas. This mode is optimal for helping locate downed personnel
and victims during search and rescue.
Find Quality Products Online at: sales@GlobalTestSupply.com
www.GlobalTestSupply.com
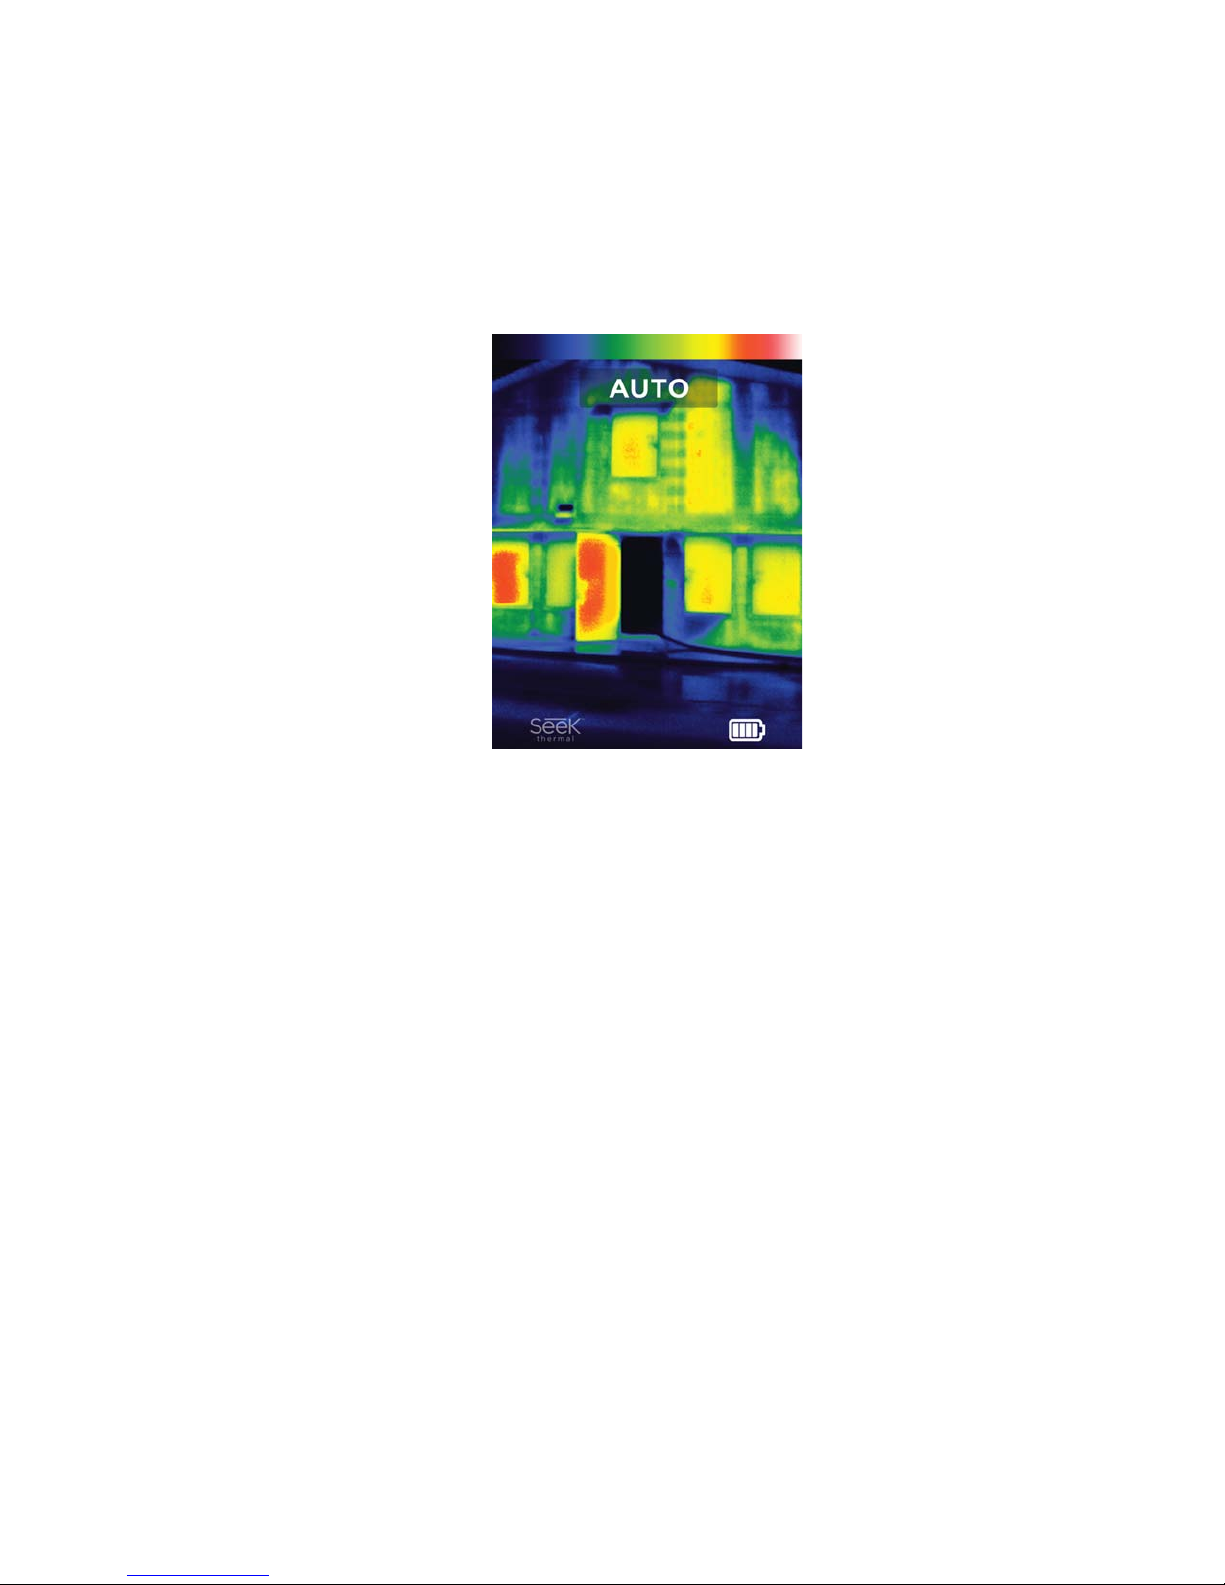
4.3 Auto – This is a demonstration mode and is best-suited for the classroom. which
highlights areas of heat in red with colorful borders as the temperature decreases. While
it’s seldom used in the field, it’s present simply to demo thermal imaging to third party
observers.
To cycle through the different filters, press the LEFT button until you find the desired
filter.
Find Quality Products Online at: sales@GlobalTestSupply.com
www.GlobalTestSupply.com
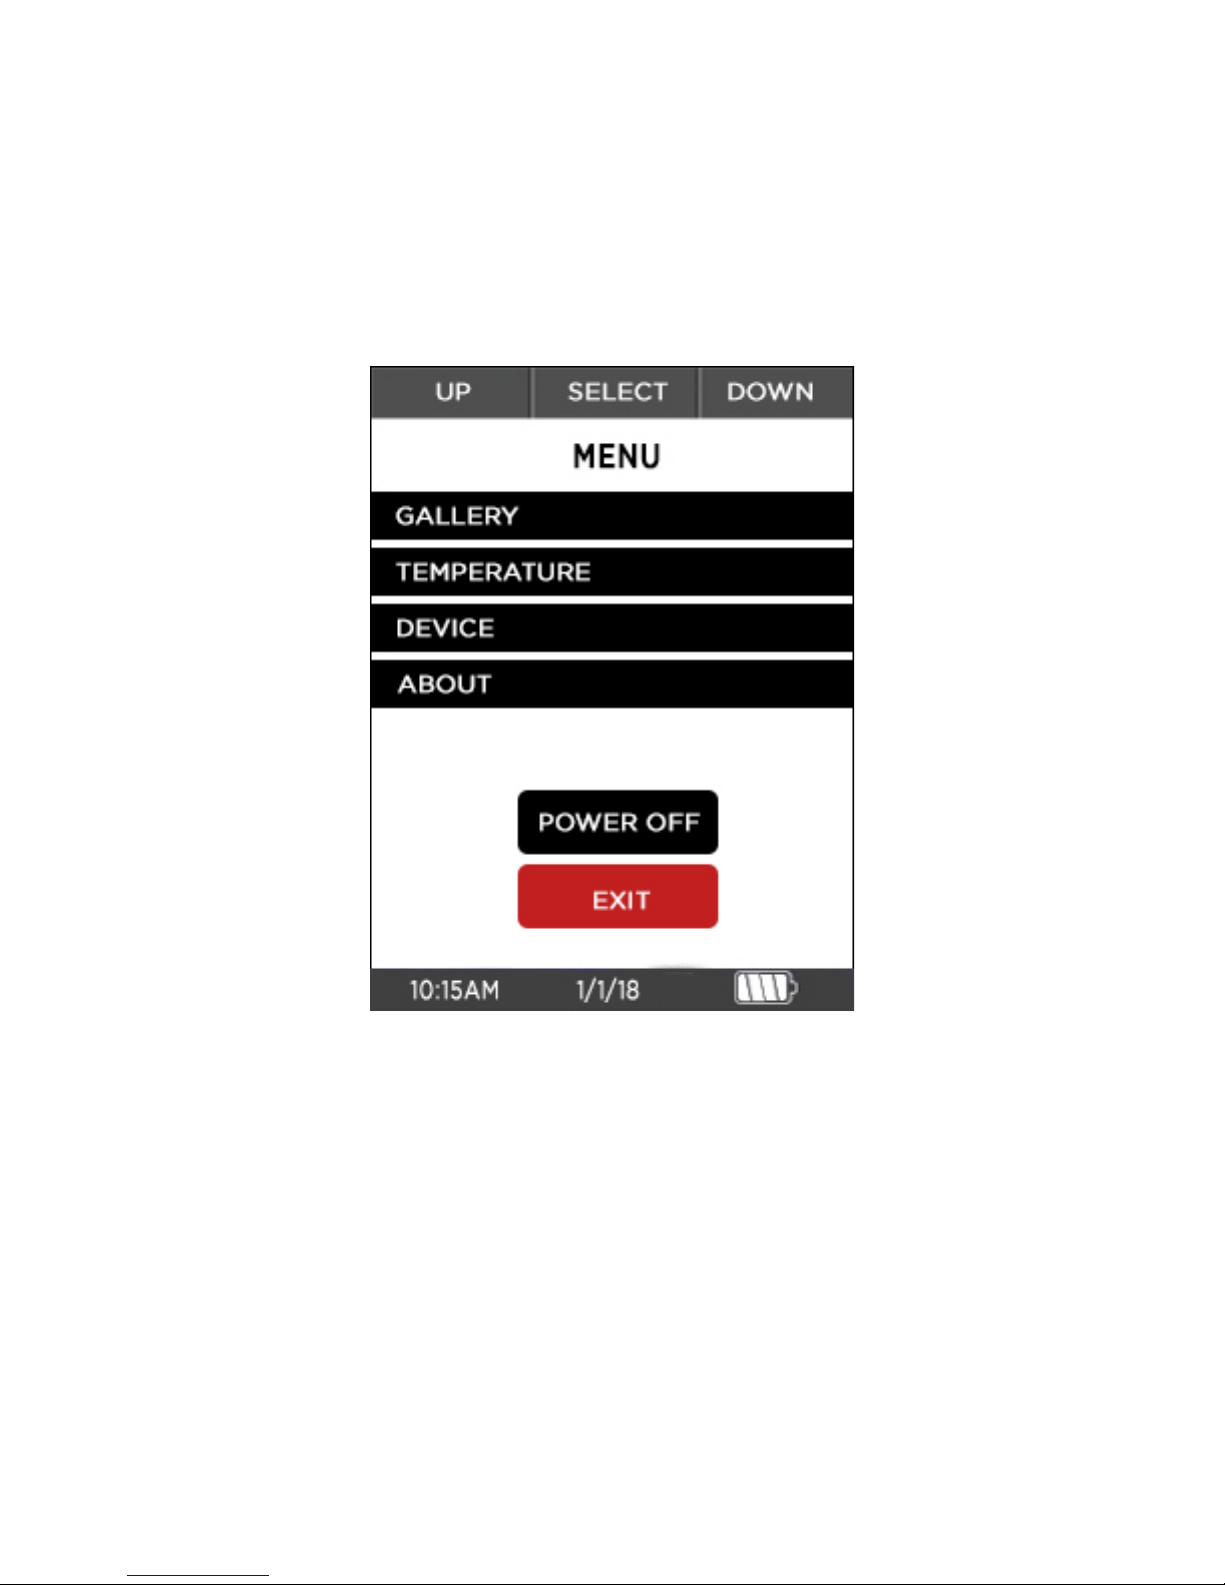
5 Menu
To access the menu, simultaneously press both the LEFT and RIGHT button and hold
for at least one second. You will then be directed to the following screen:
The Menu gives you access to your gallery, switching temperature settings from
Fahrenheit to Celsius, device settings, your flashlight, and device information.
5.1 Gallery
Entering the gallery allows you to view or delete your saved photos.
5.2 Temperature
Click on this option and use the CENTER button to choose between °F and °C for
temperature viewing.
Find Quality Products Online at: sales@GlobalTestSupply.com
www.GlobalTestSupply.com
 Loading...