


Grove Inventor Kit for micro:bit
Grove Inventor Kit for micro:bit
Project Guide
Project Guide

Content
About Seeed
Diversified demands cannot be fully satisfied by mass production. The booming of open source hardware, 3D
printing, crowd-funding and global logistics creates a evolutional easy platform to hardware innovators.
Products are becoming democratized, as some of the consumers now calling themselves makers.
Seeed is a hardware innovation platform for makers to grow inspirations into differentiating products. By
working closely with technology providers of all scale, Seeed provides accessible technologies with quality,
speed and supply chain knowledge. When prototypes are ready to iterate, Seeed helps productize 1 to 1,000
pcs using in-house engineering, supply chain management and agile manufacture forces. Seeed also team up
with incubators, Chinese tech ecosystem, investors and distribution channels to portal Maker startups
beyond.
@seeedstudio
Product Introduction
How to program Grove on micro:bit
1.Control the Light 5-6
2.Sunshine micro:bit 7-8
3.LED Bar Control 9-10
4.Music Player 11-12
5.Gesture Recognition 13-14
6.Smart Guard 15-16
7.Shake Counter 17-18
8.Ultrasonic Meter 19-20
9.Rainbow on The Desk 21-22
10.Guardians of The Secrets in Your Bag 23-24
11.Guardians of The Secrets in Your Room 25-26
12.Magic Musician 27-28
1-2
3-4

Grove Starter Kit for micro:bit
5.Grove – Light Sensor V1.2
The light sensor is used to detect how
much bright light is. This sensor is a
photo-resistor which controls the
current. Based on how much light the
senor detects, you could turn volume up
or down, sound an alarm, or increase
how fast an LED blinks!
6.Grove - WS2812 Waterproof LED
Strip - 30 LEDs 1 meter
This is a RGB LED strip. RGB means
each LED can change colors and You
can control each LED separately to
show different colors. It is also waterproof so you are free to use it outdoor
without worrying about rain.
1.Grove Shield for micro:bit
Because micro:bit does not have the
Grove interface, the Grove Shield for
micro:bit adds 4 grove interfaces. This
allows Grove modules to connect to the
Grove shield and communicate with
micro:bit.
3.Grove – Speaker
The speaker can emit a variety of
sounds such as a car horn, a doorbell,
and an alarm. By changing the frequency of the input signal, you will get
different sounds. You can also adjust
the loudness by changing the angle of
the cross screw.
2.Grove - Rotary Angle Sensor (P)
There is a 10kΩ potentiometer in the
sensor, when you rotate the rotary knob,
the value of this potentiometer will
change. This causes the output signal to
change linearly based on the angle
(0˚~300˚). You can use this rotary knob
to control volume, speed, or any other
variable!
4.Grove – Ultrasonic Ranger
This sensor sends out an ultrasonic
sound. Based on when (or if) the sound
returns to the sensor it can tell how far
away an object is. This can be used to
build projects that output different
effects such as lights or sounds by
changes in distance.
7.Grove – Gesture
This gesture sensor can recognize 9
different gestures: left, right, up, down,
forwards, backwards, clockwise rotation,
counter-clockwise rotation, and waving.
You can use this sensor to build very fun
applications such as using your gestures
to switch songs or adjust the music
volume.
9.Grove - Red LED
This is a simple red LED. The maximum
brightness can be controlled by the
onboard potentiometer that integrates
grove interface.
8.Grove - 4-Digit Display
This display is very suitable for
displaying numbers. It can be used to
display time, distance, or display other
sensor’s values.
Grow the difference
1 2

Add Package…
?
Grove
github.com/seeed-studio/pxt-grove
A Microsoft MakeCode package for
Seeed Studio Grove Module
How to program Grove on micro:bit
Images
Pins
Serial
Control
Add Package
To program Grove modules with micro:bit, you will need to add the Grove PXT packages
to your makecode environment.
Steps
1. Find the “Add Package” option at the bottom
2. Now you can add Grove Packages by:
1) Searching the keyword ‘
2) Simply enter project URL: github.com/seeed-studio/pxt-grove
Grove’
3.If you find “Grove” under “Math”, congratulations! You have successfully added the Grove Package !
3 4

1. Control the Light
Diculty Level
Part List
1
1x Grove - Red LED
2
1x Grove Shield for micro:bit
3
1x micro:bit
Description
In this demo, you will learn how to
use the 2 buttons on the micro:bit to
turn the LED on and off.
2
P0/P14
3
Steps
1
2. Add an input block for on button A is pressed,
and add a pin block digital write pin 0 to 1.
2
3. Add an input block for on button B is pressed,
and add a pin block digital write pin 0 to 0.
3. Hardware connection: Connect the Grove – Red
LED to P0 port of Grove Shield for Micro:bit.
4. Click Download to transfer your code in your
micro:bit!
5. Press button A and button B to see if the code
works as expected.
1
2
Project 1 : Control the Light
1
Add to this demo! Have button A turn the light on when pressed,
and the o when pressed again! you.
5 6

2. Sunshine micro:bit
Diculty Level
3
Steps
2. Add basic block forever, then add LED block plot
1
bar graph of…..up to, amend the block to be plot
bar graph of Light Sensor up to 255.
1
Part List
1
1x Grove - Light Sensor
2
1x Grove Shield for micro:bit
3
1x micro:bit
Description
In this demo you will learn how to
use the LED bar graph on your
micro:bit to show the current light
level. The stronger the light is, the
more LEDS will be turned on.
2
Project 2 : Sunshine micro:bit
P0/P14
1
2
3. Add basic block pause(ms), change the value to
“10”.
3. Click Download to transfer your code in your
micro:bit!
4. Put your hand over the light sensor to block the
light, and see how the LEDs on micro:bit change.
Try to change the “up to” value from 255 and see what happens
2
7 8

3. LED Bar Control
Diculty Level
Part List
1
1
1x Grove - Rotary Angle Sensor(P)
2
2
1x Grove Shield for micro:bit
3
3
1x micro:bit
Description
In this demo you will learn to control
the LEDs on your micro:bit with the
rotary angle sensor. The number of
LEDs turned on will increase or
decrease as you rotate the knob on
the sensor.
2
P0/P14
3
Steps
1
Add basic block forever, then add Led block plot
bar. Replace the first value with pin block analog
read pin P0, and change the second value to “1023”.
Add basic block pause (ms) (100).
2
2. Hardware connection: Connect the rotary angle
sensor to P0 port of micro:bit
3. Click Download to transfer your code in your
micro:bit!
4. Rotate the knob on the rotary angle sensor and
see the change of LED Bar.
1
2
Project 3 : LED Bar Control
1
Try to change the “up to” value from 1023 to other numbers and see
what will happen. Is there a dierence compared to Demo 2?
9 10

4. Music Player
Diculty Level
3
Steps
1
2. Add an input block for on button A is pressed, the
speaker executes play tone middle C for 1 beat.
1
Part List
1
1
1x Grove - Speaker
2
2
1x Grove Shield for micro:bit
3
3
1x micro:bit
Description
This demo will teach you how to use
the 2 buttons on micro:bit to play
music.
2
Project 4 : Music Player
P0/P14
1
2
3. Add an input block for on button B is pressed, the
speaker executes start melody dadadum once.
3. Click Download to transfer your code in your
micro:bit!
4. Press button A or button B to play the sounds.
Try to use block on button A+B pressed and let the
speaker play other sounds or melodies.
2
3
11 12

5. Gesture Recognition
Diculty Level
Part List
1
1
1x Grove - Gesture
2
2
1x Grove Shield for micro:bit
3
3
1x micro:bit
3
Steps
1
1. If you have added the ‘Grove Package’ successfully, add block
on Gesture Right, then add basic block show string, amend the
word to ‘Right ’.
2
2. Add another block on Gesture Left, then add basic block
show string, amend the word to ‘Left’.
3. Add another block on Gesture, choose “Clockwise”. Then
3
choose basic block show icon, then choose “smile face”.
1
2
Description
The gesture sensor can recognize 9
different gestures, in this demo, you
will learn how to display the recognized gesture name on micro:bit.
2
Left
Project 5 : Gesture Recognition
I2C
Right
1
4. Hardware connection: Connect the Grove - Gesture to I2C
port of Grove shield for micro:bit
5. Click Download to transfer your code in your micro:bit.
6. Use your hand to make different gesture in front of the
gesture sensor and see if the micro:bit can show the exact
gesture you are doing.
Try to show more gesture name or
icon on the micro:bit.
3
13 14

6. Smart Guard
Diculty Level
Part List
1
1x Grove - Ultrasonic Ranger
2
1x Grove Shield for micro:bit
3
1x micro:bit
Description
The ultrasonic ranger is able to detect
distance. In this demo, we will use the
ultrasonic ranger to detect if the is too
close. If something is too close the
micro:bit will show a sad face on it.
2
P0/P14
3
1
Steps
1
Add basic block forever, then add logic block
if…then…else…
2
2. For condition ‘if’, add logic block 0≥0
3
3. If you have added the Grove Package successfully, replace the left ‘0’ with Grove block Ultrasonic
Sensor (in cm) at P0. Change another “0” to “10”.
4
4. For ‘then’, add basic block show icon, choose the
‘happy face’ icon.
5
5. For “else”, add basic block show icon, choose the
‘sad face’ icon.
6
6. Add basic blocks pause (ms) (100).
7. Hardware connection. Connect the Grove – Ultrasonic Sensor to P0 port of Grove shield for micro:bit.
8. Click Download to transfer your code in your micro:bit.
9. Move your hand up and down in front of the Ultrasonic Sensor, when your hand is less than 10cm close to the sensor, the micro:bit will
show sad face.
1
2
3
4
5
6
Try to change the warning distance or the warning icon. You may
also place this smart guardian on your favorite toy to protect it!
Project 6 : Smart Guard
15 16

7. Shake Counter
Diculty Level
Part List
1
1x Grove - 4-Digit Display
2
1x Grove Shield for micro:bit
3
1x micro:bit
Description
In this demo, every time your shake
the micro:bt, it will increase the
number displayed by 1.
2
P0/P14
8888
:
3
Steps
1
1. Add basic block on start, then add variable block
set item to 0, rename ‘item’ to ‘Display’. If you have
added the Grove Package successfully, add block
4-Digit Display at (P0) and (P14).
2
2. Add input block on shake, then add variable
block change item by 1,rename ‘item’ to ‘N’.
3. Add block item show number from Grove
3
Package, rename ‘item’ to ‘Display’, replace ‘0’ with
variable block ‘N’.
4
4. Add basic block pause (ms) (100).
5. Hardware connection: Connect the Grove –
4-Digital Display to P0 port of Grove shield for
micro:bit.
6. Click Download to transfer your code in your
micro:bit.
7. Shake the micro:bit and you will find the number raises by 1 every time your shake the board.
1
2
3
4
Project 7 : Shake Counter
1
Use this demo to play a game with you friend. See who can get
the highest score in 1 minute.
17 18
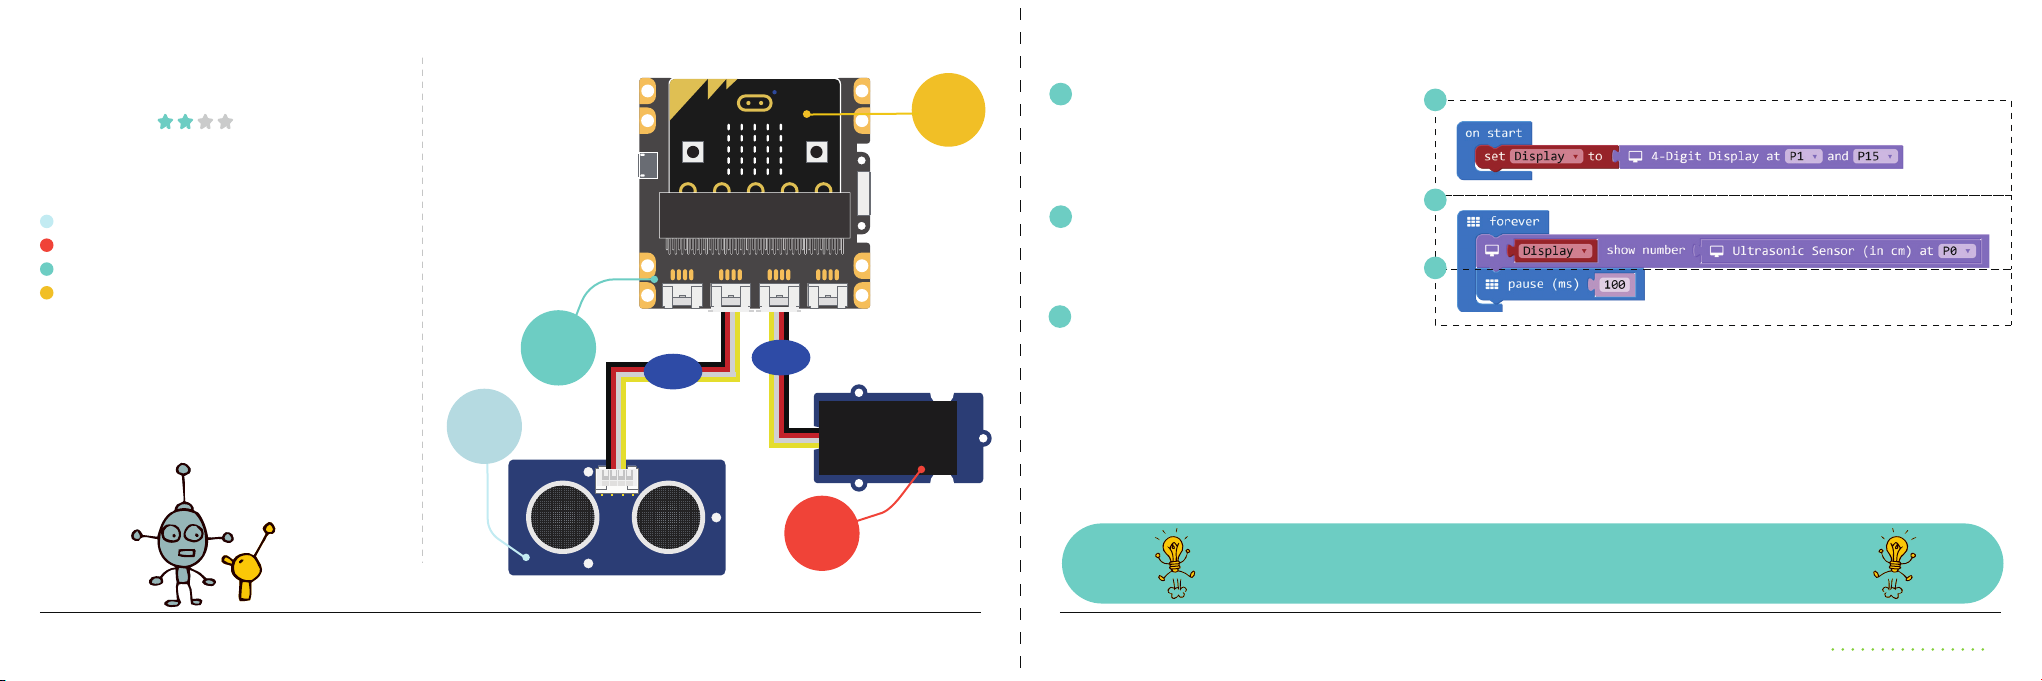
8. Ultrasonic Meter
Diculty Level
Part List
1
1x Grove - Ultrasonic Ranger
2
1x Grove - 4-Digit Display
3
1x Grove Shield for micro:bit
4
1x micro:bit
Description
In this demo, you will learn how to
use the ultrasonic sensor to measure
distance and show the value on a
display.
1
3
P0/P14
P1/P15
4
:
8888
Steps
1
2. Add basic block on start, then add variable blocks
set item to 0, rename ‘items’ to ‘Display’. If you have
successfully added the Grove package, replace
“0”with Grove block 4-Digit Display at P1 and P15.
2
2. Add basic block forever, then add Grove block item
show number 0, rename ‘item’ to ‘Display’, replace ‘0’
with Grove block Ultrasonic Sensor (in cm) at P0.
3
3. Add basic block pause (ms) (100),
4. ClickDownload to transfer your code in micro:bit!
5. Use your hand to move up and down on the
ultrasonic ranger and read the value on the 4-Digit
display.
1
2
3
Project 8 : Ultrasonic Meter
2
Try to use this creation to measure distance in your room.
19 20

9. Rainbow on The Desk
Diculty Level
Part List
1
1x Grove - Rotary Angle Sensor(P)
2
1x Grove - WS2812b
3
1x Grove Shield for micro:bit
4
1x micro:bit
Description
There are 30 LEDs on the LED strip,
in this demo, you will learn to show
rainbow color on the Led strip and
use the Rotary Angle Sensor to let
the rainbow flow on the Led strip.
3
1
P0/P14
P1/P15
4
Steps
1. To use 'Grove - WS2812b LED strip', you need to
add the 'neopixel' package first.
2
2. Add basic block on start, then add variable block
set item to 0, rename ‘item’ to ‘Rainbow, replace ‘0’
with block Neopixel at pin (P1 ) with (30 ) leds as
RGB.
3
3. Add basic block forever, then add pixel block
show rainbow from 1 to and pin block map, then
add variable block Rainbow and pin block analog
read pin P0, amend value in the blocks as below
4. Connect the hardrware pieces as instructed.
5. Click Download to transfer your code in your
micro:bit!
6. Rotate the knob on the Grove – Rotary Angle Sensor and see if the rainbow flows.
2
3
Project 9 : Rainbow on The Desk
2
Try to change the numbers of LEDs to show the rainbow, or use
the pin block map to have the rainbow ow more slowly.
21 22

10. Guardians of The Secrets
in Your Bag
Diculty Level
Part List
1
1x Grove - Speaker
2
1x Grove - Light Sensor
3
1x Grove - Red LED
4
1x Grove Shield for micro:bit
5
1x micro:bit
Description
In this demo, you will make a guardian
to guard your secret stuff. If anyone
opens the box, the guardian will flash a
red light and sound an alarm!
4
1
P0/P14
P1/P15
P2/P16
2
5
3
Steps
1
1. In the basic block forever, set a variable named 'Light
Value' to analog read pin P1.
2
2. Now we add a logic block if...then..else, in this block we
set the condition as if the 'Light Value' is greater than '100'
3
When the condition is triggered, we set the speaker to
continuously playing tone High C on P2(Pin2).
4
4. For ‘else’, add 2 pin blocks digital write pin and set pins to
‘0’. This will turn off the Led and speaker when the box is
closed and no light is deteced.
5
5. Add basic block pause (ms) (100).
6. Hardware connection: Connect the speaker to P0 port,
Grove – light sensor to P1 port, Grove - Led to P2 port,
7. Click Download to transfer your code in your micro:bit!
8. Open and close your secret box to see how it works.
Try to use this creation to protect
your secrets in the drawer.
1
2
3
4
5
Project 10 : Guardians of The Secrets in Your Bag
23 24

11. Guardians of The Secrets
in Your Room
Diculty Level
Part List
1
1x Grove - Speaker
2
1x Grove - Ultrasonic Ranger
3
1x Grove - Red LED
4
1x Grove Shield for micro:bit
5
1x micro:bit
Description
This demo will help guard your room. If
anyone enters your room, the red LED
will flash and the speaker will play an
alarm. It is similar to the previous
demo, except that this demo uses the
ultrasonic sensor. If you have tried the
demo, “smart guard”, this one should
be a piece of cake.
1
4
P0/P14
P1/P15
2
P2/P16
5
3
Steps
1. Add basic block forever, then add variable block set item to and
1
grove block Ultrasonic Sensor (in cm) at P1, Rename “item” to
“distance”
2. Add logic block if…then… For condition “if ”, add logic block and,
2
for each space in block and, fill in a logic block 0 ≥ 0, for each block 0
≥ 0, replace the first “0”with grove block Ultrasonic Sensor (in cm) at
P1, change another “0”to “3” and “60”.
3
3. For ‘then’, add loop block repeat 4 times, the add a pin block
digital write pin P2 to 1 and a music block play tone High C for 1
beat. Add block pause (ms) (100), then add a pin block digital write
pin P2 to 0 and a block pause (ms) (100) after it.
4
4 Add the last basic block pause (ms) (100).
5. Hardware connection: connect the Grove modules as
instructed in page 25.
6. Click Download to transfer your code in your micro:bit!
7. Move your hand up and down in front of the ultrasonic
sensor and see if your guardian works well.
Try to use this creation to protect your room.
1
2
3
4
Project 11 : Guardians of The Secrets in Your Room
25 26

12. Magic Musician
Diculty Level
Part List
1
1x Grove - Gesture
2
1x Grove - Speaker
3
4x Crocodile Clip
4
4x Bananas
5
1x Grove Shield for micro:bit
6
1x micro:bit
Description
This is a challenging level 4 demo;
however, it is not as hard as it seems if
you have tried the “Gesture Recognition”
demo. This demo is very fun because
you can use gesture and Bananas to
create an instrument. Show this demo to
your family and friends, they will be
amazed by you!
Left
I2C
1
Right
P0/P14
5
6
GND
P1
P2
3
2
4
Steps
1
In the Grove Package, add on Gesture Right to trigger the speaker
start melody (dadadum) repreating (once).
2
2. In the Grove Package, add on Gesture Right to trigger the
speaker start melody (entertainer) repeating (once).
3. Add input block on pin P1 pressed, then add music block start
3
melody (birthday) repeating once, or choose any melody you like
except the two you have used in step 1 and 2.
4
4. Add another input block on pin P2 pressed, then add music
block start melody (wedding) repeating once, or choose the
another melody you like.
5. Connect the hardrware pieces as instructed in page 27.
6. Click Download to transfer your code in your micro:bit!
7. For gesture control, use your hand to move left and right
above the gesture sensor, you will hear different music.
8. For banana control, use one of your hand to touch the banana that is connected to
GND, use another hand to touch the banana on P1 or P2, you will hear different music.
1
2
3
4
Try to use more bananas or gestures to play more sounds and
melodies you like. Maybe make a band with a friend!
Project 12 : Magic Musician
27 28

Grow the dierence
 Loading...