

Page 1

VERITRACKS
®
USER MANUAL
Version 10.7
April 2012
Satellite Tracking of People LLC
1212 North Post Oak Road, Suite 100
Houston, Texas 77055
Page 2

BluTag® and Blu+® comply with Part 15 of the FCC Rules. Operation is subject to the following two
conditions:
This device may not cause harmful interference, and
This device must accept any interference received, including interference that may cause undesired
operation.
RF Exposure (SAR) Statement for BluTag & Blu+ (FCC ID S5EAA90048, FCC ID S5EAA70038,
S5E0906BT5 & S5E1106MM1).
This equipment complies with FCC RF radiation exposure limits set forth for an uncontrolled environment. It
was tested as an ankle worn device in accordance with OET Bulletin 65 Supplement C. The maximum SAR
value reported is 0.572W/Kg (S5E0906BT5) and 0.967 W/kg (S5EAA90048) and 0.967 W/kg (S5EAA70038)
and 3.170W/Kg (S5E1106MM1)
The GSM and ISM transmitters used in BluTag or Blu+ are not co-located. The ISM transmitter is operational
only when it is required to communicate with the associated equipment. The BluTag or Blu+ is set up
automatically to prevent simultaneous transmission between the GSM and ISM transmitters
Canadian Compliance (Industry Canada) for Blutag V5
I.C. 9086A-BT50610, MODEL NUMBER: BluTag V5
This Class B digital apparatus complies with Canadian ICES-003
The Blutag Device has been designed to comply with applicable safety requirements for exposure to radio
waves. The radio wave exposure guidelines employ a unit of measurement known as the Specific Absorption
Rate, or SAR. Tests for SAR are conducted according to RSS-102 with the Blutag device transmitting at its
highest certified power level in all used frequency bands. The highest SAR value for the Blutag V5 when tested
was 0.174W/Kg (PCS1900) and 0.150W/Kg (GSM850). The Blutag device is designed to be ankle worn. Please
follow the instructions included in the user guide for installation around the ankle.
Canadian Compliance (Industry Canada) for Blu+
I.C. 9086A‐BT70212, MODEL NUMBER: Blu+
This Class B digital apparatus complies with Canadian ICES-003
The Blutag Device has been designed to comply with applicable safety requirements for exposure to radio
waves. The radio wave exposure guidelines employ a unit of measurement known as the Specific Absorption
Rate, or SAR. Tests for SAR are conducted according to RSS-102 with the Blutag device transmitting at its
highest certified power level in all used frequency bands. The highest SAR value for the Blutag V5 when tested
was 3.170W/Kg (PCS1900) and 3.120W/Kg (GSM850). The Blu+ device is designed to be ankle worn. Please
follow the instructions included in the user guide for installation around the ankle.
RF Exposure Statement for BluBox™ (FCC ID S5EAA90548) and BluHome™ (FCC ID S5EBH0107A)
This equipment complies with FCC RF radiation exposure limits set forth for an uncontrolled environment. The
antenna(s) used for this transmitter must be installed to provide a separation distance of at least 20 cm from all
persons and must not be co-located or operating in conjunction with any other antenna or transmitter.
WARNING – Changes or modifications to these units not expressly approved by the party responsible for
compliance could void the user’s authority to operate the equipment.
VeriTracks® 10.7 User Manual
Page 3

BATTERY SAFETY
The Blutag and Blu+ Device contains a non-removable lithium-Ion battery. Do not attempt to remove the
battery. Do not dispose of The Blutag or the lithium-Ion battery in a fire. The lithium-Ion battery might present
a fire or chemical burn hazard if mistreated. Do not disassemble, crush, or puncture the lithium-Ion battery or
the Blutag Device. Do not heat the battery or Blutag Device above 140°F (60°C).
Please return the Device to Satellite Tracking of People LLC, 1212 North Post Oak Road, Suite 100, Houston,
Texas 77055 for disposal otherwise only dispose of the battery or Blutag device in accordance with the laws and
regulations in your area governing disposal of this type of battery.
Page 4

Page 5

TABLE OF CONTENTS
CHAPTER 1: ABOUT VERITRACKS AND “BLU” DEVICES ................................................ 1
VERITRACKS® ...................................................................................................................... 1
“BLU” HARDWARE DEVICES .............................................................................................. 2
BluTag/Blu+ Active ....................................................................................................................... 4
BluTag Hybrid ............................................................................................................................... 4
BluTag Passive ............................................................................................................................... 4
BluBox ........................................................................................................................................... 6
BluHome ........................................................................................................................................ 7
BluBand ......................................................................................................................................... 8
Stalker Alert™ ............................................................................................................................... 9
BluScan™ .................................................................................................................................... 10
CHAPTER 2: GETTING STARTED ................................................................................ 12
SYSTEM AND BROWSER CONFIGURATION ............................................................................ 12
GETTING HELP .................................................................................................................... 12
LOGGING IN ........................................................................................................................ 13
VERITRACKS ORI HIERARCHY ............................................................................................ 14
VERITRACKS BROWSER LAYOUT ........................................................................................ 15
BASIC NAVIGATION ............................................................................................................. 16
Tab Pages ..................................................................................................................................... 16
Widgets ........................................................................................................................................ 17
Modal Pop-Ups ............................................................................................................................ 18
Map .............................................................................................................................................. 19
DEFAULT SETTINGS ............................................................................................................. 20
CUSTOMIZING VERITRACKS ................................................................................................. 21
UNDERSTANDING DATA ENTRY FEATURES .......................................................................... 21
Text Boxes ................................................................................................................................... 21
Date Fields ................................................................................................................................... 22
Drop-down Lists .......................................................................................................................... 22
Radio Buttons and Checkboxes ................................................................................................... 22
UNDERSTANDING HOW TO SEARCH AND BROWSE WIDGETS ................................................ 23
UNIVERSAL SEARCH PANEL .................................................................................. 23
HOW TO USE THE UNIVERSAL SEARCH PANEL ..................................................................... 23
VeriTracks® 10.7 User Manual i
Page 6

ADVANCED SEARCH ............................................................................................................ 25
SIMPLE SEARCH WIDGET .................................................................................................... 25
BROWSE ENROLLEE WIDGET .............................................................................................. 27
BROWSE INVENTORY WIDGET ............................................................................................. 29
BROWSE USER WIDGET ...................................................................................................... 30
CHAPTER 3: BLUTAG ENROLLMENT .......................................................................... 32
ENROLLING AN INDIVIDUAL .................................................................................................. 32
PREPARE BLUTAG FOR USE ............................................................................................... 32
Inspecting and Preparing Inventory ............................................................................................. 32
TURN ON BLUTAG AND ACQUIRE GLOBAL POSITIONING SYSTEM (GPS) .............................. 33
VERIFY BLUTAG READINESS ............................................................................................... 33
View BluTag Status Details ......................................................................................................... 34
BluTag Communication with VeriTracks .................................................................................... 36
ATTACH BLUTAG TO ENROLLEE ......................................................................................... 38
CREATE ENROLLEE PROFILE ............................................................................................... 39
ASSIGN BLUTAG TO THE ENROLLEE IN VERITRACKS ........................................................... 42
Verify Enrollment in Enrollee Status Screen ............................................................................... 43
Verify BluTag Connectivity to VeriTracks ................................................................................. 43
PRINT ENROLLEE PROFILE REPORT .................................................................................... 44
COMPLETE ENROLLMENT PAPERWORK ............................................................................... 45
UN-ENROLLING A TRACKED ENROLLEE ............................................................................... 46
Removing the Strap ...................................................................................................................... 47
CHANGING A DEVICE ON AN ENROLLEE ............................................................................... 47
STORING AND MAINTAINING BLUTAG .................................................................................. 47
CHAPTER 4: ZONES ................................................................................................. 48
CREATING ZONES ............................................................................................................... 48
Create Zone in Enrollment Entry Widget, Addresses Tab ........................................................... 50
Suggested Naming Convention for Zones ................................................................................... 50
ZONE CATEGORIES ............................................................................................................. 51
ASSIGNING EXISTING ZONES ............................................................................................... 51
OTHER ZONE FUNCTIONALITY ............................................................................................. 53
Unassign a Zone ........................................................................................................................... 53
EDITING ZONES ................................................................................................................... 53
Edit Zones in the Zone Tab .......................................................................................................... 53
ii VeriTracks® 10.7User Manual
Page 7

Edit Zones in the Enrollment Widget .......................................................................................... 53
Edit Zones in the Supervision Widget ......................................................................................... 55
Edit Zones in the Main Map ........................................................................................................ 56
ZONE MANAGER WIDGET .................................................................................................... 58
Description of Privileges .............................................................................................................. 58
Zone Manager Filter .................................................................................................................... 58
Editing a Zone in the Zone Manager Widget ............................................................................... 61
Zone Administration in the Zone Manager Widget ..................................................................... 62
CHAPTER 5: SCHEDULES .......................................................................................... 64
SCHEDULE TERMINOLOGY ................................................................................................... 64
RECURRING SCHEDULES ..................................................................................................... 65
Create a Recurring Schedule ........................................................................................................ 65
Alter a Recurring Schedule .......................................................................................................... 66
Delete a Recurring Schedule ........................................................................................................ 67
ONE-TIME SCHEDULES ....................................................................................................... 67
About One-Time Schedules ......................................................................................................... 67
How to Create a One-Time Schedule .......................................................................................... 67
Create a One-Time Schedule - Create a Schedule from Details Box ........................................... 68
Delete a One-Time Schedule ....................................................................................................... 68
REMOVE A SCHEDULE ON A SPECIFIC DATE ......................................................................... 70
SCHEDULING TIPS – USING MULTIPLE INCLUSION ZONE SCHEDULES ................................... 71
SCHEDULING TIPS – UNDERSTANDING CHANGES TO ENROLLMENT STATUS ......................... 71
CHAPTER 6: SUPERVISING AN ENROLLEE .................................................................. 72
ENROLLEE DETAILS WIDGET ............................................................................................... 72
Enrollee Dashboard ...................................................................................................................... 72
Key Dashboard Features .............................................................................................................. 73
Enrollee Details Widget – Status Tab .......................................................................................... 73
Enrollee Details widget – Event Tab ........................................................................................... 76
Enrollee Details widget – Profile and Addresses tabs ................................................................. 77
Enrollee Details widget – Assignments tab ................................................................................. 77
Enrollee Details widget – Zones tab ............................................................................................ 78
MAPPING PROCEDURES ...................................................................................................... 78
MAPPING TOOLS ................................................................................................................. 80
VeriTracks® 10.7 User Manual iii
Page 8

MAP TOOL PANEL AND MAP INFO PANEL ............................................................................ 81
VIEW ENROLLEES ON MAP .................................................................................................. 82
MAP TIME SCALE PANEL ..................................................................................................... 90
CALENDAR ......................................................................................................................... 91
MAP PANEL ........................................................................................................................ 93
MAP CONTROLS – IDENTIFY FEATURE ................................................................................. 93
NAVIGATION CONTROLS – PAN AND ZOOM .......................................................................... 95
MAP CONTROLS – MAP TYPES ............................................................................................ 96
MAP FOOTER PANEL ........................................................................................................... 97
MOUSE COORDINATES ........................................................................................................ 97
MEASURING DISTANCES ...................................................................................................... 97
LAYERED LOCATION TRACKING ........................................................................................... 97
Cell Tower Tracking .................................................................................................................... 97
PRINTING MAPS .................................................................................................................. 99
CHAPTER 7: EVENTS AND NOTIFICATIONS ................................................................ 102
BLUTAG EVENT DEFINITIONS ............................................................................................ 102
MASTER TAMPER EVENTS ................................................................................................. 103
Close a Master Tamper Event .................................................................................................... 103
BLUTAG EVENT VISIBILITY ................................................................................................ 104
BLUTAG NOTIFICATIONS ................................................................................................... 106
BluTag Notifications on Hybrid BluTags .................................................................................. 107
BluTag Notifications on Passive BluTags ................................................................................. 107
THE DAILY SUMMARY REPORT .......................................................................................... 108
Agency Level Options for the Daily Summary Report .............................................................. 108
How to Subscribe to the Daily Summary Report ....................................................................... 109
Explanation of Event Types ....................................................................................................... 110
Daily Report Format .................................................................................................................. 110
CHAPTER 8: MAINTENANCE .................................................................................... 114
USER MANAGEMENT WIDGET ............................................................................................ 114
Profile Tab ................................................................................................................................. 114
Notifications Tab - Daily Reports .............................................................................................. 115
Notifications Tab - Immediate Notifications General Discussion ............................................. 115
Immediate Notifications Based on Enrollee Risk Level ............................................................ 116
Immediate Notifications Based on Device Mode of Operation ................................................. 116
iv VeriTracks® 10.7User Manual
Page 9

Create Escalating Notification Plan for Notifications by Risk Level ........................................ 116
Assign Notification Plans to User Accounts .............................................................................. 119
Stopping an Escalation Plan That is in Progress ........................................................................ 120
Escalating Notifications Incorporates Event Notification Grace Period .................................... 122
Additional Enrollees Tab ........................................................................................................... 122
Off-Hours Tab ............................................................................................................................ 123
Duty Officer Tab ........................................................................................................................ 125
USER ACCOUNTS .............................................................................................................. 128
Create New Accounts – General Data ....................................................................................... 128
Create New Accounts – Privileges ............................................................................................. 129
Create Duty Officer Accounts.................................................................................................... 131
MOVE ENROLLEES WIDGET ............................................................................................... 131
CHAPTER 9: INVENTORY MANAGEMENT ................................................................... 134
INVENTORY DETAILS WIDGET – PRODUCTS TAB ................................................................ 134
Device Filter ............................................................................................................................... 134
Products Tab (Inventory List) .................................................................................................... 135
Change Device Status ................................................................................................................ 135
Change Device Owner ............................................................................................................... 137
INVENTORY MANAGEMENT REPORTS ................................................................................. 137
Device History Report ............................................................................................................... 137
CHAPTER 10: USING VERITRACKS TO INVESTIGATE INCIDENTS ................................... 138
METHODS FOR ENTERING INCIDENT DATA ......................................................................... 138
Data Import ................................................................................................................................ 138
On-Screen Data Input ................................................................................................................ 138
VIEWING INCIDENT SEARCH RESULTS ................................................................................ 139
THE INCIDENT HIT REPORT ................................................................................................ 142
How to Use the Hit Report ......................................................................................................... 142
ZONES FOR LAW ENFORCEMENT ............................................................................ 143
CHAPTER 11: VERITRACKS MONITORING CENTER MODULE ........................................ 144
IMPORTANT TERMS FOR USING THE MONITORING CENTER ................................................. 144
KEY CONCEPTS ................................................................................................................ 145
Risk Levels................................................................................................................................. 145
Monitored Events ....................................................................................................................... 145
VeriTracks® 10.7 User Manual v
Page 10

Protocols and Protocol Steps...................................................................................................... 146
Types of Protocol Steps ............................................................................................................. 146
KEY COMPONENTS – MONITORING LIST ............................................................................. 150
Monitoring List - Listing Tab .................................................................................................... 150
Monitoring List - Protocol Tab .................................................................................................. 151
Monitoring Center Administration Privilege ............................................................................. 154
KEY COMPONENTS – MONITORING HISTORY ...................................................................... 155
USING THE MONITORING LIST TO AID STANDARD ENROLLEE SUPERVISION ........................ 155
CHAPTER 12: VERITRACKS REPORTS ....................................................................... 158
THE RECENT REPORTS WIDGET ........................................................................................ 158
Access Reports Already Run ..................................................................................................... 158
Run New Reports ....................................................................................................................... 159
THE REPORT VIEWER WIDGET ........................................................................................... 161
APPENDIX A: BLUBOX ACCESSORY GUIDE ............................................................... A-1
BLUBOX OVERVIEW .......................................................................................................... A-3
HOW BLUBOX AND BLUTAG WORK TOGETHER ................................................................. A-3
ENROLLMENT: ASSIGN BLUBOX TO AN INDIVIDUAL ENROLLEE .......................................... A-4
USING BLUBOX IN A GROUP SETTING ................................................................................ A-6
Creating BluBox Groups ............................................................................................................ A-6
Adding BluBoxes and Enrollees to the Group ........................................................................... A-7
MONITORING: VERIFYING CURRENT BLUTAG STATUS VIA ENROLLEE STATUS .................... A-9
RECURRING SCHEDULES ................................................................................................. A-10
Create a Recurring Schedule .................................................................................................... A-10
Alter a Recurring Schedule ...................................................................................................... A-11
Delete a Recurring Schedule .................................................................................................... A-13
ONE-TIME SCHEDULES ................................................................................................... A-13
About One-Time Schedules ..................................................................................................... A-13
Create a One-Time Schedule – Drag a Recurring Schedule Segment ..................................... A-13
Create a One-Time Schedule – Create a Schedule from Details Box ...................................... A-14
Delete A One-Time Schedule .................................................................................................. A-14
REMOVE A SCHEDULE ON A SPECIFIC DATE ..................................................................... A-15
SCHEDULING TIPS ........................................................................................................... A-16
Understanding Changes to Enrollment Status ......................................................................... A-16
24x7 BluBox Curfews .............................................................................................................. A-16
vi VeriTracks® 10.7User Manual
Page 11

BLUBOX EVENTS ............................................................................................................ A-17
Understanding BluBox Events ................................................................................................. A-17
Understanding BluTag Violations in Range of BluBox .......................................................... A-19
Understanding Notifications on Hybrid BluTags .................................................................... A-20
Understanding BluBox Movement or Tampering .................................................................... A-20
APPENDIX B: BLUHOME ACCESSORY GUIDE FOR BLUTAG .......................................... B-1
BLUHOME OVERVIEW ....................................................................................................... B-3
KEY BLUHOME TERMS ...................................................................................................... B-3
BLUHOME KEY FEATURES ................................................................................................ B-3
HOW BLUHOME, BLUTAG, AND VERITRACKS WORK TOGETHER ......................................... B-4
BLUHOME PREPARATION .................................................................................................. B-5
Activating BluTag and BluHome .............................................................................................. B-5
Verifying BluHome has Called VeriTracks ............................................................................... B-5
BLUHOME INSTALLATION .................................................................................................. B-6
Preparing BluHome to Give to an Enrollee ............................................................................... B-6
Assigning BluTag and BluHome to an Enrollee in VeriTracks ................................................. B-6
Verifying BluTag’s Status via Enrollee Details ......................................................................... B-7
RECURRING SCHEDULES ................................................................................................... B-8
Create a Recurring Schedule ...................................................................................................... B-8
Alter a Recurring Schedule ...................................................................................................... B-10
Delete a Recurring Schedule .................................................................................................... B-11
ONE-TIME SCHEDULES ................................................................................................... B-12
About One-Time Schedules ..................................................................................................... B-12
Create a One-Time Schedule – Drag a Recurring Schedule Segment ..................................... B-12
Create a One-Time Schedule – Create a Schedule from Details Box ...................................... B-12
Delete a One-Time Schedule ................................................................................................... B-13
REMOVE A SCHEDULE ON A SPECIFIC DATE ..................................................................... B-14
SCHEDULING TIPS ........................................................................................................... B-15
Understanding Changes to Enrollment Status ......................................................................... B-15
24x7 BluHome Curfews .......................................................................................................... B-15
BLUHOME EVENTS .......................................................................................................... B-16
Understanding BluHome Activity ........................................................................................... B-16
Additional Events for Cellular BluHomes ............................................................................... B-18
VeriTracks® 10.7 User Manual vii
Page 12

Understanding Notifications on Hybrid BluTags .................................................................... B-19
Understanding Notifications on Passive BluTags .................................................................... B-19
UNENROLLING AN ENROLLEE IN VERITRACKS.................................................................. B-19
UNINSTALLATION: REMOVING BLUTAG AND BLUHOME .................................................... B-20
APPENDIX C: BLUHOME ACCESSORY GUIDE FOR BLUBAND ....................................... C-1
BLUHOME OVERVIEW ....................................................................................................... C-3
BLUBAND OVERVIEW ........................................................................................................ C-3
KEY BLUHOME TERMS ...................................................................................................... C-3
BLUHOME KEY FEATURES ................................................................................................ C-4
HOW BLUHOME, BLUBAND, AND VERITRACKS WORK TOGETHER ....................................... C-4
BLUBAND PREPARATION .................................................................................................. C-4
Activating BluBand and BluHome ............................................................................................ C-4
Verifying BluHome has Called VeriTracks ............................................................................... C-5
BLUBAND ENROLLMENT ................................................................................................... C-5
BluBand Preparation .................................................................................................................. C-5
Attach BluBand to Enrollee ....................................................................................................... C-6
Preparing BluHome to Give to an Enrollee ............................................................................... C-6
Create Enrollee Profile ............................................................................................................... C-6
Assigning BluBand and BluHome to an Enrollee in VeriTracks .............................................. C-7
Verifying BluBand’s Status via Enrollee Details ....................................................................... C-8
RECURRING SCHEDULES ................................................................................................... C-8
Create a Recurring Schedule ...................................................................................................... C-8
Alter a Recurring Schedule ...................................................................................................... C-10
Delete a Recurring Schedule .................................................................................................... C-11
ONE-TIME SCHEDULES ................................................................................................... C-11
About One-Time Schedules ..................................................................................................... C-11
Create a One-Time Schedule – Drag a Recurring Schedule Segment ..................................... C-12
Create a One-Time Schedule – Create a Schedule from Details Box ...................................... C-12
Delete A One-Time Schedule .................................................................................................. C-13
REMOVE A SCHEDULE ON A SPECIFIC DATE ..................................................................... C-13
SCHEDULING TIPS ........................................................................................................... C-14
Understanding Changes to Enrollment Status ......................................................................... C-14
24x7 BluHome Curfews .......................................................................................................... C-14
SUPERVISING AN OFFENDER ........................................................................................... C-16
viii VeriTracks® 10.7User Manual
Page 13

ENROLLEE DETAILS WIDGET ........................................................................................... C-16
Enrollee Details Widget – Enrollees Tab ................................................................................. C-16
Enrollee Details Widget – Status Tab ...................................................................................... C-17
Enrollee Details Widget – Event Tab ...................................................................................... C-18
Enrollee Details Widget – Profile and Addresses Tabs ........................................................... C-19
Enrollee Details Widget – Assignments Tab ........................................................................... C-19
EVENTS: UNDERSTANDING BLUHOME ACTIVITY ............................................................... C-19
EVENTS: ADDITIONAL EVENT FOR CELLULAR BLUHOMES ............................................... C-21
More on Master Tamper Violations ......................................................................................... C-22
To Close a Master Tamper Violation ....................................................................................... C-22
UNENROLLING AN ENROLLEE IN VERITRACKS.................................................................. C-22
UNINSTALLATION: REMOVING BLUBAND AND BLUHOME.................................................. C-24
APPENDIX D: STALKER ALERT .................................................................................. D-1
HOW STALKER ALERT WORKS WITH BLUTAG .................................................................... D-1
PREPARE STALKER ALERT FOR USE ................................................................................. D-1
View Stalker Alert Status Details .............................................................................................. D-1
VICTIM ENROLLMENT ........................................................................................................ D-2
Create Victim Profile ................................................................................................................. D-2
Assign Stalker Alert to Victim Profile ....................................................................................... D-5
Link Enrollee to the Victim ....................................................................................................... D-5
Set Victim Notifications ............................................................................................................ D-6
What to Tell the Victim ............................................................................................................. D-7
Verify Victim Status .................................................................................................................. D-7
ENROLLEE AND VICTIM PROXIMITY DETERMINATION .......................................................... D-8
SUPERVISION .................................................................................................................... D-9
How It All Works Together ....................................................................................................... D-9
Mapping Enrollee and Victim Tracks Concurrently ................................................................ D-10
SUPERVISION BEST PRACTICES ...................................................................................... D-10
Program Level Considerations ................................................................................................. D-10
Supervision Routine ................................................................................................................. D-10
Inclusion Zone Layers .............................................................................................................. D-11
Exclusion Zone layers .............................................................................................................. D-12
Extended Exclusion Zone layers .............................................................................................. D-12
VeriTracks® 10.7 User Manual ix
Page 14

Proximity Zone Minimum Recommended sizes ...................................................................... D-13
UN-ENROLLMENT ............................................................................................................ D-13
Un-Assigning a Victim ............................................................................................................ D-13
Un-Enrolling a Paired Enrollee ................................................................................................ D-13
APPENDIX E: INDEX OF VERITRACKS WIDGETS ........................................................... E-1
x VeriTracks® 10.7User Manual
Page 15

VeriTracks Data Flow
CHAPTER 1: ABOUT VERITRACKS AND “BLU” DEVICES
VERITRACKS®
VeriTracks is designed to simplify enrollee monitoring. This innovative, web-based public safety tool
receives, stores, and distributes monitoring data transmitted by BluTag® and BluBand™ to BluHome™,
and BluBox™ devices.
VeriTracks streamlines daily supervision tasks, facilitates sophisticated reporting and compiles the data
foundation for Crime Scene and Incident Correlation. Tabs and widgets allow you to customize the user
interface. VeriTracks is accessible 24/7 via any computer with a high-speed Internet connection. Robust
mapping can display and animate current or historical tracks of multiple enrollees simultaneously. You
determine which event and violation notifications to receive, and how to receive them (email, fax, pager,
or text message).
VeriTracks® 10.7 User Manual 1
Page 16

With VeriTracks you can:
Simplify the enrollment process to assure at least the most basic enrollee information is entered
and a device properly assigned.
Analyze historical tracks for patterns and trends in the movements of enrollees.
Animate movements, zoom in/out and view high resolution aerial photography on maps.
Use exclusion and inclusion zones to help modify an enrollee’s behavior.
Exclusion zones are geographic areas an enrollee is prohibited from entering.
Inclusion zones are geographic areas that an enrollee is required to enter in to and remain in
that zone.
Assign back-up supervising officers during scheduled off-hours, on vacation or on sick leave.
Create flexible and escalating notification plans for violation alerts.
Generate numerous reports that reflect near real time data.
Develop custom reports
Integrate Monitoring Center functionality into a supervising agency’s existing Monitoring
Center operations to reduce officer workload and provide immediate response to enrollee
events 24 x 7.
“BLU” HARDWARE DEVICES
Satellite Tracking Of People LLC (STOP) offers a range of hardware devices designed to meet the
evolving demands of our diverse customer base. The center piece of these devices is BluTag, the world’s
first, one-piece Global Positioning System (GPS) tracking device. BluTag houses its receiver and
transmitter in a single unit. This one-piece unit eliminates the need for enrollees to historically hand carry
the monitoring component while wearing the tag.
The BluHome and BluBox accessories link to BluTag devices via a radio frequency (RF) “tether” and
enhance the monitoring of an enrollee’s curfews for his or her residence.
2 VeriTracks® 10.7 User Manual
Page 17

BluTag Active Benefits and Operations:
All-in-one device, including GPS and
GSM/GPRS
Device settings are programmable over
the air
Remote programming of multiple
inclusion and exclusion zones
Layered location capability gives multiple
avenues for locating an individual
Battery life in excess of 30 hours
Low-battery notification by a vibrating
alarm
Weighs only six ounces
High temperature stability
Audible tone or vibration alarm can be
programmed and sent immediately
Performs exceptionally well under diverse
environmental/atmospheric conditions
Waterproof to a depth of 50 feet
Tamper resistant fiber optic strap
VeriTracks® 10.7 User Manual 3
Page 18

BluTag/Blu+ Active
BluTag Active monitors enrollees using active GPS technology that generates immediate notifications
containing near real-time data. This notification allows supervising agents to quickly take the appropriate
action related to each notification.
Because BluTag is a one-piece monitoring device, it remains securely fastened to an enrollee’s ankle at
all times. No additional equipment is needed to effectively monitor an enrollee.
In its standard configuration, an active device determines location once a minute and contacts VeriTracks
once every 10 minutes to transmit its tracking data. However, the device calls in immediately in the event
of a violation. This action provides near real-time violation notification and near real-time enrollee
tracking.
The device secures to an offender’s ankle with a fiber optic cable-lined strap that detects tamper attempts.
The strap attaches to the transceiver with two pins. If an offender attempts to disengage the device from
his or her ankle by pulling on the strap at the connection point, the pins break. If a strap tamper occurs,
BluTag records and stores the event until the agent addresses the alarm.
Blu+ operates in the same manner as Blutag. Its operation throughout this manual is the same as
Blutag. Blu+ normal operation is restricted in the number of GPS points it can collect and therefore
its battery life is extended beyond that of a Blutag
BluTag Hybrid
BluTag Hybrid communicates device tampering and inclusion zone violations with near real-time data
like BluTag Active. Supervising agents can also “ping” the device so it immediately transmits the
enrollee’s current location regardless of when the last GPS coordinates were transmitted to VeriTracks.
A distinct advantage of BluTag Hybrid is its ability to easily and quickly convert to active GPS
monitoring without changing equipment. Supervising agents need only call, email, or fax the STOP
Solutions Center any time of the day or night to switch the device to active GPS monitoring.
In its standard configuration, a BluTag Hybrid device calls VeriTracks to transmit its tracking data under
the following conditions:
Enrollee charges the device,
Enrollee enters the tether range of a BluHome unit,
Enrollee violates a 911 inclusion zone,
BluTag records a bracelet strap tamper, or
Agent or officer “pings” the device while logged into VeriTracks.
BluTag Passive
BluTag Passive receives and stores all monitoring data onboard until the enrollee enters the RF tether
range of BluHome that is installed in an enrollee’s home. More information about BluHome is included
later in this chapter.
Unlike multi-piece tracking devices, BluTag Passive transmits data via an radio frequency (or RF) signal
to BluHome while still attached to an enrollee’s ankle. Multi-piece passive GPS devices require an
enrollee to remove the transmitter (the component that actually tracks an enrollee’s movements) every
day for up to eight hours to recharge the battery and/or transmit monitoring data.
BluTag Passive immediately receives GPS coordinates when the RF tether between itself and BluHome
breaks. Because BluTag Passive remains securely attached to an enrollee’s ankle at all times. Public
4 VeriTracks® 10.7 User Manual
Page 19

safety is enhanced because the movements of an enrollee are tracked 24/7, even when an unscheduled exit
from the residence occurs. BluHome sends VeriTracks a violation alert when such an event occurs.
VeriTracks® 10.7 User Manual 5
Page 20

BluBox Benefits and Operations:
Enhance curfews with the RF signal regardless of layout or construction of facility
Uses a standard AC electrical outlet for power
Back-up battery power lasts up to three days
Detects unauthorized movement or tampering to BluTag that sends the data to VeriTracks
When an enrollee enters the RF signal range and BluBox and BluTag are tethered together,
BluTag transmits a message to VeriTracks
When BluTag is tethered to BluBox, GPS tracking is curtailed; when the tether is broken, GPS
tracking returns to standard operation protocol
BluBox
BluBox is a BluTag accessory designed for use in group residential facilities with multiple enrollees or
for a single enrollee where an RF tether is required. It emits an encrypted RF signal to electronically
tether multiple enrollees monitored with a BluTag device. BluBox does not transmit monitoring data. The
BluTag device attached to the enrollee’s ankle transmits monitoring data.
6 VeriTracks® 10.7 User Manual
Page 21

BluHome Benefits and Operations:
Enhance curfews with customized cut-off points with the RF signal regardless of layout or
construction of the residence
No removal of BluTag from the enrollee’s ankle to transmit monitoring data to BluHome
BluHome installs in an inconspicuous location in the enrollee’s home
No enrollee interaction is required for normal operations or maintenance
Uses a standard AC electrical outlet for power
Back-up battery power lasts up to three days
Detects, records and transmits unauthorized movement and electrical or telephone service
interruptions
BluHome
BluHome is a GPS accessory that transmits monitoring data through a standard landline telephone
connection or cellular signal in an enrollee’s residence. When an enrollee enters BluHome’s RF signal
range, the unit immediately tethers itself to the BluTag device. GPS location data, violations and other
monitoring data transmit to the BluHome through the tether. BluHome then transmits the data to
VeriTracks using a landline or cellular connection.
BluHome allows customized cut-off points for the RF tether regardless of the layout or construction of the
residence. This significantly enhances curfews since the tether can be programmed to cut off at a
specified location in or out of the enrollee’s residence.
BluHome is also the in-home unit that monitors the presence of enrollee’s wearing the BluBand RF
device.
VeriTracks® 10.7 User Manual 7
Page 22

BluBand
BluBand is a radio frequency (RF) transceiver that interfaces with BluHome, the home unit that transmits
monitoring data to VeriTracks. Together BluBand and BluHome monitor every entrance into and exit
from an offender’s home. After BluHome records the date and time of an offender’s entrance into and exit
from his or her home, it transmits the data to ® using digital, cellular or traditional landline telephone
service.
BluBand is approximately 1.25” x 2.25” x .05” and weighs around two ounces. The device secures to an
offender’s ankle with a fiber optic cable-lined strap that detects tamper attempts. The strap is the same
one used for BluTag, attaches to the transceiver with two pins. If an offender attempts to disengage the
device from his or her ankle by pulling on the strap at the connection point, the pins break. If a strap
tamper occurs, BluBand records and stores the event until the offender enters the BluHome RF tether
range.
8 VeriTracks® 10.7 User Manual
Page 23

Stalker Alert™
Stalker Alert uses GPS technology, mobile proximity zones and nationwide cellular telephone networks
to help provide advance warning to victims about the presence of their abuser. The abuser’s supervising
officer creates a mobile proximity zone around the victim, which is a pre-determined amount of protected
space, usually the distance specified in the order of protection. This circular zone moves with the victim
24/7 and is stored in Stalker Alert’s onboard memory. The same zone also moves with the abuser and is
stored in the onboard memory of his or her BluTag device. If the abuser who is monitored by BluTag
enters the mobile proximity zone, Stalker Alert immediately recognizes the violation and sends the
information to VeriTracks, so the supervising officer and law enforcement personnel can be alerted to the
violation. At the same time, Stalker Alert performs two actions to alert the victim of the abuser’s
proximity (1) the alert begins emitting an audible tone and (2) sends a text message to the victim’s
cellular telephone.
Stalker Alert weighs less than seven ounces and can easily fit into a handbag, briefcase or attach to a belt.
The Alert operates up to 60 hours on a single charge. Approximately five hours prior to the depletion of
power, Stalker Alert vibrates. Recharging the battery is a simple process that takes about one hour. The
charging device is similar to that of a cell phone — one end plugs into the device and the other plugs into
a standard AC electrical outlet. The victim knows the battery is completely recharged when the LED on
the face of the device steadily glows green. Even while charging the battery, Stalker Alert continues
monitoring the location of the victim and any violation of the victim’s mobile proximity zone.
VeriTracks® 10.7 User Manual 9
Page 24

BluScan™
The BluScan mobile monitoring unit has an operating range of 300 feet and it is designed to monitor the
presence of any STOP product. BluScan can concurrently monitor STOP BluTag or BluBand devices or
BluHome units – or any combination of equipment totaling sixteen devices. BluScan can store
approximately 5,000 events through continual recording or when requested by a supervising officer. It
indicates the approximate distance of the equipment being monitored.
The mobile monitoring unit records any event notifications transmitted by BluTag or BluBand, including
tampering and low battery statuses. BluScan monitors date and time stamps all events and stores them in
its onboard memory until such time as the supervising officer uploads the data to a computer.
When the unit is in set-up mode, it can be configured to report the operational status of a BluBand or
BluTag device, including the battery’s level of power, tampers and the GPS signals being received. The
unit operates with a small attached antenna yet can easily be connected to a magnetic car-mount antenna
for use in a vehicle for increased range.
BluScan can operate on battery power for approximately three days. A battery charger for use in a vehicle
is also available.
10 VeriTracks® 10.7 User Manual
Page 25

This page is deliberately blank.
VeriTracks® 10.7 User Manual 11
Page 26

CHAPTER 2: GETTING STARTED
Contacting STOP’s Solutions Center:
By Phone:
1-866-703-STOP (7867)
By Fax:
1-877-410-STOP (7867)
By Email:
techsupport@stopllc.com
SYSTEM AND BROWSER CONFIGURATION
In order to maximize the quality of VeriTracks:
Windows XP or Windows 7 operating system
Microsoft Internet Explorer® 8 or Google Chrome
2 GB RAM
Display 1024 x 768 or higher screen resolution
Cookies enabled on the browser (used for login identification purposes only)
JavaScript enabled on the browser
TIP: If you have appropriate administrative rights on your computer, you may change the
settings for cookies and JavaScript by selecting Tools > Internet Options in Internet
Explorer, then selecting the Settings button in the Temporary Internet Files section of the
General tab.
Verify and change screen resolution by right-clicking on the Desktop and selecting
Properties > Settings tab.0
NOTE: VeriTracks is designed and tested work with the certified system requirements stated
above. If a computer’s browser does not have sufficient encryption capability, a message
displays directing users to a browser upgrade website. For further assistance, contact our
STOP Solutions Center toll free at 866-703-STOP (7867).
GETTING HELP
Technical support staff at STOP’s Solutions Center can assist with any questions regarding the operation
of VeriTracks or any of the Blu hardware devices.
For security reasons, the Solutions Center can only assist users if a valid security question and answer
have been established for that user in VeriTracks. If assistance is needed with accessing a particular
security question/response, please contact your agency’s System Administrator/Manager or refer to
Chapter 8: Maintenance for more details.
12 VeriTracks® 10.7 User Manual
Page 27

LOGGING IN
1. To begin, open Internet Explorer or Google Chrome browser
2. In the address line on the Home Page, type the following address: https://www.veritracks.com
3. Select Yes or No to the Security Warning (if applicable)
4. VeriTracks login screen displays
5. Enter your Username and Password
TIP: If you forget your username or password, VeriTracks can email the information to
you. Simply click the “Forgot your password?” link and follow the instructions.
Still having trouble loggin in? Contact VeriTracks support for further assistance.
6. Select No to the Security Warning (if applicable); Main Map data may not display completely if
Yes is selected
7. Select Login
8. If your organizations has a hierarchy of field and regional offices, select the office you wish to
access from the list provided.
VeriTracks® 10.7 User Manual 13
Page 28

VeriTracks Login Screen
VERITRACKS ORI HIERARCHY
An ORI is a unique nine-character identifier assigned by the Federal Bureau of Investigation
(FBI) and assigned to law enforcement agencies. VeriTracks uses this identifier when available
to establish the unique identity of each of its customers in the VeriTracks system. If an agency
does not have an FBI ORI, STOP will create a VeriTracks ORI for each agency. Larger
organizations that are divided into geographic regions, functional branches, and field offices are
set up in VeriTracks to replicate their organization’s hierarchy of offices. Additionally,
organizations that have a reason to separate two supervised populations like adults and juveniles
can have each population separated in VeriTracks. For simplicity’s sake, each population entity
in the hierarchy is referred to as an ORI.
For example, if an agency has a Headquarters office and three (3) field offices, the Headquarters
office is set up as the “parent” ORI and the three field offices are configured as “child” ORIs.
Users with access to the parent ORI can view enrollee information and tracking data, monitor
inventory lists, receive notifications, etc. for all three child ORIs as well as the parent ORI. Users
who only have access to a child ORI only have rights to the above information for their own
ORI.
14 VeriTracks® 10.7 User Manual
Page 29
Header
Panel
Tab
Page
Panel
Map
Panel
Widget
Panel
VERITRACKS BROWSER LAYOUT
VeriTracks consists of the Header Panel, the Tab Page Panel, the Widget Panel, and the Map Panel. The
screen print below shows the location of each of these panels.
TIP: VeriTracks uses tab pages and widgets to organize functionality. Widgets are the small
screens seen within each tab page.
VeriTracks Panel Layout
VeriTracks® 10.7 User Manual 15
Page 30
Tab Page
Selection
Icon
Available
Tab Pages
Tab Page
Close
Icon
BASIC NAVIGATION
WARNING: Do not use the Back button on your browser as it may produce unexpected
results in VeriTracks. To switch from one tab to another or to change a widget,
simply select the applicable tab or widget.
Tab Pages
VeriTracks utilizes tab pages and widgets allowing a user to view the information they want in the
specific order they choose. Select the tab pages to display in the Tab Page Panel. Add the same tab page
multiple times in the Tab Page Panel. Available tabs include the following:
VeriTracks Tab Pages
General – view general system information and messages; available widgets include Introduction
and Messages. Note: This tab page displays when first logging into VeriTracks. Use the feedback
form to submit any questions or comments.
Supervision – view the most current information for an enrollee; available widgets include
Enrollee Details, Simple Enrollee Search, Advanced Enrollee Search, Browse Enrollees, and
Schedules
Enrollment – create and modify enrollee records; available widgets include Enrollment Entry,
Simple Enrollee Search, Advanced Enrollee Search, Browse Enrollees, Browse Inventory,
Schedules, Available Inventory, and BluBox Management
Inventory – manage devices and device inventory; available widgets include Inventory Details,
Browse Enrollees, and Browse Inventory
16 VeriTracks® 10.7 User Manual
Page 31

Maintenance – browse users and then maintain as necessary; available widgets include User
Widget
Icon
Management and Browse Users
Analysis – search for and view incident reports; available widgets include Simple Enrollee Search,
Advanced Enrollee Search, Incident Search, and Incident Entry
Reports – view report details; available widgets include Recent Reports and Report Viewer
Monitoring – monitor the event activity of your entire offender population in a single screen and
respond to those events with step-by-step pre-defined protocols.
To remove a tab page:
1. Click the tab page close icon on the tab you wish to close. This icon displays to the right of the
tab page label in the Tab Page Panel. This closes the tab page.
To add a tab page:
1. Click the tab page selection icon in the Tab Page Panel. A drop-down list displays and displays
all of the available tab pages.
2. Select the tab page you wish to add. This tab page will now appear in the Tab Page Panel. The
default widget(s) will appear on the tab page once it opens.
Widgets
VeriTracks Widgets
VeriTracks displays information as widgets, or individual windows, that represent a group of related
information or functions. Widgets display the information and functions that a user chooses in a manner
that is most useful to them. For example the Enrollment Widget contains data and functions used to enroll
an individual on a device in VeriTracks. Widgets can be added to or removed from a tab page and
arranged on the tab page in the order that makes the most sense.
Each tab page has a drop-down list of widgets available on that tab page. Available widgets are organized
into two sub-menus: function specific widgets and Generic Widgets.
When a widget is selected, the information is placed within the box on the tab page. These boxes may be
moved on the tab page to any desired location within the box. Each widget box has a toolbar that displays
in the upper-right corner of the widget box.
Function specific widgets – Function specific widgets present information or functions specific to
the topic of the tab. Function specific widgets will vary on each Tab Page Panel.
Generic Widgets – Generic widgets appear on many tab pages and include Clock, Calendar, and
Feedback.
VeriTracks® 10.7 User Manual 17
Page 32

To use widget tools:
Tool
Function
Reload icon – refreshes or redisplays the widget box using the most current data
available
Minimize icon – only reduces the size of the widget box, it does not close it
Note: when the widget is minimized, the icon changes to allowing you to restore
the widget box to its original size
Maximize icon – resizes the widget box so that it displays the full width of the
browser screen
Close icon – shuts the widget box.
Each widget box in VeriTracks contains a toolbar with the following options:
To add widgets to a tab:
1. Select the widget icon on the tab page you wish to add the widget. This icon displays to the left of
the tab page name in the tab page label. Each tab page has a unique widget icon.
2. A drop-down menu listing the widgets available for that tab page displays. Navigate to and select
the widget you wish to add to the tab page.
To remove widgets from a tab page:
1. Select the widget close icon from the widget toolbar. The widget will close.
To move a widget:
Widgets can be repositioned on a tab page by selecting and dragging. To move the widget, ensure the
mouse cursor displays a four-headed arrow and is located inside the box. Drag the widget to the desired
location within the tab page. VeriTracks will handle the proper positioning of the widget as it locks itself
into its new location.
Modal Pop-Ups
Throughout VeriTracks modal pop-ups are used to enter or view information. A modal popup is a
window that requires a user to interact with and enter the requested information before returning to the
widget.
18 VeriTracks® 10.7 User Manual
Page 33

Tool
Function
Reload icon – refreshes or redisplays the Map using current data available
Minimize icon – only reduces the size of the widget box, it does not close it.
Note: when the widget is minimized, the icon changes to allowing you to restore the
widget box to its original size
Stacked maximize icons – displays the map in a split screen to share space with other
widgets in VeriTracks.
Maximize icon – resizes the Main Map to display the full width of the browser screen
Map
The map permanently displayed on the bottom of VeriTracks, once the application is launched. Resize
the map by selecting the outer edge of the box. A double-headed arrow displays. Click and drag the
arrow up, down, left or right to resize the view. You can also minimize, display the map in a split screen,
or maximize the Map view using the icons on the right side of the header. If you maximize the map, it
will cover any currently displayed widgets; however, those widgets and their displayed information are
still available as soon as the map is minimized or partially minimized.
VeriTracks® 10.7 User Manual 19
Page 34

Page
Widgets
General
Introduction, Feedback, Messages
Enrollment
Browse Enrollees, Enrollment Entry, Available Inventory
Supervision
Browse Enrollees, Enrollee Details
Page
Widgets
General
Introduction, Feedback, Messages
Analysis
Incident Entry, Incident Search
Hyper
Link Icon
DEFAULT SETTINGS
The first time a user logs into VeriTracks, certain default setting pages and widgets display. Change any
or all of the default settings to a display order that is most logical for you.
The default pages and widgets for standard parole and probation users are:
The default pages and widgets for law enforcement (crime scene correlation) users are:
If a user opens too many tab pages and widgets and wants to return VeriTracks to its default settings:
1. Select My Account link in the upper-right corner of the browser window.
My Account Link
2. A modal pop-up displays your account information. Select General Settings in the lower-left of
the modal.
3. Check the Reset Default Settings box. A message displays the outcome of VeriTracks once the
box has been checked.
4. Select Save in the lower-right of the modal. VeriTracks displays the saving of data.
5. Select Close to return to the main tab views.
20 VeriTracks® 10.7 User Manual
Page 35

CUSTOMIZING VERITRACKS
My Account Modal
One unique advantage of VeriTracks is the software remembers the pages, widgets, and settings you
select to display in a former session. Each time a user logs out VeriTracks takes a snapshot of the current
pages and widgets you opened during a current session. This recall function makes it very convenient by
displaying the same pages, widgets and settings you use most.
Your settings are automatically saved by VeriTracks. However, to ensure your configuration is saved,
use the Logout [username] link in the upper right corner of VeriTracks.
For more details on customization of VeriTracks refer to Chapter 8: Maintenance.
UNDERSTANDING DATA ENTRY FEATURES
Text Boxes
Text boxes allow direct data entry using the keyboard.
Text Box
VeriTracks® 10.7 User Manual 21
Page 36

Date Fields
Radio
Button
Checkbox
All dates can be input directly or picked off a calendar pop-up list.
Calendar
Drop-down Lists
Drop-down list boxes allow you to: (1) type information directly into the box, (2) search the list or (3)
pick an item off the drop-down list. You cannot select multiple values in these fields.
Drop-Down List
Radio Buttons and Checkboxes
Radio buttons allow users to select a single entry in a list of options. When options are presented
in a list of radio buttons, a selection must be made.
Checkboxes allow you to select multiple entries in a list. You also have the option of not selecting
any option.
Radio Buttons and Checkboxes
22 VeriTracks® 10.7 User Manual
Page 37

UNDERSTANDING HOW TO SEARCH AND BROWSE WIDGETS
Universal
Search
Panel Icon
Universal Search Panel
The Universal Search panel for VeriTracks (shown below) allows users to search and use the results
across different widgets and tabs.
Universal Search Panel
Users access the Universal Search page by clicking on the Search icon on the far right of the screen
and below the agency name. Users may search by enrollee, device or agent and “grab” the search results
to “drag and drop” into another widget for quicker viewing.
How to Use the Universal Search Panel
1. Type the enrollee’s name and select Go. The enrollee, their ID number and the agent assigned to
that enrollee display.
Enrollees may be dragged and dropped onto the:
Enrollment tab
o Enrollment Entry widget
o Victim Entry widget
o BluBox Management widget
Supervision tab
o Enrollee Details widget
o Main Map
o
TIP: The Enrollee name can also be dragged to the Map to view the last four (4)
hours of activity on this individual.
VeriTracks® 10.7 User Manual 23
Page 38

2. Select the drop down in the upper left corner of the Universal Search Panel. Searches may be
Search
Drop
Down
done by Enrollee, by Devices or by Agent. Search icons display, respectively.
Enrollee Search Drop Down
3. Select the Cell Phone/Devices icon.
4. Type any portion of the Enrollee’s name and select Go. The Serial Number (#), along with the
type of product associated with this enrollee and to whom the enrollee is assigned displays.
Simple Device Search
Devices may be dragged and dropped onto the Inventory Details tab:
o Inventory Details widget or
o BluBox Management widget (BluBox units only)
5. Select the Agent icon.
6. Type any portion of the Agent’s name and select Go. The Agent’s Name and email address
display.
Simple Agent Search
Agents may be dragged and dropped only to the Maintenance tab, User Management widget.
24 VeriTracks® 10.7 User Manual
Page 39

Advanced Search
TIP: The Advanced Search feature is only available within the Analysis tab.
Advanced Enrollee Search
Simple Search Widget
The Simple Enrollee Search is located in both the Enrollment and Supervision tab pages.
The Simple Enrollee Search widget allows you to find enrollees in your caseload or for other officers in
your ORI by using easy to define search criteria. The Simple Enrollee Search widget only searches the
ORI where you are logged in.
Simple Enrollee Search
1. Type an Enrollee’s search criteria (name, ID, enrollment date) in the text box.
VeriTracks® 10.7 User Manual 25
Page 40

2. Select the Apply Filter button and view the results.
Enrollee Search Results
3. Select the Remove Filter button to clear the current enrollee search criteria and begin a new
search.
4. Select the General icon to display additional Enrollee sort features.
General Enrollee Search
26 VeriTracks® 10.7 User Manual
Page 41

Browse Enrollee Widget
The Browse Enrollees widget is located in the Enrollment tab.
Use the Browse Enrollees widget to locate enrollees in any ORI that your login has permission to access.
Enrollees are located in “folders.” Two main folders display in the widget—My Caseload and Agencies.
My Caseload opens to the defaults shown below.
Browse Enrollee widget
1. Select the Unassigned folder to view enrollees previously assigned to a device in your caseload.
Browse Unassigned Enrollees
2. To locate enrollees under other officers or in other ORIs, select the Agencies folder and drill
down in the structure to display a list of other agent’s and their assigned and unassigned
enrollees.
VeriTracks® 10.7 User Manual 27
Page 42

Browse Other Agents
3. Select the Enrollment tab page, drag individual enrollees from the Browse Enrollees widget to
the Enrollment Entry widget to display detailed enrollee data per individual as shown below.
Browse Enrollment Entry
28 VeriTracks® 10.7 User Manual
Page 43

Browse Inventory Widget
The Browse Inventory widget is located in the Inventory tab page.
Use the Browse Inventory widget to locate inventory in any ORI that your login has permission to
access.
1. Open the Unassigned or Assigned folders in the Browse Inventory widget to view various
products in your ORI. In the example below, the widget displays the BluHome in that ORI that
are not currently assigned to a BluHome Group.
Browse Inventory
If the folder is not open and the icon on the folder is red, there is no inventory for that product type
currently displayed in the ORI. For example, in the screen print above, the ORI has no inventory of
BluBand equipment.
TIP: The most common use of the Browse Inventory widget is to locate and edit BluBox
groups. Drag a BluBox group to the BluBox Management widget to edit details of the
group, assign new BluBoxes to the group, or assign new enrollees to the group.
VeriTracks® 10.7 User Manual 29
Page 44

Browse User Widget
The Browse User widget is located in the Maintenance tab page. Use the Browse User widget to locate
users in any ORI that your login has permission to access. The widget defaults to displaying the names of
all of the users in the ORI into which you are currently logged.
Browse Users
1. Drag a user from the Browse User widget to the User Management widget to edit the profile,
notifications, or permissions, etc. of a VeriTracks user in your agency.
User Management View
30 VeriTracks® 10.7 User Manual
Page 45

This page is deliberately left blank.
VeriTracks® 10.7 User Manual 31
Page 46

CHAPTER 3: BLUTAG ENROLLMENT
ENROLLING AN INDIVIDUAL
Tracking individuals in the VeriTracks system begins with first enrolling them in the system and
activating the assigned BluTag device. The recommended enrollment process is as follows:
1. Prepare BluTag for use
2. Turn on BluTag and acquire GPS
3. Verify BluTag readiness
4. Attach BluTag to an Enrollee
5. Create an Enrollee Profile and assign a BluTag
TIP: The five steps listed above are sequentially ordered to provide the most efficient
process for enrollment. Although, the creation of an Enrollee Profiles may be
completed in advance of the steps 3, 4, although no tag may be assigned until all steps
have been done in order.
PREPARE BLUTAG FOR USE
Inspecting and Preparing Inventory
1. If the BluTag device is being re-assigned, visually inspect the lenses in each wing of the device
first.
2. Locate the strap, u-clips, top caps, cutter, and cutting plate to ensure all tools are in place for
installation.
3. Insert a u-clip on top of each wing of the tag, making sure each u-clip is flush when inserted.
4. Place a top cap on top of each u-clip, aligning the top cap’s lip with the curved groove.
5. Slide the flat, underside of a STOP removal plate across the top cap to push it into place. It should
then be flush when inserted correctly.
6. Inspect the ends of the strap, making sure each end is cut straight and on a line (if necessary, re-
cut each end, on a sizing line).
7. Attach a pair of clips to one end of the strap. The ends of the clips must align evenly with the end
of the strap (i.e., not shorter or longer than the width of the strap).
8. Insert the clipped end of the strap into a wing of the tag. Pull slightly to ensure that the strap is
secure (i.e., each end of the strap must remain attached to the BluTag at all times and should
never become unattached unless cut, terminating the connection.)
32 VeriTracks® 10.7 User Manual
Page 47

Device
Status
TURN ON BLUTAG AND ACQUIRE GLOBAL POSITIONING SYSTEM (GPS)
BluTag devices are shipped in “deep sleep” mode. Un-enrolling an enrollee also places BluTag in
“deep sleep” mode. In order to assign or re-assign the BluTag device, perform the following:
1. Activate BluTag by placing it on the charger for at least four (4) hours before an installation.
2. Place BluTag in a location with a clear view of the sky. An ideal location for the device is a
window sill, preferably while it charges, to acquire GPS. Acquiring GPS may take up to 15 - 45
minutes to ensure the device is fully charged.
IMPORTANT: Do not charge a device for longer than two (2) weeks without installing it on an
enrollee.
When a device is ready for use, the cycle listed above may be repeated.
Avoid charging BluTag in direct sunlight.
VERIFY BLUTAG READINESS
After charging the BluTag’s battery for at least four hours, verify the device is communicating with
VeriTracks and has an updated Global Positioning System (GPS) almanac. The GPS almanac describes
the orbits of the complete active fleet of satellites. GPS receivers use the almanac to determine
"approximately" the location of the satellites relative to the GPS receiver’s location. The receiver uses the
almanac to determine what satellites it should use to verify location of each BluTag. Having an up-todate almanac speeds acquisition time for the GPS receiver.
The best indication of an up-to-date GPS almanac is that the device is continuously receives GPS for 45
minutes. To verify the status of communication and the acquisition of GPS, open the Assignments tab on
the Enrollment Entry widget. A drop-down box shows the list of available BluTag devices. Next to
each device serial number is an icon indicating device readiness. If the icon is green, the device is ready
to be placed on an enrollee.
VeriTracks® 10.7 User Manual 33
Page 48

Device
Status
Show
Contacts
An icon’s status is green if the device is (1) contacting the system regularly; (2) averaging 60% or more
GPS coordinates per call-in during the previous two (2) hours; and (3) averaging a battery level of 4.1 or
higher during the previous two hours.
View BluTag Status Details
Checking the device status of a BluTag is easy. If you want to assign a BluTag to an enrollee, you see the
device status represented as a yellow triangle or a red exclamation point instead of the green circle with a
check mark next to the Device Number; follow the steps below to ensure the exact status of a device
before linking it to an Enrollee.
1. Under the Browse Enrollment Tag page, select and drag the Unassigned Enrollee to the
Enrollment Entry widget. The unassigned enrollee’s information defaults in the Profile tab.
2. Select the Assignments tab, then select and associate a Device Number you would like to assign
to the enrollee.
3. Once a device is temporarily selected or associated with the unassigned Enrollee, a report on this
device may now be generated to display accurate information about this particular device. Select
the Show Contacts icon.
34 VeriTracks® 10.7 User Manual
Page 49
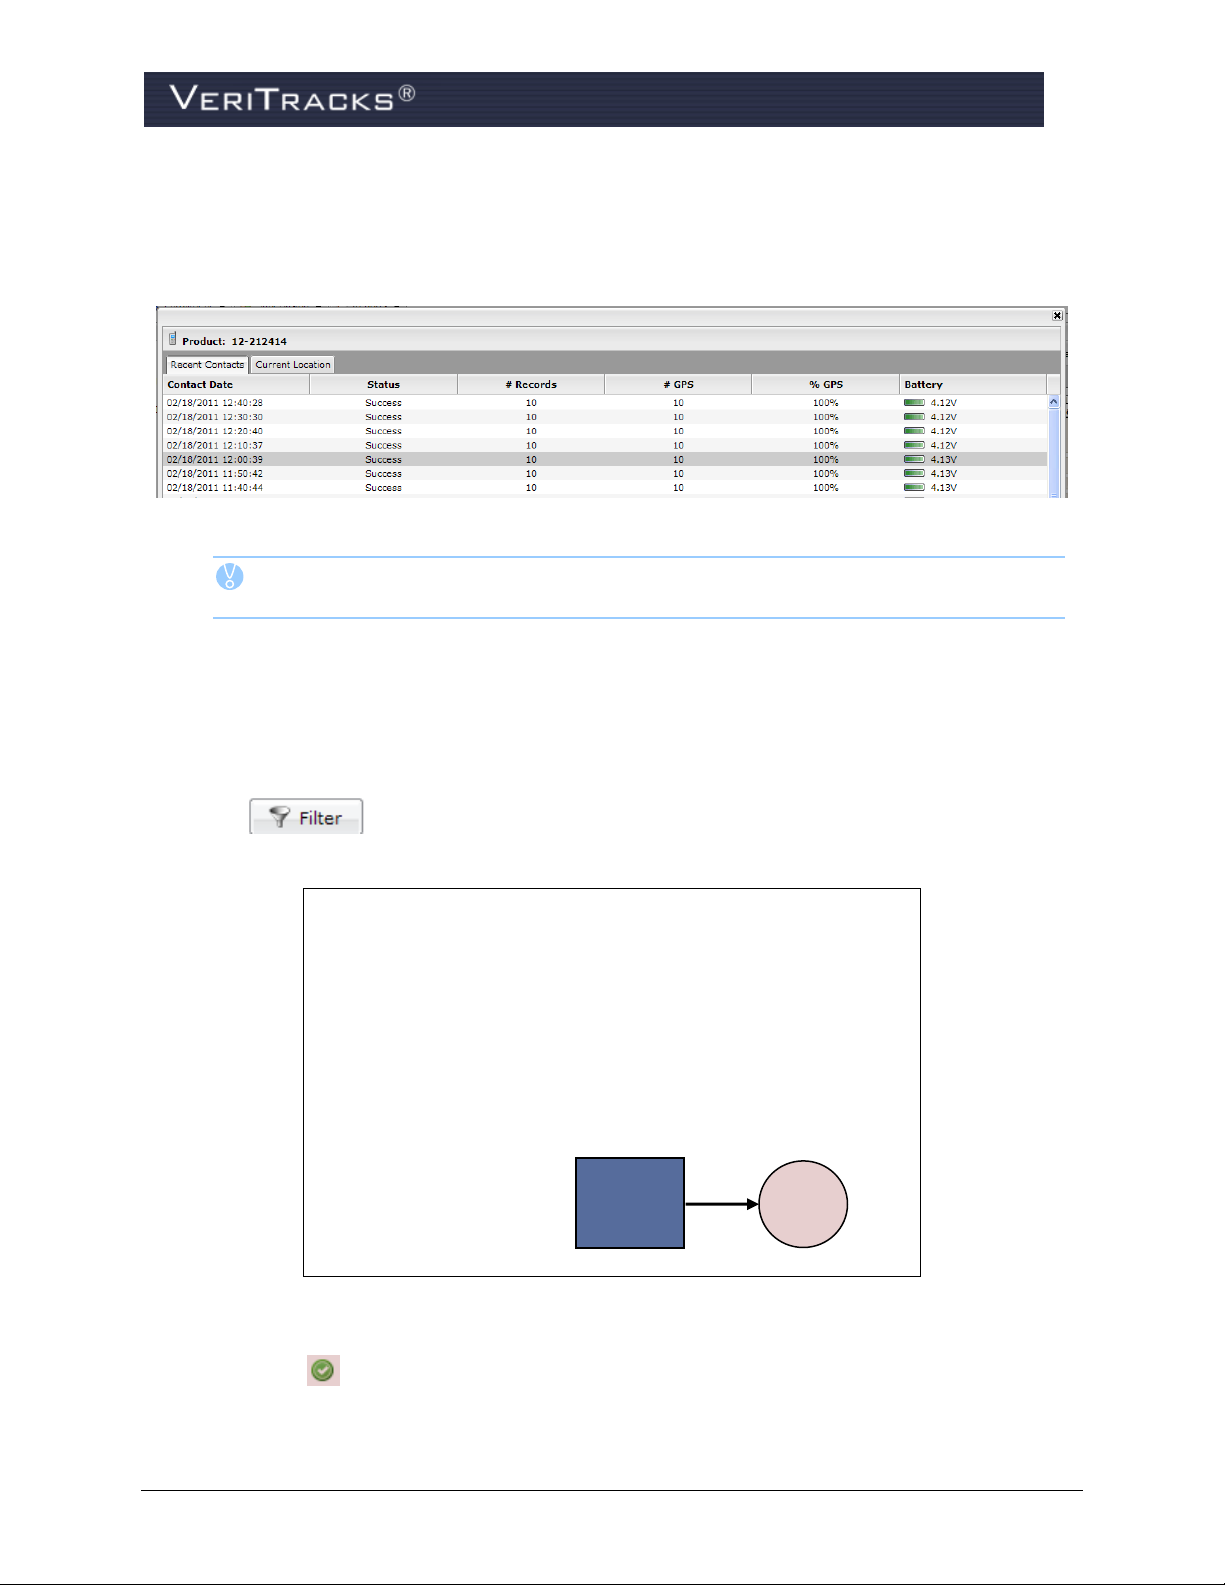
Device
Status
Details
4. A VeriTracks system generated report is generated and displays if you have reached a successful
contact status, battery life on this device, as well as the percentage of GPS readings against this
device before you assign the BluTag to the enrollee.
Device Status Detailed Report Window
TIP: If the BluTag device’s status icon is not green, it is recommended not to assign it
to an enrollee.
To determine why a BluTag device status icon is not green, review the BluTag contacts described below.
Other methods to view BluTag Status Details
1. Open the Available Inventory widget in the Enrollment Tab page.
2. Search for the device number by scrolling through the list of Serial Numbers or by using one of
the data filters.
3.
Device Status Details Icon
4. Select the Device Status Details icon in the State column of the device’s row. A system
generated report displays a listing of the details for all recent contacts made by the device. Use
VeriTracks® 10.7 User Manual 35
Page 50

this report to determine whether the device has a sufficiently frequent call-in rate, a high average
Status
Call
Button
Status
Indicator
Lights
of GPS tracking percentage, and adequate battery charge of the device.
Device Status Detailed Report Window
BluTag Communication with VeriTracks
If BluTag is not calling into VeriTracks, use these techniques to activate the device:
Attach the charger to BluTag and remove it after a few seconds to wake up the device.
Press and hold the Status Call button on the front of the device until it beeps.
If BluTag does not have a satisfactory number of current GPS coordinates (i.e., 60% or more), place the
BluTag outside with a full view of the sky to recharge itself. This process may require 15 to 60 minutes
for the device to acquire initial GPS coordinates and download its almanac if it has been in storage or
shipped a long distance (e.g., new BluTag devices are shipped from the manufacturing site in Houston,
TX).
The BluTag icon turns green when it is adequately charged. BluTag may need to be placed a charger on it
until the 3 Status Indicator Lights turn green.
If any of these conditions are not resolved with these techniques, use a different BluTag and return the
first device to STOP’s manufacturing facility, 1212 North Post Oak Road, Suite 100, Houston, Texas
77055.
TIP: Available Inventory Widget Tips:
Click on a column heading to sort by Serial #, Product, or State.
36 VeriTracks® 10.7 User Manual
Page 51

Filter
Options
Bar
Next Page/
Previous Page
Buttons
Open or close the filter section by clicking anywhere on the Filter Options bar.
Available Inventory
Move to the next page of the device listing by selecting the Next Page/Previous Page
buttons at the bottom of the widget panel.
Next Page/Previous Page buttons
VeriTracks® 10.7 User Manual 37
Page 52

ATTACH BLUTAG TO ENROLLEE
Once BluTag is ready for use, it must be physically attached around the enrollee’s ankle. Installation on
the left leg is recommended to improve tracking in automobiles. Follow these easy steps to install BluTag
on an enrollee.
1. Write down and save the BluTag’s serial number.
2. Place the tag on the outside of the left ankle and wrap the strap around the ankle.
3. Insert two fingers inside the strap, opposite of the tag to ensure the leg has mobility while wearing
the tag.
4. Look for the line on the strap that displays two (2) lines past the edge of the tag.
5. Make a straight cut on the line, using STOP cutters only.
Correct alignment Incorrect alignment
BluTag Strap Alignment
6. Insert the unclipped end into the wing to test the fit. Cut excess strap, if necessary.
7. Attach clips to the end of the strap and press firmly into the wing.
WARNING: If the clipped end cannot be inserted without pulling or bending, the
strap has been cut too short. Do not attempt to use it, as the clips may
not fully attach to each side of the wing, causing false tamper alerts and
discomfort for the enrollee.
8. Firmly pull the strap to check the fit.
9. Push the Status Call Button on the front of the BluTag, so BluTag calls and reports the status as a
closed strap.
38 VeriTracks® 10.7 User Manual
Page 53

CREATE ENROLLEE PROFILE
Create New
Enrollee
Record
To create an enrollee’s profile:
1. Open the Enrollment tab page.
2. Open the Enrollment Entry widget.
3. Click the Create a new Enrollee Record icon. The Enrollee: New Enrollee screen opens and
allows you to enter enrollee information.
Create New Enrollee Icon
4. Complete the enrollee profile. The following are required fields that must be populated in order
to add an enrollee to VeriTracks:
Primary Id
First Name
Last Name
Agent of Record
GPS Start & End Dates (MM/DD/YYYY; slashes only)
Enrollee Risk Level (default is set to Level One)
VeriTracks® 10.7 User Manual 39
Page 54

Save
Profile
Additional
Data
Sections
New Enrollee Profile
More about the Primary ID field
The Primary ID is the unique identifier for that individual. Agencies use inmate number, case number,
social security number, etc. The Primary ID relates solely to that Enrollee and no ID may be used more
than once.
More about the Risk Level field
Risk levels allow supervising agencies to define their own enrollee categories and to organize their case
loads under those categories. Different types of notification procedures and monitoring center protocols
can be assigned to each risk level and therefore to each enrollee in each risk level.
Risk levels are set up by STOP technical support and are defined by the agencies during setup. Risk
levels can vary from one ORI to the next and are assigned to the enrollee in when the agent enters the
Enrollee profile in the Enrollment Entry widget. If only one risk level exists in an ORI, new enrollee
profiles default to that risk level so there is no additional data entry required at enrollment.
Additional data can be entered by selecting the bars at the bottom of the Fundamentals section. The bars
are labeled Characteristics, Vehicle, Miscellaneous and Enrollee Payment. These bars contain
additional data fields such as hair color, eye color, etc.
40 VeriTracks® 10.7 User Manual
Page 55

To enter an enrollee’s home and work addresses:
Address
Tab
Save
Address
Address
Map
Create/
Assign Zone
1. Open the Address tab on the Enrollment Entry widget.
TIP: To set a location based on cross streets anywhere in VeriTracks, simply insert an “&”
between the two streets in the Street 1 field.
2. Enter the home street address (and work address, if applicable). Once the addresses are entered,
click Set Location to show the localization of that address. Zoom in or out and use satellite
photography to decide the precise placement of the icon. As necessary drag and drop the icon to
adjust the placement of the address icon. Note: The icon returns to the geo-coded position if more
address data is added after moving the icon.
3. After entering the necessary data fields, select Set Location again to update the VeriTracks map.
4. Select in the top-right corner of the page to update the Enrollee’s address information.
TIP: Use the Street 2 field for non-geographic address data like apartment number.
Enrollment Entry: New Enrollee Address
TIP: VeriTracks has features for more efficient zone creation. While still in the Address tab,
select the Create / Assign Zone checkbox. The screen displays fields for entering zone
name and type. See Chapter 4 for additional details.
In addition to home and work addresses, VeriTracks can store an unlimited number of other addresses for
an enrollee. These addresses will display on the map when reviewing Enrollee tracks and can be helpful
in analysis of movement.
VeriTracks® 10.7 User Manual 41
Page 56

To enter additional addresses for an enrollee:
Assign Device
Save Assignment
1. Scroll down to the last existing Address record for the enrollee. Beneath this record the Add
New Address button displays. Select the Add New Address button and VeriTracks creates an
additional blank address record.
2. Complete the desired data fields and select Set Location after entering an address to update the
VeriTracks map.
3. Select in the top-right corner of the page to update the Enrollee address information. A
message briefly displays stating Save in Progress . . . Please wait . . . The record is now saved
to VeriTracks.
ASSIGN BLUTAG TO THE ENROLLEE IN VERITRACKS
IMPORTANT: DO NOT assign a BluTag device to an enrollee in VeriTracks until it is
attached to the enrollee’s ankle.
1. To enroll a new enrollee in VeriTracks, open the Assignments tab on the Enrollment Entry
widget.
2. On the Assignments tab leave “BluTag” selected in the Device Type field, and select the drop
down next to the Device Number field to choose the applicable device number from the serial
number drop-down list associated with this BluTag.
Enrollment Entry BluTag Assignment
3. Once the tag has been identified, select in the top-right corner of the page to update the
Enrollee’s tracking device assignments. A message briefly displays stating Save in Progress . . .
Please wait . . . The record is now saved to VeriTracks.
4.
TIP: Always confirm the location of the device on the map prior to selecting SAVE.
42 VeriTracks® 10.7 User Manual
Page 57

Verify Enrollment in Enrollee Status Screen
To verify that the device is properly assigned:
1. Select the Supervision tab, and open the Enrollee Details widget. All enrollees assigned to this
Supervisor display in tabular form in the Enrollee Details widget.
2. Verify that VeriTracks properly received the enrollee information and confirms the updated
Device ID and the Enrollment Date are populated, as highlighted below.
Supervision Enrollee Details Widget
Verify BluTag Connectivity to VeriTracks
To physically ensure the device is properly assigned:
1. Physically press and hold the BluTag Status Call button until it beeps. This action causes BluTag
to call VeriTracks and forces a direct line of GPS communication with VeriTracks and ensures
the device, the enrollee and the agent are in sync.
TIP: Establishing a Status Call connection with VeriTracks validates the BluTag is connect to
the VeriTracks and the respective agent.
VeriTracks® 10.7 User Manual 43
Page 58

PRINT ENROLLEE PROFILE REPORT
To print an Enrollee profile:
1. Ensure the Enrollee profile is saved in both the Enrollment and Supervision tabs.
2. Drag the Enrollee into the Enrollment Entry widget. Once the profile displays use the scroll bar
to locate the Enrollee Profile Report icon.
3. Scroll down the Profile tab to select the icon (to the right of the Enrollment End Date) to send the
Enrollee Profile Report to the print queue.
Instant Enrollee Profile Report
4. View or print the report from the Reports tab page.
44 VeriTracks® 10.7 User Manual
Page 59

COMPLETE ENROLLMENT PAPERWORK
General Instructions for Enrollees
Attach the charging cup by clipping it to both sides of the tag.
Light on front indicates contact with charger, not battery level.
Remove the charger by gently detaching its clips from the tag.
Charge twice a day, every 12 hours, for 30 minutes.
If a charge is skipped, the tag must be charged for 60 minutes.
If you feel a low battery vibration (twice every 10 minutes), charge for 2.5 hours.
Do not charge the device while sleeping or driving.
Do not tamper with the device (do not pull, strike, or attempt to open).
BluTag is hypoallergenic and cannot overheat.
Do not force a boot over the tag.
A sock can be worn over and/or under the device.
Do not expose to extreme temperatures (below -4 oF or above 131 oF).
Notify the officer if a medical procedure requires removal of the tag.
Do not submerge BluTag in water (baths, pools, large bodies of water).
Do not press the “Status Call Button” unless instructed by your supervisor.
If the tag vibrates or beeps, contact the officer.
If the light shines or blinks when off the charger, contact your supervisor.
Each agency will have its own policies and procedures. As part of the enrollment process, each agency
should consider reviewing the following instructions with each enrollee.
VeriTracks® 10.7 User Manual 45
Page 60

UN-ENROLLING A TRACKED ENROLLEE
Un-Enroll
Icon
To Un-Enroll the enrollee from a BluTag:
1. Select the Enrollment tab and then open the Enrollment Entry widget.
2. Highlight the enrollee and drag a name from Browse Enrollees widget to the Enrollment Entry
widget.
3. Select the Un-Enroll icon. A message displays “Select a reason for unassignment of
enrollee.”
4. Select a reason from the drop-down list and select OK.
NOTES:
Un-enroll Icon
Confirm Un-Assignment
1. When an enrollee is un-enrolled, VeriTracks sends a command to put BluTag into
“deep sleep” mode.
2. Attaching the charging coupler reactivates BluTag.
3. If a device is to be reinstalled on an enrollee in the next 24 hours, the
recommendation is to immediately place the device on a charger and put the charger
in a place where it can continue to acquire GPS coordinates.
46 VeriTracks® 10.7 User Manual
Page 61

Removing the Strap
1. After un-enrolling an enrollee, cut the strap to remove the device from the ankle with a pair of the
STOP supplied scissors.
Inspecting of device after the enrollee leaves:
2. Puncture one of the notches on the top cap with the STOP flathead screwdriver to lift the cap
from the tag.
3. Use the plastic removal tool as a guide. Insert the flathead screwdriver into a notch on the u-clip
and pry it from the tag.
5. Pull the strap out of the tag.
6. Inspect all parts for signs of tampering.
7. Remove and discard the old straps, clips, and caps.
8. Clean the device with warm water, alcohol, or bleach wipes.
9. Clean the lens and surrounding area to remove dirt that has built up.
10. If the enrollee has completed the program, no signs of tampering exist, and the unit is not needed
for evidence, place the device back into inventory.
11. If you had to replace the strap or device, repeat all preparation and enrollment steps required for a
new enrollee (charge device, make GPS connection, add a profile, install, assign, and verify
GPS).
12. If you sense a problem with the device, send it back to STOP LLC, 1212 North Post Oak Road,
Suite 100, Houston, Texas 77055.
CHANGING A DEVICE ON AN ENROLLEE
Occasionally you may need to remove a device from an enrollee’s ankle due to service issues or damage
and replace it with a new one.
Simply follow the complete instructions under the Un-Enrolling a Tracked Enrollee section to properly
record the removal of the original device. Then follow the standard enrollment instructions in the Assign
the BluTag to the Enrollee in VeriTracks section to attach the new device to the enrollee’s profile.
STORING AND MAINTAINING BLUTAG
1. Store unused BluTag devices in a secure and dry space.
2. Devices do not need to be charged while in storage.
3. Prior to re-assigning a device, follow the instructions for preparing a device for use and enrolling
an enrollee.
VeriTracks® 10.7 User Manual 47
Page 62

CHAPTER 4: ZONES
Zones are time-sensitive geographic locations that place limitations on an enrollee’s movements. Zones
allow you to require an enrollee’s presence at a certain place/location, known as an Inclusion Zone, or
prohibit an enrollee’s presence from a certain place/location, better known as an Exclusion Zone. The
system records an enrollee’s violation of these movement restrictions.
Building a zone is a three-step process:
Create the geographic zone
Assign the zone to an enrollee
Set a schedule during which the movement restrictions apply to an individual enrollee.
This chapter discusses the creation of the geographic zone and the assignment of the zone to an enrollee.
Chapter 5 discusses zone schedules.
CREATING ZONES
The geography of a zone is created using the Create Zone modal.
The Create Zone modal can be accessed from three places:
1. A specific address in the Address tab of the Enrollment Entry widget
2. The Zones tab of the Enrollment Entry widget
3. Directly on a map.
To access the Create Zone modal from any of these places, click on the Create New Zones button.
From each of these widgets, the Create New Zone button displays the standard zone creation view.
48 VeriTracks® 10.7 User Manual
Page 63

From the Zones tab, select the Create New Zone button to access the basic Zone view.
In the Addresses tab, once an address has been created/assigned, click the Create New Zone button to
access the Zone screen and note that the address is brought forward as well.
VeriTracks® 10.7 User Manual 49
Page 64

Launch the Main Map, select the Zones tab, and select Create New Zone button to access the Zone
screen. Note that the enrollee tracks are brought forward as well.
Create Zone in Enrollment Entry Widget, Addresses Tab
As discussed in Chapter 3, enrollees can have multiple addresses listed in their profile under the Address
tab. These addresses can be anything pertaining to an enrollee’s situation including residence, work place,
guardian’s home, areas to stay away from, etc. You can also create either an inclusion or exclusion zone
for enrollees in each address record.
NOTE: Exclusion zones automatically default to a 24x7 schedule unless you indicate otherwise.
Suggested Naming Convention for Zones
Zone names must be unique across the entire agency. This is to prevent confusion as your agency’s
population grows. Below is a suggested format for naming your addresses and zones. By using the
scheme below, you will know the zone’s location, purpose, and type. By including the Primary ID you
will avoid any confusion about which enrollee the zone was created for.
<PID>_<ENROLLEE LAST NAME>_WORK_IZ
<PID>_< ENROLLEE LAST NAME>_VICTIM_EZ
<PID>_ <ENROLLEE LAST NAME>_IZ
50 VeriTracks® 10.7 User Manual
Page 65

ZONE CATEGORIES
A zone assigned to an enrollee can be categorized as one of four types of assignment: Active, 911, Silent
and Global user indicated radio buttons:
Active Zones are actively monitored on a 24 hour/7 day-a-week basis within the BluTag device
itself. Agents receive Active Zone notifications regarding zone assignment activity. Notifications
for Active Zone violations can be set up according to your preferences and sent for immediate
response.
911 Zones are actively monitored on a 24 hour/7 day-a-week basis within the BluTag device
itself. Notifications for 911 Zone violations can be set up according to agent preferences and sent
for immediate response. 911 zone notifications are also sent to the STOP Solutions Center for
human intervention and follow up monitoring (if stipulated in the agency’s contract).
Silent Zones are not actively monitored within the BluTag device itself. However, if you
subscribed to receive the notification, it will still be sent. Silent Zones can be used like a Passive
Zone (see Chapter 3). If you do not subscribe to the immediate notification, the event only
displays on the daily summary report.
Global Zones apply to all enrollees in an agency monitored with BluTag. Only law enforcement
agencies can create a Global Zone.
ASSIGNING EXISTING ZONES
In certain situations, a zone that was previously created may need to be assigned to another enrollee. For
example, a single zone may be used for multiple enrollees. The assignment of existing zones is
performed in the Zones tab on the Enrollment Entry widget.
To assign an existing zone:
1. Launch the Enrollment Entry widget, and select the Zones tab.
2. Select the Assign Zones button.
Assign Zones Button
3. A modal displays a listing all the zones previously created.
VeriTracks® 10.7 User Manual 51
Page 66

Zone Modal
The data listed in the modal is as follows:
Name (or Zone Address)
Owner
Agency
The assigned Enrollee. If the Enrollee column has more than one name in the field, the
nomenclature displays the actual number of enrollees assigned to that zone (i.e., 2 Enrollees).
The list displays only those zones originally created for the agency. To view specific zones, select the
Filter Options bar:
4. Once the zone you wish to assign is visible, highlight the zone by selecting the proper row within
the filtered table.
52 VeriTracks® 10.7 User Manual
Page 67

Unassign
Zone
Save
Unassignment
OTHER ZONE FUNCTIONALITY
Unassign a Zone
To unassign an inclusion or an exclusion zone, locate the zone listed in the Enrollment Entry Zones tab
and select Unassign Zone. Select Save to remove this particular exclusion zone from the Enrollee.
Unassign Zone
EDITING ZONES
There are generally two reasons why a zone needs to be modified.
1. Changing the size or placement of a zone to give greater restriction or freedom to an enrollee.
2. Adjusting the placement of a zone to more accurately reflect the appropriate restricted area.
NOTE: Only the Zone Owner can edit a zone.
Edit Zones in the Zone Tab
Performing edits to a particular zone may be performed from both the Enrollment and the Supervision
widgets, strictly based on granted permissions. Both sets of zone editing procedures are documented
below:
Edit Zones in the Enrollment Widget
1. In the Enrollment Entry widget, ensure the correct Enrollee displays in the default Profile tab.
2. Select the Zones tab, the enrollee inclusion or exclusion zone displays.
VeriTracks® 10.7 User Manual 53
Page 68

Modify
Zone
3. Select Modify Zone. The Zone Editor modal displays the information specific to that zone. Edit
the appropriate zone parameters by selecting the point(s) and dragging them to the desired
location on the zone map.
4. Select the Save Zone button to retain the modified zone inclusion/exclusion parameters.
NOTE: In Editor Mode, the Enrollee inclusion/exclusion area changes from Red to Yellow to
indicate the zone is available for editing.
54 VeriTracks® 10.7 User Manual
Page 69

Edit Zones in the Supervision Widget
1. From the Supervision Entry widget, highlight the Enrollee from the tabular display that requires
zone editing.
2. Select the Zones tab and select the Edit Zone hyperlink.
3. The Zone Editor modal displays the information specific to that zone. Edit the appropriate zone
parameters by selecting the point(s) and dragging them to the desired location on the zone map.
Modify Zone
NOTE: In Editor Mode, the Enrollee inclusion/exclusion area changes from Red to Yellow to
indicate the zone is available for editing.
4. Select Save.
VeriTracks® 10.7 User Manual 55
Page 70

Edit Zones in the Main Map
Enrollee
Icon
Camera
Icon
Editing an Enrollee’s zone size or location may also be performed from the Main Map widget.
1. Launch the Main Map widget and drag the selected Enrollee icon anywhere on the US Map.
Main Map Zones
2. The respective Legend displays for this particular Enrollee. Select the Zones tab to display the
zone points for the respective enrollee.
3. Select a particular point on the map and a pop-up window displays with information about the
zone.
Information Bubble
56 VeriTracks® 10.7 User Manual
Page 71

4. Select the Camera icon next to the Address data to display an actual photo of the point the
Push Pins
for Editing
Zone
enrollee was located at that specific time.
Google Earth Photo of Enrollee Zone Point
5. To edit a zone, select Create New Zone. Drag the Push Pin to the desired diameter and select
Save Zone when the zone editing is complete.
Edit Zone Boundaries
VeriTracks® 10.7 User Manual 57
Page 72

Save
Zone
ZONE MANAGER WIDGET
The Zone Manager widget is available in the Enrollment tab page menu if you have the appropriate
permission to access the widget.
Description of Privileges
Access to the Zone Manager widget is granted via the Zone Editing privilege. With simple access to
this widget, the user can:
• View their own zones
• Delete their own zones
• Transfer ownership of their own zones to another user
• Edit the geography of any of their own zones
• Create a new zone
A new Zone Administrator privilege allows the user to perform all of the above functions to the zones of
any user in their agency ORI hierarchy.
Zone Manager Filter
To apply a filter on the list of enrollees within a zone, perform the following:
1. From The Enrollment tab, select the drop-down Add Enrollment Widget, Zone Manager.
The Zone Manager widget displays a robust filtering capability located in the Filter Options bar at
the top of the widget.
58 VeriTracks® 10.7 User Manual
Page 73

.
Zone Manager
2. Directly beneath the Filter Options bar, the widget displays the filtering options selected. The
widget defaults to display the regular (non-global) zones owned by the Agent.
3. Select the Filter Options bar to open the filter and view the filter controls.
VeriTracks® 10.7 User Manual 59
Page 74

Filter Controls
NOTE: If you have access to the Zone Manager widget, yet do not have Zone Administrator
privileges or the Global Zone privilege, you will not have access to the following fields
in the Filter:
* Owner Name
* My Zones Only (defaults to ‘checked’)
* Scope
These restrictions prevent a user from viewing or editing other user zones or global
zones unless they have proper training and privileges.
4. Select one or more options and select the Filter button. The widget refreshes to show the zones that
reflect the filtered criteria.
5. Select the Filter Options bar again to hide the filter. The widget displays the filter parameters
requested.
60 VeriTracks® 10.7 User Manual
Page 75

Editing a Zone in the Zone Manager Widget
To change the zone parameters within Zone Manager widget, perform the following:
1. From the Zone Manager widget, select the [edit] link to access the Editor screen. All information
for the zone will be brought forward in the modal.
Edit Enrollee Zone
2. Make any necessary changes to the zone and then select Save Zone.
VeriTracks® 10.7 User Manual 61
Page 76

Zone Administration in the Zone Manager Widget
Select a zone by highlighting the record OR
Select multiple zones by holding down the CTRL key on your computer keyboard as you select the zones
OR
Select all zones using the Select All check box in the lower left corner of the widget.
At the bottom of the widget are the actions a zone manager may perform.
2) Change Owner
3) Change Scope (regular or global). Only administrators with privileges will have this
option in the drop-down.
4) Delete Selected Zones. When a zone is deleted, all events, violations and other data
pertaining to that zone are retained in the system. However, the zone is no longer
accessible for assignment to an enrollee and is no longer visible in the Zone Manager
widget.
62 VeriTracks® 10.7 User Manual
Page 77

This page is deliberately left blank.
VeriTracks® 10.7 User Manual 63
Page 78

CHAPTER 5: SCHEDULES
Schedules can be set for any BluTag, BluHome or BluBox assigned to an enrollee. Schedules are set for
individual enrollees. Agents set schedules for zone based on the time an enrollee is required to enter an
inclusion zone and the time when the enrollee may exit an inclusion zone.
Exclusion zones default to 24 hours a day, 7 days a week or 24/7. However, agents may set the time
period an enrollee is prohibited from entering an exclusion zone, if the enrollee is allowed to enter an
exclusion zone at other times.
A single zone may be assigned to many enrollees, and each enrollee may have a different schedule for
that zone.
If enrollees are assigned a BluHome or BluBox unit, agents may set the period of time enrollees must be
in the presence of their assigned unit.
An enrollee can have multiple schedules for a single zone, and each schedule can be titled to describe its
individual purpose. For example, an enrollee has a recurring appointment each Thursday, that creates a
different curfew from the rest of the week. The curfew schedule for Thursday could be titled “Thursday’s
Curfew for Appointments” and curfew for the remaining week days titled “Mon-Wed and Friday
Curfew.”
SCHEDULE TERMINOLOGY
Schedule Types – Zones, BluHomes, BluBox Groups (recurring or one-time schedules are set for
each type individually).
Recurring Schedules – A permanent schedule that applies every week.
One-Time Schedules – Only applies for a single specific date and time.
Times – Start and end times indicate the period of time the schedule is active. An inclusion zone
schedule determines the time the enrollee is expected to enter and remain in the zone. An
exclusion zone schedule determines the time the enrollee is restricted from entering the zone.
BluHome or BluBox schedules determine the period of time an enrollee is expected to be within
RF range of the device.
All Day – A button that sets the start and end times to 24 hours.
No Schedules – When a recurring schedule is deleted VeriTracks displays the original schedule
and a gray banner to remind the user that there is no schedule for that day.
Forced Leave – Creates an alert if the enrollee remains in the RF range of BluHome or BluBox
after the curfew ends. If an enrollee does not leave the RF range on time, an “Awaiting Leave”
event generates. If the enrollee is still in RF range 30 minutes after the curfew ends, a “Forced
Leave Exceeded” violation generates.
Days of Week – Indicates each day that the start time applies.
Wrap - If an evening start time and a morning end time are chosen, the schedule automatically
wraps around to end the next morning. Choose only each day that the start time applies.
o For example, to create a schedule that starts at 8 p.m. (20:00) on Monday and ends at 8
a.m. (08:00) on Tuesday, you need only select Monday.
64 VeriTracks® 10.7 User Manual
Page 79

RECURRING SCHEDULES
Enrollee’s Schedule
Types
Create a Recurring Schedule
1. From the Browse Enrollees widget, drag the selected enrollee name to the Enrollment Entry
widget.
2. From the Enrollment Entry widget, select Schedules. The tab displays a listing of schedules that
apply to that enrollee for the next seven calendar days.
3. At the top of the schedule, click the appropriate link to create or change schedules for a zone, a
BluHome unit, or a BluBox group.
4. Select the Zones link. Zone schedules for the enrollee display.
5. Double-click anywhere time is NOT scheduled on the calendar. The Schedule Details box
displays.
Schedule Details Box
6. Enter a schedule Title (i.e., New Event), applicable Days, the Zone to which the schedule
VeriTracks® 10.7 User Manual 65
applies, and the schedule Start and Stop time (or All Day).
Page 80

7. Select Save.
8. VeriTracks displays the new schedule.
Recurring 24/7 Schedule
Alter a Recurring Schedule
The following steps reflect actually altering a Recurring Schedule in order to permanently change a
schedule segment.
1. Select any segment of the schedule you wish to alter.
2. Double click on the segment to view the Schedule Details box. Un-check the boxes of those
days you wish to alter.
3. Select Save.
NOTE: All segments of the recurring schedule are now deleted for the days a user un-
checked the boxes. Therefore, the enrollee is now not required to be in the Work
Inclusion – Auto 24/7 Inclusion Zone (IZ) on those days.
Altered Recurring Schedule
66 VeriTracks® 10.7 User Manual
Page 81

Delete a Recurring Schedule
1. Select any segment of the schedule you wish to delete.
2. Double-click the segment to view the Schedule Details box.
3. Select the Delete Entire Schedule button in the lower right corner of the box to permanently
remove this Enrollee’s schedule.
4. A message displays stating “Entire Schedule will be deleted, are you sure?” Select OK to
finalize the process.
ONE-TIME SCHEDULES
About One-Time Schedules
• One-time schedules apply only to the day in which they are visible.
• One-time schedules override any recurring schedules for that zone on that particular day.
• One-time schedules display on the calendar in orange.
NOTE: Orange specifies a one-time schedule.
There are two ways to create One-Time schedules:
1. Drag a recurring schedule segment to General, Add General widget, Calendar.
2. Create a one-time schedule from the Details box.
Once you have created a One-Time schedule:
• You can alter the orange schedule segment by dragging it to change the beginning and end times.
• You can also delete the orange schedule segment to revert to the original recurring schedule.
How to Create a One-Time Schedule
1. Select the segment you wish to alter.
2. Drag the beginning or end time of the segment to adjust the details.
3. VeriTracks displays the original schedule segment and the altered segment. The altered segment
displays in orange and is valid.
VeriTracks® 10.7 User Manual 67
Page 82

Create a One-Time Schedule - Create a Schedule from Details Box
1. Double-click anywhere in the calendar to view the Schedule Details box.
2. Select the Switch to One-Time link.
3. Enter a schedule Title, the Zone to which the schedule applies, and the schedule Dates, Start
time and Stop time (or All Day).
4. Select Save.
NOTE: VeriTracks now displays the new schedule in orange as shown below.
Delete a One-Time Schedule
1. Select the orange highlighted section in the schedule.
2. Select the red Delete icon. I message displays stating that this “Item will be deleted, are you sure?
68 VeriTracks® 10.7 User Manual
Page 83

3. Select OK. The orange segment is removed, leaving the original schedule intact.
VeriTracks® 10.7 User Manual 69
Page 84

REMOVE A SCHEDULE ON A SPECIFIC DATE
1. Select the Zones tab.
2. Selet the segment you wish to remove.
3. Select the No Schedule For Today button.
4. VeriTracks displays the original schedule and a gray schedule indicator bar informs the user that
there is no schedule that day.
NOTE: Anytime a gray schedule indicator bar displays, NO valid schedules have been
recorded for that particular day.
70 VeriTracks® 10.7 User Manual
Page 85

SCHEDULING TIPS – USING MULTIPLE INCLUSION ZONE SCHEDULES
If you:
The result:
Remove a zone from an enrollee.
The enrollee’s schedules for that zone are
deleted permanently and must be recreated if
the zone is added again.
Remove a BluTag from an enrollee (that is,
they are now un-enrolled from VeriTracks).
If the enrollee had Zone schedules:
All of the enrollee’s zones and zone schedules
remain attached to their profile and will be
applied again automatically when or if they are
re-enrolled on a BluTag and commands are
sent to the new BluTag for active and 911
zones)
If the enrollee had BluHome schedules:
All of the enrollee’s BluHome schedules will
remain attached to the profile and will be
applied again automatically if they are reenrolled on a BluTag/BluHome combination.
If the enrollee had BluBox Group schedules:
The enrollee’s schedules for that BluBox group
are deleted permanently and must be recreated
if the enrollee is enrolled and added to the
group again.
Remove an enrollee from a BluBox Group
The enrollee’s schedules for that BluBox group
are deleted permanently and must be recreated
if the enrollee is added to the group again.
NOTE: If multiple Inclusion Zones (IZ) are created, please allow sufficient time for the
enrollee to get from one zone to the next. Do not overlap inclusion zone schedule times
or the enrollee will stay in a constant state of inclusion zone violation.
SCHEDULING TIPS – UNDERSTANDING CHANGES TO ENROLLMENT STATUS
VeriTracks® 10.7 User Manual 71
Page 86

CHAPTER 6: SUPERVISING AN ENROLLEE
The Supervision tab provides the most current information for an enrollee. The Enrollee Dashboard in
Enrollee Details widget displays all assigned enrollees. Select the Enrollee Details widget to view
details regarding your caseload. Regardless of your selection, each widget defaults to your specific
caseload. Supervisory staff may also use one of the search widgets to monitor enrollees in their office,
region, or organization.
ENROLLEE DETAILS WIDGET
The primary source of enrollee information is the Enrollee Details widget on the Supervision tab. Access
to the enrollee information in the Enrollee Details widget is limited to users who have a login for that
ORI or the parent ORI in the organizational hierarchy.
TIP: For more information on any of the tabs in this widget, or to see any of the functions
being used, select the video icon in the upper right corner of the widget to see an on-line help video
tutorial.
Enrollee Dashboard
1. Select the Enrollee Details widget – Enrollees tab. The Enrollee Details widget on the
Supervision tab has always been the location for the most up-to-date information about an
Enrollee. VeriTracks has upgraded Enrollee Details to a dashboard view for greater visibility
and added custom selection filters to make it easier for agents to manage their caseload of
enrollees.
When an authorized agent opens the Enrollee Details widget, the Enrollee tab displays a full
view of each enrollee’s profile along with an extensive column list and enhanced filtering
capabilities.
Enrollee D e t a ils Widget
72 VeriTracks® 10.7 User Manual
Page 87

Enrollee Tab
It is important to note that when a supervising agent initially visits the Enrollee Details widget, the view
defaults to display “Assigned” and “My Caseload” enrollees that are listed in the Enrollee column of the
widget. The supervising agent may easily browse the entire list of enrollees’ profiles from this page or
search for a specific enrollee by typing as much of the Enrollee’s name as possible then select [Apply
Filter].
NOTE: VeriTracks conducts Boolean (that is, a partial word or character) filtered
searches. However, the more detailed information entered in the Enrollee
search field - the greater the success rate of exact Enrollee matches being
returned.
Key Dashboard Features
The dashboard features a number of columns with special features and data. A description of all
the columns is in the section on customizing the dashboard. Below are a few of the most popular
features.
Enrollee Details Widget – Enrollee Tab
Enrollee Details Widget – Status Tab
The Status tab, located within the Enrollee Dashboard, provides the opportunity to view the current
details and most recent GPS tracking information for particular enrollees. This information is as current as
of the last call by the device.
When an event occurs on an enrollee, users receive an immediate notification on your cellular device;
however, it is possible that by the time you log in to VeriTracks, the event may have cleared the queue.
Refresh the data on the Status page by pressing the Refresh Status button (the circular arrows within the
Status tab itself). The tab also automatically refreshes every three (3) minutes.
The following information displays on this screen:
Supervising officer or agent name and ORI
Enrollee risk level (or “VICTIM” if individual is enrolled as a victim)
Device number
VeriTracks® 10.7 User Manual 73
Page 88

Date, time, and approximate address of the enrollee’s last recorded position
A View on Main Map link s you can view an enrollee’s most recent tracks. The map and its
capabilities are described later in this chapter.
A Street View icon. Select the icon. If Street View is available in the vicinity of the last track
point, a Street View pop-up displays on your screen.
A red “X” on the map represents the enrollee’s last reported position.
Date and time of the last contact from the device
A Turn On Rapid Contact button. Select this button and a command is sent to the BluTag
causing it to call in every two (2) minutes for the next hour. When the button is selected, the
screen refreshes to display the end time of the rapid reporting
Enrollee Details Widget – Rapid Contact Information
A link to a contact history report which displays the most recent contacts VeriTracks received
from the enrollee’s BluTag.
Device battery level. Anything above 4.2 is near full charge and anything below 3.7 means the
BluTag is in danger of going off-line. Note also the green bar which gives a graphic
representation of the percentage of battery power left.
A link to a complete list of the enrollee’s zone and RF schedules
BluBox or BluHome assignments and status
Any open events
74 VeriTracks® 10.7 User Manual
Page 89

Three methods of contacting the enrollee: send vibrate, send audible tone, or silent position
request to contact the BluTag.
The three icons are located on the right side of the Enrollee Status page and display as follows:
Send Vibrate
Send Audible Tone
Send Request Position (Silent to the offender)
The icon that is used for the silent position request is also the icon used to cause a hybrid BluTag to report
its data.
Enrollee Details widget – Status Tab
VeriTracks® 10.7 User Manual 75
Page 90

Filter Display
View On
Main Map
Store Notes
Confirm
Event
Enrollee Details widget – Event Tab
The Event tab, also located within the Enrollee Details view, lists all the violations for an enrollee within
the last 48 hours. Change the time range on the screen to display longer or shorter periods of event time
for the enrollee.
Select View On Main Map icon to the left of the event name to map the tracks recorded by the BluTag
during the event.
Check the Confirm box and click OK on the resulting pop-up window to record that you reviewed the
event. The check box will be replaced by your first initial and last name.
You can also capture notes about events. The notes are date and time stamped and attributed to you. Each
agency should adopt a standard for making notes. To add a note, click the Notes icon for the event, enter
note text, and click Save.
Use the Generate Instant Enrollee Event Report button to send a report to the reports queue for all events
currently displayed in the screen.
The Notes link allows users to enter as many date and time stamped notes as needed.
View Filtered Events
To view certain events for an enrollee, perform the following:
1. Select the Filter bar to manipulate and display the enrollee’s events in a filtered view.
2. Select the Start and End Dates for the filtered request.
3. Select the Events you wish to view by holding [Ctrl] and selecting each event type that is
included in the filtered view.
4. Enter a value in the Duration field greater than the value entered, if any.
5. Select the Filter button located at the bottom of the Event’s tab to display the results in the
standard Events tab format.
76 VeriTracks® 10.7 User Manual
Page 91

Enrollee Details Widget – Events Tab
Enrollee Details widget – Profile and Addresses tabs
The Profile and Addresses tabs are displays of information entered during the enrollment process. These
tabs are read-only to mean that no information may be modified in these specific tabs.
Enrollee Details widget – Assignments tab
The Assignments tab contains a history of the specific BluTag assigned to the enrollee, the beginning and
end dates of that assignment, the reason the device was changed, and the user under whose login the unassignment was performed.
This tab is read-only and no actual assignments or un-assignments may be conducted through the
Assignment tab.
Enrollee Details Widget – Assignments Tab
VeriTracks® 10.7 User Manual 77
Page 92

Enrollee Details widget – Zones tab
The Zones tab contains a listing of all areas currently assigned to the enrollee, including a map of the zone
geography.
The Zones tab also contains an Edit link to provide users with the Schedules modal to edit the enrollee’s
times in and around a particular zone.
Enrollee Details Widget – Zones Tab
MAPPING PROCEDURES
Three (3) ways to chart an enrollee’s tracks:
1. From the Supervision tab, select the Enrollee Details widget, there is a View Map to the left of
the Enrollee Dashboard to the left of each enrollee.
2. Drag the enrollee to the Main map from the Universal Search Panel.
3. Select the View On Main Map icon next to the left of each Enrollee name in the Events tab.
When the View on Main Map link from the Enrollee Details widget is selected, or when an enrollee is
dragged from the Universal Search Panel to the map, VeriTracks displays the most recent four hours of
tracks for that enrollee.
In the illustration below, the last position was at 16:17, so the map displays from 12:17 to 16:17
78 VeriTracks® 10.7 User Manual
Page 93

When the View on Main Map icon is selected next to an Enrollee in the Events tab, the map displays the
tracks recorded by the BluTag at the time of the event. The start time of the mapped tracks is the start
time of the event. The window of time mapped is rounded up to the next available window size. (If the
event lasts 11 minutes, 15 minutes of tracks will be mapped).
Enrollee Details Widget – Events Tab
TIP: To review an entire caseload on the map, bring up the points of the first enrollee in your
caseload. Adjust the start time on the map to the earliest time from which you wish to view
the enrollee’s tracks. Then click the Lock Start Time button in the map legend tool. Drag
the names of succeeding enrollees to the map and their tracks will always start with the
locked-in start time.
To unlock the start time simply un-check the Lock Start Time box.
VeriTracks® 10.7 User Manual 79
Page 94

MAPPING TOOLS
The VeriTracks mapping function uses services provided by Google™ Maps. Both the Enrollee Status
menu option and the Search menu option provide access to the mapping function.
VeriTracks uses a private (secure) interface for Google so there are times when the public site may show
data not yet on the secure Google site.
The map screen contains five areas: the Map Tool Panel, the Map Info Panel, the Map Time Scale Panel,
the Map Panel and the Map Footer Panel.
Map Panel Layout
The Map Info Panel supplements the Map Tool Panel by displaying information pertaining to the current
tool selected. The Map Time Scale Panel shows the current time scale of the data displayed on the map.
The Map Panel is the Google Map itself. The Map Footer Panel displays additional information about the
map such as the current mouse map coordinates.
80 VeriTracks® 10.7 User Manual
Page 95

Map Tool Panel and Map Info Panel
The Map Tool Panel consists of four tabs to analyze an enrollee’s tracks on a map. The Map Info Panel
explains how a tool works or provides multiple options for the tool. When a tool button is clicked from
the Map Tool Panel, the Map Info Panel updates showing specific information about the tool.
The four tabs on the Map Tool Panel are Legend, Locate, Zones and Playback. The mapping tool panel
has one icon for each of the four tools.
Map Tools
Legend tab
The Legend tab explains symbols and other features visible on the map. In Google Maps, objects such as
roads, cities, etc., are inherently shown on the map. The legend only shows those additional objects
overlaid by VeriTracks. These layers consist of, but are not limited to, enrollee tracks, enrollee addresses,
event and violation symbols and crime scene incidents. When you open the Legend tab, the Map Info
Panel refreshes to show the details about the tool.
Enrollee Legend
VeriTracks® 10.7 User Manual 81
Page 96

View Enrollees on Map
Enrollees Section
The most important feature of this section is the ability to easily change the enrollee’s tracks that are
displaying on the map. Multiple enrollees’ data can be requested through the VeriTracks Search function,
yet only two (2) enrollees’ tracks can be displayed on a Google Map at any given time.
In the Selected box, users see the name or names of the enrollees whose track points currently display on
the map. Select the red “-” to the left of the enrollee’s name and the enrollee’s track points are removed
from the map and the enrollee’s name moves down to the Available box as indicated by a green “+”, and
as shown in the image below. Nonetheless, from the Selected box, the dot to the right of an enrollee’s
name shows the color of his/her tracks on the map that displays on the right. Select any dot on the map
and the map displays a pop up cloud detailing the exact location the enrollee was tracked at that given
point, as shown below. Select the camera icon in the information cloud and a GPS photo of the exact
location point displays.
Enrollee Detailed Point
The Available box displays the name or names of any enrollees included in your search; however,
available enrollee points are not currently displayed on the map until they are moved to the Selected
box. To do so, select the green “+” to the left of the enrollee’s name and the enrollee’s tracks display
on the map and the enrollee’s name moves up to the “Selected” box.
Enrollee Available to Selected View
82 VeriTracks® 10.7 User Manual
Page 97

Control Enrollee Map View Data
Underneath the Enrollee selection area, there is a group of check boxes used to control the specific
data that displays on the map.
Lock Start Date – Maps several enrollees leaving one in the Selected box, change the start time
of the enrollee’s tracks to an earlier time, and select the Lock Start Date box.
The locked date displays under the check box.
Enrollee Lock Start Date
Move the next available enrollee from the Available box to the Selected box. Wherever the map
start times are current, the start time jumps back to the date time that was originally locked in for
this enrollee.
This function is useful for reviewing the tracks of an entire caseload. For example, if a user logs
in to VeriTracks in the morning and drags all of his/her caseload down to the Main Map, the
agent can change the start time to 5:00 pm the night before and lock the start time, then review
the tracks of the first enrollee in the Available box, scrolling forward through the night.
When a user selects the green ball to the left of the next enrollee in the Selected box, the start
time automatically reverts to 5:00 pm of the night before.
VeriTracks® 10.7 User Manual 83
Page 98

Enrollee Addresses – This checkbox turns on or off the display of the icons associated with
addresses retained in the Address tab of the enrollee’s profile.
Enrollee Address Display View
GPS and Cell Towers – This dropdown permits users to toggle between displaying both the GPS
tracks and cell tower locations (default), or just the GPS tracks, or just the cell tower locations
reported by the BluTag.
GPS & Cell Tower Display View
84 VeriTracks® 10.7 User Manual
Page 99

A cell tower location is generated when a T-Mobile BluTag is unable to hear sufficient GPS satellites to
record a valid GPS location. In this situation, the BluTag records the latitude and longitude of the cell
tower that communicates at that point in time.
Cell tower locations are displayed as a green square in place of the red or blue GPS point.
Cell Track Trapezoids – VeriTracks has the ability to give an approximate location based on
additional location from T-Mobile cell towers. Check this box to see the trapezoids.
Show Connected Tracks and Show Numbered Labels – These checkboxes are used to connect
the tracks on the map with a line and number the points sequentially.
VeriTracks® 10.7 User Manual 85
Page 100

When the Show Connected Tracks box is checked, the map refreshes and the connected tracks are
shown.
When the Show Numbered Labels box is checked, the map refreshes again to show the sequential
numbering of the track points.
86 VeriTracks® 10.7 User Manual
 Loading...